

Page 1

X5 CoPilot
User’s Guide
US Fleet Tracking Corp.
23 March 2009
[A Guide for the
New User]
This document provides a step-by-step instructional guide
for the new user, detailing operational characteristics of
the X5 CoPilot and its practical application in a real-world
environment.
Page 2

2
X5 CoPilot User’s Guide| US Fleet Tracking Corp.
Page 3

US Fleet Tracking Corp. | X5 CoPilot User’s Guide
3
introduction 5
adjust screen brightness 8
adjust audio volume 8
product components 5
charging your X5 CoPilot 5
main menu 7
breadcrumb trails 7
daylight savings time 7
day/night mode 7
time display format 7
time zone selection 7
voice selection 7, 8
language selection 7, 8
map controls (right/left) 7
vehicle marker selection 8
routing options 8
route avoidance 8
attention tone 8
satellite visibility 8
gps interference,common causes 9
main menu 9
inactive buttons 9
primary buttons 9
2d and 3d mode, switching 10
north-Up mode 10
heading-Up mode 10
zooming the map in/out 11
map detail level 11
map exploration 12
setting destination 12
from previous destination 12
from Points Of Interest 13
searching Points of Interest 14
manually entering destination 15
calculating route 15
reading the route map 16
trip details 16
maneuver list 16, 17
changing a route 17
stopping/restarting a route 17
avoiding roads on a route 17
changing a destination 18
adding waypoints 18
adding multiple waypoints 18
additional subscription features 19
FAQ (frequently asked questions) 20,21
legal notices 22
Page 4

4
X5 CoPilot User’s Guide| US Fleet Tracking Corp.
Page 5
US Fleet Tracking Corp. | X5 CoPilot User’s Guide
5
introduction
Congratulations – and Thank You - for your
purchase of the X5 CoPilot!
Please take a moment to check the package
contents and familiarize yourself with the X5
CoPilot and its components.
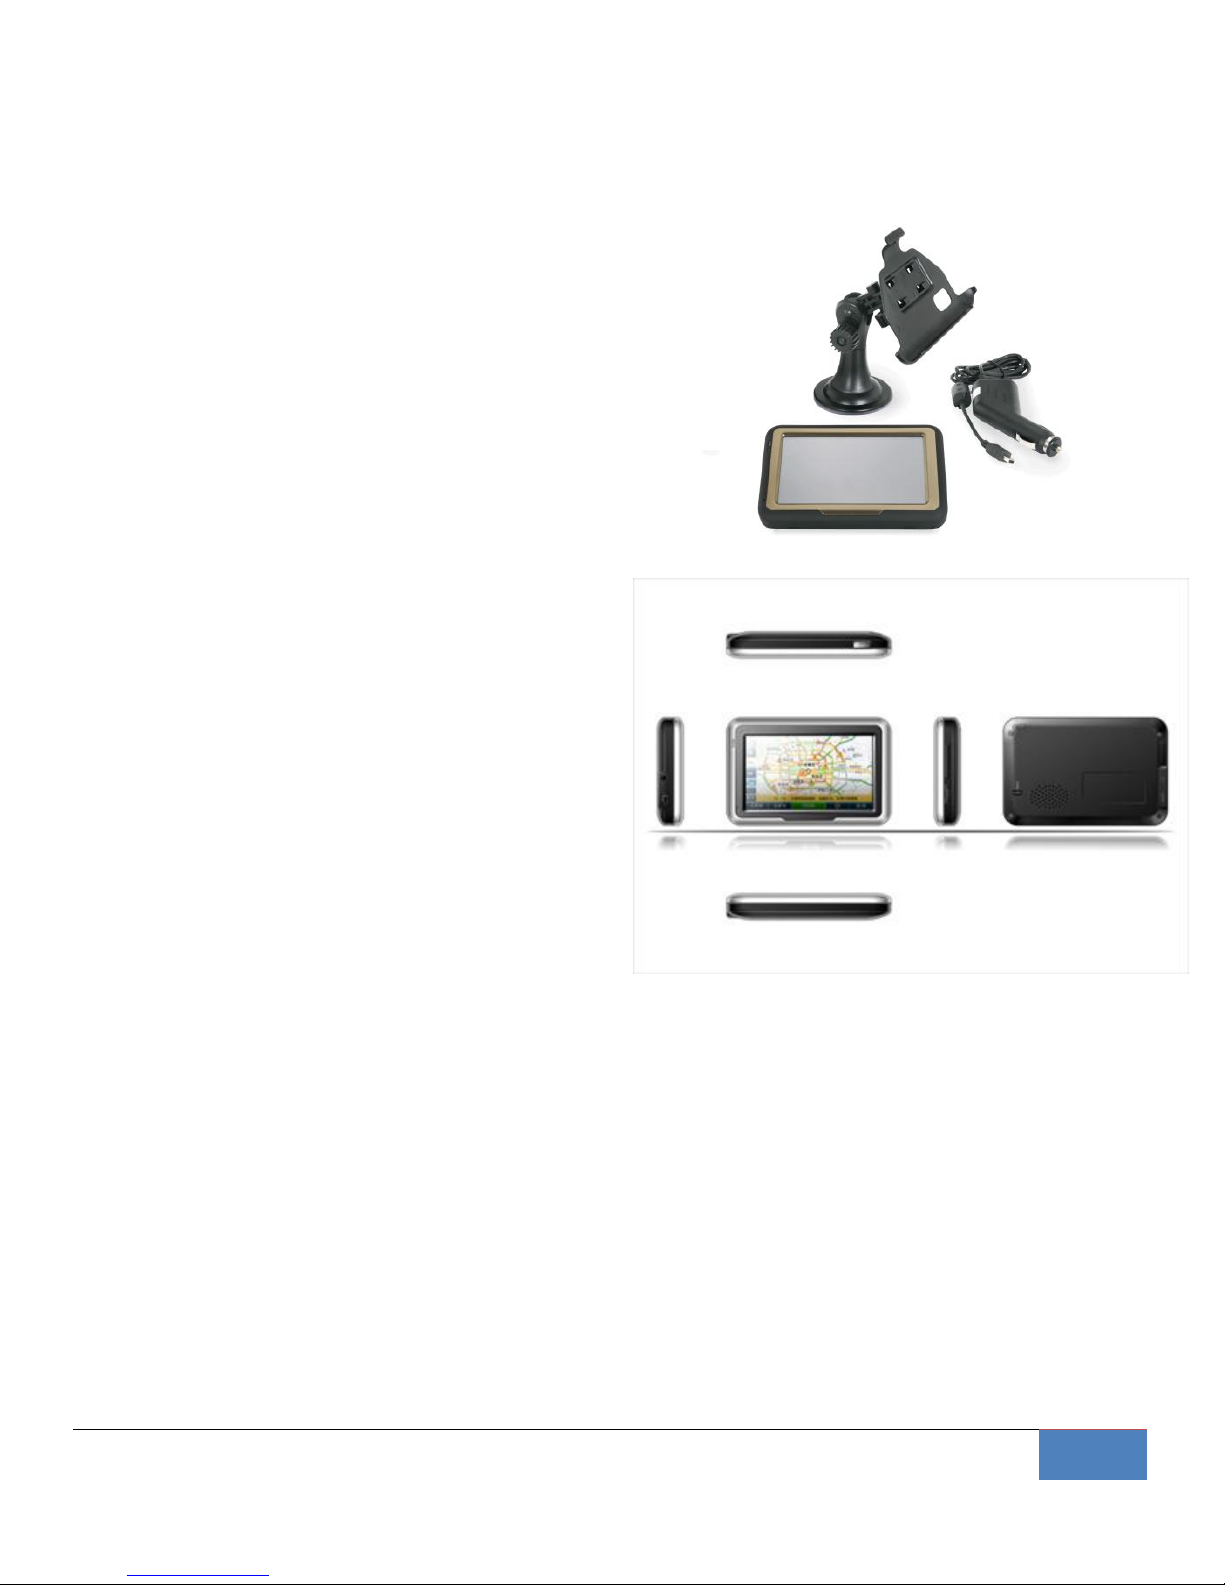
In the package, you will find the X5 CoPilot unit,
mounting bracket, DC (automotive) power
adapter, and this manual (see photo at right).
While the X5 CoPilot has a built-in battery, it is
important to understand that this battery is not
intended to be a standalone power supply for
prolonged periods. Rather, it is intended to serve
as a battery back-up in the event of interruption
of the normal 12-volt power supply. The actual
duration of backup battery supply will vary from
30 minutes to 2 hours, depending on screen
brightness settings, communications traffic to and
from the CoPilot, and a variety of other factors.
To apply power to the X5 CoPilot, simply plug the
provided DC USB power adapter into any
automotive 12vDC power port (cigarette lighter
plug) and plug the other end of the cable into the
matching USB port located at the lower right
corner of the CoPilot. With the screen facing you,
you’ll find the main power button located on the
upper right edge of the device. Simply press and
hold this button to power the CoPilot on or off.
We’ve done everything possible to provide a
rugged, durable product – we’ve even given it a
rubberized exterior skin to provide protection
against minor drops and bumps. Even so, nothing
in this world is indestructible, so please use care
when handling your X5 CoPilot.
Properly cared for, the rugged X5 CoPilot will
provide reliable navigation and communications
service for years to come.
We appreciate your business!
Page 6

6
X5 CoPilot User’s Guide| US Fleet Tracking Corp.
Page 7
US Fleet Tracking Corp. | X5 CoPilot User’s Guide
7
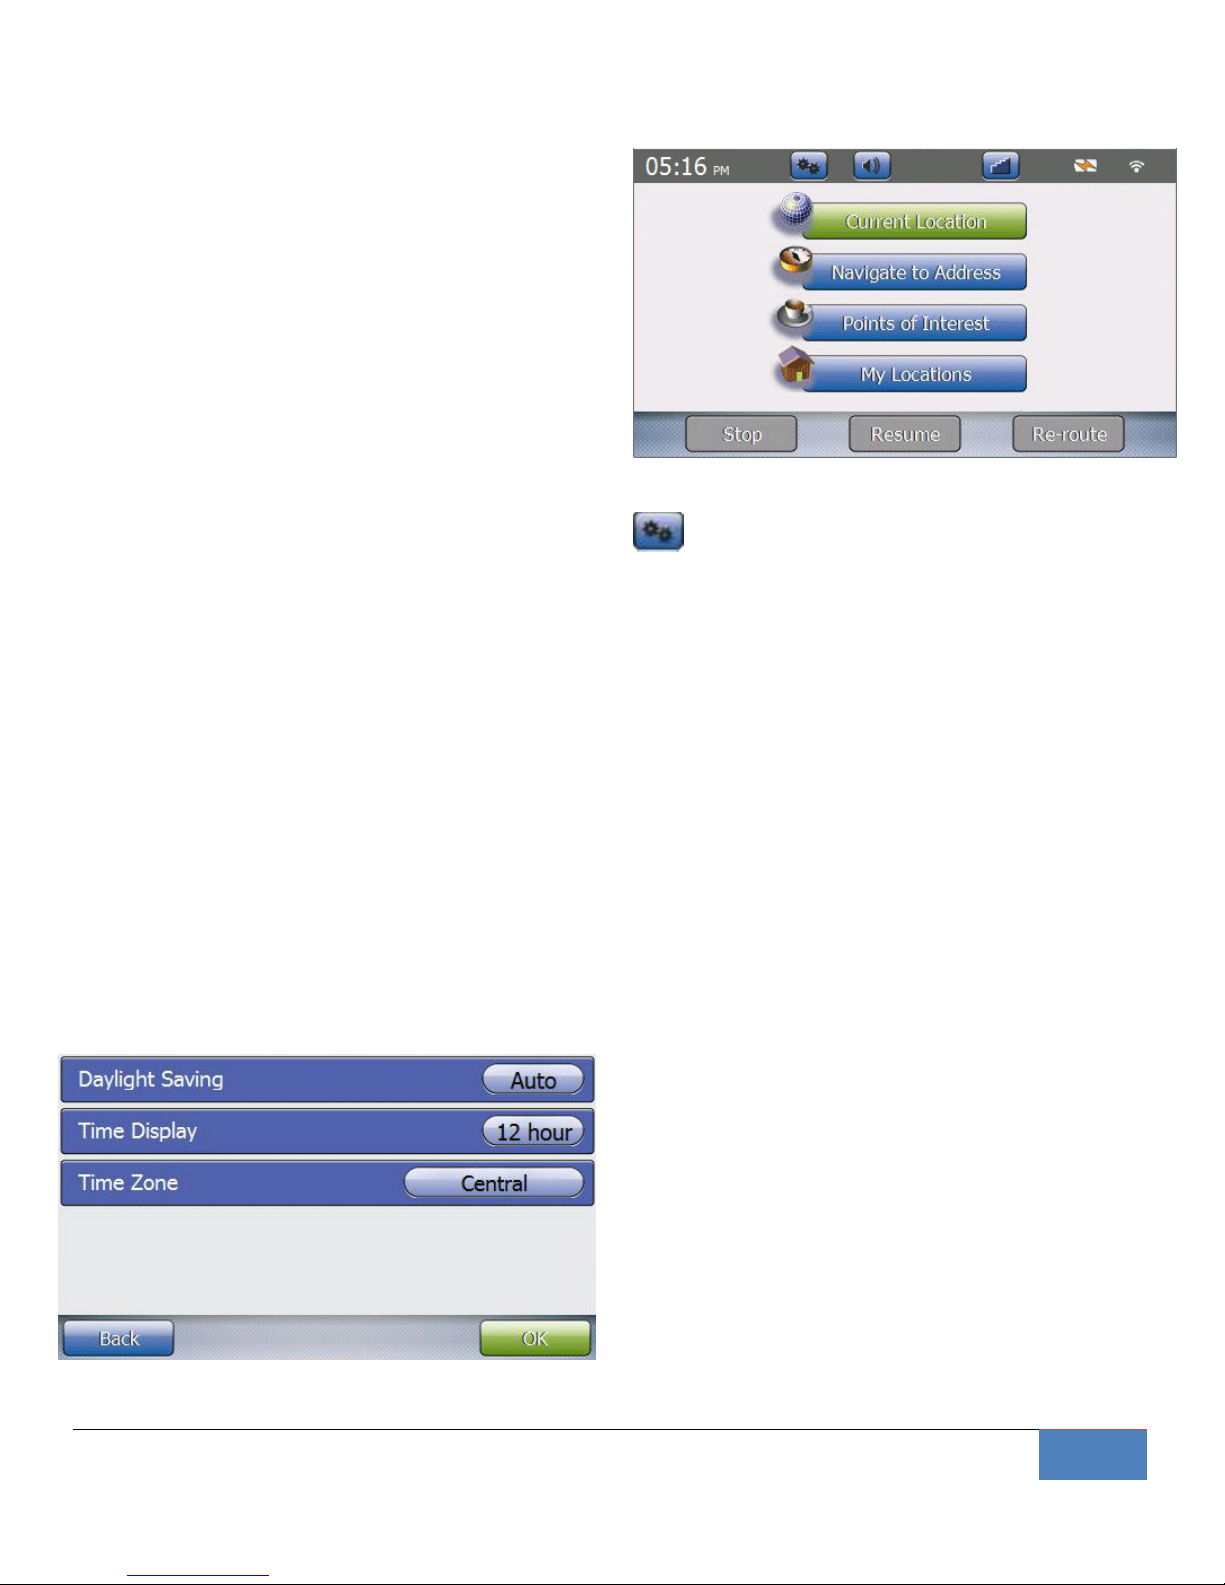
When you first power on the X5 CoPilot, you’ll
see a screen similar to the one pictured in figure
7.0 (right). This is the main menu for the X5
CoPilot, and provides access to all functions of
the device.
Your X5 CoPilot requires no physical keyboard.
Equipped with a touchscreen, every function and
feature of the CoPilot is easily accessed by
touching the appropriate area of the screen.
At the upper left corner of the display, you’ll see
the time. Touch this clock on the screen and the
menu will change to show options specific to
time (see figure 7.1, below). This menu allows
you to configure your settings for daylight savings
time, to specify whether the clock will display in
12- or 24-hour format, and to specify your
timezone.
All menu functions on the X5 CoPilot operate in
this manner – simply touch the item, and an
intuitive menu is presented.
Figure 7.1 –Time Configuration Options.
Figure 7.0 – The X5 CoPilot Main Menu.
As you move to the right across the top bar
on the CoPilot, you’ll see a number of other
buttons. The first of these buttons appears with
the image of a pair of gears. Touching this button
provides access to the main setup/configuration
options on the CoPilot.
Setup/Configuration options under the X5 CoPilot
are separated into three logical groups – System
settings, Language & Locale options, and Routing
options.
Under System Settings, configuration options
include selecting your preference of Day/Night
color scheme (the default will auto-select based
on time of day), whether or not you prefer to
enable touch sounds, whether to auto-zoom the
map as you close on your destination, whether
you prefer the map controls (zoom in / zoom out)
on the left or right, and whether to enable route
breadcrumb markers.
Language & Locale options enable you to select
the text language (American English, Spanish, or
French Canadian), the language spoken by the
Page 8
8
X5 CoPilot User’s Guide| US Fleet Tracking Corp.
CoPilot for audible directions (male or female
voices for each of these three languages), the
units of distance reported on the device (in miles
or kilometers), and definition of timezone
features (shown in figure 7.1, previous page).
Routing options allow you to specify a number of
options – including route elements you prefer to
avoid – for example, ferries, dirt roads, and toll
roads. This falls under the first option on the
Routing options menu entitled “Avoidances”.
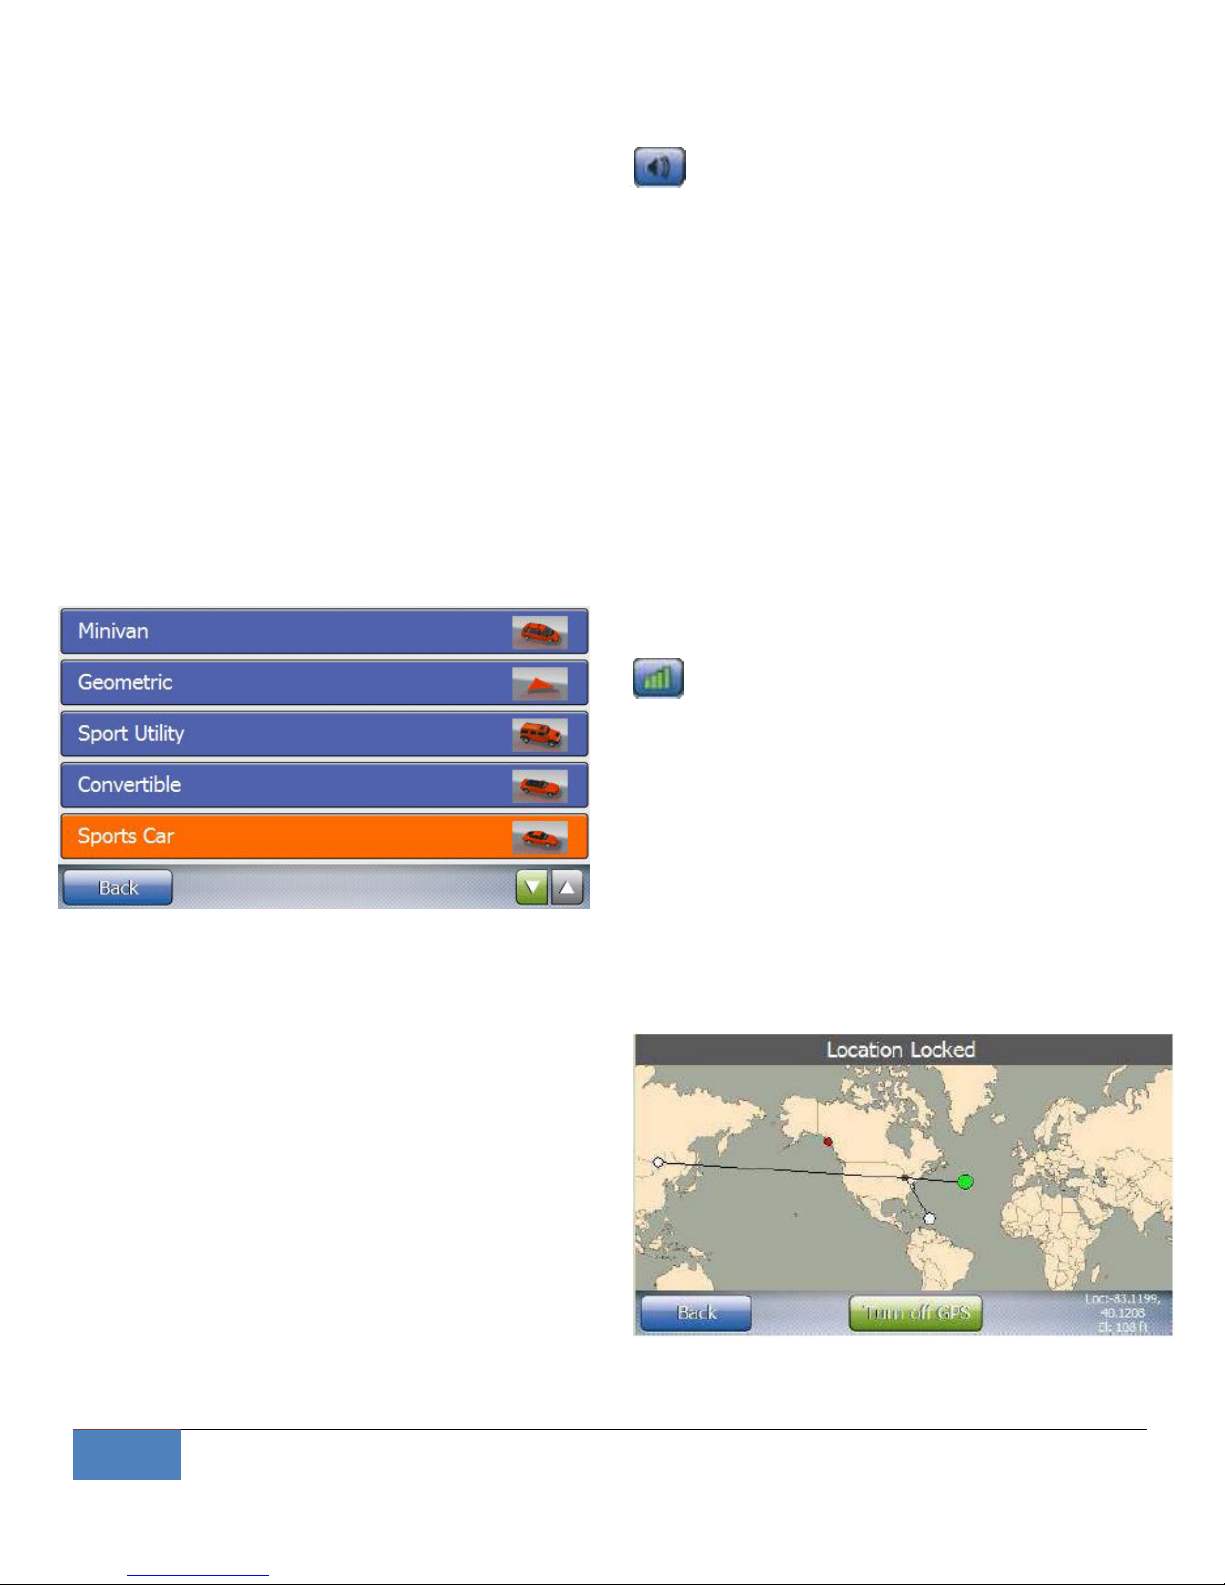
Figure 8.0 – Vehicle Marker options.
The second option appearing under Routes
enables you to choose the Vehicle marker
(allowing you to select the graphic representation
of your vehicle –minivan, geometric, SUV,
convertible, sports car, or pickup truck). (See
figure 8.0, above).
Additional Routing configuration options enable
you to select routes with shortest time vs.
shortest distance (not always the same), define
whether or not the “Attention Tone” will sound,
and enabling or disabling voice prompts.
Moving to the right, the next icon
appearing on the top bar of the main menu bears
the image of a speaker. Touch this button to
define the system volume and brightness of the
screen.
A brighter screen will reduce battery life when
the CoPilot is not plugged into a power source. A
dimmer screen will extend the useful life of the
battery when operating without a direct power
connection. The default setting of highest
brightness improves visibility of the CoPilot’s
screen in direct sunlight.
Again moving right across the top bar on
the main menu, the next configuration button
appears to bear the image of a number of vertical
bars. This icon provides you a quick visual of the
satellite visibility of the X5 CoPilot (how many
satellites are in view), and touching this button
enables you to see which satellites your device is
using (and where they are located). (See Figure
8.1 below).
Figure 8.1 – Satellite Visibility.
Page 9
US Fleet Tracking Corp. | X5 CoPilot User’s Guide
9
A green circle on the world map (figure 8.1,
above) indicates the GPS has locked onto this
satellite. A white or red circle indicates the
CoPilot doesn’t have a lock on this satellite. The
size of the circle indicates the strength of the
signal : the larger the circle, the stronger the
signal.
When the GPS locks on a sufficient number of
satellites, it locks your current location and
displays it (in latitude and longitude) in the lower
right corner.
When the GPS locks onto four or more satellites,
it can also calculate your elevation. Your
elevation is displayed on the world map below
your current location.
Note : If you tap the “turn off GPS” button to
disable the GPS receiver, the CoPilot will be
unable to calculate your current location.
The GPS receiver built into the X5 CoPilot is
among the most sensitive in the industry, and
under normal circumstances should have no
problem obtaining a position lock. Even so, the
most common cause of signal lock issues is
external radio interference or signal blockage.
Some common causes for GPS interference are:
o Radio broadcast towers or signal repeaters
o Tall buildings or canyon walls
o Tunnels, large bridges, overpasses, parking garages
o High frequency power lines
o Large iron-ore deposits beneath your location
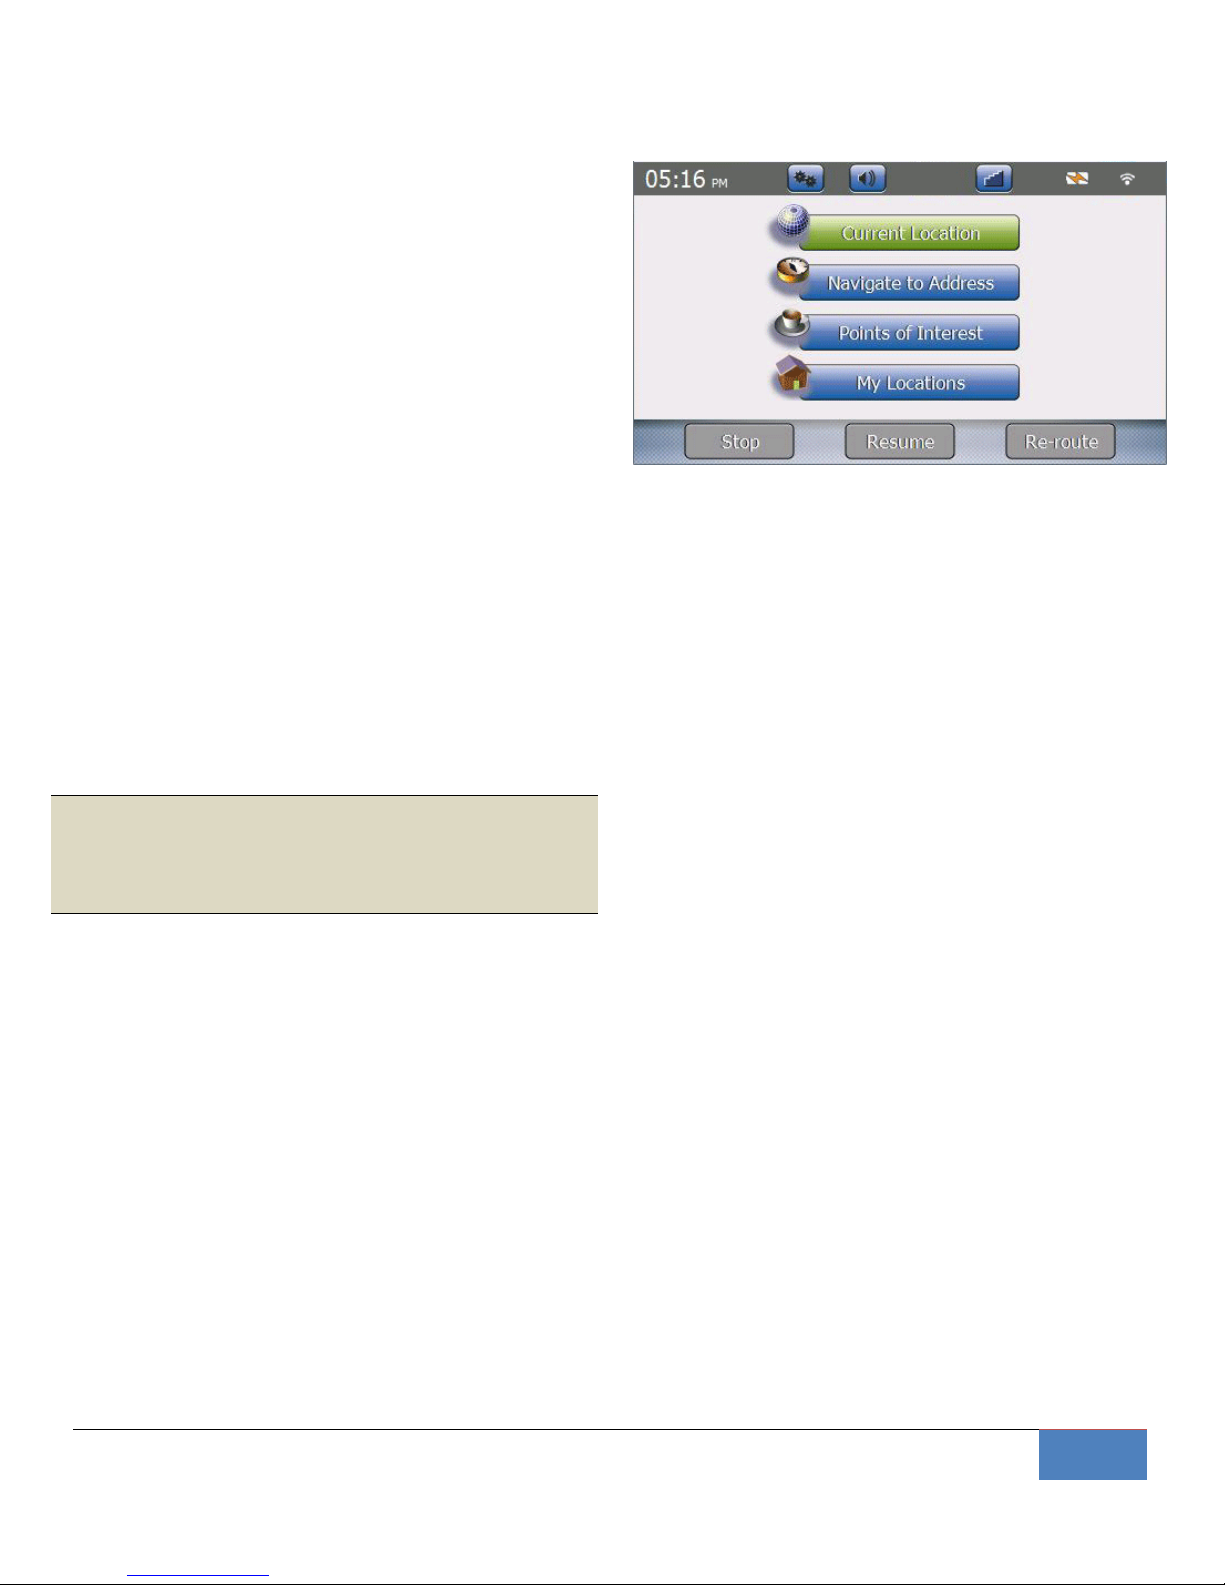
Figure 9.0 – Stop, Resume and Re-Route are deactivated.
Inactive Buttons on the Main Menu
On the bottom bar of the main menu are three
buttons labeled Stop, Resume, and Re-Route. If a
button’s function is not available, the button is
deactivated and displayed in gray (See Figure 8.0,
right). For example, if you pause an active route,
the STOP and RE-ROUTE buttons are deactivated,
and the RESUME button becomes active.
Throughout the system you’ll find this trend to be
true – inactive buttons are grayed and appear in
color when they are active and enabled.
Primary Buttons on the Main Menu
There are four primary buttons – those in the
center of the screen – of the main menu. The
“Current Location” button takes you to the main
navigation (map) screen. The remaining three
enable you to define the destination, points of
interest, and common destinations – we’ll
provide more on these other three buttons later
in this document.
Page 10
10
X5 CoPilot User’s Guide| US Fleet Tracking Corp.
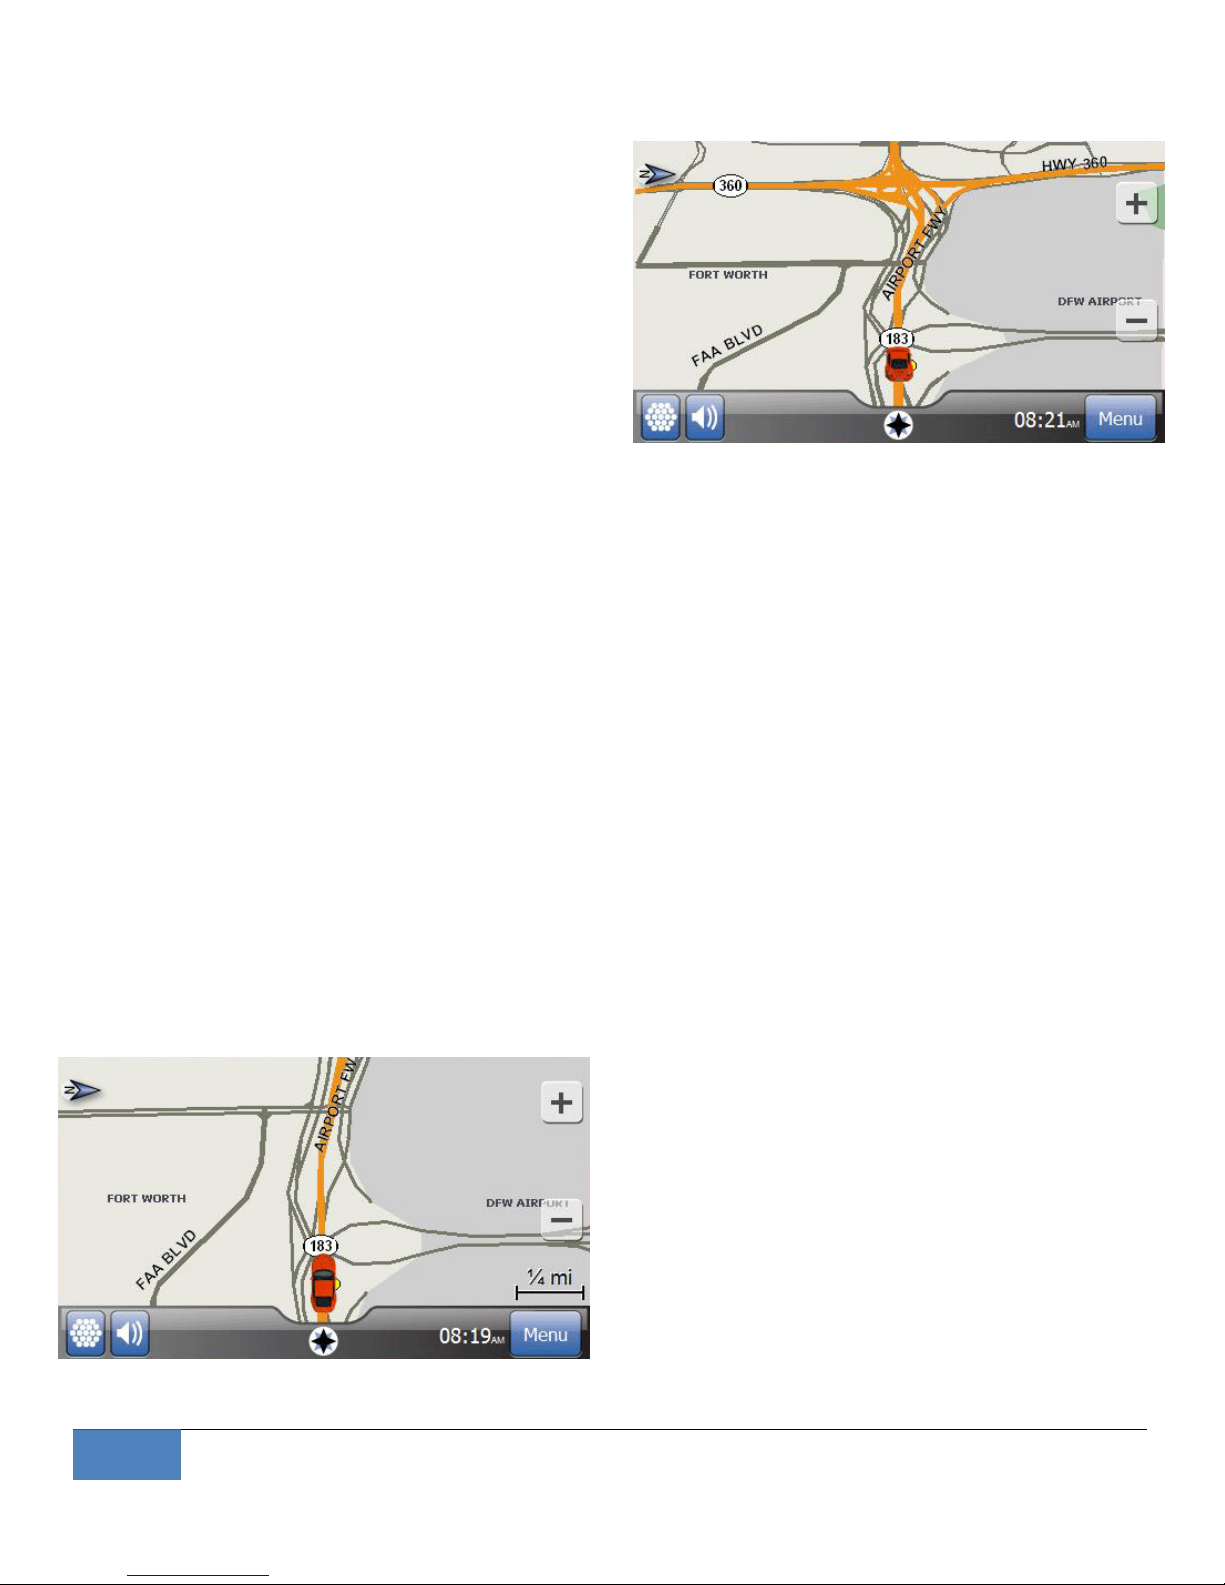
Click the “Current Location” button on the main
menu, and the mapping and navigation screen
will appear similar to the image shown in Figure
10.0 (right). The actual location shown on the
map will be a map of your area.
If a map of your area does not appear on the
screen, it’s possible the device either (A) cannot
get a GPS lock (see pages 8 and 9 of this
document) or (B) the GPS has been turned off. If
the GPS has been turned off, return to the main
menu and touch the vertical bars to get to the
GPS diagnostics screen and turn the GPS on.
Switching Between 2D and 3D Modes
The display format for the map is configurable in
two different formats – two dimensional (2D) and
three dimensional (3D) views. See Figures 10.0
and 10.1 for clarification of the difference.
In order to change the view, you may tap the
map view icon at the bottom center of the
mapping and navigation screen to switch
between 2D and 3D views.
Figure 10.1 – The Navigation screen, 2D mode Heading Up.
Figure 10.0 – The Navigation screen, 3D mode Heading Up.
North-Up or Heading-Up Modes
In addition to the two map views, you can change
the orientation of the map (the direction the map
faces). The options in map orientation are (A)
North-Up, or (B) Heading-Up.
In order to change between these modes, simply
tap the compass icon in the upper left or right
corner of the screen (depending on your
configuration settings) to indicate the direction of
North. Tap this compass icon to switch between
North-Up or Heading-Up modes.
In “North-Up” mode, North is always at the top of
the screen, just as it is with a standard paper
map. The vehicle icon turns to show the direction
in which the vehicle is travelling, and the compass
icon will always point straight up.
In “Heading-Up” mode, the direction in which
you are travelling will always appear at the top of
the map with the vehicle marker always facing
forward. The whole map will turn as you turn to
show the direction in which you’re travelling, and
the compass icon will always turn to point North.
Page 11
US Fleet Tracking Corp. | X5 CoPilot User’s Guide
11
Zooming the Map In and Out
Also on the mapping and navigation screen on
either the right or left side (depending on your
configuration settings), you will notice two
transparent buttons overlaid over the top of the
map – the upper button will show a “+” and the
lower button will show a “-“. These are the zoom
buttons, and are used to zoom the map in or out.
There are 14 different zoom levels, ranging from
½ inch =100 feet to ½ inch = 600 miles. Tap the +
or – icon to change the zoom level one step.
When you’re at the highest or lowest available
zoom level, the icon turns blank and does not
allow you to zoom in or out any further.
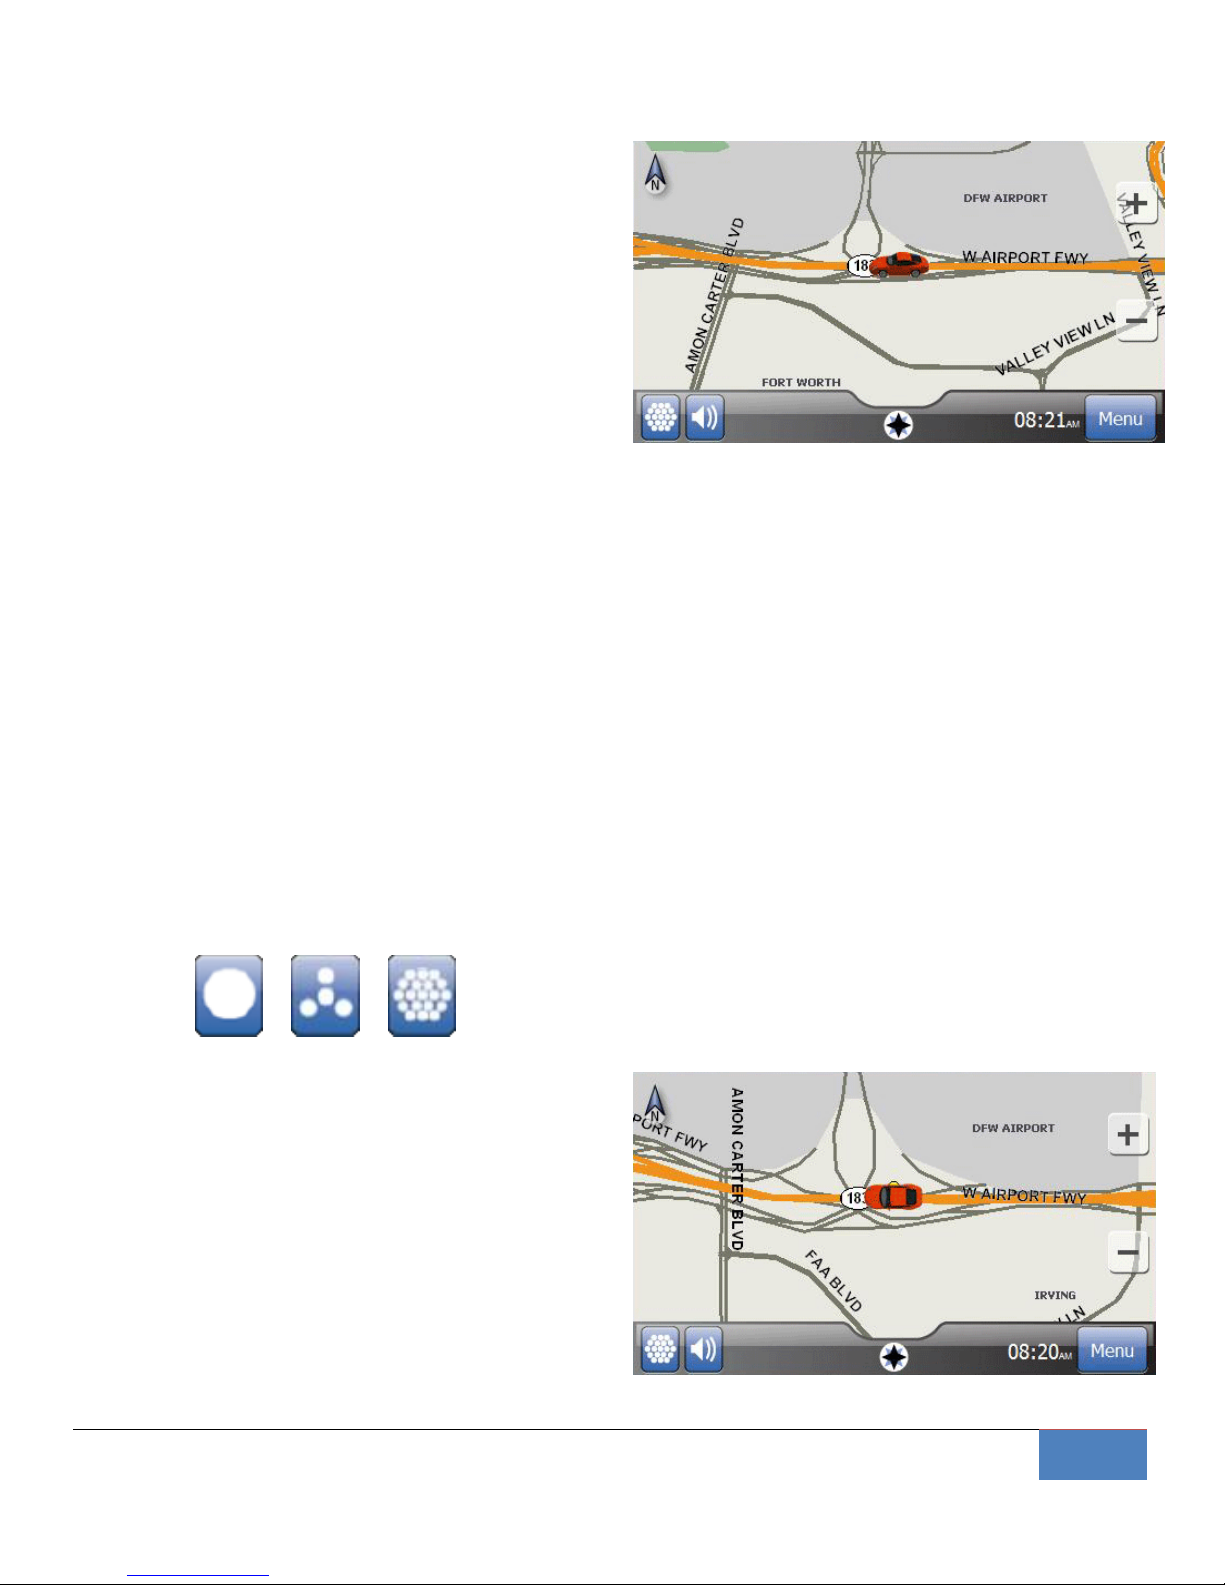
Setting the Map Detail Level
At the lower left corner of the navigation screen
the X5 CoPilot displays a button which appears as
one of the following :
Low Medium High
These (from left to right) indicate the various
detail levels for the map system – low detail,
medium detail, or high detail.
Low detail shows only major arteries, controlled
access roads, area features, and the current
route. Medium detail level displays everything
shown on low detail but adds residential and
Figure 11.0 – The Navigation Screen in 3D mode North Up.
surface streets. High detail displays all of the
above, and adds selected Point-of-Interest (POI)
icons.
When you select the highest detail level, the
CoPilot provides a pop-up dialog box asking
which POI icons you’d like to see on the map.
Simply touch the category in which you’re
interested – these categories match the main
categories you see when you tap the Points-OfInterest button on the main menu.
Categories include Fuel & Automotive, Travel &
Lodging, Shopping, Health Care, Entertainment,
Recreation, City Services, Cultural and Restaurant
locations.
Figure 11.1 – The Navigation Screen in 2D mode North Up.
Page 12
12
X5 CoPilot User’s Guide| US Fleet Tracking Corp.
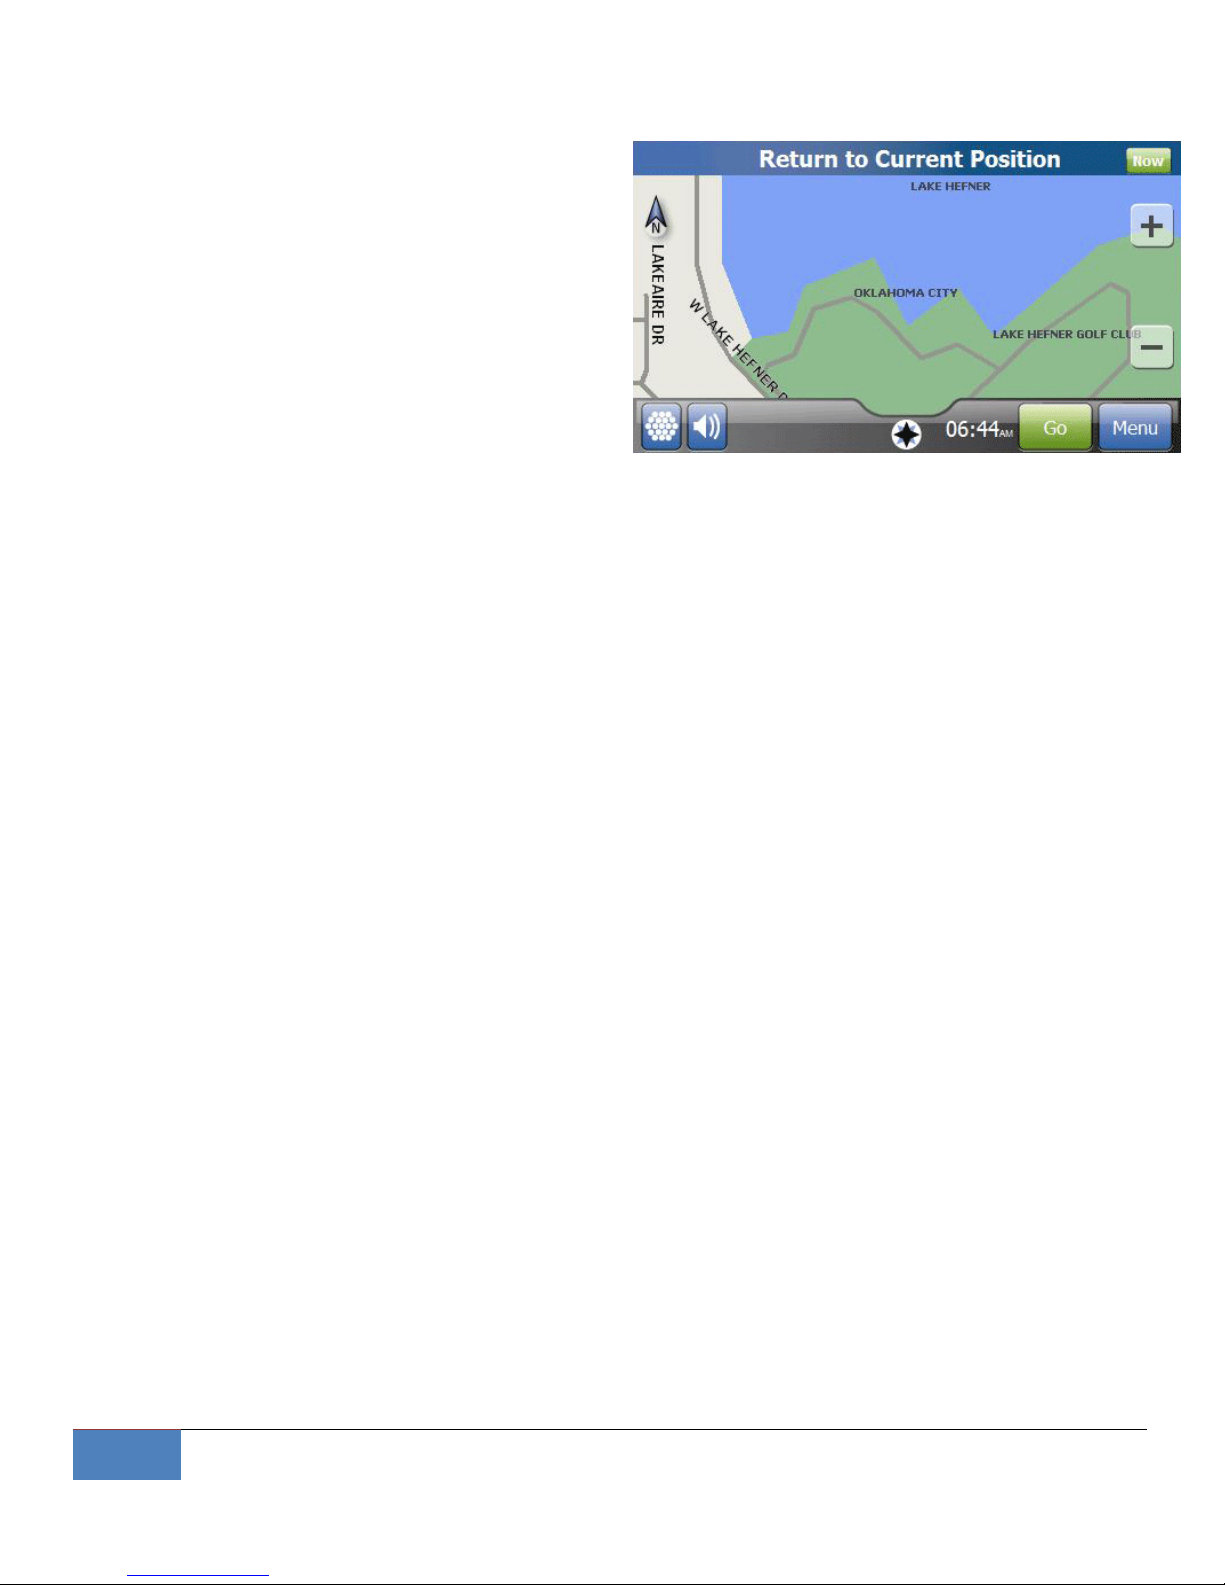
Map Exploration Mode
Vehicle tracking mode is the default map display
mode, and provides a vehicle-centric view of the
world around you.
As explained on page 10, there are four different
ways to view the map in vehicle tracking mode
based on North-Up, Heading-Up, 2D or 3D
perspectives.
In addition to this, you have the ability to touch
the map and slide it about the screen, exploring
areas beyond the immediate viewable area. This
is called Map Exploration mode. In this mode, you
are free to drag the map to other locations, zoom
in or out, examine your existing planned route, or
select new destinations.
The map display changes to 2D mode and shows
a bar across the top to indicate that you are in
exploration mode, and also provides a means to
return to vehicle tracking mode through the
“Return to Current Position NOW” button which
appears at the top right corner of the display.
Tapping the NOW button while in map
exploration mode will return the map display to
the default vehicle tracking mode.
How do I Get There From Here?
The reason you purchased a Navigation device in
the first place was likely so that you could get
turn-by-turn directions to guide you to where you
want to go.
Figure 12.0 – Map Exploration Mode.
There are four basic ways to tell the X5 CoPilot
where you want to go.
1. Pick your destination from the map screen.
2. Pick your destination from the list of places
you’ve been to before.
3. Pick your destination from the pre-
programmed list of “Points Of Interest”
(POI)
4. Enter a new address or intersection as your
destination.
Select Your Destination From the Map
To select your destination from the map, simply
tap the map screen to enter Map Exploration
mode. Drag the map about the screen with your
finger, zoom in or out, and find your destination.
When you tap the screen, the CoPilot marks the
spot you’ve tapped with a pin and displays the
name of the street or intersection. If there are
any POI icons displayed on the map, you can tap
the icon to select it as your destination. Once
you’ve selected your destination – whether POI
Page 13
US Fleet Tracking Corp. | X5 CoPilot User’s Guide
13
icon or simply a place on the map – press the GO
button on the lower bar of the device (next to the
menu button – see Figure 12.0). The CoPilot will
then calculate the quickest route between your
current location and the location you’ve selected.
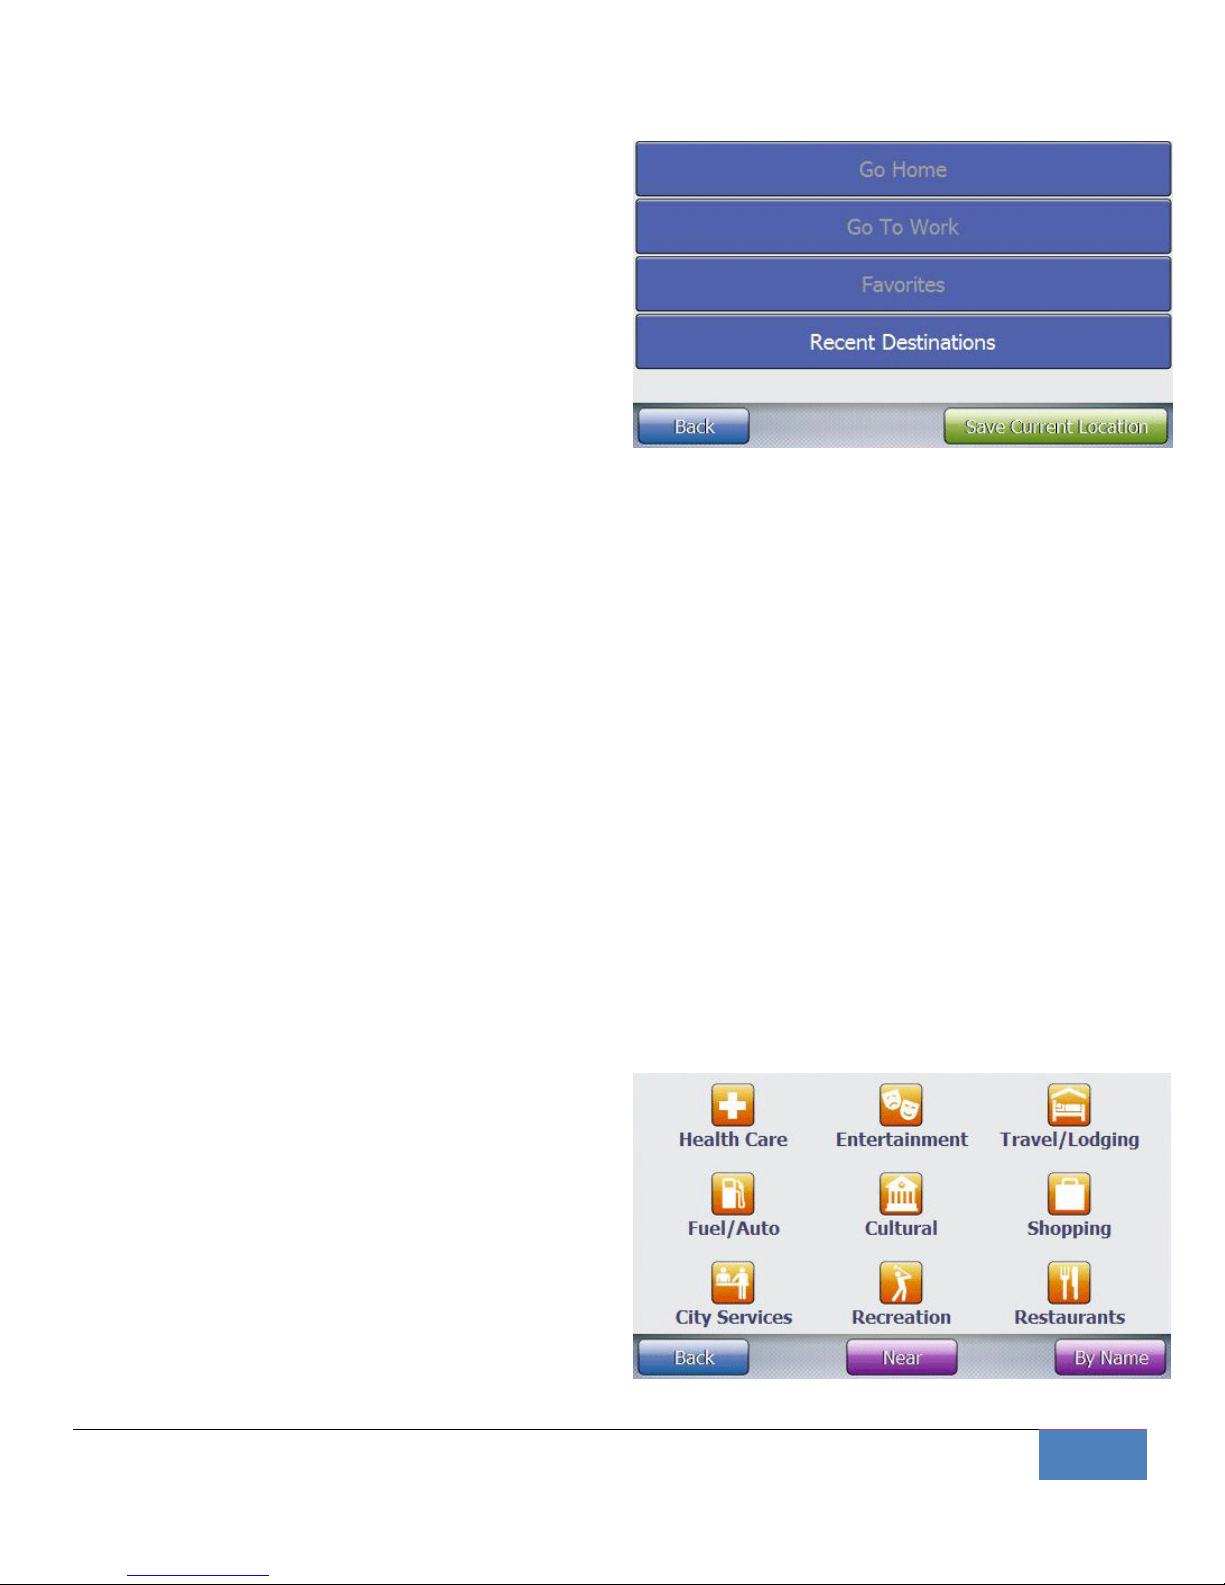
Selecting From Previous Destinations
From the main menu, tap MY LOCATIONS. You’ll
see a menu similar to that shown in Figure 13.0
(right).
From this menu, you can select from your Home
and Work locations, a stored Favorite, or Recent
Destinations.
To set your current location as a Home, Work, or
other Favorite location, simply click the SAVE
CURRENT LOCATION button on the lower right
corner of the screen.
Selecting Your Destination From POI’s
From the main menu, tap Points Of Interest. This
opens the main POI Category Screen (see figure
13.1, right).
Categories include Fuel & Automotive, Travel &
Lodging, Shopping, Health Care, Entertainment,
Recreation, City Services, Cultural and Restaurant
locations.
Once you’ve selected your category of interest, a
menu of sub-categories will appear. Select the
sub-category which best describes what you’re
searching for.
Figure 13.0 – The MY LOCATIONS Menu.
The RESTAURANT category, for example, is
divided into cuisine type; Some cuisine types are
divided again into more specific types – for
example, if you choose ASIAN as the cuisine type,
you can then choose a more specific description
such as Chinese, Filipino, Indian, Indonesian,
Japanese, etc.
After you’ve picked the lowest division in a
category, the CoPilot shows the closest 20 PointsOf-Interest (POI) that match your selection. Select
the location you prefer, and your X5 CoPilot will
display the address, distance, and phone number.
Touch the GO button and the CoPilot will guide
you there.
Figure 13.1 – The Points-Of-Interest (POI) Menu.
Page 14
14
X5 CoPilot User’s Guide| US Fleet Tracking Corp.
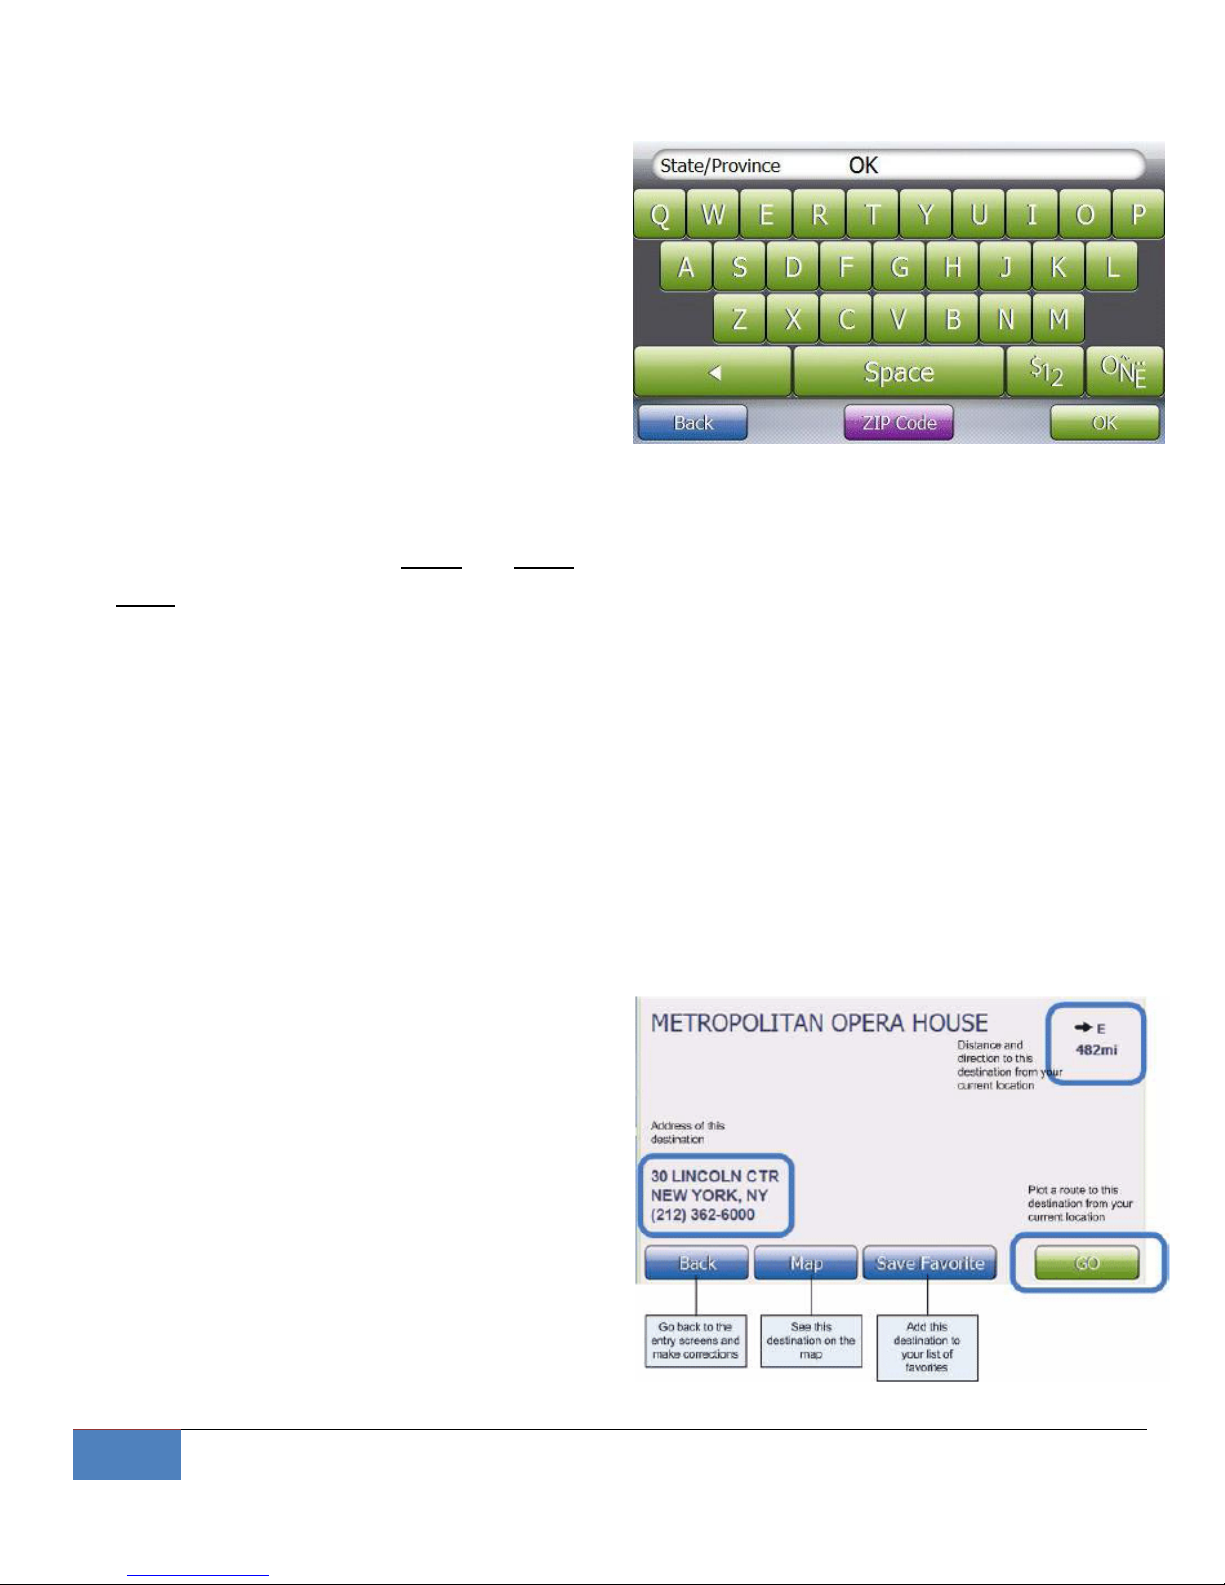
Optionally, if you know the name of the POI you
want, you can tap the “BY NAME” button in the
lower right corner of the category screen. The
keyboard will be displayed on-screen, allowing
you to enter the name of the POI you would
choose.
It’s important to remember that you needn’t
enter the whole name – the X5 CoPilot searches
for the POI names that include the characters you
enter. For example, if you enter MUSE, the
CoPilot will show all POI with Museum, Museo,
and Amusement Park in the name.
When you tap OK, the CoPilot displays the 20
closest POI items that include the letters you
entered (in the order in which you entered
them).
About the Search Order
By default, the CoPilot sorts POI by distance using
your current location as the center. To change
the center point used for the POI search, tap the
NEAR button at the bottom of the category
screen.
Choose NEAR BY to search for POI near your
current location (the default). If you are in an
active route, choose NEAR DESTINATION to
search for POI near the route destination.
Choose IN CITY to search for POI in a different
city from your current location. The CoPilot takes
you to the state selection screen, where you can
enter the state and then the city in which you
want to search.
Figure 14.0 – The Onscreen Keyboard.
If you change the search center, the CoPilot
remembers the new center point until you
change it. For example, if you change the search
center to another city, the next time you search
for POI, the CoPilot searches in that city.
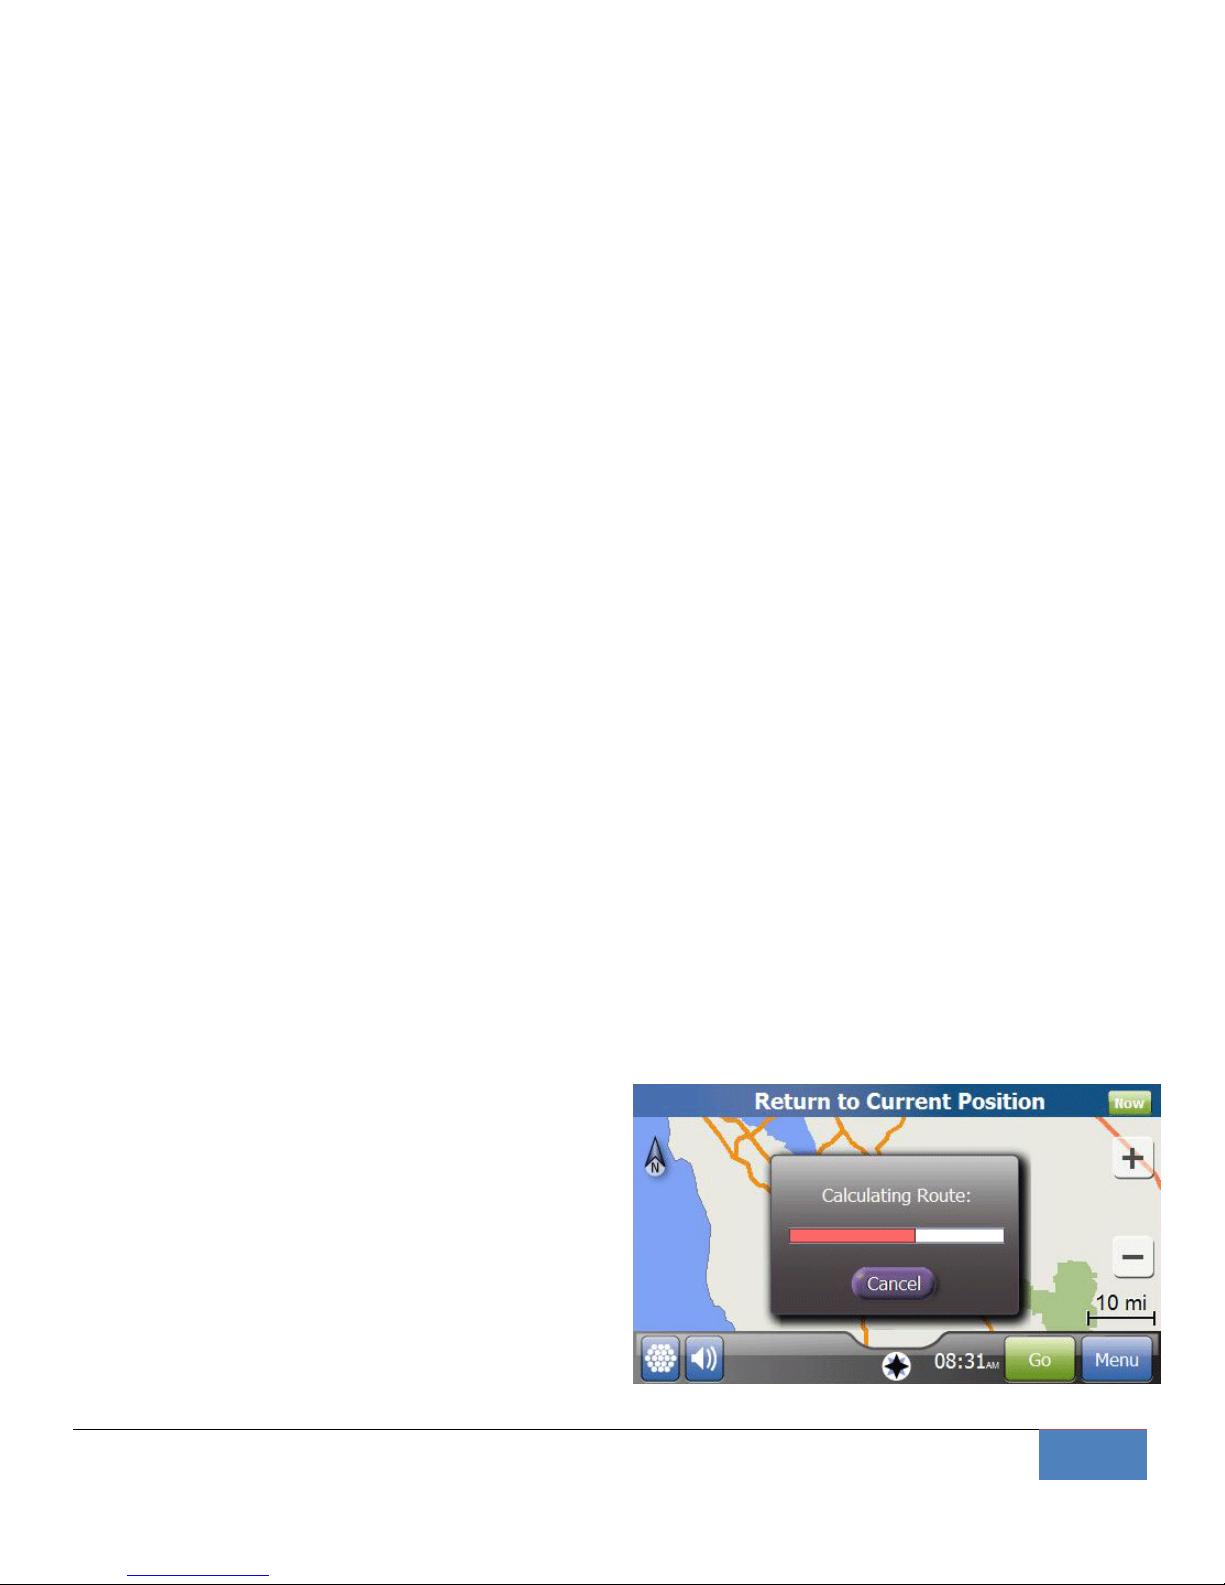
After you’ve completed your POI selection, the
destination selection screen will appear similar to
Figure 14.1 (below), providing distance, direction,
address and phone number of the destination
you’ve selected. Tap the GO button, and the X5
CoPilot will begin directing you to your
destination.
Figure 14.1 – The Confirm Destination screen.
Page 15
US Fleet Tracking Corp. | X5 CoPilot User’s Guide
15
Manually Entering a Destination
From the main menu, choose NAVIGATE TO
ADDRESS. This opens the enter state or province
screen: Enter the name or the two letter postal
code of the state your destination is in. (You can
just enter the first few letters of the name.)
If you know the zip code or postal code of your
destination, you can tap the ZIP CODE button.
(This takes you to the numeric keypad on the
next page so you can enter your destination’s zip
code.)
For the US, there are 53 available states: all 50
states, Puerto Rico (PR), the US Virgin Islands (VI),
and the District of Columbia (DC).
The CoPilot searches for names that include the
characters you enter, regardless of where in the
name those characters appear. If you need to
type a letter with an accent or diacritical mark,
tap the ÔÑË button to go to the symbol keypad.
If you need to type a number or any kind of
punctuation mark, tap the $12 button to go to
the number keypad. To go back to the alphabet
keypad, tap the ABC button.
Tap the OK button when you are finished. Use
the alphabet keypad to enter the name of the city
(or unincorporated area) of your destination.
When you tap OK, your CoPilot shows the list of
city names that include the characters you
entered. Tap the name of the city you want, or
tap the BACK button to go back and make any
changes. After you select the city, enter the
street name the same way you entered the city
name. When the CoPilot shows the list of streets,
tap the name of the street you want.
Enter numbered streets as numerals plus
abbreviation (1ST, 2ND, 3RD, etc.) instead of
spelling out the word (First, Second, Third, etc.).
Enter the house or building number using the
same method you used to enter the city and the
street name. Or if you want to search for a corner
or an intersection of two streets, tap the
INTERSECT button at the bottom of the screen.
The CoPilot will prompt you to enter the name of
the cross street.
If the CoPilot finds the building number or
intersection, it displays the Confirm Destination
screen (Figure 14.1, previous page). Tap the GO
button, and the X5 CoPilot will begin directing
you to your destination.
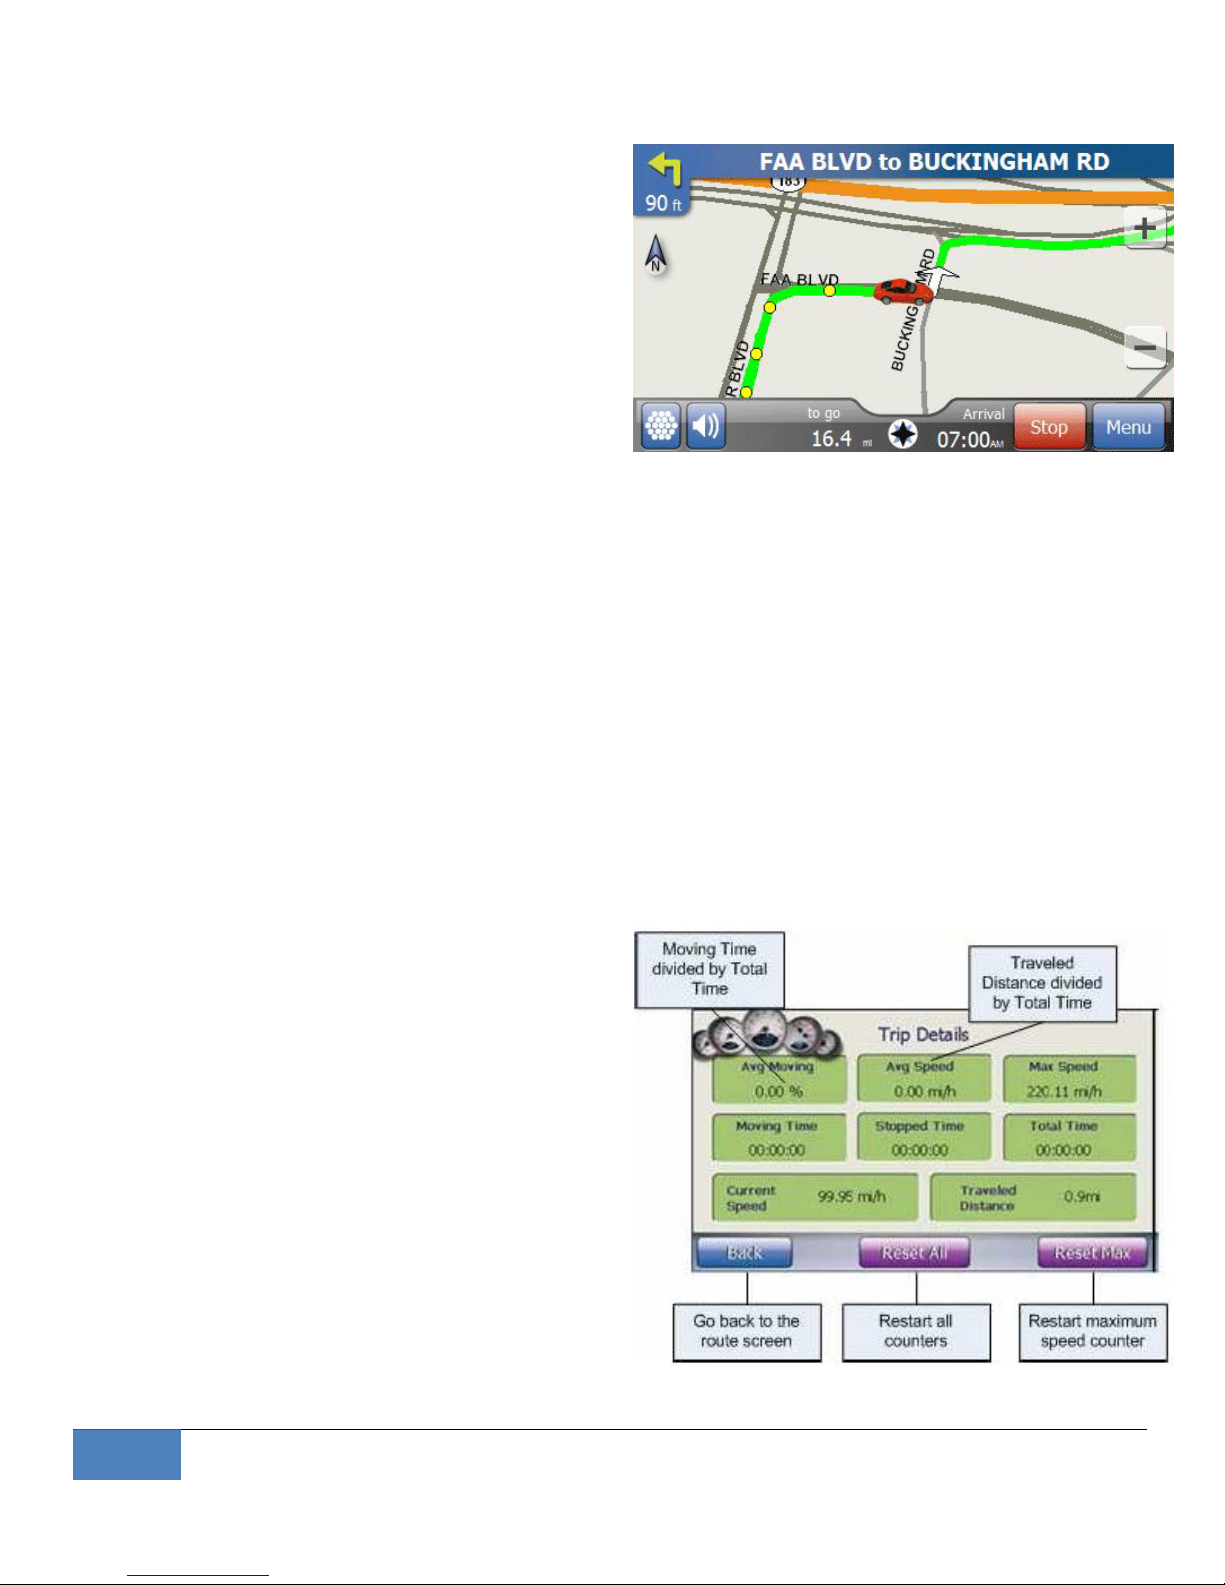
While it’s calculating the route, the CoPilot shows
a dialog box with a progress bar. If you want to
stop calculating this route, tap the CANCEL
button.
Figure 15.0 – Calculating the Route.
Page 16
16
X5 CoPilot User’s Guide| US Fleet Tracking Corp.
Reading the Route Map
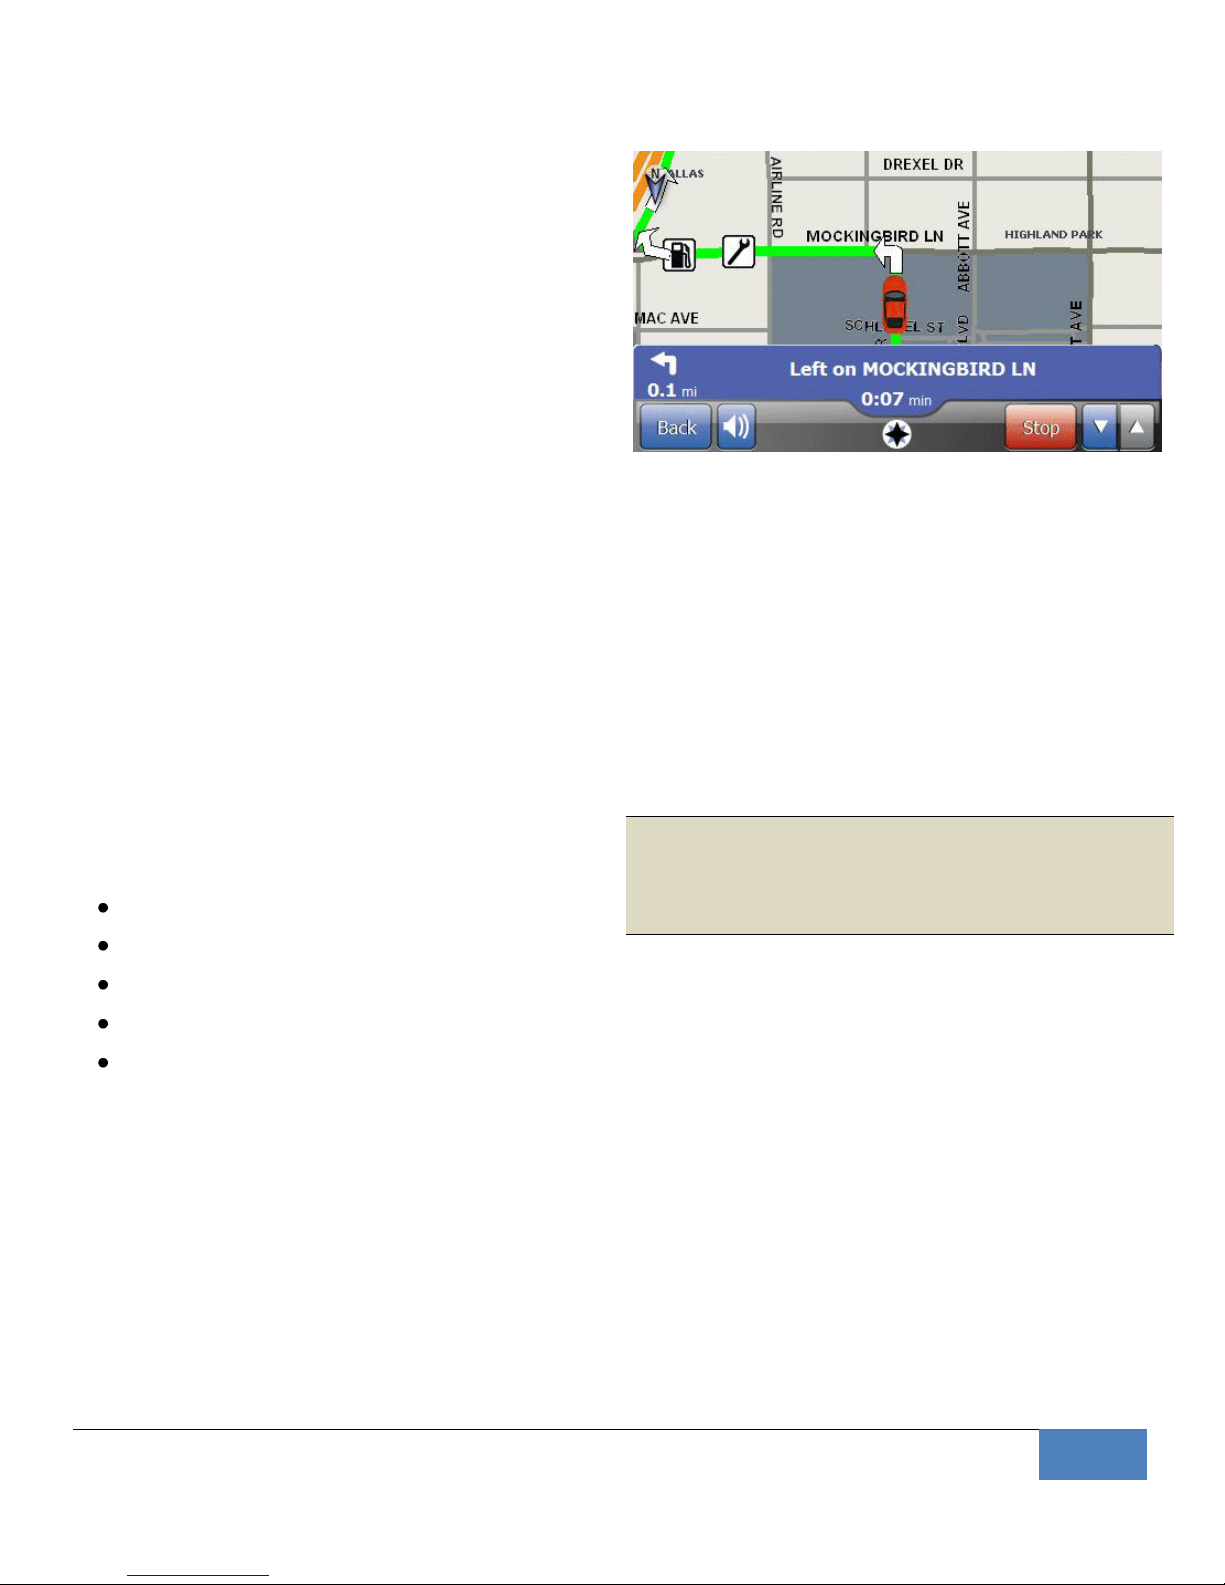
When it finishes calculating the route, the CoPilot
switches back to the navigation map. When a
route has been selected, additional information
and options are provided (see figure 16.0, right).
The most obvious difference when a route is
selected is that the street you should be driving
on is marked in green. When you get close to the
next maneuver, the white arrow appears on the
route. You’ve the ability to tap the STOP button
to pause the route. You may also tap the
estimated ARRIVAL time or the distance TO GO in
order to see the Trip Detail screen.
Lastly, you may tap on the title bar or the next
turn arrow to see a close up view of the next
maneuver.
Seeing Your Trip Details
At any point during a route, tap the ARRIVAL time
or the distance TO GO to open the Trip Details
screen and see detailed information about your
trip (See Figure 16.1, right).
You may tap the RESET ALL or RESET MAX
buttons to reset the counters on this screen.
Viewing the Maneuver List
When you are in a route, a third option is added
to the map views – the Maneuver List.
The Maneuver List is a complete set of directions
Figure 16.0 – The Route Map.
for the entire route. It shows all the information
about every maneuver you will need to make –
the name of the street you need to turn on, the
direction you need to go, and the distance from
the previous maneuver.
You may use the UP and DOWN buttons to scroll
through multiple screens of maneuvers, and may
tap on any maneuver to see that particular
maneuver on the map. Touch the BACK button to
return to the previous screen.
Figure 16.1 – The Trip Detail Screen.
Page 17
US Fleet Tracking Corp. | X5 CoPilot User’s Guide
17
Viewing the Route
One Maneuver at a Time
You can jump ahead in the route to see individual
maneuvers before you get there. You can even
scroll through the whole route one maneuver at a
time.
From the main route map, tap anywhere on the
title bar or the next turn arrow to see a close-up
of the next maneuver. Then, from the maneuver
list, tap on any individual maneuver to jump to
that maneuver. You may tap the UP arrow to see
the previous maneuver or the DOWN arrow to
see the next maneuver.
Making Changes to a Route
At any time during a route, you can make the
following changes :
Pause or stop the route
Detour away from the current road
Avoid particular roads on the route
Change your destination
Add waypoints or stopovers on the route
Stopping and Restarting a Route
To pause the current route, tap the STOP button
at the bottom of the map screen. When you want
to restart the route, go to the MENU screen and
you’ll find the RESUME button at the bottom of
the screen is now active; You may tap RESUME at
any time to restart the route.
Figure 17.0 – Viewing the Route
Avoiding Roads During a Route
You can avoid particular types of roads during a
route : The CoPilot can recalculate the current
route without using U-turns, highways, dirt roads,
toll roads, or ferries. In addition, you can request
a temporary detour from the road on which
you’re currently driving.
Note : To avoid certain types of roads for all
routes from now on, use the Avoidances option
under the Routes menu (See page 8).
On the menu screen, tap the RE-ROUTE button.
(If the route is paused, tap RESUME to restart it.)
This opens the CALCULATE ALTERNATIVE ROUTE
screen.
Tap the button on the DETOUR line if you wish to
avoid the current road. You can avoid this road
for the next 2, 5, or 10 miles. Set this line to “-“ if
you don’t want to leave the road on which you’re
currently driving.
To avoid a type of road for the remainder of this
route, tap the button at the end of the line to set
Page 18
18
X5 CoPilot User’s Guide| US Fleet Tracking Corp.
that road type to AVOID. Leave the setting at OK
if you don’t wish to avoid that road type.
When you’ve selected the road types you want to
avoid, tap the OK button. The X5 CoPilot will then
recalculate the route, detouring you from the
road on which you’re currently travelling for the
designated distance and avoiding the road types
you’ve selected for the remainder of the route.
Note: The X5 CoPilot will avoid the road types
you select as much as it possibly can. There may,
however, be some cases where the CoPilot
cannot avoid a particular road type between your
current location and your destination.
Changing Destination or Adding Waypoints
During a route, you can add one or more
waypoints (waypoints are places you want to
stop along the way). You can also replace the
current destination with a new one.
At any time during the route, tap the MENU
button to go to the main menu screen. Following
the exact same steps you normally use to set a
destination, find the new location you want to
add to the current route.
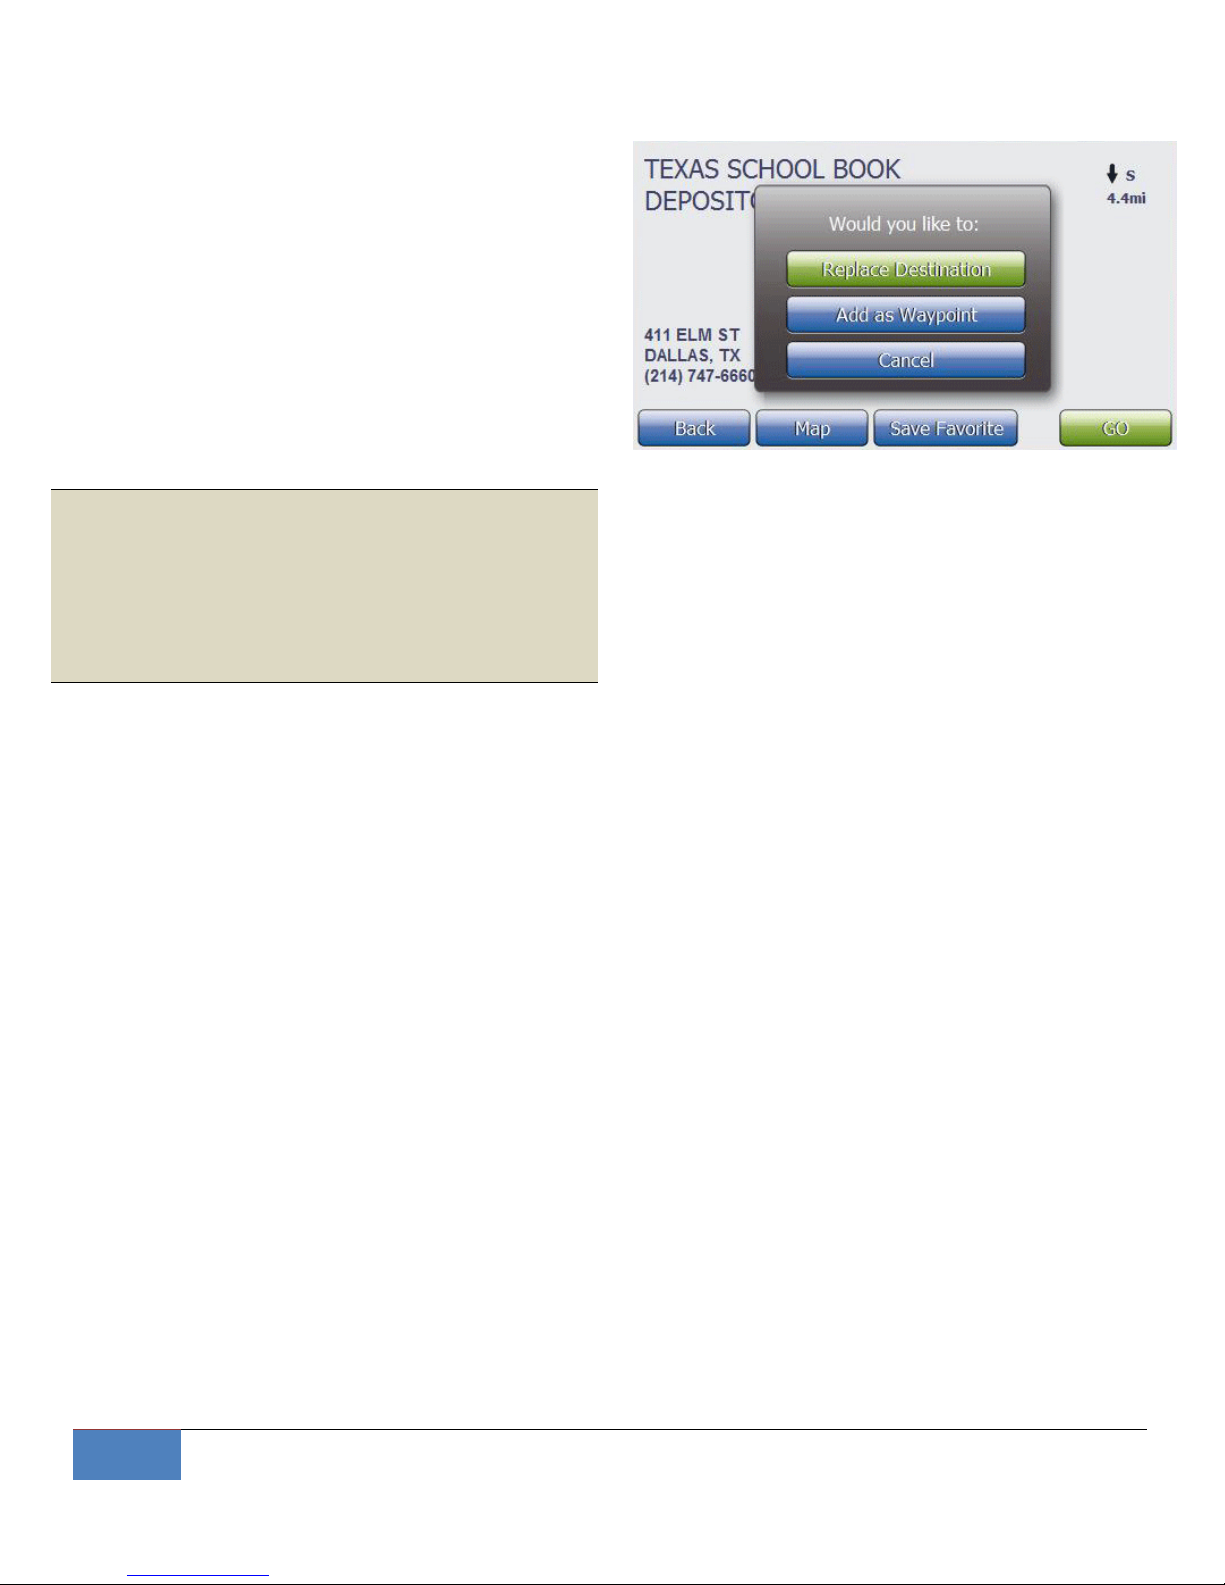
When you come to the CONFIRM DESTINATION
screen (see Figure 18.0), tap the GO button. The
X5 CoPilot will then ask what you want to do with
the new destination. To change the destination,
simply tap the REPLACE DESTINATION button.
The CoPilot will then automatically recalculate a
Figure 18.0 – Replacing a Destination or Waypoint.
route from your current position to the new
destination.
To keep your current destination and add the
new location as a stop-over or waypoint, tap the
ADD AS WAYPOINT button.
The X5 CoPilot recalculates the route from your
current position to the waypoint, then from the
waypoint to your destination. The waypoint
appears on the route screen as a pink pin marked
with a W.
On the Maneuver List screen, the line showing
the waypoint is highlighted Tap on this line to
jump to the waypoint. Tap the DELETE button if
you wish to remove the waypoint and recalculate
the route.
Adding Multiple Waypoints
You may add an unlimited number of waypoints
to a route using the same steps you used to add
the first one. When you tap the ADD AS
WAYPOINT button, the CoPilot will ask if you
want to keep the existing waypoints.
Page 19

US Fleet Tracking Corp. | X5 CoPilot User’s Guide
19
You may tap the OK button to add the new
waypoint to the existing ones, tap the REMOVE
button to delete all existing waypoints and create
this new one, or tap CANCEL to return to the
CONFIRM DESTINATION screen.
Each time you add a new waypoint, the CoPilot
will display a list of all waypoints on the route and
ask where you want to insert the new waypoint.
Simply tap the line you want to put the new
waypoint in front of – that is, select the waypoint
which should come immediately after the new
one.
Subscription Features
For other functions and features available by
subscription, please consult the included
“Extended Subscription Features” manual
provided.
For Additional Information
For additional information, please visit us at
www.X5CoPilot.com for the latest information,
tips, and upgrades available for your X5 CoPilot.
Page 20

20
X5 CoPilot User’s Guide| US Fleet Tracking Corp.
Why can’t I get a GPS signal lock?
First, check to ensure the GPS receiver in the
device is turned on. To do this, go to the Main
MENU and select the BARS icon on the top row. If
the button on the bottom of that screen shows
an option to TURN ON GPS, this means the GPS
has been turned off. Tap the button to turn it on.
The GPS receiver built into the X5 CoPilot is
among the most sensitive in the industry, and
under normal circumstances should have no
problem obtaining sufficient satellite visibility to
establish a position lock. Even so, the most
common cause of signal lock issues is external
radio interference or signal blockage. Some
common things that can interfere with satellite
signals are:
o Radio broadcast towers or signal repeaters
o A Cell phone located too close to the CoPilot
o Tall buildings or canyon walls
o Tunnels, large bridges, overpasses, parking garages
o High frequency power lines
o Large iron-ore deposits beneath your location
If you believe your CoPilot may be receiving radio
interference, relocate either the CoPilot or the
source of the radio interference to separate the
two devices.
Why do my POI icons disappear?
First, check to ensure the highest level of detail is
selected by tapping the detail icon on the lower
left corner of the map screen, and select HIGH
DETAIL (see page 11).
Page 21

US Fleet Tracking Corp. | X5 CoPilot User’s Guide
21
Secondly, the X5 CoPilot does not display POI
icons when the map scale is greater than 700
feet. If you can’t see the POI icons on the map
(and HIGH DETAIL is selected), try zooming in to
700 feet or closer.
I Have Questions Not Listed Here
For additional information, please visit us at
www.X5CoPilot.com for the latest information,
tips, and upgrades available for your X5 CoPilot.
Page 22

22
X5 CoPilot User’s Guide| US Fleet Tracking Corp.
Legal Notice
© 2008,2009 US Fleet Tracking Corp.,
All rights reserved.
This product or document is protected by copyright and
distributed under the terms of a license agreement, restricting
its use, copying, distribution and decompilation (“License
Agreement”). No part of this document may be distributed
without written consent from US Fleet Tracking Corp.
The product described in this document may be protected by
one or more U.S. patents, foreign patents, or pending
applications.
U.S. Patent Number 5,963,956 and 6,647,269. U.S. Patents
Pending.
RESTRICTED RIGHTS
SPECIAL LICENSE RIGHTS
The documentation is provided with RESTRICTED RIGHTS.
Use, duplication, or disclosure by the Government is subject
to restrictions as set forth in the License Agreement and in
subparagraphs (c)(1)(ii) of the Rights in Technical Data and
Computer Software clause at DFARS 252.227-7013 or
subparagraphs (c)(1) and (2) of the Commercial Computer
Software—Restricted Rights at 48 CFR 52.227-19, or their
equivalent, as applicable. Manufacturer is US Fleet Tracking
Corp., 11032 Quail Creek Road, Oklahoma City, OK 73120.
WARRANTY COVERAGE
US Fleet Tracking Corp (USFT)’s warranty obligations for this
X5 series tracking unit are limited to the terms set forth below:
USFT warrants the USFT X5 series tracking unit against
defects in materials and workmanship for a period of one (1)
year from the date of original purchase ("Warranty Period").
Specifically, the date the equipment is shipped to the
customer.
If a defect arises and a valid claim is received by USFT within
the Warranty Period, at its option, USFT will (1) repair the
product at no charge, using new or refurbished replacement
parts, (2) exchange the product with a product that is new or
which has been manufactured from new or serviceable used
parts and is at least functionally equivalent to the original
product, or (3) refund the purchase price of the product.
USFT warrants replacement products or parts provided under
this warranty against defects in materials and workmanship
from the date of the replacement or repair for ninety (90) days
OR for the remaining portion of the original product's
warranty, whichever provides longer coverage for you. When
a product or part is exchanged, any replacement item
becomes your property and the replaced item becomes
USFT's property. When a refund is given, your product
becomes USFT's property.
EXCLUSIONS AND LIMITATIONS
This Limited Warranty does not apply to any non-USFT
hardware product or any software. USFT is not liable for any
damage to or loss of any programs, data, or other information
stored on any media contained within the vehicle tracking or
navigation systems.
This warranty does not apply: (a) to damage caused by
accident, abuse, misuse, misapplication, or non-USFT
products; (b) to damage caused by electrical connection not
conforming to instructions; (c) to a product or a part that has
been modified without the written permission of USFT; (d) if
any USFT serial number has been removed or defaced; (e) in
the event of interruption or discontinuation of GPS satellite
signal; or (f) in the event of interruption or discontinuation of
the wireless coverage.
To the maximum extent permitted by law, this warranty and
the remedies set forth above are exclusive and in lieu of all
other warranties, remedies and conditions, whether oral or
written, express or implied. USFT specifically disclaims any
and all implied warranties, including, without limitation,
warranties of merchantability and fitness for a particular
purpose. If USFT cannot lawfully disclaim or exclude implied
warranties under applicable law, then to the extent possible
any claims under such implied warranties shall expire on
expiration of the warranty period. No USFT reseller, agent, or
employee is authorized to make any modification, extension,
or addition to this warranty.
SPECIFIC LIMITATION OF LIABILITY
To the maximum extent permitted by law, USFT assumes no
liability for direct, special, incidental or consequential
damages of any kind under any circumstance resulting from
the use of or inability to use USFT products. Use of USFT
products constitutes your agreement to and acceptance of
this limitation of USFT liability.
As a knowledgeable and informed person, the user
specifically acknowledges USFT is not responsible for direct,
special, incidental or consequential damages resulting from
any breach of warranty or condition, or under any other legal
theory, including any costs of recovering or reproducing any
program or data stored in or used with the USFT product, and
any failure to maintain restricted airtime usage or failure to
maintain the confidentiality of data stored on the product.
USFT specifically does not represent that it will be able to
repair any product under this warranty or make a product
exchange without risk to or loss of programs or data.
OBTAINING WARRANTY SERVICE
Please email [email protected] with your USFT
model and serial number, and describe the anomaly in detail.
USFT will respond to your email with proper user diagnosis
and repair or provide you with an authorization number and
instruction for shipment for authorized repair. Use care and
original shipping container to prevent shipping damage. No
repair work will be done and your tracking unit will not be
returned if an authorization number is not obtained in
advance.
 Loading...