

Page 1
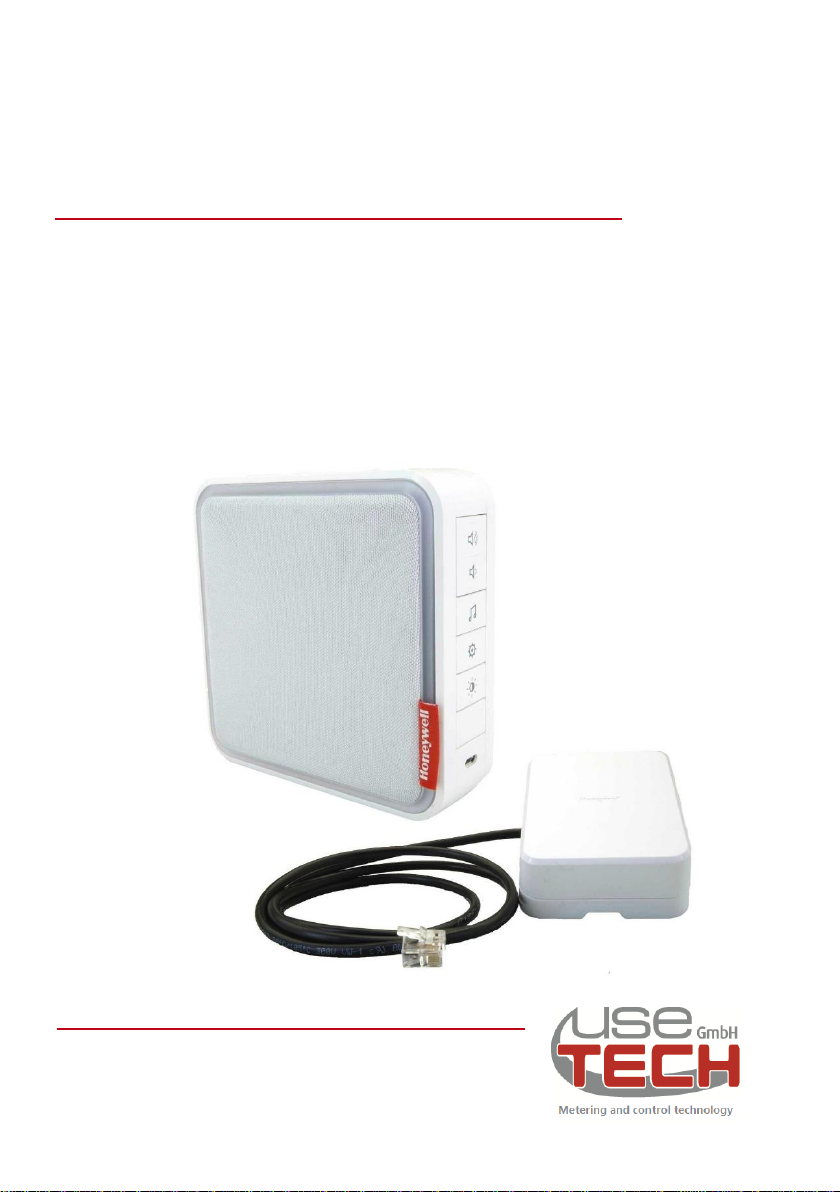
FlowTimer+ Sound Set
FlowTimer+ wireless pre-alarm using
of a pre-wired Honeywell wireless gong set
Operating Manual
Page 2

Publisher
usetech GmbH
Tanzplatz 10
D- 55130 Mainz
Phone:
+49 6131 - 921325
Website:
www.use-tech.com
Document
number
FlowTimer+ Sound_Manual_EN_V3
Original Operating Manual
Date of issuance
04.03.2019
Printing date
04.03.2019
Copyright
usetech GmbH
This documentation including all its parts is protected by copyright.
Any use or modification outside the narrow limits of copyright law
without the consent of the company usetech GmbH is prohibited
and punishable by law.
This applies in particular to duplications, translations, microfilming
and storage in electronic systems as well as processing in these.
Page 3

Table of contents
Table of contents
Table of contents ......................................................................... 1
1 General information ............................................................. 3
1.1 Explanation of symbols ......................................................... 3
2 Technical data ...................................................................... 5
3 Intended Use ........................................................................ 6
3.1 Non-approved use ................................................................. 7
4 System description FlowTimer+ Sound Set ....................... 8
4.1 Content of the FlowTimer+ Sound Set .................................. 8
4.2 Front view Honeywell wireless gong ..................................... 9
4.3 Plan view Honeywell wireless gong .................................... 10
4.4 Rear view Honeywell wireless gong .................................... 11
4.5 Overview Honeywell Wireless Converter ............................ 12
5 Installation .......................................................................... 13
5.1 Mounting of converter and wireless gong ........................... 13
5.2 Electrical connection ........................................................... 13
5.3 Insert batteries ..................................................................... 14
6 Operation and Function ..................................................... 15
6.1 Reset wireless gong (factory reset) ..................................... 15
6.2 Coupling converter and wireless gong ................................ 15
6.3 Test wireless connection ..................................................... 16
6.4 Change melody ................................................................... 16
6.5 Change ring color ................................................................ 17
6.6 Changing the optical signalling mode ................................. 17
6.7 Muting .................................................................................. 17
7 Troubleshooting, Maintenance ......................................... 18
7.1 Maintenance ........................................................................ 18
03/19 FlowTimer+ Sound Set 1
Page 4

Table of contents
8 Packaging, Transport, Storage ......................................... 19
9 Disposal .............................................................................. 20
03/19 FlowTimer+ Sound Set 2
Page 5

General information
NOTE
The operating instructions contain important
information on safety!
Non-observance of these instructions can lead to dangerous
situations.
The operating instructions must be read and understood.
DANGER
Warns of imminent danger!
Failure to do so will result in death or serious injury.
WARNING
Warns of a potentially dangerous situation!
Failure to do so could result in serious injury or death.
CAUTION
Warns of a possible hazard!
Failure to do so may result in moderate or minor injury.
NOTE
Warns of material damage!
Failure to do so may result in damage to the system or
equipment.
1 General information
The operating instructions describe the entire life cycle of the
system. Keep this manual in such a way that it is easily accessible
to any user and available to any new owner of the system.
1.1 Explanation of symbols
03/19 FlowTimer+ Sound Set 3
Page 6

General information
indicates important additional information, tips and
recommendations that are important for your safety and the
proper functioning of the system.
refers to information in this operating manual or other
documentation.
Action steps
The defined sequence of steps makes it easier for you to
use the system correctly and safely.
Result
Here you will find the result of a sequence of steps
described.
03/19 FlowTimer+ Sound Set 4
Page 7

Technical data
For technical data please refer to the original data sheets of
the Honeywell DC915SCV wireless set (included in the set).
The EC declaration of conformity as well as the original
Honeywell operating instructions are also included in the
set.
Download the documents at the address:
https://livewell.honeywell.com/de/turgongs/dc915scv/
Remark:
The terminal connections of the Honeywell DCP917S
converter supplied in the set are not available in the
FlowTimer+ version!
These wire connections have been replaced by an internally
fixed and strain-relieved I/O cable to provide a simple and
secure connection to the FlowTimer+ without wiring and
expertise.
2 Technical data
03/19 FlowTimer+ Sound Set 5
Page 8

Intended Use
3 Intended Use
Please observe the notes in this operating manual as well as the
operating conditions and permissible data in the data sheet so that
the system functions perfectly and remains operational for a long
time. In case of non-observance of these instructions as well as in
case of inadmissible interventions into the system, any liability on
our part is void, as is the warranty on the system and accessories!
The FlowTimer+ Sound Set consists of a pre-wired batteryoperated transmitter and wireless receiver.
Three minutes before the set maximum flow time of the FlowTimer+
is reached, an acoustic and optical signal is emitted by the wireless
receiver at short intervals.
If after this system pre-alarm the water flow is interrupted for
approx. 40 seconds, the pre-alarm stops and water can be
removed again for the previously set flow duration.
Any other use or use going beyond this shall be deemed improper
use. The usetech GmbH is not liable for damages resulting from
this. The risk is borne solely by the user.
03/19 FlowTimer+ Sound Set 6
Page 9

Intended Use
3.1 Non-approved use
Unapproved use in the sense of a foreseeable misuse shall be
deemed to be improper use:
The I/O connection cable (17) of the converter (1) is only suitable
for connection to the FlowTimer+.
No telephones, ISDN, other devices or adapters may be
connected.
03/19 FlowTimer+ Sound Set 7
Page 10
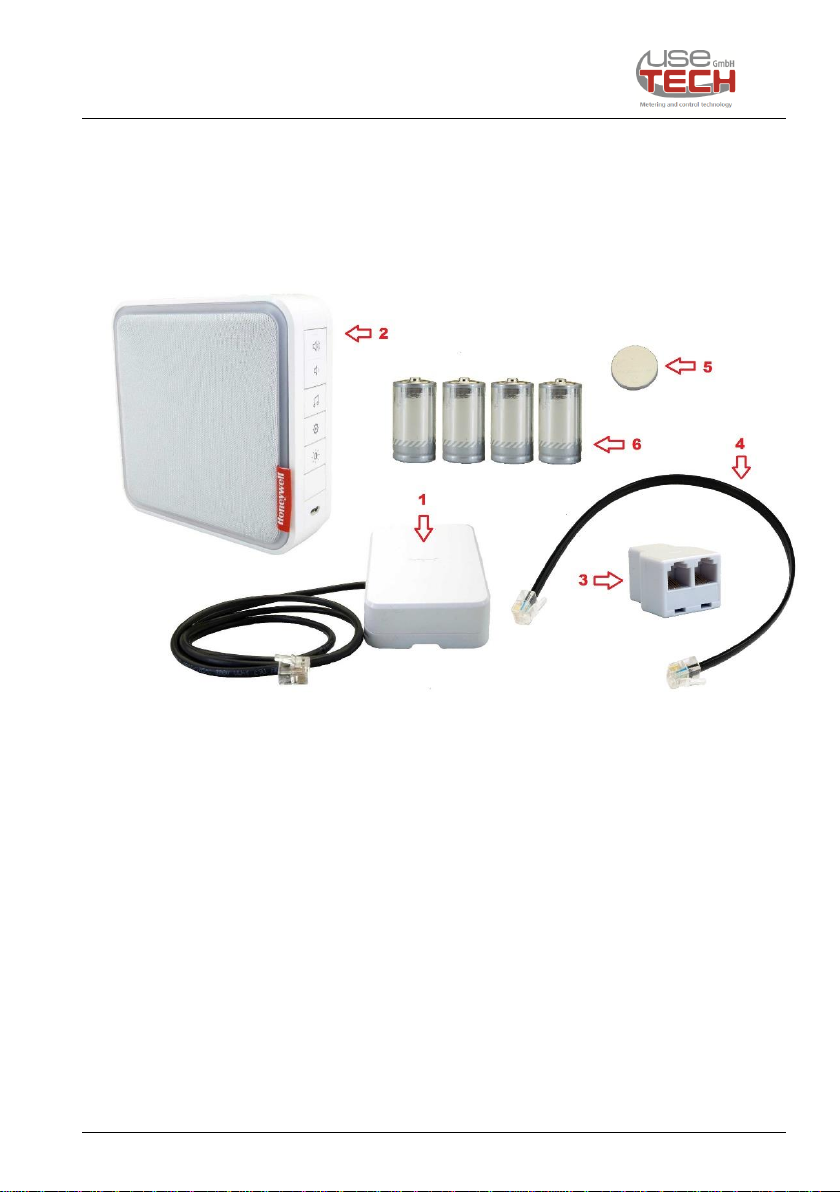
System description FlowTimer+ Sound Set
1
Honeywell converter with FlowTimer+ I/O connector
2
Honeywell wireless gong
3
I/O splinter
4
I/O connection cable
5
1x button cell for converter
6
4x baby cell for wireless gong
4 System description FlowTimer+ Sound Set
4.1 Content of the FlowTimer+ Sound Set
Fig. 4.1: Content of the FlowTimer+ Sound Set
Original mounting material from Honeywell for the converter and
wireless gong.
03/19 FlowTimer+ Sound Set 8
Page 11
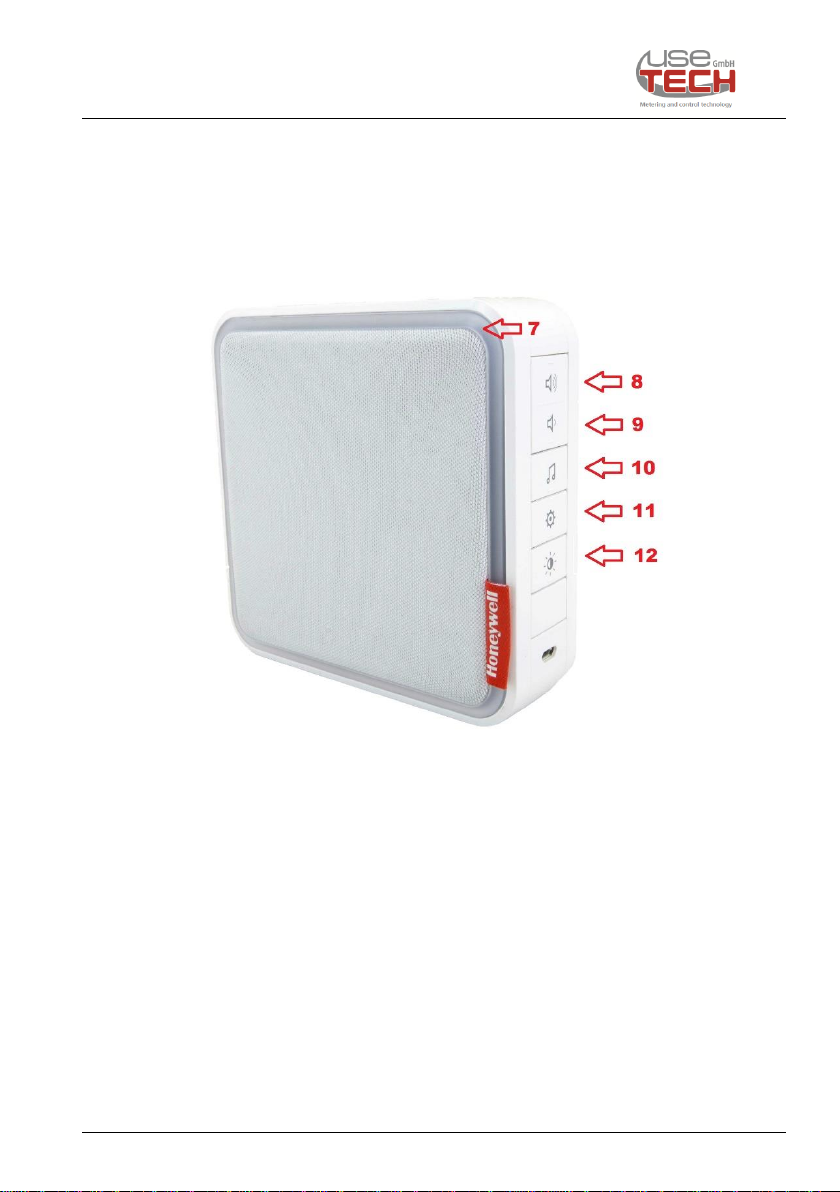
System description FlowTimer+ Sound Set
7
Illuminated ring
8
Button Volume +
9
Key Volume -
10
Key Melody selection
11
Teach-in button
12
Color and signal selection button
4.2 Front view Honeywell wireless gong
03/19 FlowTimer+ Sound Set 9
Fig. 4.2: Front view Honeywell wireless gong type DC915SCV
Page 12
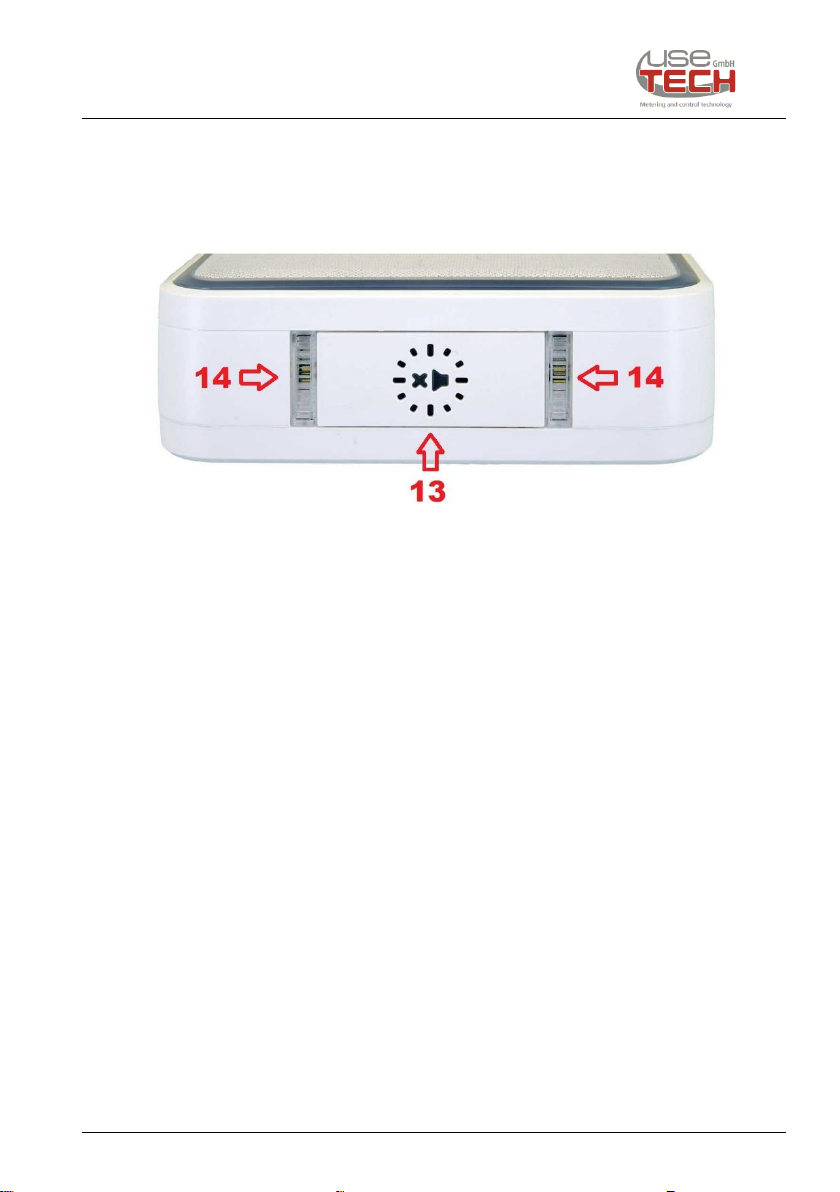
System description FlowTimer+ Sound Set
13
Mute button with display
14
Optical signal lamps
4.3 Plan view Honeywell wireless gong
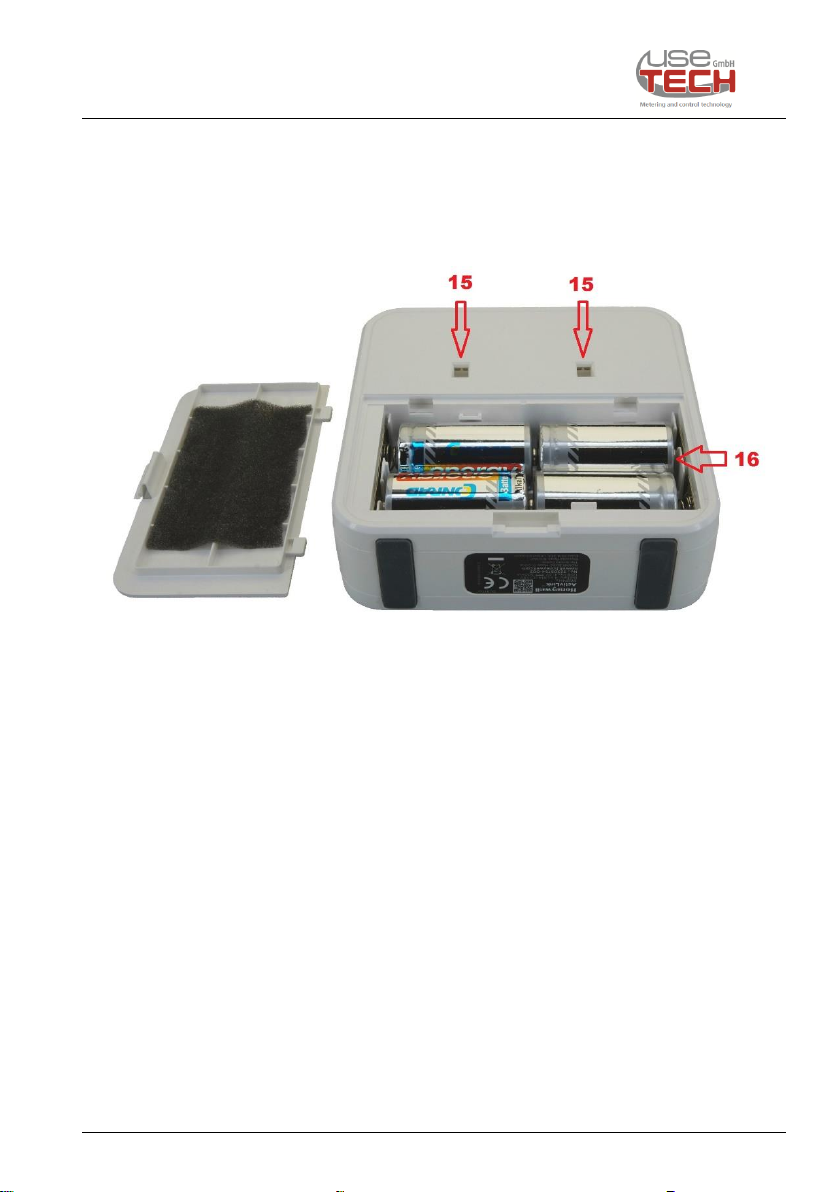
Fig. 4.3: Plan view Honeywell wireless gong type DC915SCV
03/19 FlowTimer+ Sound Set 10
Page 13
System description FlowTimer+ Sound Set
15
Openings for wall brackets
16
Battery compartment
4.4 Rear view Honeywell wireless gong
03/19 FlowTimer+ Sound Set 11
Fig. 4.4: Rear view Honeywell wireless gong type DC915SCV
Page 14
System description FlowTimer+ Sound Set
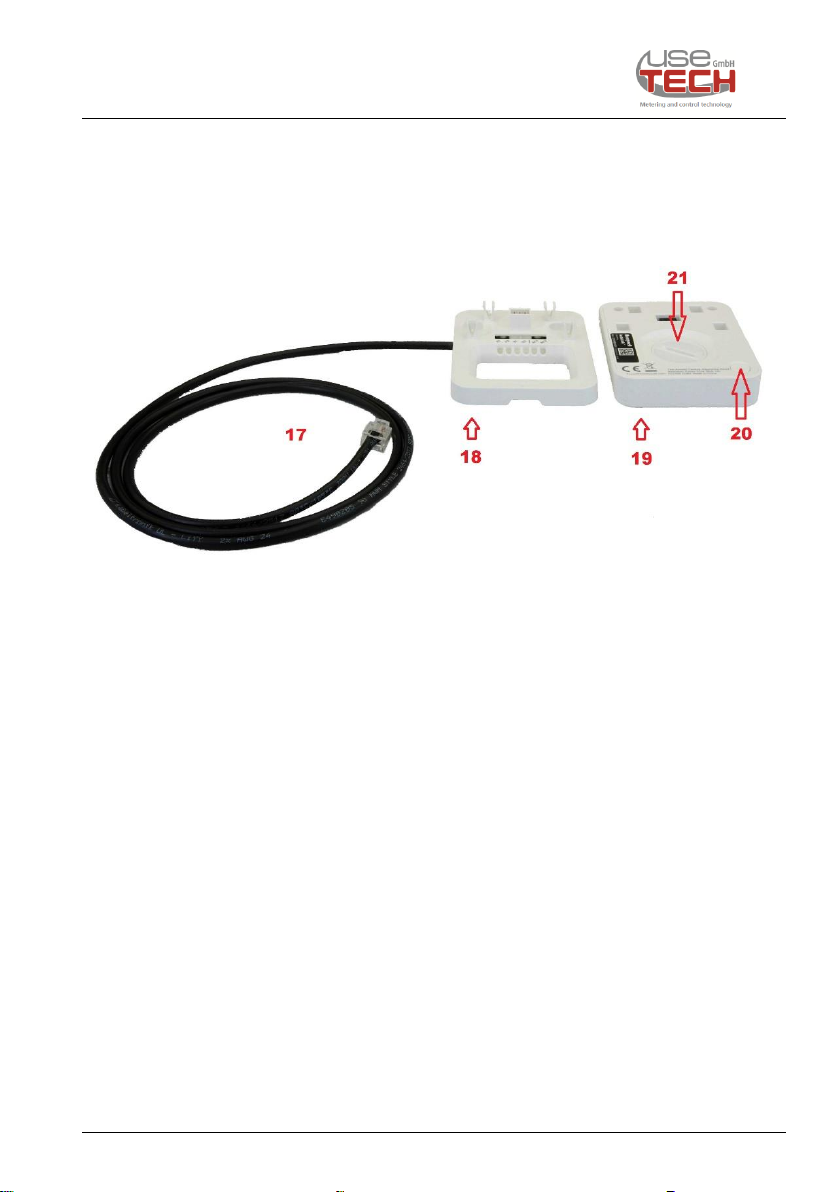
17
FlowTimer+ I/O connection cable
18
Converter Mounting and connection plate
19
Converter upper part
20
Send button
21
Battery compartment
4.5 Overview Honeywell Wireless Converter
Fig. 4.5: Overview Honeywell Wireless Converter
03/19 FlowTimer+ Sound Set 12
Page 15

Installation
If the I/O plug is plugged into the socket, this must cause
a clicking noise. If not, please check again whether the
plug is correctly engaged!
When disconnecting connections, please note to press
the locking lugs of the I/O connectors!
5 Installation
5.1 Mounting of converter and wireless gong
If necessary, use the original Honeywell mounting material supplied
to attach the converter or wireless gong.
The components must not be mounted over heat sources. Do not
mount the parts on a metal surface, as this can impair the wireless
connection.
Before final assembly, test whether the wireless range is sufficient.
For this reason, first go through the entire operation (see Chapter
6) and test the wireless connection in accordance with Chapter 6.3.
5.2 Electrical connection
Plug the connector of the wireless converter I/O cable (17) into
the I/O connector of the FlowTimer+ used.
03/19 FlowTimer+ Sound Set 13
Page 16

Installation
If also a FlowTimer+ Detect (water sensor) or a
FlowTimer+ Hub is connected to the FlowTimer+, please
use the I/O splinter (3) and the I/O connection cable (4)
included in the set.
For additional information, please refer to the operating
instructions of the respective accessories.
5.3 Insert batteries
Remove the wireless converter (19) from the holder (18), open
the battery compartment (21) on the rear side with a coin and
insert the supplied button cell (5) (observe polarity). Then close
the battery compartment again.
Open the battery compartment (16) of the wireless gong (2),
insert the four batteries (6) (observe polarity) and close the
compartment again.
03/19 FlowTimer+ Sound Set 14
Page 17

Operation and Function
6 Operation and Function
6.1 Reset wireless gong (factory reset)
Remove one of the four batteries (6) from the battery
compartment (16) of the wireless gong (2).
Wait 30 seconds
Press the Teach-in button (11) and keep it pressed!
Replace the battery at the same time
The illuminated ring (7) of the wireless gong indicates the reset!
Release the Teach-in button (11) and wait until the light ring
stops flashing.
6.2 Coupling converter and wireless gong
Press and hold the Teach-in button (11) on the wireless gong
(2) until the light ring (7) indicates the teach-in.
Remove the wireless converter (19) from the holder (18) and
briefly press the transmit button (20) on the back once.
The wireless gong acknowledges the learning with a melody and
Light signals.
03/19 FlowTimer+ Sound Set 15
Page 18

Operation and Function
If the wireless gong does not react, please change the
distance or orientation of the converter and wireless gong
and test again.
If necessary, the distance between the devices must be
reduced.
If necessary, repeat the steps in chapter 6.1- 6.3.
6.3 Test wireless connection
Remove the wireless converter (19) from the holder (18) and
briefly press the transmit button (20) on the back once.
The wireless gong acknowledges with a melody and light
signals.
6.4 Change melody
Remove the wireless converter (19) from the holder (18) and
briefly press the transmit button (20) on the back once.
The wireless gong acknowledges with a melody and light
signals.
You can now change the melody within 12 seconds.
03/19 FlowTimer+ Sound Set 16
Press the Melody selection key (10) repeatedly until the desired
melody is played.
Page 19

Operation and Function
6.5 Change ring color
Remove the wireless converter (19) from the holder (18) and
briefly press the transmit button (20) on the back once.
The wireless gong acknowledges with a melody and light
signals.
You can now change the light ring color within 12 seconds.
Press the Color and Signal Select button (12) repeatedly until
the desired ring color is displayed.
6.6 Changing the optical signalling mode
Press the Color and Signal Select button (12) repeatedly until
the desired signal type is displayed.
The wireless gong then acknowledges this in the order:
1. Illuminated ring (7) and additional signal lamps (14) on
alarm
2. Illuminated ring only (7) on alarm
3. Only signal lamps (14) on alarm
4. No optical signal on alarm
6.7 Muting
Press the mute button (13) repeatedly until the desired mute is
displayed.
The integrated display (13) then acknowledges in sequence:
1. The melody is muted on alarm (forever)
2. The melody is muted on alarm (for 3h)
3. The melody is muted on alarm (for 6h)
4. The melody is muted on alarm (for 9h)
5. The melody is muted on alarm (for 12h)
6. The melody is not muted in case of alarm.
03/19 FlowTimer+ Sound Set 17
Page 20
Troubleshooting, Maintenance
The wireless gong and the converter are battery
operated!
The wireless gong (receiver) announces a pending
battery change by two beeps.
After each transmission (see also chapter 6.3), the
converter (transmitter) indicates a pending battery
change by flashing briefly on the top of the device.
interval
plot
6 months
Test the wireless connection (see chapter
6.3) and check the battery condition (see
above).
7 Troubleshooting, Maintenance
If the connected FlowTimer+ has shut down without a pre-alarm
being triggered, please check the wireless connection (see chapter
6.3).
7.1 Maintenance
03/19 FlowTimer+ Sound Set 18
Page 21

Packaging, Transport, Storage
Transport damage!
Inadequately protected systems can be damaged during
transport.
Protect the system from moisture and dirt and transport it
in shockproof packaging.
Avoid exceeding or falling below the permissible storage
temperature.
Incorrect storage can cause damage to the system!
Store system dry and dust-free!
Storage temperature: -30°C to +60°C
8 Packaging, Transport, Storage
The system must be transported or stored in its intended packaging
until it is installed.
03/19 FlowTimer+ Sound Set 19
Page 22

Disposal
Note on the Electrical and Electronic Equipment Act
(ElektroG):
Please dispose of old equipment at a municipal collection
point as required by law, or hand it over to your local dealer
free of charge.
Disposal with household waste is expressly forbidden
according to the Old Equipment Ordinance!
You can return devices received from us after use free of
charge to us by sending them back sufficiently franked by
post to the address given in the imprint.
Old appliances that contain harmful substances are marked
with the symbol of a crossed-out dustbin.
9 Disposal
Information on the Waste Equipment
Ordinance
Act on the placing on the market, take-back and environmentally
sound disposal of electrical and electronic equipment (Elektround Elektronikgerätegesetz - ElektroG).
Battery Disposal Information
Empty batteries must not be disposed of with household waste!
You can hand these in at points of sale in retail or at municipal
collection points.
03/19 FlowTimer+ Sound Set 20
 Loading...