

Page 1

HDTV Receiver
Operating Instructions
Model- DB2010
Page 2
IImmppoorrttaanntt SSaaffeegguuaarrdds
s
1. Read instructions: All the safety operating instructions should be read before the product is
operated.
2. R
etain Instructions: The safety and operating instructions should be retained for future refer-
enc
e.
3. Heed Warnings: All warnings on the product and in the operating instructions should be
adhered to.
4. Follow Instructions: All operation and use instructions should be followed.
5. Cleaning: Unplug this product from the wall outlet before cleaning. Do not use liquid cleaners
or aerosol cleaner. Use a damp cloth for cleaning.
Exception: A product that is meant for uninterrupted service and that for some specific reason,
such as the possibility of the loss of and authorization code for a CATV converter, is not intended to be unplugged by the user for cleaning or any other purpose, may exclude the reference to
unplugging the product in the cleaning description otherwise required in this article.
6. Attachment: Do not use attachments not recommended by the product manufacturer as they
may cause hazards.
7. Water Moisture; Do not use the product near water, for example: near a bath tub, wash bowl,
kitchen sink, or laundry tub, in a wet basement, or near a swimming pool, and the like.
Safety Information
2
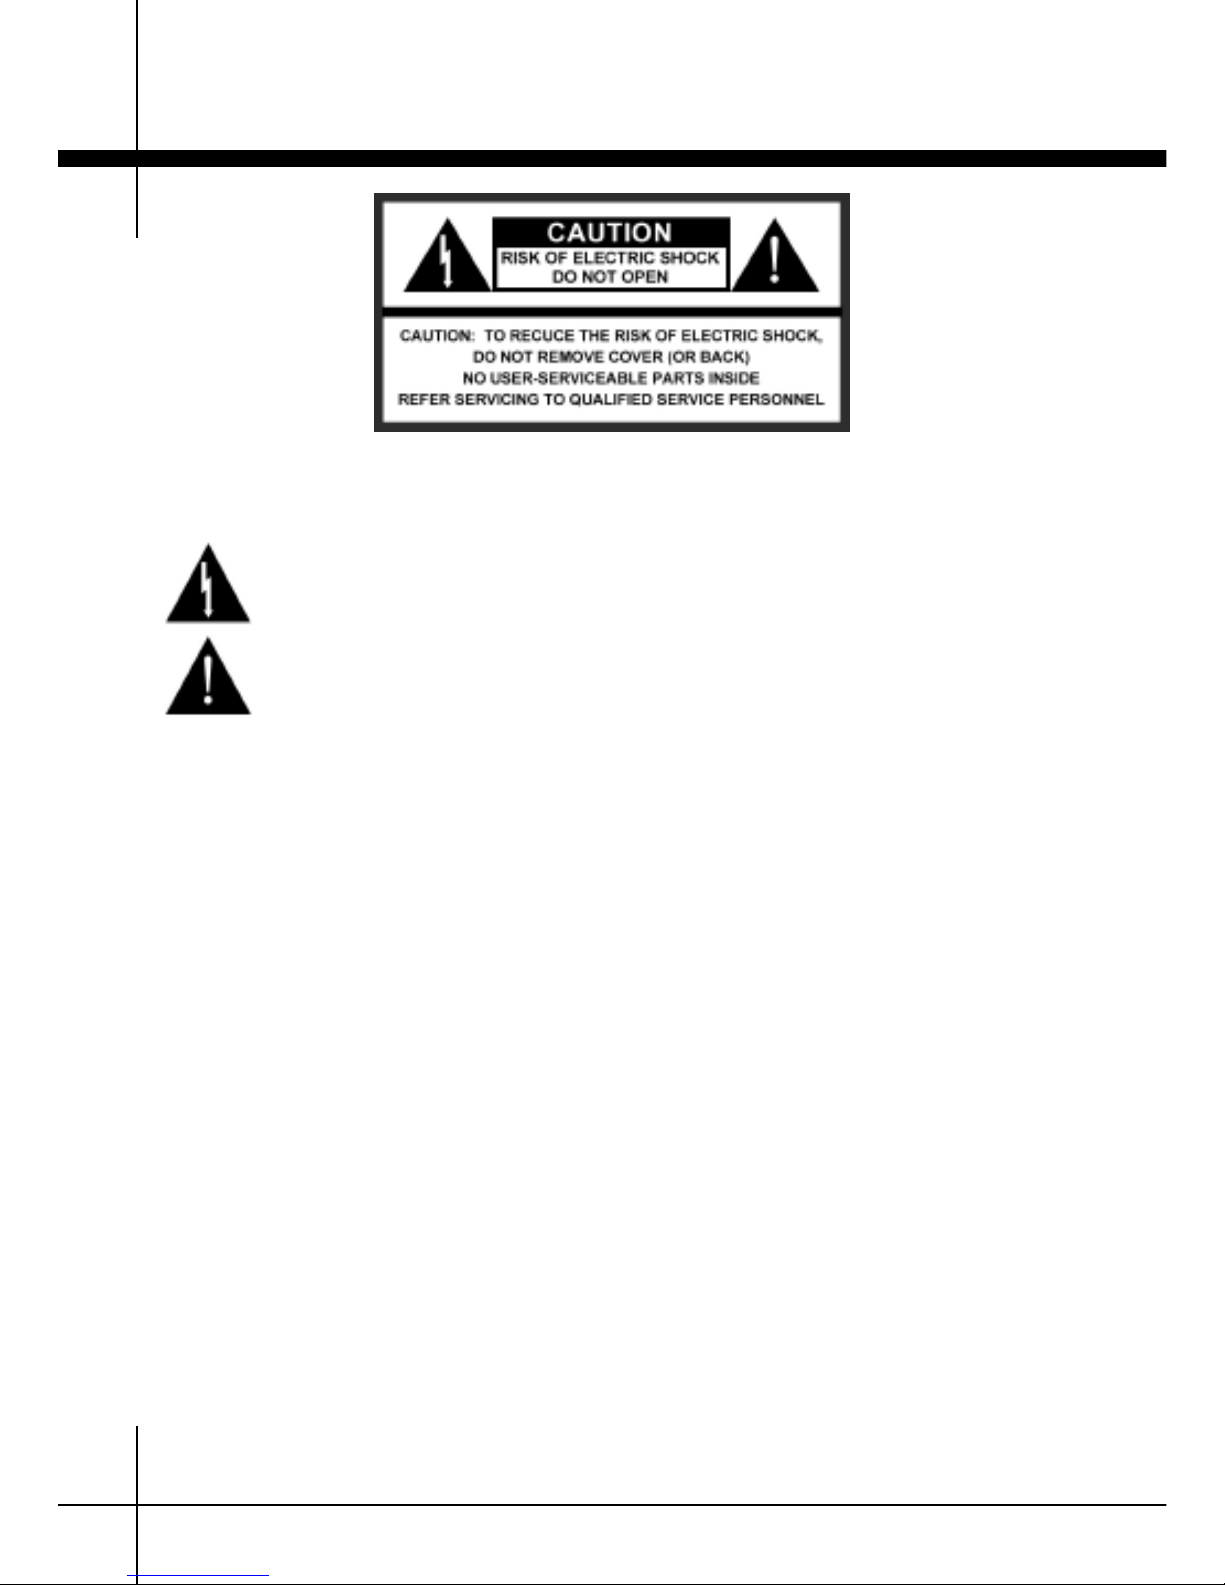
CAUTION: TO REDUCE THE RISK OF ELECTRIC SHOCK, DO NOT REMOVE COVER. NO
USER SERVICEABLE PARTS INSIDE. CONTACT QUALIFIED PERSONNEL FOR SERVICE.
WARNING: TO PREVENT DAMAGE WHICH MAY RESULT IN FIRE OR ELECTRIC SHOCK
HAZARD, DO NOT EXPOSE THIS APPLIANCE TO RAIN OR MOISTURE.
This symbol intended to alert the user to the presence of uninsulated “dangerous
voltage” within the product’s enclosure that may be of sufficient magnitude to constitute a risk of electric shock to persons.
This symbol is intended to alert the user to the presence of important operating and
maintenance (servicing) instructions in the literature accompanying the appliance.
NNOOTTEE TTOO CCAATTVV SSYYSSTTEEMM IINNSSTTAALLLLEERR::
This reminder is provided to call CATV system installer’s
attention to Article 820-40 of the National Electrical Code (Section 54 of Canadian Electrical
Code, Part 1), that provides guidelines for proper grounding and, in particular, specifies that the
cable ground shall be connected to the grounding system of the building as close to the point of
cable entry as practical.
Page 3
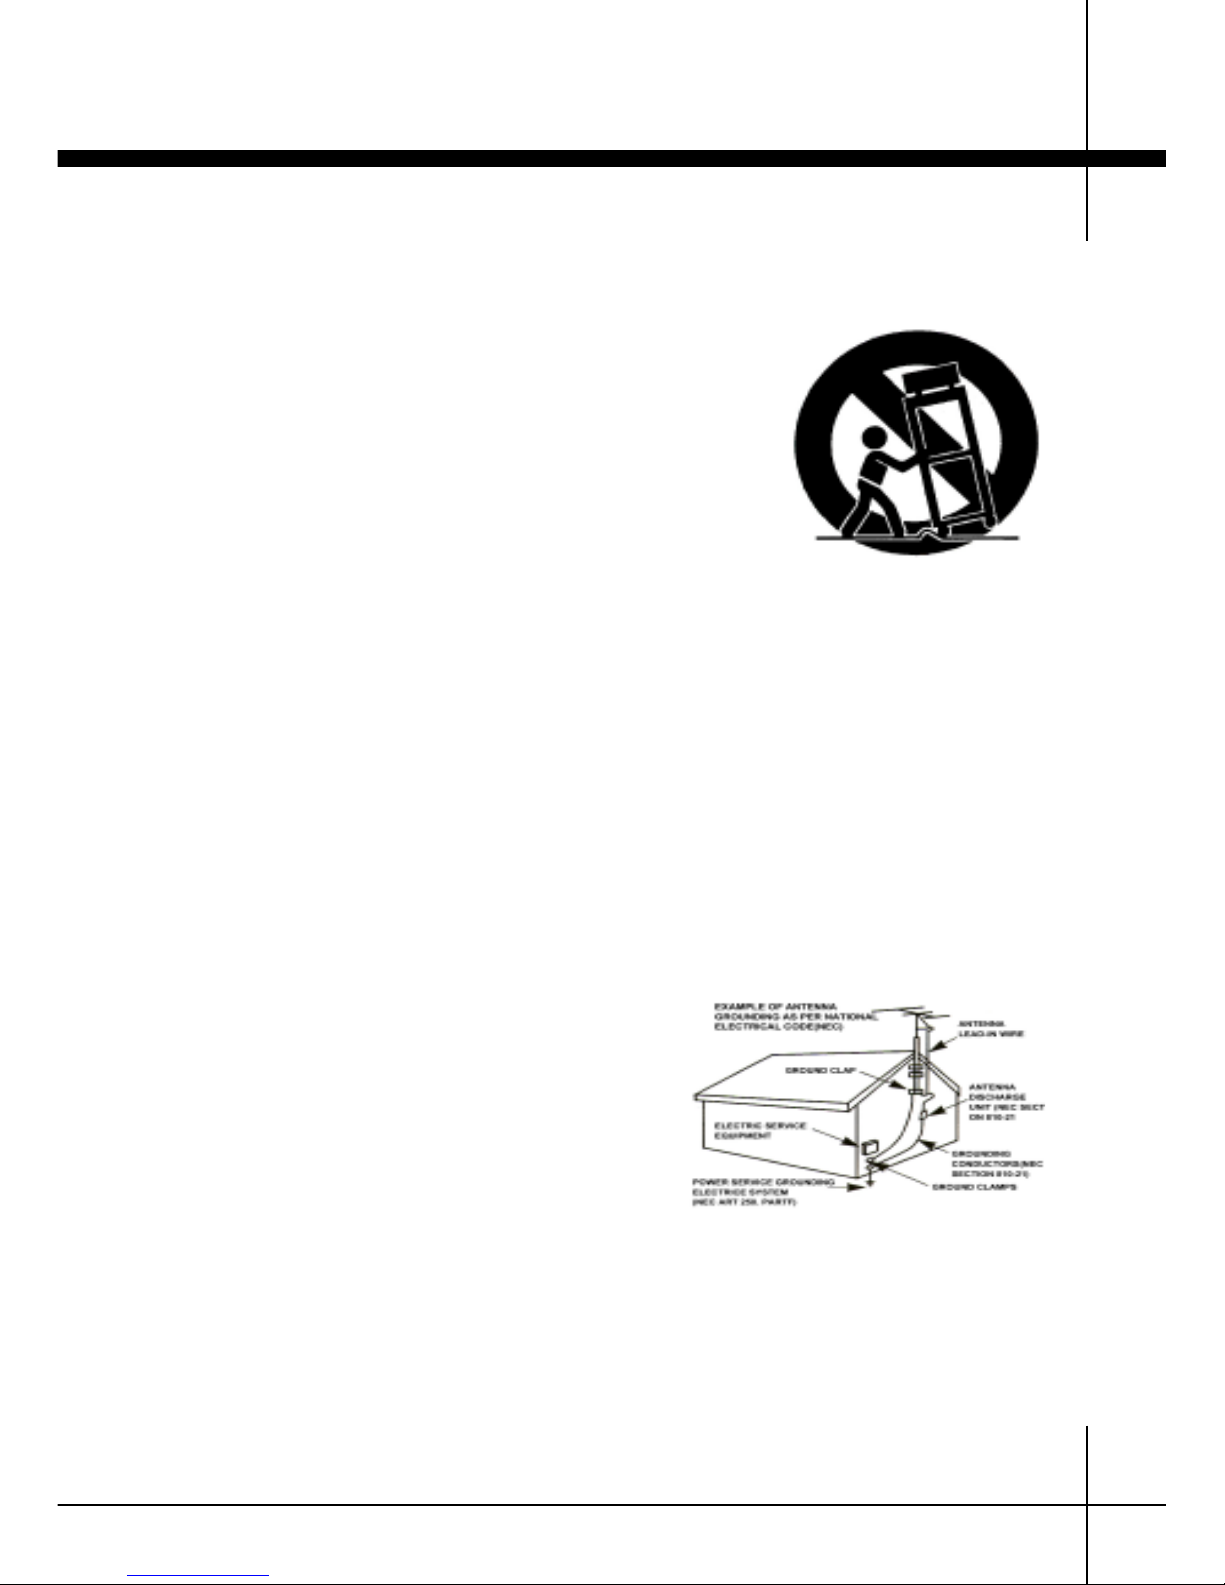
8. Accessories : Do not place this product on an unstable cart, stand, tripod, bracket, or table. The product may fall, causing serious injury to a child or adult, and serious damage to the product. Use only with
a cart, stand, tripod, bracket, or table recommended by the manufacturer, or sold with the product. Any
mounting of product should follow the manufacturer’s instruction, or sold with the product. Any mounting of the product should follow the manufacturer’s instructions, and should use a mounting accessory
recommended by the manufacturer.
9. A product and cart combination should be moved with cart. Quick
stops, excessive force, and uneven surface may cause the product and
cart combination to overturn. Please refer to picture on the right.
10. Ventilation : Slot openings in the cabinet are provided for ventilation and to ensure reliable operation of the product and to protect it
from overheating, and these openings must not be blocked or covered. The openings should never be blocked by placing the product
on a bed, sofa, rug, or other similar surface. This product should not
be placed in a built-in installation such as a bookcase or rack unless
proper ventilation is provided or the manufacturer’s instructions have
been adhered to.
11. Power Sources : This product should be operated only from the type of power source indicated on
the marking label. If you are not sure of the type of power supply to your home, consult your product dealer or local power company. For products intended to operate from battery power, or other
sources, refer to the operating instructions.
12. Grounding or Polarization : This product may be equipped with a polarized alternating-current line
plug (a plug having one blade wider than the other). This plug will fit into the power outlet only one
way. This is a safety feature. If you are unable to insert the plug fully into the outlet, try reversing
the plug. If the plug should still fail to fit, contact your electrician to replace your obsolete outlet. Do
not defeat the safety purpose of the polarized plug.
13. Power-Cord Protection : Power-supply cords should be routed so that they are not likely to be
walked on or pinched by items placed upon them, paying particular attention to cords at plugs, convenience receptacles, and the point where they exit from the product.
14. Protective Attachment Plug : The product is equipped with an attachment plug having overload protection. This is a safety feature. See Instruction Manual for replacement or resetting of protective
device. If replacement plug is required, be sure the service technician has used a replacement plug
specified by the manufacturer that has the same overload protection as the original plug.
15. Outdoor Antenna Grounding : If an outside antenna or
cable system is connected to the product, be sure the
antenna or cable system is grounded so as to provide
some protection against voltage surges and built-up static charges. Article 810 of the National Electric Code,
ANSI/NFPA 70, provides information with regard to proper grounding of the mast and supporting structure,
grounding of the lead-in wire to antenna discharge unit,
size of grounding conductors, location of antenna-discharge unit, connection to grounding electrodes, and
requirements for the grounding electrode. Please refer to
picture above.
16. Lightning : For added protection for this product during a lightning storm, or when it is left unattended or unused for long periods of time, unplug it from the wall outlet and disconnect the antenna
or cable system. This will prevent damage to the product due to lightning and power-line surges.
17. Power Lines : An outside antenna system should not be located in the vicinity of overhead power
lines or other electric light or power circuits, or where it can fall into such power lines or circuits.
When installing an outside antenna system, extreme care should be taken to keep from touching such
power lines or circuits as contact with them might be fatal.
18. Overloading : Do not overload wall outlets, extension cords, or integral convenience receptacles as
this can result in a risk of fire or electric shock.
Safety Information
3
Page 4

19. Object and Liquid Entry : Never push objects of any kind into this product through opening as
they may touch dangerous voltage points or short-out parts that could result in a fire or electric
shock. Never spill liquid of any kind on the product.
20. Serving : Do not attempt to service this product yourself as opening or removing covers may
expose you to dangerous voltage or other hazards. Refer all serving to qualified service personnel.
21. Damage Requiring Service : Unplug this product from the wall outlet and refer servicing to qualified service personnel under the following conditions :
a. When the power-supply cord or plug is damaged.
b. If liquid has been spilled, or objects have fallen into the product.
c. If the product has been exposed to rain or water.
d. If the product does not operate normally by following the operating instructions. Adjust
only those controls that are covered by the operating instructions as an improper adjustment
of other controls may result in damage and will often require extensive work by a qualified
technician to restore the product to its normal operation.
e. If the product has been dropped or damaged in any way.
f. When the product exhibits a distinct change in performance – this indicates a need for service.
22. Replacement Parts : When replacement parts are required, be sure the service technician has
used replacement parts specified by the manufacturer or have the same characteristics as the
original part. Unauthorized substitutions may result in fire, electric shock, or other hazards.
23. Safety Checks : Upon completion of any service or repairs to this product, ask the service technician to perform safety checks to determine that the product is in proper operating condition.
24. Wall or Ceiling Mounting : The product should be mounted to a wall or ceiling only as recommended by the manufacturer.
25. Heat : The product should be situated away from heat sources such as radiators, heat registers, stoves, or other products (including amplifier) that produce heat.
CCAAUUTTIIOONN;; TToo pprreevveenntt eelleeccttrriicc sshhoocckk ddoo nnoott uussee tthhiiss ((ppoollaarriizzeedd)) pplluugg wwiitthh aa rreecceeppttaaccllee oorr ootthheer
r
oouuttlleett uunnlleessss tthhee bbllaaddeess ccaann bbee ffuullllyy iinnsseerrtteedd ttoo pprreevveenntt bbllaaddee eexxppoossuurree.
.
NNOOTTEE:
:
This equipment has been tested and found to comply with the limit for a Class B digital
device, pursuant to part 15 of the FCC Rules.
These limits are designed to provide reasonable protection against harmful interference in a residential installation. This equipment generates, uses, and can radiate radio frequency energy and,
if not installed and used in accordance with the instructions, may cause harmful interference to
radio communications. However, there is no guarantee that interference will not occur in a particular installation. If this equipment does cause harmful interference to radio or television reception, which can be determined by turning the equipment off and on, the user is encourage to try to
correct the interference by one or the following measures:
• Reorient or relocate the receiving antenna.
• Increase the separation between the equipment and receiver.
• Connect the equipment into an outlet on a circuit different from that to which the receiver
is connected.
• Consult the dealer or an experienced radio/TV technician for help.
CChhaannggee oorr mmooddiiffiiccaattiioonn nnoott eexxpprreessssllyy aapppprroovveedd bbyy tthhee ppaarrttyy rreessppoonnssiibbllee ffoorr ccoommpplliiaannccee ccoouulldd vvooiid
d
tthhee uusseerr’’ss aauutthhoorriittyy ttoo ooppeerraattee tthhee eeqquuiippmmeenntt..
Safety Information
4
Page 5

1 Getting Started
Customer Service & Contents.............................................. 6
Front Panel................................................................................ 7
Rear Panel ............................................................................... 8
Antenna Connection............................................................... 9
Video Connections.................................................................. 10
Audio Connections.................................................................. 11
2 Basic Settings
Remote Control........................................................................ 12
3 Initial Setup
Initial Setup & Receiver Controls......................................... 14
4 Features
Digital TV Channels & Changing Channels........................ 17
Channel Guide.......................................................................... 18
Program Information.............................................................. 19
Video Program Guide.............................................................. 20
Other Features......................................................................... 21
5 Configuration
Main Menu & Closed Captions.............................................. 22
TV & Movie Ratings, Parental Controls............................... 23
Editing Channel List................................................................ 25
Adjust Antenna ....................................................................... 26
Video Setup & Screen Aspect Ratio.................................... 28
6 Troubleshooting
Video Issues............................................................................. 29
A
udio & Reception Issues...................................................... 31
Closed Caption & Parental Control Issues.......................... 32
Other Issues.............................................................................. 33
Table of Contents
5
Page 6
Getting started1
6
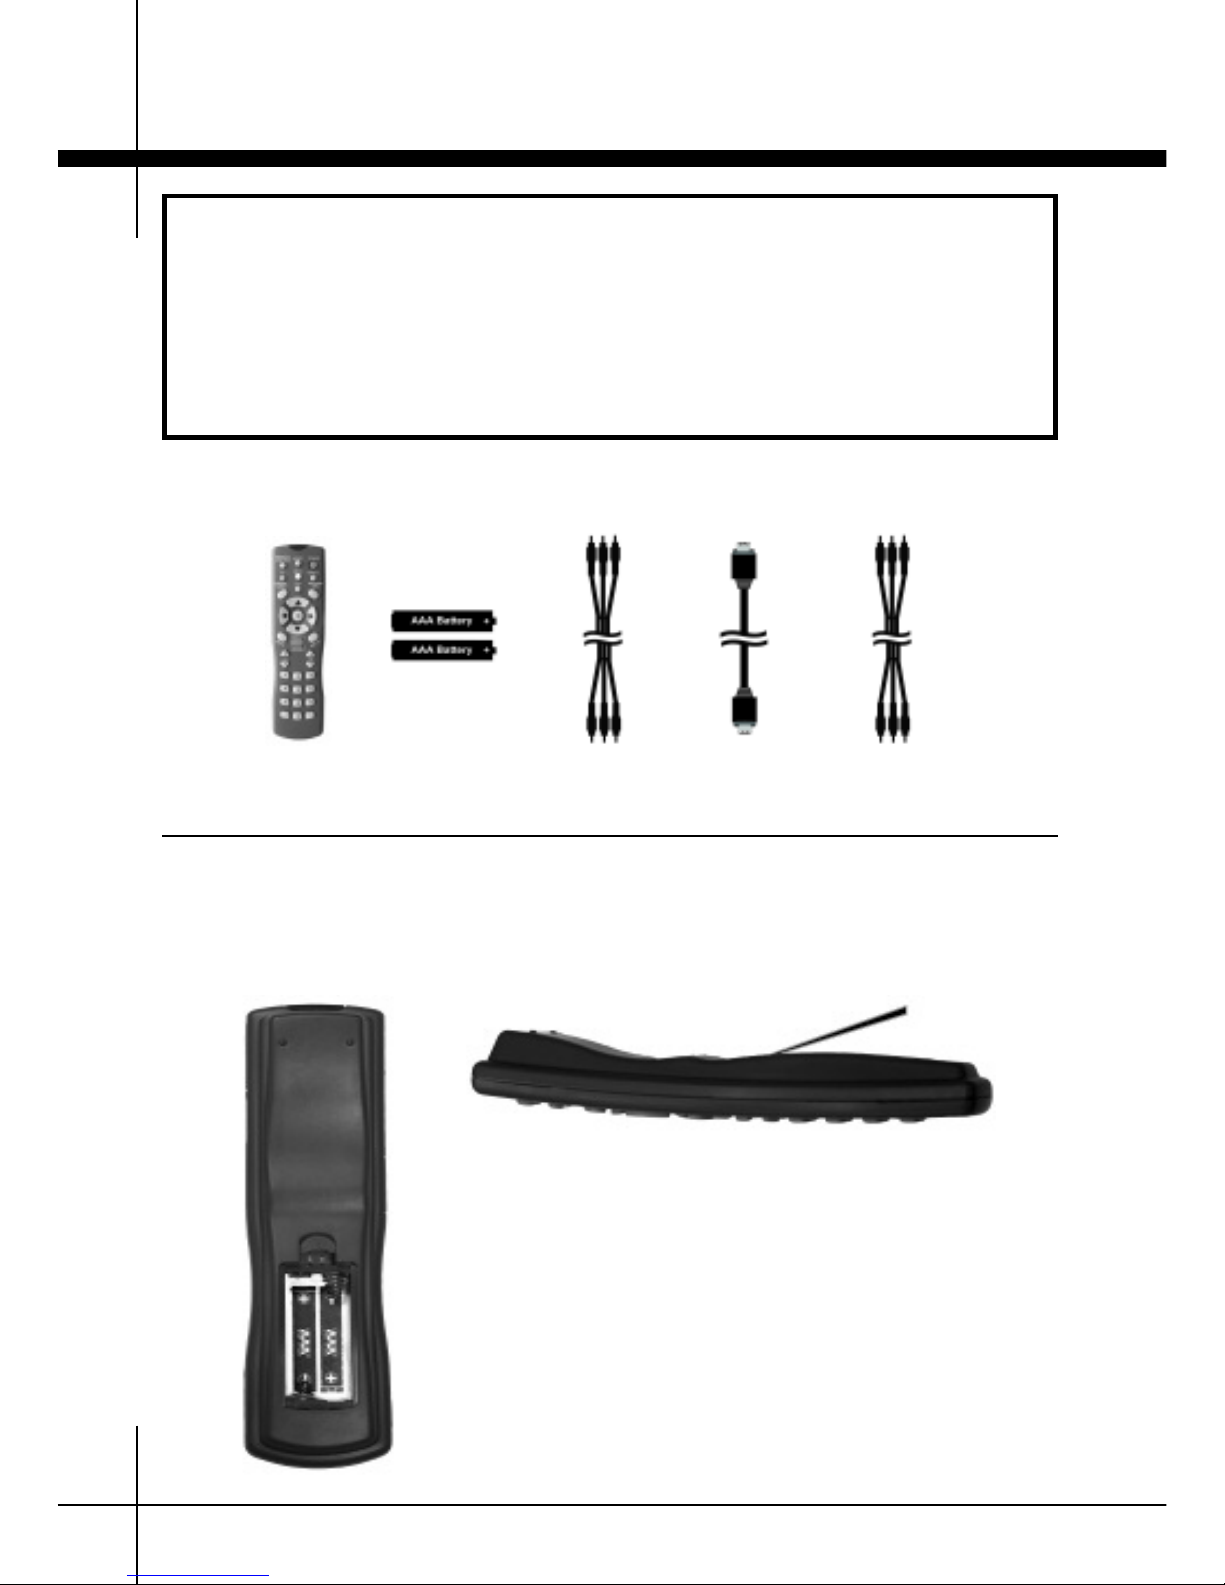
Remote Control
Handset
S-Video
Cable
Batteries
Component Cable
(Y, Pb, Pr)
Composite Cable
(video/audio L/R)
Remote Control Battery Installation
Contents
Customer Service
Remove the battery cover and install batteries like the diagram below.
1. Unlatch the battery compartment cover
on the b
ack of the remote control.
2. Insert 2 AAA batteries as shown, making
sur
e the + and - ends of each battery line up
with the c
orr
e
sponding marks in the battery
compartment.
3
. Snap the c
o
ver back on the remote con-
trol.
if you need assistance setting up your USDTV HDTV reciver or need technical support, please feel free to call our toll-free technical support number
or visit our website.
11--887777--445588--88773388 ((11--887777--GGEETT--UUSSDDTTVV))
wwwwww..uussddttvv..ccoomm
Page 7
Getting Started 1
7
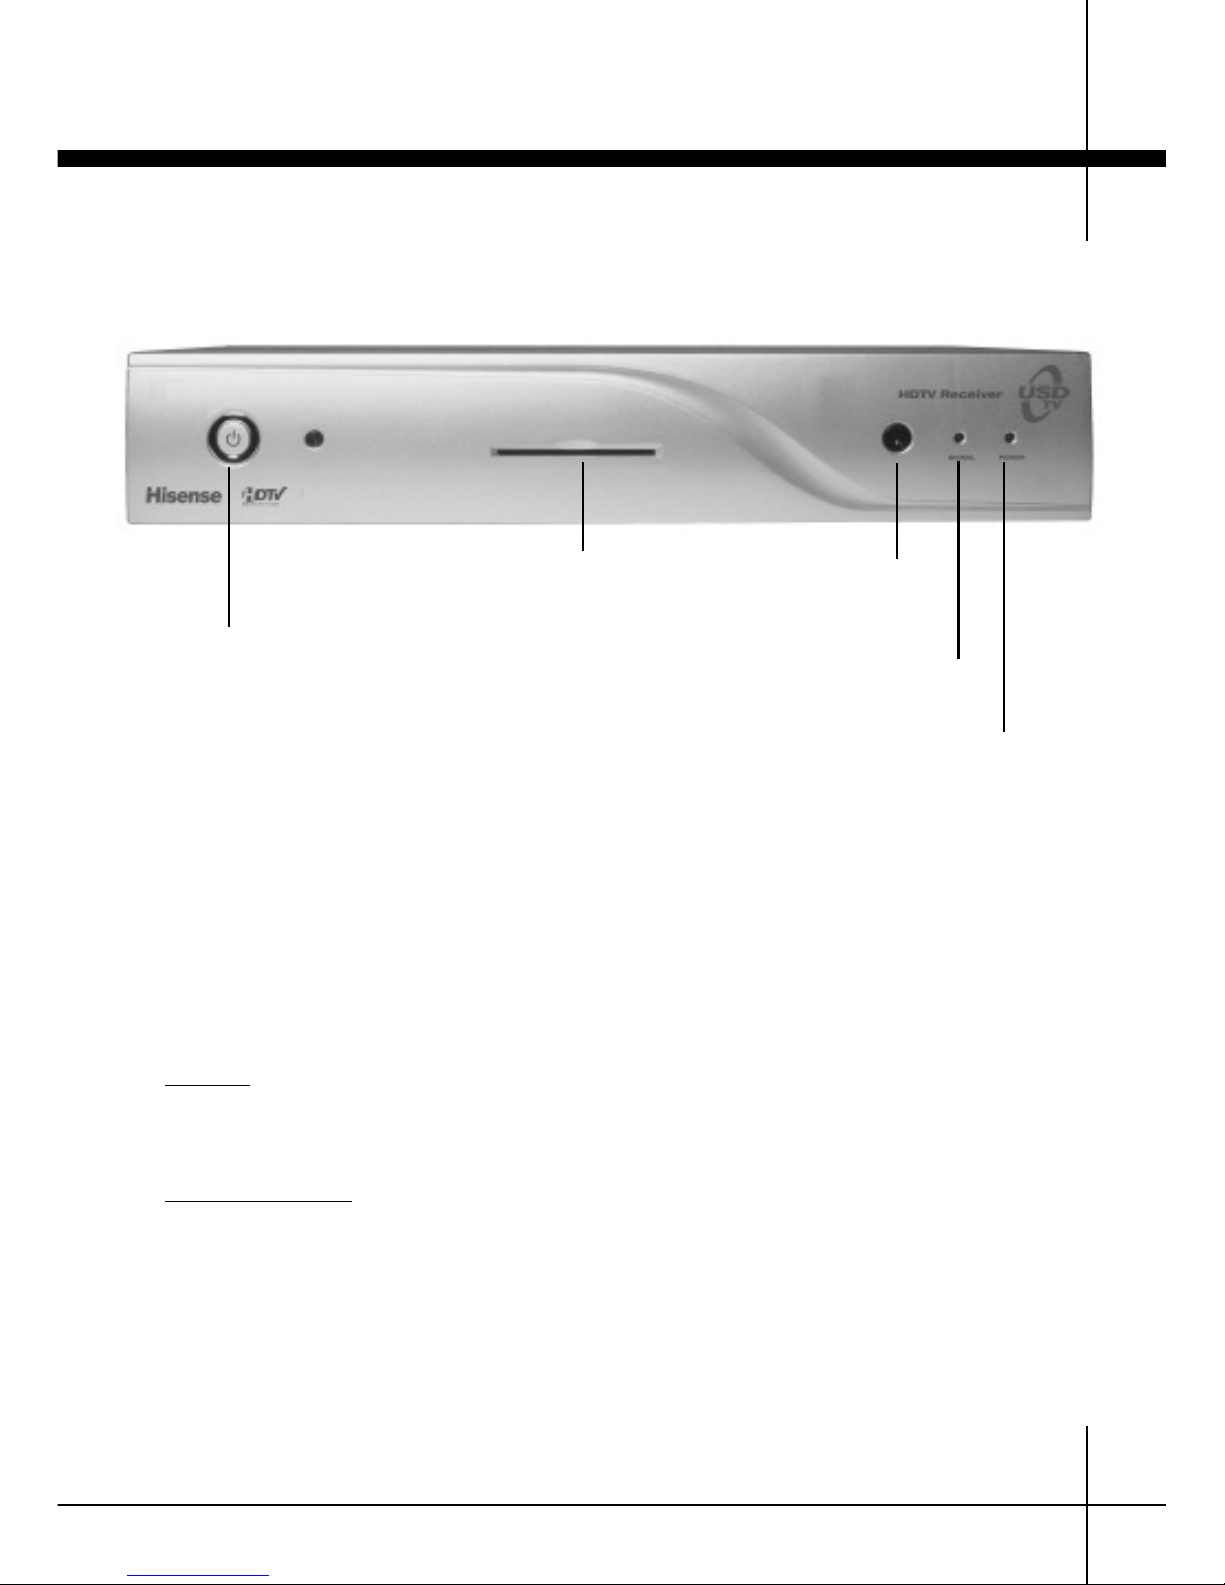
Front Panel
LED Indic
at
ors
Power
PPoowweerr BBuuttttoonn::
Press the power button to switch between power on and standby.
PPoowweerr::
The power LED indicates system state.
GGrreeeenn
- power on.
RReedd
- standby.
FFllaasshhiinngg
- S
y
s
t
em update in pr
ogr
ess.
SSiiggnnaall::
T
he signal LED indic
at
es tuner signal status:
GGrreeeenn
- signal lock
ed.
RReedd
- no signal.
Power Button
Card Reader
(for future use)
IR Sensor
Signal Lock
Power (green)
Page 8
Getting Started1
8
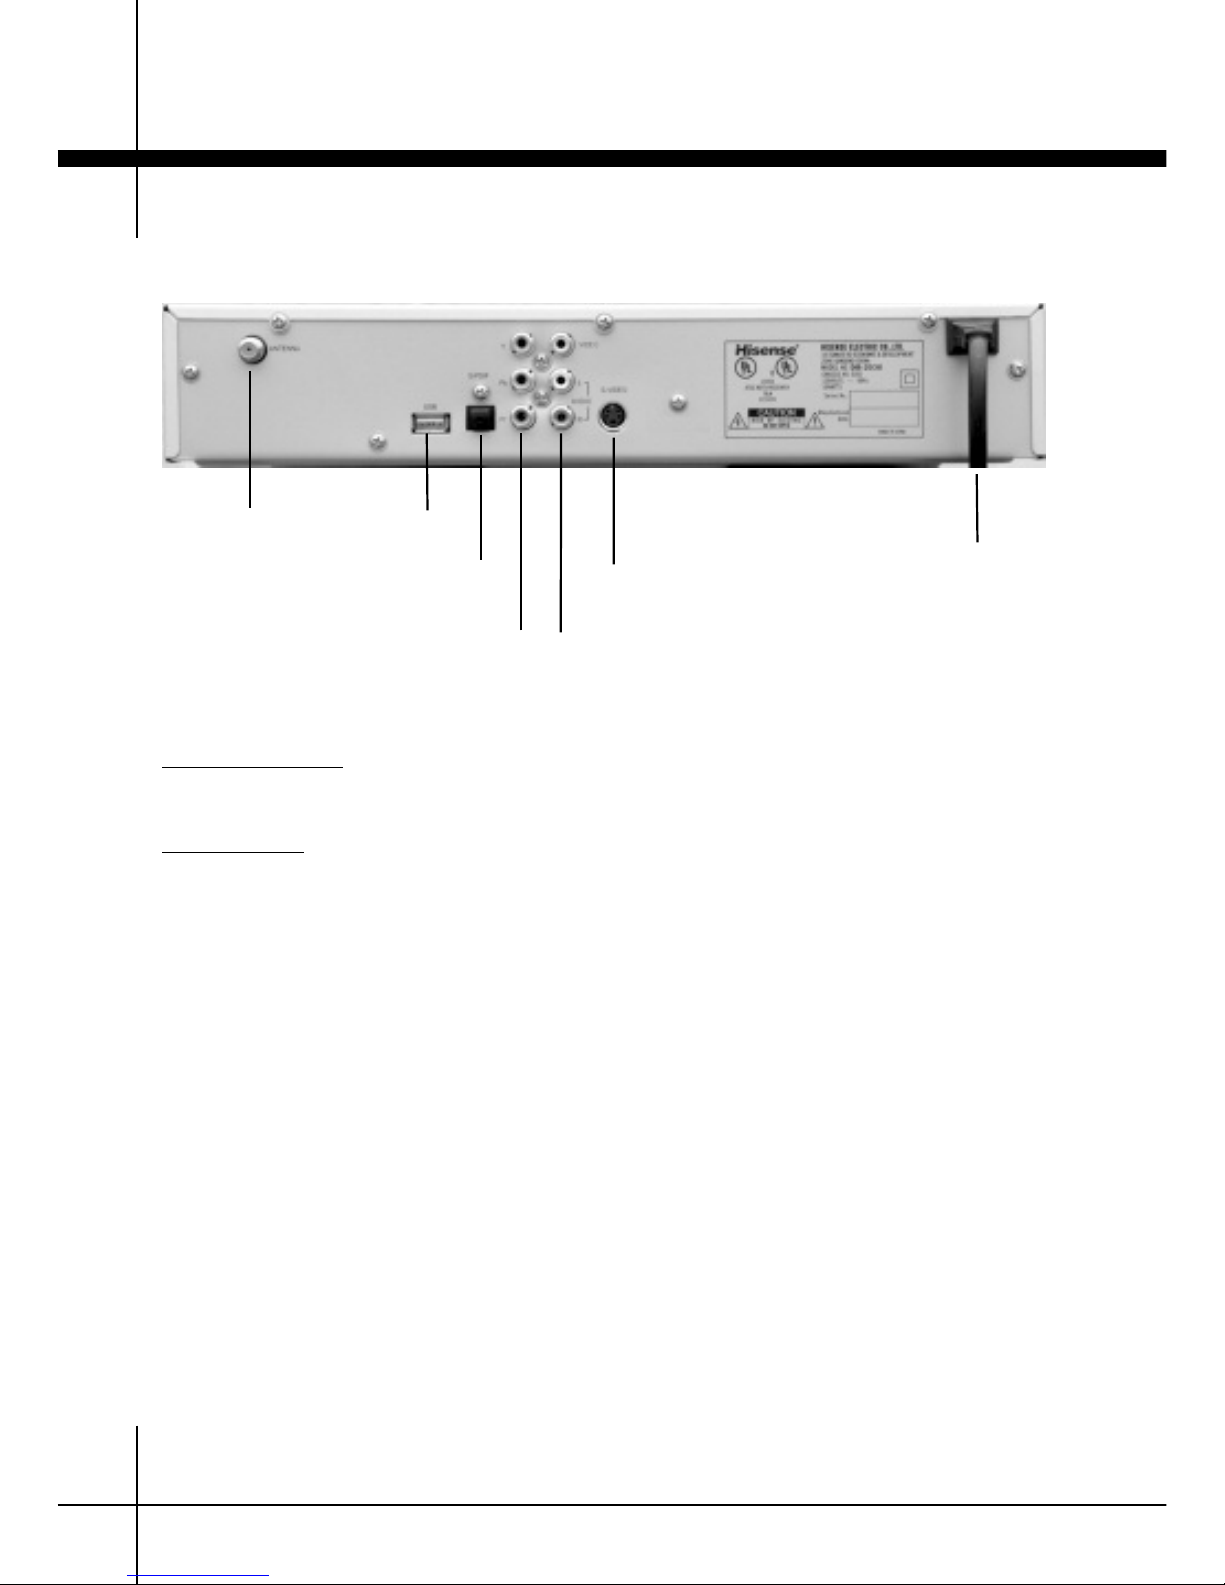
Rear Panel
Antenna
Input
S-Video
S/PDIF
Digital Audio Output
Video, Audio L, Audio R
Composite Video/Audio Output
USB
Y, Pb, Pr
Component Video Output
P
ower Cord
Connect the power cord to an AC outlet. (AC 120V / 47-63Hz to 60Hz.)
Antenna Input
Connect the cable from an off-air TV antenna to the RF connector labeled ANT.
Power Cord
Page 9
Getting Started 1
9
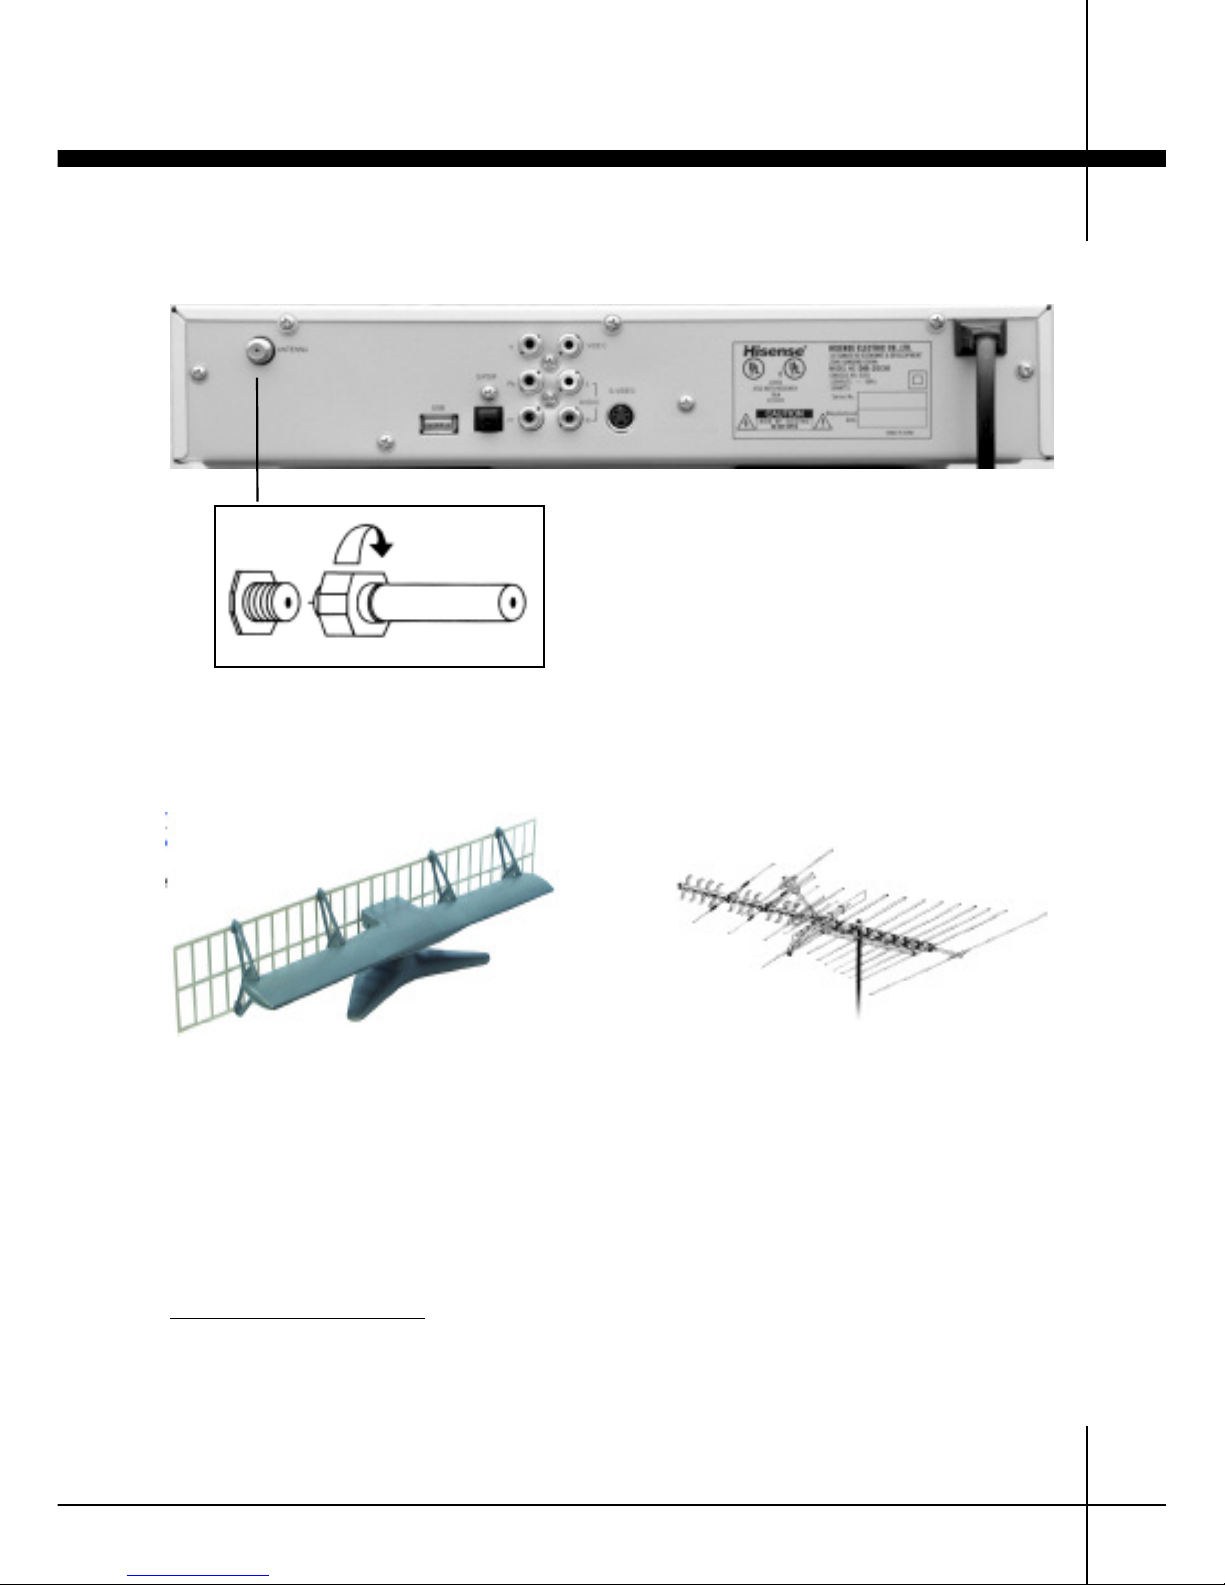
Antenna Connection
NNoottee::
Either an indoor or outdoor antenna designed to receive VHF and UHF
signals mus
t be us
ed. (VHF Channels 2 to 13) (UHF Channels 14 to 69)
C
onnect the c
o
axial an
t
enna c
able directly to the antenna input.
NNoottee::
T
he HDTV receiver must be unplugged before connecting the antenna.
NNoottee:: DDoo NNoott
connect a cable from a cable TV or satellite TV system.
Connect antenna cable to either an indoor
or outdoor UHF/VHF antenna.
Indoor antenna Outdoor or attic antenna
Connecting Antenna
Example:
Winegard Sharpshooter SS-3000
Example:
Standard outdoor YAGI, UHF/VHF
Page 10
Getting Started1
10
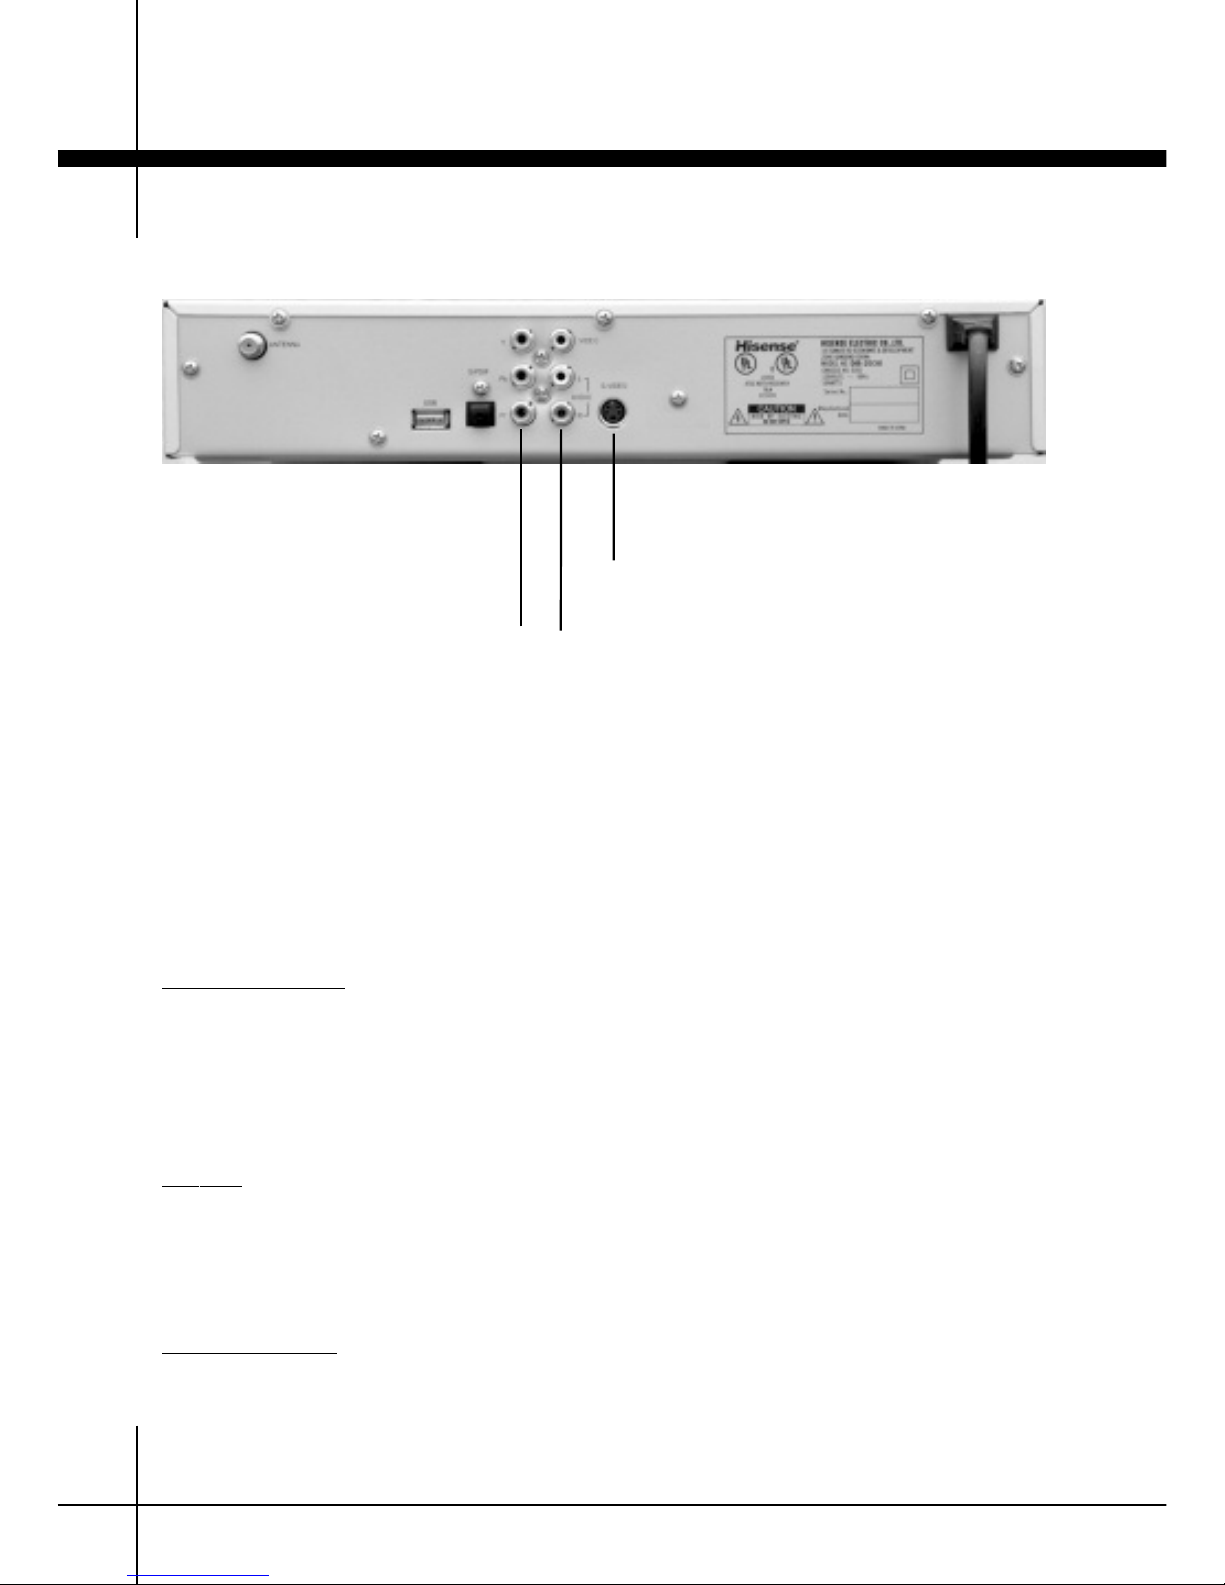
Video Connections
S-Video
Video, Audio L, Audio R
Composite Video/Audio Output
Y, Pb, Pr
Component Video Output
Component Video
Component video (outputs labeled Y/Pb/Pr) is the best option. Use the included
cable with red, blue and green ends to connect the same-colored jacks on your
HDTV receiver and television. The inputs on your TV may be labeled Y, Cb and Cr.
T
hese are the same as Y, Pb and Pr. Note that this is a video connection only and
ano
ther c
able is needed f
or audio as de
s
cribed belo
w
.
S-Video
The next best option after component video is S-Video. Use the included cable with
large black ends t
o c
onnect fr
om the HD
TV receiv
er’s S-VIDEO jack to your television or amplifier’s S-Video jack. Note that this is a video connection only and
ano
ther c
able is needed for audio as described below.
C
omposit
e V
ideo
If your TV does not have component video or s-video, the other option is composite video. That is the yellow part of the included cable with red, white and yellow
ends
. Connect the yellow end of the cable to the HDTV receiver’s VIDEO jack and
the o
ther end t
o y
our TV’
s VIDEO IN jack.
VIDEO CONNECTION
Choose one of the following ways to connect the HDTV receiver video, based on the
connectors available on your television.
Page 11
Getting Started 1
11
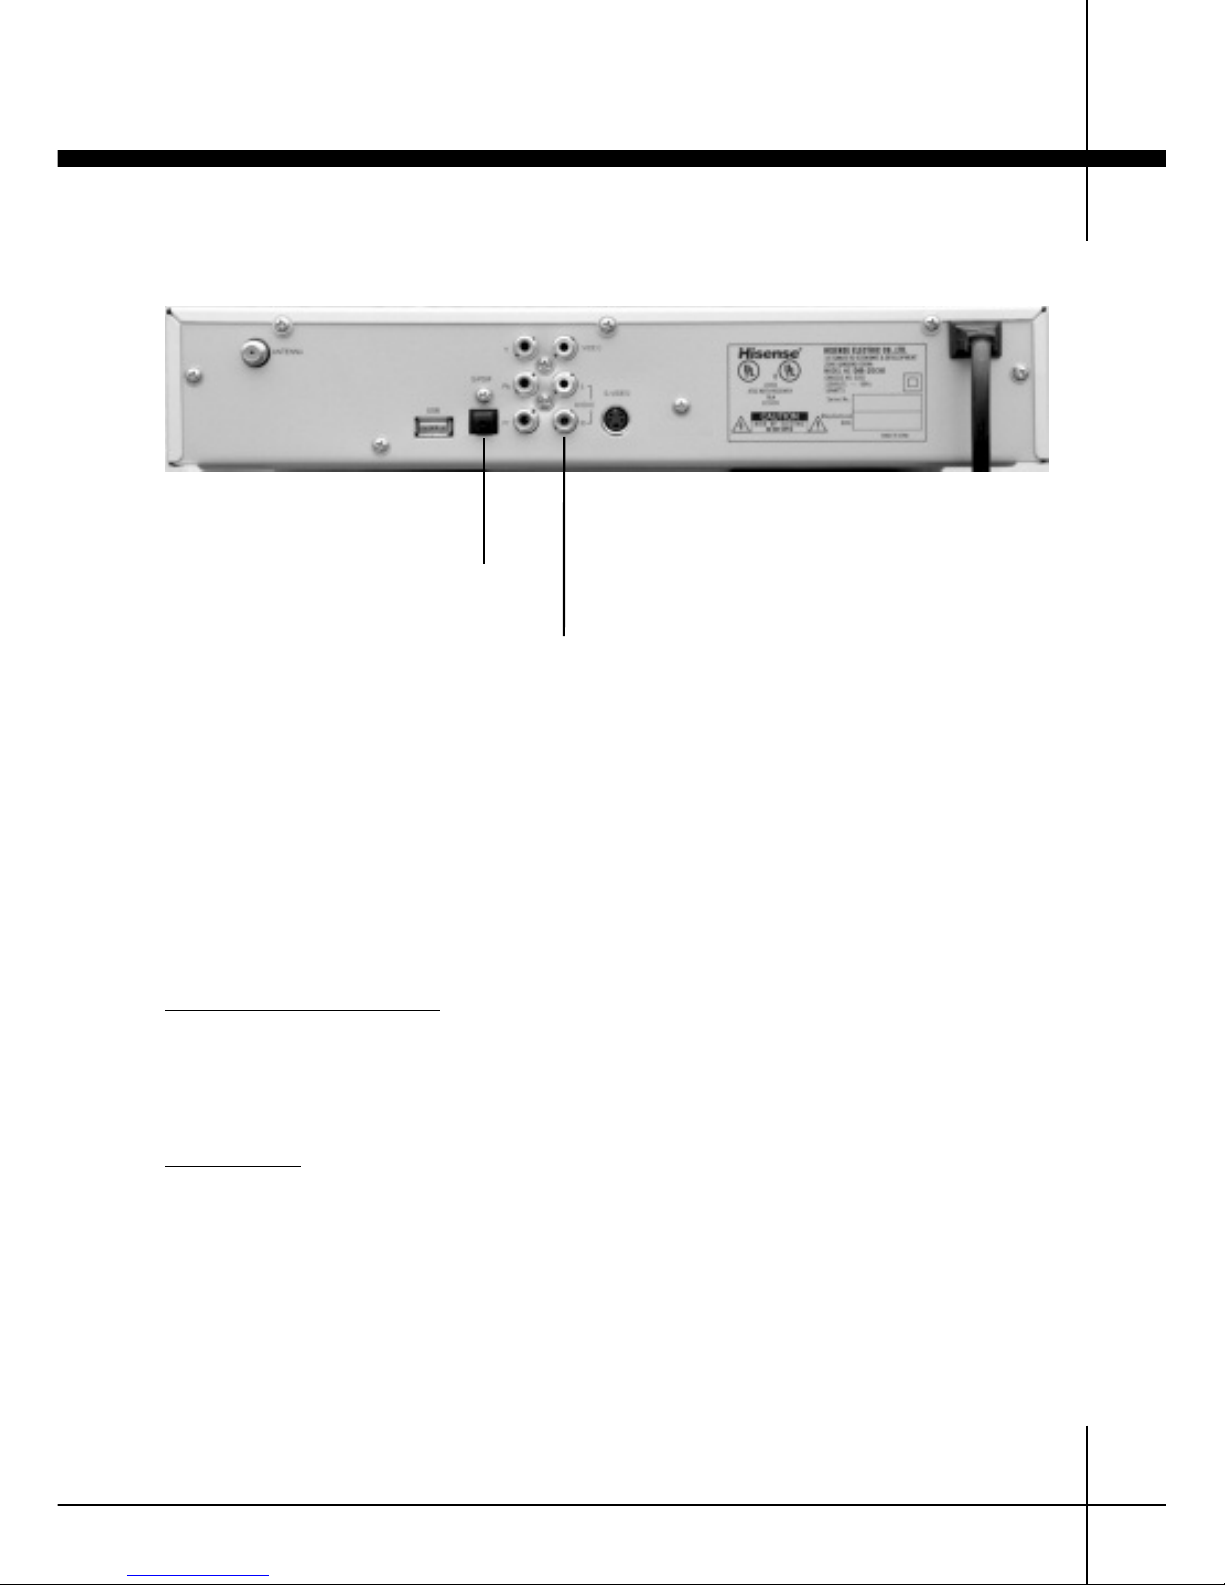
Audio Connections
S/PDIF optical connection
If y
ou have an amplifier that is capable of surround sound, use an optical S/PDIF
cable (not included). Connect the optical cable to the S/PDIF port on the back of
the HDTV receiver and to the S/PDIF port on your audio equipment.
Analog audio
Analog audio is available from the red and white connectors of the included cable
with red, white and yellow connectors. The yellow connector may be used for video
as described above, or just the red and white connectors may be used for audio. It
is not necessary to use all three connectors.
For analog audio, plug the red connector into the HDTV receiver’s AUDIO R jack.
Plug the white connector into the HDTV receiver’s AUDIO L jack. Plug the other red
and whit
e c
onnect
or
s in
to your TV or amplifier’s audio right and left jacks, again
plugging the red into the right audio and the white into the left audio.
S/PDIF
Digital Audio Output
White, Red
Audio Output
AUDIO CONNECTION
Choose one of the following ways to connect the HDTV receiver audio, based on the
connectors available on your television or audio equipment.
Page 12
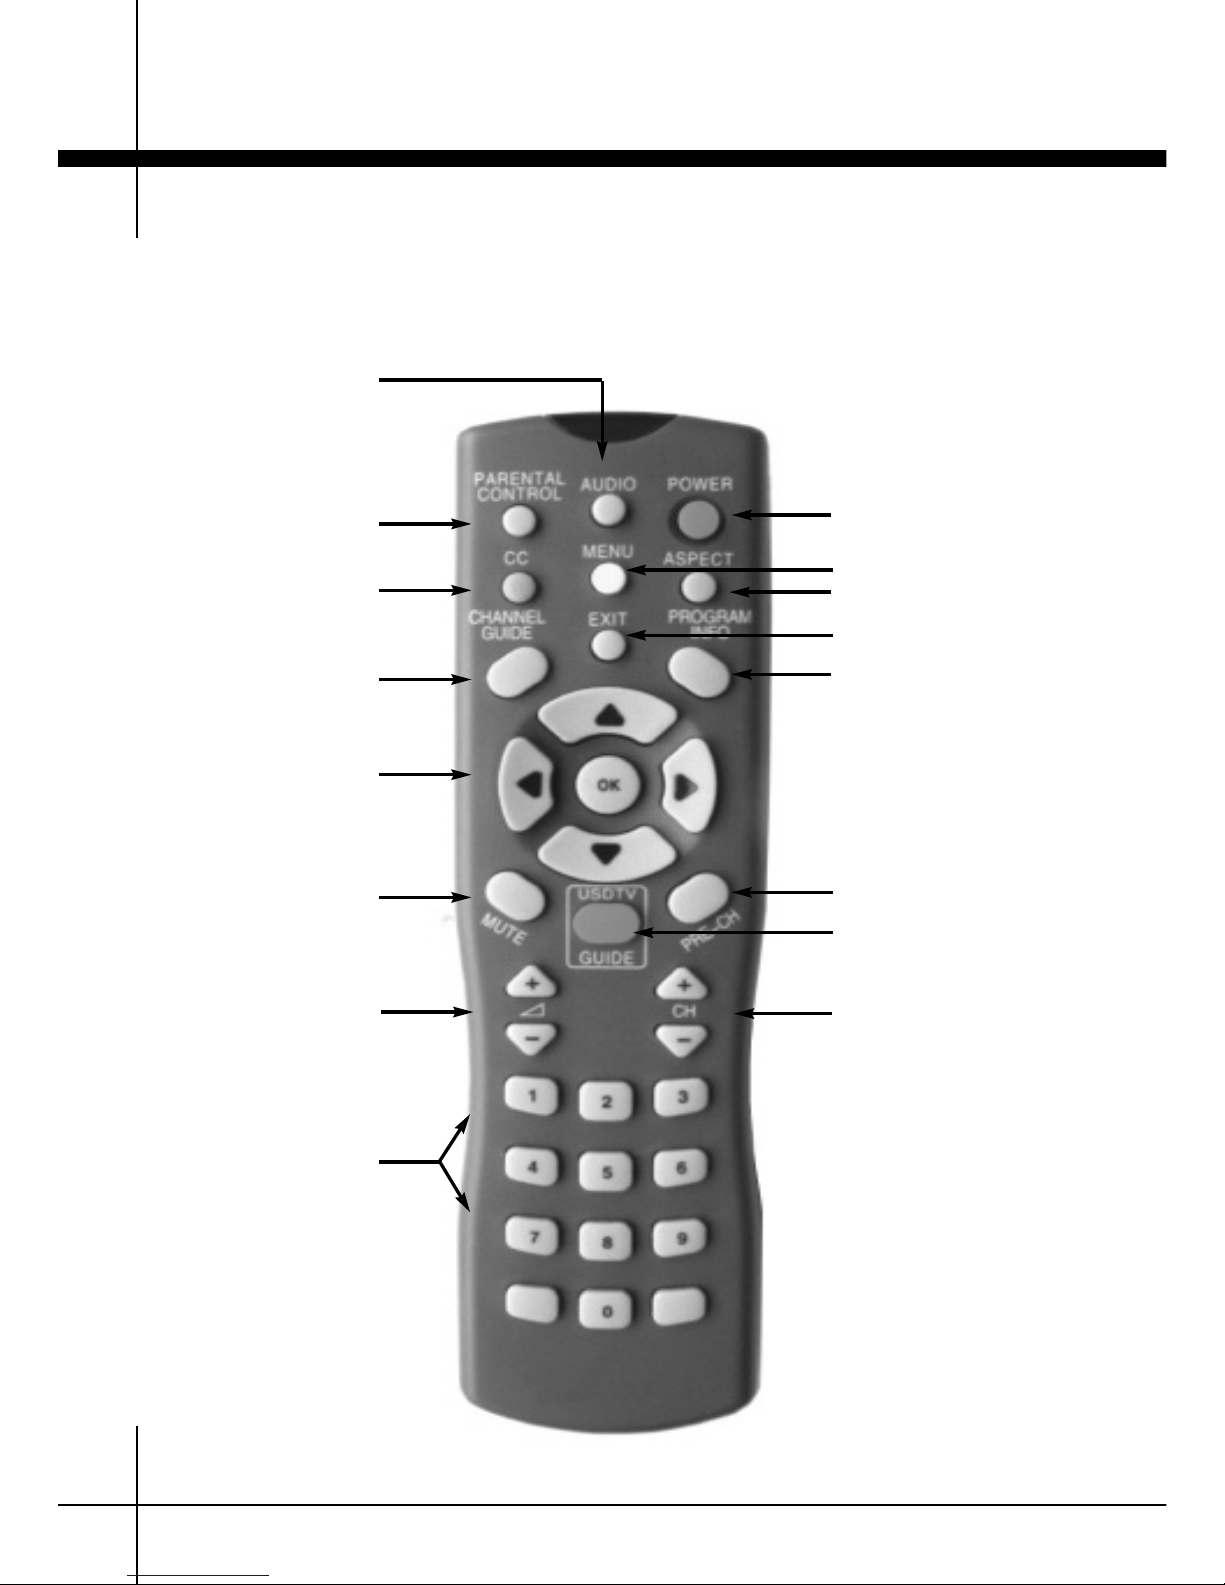
Basic Settings2
12
Remote Control
Navigation Buttons
Alternate Language
Parental Control
Mute
Volume Control
Number Buttons
Program Information
Channel Guide
Previous Channel
Power
Channel Change
Menus
Exit
Aspect Ratio
Closed Caption
USDTV
Video Program Guide
Remote Functions
Page 13
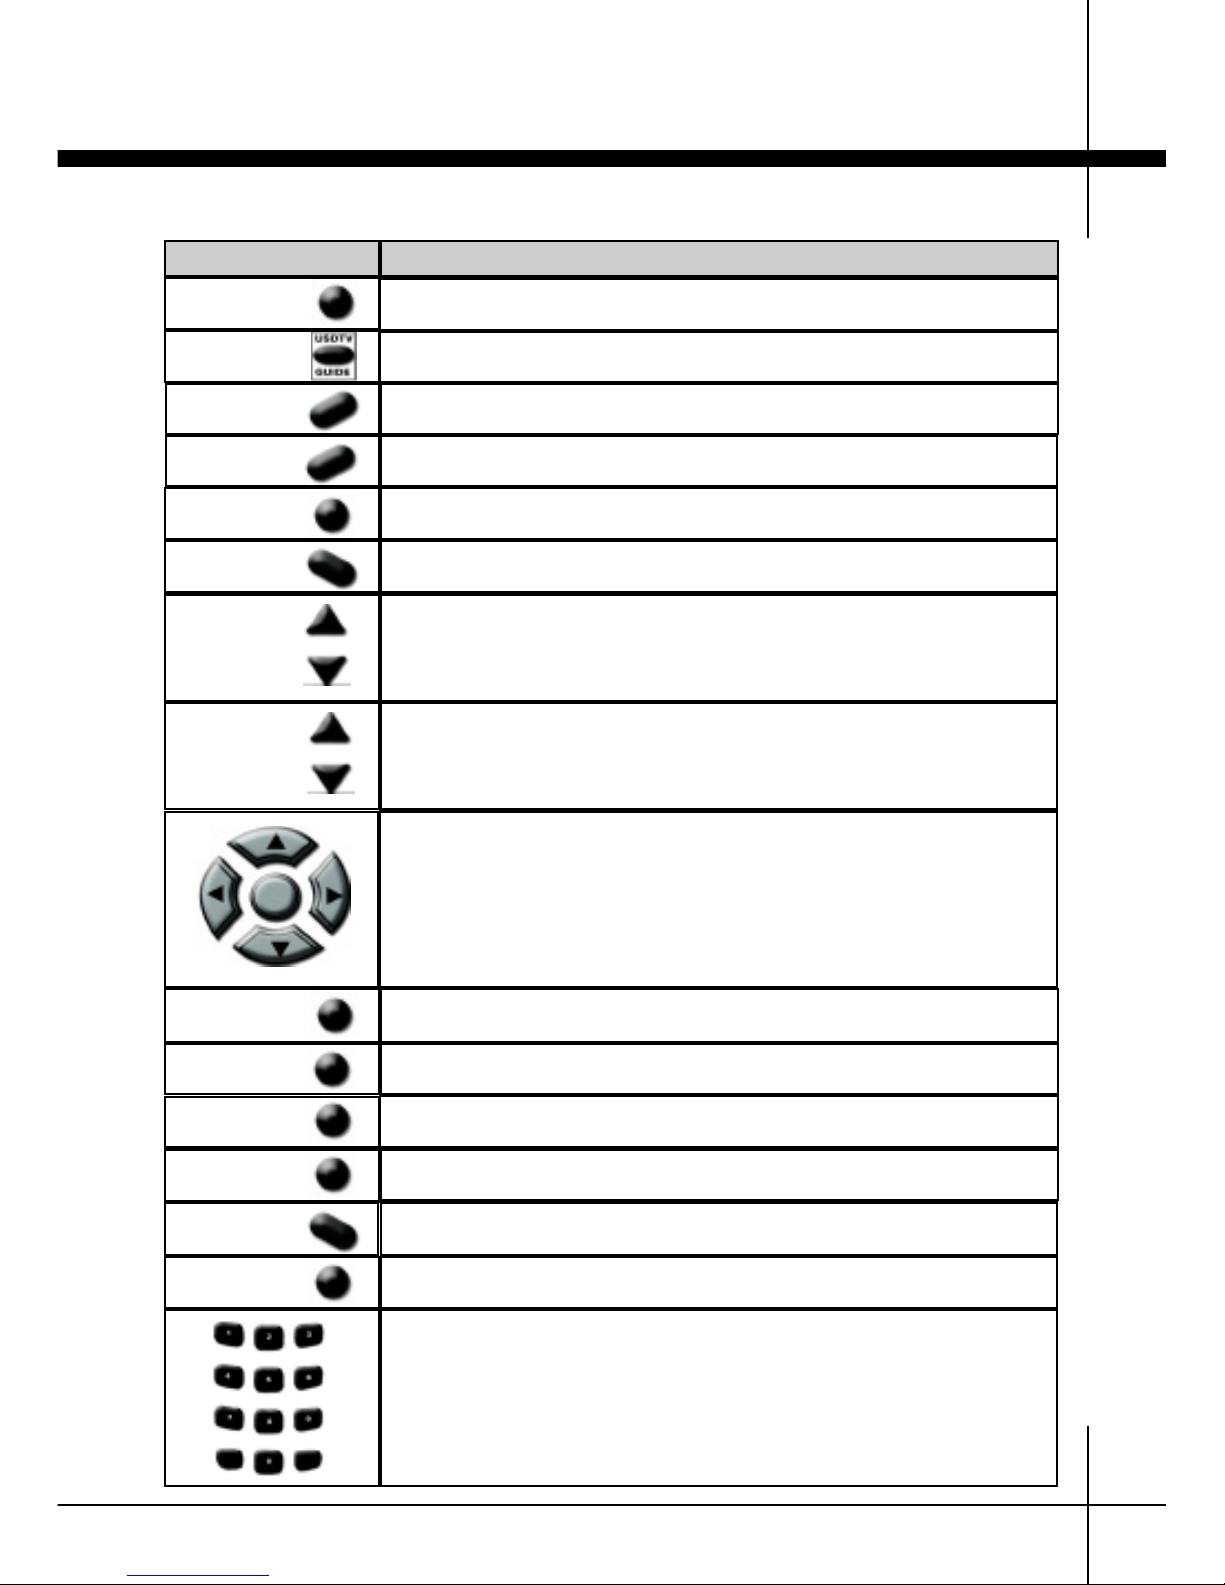
Basic Settings 2
13
Remote Control
Button
Description
Press to switch the receiver between power on and standby.
Press to display USDTV guide.
Press to display the on-screen program channel guide.
Press to change to previous channel.
Press to select audio output for alternate language.
Press to temporarily turn off the sound.
Press to display or exit the on-screen menu.
Press to return to the previous menu screen.
Press to change the aspect ratio.
Closed captioning ON/OFF button.
Press to control volume.
Press to change channels.
(qp) Menu navigation Up/Down.
(tu) Menu navigation in Left/Right direction.
(OK) Select button
POWER
G
UIDE
PRE-CH
AUDIO
MUTE
VOLUME
CHANNEL
Press to display information on the current program. Please see
page 19 for detailed information
Press to access TV & movie rating parental control features.
CHANNEL GUIDE
MENU
Channel number buttons from #0 to #9. See page 17 for
de
t
ailed in
formation on how to tune directly to a particular
channel.
OK
EXIT
A
SPE
C
T
CC
PROGRAM INFO
PARENTAL
CONTROL
Page 14
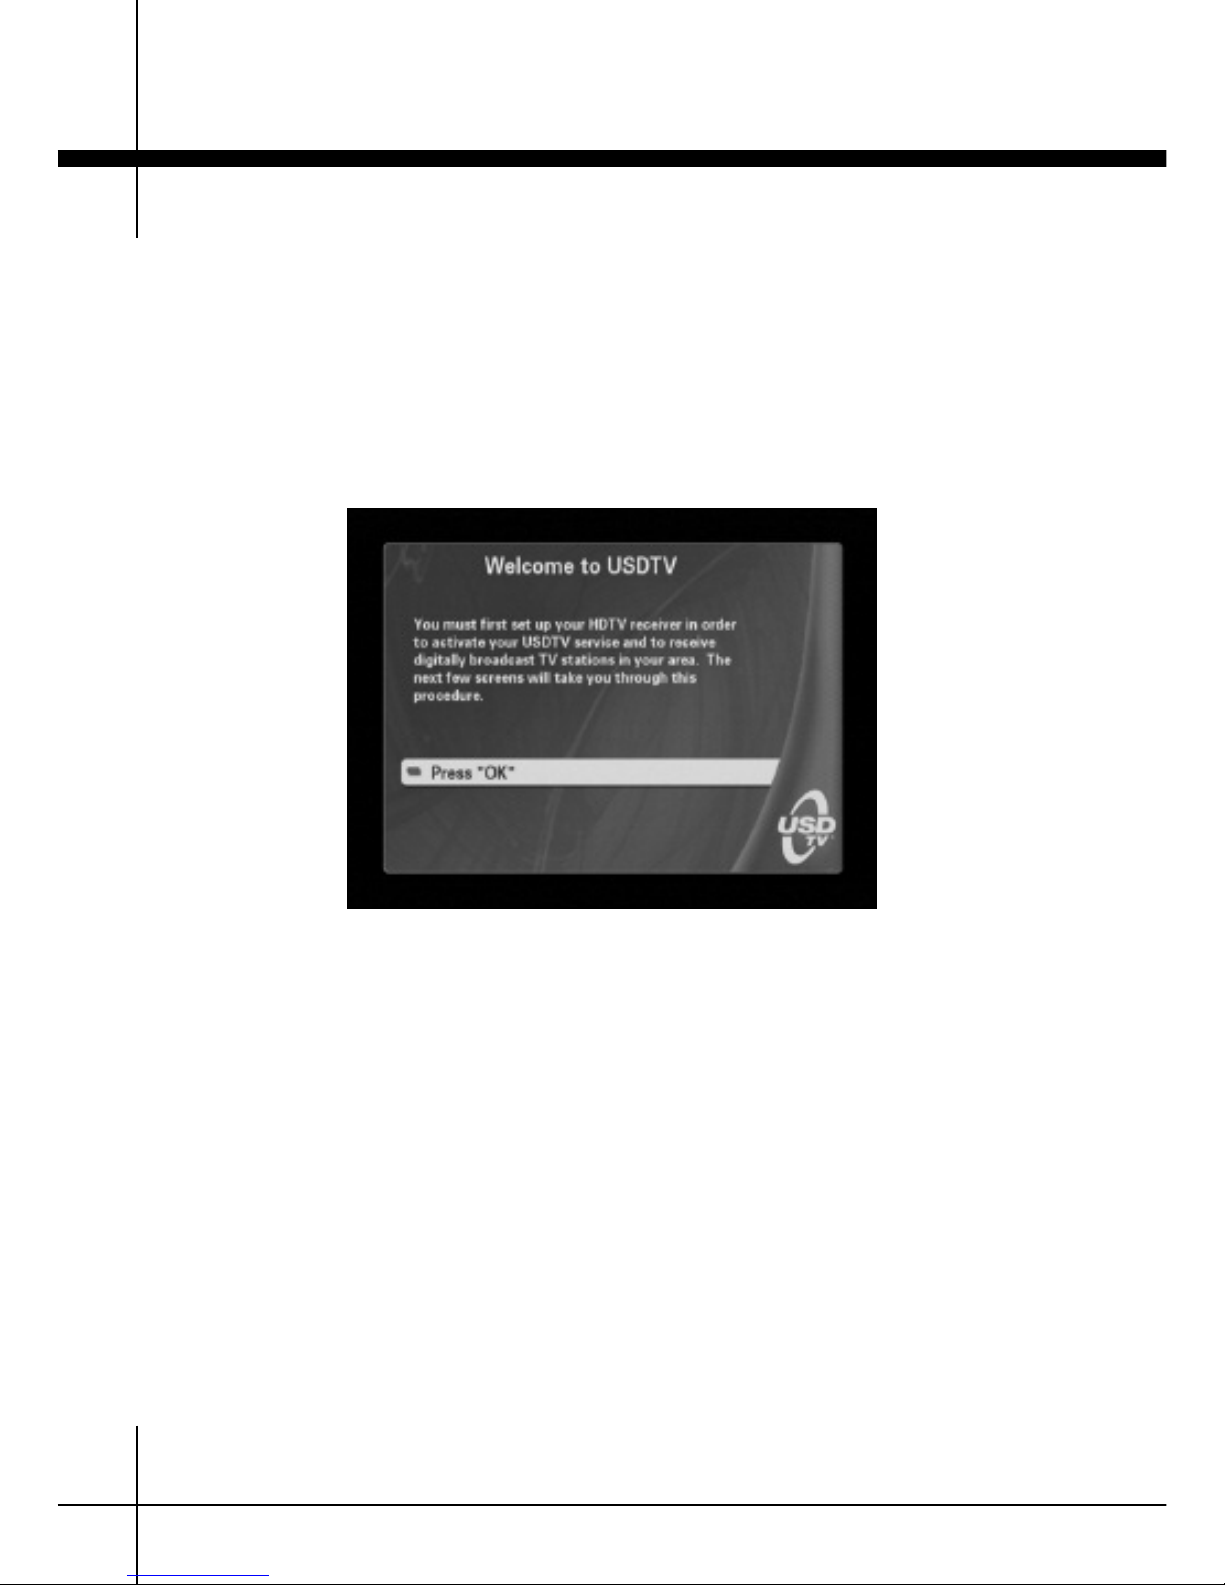
Initial Setup3
14
Initial Setup & Receiver Controls
Step One:
Power On
Plug the HDTV receiver’s power cord into an electrical outlet. The USDTV logo
will appear on your TV set for approximately 30 seconds, while the receiver
starts up. When you turn on the HDTV receiver, you will see the following screen.
NNoottee::
If your HDTV receiver loses power, it will take approximately 30 seconds
to restart.
Important Note: If your TV set is a high definition set, or if you are using component (Y/Pb/Pr) video connectors, the screen above may be distorted, in black and
white, or not displayed at all. In that case follow the steps below to setup your
receiver. If you have a standard TV set, using composite or S-video connections,
proceed to Step Two.
S
e
t the appropriate video output mode for your television by pressing the follow-
ing s
equenc
e on your remote control very quickly … allow no more than three
seconds between button presses:
1) Pr
e
ss “USDTV Guide”
2) Press “ASPECT”
3) Press “USDTV Guide” again
4) F
or a 4
80i video input on your TV set, press 2
• F
or a 4
80p video input on y
our TV s
et, press 3
• For a 720p video input on your TV set, press 4
• For a 1080i video input on your TV set, press 5
(Note: Refer to your HDTV set’s instructions for acceptable input.)
Page 15
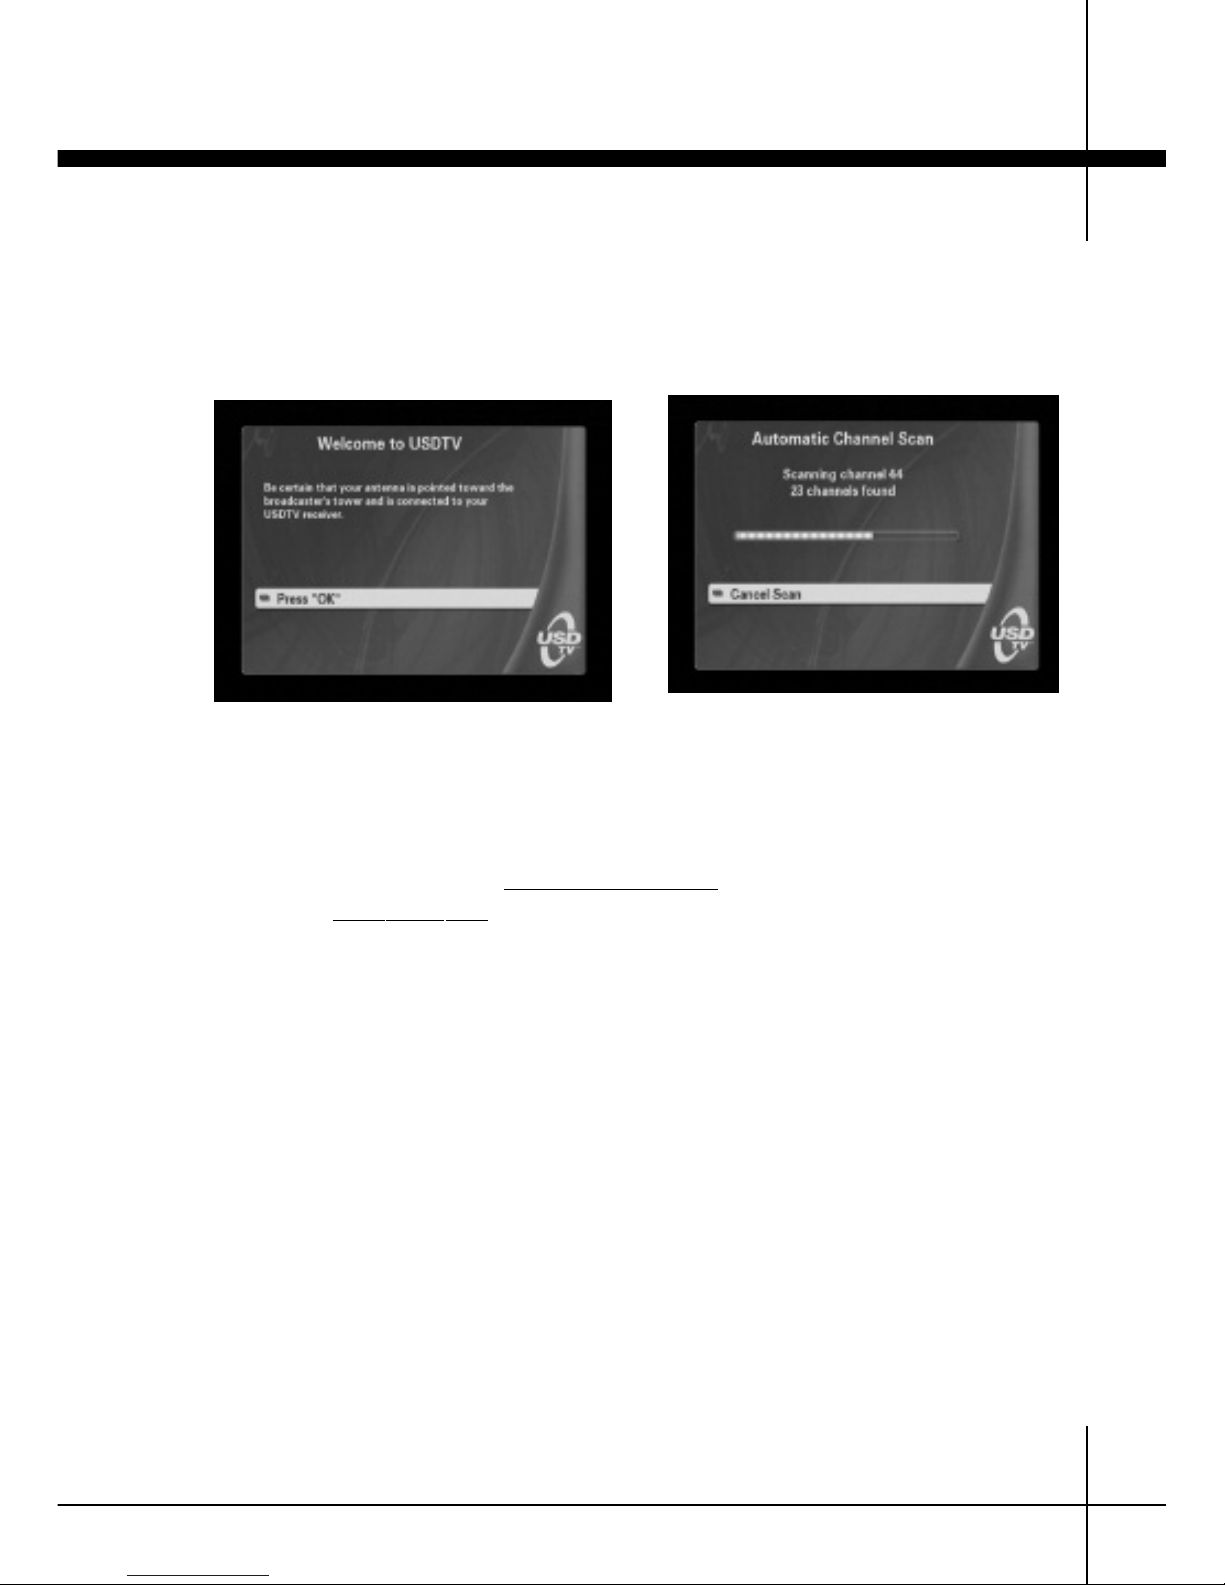
Step Two:
Scan for Local Broadcast Channels
The following two screens will allow your receiver to scan for your local broadcast TV stations.
Your HDTV receiver is now scanning to receive all digitally broadcast TV stations in your area. If the receiver does not locate any channels:
1) Make sure your antenna is connected properly.
2) Reposition your antenna by pointing it toward the broadcaster’s antenna. You
may also want to refer to www
.antennaweb.org for help in pointing your antenna.
3) Go to www.usdtv.com for Frequently Asked Questions about reception.
4) Call 1-877-438-8738 for technical support.
Initial Setup 3
15
Initial Setup & Receiver Controls
Page 16
16
Initial Setup & Receiver Controls
Initial Setup3
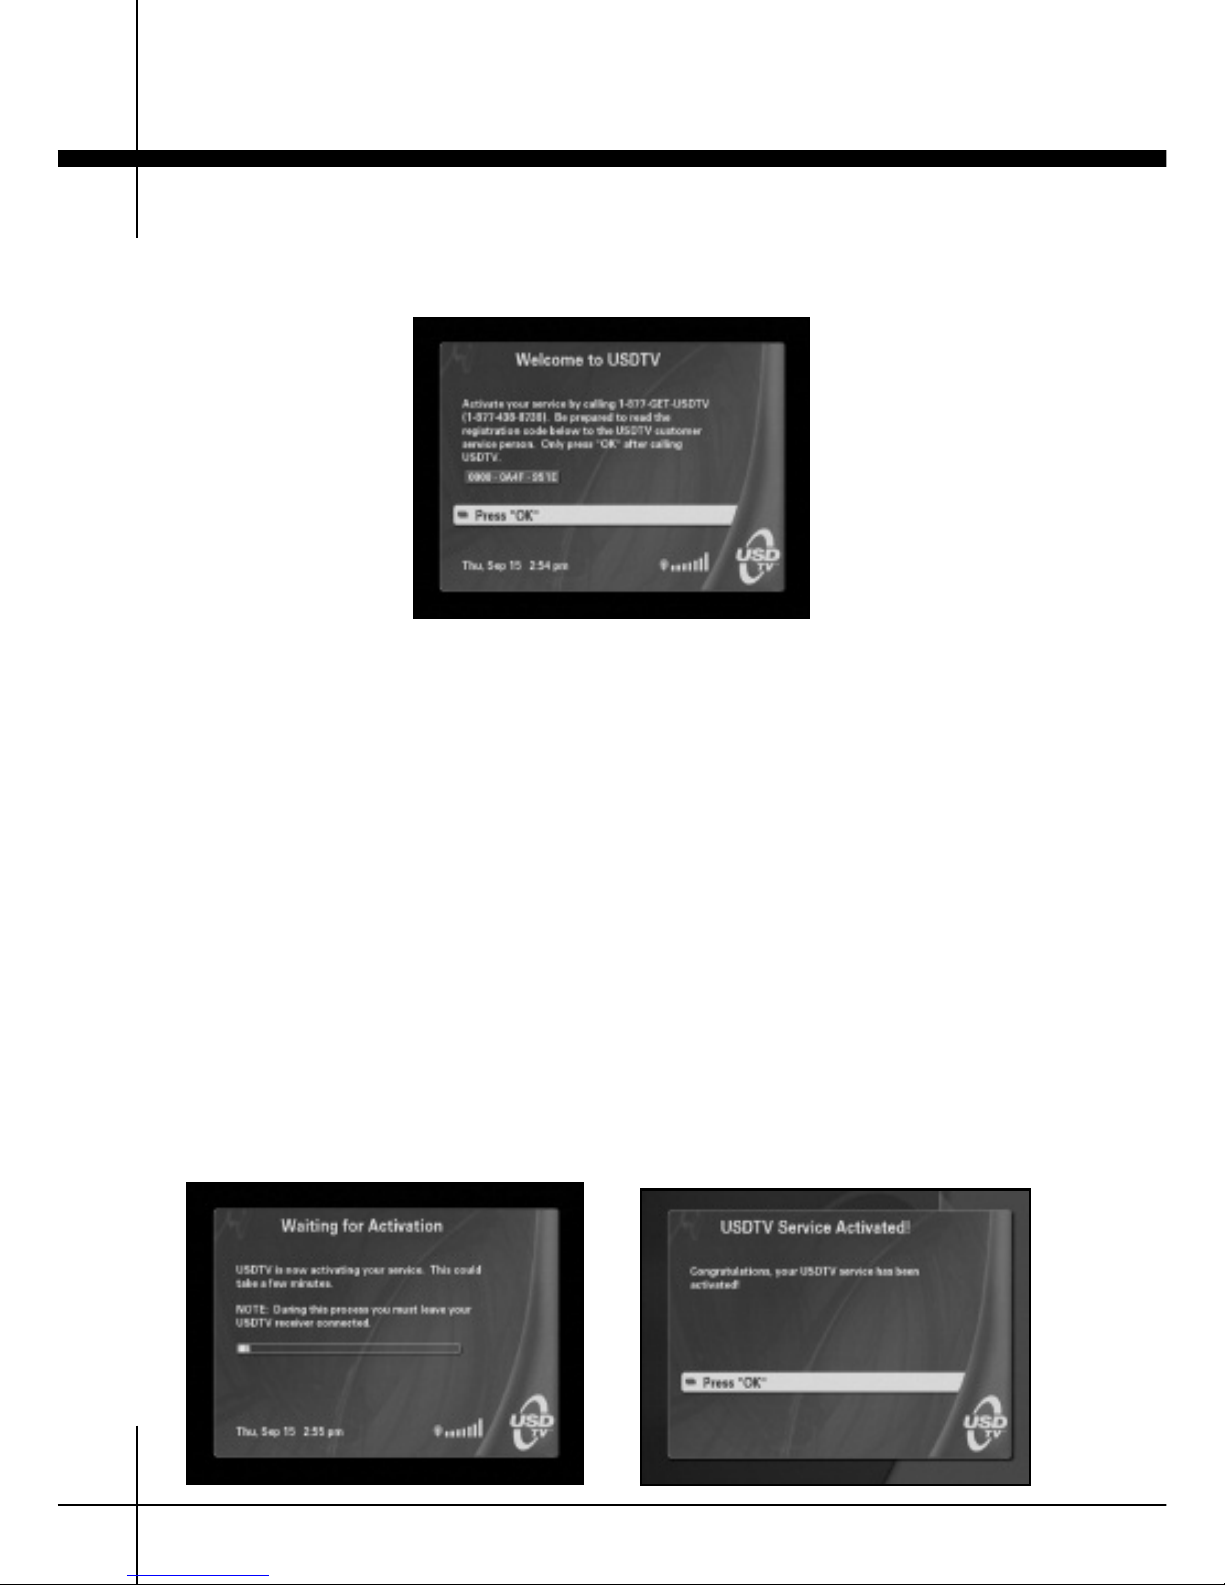
Step Four:
Completing Receiver Activation
Please wait a few moments while your USDTV service is activated. It is import
an
t t
o le
a
ve your USDTV receiver connected to the antenna cable and electrical
outlet. If the “USDTV Service Activated” screen does not appear after about five
minutes, please call USDTV again at 1-877-438-8738
Step Three:
Activating USDTV Service
The following screen provides information necessary to activate your USDTV receiver
and begin receiving USDTV service. Do NOT press “OK” until you have followed the
steps below:
1. Write down the registration code shown on the screen. The code is in the
form of 0000-0000-0000.
2. Call 1-877-GET-USDTV (1-877-438-8738) and complete registration with the
USDTV customer service person.
3. Only press the OK button AFTER calling USDTV.
Page 17
17
Digital TV Channels & Changing Channels
4Features
Digital TV Channels
One advantage of digital television is the ability for a broadcaster to transmit more than
one program simultaneously on one channel. This is done by using major and minor
channel numbers such as 4-3. With digital television, a broadcaster on channel 4 (the
major number) may provide their usual programming on channel 4-1 but also provide
other programs on channel 4-2, 4-3, 4-4, etc. Note that some broadcasters only broadcast their usual programming on one minor channel such as 4-1.
Viewing a particular minor channel is much like changing channels on a regular television, but there are several ways to do it:
• Use the channel + and – keys
• Use the program guide or info bar described below
• Type in the major number, the right-arrow key to create the -, then the minor
number (e.g. 4 right-arrow 3)
• Type in the major number as two digits such as 04 or 10, then the minor
number (e.g. 0 4 3)
When typing channel numbers in you can press OK to go to the channel immediately, or
wait a few seconds to go there automatically.
Note that a few broadcasters use one minor
channel for HDTV during prime time and
others to send multiple standard programs
at other times. For example channel 4-1 may
be showing an HDTV program during prime
time but channels 4-2, 4-3 and 4-4 show
standard programs during other times.
Channels 4-2, 4-3 and 4-4 are off the air
during prime time, and channel 4-1 is off the
air at other times. This is normal and is not
a problem.
Also note that you can watch HDTV programs even if you do not have an HDTV
capable television. When the HDTV receiver
is not set to a high definition video mode,
the HDTV receiver converts the broadcaster’
s signal so it is visible on any television.
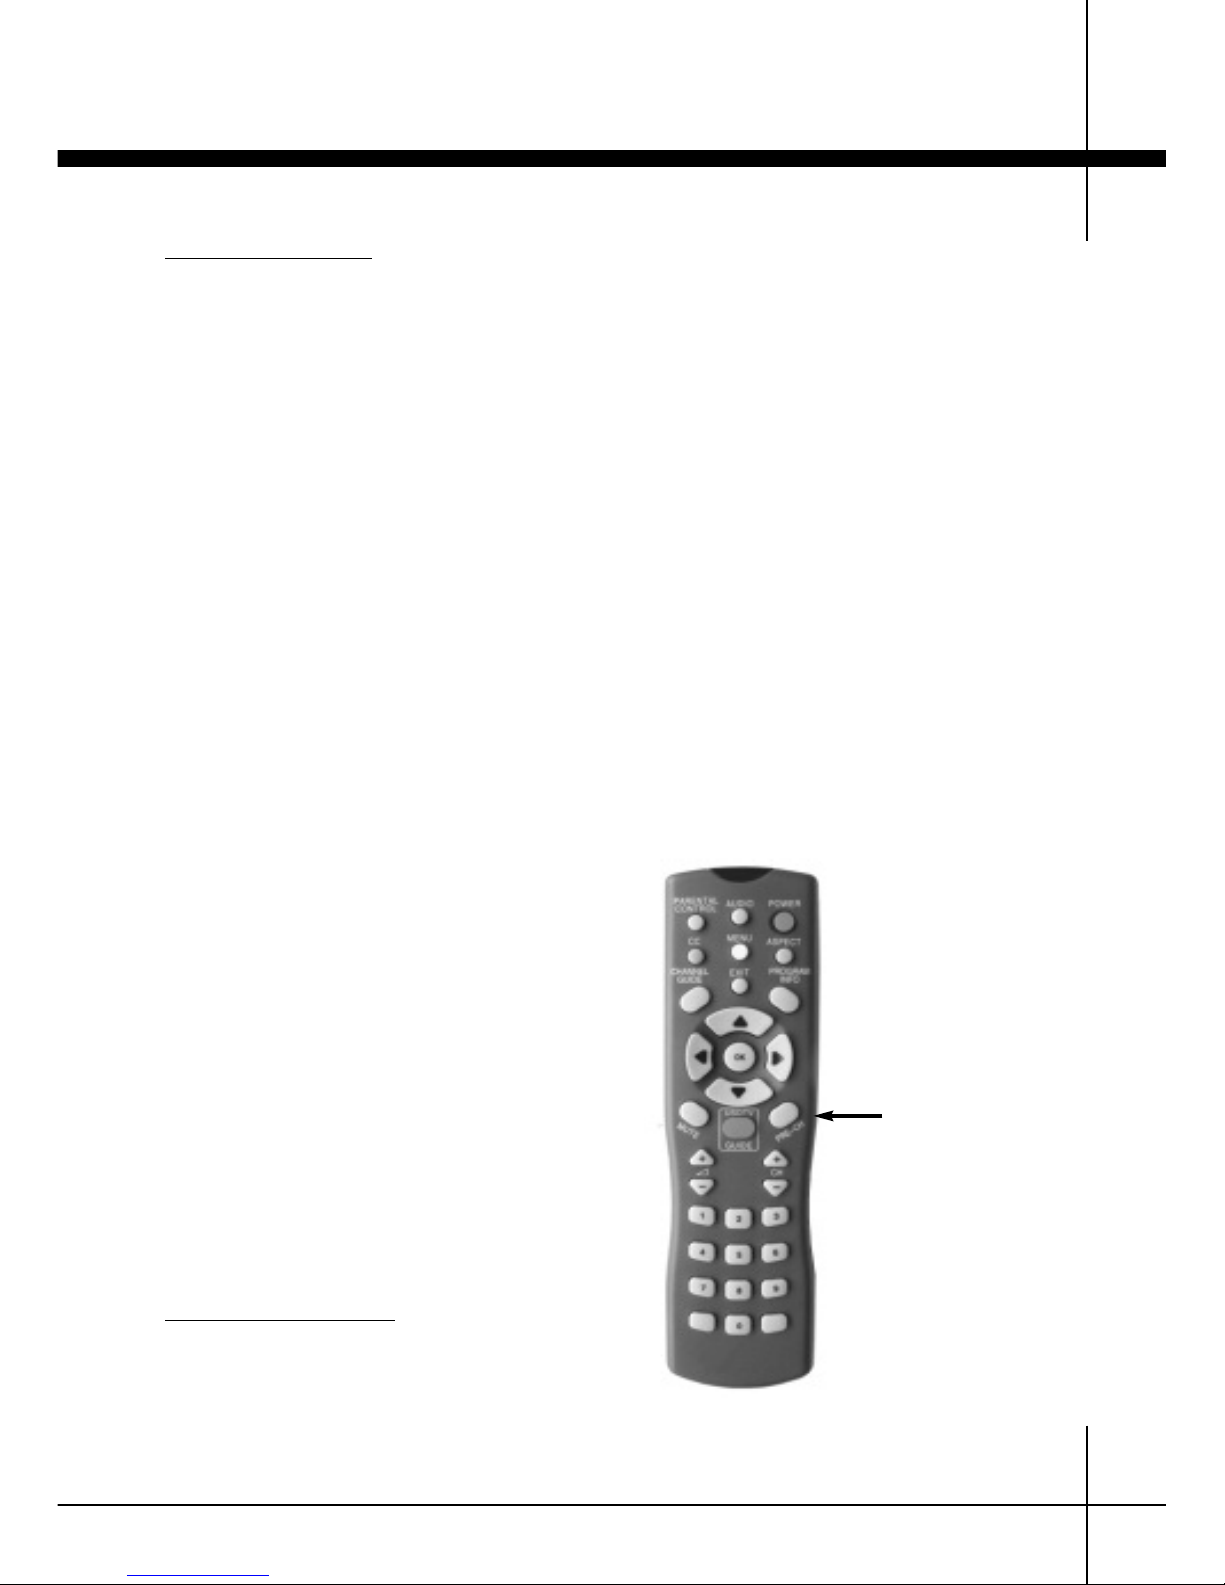
PREVIOUS CHANNEL
The
PPRREE--CCHH
button switches to the last
channel viewed.
Previous Channel
Page 18
18
Channel Guide
4 Features
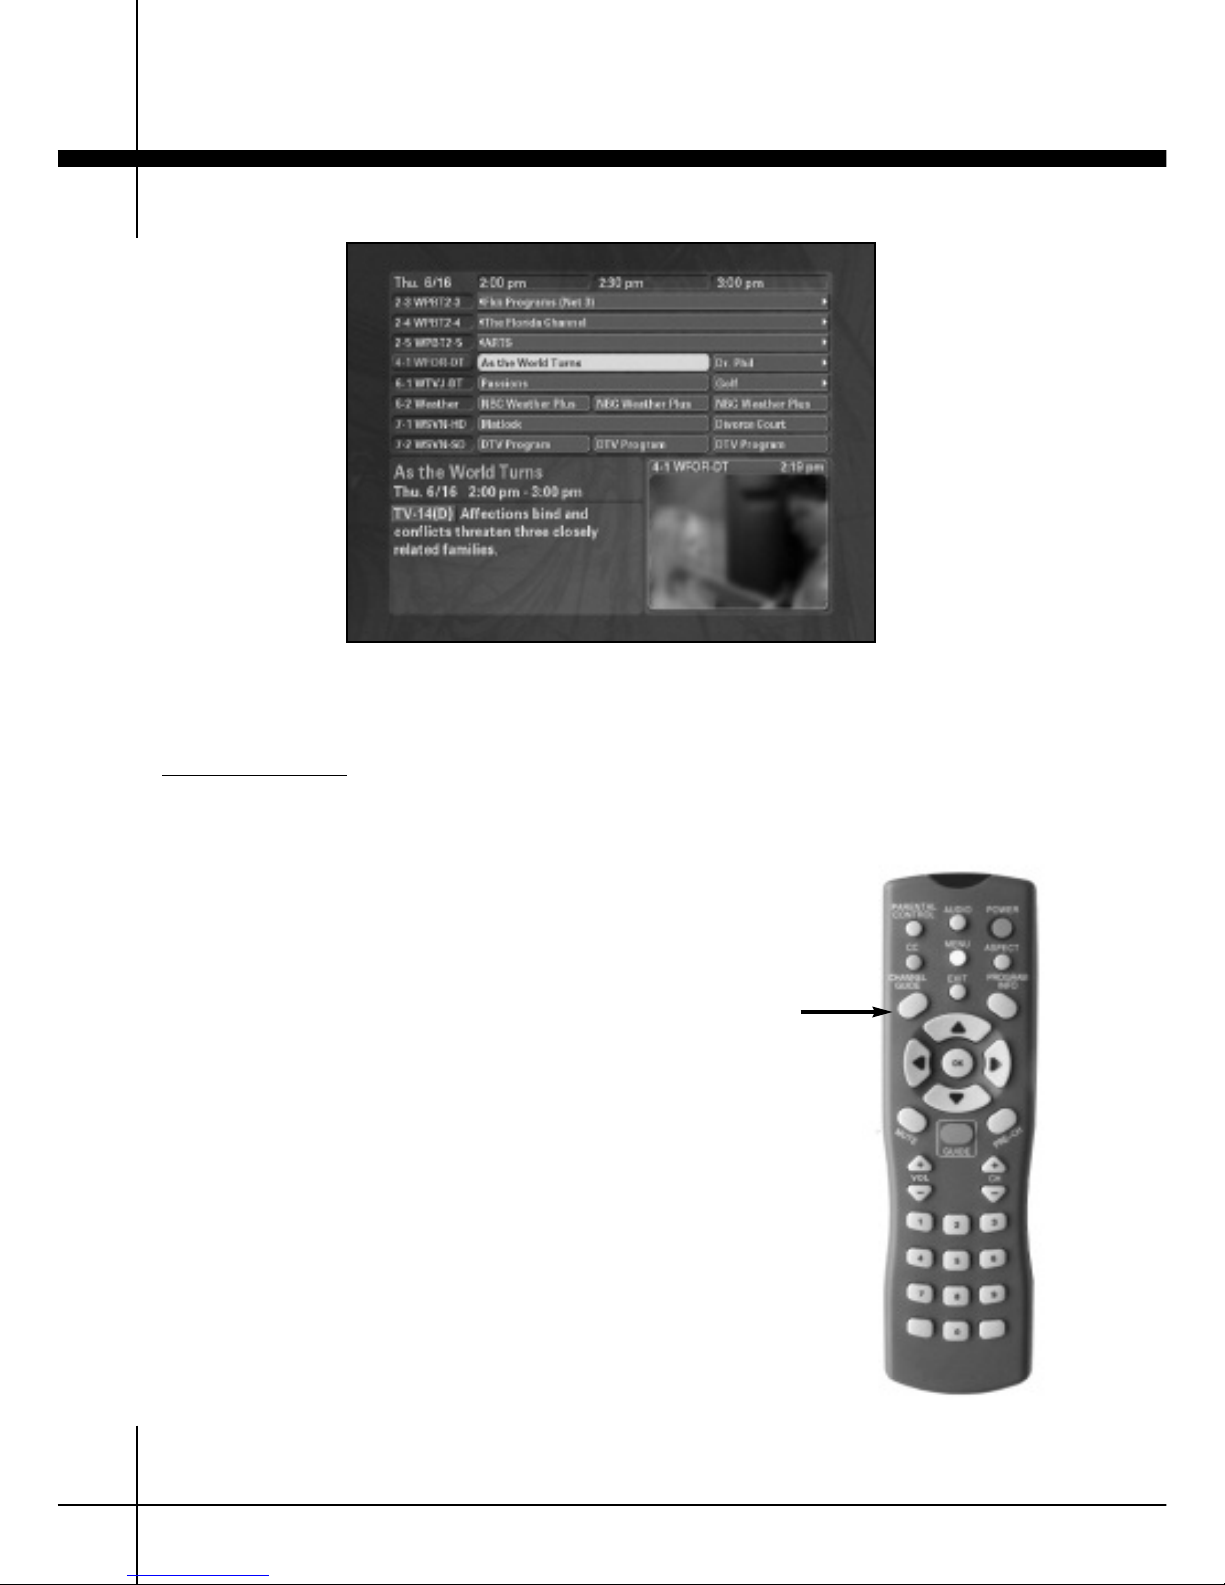
CHANNEL GUIDE
Press the
CCHHAANNNNEELL GGUUIIDDEE
button to display
a list of programs. The top part of the
screen shows a grid organized by time and
channel. The bottom left corner of the
screen shows details about the program
highlighted in the grid. The bottom right
corner of the screen shows video from the
channel you were watching before displaying
the guide, except when the receiver is gathering program information. The process of
gathering program information usually takes
a few minutes, depending on the number of
channels in your area.
Use the arrow keys on your remote control
to navigate through the grid. Press OK to
change to the highlighted channel.
IMPORTANT: If a program description is cut
off, press the
PPRROOGGRRAAMM IINNFFOO
button to
bring up a lar
ger bo
x. Press
OOKK
or
EEXXIITT
t
o
dismiss the larger box and return to the
channel guide.
CChhaannnneell GGuuiiddee
Channel Guide
Page 19
Features 4
19
Program Information
PROGR
AM INFO
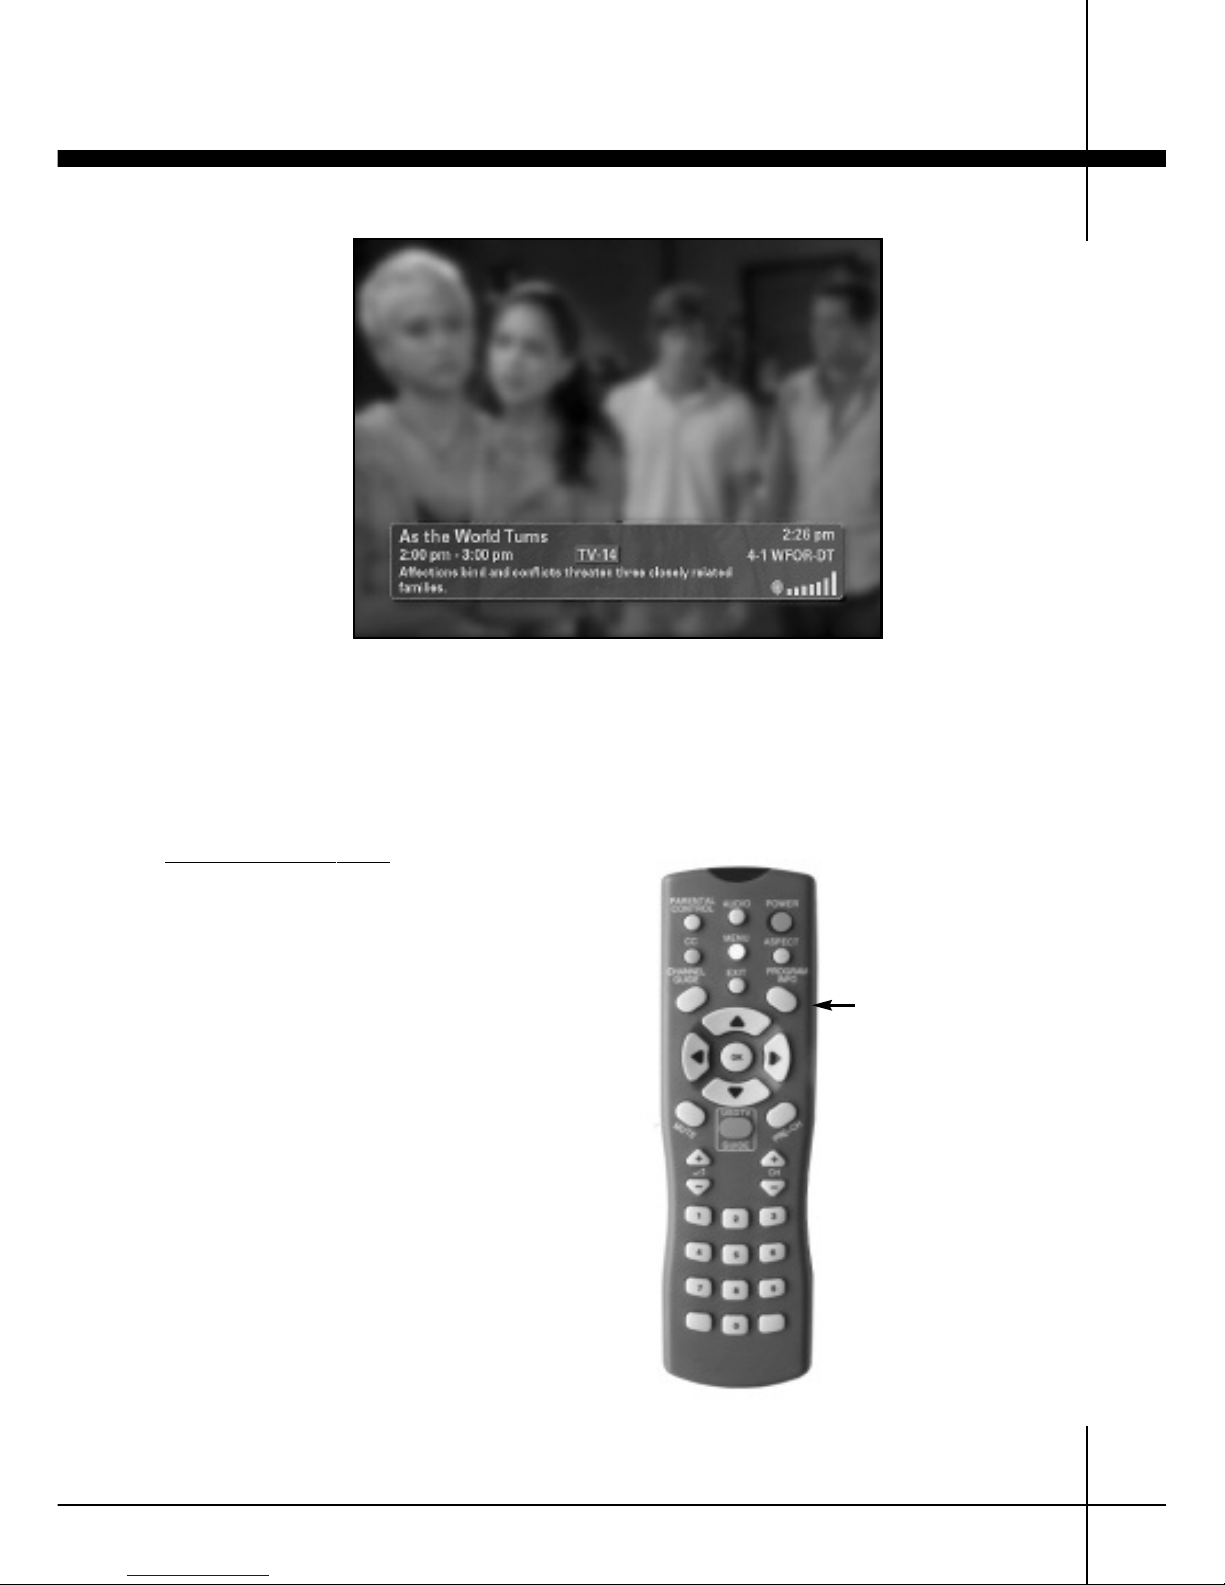
BAR
Press the
PPRROOGGRRAAMM IINNFFOO
button to display
a bar with information about the program
you are currently watching. Press
PPRROO--
GGRRAAMM IINNFFOO
a second time (or
EEXXIITT))
to dis-
miss the display.
While the Program Info Bar is visible, you
may use the arrow keys to see program listings for other times and channels.
Press the right arrow to see listings for
upc
oming pr
ogr
ams on this channel, and the
left arrow to go back.
Pr
e
s
s the up and down arro
ws to see listings
for other channels. To change to another
channel, press the
OOKK
button while that
channel’s listing is displayed.
Program Information
PPrrooggrraamm IInnffoo
Page 20
Features4
20
Video Program Guide
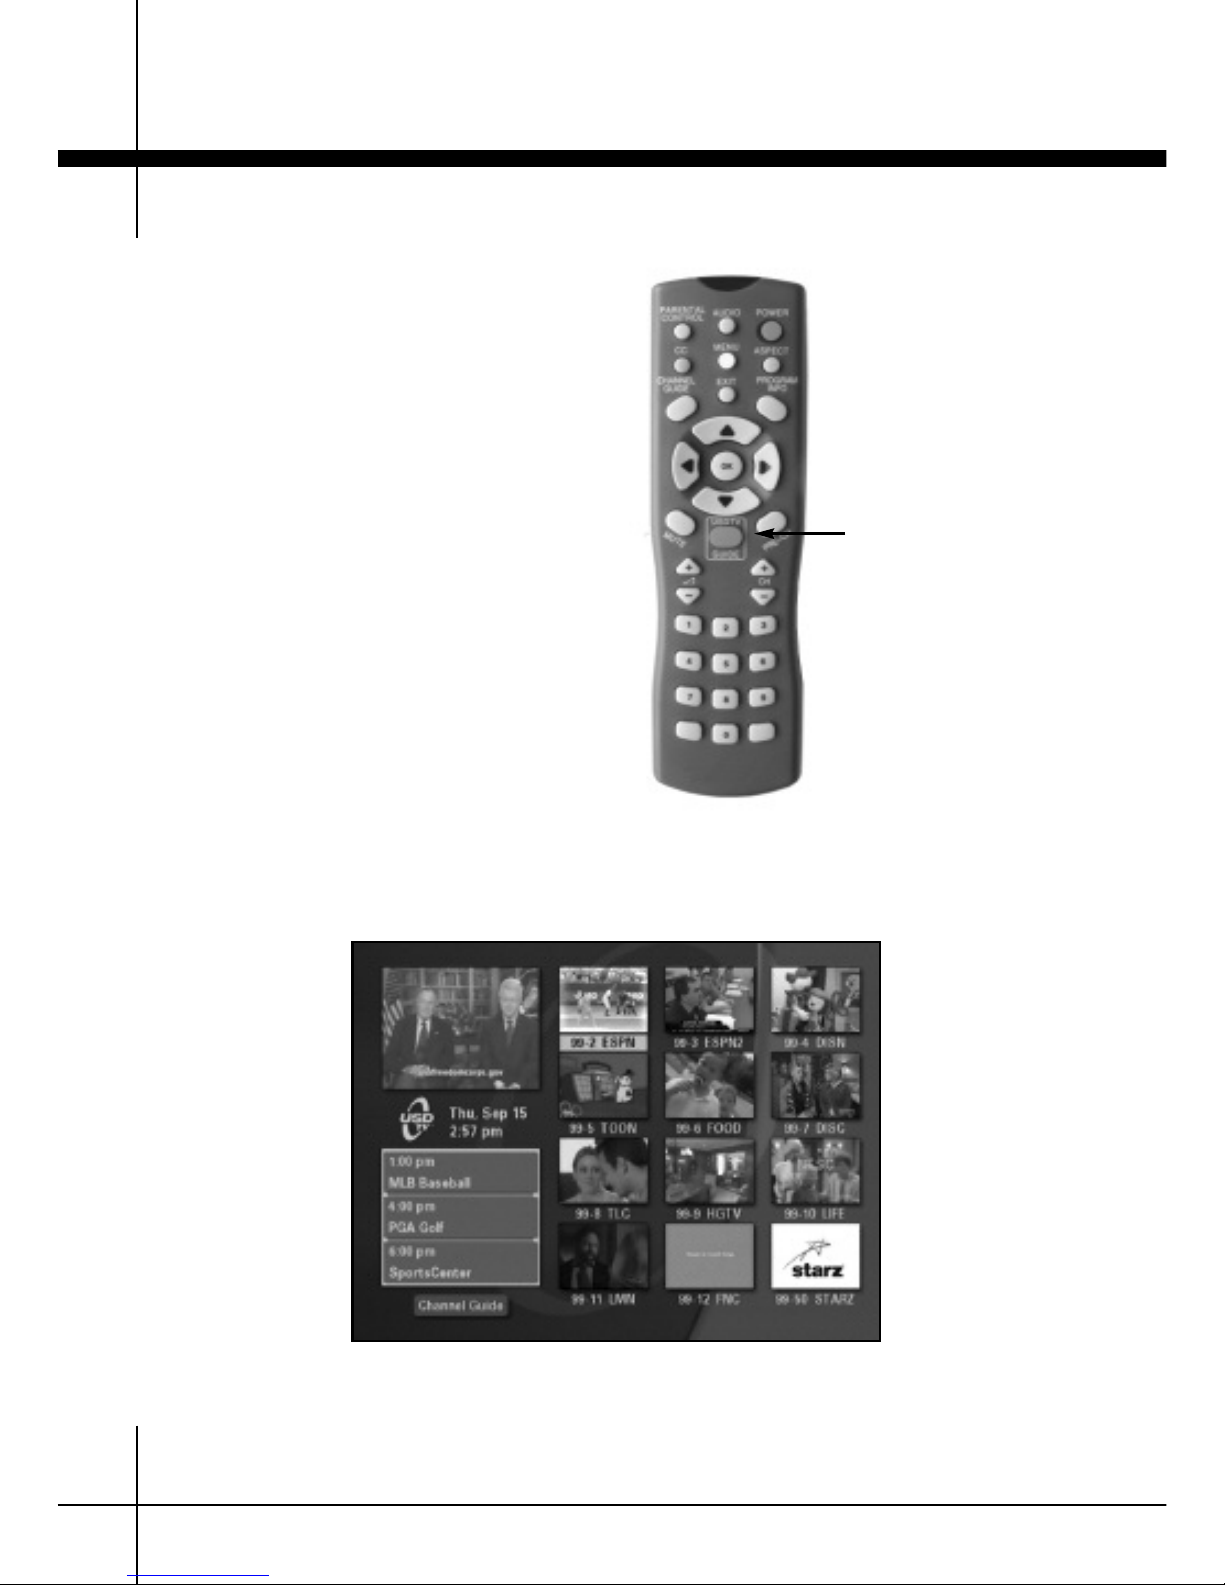
Press the big red GUIDE button at the center
of the remote to display the USDTV Video
Program Guide. This screen shows at a
glance the program currently playing on
each of the USDTV service channels.
One of the program boxes is brighter than
the others and has a yellow highlight around
its channel number. The program listings in
the lower left corner of the screen correspond to the highlighted channel. Use the
up, down, right and left arrow buttons to
move the highlight to other channels on the
display.
To tune directly to the highlighted channel,
press the OK button. You can also leave the
video program guide by pressing channel up,
channel down, or by entering a channel number.
USDTV
Video Program Guide
VViiddeeoo PPrrooggrraamm GGuuiiddee
Page 21
Other Features
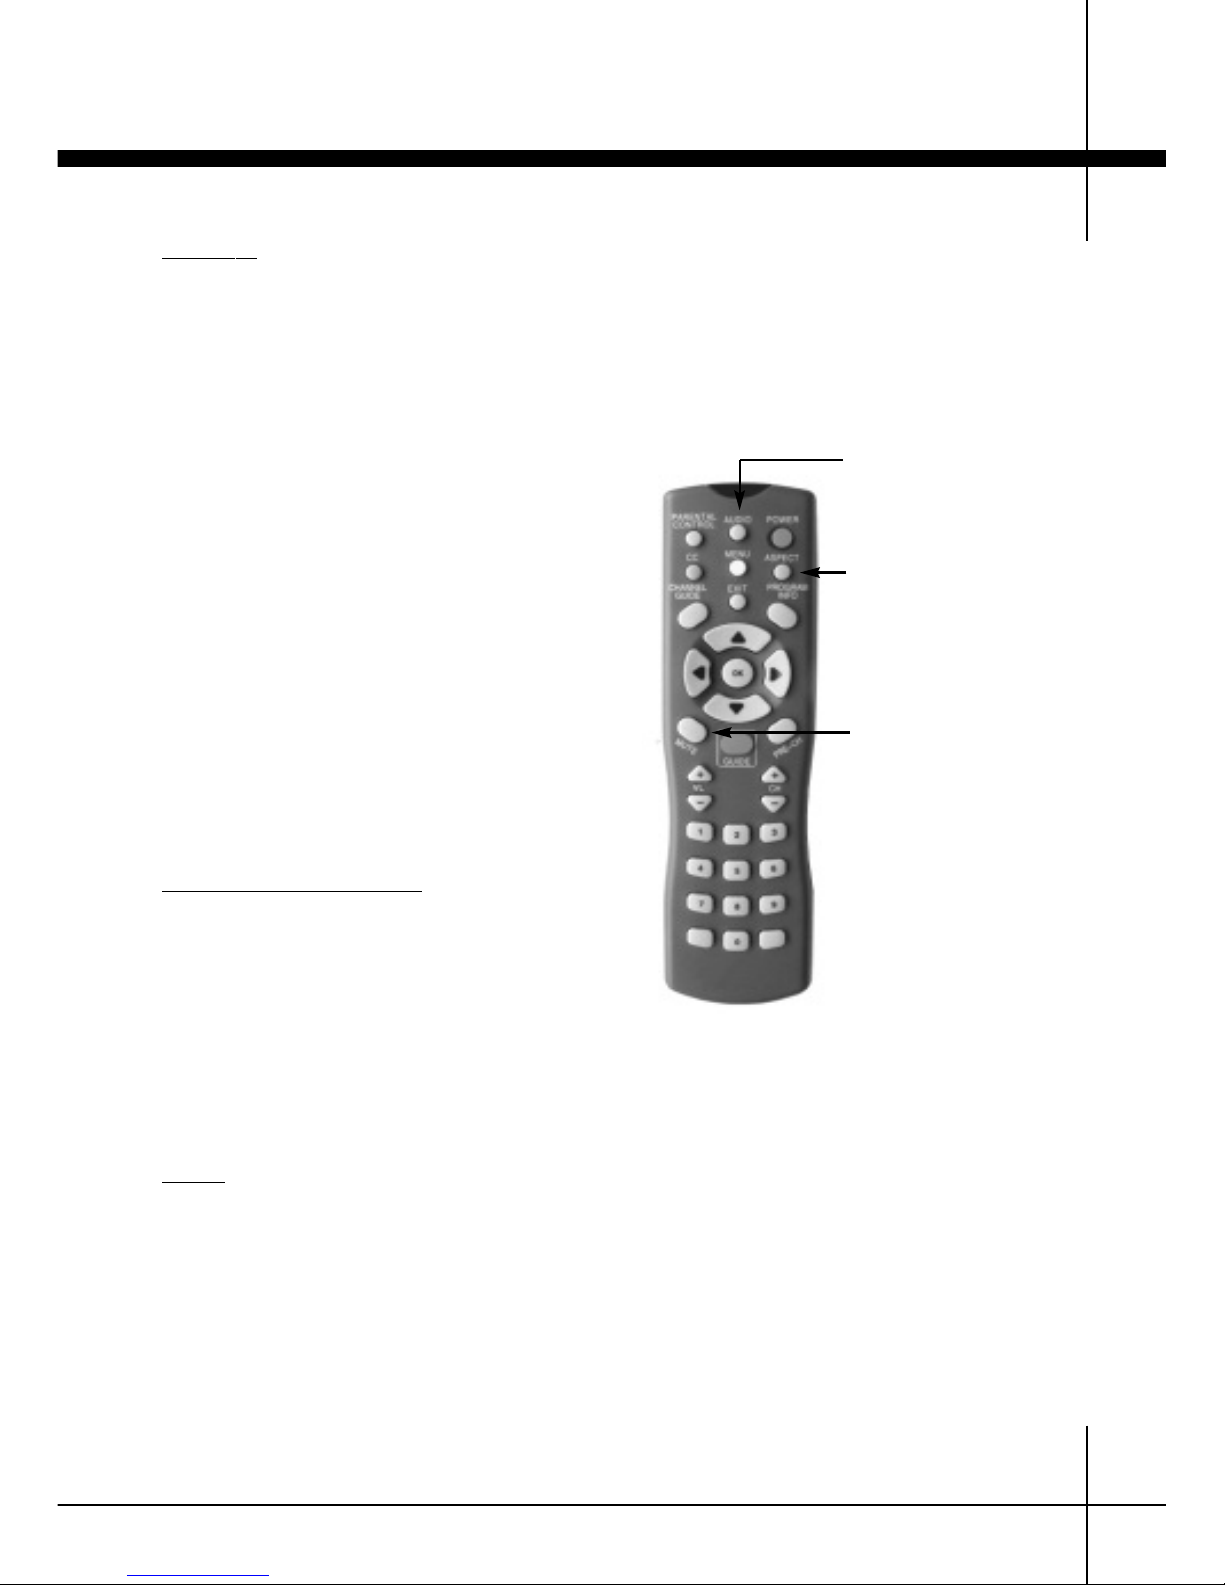
ASPECT
The
AASSPPEECCTT
button allows you to “zoom in”
on the current program. This is useful
because some broadcasters use vertical and
horizontal bars to frame standard definition
programs.
Press the
AASSPPEECCTT
button repeatedly to
cycle through various zoom settings. You
can have different settings for each channel,
and they will be retained when you change
channels and return to those with modified
aspect settings.
IIMMPPOORRTTAANNTT::
It is possible that a broadcaster will use these bars to frame one program
and then not use them for another program.
If you have zoomed in earlier, you will not
see the entire image now. If this occurs,
press the
AASSPPEECCTT
button repeatedly again
until the framing is correct.
AL
TERNATE LANGUA
GE
If alternate audio tracks are provided by the
broadcaster, you can cycle through them by
pressing the
AAUUDDIIOO
button. If the language
or a description is available, it will be displayed briefly. If you change channels, then
return to this channel, the alternate audio
s
election will be retained.
MUTE
The
MMUUTTEE
button silences the program’s
audio. A small icon will appear in the bottom
right corner of the screen. If the program
provides closed captions, they will appear
on the screen. Press
MMUUTTEE
again to restore
audio.
Features
Alternate Language
Mute
Aspect Ratio
4
21
Page 22
Main Menu & Closed Captions
Configurations
22
5
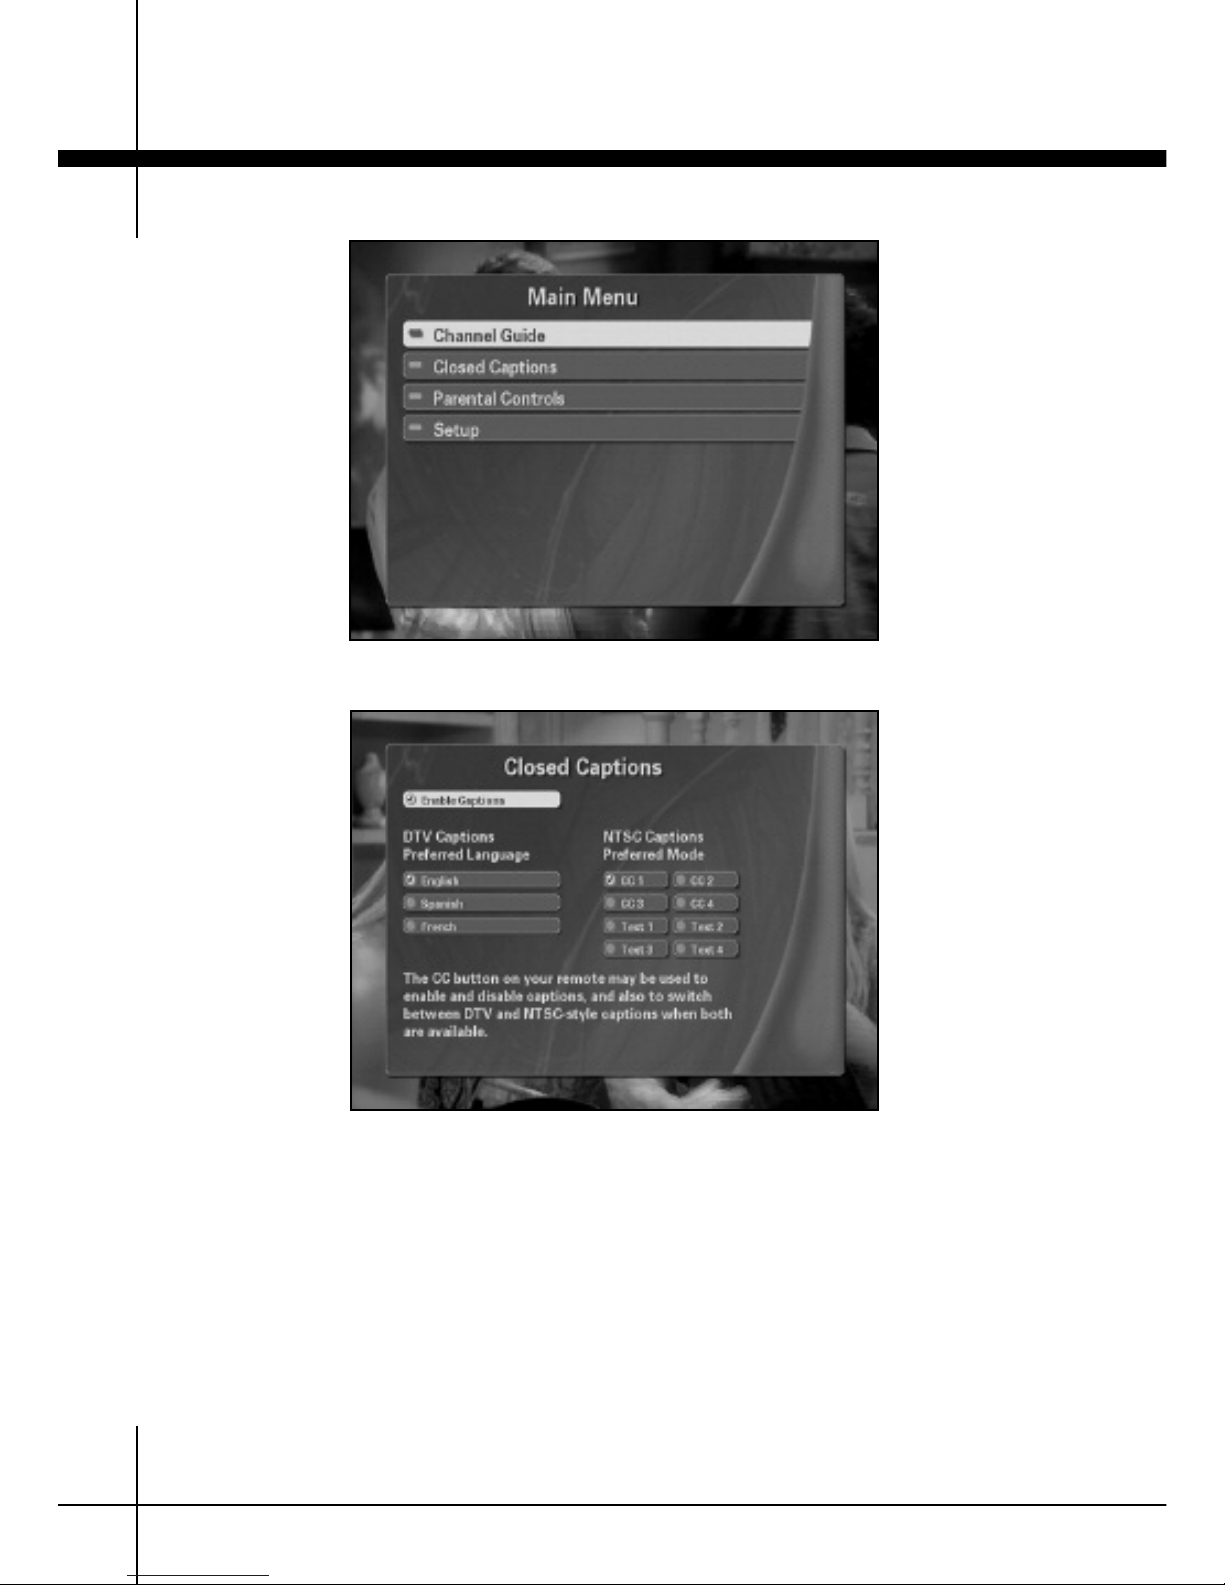
Press the
MMEENNUU
button to access configuration options for your HDTV receiver.
The
CCCC
button on your remote is used to enable and disable captions, and also to switch
between DTV and NTSC-style captions when both are available. DTV (EIA-708-B) captions ar
e an adv
anc
ed caption style which is provided by some broadcasters. NTSC
(EIA/CEA
-608-B
) c
ap
tions are a basic style of captions which broadcasters may provide
instead of, or in addition to, DTV captions.
Y
ou c
an choo
s
e your own closed caption preferences. From the main menu, highlight
CClloosseedd CCaappttiioonnss
and press
OOKK
. From there you can set options for DTV and NTSC cap-
tions.
You can choose your preferred language for DTV captions, and your preferred mode for
NTSC captions. The default NTSC setting, CC1, is correct for almost all cases. Language
preference is not available for NTSC captions.
Page 23
TV & Movie Rating, Parental Controls
Configuration 5
23
TV & Mo
vie Rating, Par
ental C
ontrols
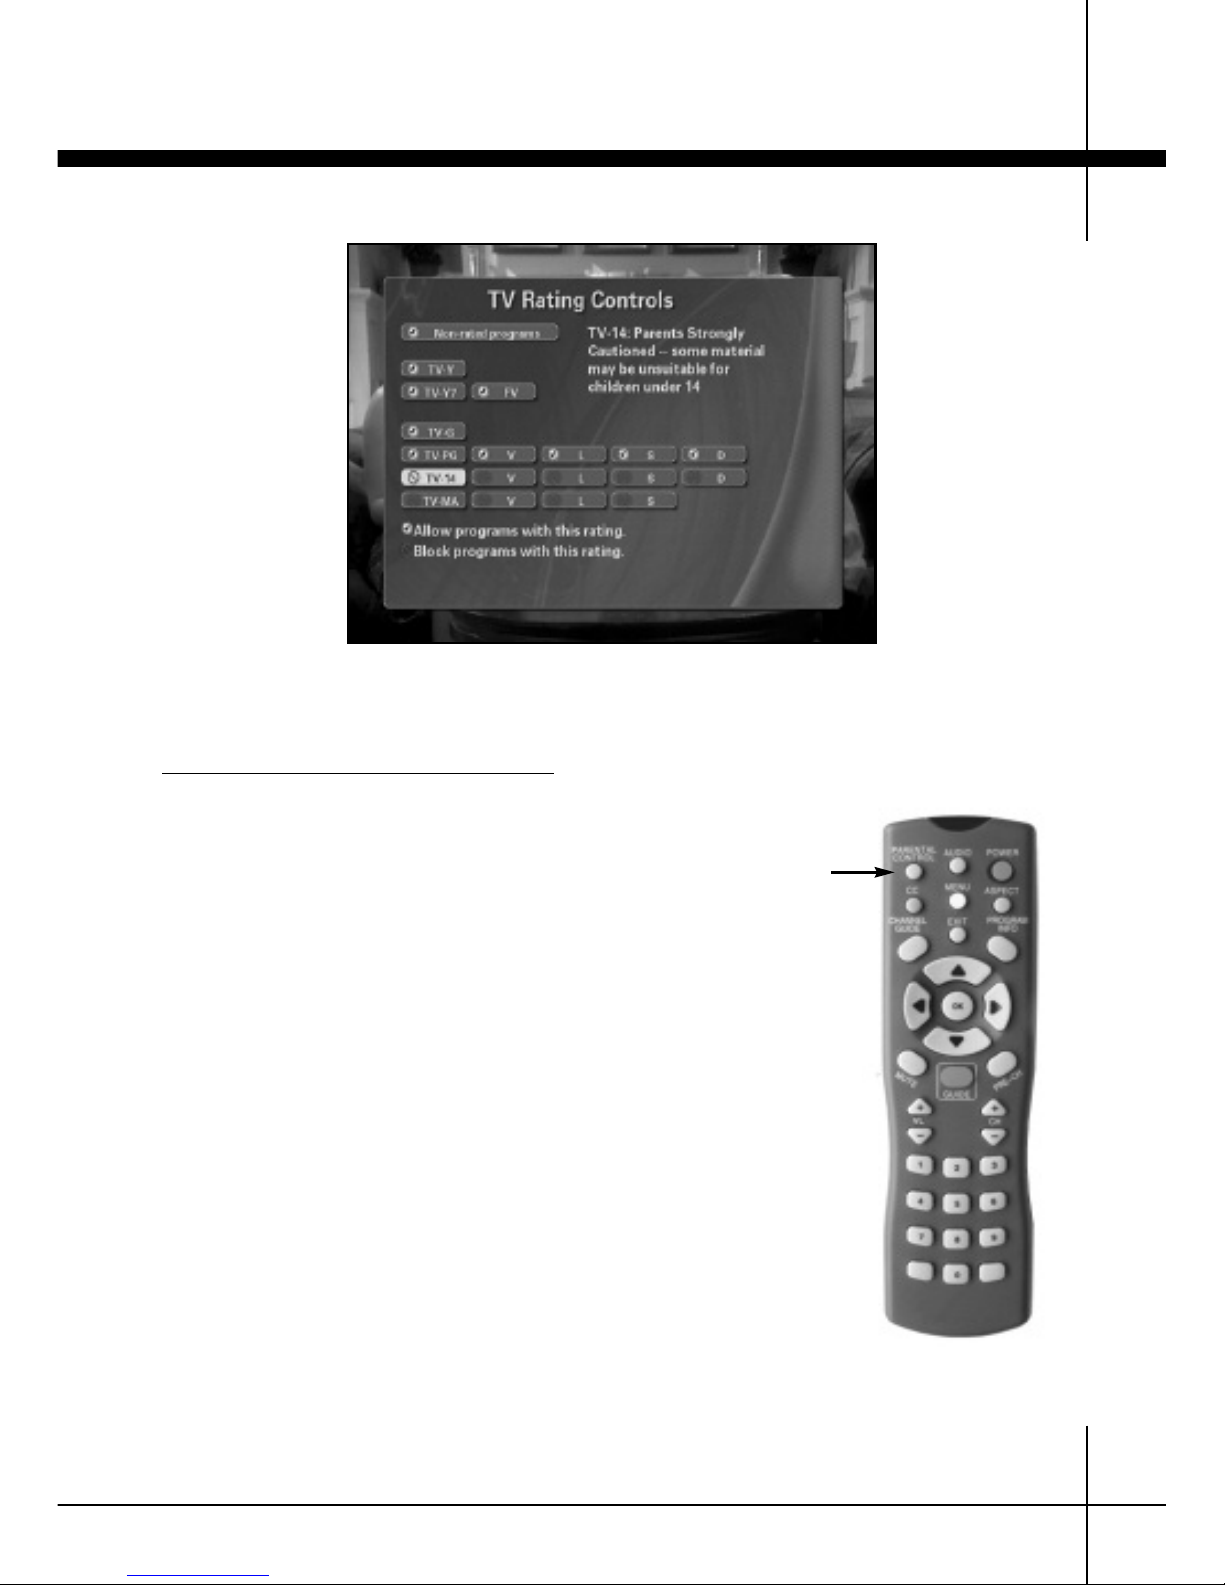
Programs can be blocked based on their TV
or movie ratings. You can set a 4-digit password and the HDTV receiver will show
blocked programs only after that password
has been entered. From the main menu,
highlight
PPaarreennttaall CCoonnttrroollss
and press
OOKK
.
This brings you to another menu with the
following items:
EEnnaabbllee//DDiissaabbllee BBlloocckkiinngg
This menu allows you to turn program blocking on, turn it off, or turn it off for a period of
time
.
MMaannaaggee TTVV RRaattiinnggss
T
his menu allo
w
s y
ou t
o block programs with
your preference of TV rating, including programs with ratings for violence, language,
s
e
x
ual situations and suggestive dialog. You
can also block non-rated programs. This
would block any program that has not been
r
ated, including most news broadcasts.
Parental Control
TTVV RRaattiinngg CCoonnttrroollss
Page 24
TV & Movie Rating, Parental Controls
Configuration5
24
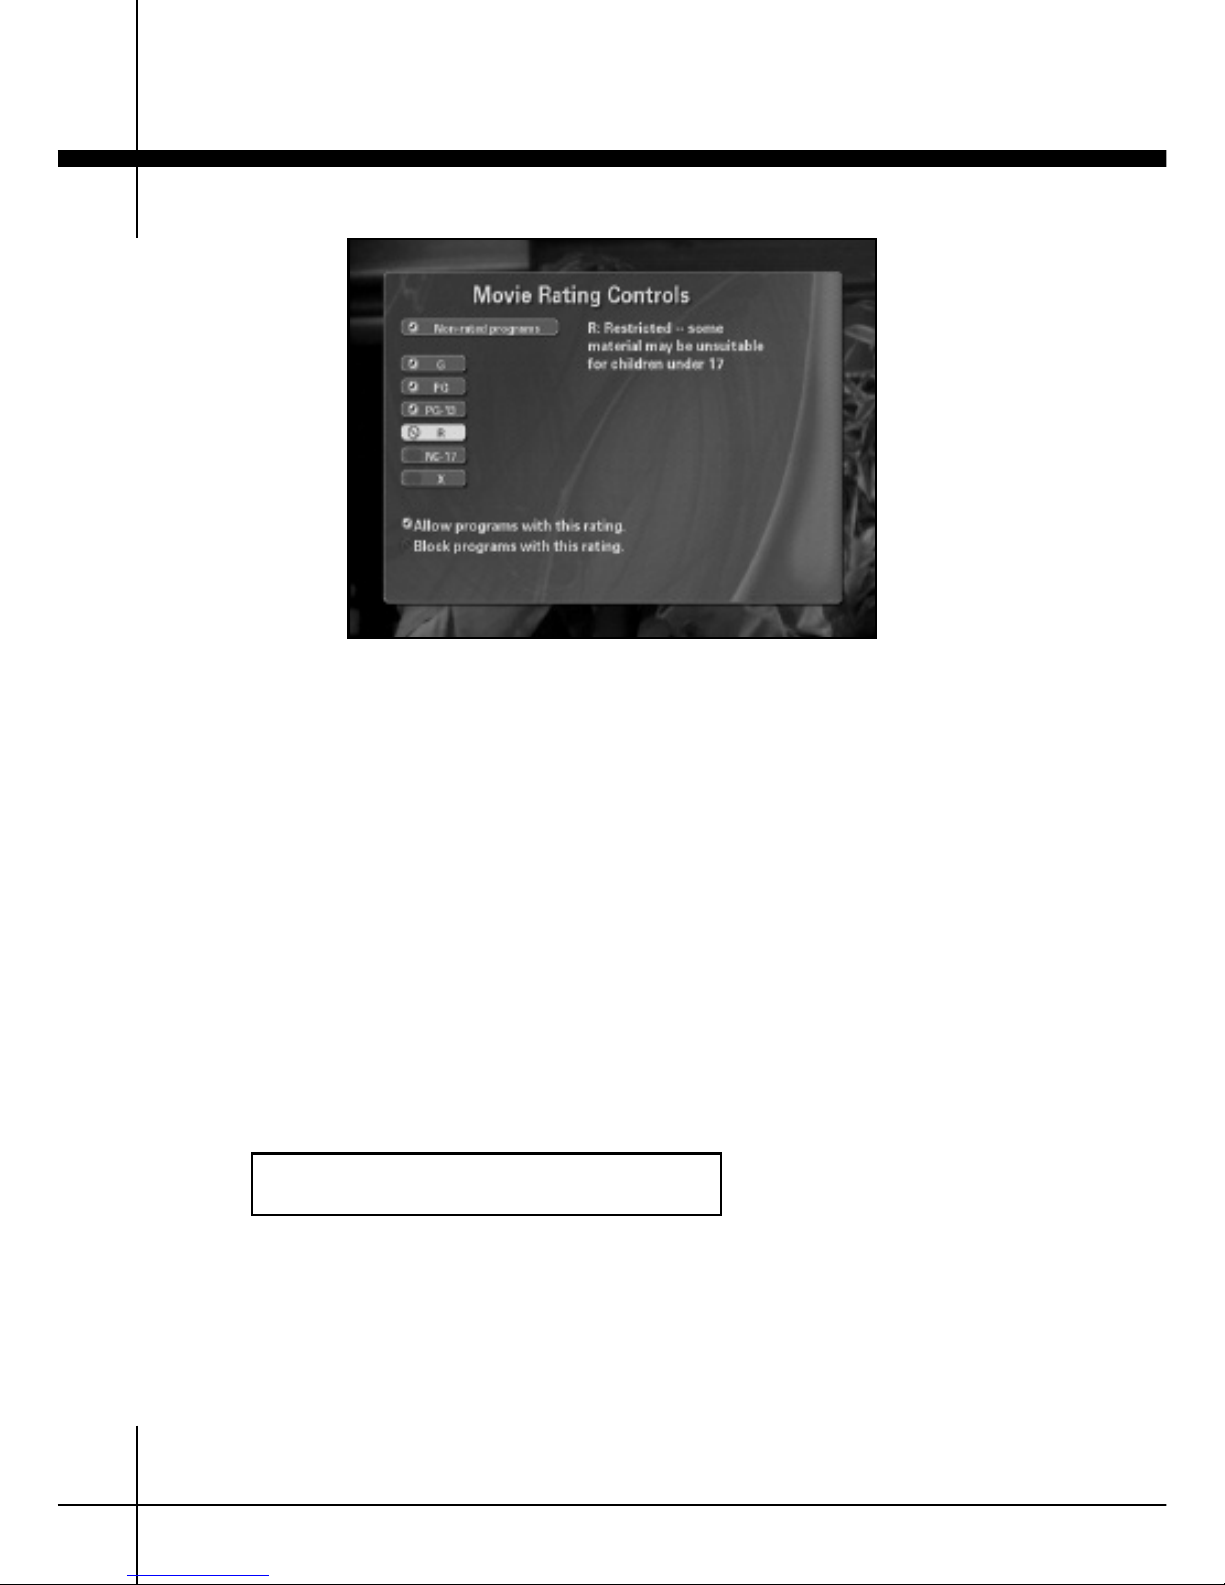
MMaannaaggee MMoovviiee RRaattiinnggss
This menu allows you to block programs with your preference of MPAA (Motion Picture
Association of America) ratings. Only movies have MPAA ratings. Some movies have a
specific “MPAA Not Rated” rating, and these can be blocked as well.
SSeett PPaasssswwoorrdd
This screen allows you to enter a 4-digit password. If you previously entered a password,
you must enter it again before it can be changed.
WWAARRNNIINNGG::
use a password that is easy to remember, or keep it written in a safe
place. If you forget your password, it can only be cleared by calling USDTV at
1-877-438-8738.
WWrriittee yyoouurr ppaasssswwoorrdd hheerree ffoorr ffuuttuurree rreeffeerreennccee::
MMoovviiee RRaattiinngg CCoonnttrroollss
Page 25
Editing Channel List
Configuration 5
25
S
etup
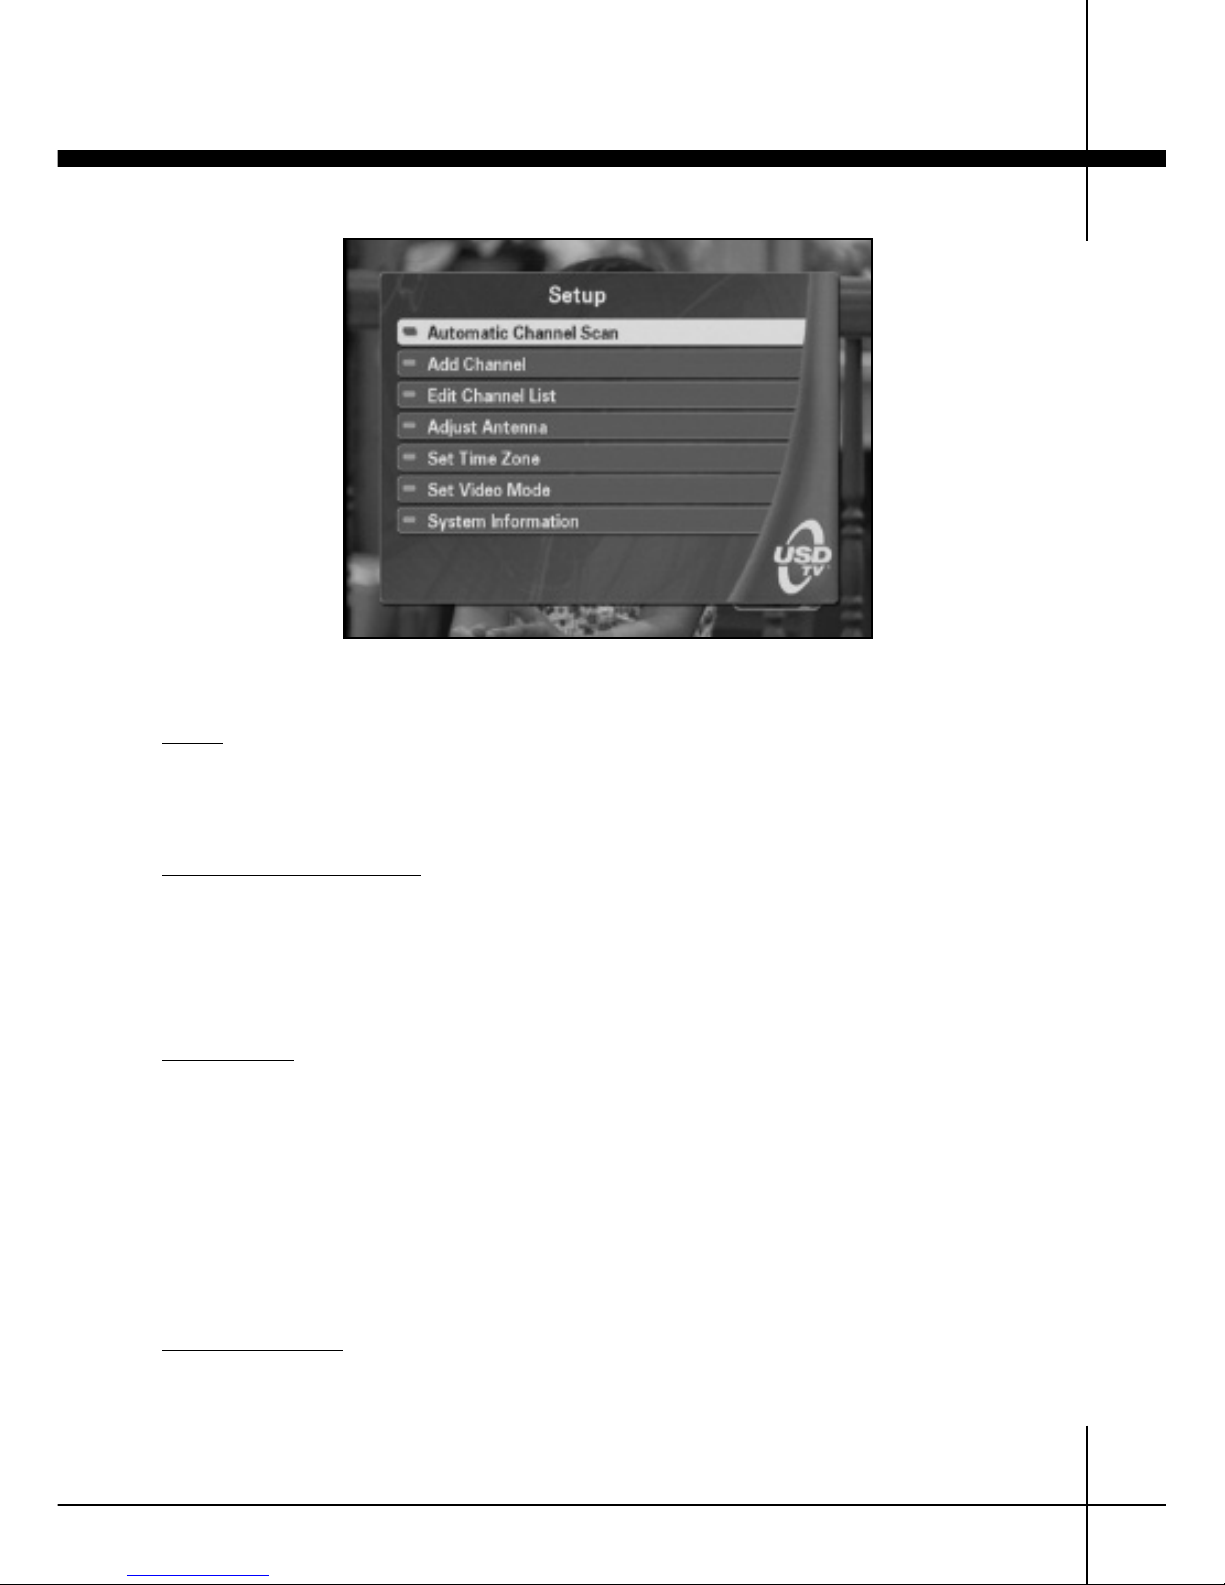
From the main menu, highlight
SSeettuupp
and press
OOKK
to access the configuration options
described below.
Automatic Channel Scan
You can scan for channels any time you would like to do so. If you desire to rescan for
channels, select
AAuuttoommaattiicc CChhaannnneell SSccaann
from the Setup menu and press
OOKK
. You may
want to rescan every few months to search for new local digitally broadcast TV stations
in your area.
Add Channel
If y
ou ar
e trying t
o receive a channel that was not previously detected, you can do so
with a version of the Adjust Antenna screen described below. From the Setup menu,
highligh
t
AAdddd CChhaannnneell
and pr
e
s
s
OOKK
. En
t
er the br
oadcast frequency number and press
OOKK
. It is import
ant t
o kno
w the broadcast frequency, which is different from the chan-
nel number. For instance, your “local channel 4 news” may be on broadcast frequency
18. T
his is only important to know when adding a channel that was not detected by the
HD
TV receiver. If you do not know the frequency number, see the web site
antennaweb.org or call us (1-877-438-8738) for assistance.
E
dit Channel List
If you would rather not see a channel that was found by the HDTV receiver, you can view
a list of all channels and “cross out” the ones you do not want. From the Setup menu,
s
elect
EEddiitt CChhaannnneell LLiisstt
and pr
e
s
s
OOKK
. Highligh
t the channel y
ou do no
t want and press
OOKK
. To see the channel again, highlight it and press
OOKK
again.
SSeettuupp MMeennuu
Page 26
Adjust Antenna & Time Settings
Configuration5
26
5
A
djust Ant
enna
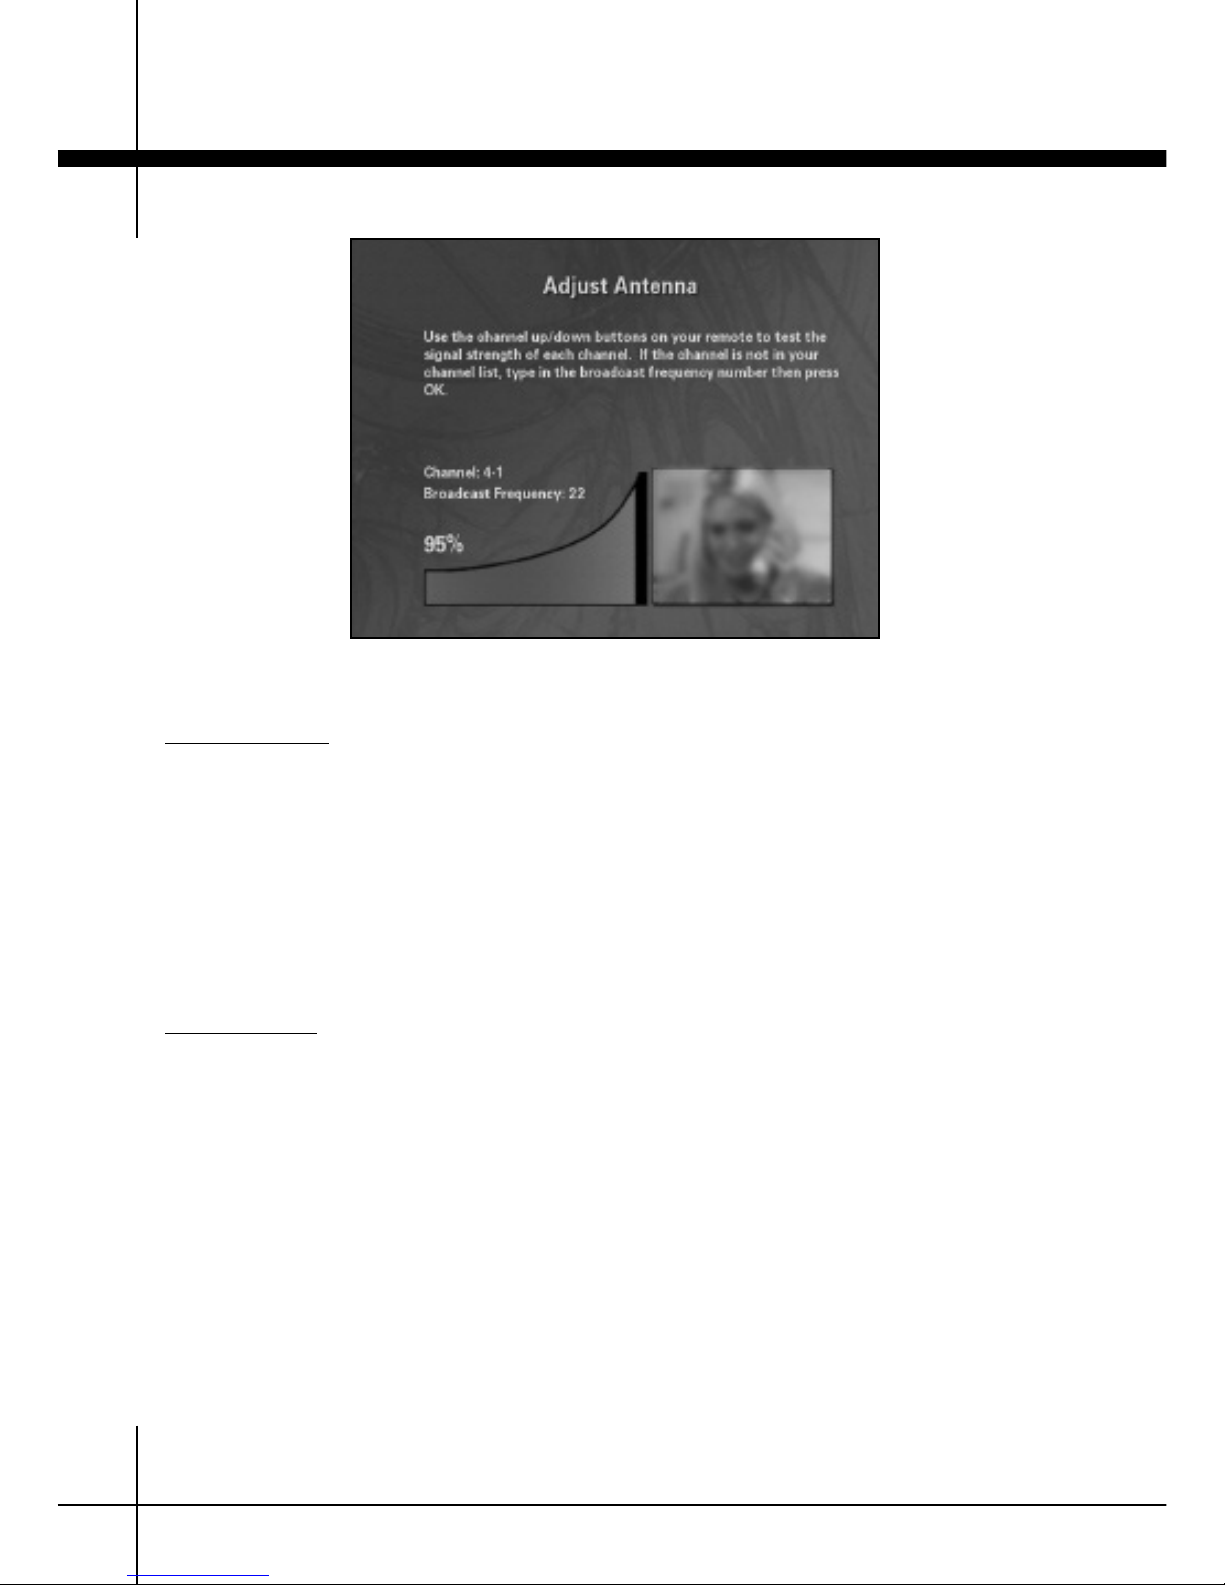
If you would like to see the effects of rotating or moving your antenna, there is a special screen to help. From the
SSeettuupp
menu, select
AAddjjuusstt AAnntteennnnaa
and press
OOKK
again.
This screen displays useful information to help find the best position for the TV antenna. A large graph shows signal strength of the current channel. The channel’s video
also plays in a window on the same screen. As you adjust the antenna the changes will
be seen in both the graph and in the quality of the video. You can press the channel-up
and channel-down buttons to see the quality of each channel. Note that you cannot
use the number keys to type channel numbers, only broadcast frequency numbers!
Set Time Zone
T
o change your time zone, highlight Set Time Zone in the Setup menu and press OK.
Highligh
t the appr
opriat
e time zone and press OK again.
AAddjjuusstt AAnntteennnnaa
Page 27
Video Setup & Screen Aspect Ratio
Configuration 5
27
VIDEO SETUP
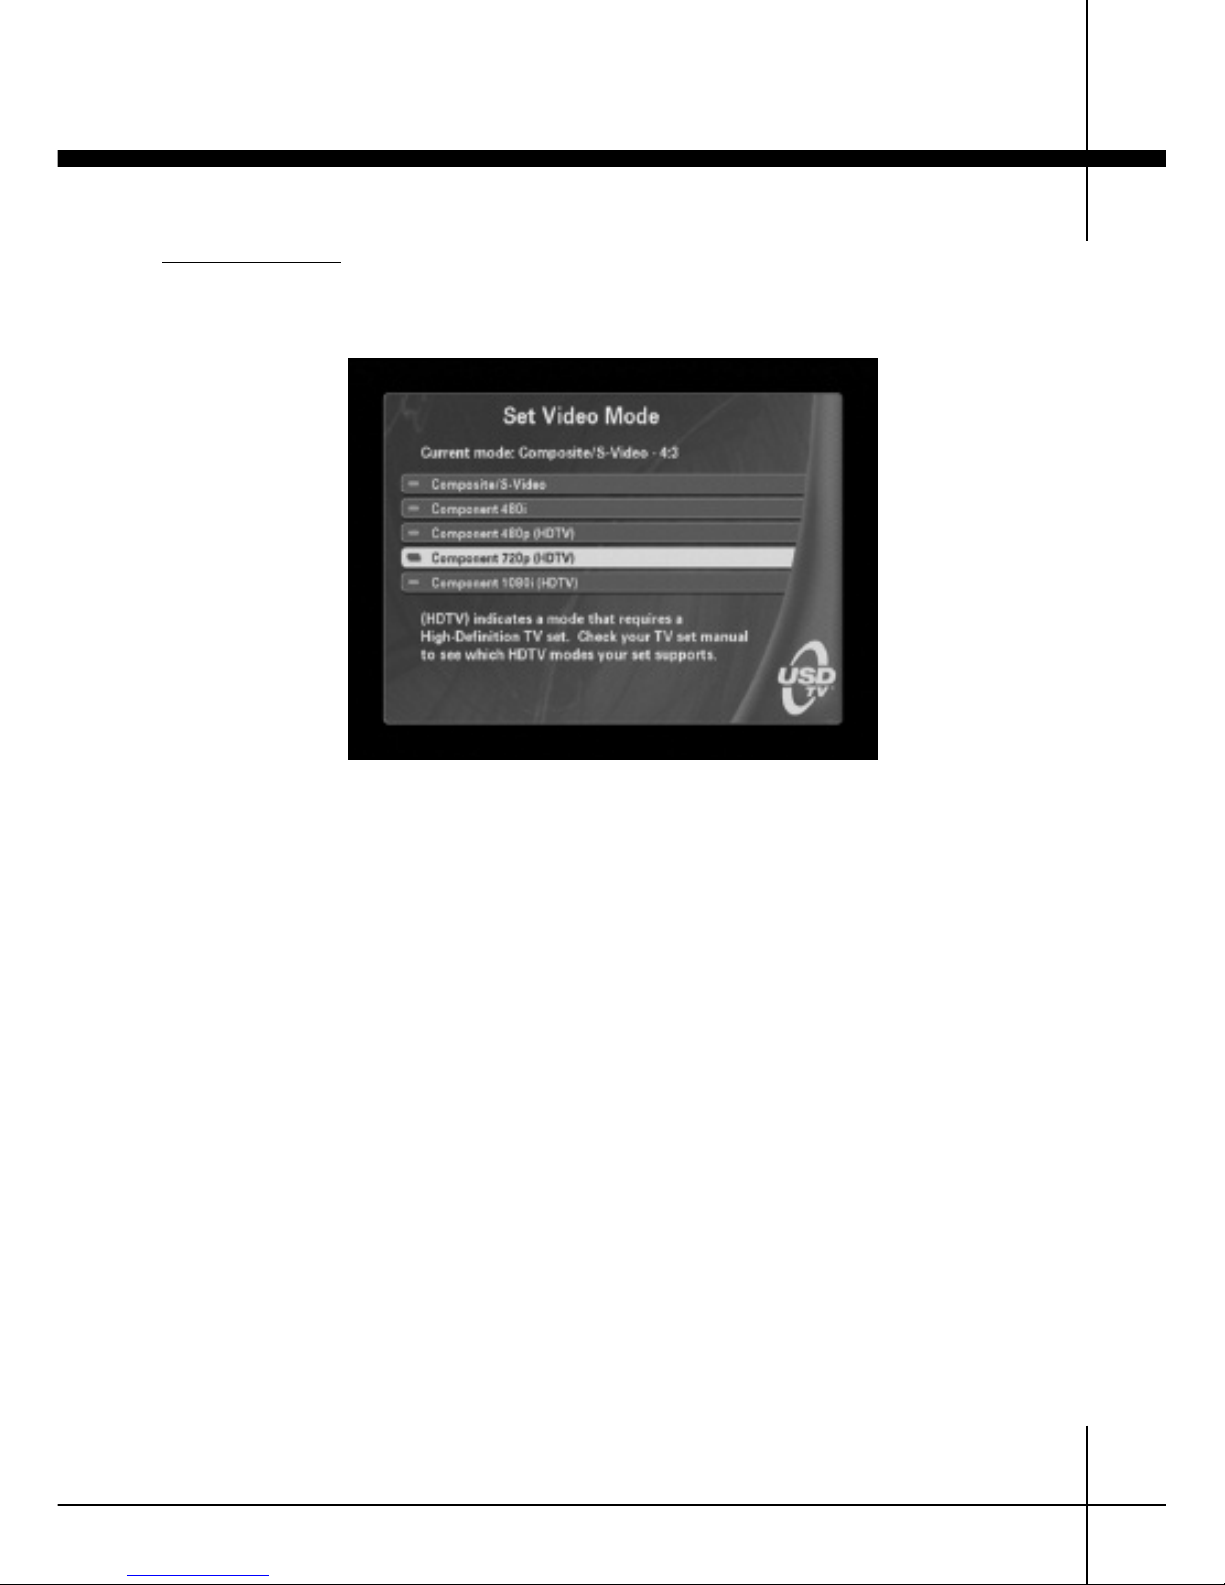
You may wish to change the video mode that was configured during initial setup. Go to
the Setup menu, highlight Set Video Mode, then press
OOKK
.
Choose the appropriate video setup menu option based on the video cable type you are
using.
• Composite refers to the yellow connector of the 3-wire cable with red, white
and yellow ends connected to the Video output (the red and white ends are used
for audio).
• S-Video refers to the 1-wire cable with large black ends.
• Component refers to the 3-wire cable with red/green/blue ends connected to
the Y, Pb and Pr output.
Highligh
t the de
sir
ed mode and press OK.
Page 28
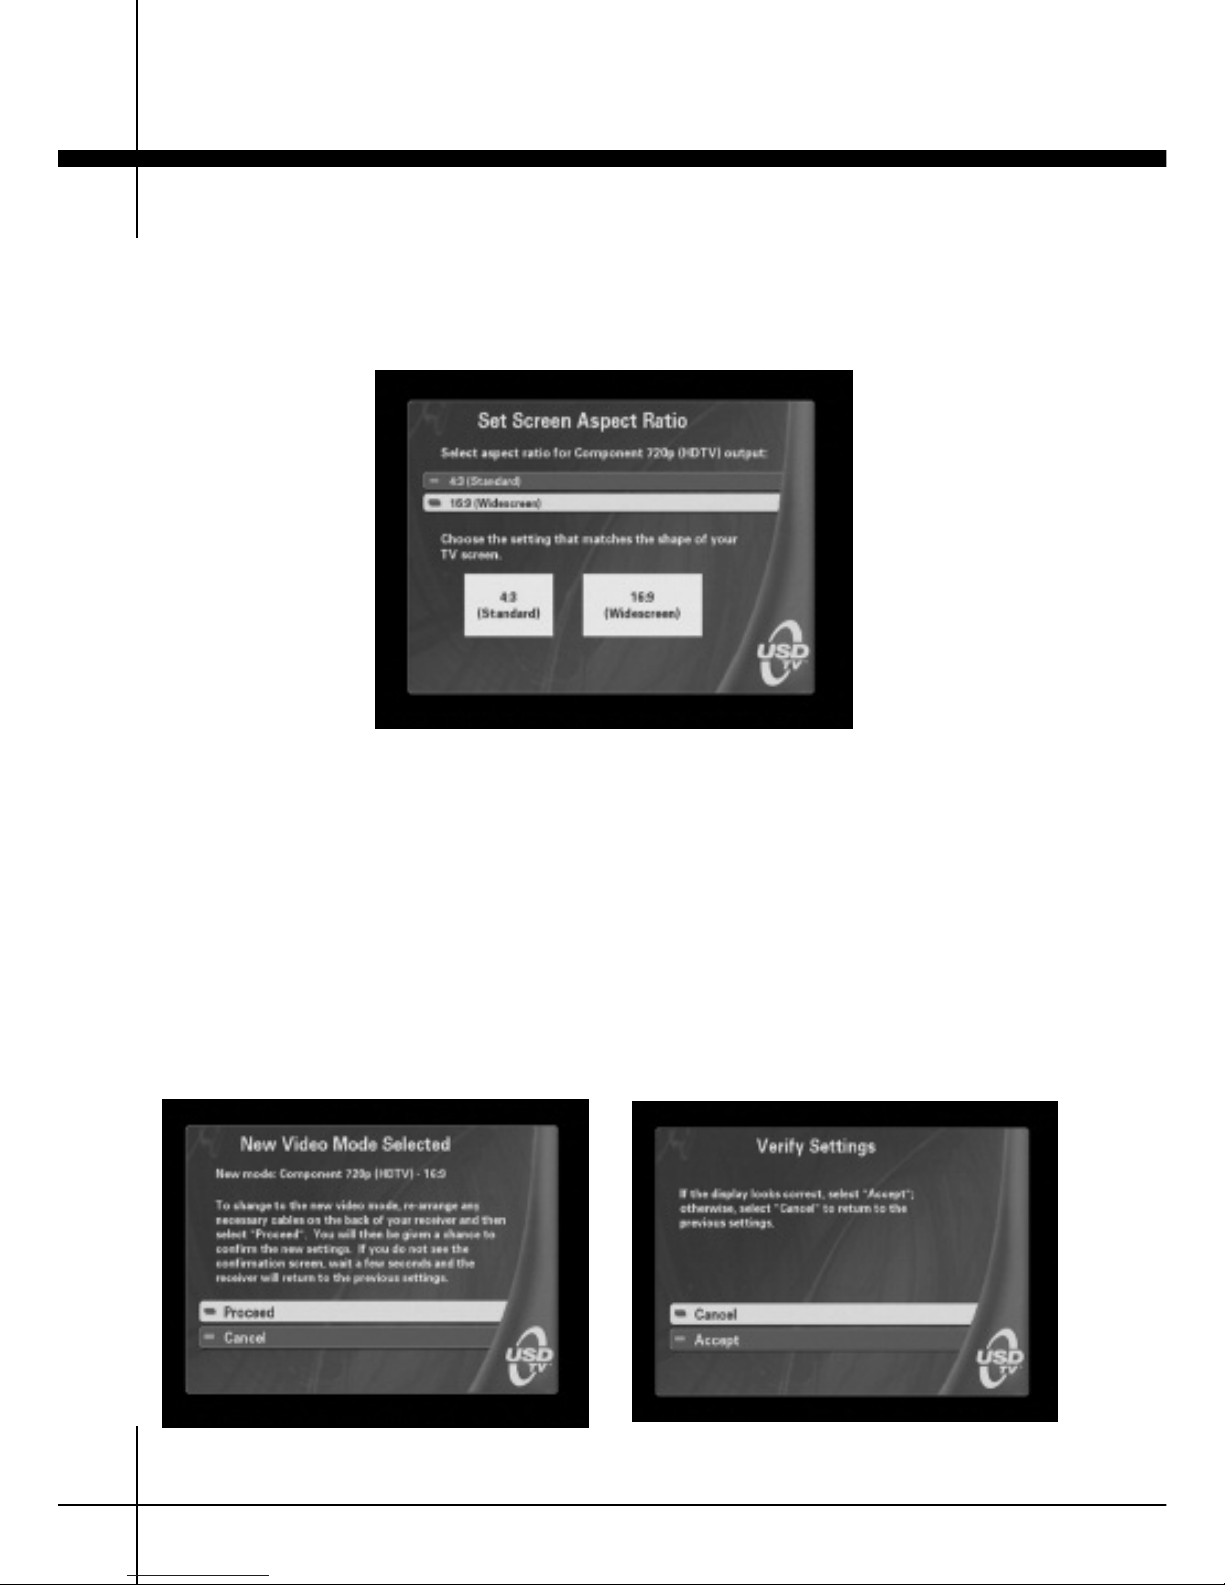
Video Setup & Screen Aspect Ratio
Configuration5
28
The next screen allows you to select the aspect ratio (shape) of your television screen.
If you have a standard-screen TV, select 4:3 (Standard). If you have a widescreen TV,
select 16:9 (Widescreen). Highlight the appropriate item and press OK.
The next screen confirms your choice and reminds you to make any cable changes that
may be needed.
When you are ready to test the new mode, press OK.
The receiver then changes to the new mode and asks if this mode is acceptable.
If the screen looks correct, highlight Accept and press OK.
If the screen does not look correct, or if you do not see a picture, just wait several seconds and the receiver will go back to the previous mode.
Page 29

Video Issues
Troubleshooting 6
29
VIDEO ISSUES
BBllaacckk ssccrreeeenn,, BBlluuee ssccrreeeenn,, ssnnooww oorr ssttaattiicc oonn tthhee ssccrreeeenn,, oorr ““nnoo ssiiggnnaall”” mmeessssaaggee ffrroomm TTVV
• Check that both the television and the HDTV receiver are turned on
• Check the input on the television to be sure it is not set to a different input,
such as a DVD player or other device. Consult your television’s manual for fur-
ther information
• Check cabling, making sure that the video cable between the HDTV receiver and
television is connected properly
• If the above does not work, and you are using a component (Y/Pb/Pr) video con-
nection, the HDTV receiver may be set to a mode that the television cannot
handle. All component televisions can handle 480i mode, and you can put the
HDTV receiver into 480i mode by pressing the following buttons quickly, in this
order:
•• GGUUIIDDEE
•• AASSPPEECCTT
•• GGUUIIDDEE
•• 22
Then consult your television manual to determine which modes it supports and
use the video setup menu if you wish to change modes.
• If the above does not work, restart the HDTV receiver by pressing the
PPOOWWEERR
button on the receiver’s front panel and holding it until the receiver’s lights
begin to blink, about five seconds
• If the above does not work, unplug the receiver from the electrical outlet and
plug it in again
CCoolloorrss aarree wwrroonngg
Check cabling. If you are using a composite video connection (yellow end of the
c
able with r
ed, white and yellow ends), make sure it is plugged into the VIDEO
jack in the b
ack o
f the HD
TV receiver and of the television … and that it is NOT
plugged into the green component video jack, which is labeled “Y” (component
video jacks are labeled Y/Pb/Pr).
If you are using a component video connection (Y/Pb/Pr), make sure each connector is plugged into the correct jack, both on the HDTV receiver and on the tele
vision. T
hese are the correct colors:
LLAABBEELL CCOOLLOORR
YY ggrreeeenn
PPbb bblluuee
PPrr rreedd
Page 30

Video Issues
Troubleshooting6
30
PPiiccttuurree ddiissttoorrtteedd,, iinn ppiieecceess,, oorr ““oouutt ooff rraannggee”” mmeessssaaggee ffrroomm tteelleevviissiioonn
This indicates that the HDTV receiver is set to a mode that the television is
unable to handle. The following sequence of buttons on the remote control will
change the HDTV receiver settings to 480i mode, which all televisions can display. Note that you must press the buttons in the exact order shown, and do so
quickly. Press these buttons:
•• GGUUIIDDEE
•• AASSPPEECCTT
•• GGUUIIDDEE
•• 22
Once the receiver is in 480i mode you can use the video setup menus to switch
to another mode if desired. Check your television’s manual to determine which
modes it can display.
FFrroozzeenn ppiiccttuurree oorr ttiilliinngg//mmoossaaiicc ppaatttteerrnn
See the
RReecceeppttiioonn
section on page 31.
PPiiccttuurree hhaass bbllaacckk aallll aarroouunndd // ppiiccttuurree wwrroonngg sshhaappee
Using the remote, do the following:
• Press
MMEENNUU
• Highlight
SSeettuupp
, press
OOKK
• Highlight
SSeett VViiddeeoo MMooddee
, press
OOKK
• Your current video mode his highlighted. Just press
OOKK
• If you have a widescreen TV, highlight “16:9 (Widescreen)”
• If you have a standard TV, highlight “4:3 (Standard)”
If this does not solve the problem, press the
AASSPPEECCTT
button on the remote con
trol repeatedly until you find a zoom setting that looks correct for this TV pro
gram. Please see the configuration chapter in this manual for more information
about aspect settings.
VViiddeeoo ssttooppppeedd wwoorrkkiinngg oonn oonnee oorr ssoommee cchhaannnneellss,, OOffff TThhee AAiirr mmeessssaaggee aappppeeaarrss
Local broadcasters occasionally change settings on their equipment. If one or a
few stations are off the air for a day or two, have the HDTV receiver rescan channels. Using the remote, do the following:
• Press
MMEENNUU
• Highlight
SSeettuupp
, press
OOKK
• Highlight
AAuuttoommaattiicc CChhaannnneell SSccaann
, press
OOKK
The receiver will scan for all channels, and the missing one(s) should reappear.
Page 31

Audio & Reception Issues
Troubleshooting 6
31
AUDIO ISSUES
AAuuddiioo nnoott wwoorrkkiinngg
• Check that the television or amplifier’s volume is at a reasonable level
• Check that the HDTV receiver’s volume is at a reasonable level
• Press the MUTE button on the HDTV receiver’s remote control (press it again
if sound does not return)
• Check that the mute function is not activated on the television or amplifier
• Check the audio cables between the HDTV receiver and television or audio
equipment
• If you are using an amplifier with configurable inputs, check that the amplifier
is configured to play sound from the HDTV receiver
AAuuddiioo iiss iinn aa llaanngguuaaggee ootthheerr tthhaann EEnngglliisshh
Some television programs include alternate audio tracks. Press the AUDIO but
ton on your remote control to switch between them (if any are provided). Of
course, some television stations broadcast only in Spanish or another language,
so this would be normal for those stations.
AAuuddiioo iiss nnoott iinn ssuurrrroouunndd ssoouunndd
Surround sound is only available with digital audio, so you must use an amplifier
with Dolby Digital capability, and the corresponding S/PDIF (optical) cable (not
included with the USDTV receiver). In addition surround sound is only provided
by broadcasters for some programs.
RECEPTION ISSUES
AAllll cchhaannnneellss ooffff tthhee aaiirr,, oorr ffrroozzeenn ppiiccttuurree oonn ssccrreeeenn
Restart the HDTV receiver by holding the front panel button for about five seconds, until the lights on the HDTV receiver begin to blink.
TTiilliinngg//mmoossaaiicc ppaatttteerrnn,, oorr bbaadd rreecceeppttiioonn
The signal strength for this station is weak. Signal strength can be improved in
the following ways:
• Repositioning the antenna (see the configuration section of this manu
al for a screen that helps with this)
• Switching from an indoor antenna to an outdoor one, or to a better
antenna
• Using f
ew or no splitters on the antenna cable
Signal s
tr
ength c
an als
o be af
fected by rain or snow.
IItt ttaakkeess aa lloonngg ttiimmee ttoo cchhaannggee cchhaannnneellss
In digit
al br
oadcasting, it could take 1 to 2 seconds to receive data. Therefore, a
shor
t dela
y is normal.
Page 32

Closed Caption, Parental Control Issues
Troubleshooting6
32
CLOSED CAPTION ISSUES
NNoo ccaappttiioonnss aappppeeaarr wwhheenn tthhee CCCC bbuuttttoonn iiss pprreesssseedd
First, be aware that some television programs and commercials do not have any
closed captions. Second, be aware that there are two types of closed captions in
digital television:
DTV (EIA-708-B) captions are an advanced caption style which is provided by some broadcasters.
NTSC (EIA/CEA-608-B) captions are a basic style of captions which
broadcasters may provide instead of, or in addition to, DTV captions.
It is possible that only one of these is provided by the broadcaster. To switch
between closed caption types, press the
CCCC
button repeatedly.
TTwwoo sseettss ooff ccaappttiioonnss aappppeeaarr oonn tthhee ssccrreeeenn
This happens when both the HDTV receiver and the television have closed captions turned on. Consult your television’s manual to learn how to turn its closed
caption feature off.
PARENTAL CONTROL ISSUES
PPrrooggrraammss aarree nnoott bbeeiinngg bblloocckkeedd
There are several possible reasons why a program may not be blocked. To reach
the parental control menus, press
MMEENNUU
, highlight
PPaarreennttaall CCoonnttrroollss
and press
OOKK
. From here, check that blocking is enabled and that a password is set.
If blocking is enabled, check that the desired ratings are set to be blocked, in the
Manage TV ratings screen and the Manage movie ratings screen. Note that a
program may have one of these but not the other. Also note that if you choose
to block non-rated programs, this may block programs like news broadcasts and
loc
al programming that is not given a rating.
LLoosstt ppaasssswwoorrdd
A lost password can only be cleared by the USDTV customer service department.
Before calling, please check page 24 of this manual. You may have written the
password in the box there. If the password is not available, please contact
USDTV customer service at 1-877-438-8738.
Page 33

Other Issues
Troubleshooting 6
33
OTHER ISSUES
HHDDTTVV rreecceeiivveerr iiss oovveerrhheeaattiinngg
Make sure the HDTV receiver is properly ventilated. The receiver may overheat
if enclosed in an entertainment cabinet with other equipment without proper
ventilation.
RReemmoottee ccoonnttrrooll iiss nnoott wwoorrkkiinngg
Make sure the remote control sensor on the front panel of the HDTV receiver is
not covered. Check to ensure that the batteries are installed correctly in the
remote control. Point the remote control directly at the HDTV receiver. Install
fresh batteries if the above does not work.
RReesseett HHDDTTVV rreecceeiivveerr ttoo ffaaccttoorryy sseettttiinnggss
To reset the HDTV receiver to its factory settings, press the following buttons
quickly, in this order:
•• GGUUIIDDEE
•• AASSPPEECCTT
•• EEXXIITT
•• PPRROOGG IINNFFOO
•• 00
NOTE 1: The initial setup process must be followed in order to use the receiver
again
NOTE 2: Resetting to factory settings does not remove the parental control
password.
Page 34

1-877-438-8738 (1-877-GET USDTV)
www.usdtv.com
USDTV is a registered trademark of U.S. Digital Television, LLC.
©2005 U.S. Digital Television,LLC.
 Loading...