

Page 1
Page 2

USB 9640 5-Channel LED PAR
© US Blaster Europe BV
Introduction
Thank you very much for purchasing the USB 9640, our 5-channel LED Par that can work in
AUTO, AUDIO and DMX mode. To assure the reliable performance it is designed for, please read
the instructions in this manual thoroughly and carefully before application.
Safety Information
The following definitions of identifying the severity of the hazards associated with the products are
used:
“DANGER” Imminently hazardous situation, which if not avoided, will cause death or serious
injury.
“WARNING” Potentially hazardous situation, which if not avoided, could cause death or serious
injury.
“CAUTION” Potentially hazardous situation, which if not avoided, may cause minor or moderate
injury or property damage. In addition, it uses to alert against unsafe practice.
IGNORING A HAZARD WILL VOID ANY WARRANTY.
DANGER: Ensure that the fixture is disconnected from the main power before
performing any type of service or any cleaning procedure.
WARNING: No serviceable parts inside the fixture, do not attempt to open it.
WARNING: Qualified professional in accordance with related local codes must
perform the Installation.
WARNING: Do not attempt to operate the fixture before read and understand the
installation instructions and safety labels.
CAUTION: Do not modify, alter, or attempt to service the USB 9640.
CAUTION: Always ground (earth) the fixture electrically.
CAUTION: Refer all service to a qualified technician.
CAUTION: When suspending the fixture above ground level or place it on the
ground, verify that the structure or surface can hold at least 10 times the weight of
all installed devices.
Page 3

USB 9640 5-Channel LED PAR
© US Blaster Europe BV
Unpacking
The USB 9640 has been thoroughly tested and shipped in perfect operating condition. Check the
shipping carton carefully for damage that may have occurred during shipping. If the carton
appears to be damaged, carefully inspect your fixture for damage and be sure all accessories
necessary to operate the fixture have arrived intact. In case damage has been found or parts are
missing, please contact the sales person for further instructions.
You will find the following components inside the box:
1 USB 9640
3-pin DMX XLR cable
This User Manual
3-wire IEC power cable
Specifications
Power Supply: AC 240V/50 Hz
LED Configuration: 174 Pcs. (R=80PCS 0.044w, G=66PCS 0.064w, B=54PCS 0.064w)
Power Consumption: 19 Watt
Dimension: 255 x 200 x 200 mm
Weight: 2.3 Kg
Features
Low power consumption
Maintenance free operation
100.000 hours rated LED lifespan
174 Pcs. of LED generates 16.7 million additive RGB colors
DMX or stand-alone mode with Master/Slave function
18 built-in programs accessed via DMX-controller or manually
Sound-activated via built-in microphone of adjustable sensitivity
Brilliant light output
Page 4
USB 9640 5-Channel LED PAR
© US Blaster Europe BV
Panel review
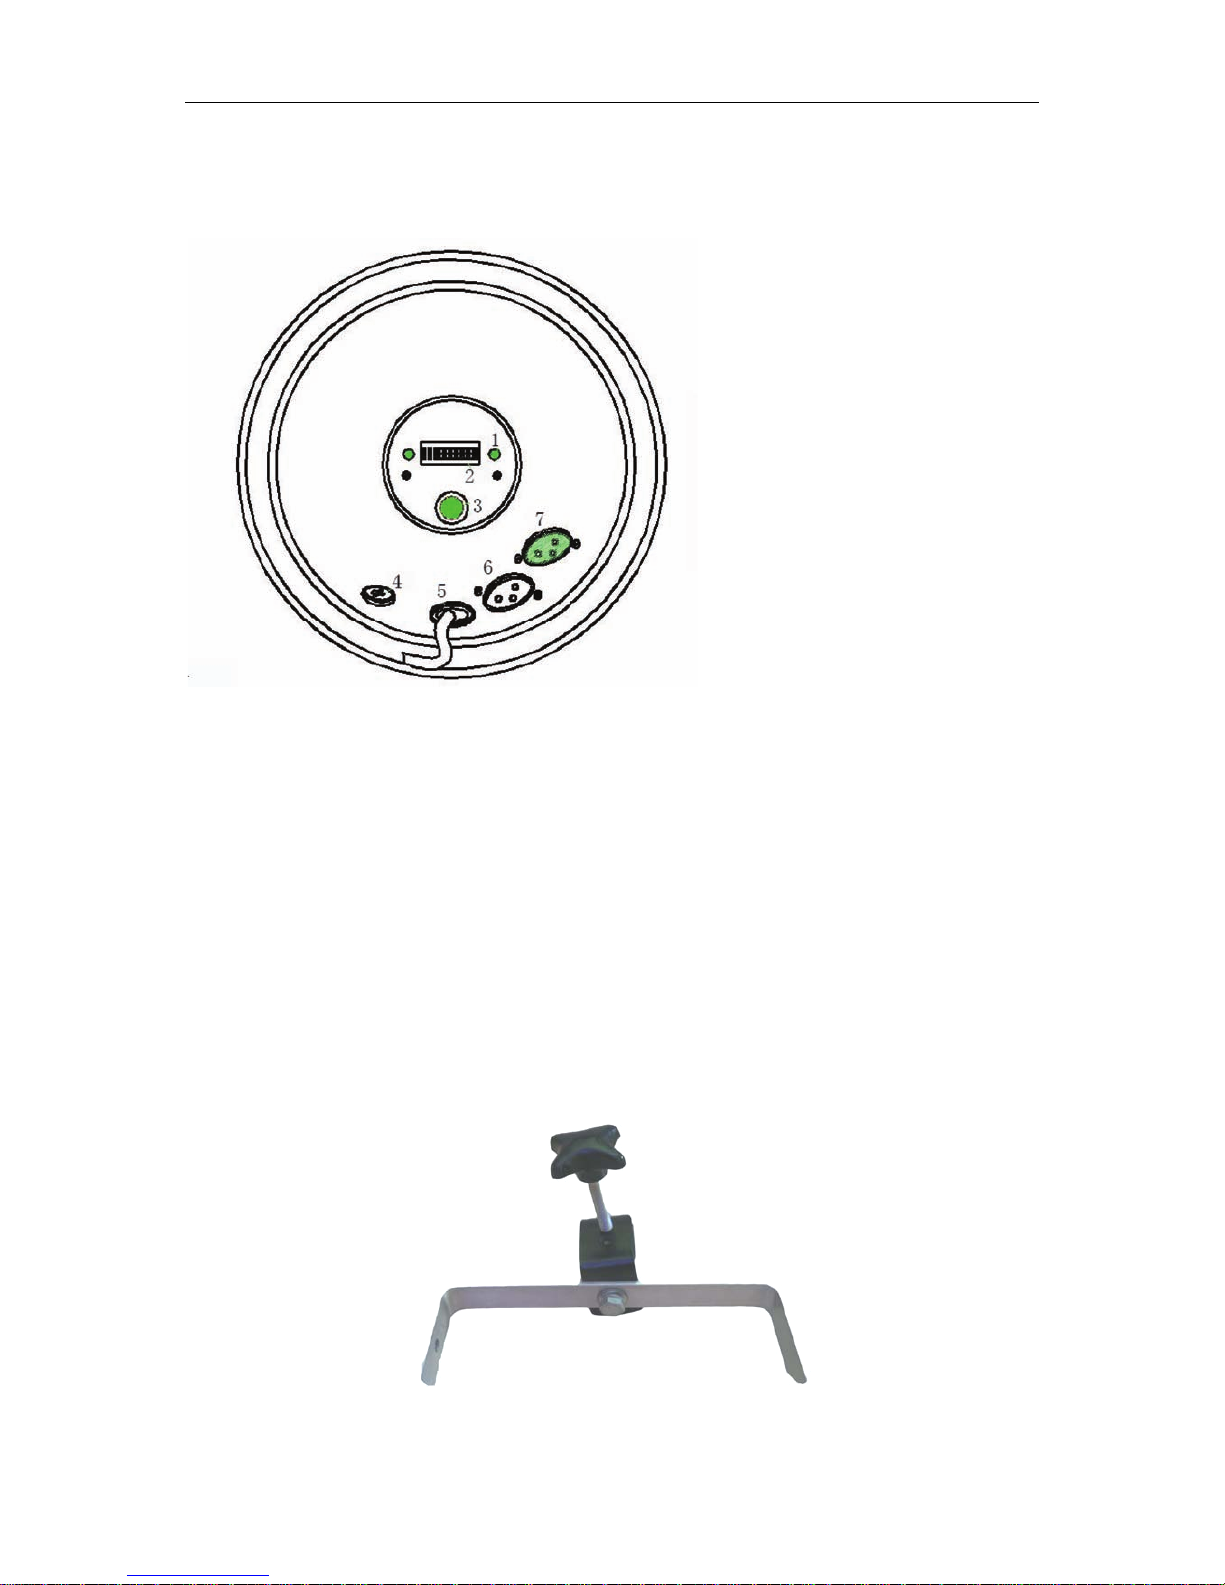
1. LED indicator 2. Dipswitches 3. Microphone 4. Fuse
5. Power inpu t 6. DMX in 7. DMX out
Installation and operation
Mounting
The fixture can be mounted overhead by a clamp or against a flat surface by the bracket it has.
When you mount overhead, you can connect its bracket with the clamp through the center hole.
Verify the structure can hold 10 times the weight of all installed fixtures.
Always use a safety cable or chain as a assistant attachment. The safety cable or chain must hold
10 times the weight o f all installed fixtures.
Page 5
USB 9640 5-Channel LED PAR
© US Blaster Europe BV
AC power
The fixture’s mains lead may require a grounding-type cord cap that fits your power distribution
cable or outlet. Consult a qualified electrician if you have any doubts about proper installation.
WARNING: For protection from dangerous electric shock, the fixture must be grounded
(earthed). The AC mains power supply shall have overload and ground-fault
protection.
CAUTION: Verify that the feed cables are undamaged and rated for the current
requirements of all connected devices before use.
Following the cord cap manufacturer's instructions, connect the yellow and green wire to ground
(earth), the brown wire to live, and the blue wire to neutral. The table below details some pin
identification schemes.
Wire
Pin
Marking
Screw color
Brown
Live
“L”
Yellow or brass
Blue
Neutral
"N”
Silver
Yellow or green
Ground
〨
Green
Understanding DMX
About DMX
DMX is the abbreviation of Digital Multiplex. It’s a universal protocol used by most audio, lighting
and controller manufactures as a form of communication between fixtures and controllers. A DMX
controller sends out DMX data instructions to the fixtures via 5-pin XLR cables. The data travels
through the DMX chain as a serial data.
DMX is a kind of "common language" allowing all products of different manufactures to be linked
together and operate from a single controller, as long as all fixtures and the controller are DMX
compatible. To ensure proper DMX data transmission, when using several DMX fixtures try to use
the shortest cable path possible.
DMX Cable Requirements:
Your fixture, USB 9640 uses 3-pin XLR cable as connection media. We provide each fixture with
a 3-pin XLR cable for you to chain the fixtures.
Page 6
USB 9640 5-Channel LED PAR
© US Blaster Europe BV
Connection of DMX
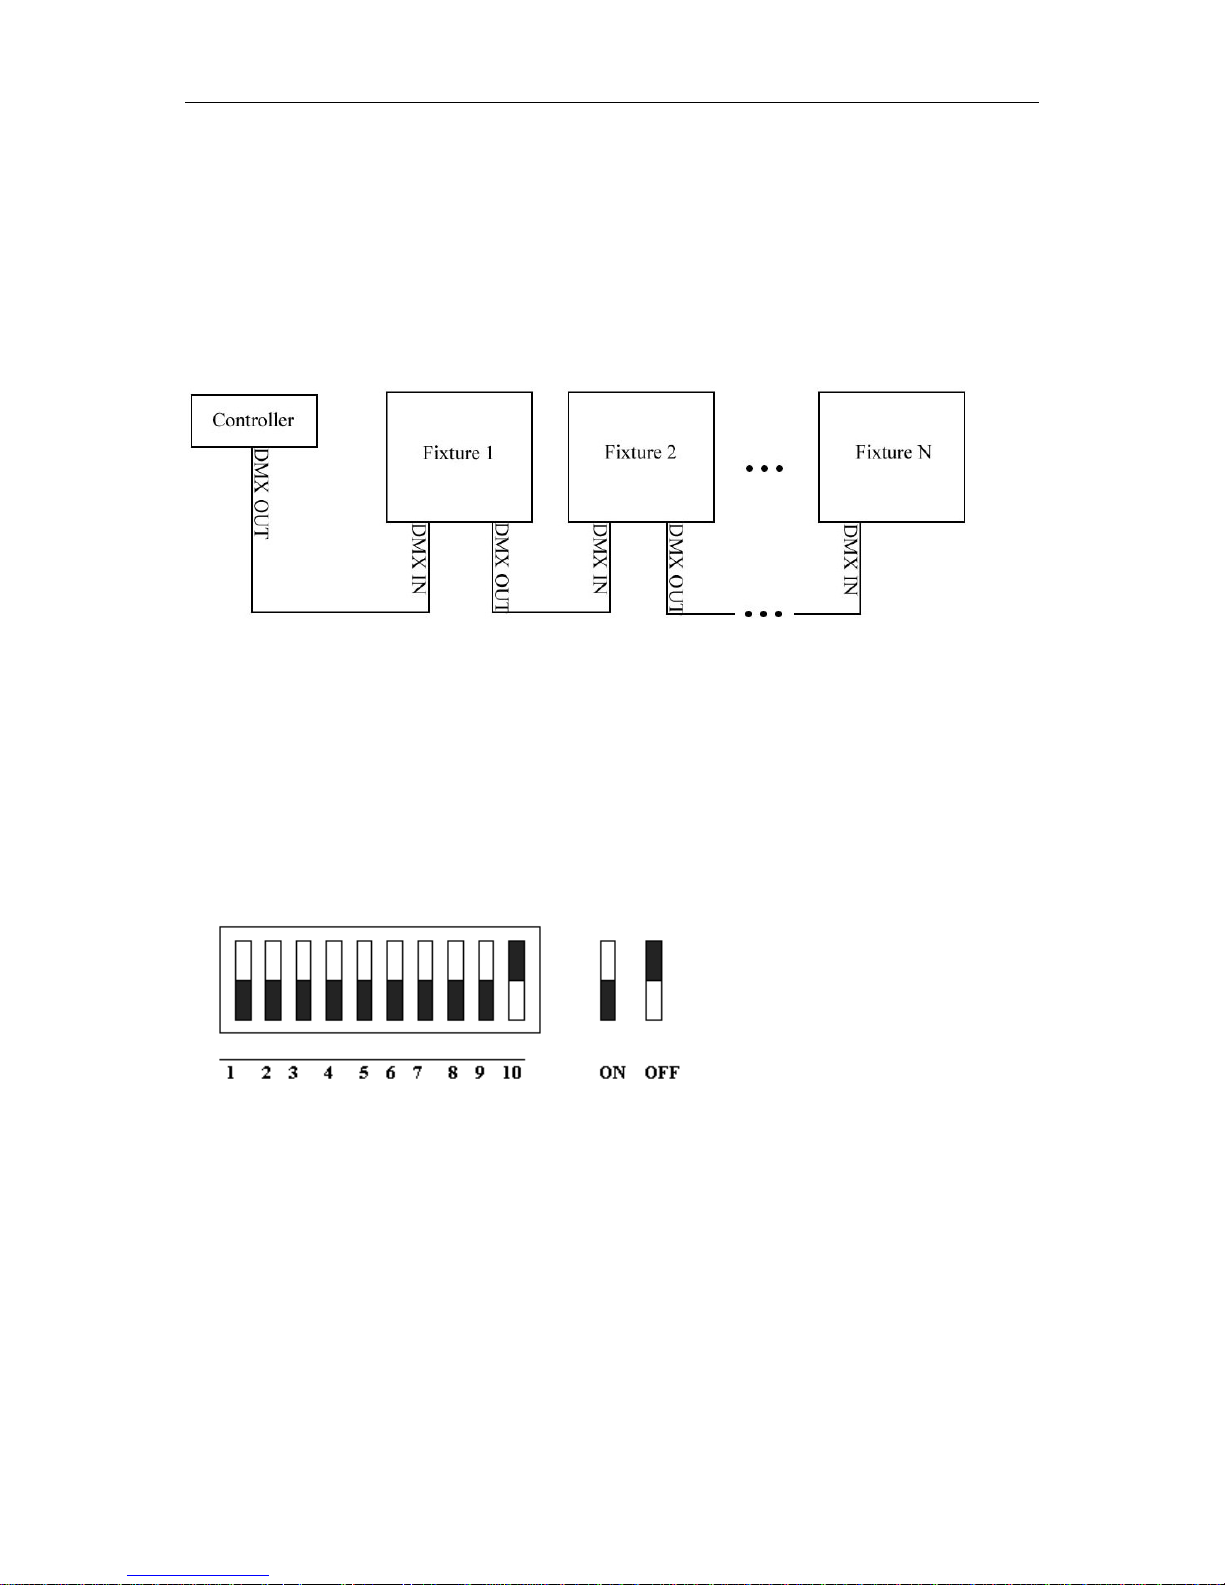
Connect the provided DMX XLR cable to the female 3-pin XLR output of your controller and the
other side to the male 3-pin XLR input of the fixture (please refer to the figure “Installation and
Operation” below).
You must chain multiple fixtures together through serial linking, never split your DMX connections
unless you are using a splitter/signal amplifier.
DMX addressing
All fixtures should be given a DMX starting address when using a DMX controller, so the correct
fixture responds to the correct control signal. This digital starting address is the channel number
from which the fixture starts to "listen" to the digital control information sent out from the DMX
controller. The allocation of this starting DMX address is achieved by various combining the
dipswitches.
This fixture employs 10 dipswitches to access its functions. Normally the dipswitches from #1 to
#9 are used for encoding DMX address, the dipswitch #10 for enabling DMX mode.
Dipswitch 1 address equals to 1
Dipswitch 2 address equals to 2
Dipswitch 3 address equals to 4
Dipswitch 4 address equals to 8
Dipswitch 5 address equals to 16
Dipswitch 6 address equals to 32
Dipswitch 7 address equals to 64
Dipswitch 8 address equals to 128
Dipswitch 9 address equals to 256
DMX address=Dipswitch 1+Dipswitch 2+…+Dipswitch 9.
Page 7
USB 9640 5-Channel LED PAR
© US Blaster Europe BV
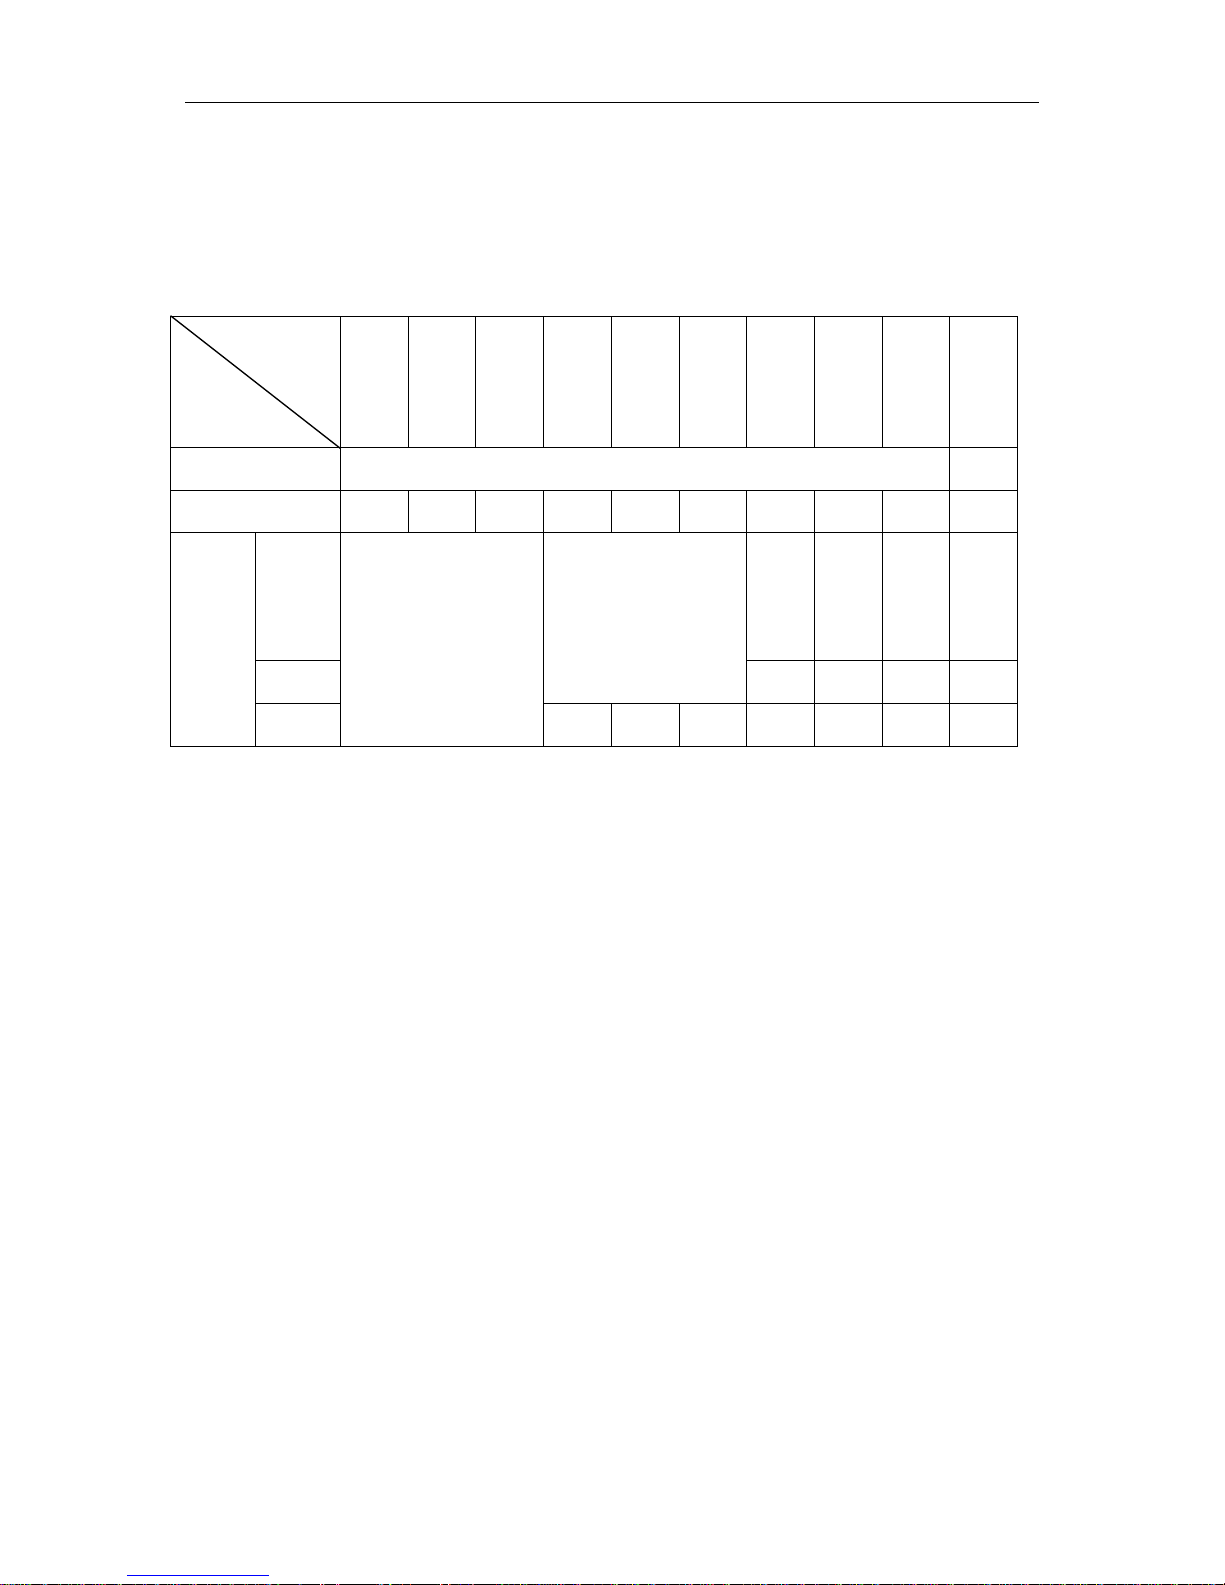
Operation Instructions
Brief function chart
Switch
Function
#1
#2
#3
#4
#5
#6
#7
#8
#9
#10
DXM
Set DMX address (see DMX address chart for details)
1
Slave X X X X X X X X X 1
Fade
and
Auto
1 X 0
0
Auto
Choose speed via
switch 4~6 ( See
speed choose chart
for details)
0 X 0
0
Master
Sound
Choose program via
switch 1~3 (See
program choose
chart for details)
X X X X X 1 0
Notes:
In sound active mode: No fade; Run to sound; Choose different programs via switch1~3
Connect DMX controller with the fixture through 3-pin XLR signal cord.
In master/slave mode, fixtures can run at the same time by setting one of fixtures as auto mode,
the left DMX mode.
In DMX mode, please pay attention to such points: set DMX channel address via switch 1~9
ranging from 1~512.
Page 8
USB 9640 5-Channel LED PAR
© US Blaster Europe BV
Modes
Auto mode
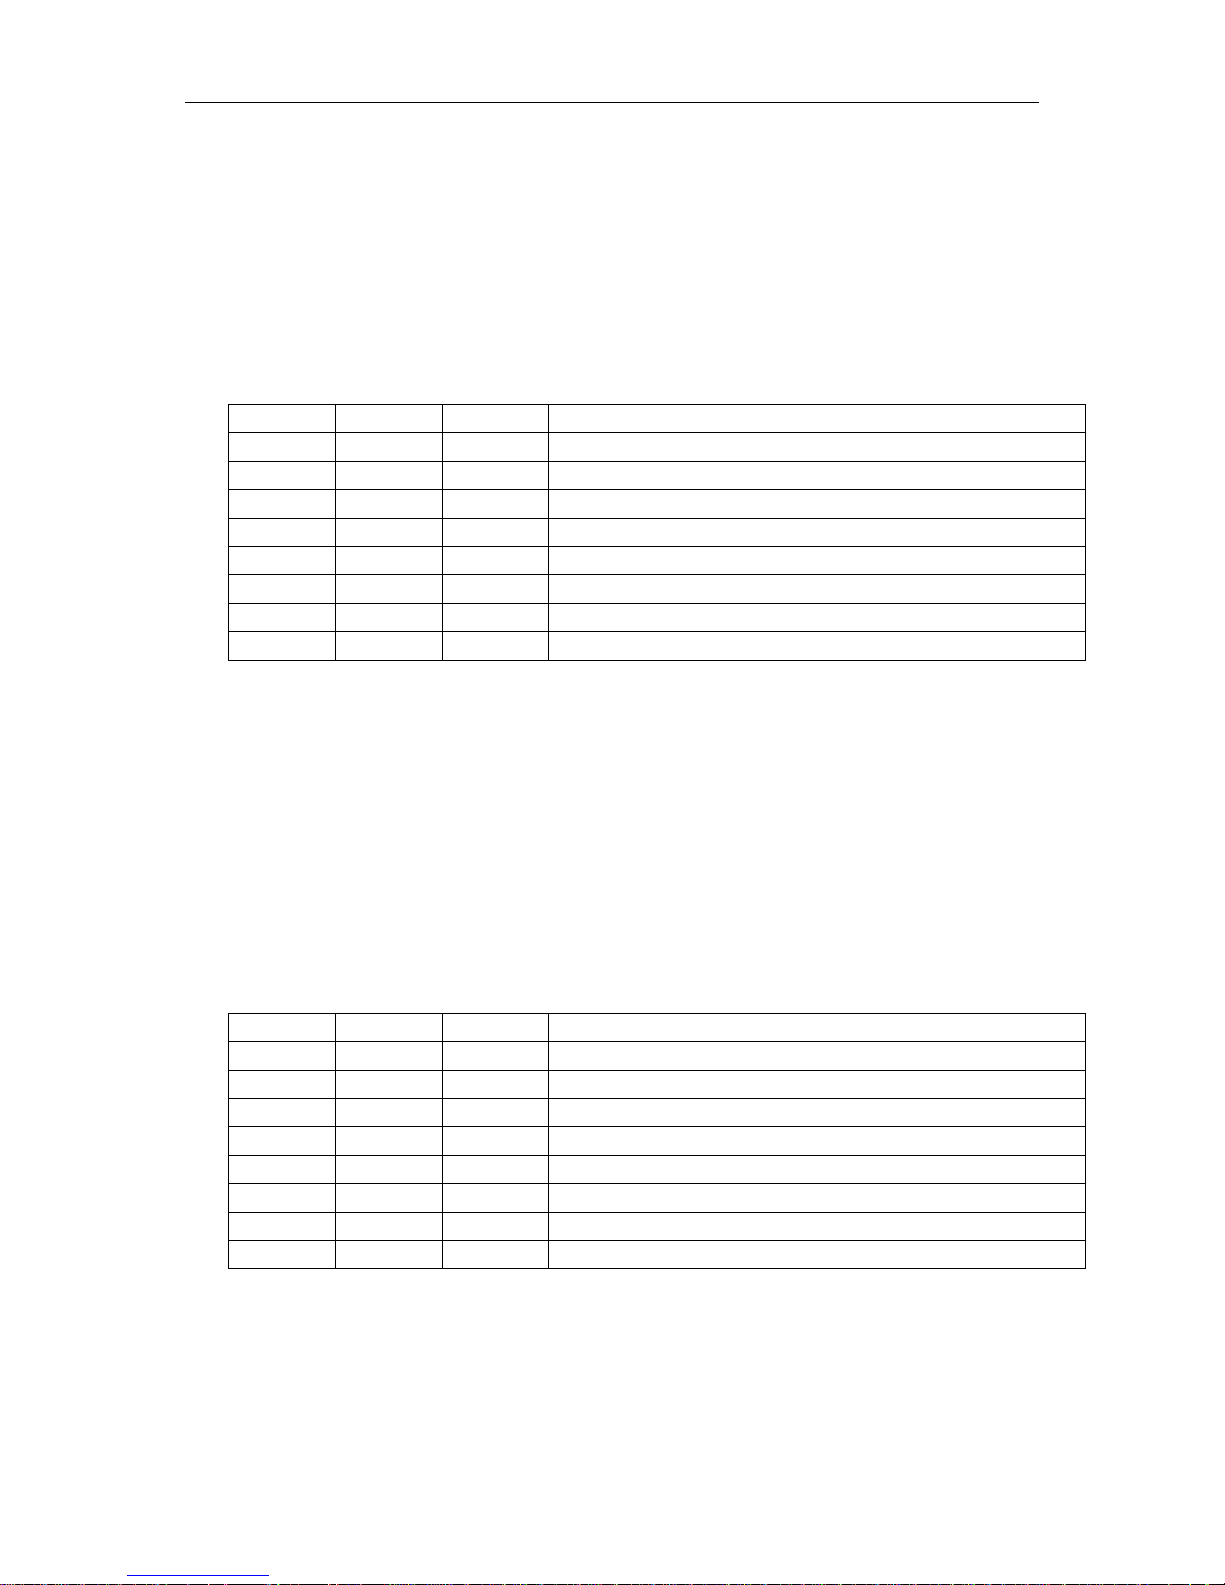
When dipswitches #9 & #10 are both set at OFF, the fixture works in Auto mode. The detailed
setting you can check in following table:
Combination of Dipswitch #1, #2 and #3 to select different PROGRAM:
Dip #1
Dip #2
Dip #3
PROGRAM selected
OFF
OFF
OFF
PROGRAM 1(red twinkle )
ON
OFF
OFF
PROGRAM 2(Green twinkle)
OFF
ON
OFF
PROGRAM 3(Blue twinkle)
ON
ON
OFF
PROGRAM 4(Red and Green twinkle)
OFF
OFF
ON
PROGRAM 5(Red &Blue twinkle)
ON
OFF
ON
PROGRAM 6(Green &Blue twinkle)
OFF
ON
ON
PROGRAM 7(Red, Green &Blue twinkle)
ON
ON
ON
PROGRAM 8(7-color twinkle)
Note:
Dipswitch #4, #5 and #6 specify the speed of the running PROGRAM with 8 levels of different
speed adjustable. Dipswitch #7 is for FADE selection. OFF turns FADE off while ON turns FADE
on.
Sound Active mode
When dipswitch #9 is ON and dipswitch #10 is OFF the fixture works in Sound active mode.
Various combining of dipswitch #1, #2 and #3 forms different PROGRAM
DIP #1
DIP #2
DIP #3
PROGRAM selected
OFF
OFF
OFF
PROGRAM 1(red twinkling )
ON
OFF
OFF
PROGRAM 2(Green twinkling)
OFF
ON
OFF
PROGRAM 3(Blue twinkling)
ON
ON
OFF
PROGRAM 4(Red and Green twinkling)
OFF
OFF
ON
PROGRAM 5(Red &Blue twinkling)
ON
OFF
ON
PROGRAM 6(Green &Blue twinkling)
OFF
ON
ON
PROGRAM 7(Red, Green &Blue twinkling)
ON
ON
ON
PROGRAM 8(7-color twinkling)
Note:
In this mode step is triggered by the rhythm of sound.
DMX mode
Page 9
USB 9640 5-Channel LED PAR
© US Blaster Europe BV
When dipswitch #10 is set at ON, the fixture works in DMX mode. By various combining the
Dipswitches #1 to #9 you can set the address ranging from 1 to 512.
At this moment, the fixtures can be controlled by DMX controller or another fixture that has been
designated as Auto or Sound Active mode with 5 channels receiving the data controlling the Red,
Green, Blue, brightness and strobe rate output of the fixture respectively.
Note:
The address encoded by combining dipswitches #1 to #9 function as initial channel address.
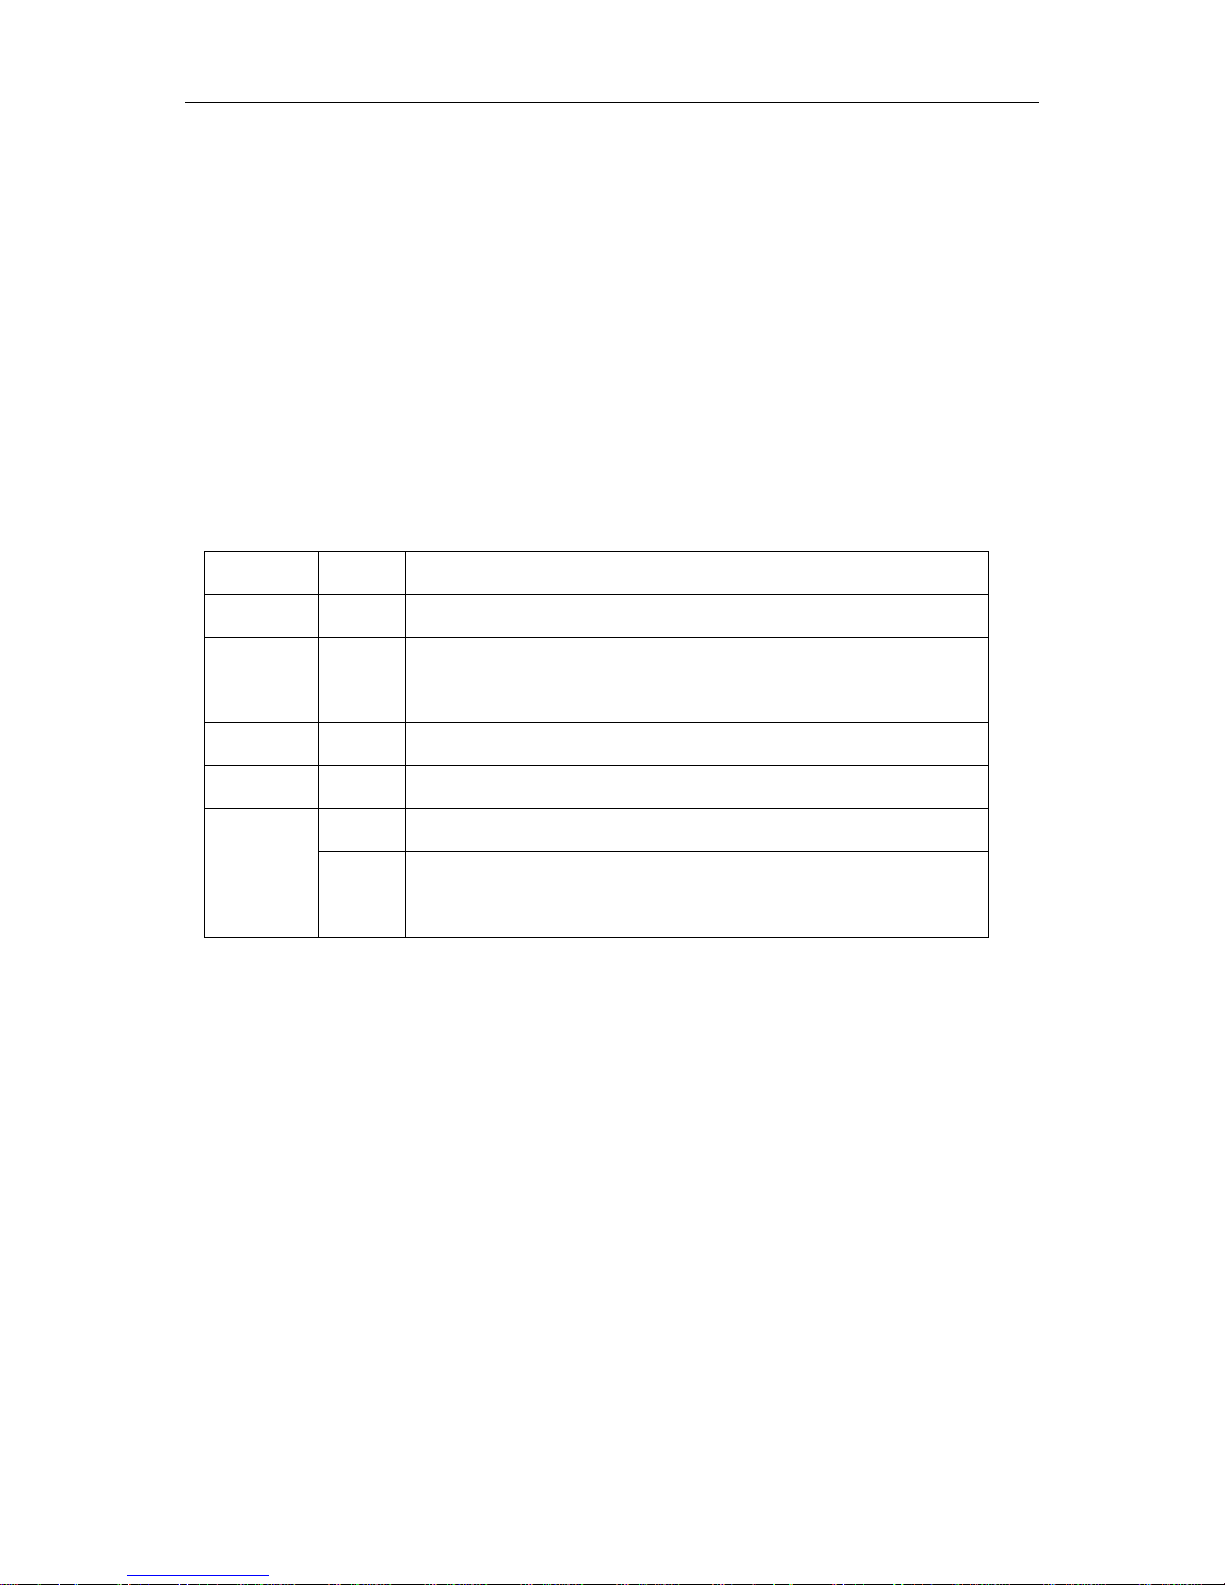
DMX channel and function chart
Channel
Value
Function
CH1
0~255
Adjust CH1 value 0~255 and brightness of red LED is 0~100%
CH2
0~255
Adjust CH2 value 0~255 and brightness of green LED is
0~100%
CH3
0~255
Adjust CH3 value 0~255 and brightness of blue LED is 0~100%
CH4
0~255
Adjust CH4 value 0~255 and brightness of all LEDS is 0~100%
0~10
No strobe
CH5
11~255
Adjust CH5 value 11~255 and all LEDS strobe.
Strobe speed is from slowest to fastest.
Master/slave mode
Set switch 10 of slaves ON and switch 10 of master OFF, it is in MASTER/SLAVE mode and they
can run at the same time. Master mode has three working ways: auto with fade, auto without fade
and sound. You can choose program via switch 1~3 and choose auto speed via switch 4~6 in
auto mode.
Page 10
USB 9640 5-Channel LED PAR
© US Blaster Europe BV
Maintenance and cleaning
Please refer to the following points during the normal inspection:
A. Be sure all screws and fasteners are securely tightened at all times. Lose screws may cause
unexpected damage or injury.
B. Electric power supply cables must not show any damage or frayed spots.
CAUTION:
Make sure that the power cord of the unit is disconnected from the
mains before performing the following operation to avoid shock
hazard!
We recommend, if possible, frequent cleaning of the device, which will ensure its long lifespan
and bright light output. While performing the cleaning, please always make sure that the power
cord is disconnected from the mains and use a moist, lint-free cloth. Avoid using any alcohol
or solvents, as they are harmful to the fixture.
Page 11
USB 9640 5-Channel LED PAR
© US Blaster Europe BV
Appendix
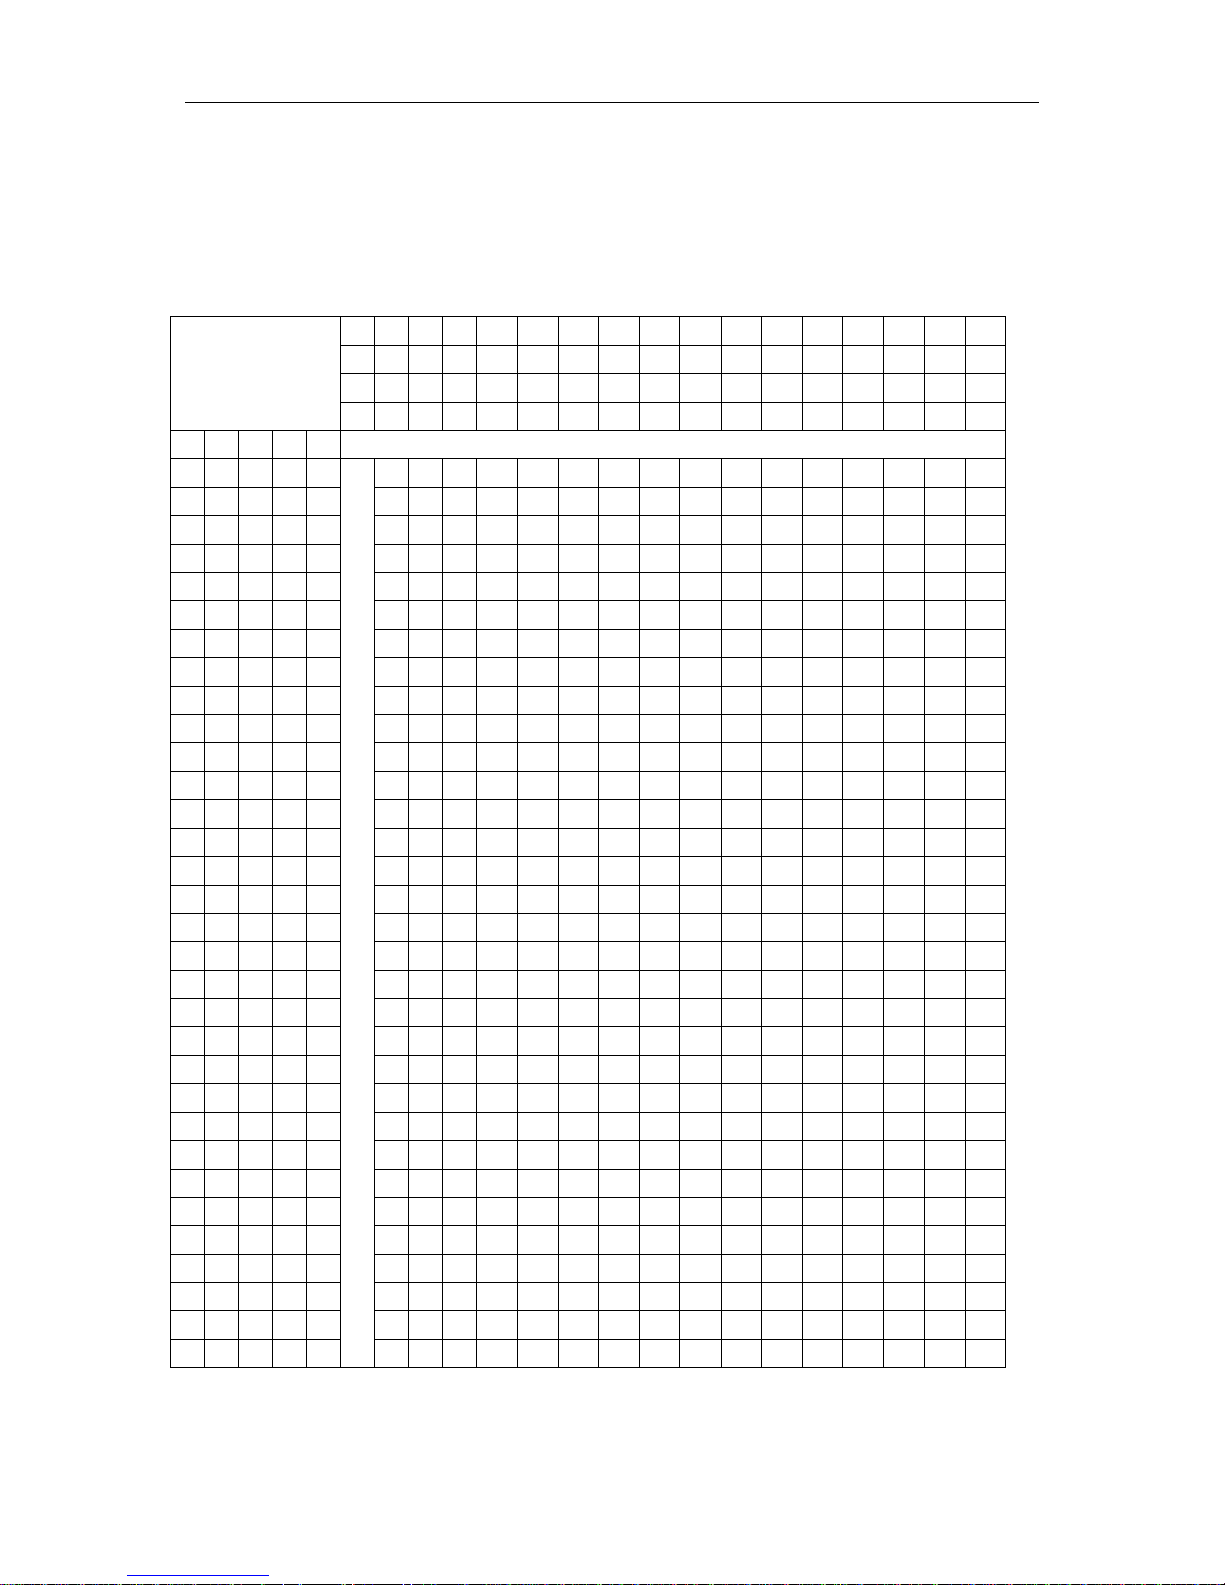
DMX address chart
#9 0 0 0 0 0 0 0 0 1 1 1 1 1 1 1 1
#8 0 0 0 0 1 1 1 1 0 0 0 0 1 1 1 1
#7 0 0 1 1 0 0 1 1 0 0 1 1 0 0 1 1
SWITCH SET
0 = OFF
1 = ON
#6 0 1 0 1 0 1 0 1 0 1 0 1 0 1 0 1
#1
#2
#3
#4
#5
0 0 0 0 0 32
64
96
128
160
192
224
256
288
320
352
384
416
448
480
1 0 0 0 0 1 33
65
97
129
161
193
225
257
289
321
353
385
417
449
481
0 1 0 0 0 2 34
66
98
130
162
194
226
258
290
322
354
386
418
450
482
1 1 0 0 0 3 35
67
99
131
163
195
227
259
291
323
355
387
419
451
483
0 0 1 0 0 4 36
68
100
132
164
196
228
260
292
324
356
388
420
452
484
1 0 1 0 0 5 37
69
101
133
165
197
229
261
293
325
357
389
421
453
485
0 1 1 0 0 6 38
70
102
134
166
198
230
262
294
326
358
390
422
454
486
1 1 1 0 0 7 39
71
103
135
167
199
231
263
295
327
359
391
423
455
487
0 0 0 1 0 8 40
72
104
136
168
200
232
264
296
328
360
392
424
456
488
1 0 0 1 0 9 41
73
105
137
169
201
233
265
297
329
361
393
425
457
489
0 1 0 1 0
10
42
74
106
138
170
202
234
266
298
330
362
394
426
458
490
1 1 0 1 0
11
43
75
107
139
171
203
235
267
299
331
363
395
427
459
491
0 0 1 1 0
12
44
76
108
140
172
204
236
268
300
332
364
396
428
460
492
1 0 1 1 0
13
45
77
109
141
173
205
237
269
301
333
365
397
429
461
493
0 1 1 1 0
14
46
78
110
142
174
206
238
270
302
334
366
398
430
462
494
1 1 1 1 0
15
47
79
111
143
175
207
239
271
303
335
367
399
431
463
495
0 0 0 0 1
16
48
80
112
144
176
208
240
272
304
336
368
400
432
464
496
1 0 0 0 1
17
49
81
113
145
177
209
241
273
305
337
369
401
433
465
497
0 1 0 0 1
18
50
82
114
146
178
210
242
274
306
338
370
402
434
466
498
1 1 0 0 1
19
51
83
115
147
179
211
243
275
307
339
371
403
435
467
499
0 0 1 0 1
20
52
84
116
148
180
212
244
276
308
340
372
404
436
468
500
1 0 1 0 1
21
53
85
117
149
181
213
245
277
309
341
373
405
437
469
501
0 1 1 0 1
22
54
86
118
150
182
214
246
278
310
342
374
406
438
470
502
1 1 1 0 1
23
55
87
119
151
183
215
247
279
311
343
375
407
439
471
503
0 0 0 1 1
24
56
88
120
152
184
216
248
280
312
344
376
408
440
472
504
1 0 0 1 1
25
57
89
121
153
185
217
249
281
313
345
377
409
441
473
505
0 1 0 1 1
26
58
90
122
154
186
218
250
282
314
346
378
410
442
474
506
1 1 0 1 1
27
59
91
123
155
187
219
251
283
315
347
379
411
443
475
507
0 0 1 1 1
28
60
92
124
156
188
220
252
284
316
348
380
412
444
476
508
1 0 1 1 1
29
61
93
125
157
189
221
253
285
317
349
381
413
445
477
509
0 1 1 1 1
30
62
94
126
158
190
222
254
286
318
350
382
414
446
478
510
1 1 1 1 1 31
63
95
127
159
191
223
255
287
319
351
383
415
447
479
511
Page 12
 Loading...