

Page 1
User Guide
SP-770
Page 2

FOR S
AFE O
PERA
INFORMATION FOR
ST
ABOUT
MENU . . . . . . . . . . . . . . . . . . . . . . . . . . . . . . . . . . . . . . . . . . . . . . . . . . 7
MEASUREMENT OF R
(
ABSORBED S
OMMUNICATION N
C
SAFETY ON THE ROAD . . . . . . . . . . . . . . . . . . . . . . . . . . . . . . . . . . .
SAFETY IN H
SAFETY IN F
SAFETY IN P
P
REDICTABLE . . . . . . . . . . . . . . . . . . . . . . . . . . . . . . . . . . . . . . . . . . 10
INFRARED E
ELECTRICAL E
TTERY A
BA
INSIDE THE P
HANDSET DESCRIPTION . . . . . . . . . . . . . . . . . . . . . . . . . . . . . . 14
CELLULAR PHONE . . . . . . . . . . . . . . . . . . . . . . . . . . . . . . . . . . . 15
IN THE BEGINNING . . . . . . . . . . . . . . . . . . . . . . . . . . . . . . . . . . . . . . 15
INST
ALIMENT OF SIM CARD . . . . . . . . . . . . . . . . . . . . . . . . . . . . . 15
TTERY CHARGE. . . . . . . . . . . . . . . . . . . . . . . . . . . . . . . . . . . . .
BA
USING THE MICRO SD CARD . . . . . . . . . . . . . . . . . . . . . . . . . . . . . 18
INST
ALLING THE MICRO SD CARD . . . . . . . . . . . . . . . . . . . . . . . 18
REMOVING THE MICRO SD CARD . . . . . . . . . . . . . . . . . . . . . . . . 18
REMOV
PHONE ON/OFF . . . . . . . . . . . . . . . . . . . . . . . . . . . . . . . . . . . . . . . . . 21
START . . . . . . . . . . . . . . . . . . . . . . . . . . . . . . . . . . . . . . . . . . . . . . . 21
ST
AND-BY SCREEN . . . . . . . . . . . . . . . . . . . . . . . . . . . . . . . . . . . . 22
CALLS . . . . . . . . . . . . . . . . . . . . . . . . . . . . . . . . . . . . . . . . . . . . . . . . . 27
MAKING A CALL . . . . . . . . . . . . . . . . . . . . . . . . . . . . . . . . . . . . . . . 27
ANSWERING THE PHONE . . . . . . . . . . . . . . . . . . . . . . . . . . . . . . . 27
WHOLE MENUS . . . . . . . . . . . . . . . . . . . . . . . . . . . . . . . . . . . . . . . . . 28
COMMON
MENUS . . . . . . . . . . . . . . . . . . . . . . . . . . . . . . . . . . . . . . . . . . . . . . . . 29
INPUT PHONE NUMBER . . . . . . . . . . . . . . . . . . . . . . . . . . . . . . . . 29
WRITER . . . . . . . . . . . . . . . . . . . . . . . . . . . . . . . . . . . . . . . . . . . . . . 29
WRITER
WRITER
WRITER
SMART INPUT . . . . . . . . . . . . . . . . . . . . . . . . . . . . . . . . . . . . . . . . . 31
TION . . . . . . . . . . . . . . . . . . . . . . . . . . . . . . . . . 6
SAFE OPERA
ORAGE A
ND
MAINTENANCE . . . . . . . . . . . . . . . . . . . . . . 6
ADIO FREQUENCY E
PECIAL RATE INFORMATION SAR) . . . . . . . . . . . . . . 8
ETWORK SERVICE . . . . . . . . . . . . . . . . . . . . . . 9
OSPITAL . . . . . . . . . . . . . . . . . . . . . . . . . . . . . . . . . . . . 10
LIGHT . . . . . . . . . . . . . . . . . . . . . . . . . . . . . . . . . . . . . .
LACES WHERE E
QUIPMENT A
QUIPMENT . . . . . . . . . . . . . . . . . . . . . . . . . . . . . . . . 11
ND
PAR TS . . . . . . . . . . . . . . . . . . . . . . . . . . . . . . . . . . . . 12
ACKAGE . . . . . . . . . . . . . . . . . . . . . . . . . . . . . . . . 13
ABLE MEMORY STORAGE FUNCTIONALITY . . . . . . . . . 19
SCREENS AND SYSTEM IN V
OF
PHONE NUMBER . . . . . . . . . . . . . . . . . . . . . . . . . . . 28
OF
NUMBER . . . . . . . . . . . . . . . . . . . . . . . . . . . . . . . . . . 30
OF
TEXT. . . . . . . . . . . . . . . . . . . . . . . . . . . . . . . . . . . . . .
TION . . . . . . . . . . . . . . . . . . . . . . 6
XPOSED
XPLOSION IS
ND
SAFETY . . . . . . . . . . . . . . . . . . . . . . 11
ARIOUS
9
10
17
30
Page 3

TEXT SELECTOR . . . . . . . . . . . . . . . . . . . . . . . . . . . . . . . . . . . . . . 32
1.CALLS. . . . . . . . . . . . . . . . . . . . . . . . . . . . . . . . . . . . . . . . . . . . . 33
DIALED . . . . . . . . . . . . . . . . . . . . . . . . . . . . . . . . . . . . . . . . . . . . . . . . 34
RECEIVED . . . . . . . . . . . . . . . . . . . . . . . . . . . . . . . . . . . . . . . . . . . . . 35
MISSED. . . . . . . . . . . . . . . . . . . . . . . . . . . . . . . . . . . . . . . . . . . . . . . .
CALL SETTINGS . . . . . . . . . . . . . . . . . . . . . . . . . . . . . . . . . . . . . . . . 37
CALL W
AITING . . . . . . . . . . . . . . . . . . . . . . . . . . . . . . . . . . . . . . . . 37
CALL FORWARDING . . . . . . . . . . . . . . . . . . . . . . . . . . . . . . . . . . . 38
CALL RESTRICTION . . . . . . . . . . . . . . . . . . . . . . . . . . . . . . . . . . . . 38
ANSWER MODE . . . . . . . . . . . . . . . . . . . . . . . . . . . . . . . . . . . . . . . 39
AUTO REDIAL . . . . . . . . . . . . . . . . . . . . . . . . . . . . . . . . . . . . . . . . . 39
DELETE CALL
CALL TIME . . . . . . . . . . . . . . . . . . . . . . . . . . . . . . . . . . . . . . . . . . . . . 41
SMS COUNTER . . . . . . . . . . . . . . . . . . . . . . . . . . . . . . . . . . . . . . . . . 42
GPRS COUNTER . . . . . . . . . . . . . . . . . . . . . . . . . . . . . . . . . . . . . . . . 43
2. PHONE BOOK. . . . . . . . . . . . . . . . . . . . . . . . . . . . . . . . . . . . . . 44
QUICK SEARCH . . . . . . . . . . . . . . . . . . . . . . . . . . . . . . . . . . . . . . . . . 45
SEARCH ENTRY . . . . . . . . . . . . . . . . . . . . . . . . . . . . . . . . . . . . . . . .
ADD
CALLER GROUP . . . . . . . . . . . . . . . . . . . . . . . . . . . . . . . . . . . . . . . . 49
CALLER GROUP DETAILS . . . . . . . . . . . . . . . . . . . . . . . . . . . . . . . 49
SPEED DIAL . . . . . . . . . . . . . . . . . . . . . . . . . . . . . . . . . . . . . . . . . . . . 51
SETTING SPEED DIAL NUMBER. . . . . . . . . . . . . . . . . . . . . . . . . .
OWNER NUMBER . . . . . . . . . . . . . . . . . . . . . . . . . . . . . . . . . . . . . . . 53
EXTRA NUMBER . . . . . . . . . . . . . . . . . . . . . . . . . . . . . . . . . . . . . . . . 54
MANAGEMENT. . . . . . . . . . . . . . . . . . . . . . . . . . . . . . . . . . . . . . . . . .
3. EXTRA . . . . . . . . . . . . . . . . . . . . . . . . . . . . . . . . . . . . . . . . . . . . 56
CALENDAR. . . . . . . . . . . . . . . . . . . . . . . . . . . . . . . . . . . . . . . . . . . . .
ADD
JUMP T
T
O DO
ALARM . . . . . . . . . . . . . . . . . . . . . . . . . . . . . . . . . . . . . . . . . . . . . . . . 59
ADD
WORLD
CALCULA
UNIT CONVER
CURRENCY CONVER
LOG . . . . . . . . . . . . . . . . . . . . . . . . . . . . . . . . . . . . . .
NEW ENTRY . . . . . . . . . . . . . . . . . . . . . . . . . . . . . . . . . . . . . . .
EVENTS . . . . . . . . . . . . . . . . . . . . . . . . . . . . . . . . . . . . . . . . . 57
O DATE . . . . . . . . . . . . . . . . . . . . . . . . . . . . . . . . . . . . . . . .
LIST . . . . . . . . . . . . . . . . . . . . . . . . . . . . . . . . . . . . . . . . . . . . 58
ALARM . . . . . . . . . . . . . . . . . . . . . . . . . . . . . . . . . . . . . . . . . . 59
CLOCK . . . . . . . . . . . . . . . . . . . . . . . . . . . . . . . . . . . . . . . . .
TOR. . . . . . . . . . . . . . . . . . . . . . . . . . . . . . . . . . . . . . . . . . .
TER . . . . . . . . . . . . . . . . . . . . . . . . . . . . . . . . . . . . . . 62
TER . . . . . . . . . . . . . . . . . . . . . . . . . . . . . . . . 63
36
40
47
48
52
55
57
58
60
60
Page 4

ST
OPWA
TCH . . . . . . . . . . . . . . . . . . . . . . . . . . . . . . . . . . . . . . . . . . .
TYPICAL ST
NWAY ST
4. ENTERTAINMENT . . . . . . . . . . . . . . . . . . . . . . . . . . . . . . . . . . . 66
JAVA . . . . . . . . . . . . . . . . . . . . . . . . . . . . . . . . . . . . . . . . . . . . . . . . . . 67
MY GAMES . . . . . . . . . . . . . . . . . . . . . . . . . . . . . . . . . . . . . . . . . . . . . 68
HEAL
BMI
MENSTRUAL . . . . . . . . . . . . . . . . . . . . . . . . . . . . . . . . . . . . . . . . . . 70
MELODY COMPOSER . . . . . . . . . . . . . . . . . . . . . . . . . . . . . . . . . . . . 71
CREATE MELODY. . . . . . . . . . . . . . . . . . . . . . . . . . . . . . . . . . . . . .
DOWNLOAD . . . . . . . . . . . . . . . . . . . . . . . . . . . . . . . . . . . . . . . . . . . . 72
5. MESSAGE . . . . . . . . . . . . . . . . . . . . . . . . . . . . . . . . . . . . . . . . . 73
SMS. . . . . . . . . . . . . . . . . . . . . . . . . . . . . . . . . . . . . . . . . . . . . . . . . . .
SEND NEW SMS . . . . . . . . . . . . . . . . . . . . . . . . . . . . . . . . . . . . . . . 74
INBOX . . . . . . . . . . . . . . . . . . . . . . . . . . . . . . . . . . . . . . . . . . . . . . . 75
MMS . . . . . . . . . . . . . . . . . . . . . . . . . . . . . . . . . . . . . . . . . . . . . . . . . . 78
SEND NEW MMS . . . . . . . . . . . . . . . . . . . . . . . . . . . . . . . . . . . . . . 78
INBOX . . . . . . . . . . . . . . . . . . . . . . . . . . . . . . . . . . . . . . . . . . . . . . . 81
OUTBOX . . . . . . . . . . . . . . . . . . . . . . . . . . . . . . . . . . . . . . . . . . . . . 81
DRAFT . . . . . . . . . . . . . . . . . . . . . . . . . . . . . . . . . . . . . . . . . . . . . . . 82
SENT . . . . . . . . . . . . . . . . . . . . . . . . . . . . . . . . . . . . . . . . . . . . . . . . 82
TEMPLATE. . . . . . . . . . . . . . . . . . . . . . . . . . . . . . . . . . . . . . . . . . . .
MESSAGE SETTINGS . . . . . . . . . . . . . . . . . . . . . . . . . . . . . . . . . . 83
EMAIL . . . . . . . . . . . . . . . . . . . . . . . . . . . . . . . . . . . . . . . . . . . . . . . . . 84
VOICE MAIL SER
CHA
BROADCAST MESSAGE . . . . . . . . . . . . . . . . . . . . . . . . . . . . . . . . . . 87
6. MULTIMEDIA . . . . . . . . . . . . . . . . . . . . . . . . . . . . . . . . . . . . . . . 89
CAMERA . . . . . . . . . . . . . . . . . . . . . . . . . . . . . . . . . . . . . . . . . . . . . . . 90
CAMERA OPTIONS. . . . . . . . . . . . . . . . . . . . . . . . . . . . . . . . . . . . .
IMAGES . . . . . . . . . . . . . . . . . . . . . . . . . . . . . . . . . . . . . . . . . . . . . . . 93
IMAGE OPTIONS . . . . . . . . . . . . . . . . . . . . . . . . . . . . . . . . . . . . . . 93
VIDEOS. . . . . . . . . . . . . . . . . . . . . . . . . . . . . . . . . . . . . . . . . . . . . . . .
RECORD VIDEO . . . . . . . . . . . . . . . . . . . . . . . . . . . . . . . . . . . . . . . 94
PLAY
PHOTO EDITOR . . . . . . . . . . . . . . . . . . . . . . . . . . . . . . . . . . . . . . . . .
OPWA
TCH. . . . . . . . . . . . . . . . . . . . . . . . . . . . . . . . . .
OPWA
TCH . . . . . . . . . . . . . . . . . . . . . . . . . . . . . . . . . . . .
TH . . . . . . . . . . . . . . . . . . . . . . . . . . . . . . . . . . . . . . . . . . . . . . .
. . . . . . . . . . . . . . . . . . . . . . . . . . . . . . . . . . . . . . . . . . . . . . . . . . 69
T . . . . . . . . . . . . . . . . . . . . . . . . . . . . . . . . . . . . . . . . . . . . . . . . . . 86
VER . . . . . . . . . . . . . . . . . . . . . . . . . . . . . . . . . . . . 85
VIDEO . . . . . . . . . . . . . . . . . . . . . . . . . . . . . . . . . . . . . . . . . . 96
64
64
64
69
71
74
83
91
94
97
Page 5

AUDIO
PLA
SOUND RECORDER . . . . . . . . . . . . . . . . . . . . . . . . . . . . . . . . . . . . 100
7. SETTING . . . . . . . . . . . . . . . . . . . . . . . . . . . . . . . . . . . . . . . . . 102
PHONE SETTING . . . . . . . . . . . . . . . . . . . . . . . . . . . . . . . . . . . . . . . 103
NETWORK SETTING . . . . . . . . . . . . . . . . . . . . . . . . . . . . . . . . . . . . .
SECURITY SETTING . . . . . . . . . . . . . . . . . . . . . . . . . . . . . . . . . . . . 111
BLUET
INITIALIZE USER SETTING. . . . . . . . . . . . . . . . . . . . . . . . . . . . . . .
8. SERVICE . . . . . . . . . . . . . . . . . . . . . . . . . . . . . . . . . . . . . . . . . 118
9. FILE MANAGER . . . . . . . . . . . . . . . . . . . . . . . . . . . . . . . . . . . 119
TECHNICAL SPECIFICA
YER . . . . . . . . . . . . . . . . . . . . . . . . . . . . . . . . . . . . . . . . . 98
RECORD SOUND . . . . . . . . . . . . . . . . . . . . . . . . . . . . . . . . . . . . . 100
RECORDING OPTIONS . . . . . . . . . . . . . . . . . . . . . . . . . . . . . . . . 101
SOUNDS . . . . . . . . . . . . . . . . . . . . . . . . . . . . . . . . . . . . . . . . . . . . 104
DISPLAY . . . . . . . . . . . . . . . . . . . . . . . . . . . . . . . . . . . . . . . . . . . .
LANGUAGE . . . . . . . . . . . . . . . . . . . . . . . . . . . . . . . . . . . . . . . . . . 106
TIME AND
MENU STYLE . . . . . . . . . . . . . . . . . . . . . . . . . . . . . . . . . . . . . . . . 108
PREFERRED INPUT MODE . . . . . . . . . . . . . . . . . . . . . . . . . . . . . 108
SELECT MODE . . . . . . . . . . . . . . . . . . . . . . . . . . . . . . . . . . . . . . . .
PREFERRED . . . . . . . . . . . . . . . . . . . . . . . . . . . . . . . . . . . . . . . . . .
SELECT
GPRS CONNECTION . . . . . . . . . . . . . . . . . . . . . . . . . . . . . . . . . . 110
SIM LOCK . . . . . . . . . . . . . . . . . . . . . . . . . . . . . . . . . . . . . . . . . . . 112
PHONE LOCK . . . . . . . . . . . . . . . . . . . . . . . . . . . . . . . . . . . . . . . . 112
AUTO KEYP
FIXED DIAL . . . . . . . . . . . . . . . . . . . . . . . . . . . . . . . . . . . . . . . . . . 112
BARRED DIAL . . . . . . . . . . . . . . . . . . . . . . . . . . . . . . . . . . . . . . . . 113
CHANGE PIN 1 & 2 . . . . . . . . . . . . . . . . . . . . . . . . . . . . . . . . . . . . 113
CHANGE PAS SWO RD . . . . . . . . . . . . . . . . . . . . . . . . . . . . . . . . . 114
WAP . . . . . . . . . . . . . . . . . . . . . . . . . . . . . . . . . . . . . . . . . . . . . . . . 118
DA
SPECIAL . . . . . . . . . . . . . . . . . . . . . . . . . . . . . . . . . . . . . . . . . . . . 118
DATE . . . . . . . . . . . . . . . . . . . . . . . . . . . . . . . . . . . . . .
BAN D . . . . . . . . . . . . . . . . . . . . . . . . . . . . . . . . . . . . . . .
AD
LOCK . . . . . . . . . . . . . . . . . . . . . . . . . . . . . . . . . . 112
OOTH . . . . . . . . . . . . . . . . . . . . . . . . . . . . . . . . . . . . . . . . . .
TA
ACCOUNT . . . . . . . . . . . . . . . . . . . . . . . . . . . . . . . . . . . . . . 118
TION . . . . . . . . . . . . . . . . . . . . . . . . . . 120
105
107
109
109
109
110
117
115
Page 6

Information For Safe Operation
Please read the following user manual carefully to keep from injuries.
About S
torage And Maintenance
Do not try to disassemble or repair the phone.
A
void wet and damp places.
Do not use harmful detergent or harmful chemical materials to wash the
phone.
Instead, use soft cloth to rub its appearance.
Do not inflict strong shock on the appliance.
The appliance shall be situated near the electronic switch for hands to
reach easily when the battery is charged. Do not put the phone in high
temperature environment, which may cause defects on the phone. The
warranty on this phone will be invalid if it is repaired by an unauthorized
person.
And its maker does not take responsibility for the breakdown
caused
afterward.
Never extract the battery from the phone while turned on, which will cause
defects on the phone.
Contact the agency you joined if the phone or its parts (charger,
and so on) malfunction.
battery
,
Page 7

Menu
1. Calls
2. Phonebook
3. Extra
4.
Entertainment
5. Messages
6. Multimedia
7.
Settings
8.
Service
9.
File Manager
Page 8

ate
Measurement Of Radio F
E
xposed (Absorbed S
I
nformation SAR)
requency
pecial R
This phone is a communication appliance with low-output electric wave.
Complying with EU standard requirements related with radio wavelength
exposure, the phone has been designed and made not exceeding the
energy exposure limit of the radio frequency as recommended by European
Union board of directors. The limit specified above is a frequency allowable in
general as a world standard.
W
orld standard value was developed, based on thorough and regular
scientific researches and estimation (examination) by an independence
research institution. The limit is a standard to search for safety of all,
regardless
of
Standard value of the phone exposure is displayed in unit of Specific
absorption index (SAR).
age or present state of health.
Page 9

Communication N
etwork S
ervice
The mobile conforms to the communication standard laws of GSM850,
DCS1800, PCS1900 and GPRS.
Read this user manual thoroughly to understand and learn the functions of
this appliance.
Customers should know that the trio function (850-1800-1900) is a feature
coming from the communication network.
Make sure that this feature is available via the RED exchange service
personnel.
Additional RED services are available for this phone.
For these services, however,
service.
For further information on How To
Safety On The R
Please remember that using a mobile phone during driving is prohibited.
Follow the rules as applicable in each country
Stop the car in a safe place if you need to answer or use the phone.
Please always remember the following before using the phone in
emergencies.
Focus on driving only
Remember the most considerable thing is nothing but your safety
If you want a Hands-Free device on vehicles, let it installed by an
authorized engineer.
.
customers are required to join the exchange
Join, see below
oad
.
.
.
Page 10

Safety In H
ospital
The mobile phone since designed to transmit electric waves can disturb
functions of electric or medical appliances.
Remember to turn the phone off
always in hospital.
Safety In Flight
Remember the phone if used in the airplane can disturb functions of
electric wave equipment of the airplane.
Therefore, the use of the phone is illegal in the airplane.
Remember to turn the phone off
always during flight.
Safety In Places W
P
redictable
here E
xplosion I
s
In such places as gas stations or chemical factories where explosion is
predictable, the use of any electric wave equipment is illegal and prohibited.
T
urn off
the phone and avoid the use near any gas station.
Page 11

For S
afe Operation
Infrared E
quipment And Safety
This phone includes infrared transmission equipment.
Do not let infrared rays come in contact with eyes of others nor use
together with other infrared equipment.
Electrical E
quipment
Most electric appliances are secured and protected against the ef
phone radio frequency
Nevertheless, there are some products that are not protected against.
A person who works in a manufacturing company of those products,
wearing heart pulsimeter is desired to keep at least 15cm away from the
to
avoid the electric wave.
phone
If applicable problems still occur as before to the person with heart
pulsimeter,
The phone can disturb functions of some kind of microphones.
In this case, please contact the manufacturing factory of such microphones
for further information.
Since the radio frequency signal generated from this phone may have an
influence on electric equipment of a car (air bag, brake, and so on), please
be well informed thereof via its maker.
then the phone shall be turned off.
.
fect of the
11
Page 12

For S
afe Operation
Battery And
Parts
This phone uses a rechargeable battery of Li-ion T
The battery if completely recharged is usable to call for a duration of 230
minutes and available for standing-by for a duration of 180 minutes.
Do not use any charger or battery if damaged or worn out.
Do not touch any circuit of the battery. It
If the battery is kept in hot temperature, its function and duration may be
deteriorated.
Keep temperature always as similar as possible.
The phone if kept in too high or too low temperature may not operate from
time to time even if the battery completely recharged.
T
ime required to recharge the battery may be dif
factors such as capacity left, type of battery and charger,
better
The battery although completely recharged can be discharged of itself as
the time elapses.
Unplug the switch of the charger if not used.
For ef
lengthwise.
Do not throw the battery in a ditch or a fire.
The battery shall be recycled according to its related laws.
Use only the battery,
provided from the factory.
Parts shall be compatible to be used.
If not, its warranty will be invalid.
If some parts need replacement, contact the agency you joined to order
Fill up the battery to the maximum prior to its first operation.
For pluggable equipment, the socket-outlet shall be installed near the
equipment
performance of recharge, keep suitable temperature.
fective operation of the phone, please stand the phone always
charger and parts attached to the phone just as
and shall be easily accessible.
echnology.
will cause damage thereon.
ferent according to several
and so on. For the
.
Page 13
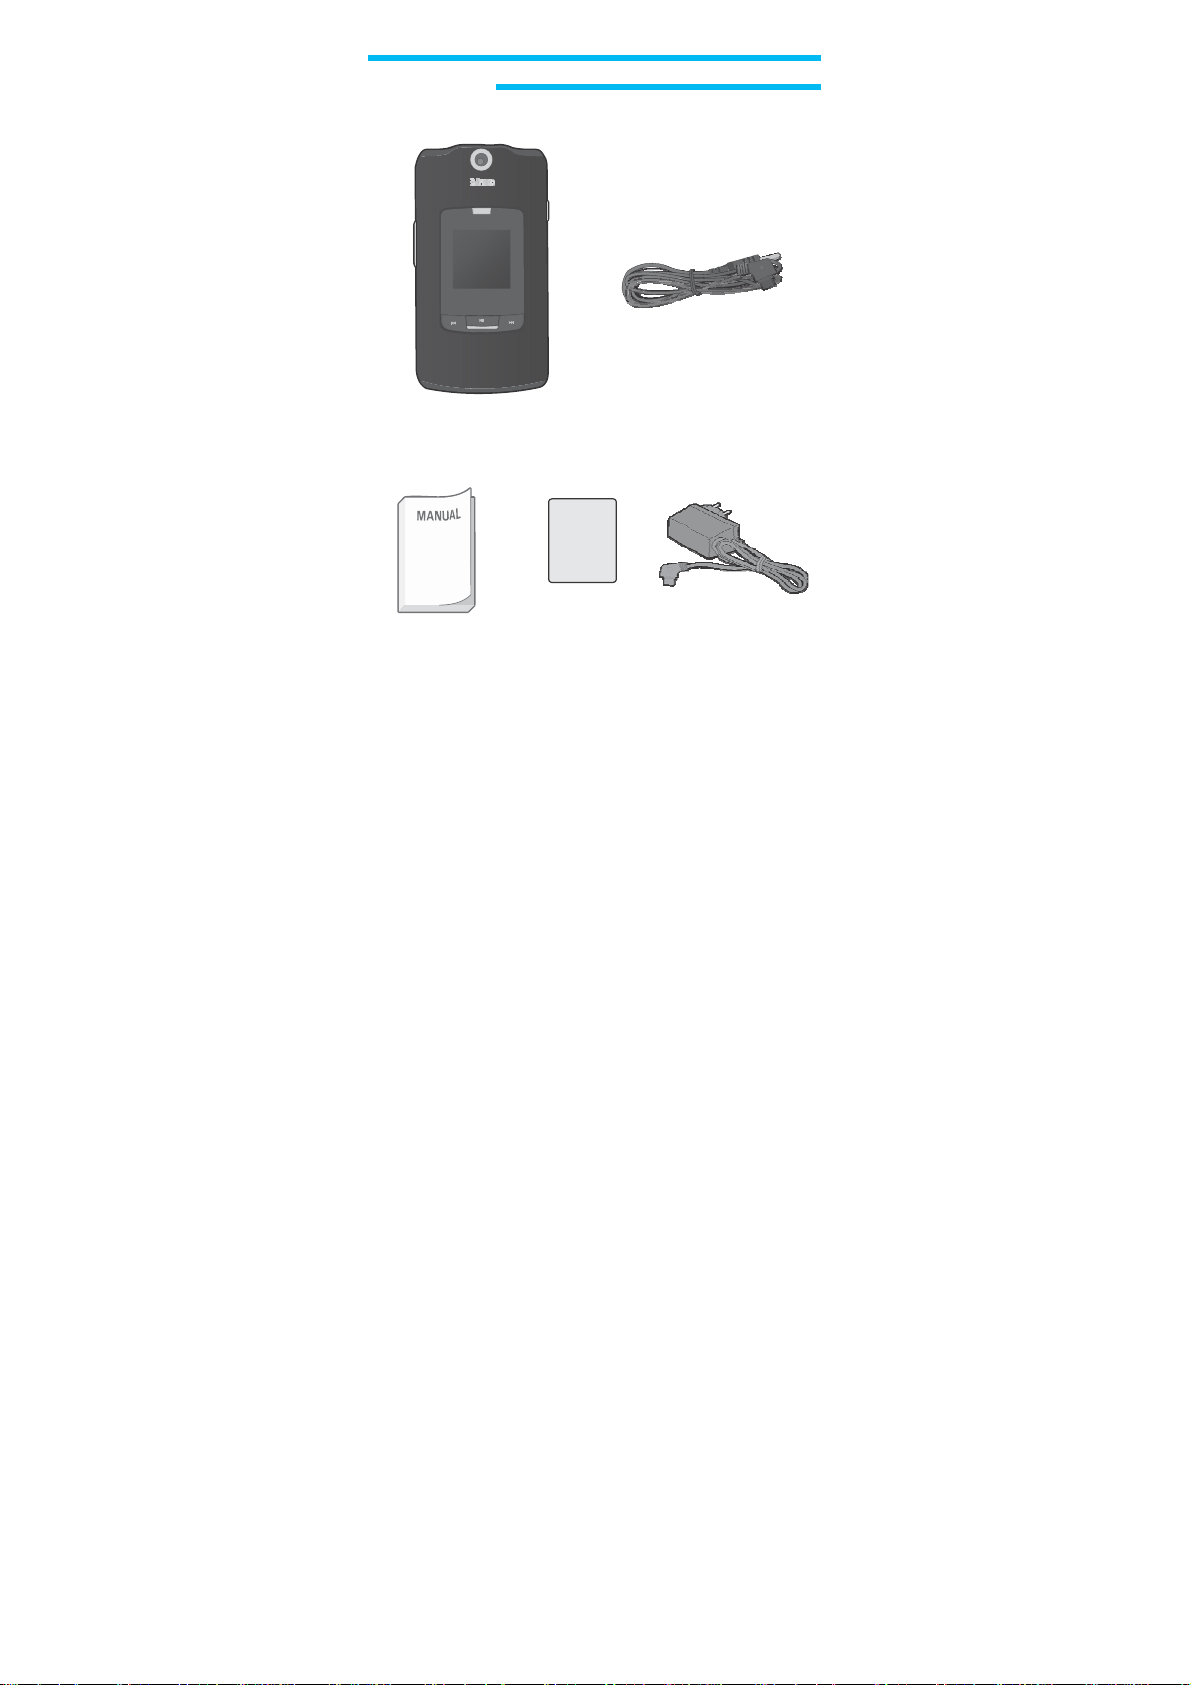
User Manual
Handset
Inside The Package
USB Cable
Battery
T
ravel Charger
13
Page 14
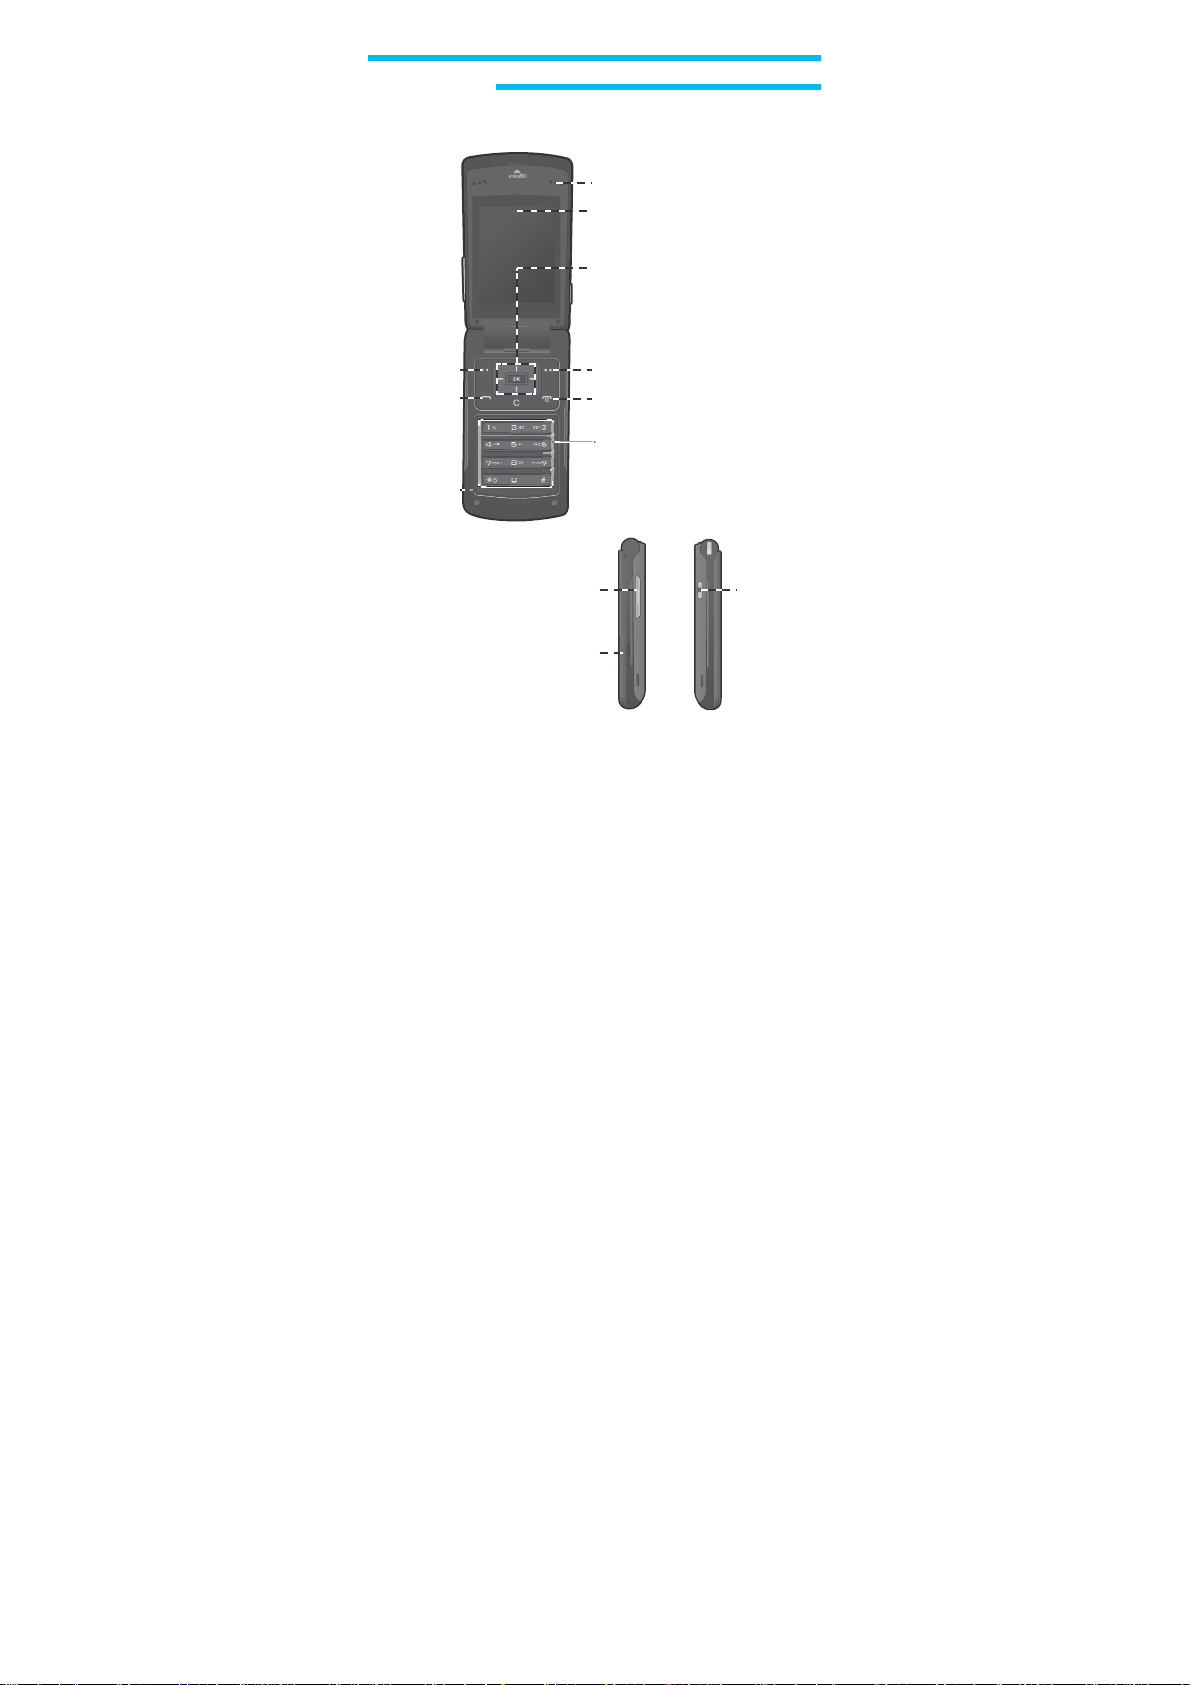
Left Selection Key
Send Key
MIC
Side V
olume Key
Earjack&Charger
&USB Cable port
Handset Description
Earpiece
LCD Screen
Navigation &
WAP
Right Selection Key
END / Power Key
Alphabet / Number Key
Key
Camera Key
Page 15
In The Beginning
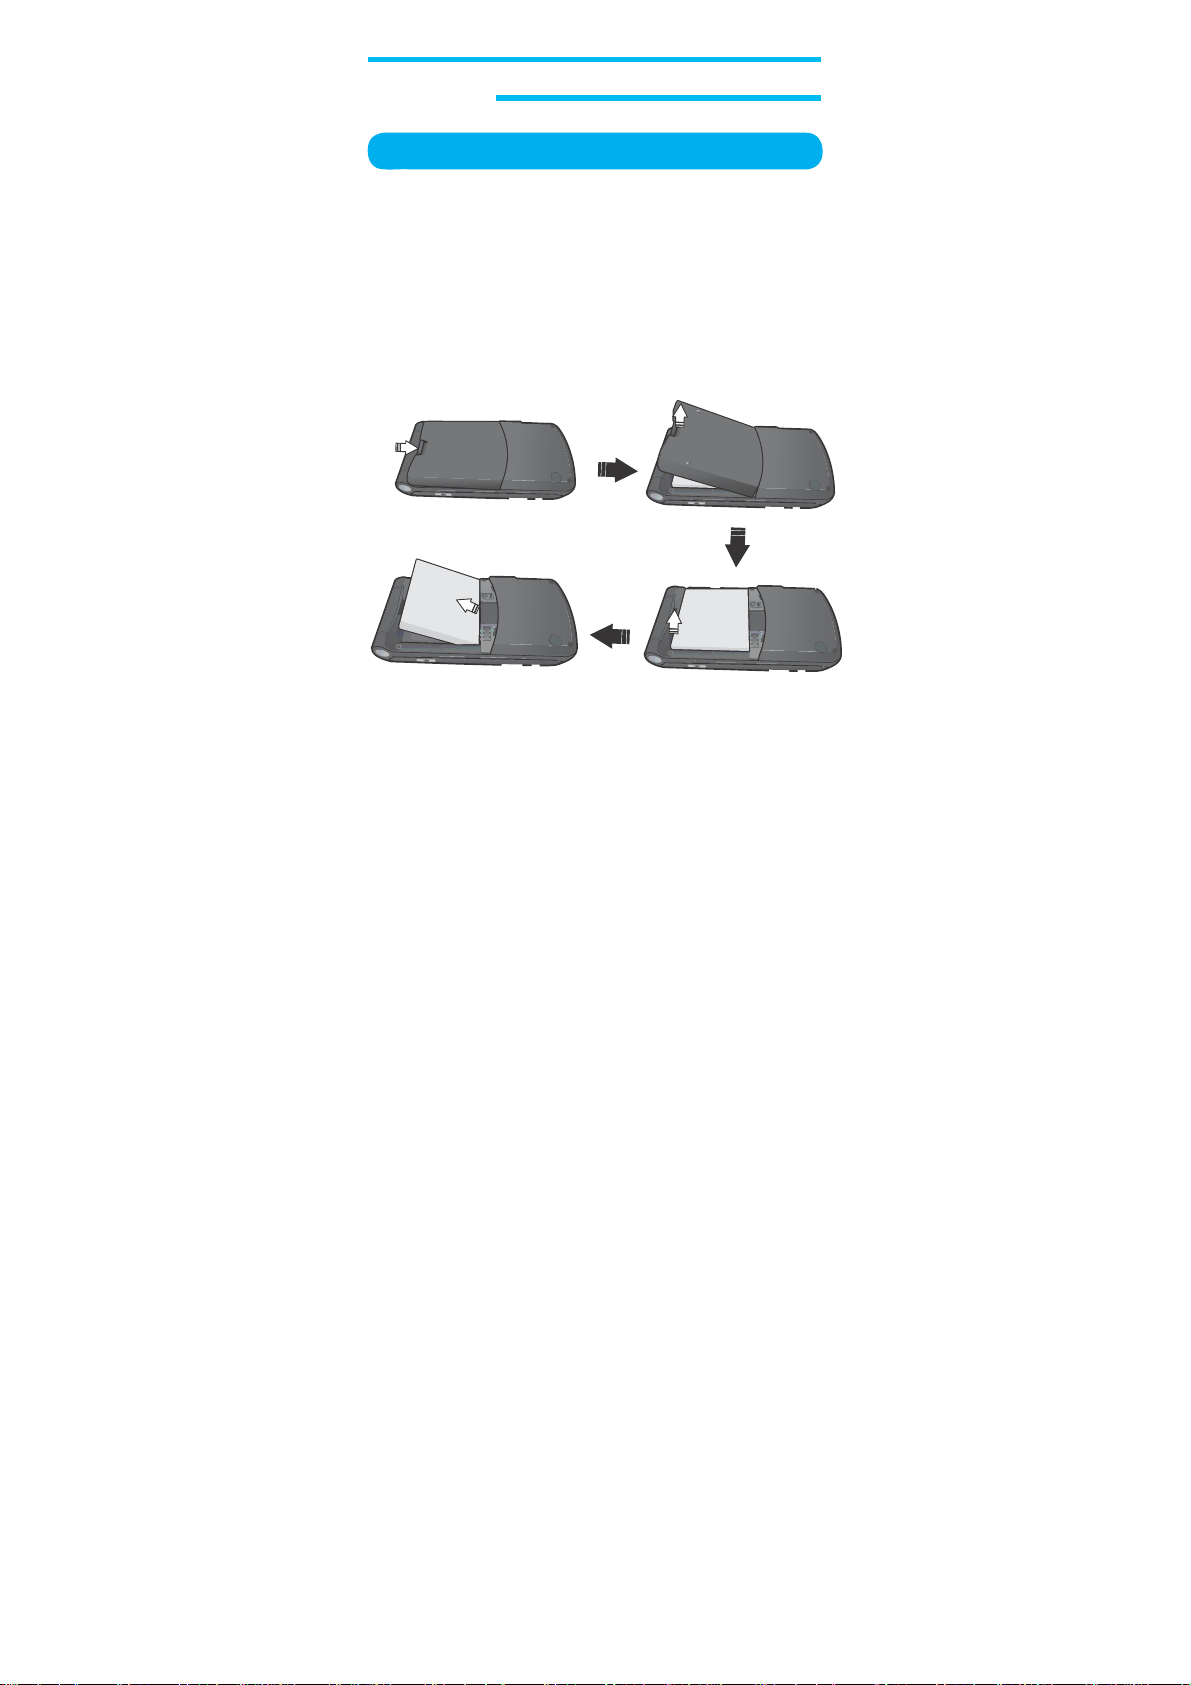
Installment Of
To
answer the phone or to call, the mobile needs a available SIM
card, which the communication company may have installed already
Note If the mobile is used, installation state of the SIM card will be
displayed. If the SIM card is not installed, a confirmation paragraph will be
displayed.
1. Remove the battery after pulling the hook outward with the mobile
turned off.
component.
SIM C
ard
The battery since adhered to the cover will come out as one
.
15
Page 16
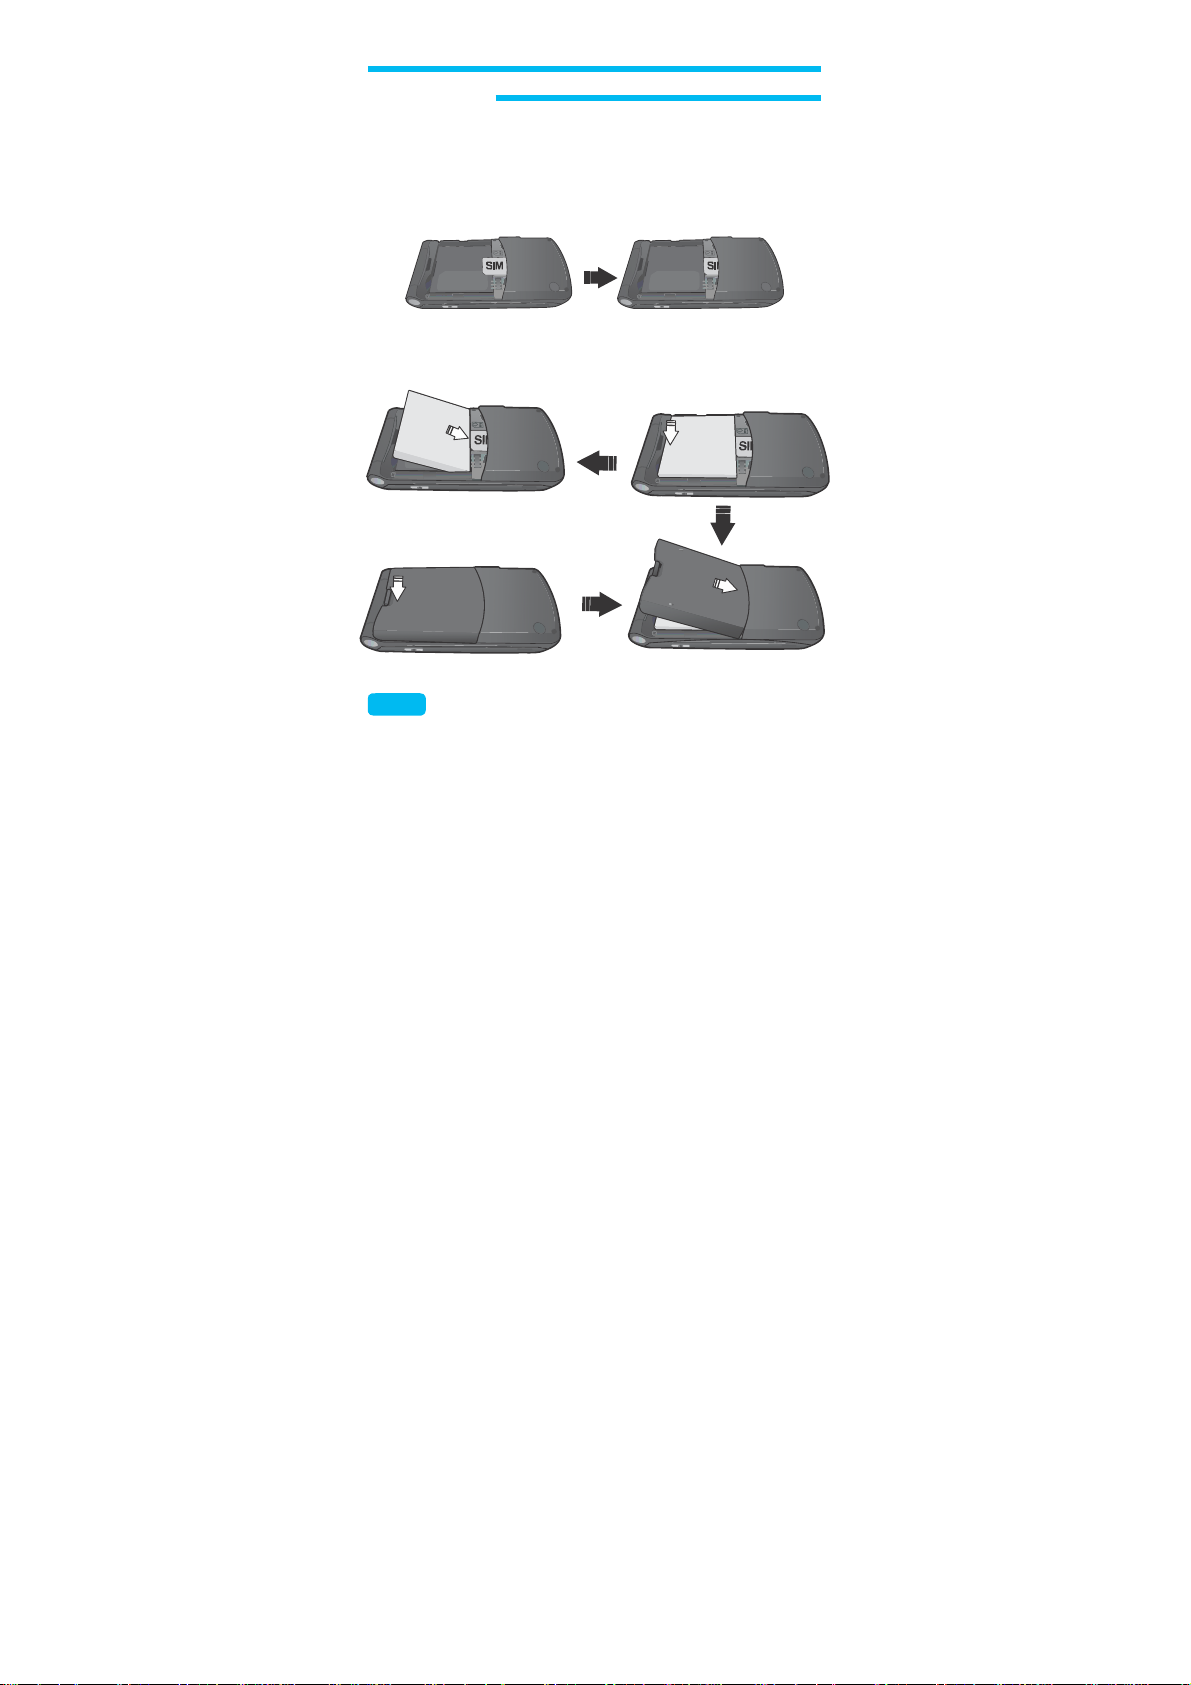
2. After the battery is removed, insert the SIM card to the hole. At this
moment, make sure the corner of card fits well on the rim of the hole
so to insert the card, checking the remaining aspect. Insert SIM card as
shown in the following figure.
3. As for the two holes, make sure the cover on the rear fits well to insert
the battery.
4. Pull the hook and insert the cover and the battery.
Note:
Finally,
keep pressing the lower of the cover till it sounds T
Follow these procedures or some defects may occur on the support
parts
of
the entrance, which will not be guaranteed.
ic.
Page 17
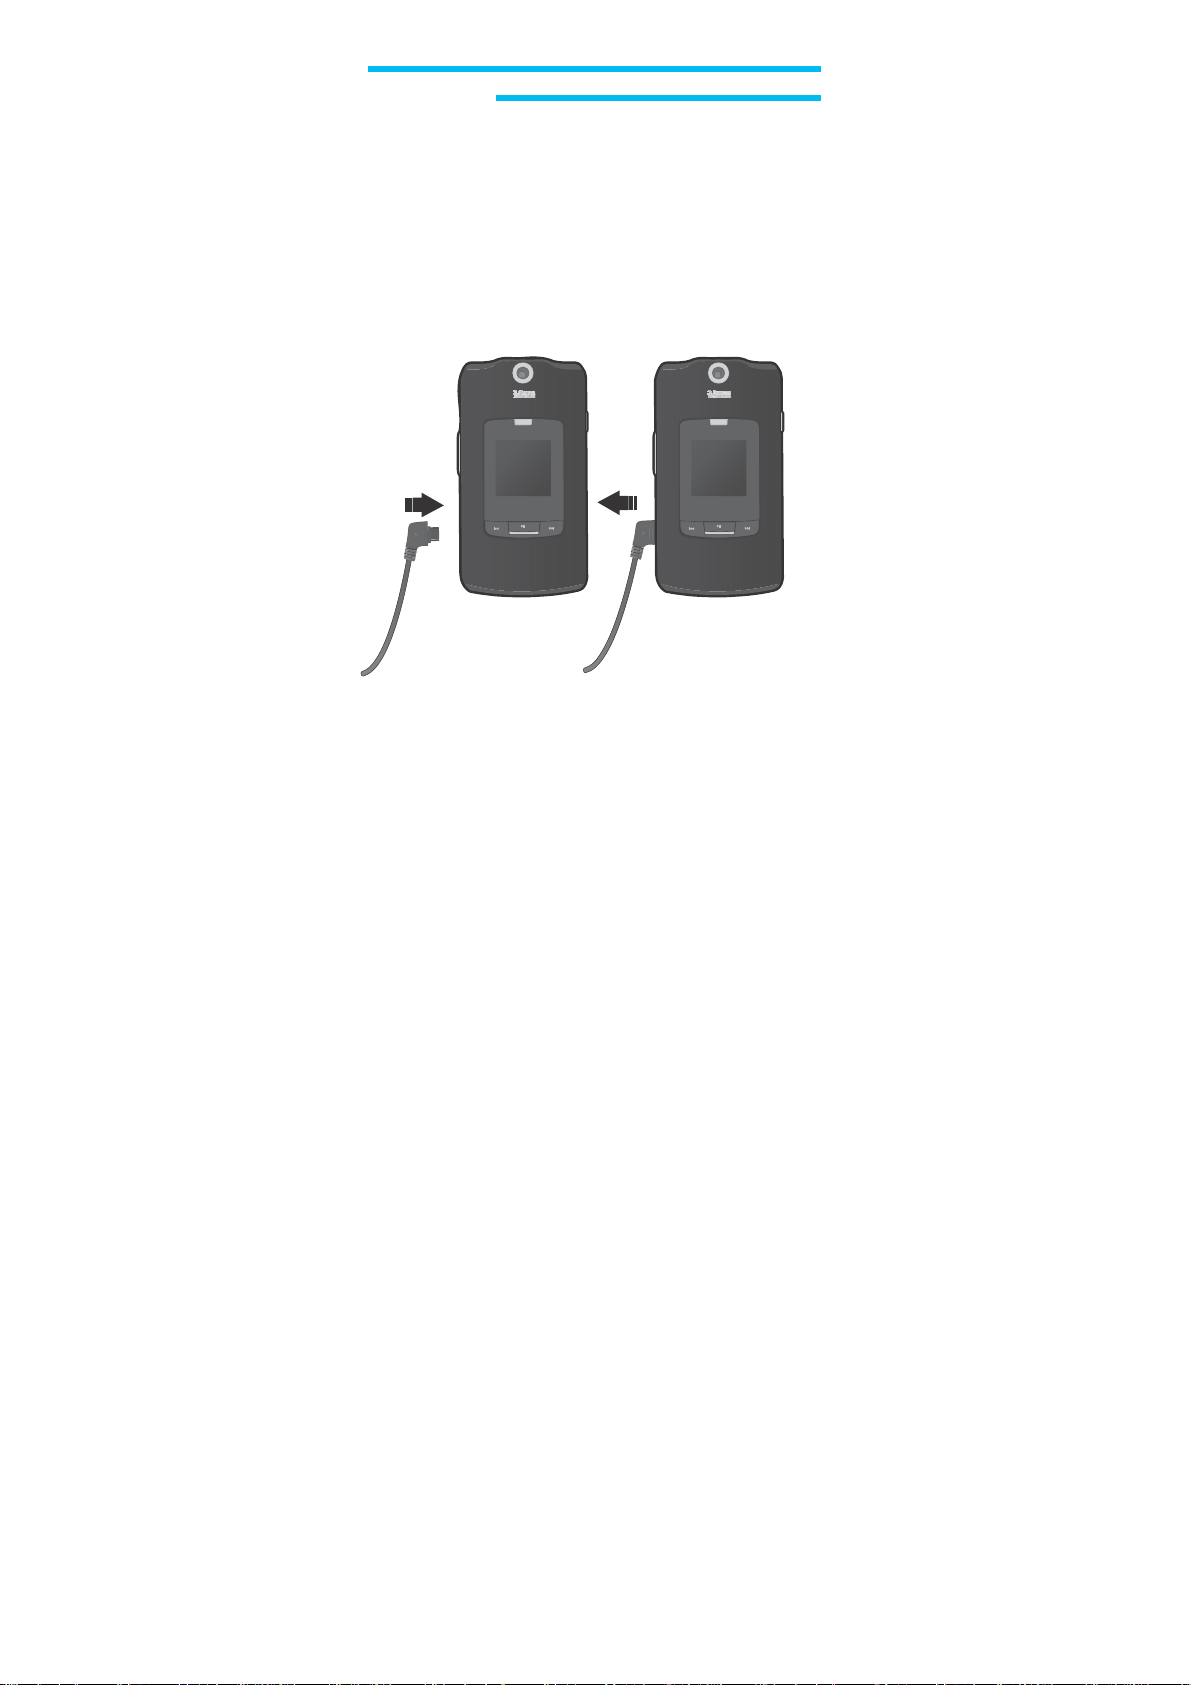
Battery C
1. Insert the charger as shown in the figure. The screen will display the
harge
Battery is being charged while the phone is turned on for several
seconds before returning to the previous step. (your phone is available
even during the battery is charged). If the phone is turned off,
Battery is being charged will be continuously displayed.
display of
2. If the charge is completed, the screen will be as shown in the figure. T
remove the charger hold and press the both ends to extract.
o
17
Page 18

Using the Micro SD Card
Installing the Micro SD Card
1. Open the card hole co
Micro SD card like
the arrow indicates.
ver,
and insert the
Note:
Please keep Micro SD c
c
ard is inserted or not to prevent possible damages.
Removing the Micro SD Card
1. To
remove the Micro SD card, press and
release the card so that it is disengaged
from the slot. Then slide it out.
• When you insert Micro SD card, make sure contact terminals face down.
• Mem
ory used for the mobile
Micro SD cards.
• Do not remove the Micro SD card while reading or writing files
Otherwise it
• “
Micro SD”
a
personal computer.
• When disconnecting f
equipment on your PC. Otherwise, the stored files on the Micro SD card
could be damaged.
could be damaged.
card is recognized as a mobile disk when connected to
ard slot closed at all times whether Micro SD
phone is not the general SD card but the
rom PC, please remove the USB storage
.
Page 19
Removable memory storage functionality
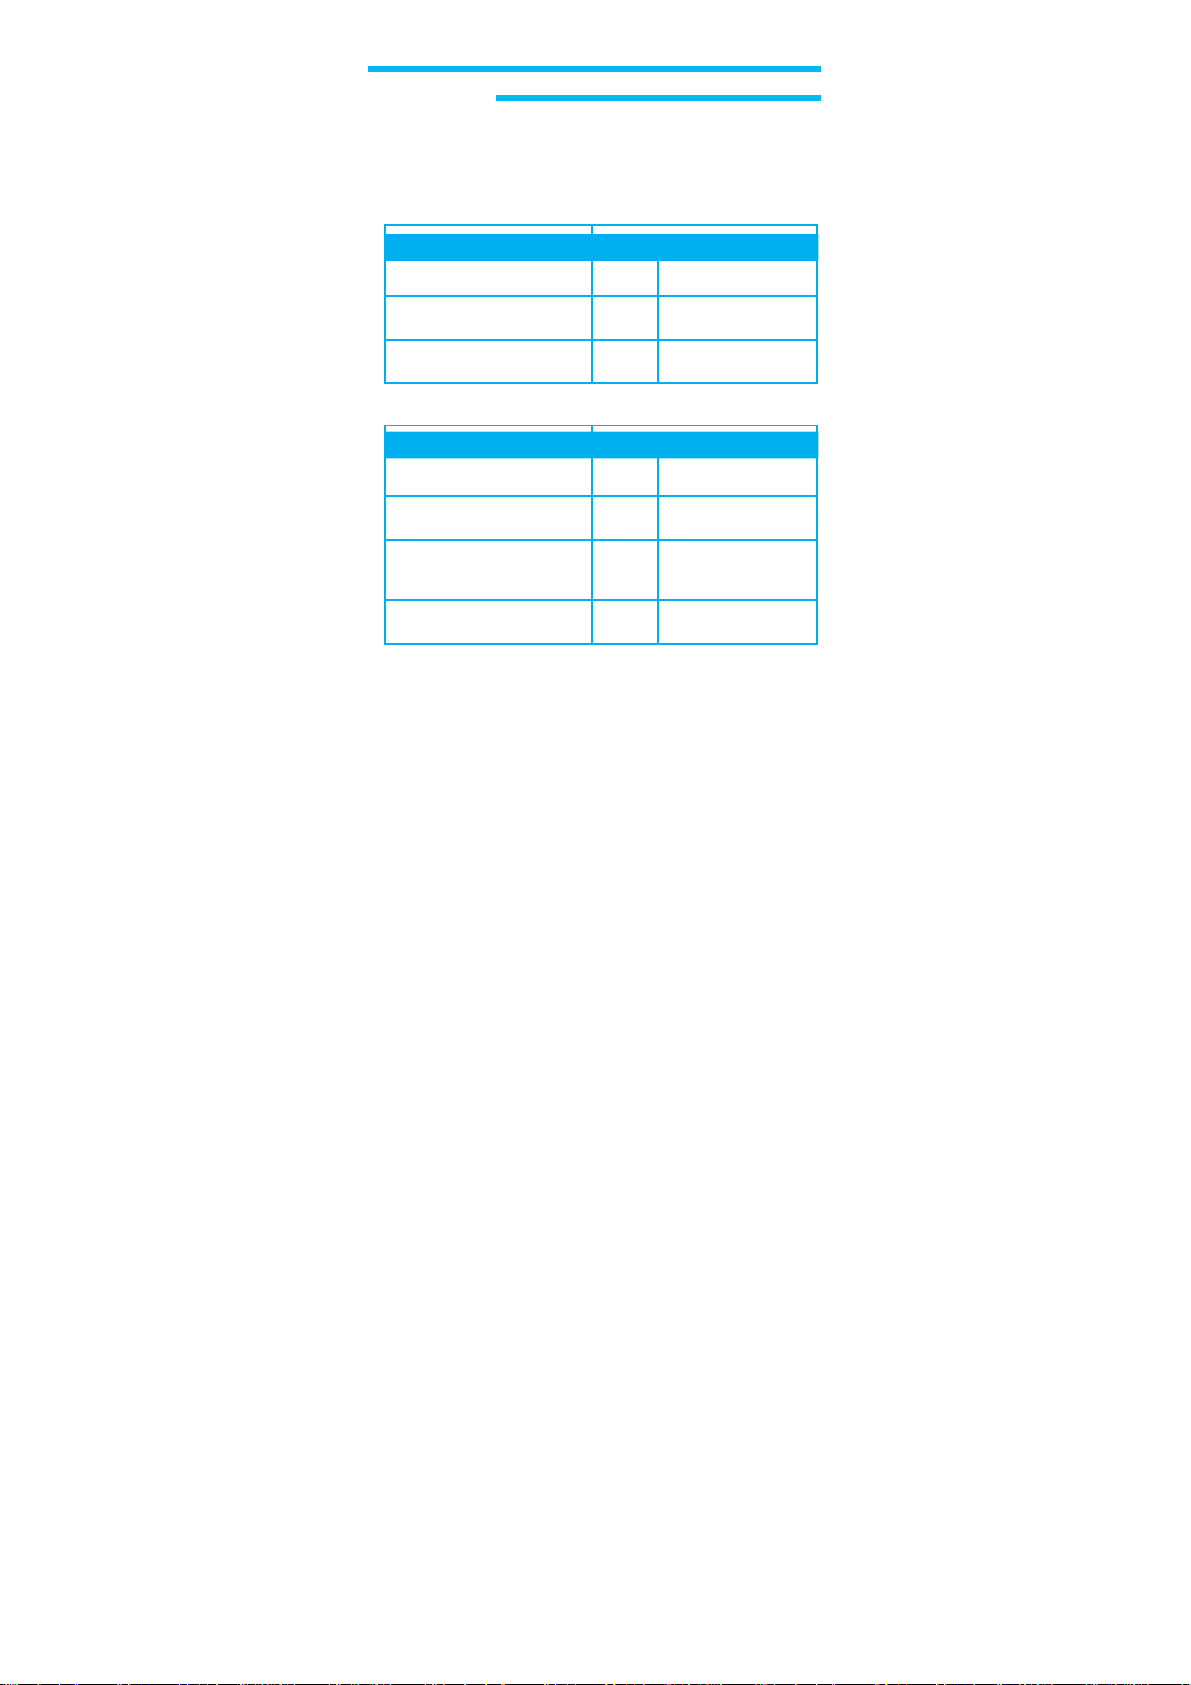
The following grid shows what types of files can be transferred to the
removable memory card.
Ringtones
Memory Usage
Download vid “Get It Now“
application
Saved to a removable SD
memory card
Saving a sound attachment to
the Micro SD card
YES
PIX
Memory Usage
Pictures received from other
users
Download via a Get It Now
application
User generated picture
Information/fi les
viewable on
YES
YES
YES
PC
Pix
to
phone or
Ring tone
Stored to the phone
only
Stored to the phone
NO
only
Stored to the phone
No
only
Stored to the phone
only
Stored to the phone
only
Information can be
stored
memory card
NO Files are locked
19
Page 20

F
lix
Memory Usage
V
ideo clips received from
other users
V
ideo clips downloaded via
Get It Now
V
ideo clips downloaded via
packet V
ideo
(P V)
User generated video
Information/fi les
viewable on
MP3/Music
Memory Usage
Move MP3 files from PC to
the memory card
Move MP3 files off
to
the phone’s
Are
other music file
types
available for
Ex:
NB C
the card
memory
PC
YES
YES
YES
YES
NO Files are locked
YES User can play MP3
NO
NO
Flix
Stored to the phone
only
Stored to the phone
only
Stored to the phone
only
Information can be
stored
to
Flix
phone or
memory card
files from the card
Page 21

Phone
ON/OFF
Keep on pressing the End Key for 5 seconds to turn on the phone.
This function is designed to avoid unintentional ON or OFF of the phone
when kept in a pocket or luggage.
Start
If PIN enable setting on after the phone is turned on, you will be required to
input 4-digit password. Input correct password and press OK(Center_
Direction) Key.
Note:
If
password is not input, only emergency call will be available with
SOS Key
In case the phone has been off
date and time are correct.
If they are not correct, press edit Key.
If the date is correct, press OK(
If the date is not correct, input new date using the number on the Key
pad and then if
OK(
Center
.
for long, you may be asked to make sure if
Center
_Direction) Key
the time is not correct, input new time and then press
_Direction) Key.
Select daylight saving on or off.
.
21
Page 22

Stand-by S
Note For about 1 minute and 30 seconds after the phone is on, it’s
and
menu may be displayed a little slower than usual. This delayed time is
environmental setting of the menu. And the menu will not be displayed during
this duration. After this duration, the speed will be back to normal.
to call.
creen
screen is displayed when the phone is available to answer or use
• Central Part: If the phone is not available yet for services,
• Lower Part: Optional menu will be displayed as a Left_selection Key
22
bumpy paper type of background is displayed,
where main menus are displayed here too. On the
bottom, day, month, year and present time will be
displayed.
Name menu will be displayed as a Ri
ght
_selection Key
image
for
Stand-by
.
.
Page 23

• Press the Left_selection Key located below the menu in stand-by
screen stat so to display the main menu.
• Press the Right_selection Key in stand-by screen state so to display
the
Name menu.
• Press the Upper of the direction Key in stand-by screen state so to
display the Audio Player menu.
• Press the lower of the direction Key in stand-by screen state so to
display the W
• Press the left of the direction Key in stand-by screen state so to display
Call Logs menu.
the
• Press the right of the direction Key in stand-by screen state so to
display the T
rite Message menu.
one Setup menu.
23
Page 24

The direction Key will be used mainly to appropriate functions of the phone.
• Keep on pressing End Key in stand-by screen state to turn off
phone.
• When the screen is in a normal state, press Send Key to display the call
record.
• In order to make a call, press number first in stand-by screen state
and the call Key next. Keep on pressing one number among 2 and 9
and a
call to the number as input will be made. In the following table,
various
functions are described as applicable when number keys are
pressed
for short or long in stand-by screen state.
They are company mode and individual mode, where a relevant SIM card
mode
will appear if any password is input in stand-by screen state.
Company mode and individual mode have their own numbering system
respectively
.
the
24
Page 25

Short
No.1
No.2
No.3
No.4
No.5
No.6
No.7
No.8
No.9
No.0
Symbol* V
Symbol
# Symbol #
respectively
.
Call connected to voicemail box
S
S
S
S
S
S
S
S
Number 0
peed Dial
peed Dial
peed Dial
peed Dial
peed Dial
peed Dial
peed Dial
peed Dial
ibration Mode
1
2
3
4
5
6
7
8
9
0
*
#
Dual SIM card: Dual SIM card has 2 passwords and 2 relevant modes
Long
25
Page 26
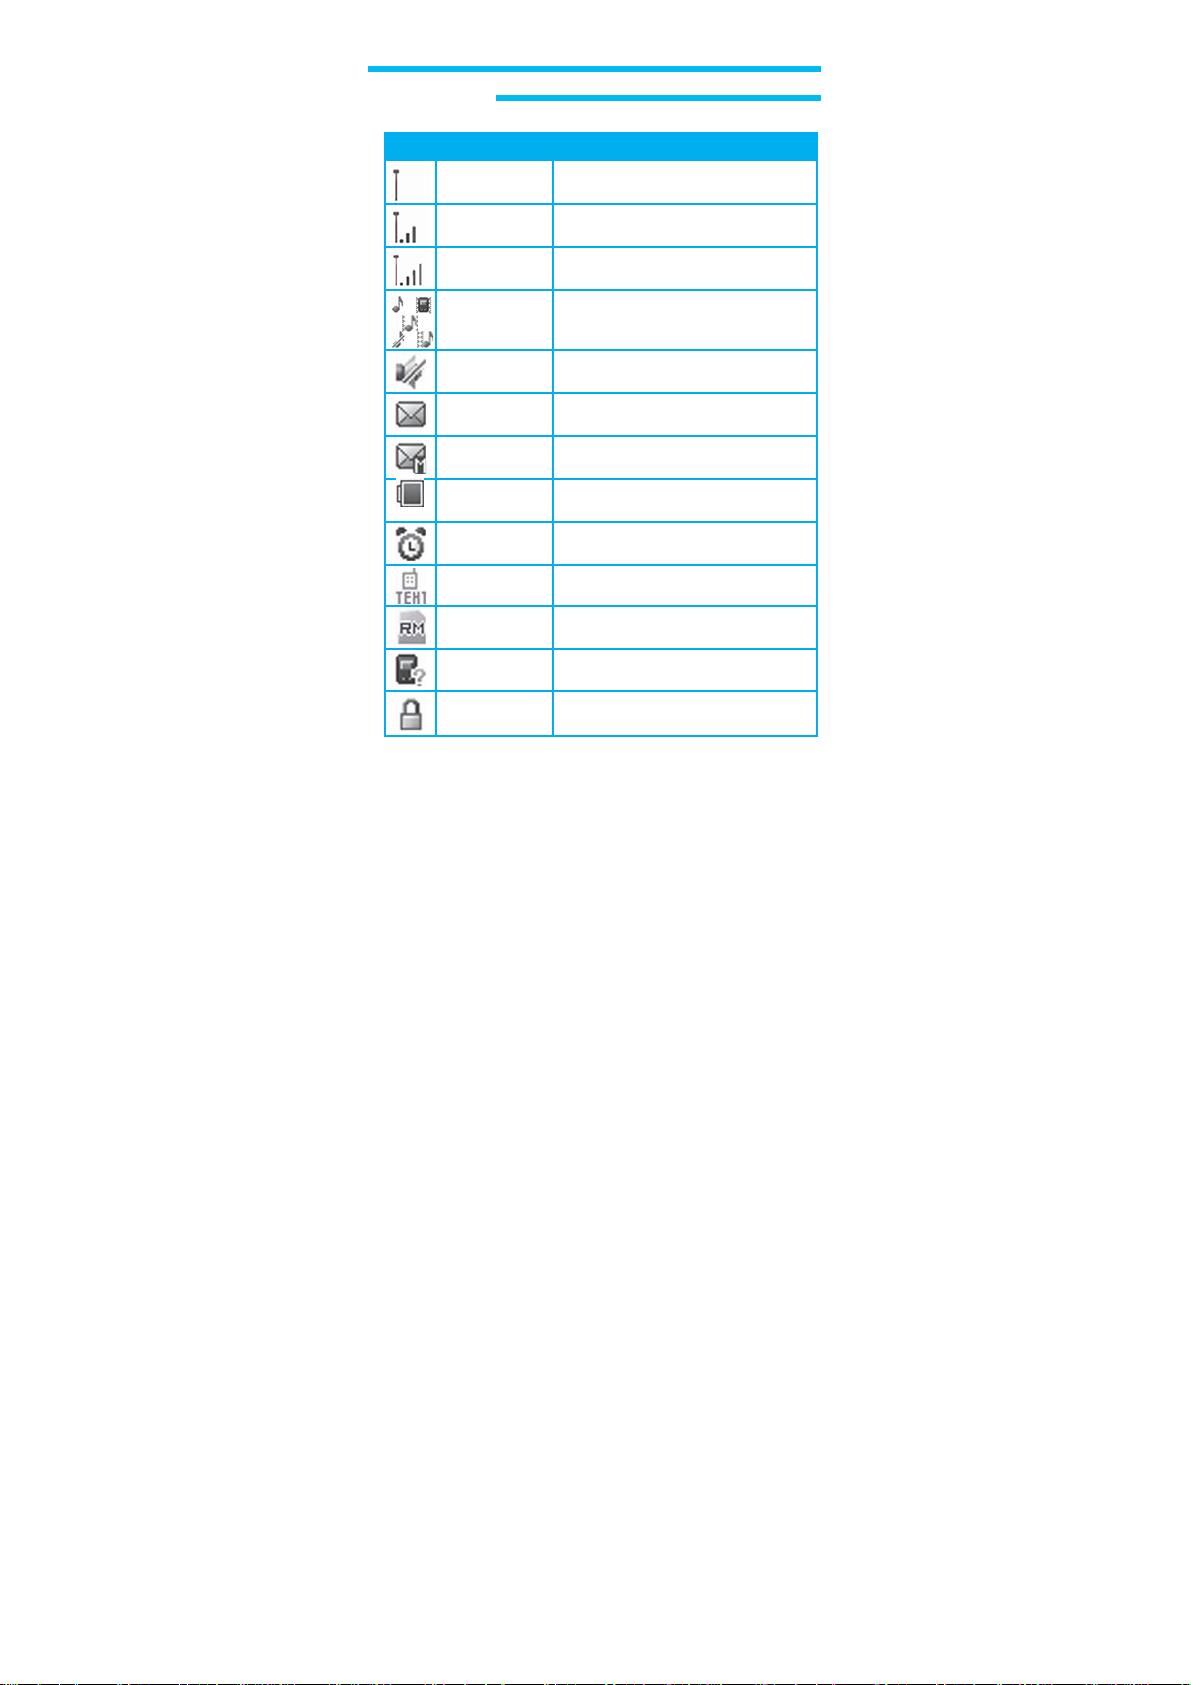
Icon
Name
Antenna Always displayed to show service area if
Service
available
Service
available
Bell mode There are 5 modes available (sound
Mute
New SMS This will be displayed when a new SMS
New MMS This will be displayed when a new MMS
Battery
Alarm
TTY
Roaming state Displayed while user is in other
Missed Calls
Lock
reached.
Always displayed to show service
level
available level (0 to 5) in a bar graph.
greatest service available level with
The
level A
the maximum bars.
only,
vibrate only,
with vibrate, silence).
sound
Ringer volume is set to off.
message is received.
message is received.
Battery charging level - the more
blocks, the stronger the charge.
Displayed if alarm is set via the
calendar
.
TTY mode is active.
service area or receiving a call abroad.
Description
sound after vibrate,
26
Page 27

Making A C
To
then
If you input wrong number,
In order to delete a specific number,
number to delete (press the left direction Key)
Press End Key to finish the call.
In the stand-by state of the phone, input number to display the following
screen.
Calls
all
make a call, press desired phone number in stand-by screen state and
Call Key .
Clear Key to delete the last number input.
move the cursor right behind the
and then press End Key.
If the inputted phone number is displayed, just press menu(Left_selection)
Key and specify a save folder.
If SIM card or the memory of the phone is displayed automatically,
a related type of the phone too. (Refer to the user manual for more detailed
procedures)
specify
Answering The Phone
Press Call (receive) Key to answer the phone call.
Press End Key not to answer the phone call.
27
Page 28
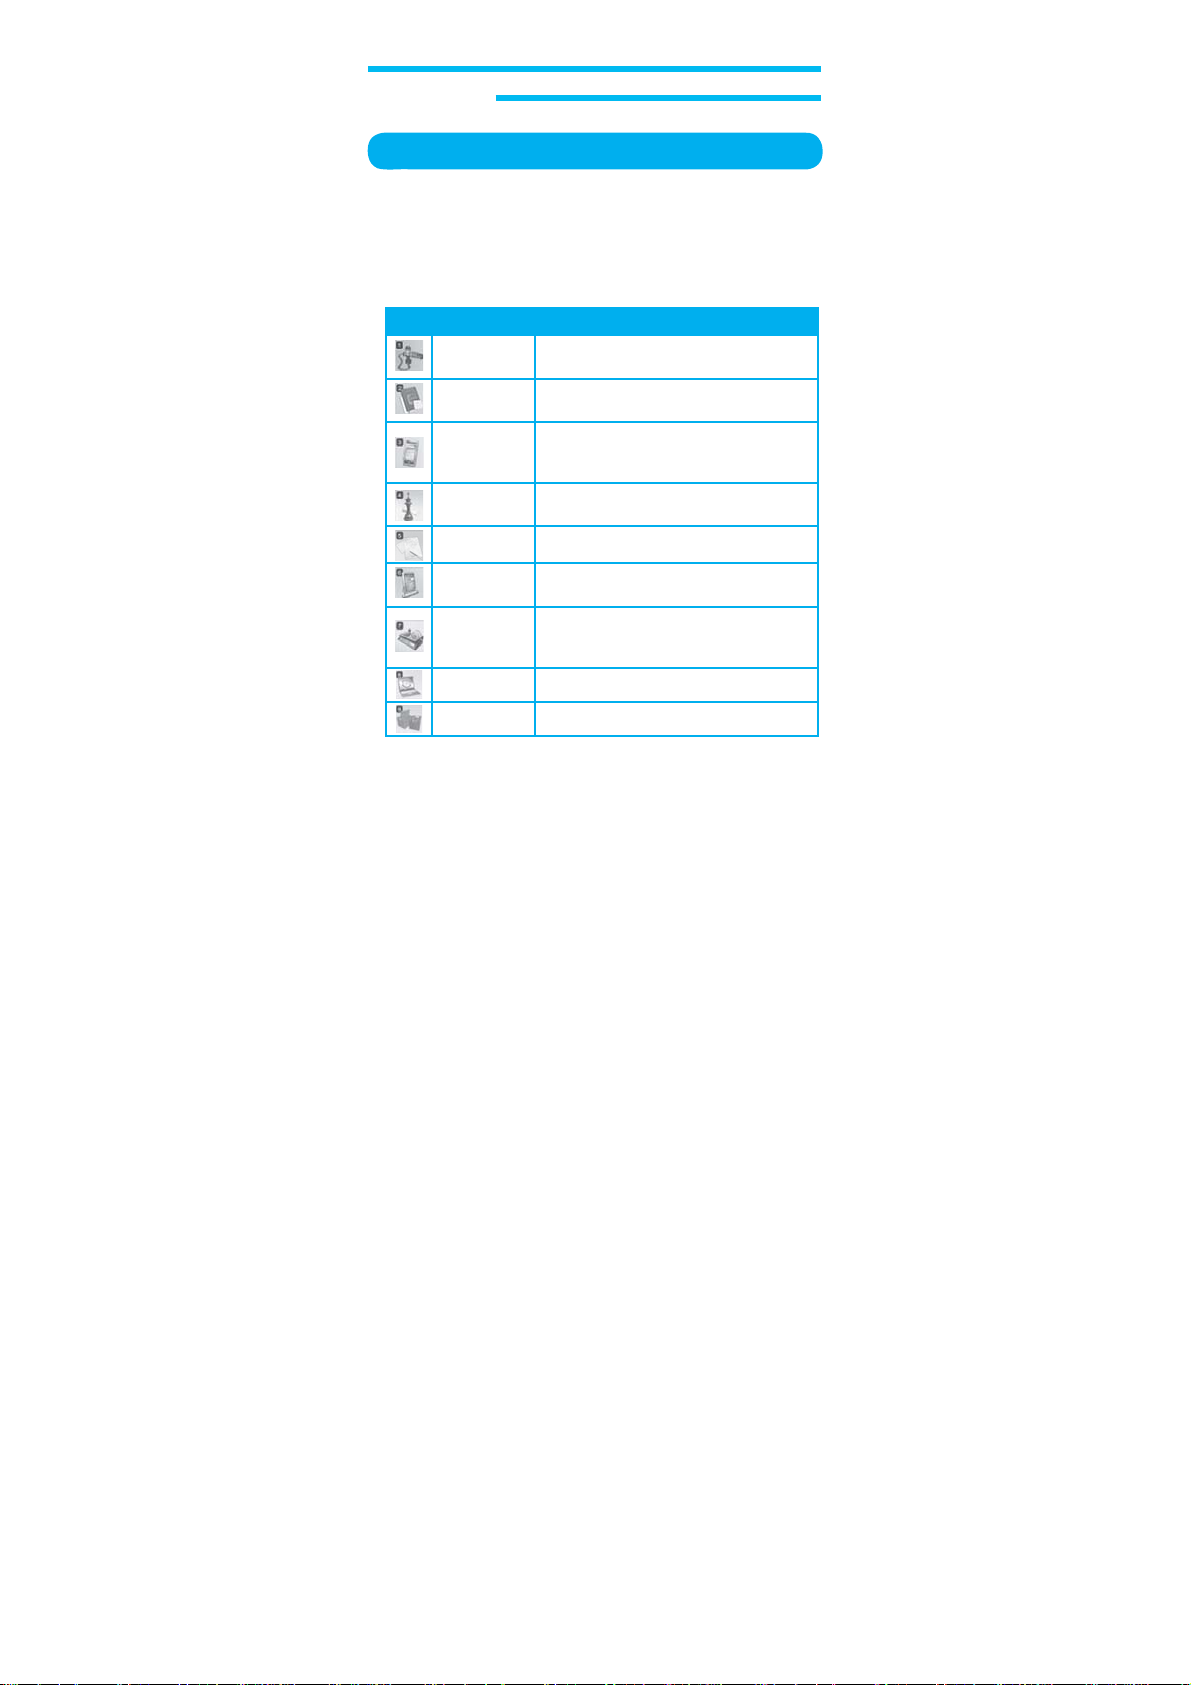
Whole M
enus
In the stand-by state, press the menu(Left_selection) Key to go to standard
menu. Press the direction (up/down/left/right) Key to get into menu desired.
While pressing the OK(
into
the category applicable. Figures of the icons, names of the categories,
brief
description of each menu and short-cut keys are as in the following
table;
Icon
Phone Book To
Entertainment
Messages To
Center
Menu
Calls
To
messages sent and received.
dial, owner,
Extras To
converter,
To download and select new video games
and
_Direction) Key,
look through call record and voice
save phone numbers and setting speed
use calendar,
calculator,
melody images. and Health.
read and write text messages.
press relevant number to get
Description
extra number.
alarm, world clock,
unit converter,
stopwatch.
currency,
Multimedia To
28
Setting To
Service To
File Manager
deal with camera and image album,
videos, MP3, etc.
specify volume, calling melody,
ground image and other environment of
the phone.
move to service menu.
To edit file.
back
-
Page 29

Common S
M
enus
Input P
hone Number
When you start inputting number in stand-by state, the number will be
displayed,
reaches
prepare a space for the next numbers to input.
During inputting number,
In order to insert a number between numbers just entered, use the direction
Key (up/down/left/right) to move the cursor
Press Clear Key to delete the number on the left of the cursor
moving from right to left as it is inputted. If the number input
the end of the right, the number will move to the lower line to
creens And
the screen will be as shown below
System In Various
.
.
.
W
riter
W
riter is used to input phone number,
All kinds of writers (phone number,
respectively.
text or number
number,
.
text) have their own functions
29
Page 30

W
riter Of Phone Number
It is used to input phone number from the phonebook. Above all, press
number in stand-by screen state to get into the screen of writer function.
0 ~ 9 are available to enter,
• Press <*> and <#> to input characters of <*> and <#> respectively
• Press Clear Key to delete the last number input. Keep on pressing
Clear Key to delete the whole number input (whole number) and to
return to stand-by screen state.
• Press Lower Key (menu displayed on the left of the screen) to go
to
next step. Press Previous Key to go back to the previous step of
the screen.
W
riter Of
It is used to input password 1, password 2 and call-restricted password.
Press the following keys to make use of its functions specified.
• Use the keys 0 to 9 to press such number 0 to 9 as applicable.
• <*> and <#> Key has no function.
• Press Clear Key to delete the last number input. Keep on pressing
Clear Key to delete the whole number input.
• Press OK(Center_Direction) Key to go to next screen.
Press Back(Right_selection) Key to go back to the previous screen.
W
riter Of
It is used to input text of names or messages. There are 4 input methods
for text writer.
Number
Text
which has the following features.
• [ABC] Capital english letter input: displays all the input text in capital
letters. This can be used together with Multi Input and Smart Input
which
will be later described.
.
30
Page 31

Cellular Phone
• [abc] Small english letter input: displays all the input text in small
letters. This can be used together with Multi Input and Smart Input.
• [
123] Number Input, number input is available fast. (Press number 0 to
9 to display 0 to 9 as applicable
.
Note:
Press <#> shortly to change input sequence as follows;
ABC, abc, 123, RU, ru, UK, uk.
Input method is displayed between the two menus in the center of
the bottom line of the screen.
(See below):
In the Expected Input method, the method is underlined.
In case with the two accompanied, it will be displayed as below
.
Smart I
nput
This makes fast text input available. With the improved technology of (Press
and Expect), a function to expect is realized, making use of the dictionary
prepared
in
expected characters of text when the user presses the Key once.
the language specified. In this way the writer provides the serial
31
Page 32

Cellular Phone
Tex t S
Press
can
display special characters which are not available in general text mode.
Move the direction Key (up/down/left/right) on the text desired to select
those special characters.
If you select the special character.
applicable
elector
Key shortly in the screen of text mode to display text selector which
*
character.
Characters available are as follows;
Press OK(Center_Direction) Key to input
32
Page 33

Through this Calls menu, you can move to call Logs, voice mail and mainly
used number list.
1. In stand-by state, press menu(Left_selection) Key to display main menu
option.
2. Use the direction Key to select Calls menu then press OK(Center_
Direction) Key.
• Dialed
ed
ime
• Receiv
• Missed
• Call Settings
• Delete Call Log
• Call T
• SMS Counter
• GPGS Counter
33
Page 34

Dialed
1. In stand-by state, press menu(Left_selection) Key to display main menu
option.
2. Use the direction Key to select Calls menu then press OK(Center_
Direction) Key.
3. On calls screen, select Dialed and press select to display the
following information.
Select a call desired and press option
menu
with the following options;
• Delete: Delete phone number in dialed folder.
• Save to Phone book: S
• Dial: T
ries a call to the phone previously selected.
• Edit: Edit phone number.
(Left_selection) Key to display new
end a message (Short or multimedia) to
selected number.
34
Page 35

Received
1. In stand-by state, press menu(Left_selection) Key to display main menu
option.
2. Use the direction Key to select Calls menu then press OK(Center_
Direction) Key.
3. On calls screen, select Received and press select to display the
following information.
Select a call desired and press option
menu
with the following options;
• Delete: Delete phone number in received folder.
• Save to Phone book: S
• Dial: T
ries a call to the phone previously selected.
• Edit: Edit phone number.
(Left_selection) Key to display new
end a message (Short or multimedia) to
selected number.
35
Page 36

Missed
1. In stand-by state, press menu(Left_selection) Key to display main menu
option.
2. Use the direction Key to select Calls menu then press OK(Center_
Direction) Key.
3. On calls screen, select Missed and press select to display the
following information.
Select a call desired and press option
menu
with the following options;
• Delete: Delete phone number in missed folder.
• Save to Phone book: S
• Dial: T
ries a call to the phone previously selected.
• Edit: Edit phone number.
(Left_selection) Key to display new
end a message (Short or multimedia) to
selected number.
36
Page 37

Call Settings
1. In stand-by state, press menu(Left_selection) Key to display main menu
option.
2. Use the direction Key to select Calls menu then press OK(Center_
Direction) Key.
3. On calls screen, select Call Settings and press select to display the
following information.
• Call W
aiting
• Call Fowarding
• Call Restriction
• Answer Mode
• Auto Redial
Call W
aiting
This service is used to make other call stand by while a precedent call is
connected, which can be applied or cancelled as necessary.
• Activate: A
• Deactivate: Deactivate Call W
• Query Status:
ctivate Call W
Query status of Call W
aiting call option.
aiting call option.
aiting call.
37
Page 38

Call Forwarding
It allows you to make received Call to go to other phone number.
this option and press OK(Center_Direction) Key to use this function,
has 6 sub-menus as follows;
• Divert All V
• Divert If Unreachable: Forwards all calls received even if out of
• Divert If No Answer: The service provider shall specify the number of
• Divert If Busy: Forwards all calls selected during you are connected
• Divert All Data Calls: Forwards all data calls.
• Cancel All Divert
Call Restriction
This makes calls be sent and received only under the specified conditions.
Select this option on menu to make use of this service.
• All outgoing: Restricts All outgoing calls, which is controlled by
• Internationl Outgoing: Restricts All outgoing calls to abroad, which is
• Internationl Expect Home
• All Incoming: Restricts All incoming calls which is controlled by
• W
hen Roam
• Cancel All: Cancel All the pre-set restricts at a fine, which is controlled
oice Calls: Forwards all voice call.
service area.
bells to make In-absence mode active if call is
not answered.
with other phone.
password.
controlled by password.
password.
by password.
Select
which
38
Page 39

• C
hange Password: In order to change password for call barring,
Answer Mode
• Any Key : Starts connection if active to any call when any Key on the
• Cover Answer: Starts connection if active to any call when the mobile
Auto Redial
If this function of the mobile is selected, dialing will be repeated to any
number if the connection is failed since in absence or not answered. In 5
seconds, the phone will try to make a call to the number again automatically
If you don’ t want to use this function, press Back
press
again
however,
OK(Center_Direction) Key to use. The call if the connection is failed
will be retried in 60 seconds. This function can be made on or of
kept inactive initially.
select
change password option and press
OK(Center_Direction) Key.
existing password first and then new password
twice(it is to confirm that the new password is
correct).
pad
is
pressed.
folder is opened.
(Right_
then input the correct
selection) Key,
.
or
f,
39
Page 40

Delete Call Log
This option is used for you to erase all the call lists through call option
menu. (Missed, Received, Dialed, All).
It will erase all the record of calls with ease.
1. In stand-by state, press menu(Left_selection) Key to display main menu
option.
2. Use the direction Key to select C
Direction) Key.
3. On calls screen, select Delete Call Log and press OK(Center_Direction)
Key to display the following information.
alls menu then press OK(Center_
• Missed Calls: D
• Dialed Calls: Deletes all sent calls saved.
• Received Calls: D
• Delete All: Deletes all the lists of calls saved.
eletes all calls in absence saved.
eletes all received calls saved.
40
Page 41

Call Tim
e
This provides information on calling time used in total (time used for calls
dialed and received including the last one).
1. In stand-by state, press menu(Left_selection) Key to display main menu
option.
2. Use the direction Key to select C
Direction) Key.
3. On calls screen, select Call T
display the following information.
alls menu then press OK(Center_
ime and press OK(Center_Direction) to
The following is to describe the option.
• Last Call T
• Tot a l Sent: U
• Tot a l Received: U
• Reset All T
ime: U
sed for the last call.
sed for calls sent.
sed for calls received.
ime: Erase the time used all time.
41
Page 42

SMS Counter
1. In stand-by state, press menu(Left_selection) Key to display main menu
option.
2. Use the direction Key to select C
Direction) Key.
3. On calls screen, select SMS Counter and press OK(Center_Direction) to
display the following information.
alls menu then press OK(Center_
The following is to describe the option.
• Sent
• Received
42
Page 43

GPRS Counter
1. In stand-by state, press menu(Left_selection) Key to display main menu
option.
2. Use the direction Key to select C
Direction) Key.
3. On calls screen, select GPRS Counter and press OK(Center_Direction)
to display the following information.
alls menu then press OK(Center_
The following is to describe the option.
• Last Sent
• Last Received
• All Sent
• Reset Counter
43
Page 44

In Phonebook, phone number,
displayed.
There are three points of contact in address book.
1. To
SIM: Information related with contact is saved in SIM memory only
2. To Phone: Information is saved in phone memory only
A special icon represents each contact.
In this way,
icon
The followings are several rules used in address book.
duplicate contact uses SIM contact uses SIM card-shaped
,
and the next icon
• As specified, address book displays whole address book on the screen
to show all contacts.
Group will be represented by a special icon.
• Information in the phone book is displayed in alphabet order.
number correspondent to each name is marked on the right of the line
under the screen.
• Up to 14-character and 20-digit input can be saved in the phone book.
(If the first text input is some symbol to represent international call, up
to 21 is available)
• Up to 4 phone numbers are available for a name.
• Up to 250 addresses can be saved in SIM memory.
addresses available dif
• Up to 500 entries can be saved in phone memory
• If all the information of a name can not be displayed at a time on screen,
press
the direction Key to move the information vertically so to display
and
read the rest on screen (being accordingly changed) to the end.
name and other information are saved and
.
is
fers from each other according to card capacity)
used for phone contact.
.
.
Phone
(The number of
44
Page 45

“ ......” if displayed in the end of the screen means that there is more
information to come.
Quick Search
1. In stand-by state, press menu(Left_selection) Key to display main menu
option.
2. Use the direction Key to select P
OK(Center_Direction) Key
3. On calls screen, select Quick Search and press OK(Center_Direction) to
display the following information.
hone Book menu then press
.
4. On
the screen write more than 1 characters of the contact name to find.
45
Page 46

Select Quick Search and press Option(Left_Direction) Key to display its
options
as
follows;
• V
iew: Shows details on contact being selected.
- Name (it appears on the upper of the screen)
- number
- Home Number
- Company N
- E-mail Address
- Of
- Fax Number
- Birthday
- Associate Picture
- Associate V
- Associate Sound
- Caller Group
• Edit: C
• Delete: Delete contact.
• Copy: Copy to SIM or Phone memory
• Move: Move to SIM or Phone memory
• Duplicate: To
• Send vCard: To send vcard.
This option is used to search for other contacts on the contact list.
Select Search option to display Search by name screen.
ame
fice Number
hange the information of the name selected.
ideo
duplicate contact.
.
.
46
Page 47

Search Entry
1. In stand-by state, press menu(Left_selection) Key to display main menu
option.
2. Use the direction Key to select P
OK(Center_Direction) Key
3. On calls screen, select Search Entry and press OK(Center_Direction) to
display the following information.
hone Book menu then press
.
This option is used to search for other contacts on the contact list.
Select Search option to display Search by name screen.
On the screen write more than 1 characters of the contact name to find.
If written, the applicable name with the same characters is displayed.
Now you may search up and down to find the name on the list.
For example, press No.2 Key to fast reach names with the first
character of C.
If there is no name with such a character,
next character (in alphabetical order).
the
the Key will show names with
47
Page 48

Add New Ent
ry
1. In stand-by state, press menu(Left_selection) Key to display main menu
option.
2. Use the direction Key to select P
OK(Center_Direction) Key
3. On calls screen, select Add New Entry and press OK(Center_Direction)
to display the following information.
hone Book menu then press
.
This option adds new contact to address book. Select this option to display
the
following screen.
Note:
New contact can not be made directly to whole address book.
For this operation, you should make it first in SIM or phone address
book and then copy the contact to address book next. Select In
memory to make contact in address book. Select In SIM
memory to save contact in card. Select option as desired and press
OK(Center_Direction) Key
• To
SIM: I
• To
Phone: I
48
.
nput name and n
Select yes to save contact in SIM memory
nput name,
address, office number,
picture, associate video, associate sound and caller group
then press Done(Right_Direction) Key.
contact in Phone memory.
umber then press OK(Left_Direction) Key.
number,
home number,
fax number,
.
company name, email
birthday,
associate
Select yes to save
phone
Page 49
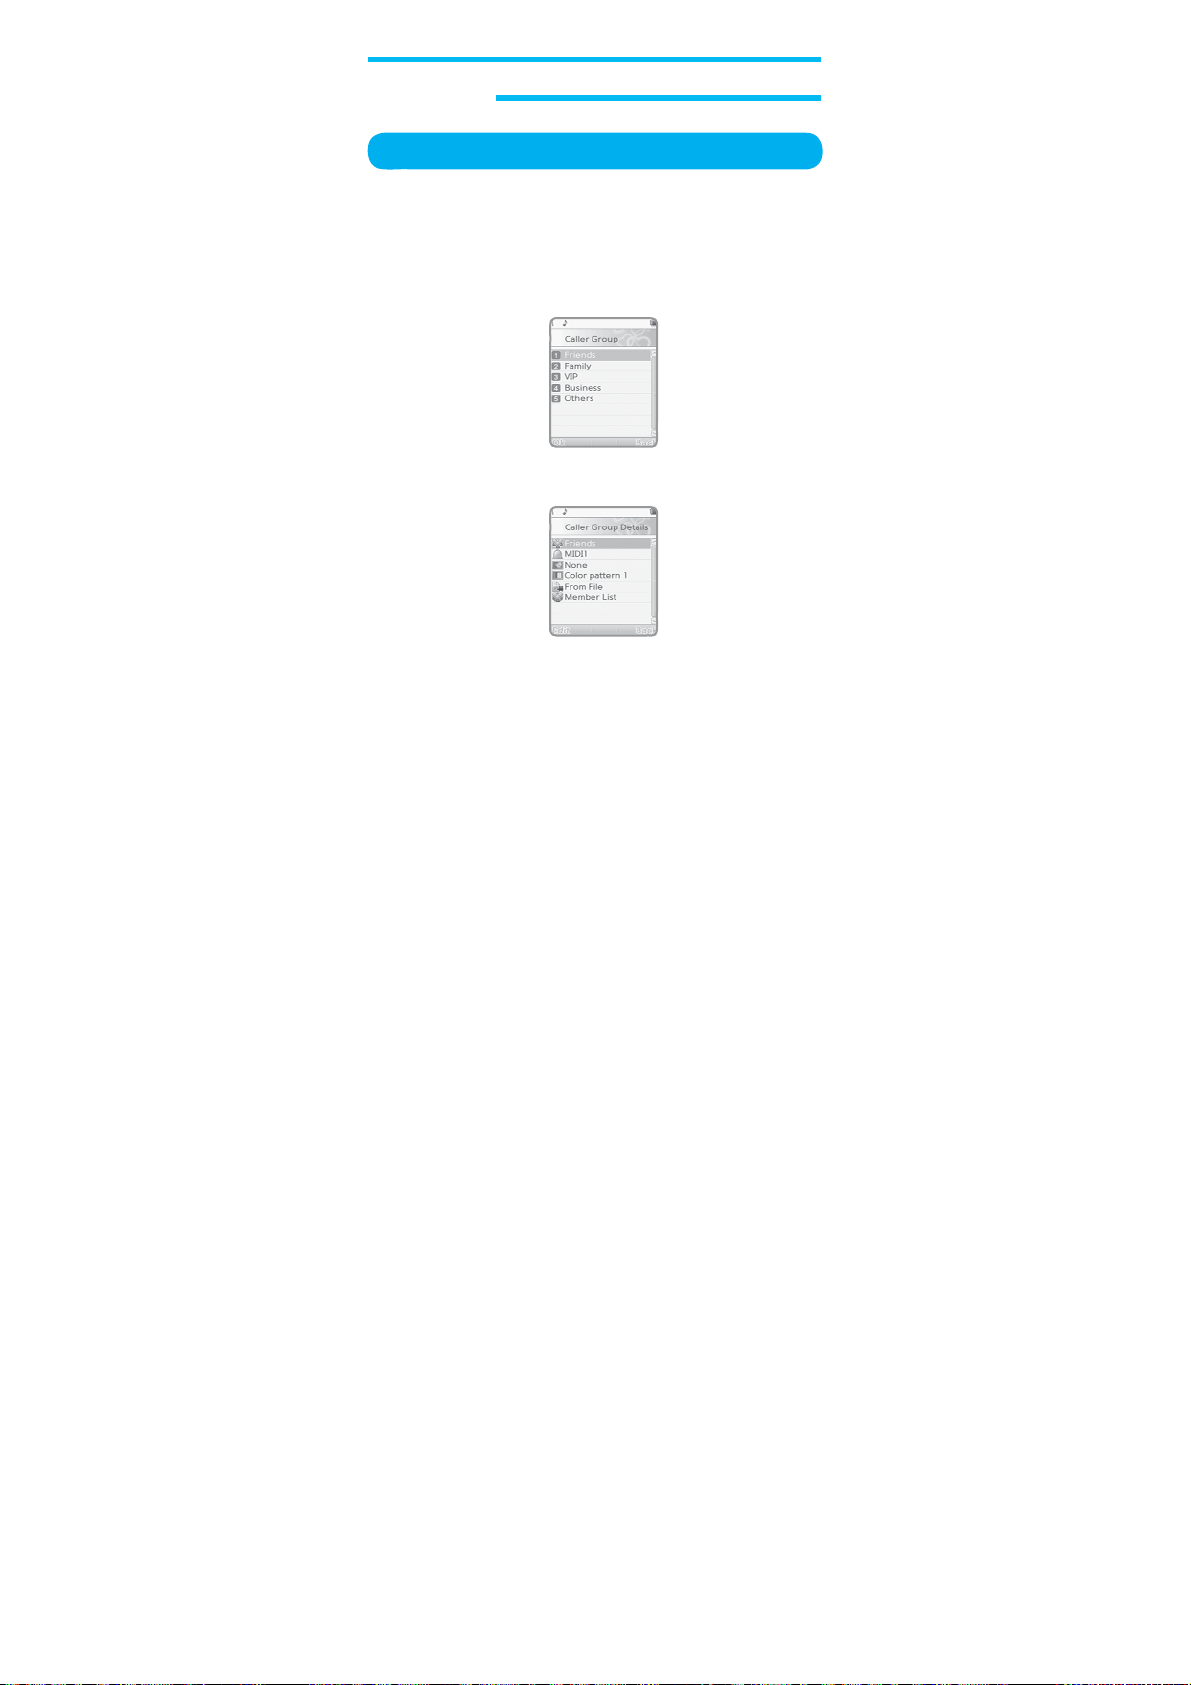
Caller Group
1. In stand-by state, press menu(Left_selection) Key to display main menu
option.
2. Use the direction Key to select P
OK(Center_Direction) Key
3. On calls screen, select Caller Group and press OK(Center_Direction) to
display the following information.
hone Book menu then press
.
Caller group Details
Select group press OK(Center_Direction) to display its options as follows;
Rename Grou
It is used to change selected group name. Select group name on Caller
Group details screen and press Edit(Left_Direction) Key to display W
Rename group screen. Use alphabet/number buttons to change to new
name. Press OK(Center_Direction) Key then select
p
done to
finish.
rite
49
Page 50

G
roup Ringer
It is used to change select group ringer.
details screen. Use Left/Right direction Key to select group ringer.
G
roup Picture
It is used to change select group picture. Select P
details screen. Use Left/Right direction Key to select group picture or select
V
iew
group picture.
G
roup Color Pattern
It is used to change select group color pattern. Select Color Pattern on
Caller Group details screen. Use Left/Right direction Key to select None or
Color pattern 1~6.
Associate V
It is used to change select associate video. Select V
details screen. Use Left/Right direction Key to select None, V
File.
Add Member
It is used to add member in group. Select Member List on Caller Group
details screen. Press op
Select contact and press Add(Left_selection) then select Yes(Left_selection)
to finish.
Delete Member
It is used to add member in group. Select Member List on Caller Group
details screen. Press op
Select Yes(Left_selection) to delete member
50
(Left_selection) Key then use Up
ideo
tion
(Left_selection) Key and select Add.
tion
(Left_selection) Key and select Delete.
Select R
inger on Caller Group
icture on Caller Group
per
/Lower direction Key to select
ideo on Caller Group
ideo 1 or From
.
Page 51

Speed Dial
1. In stand-by state, press menu(Left_selection) Key to display main menu
option.
2. Use the direction Key to select P
OK(Center_Direction) Key
3. On calls screen, select Speed Dial and press OK(Center_Direction) to
display the following information.
hone Book menu then press
.
4. Select Enable Speed Dial on Speed Dial screen to Speed Dial On/Off.
If this option is applied, you can make a fast call. Select number and then
it to
make a fast call thereto in stand-by state.
press
How to make it available is as follows;
51
Page 52

Setting Speed Dial Number
In the mobile, individual phone number can be set to each number Key of 2
to 9. For example, if you want to set Key No.7 for certain fast dial number
the procedures below shall be followed.
1. In stand-by state, press menu(Left_selection) Key to display main menu
option.
2. Use the direction Key to select P
OK(Center_Direction) Key
3. On calls screen, select Speed Dial and press OK(Center_Direction) to
display the following information.
4.
Select Set Number and press OK(Center_Direction) Key to go into speed
dial
setup window.
5. Select 7 and press Option(Left_Direction) Key then select Edit.
6. Select any contact number you want to connect with Key No.7 and press
OK(Center_Direction) Key
7. Press option
Edit or Delete the fast call connection.
(Left_selection) Key and select Edit or Delete if you want to
hone Book menu then press
.
.
If the fast dial number is presently active, keep pressing Key No.7 till the call is
connected.
,
52
Page 53

Owner Num
ber
The number of owner
1. In stand-by state, press menu(Left_selection) Key to display main menu
option.
2. Use the direction Key to select P
OK(Center_Direction) Key
3. On calls screen, select Owner Number and press OK(Center_Direction)
to display the following information.
number can vary (up to 4) depending on the SIM.
hone Book menu then press
.
4.
Press option
• Edit: E
• Erase: D
(Left_selection) Key and select Edit or Erase.
dit an Owner Number.
eletes an Owner Number
.
53
Page 54

Extra Number
1. In stand-by state, press menu(Left_selection) Key to display main menu
option.
2. Use the direction Key to select P
OK(Center_Direction) Key
3. On calls screen, select Extra Number and press OK(Center_Direction) to
display the following information.
hone Book menu then press
.
• Service Dial Number: The list of numbers in the SDN (Service Dial
• SOS Number: The list of numbers in the SOS Number.
Numb
er) appears. Select service Numbers then
press
Call Key.
Number then press Call Key.
Select SOS
54
Page 55

Management
1. In stand-by state, press menu(Left_selection) Key to display main menu
option.
2. Use the direction Key to select P
OK(Center_Direction) Key
3. On calls screen, select Management and press OK(Center_Direction) to
display the following information.
hone Book menu then press
.
• Memory Status: U
• Preferred Storage: Select SIM or Phone.
• Copy All: Copy all from SIM to Phone or Phone to SIM.
• Delete All: Delete all from S
• Fields: Setting Contact fields.
• My vCard: E
• Human V
sed to confirm the capacity and the condition of SIM
card or phone memory
dit and Send My Card.
oice Prompt: Select On or Of
.
IM, P
hone or One By One.
f.
55
Page 56

The options on Extras menus allow you to connect to other functions of the
phone
and SIM card. Follow the procedures below
to enter Extras menus.
1. Press menu(Left_selection) Key when the phone is in stand-by state to
display options on main menu.
2. Use the direction Key to select a Extra icon.
Option list related with Extras menus will be displayed as shown below;
• Calendar
• To Do
• Alarm
• W
• Calculator
• Unit converter
• Currency Converter
• StopW
List
orld Clock
atch
56
Page 57

Calendar
1. In stand-by state, press menu(Left_selection) Key to display main menu
option.
2. Use the direction Key to select Extra menu then press OK(Center_
Direction) Key.
3. On Extra screen, select Calendar and press OK(Center_Direction) Key to
display the following information.
Add Events
1. On option screen, select V
2. On Task List screen, press Add(Left_Direction)
• Date: Set
• Time: Set time.
• Note: Press Edit
• Alarm: Se
• Repeat: S
3.
Press Done
iew T
asks and press OK(Center_Direction).
date.
(Left_Direction) Key then I
key.
lect On or Of
elect Once,
or Monthly.
(Right_Direction) then select Yes(Left_Direction) to finish.
f.
Every Day,
.
nput memo use digit
Day(Monday
~Fr
iday), W
eekly
57
Page 58

Jump To
1. On option screen, select Jump To
2. Input date use digit key
Date
Date and press OK(Center_Direction).
then press OK(Center_Direction).
To Do
List
1. In stand-by state, press menu(Left_selection) Key to display main menu
option.
2. Use the direction Key to select Extra menu then press OK(Center_
Direction) Key.
3. On Extra screen, select To Do
to display the following information.
• V
iew:
Any event once after specified can be checked everyday through
the
following options displayed on calendar screen.
• Add: Add event.
• Edit Tas k: To edit event.
• Delete Tas k: To
• Delete All: To
• Send vCalendar: To
delete event.
delete all event.
List and press OK(Center_Direction) Key
vcalendar
.
send
58
Page 59

Page 60
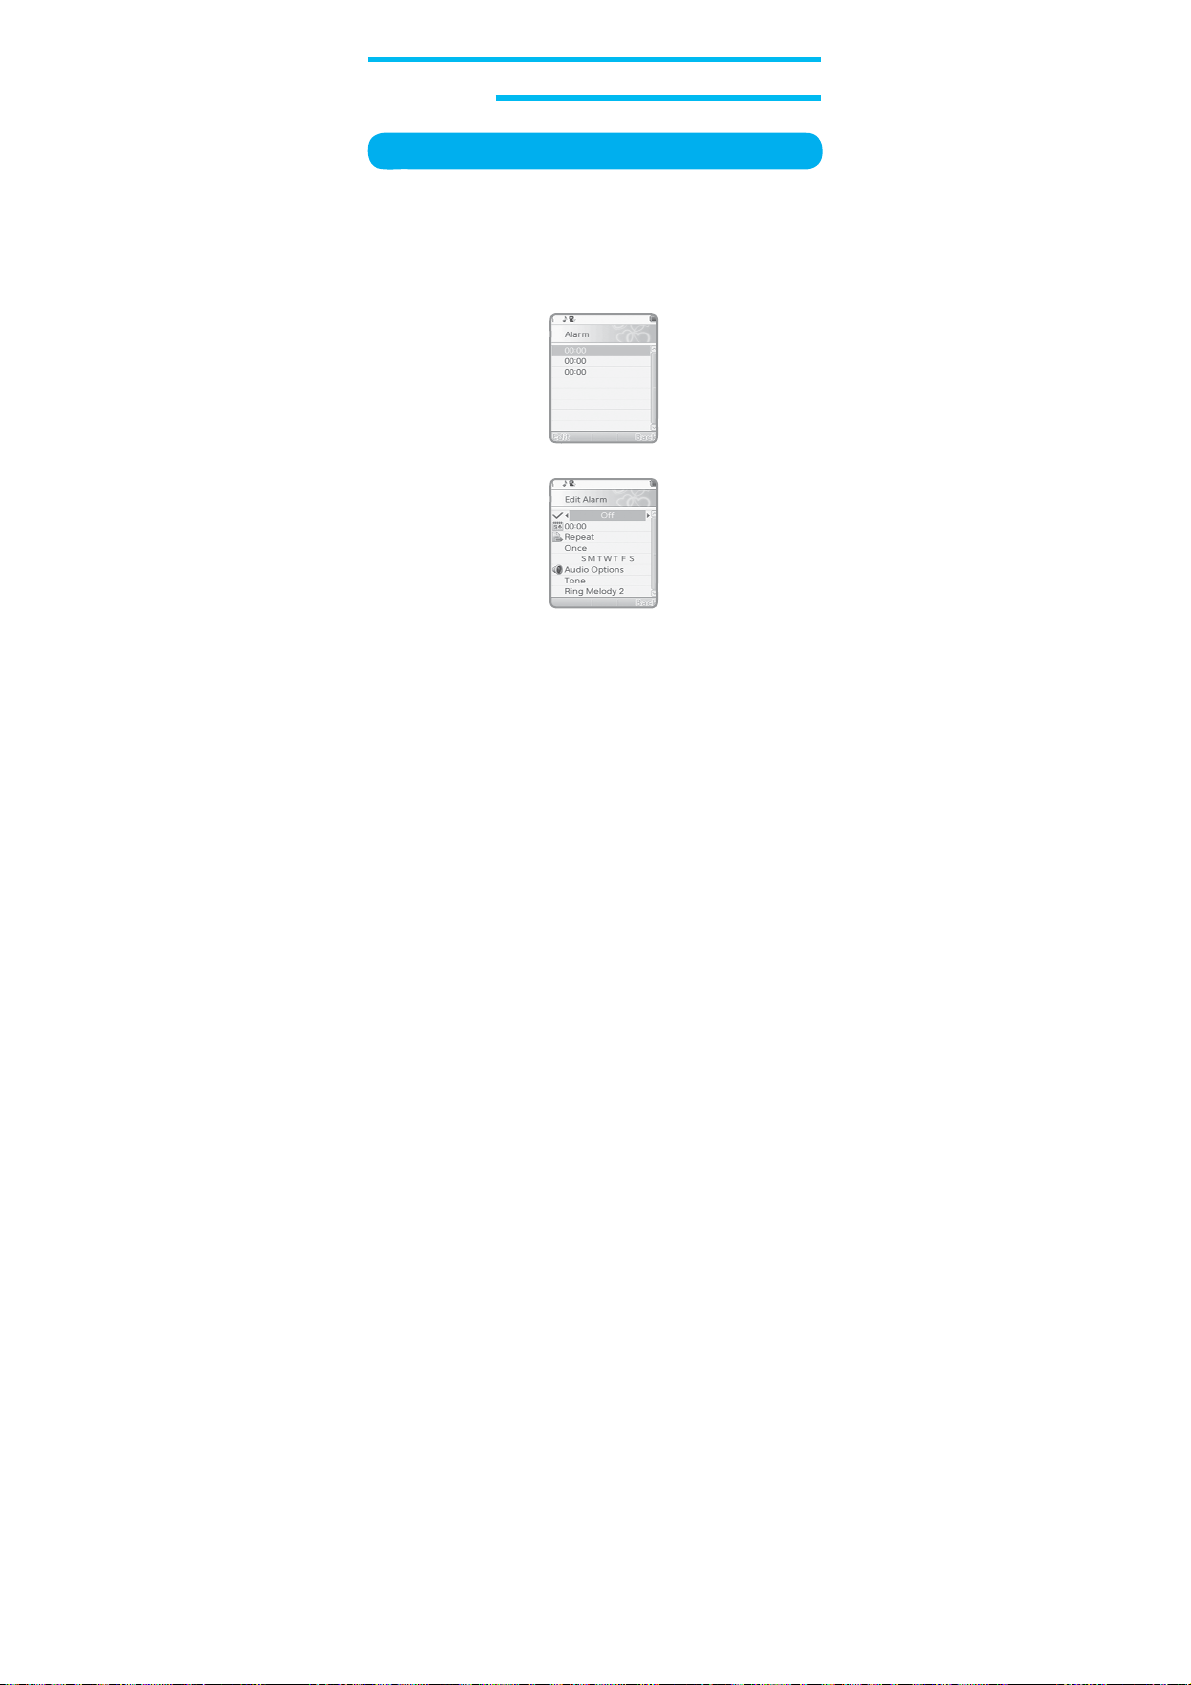
Alarm
1. In stand-by state, press menu(Left_selection) Key to display main menu
option.
2. Use the direction Key to select Extra menu then press OK(Center_
Direction) Key.
3. On Extra screen, select Alarm and press OK(Center_Direction) Key to
display the following information.
Add Alarm
• Set: S
elect On or Off.
• Time: Set time.
• Repeat: S
• Audio Options: Select T
4.
Press Done
alarm.
elect Once,
(Right_selection) Key then select Yes(Left_Direction) to save
Every Day or Day(Monday
one or FM Radio.
~Fr
iday)
.
59
Page 61

W
orld Clock
1. In stand-by state, press menu(Left_selection) Key to display main menu
option.
2. Use the direction Key to select Extra menu then press OK(Center_
Direction) Key.
3. On Extra screen, Select W
Key to display the following information.
4. Go to option and press On/Off(Left_Direction) Key to Daylight Saving
T
ime for Foreign City On or Off.
orld Clock and press OK(Center_Direction)
Calculator
The mobile calculator helps you to perform basic calculation work.
Follow the procedures below to use the calculator
1. In stand-by state, press menu(Left_selection) Key to display main menu
option.
2. Use the direction Key to select Extra menu then press OK(Center_
Direction) Key.
.
60
Page 62

Page 63

3. On Extra screen, Select Calculator and press OK(Center_Direction) Key
to display the following information.
- Use number keys to input numbers desired.
- Use * Key to display a decimal point.
- Use # Key to make a negative number
- After desired number is input, press Navigation Key to input the signs
of +, -, x and /.
- Input the first number and then the second number to calculate.
- Te
get the result of the calculation, press Equals Key (See the figure
below).
- You
Navigation Keys. This calculator does not support simultaneous
multi-calculation. You
a case and then perform each calculation in due consideration of
calculation priority.
Press Back(Right_selection) Key to return to previous screen.
can use the acquired result to apply to other calculation with
should divide the object into several in such
.
61
Page 64

Unit Converter
1. In stand-by state, press menu(Left_selection) Key to display main menu
option.
2. Use the direction Key to select Extra menu then press OK(Center_
Direction) Key.
3. On Extra screen, Select Unit Converter and press OK(Center_Direction)
Key to display the following information.
• W
eight: Kg
<-> P
• Length: Km
ound or Kg <-> Ounce
<-> Mile, M <-> Yard, M <-> Foot or Cm <-> Inch
62
Page 65

Currency Converter
1. In stand-by state, press menu(Left_selection) Key to display main menu
option.
2. Use the direction Key to select Extra menu then press OK(Center_
Direction) Key.
3. On Extra screen, Select Currency Converter and press OK(Center_
Direction) Key to display the following information.
4. On
Input Currency screen, input rate date then press OK(Center_
Direction) Key.
5.
Input local date then press OK(Center_Direction) Key
.
63
Page 66

Stopwatch
1. In stand-by state, press menu(Left_selection) Key to display main menu
option.
2. Use the direction Key to select Extra menu then press OK(Center_
Direction) Key.
3. On Extra screen, Select Stopwatch and press OK(Center_Direction) Key
to display the following information.
Typ ica l Stopwatch
Split Timing
- To
start,
- To
Stop,
- To
Resume,
- To
Split,
- To
Save Split time,
Yes(Right_Direction).
Direction) then select Done.
press Start
press Stop(Left_Direction) Key
press Split(Right_Direction) Key
(Left_Direction) Key
press Resume
(Left_Direction) Key
press Back(Right_Direction) Key then select
Input Save Stopwatch title and press Opt
.
.
.
.
ion
(Left_
64
Page 67

Lap Timing
V
iew Record
nWay
- To
start,
press Start
- To
Stop,
press Stop(Left_Direction) Key
- To
Resume,
- To
- To
Yes(Right_Direction).
Direction) then select Done.
- V
iew: V
- Delete: D
- Delete All: D
press Resume
Lap,
press Split(Right_Direction) Key
Save Lap time,
iew record date.
elete record date.
Stopwatch
• To
start,
• To
• To
• To
press Start
Stop,
press Stop(Left_Direction) Key
Resume,
Back,
press Back(Right_Direction) Key
(Left_Direction) Key
(Left_Direction) Key
press Back(Right_Direction) Key then select
Input Save Stopwatch title and press Opt
elete all record date.
.
.
.
.
(Left_Direction) Key
press Resume
(Left_Direction) Key
.
.
.
.
ion
(Left_
65
Page 68

1. In stand-by state, press menu(Left_selection) Key to display main menu
option.
2. Use the direction Key to select Entertainment menu then press
OK(Center_Direction) Key
Option list related with Entertainment menus will be displayed as shown
below;
• Java
• My Games
• Melody Compser
• Download
.
66
Page 69

Java
1. In stand-by state, press menu(Left_selection) Key to display main menu
option.
2. Use the direction Key to select Entertainment menu then press
OK(Center_Direction) Key
3. On Entertainment screen, Select Java and press OK(Center_Direction)
Key to display the following information.
You
can download and execute the java application on your hand set.
• Java Contents
• Java Setting
.
67
Page 70

My Games
1. In stand-by state, press menu(Left_selection) Key to display main menu
option.
2. Use the direction Key to select Entertainment menu then press
OK(Center_Direction) Key
3. On Entertainment screen, Select Games and press OK(Center_Direction)
Key to display the following information.
.
• Egg Othello
• Salad W
• Pikko
orld
68
Page 71

Health
1. In stand-by state, press menu(Left_selection) Key to display main menu
option.
2. Use the direction Key to select Entertainment menu then press
OK(Center_Direction) Key
3. On Entertainment screen, Select Health and press OK(Center_Direction)
Key to display the following information.
You
can cheak your BMI and m
BMI
.
enstrual.
- Select Male or Female.
- Input Height (Cm)
- Input W
eight (Kg)
use number key
use number key
.
.
69
Page 72

Menstrual
- Input Last Mens Date.
- Input A
verage Period use number key
.
70
Page 73

4. Entertainment
Melody Composer
1. In stand-by state, press menu(Left_selection) Key to display main menu
option.
2. Use the direction Key to select Entertainment menu then press
OK(Center_Direction) Key
3. On Entertainment screen, Select Melody Composer and press
OK(Center_Direction) Key to display the following information.
Create Melody
1. Press Option(Left_Direction) Key
2.
Press Add(Left_Direction) Key then you can input musical note use
number
key.
.
.
3. If you want delete musical note
4.
Press option
• Play: P
• Play Speed: S
• Select Instrument: S
• Save: S
(Left_selection) Key. The following is to describe the option.
lay be created me
elect play speed F
ave be created melody
press Clear
lody.
elect instrument P
S
teel D
rums, F
Box or Xyloph
.
(Right_Direction) Key.
ast, N
ormal or S
iano, G
lute, H
armonica, T
one.
low
.
uitar, Violin, S
rumpet, M
axophone,
usic
Page 74

4. Entertainment
Download
1. In stand-by state, press menu(Left_selection) Key to display main menu
option.
2. Use the direction Key to select Entertainment menu then press
OK(Center_Direction) Key
3. On Entertainment screen, Select Download and press OK(Center_
Direction) Key to display the following information.
.
• Image: D
• Audio: D
ownload image.
ownload aud
io.
72
Page 75

1. In stand-by state, press menu(Left_selection) Key to display main menu
option.
2. Use the direction Key to select Message menu then press OK(Center_
Direction) Key.
Option list related with Message menus will be displayed as shown below;
• SMS
• MMS
• Email
• V
oice Mail Server
• Chat
• Broadcast Message
Page 76

SMS
1. In stand-by state, press menu(Left_selection) Key to display main menu
option.
2. Use the direction Key to select Message menu then press OK(Center_
Direction) Key.
3. On Message screen, Select SMS and press OK(Center_Direction) Key to
display the following information.
Send New SMS
1. On
SMS screen, Select W
Key to display the following information.
2.
Input me
3.
Press option
ssage.
(Left_selection) Key
rite Message and press OK(Center_Direction)
.
74
Page 77

• Done:
- Send Only: Send message.
- S
ave and Send: Save message then send message.
- Save:
Save message.
- Send To Many: Send message to many people
- Send By Group: Send message to group.
• Use T
emplate: Insert a
• Insert Object: A
• Save: S
• Format Text :
- Tex t Size: Select Small, Medium or Large.
- Tex t Style: Select On or Off
- Alignment:
- New Paragraph: Send message to many people
• Input Method: Select Input method. (Alphabetic/Numeric/Symbols)
Inbox
It is a space to save all the messages received including SMS.
If a message is received, separately specified sound of bell will operate.
And as shown below, an
llows user to insert some object in a message. For
example, picture (simple static picture), animation (small
moving
aves the just written message in memory
Strikethrough.
Save message.
image will be displayed on the screen.
clause stored in T
picture), melody (music), sound (simple bell).
for Bo
emplate.
ld, Italics, Underline and
.
.
.
Page 78

V
iew S
aved M
essage Not Read Yet
Follow the procedures below to read new message saved.
a. Read Tex t M
• This icon means that the message in the Inbox is not read yet.
• This icon means that the message in the Inbox is read already
Select a text message to read now and press option
essage: Select text message option to display text
message list, received. Each message has an
icon and senders number,
kinds of icons;
date. There are two
(Left_selection) Key.
- Reply: D
isplays W
rite T
received. W
write and send text message (SMS), refer to <Send New SMS>.
- Delete: Delete the SMS.
- Edit: Edit the message.
- Forward: D
- Copy to Phone: Copy message to phone.
- Move to Phone: Move to
elivers the received message to others. Input the phone
number directly thereon or select a receiver on address
book. Then press OK(Center_Direction) Key.
ext Screen to replay to the message
rite message as desired. If you want to know how to
message to phone.
.
76
Page 79

- Chat:
Set nickname and remote number then input message. And
send message.
- Del
eta All: Deletes all the SMS.
- Copy All: Copy all message to phone.
- Move All: Move
- Use Number: You
- Use URL
- Save Objects: Save d
(Use T
all message to phone.
can Dial or save to phone book.
isplay objects integrated with a message.
emplate, insert PHB number,
name.)
Page 80

MMS
1. In stand-by state, press menu(Left_selection) Key to display main menu
option.
2. Use the direction Key to select Message menu then press OK(Center_
Direction) Key.
3. On Message screen, Select MMS and press OK(Center_Direction) Key
to display the following information.
Send New MMS
1. On
MMS screen, Select W
Key to display the following information.
• To
Nr: W
here main receiver’s phone number or E-mail addresses will
be
surely specified. Up to 60 characters are available for E-mail
and up to 40 numbers for the phone number
• Cc: W
here other receiver s contact will be displayed to receive copy
of message. How to select receivers is as described previously
You
may input several phone numbers or E-mail addresses to
send a message to many receivers at a time through address book
screen.
• Bcc: W
• Subject: W
here other receiver s contact will be displayed to receive copy
of message. How to select receivers is as described previously
You
may input several phone numbers or E-mail addresses to
send a message to many receivers at a time through address
book screen.
here title of message will be displayed. Select this
option
and press Edit(Left_Direction) Key to go to Subject
screen described previously to input up to 40 characters.
rite Message and press OK(Center_Direction)
.
.
.
78
Page 81

• Message: W
- Done
- Input Method: Select Multitap ABC, Multitap abc, Numeric, Multitap
- Add Image: It is used to attach picture or image already saved in
- Add Audio: It is used to add desired sound to MMS. (You
- Add V
- Add Attachment: It is used to add desired Attachment to MMS.
- Insert New Slide: Adds a new slide page to create more slides. Y
- Delete Slide: To
- Preview: Displays the appearance of the present messages page.
- Slide Timing: Set the time duration that the recevied message is
here details of message are written. Press Edit(Left_
Direction) Key to go to Subject screen described previously to
input up to 612 characters.
RU,
Multitap ru, Multitap UK, Multitap uk,
ABC,
Smart abc, Smart RU, Smart ru, Smart UK,
Smart
uk or
the
phone.
select the sound saved in the phone or the sound being
recorded
ideo: It is used to add desired V
to
select the V
recorded
to
can
move to each slide page us
direction
delete slide.
displayed. The display the display automatically
scrolls to the next slide page after the specified time.
Insert Symbols.
the phone using the microphone.)
ideo saved in the phone or the V
the phone using the video recorder.)
key on the message composer screen.
ideo to MMS. (You
ing the Left
Smart
may
may
ideo being
/Right
ou
Page 82

2. Press Done
• Send Only: Send message.
• Save and Send:
• Send to Dra
• Send Options
80
(Right_Direction) Key to display the following information.
- V
alidity period: Maximum period can be specified as necessary to
- Delivery Report: If this function is executed, the message sender
- Read Report: If this option is executed, you can be sure if its
Save then send message.
fts: S
aves the written multimedia message in Draft
MMS
folder.
select a
small
letters, etc.)
:
receiver has read the message or not. Once the
receiver read the message, the time and date when
the message was read will be sent to its sender. No
option is available for this function. It lets you be sure
if the message has been read by the receiver or not.
Alphabetic or numeric mode: You
mode to input messages. (Capital letters,
make message sent. If once the period is over,
message will be automatically deleted. 1 hour,
hours, 1 Day, 1
are available for the period. The maximum has
been previously established by its service provider
However,
the minimum is 1 hour as described above.
will
have information on message transfer from
MMS service center,
sender can be sure if the message has been
read by the receiver or still saved in MMS service
center
. This information includes the receivers
phone number,
(if transferred or kept in MMS service center),
transfer time and date.
week and the maximum
through which the message
message details, present state
may
the
12
.
Page 83

- Priority: D
• Exit: To exit write message.
Inbox
MMS received and saved. Select message to read and press option
selection) Key to display various option menus.
• V
iew: Edits all information related with To,
• Properties: Shows the message as it
• Send: Send draft message.
• Edit Message: E
• Delete: D
• Delete All: Del
• Use Number: Use dial or save to p
Outbox
Outbox stores messages that you have sent, or failed to send, or cencelled.
• V
iew: Edits all information related with To,
• Properties: S
• Send: Send draft message.
• Edit Message: E
• Delete: D
• Delete All: Del
• Use Number: Use dial or save to p
isplays priority of multimedia messages sent. (High,
Medium, Low)
recipient’
Edit content.
elete draft message.
Cc, details or message.
s phone.
dits all information related with To,
ete all draft messages.
appears on the
honebook.
Cc, details or message.
hows the message as it
recipient’
s phone.
dits all information related with To,
Edit content.
elete draft message.
ete all draft messages.
appears on the
honebook.
(Left_
Cc, Bcc, Subject or
Cc, Bcc, Subject or
Page 84

Draft
Select Save as Draft to display temporary box of MMS saved.
• V
iew: Edits all information related with To,
• Properties: Shows the message as it
• Send: Send draft message.
• Edit Message: E
• Delete: D
• Delete All: Del
• Use Number: Use dial or save to p
Sent
It is the place all sent MMS are saved (messages sent or saved after
written).
• V
• Properties: Shows the message as it
• Send: Send draft message.
• Edit Message: E
• Delete: D
• Delete All: Del
• Use Number: Use dial or save to p
recipient’
s phone.
dits all information related with To,
Edit content.
elete draft message.
ete all draft messages.
iew: Edits all information related with To,
recipient’
Edit content.
elete draft message.
ete all draft messages.
s phone.
dits all information related with To,
Cc, details or message.
appears on the
honebook.
honebook.
Cc, details or message.
appears on the
Cc, Bcc, Subject or
Cc, Bcc, Subject or
82
Page 85

T
emplate
A template contains a block of t
1. Select a T
emplate menu and press Option(Left_Direction) Key.
• V
iew: View the message.
- Play: Play MMS.
- Save Image As: Save image in phone or DRM rights.
- Save Audio As: Save audio in phone or DRM rights.
• Properties: Shows the message as it
• W
recipient’
rite Message: W
Message Settings
It is used to define a series of options for MMS. The options displayed on
screen
are as shown below;
• Sending: View the message.
- V
alidity Period: Select Max, 1 Hour, 12
- Delivery Report: When t
- Read Report: When this option set to On, receiver’s phone sends a
- Priority: S
- Slide Timing: D
- Delivery T
elect High, Medium or Low
ime: S
ext for quick insertion into MMS.
s phone.
rites a new MMS template.
appears on the
his option is set to On,
you
whether or not your message has been
delivered
successfully.
reply to let you know when your message was read
by her
file is played.(Up to 99 seconds available.) I
to 99.
/him.
isplays the play time in second during the attached
elect In one hour, In 12
Immediate.
Hour, 1
.
hours, In 24 hours or
Day or 1 W
the network informs
nput 1
eek.
Page 86

• Retrieval:
- Home network: S
- Roaming: Select As Home, Delayed or Restricted.
- Read Report: Select On request, Send or Never Send.
- Deliver Report: Select On or Of
• Filters: Spam filter
- Anonymous: Select Allow or Reject.
- Max Size: Input 1~999 KB
- A
• E
• Compose:
- Creation Mode: S
- Image Resizing:
- Auto Signature: Select On or Of
- Tex t: Input T
• Memory Status:
dvertisement: Select Allow or Reject.
dit Profile:
elect Immediate, Restricted or Delayed.
.
Select FET MMS, CHT MMS, TCC MMS, TAT MMS,
CHINA MOBILE MMS, KGT MMS or Profile 7~10.
elect Free or Restricted.
Select 160X120, 320X240, 640, 480 or Of
ext.
This function displays the amount of used and
available memory on your phone.
f.
f.
Email
1. In stand-by state, press menu(Left_selection) Key to display main menu
option.
2. Use the direction Key to select Message menu then press OK(Center_
Direction) Key.
3. On Message screen, Select Email and press OK(Center_Direction) Key
to display the following information.
f.
84
Page 87

V
oice Mail Server
1. In stand-by state, press menu(Left_selection) Key to display main menu
option.
2. Use the direction Key to select Message menu then press OK(Center_
Direction) Key.
3. On Message screen, Select V
Direction) Key to display the following information.
oice Mail Server and press OK(Center_
The options are as follow;
Whatever option is selected (Edit, Connect to V
instructions if connected to the number you joined. And if any of those is
unavailable,
In case a call is made to voice mailbox
an
oice), you may hear
error message will be displayed on screen of the phone.
.
Page 88

Chat
1. In stand-by state, press menu(Left_selection) Key to display main menu
option.
2. Use the direction Key to select Message menu then press OK(Center_
Direction) Key.
3. On Message screen, Select Chat and press OK(Center_Direction) Key to
display the following information.
4.
Select Chat Room 1 or Chat Room 2 and press Option (Left_Direction)
Key.
5.
Select Chat Room Info. Set
OK(Center_Direction) Key
6. Select Start New and
nickname and remote number then press
.
send message.
86
Page 89

Broadcast Message
1. In stand-by state, press menu(Left_selection) Key to display main menu
option.
2. Use the direction Key to select Message menu then press OK(Center_
Direction) Key.
3. On Message screen, Select Broadcast Message and press OK(Center_
Direction) Key to display the following information.
• Reception: Allows you to receive Broadcast messages if this option is
• Channel: Defines a channel to receive this kind of messages. Select
selected. (Default is set to off)
a new channel from the list to display on screen and use
option Key to execute. If you want to add a new channel to
press option Key and then Add. Input new channel
list,
number to number writer and press OK(Center_Direction)
(Up to 3-digit number is available and the number shall be
surely input. If not, channel setting will not be available)
W
rite option of sub-menu edits name and number
the selected channel on the list. Up to 10
available.
assigned to
channels are
The
Key
Page 90

• CB List: S
on
displayed.
shown. Press details Key for further information. To
message press Yes(Left_selection) Key,
selection) Key to delete.
hows CB messages recently received, not saved nor deleted
this screen. If there is no message, List is empty will be
If
there is any message, its related title will be
and press No(Right_
save the
88
Page 91

Page 92

6.
Multimedia
1. In stand-by state, press menu(Left_selection) Key to display main menu
option.
2. Use the direction Key to select Multimedia menus icon and then press
OK(Center_Direction) Key.
The icons are as shown below;
Option list related with Multimedia menus will be displayed as shown below;
• Camera
• Images
• V
• Photo Editor
• Audio Played
• Sound Recorder
• FM Radio
ideos
90
Page 93

6.
Multimedia
Camera
1. In stand-by state, press menu(Left_selection) Key to display main menu
option.
2. Use the direction Key to select Multimedia menu then press OK(Center_
Direction) Key.
3. On Multimedia screen, Select Camera and press OK(Center_Direction)
Key to display the following information.
• Enter Via Main Menu: On the menu screen, select camera . Press
• Hot Key (folder open): Keep pressing the camera key in stand-by
You can adjustment camera opti
OK(Center_Direction) again. If the camera
operates anyway,
with
its number pad downward, then catch
hold of an object to take a picture of using the
direction Key (ensure that camera controller is
located at the rear central upper of the phone)
and
press OK(Center_Direction) in the center to
take a picture.
screen, press camera Key on the Right side to
open the camera menu.
ons use number key.
let the phone stand lengthwise
Page 94

Page 95

Note:
- Wait a few seconds for the digital sensor to adjust to digital tone of
color when starting camera operation, which will make the quality
of images excellent.
- Sound similar to the shutter of a camera will be heard for you
to feel the same as with the actual camera when the moment a
picture is taken.
Camera O
The camera built-in the mobile includes functions of digital zooming and
glossy
adjustment. If the camera starts to operate, the following icon will be
displayed on the option below the screen.
ptions
•
bum:
Image album.
Al
C
• amera Setting
-
Flash: Select On, Off or
Shutter Sound: Select Sound 1~3 or Of
EV:
Select EV +4 ~ -4.
AE Meter: Select Auto, Spot, Weight or A
Banding: Select 50Hz~60Hz.
Delay Timer: Select 5 sec, 10 sec, 15 sec or Of
-
- Cont Shot: Select Off, 1
:
Auto.
Shot or Burst Shot.
f.
verage.
f.
91
Page 96

• Image Setting:
-
Image Size:
-
Image Quality:
• White Balance:
• Scene Mode: Select Auto, Close-Up or Night.
• Effect Setting:
• Add Frame:
• Self Capture:
• S
toreage: Select Phone or Memory Card.
• Restore Default:
Size of image that you want to shoot 240x320,
480x640, 960x1280, 1152x1536, 2048x1536,
1280x1024 or 640x480.
Select Normal, high or low
Select Auto, Daylight, T
Cloud,
Incandescence or Manual.
Select
Normal, Grayscale, Sepia, Sepia Green,
Sepia Blue, Color Invert, Gray Invert,
Whiteboard,
Embossment,
Custom
Select Off or
Press * switch to
Copper Carving, Blue Carving,
FX2.
Frame 1~10.
Select Restore Default Yes or No.
ungsten, Fluorescent,
Contrast,
Sketch, Custom FX1 or
Main LCD.
Note:
You can adjustment digital Zooming use upper or low direction Key
on camera screen.
.
Blackboard,
92
Page 97

Images
1. In stand-by state, press menu(Left_selection) Key to display main menu
option.
2. Use the direction Key to select Multimedia menu then press OK(Center_
Direction) Key.
3. On Multimedia screen, Select Image and press OK(Center_Direction)
Key to display the following information.
• Phone
• Me
Image Options
Enables you to view or edit the photos
• V
iew: To view image.
• Image Info: To view image infomation.
• Forward:
• Rename:
• Delete: Delete a image.
• Delete All Files:
• Sort:
mory
Card
Set as W
allpaper,
Display,
Power Off
Bluetooth.
Rename a image.
Select By Name, By T
Delete all image.
saved in your handset.
Display, Phonebook, MMS, E-Mail o
ype, By T
Sub W
allpaper, Screen Saver, Power On
ime, By Size or None.
r
93
Page 98

V
ideos
1. In stand-by state, press menu(Left_selection) Key to display main menu
option.
2. Use the direction Key to select Multimedia menu then press OK(Center_
Direction) Key.
3. On Multimedia screen, Select V
Key to display the following information.
ideos and press OK(Center_Direction)
• V
ideo Recorder
• V
ideo Player
Record V
1. On Video screen, Select V
Key to display the following information.
ideo
ideo Recorder and press OK(Center_Direction)
94
Page 99

2.
Press OK(Center_Direction) Key to Start Record V
OK(
er_Direction) Key to suspend Record V
Cent
4.
Press
op(Right_Direction) Key to Stop Record V
St
Record eo Option
Vid
•
Ca
-
-
-
-
Vi
d
•
-
-
-
-
-
-
Ef
•
• S
toreage: Select Phone or Memory Card.
• Restore Default:
mCorder Setting
White Balance:
LED Highlight:
EV:
Select EV +4 ~ -4.
Night Mode: Select On or Of
Banding:
Select 50Hz~60Hz.
eo Setting
V
V
File Size Limit:
Rec Time Limit:
Record Audio:
Encode Format:
f
ect Setting:
:
ideo Size:
ideo Quality:
Select QCIF(176x144) or CIF(352x288).
Select
Sepia Blue, Color Invert, Gray Invert,
Whiteboard,
Embossment,
Select Restore Default Yes or No.
:
Select Auto, Daylight, T
Cloud,
or
Incandescence.
Select On or Of
Select Normal, Low, Fine or High.
Select No Limit, 95k, 195k or 295k.
Select No Limit, 15
Select On or Of
Select Mpeg4 or H.263.
Normal, Grayscale, Sepia, Sepia Green,
Copper Carving, Blue Carving,
Contrast or
ideo. One More Press
ideo.
ideo.
ungsten, Fluorescent,
f.
f.
sec, 30
f.
sec or 60 sec.
Blackboard,
Sketch.
95
Page 100

Play V
ideo
1. On Video screen, Select V
Key to display the following information.
2.
Select Phone or Memory Card.
Direction) Key to
• Play:
• Forward:
• Rename:
• Delete: Delete a image.
• Delete All Files:
• Sort:
• Select Screen:
display the following information.
Play recorded video.
Set as S
creen Saver, Power On Display,
P
honebook, MMS, E-Mail or
Rename a image.
Select By Name, By T
Delete all image.
Select Horizontal or V
ideo Player and press OK(Center_Direction)
Select V
ype, By T
ideo then press Op
Bluetooth.
ime, By Size or None.
ertical.
tion
Power Off
(Left_
Display
,
96
 Loading...