

Page 1
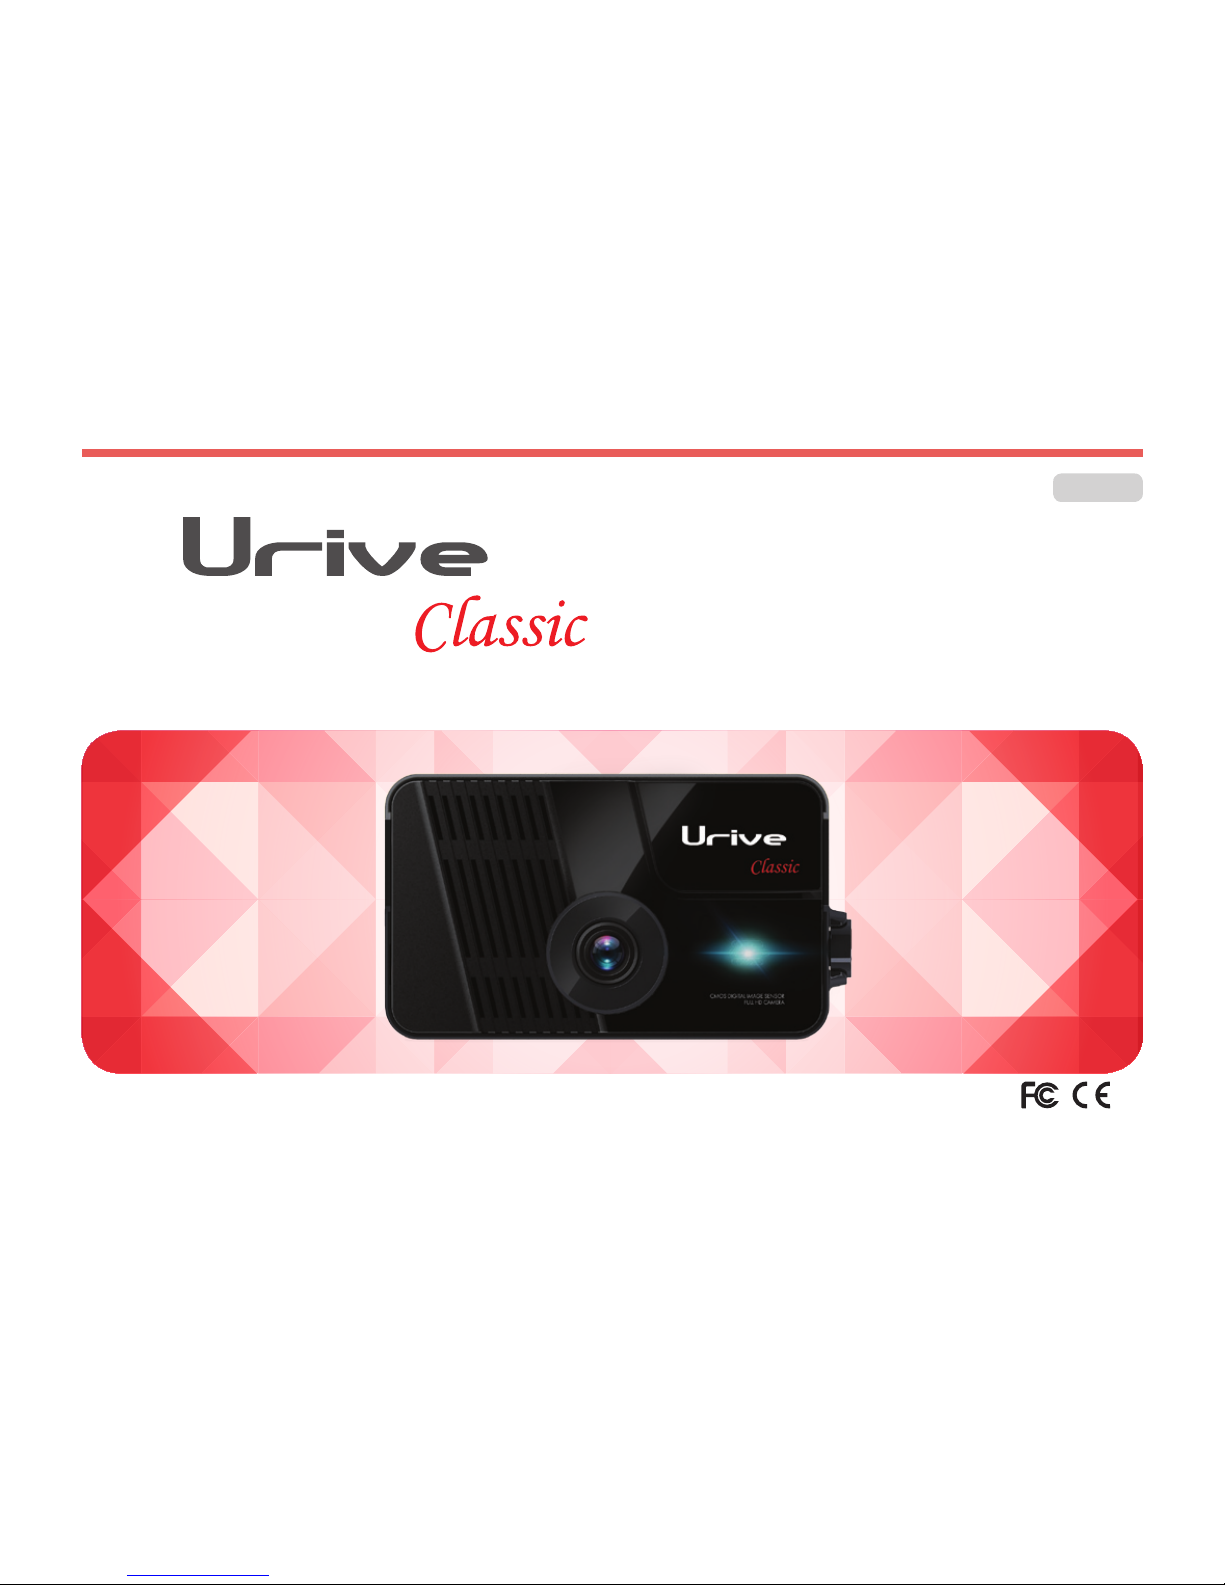
User manual
Manufacturer: Midong E&T Co., Ltd.
Ver.1.0
Page 2

01. Before using Urive Classic ………………………………… 3
02. Precautions before using the product …………………… 4
03. Precautions when using the product ……………………… 5
04. Product: Features …………………………………………… 7
05. Package component ………………………………………… 10
06. Name of each part …………………………………………… 11
07. How to install the Urive Classic …………………………… 15
08. Product: functional description …………………………… 18
09. GUI ………………………………………………………………20
10. How to upgrade ………………………………………………29
11. PC viewer ………………………………………………………30
12. Configuration…………………………………………………… 41
13. Video recording type …………………………………………43
14. Product: specification ………………………………………45
15. Consumer compensation regulations ……………………… 46
16. Before requesting A/S services ……………………………47
17. Warranty…………………………………………………………49
C ONTENTS
Page 3

Urive Classic ... 3 ... User's Guide
01. Before using Urive Classic
The product is a secondary product for safe driving. It is designed to store video and audio information
coming from the front and rear cameras with touch LCD. It records driving and parking videos and
information about car accidents or impacts. This will provide relevant circumstantial reference data.
◊
#
Urive Classic is a trademark of Midong E&T.
◊
#
All the manual’s contents are protected according to copyright law.
◊
#
All the program rights used in the product belong to Midong E&T and are protected according to copyright
law.
◊
#
The manufacturer shall not be liable for product failures or damages because of misuse, incorrect
installation, or unauthorized alteration.
◊
#
For safety reasons, avoid manipulating the black box while driving.
◊
#
The images used in the manual may look different from the actual screens depending on the printing
conditions.
◊
#
It is recommended that users read the manual carefully before using the product for proper and safe use.
◘# This is a driver assistance device. The manufacturer will not be held liable for any consequences resulting from the use of the product.
Please use the product properly.
◘
#
To enhance the performance of the product, the contents of this instruction manual may be changed without prior notice.
Page 4

Urive Classic ... 4 ... User's Guide
02. Precautions before using the product
• Scope of warranty and responsibilities
-# This product is for assisting people in driving safely. The company will not be responsible for the loss that could occur because
of failures, data loss, or while using the product.
-
#
This product is an ancillary device designed for recording and storing external videos. Some functions may not be supported
depending on the driving conditions and the conditions of a vehicle itself. When it comes to the level of support for
performance that is to be provided through the updating of firmware for improving quality and securing stability, it may vary
depending on the types of products. Depending on situations, recording may not take place. Considering that, users need to
use the product only for getting information for checking driving-related videos. Recording may not take place also depending
on the conditions of the SD card.
-
#
This product is designed for recording the video related to an accident involving a user’s vehicle. However, it is not guaranteed
that the whole length of a video related to an accident is to be recorded. In case of an accident in which a minor shock occurs,
the detection sensor will not be activated, and, consequently, the video related to the event may not be recorded.
• Precautions for using the memory card
-# Check the data once a week at least for confirming that the product’s operation is normal.
-
#
Format the micro SD memory card at least twice a month for stable use of the product.
-# Recommended to use a micro SD card that is exclusively designed for the product.
◘ In general, memory cards are valid for a certain period of time (warranted for 6 months) and therefore storage of new data may be
disabled if the card had been in use for a long time. If this is the case, replace with a new card as the manufacturer is not liable for the
data loss.
Page 5

Urive Classic ... 5 ... User's Guide
03. Precautions when using the product
This section is for your safety and for the proper use of the product to prevent safety accidents/risks. The
manufacturer shall not be responsible for problems caused by use of the product in violation of the instructions.
Warning!
Not following the instructions can lead to serious injuries or even death.
If the product is wet, do not place it in the heater or in the microwave oven to dry.
It may cause explosion, product deformation, or product failure, which is not covered under the warranty.
Do not use chemicals (such as benzene, thinner, or alcohol) or detergent to clean the product.
It may cause fire.
Do not alter or apply impact on the product.
Unauthorized alteration or product damage by impact shall not be covered under the warranty.
Do not install or operate the product while driving.
Operation of the product while driving can cause accidents. Please pull over to a safe spot when you operating the product.
!
Page 6

Urive Classic ... 6 ... User's Guide
03. Precautions when using the product
Caution!
Not following the instructions can lead to minor injuries or damage to the products.
If the product is directly connected to the car, do not use
the product for an extensive period.
It may discharge the battery.
Install the product in unaffected area by the Navigation
or HIPASS device.
Reflections of images of Navigation or HIPASS may cause poor
recording quality.
Ensure that the double-sided adhesive tape is firmly
affixed during installation.
The product may show poor performance when moving or
observing motor vibration for an extended period.
Keep the windshield clean.
Foreign materials may prevent normal recording of images.
Be careful when using memory cards and removing
them.
Uncertified Micro SD card may not be recorded properly.
Please remove the power cable before inserting or removing the
SD card.
Back up files periodically.
When the SD card is full, the oldest file in the card will be
overwritten by a new file. Please back up data periodically to
prevent unwanted data loss.
Please do not use sharp devices on the LCD.
The touch panel or the LCD may be damaged by sharp devices
when the black box is set up along with such devices on the LCD.
Avoid an area where the product is exposed to direct
sunlight when parked.
If used for long hours in an airtight environment inside a car and
under direct sunlight, the product may malfunction.
!
Page 7

Urive Classic ... 7 ... User's Guide
04. Product: Features
◊# High-quality video recording with clear images and an optimal viewing angle (Full HD-HD)
It provides high-quality clear video files at both day and night (Resolution: front: 1920×1080, Rear: 1280×720) and optimal viewing
angle (front: 115 degrees, rear: 130 degrees)
◊# High-quality and low capacity
It records high-quality video files & low capacity with High Profile Codec.
◊# 2CH Black Box for simultaneous front and rear monitoring
The main body of Classic is used to record the front side, and, at the same time, the external camera fitted inside the car is used to
record the rear side.
◊# Ultra speed booting
After ignition, it starts video recording quickly. (Booting time: less than 7 sec.)
◊# Black box that generates less heat
This is the least heat-generating device in our Full HD line-up. Thus, it can provide the longest recording time before the power is cut
in a hot summer.
◊# Videos that have been recorded already or in the process of being recorded can be checked immediately through the
3.5-inch wide LCD screen with high resolution.
It can show the real-time front and rear videos playback and recorded files at the 3.5” wide touch LCD.
Page 8
Urive Classic ... 8 ... User's Guide
04. Product: Features
◊# Format function
To solve disadvantages of the traditional FAT file system, it is designed to save files to an SD card in a more stable manner to allow
easy SD management.
For any physical or certain problem of SDs, the set provides a format function.
◊# PIP (picture in picture)
It shows the front and rear videos at the same time.
◊# Easy Configuration
Users can change the configuration on the touch screen by themselves.
◊# Continuous recording
All videos during driving are continuously recorded as a one-minute video file.
◊# Event (impact) manual recording
It records 20 seconds video files from the 5 seconds before the incidence to the 15 seconds after it in the event folder
when there is an impact or the power button is pressed briefly.
◊# Dedicated CCTV to protect the car, recording in parking
It provides recording in parking to record any damage or accident while your car is parked.
◊# Auto memory management
Even if a memory card is short of space, it provide auto management function to remove files from the oldest ones
to record recent driving videos.
Page 9
Urive Classic ... 9 ... User's Guide
04. Product: Features
◊# PC viewer for playing recorded data
The PC viewer can play 2 channels (front/rear) of the black box video at the same time in order for easy checking of information.
◊# Embedded voltage cutoff device to prevent battery discharge and settings for cut off voltage and timer
It is embedded with a device to cut the power to prevent battery discharge. If it reaches a certain voltage level, the black box is turned
off according to the cutoff voltage/time settings to prevent the battery from discharging. You can select 1 from 7 steps of cutoff voltage
and 5 steps of the timer, respectively.
◊# Voice information
Voice information is provided according to situations.
◊# Autosaver
1. Driving mode
- If the product temperature exceeds the LCD warranty temperature range, the LCD is automatically turned off while
if the temperature is within the range, the LCD is automatically turned on. (Remained off until the temperature is cooled down).
- Voice information (High temperature off and LCD tapped during the high-temperature off): “The LCD has been shut down
because of high temperature.”
2. Parking mode
- If the temperature is kept above the operation guarantee temperature, the black box is turned off to protect it.
If the temperature is cooled to operating temperature, it automatically starts to record video.
Page 10
Urive Classic ... 10 ... User's Guide
05. Package component
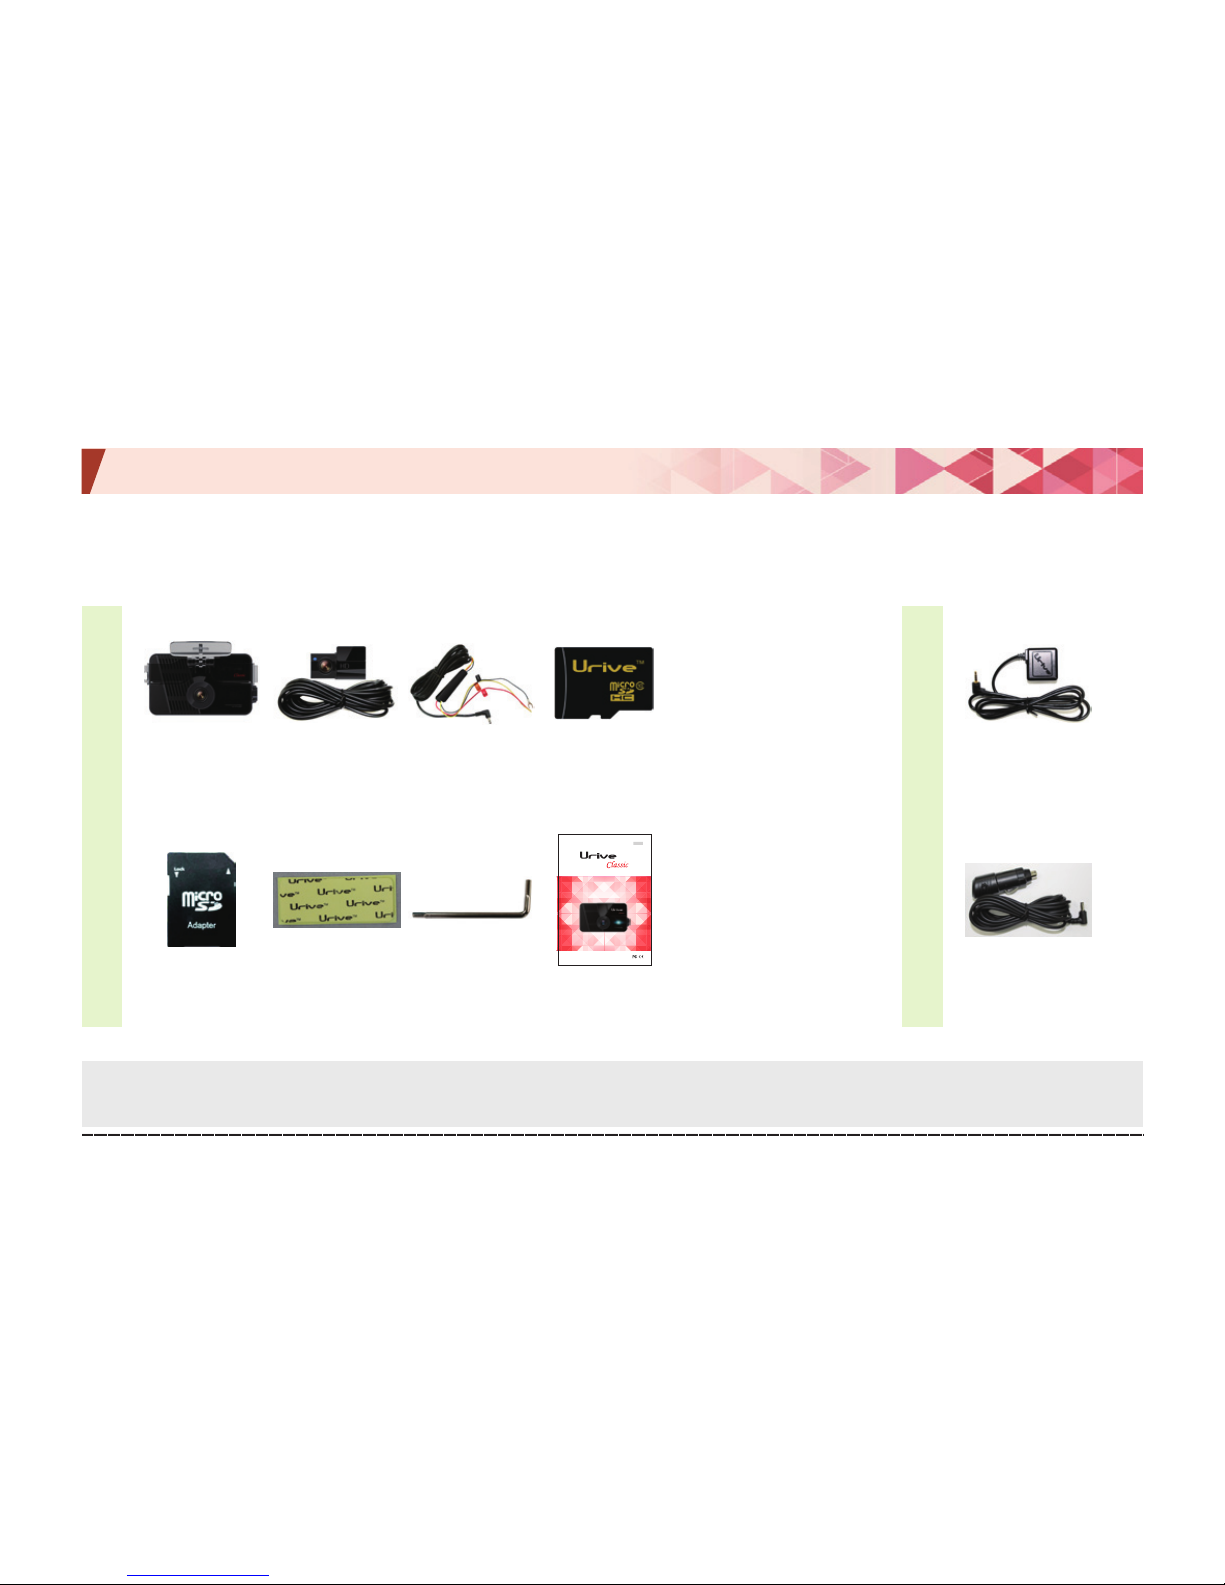
Please check all the components in the box as the picture below.
If the component is damaged or has a problem, please contact the selling shop immediately.
상기 구성품은 부품 공급에 따라 사양이 임의로 변경될 수 있습니다. (상기 이미지는 소비자의 이해를 돕기 위한 것이며 실물과 다를 수도 있습니다.)
This component can be changed based on the supply of parts without prior notice.
(The images shown above are for the users’ information; thus, they may look different from actual components.)
Basic component
Option
(To be sold separately)
Main body,
mounting holder
Micro SD card
adaptor
Rear camera,
cable
Double-sided
tape
Micro SD card
for URIVE
Manual Cigar power
cable
Continuous
power cable
Hexagon
wrench
GPS module
Ver 1.0
User manual
Page 11
Urive Classic ... 11 ... User's Guide
06. Name of each part
(Front camera)
1
2
3
4
5
6
7
9
8
10
11
Page 12
Urive Classic ... 12 ... User's Guide
06. Name of each part
(Front camera)
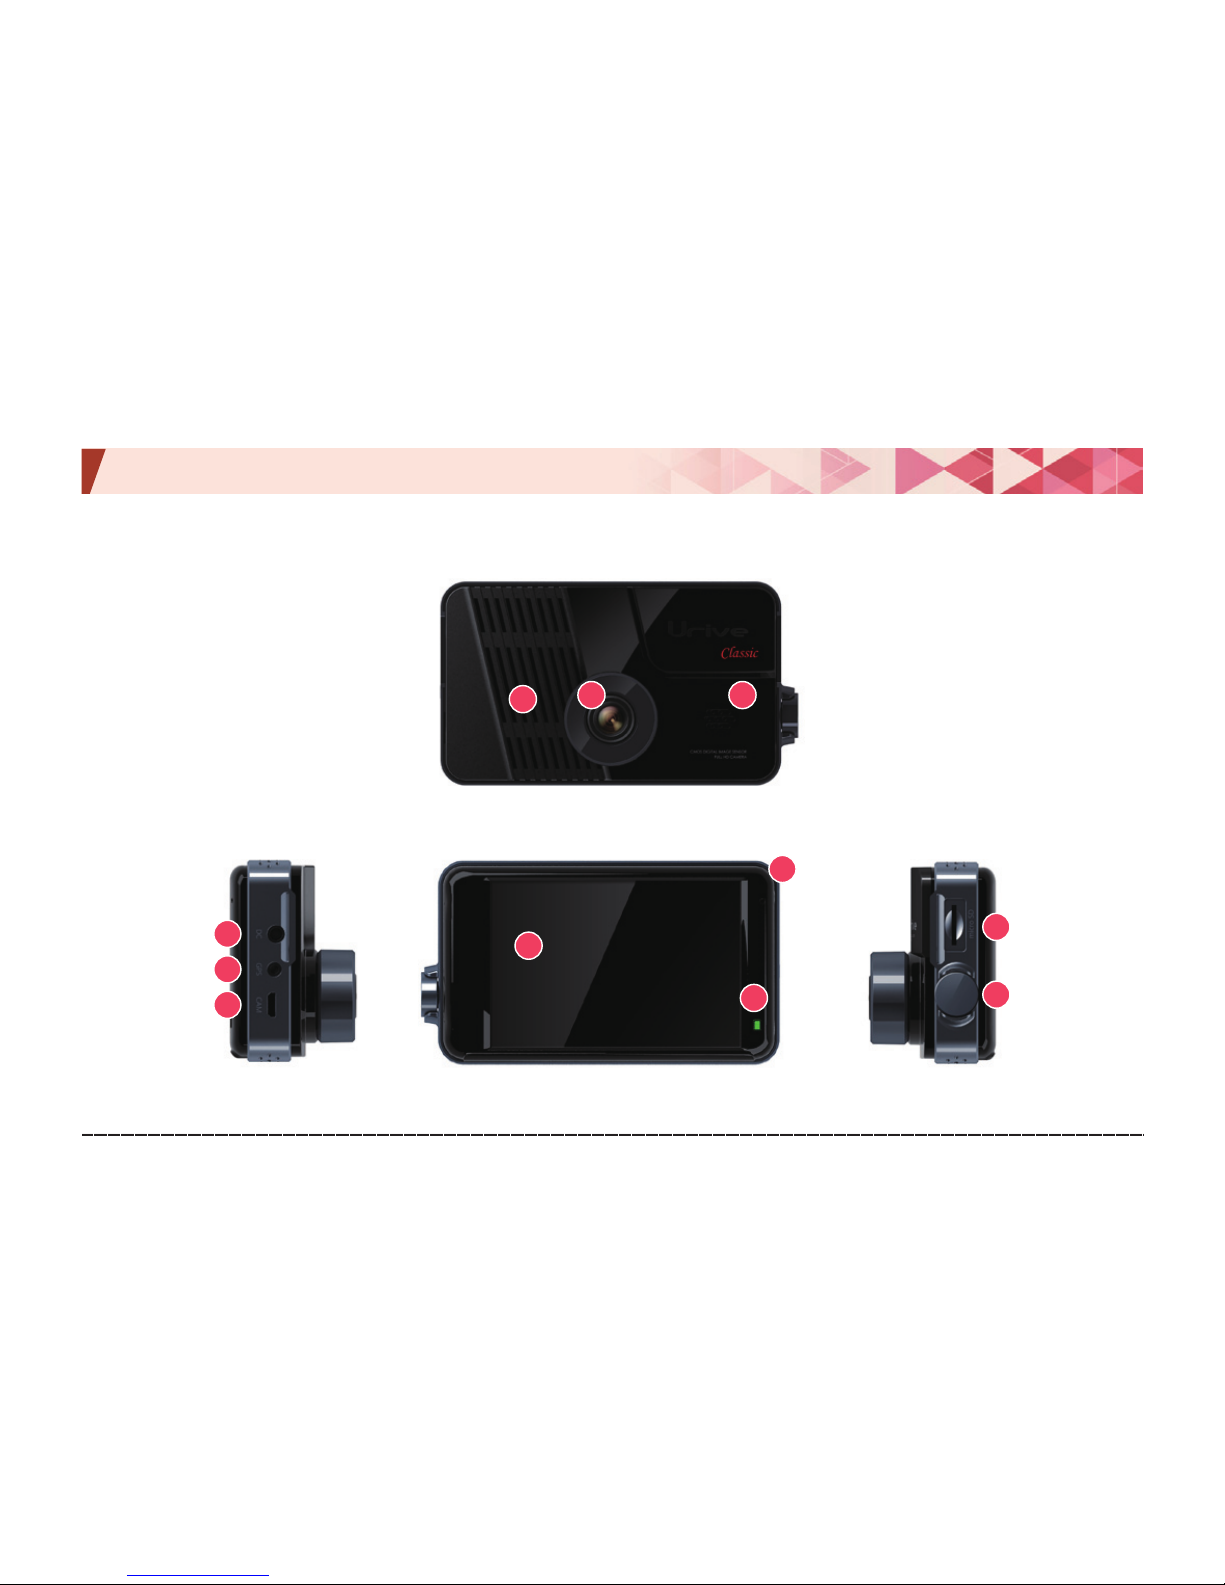
Name Functional description
① Camera lens To record the front video
② Embedded speaker For voice information
③ Security LED High-brightness blue LED for indicating the operation state and security
④ Power terminal (DC) Port to connect the power cable
⑤ External GPS terminal (GPS) Port to connect an external GPS module
⑥ Rear camera terminal (CAM) Micro USB 5-pin port to connect the rear camera
⑦ LCD 3.5″ LCD to check a video and control the device
⑧ Embedded mic (MIC) To record voice with a video
⑨ LED indicator Green LED to indicate always-on mode
⑩ SD card slot To insert a micro SD card for storage
⑪ Power & Manual record switch Power On/Off switch
Page 13
Urive Classic ... 13 ... User's Guide
06. Name of each part
(Rear camera)
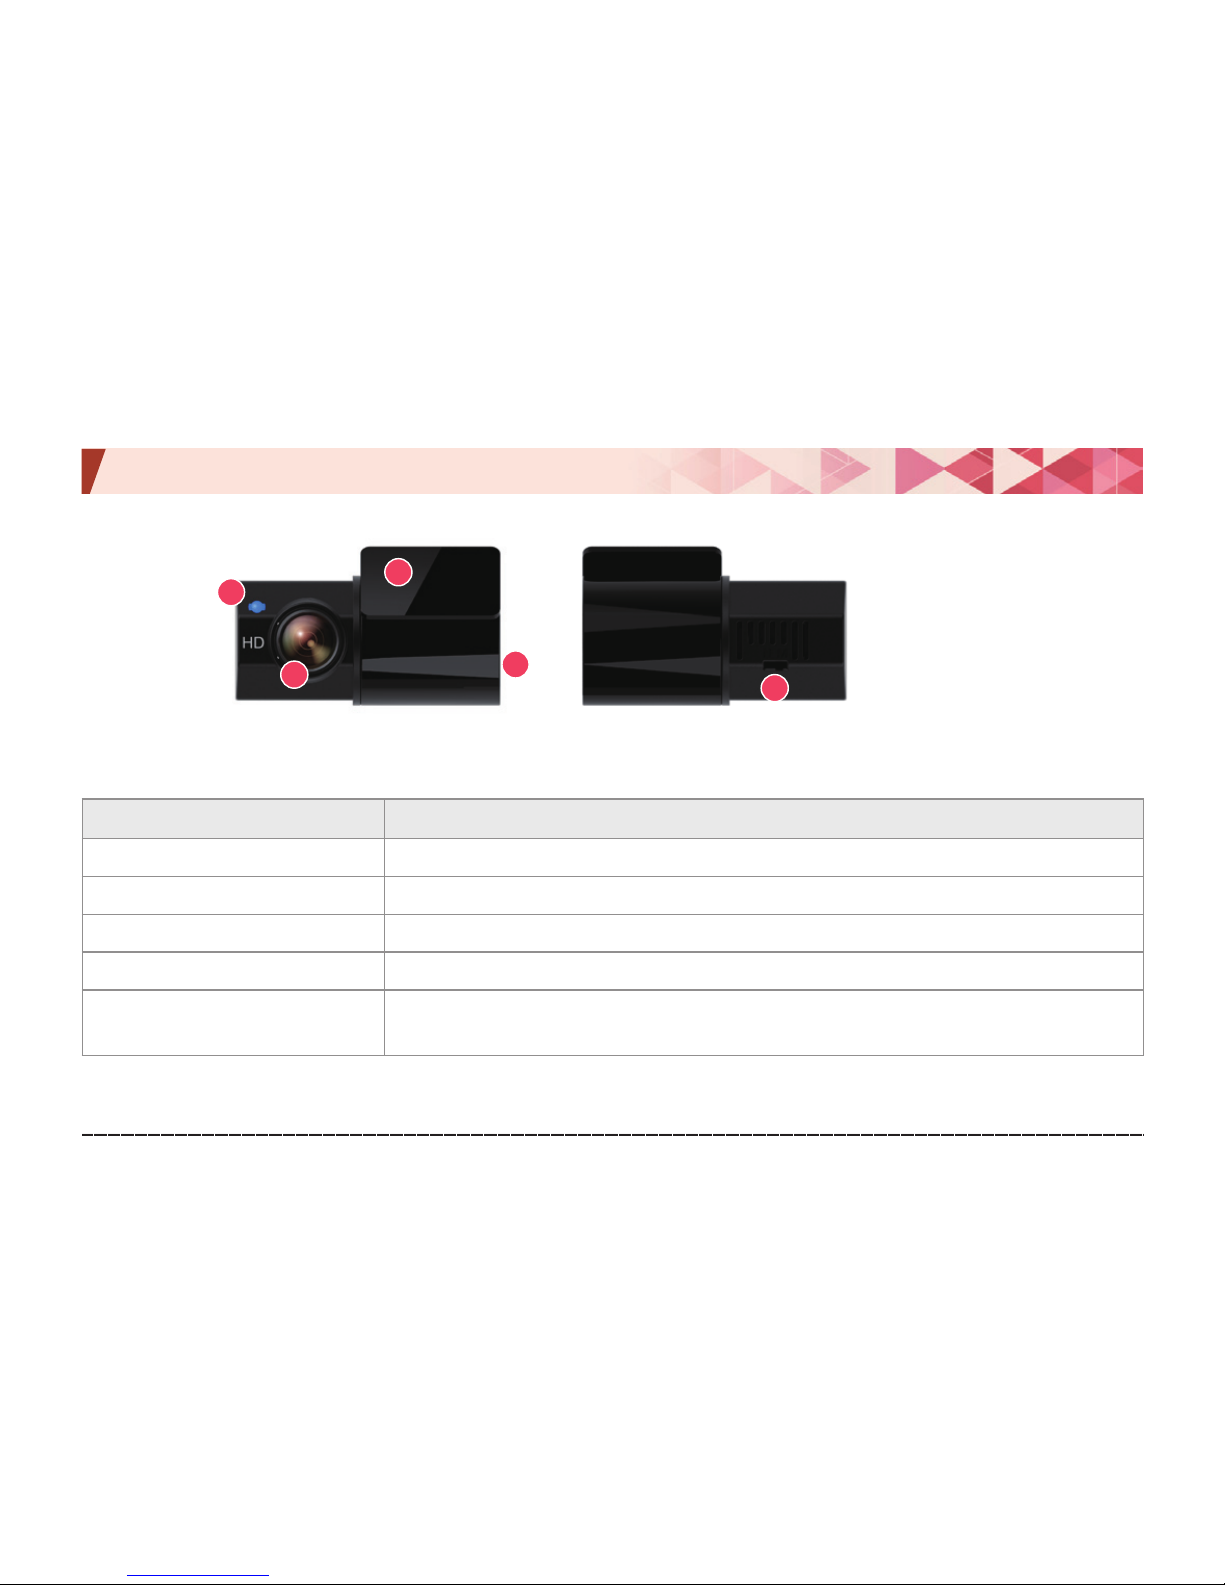
Name Functional description
① Adhering surface Surface to attach the rear camera to a rear window
② Security LED Blue LED for indicating operation state and security
③ Camera lens Rear camera lens
④ Terminal Micro USB 5-pin port to connect the body
⑤ Screen reversal switch
Horizontal reversal switch for rear-view screen (N: Normal / M: Horizontal
reversal)
1
2
3
4
5
Page 14
Urive Classic ... 14 ... User's Guide
06. Name of each part
(Socket pin arrangement)
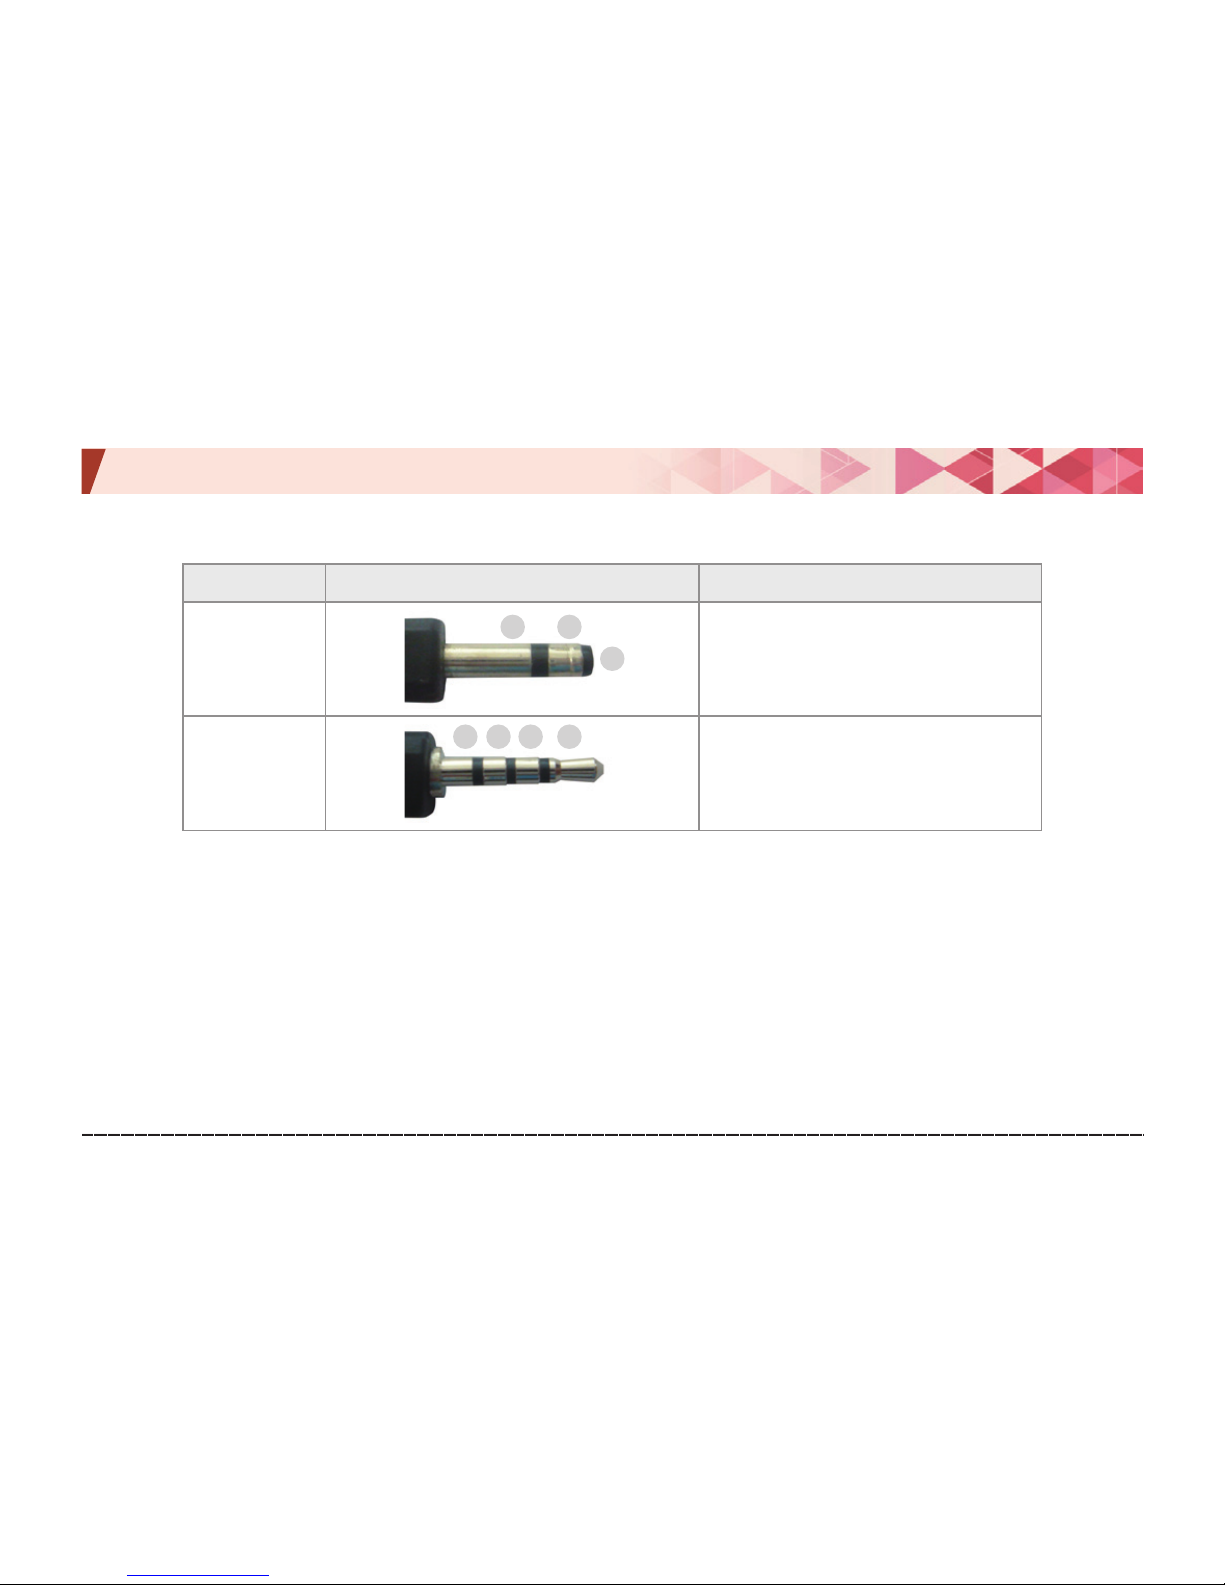
Sockets Images of sockets Pin arrangement
Power socket
(DC socket)
① GND ② ACC ③ BAT (B+)
GPS
socket(2.5 pi)
① VCC (3.6-6 V DC) ② Rx
③ GND ④ Tx (GPS Signal Output)
1
2
1234
3
◆
Socket pin arrangement
Page 15

Urive Classic ... 15 ... User's Guide
07. How to install the Urive Classic -Precautions
■
#
The installation requires embedding and constant power supply; thus, you are advised to seek help from one of
our partners.
■
#
It is recommended to use only Urive-certified power and connection cables. (The rear camera cable must ULcertified, and check the “UL” marking on the yellow band of the cable. You are provided with a 6 m-long rear
camera cable. Make sure that the length is appropriate for your car).
■
#
Try to avoid high-temperature and small sections for installing the cable as the sheath can melt
or be damaged resulting in a short circuit.
■
#
Wrong installation may lead to a fire, for which we are not liable.
■
#
To install it, park your car on a level surface under good lighting with the engine turned off.
■
#
Ensure that the power cable is not connected before the rear camera is connected.
■
#
Before finishing the installation process, make sure that the front-/rear-view video is properly saved.
■
#
Try to avoid any interruption of sight of driver.
■
#
Make sure a micro SD card is inserted and then connect the power.
■
#
For the clean and safe installation, try to hide the cables.
■
#
Keep your windshield clean.
■
#
The rear camera may be influenced by the tinting or hot wire.
■
#
Remove the lens protection of front and rear cameras after installation.
Page 16
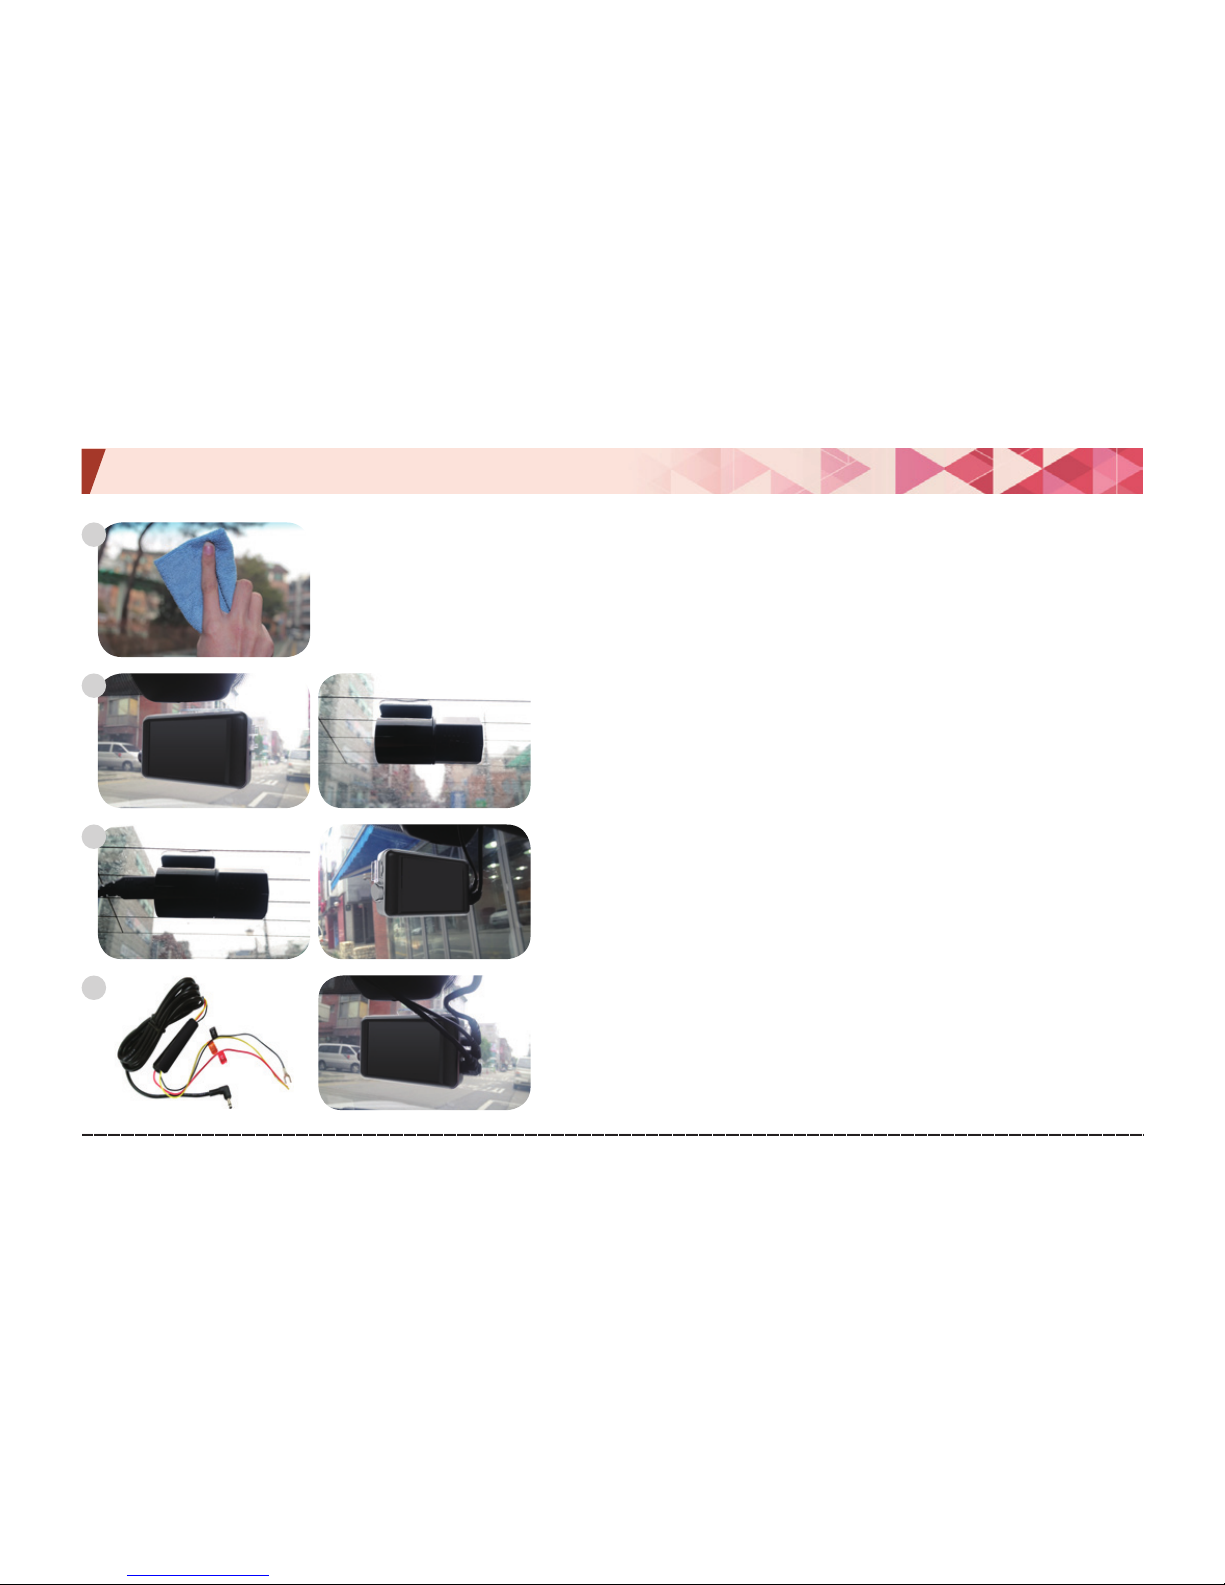
Urive Classic ... 16 ... User's Guide
07. Installation
Clean the sections to install front and rear cameras.
Attach the body and rear camera as you desire.
Connect the cable to the rear camera and external GPS (optional)
without the power cable connected.
Connect the power to a fuse box, and power cable to the body.
- Black line: GND, (ex) Chassis
- Yellow line: ACC, (ex) Fuse of cigar jack
- Red line: BAT(B+), (ex) Emergency light
1
2
3
4
Page 17
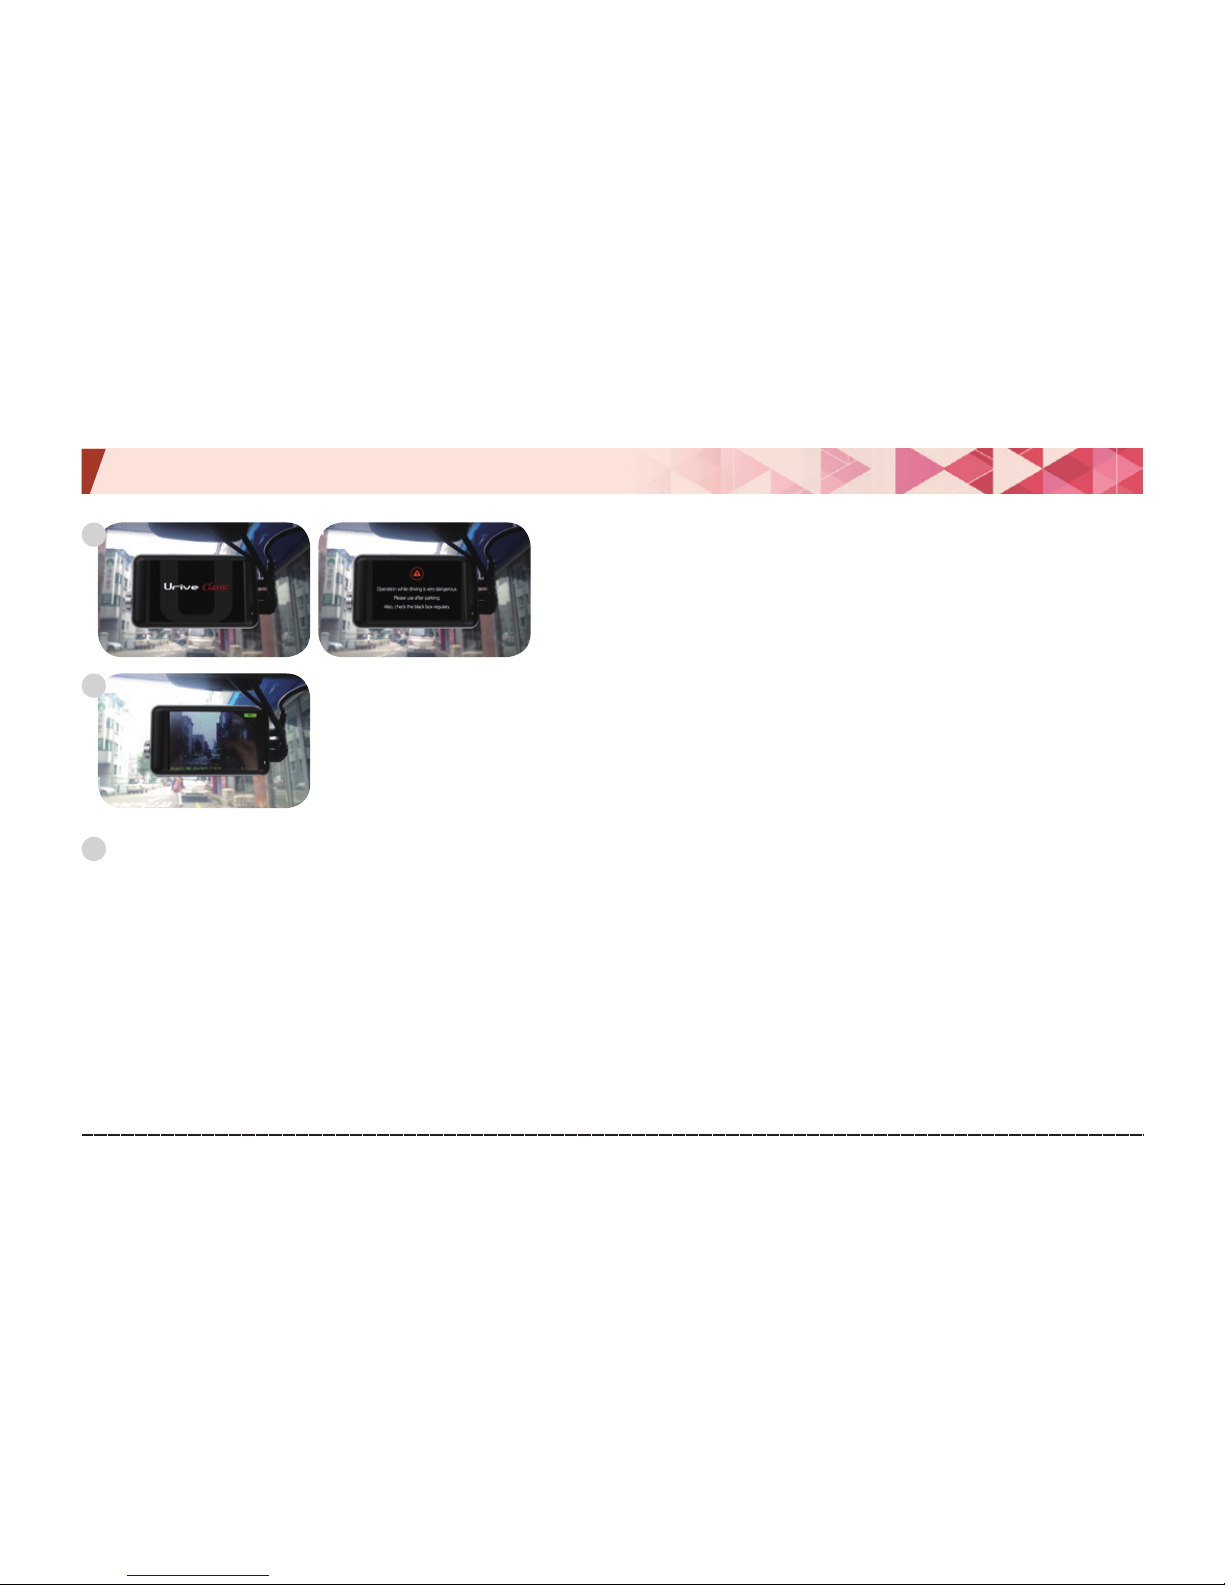
Urive Classic ... 17 ... User's Guide
07. Installation—Rear camera
After the intro and caution screens, it starts recording with a
buzzer.
After booting up, front-view image is displayed. Touch [Rear-view image] item to check the
rear-view image, and enable [Setting] – [PIP] to check the front-/rear-view images at the
same time.
※
State LED: driving mode – GREEN LED On / Parking mode – GREEN LED Off
Check if the front-/rear-view image is saved, and, then, hide the cables.
5
6
6
Page 18
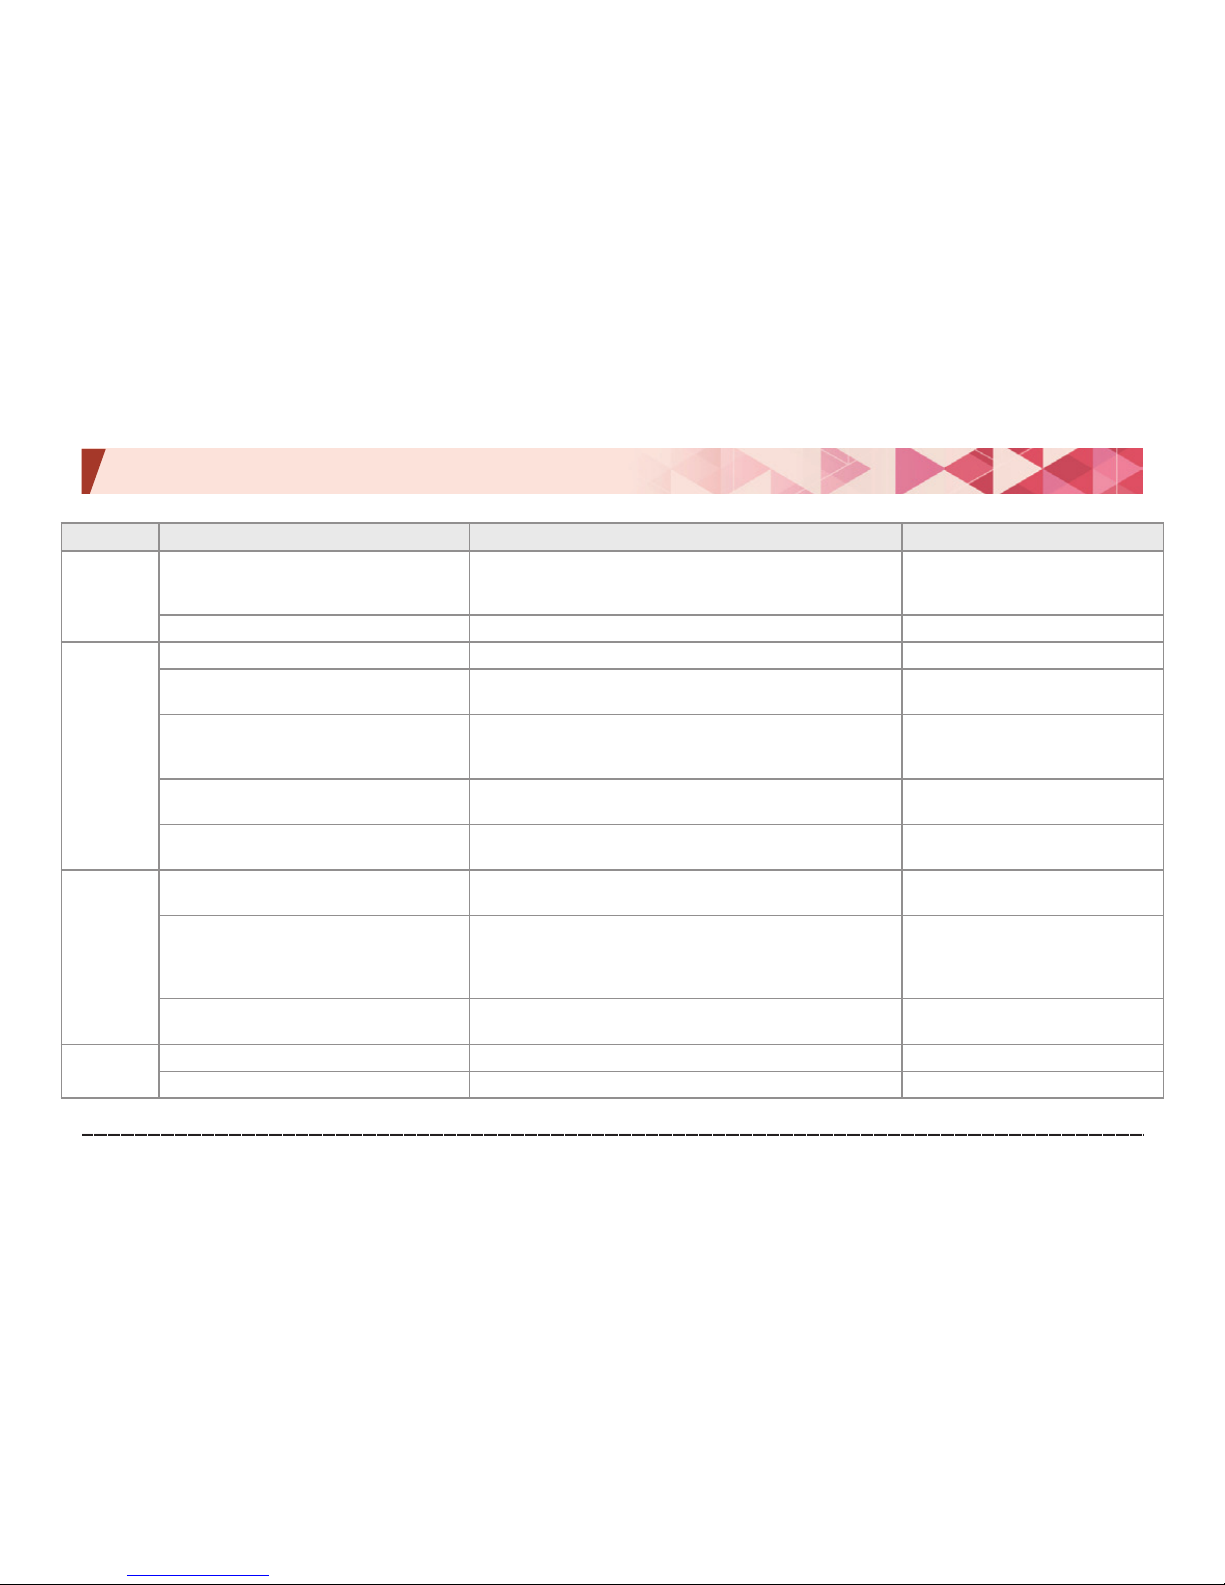
Urive Classic ... 18 ... User's Guide
08. Functions
Classification
Situation Action Voice information
Power
(ACC ON)
Power cable is connected to the body.
BLUE LED is turned on and then off after booting up, GREEN
LED is turned on. After booting up, consecutive videos are
saved with the interval at 1 min.
1 time of buzzer sound
Switch is pressed and held. Power On/Off
Power OFF: “Shutting the power down.”
Driving
mode
Parking mode → ACC(Engine) ON Mode switching with LCD ON -→ Constant recording starts. “Shifting to the driving mode.”
Switch is pressed; impact is sensed.
It saves a video from 5 seconds before to 15 seconds after
(20-second duration).
2 times of buzzer sound
Video list, system state, and entering the
setting menu
When entering a menu, the video recording is stopped.
When exiting the menu, “Recording starts.” Recording is
resumed with the voice information.
“Stopping recording.”
During the power cutoff due to
high temperature, the LCD doesn't turn on.
The LCD doesn't turn on even if it is pressed.
“The LCD has been shut down
because of high temperature.”
Receiving GPS signal
“G” mark at the bottom of image; it starts to measure the
speed and save the operation record.
“GPS is connected.”
Parking
mode
Parking mode → ACC (Engine) OFF
After switching the mode, LCD OFF; it starts motion and
impact; blinking of BLUE LED at 1 second interval
Impact is sensed: 2 times of buzzer.
Motion or impact is sensed.
A 30-second video image is saved.
BLUE LED
Blinks 2 times per second while saving due to a motion.
Saving because of a motion: Blinks 4 times per second.
“Shifting to parking mode.”
Turning off due to cutoff voltage, time, or
high temperature
Cutoff details are recorded in the SD card before turning off. “Shutting the power down."
Others
Firmware update
BLUE LED blinks during update and it reboots after the update.
“Starting the update.”
When there is no SD card, or a problem with it.
Rebooting after a voice information “Please check the SD card.”
※
When the black box switches to parking or driving mode, it does not record a video until it finishes rebooting.
Page 19
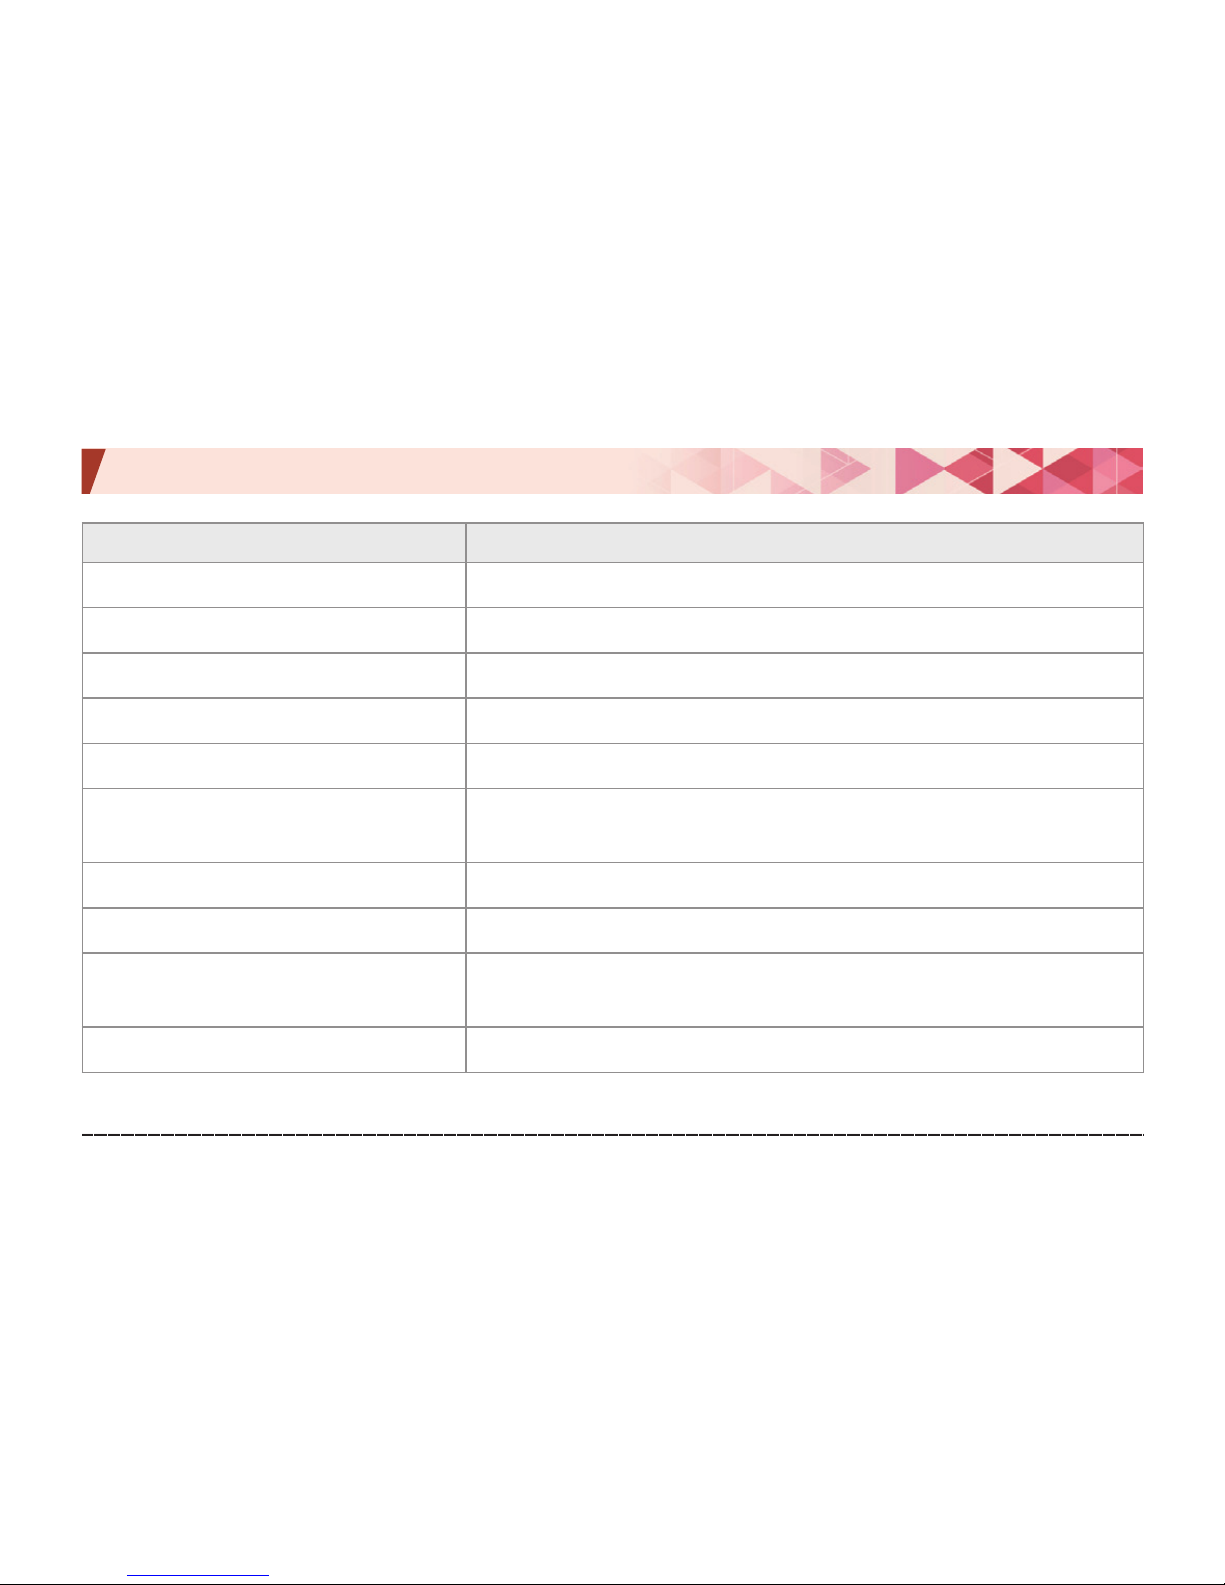
Urive Classic ... 19 ... User's Guide
08. Product: functional description -Voice information
Voice Situation
“Shifting to driving mode.” When shifting from parking to driving mode
“Shifting to parking mode.” When shifting from driving to parking mode
“Stopping recording.” When entering Video View, System State, or Setting menu
“Shutting the power down.” Power is turned down by a switch or during parking.
“GPS is connected” When GPS signal is received in driving mode (1 alarm)
“Impact during parking has been
identified.”
When it is shifted to driving mode after an impact file is created while
parking.
“Please check the SD card.” When there is no SD card or a problem with it.
“Formatting the SD card.” When formatting an SD card
“The LCD has been shut down because of
high temperature.”
When the LCD is touched after it has been shut down because of high
temperature.
“Starting the update.” When starting to update
Page 20
Urive Classic ... 20 ... User's Guide
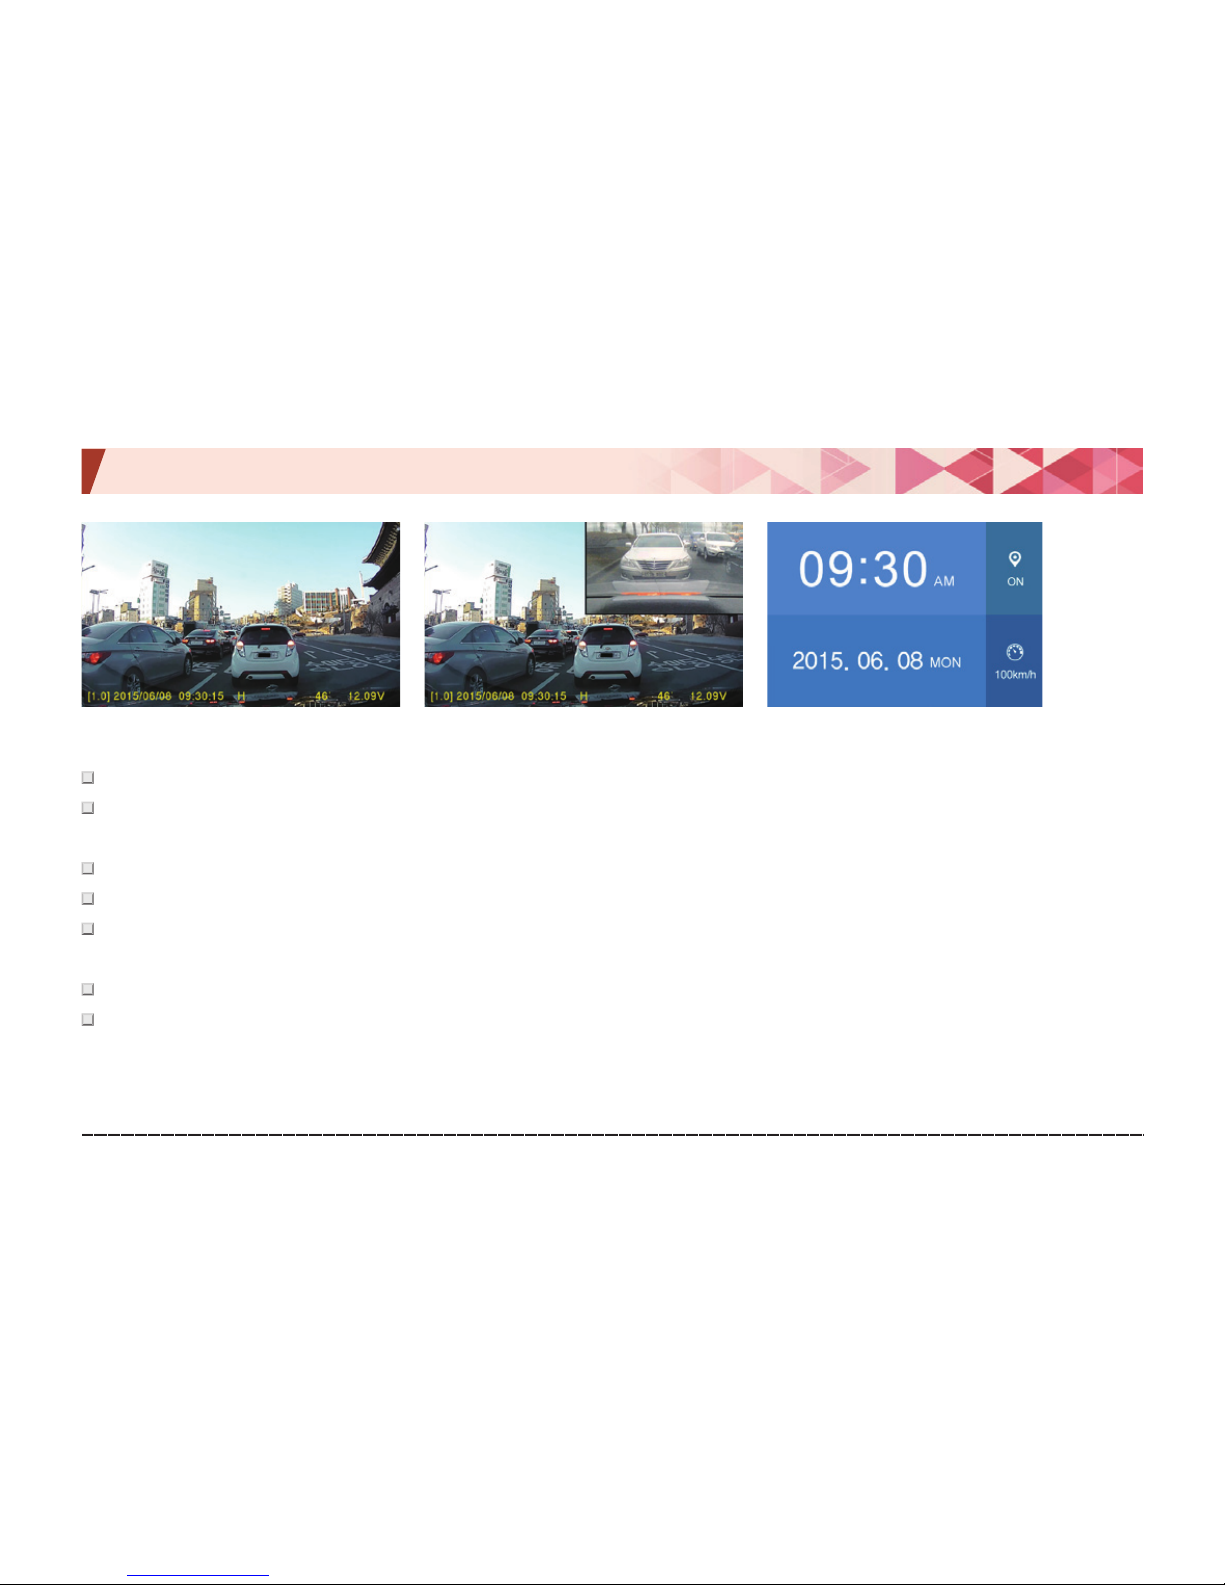
09. GUI -Real-time view
#
After booting up to driving mode, real-time view is provided.
#
The view screen shows firmware version, video recording time, image quality, GPS signal state, voice recording
state, product temperature, battery voltage, and recording state(REC, EVT).
#
In the screen setting, enable PIP to see the front and rear view images in PIP.
#
Disable the PIP to see either the front or rear view image. (Default: PIP OFF)
#
Screen saver on: With no action in the real-time view screen, it shifts to the screen saver, which turns off
the LCD in 2 minutes if there is no action again.
#
Screen saver off: With no action in the real-time view screen for 2 minutes, the LCD is turned off.
#
Use the reversal switch of rear camera to horizontally reverse the image.
[Real-time view] [Real-time view - PIP mode] [Screen saver]
Page 21
Urive Classic ... 21 ... User's Guide
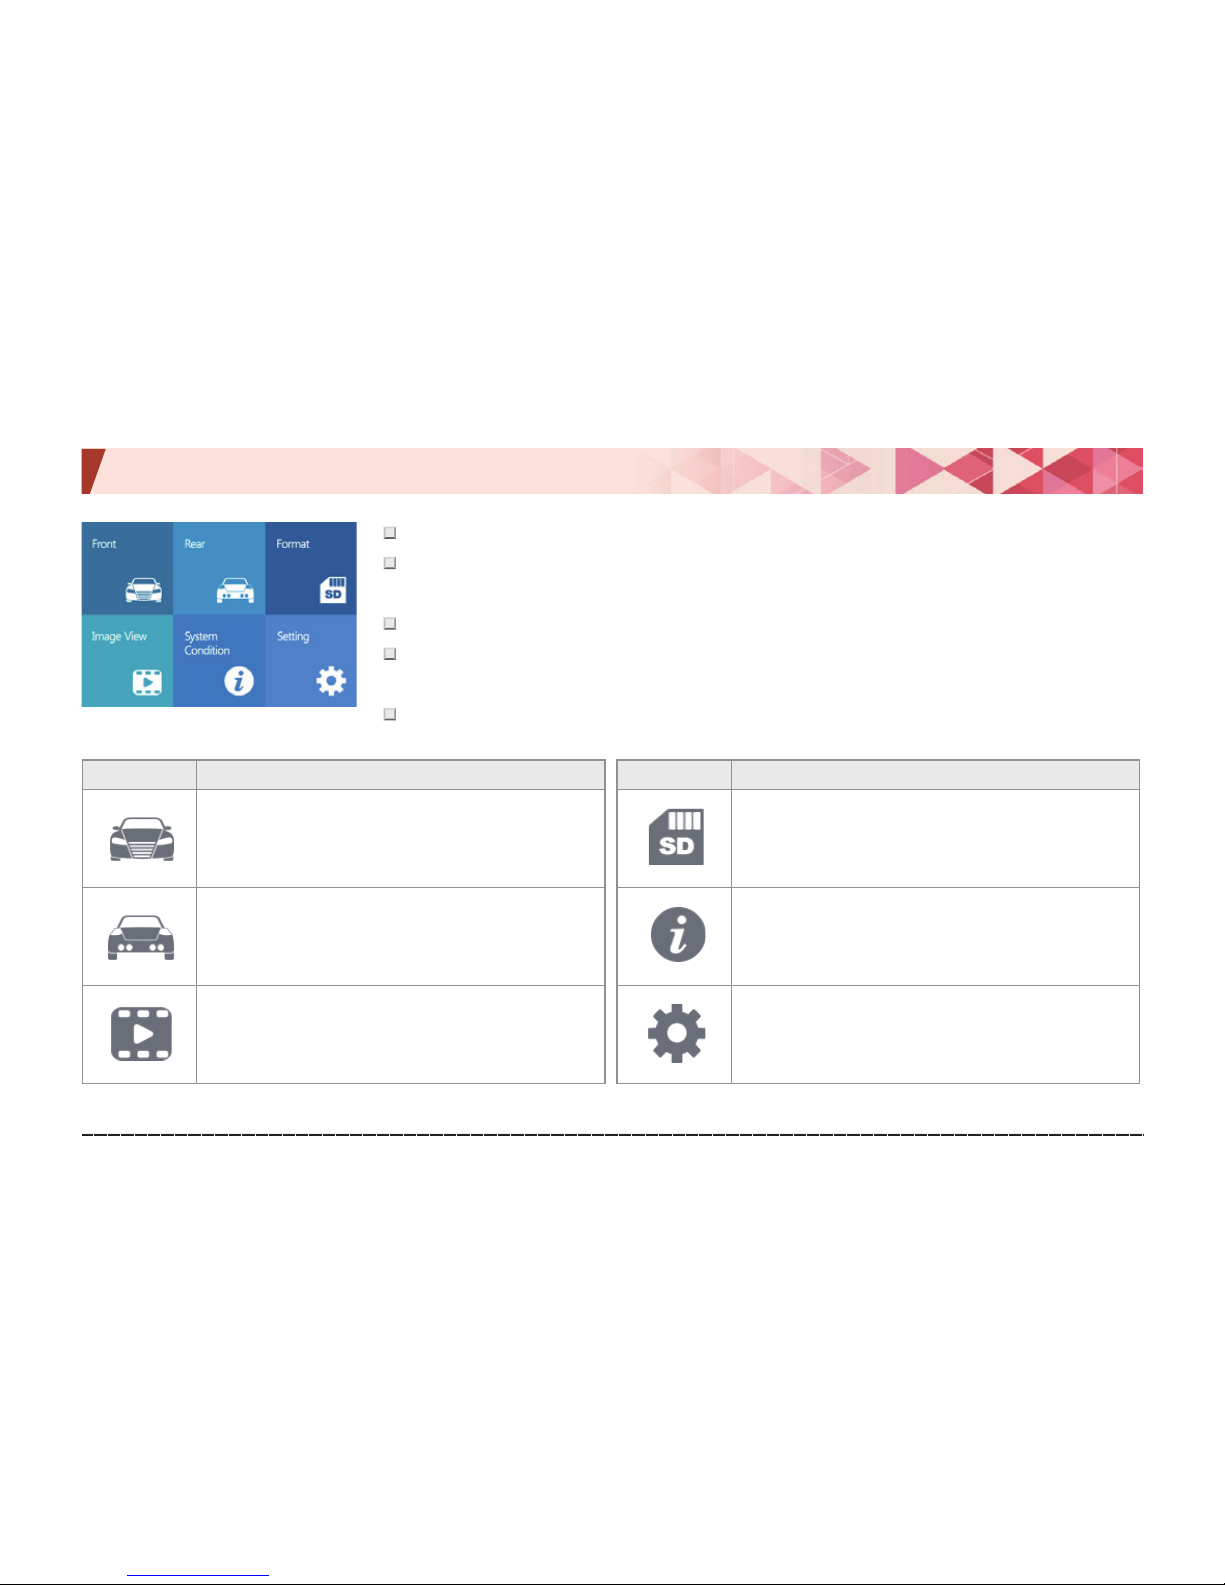
09. GUI -Menu screen
#
In the driving mode, touch the LCD to show the menu screen.
#
The menu screen has 6 icons: Front view, Rear view, Format SD, Video list, System
state, and Settings.
#
In the menu screen, video and voice recording doesn't stop.
#
Screen saver on: With no action for 1 minute, it shifts to the screen saver, which turns
off the LCD in 2 minutes if there is no action again.
#
Screen saver off: With no action for 2 minutes, the LCD is turned off.
Icon Meaning
Front view
Shows real-time video of front camera.
Rear view
Shows real-time video of rear camera.
Video list
Lists recorded videos.
Icon Meaning
Format SD
Formats the SD card.
System state
Firmware version, SD card space, etc.
You can check the information of black box.
Settings
You can change the information of the black
box.
Page 22
Urive Classic ... 22 ... User's Guide
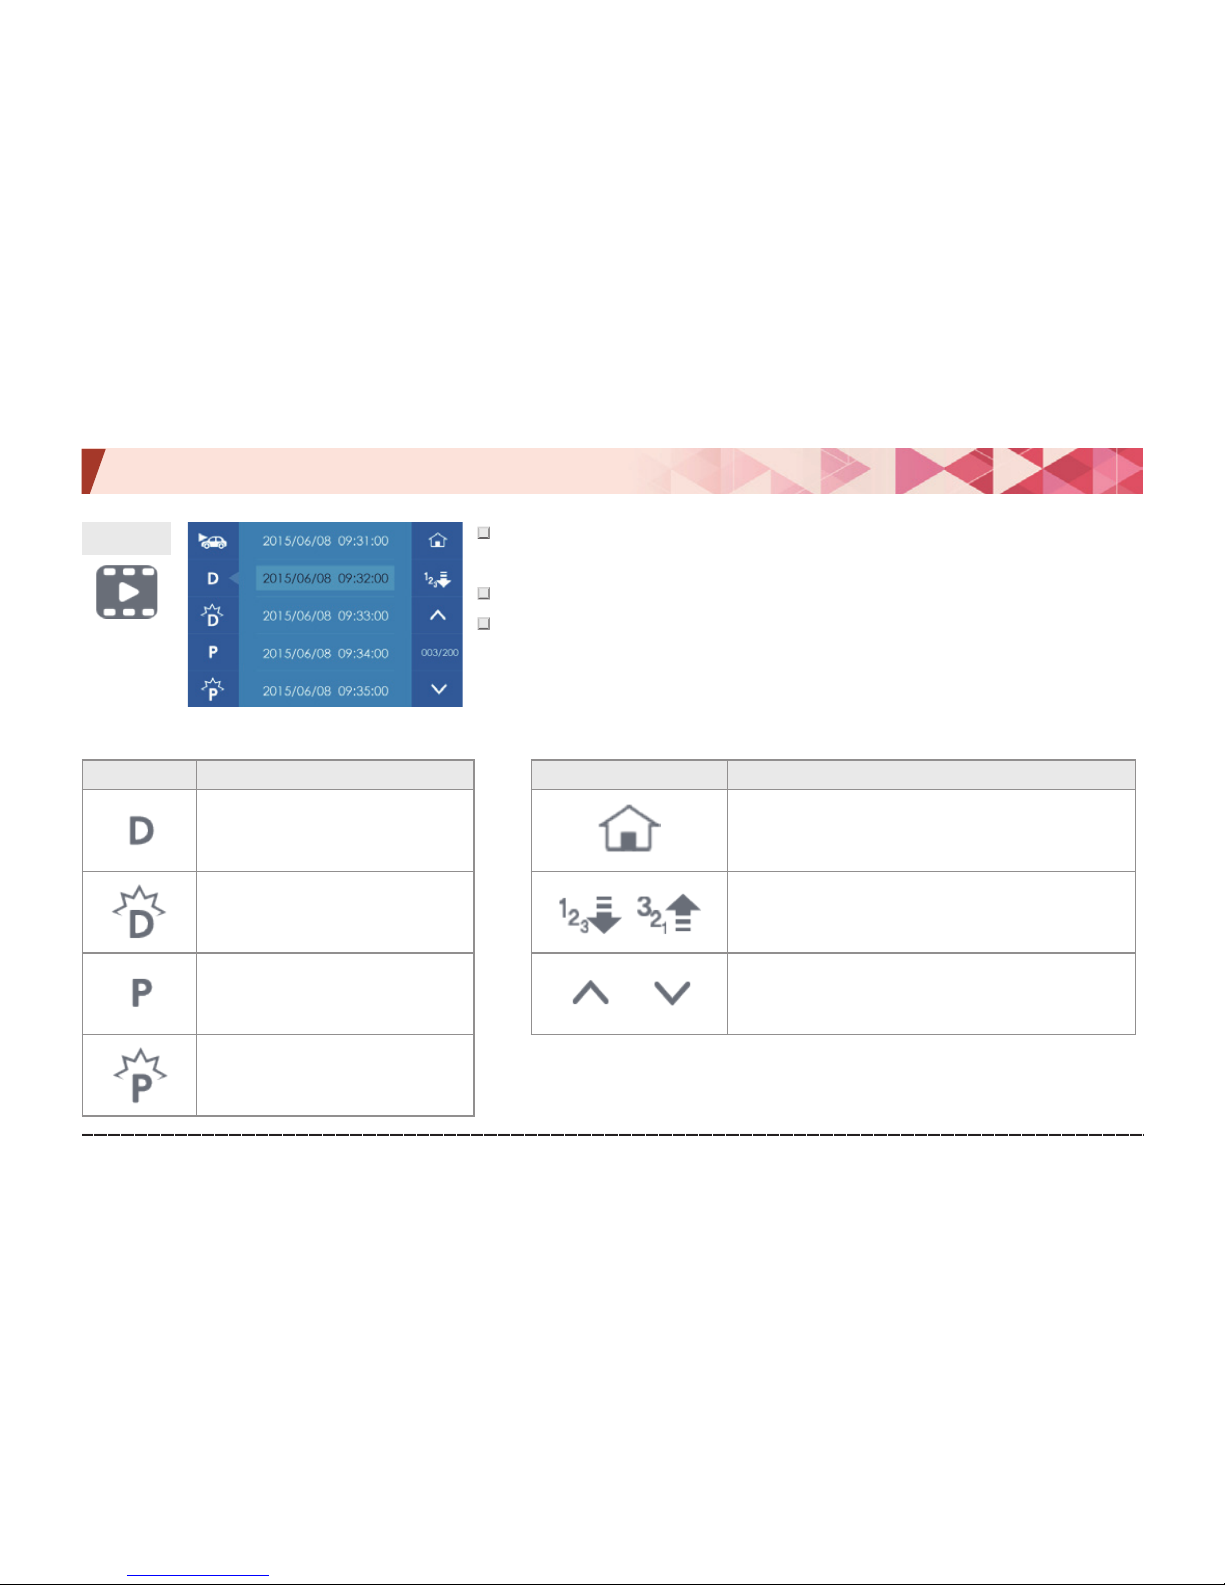
09. GUI -Video list
#
Video list: You can check the driving, event, parking motion, and parking
event video list, and play them back.
#
In the video list menu, video recording is stopped.
#
With no action for 2 minutes, it shifts to the real-time image screen.
Icon Meaning
Driving video list
Event video list
Parking motion video list
Parking event video list
Icon Meaning
Shifts to the real-time image screen;
starts to save a video
Ascending/descending order
Touch the icon to toggle it.
Page up/down in the file list
Video list
Page 23
Urive Classic ... 23 ... User's Guide
09. GUI -Video list
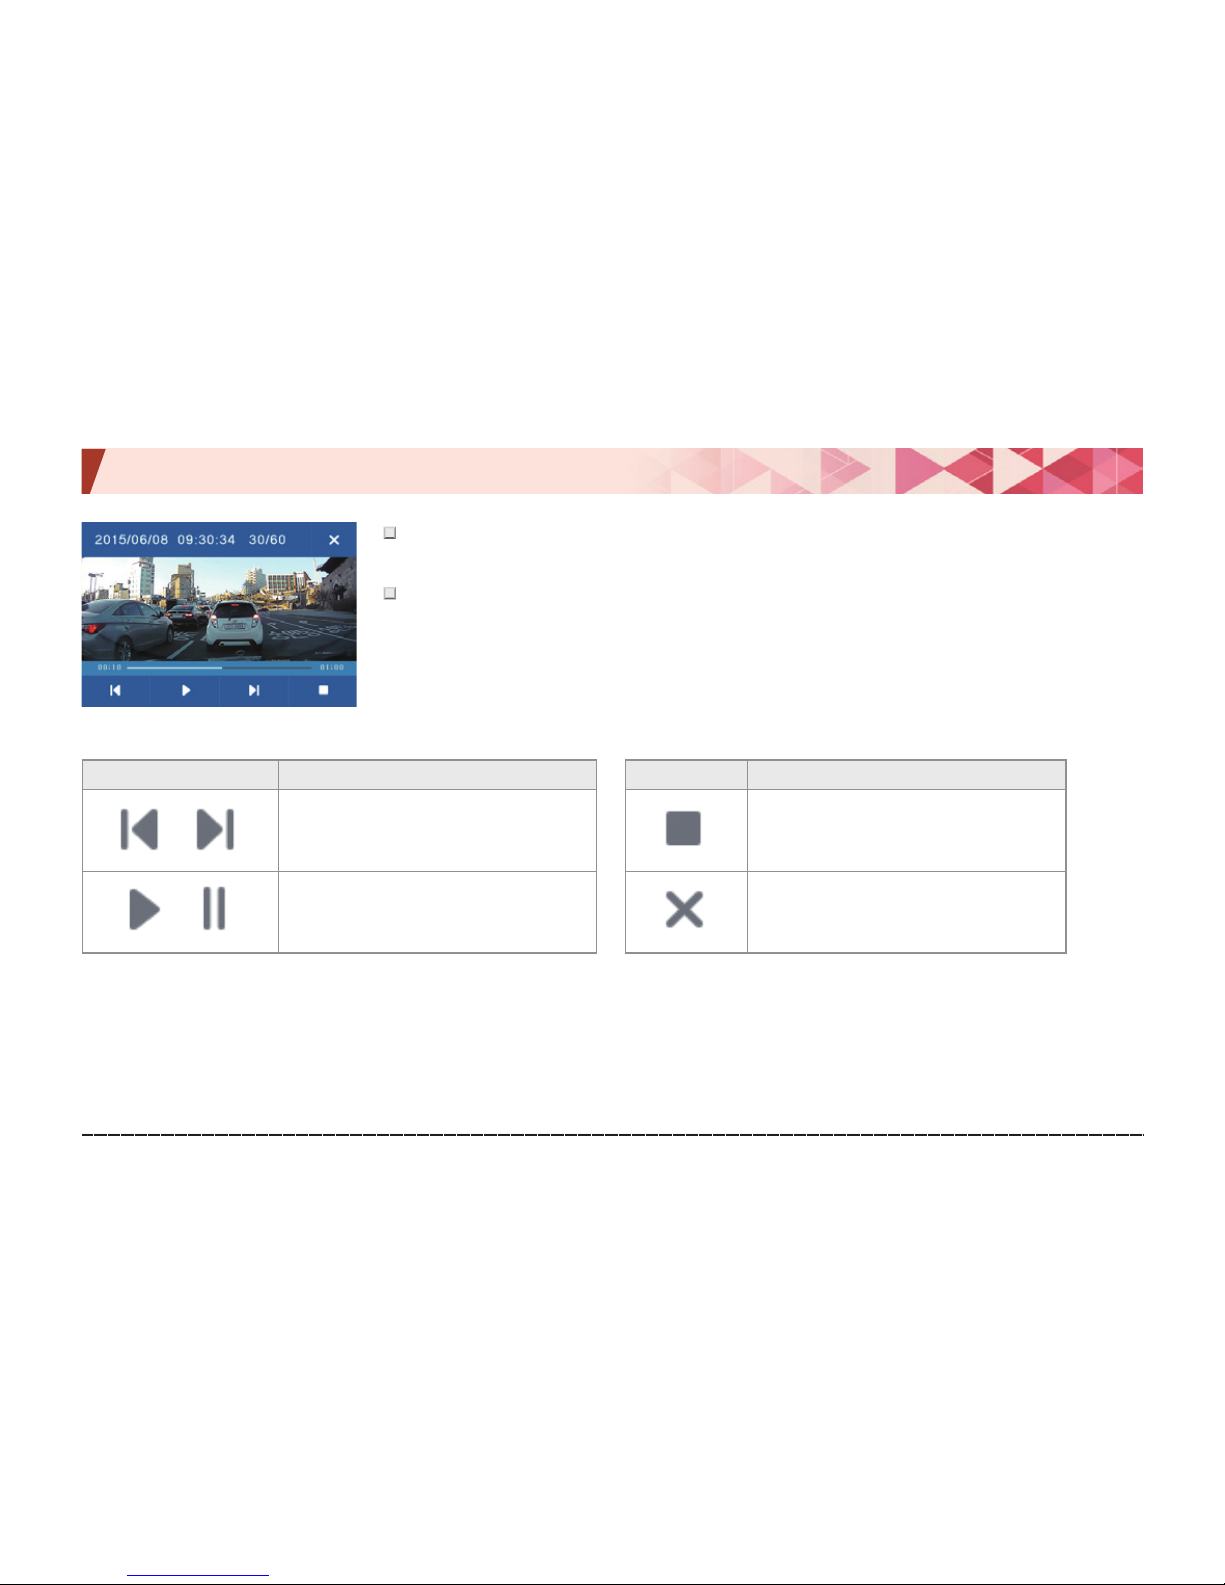
# If a video is played back, file information is displayed in the top, and the control is
displayed in the bottom.
#Touch the video again to show the video in full screen.
Icon Meaning
Previous/Next video
Play/Pause
Touch the icon to toggle it.
Icon Meaning
Stop
Return to the video list
Page 24
Urive Classic ... 24 ... User's Guide
09. GUI -System state
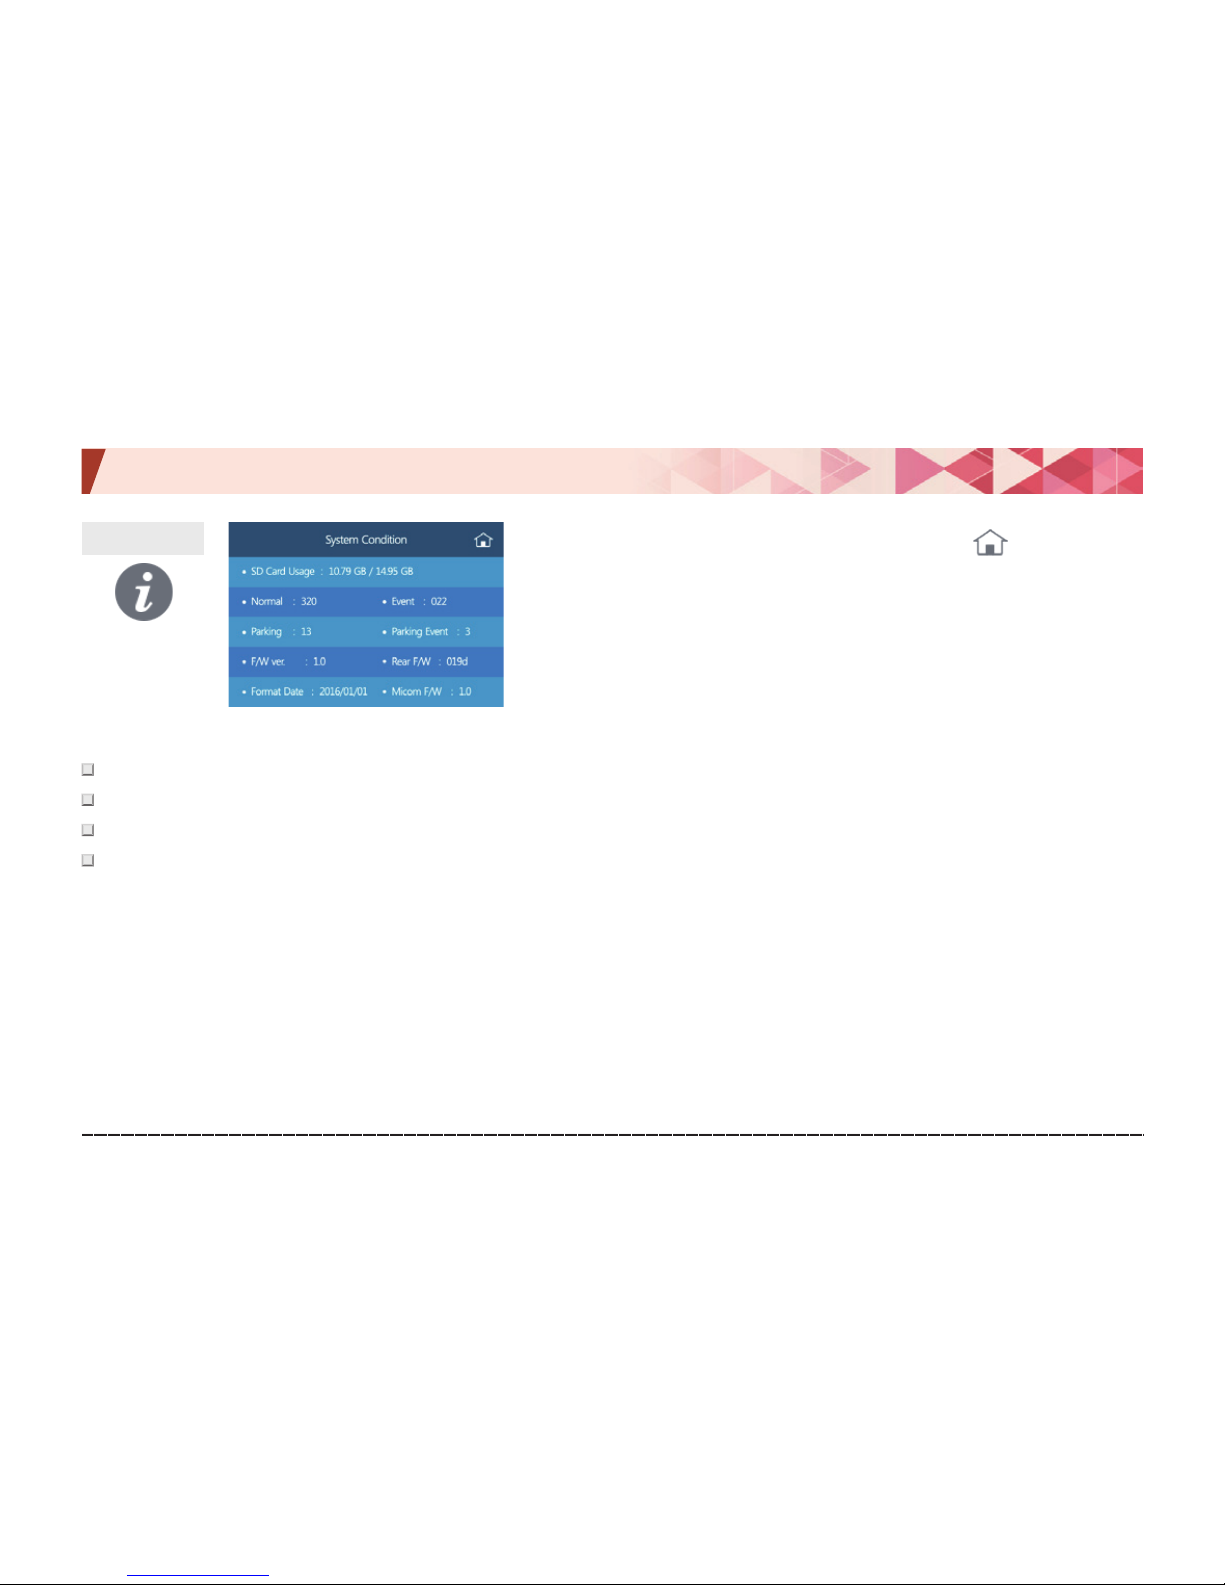
# SD card space: Shows the total and used space of SD card.
# Number of saved driving, events, parking motion, and parking event video files can be seen
# Firmware version, Rear F/W, and Mycom F/W: Shows the software version of the black box.
# Format date: Shows the last date that the SD card was formatted.
System state
[Real-time view]
Page 25
Urive Classic ... 25 ... User's Guide
09. GUI -Settings
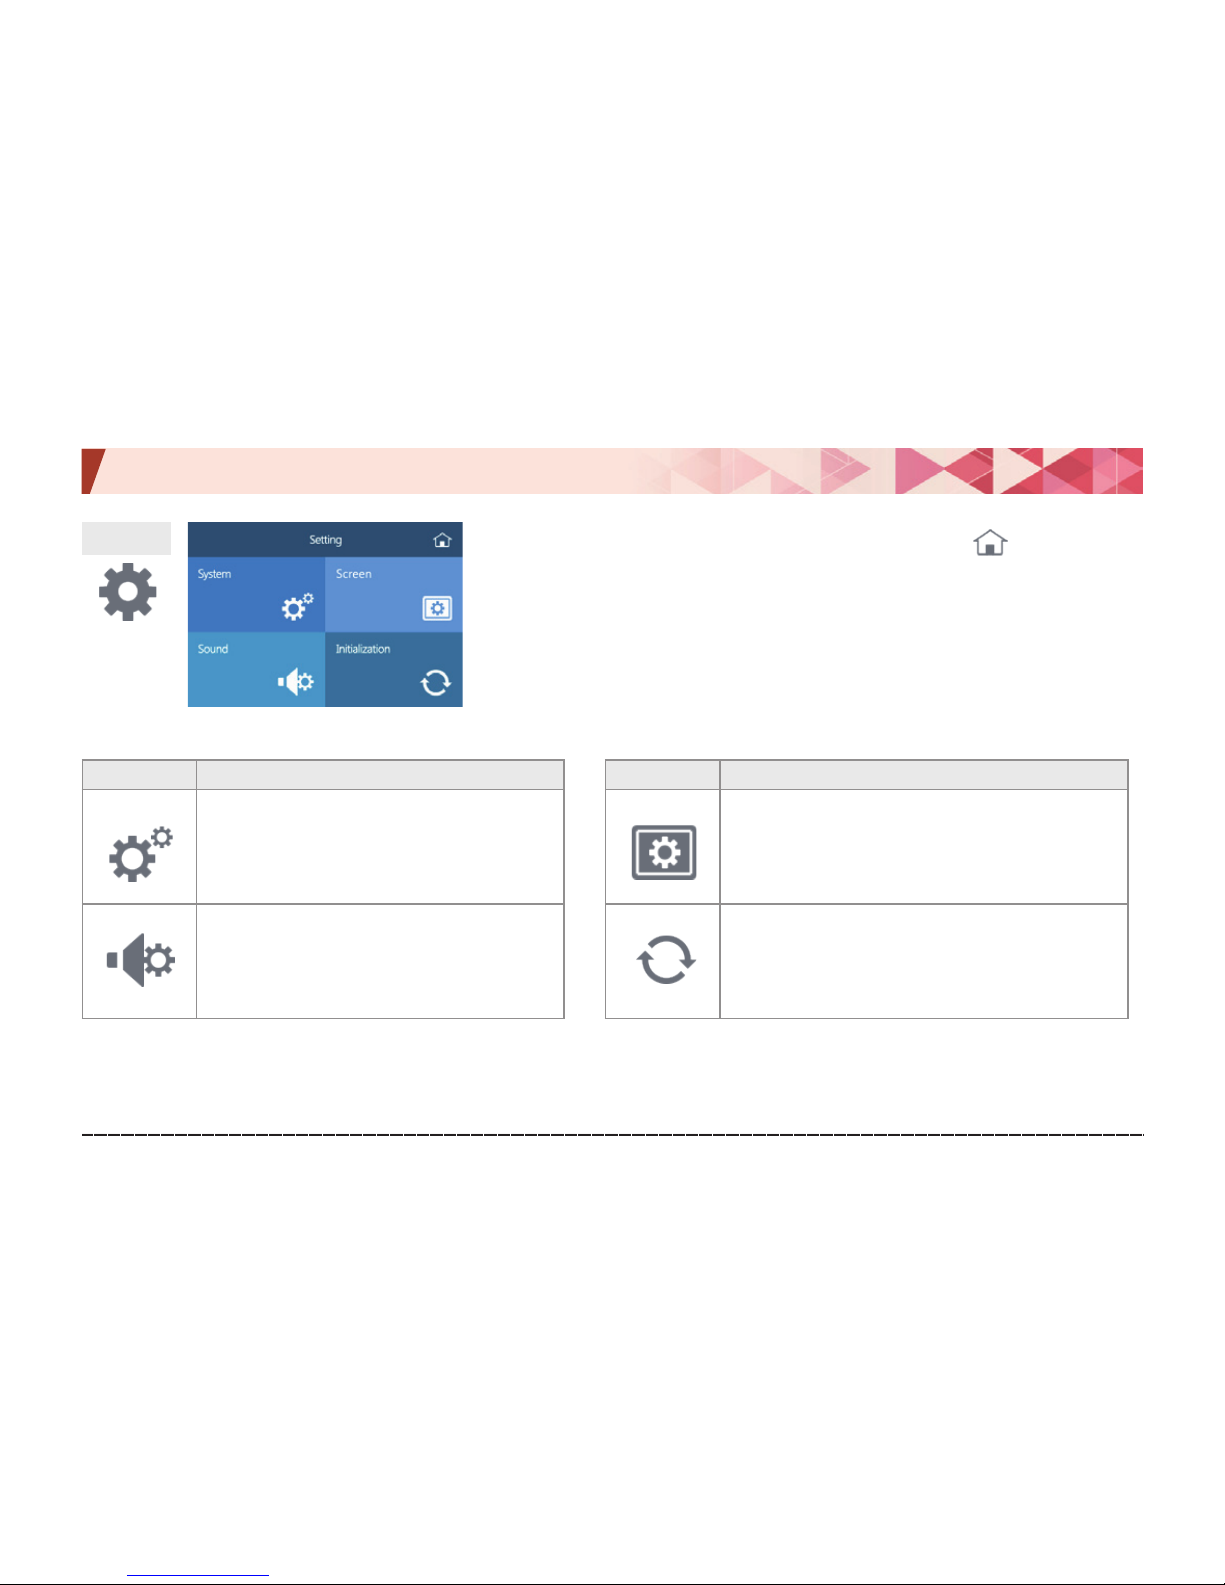
Icon Meaning
System
Sensor sensitivity, cutoff, and time
settings can be changed.
Voice
Volume level and voice recording
function can be set.
Icon Meaning
Display
Coordinate correction, PIP, screen saver, and
background color can be set.
Reset
All changed setting values are reset.
Settings
[Real-time view]
Page 26
Urive Classic ... 26 ... User's Guide
09. GUI -System settings
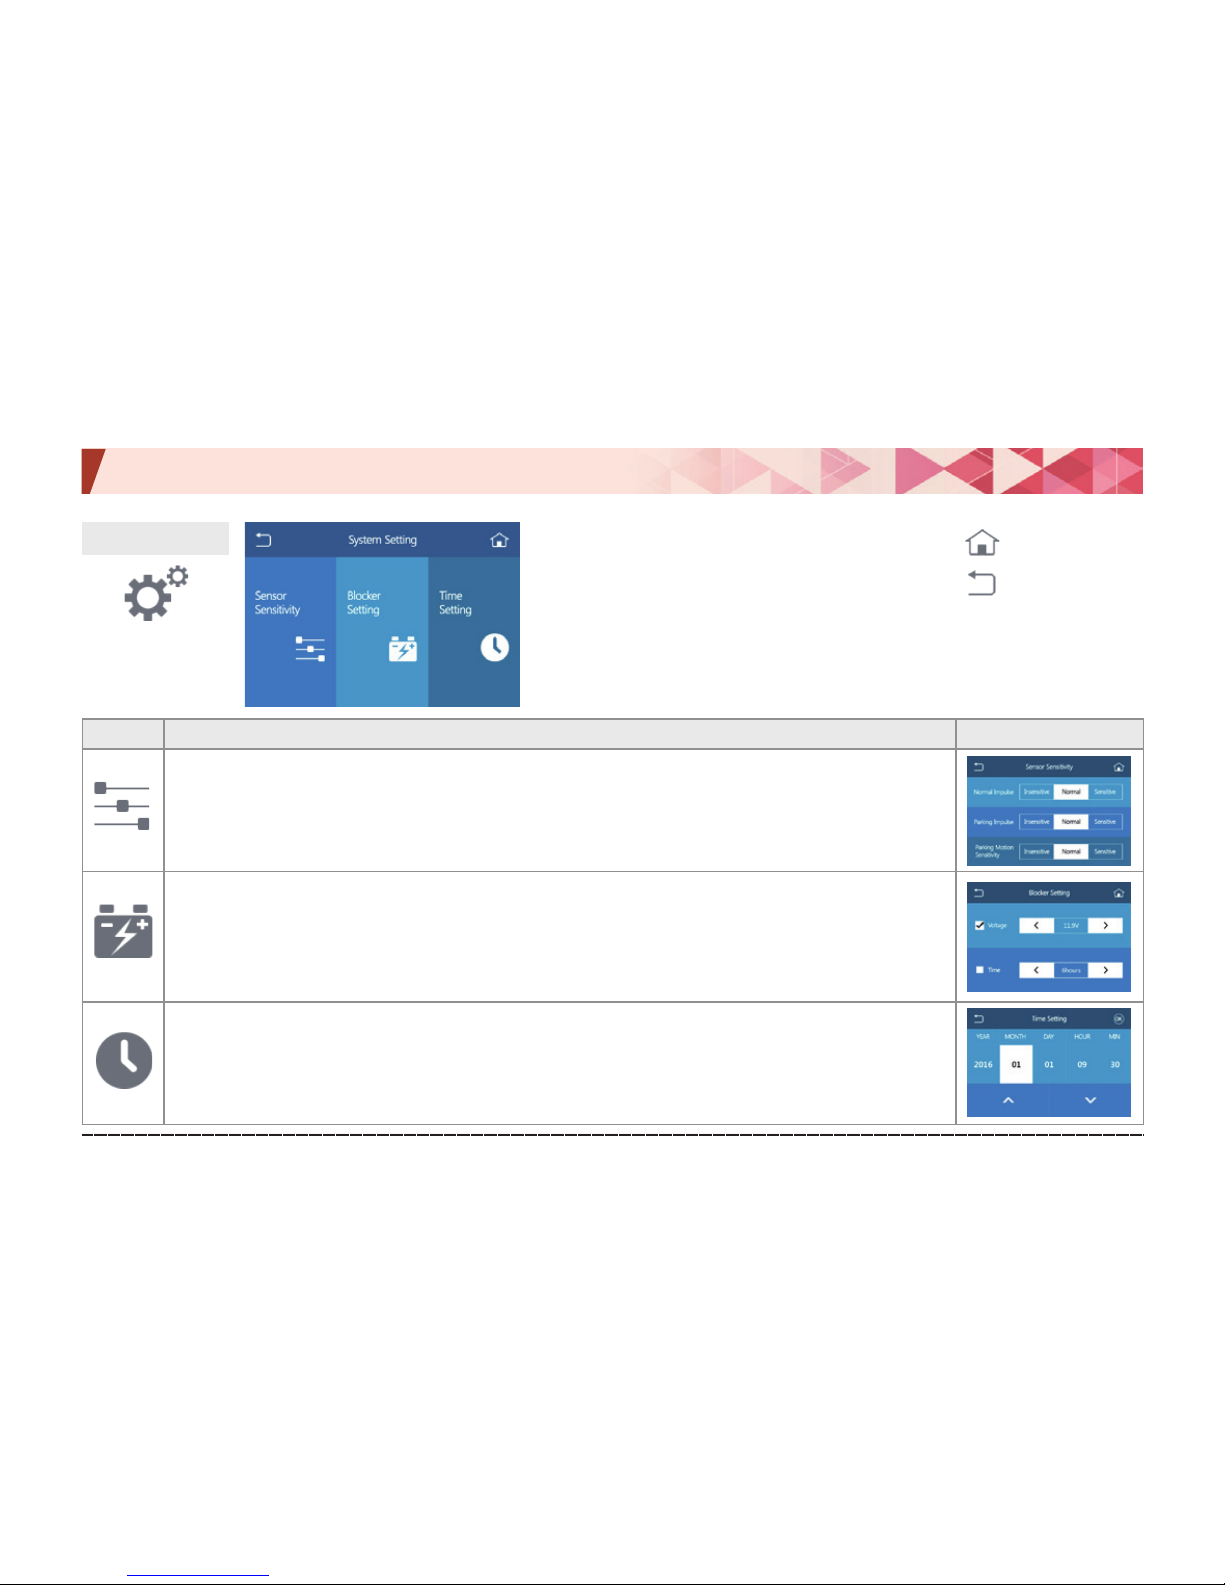
Icon Meaning
Sensor sensitivity
Loose, Normal, or Sensitive can be set for the drive impact, parking impact, and parking
motion.
Cutoff setting
Black box can be set to be turned off automatically to prevent battery discharge. 7 settings (None,
11.5 V, 11.7 V, 11.9 V, 12.1 V, 12.3 V, and 12.5 V) and 5 settings (None, 6 hr, 12 hr, 24 hr, and 48 hr)
can be set for the voltage and time, respectively.
※
Even if the cutoff time is set, the black box is turned off if the battery voltage becomes 11.5 V or less.
Time setting
Clock of black box can be manually set.
※
Connect an external GPS (optional) for auto clock setting.
System settings
[Previous screen]
[Real-time view]
Page 27
Urive Classic ... 27 ... User's Guide
09. GUI -Display settings
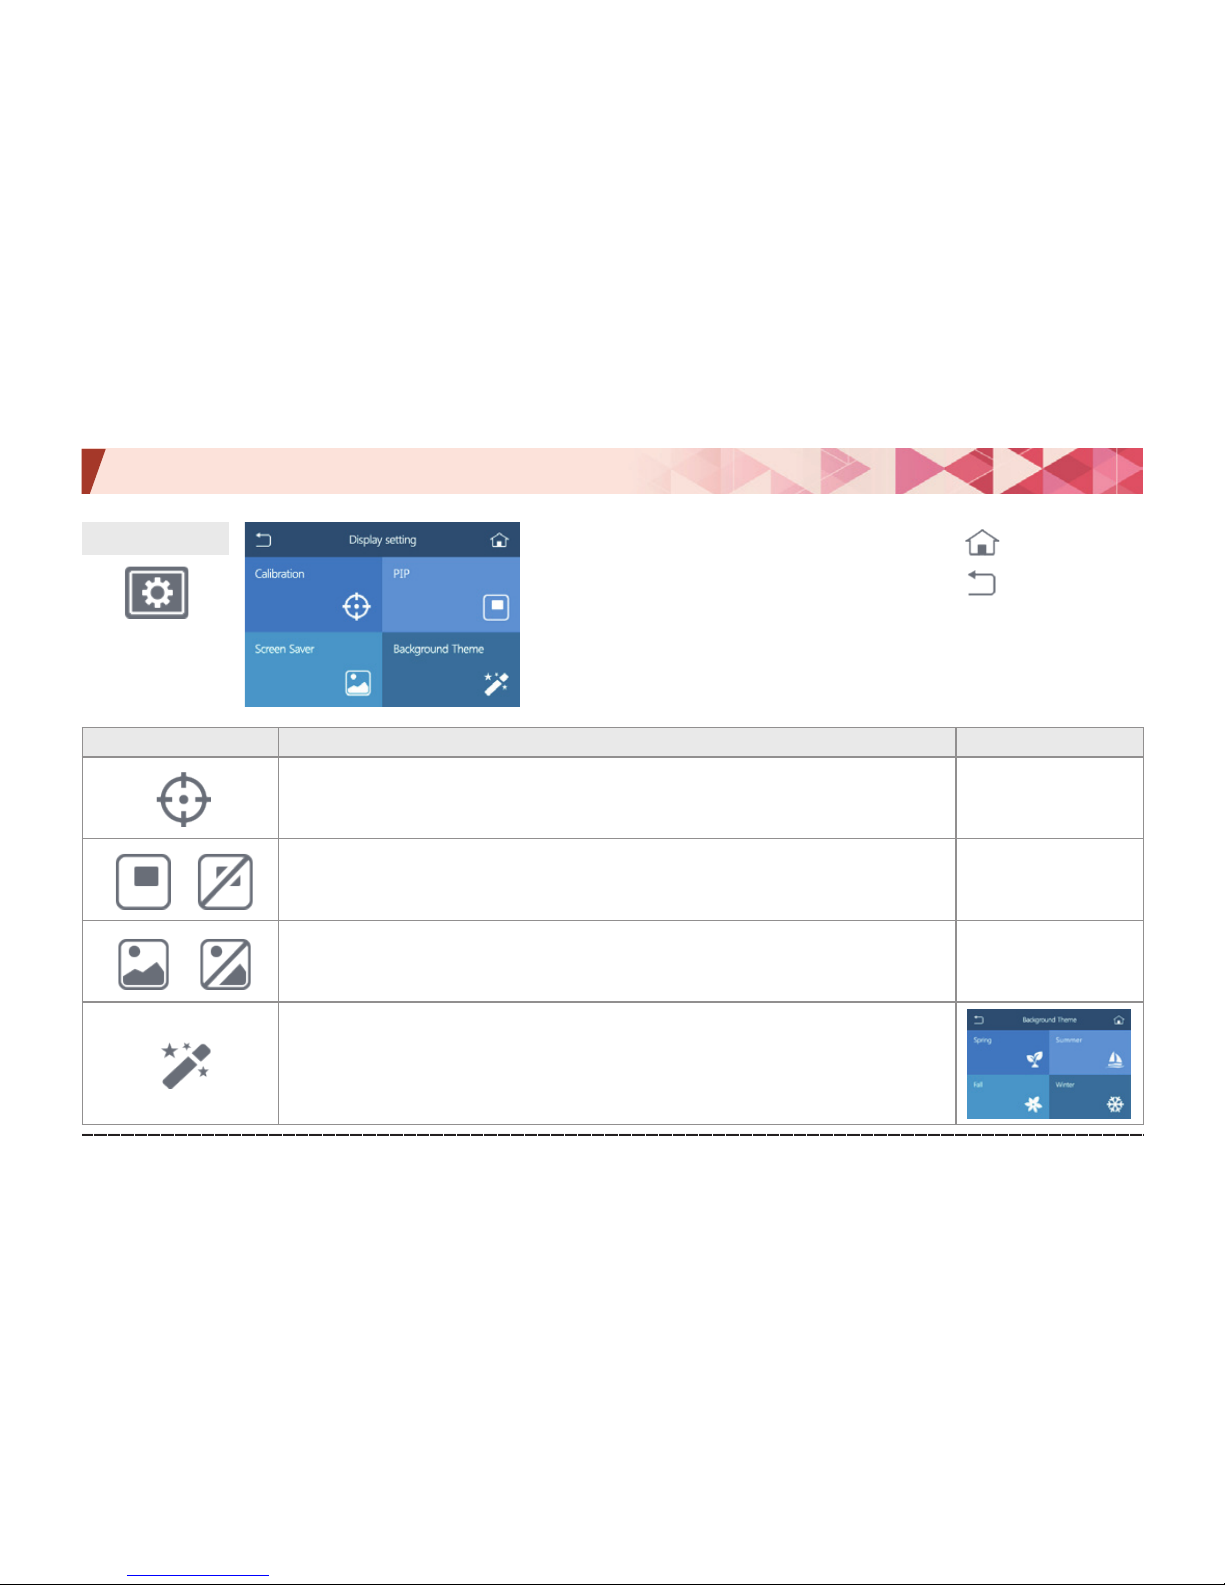
Icon Meaning
Coordinate correction
Touch 5 points (upper left, upper right, lower right, lower left, and center) on the
display to correct them.
PIP
You can set PIP to show/hide the front and rear view images at the same time in the
real-time video.
Screen saver
You can set to show the screen saver or not when there is no action with the LCD.
Background color
You can set 1 of 4 types of background color for the menu screen.
Display setting
[Previous screen]
[Real-time view]
Page 28
Urive Classic ... 28 ... User's Guide
09. GUI -Voice settings
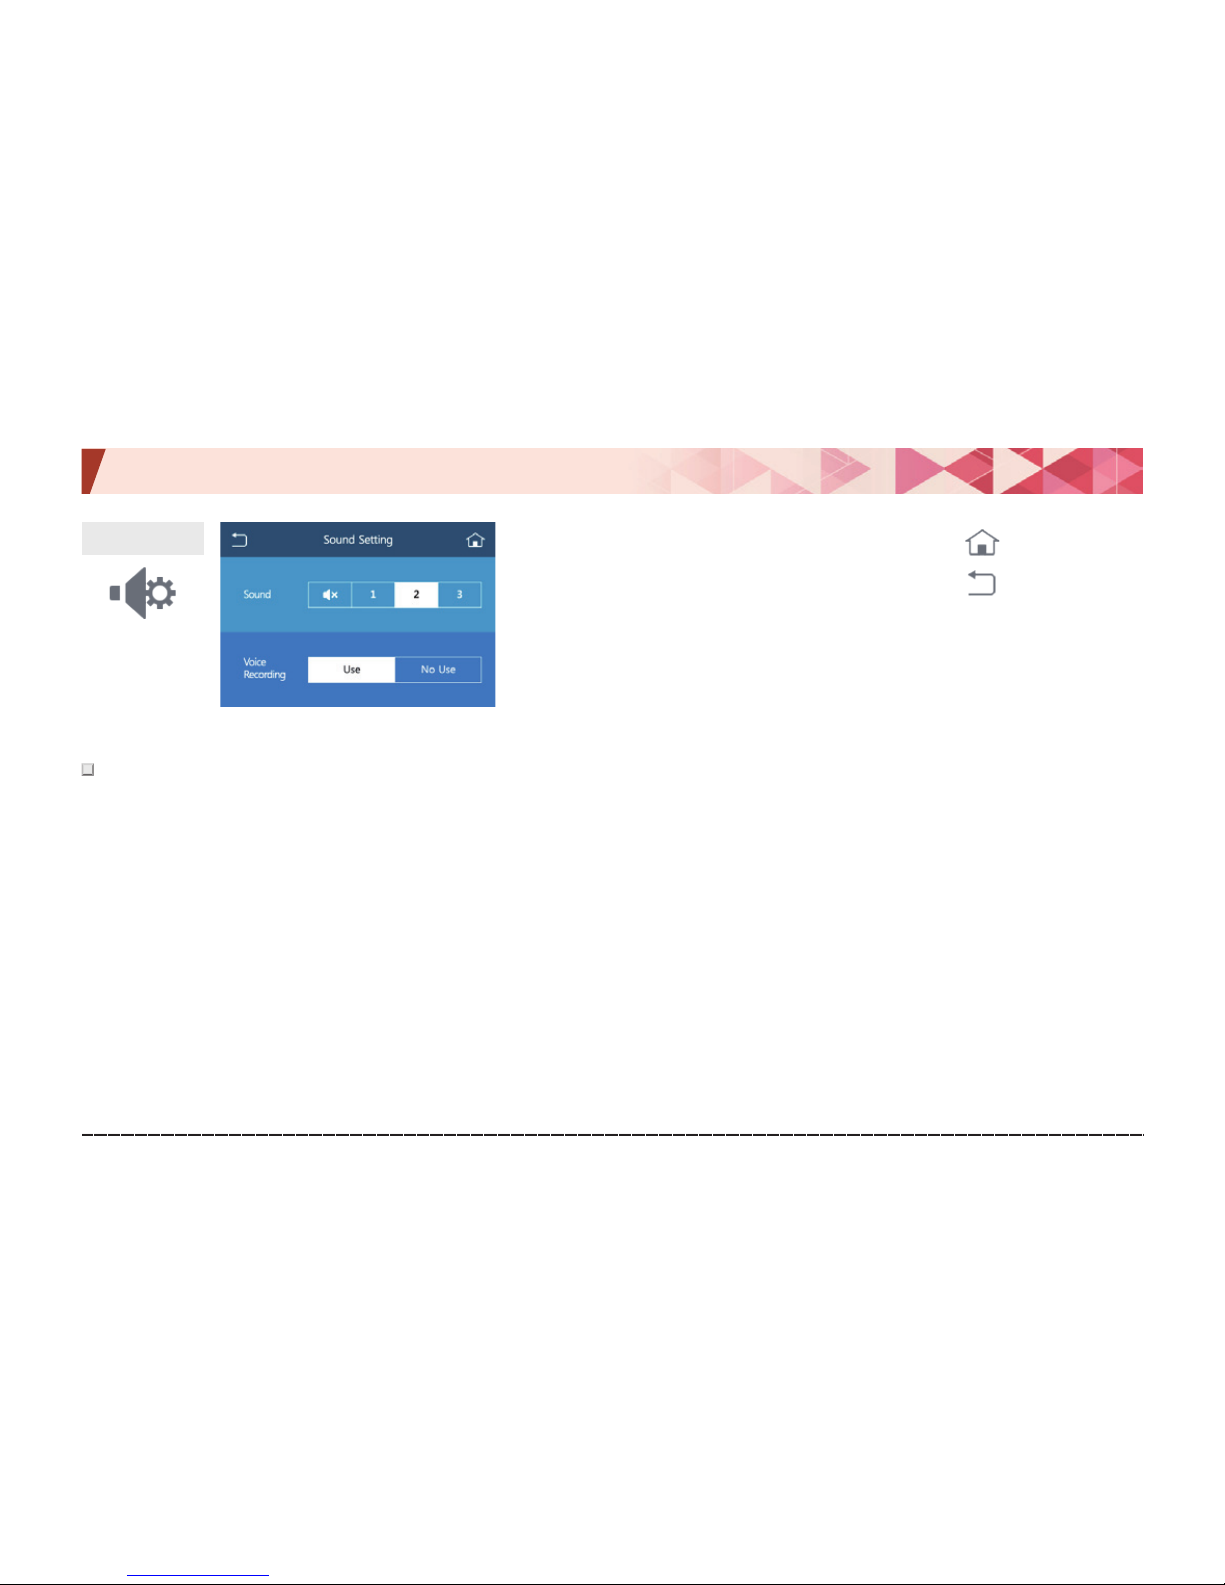
# If the voice recording is disabled, “M” is indicated in the real-time video screen and recorded video.
Voice setting
[Previous screen]
[Real-time view]
Page 29
Urive Classic ... 29 ... User's Guide
10. Upgrade -Auto upgrade
[ How to upgrade automatically ]
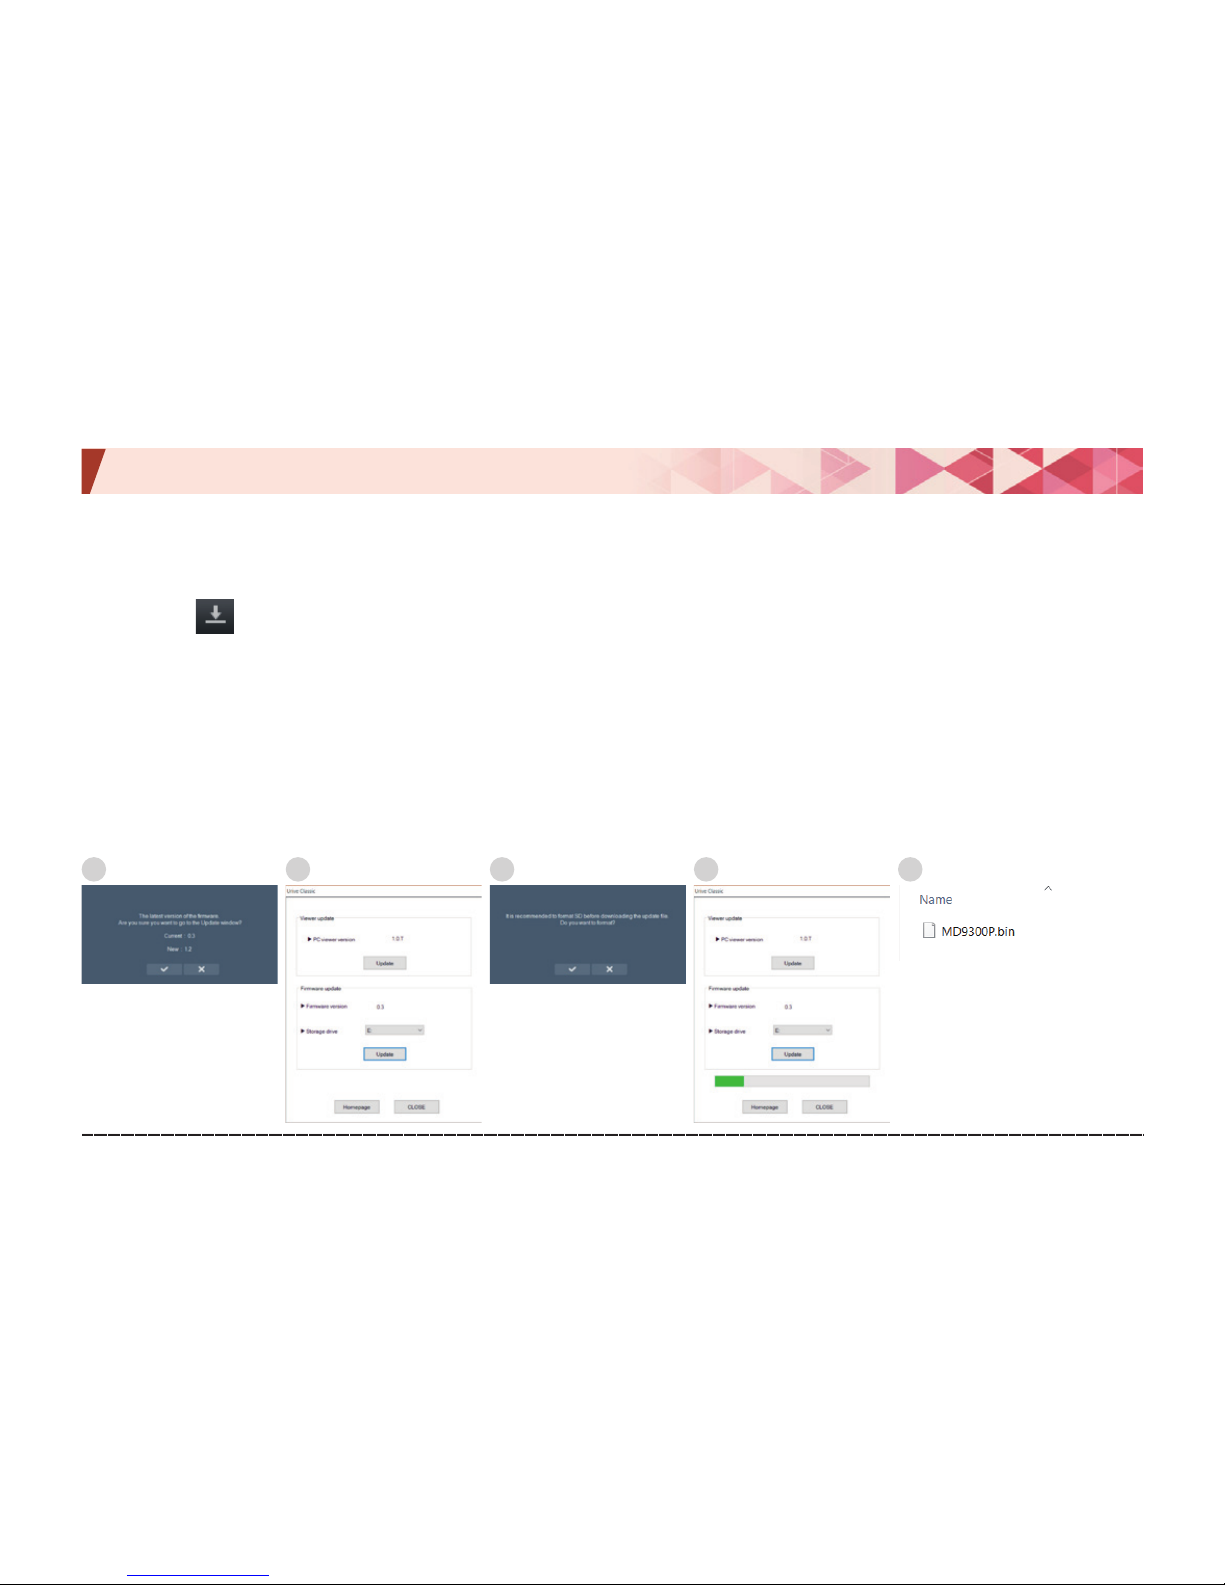
1.# With the PC Viewer, you can automatically install the upgrade file in the memory card. Insert a micro SD card into a PC, and
then press button at the upper left of main screen of Viewer. (If a micro SD card having firmware version information is
inserted, a prompt of new firmware is shown as in ①).
2.
#
Make sure you select correct drive letter of micro SD card; press the Update button; and format the micro SD card according
to the instruction. (For the format process, refer to “11. PC Viewer – Format SD.”)
3.
#
When the update is finished, a prompt pops up as in ④ and the update file (MD9300P.bin) is copied to the micro SD card.
4.
#
After turn the device off, insert the micro SD card to the body.
5.
#
After turn the device on, it is automatically upgrade with voice information(Starting the update) and then it will reboot by itself.
6.
#
In the SD card, some set folders are created after rebooting.
1 2 3 4 5
Page 30
Urive Classic ... 30 ... User's Guide
11. PC Viewer -Installation
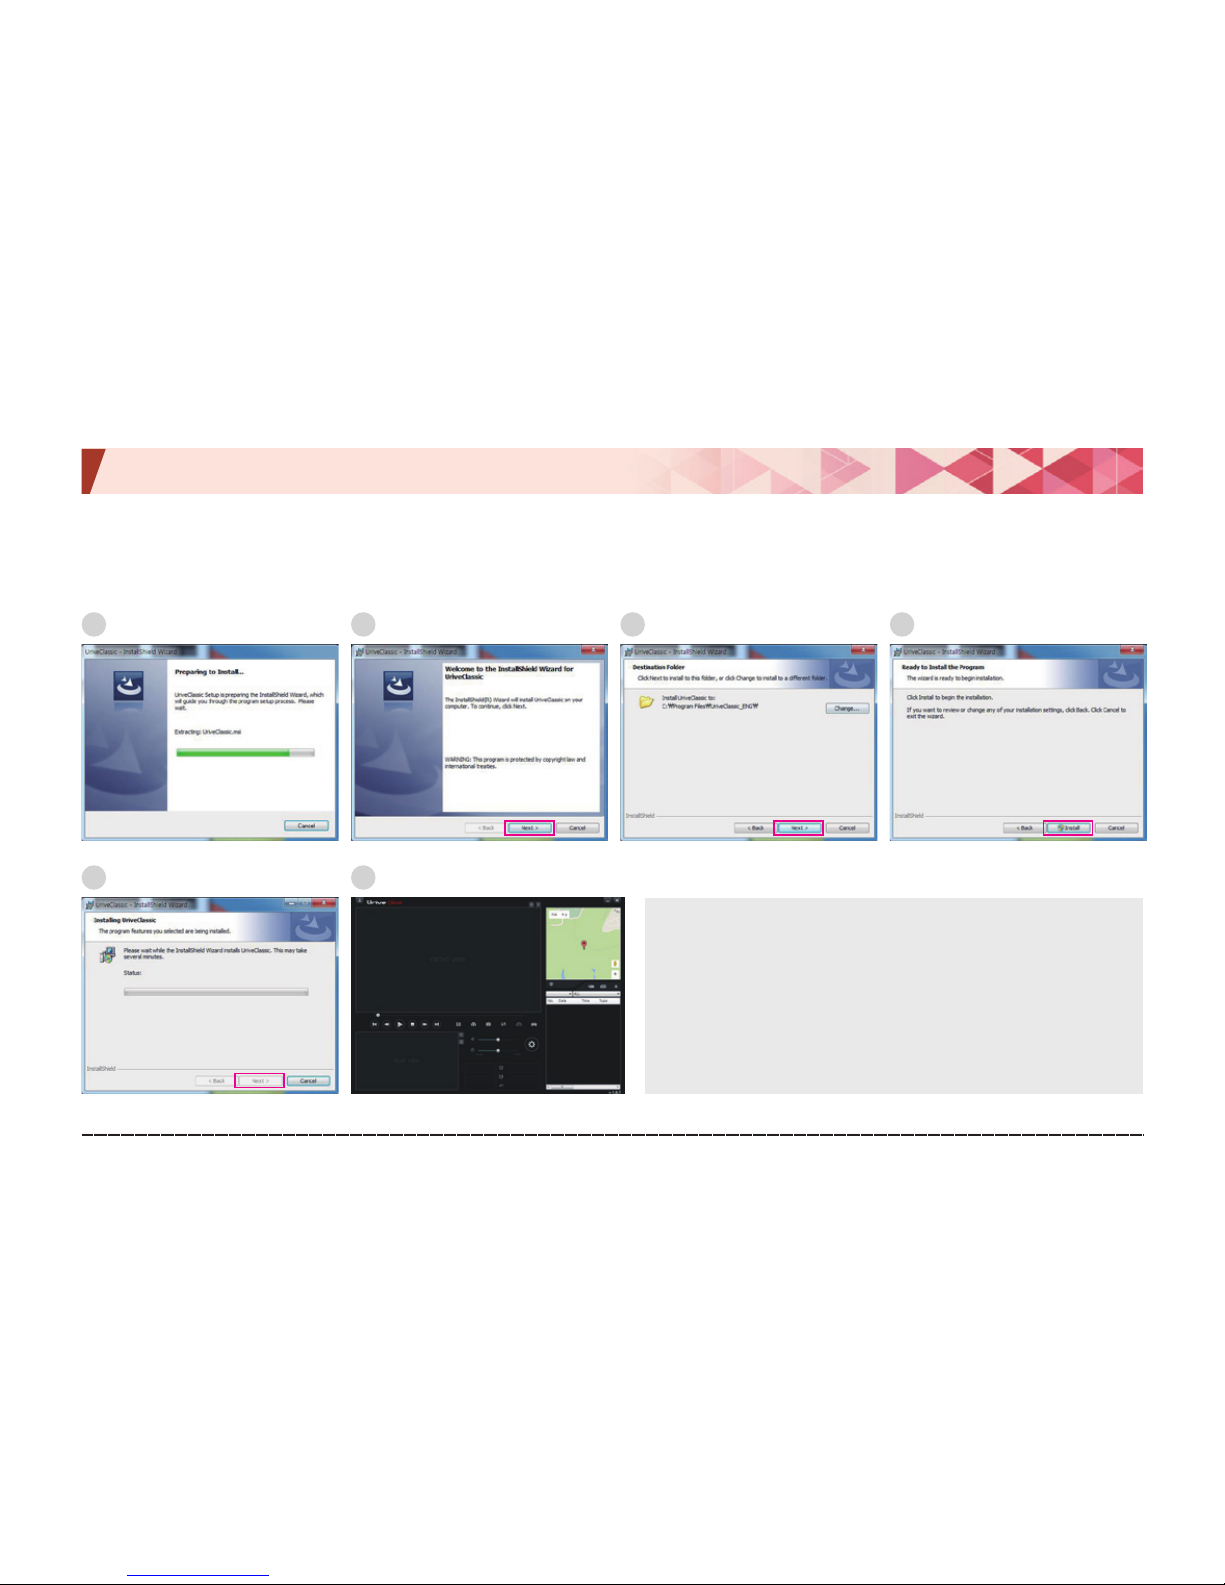
1.# Run the PC Viewer installation file (UriveClassic.exe) from a micro SD card (or where you downloaded it), and follow
the items to finish the installation.
[ Recommended Specifications for PC Viewer ]
ㅇ
#
Computer OS: XP (32 bit), Vista (32 bit), Windows
7(32/64 bit), or Windows 8 (32/64 bit)
ㅇ
#
Computer H/W: PENTIUM4 2.8 GHz or higher / 1 GB
RAM or more
ㅇ
#
Web browser: Microsoft Internet Explorer 7.0 or later
1
5
2
6
3 4
Page 31
Urive Classic ... 31 ... User's Guide
11. PC Viewer -Main screen
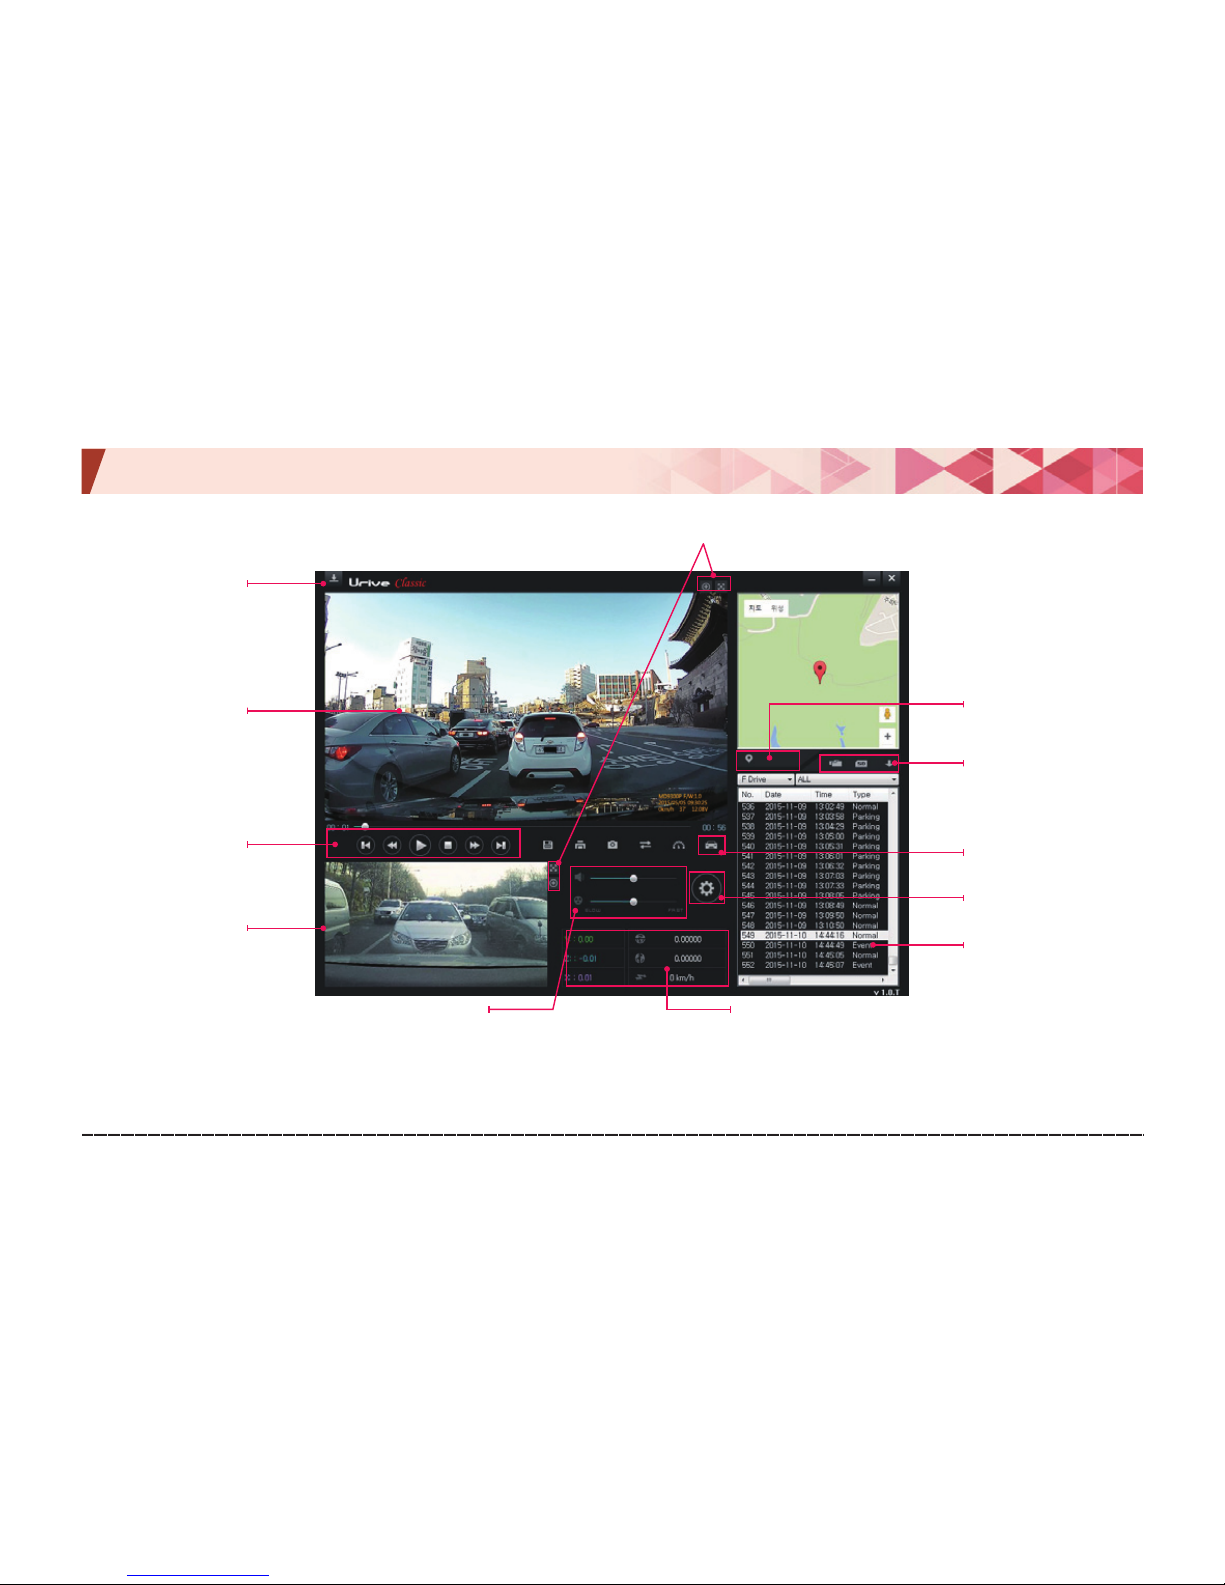
Impact level/latitude/
longitude/speed
Volume, Play speed
Map On/Off
Switch Daum/Google Map
Open file, Format &
check SD card, and
sorting
Black box settings
Driving path
File list
Viewer/firmware
version information
& auto update
Front view
Play control
Rear view
Zoom, Full screen
※
Latitude, longitude, speed, and map information is provided only if an external GPS (optional) is connected.
※
Disabled voice recording (M) and GPS signal reception (G) are indicated at the lower right of front view.
Page 32
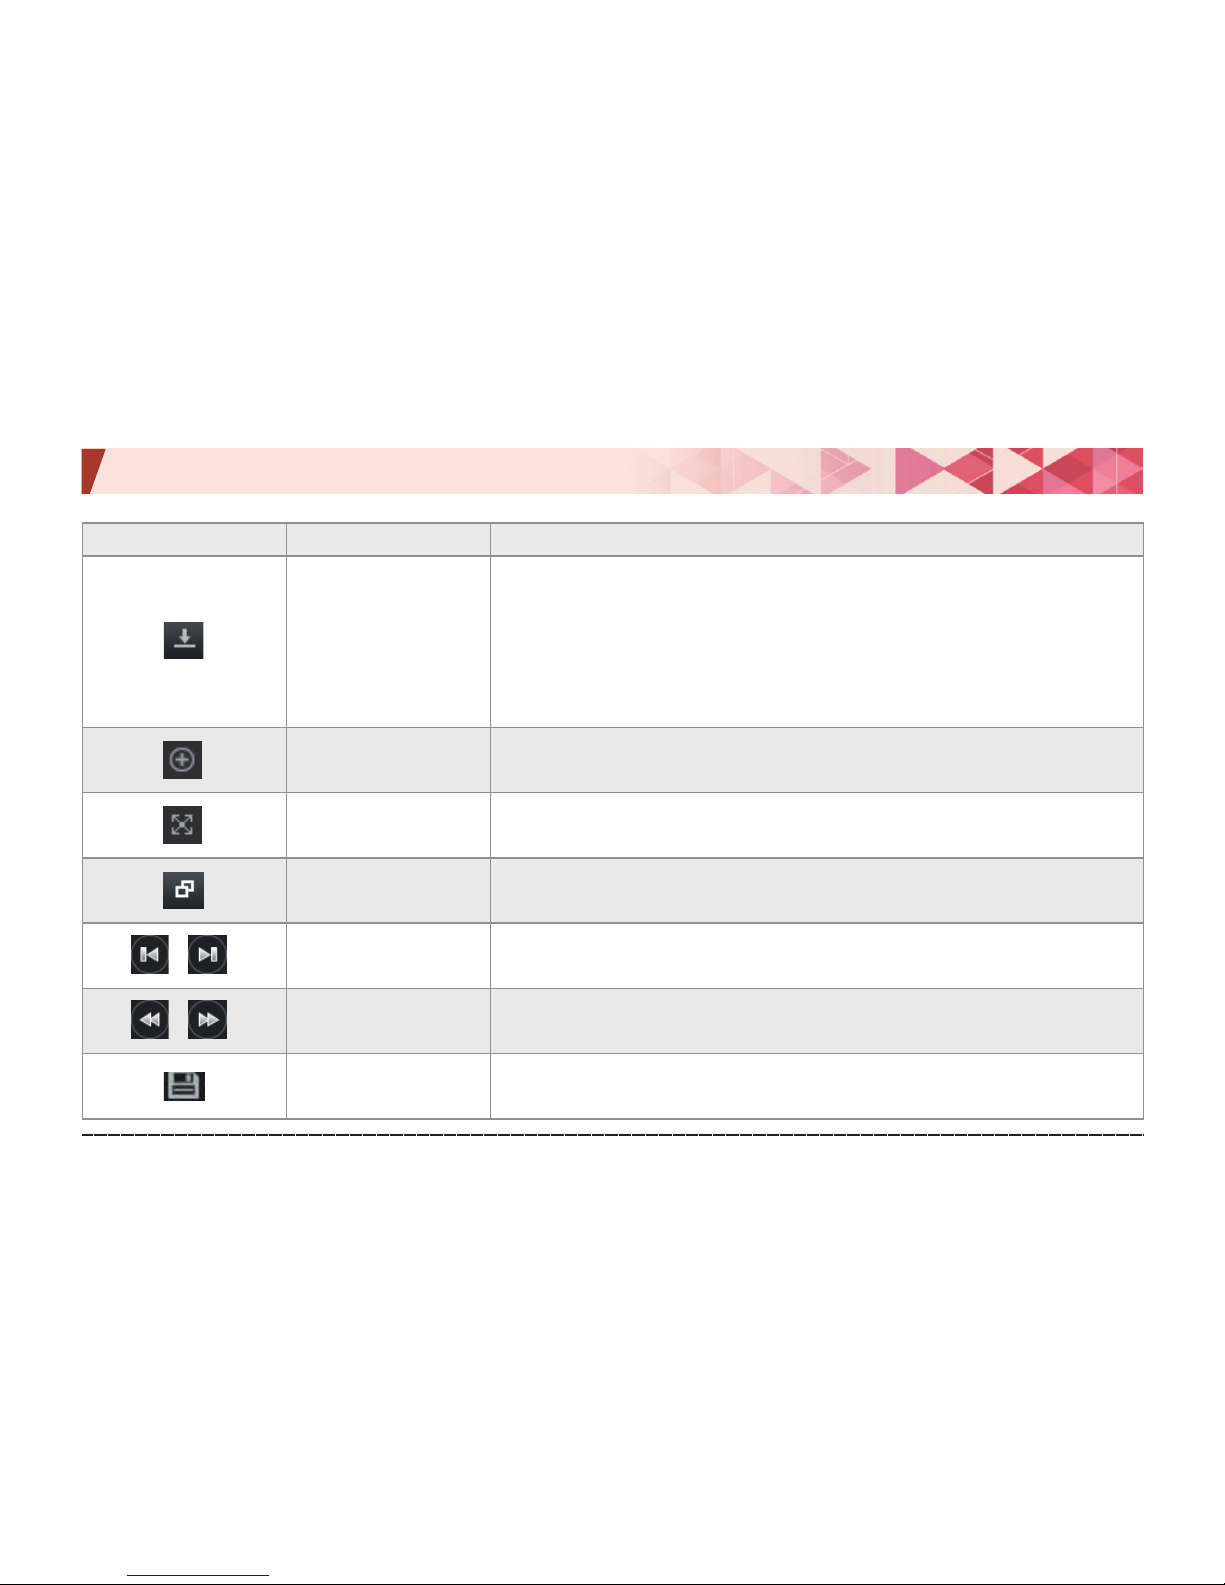
Urive Classic ... 32 ... User's Guide
11. PC Viewer -Buttons
Icon Function Explanation
Program version
information
Provides the version information of PC Viewer and firmware of the black box,
and shortcut to the download center of Urive’s Web page. Insert the micro SD
card into a PC to check the version information. PC Viewer and firmware can be
automatically updated.
※
When downloading the PC Viewer or firmware, select “Unblock” button in
the “Windows Security Warning” prompt.
Zoom in
It indicates selection of either front or rear view, which can be zoomed in with the
mouse scroll wheel.
Full screen
Front or rear view can be seen in full screen.
Return to main
screen
Switches from the full-screen play back to the main screen of PC Viewer.
Play previous/
next file
Plays back previous/next file while playing a video.
Previous/next frame
While playing a video, press it to pause the video, and move it by frame
Copy file
Copies currently playing video to the PC
Page 33
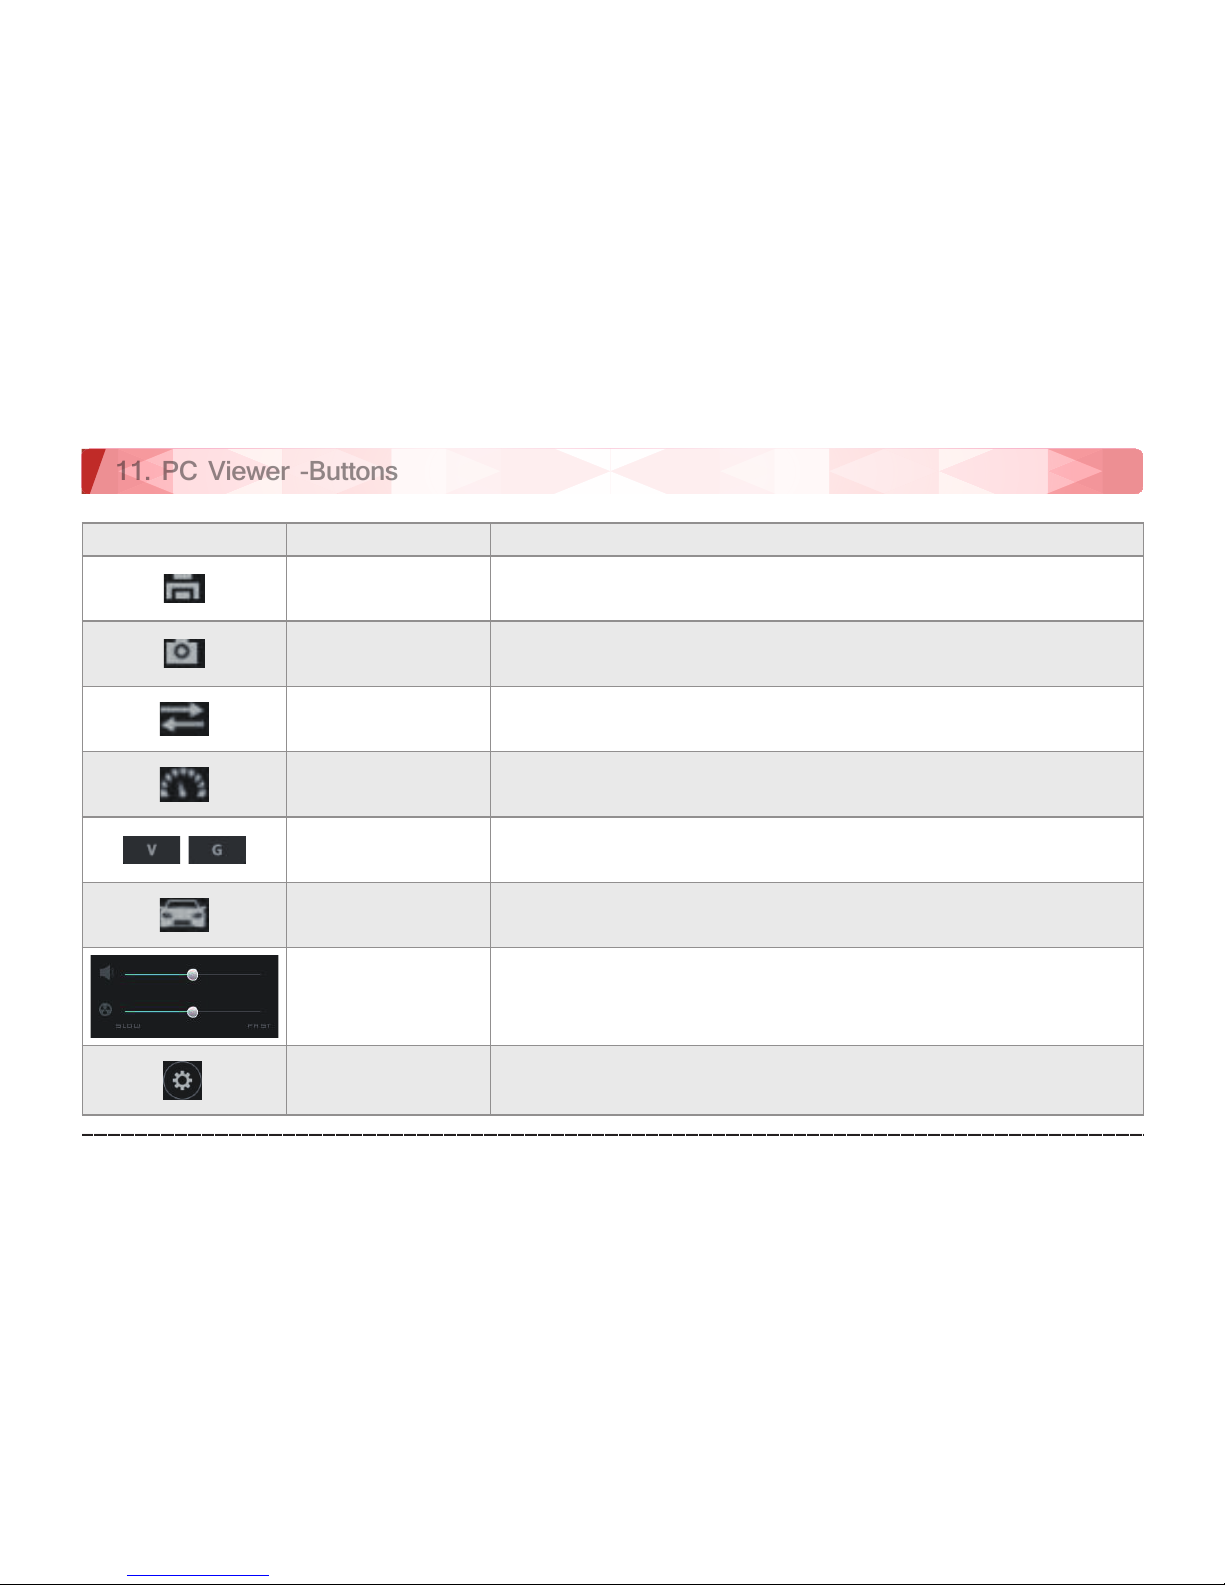
Urive Classic ... 33 ... User's Guide
11. PC Viewer -Buttons
Icon Function Explanation
Print screen
Saves the full screen of Viewer to a JPG file.
Screen capture
Saves the full screen of Viewer to a JPG file.
Switch front/
rear view
In the PC Viewer, front and rear views are switched.
Speed /
acceleration graph
Speed/acceleration graph pops up.
Select speed/
acceleration graph
Speed or acceleration graph can be selected. (Requires external GPS (optional)
Driving record
Shows the information of driving record. (Requires external GPS (optional)
Playback option
Volume and video play speed can be controlled.
Black box settings
Settings of black box are saved to a micro SD card. A micro SD card needs to be
inserted.
Page 34
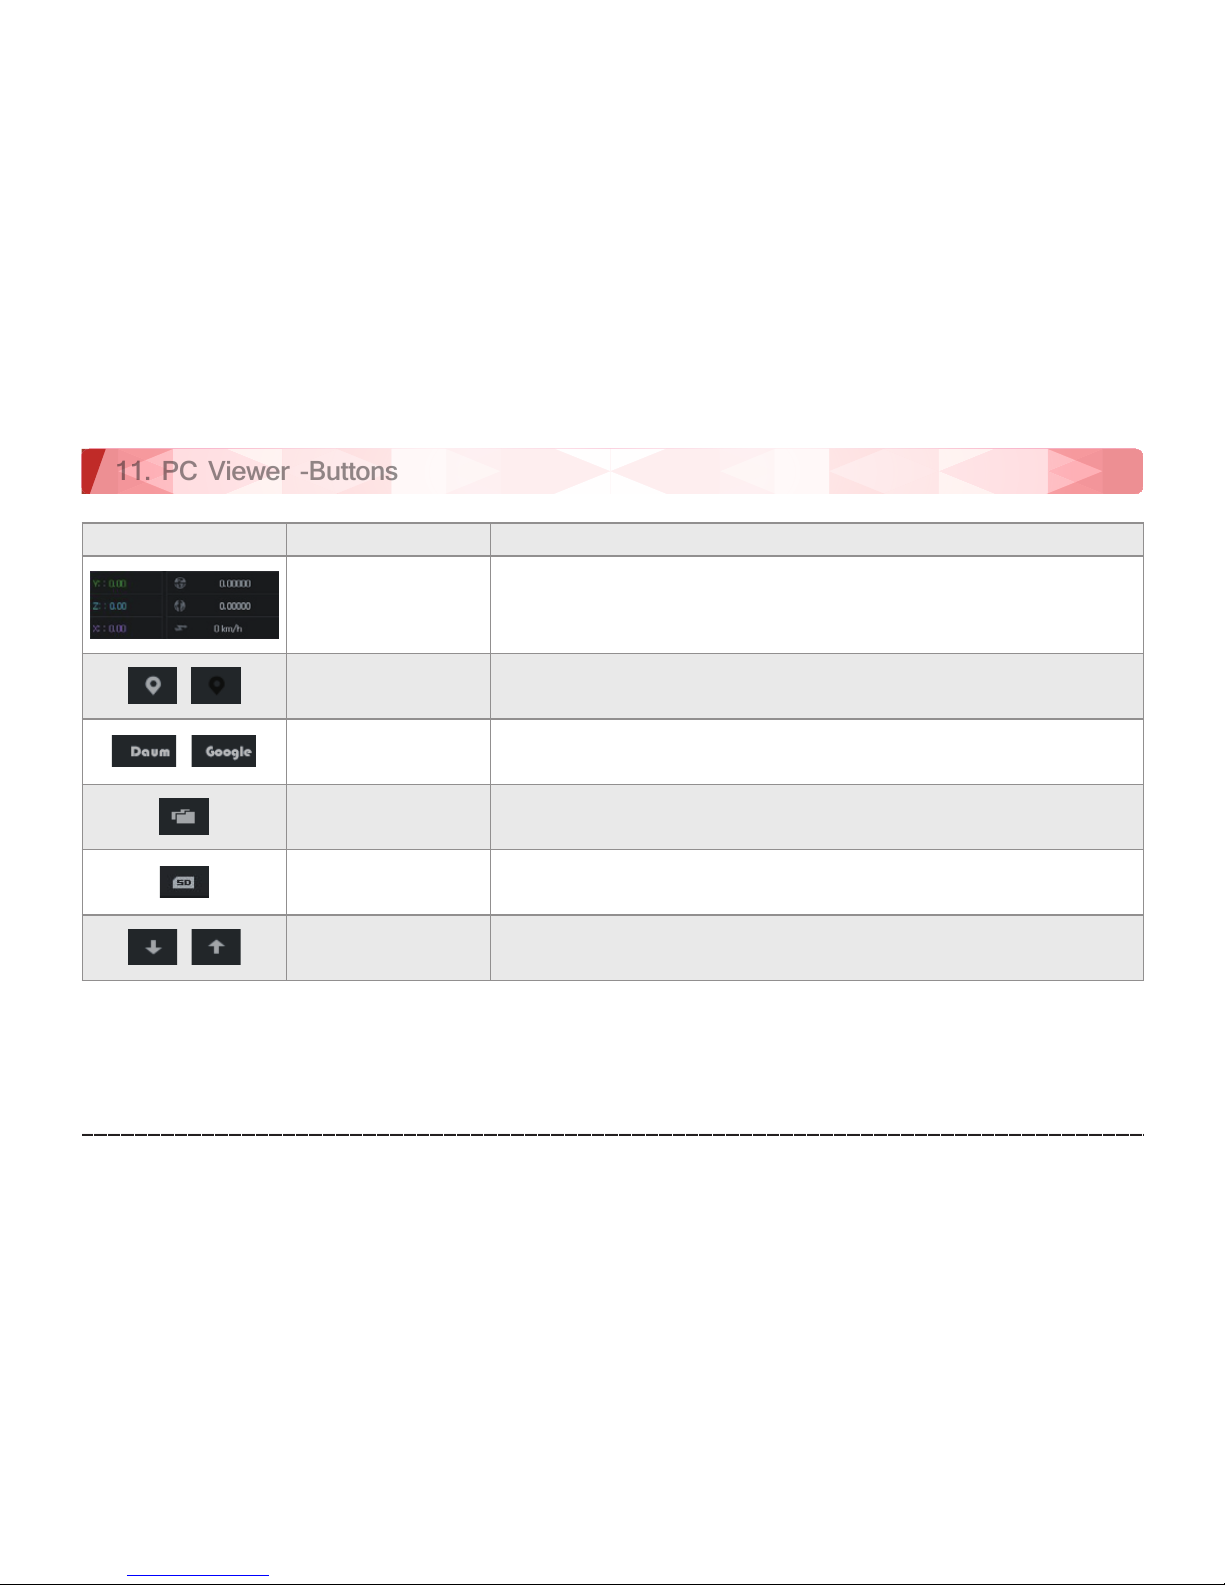
Urive Classic ... 34 ... User's Guide
11. PC Viewer -Buttons
Icon Function Explanation
Impact and location
information
Shows impact level, GPS, and speed information (GPS and speed information
display requires a GPS(optional).
Show/hide map
Shows the information of driving location during video playback.
Switch Daum/Google
Mapgraph
Map service can be selected
Open file
Used to open a saved video file.
Format/check SD
A SD card can be formatted or checked for error.
Sort file list
A file list can be sorted in the ascending/descending order.
Page 35
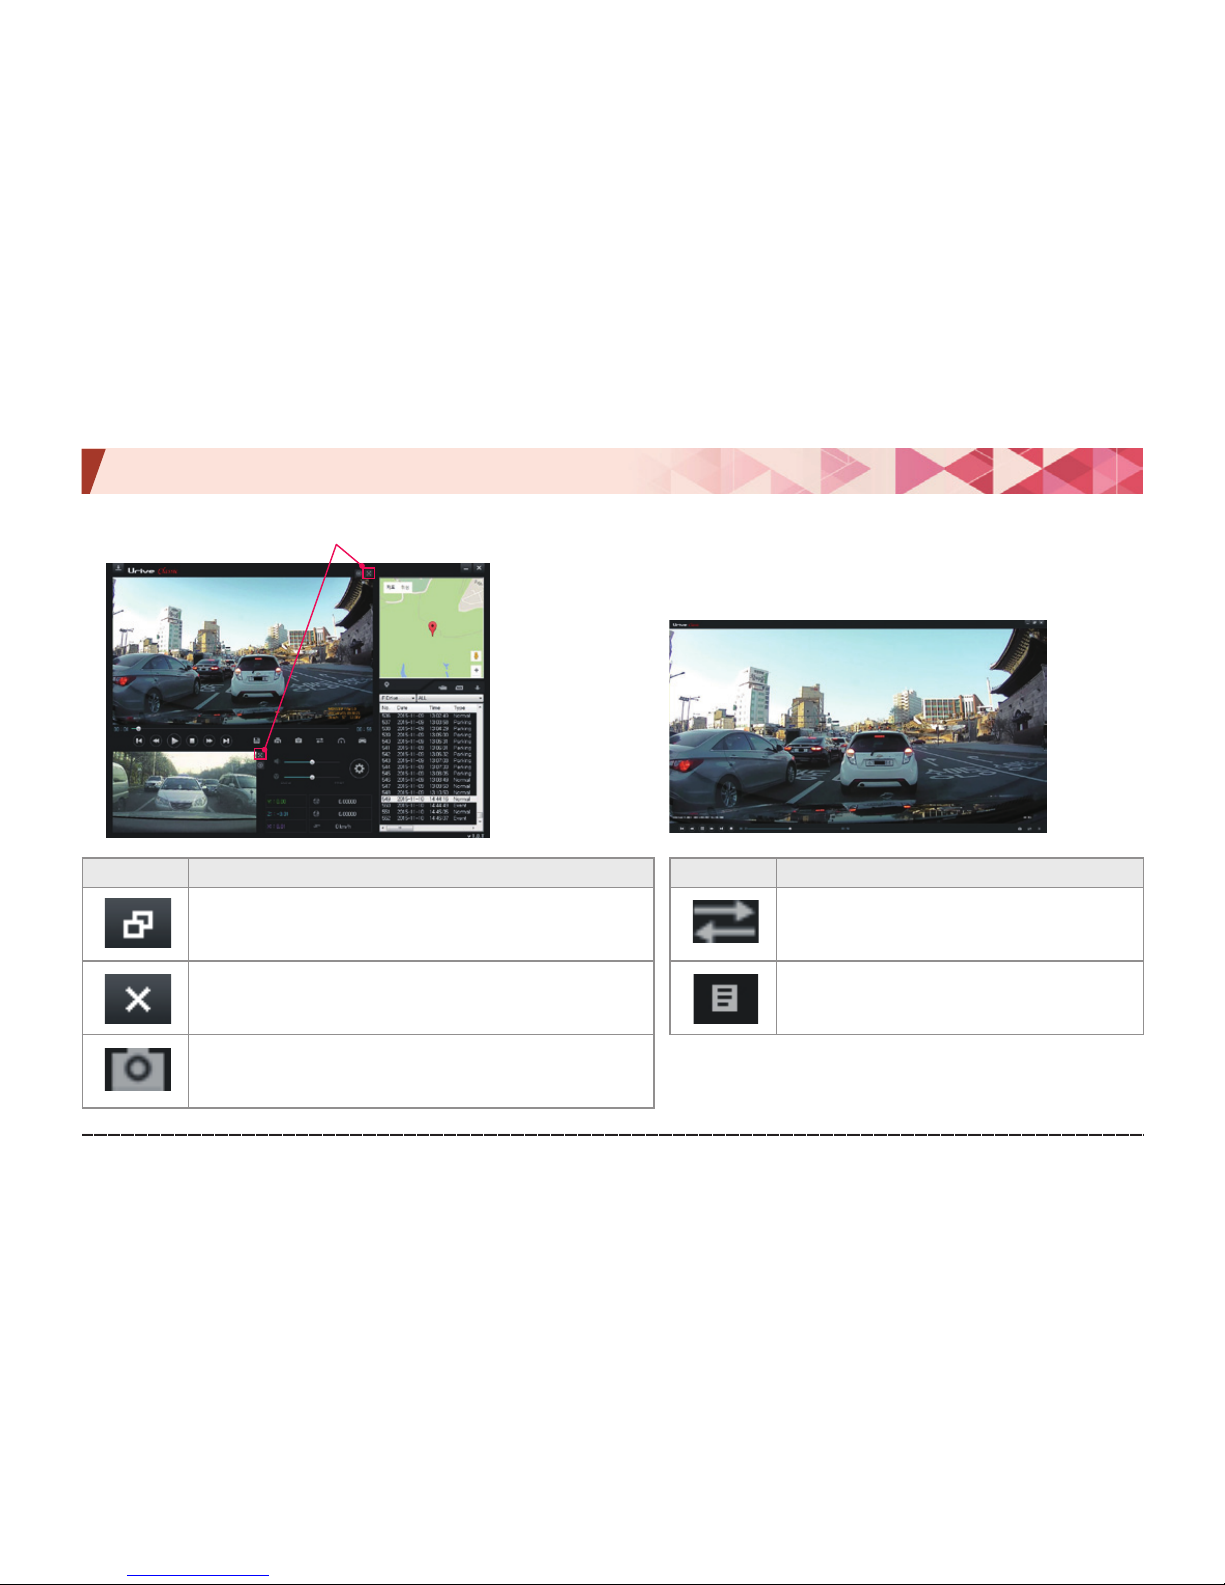
Urive Classic ... 35 ... User's Guide
11. PC Viewer -Full screen view
Switches front/rear view to full screen.
Icon Meaning
Main screen
Returns from the full screen mode to the main screen.
Exit
Viewer is exited without returning to the main screen.
Capture
Captures the screen, and saves as an image file.
Icon Meaning
Switch view
Switches between front and rear views.
Play list
Shows video list of the SD card.
Page 36
Urive Classic ... 36 ... User's Guide
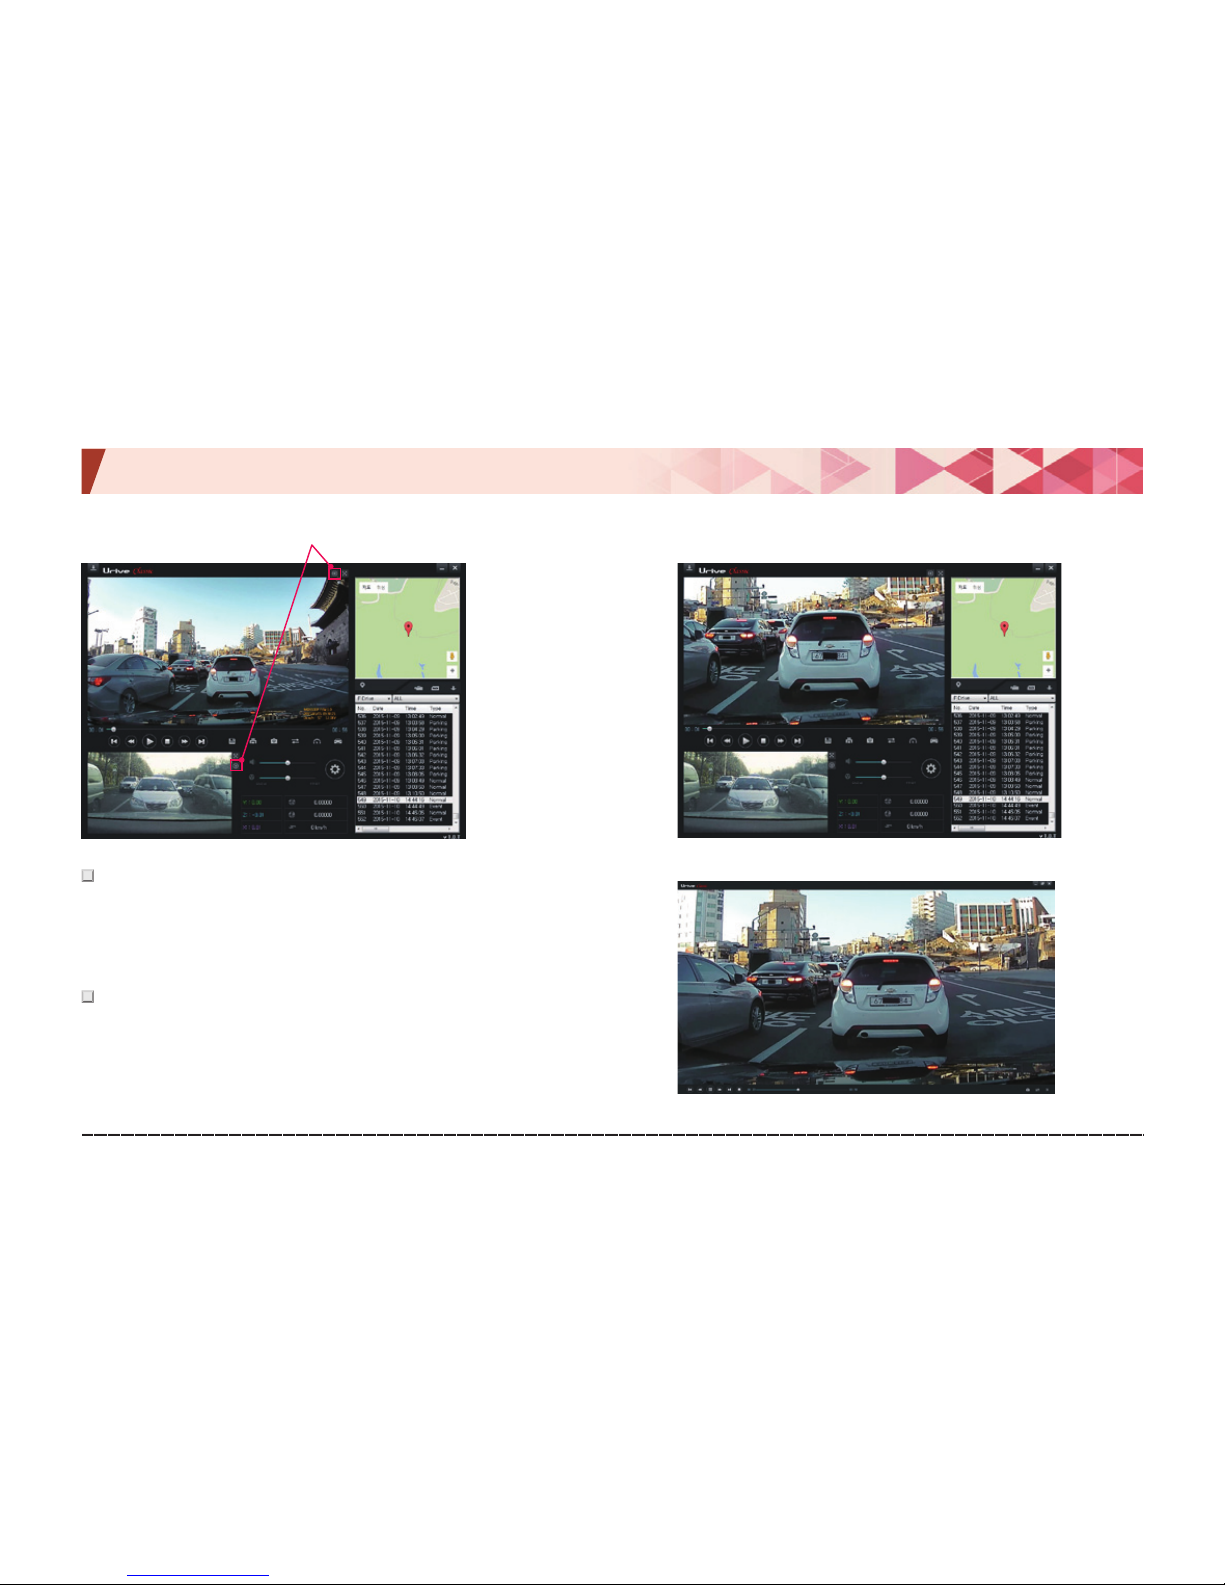
11. PC Viewer -Digital zoom
Digital zoom
#
While playing a front- or rear-view video, the video can be
zoomed in/out using the mouse scroll wheel after clicking
the video or Zoom in button.
#
Zoomed-in video can be dragged and dropped.
[ Zoomed-in front view video in the main screen ]
[ Zoomed-in video in full screen mode ]
Page 37
Urive Classic ... 37 ... User's Guide
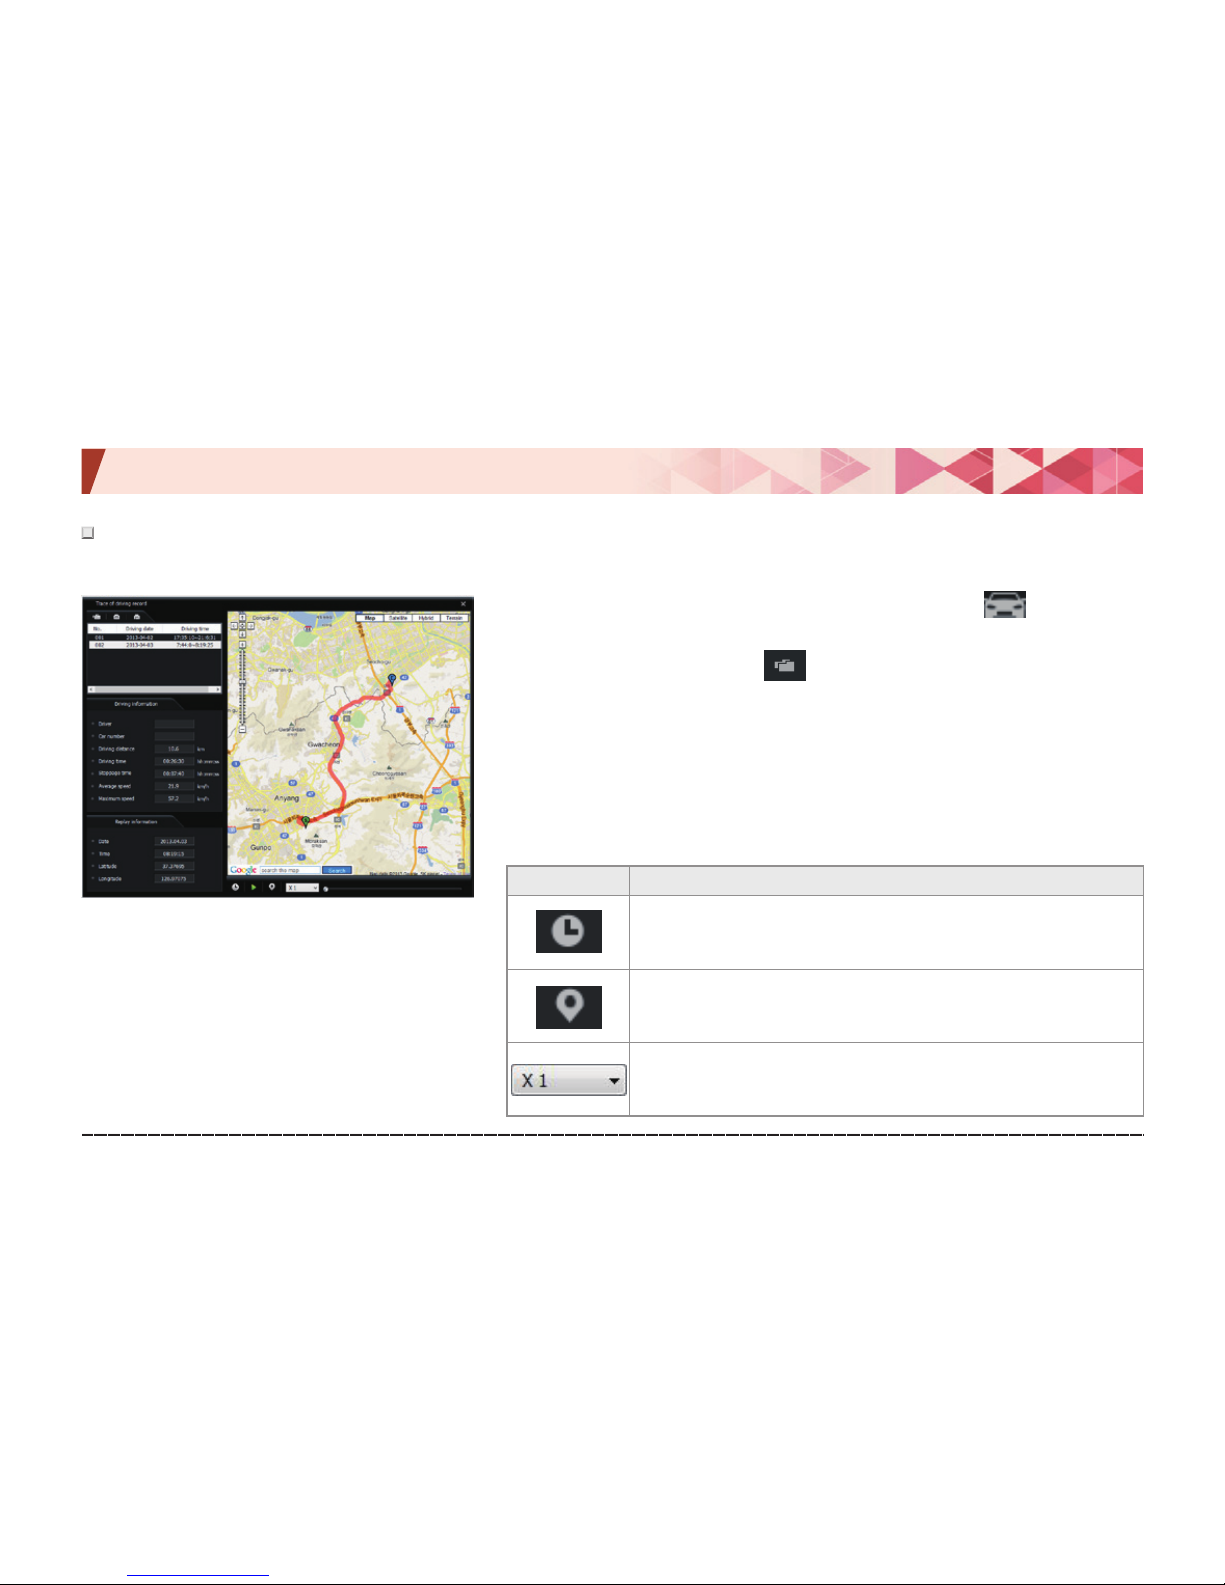
11. PC Viewer -Driving record
#
Driving record is saved every 10 seconds in the driving mode. 1 Dat file can save the driving record up to 1 month.
However, GPS signal must be stable.
1.# Insert a micro SD card into the PC, and, then, press in the Viewer
to show the driving record mode screen (on the left).
2.# On the screen, press the button, and, then, select a .dat file in
Setup folder of micro SD card to show the driving record list sorted by
date.
3.# Click an item to show the driving path.
※
Up to 5 .dat files can be saved.
Icon Meaning
Shows the driving date and time while playing the
driving path.
Shows markers on the driving path while playing it.
Plays a driving path in ½×, 1×, 2×, or 4× speed.
Page 38
Urive Classic ... 38 ... User's Guide
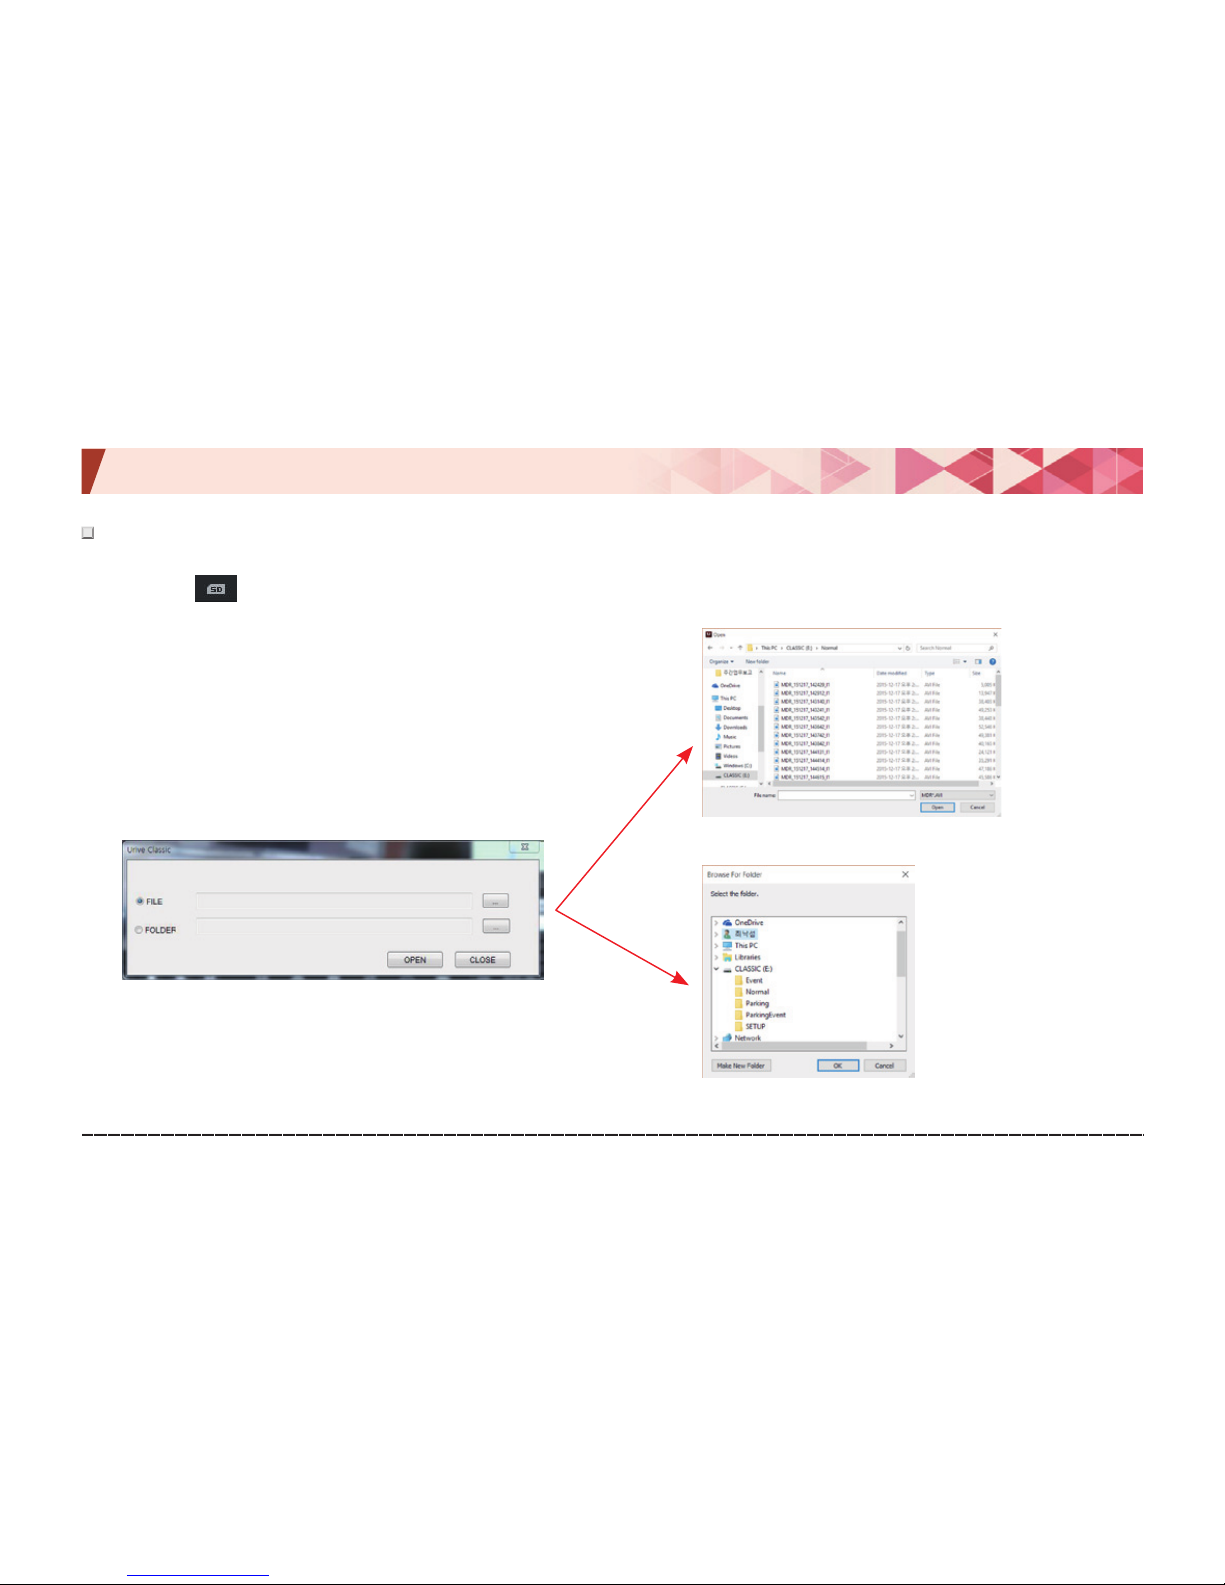
11. PC Viewer -Open file
#
In the PC Viewer, a black box video (prefixed with MDR) can be selected and played from a micro SD card or PC.
1
.#
Select the button in the main screen.
2
.#
Select a file or folder, and, then, press Open.
3
.#
Selected files are added to the video list and
automatically played back from the first one.
[File select prompt]
[Folder select prompt]
Page 39
Urive Classic ... 39 ... User's Guide
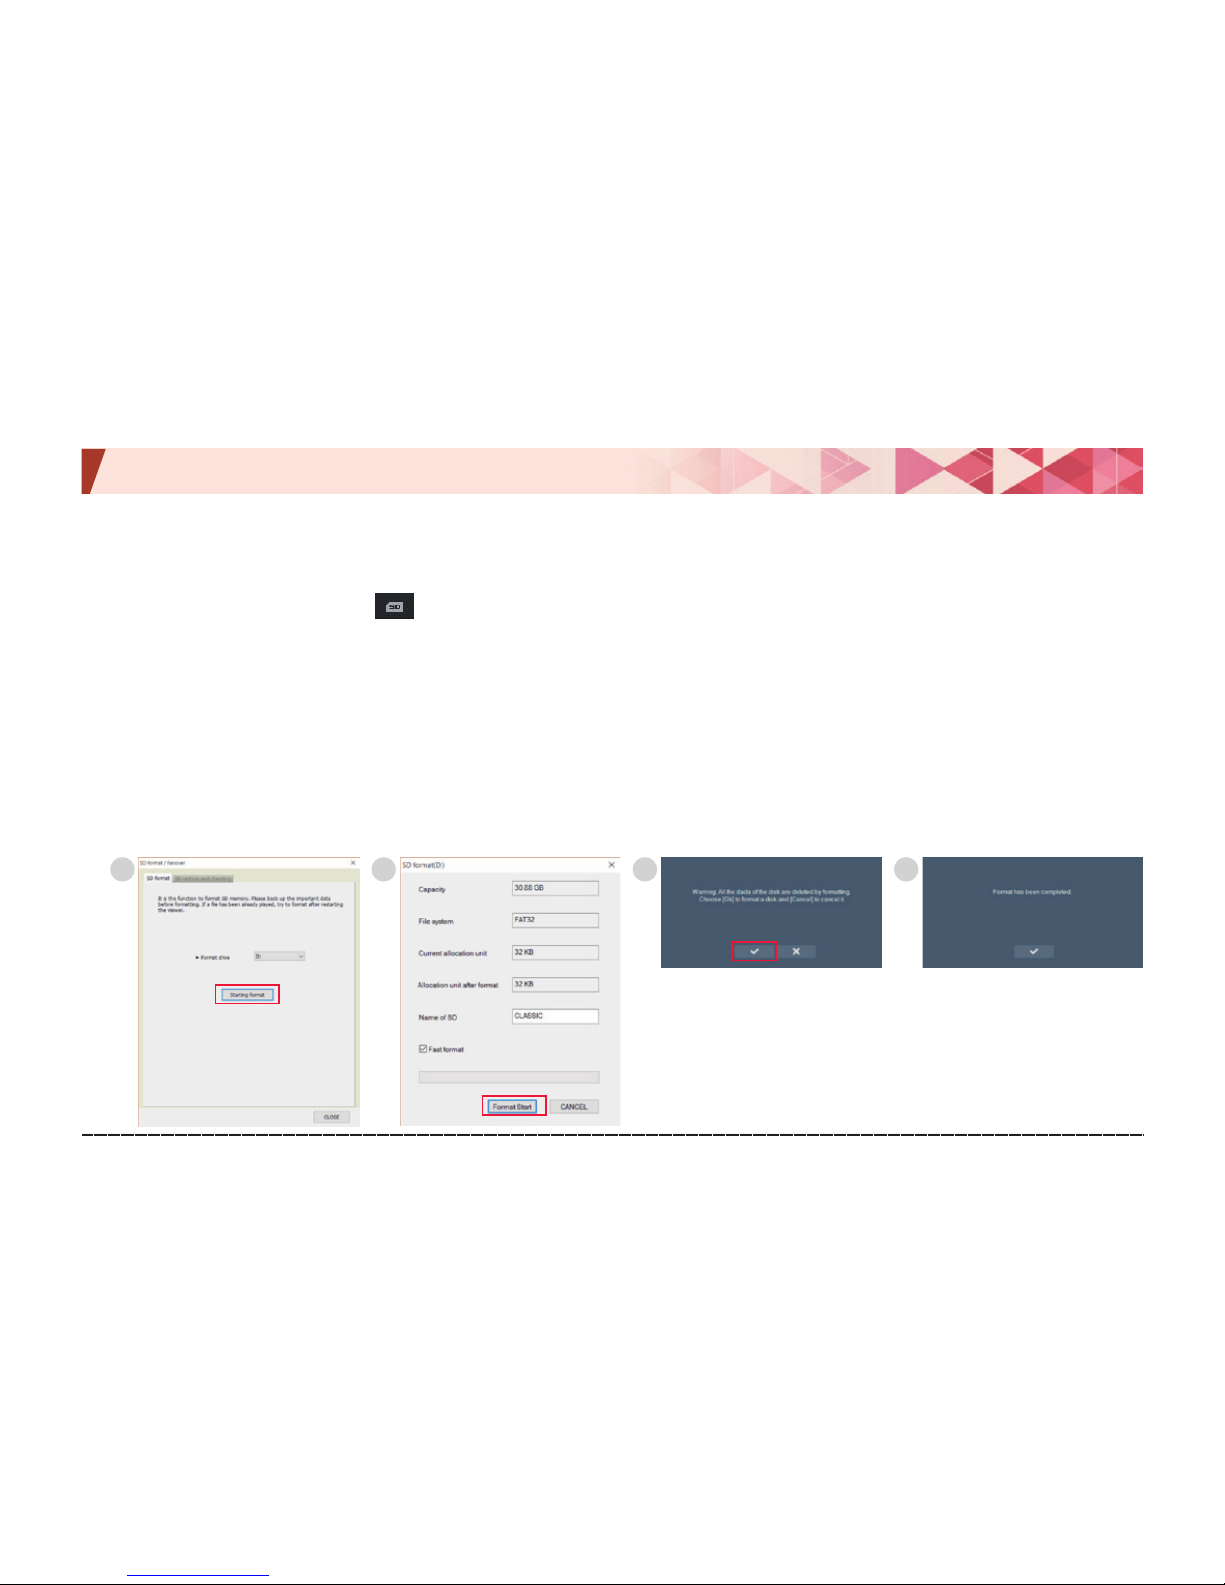
11. PC Viewer—Format & Recover SD
◆
Format SD
1.# Insert a micro SD card into the PC.
2.# In the main screen, press the button to format the micro SD card from the Format SD tab.
3.# Press the Start button to check the information of micro SD card, and, then, select to use quick format or not.
※ Without selecting the quick format, it may take a long time depending on your PC specifications.
4.# Press the Start button to show the data deletion pop-up, and press V to format it.
5.# If the formatting finished, an information prompt pops up.
Caution) Allocation unit after formatting
: When formatting it without using the PC Viewer, select
32KB
for the allocation unit.
Caution)
Micro SD 64 GB should be formatted by the main body or PC viewer. When formatting in a PC,
the black box may not work properly. (When formatting using a PC viewer, close all “Explorer” programs before
formatting).
1 1 1 1
Page 40
Urive Classic ... 40 ... User's Guide
11. PC Viewer -Format & Recover SD
◆
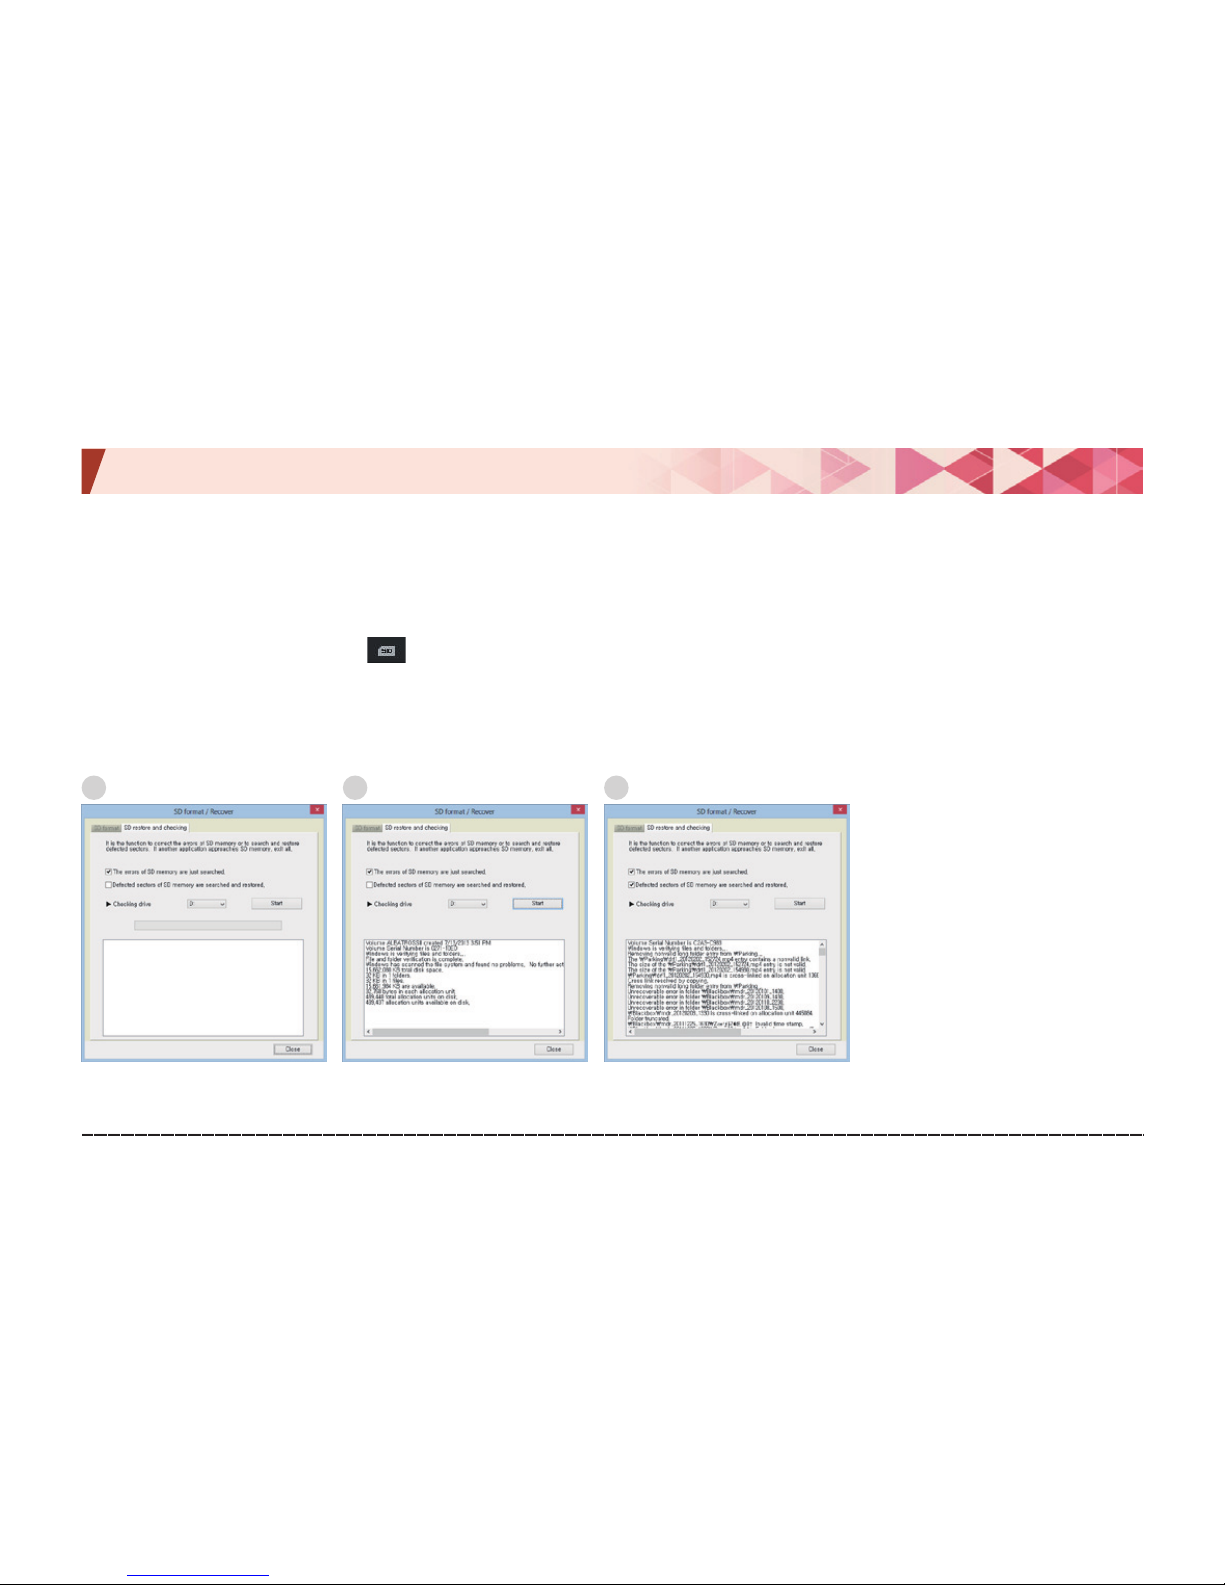
Check & Recover SD:
Fixes errors or finds and recovers bad sectors of a micro SD card. If any program is accessing
the SD memory (memory use), close everything.
1.# Insert a micro SD card into the PC.
2.
#
In the main screen, press the button to format the micro SD card from the Check & Recover SD tab.
3.
#
Figs. ② and ③ illustrate the results of SD card checking, error fixing, and detected errors.
4.
#
If errors are found as shows in ③ format the card.
[ Check & Recover SD screen ] [ Result of normal SD card ] [ Fix result of erroneous SD ]
1 2 3
Page 41
Urive Classic ... 41 ... User's Guide
12. Black box configuration -Configuration
◆
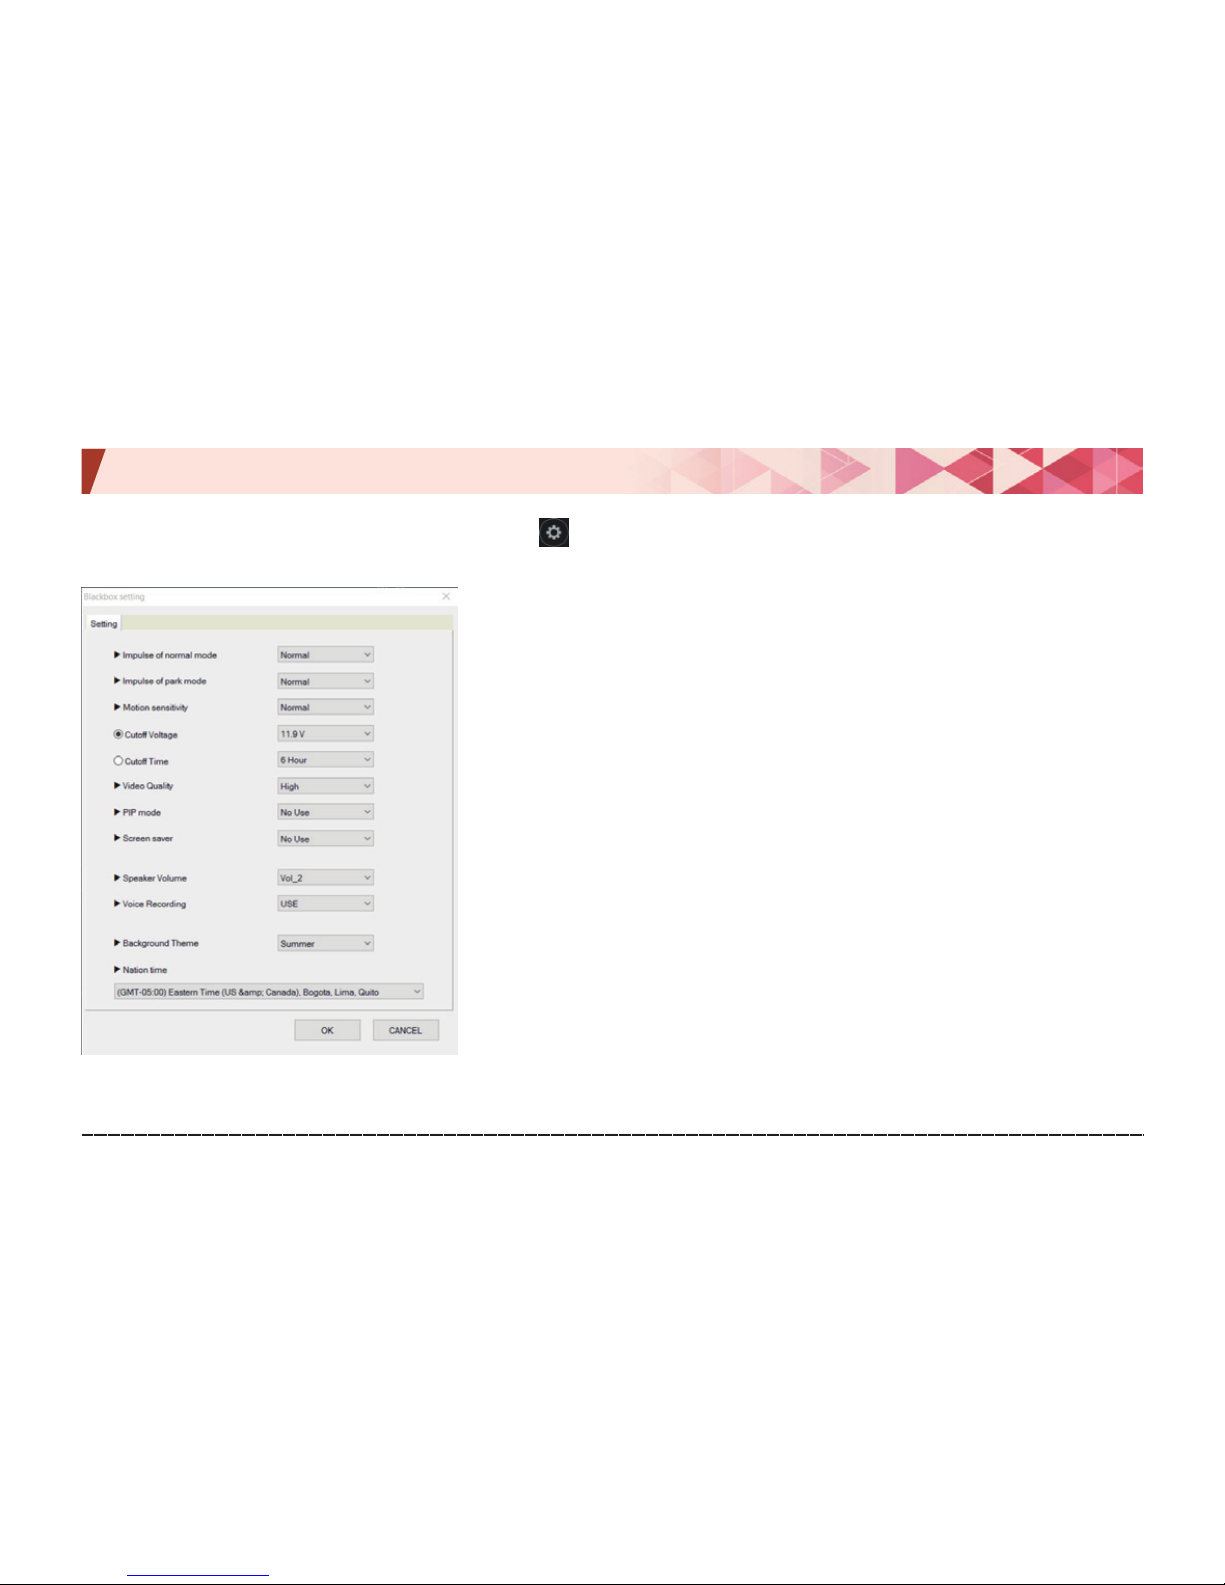
Black box configuration:
In the PC Viewer, press to open the Black box configuration window as follows.
[ Configuration ]
[ Configuration ]
1.# Impact level of driving & parking mode: You can adjust 3 levels (High,
Medium, or Low) for the black box to sense impact.
2.# Motion sensitivity of parking mode: You can adjust 3 levels (High,
Medium, or Low) for parking mode to sense motion.
3.# Cutoff voltage & time: Black box can be set to be turned off
automatically in order to prevent battery discharge. 7 steps (None, 11.5
V, 11.7 V, 11.9 V, 12.1 V, 12.3 V, and 12.5 V) and 5 steps (None, 6 hr, 12
hr, 24 hr, and 48 hr) can be set for the voltage and time, respectively.
4.# Image quality: You can adjust 3 levels (High, Medium, or Low) for the
quality of the recorded image.
※ Number of saved files depend on the image quality.
Page 42
Urive Classic ... 42 ... User's Guide
12. Black box configuration -Configuration
5.# PIP mode: You can set to use PIP for showing front and rear view
images at the same time or not.
6.# Screen saver: You can set to use the screen saver (clock) or not.
7.# Speaker volume: You can adjust the volume in 4 steps (Mute, 1, 2, and 4).
8.# Voice recording: You can set to record voice or not.
9.# UI type: You can select one of 4 series (Spring, Summer, Fall, or
Winter) for the color scheme of the menu screen.
10.# Time zone: Set GMT.
Page 43
Urive Classic ... 43 ... User's Guide
13. Video saving type -Folder hierarchy
―
#
Normal folder:
Driving mode video is saved at a 1-minute interval.
―
#
Event folder:
A video of event is saved from 5 seconds before to 15 seconds after (20-second duration).
―
#
Parking folder:
Parking mode video is saved when a motion is sensed. A video of motion is saved from 5 seconds
before to 25 seconds after (30-second duration).
―
#
Parking Event folder:
30-second video is saved when an impact is sensed.
―
#
Setup folder:
Saves the configuration, driving record, and power cutoff details of black box.
―
#
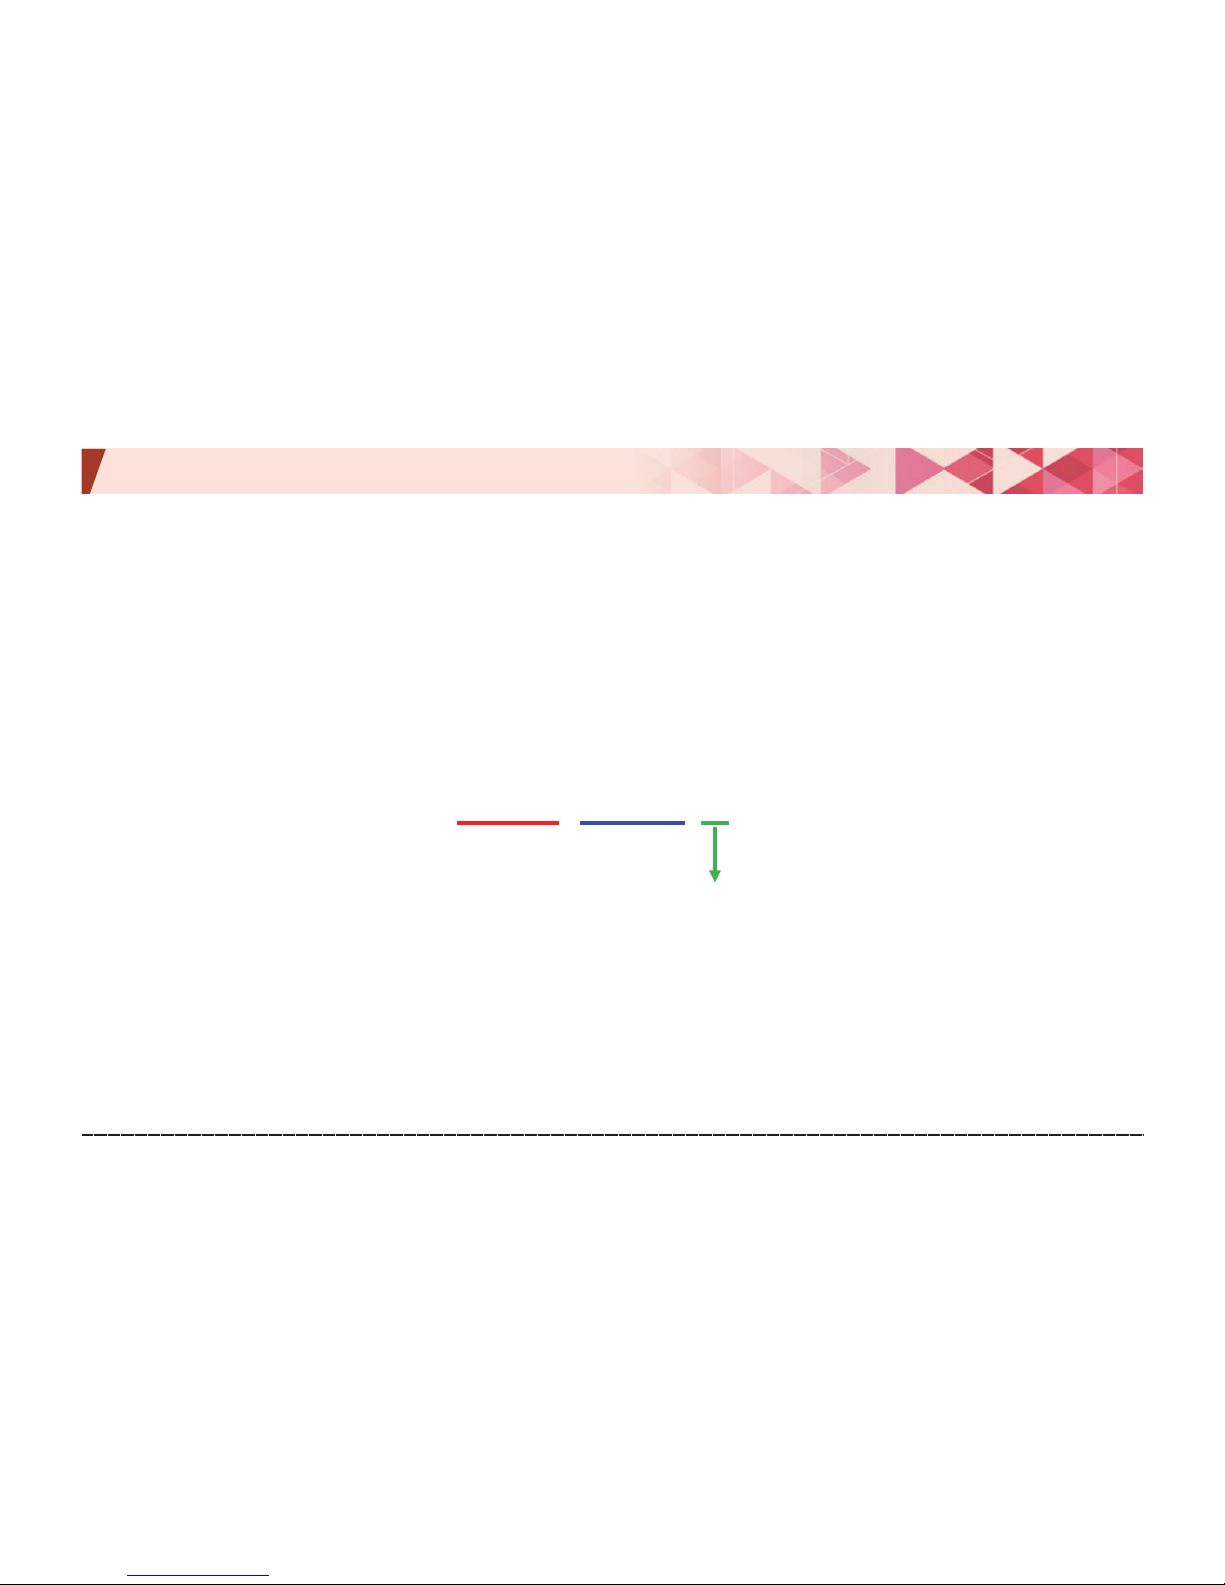
Example of video file name
―
#
Type
I: Driving, E: Driving event,
P: Parking motion sensed, A: Parking event
MDR_150 601 _093100_I 2. avi
년/월/일 시/분/초
영상종류/ 채널 수
Yr/Mon/Day
Type/Number of channel
Hr/Min/Sec
Page 44
Urive Classic ... 44 ... User's Guide
13. Video saving type -Aspect ratio & File size
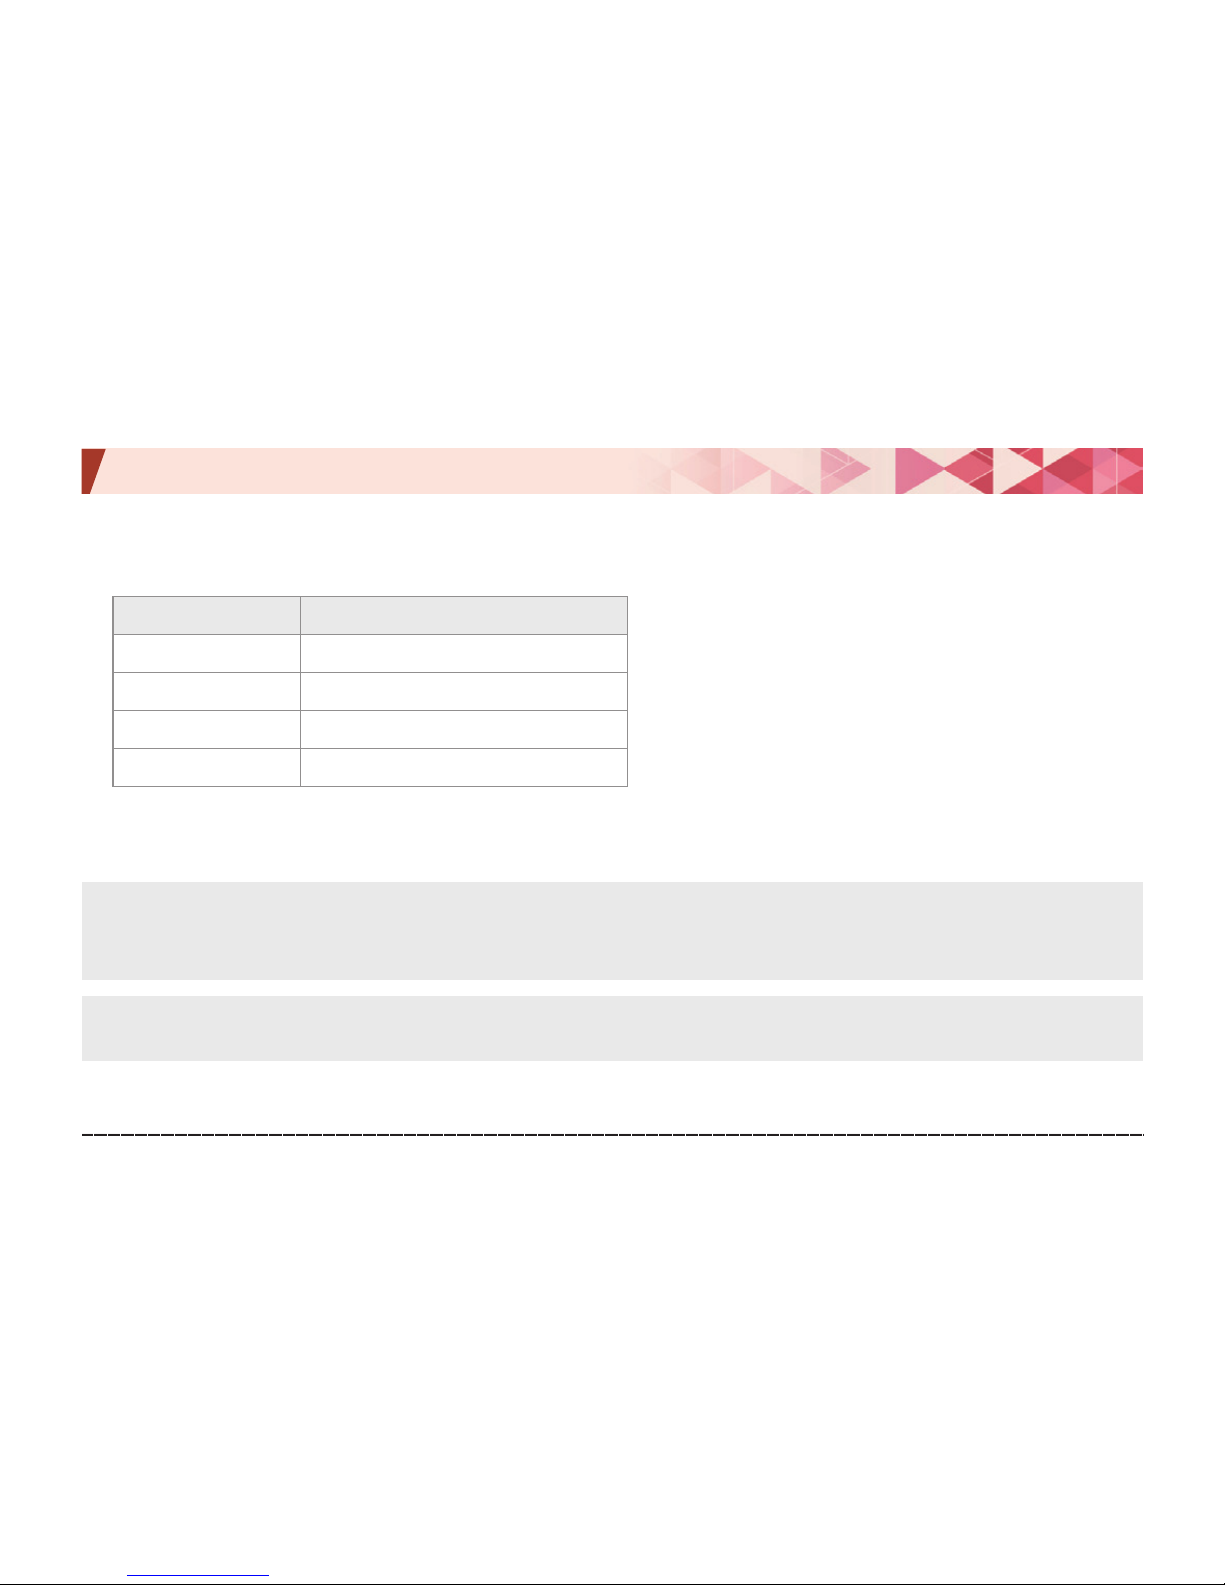
Classification 16 / 32 / 64 GB
Driving 45%
Event 10%
Parking 40%
Parking event 5%
◆
Driving, event, parking motion, and event files share the space of micro SD card in the given
ratio. Depending on the characteristics of memory card, the number of files may vary.
Note)
1. If the space limit is exceeded, it saves new files by eliminating from the oldest ones.
2. Size of saved file (for 2 channels, highest quality)
driving: 75 MB (1 min), Event: 25 MB (20 sec) , Parking motion/event: 33 MB (30 sec)
Caution)
Use a Urive-certified SDHC card because we are not liable for any fault
caused by not using uncertified ones.
Page 45

Urive Classic ... 45 ... User's Guide
14. Product: specification
Model name Urive Classic
Size
105.4 × 60 × 36.1 mm (Main body without
mounting holder) / 55×27×27 mm (Rear
camera)
Memory
Micro SDHC card class 10 exclusively for
Urive Classic (Support up to 64GB)
Recording
Normal Recording, Event Recording
(Impact Detection), and Parking mode
Recording (Motion+Impact Detection)
Viewing angle
front camera—115 degrees, rear
camera—130 degrees
LCD Size &
resolution
3.5” TFT touch LCD, 480×320
FPS front·rear Max. 30 fps
Resolution
front—1920×1080
rear—1280 × 720
Video
H.264 (front: High Profile, rear: Main
Profile, Extension: avi)
Audio Embedded microphone, PCM recording
Speaker Voice information
Acceleration sensor 3-axis acceleration sensor
Security LED front & rear BLUE LED
Working status LED
Driving mode—GREEN LED ON / Parking
mode—GREEN LED OFF
GPS optional GPS / U-BLOX6
Operation Voltage DC 12 V / 24 V
Power consumption 2 CH. Max. 3.6 W, 1 CH Max. 2.9 W
Operation
temperature
-20℃ to 70
℃
Storage
temperature
-40℃ to 85
℃
Viewer compatible
OS
Window XP / Vista / Windows 7 / Windows 8
※
Product: appearance and specification may change without prior notice for further improvement.
Page 46
Urive Classic ... 46 ... User's Guide
15. Consumer compensation regulations
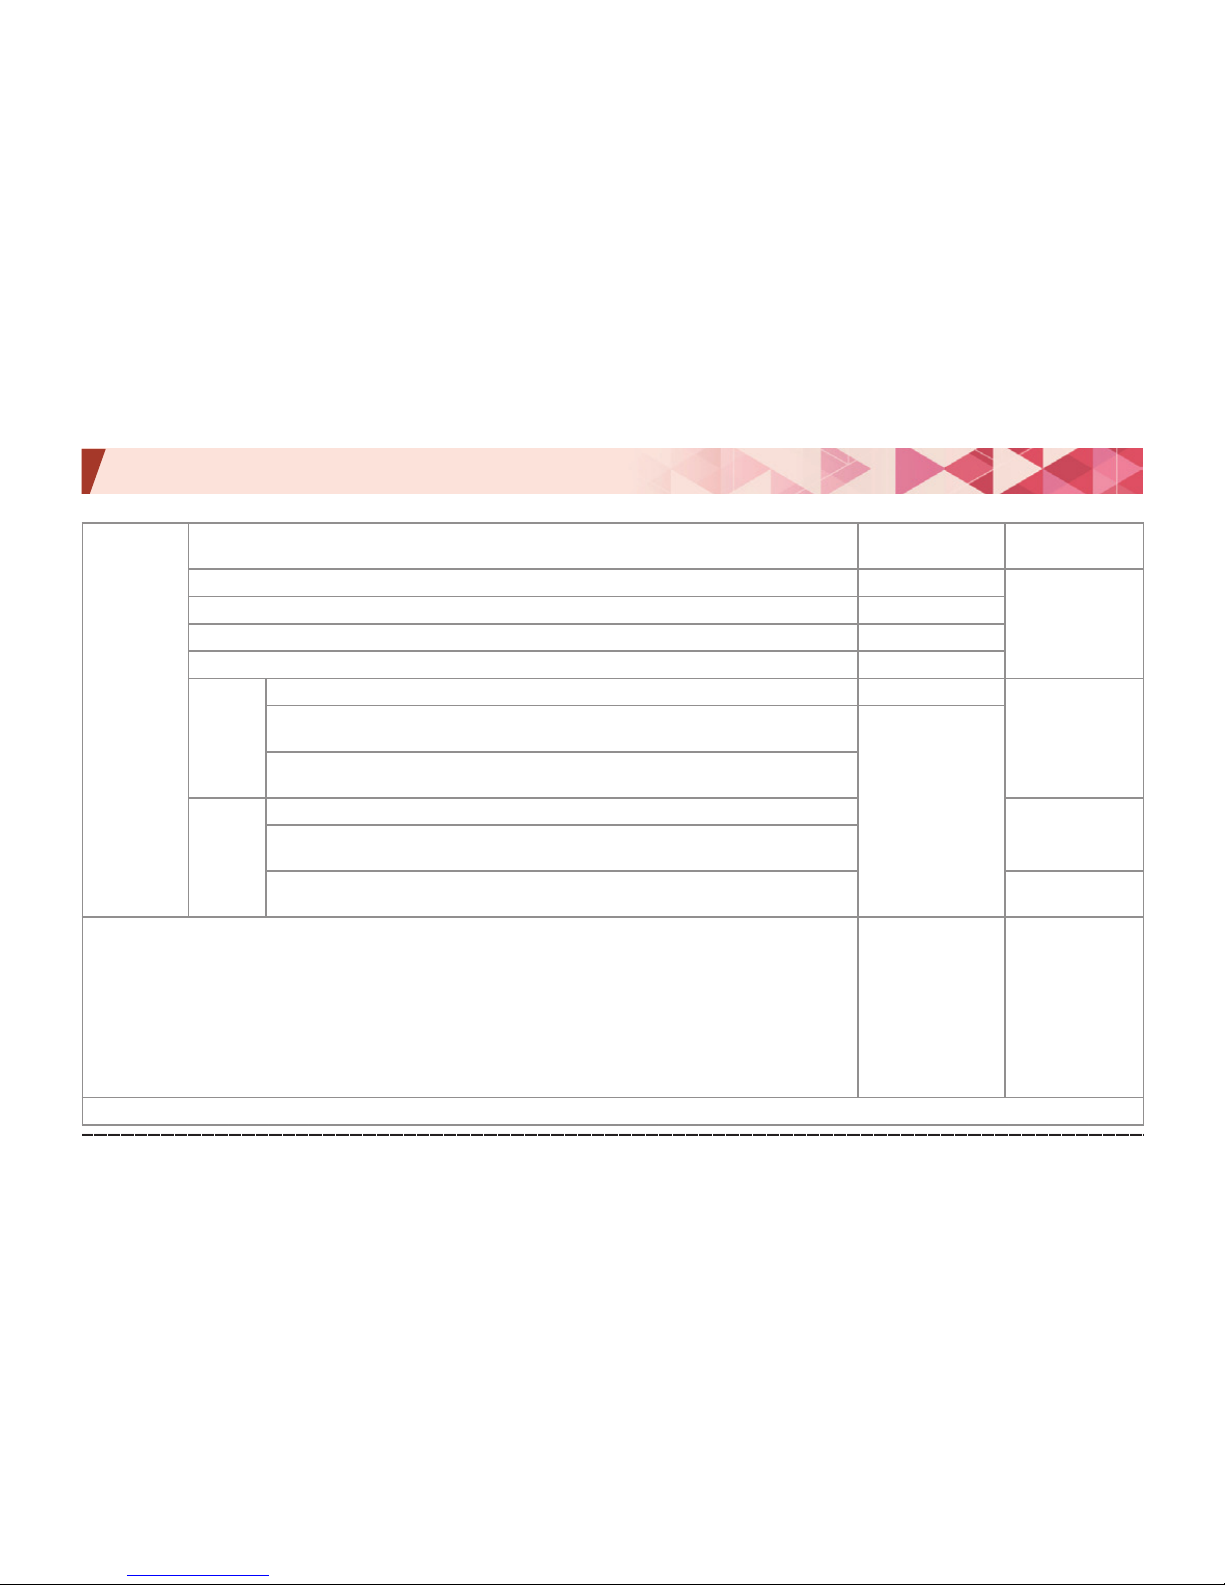
Failures of the
performance or
the functions
occurs
naturally
while using
the product
in normal
conditions.
Cases that require consumer compensation
A/S service within
the warranty period
A/S service after the
warranty period
When a major repair work is required within 10 days after purchasing the product. Replacement
None
When an important part needs to be repaired within 1 month after purchasing the product. Replacement
When a major repair work is required within 1 month after the product is replaced. Replacement
When impossible to replace the product. Refunding
When
possible
to repair
When a defect is found Free-of-charge repair
Paid repair or paid
replacement
When failure occurs (4
th
occurrence) again even after the product was repaired 3 times
already for the same defect.
Replacement
When failure occurs (5
th
occurrence) again even after the product was repaired 4 times
already for problems with various parts.
When
impossible
to repair
If the company lost the product for which a customer requested a repair work.
Paid repair or paid
replacement
When impossible to repair the product as there is no part available for the repair work
within the period in which the parts should be kept in storage by the company.
When impossible to repair even when repair parts are available.
Paid repair or paid
replacement
1) Cases in which failures occur due to the user’s mistakes.
- When a user is careless in handling the product (When the product fails or gets damaged because of dropping, shock, breakage,
excessive use, or errors in using the product)
- When the user makes the product fail or get damaged on purpose or by mistakes.
- When the product fails or gets damaged as users themselves or a third-party person repaired or modified the product.
- When the product fails or gets damaged as the parts, expendable items and optional items that are not designated by the company
were used.
2) Other cases
- When the product gets damaged because of natural disasters (including fires, flooding and earthquakes)
- The lifetime of expendable items runs out - Because of external causes
Paid repair Paid repair
* Except for the main body, separate warranty periods will be applied for ancillary components and expendable items
Page 47

Urive Classic ... 47 ... User's Guide
16. Before requesting A/S services
#
Important data must be regularly (separately) updated by users. Sometimes, it is inevitable to delete data from a
storage media (micro SD card). In this case, all data might be deleted for a service. Thus, back up any important data
before you request a service.
#
Any product received at the customer center is assumed that a backup had been made. Therefore, we are not liable
for any data lost.
#
When sending a product through a parcel service, pack it up in a way that prevents damage because of impact, and
leave a memo of your name, contact, address, and description of problem for a quicker response.
Page 48
Urive Classic ... 48 ... User's Guide
16. Before requesting A/S services
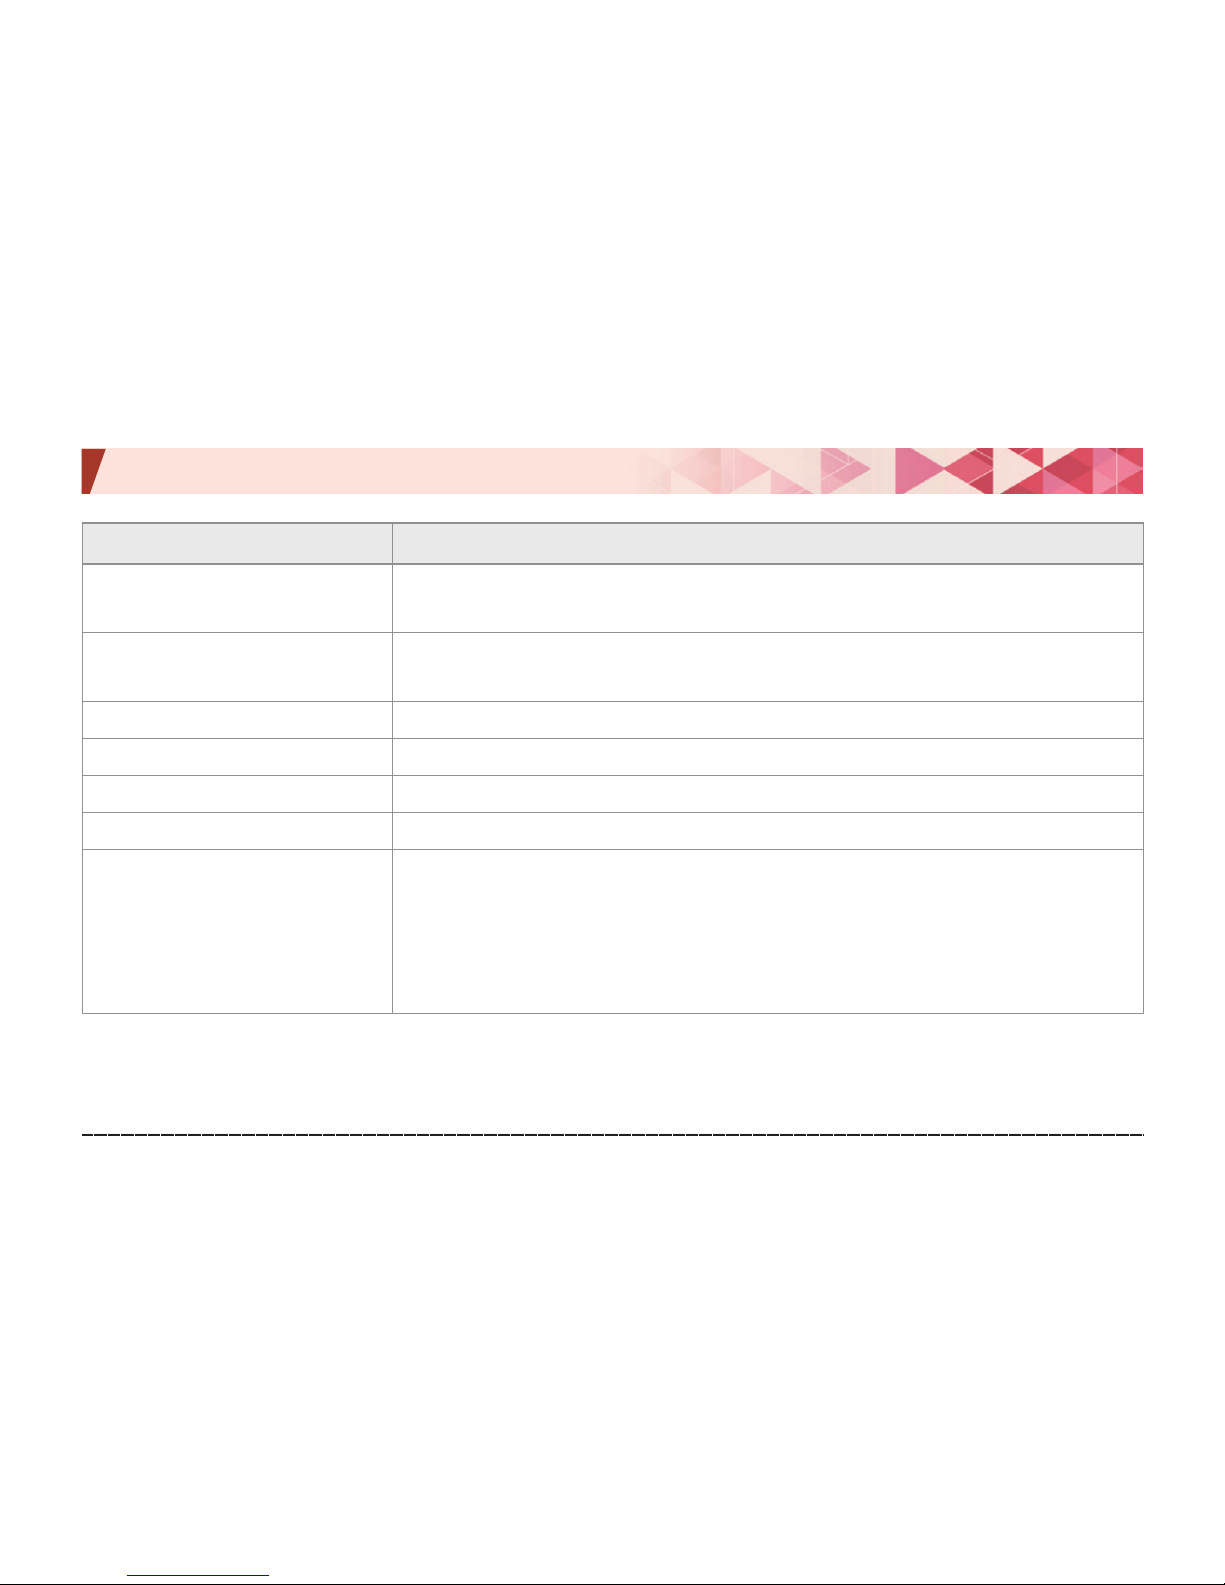
State Action
The clock of the black box is not
correct.
Without a GPS, you can set the clock in [Settings] – [System] – [Clock setting] menu.
The power is not turned on.
Make sure it is connected to a constant power supply source.
(Black: GND/ Red: B+/ Yellow: ACC power)
Screen saver does not work. You can set to use the screen saver in [Settings] – [Screen setting] menu.
GPS signal is not received. Check the connection between the black box and GPS terminal.
Voice information cannot be heard. You can change the volume level in [Settings] – [Voice setting] menu.
Voice is not recorded. You can set to use the voice recording in [Settings] – [Voice setting] menu.
Micro SD card 64 GB cannot be
formatted with the PC Viewer.
1)To format a micro SD card 64 GB in exFAT format with Windows XP, you need to install
a patch.
2) File: WindowsXP-KB955704-x86-KOR.exe
3) You can download it from Urive home page.
4) Close all Windows Explorer windows when formatting it with the PC viewer.
Page 49
Urive Classic ... 49 ... User's Guide
17. Warranty
The product’s warranty period is 1 year.
Except for the main body, a separate warranty period will be applied for ancillary components and expendable items.
◆#
This warranty is only available based on the data filled in the warranty card.
◆#
Enter the “date of purchase” as the warranty starts on date of purchase.
◆#
Please refer to the “Consumer Damage Compensation Regulations” for more information.
◆#
Defective parts will be replaced with new parts or with similar parts having similar functions.
◆#
The manufacturer shall not be responsible for repair, replacement, or refund unless the defective product is returned.
◆#
This warranty card shall not be reissued. Keep it in a safe place.
(The product’s serial number will not be reissued.)
◆#
The manufacturer will not provide A/S services for any unauthentic product. (Watch out for similar products.)
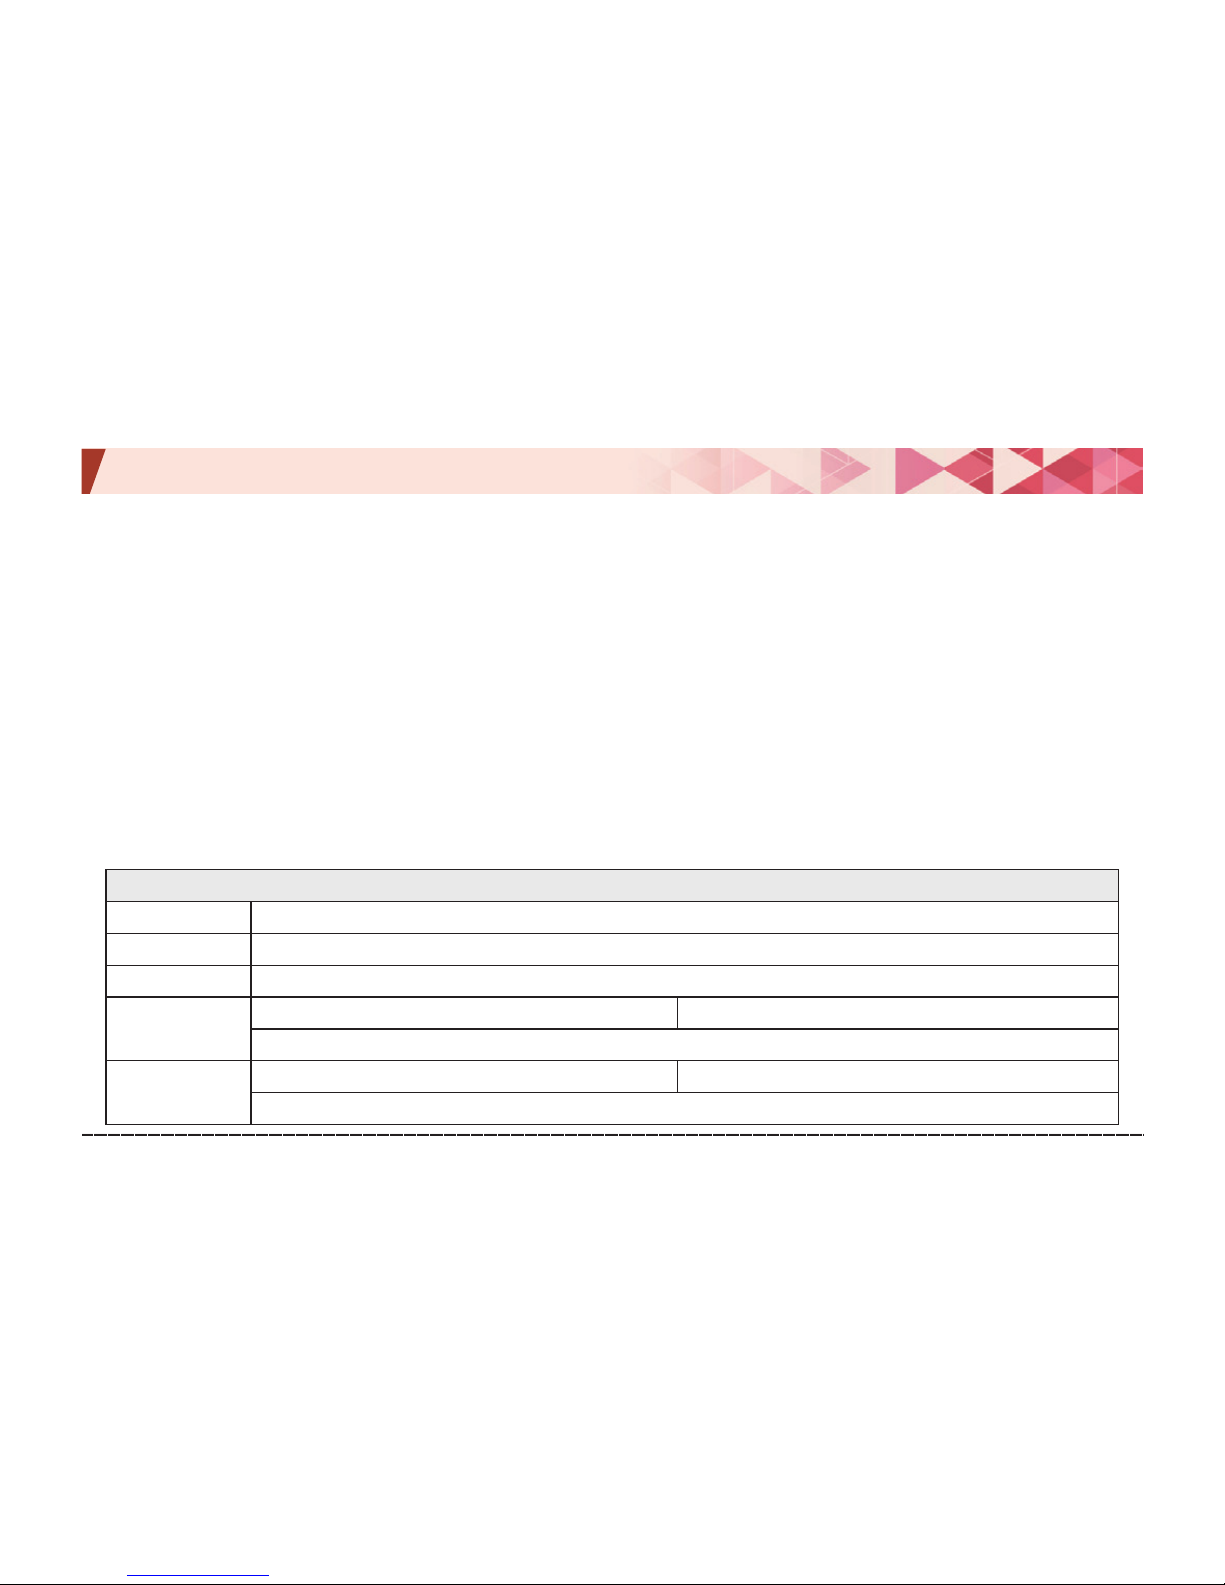
Product warranty
Product name Urive Classic
Manufacturing no. MSIP-REM-MDU-MD-7400P
Warranty period 1 year from the purchased date of
Customer
Name Contact info.
Address
Sold by
Name of the shop
Contact info.
Address
 Loading...