

Page 1
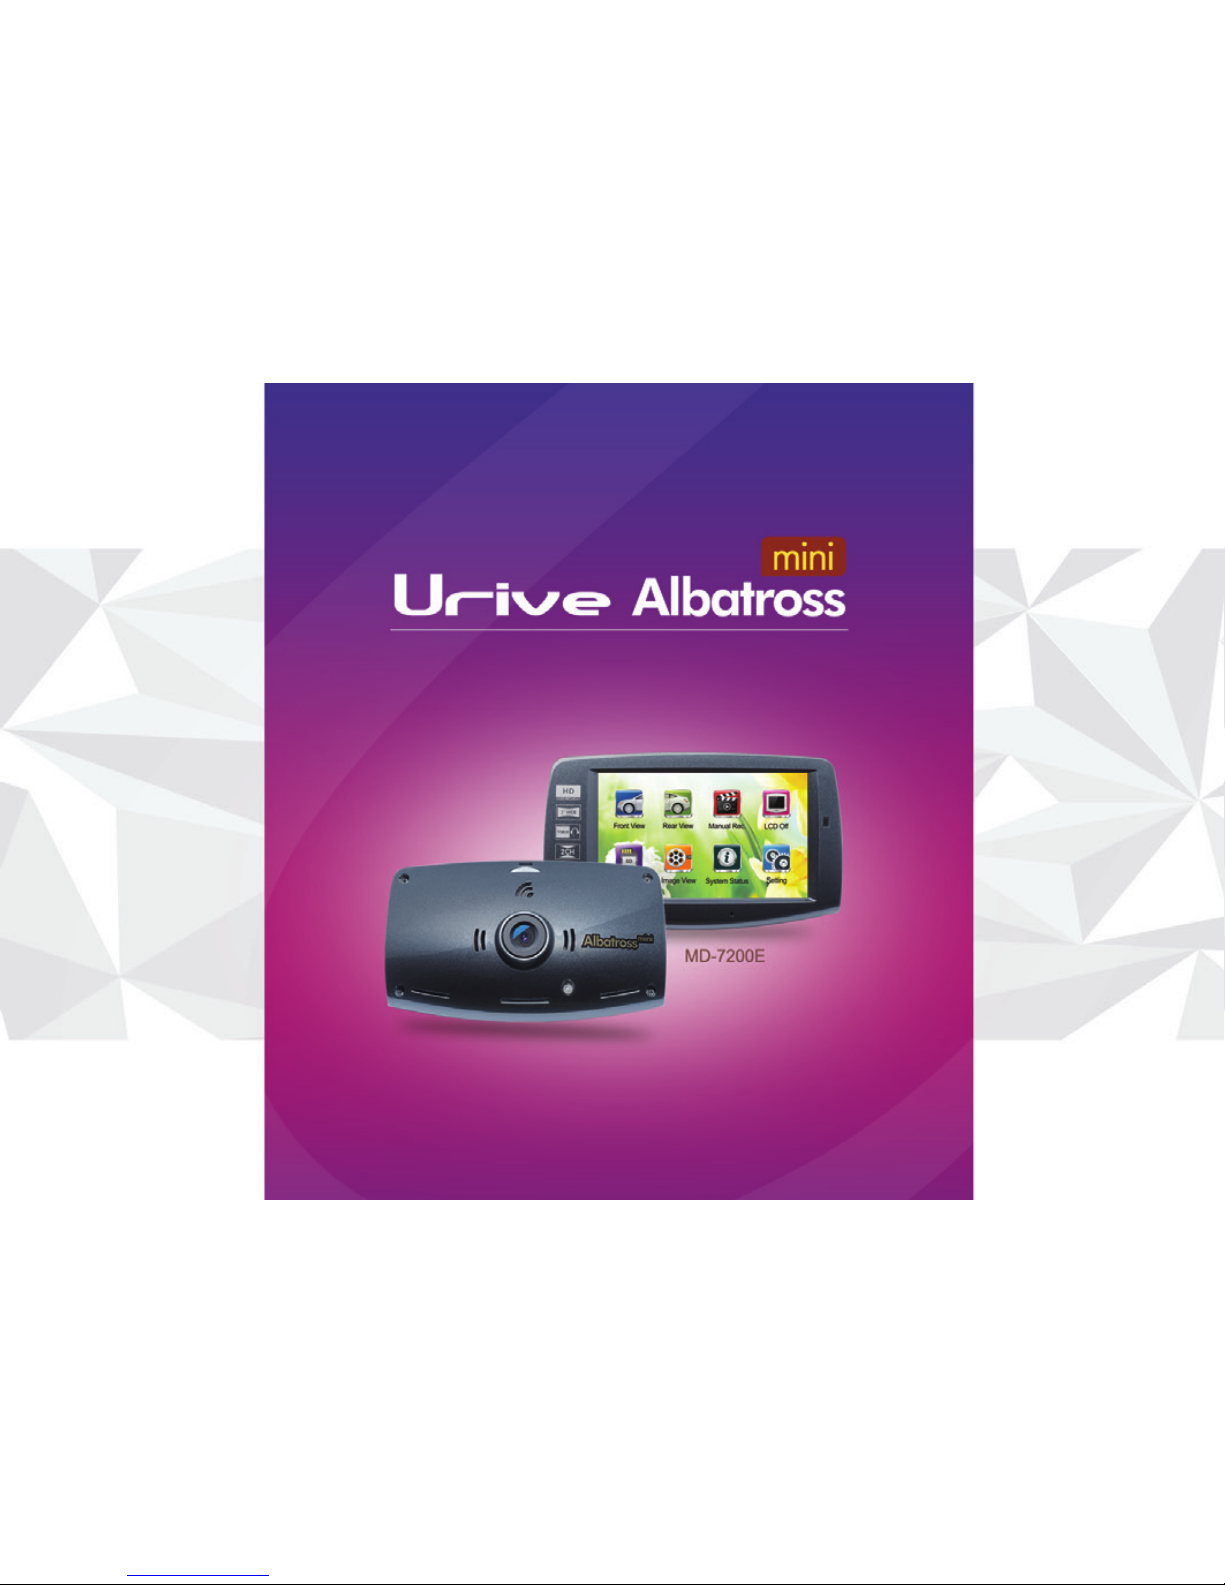
User manual
This is an auxiliary product for safe driving.
The Manufacturer is not held responsible for liability arising from an accident.
Use the product in accordance with the intended use.
Page 2

CONTENTS
01. Before getting started with Urive Albatross Mini ............... 2
02. Precautions before using the product .............................3
03. Precautions when using the product ..............................4
04. Features .................................................................. 6
05. Components ............................................................. 9
06. Names of Parts and Function Description ..................... 10
07. Features and Connectors ........................................... 13
08. Firmware Update .......................................................15
09. Installation Precautions .............................................. 18
10. Installation ............................................................... 19
11. GUI (Graphic User Interface) ........................................ 21
12. Voice Guidance.........................................................32
13. PC Viewer Installation ................................................33
14. PC Viewer – Main .....................................................34
15. PC Viewer – Viewer Buttons........................................35
16. PC Viewer – Black-box configuration ............................38
17. PC Viewer – Play List ...............................................44
18. PC Viewer – File Open ..............................................45
19. PC Viewer – SD Card Format and Restore ................... 46
20. PC Viewer – Driving Record Trace ............................. 49
21. PC Viewer – Full Screen .............................................51
22. PC Viewer - File folder’s structure ...............................52
23. PC Viewer - Each file size and saving capacity .............53
24. Technical Specifications .............................................54
25. Warranty .................................................................55
Page 3
2 _
01
Before getting started with Urive Albatross Mini
Urive Albatross Mini is a safety assistance device for vehicle that records front and rear image and sound
of when driving and parking.
#
Urive Albatross Mini is a trademark of MiDong E&T Co., Ltd.
#
All descriptions and contents included in this manual are protected by relevant copyright laws.
#
All other products and services used in this manual are the registered trademarks of their respective owners.
#
All the program rights used in the product belong to MiDong E&T Co., Ltd. and are protected according to relevant
copyright laws.
#
This manual is based on current conditions and may include technical or editorial errors and omissions.
#
Some changes can be made in the product to improve Urive Albatross Mini’s performance even without prior notice
to users.
#
The images used in the manual may look different from the actual screen displays depending on the printing quality.
#
It is recommended that users should read this manual carefully before using the product to use the device properly
and Safely.
#
For your own safety, please do not operate the device while driving
•# The user manual can be changed without a prior notice to users for the purpose of improving the performance of the
functions of the product.
Page 4
User's Manual _ 3
02
Precautions before using the product
#
Warranty and Coverage
-# This product is a safety assistance device for a vehicle. The user is liable for any malfunction, failure, accident and damage to
product and car.
-
#
Depending on the driving conditions, vehicle type, and navigation environments, some functions may not be supported.
Functional support related to firmware updates for more reliable and advanced quality may vary by product. In addition,
please use this apparatus as a reference to check the driving video since the video recording function may not work in some
environments or conditions
-
#
This product does not guarantee that it records all videos of accidents and any accidents caused by an impact not big enough
to trigger the impact sensor (G-SENSOR) may not be identified as an impact video and, consequently, may not be recorded.
#
Micro SD Memory Card
-# Please check Micro SD memory card at least once a week and normal operation
-
#
Please format Micro SD memory card at least twice a month for normal operation
-
#
It is highly recommended to use genuine Urive Micro SD memory card.
-
#
If the micro SD memory card is inserted forcibly into the wrong direction, the card and main body may be damaged.
-
#
Use 64GB Micro SD memory card after formatting the card with Urive PC viewer or Albatross Mini main body.
Generally, the memory card has a lifetime during which it can be used (6 months are guaranteed). If it has been used for
a long period of time, it would be impossible to store new data. In that case, users need to buy a new memory card for
using the product. It should be understood in advance that the company will not be held responsible, at all, for data loss
due to long-time use. Removing the memory card or turning its power off while the recording is in progress may cause
stored data at the last stage to be deleted. The company will not be held responsible for it at all. It is recommended to
copy and store important data into other recording units.
Page 5
4 _
03
Precautions when using the product
Warning - violation of the instruction may cause death or serious human injury.
The following instructions are given to ensure your safety and prevent the loss of property. Read them
thoroughly and ensure the product is correctly used. The user is liable for any damage to the product or the
car resulting from failure to follow this instruction.
Do not remodel or cut the power cable. It may result in
damage to the product or the car. The user is liable for any
damage to the product or the car caused by the remodeling
or cutting of the power cable.
Do not use out of rated voltage. Users may damaged caused
by fire or electric shock.
Do not touch the power cable with wet hands. It may result
in electrical shock.
Do not disassemble or apply shock on it arbitrarily. It may
carouse of It may result in damage to the product.
If the product is not be used for a long time, please detach
the power cable from the product or the car. The user is liable
for any damage to the product caused by the remaining of
the power cable.
Refrain from installing or manipulating the product while
driving. It may result in an accident.
Page 6

User's Manual _ 5
03
Precaution - Minor injuries or insignificant damage to the product could be caused if violating the
instructions
Do not use the product for a long period of time while
connected to the electrical power of the vehicle directly.
Otherwise, the battery could be discharged.
Be careful about a reflective device, such as a navigation
device or a hi-pass terminal.
The screen will be reflected on the windshield, causing the input of video
to be interfered with. In that case, the quality of video may be degraded.
Apply the dual-side tape firmly when installing the product.
Its position can be changed when used for a long period of time or due
to the vibration from the vehicle, possibly causing the performance to
be degraded.
Take precautions when installing the external camera.
When installing it on the rear window, the quality of video will vary
depending on the density of the tinted film.
Keep the windshield clean in front of the front camera lens
always.
If the video that is improperly recorded due to impurities is fed, the
recording of the video while driving will not take place normally.
Users should pay attention to it.
Recording may not take place normally when using a noncertified micro SD card.
The memory card must be inserted or removed while the power cable is
disconnected.
Back up the stored file periodically.
When the memory usage exceeds a certain level, files will be deleted
starting with the oldest ones while new ones are saved. Considering
that, it is required to back up the stored files periodically to prevent
necessary ones from being removed.
Keep the memory card separately when a car accident occurs
or when the card is checked for any damage .
When the black box is used continuously and the memory usage level
exceeds a certain level, files will be deleted starting with the oldest
ones in individual folders while new ones are stored, which could cause
necessary files to be deleted.
Page 7
6 _
04
Features
High-quality video recording with clear images and an optimal viewing angle
- Resolution: Front 1280x720, Rear 1280x720
- Viewing angle(diagonal): Front 120°, Rear 105°
Full touch LCD screen with smart GUI
- The front and rear real time video and recorded video files can be viewed on a 3.0-inch wide LCD screen. In addition,
thanks to a smart GUI-based touch method, environment setting and SD card formatting can be carried out directly
from the LCD screen.
Real time image check and record on 3” LCD screen
Real time image check and record on 3” LCD screen with PIP (Picture-in-picture) and Drag-and-drop for front and rear
images. System configuration and SD card format available with a touch.
Formatting on the LCD function is supported
The auto format function is supported on the Albatross Mini’s touch LCD.
Driving Mode
Records videos in 1minute segment.
Event (Impact) Mode
Detects impact and saves 20 second of video with built-in 3D G-Sensor (10 seconds before and after the impact) in the
event folder in driving mode.
Page 8

User's Manual _ 7
04
Manual (Forced) Mode
Saves 20 second of video in driving mode by touching “Manual Recording” button on the screen (10 seconds before
and after the touch) in the event folder.
Intelligent parking monitoring
Records automatically video with motion detector, a differentiated technology from Urive, when the car gets shock or
detects any motion near the car while the car is parked.
Automated memory management
The system overwrites sequentially from the oldest files to record and save the latest driving, events and parking
surveillance regardless of the volume limit of memory card.
Genuine Urive Albatross Mini PC viewer
Urive Albatross Mini PC viewer provides convenient file play, system configuration and firmware update functions with
stylish GUI.
Battery discharge protection device
In order to prevent a car battery from discharge during the parking mode, Urive Albatross Mini has parking timer and
voltage cut-off setting mode. If the voltage is lower than the set volume, it executes the voltage cut-off automatically
for preventing the car discharging. Users can set the cut-off voltage in the dedicated viewer. (cut off voltage: 5stpes,
timer: 5 steps)
Page 9

8 _
04
Voice announcement and voice recording
Auto-saver
1)# The auto-saver function allows the LCD to be turned off for its safe use when the car’s internal temperature rises (above
the guaranteed LCD temperature). While the LCD is turned off, if the recording continues and the temperature
decreases to the deactivating level, the LCD screen will be turned on automatically.
2)# The voice announcement: LCD off caused of high temperature.
- Announcement : “The LCD has been shut down due to the high temperature.”
3)# The LCD OFF caroused of high temperature should be kept until the temperature decrease even when the car engine
start.
4)# The Announcement is announced when the LCD OFF caroused of high temperature.
This announcement is announced only in the driving mode.
5)# The LCD OFF coursed of high temperature with the Announcement in the driving mode. The temperature decreases,
the LCD screen will be turned on automatically.
6)# The drive recorder is power off in the parking mode when the temperature is awfully high.
Page 10
User's Manual _ 9
05
Components
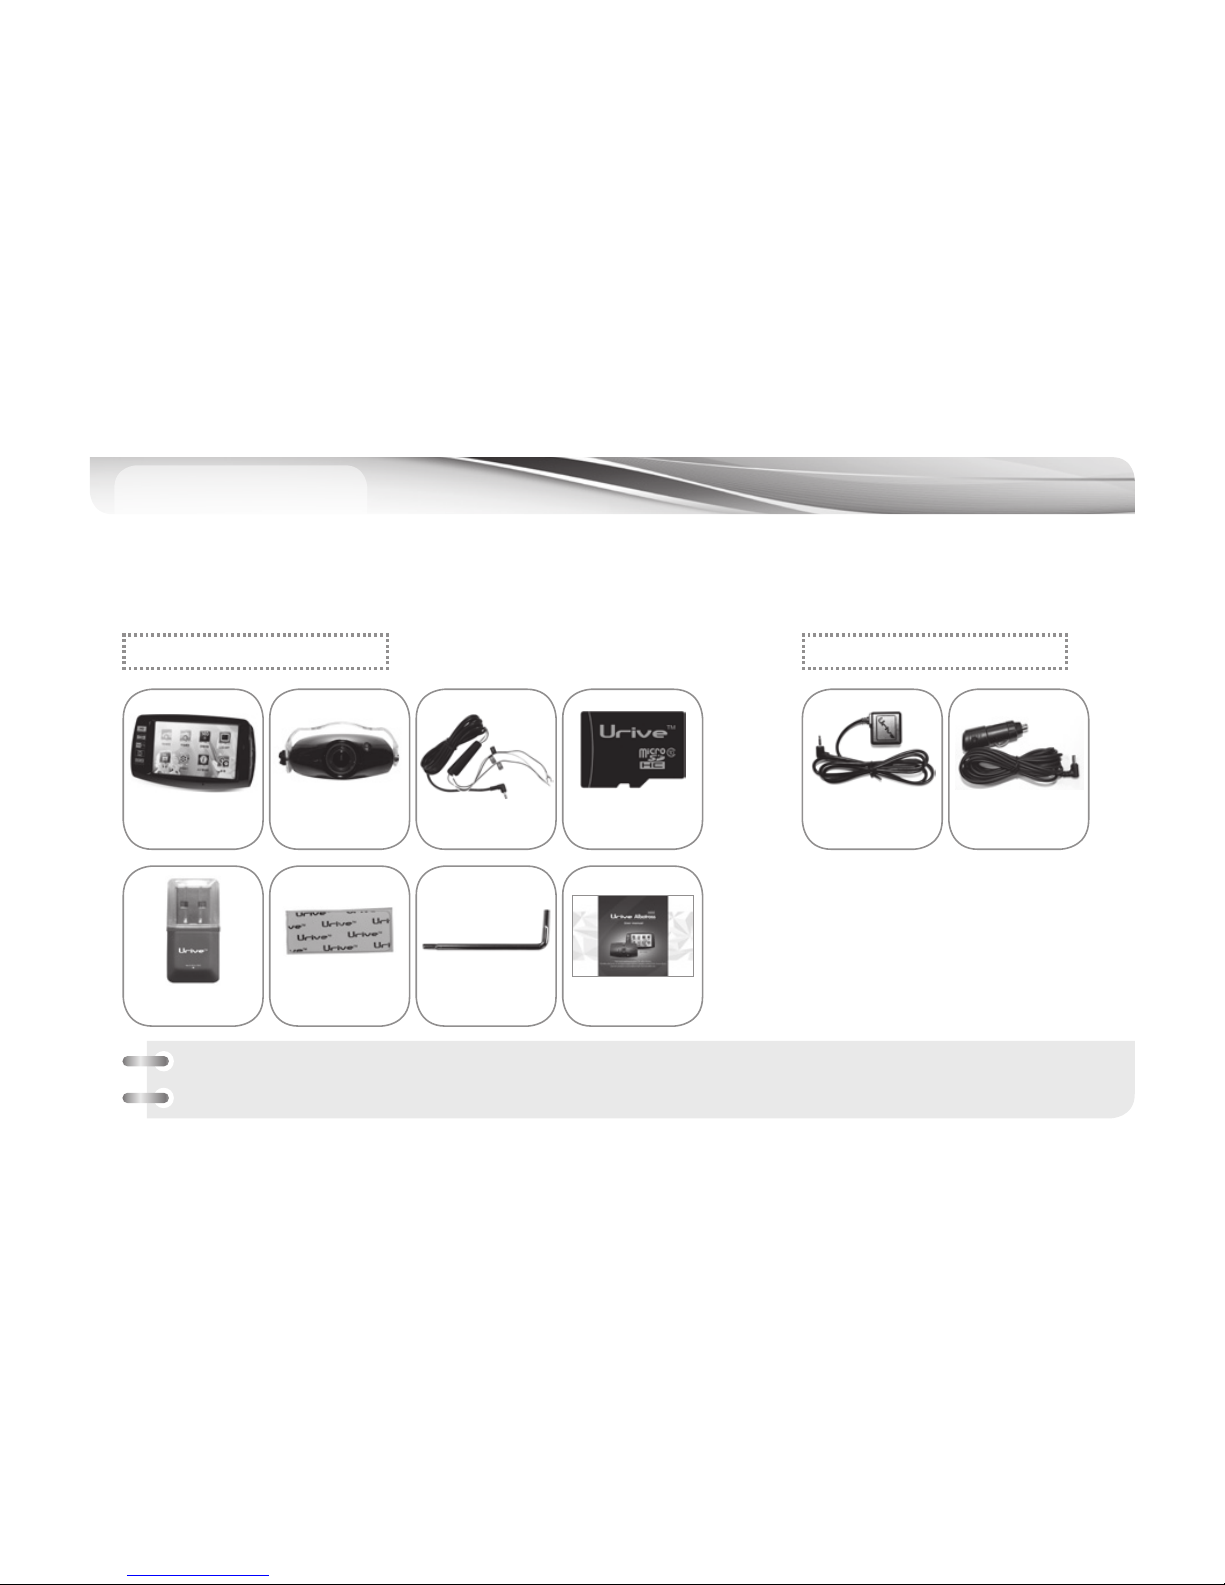
Please check if all the basic components below are packed in the gift box before use.
If any of the components are missing or damaged, please contact your retailer.
Vehicle drive
recorder and holder
GPS Module
MicroSD Card
Reader
Rear camera
and cable(6m)
Cigar Jack
Power cable
Double-sided
Adhesive Tape
Power cable
Allen Key
Urive MicroSD
memory card
User’s Manual
Optional Accessories
Components are subject to change for performance and quality improvement without prior notice.
(The images for user’s understanding can be different from the real one)
Basic Components
Page 11
10 _
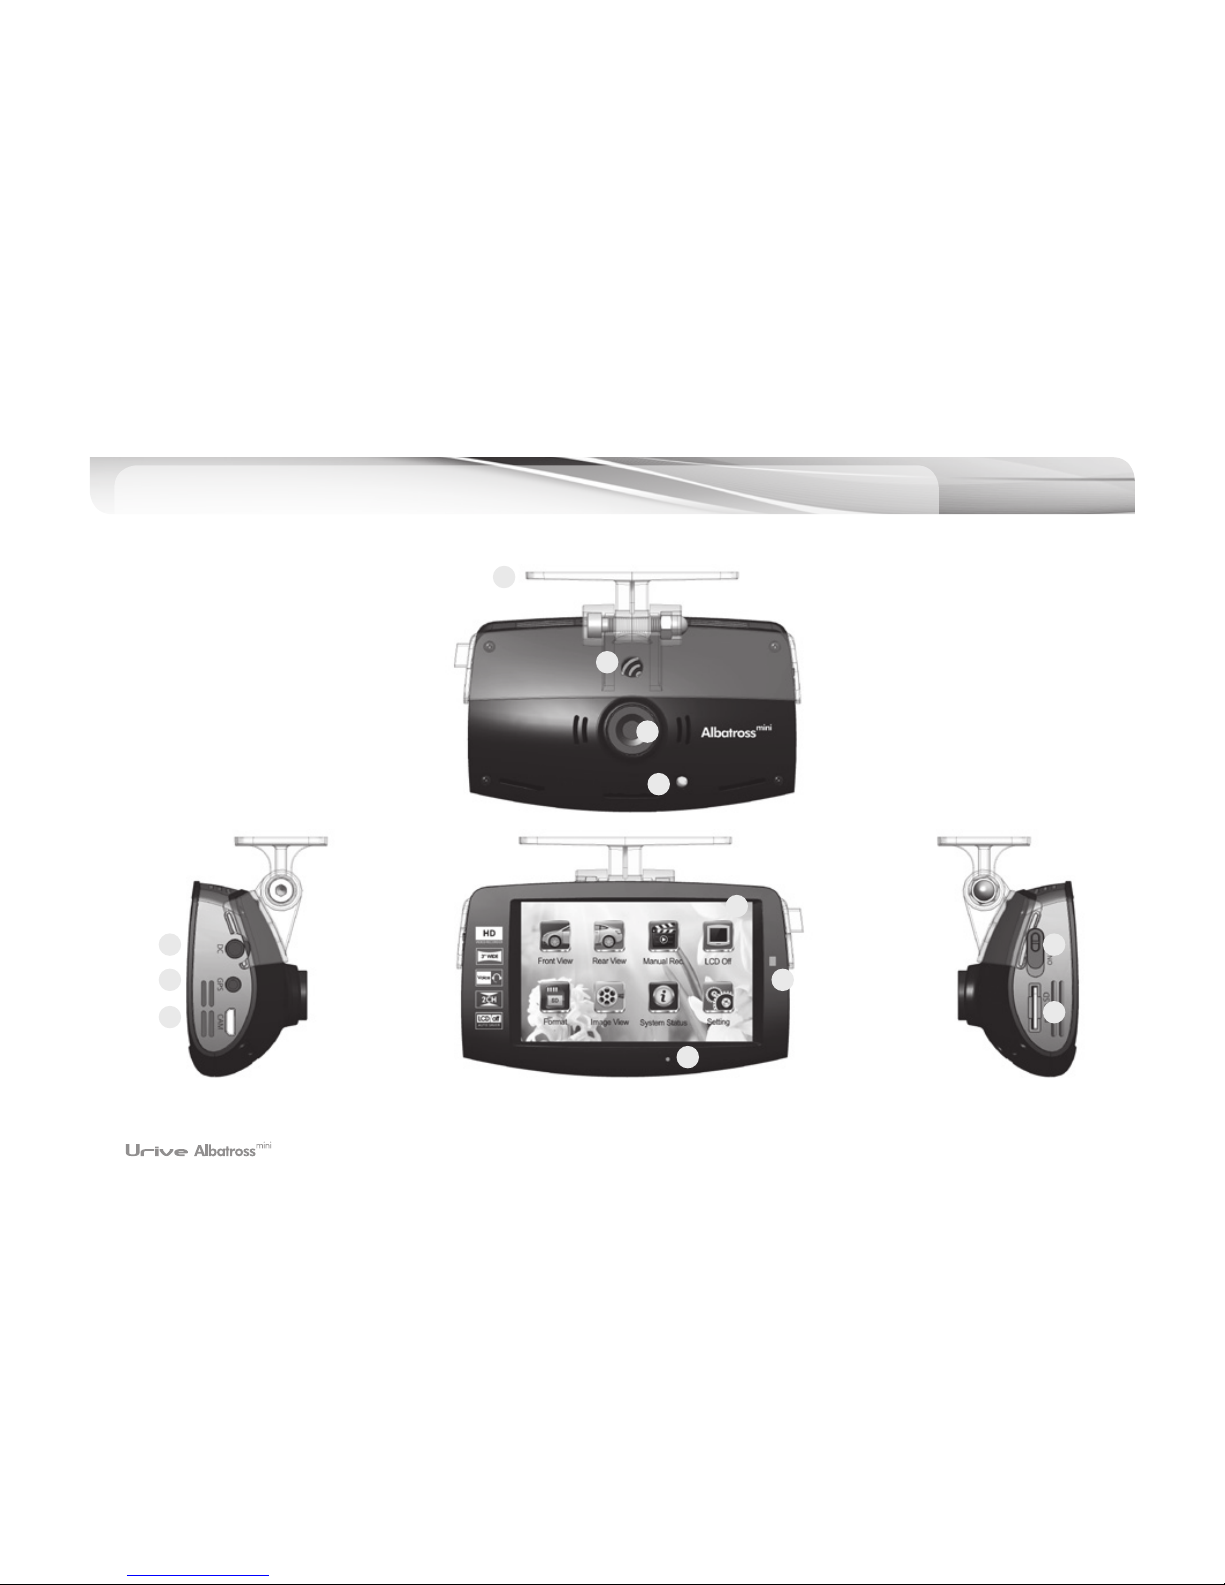
Names of Parts and Function Description
(Main Body)
06
1
2
3
8
12
4
7
11
9
10
5
6
Page 12
User's Manual _ 11
Part names and functions
(front camera)
06
Names Functions
①
Holder Transparent main body holder
②
Camera Lens 2M Pixel Front Camera Lens
③
Security LED
High-luminance blue LED for indicating the operational state and providing
security effect
④
DC Power Port Port for connecting the power cable
⑤
External GPS connection port
(GPS)
Port for connecting the external GPS module
⑥
Rear camera connection port
(CAM)
5-pin micro-USB port for connecting the rear camera
⑦
LCD screen 3-inch LCD screen for playing back recorded videos or manipulating the device
⑧
Embedded microphone For recording the audio while recording the video
⑨
SD card insertion slit For inserting the micro SD card, a storage device.
⑩
Power switch For turning on and off the power
⑪
Embedded speaker For providing voice notifications
⑫
State indication LED Green LED for indicating the continuous mode
Page 13
12 _
06
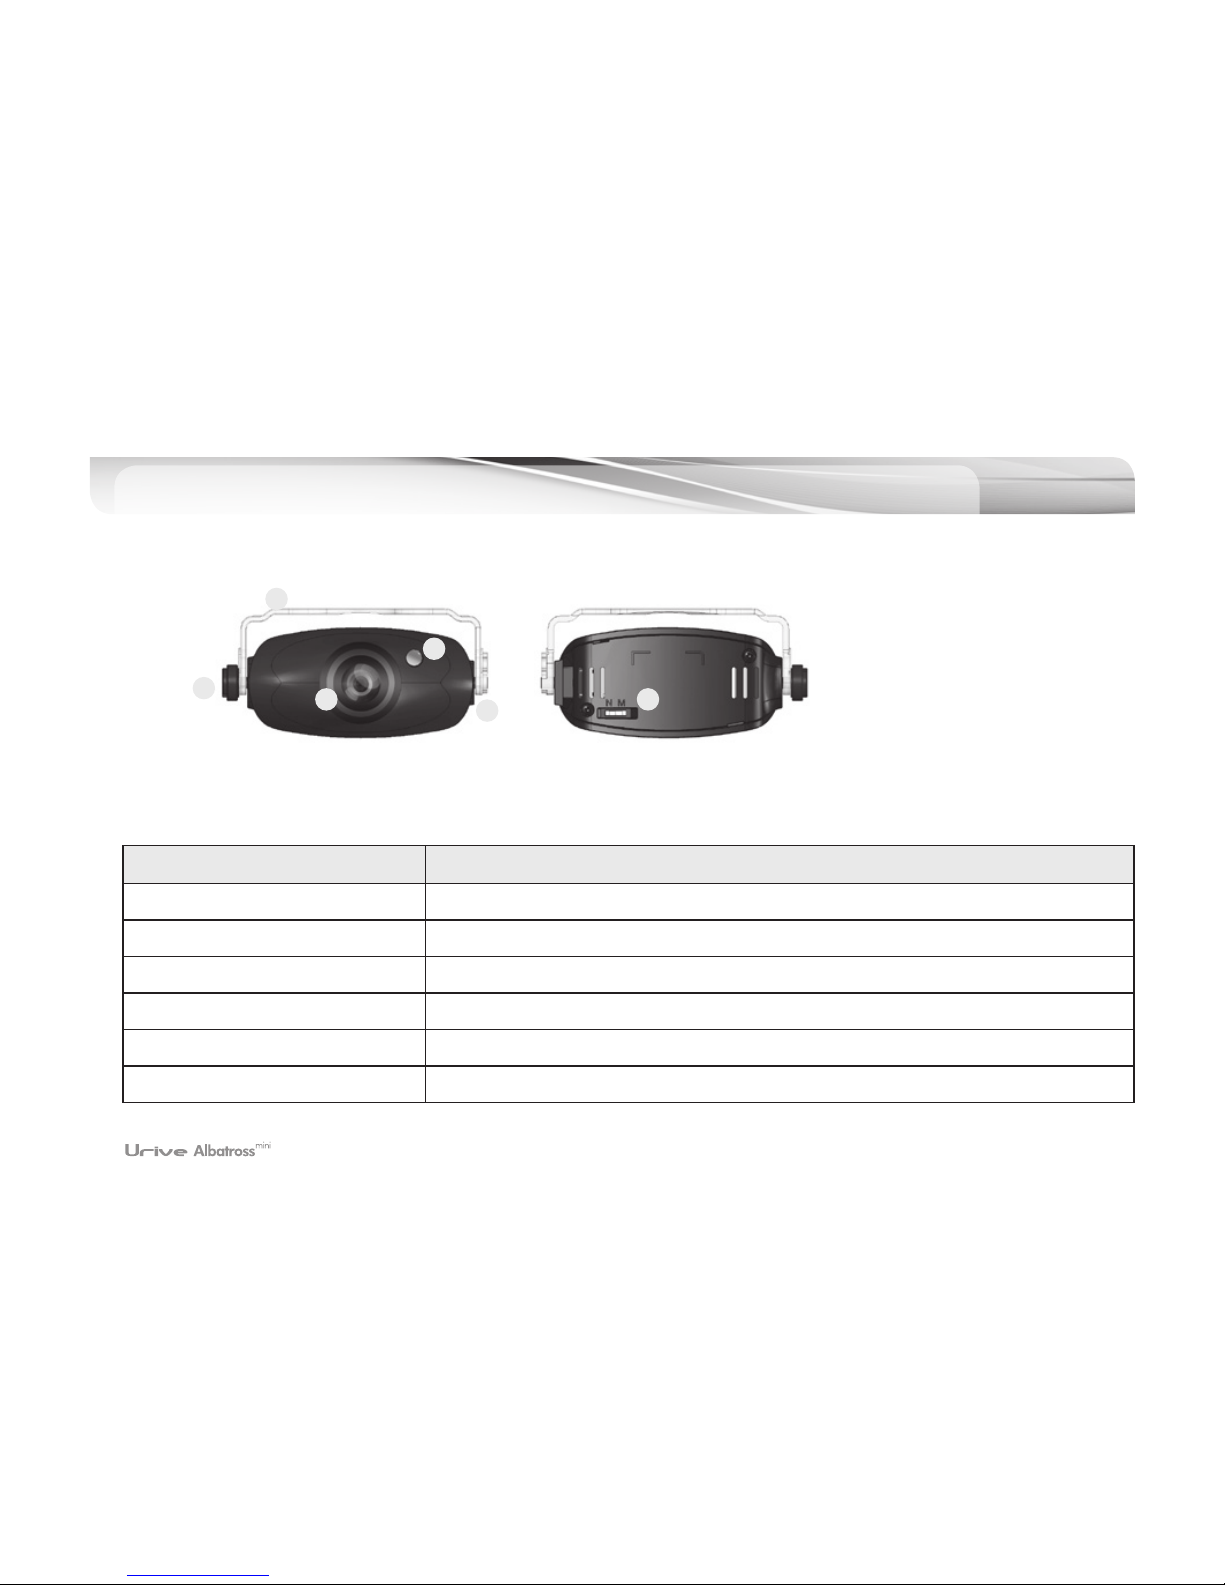
Names of Parts and Function Description
(Rear Camera)
Name Functions
①
Holder Transparent Holder
②
Camera Lens 2M pixel rear camera Lens
③
Connecting Port Connecting to main body (mini USB 5 pins)
④
Security LED Showing working status and the car is secured (High brightness blue LED)
⑤
Fixing Screw Fixing rear camera to holder
⑥
Rear view reverse switch N : normal mode / M : reverse
1
5
62
4
3
Page 14
User's Manual _ 13
07
Features and Connectors
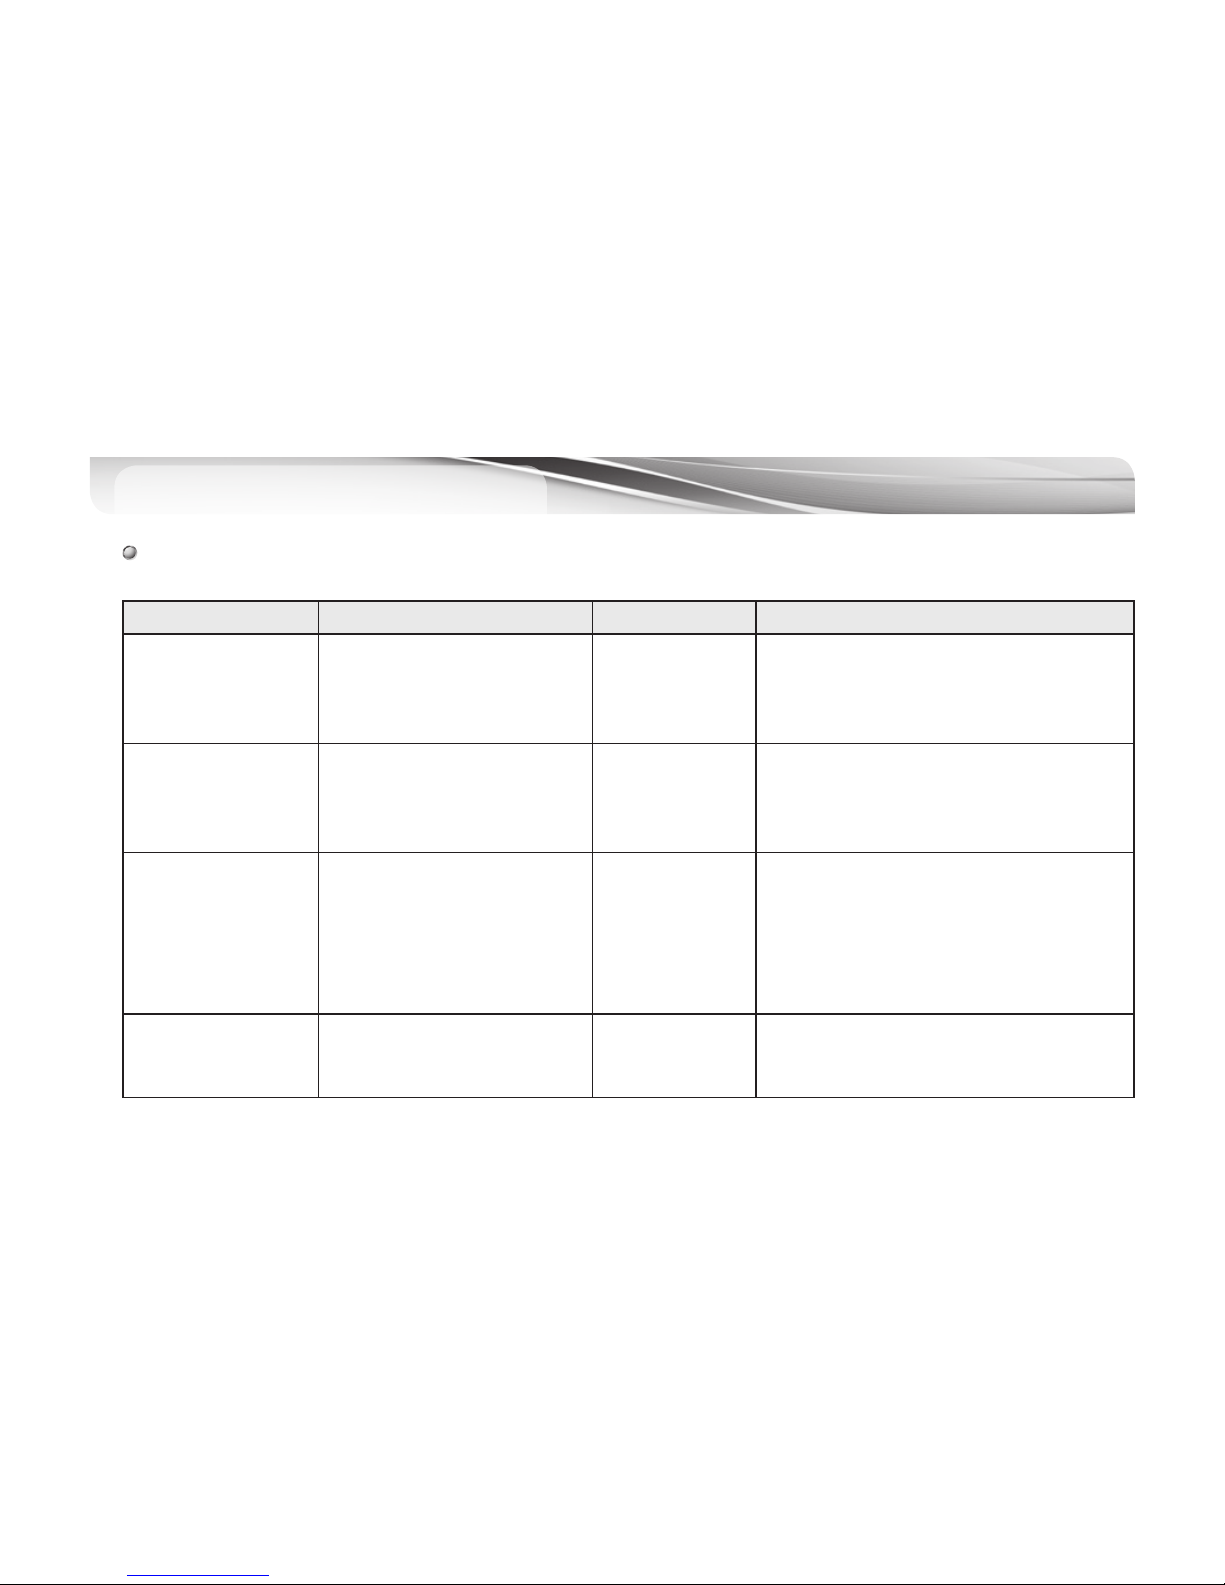
Features
Operation State Voice notification LED Indication
ACC ON
(Driving Mode)
Driving mode starts after
booting
“Start recording”
- Blue LED turns on while booting and
blinks after booting.
- Green LED of main body turns on.
- Blue LED of rear camera turn off.
Updating
Update starts via MicroSD
memory card
“Start updating”
“Ring (finished)”
- Blue LED of main body blinks while
updating
- Blue LED turns off after updating
- Blue LED turns on after rebooting
ACC OFF
(Parking Mode)
A 20-second long video, taken
10 seconds before an accident
to 10 seconds after it, will be
recorded when a motion or a
shock is detected by the front or
(and) rear camera(s)
“Converting to
parking mode”
- Blue LED blinks every one second in
parking mode
- Blue LED blinks four times a second
while saving video after detecting motion
- Blue LED blinks six times a second
while saving video upon impact
Power Cable
Disconnected /
Power Switch Off
The last video will be recorded
using the backup battery before
the power is turned off.
“Ring” -
Page 15
14 _
07
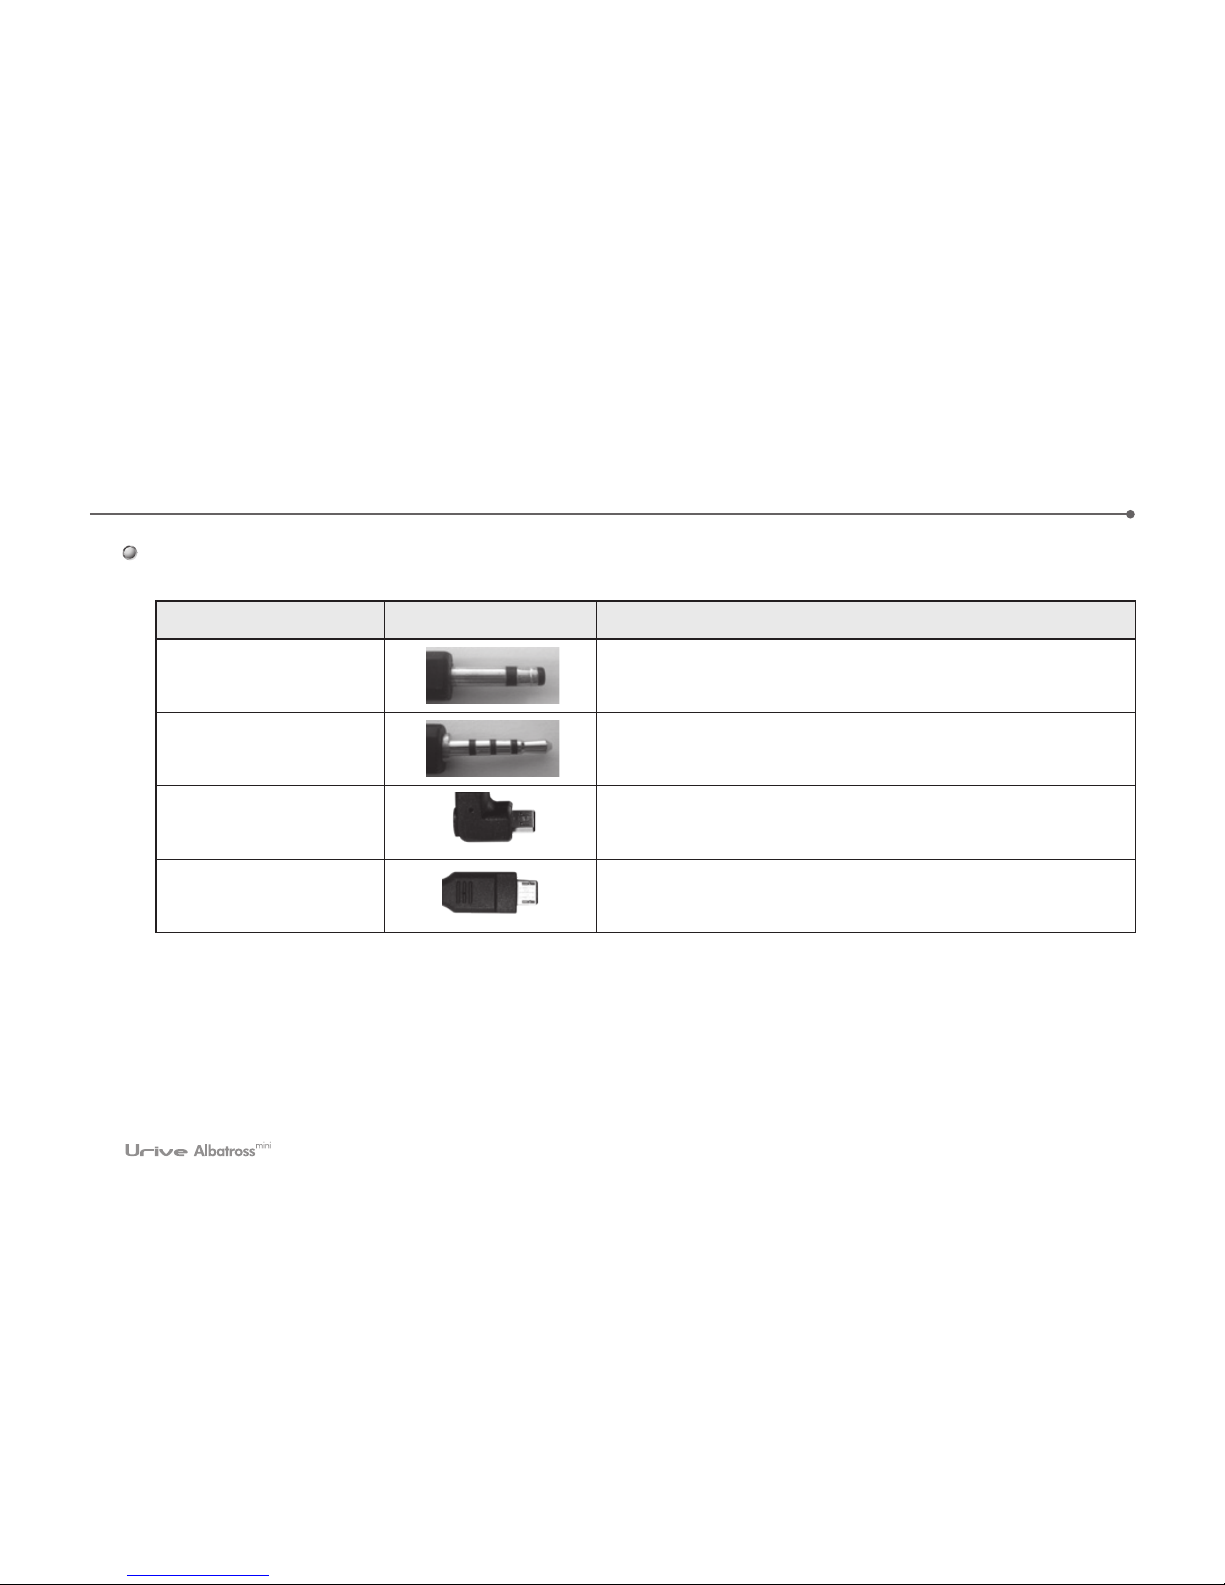
Port pin arrangement
Ports Images Pin arrangement
Power port
(DC socket)
①
GND ② ACC ③ BAT (B+)
GPS port(2.5 pie)
①
VCC(3.6~6V DC) ② Rx
③
GND ④ Tx(GPS Signal Output)
Front camera connection
port(Micro USB 5P)
①
VCC(5.0V DC) ② Video signal - ③ Video Signal +
④
No use ⑤ GND
Rear camera connection
port(Micro USB 5P)
①
VCC(5.0V DC) ② Video signal - ③ Video Signal +
④
No use ⑤ GND
①
⑤
……
①
⑤
……
①②③④
①
②③
Page 16
User's Manual _ 15
Firmware Update
08
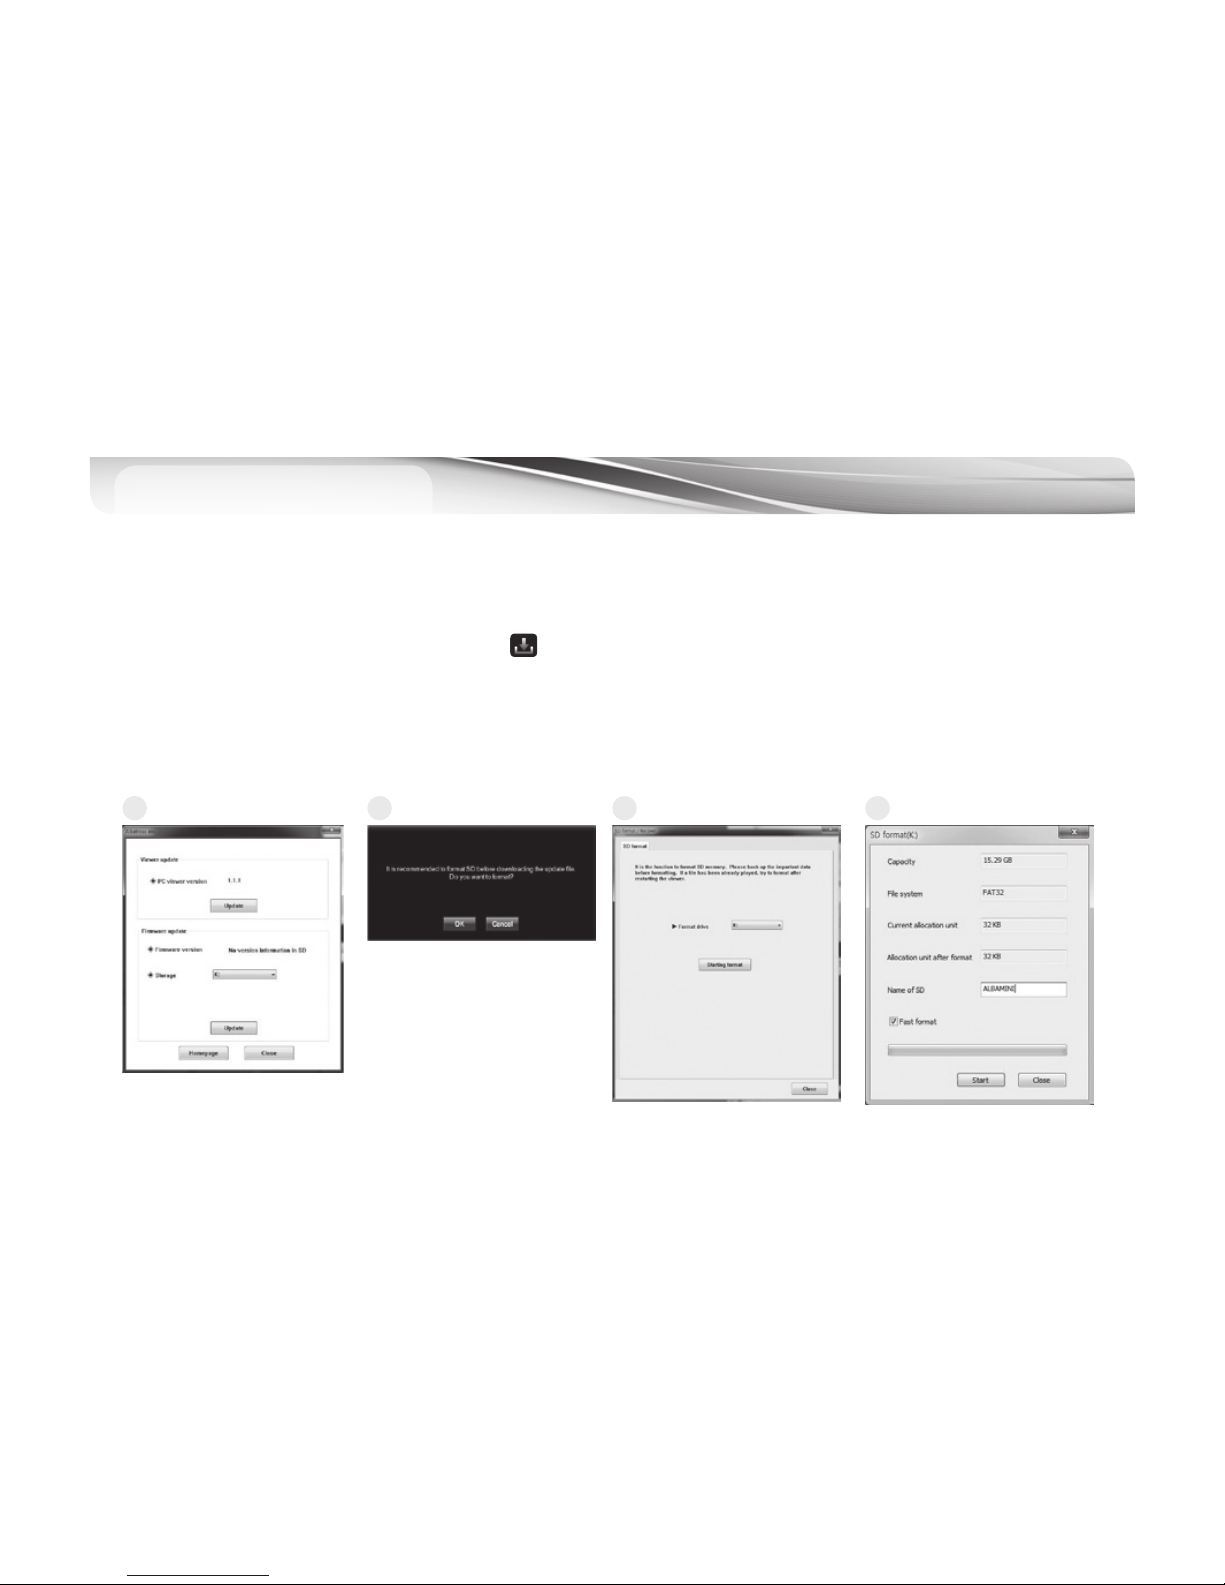
[Automatic Update]
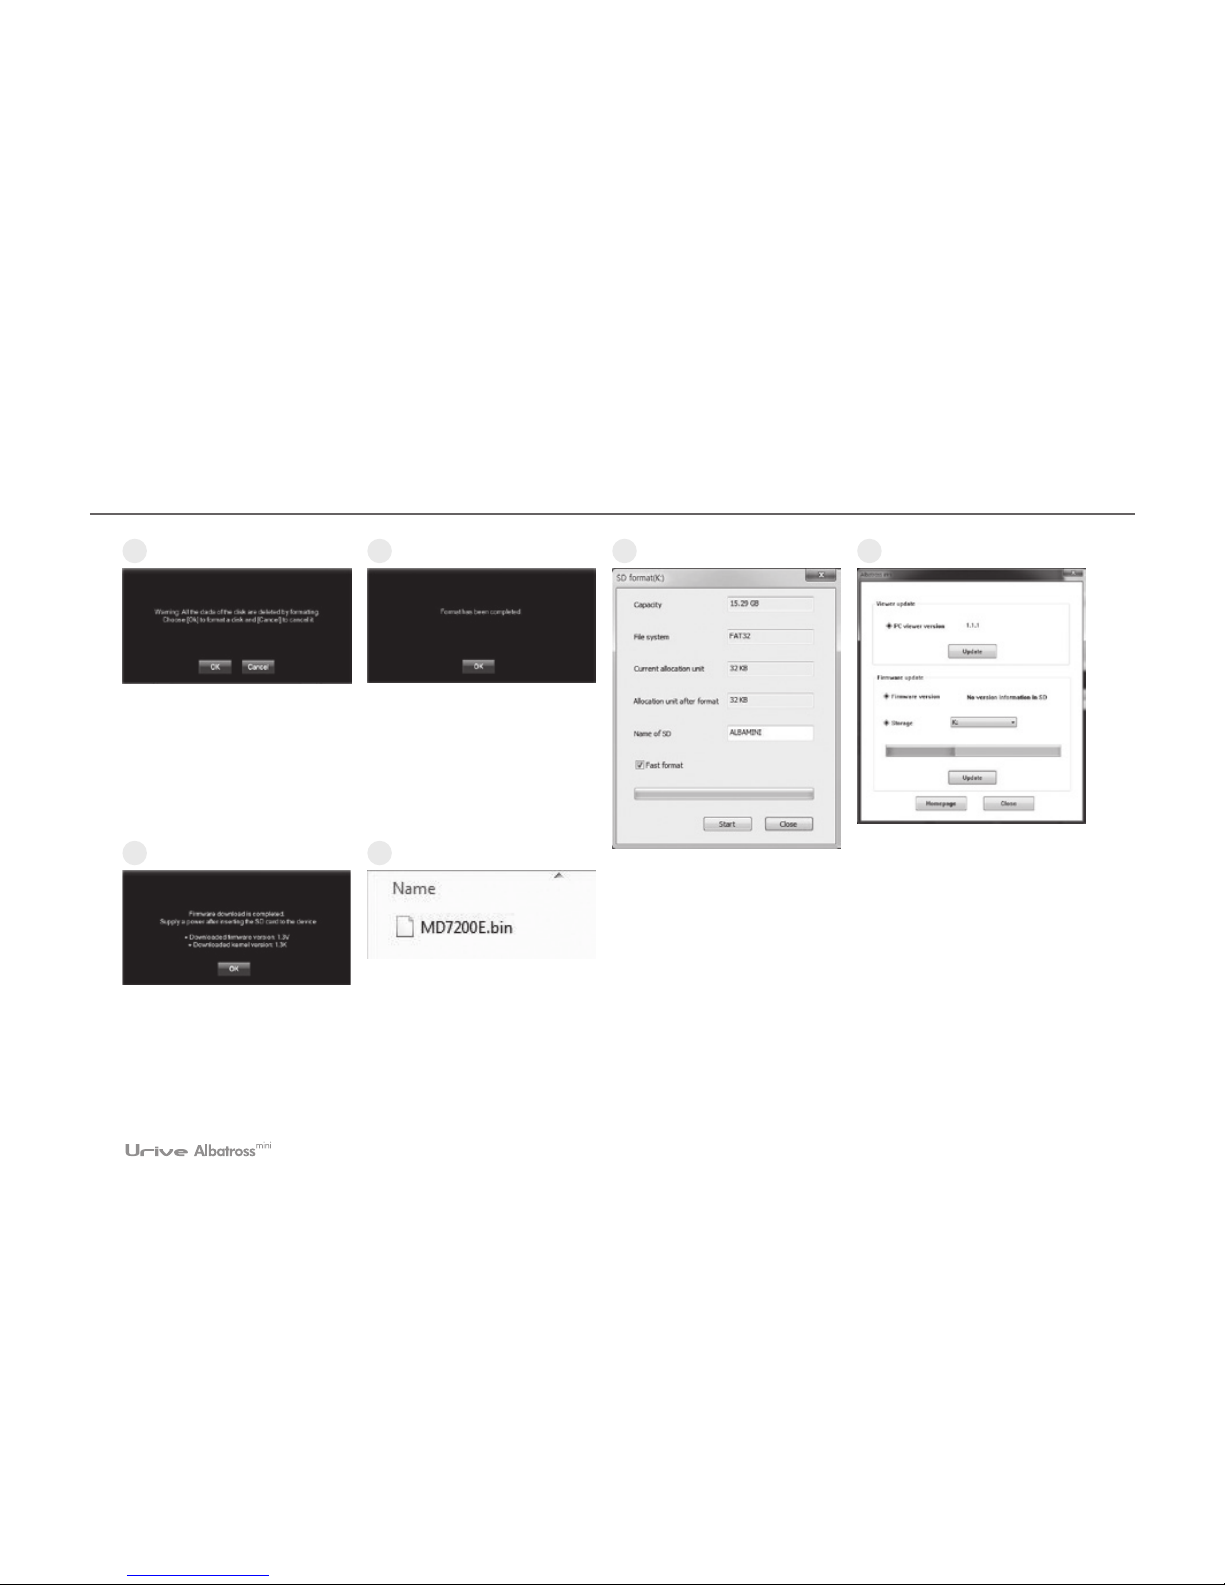
1.# The system can be updated in Urive Albatross Mini PC viewer. Insert MicroSD memory card to the reader and connect to
PC. Execute the PC viewer. Press the button at the top left corner of the viewer window.
2.# Check the firmware version at the Urive Albatross program information window. And then formatting the memory card
in the PC or Viewer. (But after formatting, users cannot check the firmware version.)
3.# Check the driver’s location which is connected with memory card at the Urive Albatross Mini program information
window.
Afterpushingtheupdatebutton,theupgradefiles(MD7200E.bin)saveautomaticallyatthememorycard.
1 2 3 4
Page 17
16 _
08
5
9
6
10
7 8
Page 18
User's Manual _ 17
08
4.# Switch off the main body and insert the memory card into the main body.
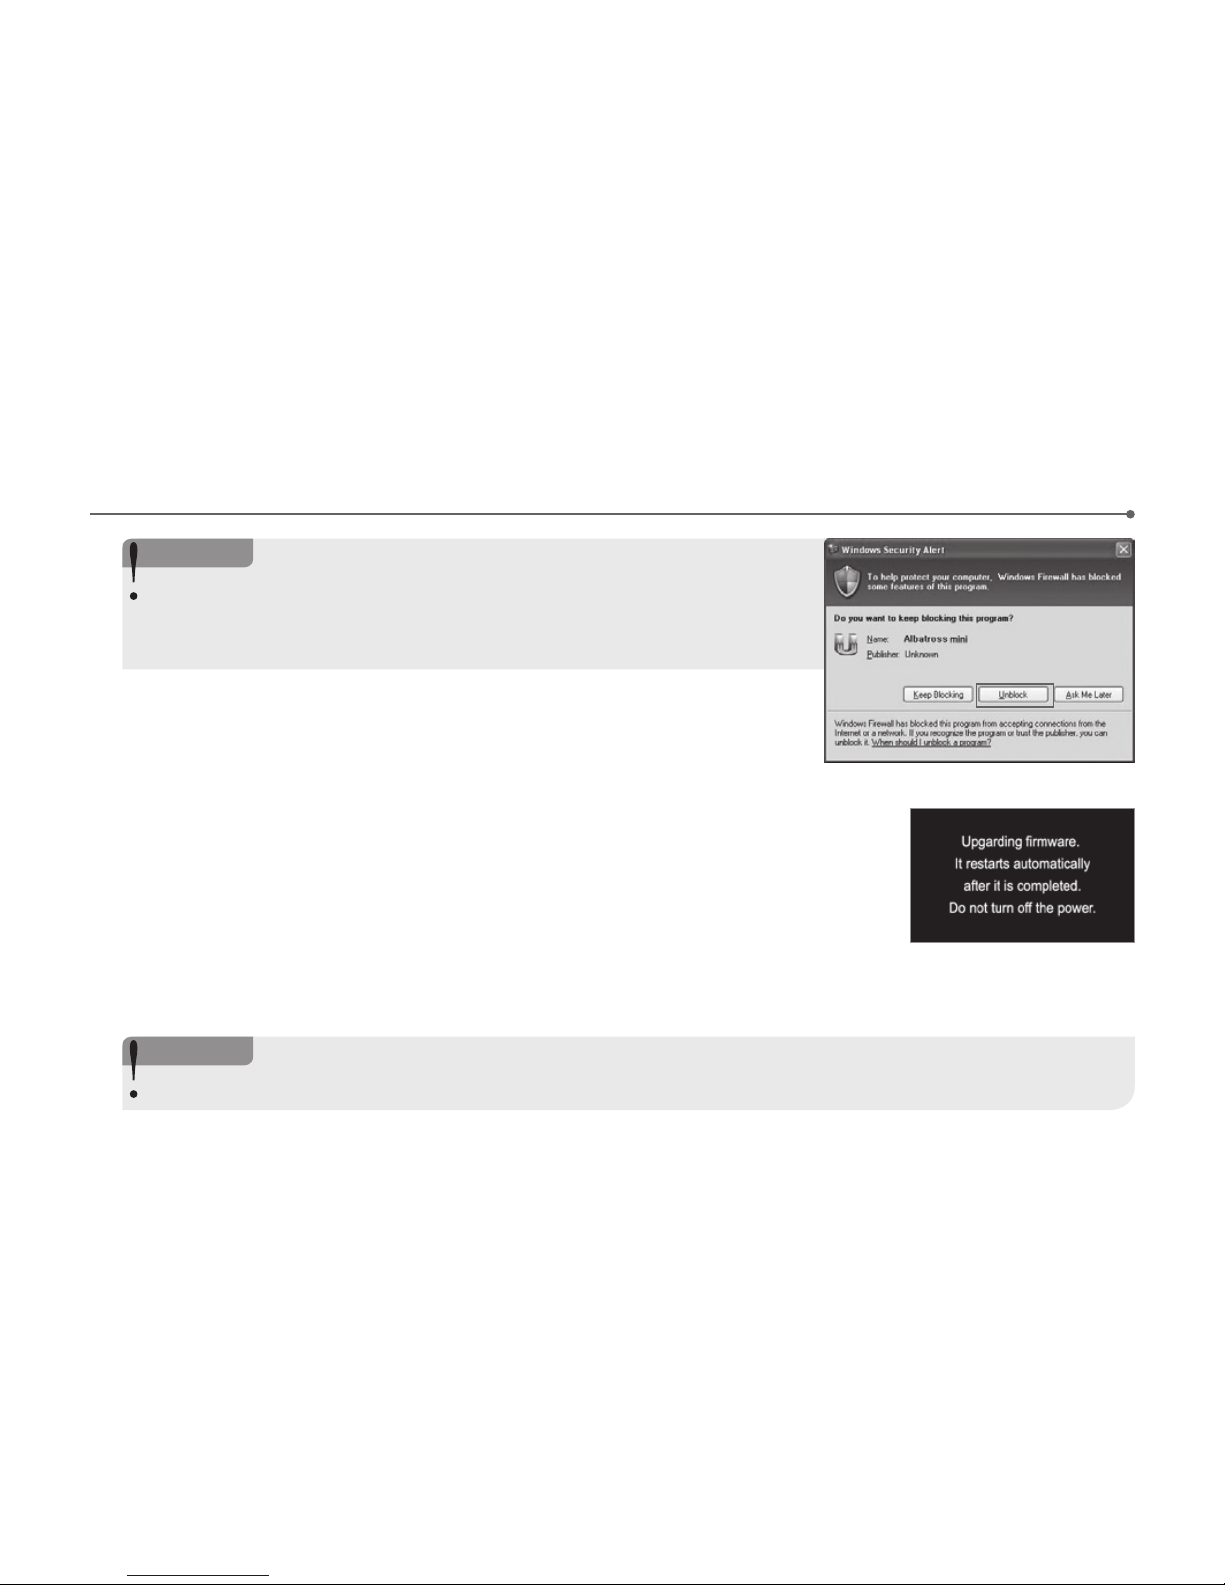
5.# Switch on the main body. Update starts with a voice “Update starting”.
it shows firmware upgrade image as below. “Update ends with “Ring” and the
system reboots automatically.
6.# When the system roboots the system creates designated folders in the formatted memory
card.
<Notice>
When the Windows security message pops up, press “Unblock” button to proceed
firmware upgrade.
when users push the ‘Keep Blocking’ button, auto-update would be failed cause of
windows safety issue.
<Notice>
The system preserves the previous setting when the system is updated in Urive Albatross Mini main body.
Page 19
18 _
Installation Precautions
09
#
It is recommended to install the device in an area with a flat surface. The ignition must be turned off while installing.
#
As the product is powered by car battery, it is required to check battery power whether the front and rear videos are
saved normally before the process of installation.
#
When installing external camera, the DC power cable must be disconnected from the main body.
#
All components required for installation are provided with the Product. Check the components and read the instructions
before installation.
#
Check if the SD Card is correctly inserted, and then connect power.
#
Do not install the product in a location that hinders your driving or road-visibility.
#
Try to conceal cables for tidiness and safety.
#
Keep the windshield clean always.
#
Install the Product in a safe and bright area.
#
When the deep color sunshade and heat lines on the rear wind shield, the rear view would be not perfectly recorded as
a normal resolution.
#
Please remove the camera’s protective plastic covers after installation.
Page 20
User's Manual _ 19
Installation - Main Body
(Front Camera)
10
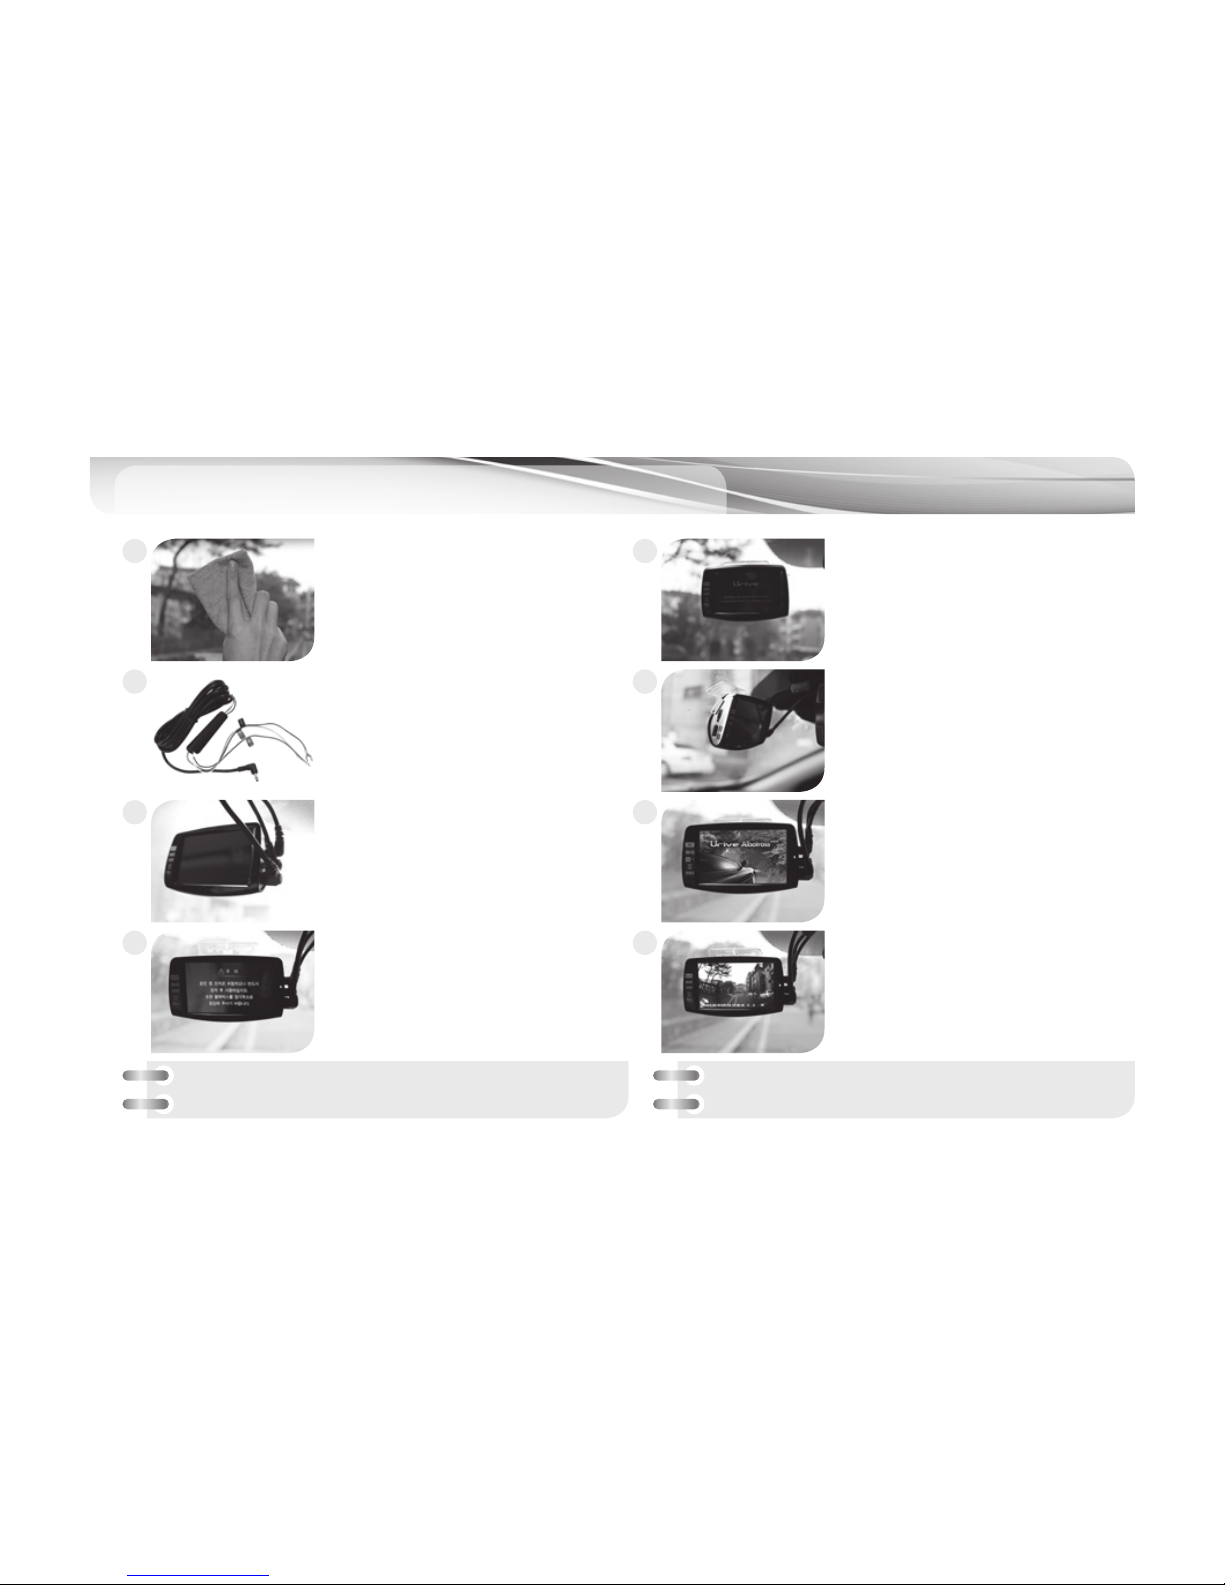
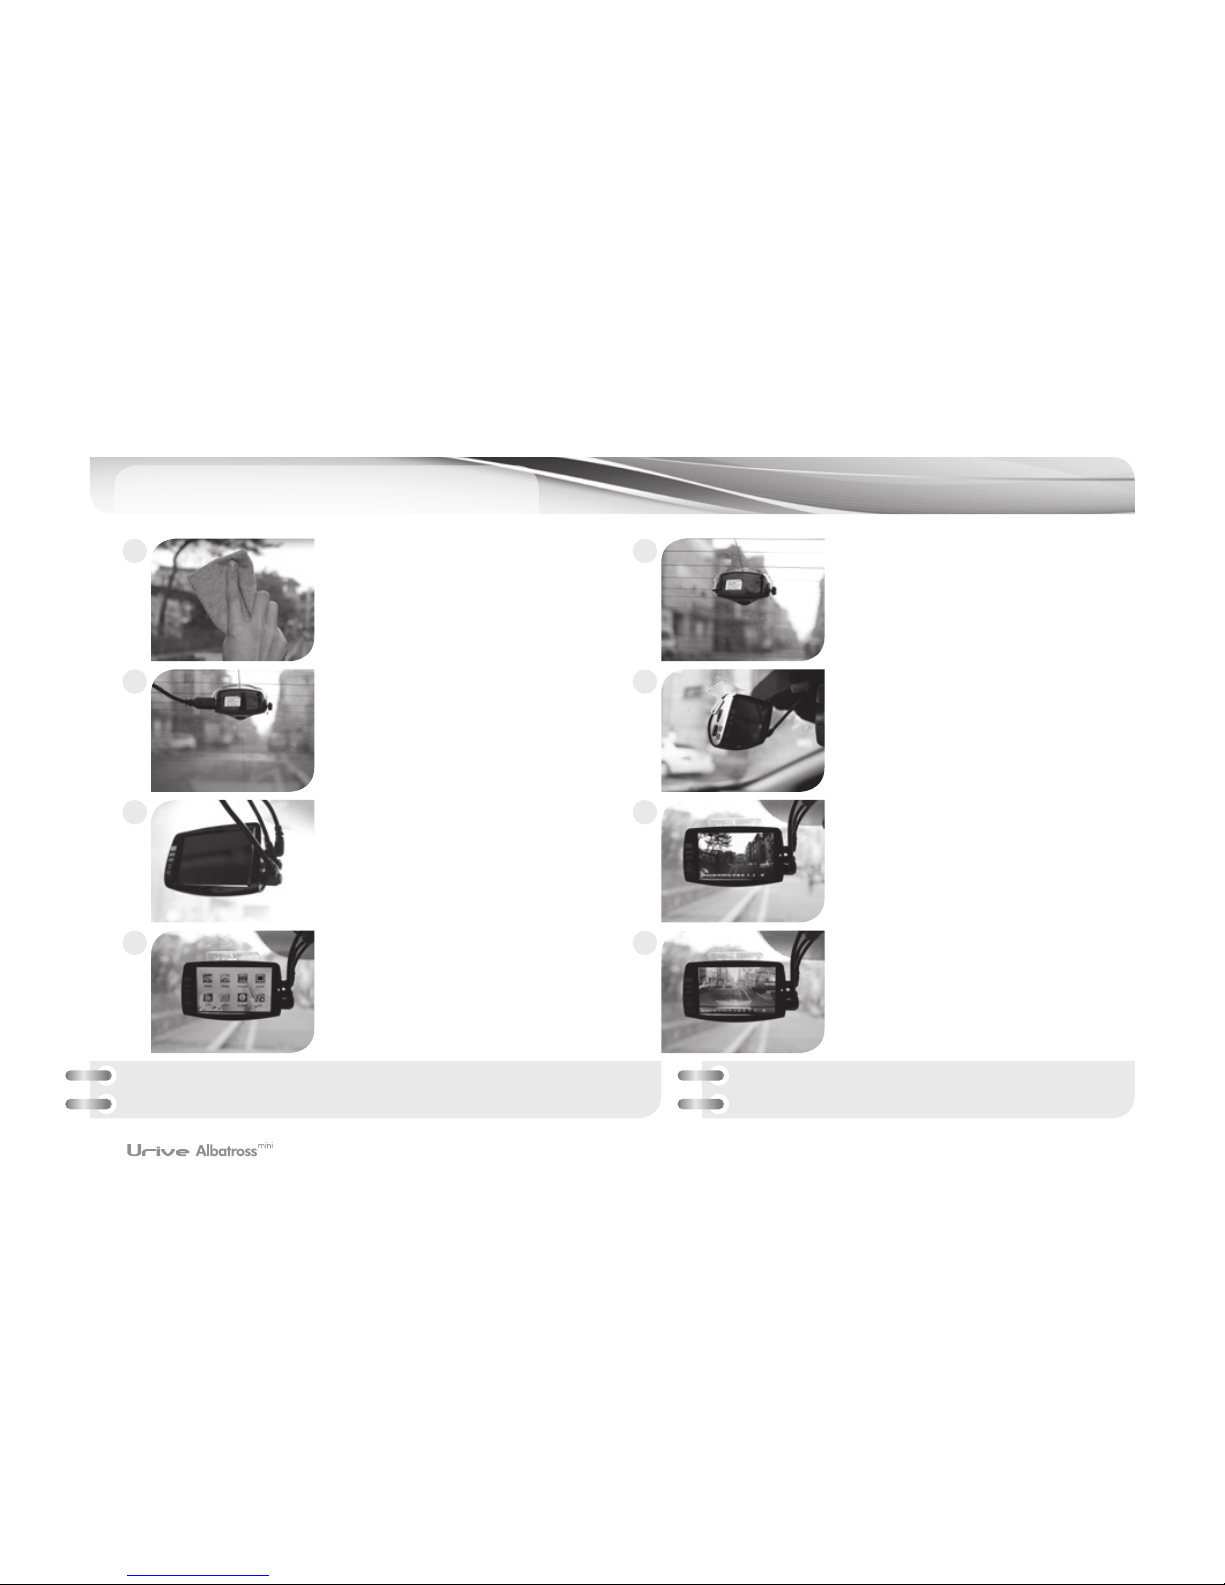
Clean the spot on the front window
where the product is installed.
The constant power supply must
be installed by an expert.
- Black: GND (ex. Car chasis)
- Yellow: ACC (ex. Cigar Jack Fuse)
- Red: Battery(+), (ex. Emergency Lamp)
Connect DC power cable to DC port
with the power switch turned off.
“Caution” message shows after Intro
screen.
Put the device where you want to
place it
Connect rear camera cable and GPS
cable with the power switch turned
off.
Turning on the power switch will
bring up an intro screen.
Front image dispaly on the screen
with “Start recording” voice after
booting.
1
3
5
7
2
4
6
8
※
Before building in the system completely, please check
whether the front and rear videos are stored normally.
※
State check LED: Continuous mode – Green LED On
Parking mode – Green LED Off
Page 21
20 _
Installation -
Rear Camera
10
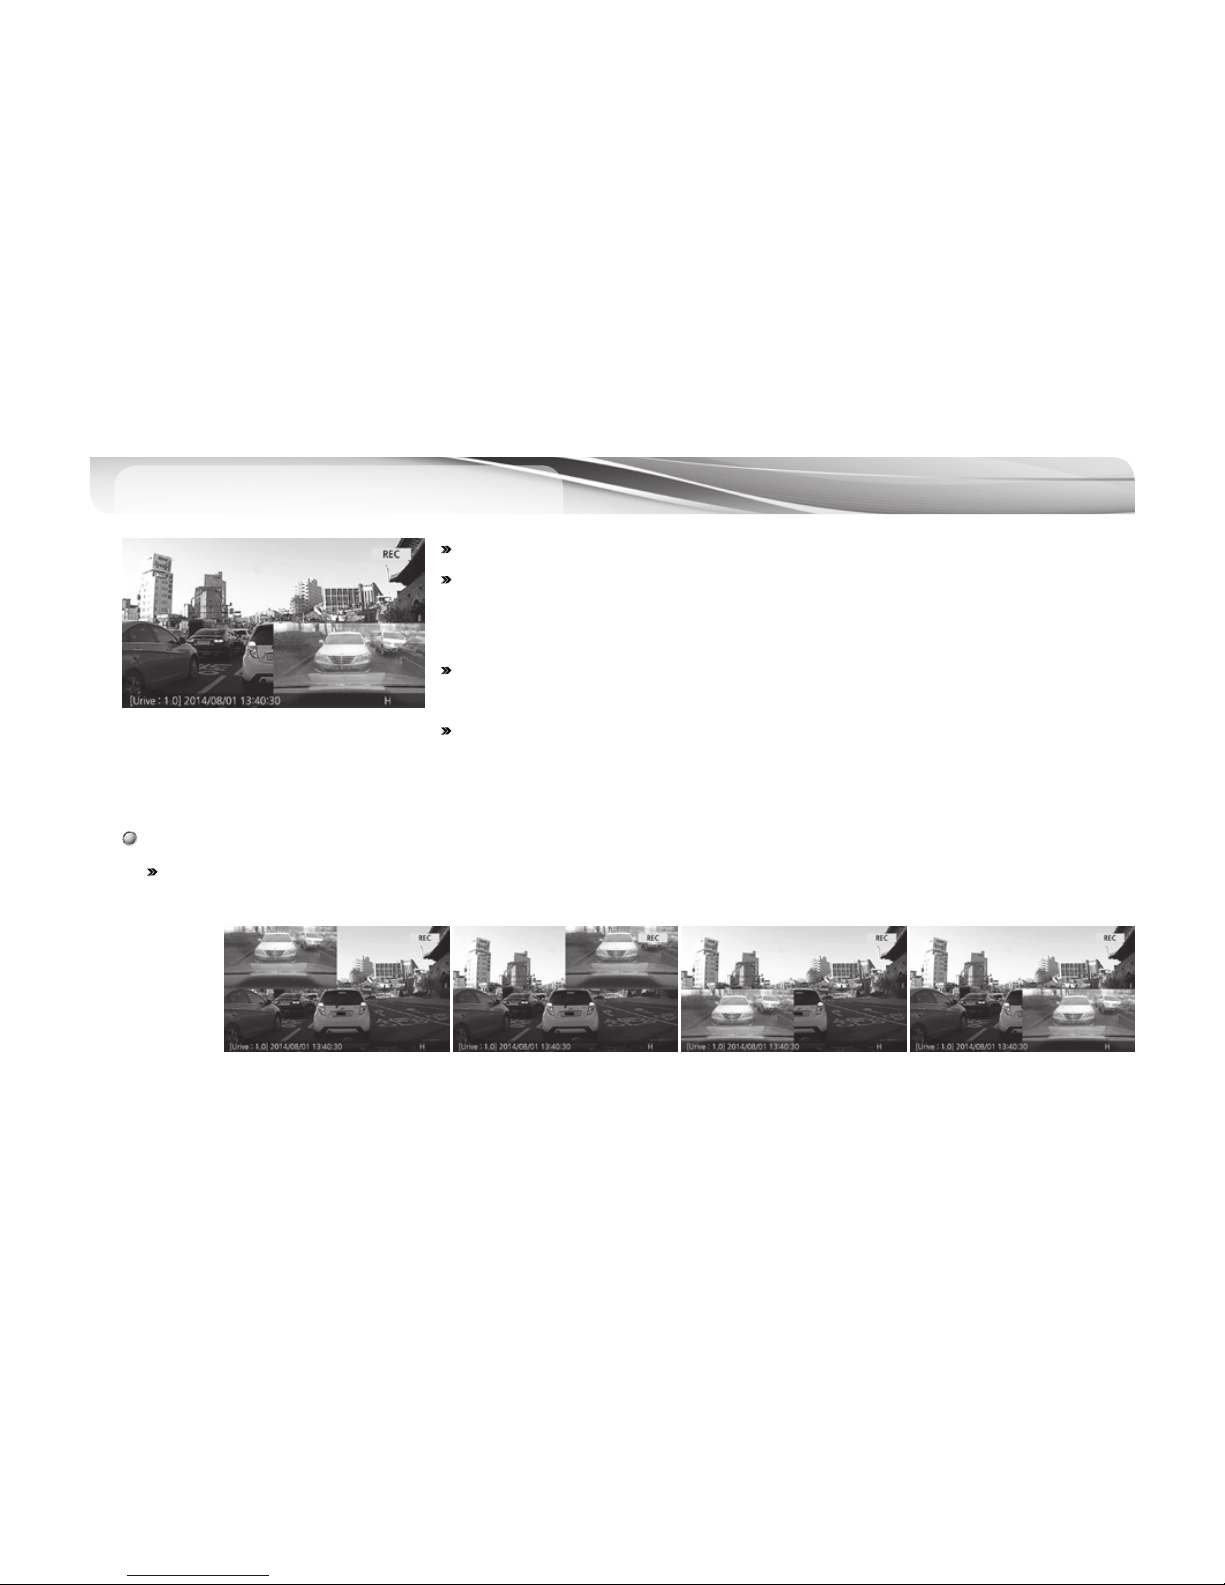
Clean the spot on the rear window
where the product is installed.
Connect mini USB cable to the rear
camera.
Connect DC power cable to DC port
with the power switch turned off.
LCD screen turns to main menu
when touching the screen once.
Put the device where you want to
place it.
Connect mini USB cable to the main
body with the power switch turned
off.
Front image dispalys on the screen
with “Start recording” voice after
booting.
Rear image dispalys on the screen
when choosing “Rear View” in the
main menu.
1
3
5
7
2
4
6
8
It is required to take precautions installing the rear camera to the rear window, considering
that the quality of video may not be as good as desired due to tinting or heating cables.
※
State check LED: Regular recording mode – Green LED On
Parking mode – Green LED Off
Page 22
User's Manual _ 21
GUI-Descriptions
(Displays)
11
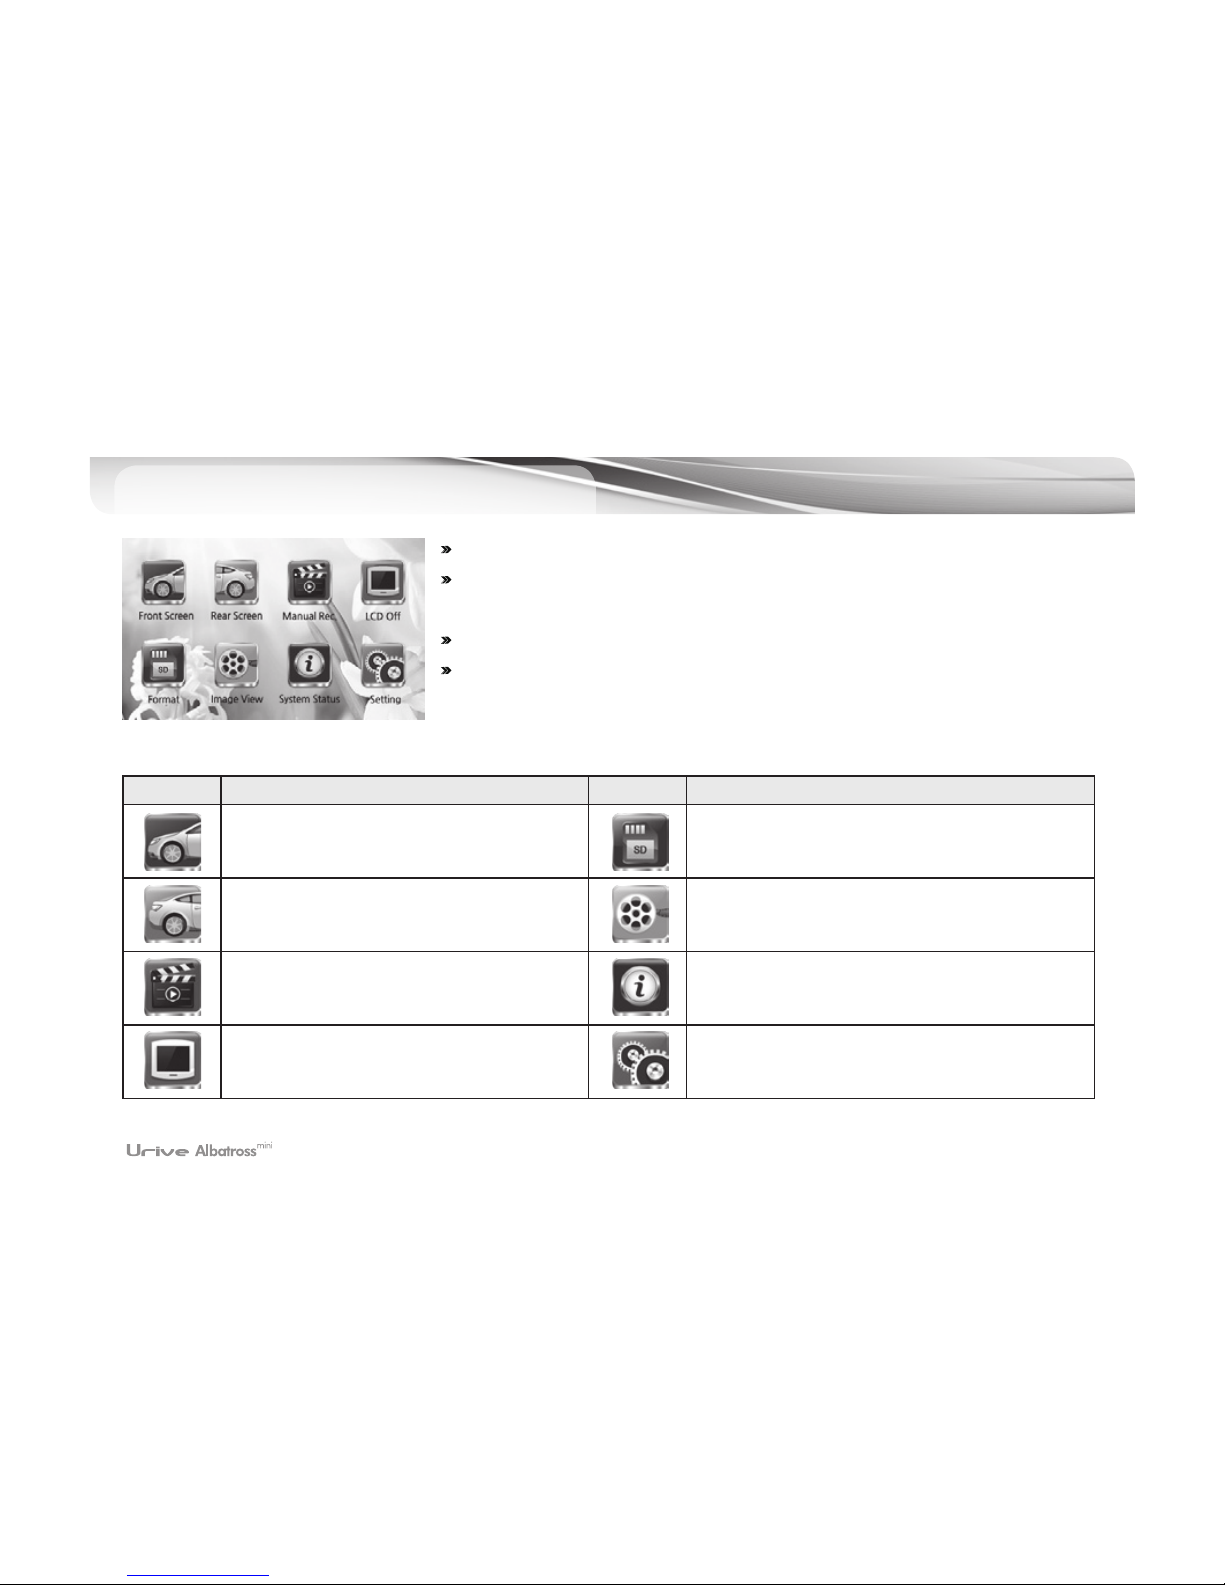
# After booting in driving mode, real-time image shows on the screen.
# On screen dispalys, firmware version, video recording time (yy/mm/dd), video
quality, voice recording on/off, GPS on/off, recording mode (REC, EVT) can be
checked.
# When PIP feature is on, front and rear images are displayed on the screen
together. (PIP feature is set to off by default.)
# The screen turns to screen saver when there is no operation for over one minute
when screen saver feature is on.
# The user can switch the front and rear images by a touch and change the location of images by drag-and-drop on
the screen.
PIP Drag-and-drop
Page 23
22 _
GUI-Descriptions
(Main Menu)
11
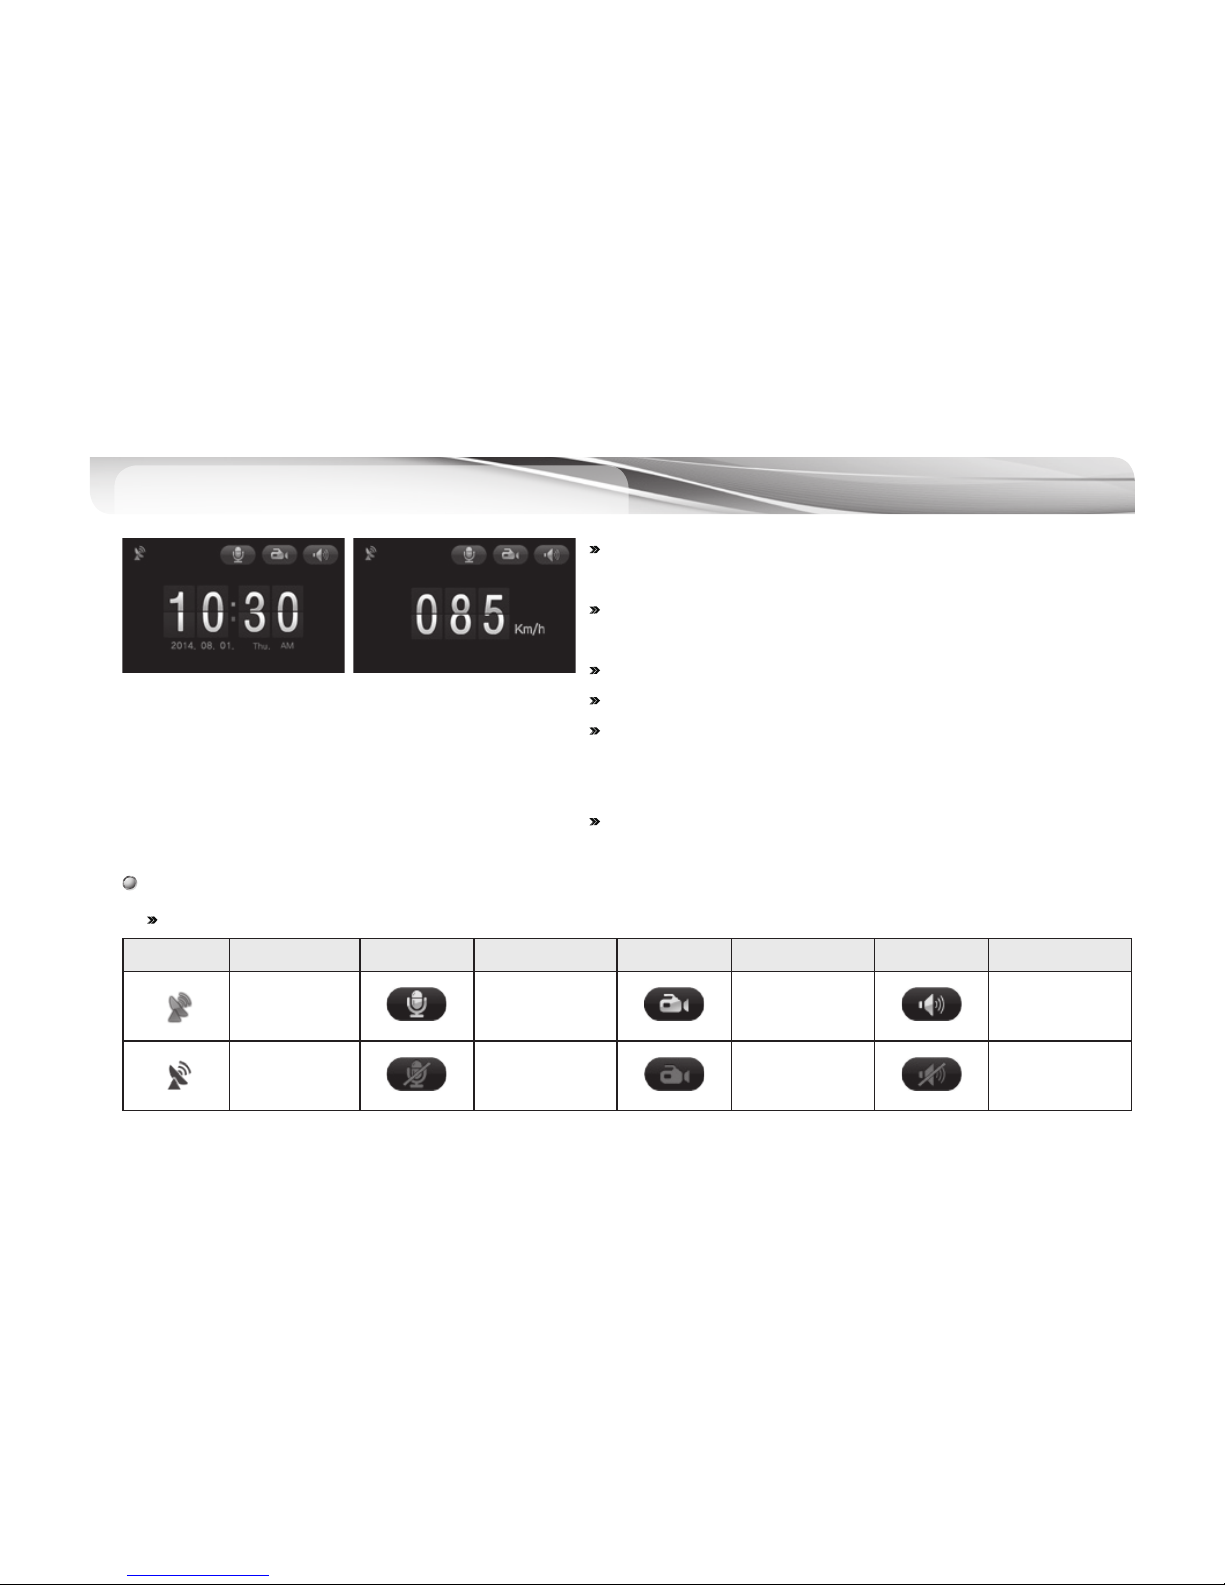
# LCD screen turns to main menu when touching the screen once.
# The menu screen will show eight icons for front video, rear video, image
recording, LCD off, formatting, video view, system state, and setting.
# Video/audio recording continues on main menu screen.
# The screen turns to screen saver when there is no operation for over one minute
when screen saver feature is on.
Icons Meaning Icons Meaning
Front video: Shows the front video in real
time.
Format: SD formatting
Rear video: Shows the rear video in real
time.
Video view: Checks the video, recorded in the
memory card, through the LCD screen.
Manual (forced) recording:
Manual recording and event files stored.
System status: Checks the state of the system
LCD off
: Turns off the LCD screen.
Touching the LCD screen will turn it back on.
Setting: Sets the environment
Page 24
User's Manual _ 23
GUI - Descriptions
(Screen Saver)
11
#
The he screen turns to screen saver when there is no operation
for over one minute when screen saver feature is on.
#
When screen saver feature is off, the LCD screen turns off in two
minutes.
#
There are two (clock, speed) modes in screen saver.
#
Video/audio recording continues in screen saver.
#
On screen saver, the user can check and operate “Audio On/Off,
Event (Driving) Mode On/Off, Speaker On/Off” and check GPS
receiving status.
#
Screen saver displays driving speed when GPS module is
connected. (“000Km/h” displays without GPS connection.)
Icons on the screen saver
# Except for the GPS icon, other icons for audio recording, manual recording and volume control can be pushed for setting.
Icons Meaning Icons Meaning Icons Meaning Icons Meaning
GPS ON
Audio recording
(Mute Off)
Activated during
the event
recording
Speaker volume
control
(1 – 3-stage)
GPS OFF
No audio
recording
(Mute On)
Deactivated during
the continuous
recording
No speaker
sound
[ Time ] [ Speed ]
Page 25
24 _
GUI - Descriptions
(Video Play)
11
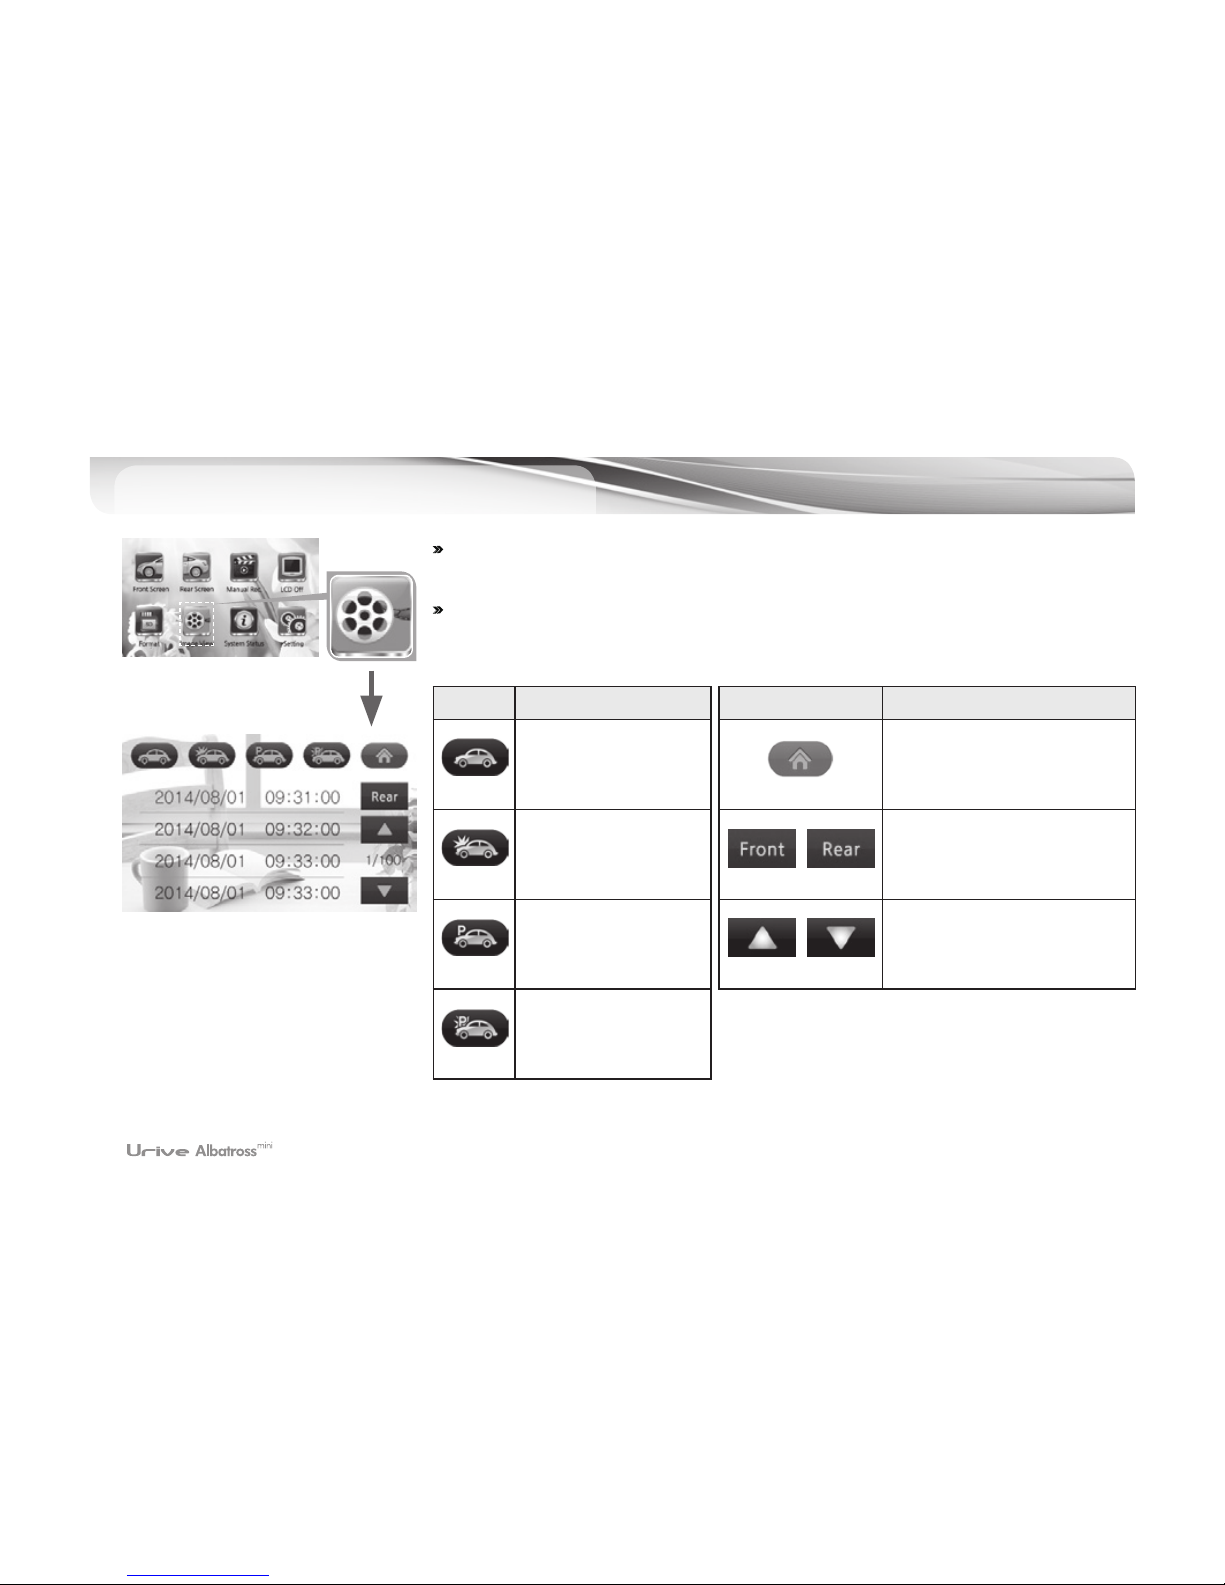
#
Video Play: The user can browse the file list in Driving, Event, Parking, Parking
Event folders and play files by clicking the file na me
#
Selecting and clicking a file from the list of files will play back the stored video.
Icons Meaning
Driving mode file list
Event mode file list
Parking mode file list
Parking Event mode
file list
Icons Meaning
Back to main menu
Sorting and displaying front
or rear file list
Browsing file list by page
Page 26
User's Manual _ 25
GUI - Descriptions
(Video Play)
11
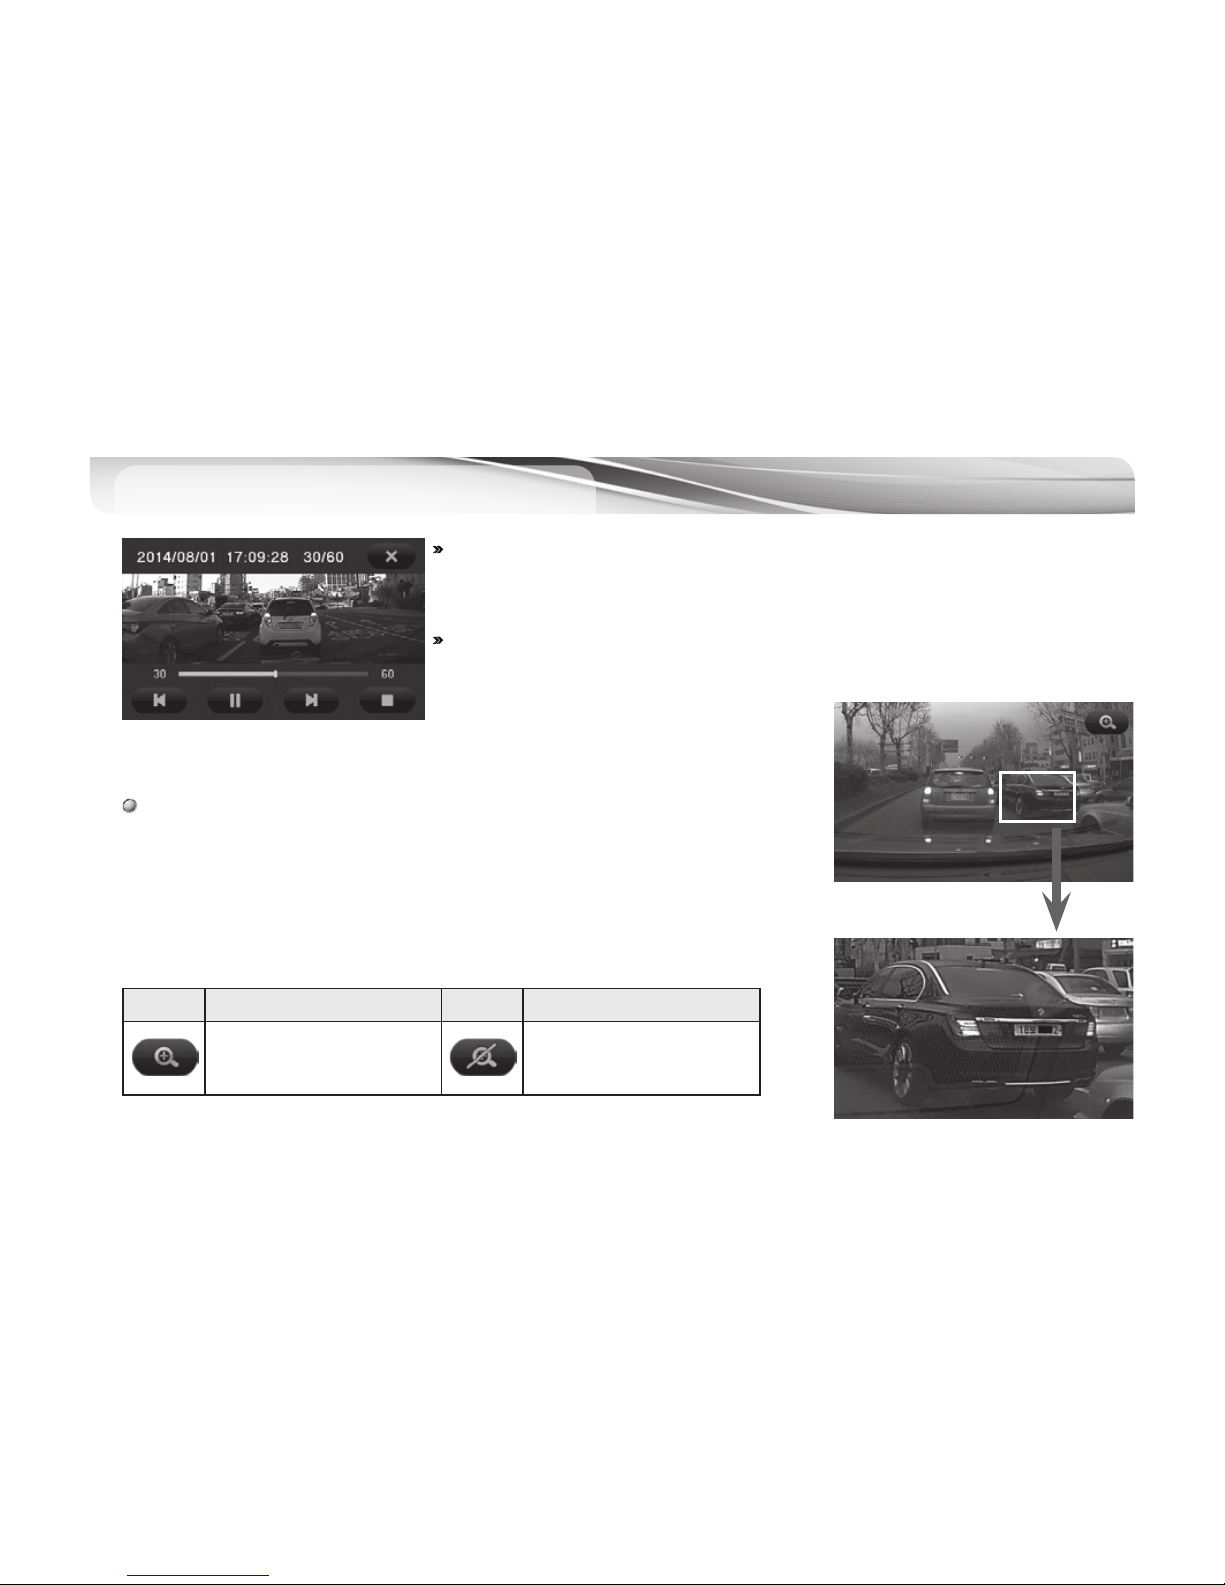
#
Video view: Checks the lists of files of continuous recording, event recording,
motions detected while parked, and events recorded while parked, and playing
them back directly for checking.
#
Selecting and clicking a file from the list of files will play back the saved video.
Zooming
- After pressing “Pause” button on the play screen, touch LC D screen
- Press “Zoom” icon at the top right corner of the screen
- Touch the part of image to zoom in.
Icons Meaning Icons Meaning
Zoom Feature On
Zoom Feature Off
Page 27
26 _
GUI - Descriptions
(System Status)
11
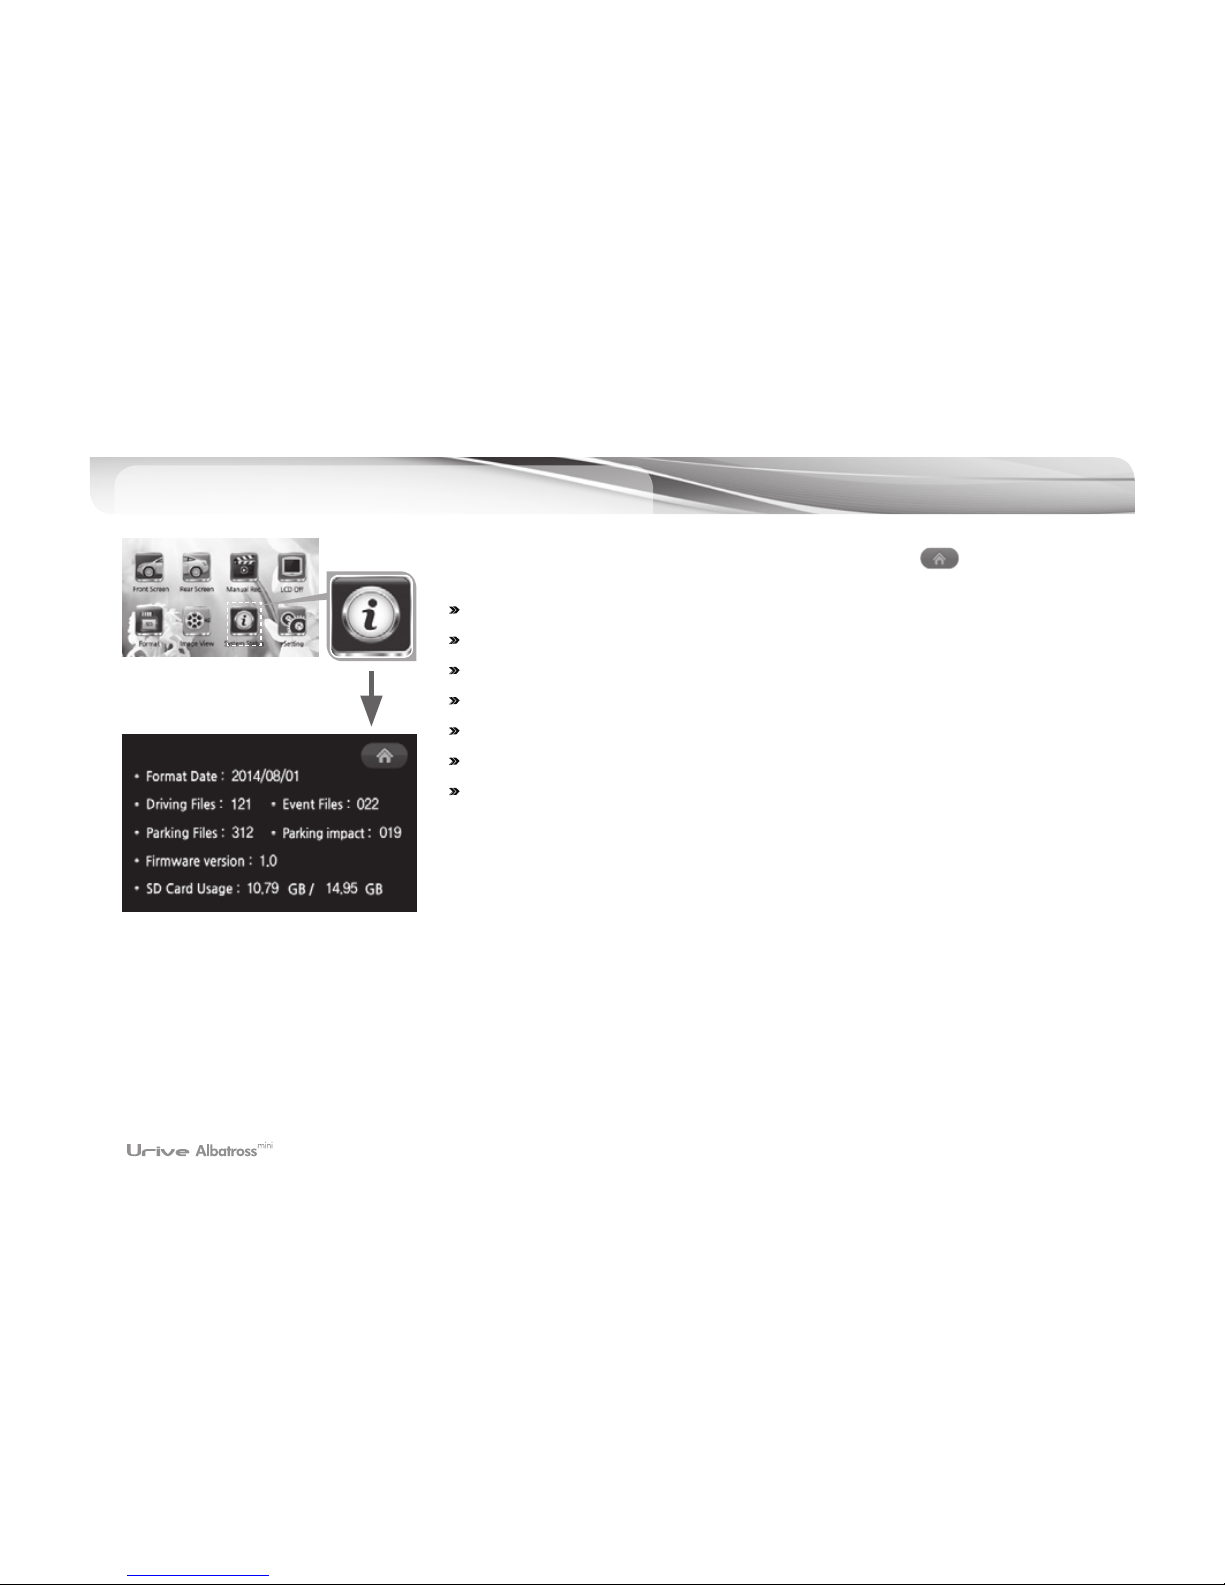
#
Format Date: the last date MicroSD memory card formatted
#
Driving Mode File: number of files recorded in driving mode
#
Event Mode File: number of files recorded in event mode
#
Parking Mode File: number of files recorded in parking mode
#
Parking Event File: number of files recorded in parking event mode
#
Firmware Version: the version of installed firmware
#
SD Card Use: used space / total space of MicroSD memory card.
[Notice] Video and audio recording stops at system status screen.
[Menu button (Home)]
Page 28
User's Manual _ 27
GUI - Descriptions
(System Setting)
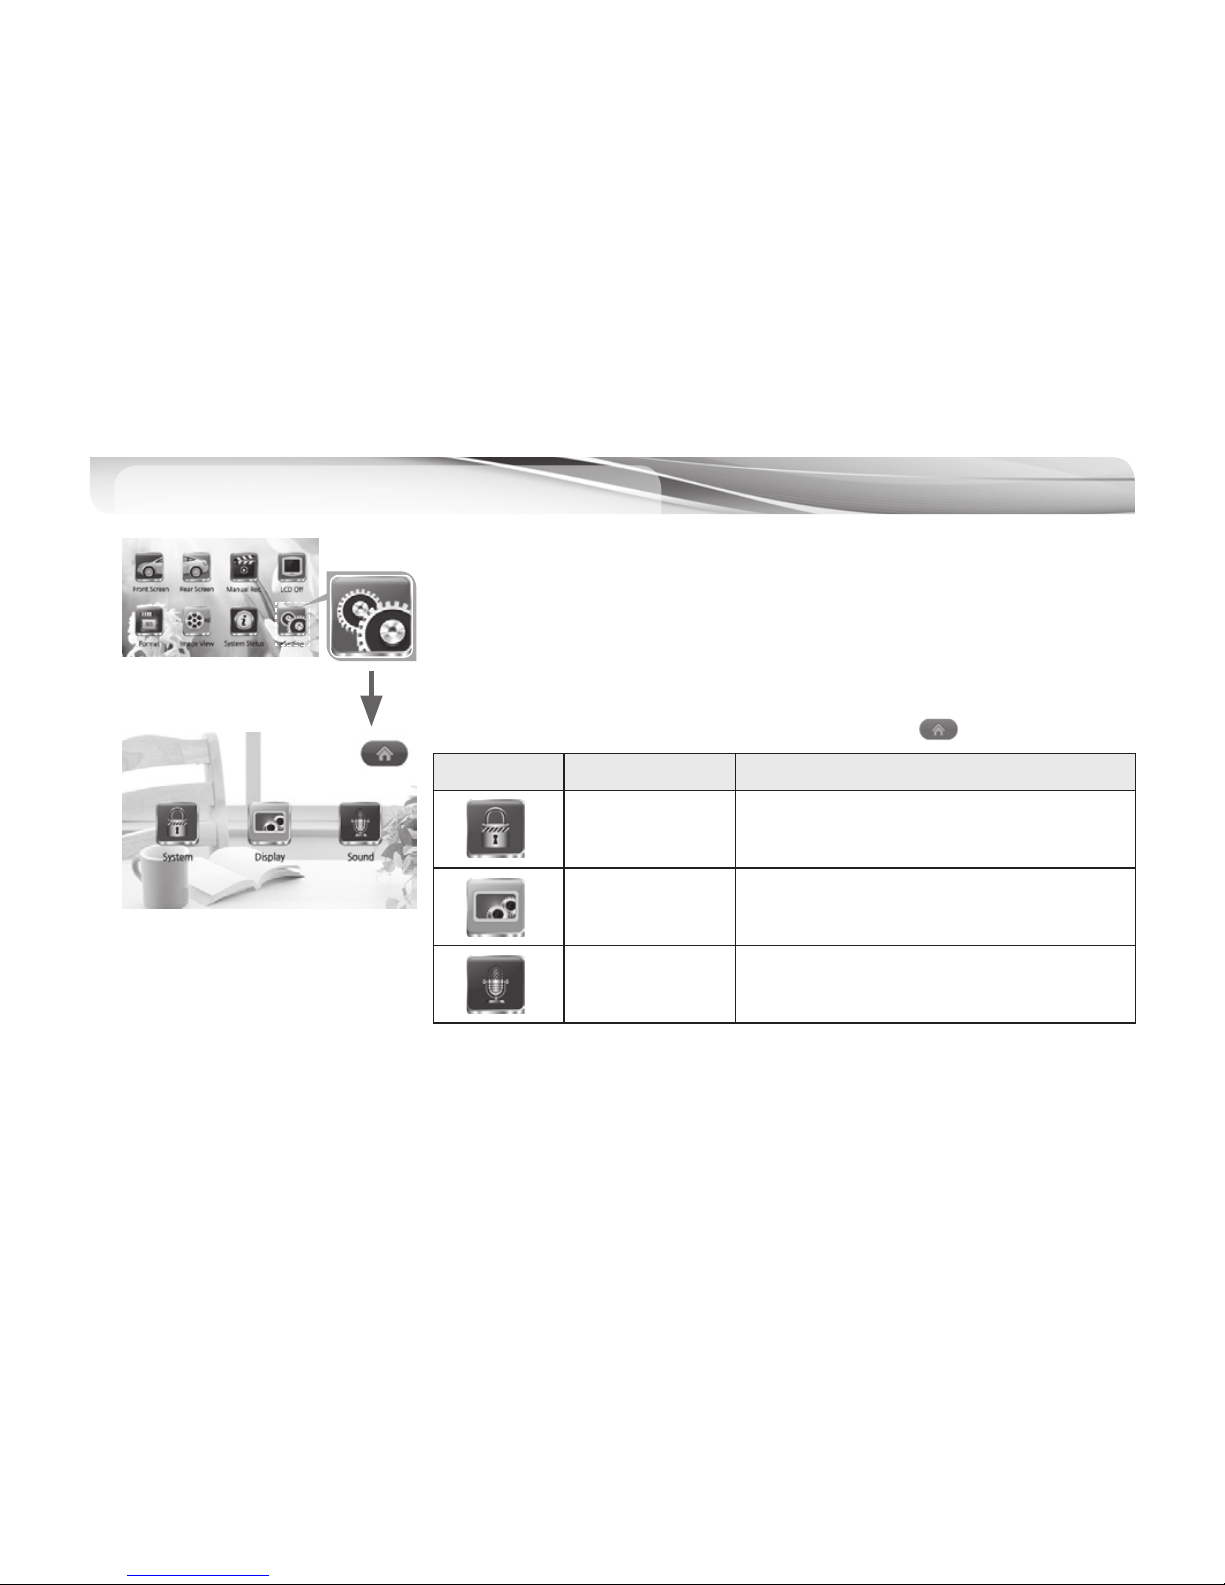
11
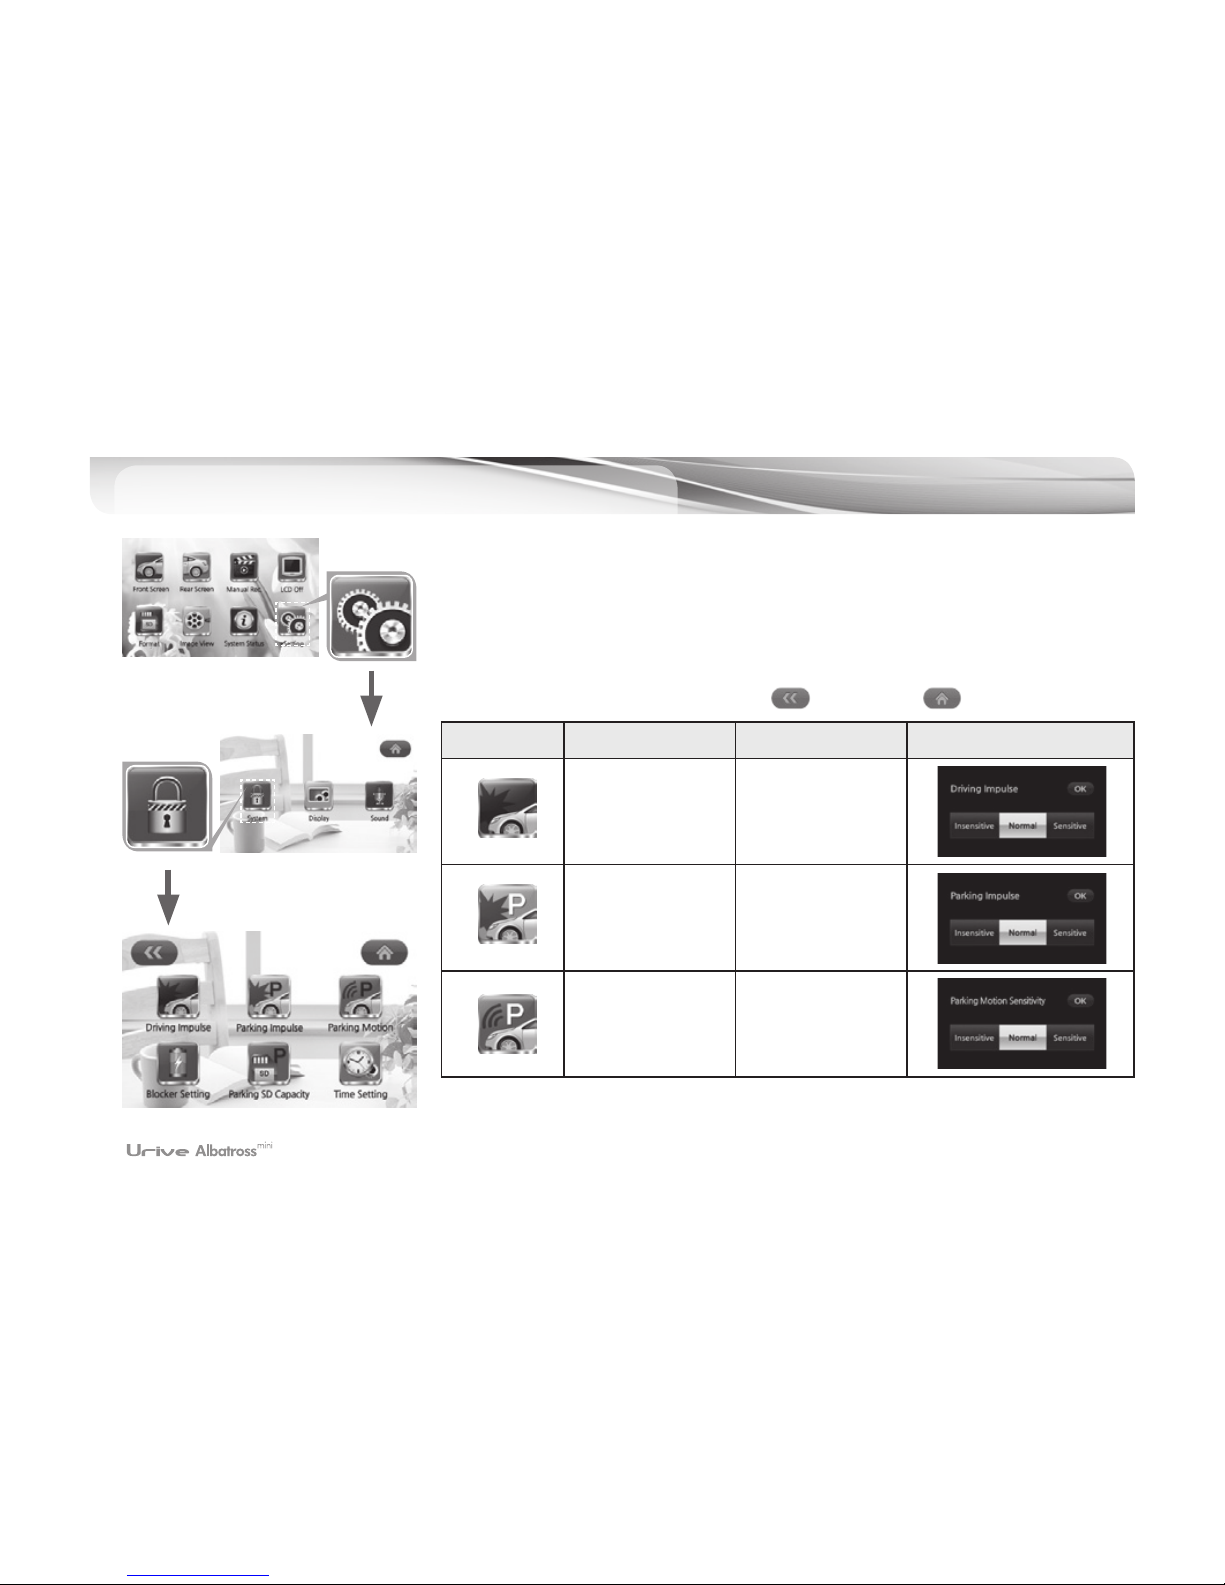
Icons Meaning Functions
System Setting
sets impact sensitivity in driving, event, parking,
parking event modes / (battery) power cut-off /
parking mode SD card use, time
Display Setting
sets coordinate correction, PIP, screen saver,
rear image flip
Audio Setting sets audio recording, volume
[Menu button (Home)]
Page 29
28 _
GUI - Descriptions
(System Setting)
11
Icons Meaning Details
Impact Sensitivity
at Driving Mode
Dull - Normal -
Sensitive
Impact Sensitivity
at Parking Mode
Dull - Normal -
Sensitive
Motion Dectection
Sensitivity
Dull - Normal -
Sensitive
[Previous] [Menu button (Home)]
Page 30
User's Manual _ 29
11
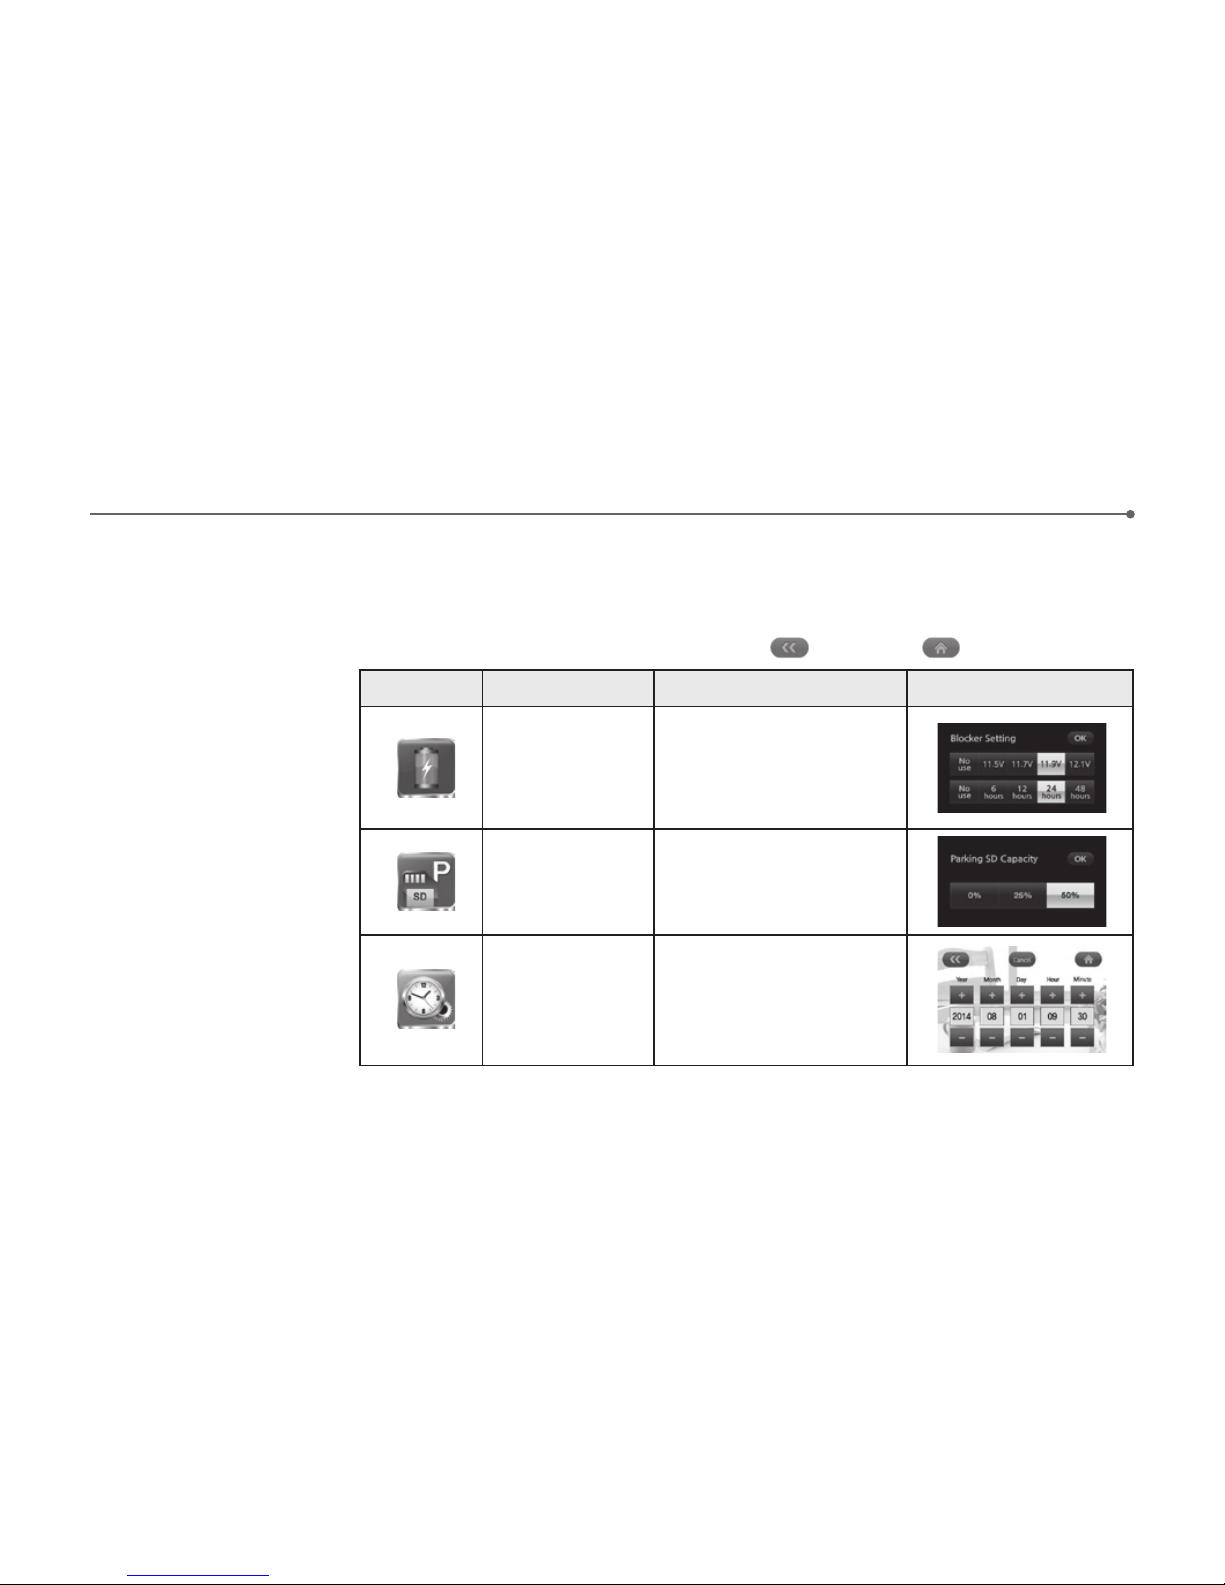
Icons Meaning Details
(Battery) Power
cut-off setup by
voltage & time
- Voltage: Off,
11.5V, 11.7V, 11.9V, 12.1V
- Time: Off,
6hr, 12hr, 24hr, 48hr
SD card use
allocation setup for
parking mode
0%, 25%, 50%
Time setup
year, month, day, hour,
minute
[Previous] [Menu button (Home)]
Page 31
30 _
GUI - Descriptions
(Display Setting)
11
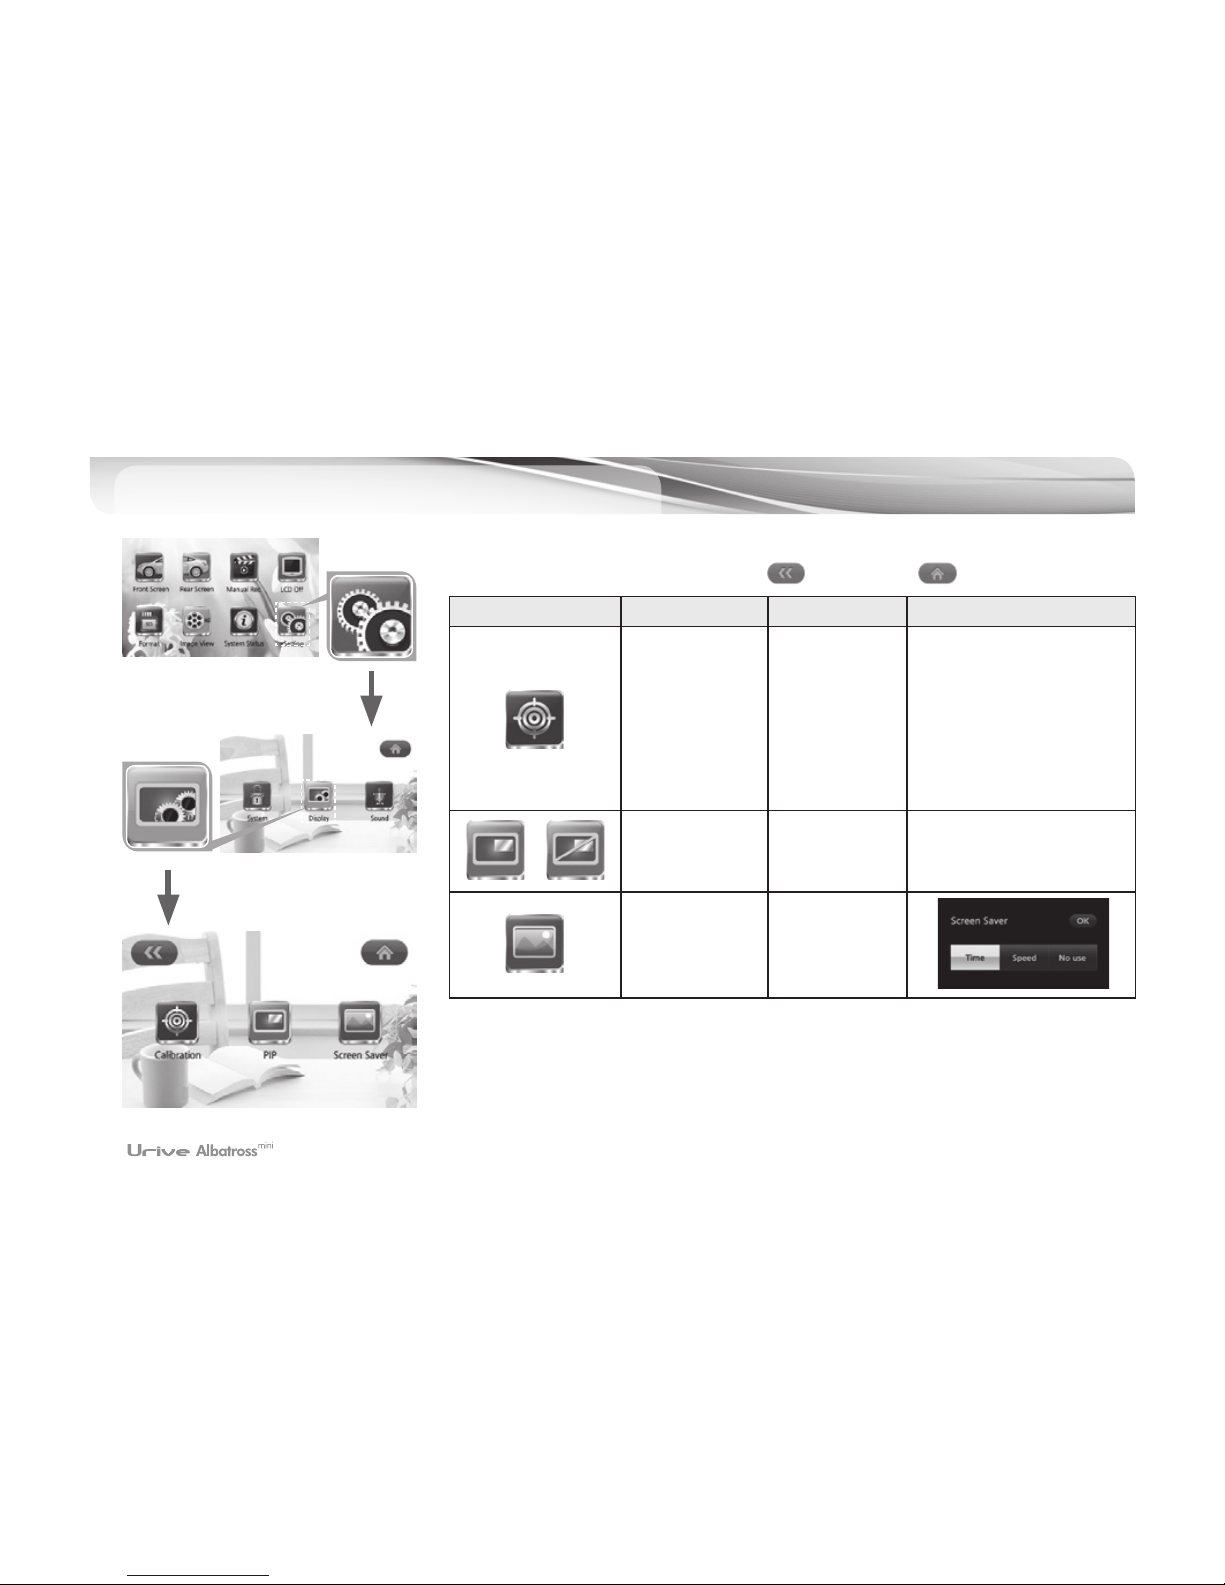
Icons Meaning Details
Coordinates
correction
For correcting
touch
coordinates
Correction will be
completed when pushing
the five points shown on
the screen (The top left,
the top right, the bottom
right, the bottom left,
center of the screen)
PIP on/off
setting
For turning on
and off the PIP
function
Screen saver
setting
Display of
time, display
of speed, and
disabled
[Previous] [Menu button (Home)]
Page 32
User's Manual _ 31
GUI - Descriptions
(Audio Setting)
11
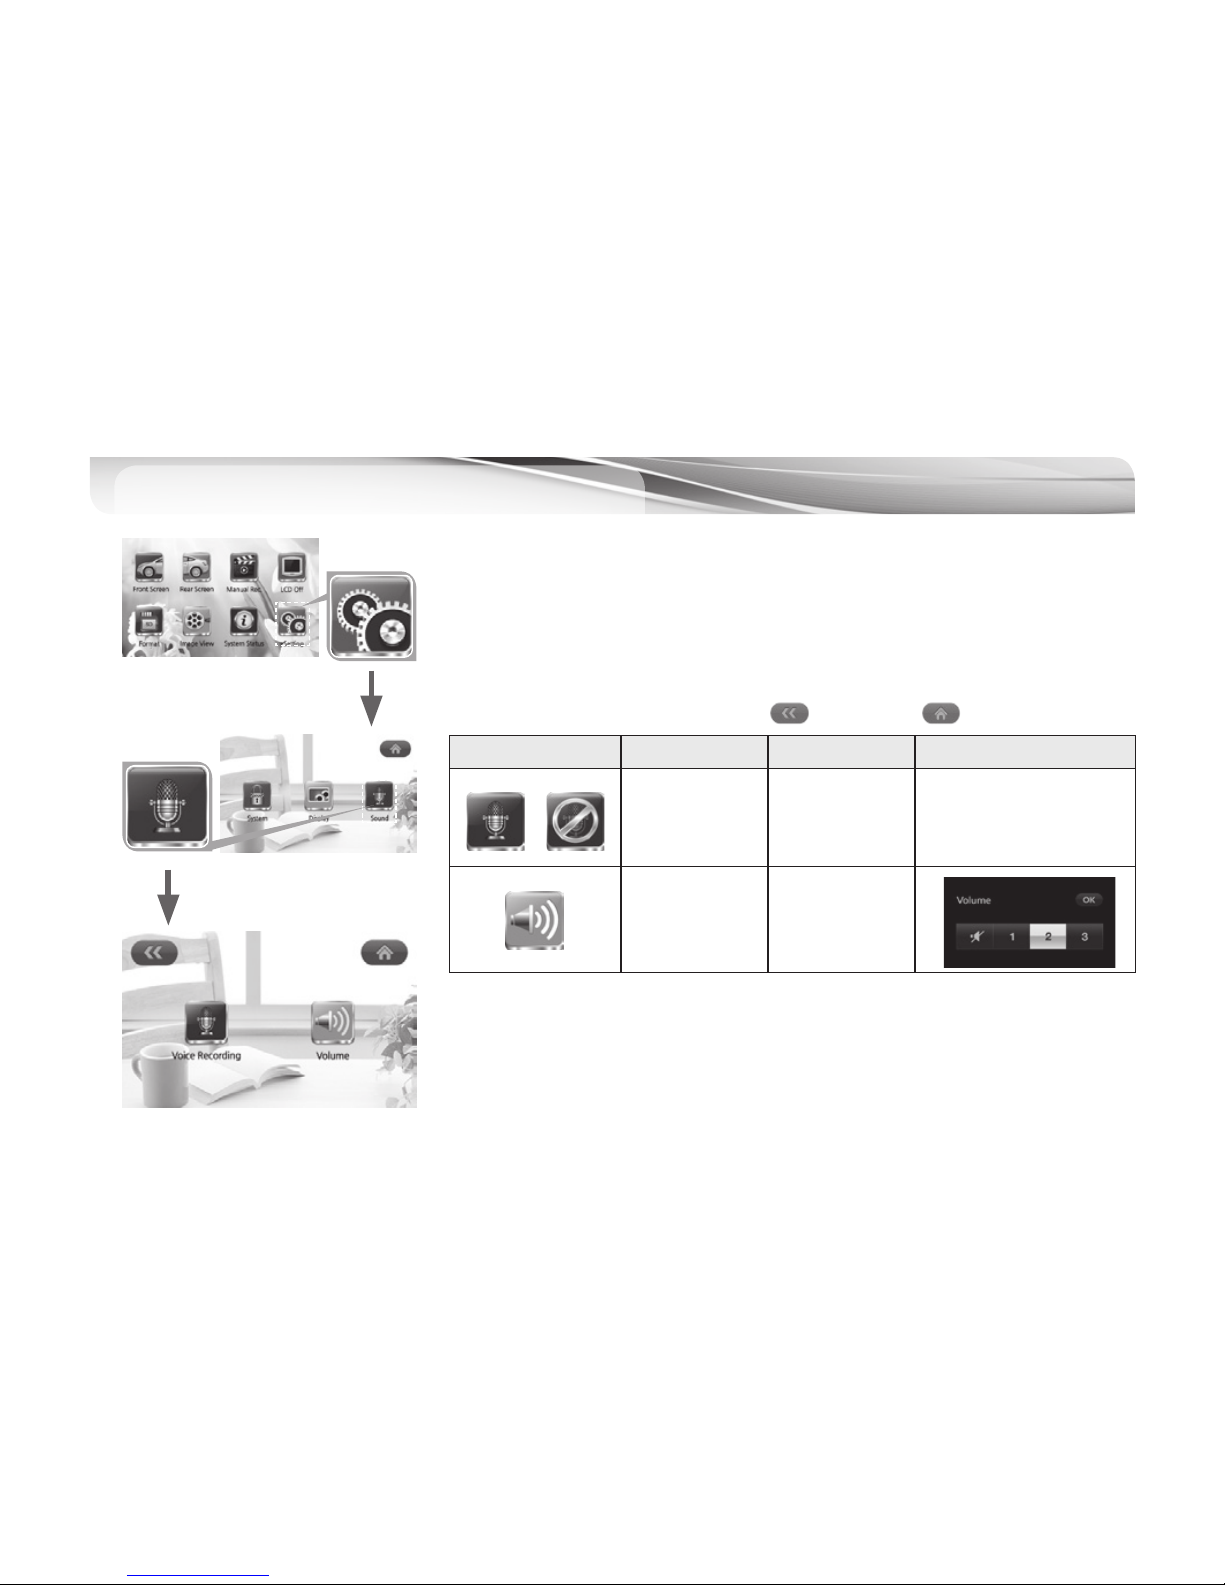
Icons Meaning Details
Audio
Recording
Voice recording
or Mute
Volume
Speaker Volume
setting
[Previous] [Menu button (Home)]
Page 33
32 _
Voice Guidance
12
Voice Description
Recording Start
- After booting
- After checking system status
- After system setting completed
- After video playing completed
Recording Stop
- When “video playing or system status or system setting” chosen
- When system format starts
Check SD Card - When SD card missing or SD card error
Turning to Driving Mode - When the system turning to driving mode from parking mode
Turning to Parking Mode - When the system turning to parking mode from driving mode
Unable to Start Parking Mode - When parking mode SD card allocation set to “0”
SD Card Format Start - When formatting SD card
Please Format SD Card - Voice guidance requesting regular SD card format once every 15 days
Parking Impact File is Created - When impact file is created while parking after the system turned to driving mode
Camera Error - When camera sensor error occurs
GPS is Connected - When GPS signal is received at driving mode (Only once)
LCD Auto Saver Activated
- When LCD off at driving mode due to high temperature
- When the LCD screen touched at high temperature
Recording continues normally
LCD Turns On After a While
- Notifying LCD Auto Saver activated (Once at driving mode)
Parking Mode - When the LCD screen touched at parking mode
Page 34
User's Manual _ 33
13
PC Viewer Installation
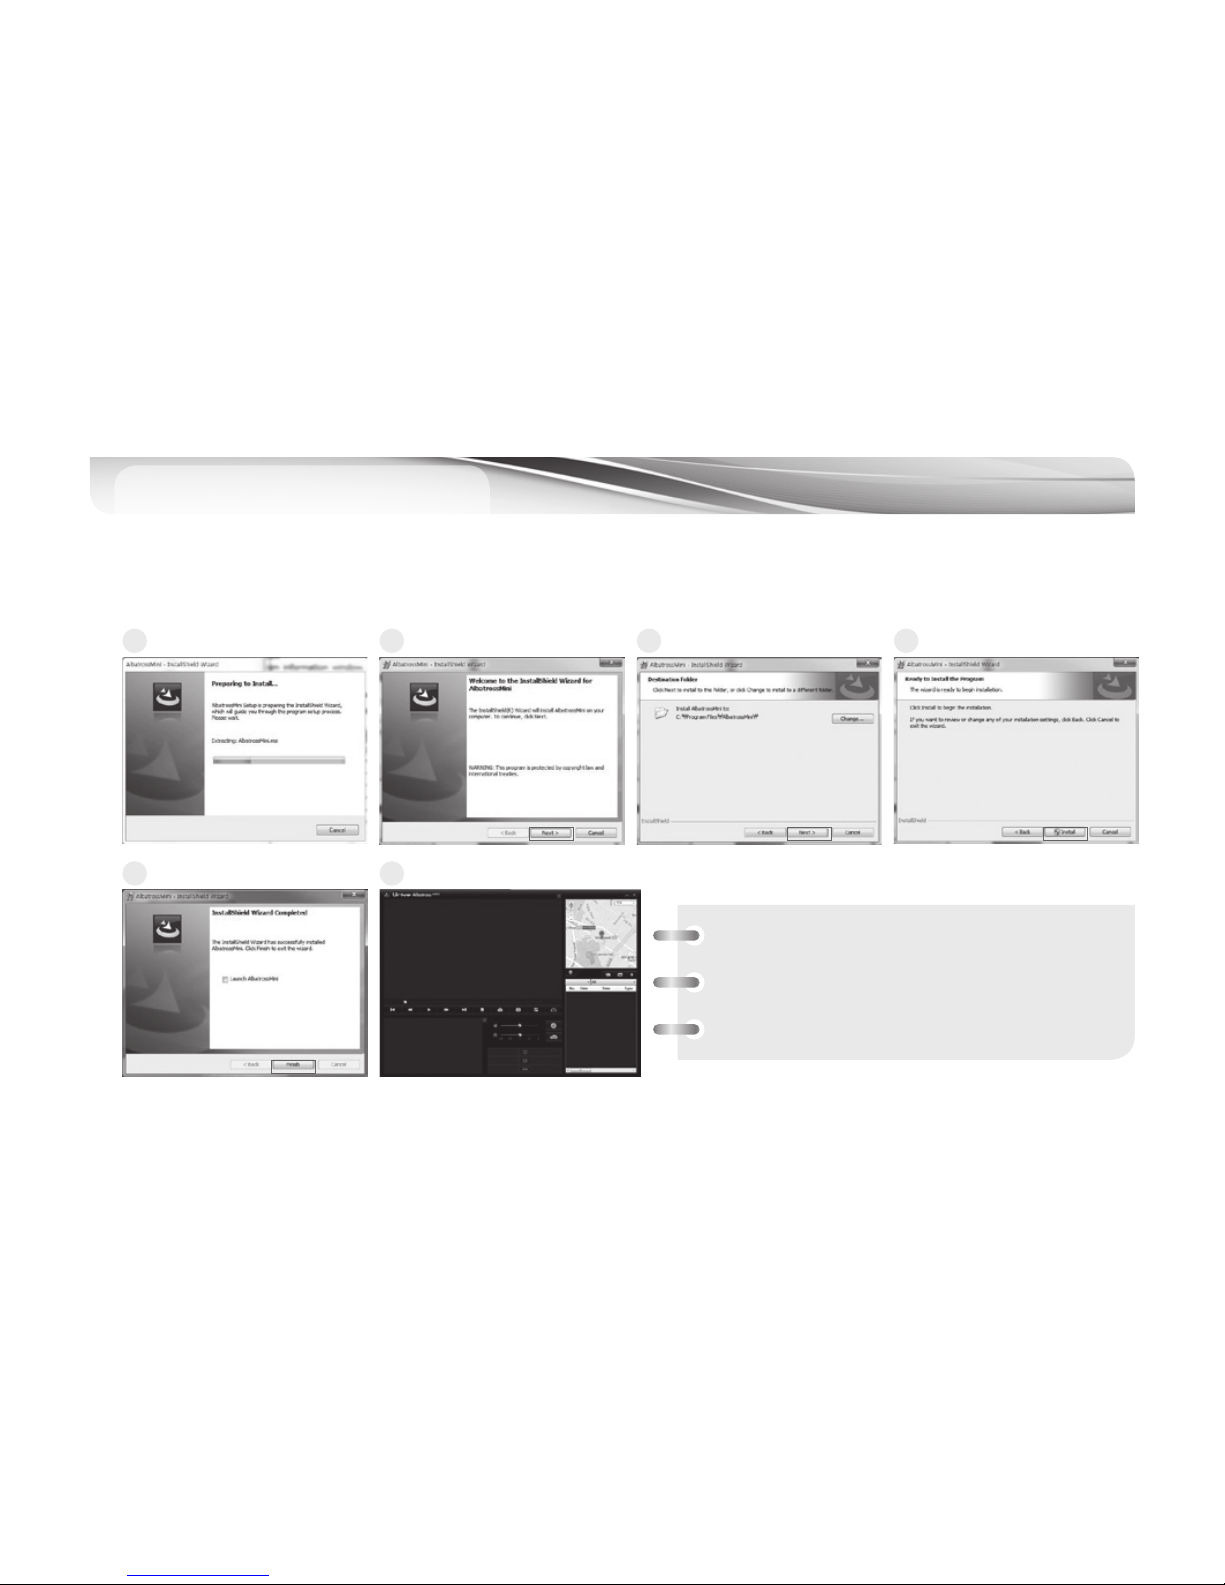
1. Connect the MicroSD memory card with MicroSD card reader to the PC and execute the “AlbatrossMini.exe”.
1
4
2
5
3
6
[Minimum PC spec. for PC viewer]
• Computer OS : XP (32bit), Vista (32bit),
Window7 (32/64bit), Window8(32/64bit)
• Computer H/W : PENTIUM4 2.8GHz / 1G RAM
• Web browser : Microsoft Internet Explorer 7.0
Page 35
34 _
14
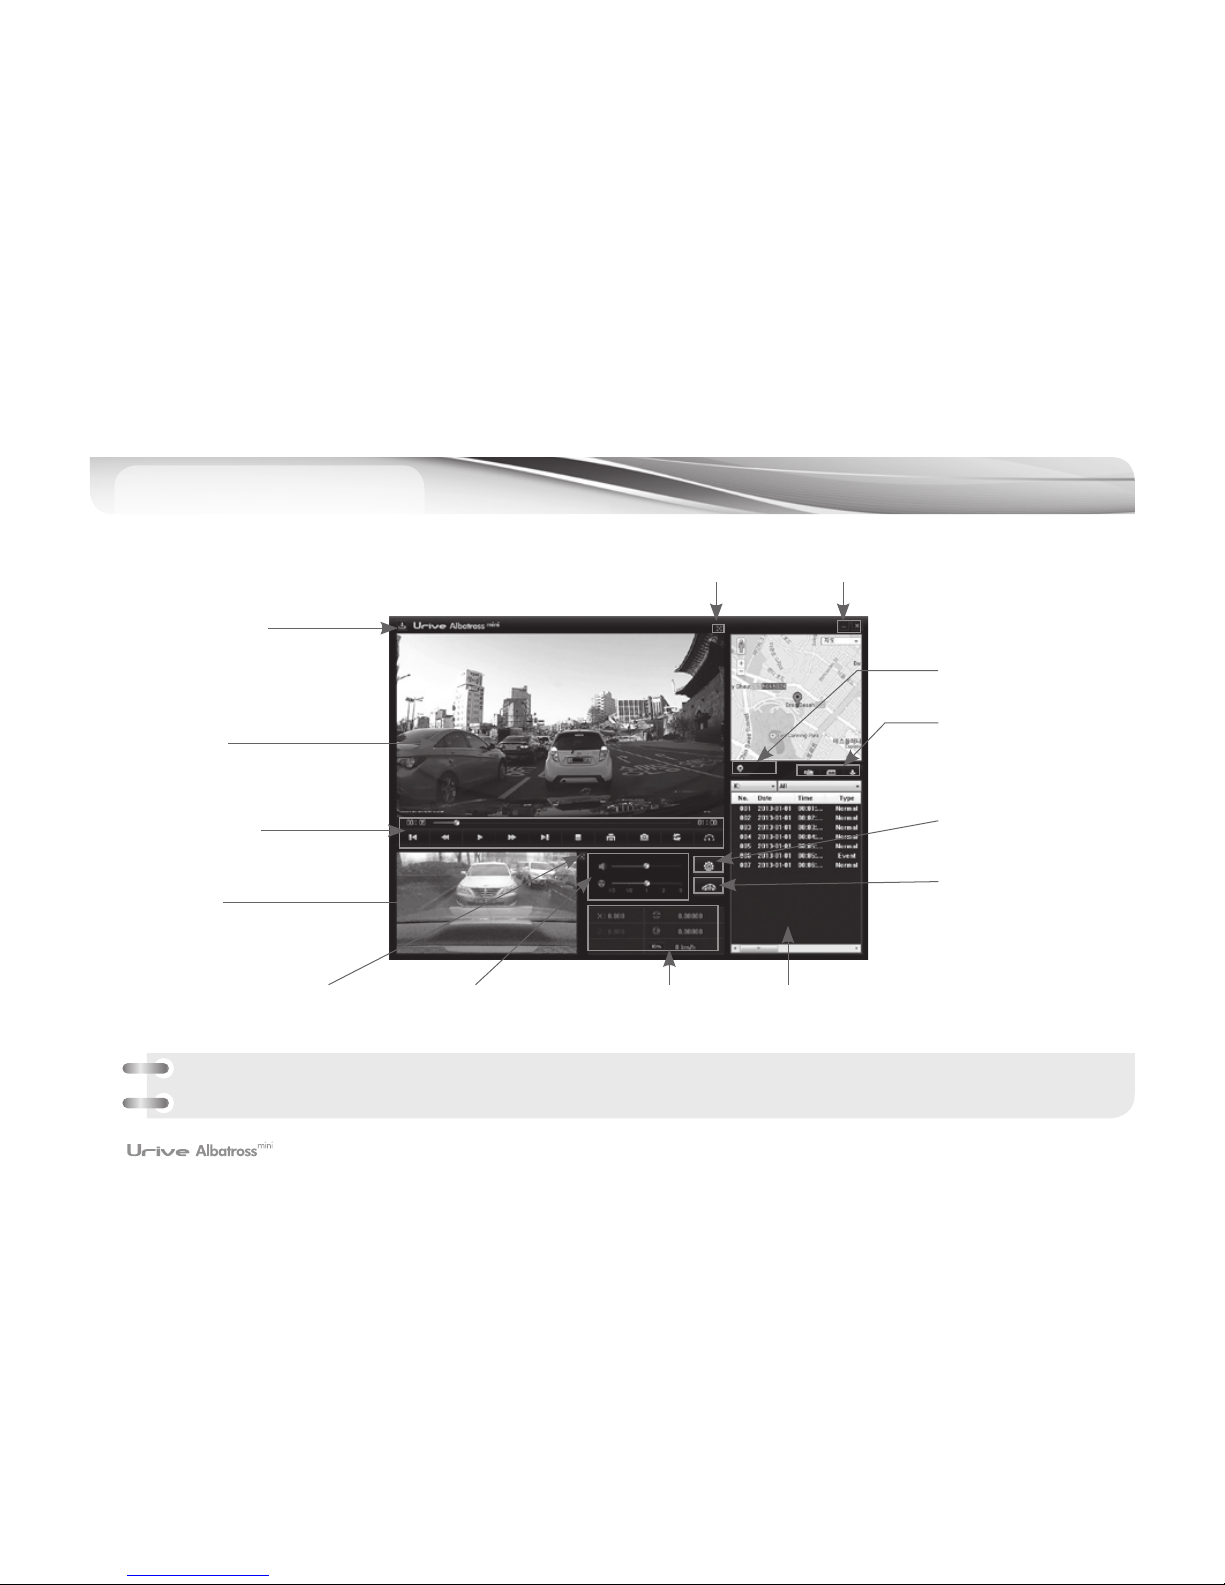
PC Viewer - Main
Front Image
Full Screen
Rear Image
Full Screen
Volume, Brightness,
playback speed
Impulse/Latitude/
longitude/Speed
File list
Viewer/Firmware
Version & updates
Front Video
Play Control Bar
Rear Video
Viewer Minimize/Close
Map On/Off
Open files. SD format
File arrangement
(ascending order)
Black Box
configuration
Tracking and tracing
the driving record
• Latitude / longitude/speed/map information can be displayed with GPS module(option).
• Picture quality(H) or (L), Mute (M)and GPS (G) are displayed at the bottom of the screen.
Page 36
User's Manual _ 35
15
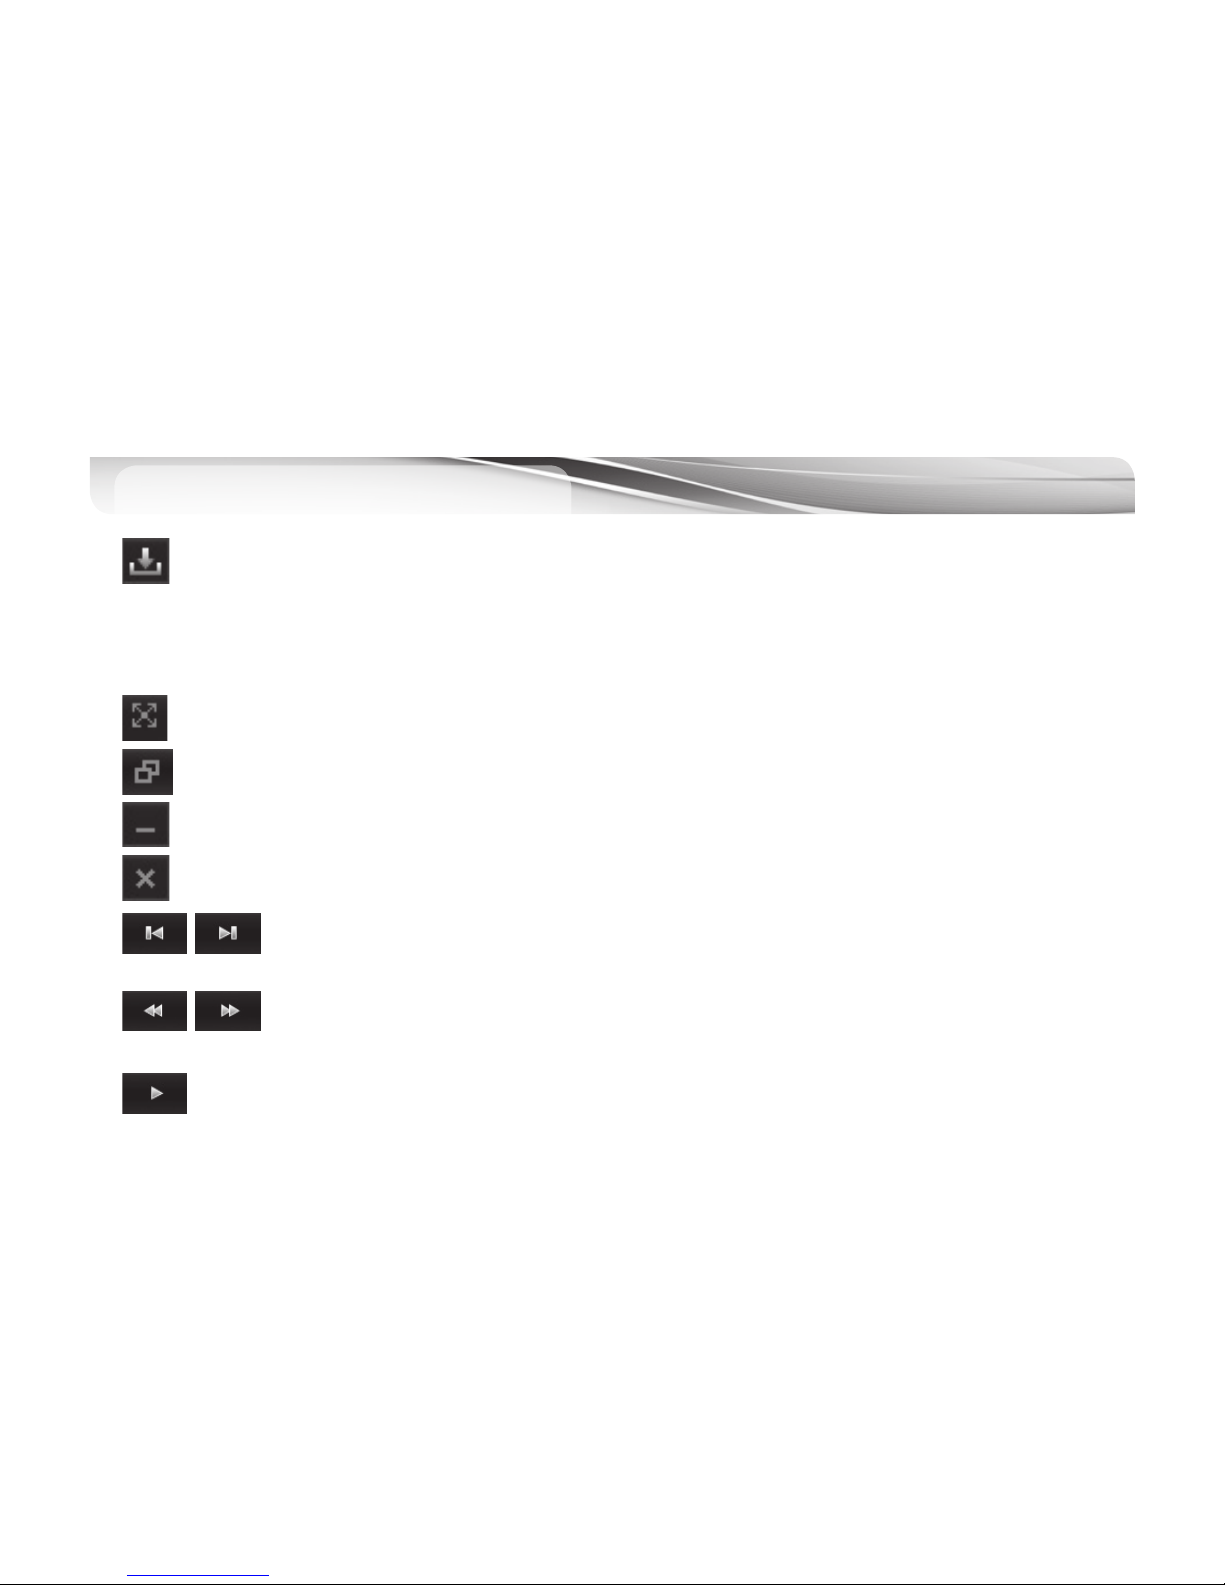
Program version information This button is for going directly to the Urive homepage and shows viewer,
firmware version information. Users can check the version information and update the viewer and firmware by
connecting Micro SD to PC.
Caution) when the viewer and firmware are downloaded, Please choose “Unblock” button during “Windows safety
worming” pops up.
Full Screen button It changes front or rear to full screen.
Return to Main screen It switches full screen play mode to viewer main screen.
Minimize button It minimize the viewer to task bar.
Viewer exit button For ending the specific PC viewer.
The previous file / next file play button Users can go to previous file and next files with that
buttons.
Moving buttons to previous frame/next frame Pause of video images and moving to previous
frame / next frame unit.
Play start Playing a file at the list and restarting the pause video.
PC Viewer - Viewer Buttons
Page 37
36 _
15
Pause
Stop the play
Screen print Printing the whole screen of the viewer.
Screen capture Saving the full screen at the viewer as a JPG file.
Volume control Control the volume up to 10.
Control the play speed Control the play speed as 1/4, 1/2, 1, 2, 4.
G-force/Velocity Graph These are toggle buttons which are used to display acceleration and
velocity graphs, respectively. The velocity graph is available only when the GPS module (optional) is
mounted.
Driving History This button is used to display information on the driving history. The information is available
only when the GPS module (optional) is mounted.
Black Box Setting This button is used to store setting of the Black Box in the SD Card. This is enabled only
when the SD card is connected to your PC.
Page 38
User's Manual _ 37
Display/Hide Map This button is used to display the information on the driver’s location on the map in
playback mode. This function is available the GPS module (optional) is mounted.
File open This button is used to open a video file (multiple files can be selected simultaneously if the Shift or
Ctrl key is pressed and held).
SD format and check This button supports to fix errors of the SD card, or to retrieve poor sectors and to
format the SD card. But format is available before playback. If a file is being played, the SD car can be formatted
only after the Viewer is restarted.
For shifting between front and rear videos Can change the locations of the front and rear videos on the PC
viewer.
For showing the acceleration and speed graphs Pushing the button will pop up the acceleration and speed
graphs.
For changing the arrangement of the list of files Can change between the ascending and
descending orders for arranging the list of stored video files.
15
Page 39
38 _
16
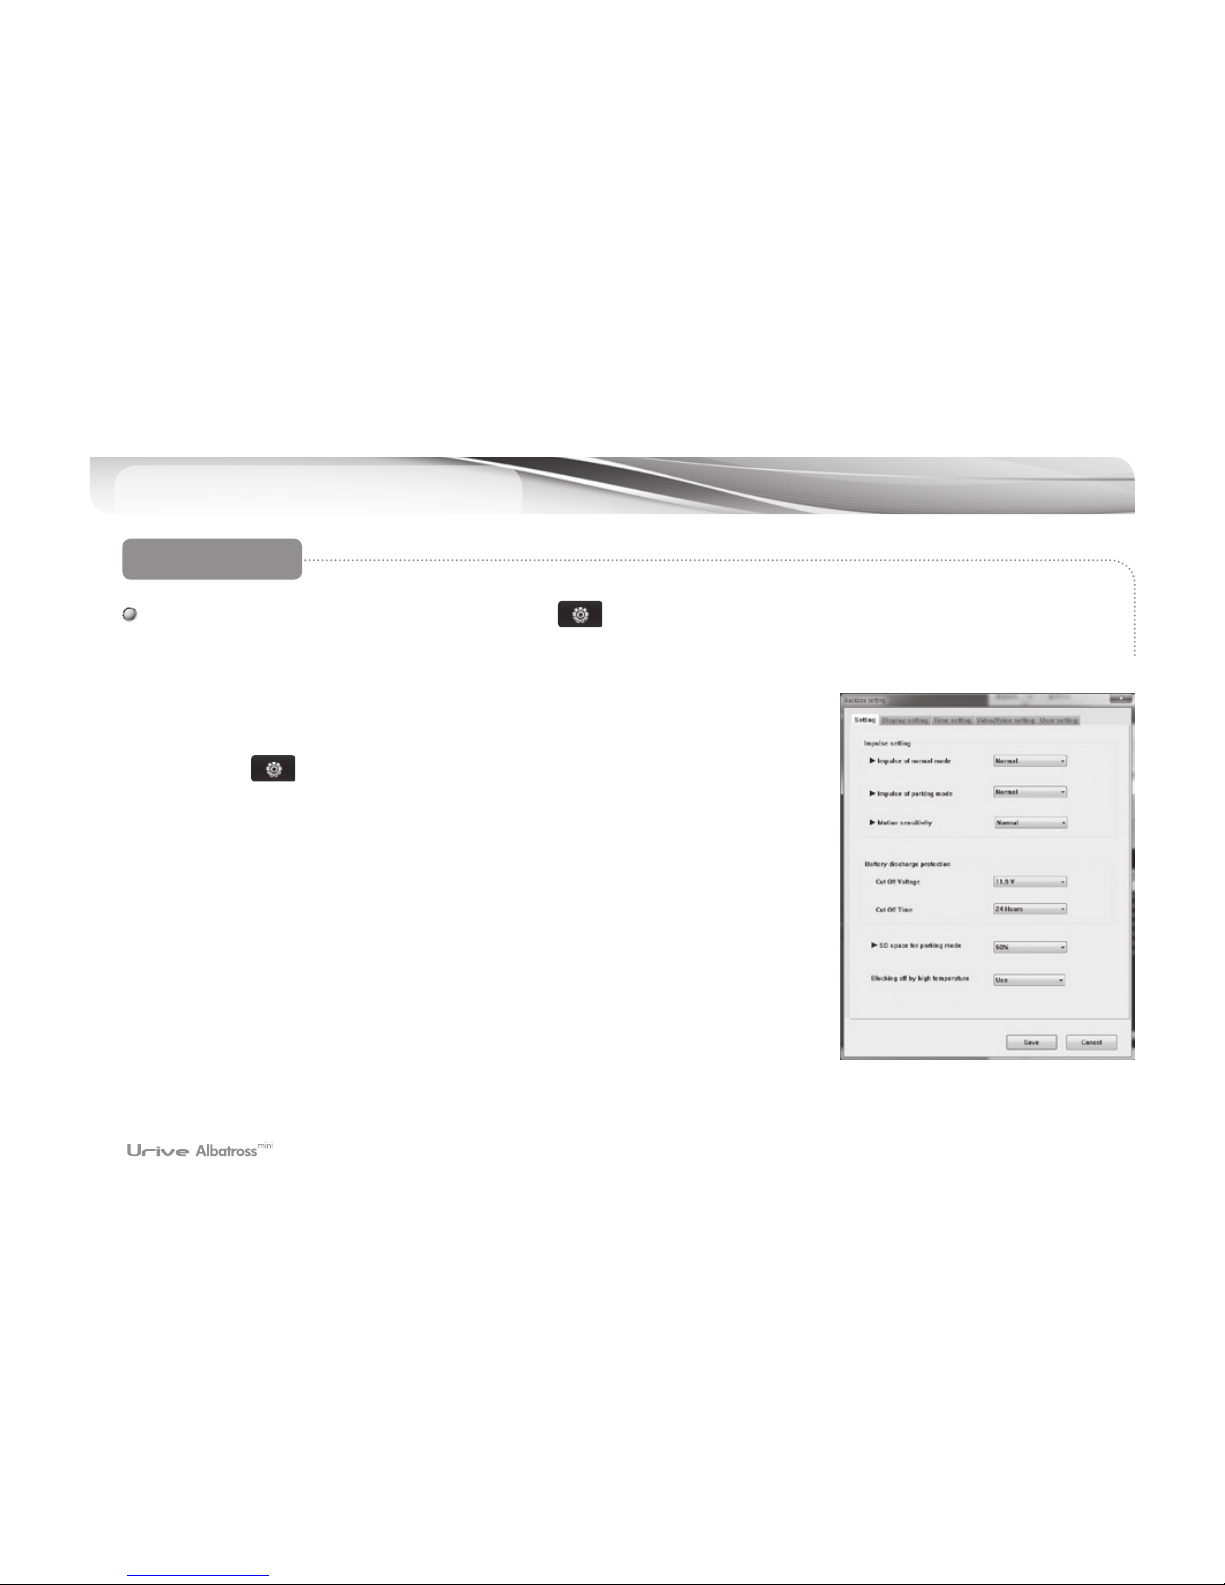
# Black Box configuration:
when users press button in the viewer main screen, it shows configuration
window like below. It is separated with time, screen, voice/image and user setting tap.
1.# Connect the MicroSD memory card with MicroSD card reader to the PC.
2.# Select the button on the Viewer Main screen. select the drive on
connected to a memory card.
3.# Driving impulse setup : Set up a degree of impact by which an event recording
is activated. Select either ‘Fast setup’ or ‘Manual setup’. Fast setup is sensitive,
normal, in sensitive of the three stages can be selected.
4.# Parking mode shock level setting: For setting the level of shocks to record
events when shocks occur while parked. The user can select from high, medium
and low levels.
5.# Parking mode motion detection sensitivity setting: For setting the level of
sensitivity to detect motions while parked. Can select among high, medium
and low levels.
[Configuration]
Black-box configuration
Page 40

User's Manual _ 39
16
6.# Blocking voltage setup : Blocking voltage setup is reference voltage setup and separated by a timer set. The reference
voltage setup is [11.5V], [11.7V], [11.9V], [12.1V] to available as a choice to step 4. timer is 6 hours, 12 hours, 24 hours, 48
hours can be selected in four steps. Select one among total eight steps.
7.# Parking mode memory usage setting: For determining the SD card memory usage that will be applied in the parking
mode (Selects from 0%, 25% and 50%)
8.# Power off for preventing the device from hi temperature: The Power off coursed of high temperature over 5minuits in
the driving mode.
9.# When you click the Save button after you select this, the environment setting is finished.
Page 41
40 _
16
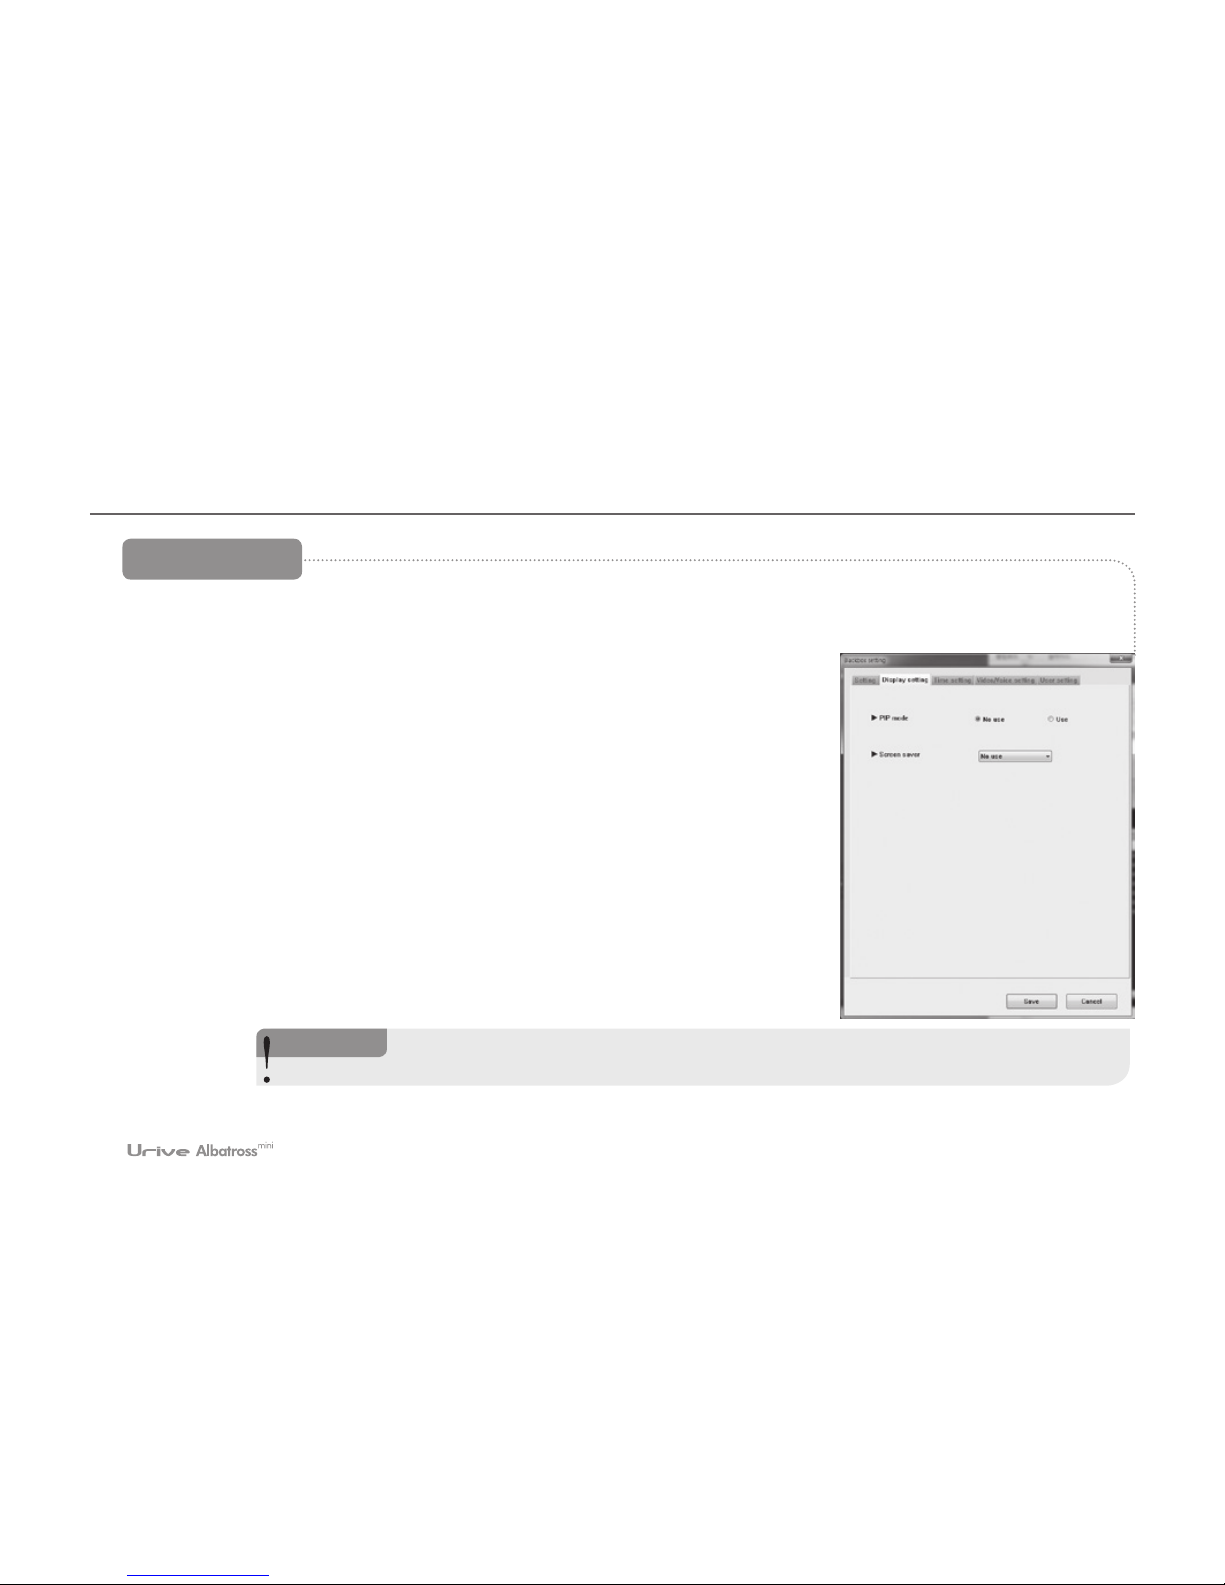
1.# When the screen setting tab is selected, users can determine whether to use the PIP function, the screen saver and the
rear video shift function.
2.# PIP Mode : Functions to check live videos of the front and rear view in a LCD
screen simultaneously. The use of this mode can be set.
3.# Screen Saver : Functions to turn the current screen to a basic screen displaying
only information of a current time, GPS reception status, mute status, event
storage status, etc. after the set time has passed without any input or touch
action. As soon as you touch the basic screen that screensaver is on, the basic
screen turns back to the previous video screen displaying video image of the
front or rear view. In the Screen saver status, if there is touch signal during 2
minutes, the LCD is turned off automatically. When the device’s LCD is turned
off, the main device switch to screen saver mode by detecting any touch signal.
4.# Rear video shift: This function is for shifting the rear side video stored in the
black box, between the left and right sides on the screen. Can be set to enabled
or disabled.
5.
#
After completing selections of modes, press save button to save the selected settings.
[Screen setting]
<Caution!>
When the rear video shift function is set, the recorded rear video can be shifted, while the
rear video shown on the LCD screen will not be shifted.
Page 42
User's Manual _ 41
16
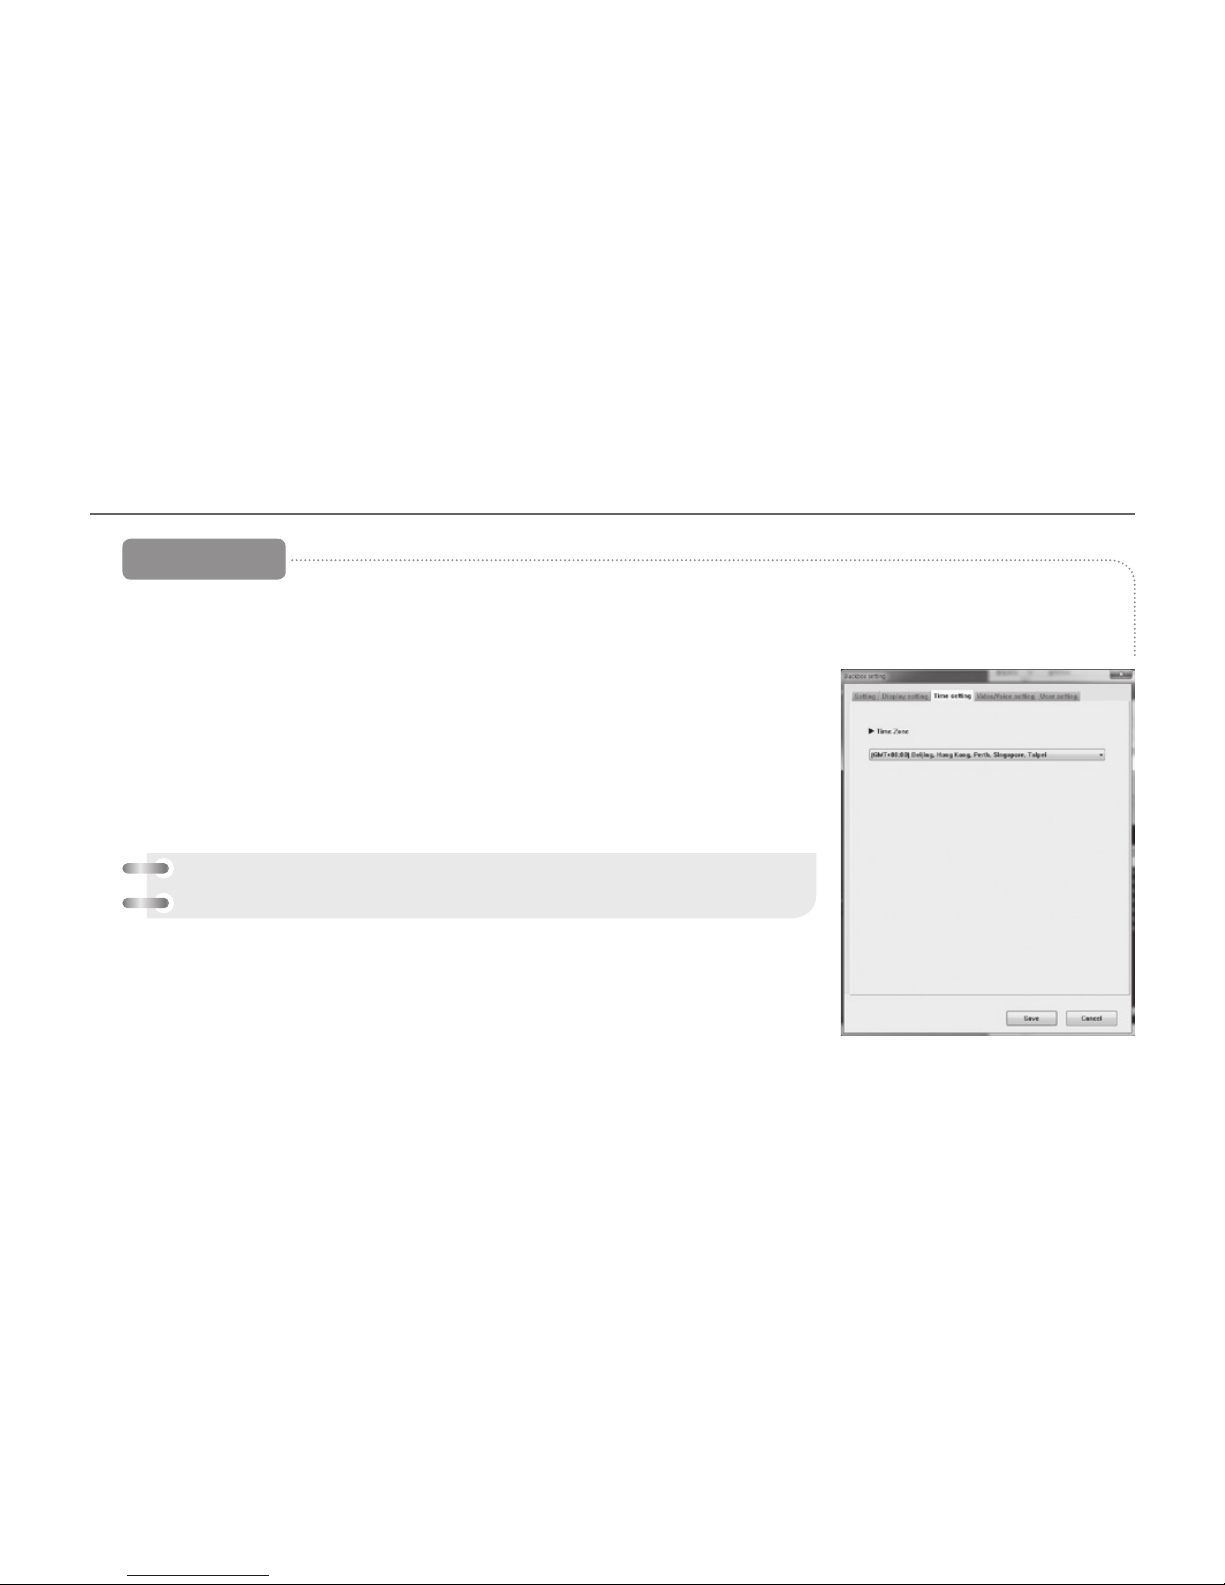
1.# Time Settings tab, the black-box time settings and standard time settings are
available.
2.# Standard Time Setup : The GMT can be set by country. The PC system time is
loaded and recognized as the standard time. (Standard Time of South Korea –
GMT +09:00 Seoul)
3.# When you click the Save button after you select this, the environment setting is
finished.
[Time setting]
[Reference] how to setting the time on the device
Main menu – system setting – time setting
Page 43
42 _
16
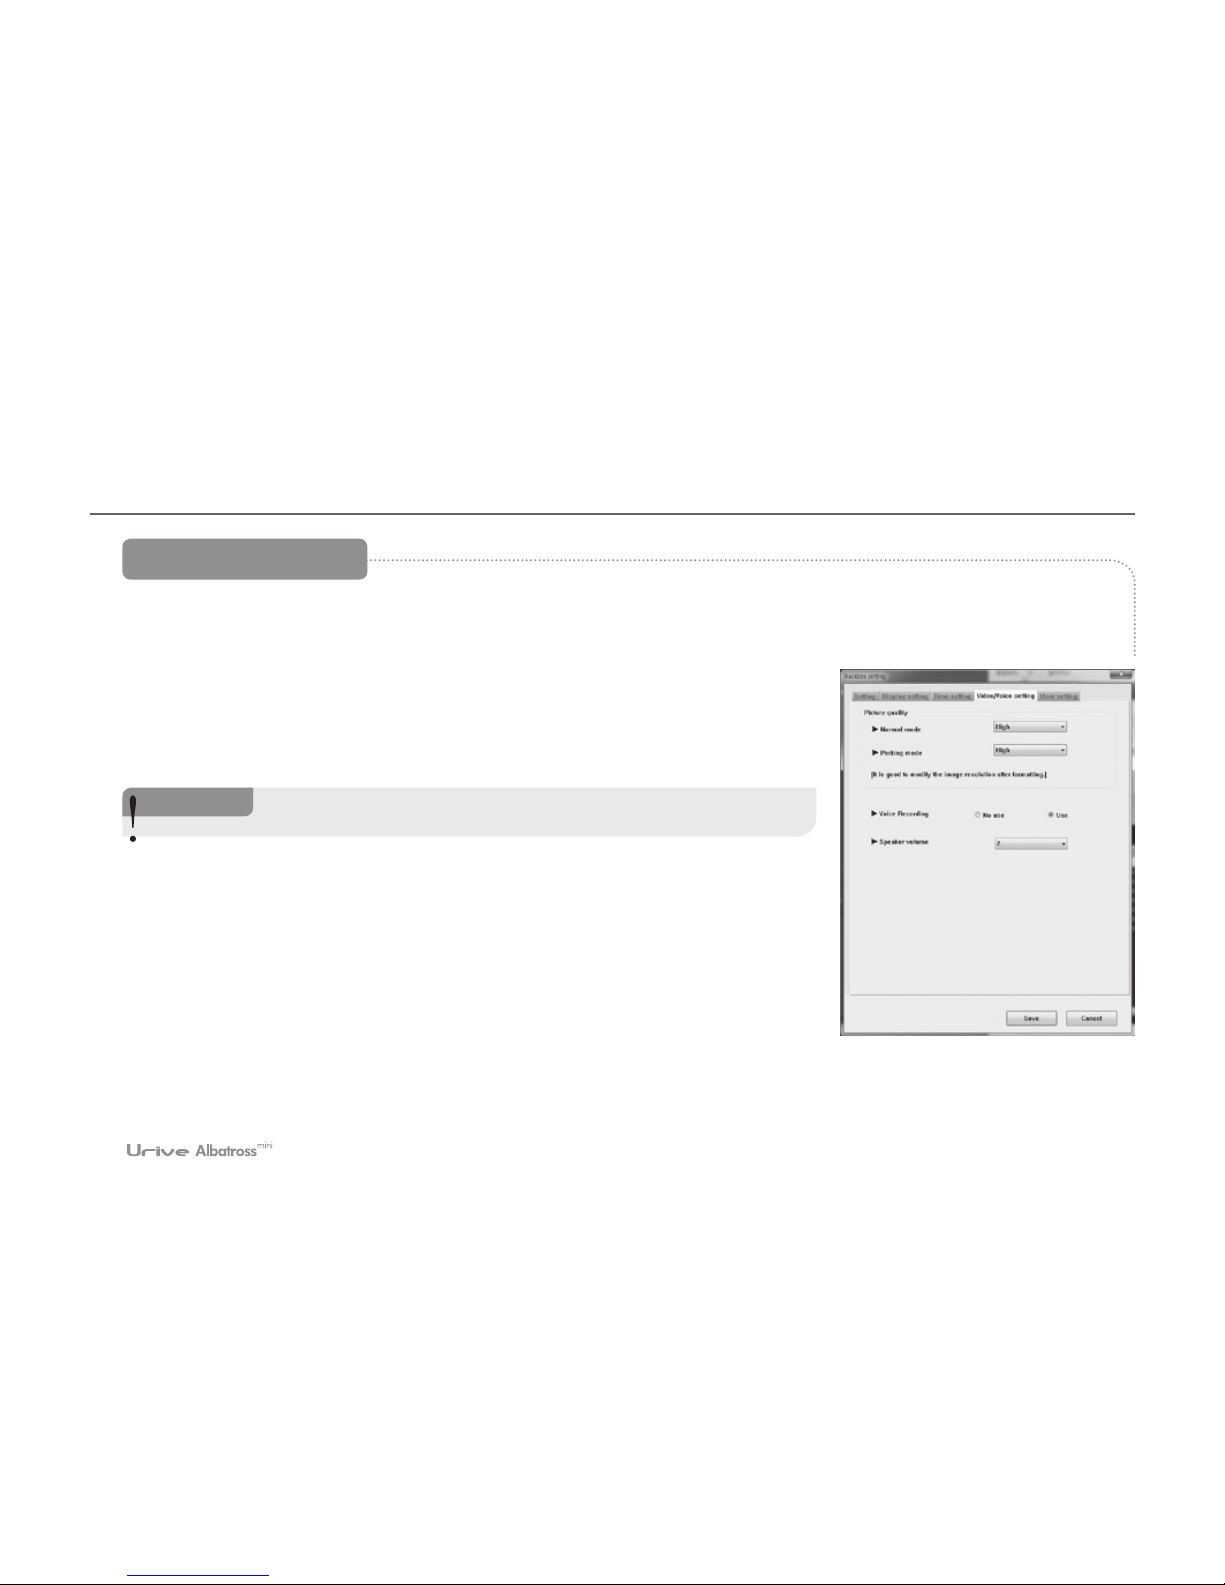
1.# When the audio/video setting tab is selected, it will be possible to set the quality of videos in the continuous mode as
well as in the parking mode, and set whether to carry out audio recording, and also set the speaker volume.
2.# Video quality: The quality of the videos, to be stored while in the continuous
(driving) as well as in the parking mode, can be set at high or low level. If the
quality is enhanced, it will be possible to see video more clearly in high quality.
However, the file size will grow and the storage time will be shortened.
3.# Audio recording: The black box is designed to record the video and audio at
the same time. When the audio recording is disabled (Mute), only the video will
be recorded while not recording audio.
4.# Speaker volume: The sound output for the voice notification and video
playback can be set. It can be set to be mute or stage 1, stage 2 or stage 3. The
higher the stage goes, the louder the sound becomes.
5.# After completing selections of modes, press save button to save the selected settings.
[Voice/image setting]
<Caution>
It is required to be set after formatting the memory card if needed
to change the video quality.
Page 44
User's Manual _ 43
16
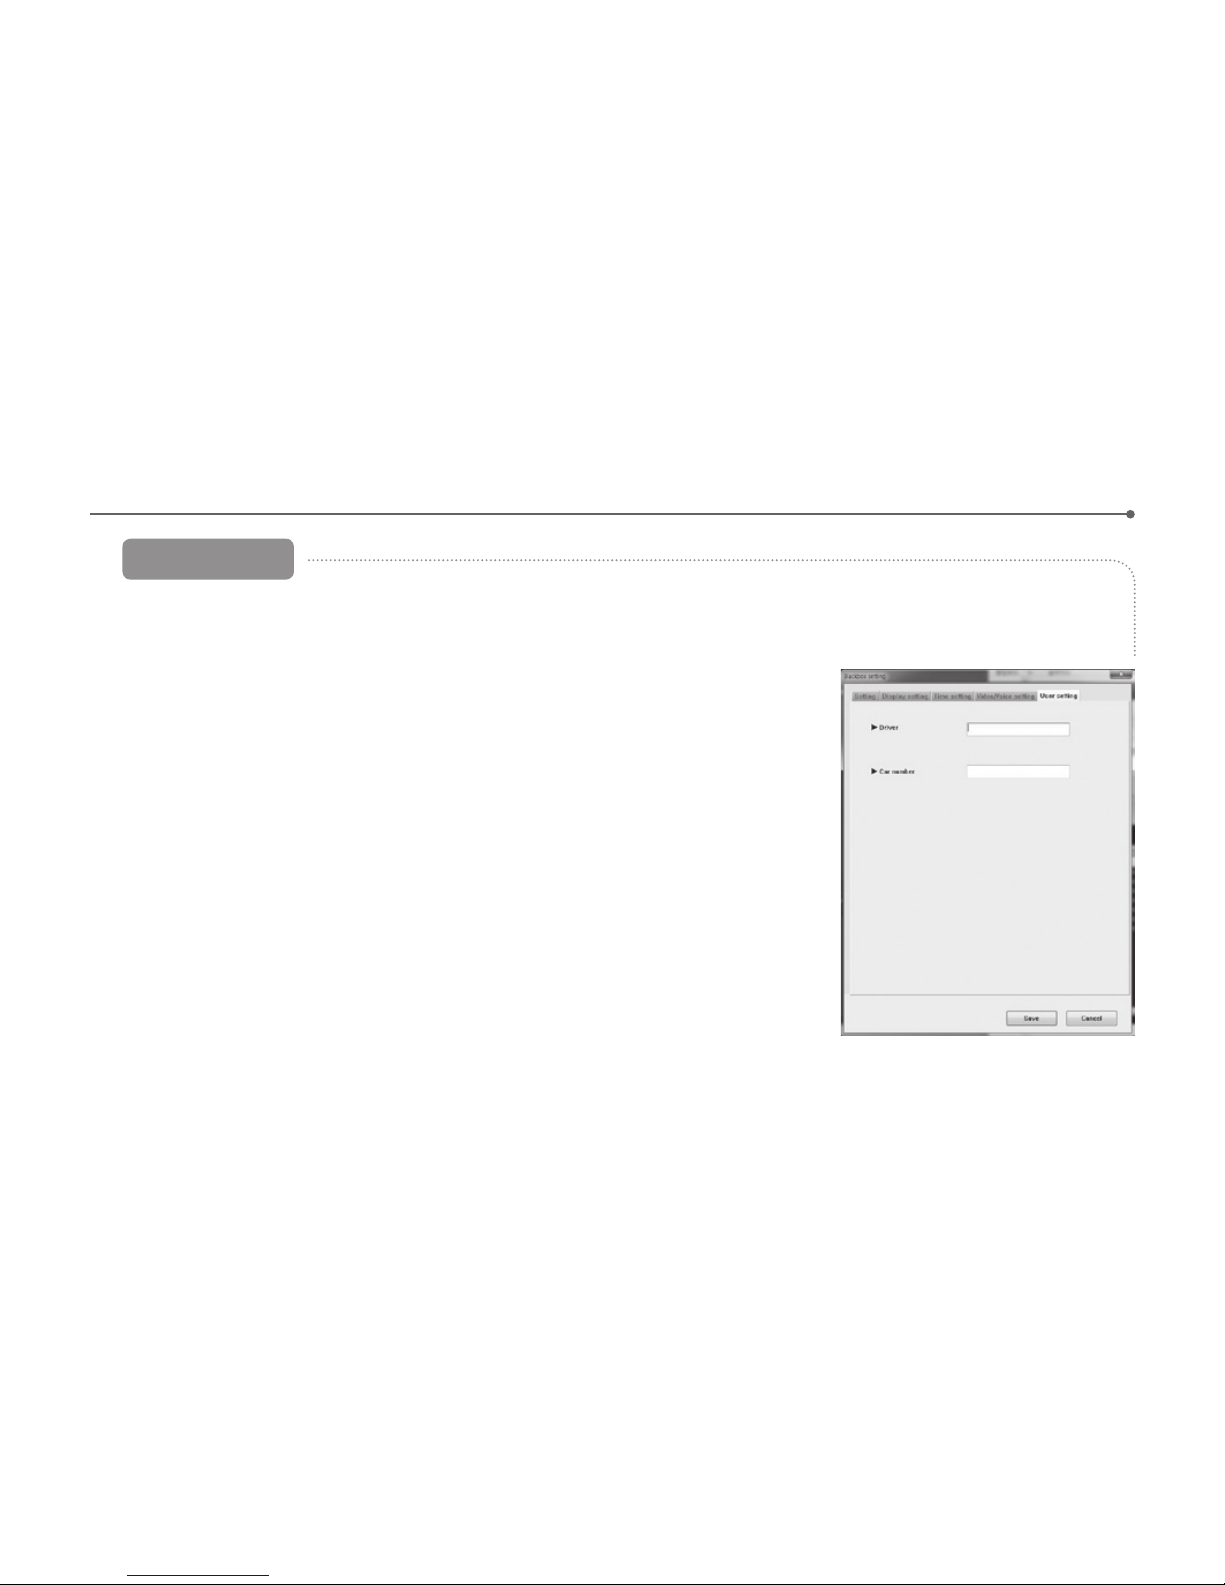
1.# By selecting driver setting tab, you can set driver information and license number
of the vehicle. This is a useful function when a separate memory card is used for
each driver.
2.# After completing selections of modes, press save button to save the selected
settings.
[User setting]
Page 45
44 _
17
PC Viewer - Play List
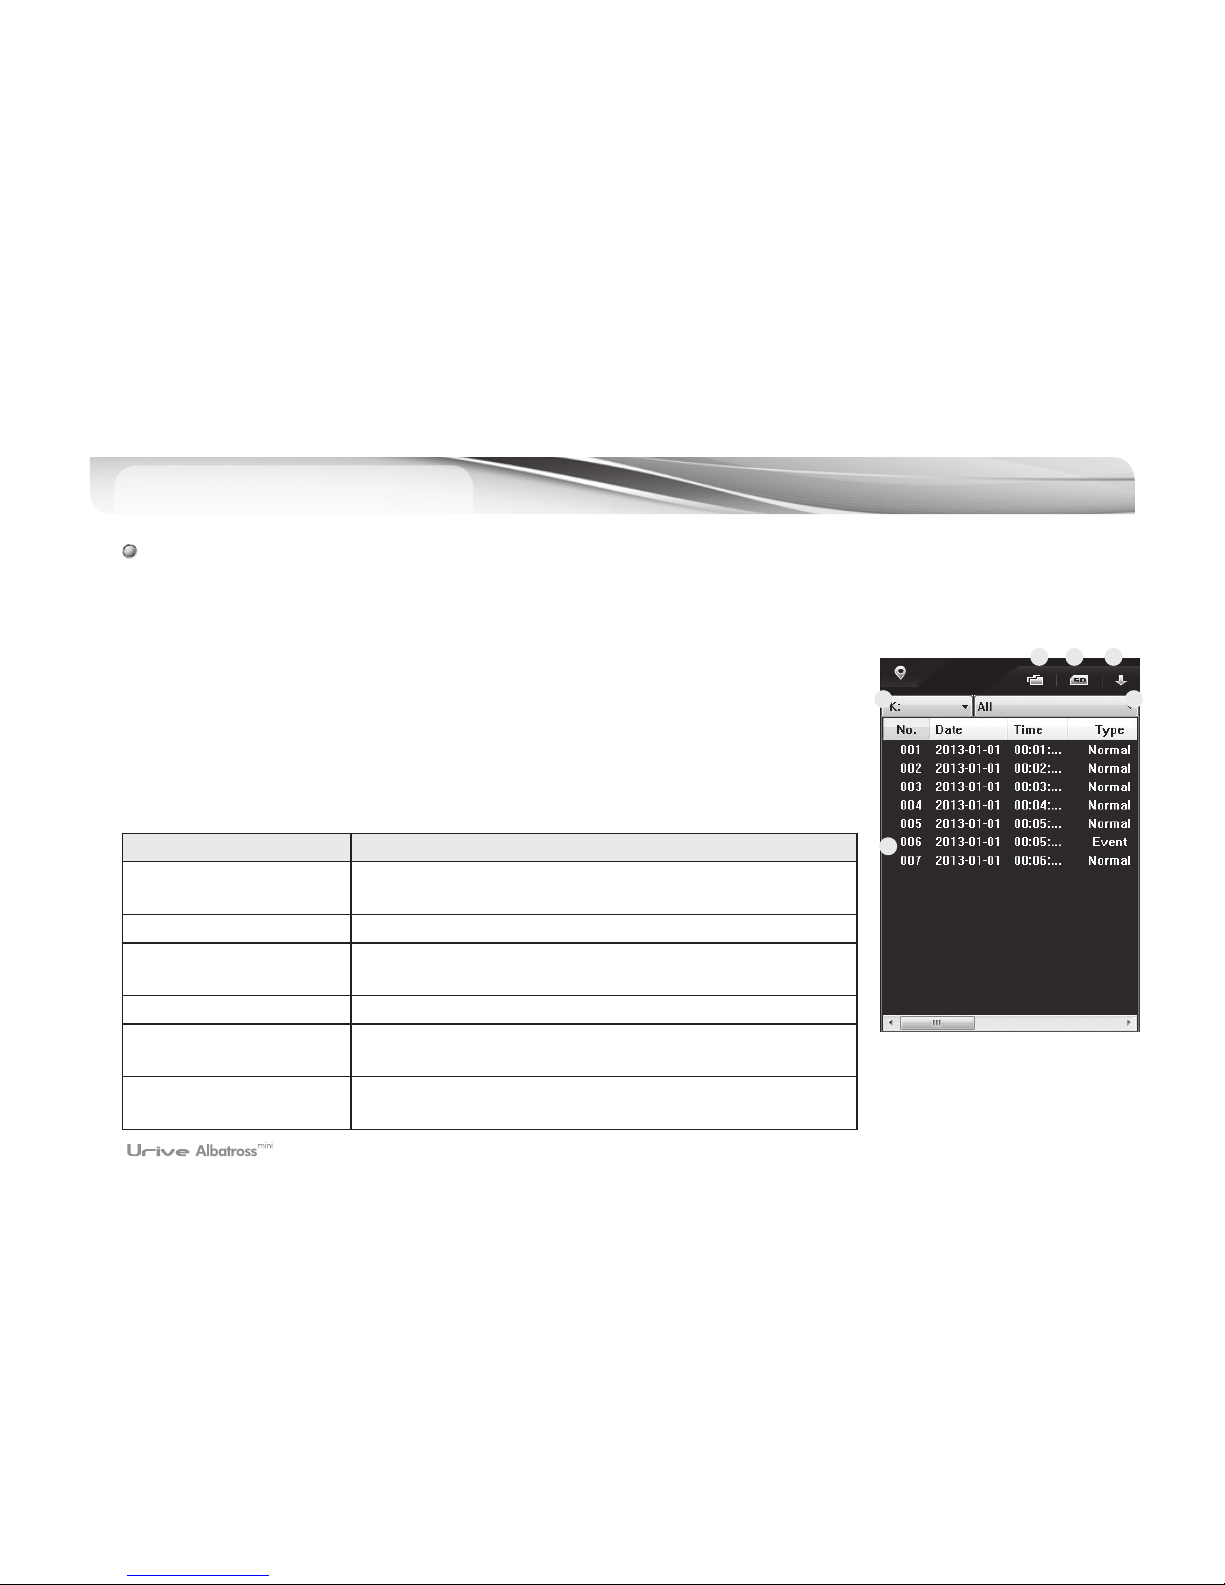
# The video data, recorded by the black box and then stored in the micro SD card or in a computer, can be
selected and played back all or by type and. The list of files can be arranged in ascending or descending order.
1.
#
Remove the micro SD card from the black box and connect it to a computer.
2.
#
The viewer, specifically designed for the product, will recognize and search all the
black box video data automatically and show them in a playback list, as shown on
the left side.
3.
#
Can select the types of videos for playing back. It is possible to select all the videos,
or select them by group, such as continuous file, event file, parking file, parking
event file, or according to user’s own selection.
Items Meaning
①
Open files
Individual files of videos can be selected and played back
(Type – Same as in the case of User’s own selection)
②
Format and recover SD The SD card can be formatted, checked and recovered.
③
Descending order/
Ascending order
The videos in the playback list can be arranged in
descending or ascending order.
④
Location of videos The SD card can be located and selected.
⑤
Types of videos
Differentiated as all, continuous file, event file, parking file,
parking event file and user’s own selection
⑥
Playback list
Files that can be played back can be identified in the order
of their numbers.
1 2 3
4 5
6
Page 46
User's Manual _ 45
18
PC Viewer - File Open
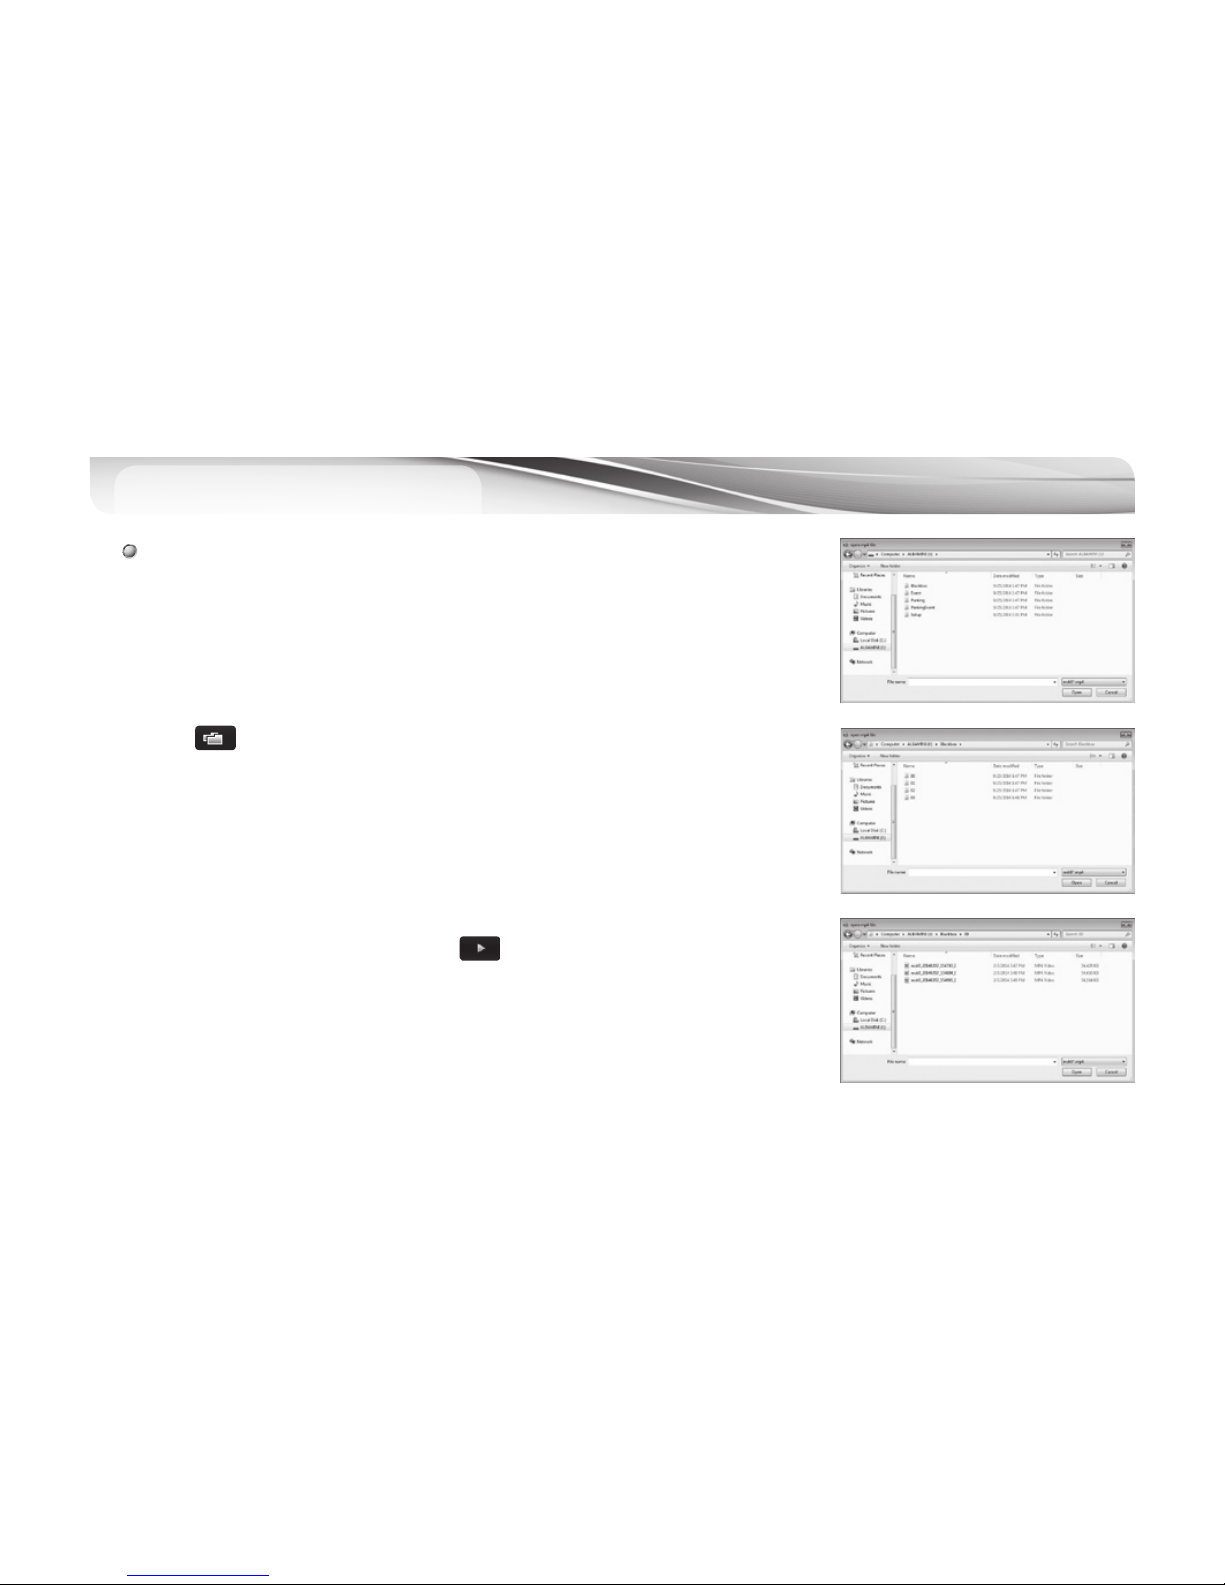
# Replaying stored video images : By opening a black box file in a specific
folder, replay starts as it enters to the file list automatically. If you want to
replay a specific file, press replay button after selecting the file you wish to
reply in a file list.
1.
#
Connect the MicroSD memory card with MicroSD card reader to the PC.
2.
#
Press button on the main viewer window.
3.
#
Select the drive for the SD card.
4.
#
Choose file(s) to play. You can choose multiple files with “Ctrl” or “Shift” key.
4.1 Blackbox Folder: Files for Driving Mode recording
4.2 Event Folder: Files for Event (Impact) recording
4.3 Parking Folder: Files for Parking Mode Motion Detect recording
4.4 Parking Event Folder: : Files for Event (Impact) in Parking Mode Recording
5.
#
Choose a file/files in the list and press or double click the file.
Page 47
46 _
19
PC Viewer - SD Card Format and Restore
1.
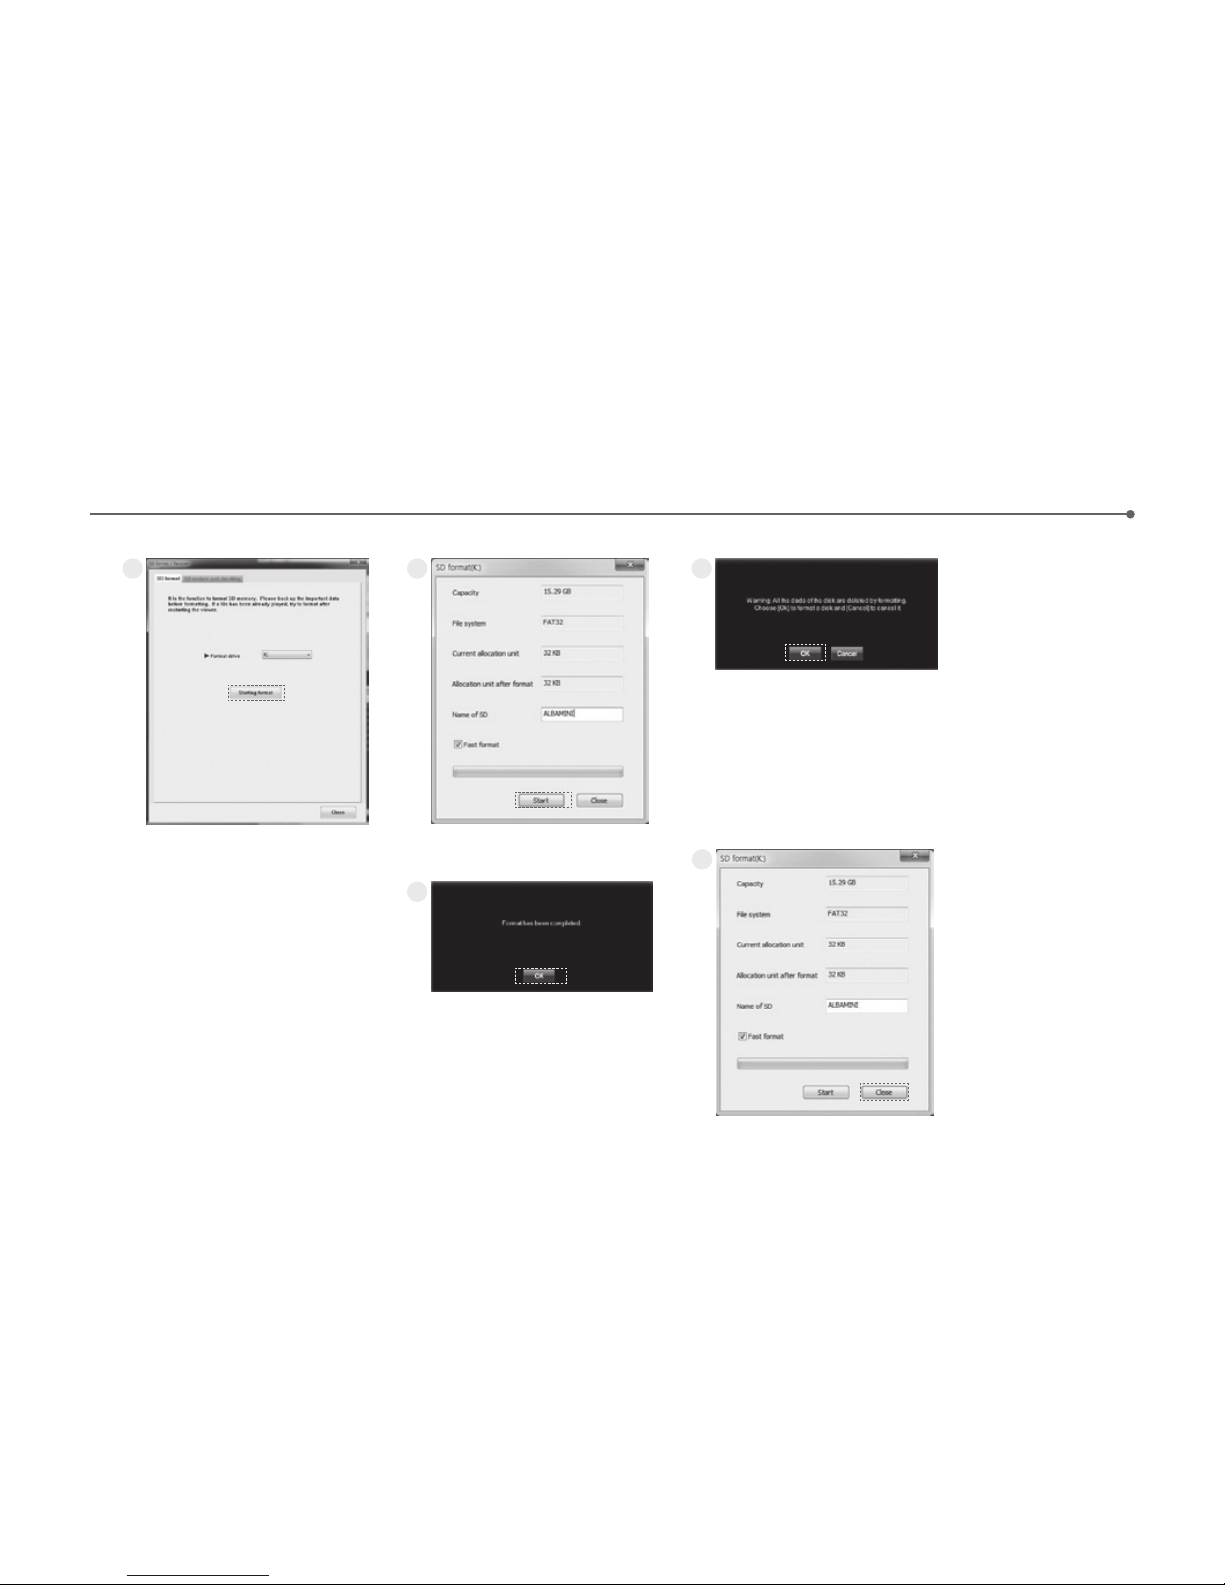
#
Take Micro SD card out of the black box and connect it computer.
2.
#
If you select button in main screen of viewer, SD format tab where Micro SD card can be formatted will appear as
shown in the picture of (1).
3.
#
Format Drive : Confirms the location of a drive Micro SD card is loaded.
4.
#
Information window asking for confirmation or cancellation of format will be popped up when format start button is
pressed.
5.
#
If you press confirm button, SD format window will be seen. Information on the volume of Micro SD card, type of
file system, current allocation unit and allocation unit after format will also be seen and the name of SD card will be
automatically assigned as “AlbaMini”. Format will be started upon pressing start button. “quick format” is also supported.
It may take a long time for SD card to be formatted depending on the specification of PC in “ normal format”.
6.
#
Window indicating the completion will be seen when format is completed. Press confirm button and close button to
end the procedures for formatting Micro SD card
<CAUTION>
- Allocation after format: When a normal format is done on your PC, select 32KB.
- For using the 64GB SD card, Format it on the PC viewer and the main body for its stable
use only.
Page 48
User's Manual _ 47
19
1 2 3
4
5
Page 49
48 _
19
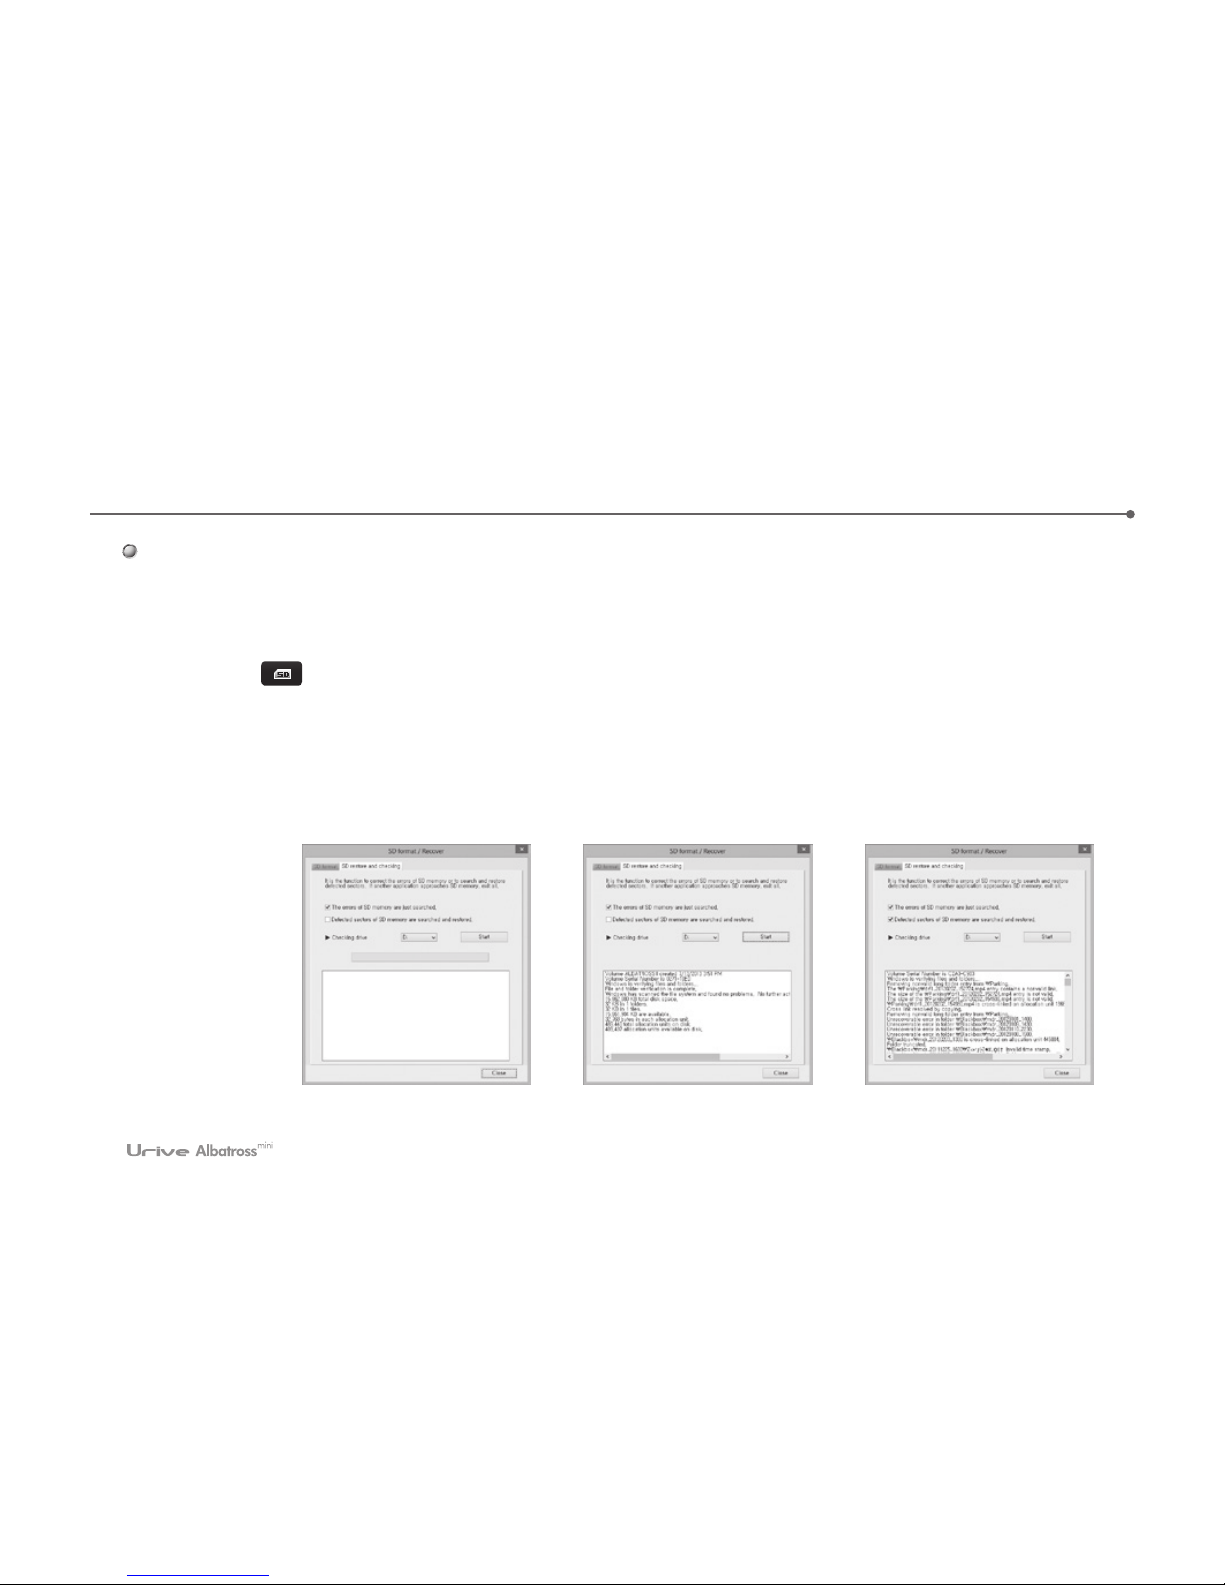
# SD inspection and restoration : functions to fix errors or restore bad sectors in SD memory. Proceed this
procedures after closing all other application programs accessing (using) the memory in SD card.
1.
#
Take Micro SD card out of the blackbox and connect it computer.
2.
#
If you select button in main screen of viewer, SD inspection and restoration tab where Micro SD card can be
inspected and restored will appear as shown in the picture of (1).
3.
#
Basic error detection in the memory card is possible and fixing of the errors, detection and restoration of the bad sectors
are also possible through the inspection of Micro SD card..
4.
#
(The pictures of (2), (3) is showing the results of memory card inspection, fixing the errors and error detection
respectively.
[SD Checking and repairing screen] [Normal SD test results] [ Error SD modify result ]
Page 50
User's Manual _ 49
20
PC Viewer - Driving Record Trace
20
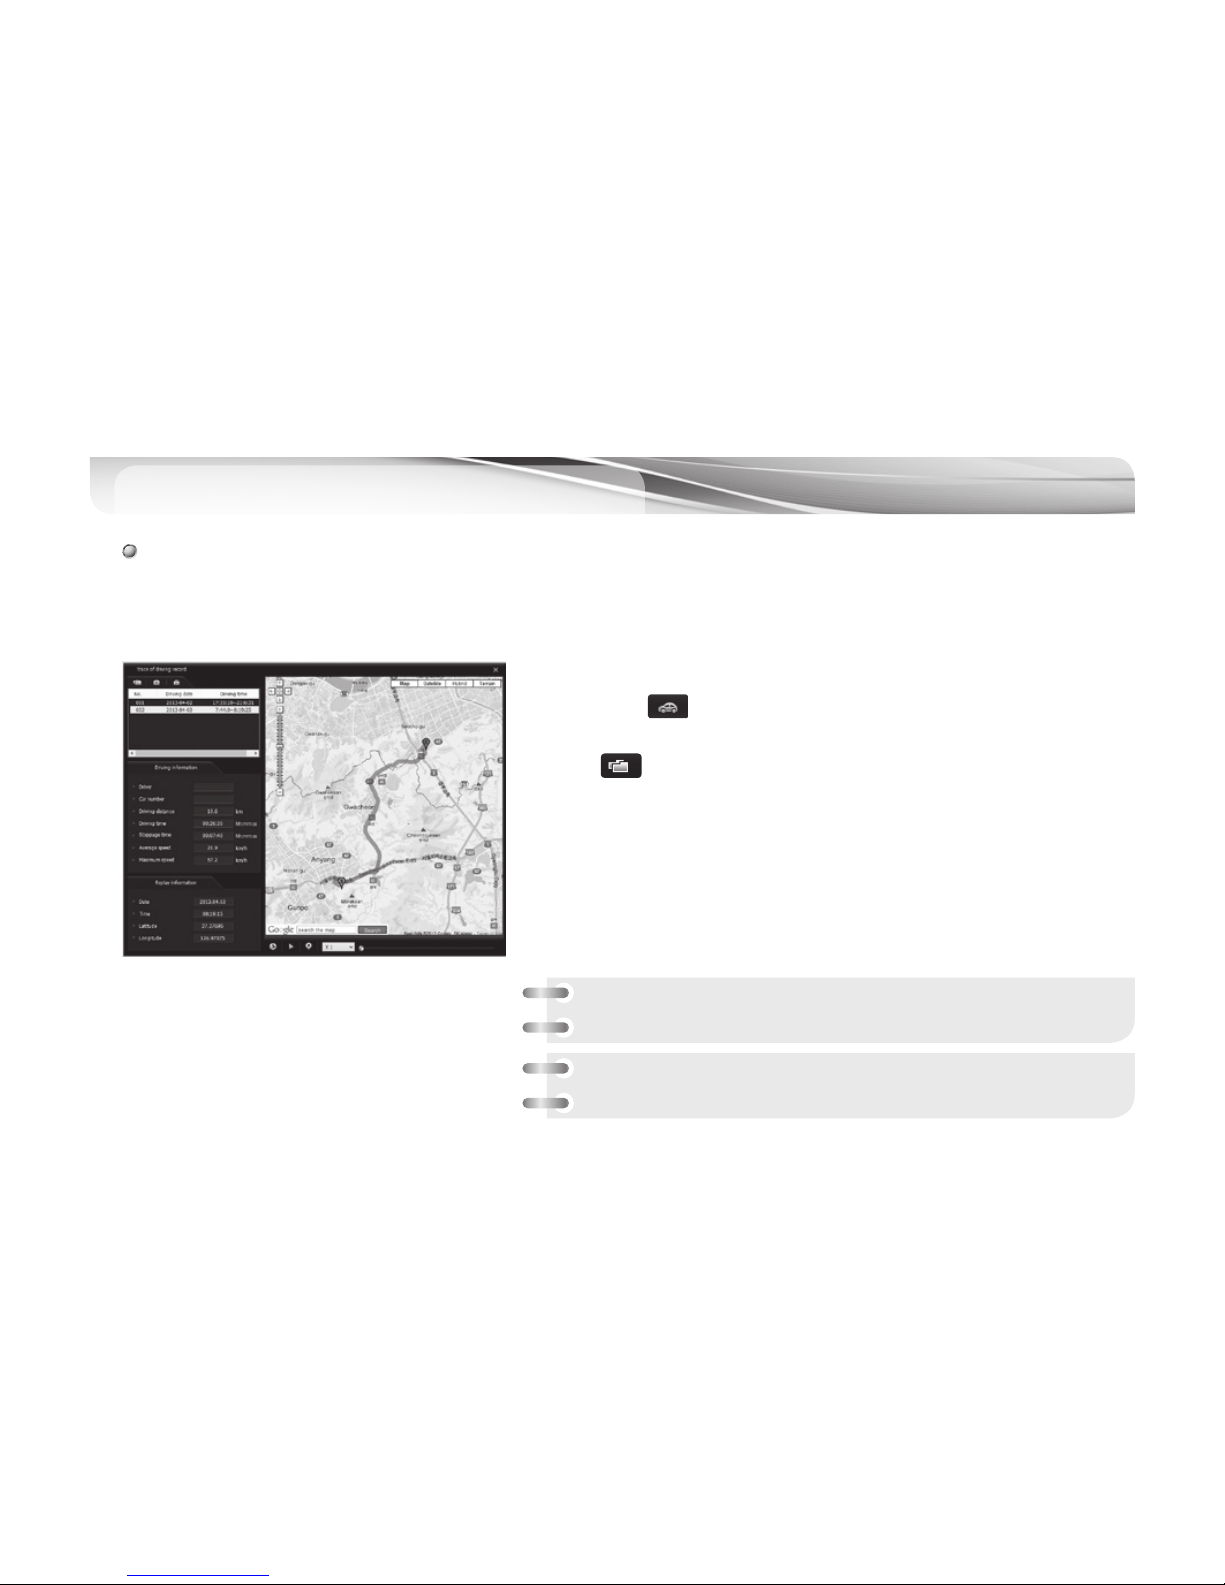
# When the GPS module is connected to the car DVR main body, the system saves driving record every 10
seconds. Each “dat” file keeps one month of driving records. GPS module which is an option item should be
installed to support this feature.
1.
#
Take Micro SD card out of the blackbox and connect it computer.
2.
#
If you press button in main screen of viewer, window showing the
trip record (picture on the left) will appear.
3.
#
Press button in the picture on the left, the list of driving record
sorted by date will appear in a line if you select files with extension of
dat. in the setup folder of Micro SD card.
4.
#
If you click the item in the list you want to review, the relevant driving
route is shown in the map on the right.
Reference) 5 dat. Files are max. saved only
Note : Stoppage time is not included in trip time and parking time
is not included in stoppage time in the map on the left.
Page 51
50 _
20
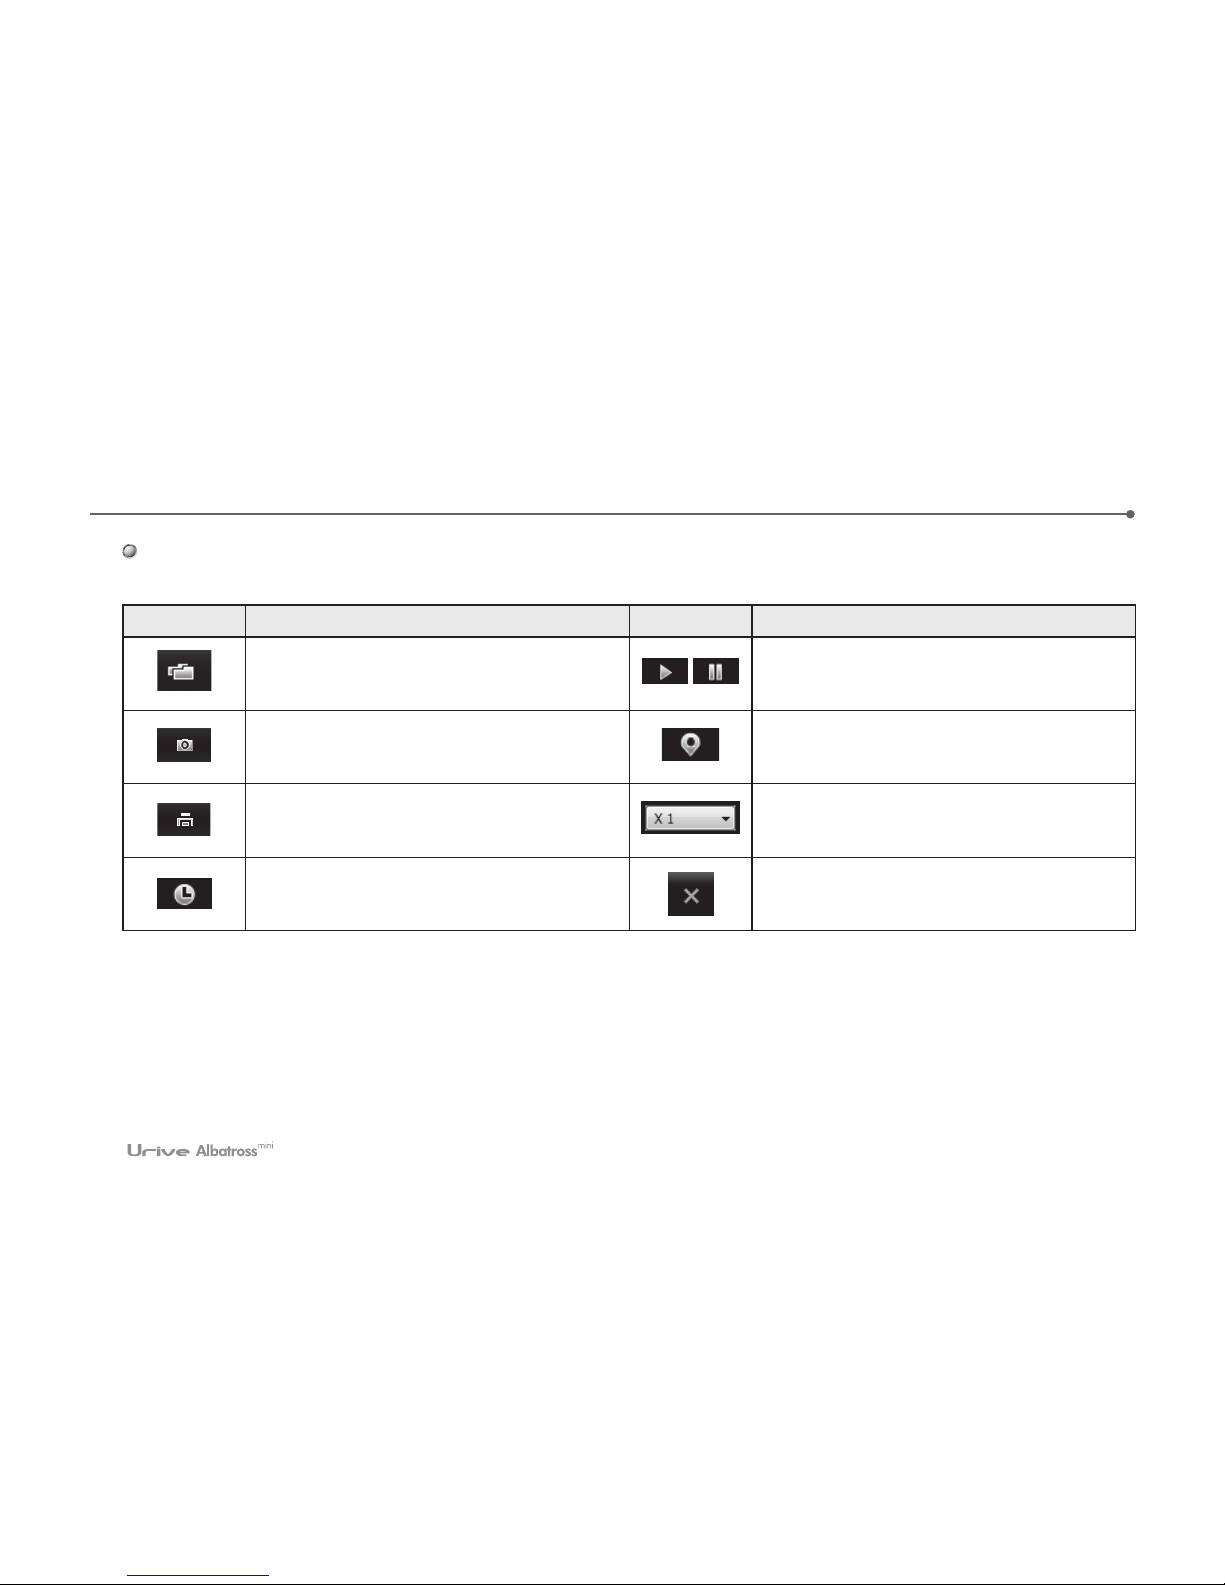
#This table is explanation for icons in the “shuttle history trace” window.
Button Description Button Description
To Open Setup folder Of Micro SD having
Driving history files(extension .dat)
Move the selected item from the list of
paths on the map in order to play.
At the map screen to save the file as ‘jpg’.
To marking on the route path during
playback.
To print the map screen. Route play as 1/2, 1, 2, 4 speed
To Show recording date and time During
playback
To exit the tracking system.
Page 52
User's Manual _ 51
PC Viewer - Full Screen
21
전체화면 전환
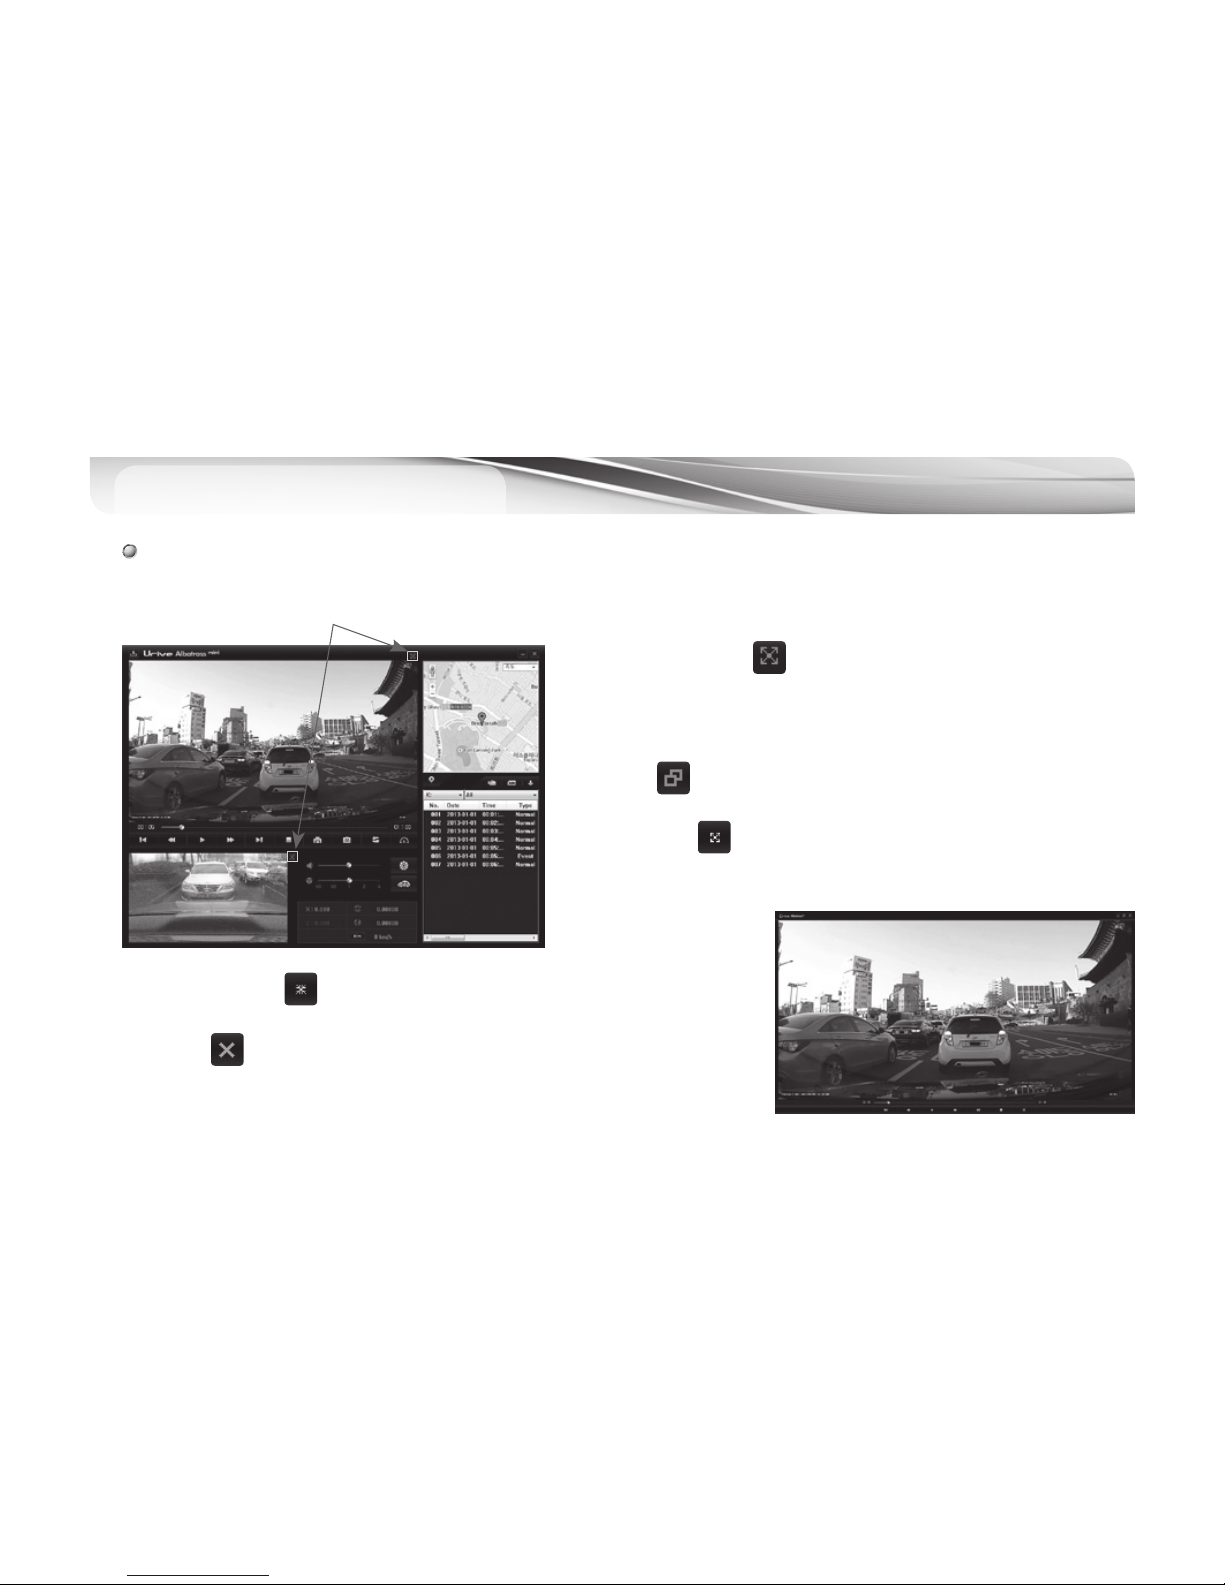
# Click the switching button at the top of the viewer to view the full screen of front/rear images.
1.# Full screen mode : button in top of Viewer, will to change to
the full screen mode.
2.# Return to the screen : To return to the previous screen in full
screen, button clicked will return to the main screen window.
3.# Full screen : button shows the videos as a full screen.
4.
#
Standard screen front : 1280x720, rear : 1280x720
5.# Clicked button In full screen do not switch to the main screen and
the Viewer program will end.
Page 53
52 _
PC Viewer - File folder’s structure
22
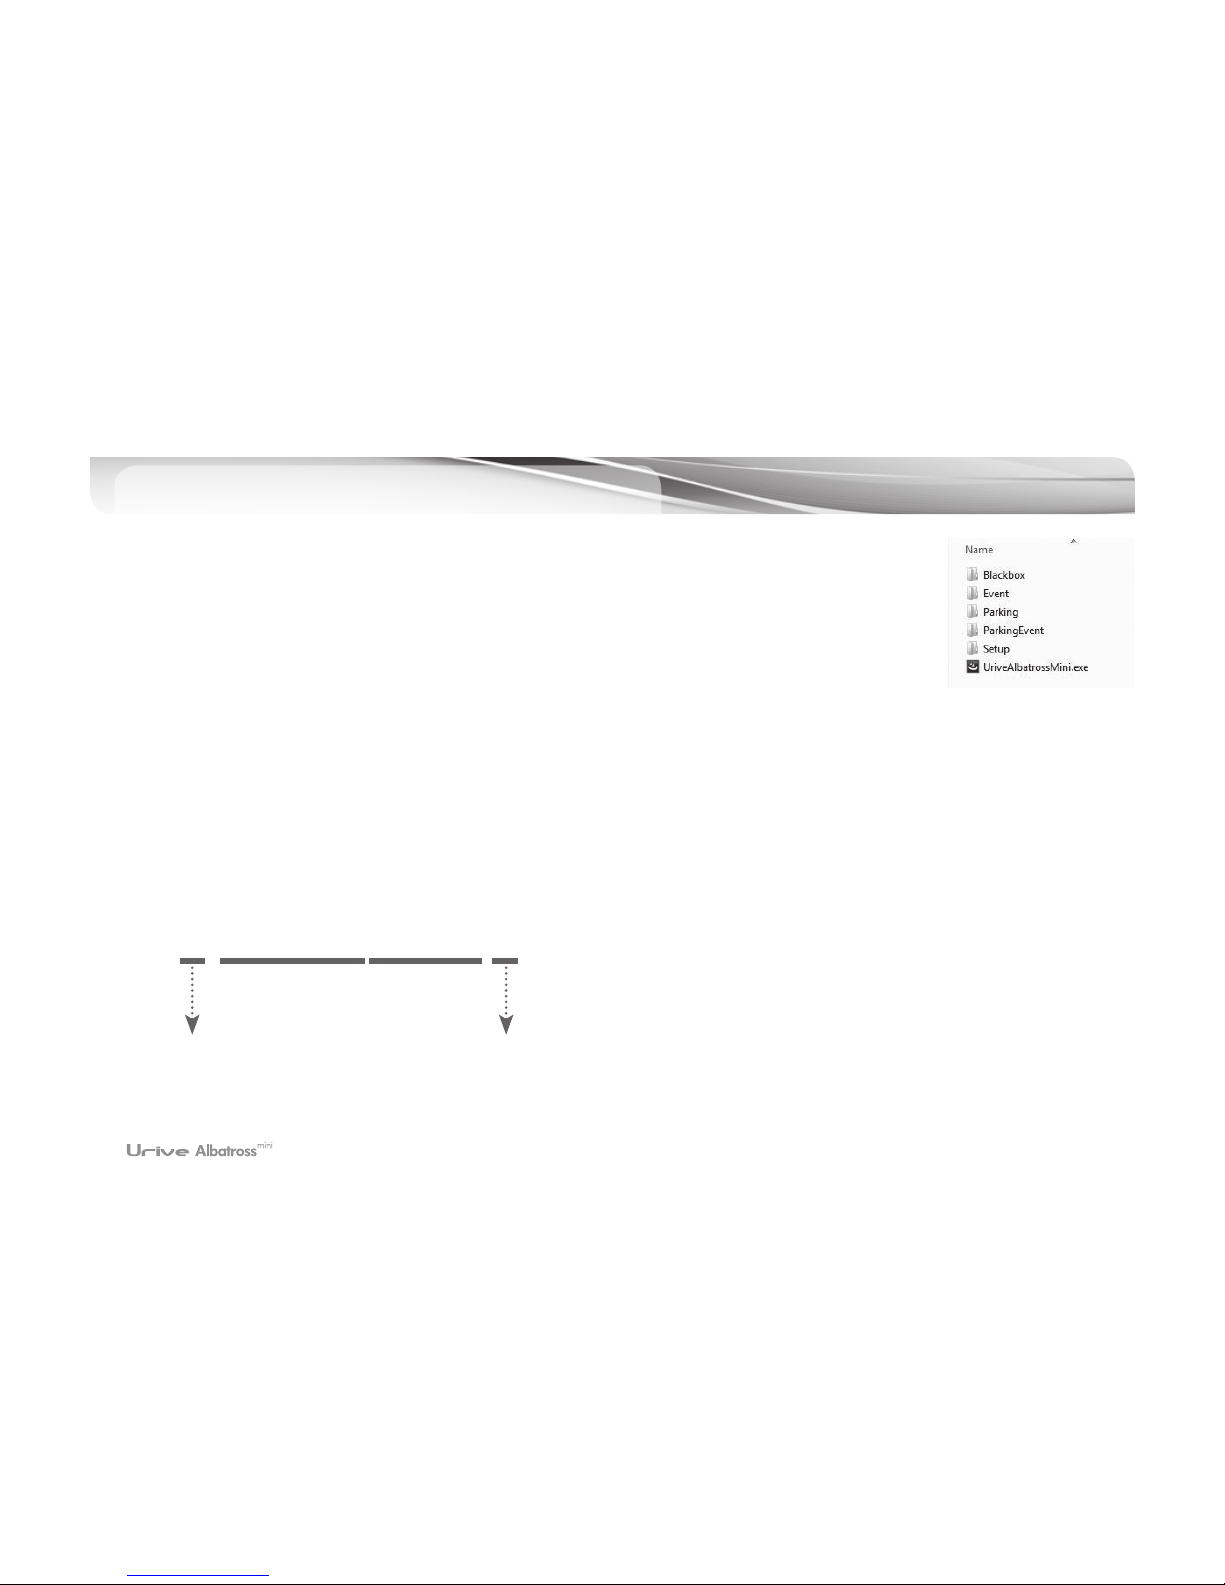
mdr0_20140201093025_I.mp4
1.
#
Blackbox Folder: Driving Mode Folder. Files are recorded by one minute.
2.
#
Event Folder: Driving Mode Event Folder. Files are recorded for 20 seconds (10 sec before
impact and 10 seconds after impact)
3.
#
Parking Folder: Parking Mode Motion Detection Folder. Files are recorded for 20 seconds (10
sec before detection and 10 seconds after detection)
4.
#
Parking Event Folder: Parking Mode Impact Folder. Files are recorded for 20 seconds (10 sec
before impact and 10 seconds after impact)
5.
#
Setup Folder: User Folder
6.
#
UriveAlbatrossMini.exe: PC viewer installation file.
0(front) / 1(rear)
various of videos
hour/minuite/
second
• various of videos
I : a driving file
E : a driving event file
P : a parking motion detection file
A : a parking event file
• EX) Video file
year/month/day
Page 54
User's Manual _ 53
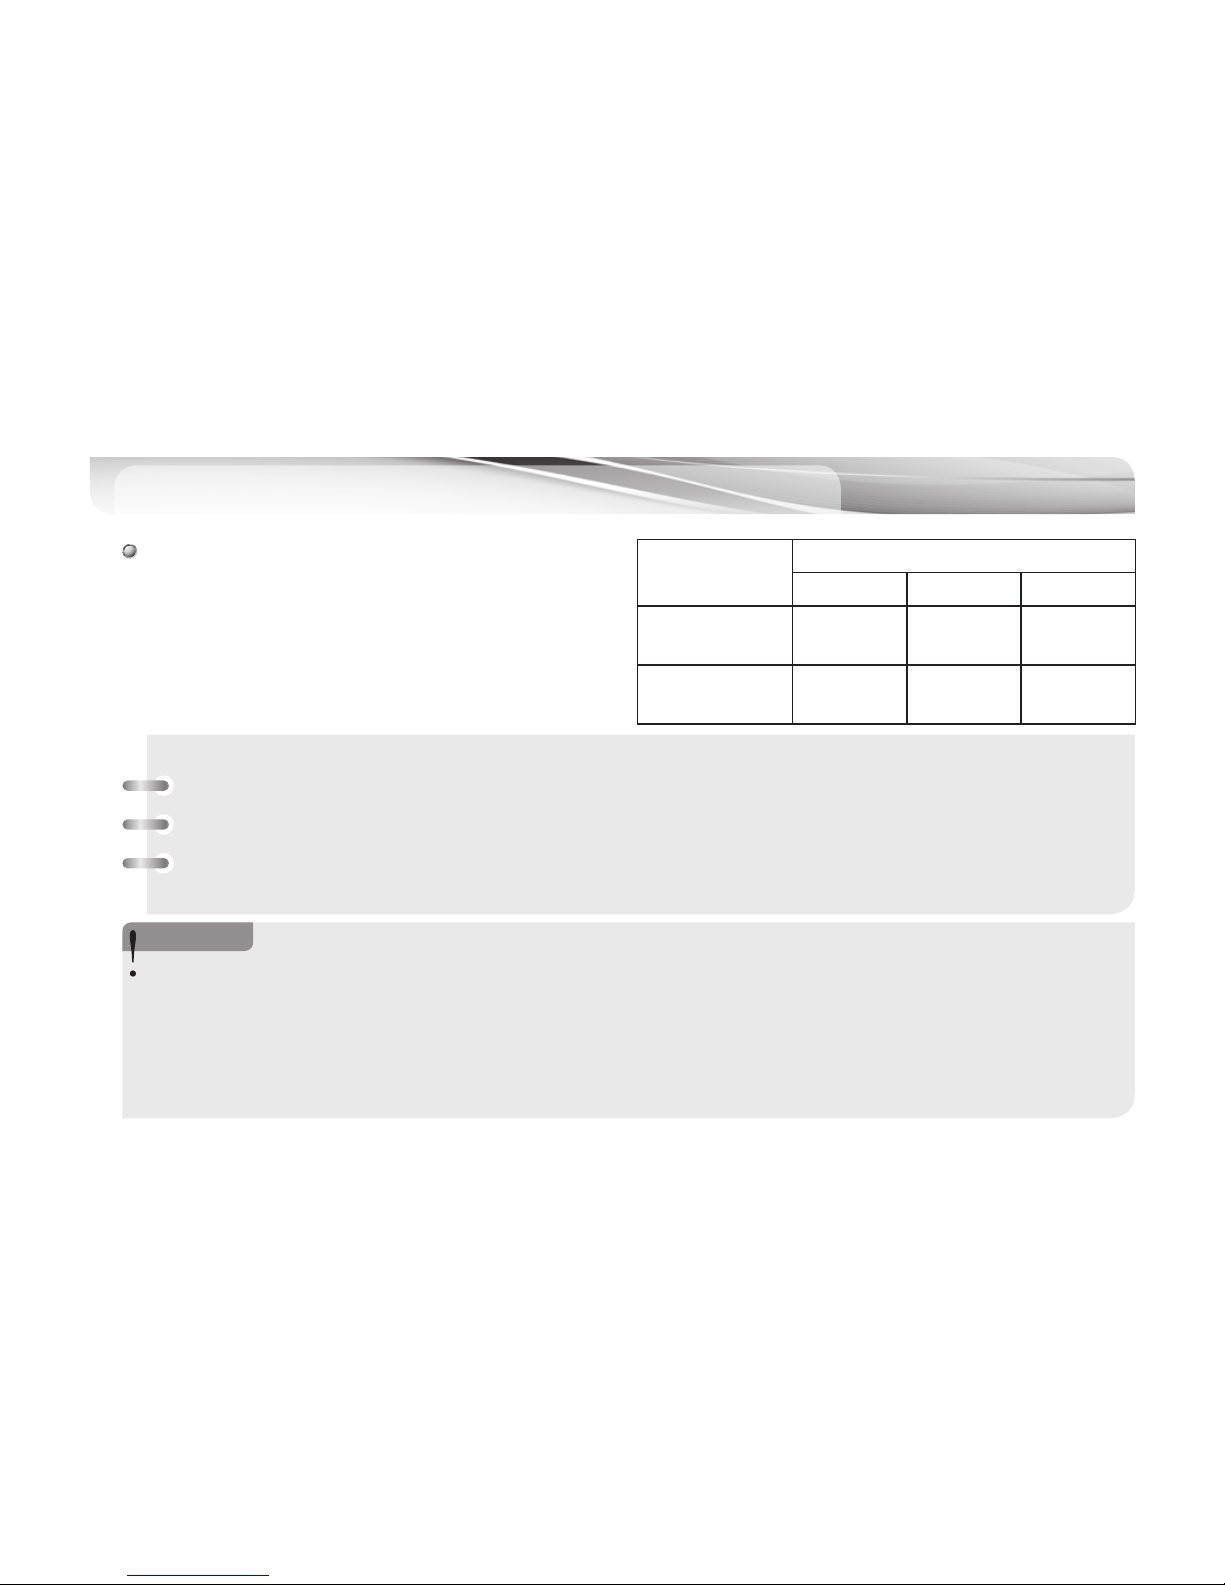
PC Viewer - Each file size and saving capacity
23
Class
16GB / 32GB / 64GB
Parking 0% Parking 25% Parking 50%
Driving
(Event)
90%
10%
65%
10%
40%
10%
Parking
(parking Event)
0%
0%
20%
5%
45%
5%
# Recording files can be stored as following its amount
of quota for regular files, event files, parking files and
parking event files. There might be some differences
depending on the memory card characteristics.
Note) 1.# When free space of memory card is less than 1GB at booting (800MB while recording) the system overwrites
sequentially from the oldest files to record and save the latest driving, events and parking surveillance
regardless of the volume limit of memory card.
2.
#
File Size (Front + Rear)
- Video Quality “High”: Driving File (1 min, approx 102MB), Event File (20 sec, approx 34MB), Parking (Event) File (20 sec, approx 34MB)
- Video Quality “Low”: Driving File (1 min, approx 72MB), Event File (20 sec, approx 24MB), Parking (Event) File (20
sec, approx 24MB)
- The file size may vary depending on its environment.
<Notice>
1.
#
Motion detection video images may be stalled and cut Intermittently in parking mode according to
environment conditions.
2.
#
Parking impact recording files are saved separately as event files up to 5% of memory space.
3.
#
It is highly recommended to use Urive genuine MicroSD memory card. Urive shall hold no liability for problems incurred in
connection with the use of other memory card
4.
#
In the Parking mode, recording is triggered only when a motion or an impact is detected. Thus, the number of recorded
files and recording time vary depending on the parking environment. The maximum number of files that can be saved is
determined by the parking mode’s SD usage (0%, 25% or 50%) for the parking mode as selected on the PC Viewer.
Page 55
54 _
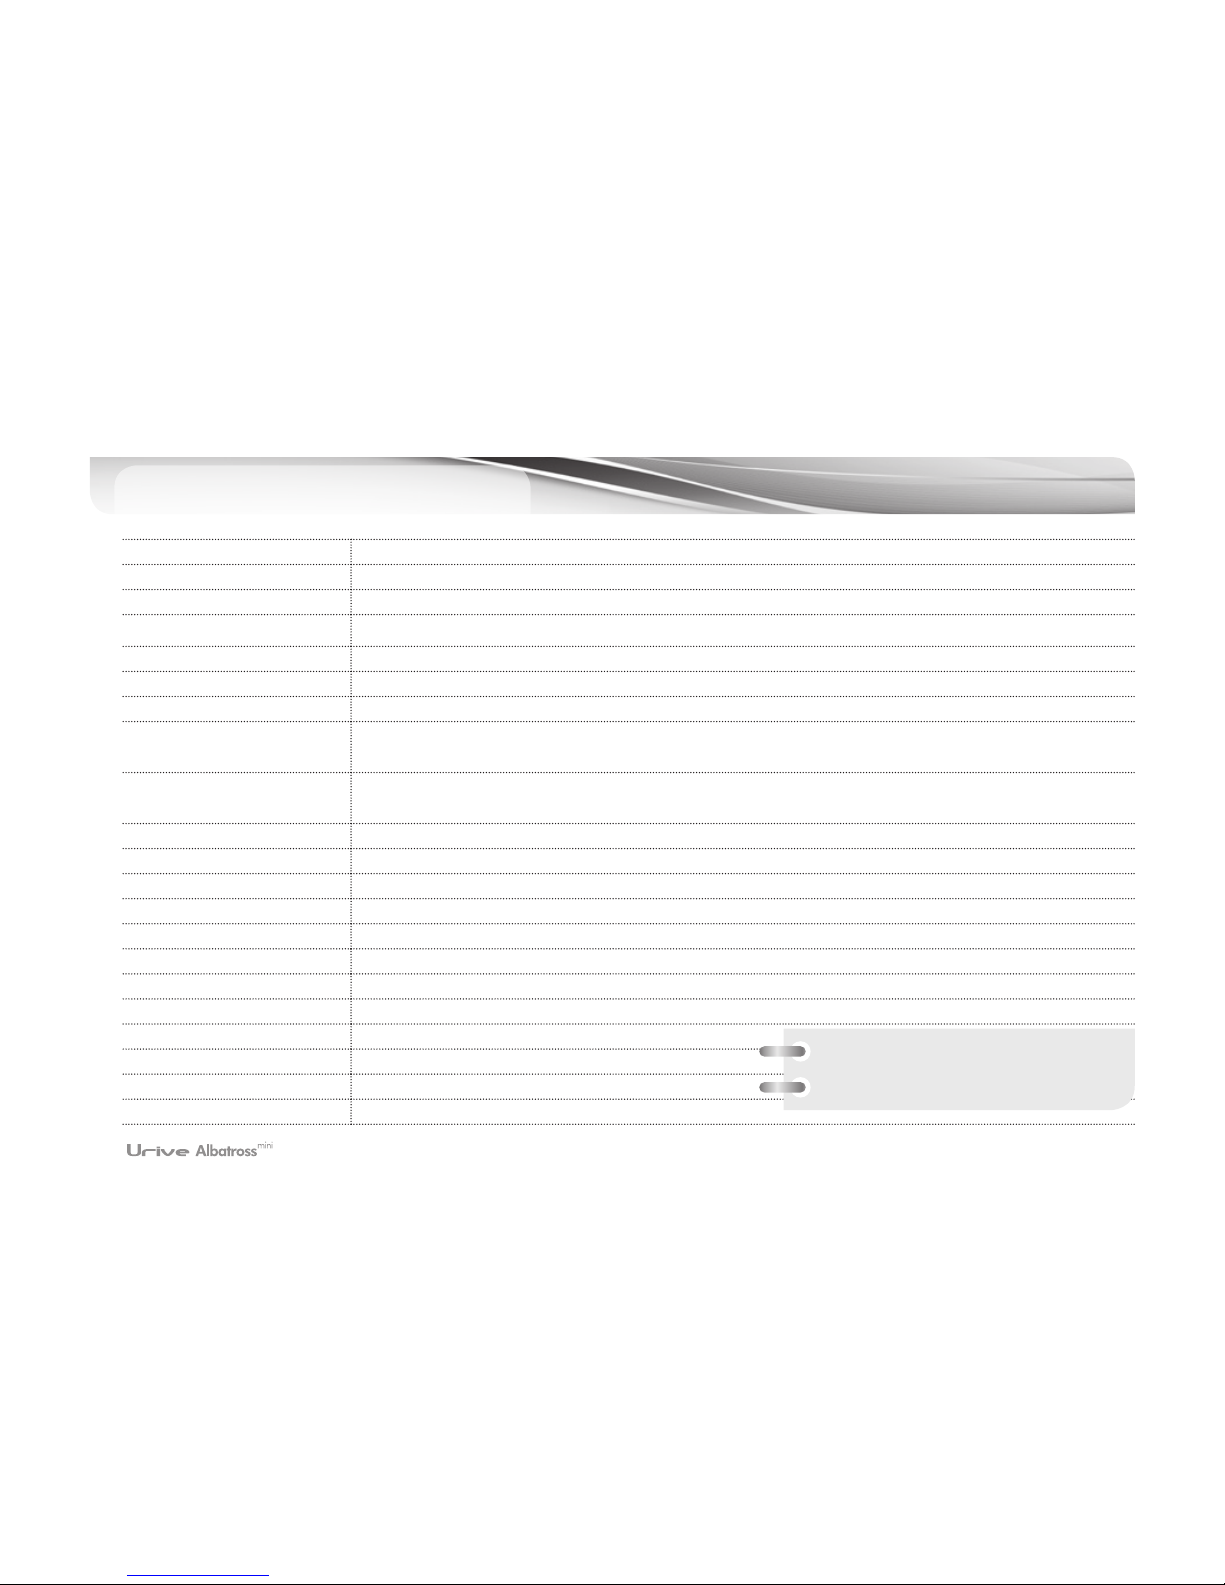
Technical Specifications
24
Product Name Urive Albatross Mini
Size 92.6 x 55.1 x 33.8 mm (Main Body without holder) / 59.2 x 24.5 x 27.2 mm (Rear Camera)
SD Card Memory Urive Genuine MicroSD SDHC Card Class 10 (up to 64GB)
Recording Type Driving / Event / Manual (Forced) / Parking / Parking Event
Front Camera 2 Million Pixels (HD, 1280x780) View Angle: 120° diagonal
Rear Camera 2 Million Pixels (HD, 1280x780) View Angle: 105° diagonal
LCD 3 inch Full Touch TFT-LCD / Resolution 400x240
Saving Frame
Driving Mode : 2CH - Front Max. 30 fps / Rear Max. 30 fps (1CH - Max. 30 fps)
Parking Mode: 2CH - Front Max. 30 fps / Rear Max. 30 fps (1CH - Max. 30 fps)
Saving Resolution
Driving Mode - Front 1280 x 720 / Rear 1280 x 720
Parking Mode - Front 1280 x 720 / Rear 1280 x 720
Video Format H.264 / mp4
Audio Built-in MIC / PCM
Speaker Voice Guidance
Shock Sensor 3-axis acceleration shock detection sensor
Security LED Front/Rear High Brightness BLUE LED (Blink)
Status LED High Brightness Green LED ON in Driving Mode / OFF in Parking Mode
G P S The exterior port for GPS / U-BLOX6 (Option)
Input Voltage DC 12V / 24V
Power Consumption Max. 4.1W (with LCD On, GPS, Rear cam)
Operation temperature -20
℃
~ 70
℃
Storage temperature -40℃ ~ 85
℃
Viewer compatible OS Window XP/ Vista/ Windows 7/ Windows 8
※
Product appearance and
specification may change without prior
notice for further improvement.
Page 56
User's Manual _ 55
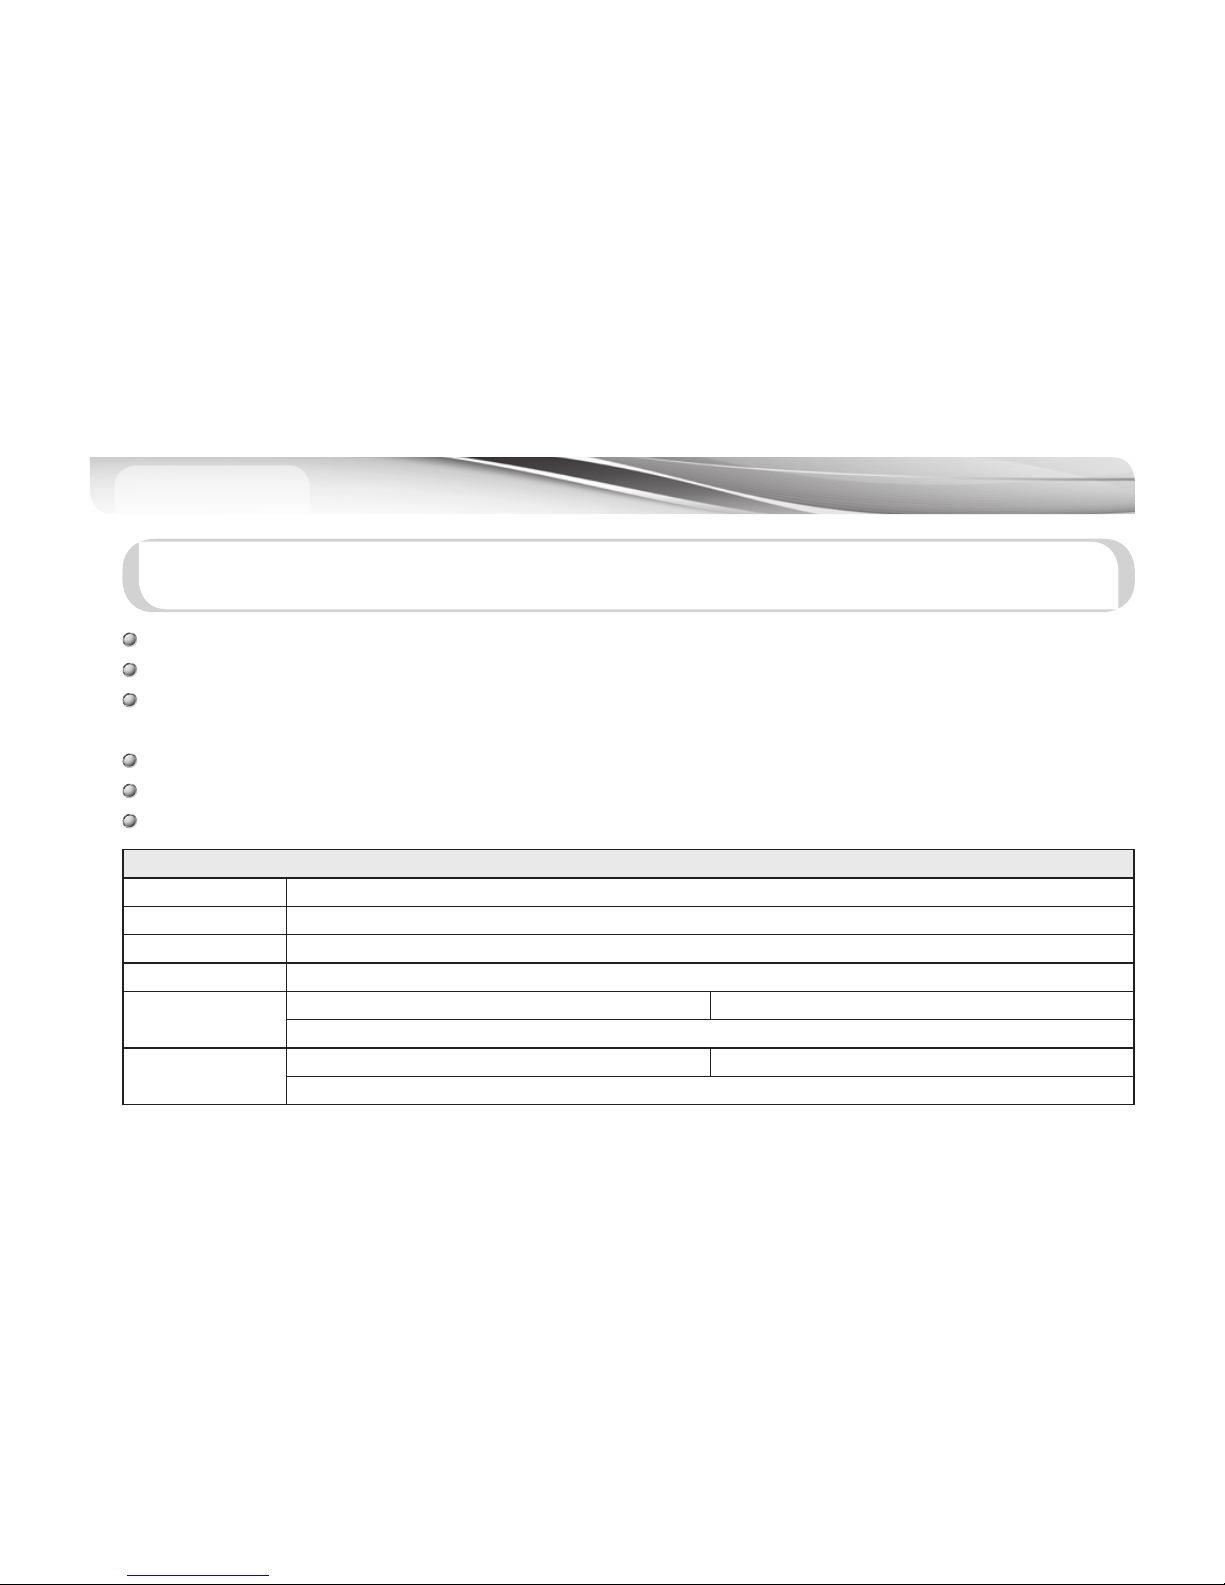
Warranty
25
#
The warranty service will be provided based on what is described in the warranty.
#
The warranty period will be calculated from the purchased date, so, users must get the purchased date filled.
#
If replacement is required, all the replacement parts will be new ones or similar ones as long as their functions are similar
to those of new ones.
#
MiDong E&T is not responsible for repairing, replacing, or refunding until a faulty product is returned.
#
Users are required to keep the warranty and the product number well as they are not to be reissued.
#
Be careful about copy products as the company does not provide services for the products that are not authentic.
Urive Products are covered under warranty for a period of 1 year.
Components and consumable parts other than the main body are covered by a separate warranty.
Warranty Card
Product Name Urive Albatross Mini (MD-7200E)
Certification FCC, CE
Serial No.
Warranty period 1 year from the purchased date of
Sold by
Name : Telephone :
Address :
Customer
Name : Telephone :
Address :
Page 57

56 _
MEMO
Page 58

User's Manual _ 57
MEMO
Page 59

58 _
MEMO
Page 60

User's Manual _ 59
MEMO
Page 61

60 _
MEMO
Page 62

User's Manual _ 61
MEMO
Page 63

62 _
MEMO
Page 64

User's Manual _ 63
MEMO
Page 65

64 _
MEMO
Page 66
 Loading...