

Page 1

CONTENT
Chapter 1: Introduction..............................1
Chapter 2: Technical Specifications...........5
Chapter 3: Principal of Operation...............6
Chapter 4: Blood Sample Collection..........7
Chapter 5: Appearance and Function........8
Chapter 6: Setting......................................9
Chapter 7: Operation...............................15
Chapter 8: Trouble-shooting....................20
Chapter 9: Maintenance..........................23
Chapter 10: Meaning of Marks.................25
Page 2

Chapter 1: Introduction
URIT-12 Hemoglobin Meter is designed for use only with H12 Hemoglobin Test
Strip from URIT Medical Electronic Co., Ltd.,
for the quantitative measurement of hemoglobin in capillary and venous whole blood.
According to the conversion between
normal average hemoglobin concentration
and haematocrit(HCT), URIT-12 Hemoglobin Meter can obtain the hint of HCT base
on determined hemoglobin concentration.
Hemoglobin is the oxygen-carrying protein
in red blood cells. The quantitative measurement of hemoglobin is indicated and clinically useful in acute illness as well as in
general care. The normal range hemoglobin values reported in medical literature are
gender and age dependent:
Adult males 13.5~18.0 g/dL.
Adult females 12.0~16.0 g/dL.
Infants Ranging from 14.5
~22.5g/dL after birth
Page 3

to 11.1~14.1g/dL at
6 months old.
Children Gradually increase
from infant to adult
levels.
Low hemoglobin levels may indicate
condition such as anemia or hemorrhage.
Elevated hemoglobin levels may indicate
conditions such as polycythemia. A hemoglobin test may be used as part of a general
screen for many types of patient populations, including the elderly, children, and
women of child-bearing age, and prior to
giving or receiving transfusions. Due to differences among patient populations, we
recommend that each clinical site establish
its own reference ranges.
People use Hemoglobin Meter with the
whole blood for local inspection or tending,
which is helpful for evaluating patients’ symptom quickly and providing proper treatm-
Page 4

ent determination.
When test result is different from clinical symptom, repeat test. If there are still some problems, validate it by control or compare hemoglobin test methods with that of
other labs.
Judge the clinical signification of test
result by following the doctor’s direction.
Prior to any medication, treatment should
be provided by doctor based on test result
and clinical symptom.
Warning:
Please read this manual carefully before using URIT-12 Hemoglobin Meter.
1. URIT-12 Hemoglobin Meter is for
in vitro diagnostic use only.
2. Insufficient blood sample volume
and inadequate mixing of EDTA-treated
samples may affect results.
3. URIT-12 Hemoglobin Meter is designed for use only with H12 Hemoglobin
Page 5

Test Strips from URIT Medical Electronic
Co., Ltd. Prior to the first use of test strips,
read the manual carefully and input the Lot
Code to the meter.
4. As all diagnostic tests, test results
should be evaluated according to the specific patient’s condition. Any results demonstrating the inconsistency with the patient’s
clinical status should be repeated or supplemented with additional test data.
5. In order to test the hemoglobin accurately, please use and maintain the meter
correctly. Review this manual before the first time using the meter.
6. While the test is in progress, do not
disturb or move the meter or strip, even press any key.
7. Over strong electromagnetic field
will disturb its work. We recommend you to
keep the distance between meter and microwave oven over 2 meters when you test in
the room.
Page 6

8. Over high temperature and humidity will affect its working. We recommend
you not to use it in the sauna or bathroom.
9. Use it at the temperature of 15℃~
30℃.
10. When equipment is at work, please
do not look directly at light source.
11. Avoid any liquid permeating the meter anytime.
Chapter 2: Technical Specifications
Parameter: Hemoglobin in fresh whole
blood.
Measuring Principle: Optical reflectance.
Strip: H12 Hemoglobin Test Strips.
Measuring time: Less than 12 seconds.
Haematocrit (HCT) hint: Display in perce-
ntage.
Measuring range: 4.0g/dL~24.0g/dL. Results under 4.0g/dL or over 24.0g/dL will display as “Lo” or “Hi” respectively so as to indicate the result which is out of range.
Display: LCD, test results display in SI.
Page 7

Storage function: Save the strip code,
memorize and update 250 test results
automatically.
Correction function: self-correction.
Weight: < 58g (Battery included).
Outer dimension: 102mm×50mm×19mm.
Power: DC 6V (Two CR2032 Battery).
Operating Ranges: 15~30℃;RH≤80% non
-condensing.
Ultimate Ranges: -20~55℃;RH<90% non-
condensing.
Others: Internal trouble check and display.
Available life: 8 years.
Chapter 3: Principal of Operation
The hemoglobin meter utilizes optical
reflectance for determination of the total
hemoglobin. The test strip is inserted into
the meter when prompted, a background
blank reading is automatically determined.
A drop of whole blood is applied to the test
Page 8

spot on the strip, blood immediately disperses within the membrane, contacting the
reagent, then reaction product could absorb spectrum in the range of 500nm-600nm.
The meter’s optical detector automatically
measure the change in membrane reflectance. The intensity of reflectance is inversely
proportional to the hemoglobin concentration. The meter calculates and displays the
total hemoglobin concentration in gram/deciliter (g/dL) in 12 seconds based on a mathematical conversion.
Page 9

Chapter 4: Blood Sample Collection
1. Fresh capillary or EDTA-anticoagulated venous whole blood may be used.
2. If an EDTA-treated sample is refrigerated, allow it to come to room temperature
prior to use. EDTA-treated blood samples
should be mixed using end to end inversions at least 8 times prior to use, and should
be tested within 24 hours.
3. For fresh venous whole blood samples,
collect approximately 0.1mL into an anticoagulant-free plastic syringe.
Page 10
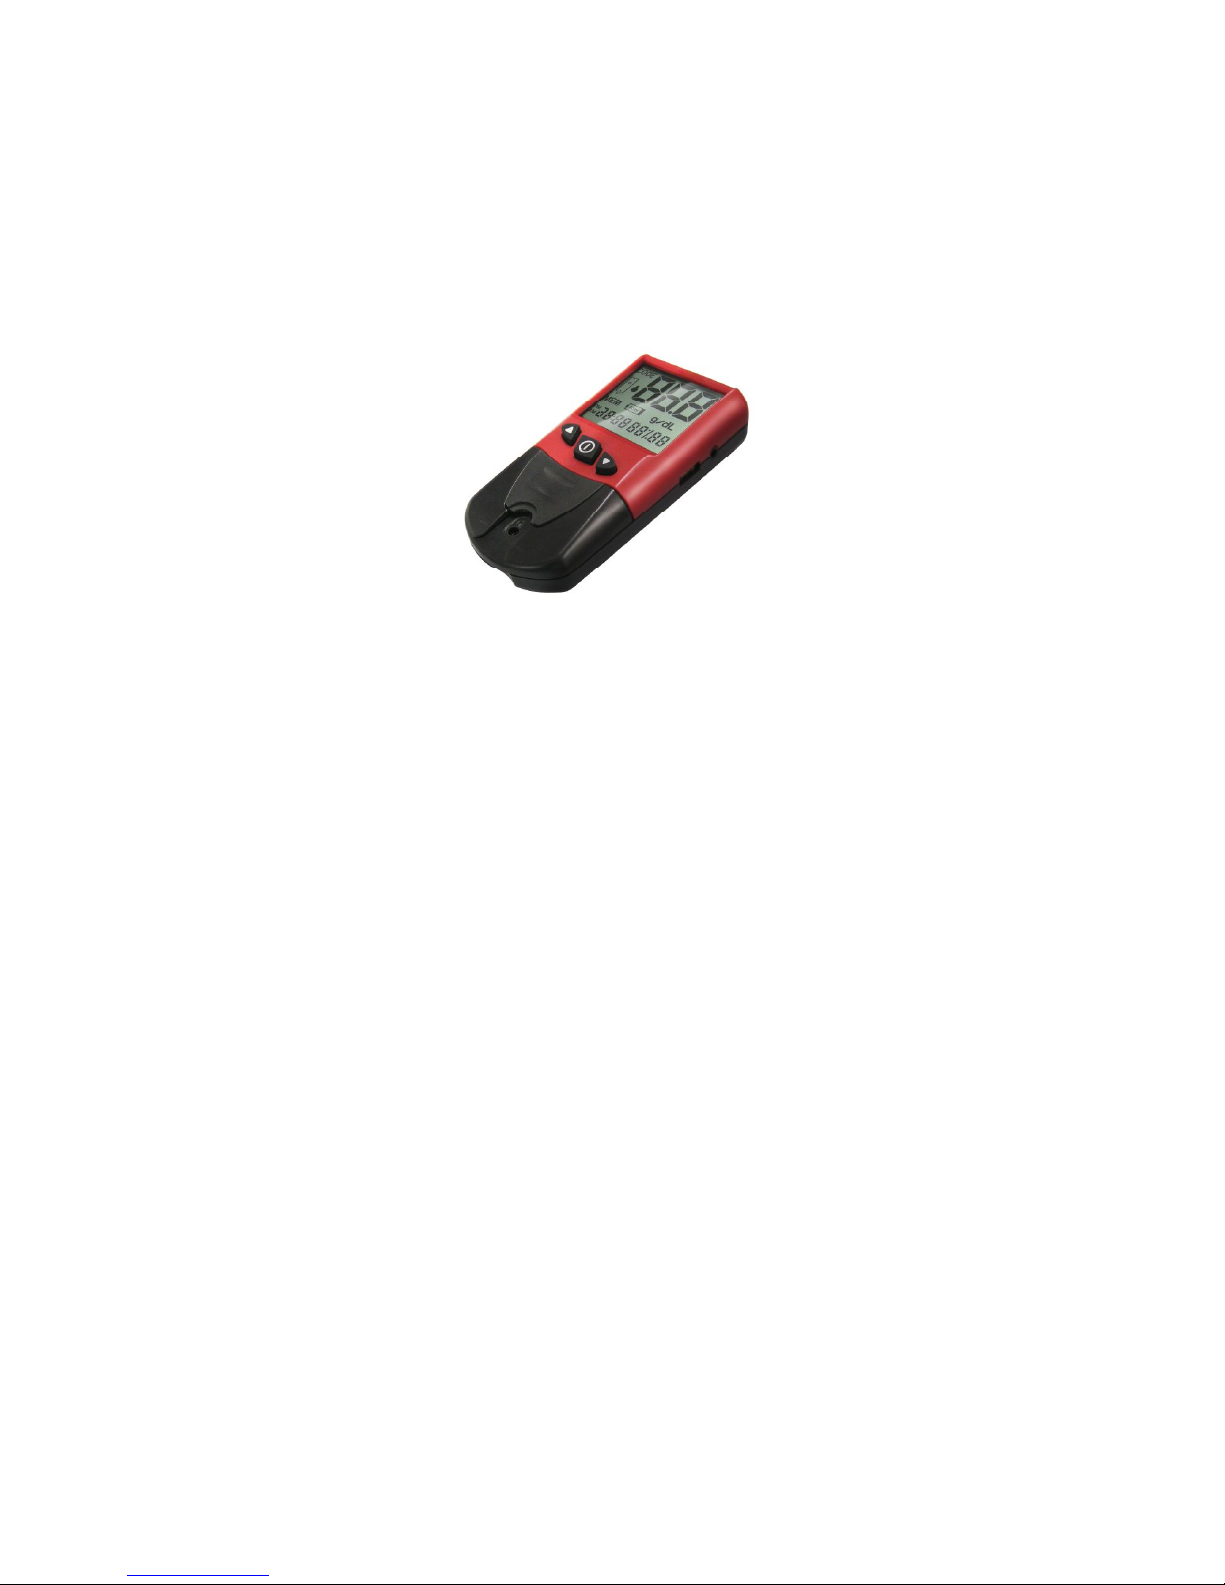
Chapter 5: Appearance and function
1. Appearance:
The meter is composed of keys, LCD,
circuitry board, optical system, strip holder,
cover and battery. See the picture of appearance as below:
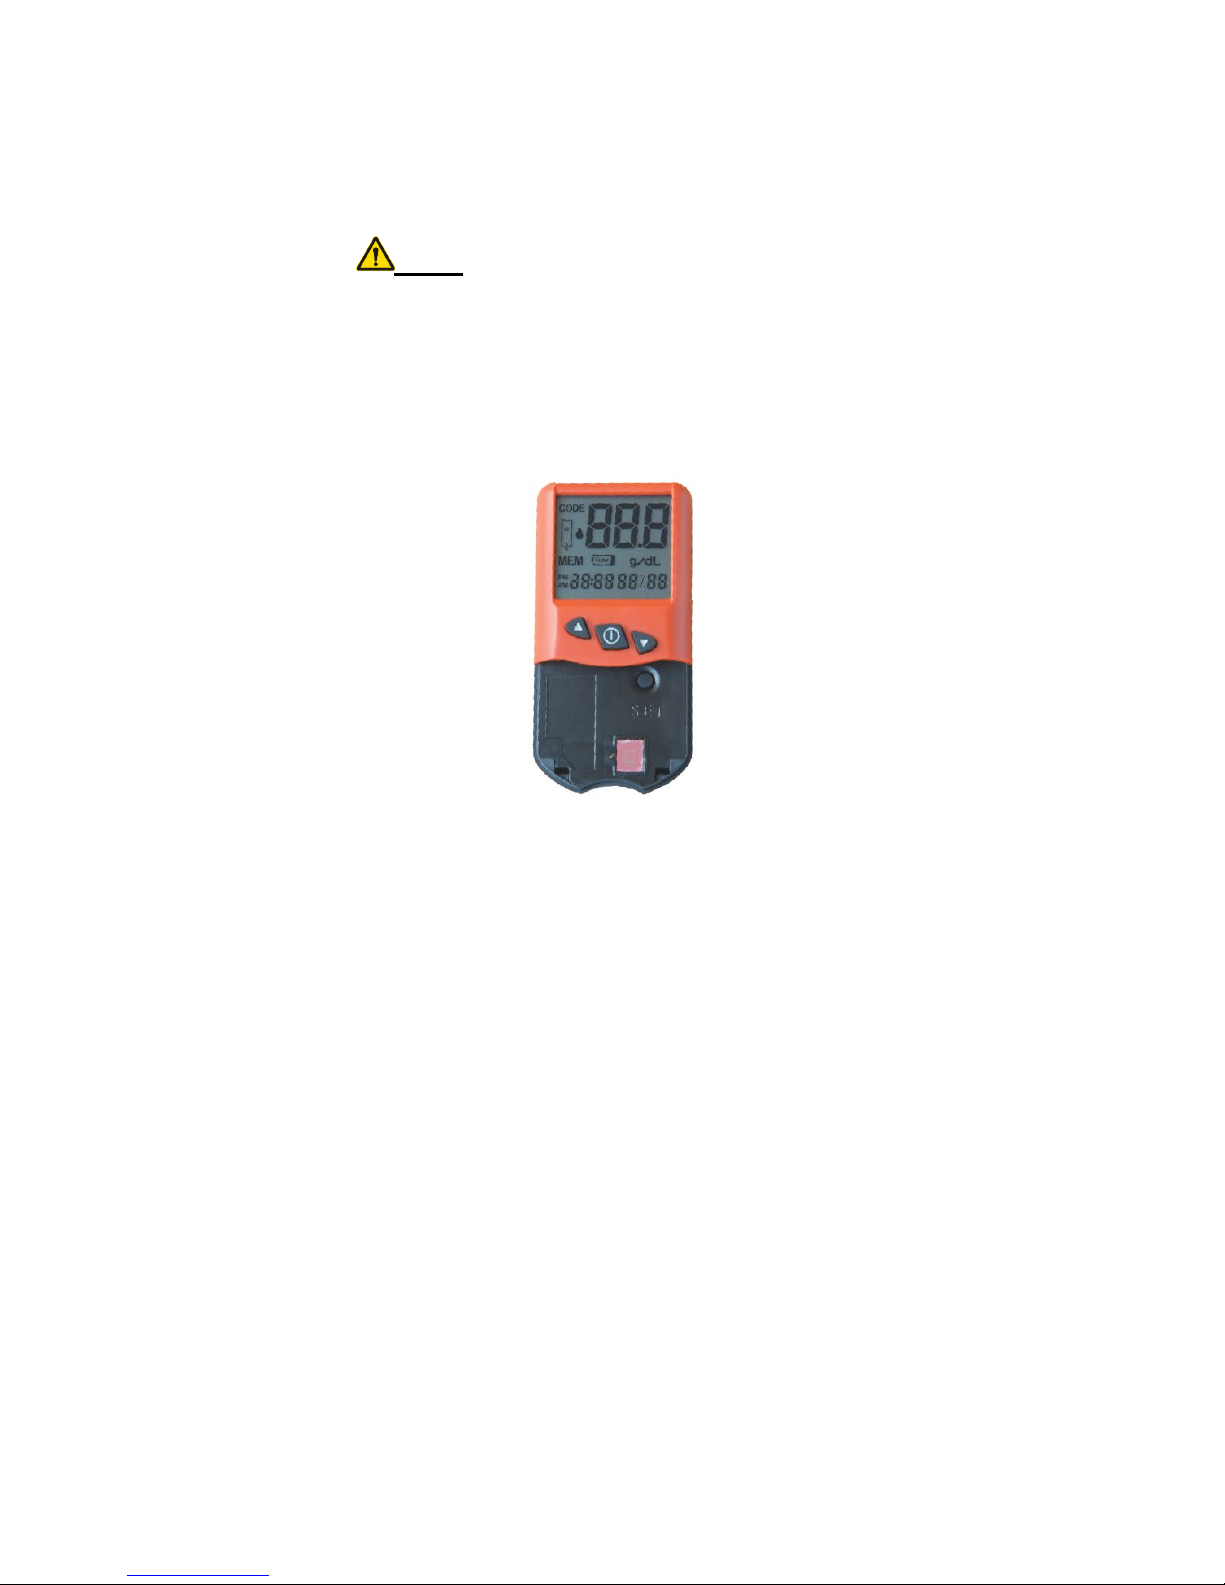
2. Function:
Power switch: Turn meter on and confirm
key (turning meter off is confirmation)
▲key: up
▼key: down
Page 11

Strip holder: hold strips
SET key: set function (under the strip hold-
er, refer to Chapter 6)
Chapter 6: Setting
1. Meter Options Setting
Before the first time using URIT-12
Hemoglobin Meter, the user must enter the
following settings:
• Time and date format.
• Current time and date.
2. Entering Settings
Step 1: Lift the test strip holder off the meter.
Step 2: Turn the meter on by pressing the
Power switch key. Wait until the meter displays the Lot Code, time and date.
Now the meter can be customized for
time and date format, current time and date.
3. Time and Date Format:
The user can select both display time
Page 12
and date in a 12-hour AM/PM time clock
with mm/dd date format or in a 24-hour time
clock with dd/mm date format.
Note: The date format only contains day
and month, not including year.
Step 1: Press the SET key once, the date
and time will display. Press and hold the
SET key again until the time and date flash.
Step 2: Press the ▲ or ▼ key to select date
format.
Page 13

Step 3: Pressing the SET key as step 1 and
2 to enter the current time and date. If entering the current time and date is not required, and then turn the meter off to confirm
the selected time and date format.
Note: Once confirmed, the time and
date format will be changed for all stored
test results.
4. Entering Current Time and Date:
The user must enter the current time
and date for correct stamping of test results.
If proceeding from Select Time and Date
Format instructions above, go directly to
Step 2. Otherwise, start from Step 1.
Step 1: Press and hold the SET key until
the time and date flash. Press the SET key
again.
Step 2: The hour (with AM/PM if 12 hr form-
at selected) will flash. Press the ▲ or ▼
key to enter the hour. Press the SET key to
confirm.
Page 14

Step 3: The minute will now flash. Press the
▲ or ▼ key to enter the minute. Press the
SET key to confirm.
Step 4: The first date selection will flash (m-
m or dd). Press the ▲ or ▼ key to enter
the first date selection. Press the SET key
to confirm.
Step 5: The second date selection will flash
(dd or mm). Press the ▲ or ▼ key to enter
the second date selection. Press the SET
key to confirm.
Step 6: Turn the meter off to confirm the
entering time and date.
Note: Once confirmed, the reporting un-
it will be changed for all stored test results.
Once selection of meter settings has
been completed, replace the strip holder
onto meter.
5. Saving Test Results
URIT-12 Hemoglobin Meter automatically stores 250 test results with a date and
Page 15

time. If the storage is more than 250 test
results, the oldest test result would be automatically erased. Test results are stored in
ascending chronological order: The first test result on the screen (sequence 001) is
the newest test result, and the last one (up
to sequence 250) is the oldest test result. A
test result will store automatically when the
meter shuts off (both by pressing the key or
automatic shutoff after two minutes of inactivity).
6. Viewing Saved Test Results
Step 1: Turn the meter on by pressing the
Power switch key. Wait until the meter displays the Lot Code, time and date. Press
the ▲ key to display the test result and its
sequence number (a flashing MEM will
display to the lower left of the test result).
After releasing the key, the test result with
its time and date, and a flashing MEM will
display.
Step 2: Continue pressing the ▲ or ▼ key
Page 16

to scroll through test results.
Step 3: Turn meter off to exit this function.
7. Deleting Test Results
Test results could be deleted by following two methods: deleting the recent results
by CLE or deleting all results by CLA.
User could turn the meter off to stop
deleting test results before MEM displays.
Step 1: Lift the strip holder, turn the meter
on. Wait until the meter displays the Lot Code, time and date.
Step 2: Press SET key twice, CLE displays.
Delete the recent results:
Step 3: Continue pressing SET key till CLE
flashes. Release SET key, the last result
will display. To delete this result, keep holding SET key and the result will flash and
then be deleted.
Delete all results:
Step4: Press SET key one more time, CLA
will display. Hold pressing SET key, CLA
flashes, Release SET key, ALL will display.
Page 17

Continue pressing SET key, all the results
will be changed into MEM ---.
After completing all steps, turn off the
meter and cover the strip holder.
Note:If you want to exit CLE witho- ut
deleting test results, you can shut off the
meter directly.
Page 18

Chapter 7: Operation
1. Turn the meter on
Press the Power switch key to turn th-
e meter on. The meter automatically monitors its internal circuitry and components during a brief self-check. The meter is ready
when the test strip prompts, Lot Code and
time/date are displayed.
Note: To conserve the battery, the meter will automatically shut off after 2 minutes
of inactivity. If this happens, turn the meter
on again.
2. Input Lot Code of the Test Strip
Input the lot code as follows:
1) Press the Power switch to turn the meter OFF.
2) Insert the code card correctly into the C-
ode slot. Press the Power switch to turn
the meter ON, the meter will read the code
card automatically and display the code on
Page 19

the screen. The meter will automatically
turn OFF.
3) Remove the code card. Turn the meter
ON again. Please verify the displayed code
is match the code printed in the label of
container which the test strips will be taken
from.
3. Prepare for a Finger stick
Make sure the patient’s hand is warm
and relaxed. Massage the patient’s middle
or ring finger from the knuckle up to the tip
to stimulate blood flow. Clean the sample
area with alcohol and wipe dry with a sterile
gauze pad.
4. Prepare the Test Strip
Take a test strip from its container. Examine the test strip. Do not use if there are
tears, wrinkles or debris. Do not touch the
test spot membrane. Reseal remaining test
strips in the original container.
5. Insert the Test Strip
Insert the test strip into the strip holder
Page 20

with the notched end in first and the hole facing up. The notched end on the top of the
strip should no longer be visible when the
test strip is inserted correctly and fully.
6. Prepare the Meter for Sample Applica-
tion
The meter will automatically perform a
background blank reading. It will display a
flashing prompt to indicate that it is ready to
test a sample. The meter will allow 2 minutes for application of the blood sample.
7. Perform a Finger stick
Incise the underside of the fingertip. Avoid “Milking”. Apply light pressure to obtain
one drop of blood.
8. Apply Blood Sample to the Test Strip
Immediately apply a drop of blood to
the test strip by touching the hanging blood
drop to the test spot, ensure the blood drop
is large enough to completely cover the test
spot. A capillary transfer pipe may also be
used to transfer the blood sample from the
Page 21

finger to the test strip.
Note: This product is used for test-
ing human blood, user must prevent against possible blood infection.
l A drop of blood (refer to the instru-
ction of Strips for detail)
l Do not use strip to touch blood,
test strip must be fixed on the meter. Apply
only the hanging blood to the test spot.
l Do not touch directly the test spot
membrane by finger.
l Do not apply superfluous blood;
the volume just covering the spot completely is enough.
l Do not apply blood on the spot ob-
taining blood repetitiously. Each strip is used for one test.
9. Read Result
The blood sample will spread and the
meter will automatically begin the test. During the test, do not disturb or move the met-
Page 22

er or strip, even press any key of meter.
The test result will be displayed in less
than 30 seconds.
After the test is completed, remove the
test strip and check whether the test strip spot is covered by blood sample completely
or not. Otherwise, the test result is not accurate, please test again.
After the test is finished, the meter will
automatically shut off after 2 minutes of inactivity, or can be turned off by pressing the
Power switch key. The test result will be
stored automatically with its date and time.
10. Disposal
The waste should be disposed strictly
according to reference requirement of local
Medical Sanitary Management Department.
Do not throw it optionally.
11. Reportable range
The reportable range for hemoglobin is
from 4.0 g/dL to 24.0 g/dL. Results under 4.
0g/dL or over 24.0 g/dL will display as “Lo”
Page 23

or “Hi” respectively to indicate the result out
of range.
Page 24

Chapter 8: Trouble-shooting
Troublecode&
phenomenon
Possible Cause Correction
Hardware or
software error
Turn off and on again.
If the error still exists,
please contact the local
distributor.
E0, E1
Meter used in
bright sunlight
Bright sunlight disturbs
optical system of meter.
Used it in room-light or
shade. Turn off and on
again. Repeat test with
new test strip.
E2
Temperature
out of Range
Allow meter to adjust to
temperature declared in
the Manual and wait until it shake down. Turn
off and on again. Repeat test with new test
strip.
Page 25

Removing the
strip with sample before testing
Do not remove test strip
till finishing the test.
Turn off and on again.
Repeat test with new
test strip.
Insufficient
Sample
Volume
Remove the test strip
and shut off. Turn on
and repeat test with new
strip. Confirm the blood
is sufficient.
Strip is
damaged
Remove the test strip
and shut off. Turn on
and repeat test with new
strip. Confirm there are
not tears, wrinkles or
debris.
Incorrect
blood sample
Do not use other blood
sample, such as plasma.
Repeat test with the
correct blood sample:
fresh or EDTA-anticoa-
gulated whole blood.
Page 26

Damaged
Strip Inserted
Remove the test strip
and shut off. Turn on
and repeat test with new
strip. Confirm there are
no tears, wrinkles or
debris.
Optical detector needs cleaning
Remove strip holder
and clean lenses follo-
wing the direction.
Optical detector does not
read the background blank
Before finishing the ba-
ckground blank reading,
do not apply blood sam-
ple. Do it until displayi-
ng a flashing prompt.
E4
Optical detector is clogged
Check the Optical dete-
ctor, whether it is cove-
red by blood or others,
if yes, remove the strip
holder and clean it. Ref-
er to the Manual.
Page 27

Used strip
Inserted
Remove the test strip
and shut off. Turn on
and repeat test with new
strip.
Inserted strip
error
Review the instruction
of Insert Strip. Remove
the test strip and shut
off. Turn on and repeat
test with new strip.
Set strip
holder error
Remove strip holder
and reset. Push it to the
end. Do not use if it is
loose or skew.
Replace
battery
Replace battery referri-
ng to the Manual. Immediately sh-
ut off once turn
on or during the
operation process
Move the strip during the
test
The meter will turn off
automatically in 4 seco-
nds if the strip is move-
d. Repeat test with new
strip.
Page 28

Chapter 9: Maintenance
1. Routine maintenance and cleaning
The cleaning must be done after applying superfluous blood sample every time.
Hold the bottom of meter with left hand and
lift holder, then the strip holder could be removed and cleaned. Wipe away the rest
blood or dirt left on the holder or meter using gauze with disinfectant (diluenting 10%
home bleacher, about 0.6% hypochlorite).
If there is superfluous blood on the optical detector, clean it by cotton sticker with
little detergent. Wipe the strip holder and
optical detector completely by cotton cloth
without hemp. Avoid any liquid permeating
the meter anytime.
Do not polish the surface of optical detector with any polished or corrosive detergent to avoid the damage of meter and optic-
Page 29
al detector. After cleaning, put the strip holder and display in a level, and press arc segment, the holder could be set back.
2. Battery replacement
Open the battery cover, take the battery out of gap, replace two new CR2032 battery, cathode is facing down, insert it into
battery container, and press it down, close
the cover.
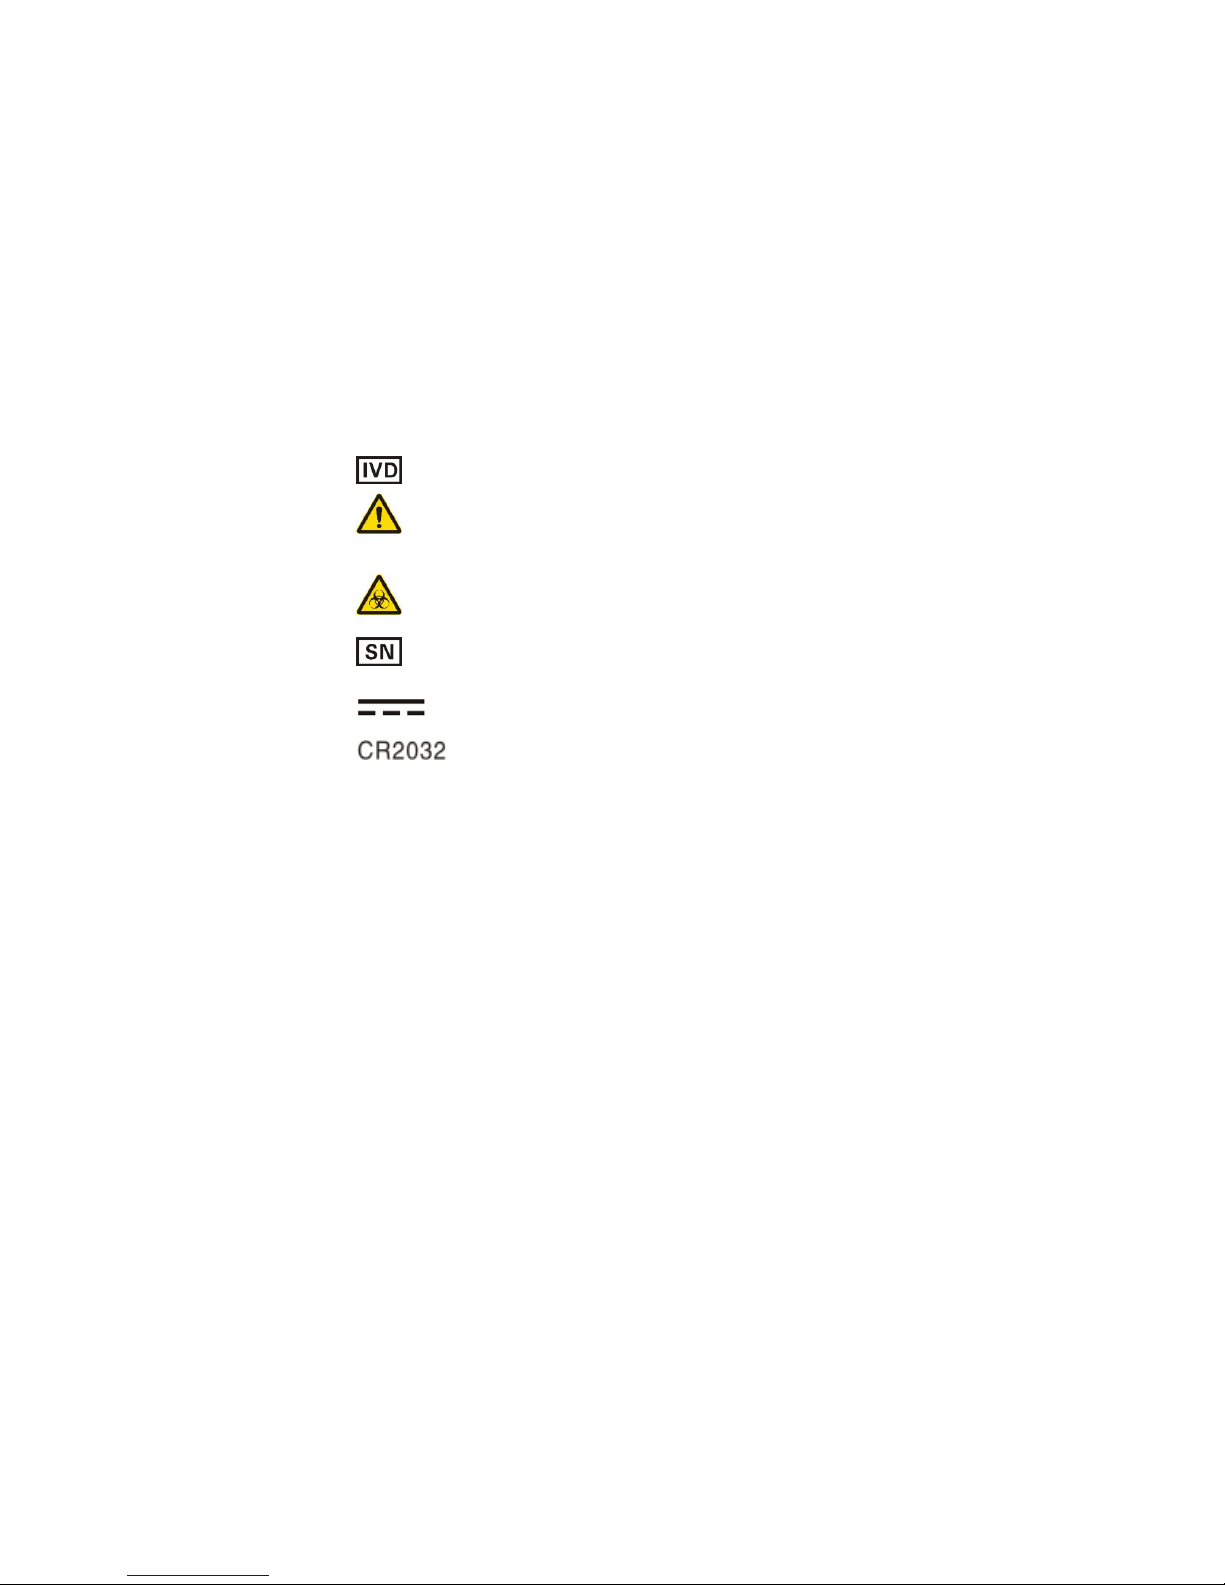
Chapter 10: Meaning of Markings
In vitro diagnostic medical device
Caution! Refer to accompanying
documents
Biological Hazard
Serial number
Direct current
Use CR2032 as power supply
Page 30
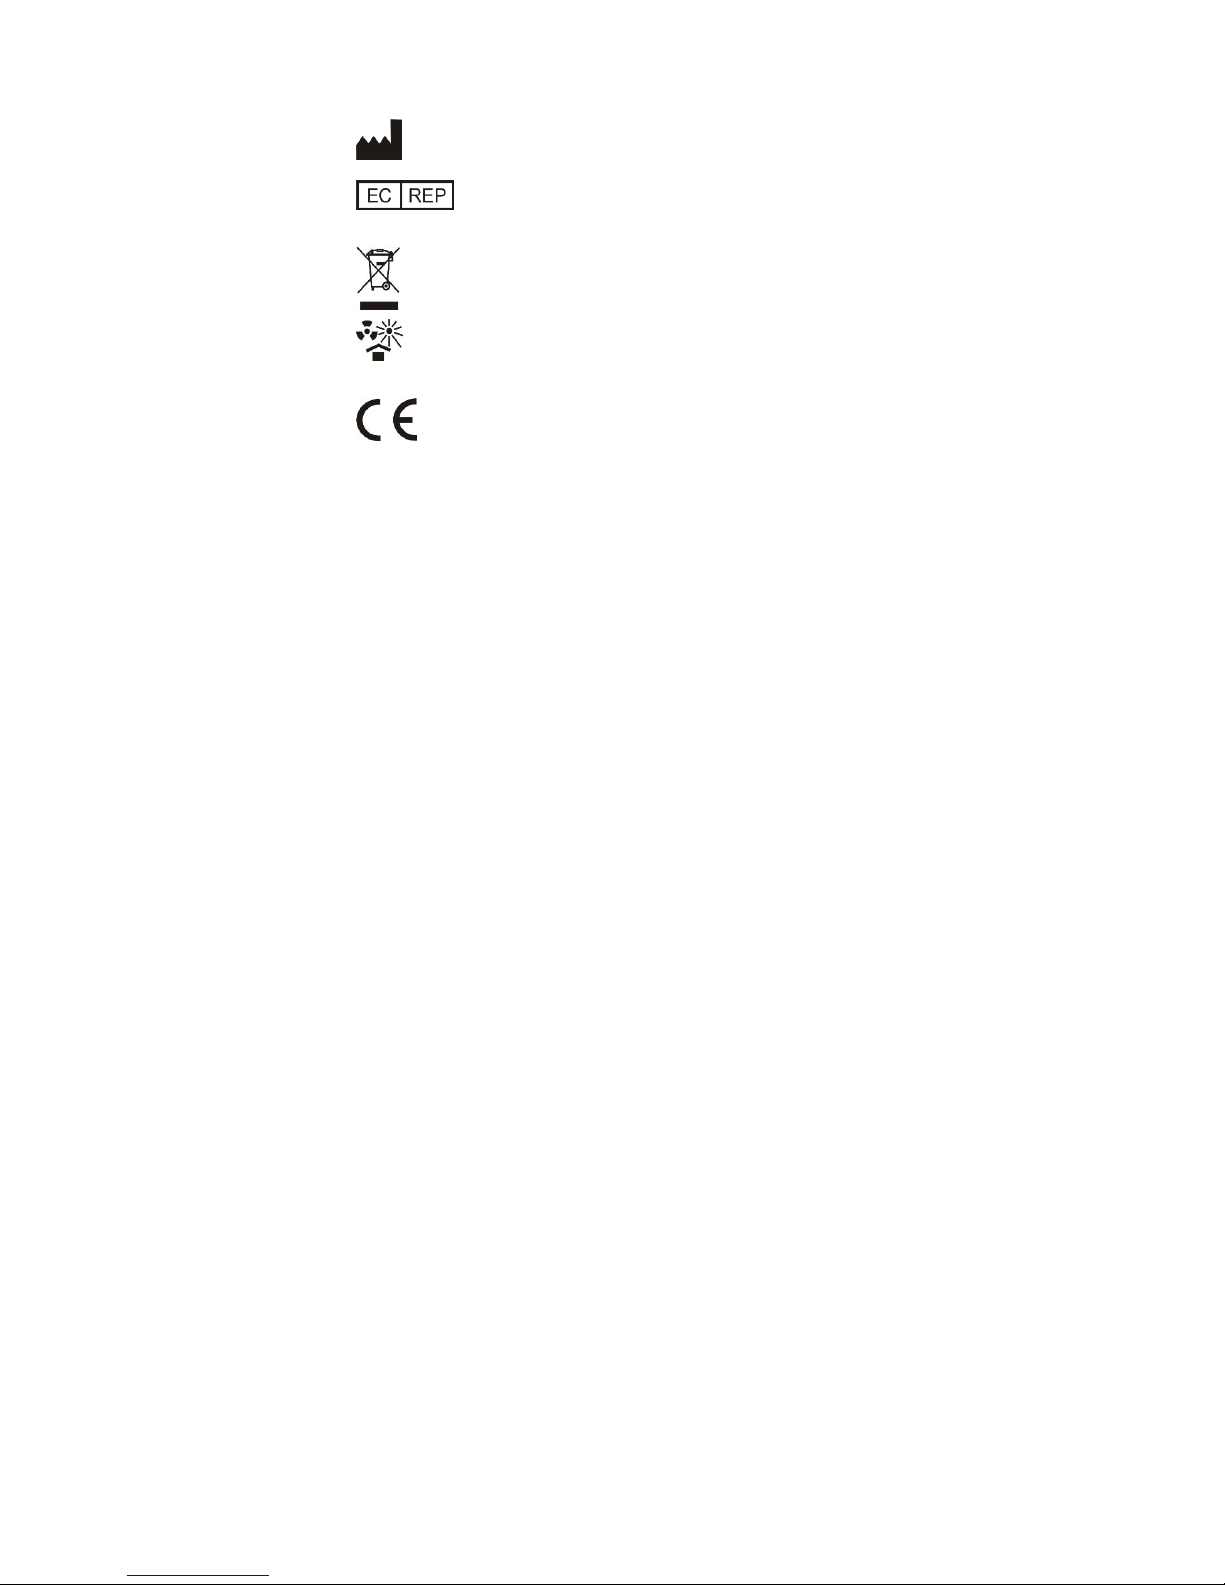
Manufacturer
Authorized representative in the
European Community
Recovery
Protect from heat and radioactive
sources
This product fulfils the requirements of
Directive 98/79/EC on in vitro iagnostic
medical devices
Page 31
Supplied by:
URIT Medical Electronic Co., Ltd.
Ver No: 07/2010-5
Wellkang Ltd t/a Wellkang Tech Consulting
Suite B, 29 Harley Street, LONDON W1G 9QR, UK
 Loading...