

Page 1

U-Reach
Mini Duplicator
PRO250
High Speed Portable HDD Duplicator
User Guide
V2.5
EN
The Data Equipment Expert
www.ureach-inc.com
Page 2

Page 3

Content Index
Disclaimer of Warranties
Disclaimer of Warranties 3
Before You Start
Important Notice 4
Safety Precautions 5
Content Index
Content Index 4
Chapter ① - Product Introduction
Features 6
1
Product Overview 7
2
2.1 System Overview 7
2.2 LCD Configuration 7
Function Table 8
3
Chapter ➁- Function Introduction
Copy 11
1
Compare 11
2
Copy+Compare 11
3
Erase 12
4
4.1 Quick Erase 12
4.2 Full Erase 12
4.3 DoD Erase 12
4.4 DoD Erase Comp 13
4.5 Secure Erase 14
Utility 14
5
5.1 Show Disc Info. 14
5.1.1 Model Number 14
5.1.2 Version of Firmware 14
5.1.3 Serial Number 14
5.1.4 Device Power Cycle 15
5.1.5 Power-on Hours 15
5.1.6 Reallocation Event Count 15
5.1.7 Off-Line Scan Uncorrectable
Sector Count 15
5.1.8 Seek Error Rate 16
5.1.9 Temperature 16
5.2 Update System 17
5.3 System Info. 17
5.4 Set Target HDD
Capacity 17
5.5 Read Speed 18
5.6 Write Speed 18
Setup 18
6
6.1 Copy Area 18
6.1.1 System and Files 18
6.1.2 All Partitions 19
6.1.3 Whole HDD 20
6.1.4 Percentage(%) 20
6.2 Skip Error 21
6.3 Language 21
6.4 Advanced Setup 21
6.4.1 Unknown Format 21
6.4.2 Erase Master 22
6.4.3 Erase Pattern 22
6.4.4 Wait HDD Time 23
6.4.5 Copy HPA Area 23
6.4.6 Clear HPA at
ERASE 24
6.4.7 Transfer Rate 25
6.4.8 Stop Motor Time 25
6.5 Restore Default 25
Chapter ➂- Specification
Specification 26
3
Page 4

Disclaimer of Warranties
All HDD duplicators are made specifically for data backup with legal
authorities from copyright owners. Any unauthorized action of copyright is
strictly prohibited, and the original manufacturer disclaims all warranties or
representations of illegal actions by users.
The manufacturer also disclaims any liability for any of losses or damages
due to not be able to perform its undertakings or provide any of the services
attributable to any events or circumstances beyond our control. Users agree
and accept all statements above as soon as purchasing our products.
This manual contains materials should be intended for personal use. All
right reserved. No part of this manual may be reproduced, transmitted or
transcribed without the expressed written permission of the manufacturer.
The information present in this manual is subject to change without prior
notice.
4
Page 5

Before you start
Important Notice
Read the complete operation instruction carefully contributes to better
•
operation.
Make sure the source device is correct and workable.
•
To guarantee data consistency, strongly suggest the capacity of source
•
and targets should be the same.
It is strongly suggest to use “Copy+Compare” to achieve a perfect
•
duplication.
Safety Precautions
The warranty will expire if damage is incurred resulting from non-
•
compliance with theses operating instructions.
Store the equipment out of the reach of children and infants.
•
Please turn o the power before replace the socket.
•
Never turn o the power while processing the rmware update.
•
Use only approved power sources.
•
The product is only suitable for operation in dry, dust free, clean
•
environment.
Do not allow liquids or foreign objects to enter. Failure to do so may
•
severely damage your duplicator.
5
Page 6

Chapter
Features
1
High copy speed supports for duplication and comparison.
•
Support reading/writing speed measuring function.
•
Show the detailed information of HDD and its quality.
•
Auto power control system helps to protect the HDD from any damage
•
during the insertion and removal from the duplicator.
Support compatibility of multiple interfaces via external adapters:
•
2.5”/3.5” IDE HDD, mSATA SSD , eSATA , iVDR , microSATA,
cFAST.
Support HDD interfaces directly: 1.8" / 2.5"/ 3.5" SATA HDD and
•
SSD.
Support 4 different duplication mode: Quick Copy (System and Files),
•
All Partitions, Whole HDD, and Percentage.
Quick Copy mode supports formats: FAT16/32/64, NTFS, Linux (Ext2/
•
Ext3/ Ext4), HFS/HFS+/HFSX, GPT, and Dynamic HDD. All Partitions
and Whole HDD support all kinds of formats.
Support 4 ways of sanitization: Quick Erase, Full Erase, DoD Erase and
•
Secure Erase.
Automatically detect and show the bad sector quantities of HDDs.
•
Light weight for easy carrying.
•
- Product Introduction
➀
6
Page 7

Chapter
- Product Introduction
➀
Product Overview
2
2.1 System Overview
Source port
Backward
Forward
/ OK
Cancel / Back
2.2 LCD Configuration
PRO250
CARRY HDD MINI DUPLICATOR
HI-SPEED
Function
Time (mm:ss)
Red : Fail
Green : Pass
Yellow : Powering
Target port
Target HDD Total size (Source)
Copy progress % Copied processed size (Target)
7
Page 8

Chapter
Function Table
3
Function Description
1. Copy
2. Compare
3.Copy +Compare
4. Erase
- Product Introduction
➀
To copy source HDD to multiple target HDDs. Refer to function [6.1 Copy Area] for 4 different
copy modes selection.
To compare data bit for bit between source and target HDDs.
It makes copy first and then compare target HDD with source HDD to ensure data
correctness.
4.1 Quick Erase
To erase HDD’s index table only, it takes short time to execute this function.
4.2 Full Erase
To erase the whole HDD content.
4.3 DoD Erase
To erase HDDs three times complying with USA Department of Defense (DoD) standard.
It takes 3 times longer than full erase.
4.4 DoD EraseComp
To erase HDDs three times complying with USA Department of Defense (DoD) standard and
bit by bit to check if data is completely erased.
It takes 4 times longer than full erase.
4.5 Secure Erase
The international authorized high standard Secure Erase function. It is able to erase the area
which is not loadable.
8
Page 9

5. Utility
Chapter
5.1 Show Disk Info.
Select one port and enter
the function.
5.2 Update System
5.3 System Info.
This function will show information of the duplicator system, including controller model,
number and software version.
5.4 Set Target HDD Capacity
To set capacity range.
5.5 Read Speed
To show the speed of reading.
5.6 Write Speed
To show the speed of writing.
- Product Introduction
➀
5.1.1 Model Number
To s how HDD's model number.
5.1.2 Version of Firmware
To s how HDD's firmware version.
5.1.3 Serial Number
To show the serial number of HDD.
5.1.4 Device Power Cycle
To show the count of HDD's tur ning on and off.
5.1.5 Power-on Hours
To show the total hours of HDD power-on.
5.1.6 Reallocation Event Count
It represents the count of failing to save data.
5.1.7 Off-Line Scan Uncorrectable Sector Count
To show the sector volume that is uncorrectable when
scanned off-line. The more the uncorrectable sector volume is,
the more serious the HDD's damage is.
5.1.8 Seek Error Rate
To show the error rate of searching for data. It can represent
the damage rate of data stored in the HDD.
5.1.9 Temperature
To show the temperature of HDD.
5.2.1 Update BIOS
To update the system firmware via the HDD.
5.2.2 Create Update HDD
To format the HDD with a 2GB FAT partition in order to quickly
save the new firmware in the HDD.
9
Page 10

Chapter
6. Setup
- Product Introduction
➀
6.1.1 System and Files
To c opy source HDD's data area only.
6.1.2 ALL Partitions
6.1 Copy Area
6.2 Skip Error
Set to ignore error of source HDD while copying.
6.3 Language
English / Japanese
6.4 Advanced Setup
6.5 Restore Default
Back to original manufacturer setting.
To c opy source HDD's all partitions.
6.1.3 Whole HDD
To copy the whole source HDD.
6.1.4 Percentage(%)
To copy percentage range of source HDD.
6.4.1 Unknown
Format
Set to Copy or Skip
Unknown.
6.4.2 Erase Master
Set to erase source or
not.
6.4.3 Erase Pattern
Set Erasing pattern.
6.4.4 Wait HDD Time
Auto start time after plugging HDD.
6.4.5 Copy HPA Area
Setup to copy HPA setting or
not.
6.4.7 Clear HPA at
ERASE
6.4.7 Transfer Rate
Select the proper transfer rate from UDMA2~UDMA7.
6.4.8 Stop Motor Time
Auto running time after stopping motor.
6.4.1.1 Copy Unknown
6.4.1.2 Skip Unknown
6.4.2.1 Disable
6.4.2.2 Enable
6.4.3.1 ONE Byte
6.4.3.2 Big Random Data
Copy and Setting
No, keep HPA
No, Clear HPA
No, Setting HPA
Clear HPA Setting
Keep HPA Setting
10
Page 11

Chapter
Copy
1
It copies data from the source HDD to the target HDD. Please ensure
you have selected the copy mode require before executing the copying
process. Refer to function [6.1 Copy Area] for details.
- Function Introduction
➁
Copy Process
Total data capacity
Copied data capacity
Copie Time
Copy 2047M
0:26 50% 1037M
Copy Process %
Copy Result
Pass 0:58
No Bad Sector!
The default setting is the quick copy mode “System and Files”.
Note
Compare
2
It is used to check if the data on the target HDD is identical to the source
HDD after the duplication is nished.
Copy+Compare
3
It executes the copying first, and then it compares the target copied with
the source to check the correctness of the duplication.
11
Page 12

Chapter
Erase
4
There are Quick Erase, Full Erase, DoD Erase, DoD EraseComp , and
Secure Erase, totally 5 kinds of erasing modes. Select the appropriate
erase method when you would like to dispose or reuse the HDDs.
•Users can go to Function [6.4.2 Erase Master] to select if
Note
erasing the source HDD. The default setting is “Disable” to erase the
source HDD.
•This function can be stopped while processing by pressing [ESC] for
about 3~4 seconds.
- Function Introduction
➁
4.1 Quick Erase
This function only erases the HDD index. It is the quickest way to erase
HDD. It will damage the data in the HDD. Please make sure you backup
all important data before using this function.
4.2 Full Erase
This function will erase all HDD sectors. It will take longer time than quick
erase. It will damage the data in HDD, please make sure you backup all
important data before using this function.
4.3 DoD Erase
This is to comply with the U.S.A. Department of Defense (DoD 5220)
standard to fully erase the HDD three times bit by bit to rewrite HDD and
guarantee all data is erased. It will damage the data in HDD, please make
sure you backup all important data before using this function.
Steps of DoD Erase:
The system will start executing DoD Erase after pressing OK.
DoD Erase
Prepare Pattem
12
Page 13

Erasing
Chapter
- Function Introduction
➁
Erasing 1 HDD
DoD Erase 2:05
[02] 465G
Erase[00] 4818M
The system will show the result after finishing
DoD Erase
Pass: 5 Fail: 0
4.4 DoD Erase Comp
As well as DoD erase, this function will also execute compare function to
make sure the random bit was correctly written. This function erases each
sector of the HDD three times: the first time with zeros (0x00), second
time with 0xFF and the third time with random characters, performs a bit
by bit check to see if data is completely erased. It will damage the data in
HDD, please make sure you backup all important data before using this
function.
DoD EraseComp Method
The erasing time of DoD Erase mode is three times longer than Full Erase mode, and the
❖
time of DoD EraseComp is four times longer than Full Erase mode.
13
Page 14

Chapter
- Function Introduction
➁
4.5 Secure Erase
The international authorized high standard Secure Erase function. It
overwrites every single track on the hard drive with "00". Even PA/DCO or
other data area which are not able to load, can be erased all together.
•Please do not disrupt during Secure Erase, otherwise it would cause
Note
irretrievable error on HDD, which turns the HDD unusable.
Utility
5
5.1 Show Disc Info.
The function will show basic information of both source and target HDDs.
5.1.1 Model Number
This function is to show HDD’s model number.
[Disc Info.]
1.Model Number
Model: WDC WD
5000BPVT-00HXZT3
5.1.2 Version of Firmware
This function is to show HDD’s rmware version.
[Disc Info.]
2.Version of Fir
Version
01.01A01
5.1.3 Serial Number
This function is to show the serial number of HDD.
[Disc Info.]
3.Serial Number
Serial NO:
WD-WXB1A91M3998
14
Page 15

Chapter
- Function Introduction
➁
5.1.4 Device Power Cycle
This function is to show the count of HDD's turning on and o.
[Disc Info.]
4.Device Power C
[Device Power C]
99
5.1.5 Power-on Hours
This function is to show the total hours of HDD powering-on.
[Disc Info.]
5.Power-on Hours
[Power-on Hours]
18
5.1.6 Reallocation Event Count
This function is to show the count of reallocating event.
When the HDD fails to save data, it will need to redefine the location to
store data. Therefore, more count of reallocation event represents more
error times.
[Disc Info.]
6.Reallocation E
[Reallocation E]
0
5.1.7 Off-Line Scan Uncorrectable Sector Count
This function is to show the sector volume that is uncorrectable when
scanned off-line. The more the uncorrectable sector volume is, the more
serious the HDD's damage is.
[Disc Info.]
7.Off-Line Scan
[Off-Line Scan]
0
15
Page 16

Chapter
- Function Introduction
➁
5.1.8 Seek Error Rate
This function is to show the error rate of searching for data. It can
represent the damage rate of data stored in the HDD.
[Disc Info.]
8.Seek Error Rat
[Seek Error Rat]
0
5.1.9 Temperature
This function is to show the temperature of HDD.
[Disc Info.]
9.Temperature
[Temperature]
22 C
o
5.2 Update System
This function is to execute rmware updating of system.
You can follow the following steps to update the system rmware.
Select Function [5.2.2 Create Update HDD]
⊳
[Update System]
2.Create Update
Create Update HDD (create a 2GB FAT partition)
⊳
(The purpose is because 2GB FAT HDD Partition can speed up the
update process.)
Do FORMAT HDD#1
Confirm ?
16
Page 17

Chapter
Download the BIOS from the PC to your HDD.
⊳
HDD
USB
HDD Enclosure PC
Plug the HDD into Port 1of the duplicator, select Function 5.2.1
⊳
to update BIOS, and wait for about 1 minute to finish the update
process.
- Function Introduction
➁
[Update System]
1.Update BIOS
5.3 System Info.
This function shows the duplicator information such as model name and
rmware version.
HDD Dupe 1-1
Ver: 2.31.0
5.4 Set Target HDD Capacity
The function is used to reset target HDDs' capacity range when reading or
writing HDDs to save processing time.
Set Capacity Complete !
17
Page 18
Chapter
- Function Introduction
➁
5.5 Read Speed
This function is to measure the reading speed of the HDD by reading the
whole HDD.
R 2:30 465G
89.0M/S 12.8G
5.6 Write Speed
This function is to measure the writing speed of the HDD by writing the
whole HDD.
W 1:08 465G
89.6M/S 4423M
•This function will delete the content in HDD, so please make sure you
Note
have backup data before executing this function.
Setup
6
6.1 Copy Area
This setting is to select the copy mode you would like to use.
6.1.1 System and Files
It copies the source HDD's System and Files instead of the whole HDD.
The system will analyze the source HDD and identify the data area to
copy. As long as the source HDD's data within the target HDD's free
space, the copy will be processed.
[Copy Area]
System and Files
18
Page 19

Chapter
- Function Introduction
➁
Source HDD 320GB
Data : 20GB
Partition1 : 90GB
•System and Files only supports FAT, NTFS, and LINUX (ext2/ ext3/
Note
Tatget HDD 320GB
When choosing “System and Files Copy”, only 20G data will be
copied, and it just takes 6.2% time compared to “Whole HDD
Copy”. The target HDD will be exactly the same as source HDD
after copy.
ext4).
6.1.2 All Partitions
This mode will copy all of the partitions areas bit by bit including the free
space.
•The capacity of target HDD has to be larger than the capacity of all
Note
partitions of the source HDD.
[Copy Area]
All Partitions
Source HDD 320GB
Data : 20GB
Partition1 : 90GB
Tatget HDD 320GB
When choosing “All Partitions Copy”, only 120G data will be
copied, and it just takes 37.5% time compared to “Whole HDD
Copy”. The Target HDD will be exactly the same as source HDD
after copy.
19
Page 20

Chapter
- Function Introduction
➁
6.1.3 Whole HDD
This mode will copy the entire HDD, regardless of content, format,
partition or free space. This mode will take much more time to duplicate
the source HDD completely.
[Copy Area]
Whole HDD
Source HDD 320GB
Data : 20GB
Partition1 : 90GB
• After copy, the remaining space in the copied HDD can be used by PC
Note
for further partitioning.
Tatget HDD 320GB
When choosing “Whole HDD Copy”, completed 320GB HDD will
be copied, and it takes the longest time. The target HDD will be
exactly the same as the source HDD after copy.
6.1.4 Percentage(%)
This mode will copy the percentage selected of source HDD. Only copy
the selected area, other area or data will not be copied. Duplication time
is aected by "transfer rate of HDD".
[Copy Area]
Percentage(%)
20
Page 21

Chapter
- Function Introduction
➁
Source HDD 500GB
Data:250GB
Partition:250GB
25%
32%
500GB
Tatget HDD 500GB
Only percentage range from25% to 32% will be copied.
25%
32%
6.2 Skip Error
This function sets the volume of errors that is acceptable for you to skip
during the copy process.
[Skip Error]
0
• If it’s critical that there are no errors on the HDD, then the error counter
Note
should be set to 0.
6.3 Language
Select preferred language.
6.4 Advanced Setup
6.4.1 Unknown Format
This function is used to select if copying the areas with unknown format.
6.4.1.1 Copy Unknown
The setting copies all the unknown area even if the format is not identied.
21
Page 22

Chapter
- Function Introduction
➁
[Unknown Format]
Copy Unknown
6.4.1.2 Skip Unknown
The setting skips the unknown format area during copy process.
[Unknown Format]
Skip Unknown
6.4.2 Erase Master
This function is to set if erasing the source or not when executing erasing
function.
[Erase Master]
Disable
[Erase Master]
Enable
6.4.3 Erase Pattern
Select different erase method during the third time writing data for
functions [4.3 DoD Erase] and [4.4 DoD EraseComp].
6.4.3.1 ONE Byte
A random character to be written into every byte.
3737373737
3737373737
3737373737
[Erase Pattern]
ONE Byte
3737373737
3737373737
3737373737
3737373737
3737373737
22
Page 23

Chapter
- Function Introduction
➁
6.4.3.2 Big Random Data
A set of dierent random character to be written into a set of area.
This erase pattern method is safer for preventing from data recovered.
26A5C8781
BF51337E81
AA9641D3B
5CDA756B1
3BAFF21FF4
[Erase Pattern]
Big Random Data
1FBAC4C99
7EDAF1237
7F51C59C3
6.4.4 Wait HDD Time
You can select auto-start time after plugging in HDD, able to set the
waiting time from 0 to 30 seconds.
[Wait HDD Time]
15 seconds
6.4.5 Copy HPA Area
This function will aect the HPA setting of target HDD during Copy. The
default setting is "No, keep HPA". This setting enables to setup whether to
copy hidden area of the source.
[Advanced Setup]
5.Copy HPA Area
[Copy HPA Area]
Copy and Setting
23
Page 24

Chapter
Copy and Setting: Yes, copy. Copy data from source to target including
❶
HPA area of source. It will not only set the target HDD the same HPA
setting as the source HDD, but also copy the data in the HPA area.
No, Keep HPA: No, don't copy. Copy data from source to target and keep
❷
the target HPA setting during Copy.
No, Clear HPA: No, don't copy. Copy data from source to target and
❸
remove the target HPA setting during Copy.
No, Setting HPA: No, don't copy. Copy data from source to target and set
❹
the target HDD the same HPA setting as the source HDD during Copy.
HPA area, host protected area, hidden protected area, is kept invisible
Note
space for booting area, recovery data or blocked bad-sector, etc. By
creating HPA, it resets max sectors and keeps some space for HPA area.
It reduces the reported size of HDD.
- Function Introduction
➁
6.4.6 Clear HPA at ERASE
You can select the best transfer rate from UDMA 2 to UDMA7 for your HDD
duplication process. If you are not condent on the HDD quality or you nd
a high failure rate on copy or compare. It is recommended to slow down the
UDMA mode.
[Advanced Setup]
6.Clear HPA at E
Clear HPA Setting: Yes, copy. During erase tasks, delete HPA setting of all
❶
targets. It will clear the HPA setting rst and then do erase.
Keep HPA Setting: No, don't copy. During erase tasks, it will not execute
❷
erase in HPA area, will keep the setting and the data as original.
[Clear HPA at E]
Clear HPA Settin
24
Page 25

Chapter
- Function Introduction
➁
6.4.7 Transfer Rate
You can select the best transfer rate from UDMA 2 to UDMA7 for your HDD
duplication process. If you are not condent on the HDD quality or you nd
a high failure rate on copy or compare. It is recommended to slow down the
UDMA mode.
[Transfer Rate]
UDMA 5
6.4.8 Stop Motor Time
When the system nishes executing functions, the motor won’t stop running
immediately. This function is used to set the time of motor stopping after
nishing function executing from 1 to 20 seconds.
[Stop Motor Time]
8 Seconds
6.5 Restore Default
This function is to go back to the manufacturer's default setting.
25
Page 26
Chapter
- Specication
➂
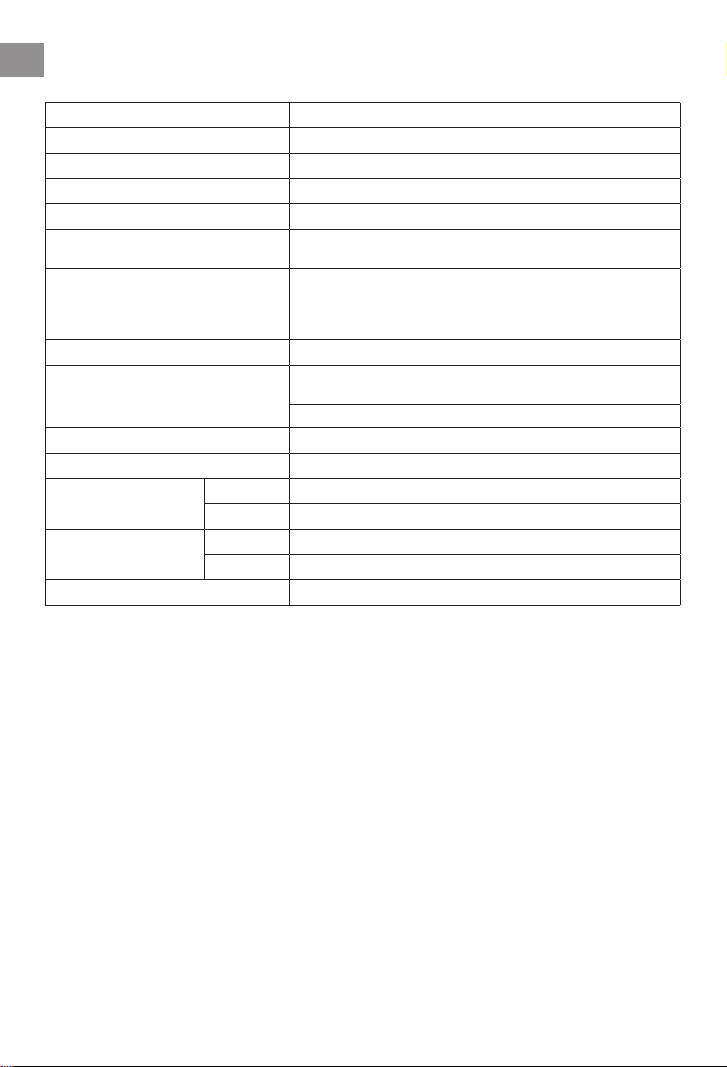
Product Name
Product Number
Targets
Support HDD Interface Directly
Control Button
Compatible HDD/SSD via Adapter
Duplication Mode
Support OS
Support Format
Capacity
Power Supply
Temperature Range
Humidity Range
Safety & Certification
The actual specification may subject to change without notice.
❖
Working
Storage
Working
Storage
Carry Mini Super High Speed HDD Dupe
PRO250
1:1 (2-port)
1.8”/2.5”/3.5” SATA HDD and SSD
4 push buttons(▲, ▼ , OK, ESC )
All major brand of 2.5"/3.5" IDE HDD, mSATA SSD, eSATA, microSATA,
iVDR, cFAST
1.Quick Copy (System and Files only)
2.All Partitions Copy
3.Whole HDD Copy
4.Percentage Copy
All (Windows, Linux, RAID, etc)
Quick Copy (System and Files): FAT16/32/64, NTFS,
Linux(Ext2/Ext3/Ext4), Mac(HFS/HFS+/HFX), GPT, Dynamic
All Partitions/ Whole HDD/Percent Copy: Supports all format
Up to 3TB
12V 5A
5 ºC ~45ºC
-20 ºC ~85 ºC
20%~80%
5%~95%
CE, FCC, RoHS
26
Page 27

Page 28

www.ureach-inc.com
 Loading...