

Page 1
MT Platform Series
User Guide
V 5.1
MT800H/1600H/2600H/600G/1600G/2100G/2600G
EN
MT HDD/SSD Duplicator
Page 2

Content Index
2
Q&A/FAQ
Content Index
Disclaimer of Warranties
Notice & Remindeer
Important Notice
Safety Precautions
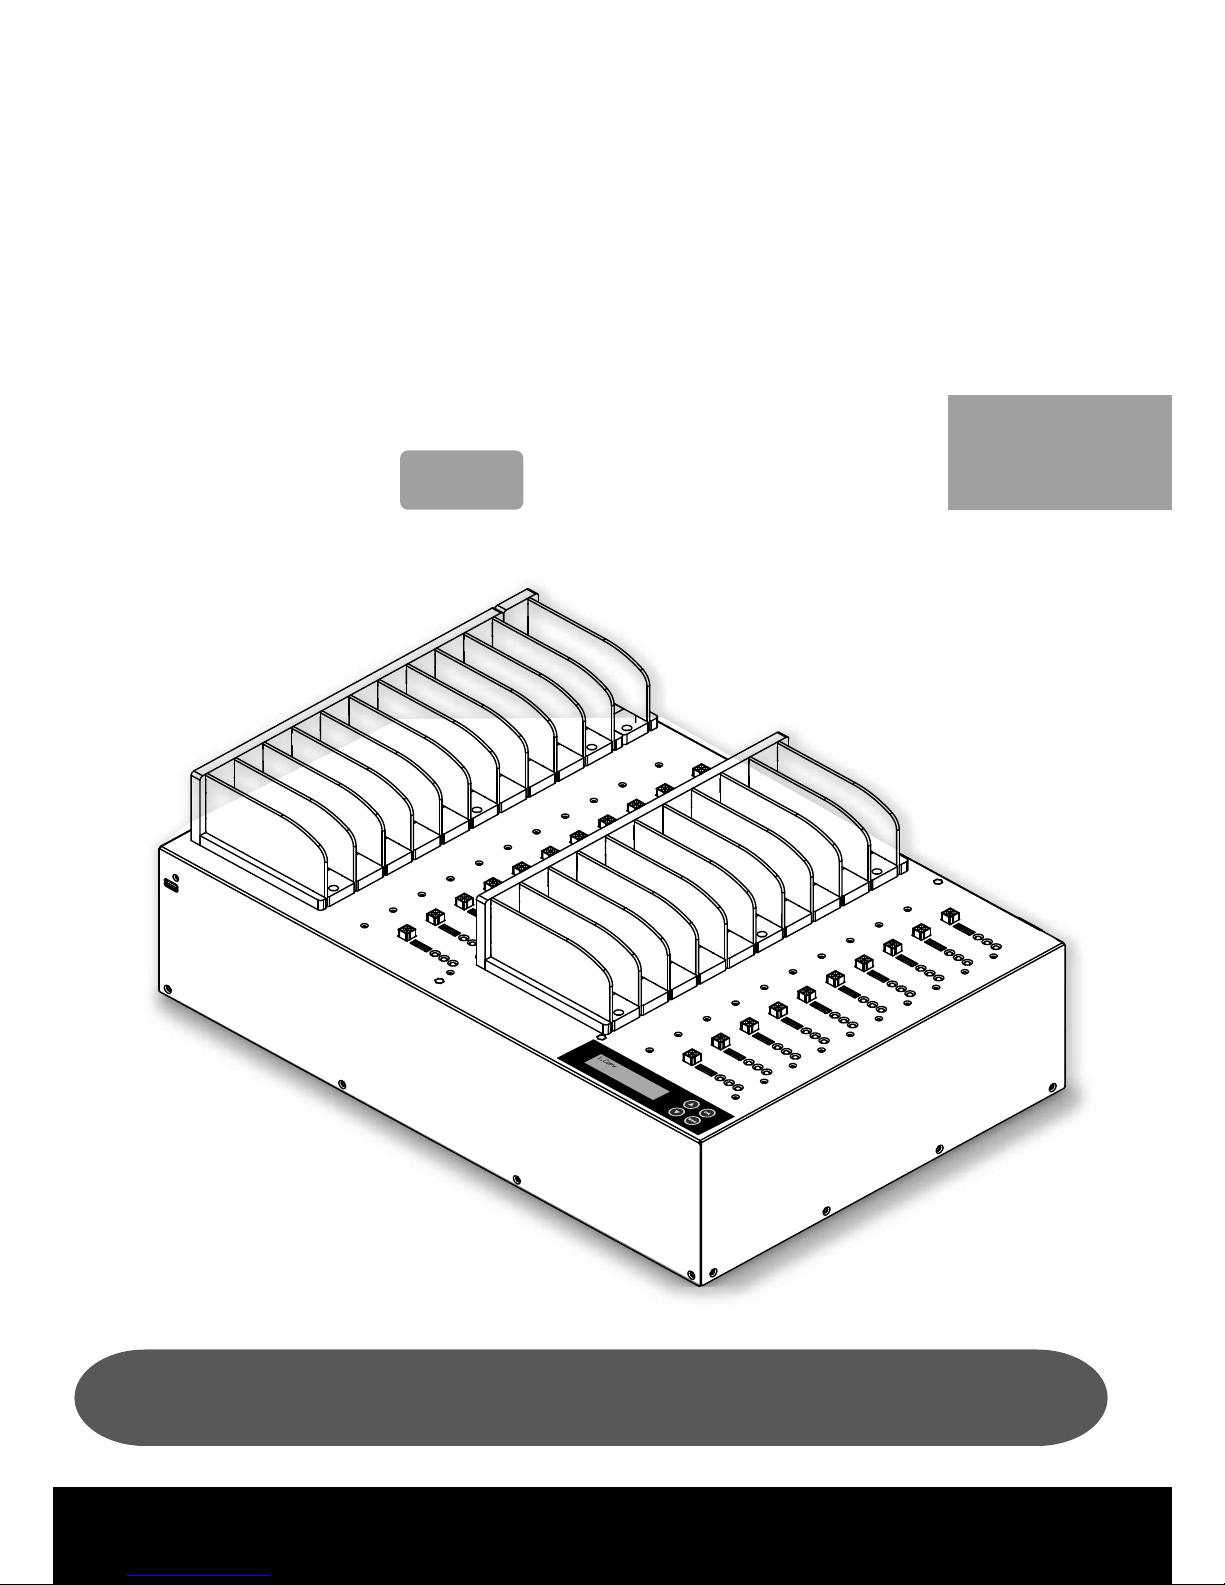
➀ Overview
⌘ Product Overview
⌘ Product Features
⌘ Hardware Overview
-Front View
-Back View
-LED Status
-LCD Configuration
-Interface Adapter
➁ Function Table
⌘ MT-G & MT-H Series
➂ How to Copy HDDs
⌘ Start to Copy
⌘ Set up before Copy/
Compare
1 Set Copy Area of
Source HDD
➊ System and Files
➋ ALL Partitions
➌ Whole HDD
➍ Percentage (%)
2 Set Tolerance of Bad
Track
3 Auto Skip Lower-Speed
HDDs
4 Auto Skip Lower-Speed
Source
※ Other Utility and
Setup
※ Troubleshooting
When Fails
※ HPA Setting
➃ How to Compare HDDs
⌘ Confirm Duplication
Accuracy
➄ How to Erase HDDs
⌘ Data Sanitization
-Settings of Erase Methods
1 Quick Erase
2 Full Erase
3 DoD Erase
4 DoD Erase & Compare
5 Secure Erase
➅ How to Update System
1 Update by USB
2 Update by BIOS
➆ How to Use PC-Monitoring
Real-time PC-Monitoring
⌘ Operation of PC-Monitoring
⌘ Browse Log Report
through PC
Log Report
1 How to Use Log Report
2 How to Export Log Report
3 Export Log by USB Drive
4 Advanced Function
➇ FAQ
⌘ System FAQ
⌘ PC-Monitoring FAQ
⌘ Quality Check
➈ Specification
⌘ MT-G & MT-H Series
2
3
3
3
3
5
6
7
7
7
8
8
9
10
13
15
15
15
16
16
17
17
18
18
18
19
19
22
23
23
24
24
24
24
25
26
26
27
30
31
32
32
32
34
35
36
37
37
38
Page 3

Warranties & Notice
3
Disclaimer of Warranties
MT series duplicators are made specifically for data backup with legal authorities from
copyright owners. Any unauthorized action of copyright is strictly prohibited, and the
manufacturer disclaims all warranties or representations of illegal actions by users.
The manufacturer also disclaims any liability for any loss or damage due to not being
able to perform its undertakings or provide any of the services attributable to any
events or circumstances beyond our control. Users agree and accept all statements
above as soon as purchasing our products. This manual contains materials that
should be intended for personal use, all right reserved. No part of this manual may be
reproduced, transmitted or transcribed without the expressed written permission of the
manufacturer. The information present in this manual is subject to change without prior
notice.
Notice & Reminder
Important Notice
Read the complete operation instruction carefully contributes to better
operation.
Make sure the source device is correct and workable.
To guarantee data consistency, we highly recommend the capacity of
source and targets should be the same.
It is strongly suggested to use "Copy+Compare" to achieve a perfect
duplication.
Safety Precautions
The warranty will expire if damage is incurred resulting from non-compliance with
theses operating instructions.
Store the equipment safely when not in used and keep out of the reach of children
and infants.
Please turn off the power before replace the socket.
Never turn off the power while processing the firmware update.
Use only approved power sources.
The product is only suitable for operation in dry, dust free, clean
environment. Do not allow liquids or foreign objects to enter. Failure to do so may
severely damage your duplicator.
Page 4
Before You Start
4
⌘
Preparation Tips before You Start
• Make sure to use stable power supply.
• Please use at clean & dry environment.
• Please keep the environment well
ventilated.
• When the duplicator operates, it is normal
for the machine to heat up.
• Please do not move the duplicator during
operation to ensure better operation.
• Please do not remove HDDs during
operation to avoid damage.
• Please use power supply of its original
manufacturer to ensure working normal.
• Eliminate Static electricity:
Static electricity may cause duplication
error. Please pay attention to the duplicator
environment and operators’ equipment. It is
recommended to purchase static electricity
elimination equipments to avoid static
electricity shock when stay in high static
electricity.
⌘
Notice Symbols
Special items, procedures, or notes should be noticed by users before operation.
●
Note:
Note It refers to related operations on the duplicator, special details, tips to know,
suggestions or more effective operation.
●
Caution:
Caution It refers to operations need to be followed or to be careful to avoid mistakes.
Page 5
Overview ➀
5
⌘
Product Overview
The MT series have ultra high speed duplication, and each SATA port is independent.
MT series support up to 25 targets duplication, it has the same performance of speed is
far beyond PC-based duplicators.
There are small to large duplication targets and different duplication speeds for option.
MT series obtain full line products to meet specific requirements.
The HDD series has ultra high speed, and each interface is independent. That's why
no matter how many targets, it has the same performance of ultra high transmission
speed, far beyond PC-based duplicators.
Comply with the U.S. Department of Defense's erasing standard (DoD5220.22 M) and
Secure Erase (NIST800-88). It is important to make sure the data inside the disregarded
HDD will not be retrieved and can be safely transferred.
2.5"/ 3.5" HDD are both
adaptable into the HDD slot
Guiding
Module
Open Platform
Design
Page 6

Features
6
⌘
Product Features
Ultra High Speed
Ultra high transmission speed for each
port operating individually.
Quick Copy Mode
Support FAT16/32/64, ext2/3/4, NTFS,
HFS+/HFX/HFS, GPT, and Dynamic
HDD format.
It will only copy the data and system
area, which can highly enhance the
copying efficiency.
Support eSATA/SATA/USM HDD
Interfaces
Revolutionary replaceable module of
SATA interface, easy plug in and out
HDDs. Easy replace new module and
connect IDE converter.
(Please contact the
duplicator manufacturer for purchasing adaptors.)
Support Multi-Interfaces
The duplicator supports 3.5"/1.8" IDE,
eSATA, iVDR, microSATA, mSATA, CF,
and SD via interface adaptors.
(Please
contact the duplicator manufacturer for purchasing
adaptors.)
• IDE to SATA
• 1.8" to 3.5" IDE
• mSATA to SATA
• CFast to SATA
• micro-SATA to SATA
• eSATA adapter cable
• IDE Module (eSATA / iVDR transmission
lines, mSATA transfer)
Auto Skip Lower Speed HDDs
Provide the speed 20, 40,
60~300MB. Set to check HDDs’
lowest tolerance speed to skip any
lower speed HDD tasks.
Log Report Management
Exclusive Logs management records all
tasks and details for better production
control.
• Besides PC-Monitoring, LV07H can
browse Log Report from duplicator
through PC.
• Output Log Report: Professional log
management reports, automatically
record working results and source
target flow.
• Log reports record details of each port,
such as serial number, source HDDs
flowing.
Real-time Checksum Comparison
Auto compare for checksum, CRC code
during copying, showing result after
task ending. Copy doesn’t degrade
performance to exclude all problems of
transmission.
4 Kinds of Copy Areas
Four copy modes to meet different
requirements: Systems and Files, All
Partition, Whole HDD, and Percentage
Copy.
4 Kinds of Erase Methods
Quick Erase, Full Erase, DoD Erase,
and Secure Erase.
Auto Power Control System
Protect the HDD from damage during
hot removal from the duplicator.
Large Duplication Targets
Complete product line, support up to
25 targets duplication synchronously.
Page 7
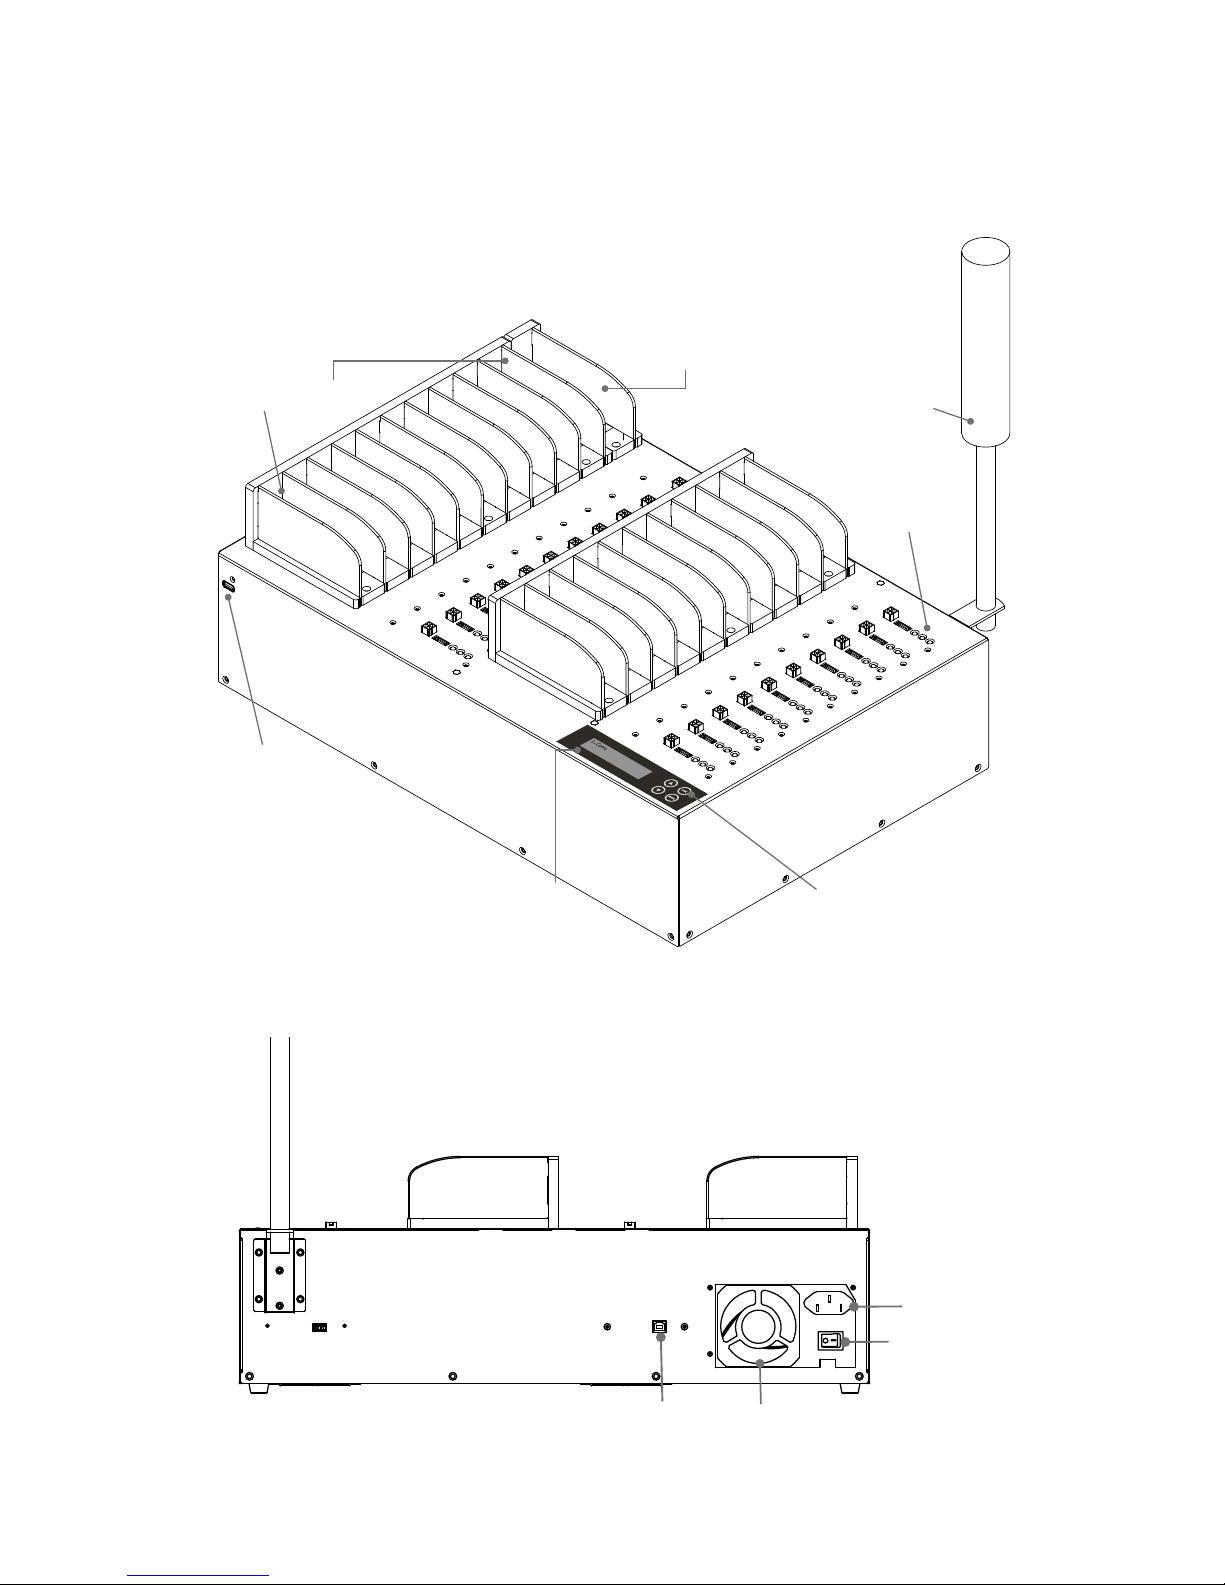
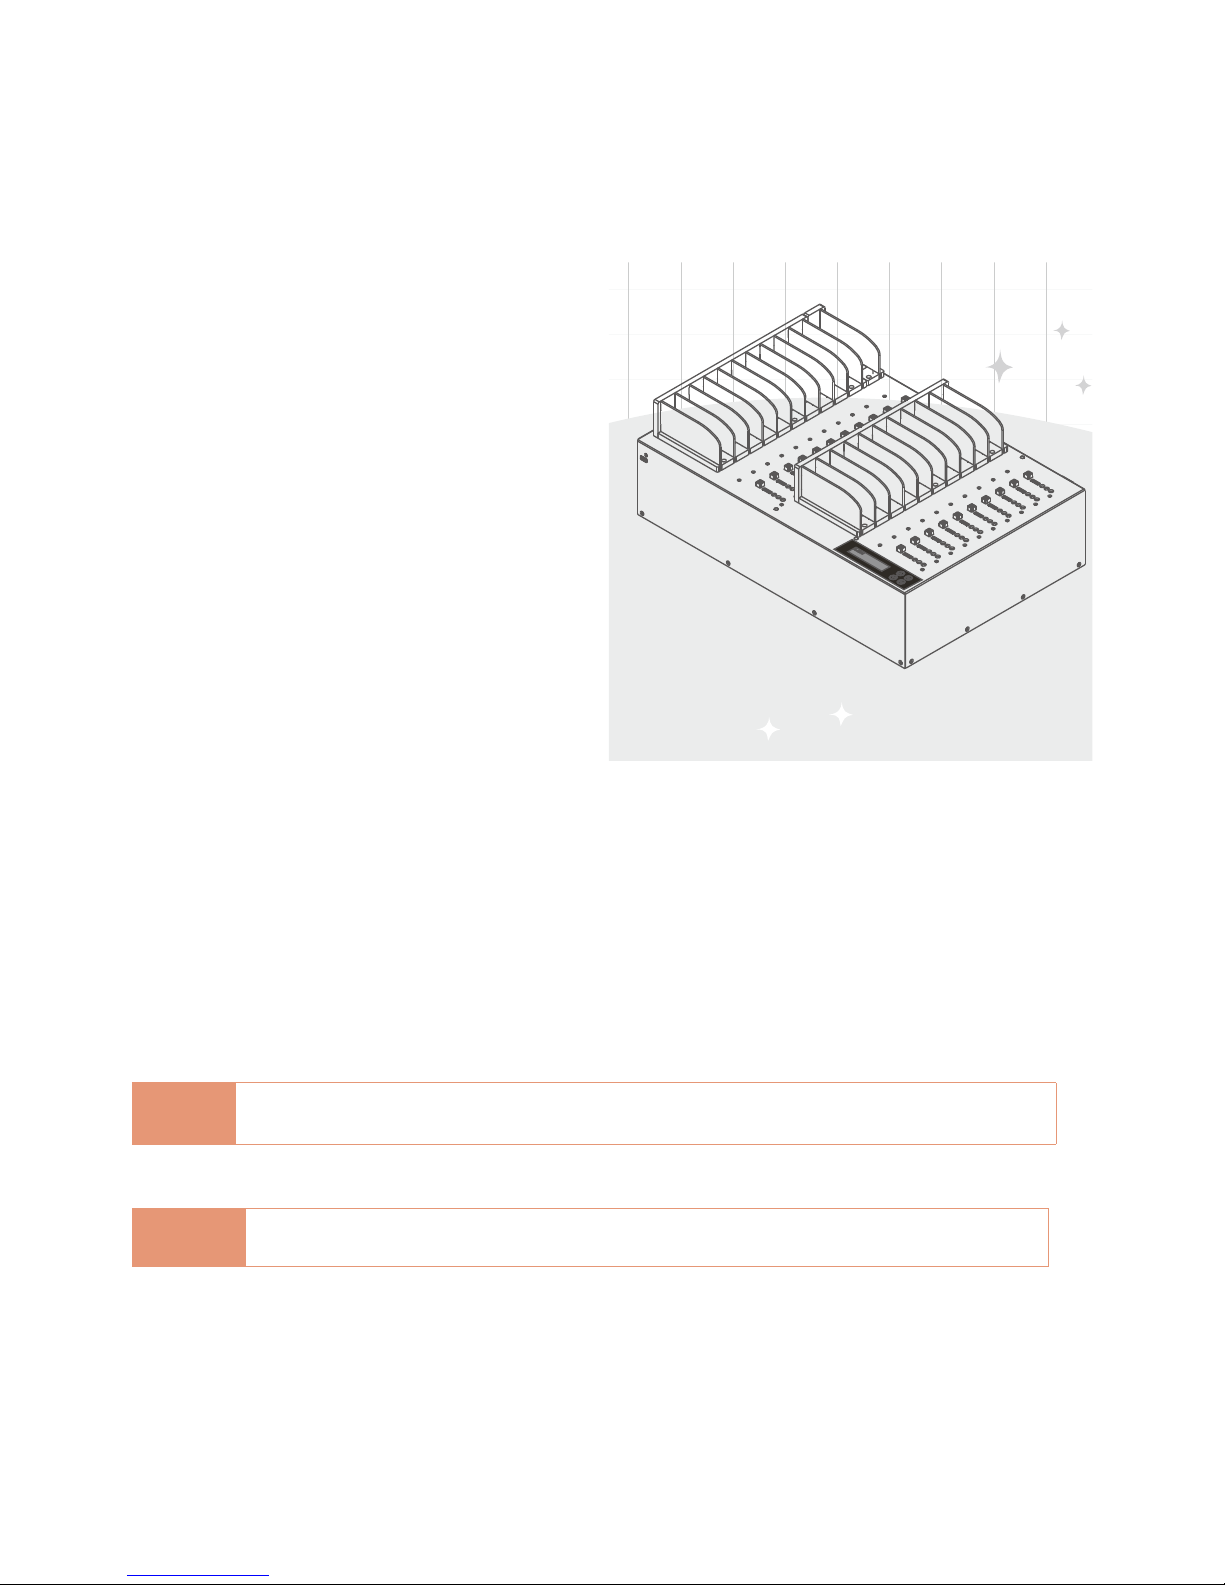
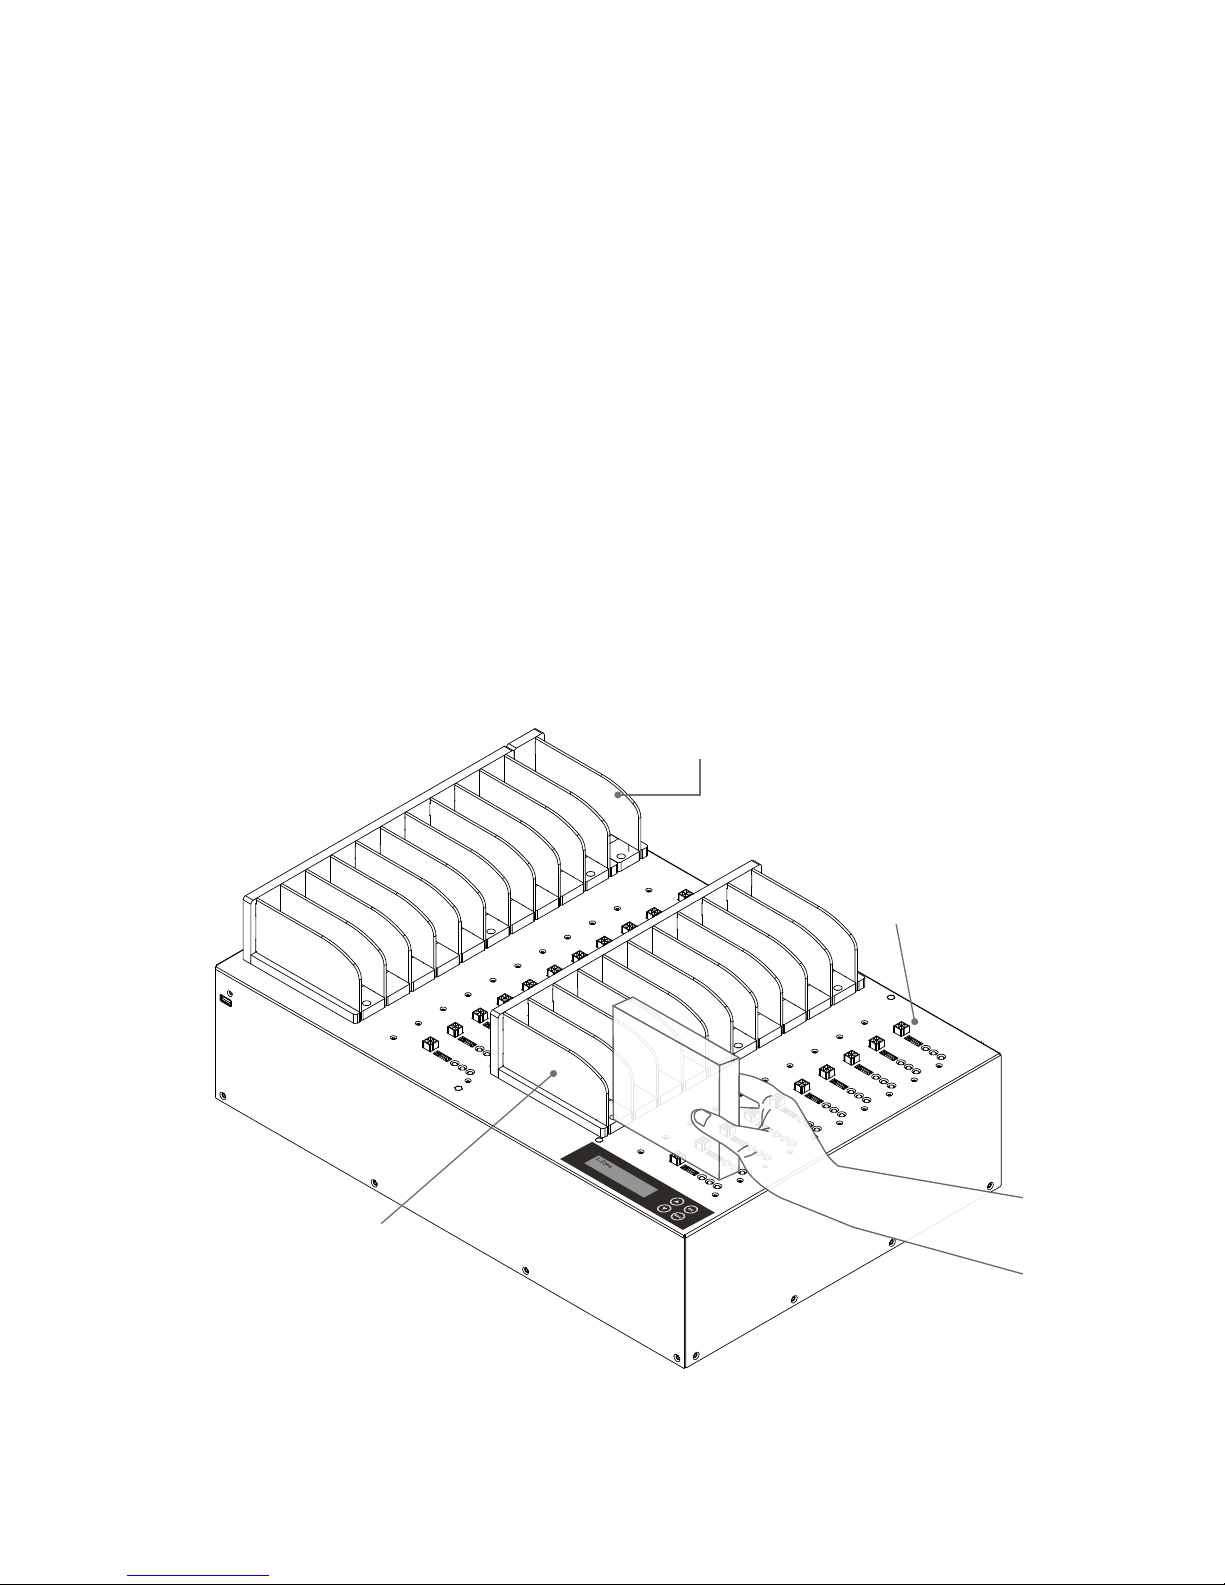
Appearance
7
⌘
Hardware Overview
●
Front View
2.5"/ 3.5" HDD are both
adaptable into the HDD slot
Target Port
LCD Operation
buttons
Optional
Source port
Indication
LED
Guiding
Module
USB port
Open Platform
Design
●
Back View
Fan
Power supply
Power switch
USB port to PC
FanUSB port to PC
Power supply
Power switch
Optional Alarm
Page 8
Appearance
8
●
LED Status
Indication LED on each slot
Yellow: Powering
Green: Pass
Red: Fail
Red
Green
Yellow
●
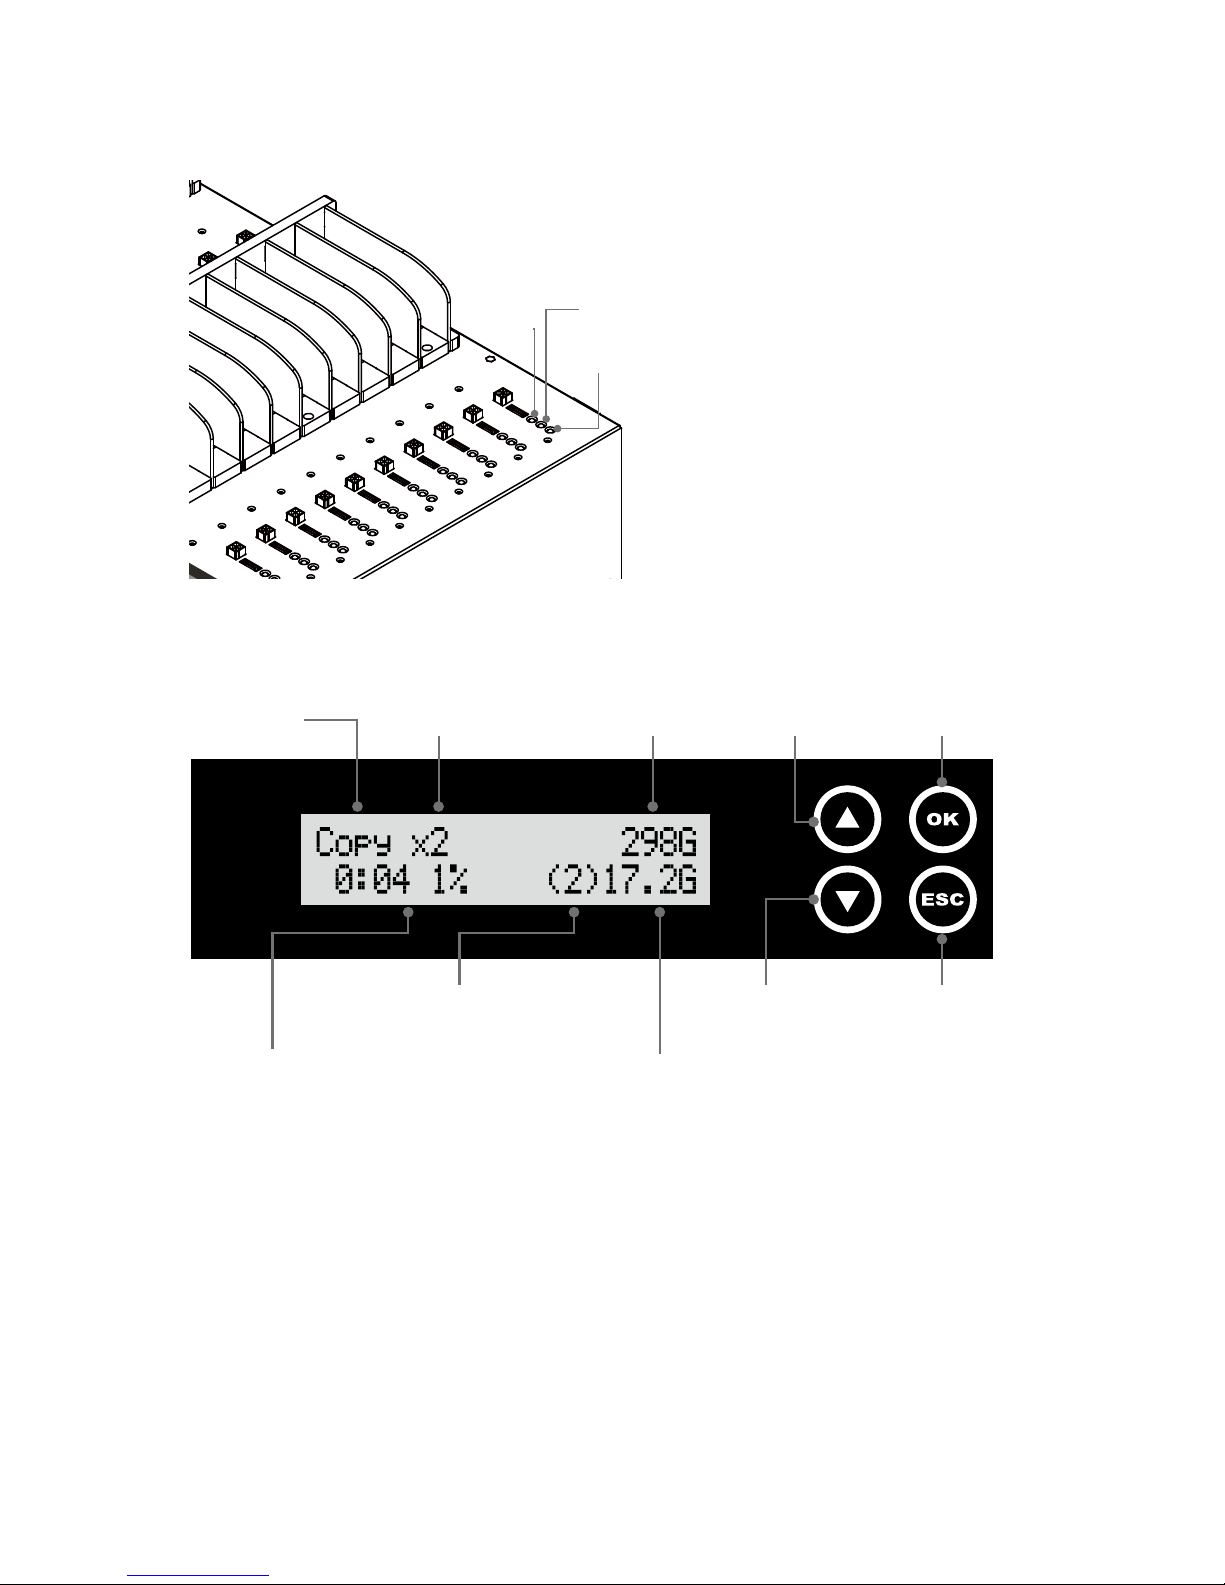
LCD Configuration
Function
Number of
target HDD Total size Forward Confirm/OK
Time elapsed and
copy progress
Copied processed size
Port # of the slowest
copying HDD
Backward Cancel/Back
Page 9
Appearance
9
●
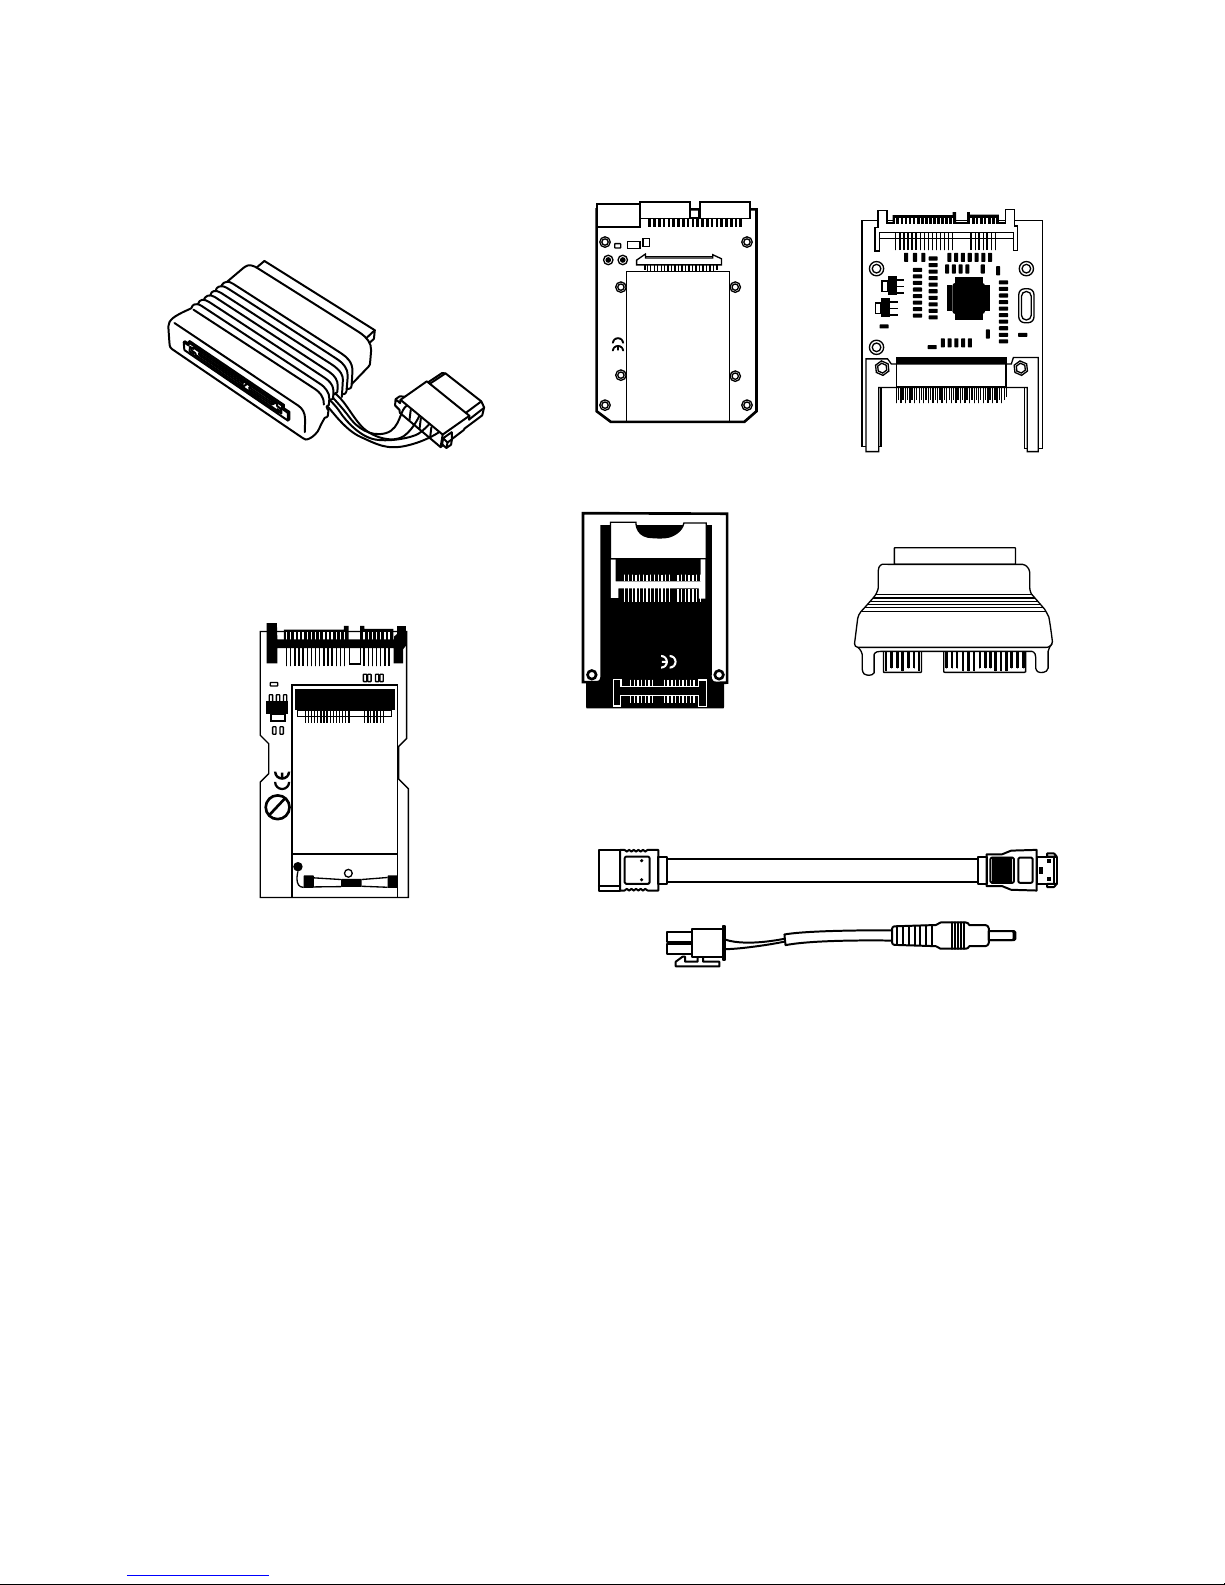
Interface Adapter
(Please contact the original manufacturer of the duplicators
)
MADE IN TAIWAN
Micro SATA to SATA
1.8”to 3.5”IDE
IDE to SATA
mSATA to SATA
CFast to SATA
CF to SATA
eSATA adapter
Page 10
➁ Function Table
10
⌘
MT-G & MT-H Series
Function Items/Description
1. Copy
Copy data from source HDD to targets.
(There are four copy modes for selection at function "6.2 Copy Area")
2. Compare
Comparison between the source and targets to make sure copy accuracy.
3. Copy +
Compare
Execute compare function automatically after copy.
4. Erase
4.1 Quick Erase
Erase the INDEX of HDD, and take very short time.
4.2 Full Erase
Ease the whole HDD
4.3 DoD Erase
Erase HDDs three times complying with USA Department of Defense (DoD) standard.
4.4 DoD EraseComp
Erase HDDs three times complying with USA Department of Defense (DoD) standard
and bit-by -bit to check if data is completely erased.
4.5 Secure Erase
The international authorized high standard Secure Erase function. Even HPA/DCO or
other data area which are not able to load, can be erased all together with this mode.
5. Utility
5.1 Show Disk Info.
Show HDD’s basic information such as HDD model name and capacity.
5.2 Update System
5.2.1 Update BIOS
Update the system firmware via the HDD.
5.2.2 Format HDD
Format the HDD with a 2GB FAT partition in order to quickly
save firmware in the HDD.
5.3 System Info.
This function will show information of the duplicator system, including controller model
number and software version.
6. Setup
6.1 Start-up Menu
Select which function is shown first when the system is turned on. Select from item 1~7.
6.2 Copy Area
6.2.1 System and Files
Set to copy source HDD's data area only.
6.2.2 ALL Partitions
Set to copy source HDD's.
6.2.3 Whole HDD
Set to copy the whole source HDD.
6.2.4
Percentage(%)
Set up percentage range of HDD for copy.
Page 11

Function Table ➁
11
6. Setup
6.3 Skip Error
Set to ignore error of source HDD while copying. (Set number from 0~65535 or unlimited)
6.4 Minimum Speed
Set to check HDDs’ minimum speed as 10, 20, 30~300MB/Sec or don’t check.
6.5 Check Source Minimum Speed
Set to check source minimum speed or don’t check.
6.6 Language
Select preferred language, English or Japanese.
6.7
Advanced
Setup
6.7.1
Unknown Format
Copy Unknown
Copy unknown area when the device cannot
identify the format.
Skip Unknown
Skip copy unknown area when the device
cannot identify the format.
6.7.2
Erase Master
Disable
Disable erase source HDD.
Enable
Erase HDDs including the source.
6.7.3
Erase Pattern
ONE Byte
A random character to be written into every
byte.
Big Random Data
A set of random character to be written into a
set of area.
6.7.4 Wait HDD Time
Set auto starting time after plugging in HDD from 0 to 30 seconds.
6.7.5 Lock Key
Do Not Lock Key
Disable Key Lock.
Do Lock Key
Enable Key Lock to use “OK” and “ESC” keys
only.
6.7.6
Copy HPA Area
No, Keep HPA
No, don't copy HPA area.
No, Clear HPA
No, don' copy HPA area and clear HPA setting.
No, Setting HPA
No, don' copy HPA area and setup targets HPA
the same size as the source HPA.
Copy and Setting
Yes, copy source HPA setting to targets.
Page 12
➁ Function Table
12
6. Setup
6.7
Advanced
Setup
6.7.7 Clear HPA at
ERASE
Clear HPA Setting
Delete HPA during erase tasks.
Keep HPA Setting
Do not delete HPA during erase tasks.
6.7.8 Transfer Rate
Select the proper transfer rate UDMA2~7. UDMA7 is the fastest.
6.7.9 Stop Motor Time
Set the waiting time for stopping the motor from 1~20 seconds after
executing function.
6.7.10 Adjust Clock
Adjust system time clock.
6.8 Restore Default
Back to original manufacturer setting.
7.
Log Manager
(For advanced
model only)
7.1 Out Today Report
Output today’s log records
7.2 Out Recent Report
Output the log records in recent 1 day to 28 days
7.3 Out Period Date
Output the log records in a specific date range
7.4
Advanced
Function
7.4.1 Clear ALL Log
Clean out the log records after entering password.
7.4.2 Setup Password
Set up the password for cleaning log records
Page 13

How to Copy HDDs
➂
13
⌘
Start to Copy
Step 1: Prepare Source & Target HDDs
Prepare a source HDD and target HDDs.
(★
It’s strongly recommended the source and target are the same capacity.)
Source HDD
Target HDD
Caution
• SATA 1.0/2.0/3.0 HDD are all supported on the duplicator.
• Various adapters are required to copy device with different interfaces, e.g. IDE, eSATA,
mSATA, and etc.
Step 2: Place Source & Target HDDs
Place source HDD at source port, target HDDs to other ports.
母口
Source Port
母口
母口
Page 14

➂
How to Copy HDDs
14
Step 3: Enter Function "1.Copy"
Use ▲▼ keys to select "1.Copy", and then press "OK". Duplication will start to proceed.
Note
When all the target HDD ports are plugged, the machine will start duplicating automatically. If
not all ports are plugged, the number of working targets shows on LCD. Press "OK" to start.
The information below shows on LCD during duplication.
Note
• Press
▲▼
together for 5 seconds to stop operation on the slowest HDD.
• It is able to use “On-Time Monitor” feature to check operation speed of every port.
複製 x1 2047M
0:12 50% (2)1024M
複製 x1 2047M
0:12 50% (2)1024M
Function
複製 x1 2047M
0:12 50% (2)1024M
功能 總容量
已拷貝容量最慢速口
已拷貝時間
及百分比
Total Data
Copied
data
Slowest
port
Copied
time & %
Step 4: Completion!
Quality of copy OK/Fail and duplication time would show on LCD after duplication completes.
• During process of duplication, every port captures in real-time and message shown on LCD
and calculates CRC checksum code.
• Once copy operation is completed, the system will immediately show comparison results
between source and target HDDs. The red light will flash when error occurs.
• It is able to record real-time checksum code output to Log report.
好的:1 壞的:0
使用時間 0:48
Pass:1 Fail:0
Time 0:48
Pass:20 Fail:0 0:51
CRC64:580A62871707DEE3
好的:20 壞的:0 0:51
校驗碼:580A62871707DEE3
Pass:20 Fail:0 0:51
CRC64:580A62871707DEE3
好的:20 壞的:0 0:51
校驗碼:580A62871707DEE3
★Checksum code: During duplication, each port will simultaneously record written message
and calculate checksum code between source and targets. The result will show light in red(fail)
or green(pass).
Page 15

Copy Setting
15
⌘
Set up before Copy/Compare
Please pay attention to the following settings before copy:
1
Set Copy Area of Source HDD 2 Set Tolerance of Bad Track
3
Auto Skip Lower-Speed HDD 4 Auto Skip Lower-Speed Source
1
Set Copy Area of Source HDD
Appropriate copy area can greatly reduce operation time and have better efficiency. There are
four copy modes with different copy area, please go to function "6.1 Copy Area".
➊
System and Files
➋
All Partitions
➌
Whole HDD
➍
Percentage
Time
Time based on %
Time
Time
Source
Quick
Copy
Data Only
Partition
Copy
All Partition
Percentage
Copy
%Percentage
Whole
Copy
Whole HDD
High
Efficiency
Copy source partition area to targets Copy selected percentage
100% bit-by-bit
whole HDD copy
Copy Area
Spend time in
copying data area only
➊
System and Files:
(Quick Copy data area only)
It will copy source HDD’s System and Files instead of the whole HDD. The system will analyze
the source HDD and identify the data area to copy. As long as the source HDD’s data within the
target HDD’s space, the copy will be processed. FAT16/32/64, NTFS, ext2/ext3/ext4, HFS+,
HFS, HFX are supported for this copy mode.
Page 16

➂
How to Copy HDDs
16
Only 120G data area will be copied, it takes 12mintues.
Source
Partition 1(150G)
Data 30G
Partition 1(200G)
Data 90G
500GB
Duplication Target
500GB
➋
ALL Partitions
Copy all of the partitions area bit-by-bit no matter there is data exist or not. The capacity of
target HDDs have to be bigger than the partition required capacity.
[ 設定複製區域 ]
有效的格式化區域
[Copy Area]
ALL Partitions
500GB 500GB
Source
Partition 1(150G)
Data 30G
Partition 1(200G)
Data 90G
Duplication Target
Only 350G partition area will be copied, it takes 48mintues.
➌
Whole HDD
Mirror copy the whole source HDD, no matter of the content, format, partition or empty space.
This mode does not analyze the data.
[Copy Area]
Whole HDD
500GB 500GB
Source
Partition 1(150G)
Data 30G
Partition 1(200G)
Data 90G
Duplication Target
Entire 500GB HDD will be copied.
Page 17

Copy Setting
17
➍
Percentage (%)
Copy the selected percentage range of source HDD
[ 設定複製區域 ]
選擇百分比
[Copy Area]
Percentage(%)
25%
32%
500GB
25%
32%
500GB
Source Duplication Target
Only copy the selected area, other area or data will not be copied.
●
Copy area selection
Example: There are two partitions in one 500G HDD.
Data and OS(120G) are saved in the partition. (C:30G/D:60G)
System and files
500GB
All partition
500GB
Whole HDD
500GB
Copy/Compare area
30G+60G= 90G
Copy/Compare area
100G + 250G = 350G
Copy/Compare area 500G
Caution
• It is recommended to execute Compare after Copy to confirm the accuracy.
• It is recommended to copy data by function “3.Copy+Compare”.
2
Set Tolerance of Bad Track
Select function "6.3 Skip Error" to set the number of
error that you accept to skip during tasks process. If
the HDD is very critical for content correctness, it is
strongly recommended to keep the Skip Error to be
"0". Set bad sectors from 0 to 65535 or unlimited.
Page 18

➂
How to Copy HDDs
18
3
Auto Skip Lower-Speed HDDs
Enter function 6.3 to setup tolerance speed of target
HDDs. Set to check HDDs’ lowest tolerance speed.
Users can choose “Don’t care” or set the speed value
among 20/40/60~300MB/second. The system will skip
any HDD which cannot reach the minimum speed. This
setting enables to speed up copying and select HDD
speed higher than the setting.
4
Auto Skip Lower-Speed Source
This setting enables to setup whether to check source
minimum speed when run speed-checking task. Select
“Yes” to include source HDD or select “No” to skip
source checking. This function enables to speed up
copying speed and setup minimum speed for source
HDD.
※
Other Utility and Setup
How to check the system firmware version?
●
Enter function "5.3 System Info", by pressing "OK", the version
➤
How to change interface language?
●
Enter function "6.6 Language" to change. Select preferred language, English or Japanese.
➤
How to change the first start-up function when turn on the machine.
●
Enter function "6.1 Start-up Menu" to reset new function as the first to show on LCD.
Choose the most frequently used one as start-up item.
➤
Page 19

Copy Setting
19
※
Troubleshooting When Duplication Fails
Check if too many bad tracks on HDDs can cause duplication failures.
●
Check the setting of function "6.2 Skip Error"
●
Make sure all data cables are properly and firmly connected.
●
Make sure the capacity of source HDD is smaller than target.
Check the function for capacity, "5.1 Show HDD Info".
※
HPA Setting
HPA area, (host protected area / hidden protected area), is kept invisible space for booting
area, recovery data or blocked bad-sector, etc. By creating HPA, it resets max sectors and
keeps some space for HPA area that reduces the reported size of HDD.
1500GB
User Area
1500GB
User Area
1000GB 500GB
User Area HPA
HPA Setting
Create HPA area
Page 20

➂
How to Copy HDDs
20
1
Copy HPA Area
Enter fundtion "6. Setup"-->"7. Advanced Setup"-->"6.Copy HPA Area"
This setting enables to setup whether to keep hidden area of the source during copy tasks. The
users can select one from the function "6.7.6 Copy HPA area". The factory default setting is
"No".
Enter function "6.7.6 Copy HPA Area" and select whether to copy HPA area or not.
➤
➊
No, Keep HPA: When copy from source to targets, do not copy source HPA area to targets.
➋ No,
Clear HPA: When copy from source to target and remove the target HPA setting during
Copy.
➌ No,
Setting HPA: When copy from source to targets, do not copy source HPA area to targets
Setup targets HPA area the same size as the source.
➍
Copy and Setting: When copy from source to targets, copy source HPA area to targets.
The settings of targets HPA will become the same as the source after duplication finished.
Page 21

Copy Setting
21
2
Clear HPA at ERASE
Enter fundtion "6. Setup"-->"7. Advanced Setup"-->"
7.Clear HPA at ERASE
"
This function will affect the HPA setting of HDDs during Erase. The default setting is
"Clear HPA Setting".
This setting enables to setup whether to erase hidden area of the targets during erasing tasks.
The users can select from "Clear HPA Setting", or "Keep HPA Setting".
Enter function "6.7.7 Clear HPA ar ERASE" and select whether to delete HPA area or not.
➤
➊
Clear HPA Setting at Erase: During erase tasks, delete HPA setting of all targets. It will clear
the HPA setting first and then do erase.
➋
Keep HPA Setting at Erase: During erase tasks, it will not execute erase in HPA area and
keep the original setting.
Page 22

➃ How to Compare HDDs
22
⌘
Confirm Duplication Accuracy
Step 1: Prepare Source and Targets
Prepare source HDD and target HDDs to compare after duplication finished.
Source HDD
Target HDD
Step 2: Place Source and
Targets
Place source HDD to source port,
target HDDs to other ports.
母口
Source Port
Source Target
Step 3: Enter "2.Compare"
Use
▲▼
to select “2.Compare” then press “OK”. Data compare will proceed.
Note
When all the target HDD ports are plugged, duplicator would start copying automatically. If not
all are plugged, the number of targets shows on LCD. Press "OK" to start.
It is able to set compare/copy area of HDD at function "6.1 Copy Area".
1
System and Files
2
Partitions
3
Whole HDD
[ 設定複製區域 ]
有效的格式化區域
[Copy Area]
ALL Partitions
[ 設定複製區域 ]
整個硬盤
[Copy Area]
Whole HDD
4
Percentage Range
For more information, please refer to -
➂
How to Copy HDDs.
Caution
It is recommended to execute Compare and Copy to
confirm the accuracy.
[ 設定複製區域 ]
百分比
母口
Source Port
Page 23

How to Erase HDDs ➄
23
⌘
Data Sanitization
Caution
• It will erase the data in HDD, please make sure you have backup all important data
before using this function.
• To cancel operation of any erasing mode, press <ESC/X> key and hold continuously
for 3 seconds to exit any erasing tasks.
Step 1: Prepare HDDs Prepare HDDs for disposal.
Step 2: Place HDDs
Insert HDDs for disposal into target
ports.
Note
Function "6.6.2 Erase Master" is to
determine erase source HDD or not. The
default setting is "Disable" disposal source
HDD.
母口
Source Port
母口
Step 3: Enter function "4. Erase".
Use
▲ ▼
to select the mode of erasing method, and then press "OK". Data Erase will
proceed.
Note
When all target HDDs are ready, the duplicators will start to copy. If the target ports not all used,
the system will show the number of ready HDDs and press "OK" key to start duplication.
●
Settings of Erase Methods:
There are 5 erase methods: 1 Quick Erase 2 Full Erase
3
DoD Erase 4 DoD EraseComp 5 Secure Erase
Time
Safety
Medium
Time
Safety
Longer
Time
Safety
Short
Time
Safety
Short
Whole
HDD
Full
Erase
DoD
Erase
Secure
Erase
Source
Page 24

➄ How to Erase HDDs
24
1
Quick Erase (System and Files Area)
The function will ONLY erase the index of the HDD. It is
the quickest way to erase HDD.
2
Full Erase (Whole HDD Area)
The function will erase the whole sectors on the target
HDD. It will take longer time than quick erase.
3
DoD Erase (DoD5220.22 M)
This is to comply with the U.S.A. Department of
Defense(DoD 5220) standard to fully erase the HDD three
times bit-by-bit to overwrite HDD data and guarantees
data not recoverable. This DoD erase method will erase
HDD over each sector three times: the first time with
zeros (0x00), second time with 0xFF(0xFF) and the third
time with random characters.
4
DoD Erase & Compare (DoD5220.22 M)
Besides DoD erase 3 times, this function will also
execute comparison to make sure the random bit
correctly written.
Page 25

How to Erase HDDs ➄
25
DoD EraseComp Method:
Note
**The erasing duration of DoD Erase mode is 3 times longer than full erase mode.
**The duration of DoD EraseComp is 4 times longer than full erase mode.
DoD Erase Settings for the third time: enter pattern of random characters in
"6.6.3 Erase Pattern".
①
One byte -
Overwrite by fixed method
②
Big random data -
Overwrite by random method
3737373737
3737373737
3737373737
3737373737
3737373737
3737373737
3737373737
3737373737
26AE891DFA
74519D55C1
E6621457EA
48AAB68901
DD51473DB
AA9A82BBE1
55713C4850
9CBFFA1457
5
Secure Erase (NIST800-88)
The international authorized high standard Secure Erase function. It overwrites every single
track on the hard drive with "00". Even HPA/DCO or other data area which are not able to load,
can be erased all together.
Caution
Highly recommended, please DO NOT disrupts Secure Erase during operation. Otherwise, it can
cause irretrievable error on HDD, which turns the HDD unusable. We are not held responsible
for any damages.
Page 26

➅ How to Update System
26
⌘
Two Methods for BIOS Update
1
Update by USB
Step 1: Create Update USB
Connect one USB drive to PC. Download latest
firmware and save it to the USB drive.
Note
Make sure the partition format of USB drive if
FAT16/32. Unzip BIOS, and save it to the root
directory.
Indication LED on each slot
Yellow: Powering
Green: Pass
Red: Fail
Red
Green
Yellow
USB
drive port
Step 2: Enter "5.2.1. Update BIOS"
Insert USB drive into USB port of the duplicator, then select and enter function "5.2.1
Update BIOS". Update will be completed in one minute.
Caution
Please do not disrupt during BIOS update, otherwise it would cause irretrievable error on
duplicator. We are not held responsible for any damages.
2
Update by HDD
Step 1: Create Update HDD
Place one HDD to the duplicator. Select function
"5.2.2 Create Update HDD".
Note
Make sure the partition format as FAT.
[ 系統韌體更新 ]
2.格式化硬盤
[Update System]
2.Create Update HDD
Step 2: Format BIOS HDD
Click "OK" to format the BIOS hard disk.
要格式化硬盤 #1
確定執行 ?
Do FORMAT HDD#1
Confirm ?
Note
Before updating firmware, one FAT, 2GB partition will be formatted in HDD. That would reduce
searching time, and speed up firmware update.
Caution
The data saved in this HDD will
be erased.
Step 3: Download Firmware
Connect the BIOS HDD to PC.
Download the latest firmware from
PC and save it to HDD.
Note
Unzip BIOS, and save it to the root
directory.
HDD enclosure Computer
USB cable
HDD
Step 4: Enter "5.2.1. Update BIOS"
Place the BIOS HDD into source port (first port).
Enter function "5.2.1 Update BIOS". Update will
take about a one minute to complete.
[ 系統韌體更新 ]
1.更新系統韌體
[Update System]
1.Update BIOS
Page 27

How to Use PC-Monitoring ➆
27
Real-time PC-Monitoring
Real-time PC-Monitoring is a convenient tool to monitor real-time status
for advanced series, that real-time tasks skip lower speed HDDs in writing
process to keep its best performance.
●
Online Status
By connecting to PC, all status can be viewed clearly, including copy process.
●
Software Overview
The related drivers and software icons for MT series are descripted as
followings:
• LV07H: PC-Monitoring driver for MT series
duplicators.
• PL-2303: USB-to-Serial program connects
USB-port of your computer to the duplicator.
• PC-Link: Software package for PC
monitoring interface.
§
Software Installation
Step 1: Open the directory. Click on the icon "PC Link.exe" to start installation. In
the next window, continue to click <Install> to start and follow the instruction. Or,
open icon directly, LV07H.exe, to launch software.
Page 28

➆ How to Use PC-Monitoring
28
Step 2: After launching PC-Link software, the install device driver of PL-2303
USB-to-Serial is initiated. Choose tab <PC Driver> and press <Install Driver> to
continue. When the Wizard screen pop up, click <Next> to start installation.
Step 3: Please wait during installation processing.
Page 29

How to Use PC-Monitoring ➆
29
Step 4: Click <Finish> to complete installation.
§
Start to Launch PC-Monitoring
Step 1: Please confirm that monitoring software LVO7H and the driver PL-
2303
have been installed well.
Step 2: Prepare USB
cable to connect
between computer and
the duplicator.
Step 3: Launch LV07H by double clicking on software icon "LV07H.exe".
Step 4: Turn on the power of the duplicator, LV07H starts to link with the
duplicator.
Page 30

➆ How to Use PC-Monitoring
30
Step 5: When the following screen shown, the duplicator is linked to the computer
successfully, ready to use real-time monitoring function.
Step 6: If the status is not shown normal online status, please check step 1~3
again.
⌘
Operation of PC-Monitoring
Note
Please select one computer to do PC-Monitoring only. It will prevent PC operating other tasks at
the same time. The information of PC-Monitoring can be instant synchronized.
Step 1: The status of duplicator shows on-line, and then open monitoring screen.
The program is ready to work when the status show STANDBY.
Step 2: Execute tasks of copy/compare on the duplicator
After placing source & target HDDs into duplicator, execute jobs for duplicator. The program
shows all related information of HDDs. It is able to monitor detail information of every HDD
through PC-Monitoring, e.g. HDD model, S/N, copy speed, and etc. It is able to record and
monitor all the function and work progress during operation.
Note
Copy speed varies during operation.
Page 31

How to Use PC-Monitoring ➆
31
Step 3: After duplication, the program will show average speed of each HDD.
⌘
Browse Log Report through PC
Besides PC-Monitoring, LV07H can browse Log Report of duplicator through PC.
Step 1: After finishing all the task
of duplicator, press "ESC" key on
duplicator. The status shown on LV07H is
"STANDBY". Scroll down to the section,
Log Data, on the middle of window, and
then select "Generate Log Report".
Page 32

➆ How to Use PC-Monitoring
32
Log Report
1
How to Use Log Report
Log Report is a very important management tool to assist users in monitoring, recording
and managing the whole duplication process and the result.
Besides PC-Monitoring, LV07H can browse Log Report from duplicator through PC.
Specific models of duplicators can provide exporting log through USB port. By saving
to USB drive, log records can be saved in a specific location and file name. Analyze
log data through PC is suitable for user’s that required frequent backup of Log Report.
It is absolutely perfect for monitoring the work progress during operation. It shows all
the information details for each port, which is a powerful tool for sorting out the slowest
writing HDD and keeping the operation running efficiently. All the information you need
will be shown on screen the PC screen.
2
How to Export Log Report
➊
Output log through real-time monitoring program LV07H
➋
Log Data
After finishing all tasks of duplicator, press "ESC" key on duplicator. The status shown on
LV07H is STANDBY. Click <Generate Log Report> in the field of LV07H screen <Log Data>.
Page 33

How to Use PC-Monitoring ➆
33
➌
Select Date Range
After entering <Open Report>, select the
date range for log report generation to
check records of the duplicator.
➍
Generate Report
After selecting the date range, clicking the tab <Generate Report> for log report
generation, log report would shows. The duplicator is able to record up to 30,000
records of operation information of HDD. One operation on a single HDD is saved
as one record. For example, there are 26 records saved for 1-25 duplicator.
Note
If there is no record saved at the selected period of time, or record had been wiped out, the
program would show "No match records!"
➎
Save Log as Text File
On the top-left tab of Log Data screen, select <File> and <Save to Text File>.
Page 34

➆ How to Use PC-Monitoring
34
➏
Save Log to the Specific Location
Specify a location and a name to save log.
➐
Complete to Output Log Reports
After successful creating and saving the log, the report has been output to the location.
3
Export Log by USB Drive
The USB port of duplicator is able to perform firmware update and also for exporting Log
Report.
➊
Log Report Management
After finishing all the task of duplicator, enter function "7. Log Manager", and then choose
among 3 options, to export log report of day, to recent log report or to select a period of time.
➋
Export Log Report of Today
Export log report of today via USB port to USB drive.
➌
Export Recent Log Report
To output the log records in recent 1 to 28 days via
USB port to USB drive.
➍
Export Report from a Period of Time
To output the log records of a period time via USB port
to USB drive.
➎
Problems of Text Logs
Note
The Log Reports that are exported from PC-Monitoring program or USB port are both in (*.txt)
file. It does not require any special software for export, which is for the convenience of user
acquiring report for analysis.
Page 35

How to Use PC-Monitoring ➆
35
➏
Screen of Text Logs
4
Advanced Function
➊
Function 7.4.1-Clear ALL Logs
After user entering password, the log report
saved in duplicator can be wiped out.
[ 記錄 #1-#6 ]
4.進階功能
➋
Function 7.4.2-Setup Password
Users can reset password to protect log
records. To execute function "7.4.1", you must
use
▲▼
keys to input password. The default
password is "123456".
Caution
It can save up to 30,000 logs at one time. One HDD record is equal to one
recorded log. (E.g. duplication from 1 to 21 HDDs will be recorded to 21 logs.
Note
Please close PC-Monitoring program LV07H or disconnect PC from duplicator
while clearing log report.
Page 36

➇ FAQ
36
⌘
System FAQ
Category Question Answer: Reasons, Solutions
Error
message
LCD shows
"HDD Too Small"
(1) When the capacity of source HDD is larger than target
HDDs. For example, copy 500GB source HDD to 250GB
target HDDs.
(2) When the capacity of source and target are the same
capacity (e.g. 500G), the internal capacity might be slightly
different.
*Prepare all HDDs from the same brand is preferable
Compatible
What OS does the
duplicator support?
The duplicator copies any kinds OS of HDDs.
Can the duplicator copy
IDE HDD, SSD, mSATA,
etc?
Yes, it can support SATA interface when attach SATA
adapter.
What kind of format does
the duplicator support?
Support all operating system.
FAT16/32/64, NTFS, Linux (ext2/ext3/ext4), Mac OS (HFS/
HFX/HFS+) are supported for Quick Copy (Systems and
Files only). If copy formats are none of the above, it auto
transfers to "All Partition Copy".
Duplication
How long does it take to
copy HDDs?
For example, the system support copy speed at 7.2GB/
min. It will take about 2 mins to copy Win7 OS (approx
12GB).
What the maximum
capacity does the
duplicator support?
The duplicator supports up to 6TB HDD capacity, and
MBR/GBT format HDD.
Can I interrupt the
copy task while it is not
finished?
Yes, the program (copy, compare and erase) can be
stopped while it is in processing by pressing ESC for about
3~4 seconds.
※
Warning: After interruption during processing, the
duplication fails to transfer complete.
Will it be safe if users
remove the HDD right
during tasks processing?
Yes, the device will automatically cut off power for each
port to help protect HDD damage during removal. The
power will automatically be applied again to each port
when operation is started.
Page 37

FAQ ➇
37
⌘
PC-Monitoring FAQ
PC-Monitor Question Answer
Real-time
connection
Why my duplicator cannot
execute PC-Monitoring?
Make sure USB cable is connected securely between
PC and duplicator. It is recommended to attach USB
cable first and then open LV07H program.
Why the monitoring information
of LV07H lags, and cannot
sync up with the duplicator?
PC-Monitoring consumes large amount of resources
from PC. If PC processing ability is low or running
other tasks at the same time, LV07H might lag and not
responsive. It is recommended not to do multi-tasks on
a PC when using the LV07H to achieve better response
time.
Log
Can I change the file name of
Log protected on PC?
File names can be changed on PC.
Can Log protected Log Report
be viewed by various user?
Yes, anyone can view the Log Report.
Checksum/
CRC Code
What’s the difference between
real-time checksum function
and compare function?
During duplication process, target HDDs will
automatically calculate checksum and compare with
the source HDD in order to execute transmission
problems.
Compare function uses more strict bit-by-bit
comparison between source and targets to exclude all
problems of HDDs.
⌘
Quality Check
Category Question Answer: Reasons, Solutions
Quality
Check
What is HDD
"Quality Check"?
What this feature
for?
HDD Quality Check can detect completely if any bad-sector exists.
By using this function, it can pick out bad-sector HDDs and skip
copying bad-track HDDs during operation. It avoids time wasting
and duplication error since bad-tracks cause failure.
*Example: While copying one HDD with 3TB HD data, it takes around
7 to 8 hours to complete. If bad-track existed at 2TB position, it will
cause error. Thus, it will waste operation hours around 5 to 6 hours
and also reduce productivity.
1. During executing "Quality Check", HDDs data has been written
in testing data by position of storage. This method could check
data normal or not. Any abnormal data being discovered, the
badsectors are confirmed existed.
2. The strictly mode processes reading & writing-in tasks twice and
each time runs data differently.
3. The settings of function, "Skip Error", its number won’t affect
"Quality Check". The system will confirm HDDs as bad-track,
only one bad-sector being discovered.
Page 38

➈ Specication
38
⌘
MT-G & MT-H Series
Series
MT-H MT-G
Model
MT800H MT1600H MT2600H MT600G MT1600G MT2100G MT2600G
Target
1:7 1:15 1:25 1:5 1:15 1:20 1:25
Compatible
HDD
Interface
Interface without adapter: 1.8"/2.5"/3.5" SATA HDD, SSD (directly support)
Interface via adapter: 2.5"/3.5" IDE HDD, mSATA SSD, micro SATA, eSATA,
iVDR (optional)
HDD compatible: All major HDDs brands, 2.5"/3.5" SATA SSD
Buffer
128 MB
OS
OS supported: All (Windows, Linux, RAiD, other stand-alone sytstems)
Operation
Type
Stand-alone operation
Real-time PC monitoring, log report management
Log Model
Support log function, MT800H/1600H/2600H/1600G/2100G/2600G
Display
Backlight monochrome LCD display
Status LED
LED(Red/Green/Yellow) on each slot: Yellow(powering), Green(pass), Red(fail)
Keys
4 push keys ( ▲ / UP, ▼ / Down, OK/ Conrm, ESC/ Exit)
Copy
Function
Quick Copy (System & Files area): Support FAT16/32/64, NTFS,
Linux (EXT2/ EXT3/ EXT4), Mac (HFS+/ HFX/ HFS), GPT, Dynamic
ALL Partitions/ Whole HDD/ Percentage Copy: support all formats
Compare
High speed bit-by-bit data comparison
Erase
Quick Erase, Full Erase, DoD Erase, Secure Erase
Capacity
15TB above
Power
Power consumption: 620W
Power supply: Adjustable voltage 115V-230V, 50/60Hz
Temperature
Working temperature: 5ºC ~45ºC; Storage temperature: -20ºC ~85ºC
Humidity
Working humidity: 20%~80%; Storage humidity: 5%~95%
Optional
Adapter
IDE converter board, 1.8" HDD converter board, eSATA converter board,
mSATA converter board, CFast converter board, IDE module adapter
(eSATA/iVDR converter cable, mSATA, CF, SD converter board)
Certication
FCC, CE, RoHS
Page 39

Page 40

 Loading...