

Page 1
Mini Series
M.2/SSD NVMe
SATA Duplicator
User Manual
V1.0
Page 2

2
Index Table
Product Disclaimer ............................................................................................................... 3
Warranty .............................................................................................................................. 3
Piracy Statement .................................................................................................................. 3
Before You Start ................................................................................................................... 4
Notice Symbols ..................................................................................................................... 4
Product Overview ................................................................................................................ 5
Product Features .................................................................................................................. 5
Hardware Overview ............................................................................................................. 6
Functions Table .................................................................................................................... 7
Functions Description ........................................................................................................ 11
1. Copy .......................................................................................................................... 11
2. Compare .................................................................................................................... 12
3. Copy+Compare .......................................................................................................... 12
4. Erase.......................................................................................................................... 12
5. Utility ........................................................................................................................ 13
6. Setup ......................................................................................................................... 14
Maintenance Guide ............................................................................................................. 20
Specifications ...................................................................................................................... 22
Page 3

3
Product Disclaimer
U-Reach is not accountable for any incidental or consequential damages, which includes,
but is not constrained to property harm, loss of time or data from use of a U-Reach product,
or any other damages attributable to product malfunction or failure (including without
limitation, those attributable to: (1) reliance of the materials provided, (2) costs of product
replacement, (3) loss of use, data or profits, (4) delays or business interruptions, (5) and any
principle of legal responsibility, arising out of or in reference to the use or overall
performance or from delays in servicing or lack of ability to render service) of any U-Reach
product. U-Reach makes every effort to ensure proper operation of all products. However,
the customer is responsible to affirm that out of the U-Reach product meets the customer’s
quality requirement. The customer further acknowledges that fallacious operation of UReach product and/or software program, or hardware issues, can cause loss of data,
defective formatting, or data loading. U-Reach will make efforts to resolve or repair any
issues recognized by customer either within the warranty period or on a time and materials
basis.
Specifications and features subject to change without notice or obligation.
Warranty
U-Reach provides a basic one-year parts and labor warranty for all of its products (excluding
cables, adapters, and other consumable items). An optional extended warranty is also
available for an added cost. Telephone and email support is available for the life of the
product as defined by U-Reach.
All warranties will be restricted and defined by the market region from which customers
purchased.
Piracy Statement
U-Reach accepts no responsibility for copyright infringement or misuse of any U-Reach
equipment. Copying all forms of data: audio, video, or software without the permission of
the copyright holder is illegal. It is the sole responsibility of the user to ensure that the legal
copyrights of the copyright owners are respected.
Page 4

4
Before You Start
Important Notice
⚫ Carefully read the entire manual before operating.
⚫ Make sure the source device is correct and functioning.
⚫ Equal capacity of source and target is recommended for guaranteed data consistency.
⚫ Using the Copy+Compare function provides the most flawless duplication.
⚫ Damage incurred due to non-compliance with U-Reach operating instructions will void
the warranty.
⚫ Store the equipment safely when not in use and keep out of the reach of children.
⚫ Please turn off duplicator before replacing a socket.
⚫ Never turn off the power while the firmware is updating.
⚫ Use only approved, stable power sources.
⚫ The power supply has overload protection. When it is overloaded and shutdown,
please unplug the power cord for 2 minutes for discharge.
⚫ Use product only in a clean, dry, dust-free, and ventilated area. Liquids or foreign
debris can severely damage your duplicator.
⚫ It is typical for the machine to heat up during operation.
⚫ While in use, do not move the duplicator or remove SSDs.
⚫ Static electricity may cause duplication error. Please pay attention to the duplicator’s
environment while operating equipment. Purchasing electricity elimination equipment
helps avoid shock.
⚫ Devices will operate at high-temperatures during selected tasks.
⚫ Wear protective gloves to prevent burns when handling devices.
⚫ Ensure machine and operator are properly grounded to prevent ESD.
⚫ Do not turn off the machine during firmware update.
Notice Symbols
Special items, procedures, or notes to be observed prior to use.
Note
Refers to related duplicator operations, special details, tips, or
suggestions for operational effectiveness.
Caution
Refers to procedures that need to be adhered to or precautions.
Page 5

5
Product Overview
Mini M.2 Series is the world’s first standalone duplicator supports NVMe , AHCI and SATA
protocol. It automatically detects device signal, and supports ultra-high speed duplication.
Mini M.2 Series is specially designed for professional use. The smart Quick Copy (System and
Files) mode supports FAT16/32/64, NTFS(Windows), ext2/3/4(Linux), HFS/HFS+/HFSX(Mac)
formats and can copy only data contained area, which highly increases the production
efficiency. Furthermore, the innovative interface design can help you easily swap M.2 socket
to reduce time and effort while repairing.
Complies with the U.S. Department of Defense's erasing standard (DoD5220.22 M). It is
important to make sure the data inside the disregarded device will not be retrieved and can
be safely transferred.
Product Features
Operation Type
Stand-alone, FPGA based operation (Non-PC based system design).
Controller Design
Embedded controller is designed to support capacities over 18TB+. Constant improvement
supports latest market-available devices.
Protocols Supported
Supports Native NVMe, Native AHCI, and SATA protocol.
Automatically detect different signal of each port. Easy to copy from SATA to NVMe M.2 and
vice versa.
Read-Only Source Port
There is no option to disable this built-in feature, and it is integrated with all U-Reach
duplicators.
Module Design
Modular M.2 ports effectively reduce downtime and is are cost-effective for long term
ownership.
Page 6
6
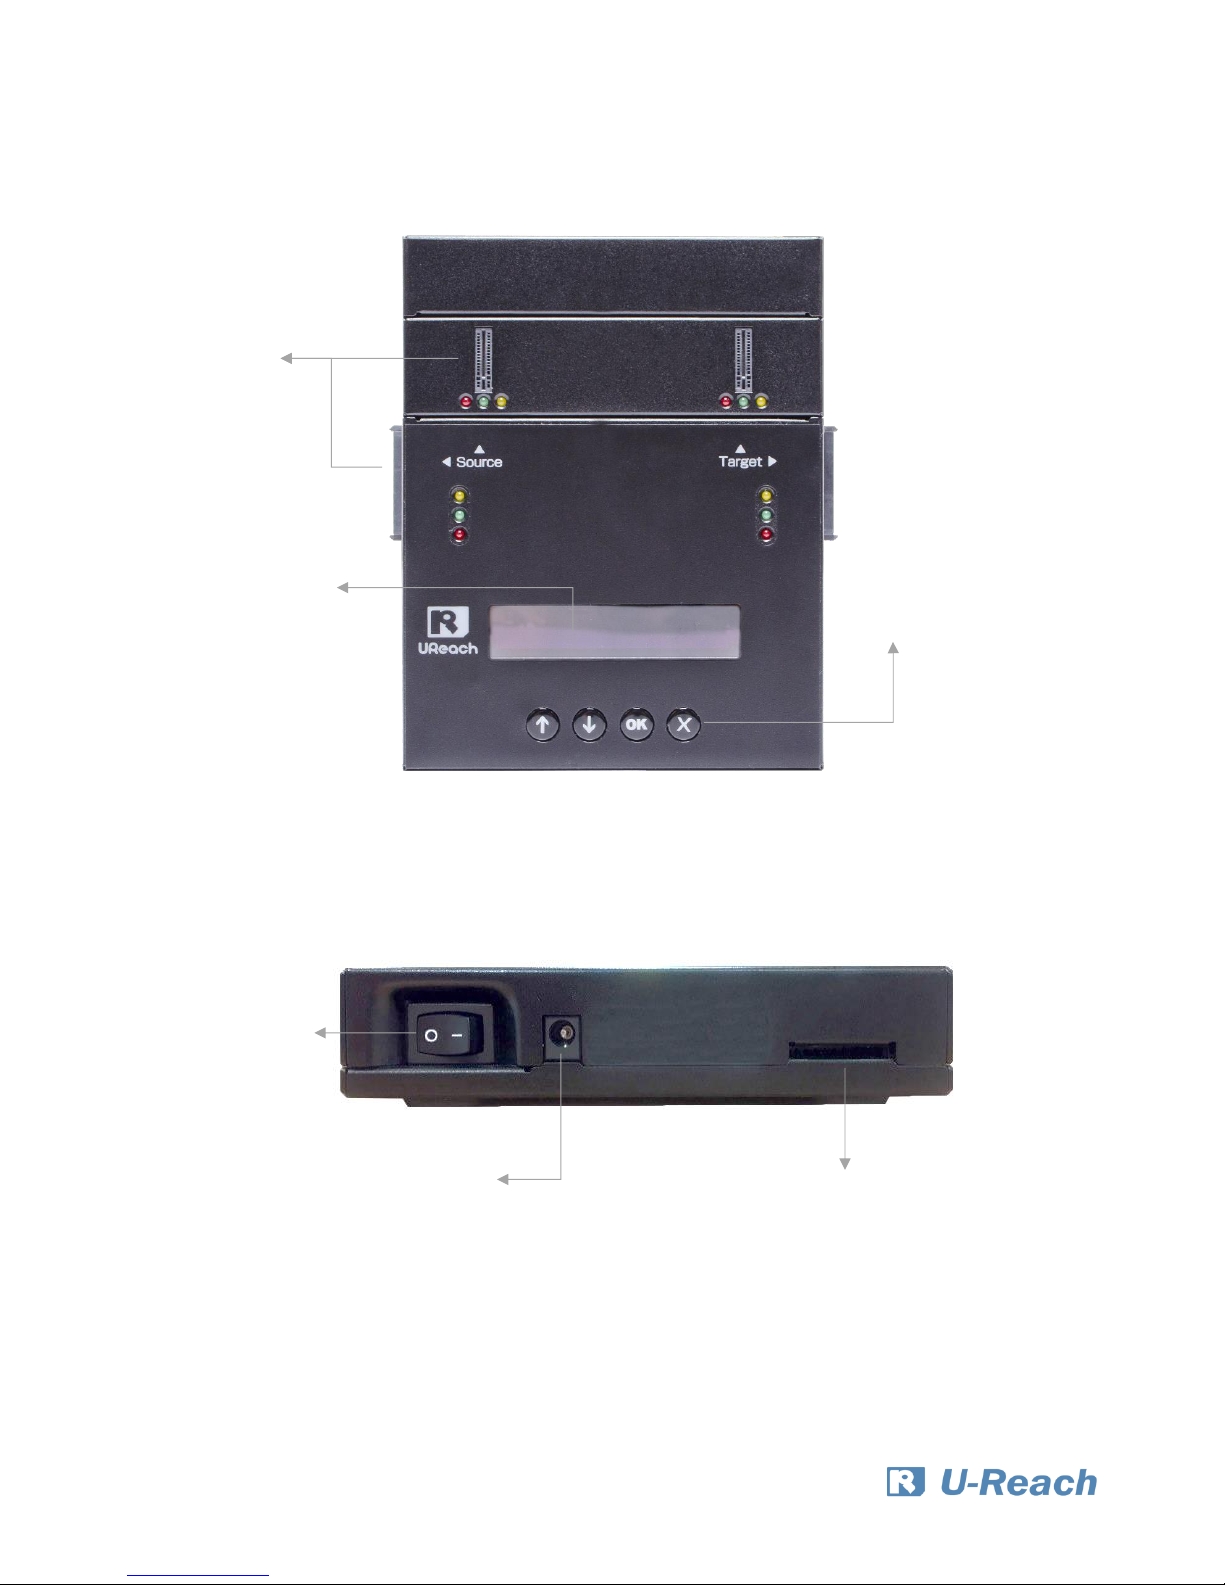
Hardware Overview
Front View
Back View
Source Port
Control Buttons
LCD Display
Power Supply
12V 5A Adapter
Power Switch
SD Slot
For Firmware Update
Page 7
7
IDE to SATA
Adapter 2 pcs
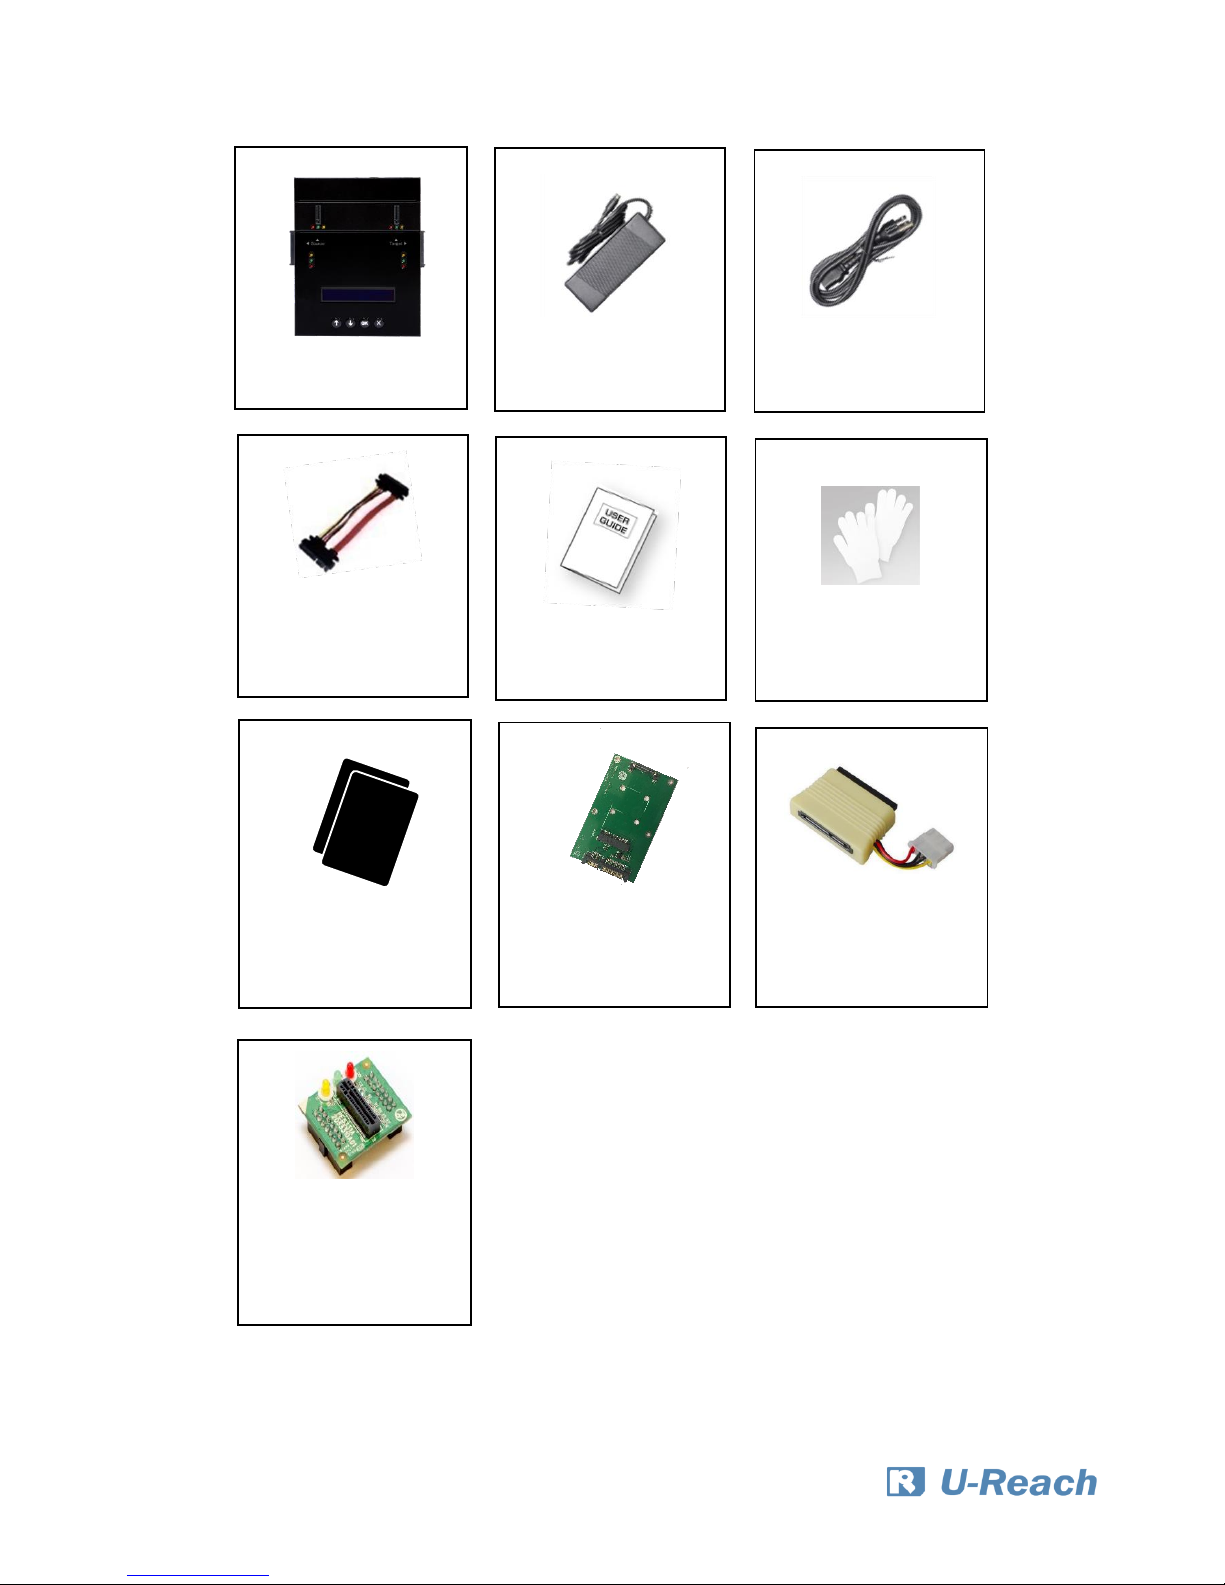
Package
Duplicator
Power Adapter
1 pcs
Power Cord
1 pcs
SATA Cable
22pin (6cm)
1 pcs
User Manual
1 pcs
Gloves
1 pair
Pad
2 pcs
mSATA Adapter
2 pcs
M.2 Socket
Module
1 pcs
Page 8

8
IDE to SATA
Adapter 2 pcs
Optional
M.2 Socket
Module
mSATA Adapter
Page 9

9
Functions Table
Functions
Descriptions
1. Copy
Copies data from source device to targets. (There are four copy modes
in function "6.1 Copy Area")
2. Compare
Compares the source and targets to ensure copy accuracy.
3. Copy + Compare
Automatically launches compare function after copy is completed.
4. Erase
4.1 Quick Erase
Erases device(s)’ index table.
4.2 Full Erase
Erases entire device(s) complying with NIST 800-88 Standards.
4.3 DoD Erase
Erases device(s) complying with DoD 5220.22-M Standards.
4.4 Secure Erase
Erases the non-loadable areas complying with NIST 800-88 Standards.
5. Utility
5.1 Device Info
Displays basic information such as device model, name, capacity, etc.
5.2 System Update
Updates system firmware at the rear SD port.
5.3 System Info
Displays system information such as controller, model number,
software version, etc.
6. Setup
6.1 Copy Modes
6.1.1 System and Files
Copies data and skips empty space. Only supports
standard formats.
6.1.2 All Partitions
Copies all partitions and data, unallocated partitions
not included.
6.1.3 Whole Device
Copies all source data, bit-by-bit.
6.1.4 Percentage (%)
Sets percentage of source capacity to copy.
6.2 Copy HPA
Area
Do Not
Copy HPA
Keep Target HPA
Does not copy HPA data, but keeps
target device’s original HPA setting.
Clear Target HPA
Does not copy HPA data and clears
target device’s HPA setting.
Page 10

10
Setting Target HPA
Copies HPA setting from source device to target.
Copy and Setting
Copies HPA setting and data from source device to
target.
6.3 Skip Bad Sectors
Skips source bad sectors.
6.4 Clear HPA at
ERASE
Clear HPA Setting
Clears HPA setting during erase.
Keep HPA Setting
Keeps original HPA setting during erase.
6.5 Language
Sets preferred language: English or Japanese.
6.6 Restore Defaults
Reinstates manufacturer settings.
Page 11

11
Functions Description
1. Copy
Step 1: Prepare source and target devices.
Step 2: Connect source and target devices.
Step 3: Proceed to copy.
Scroll to select "1. Copy", then press "OK" to start the duplication process.
The following information below states what is displayed on the LCD during duplication.
Step 4: Copy Completed!
The quantity of passed or failed target device(s) and the copied duration will be displayed
on the LCD after duplication completes.
Note
1. Recommendation: Target device(s)’ capacity must be equal to or larger
than the source device capacity.
2. The Mini M.2 accepts only one source and one target for each operation. If
both M.2 and SATA port have device, it will detect SATA port first.
Note
The number of working/connected targets will be displayed on LCD. Press
"OK" to start.
Note
Press “ESC” for 5 seconds to stop operation.
Copy 40.0G
3ready
Copy x3 40G
1:38 25% (4) 10.3G
Function
Total Data
Copied
Time & %
Slowest
Port
Copied
Data
Page 12

12
2. Compare
Scroll to select "2. Compare", then press "OK" to start the verification process.
3. Copy+Compare
Sequentially automates from Function 1, Copy to Function 2, Compare.
Scroll to select "3. Copy+Compare", then press "OK" to start the automated duplication and
verification process.
4. Erase
There are 2 submenu modes.
Step 1: Connect device(s) for sanitizing.
Step 2: Enter function "4. Erase"
Scroll to select "4. Erase”, then press "OK" to view the 4 submenus.
Caution
User is responsible for verification of targets’ quality. Testing a few completed
targets in a mass production environment for quality control is recommended.
4.1 Quick Erase
This function will erase the index table from the connected device(s).
Scroll to select "4.1 Quick Erase”, then press "OK" to start the erasing process.
4.2 Full Erase
This function will erase all data per NIST 800-88 Standards to the connected device(s).
Scroll to select "4.2 Full Erase”, then press "OK" to start the erasing process.
Note
The number of working/connected targets will be displayed on the LCD. Press
"OK" to start.
Caution
Please back up all important data before using this function.
Page 13

13
4.3 DoD Erase
This function will erase all data per DoD 5220.22-M Standards of the connected device(s).
Scroll to select "4.3 DoD Erase", then press "OK" to start the erasing process.
4.4 Secure Erase
This function erases the non-loadable areas complying with NIST 800-88 Standards.
Scroll to select "4.4 Secure Erase ", then press "OK" to start the erasing process.
5. Utility
This menu will reveal submenus related to device information, system information and
updates.
Scroll to "5. Utility”, then press "OK" to view the submenus.
5.1 Device Info
This function will display basic information such as device model, name, capacity, etc…
Scroll to select "5.1 Device Info”, then press "OK" to view the connected device(s). Then
through to view connected device(s) by port number order.
5.2 System Update
Step 1: Prepare a SD card for update.
Connect a SD card to a PC. Download the latest firmware provided from U-Reach technical
support, unzip the BIOS firmware, and save it to the root directory in the device.
Step 2: Proceed to update firmware
Connect the SD card to the back of the duplicator. Scroll to select "5.2 Update BIOS", then
press "OK" to start the firmware update process.
Note
The device’s format must be: FAT16 or FAT32.
Note
Ensure that the SD card does not have any bad sectors.
[System Update]
1.Update BIOS
Page 14

14
5.3 System Info
This function will display basic information such as device model, name, capacity, etc…
Scroll to select "5.3 System Info”, then press "OK" to view the connected device(s). Then
scroll through to view all information.
6. Setup
This menu will reveal submenus related to copy area, skip bad sector, and setting language.
Scroll to select "6. Utility”, then press "OK" to view the submenus.
6.1 Copy Area
There are 4 submenu modes.
Scroll to select "6.1 Copy Area”, then press "OK.” Then scroll through to select one of the
four copy methods.
⚫
Selecting the Proper Copy Modes
Example: There are two defined partitions in a 500GB device. The charts below illustrate
what portion would be duplicated.
Caution
The firmware update process may take longer than 5 minutes. Please do not
disrupt power or process during BIOS update. If interrupted, the system will
become useless. When the update completes, a message will display on the
LCD and ask to turn off the machine for 5 seconds. U-Reach will not be held
responsible for any damages.
100GB
250GB
500GB
60GB Data
150GB
Unallocated
30GB Data
System and files
100GB
250GB
500GB
60GB Data
150GB
Unallocated
All Partitions
70GB
190GB
30GB Data
100GB
250GB
500GB
60GB Data
150GB
Unallocated
Whole Device
70GB
190GB
30GB Data
This function will analyze and
copy only data and skip empty
spaces.
This function will copy the
entire device.
This function will copy all data
within the defined partitions.
Page 15

15
6.1.1 System and Files
Copies data and skips empty space. Only supports standard formats.
Scroll to select "6.1.1 System and Files”, then press "OK" to save the copy method.
Allows user to copy source device’s System and Files, instead of the entire device. The
system will analyze the source device and identify the data area to copy. If the source
device’s data is within the target device’s capacity, the copy will be processed. FAT16/32/64,
NTFS, EXT2/EXT3/EXT4, and HFS/HFS+/HFSX are supported in this copy mode.
6.1.2 All Partitions
Copy or skip HPA, DCO, unknown partitions, modified formats, etc. defined by settings.
Scroll to select "6.1.2 All Partitions”, then press "OK" to save the copy method.
The target device’s capacity must be equal to or larger than the source device’s capacity.
[Copy Mode]
System & Files
[Copy Mode]
ALL Partitions
Page 16

16
6.1.3 Whole Device
Copies all source data, bit-by-bit.
Scroll to select "6.1.3 Whole Device”, then press "OK" to save the copy method.
Copies the whole source device, irrespective of content, format, partition or empty space.
This mode does not analyze the data.
[Copy Mode]
Whole Device
Page 17

17
6.1.4 Percentage (%)
Select percentage of source capacity to copy.
Scroll to select "6.1.4 Percentage”, set the upper and lower %, then press "OK" to save the
copy method.
6.2 Copy HPA Area
This menu contains submenus related to HPA Copy Modes
Scroll to select "6.2 Copy HPA Area”, then press "OK" to view the submenus.
6.2.1 Do Not Copy HPA
This menu contains submenu settings from which users can select.
Scroll to select "6.7.6 Copy HPA Area >> Do Not Copy HPA”, then press "OK" view submenu
settings.
⚫ Keep Target HPA
Does not copy HPA data, but keeps target device ‘s original HPA setting.
Scroll to select "Keep Target HPA”, then press "OK" to save this setting.
⚫ Clear Target HPA
Does not copy HPA data and clears target device’s HPA setting.
Scroll to select "Clear Target HPA”, then press "OK" to save this setting.
[Copy Mode]
Percentage (%)
Page 18

18
6.2.2 Setting Target HPA
Copies HPA setting from source device to target.
Scroll to select "6.2 HPA Copy Modes >> Copy HPA Settings”, then press "OK" to save this
setting.
6.2.3 Copy and Setting
Copies HPA setting and data from source device to target.
Scroll to select "6.2 HPA Copy Modes >> Copy All HPA”, then press "OK" to save this setting.
6.3 Skip Bad Sectors
Scroll to select "6.3 Skip Bad Sectors”, then press "OK" to scroll through the available values
for skipping bad sectors. If the device data is critical and needs to be a full clone, it is
recommended to set “Skip Bad Sectors” at "0.” Bad sectors can be set as unlimited or at a
value from 0 to 65,535.
6.4 Clear HPA at Erase
Sets to clear HPA setting during erase.
Scroll to select "6.4 Clear HPA at Erase”, then press "OK" to save this setting.
6.4.1 Release
Clears HPA setting and data during erase.
Scroll to select "6.4Clear HPA at Erase >> Release”, then press "OK" to save this setting.
Caution
HPA function “Copy and Setting” may change the original parameter of target
devices. To reset it, user must set “6.4 Clear HPA at Erase >> Clear HPA Setting”
and then execute “4. Erase.”
Caution
The “Copy+Compare” function is advised for enhanced copy accuracy.
[Skip Bad Sectors]
1000
Page 19

19
6.4.2 No Release
Keeps original HPA setting and data during erase.
Scroll to select "6.4 Clear HPA at Erase >> No Release”, then press "OK" to save this setting.
6.5 Language
Select English or Japanese.
Scroll to select "6.5 Language”, then press "OK.” Then scroll through select the desired
language.
6.6 Restore Defaults
Restores all setting to manufacture defaults.
Scroll to select "6.6 Restore Defaults”, then press "OK" to restore settings back to
manufacturer defaults.
Page 20

20
Maintenance Guide
Steps to replace M.2 socket(s)
➊ Turn off power
Caution
For your safety, please turn off the power before inspecting or replacing
the socket.
➋ Remove the faceplate screws.
➌ Remove the cover plate.
➍ Replace the socket(s).
Caution
Please use extreme caution while using a screwdriver to remove the
screws as it can easily slip and damage the surrounding area.
Page 21

21
➎ Replace and secure the cover plate.
Page 22

22
Specifications
◼ Specifications
Bandwidth Performance
Up to 24GB/min(NVS200)
*Actual performance is dependent on device transfer speeds*
Supported Formats
Quick Copy (System and Files): FAT16/32/64,NTFS,
Linux(Ext2/Ext3/Ext4), Mac(HFS/HFS+/HFSX)
Whole Device Copy: All formats, including proprietary formats.
Supported Capacity
Over 18TB+.
Supported OS
All (Windows, Mac, Linux, and other proprietary systems)
Operation Mode
Standalone, FPGA-based Operation
◼ Functions
Copy Modes
Quick Copy (System and Files) / All Partitions / Whole Device /
Percentage Copy
Sanitization Modes
Quick Erase, Full Erase (NIST 800-88), DoD Erase, Secure Erase
Others
Bit-by-bit Comparison, Count of Bad Sector, Skip Bad Sectors.
◼ Compatibilities
◼ Hardware Specifications
LCD Display
2x20 Backlit Monochrome LCD Display
LEDs
3 LED Indicators per Port: Yellow (Power), Green (Pass), Red (Fail)
Control Panel
4 Push Buttons (▲, ▼, OK, ESC)
Power Requirements
12V 5A Power Adaptor
Temperature
Working: 5°C ~ 45°C
Storage: -20°C ~ 85°C
Humidity
Working: 20% ~ 80%
Storage: 5% ~ 95%
Physical Dimensions
180mm X 156mm X 34mm
Product Weight
800g
**Specifications subject to change without notice.
Compatible Device
SATA and M.2(NGFF) M Key & B+M Key.
Compatible Signal
NVMe, AHCI, SATA
Others
Supports GPT, MBR, and Advanced Formats.
1.0.6
 Loading...