

URC HCM-R1 Owner's Manual

Order Number : GETEC-C1-14-411 FCC Part 15 subpart C
Test Report Number : GETEC-E3-14-075 Page 1 / 1
EUT Type: Remote Control
FCC ID.: OZ5URCHCMR1
APPENDIX H
: USER’S MANUAL
HCM-R1
Remote Control
Owner’s Manual

HCM-R1 Remote Control Owner’s Manual
© 2014 Universal Remote Control, Inc. All rights
reserved.
The information in this manual is copyright
protected. No part of this manual may be
copied or reproduced in any form without prior
written consent from Universal Remote Control.
Universal Remote Control SHALL NOT BE
LIABLE FOR OPERATIONAL, TECHNICAL OR
EDITORIAL ERRORS/OMISSIONS MADE IN
THIS MANUAL. The information in this manual
is subject to change without prior notice.
HCM-R1 Owner's Manual © 2014 Universal
Remote Control, Inc.
URC - Control the Experience is a registered
trademark of Universal Remote Control, Inc.

Congratulations! 1
Before Getting Started 2
Parts Guide 2
Connecting the Battery 3
Using the Charger 3
Two-Way via Wi-Fi 3
Using the HCM-R1 3
Settings Screen 4
Network Settings 5
Base Station Setup 5
iControl Account Info 6
Sleep Timers 7
Brightness 8
System 9
Button Light 10
Power 11
Sound 12
Pickup 12
Firmware Update 13
Factory Default 14
Exit 14
Remote Control ID 15
URC Programming Key 15
Specifications 16
Limited Warranty Statement 17
End User Agreement 20
Precautions and Information Concerning
Rechargeable Lithium Polymer Batteries 21
Federal Communication Commission
Interference Statement 22

Congratulations!
Thank you for purchasing the HCM-R1 Wi-Fi
remote control for your home automation
system. This remote offers two-way control of
your connected devices throughout the home or
small office space. Controlling and monitoring
your home’s devices is simple using the HCMR1’s Wi-Fi communication.
Features and Benefits
● Quick Connect Wi-Fi
The HCM-R1 connects to Wi-Fi within
moments of picking up the remote, quickly
giving you control of your home audio/video
equipment.
● Two-way meta-data feedback
Experience two-way feedback right on the
remote's screen when used with compatible
home devices like thermostats, lighting, or
selection of IP Cameras. Enjoy the same
feedback when used in conjunction with an
ever expanding line of third-party products.
● Pick-up sensor
The HCM-R1 remote control has a built-in
sensor which quickly awakens the remote
when picked up. Immediately, the remote’s
backlight, and LCD turn on then connects to
your local Wi-Fi for control of your home
system.
● Rechargeable Lithium Polymer Battery
Save money and protect the environment by
using the included charger and
rechargeable lithium polymer battery.
Page 1

Before Getting Started
● Designed for use on your local wireless
network
The HCM-R1 Remote Control works with
your local wireless network. This feature
gives you control of your system by sending
commands over your home network without
being in line-of-sight of the equipment.
Expand your system to also control your
home’s audio/video devices by adding a
HCM-C1 Base Station.
● Programmable via a simple web page
interface
Use the URC web based programming
page to fully automate your home
entertainment, comfort and security system.
Download and save the setup file on the
URC µCloud. All that is needed is basic
knowledge of your devices, and the settings
of your local area network.
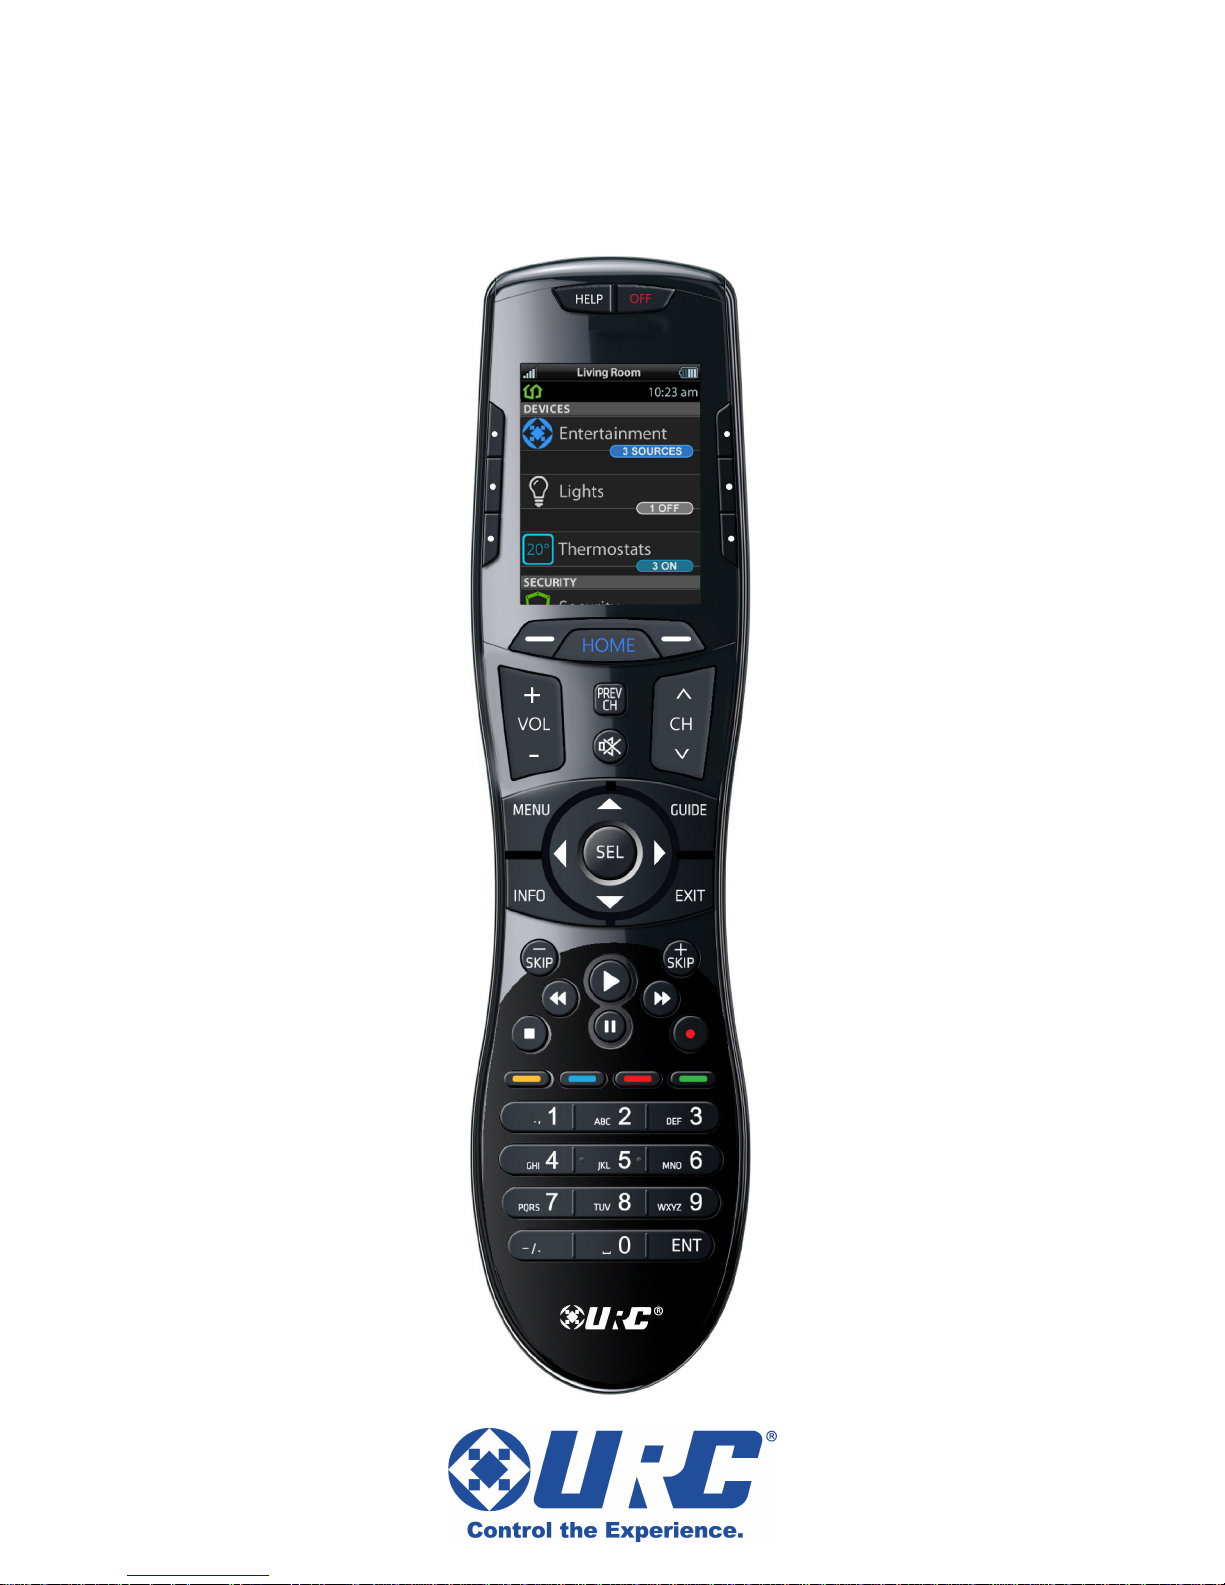
Parts Guide
What’s included in the HCM-R1 box:
● HCM-R1 Wi-Fi Remote Control
● Rechargeable Battery
● AC Power Adapter
● Owner’s Manual
Page 2
Connecting the Battery
The lithium polymer battery can be removed by
pressing the spring lock down to unlock and
remove the cover. The battery is included in the
box when shipped from the factory. Place the
battery into the battery compartment, making
sure to align the contacts on the battery to the
contacts on the HCM-R1. The battery snaps
into place when aligned properly. Replace the
cover.
Using the Charger
Plug the charger into a power outlet and to the
bottom of the HCM-R1 Remote Control. There
is no harm in leaving the HCM-R1 Remote
Control on its charger when it is not in use.
Two-Way via Wi-Fi
To use the HCM-R1 with any two-way
companion product, it must be configured to be
part of a LAN (local area network) via a Wi-Fi
b/g access point or router.
Using the HCM-R1
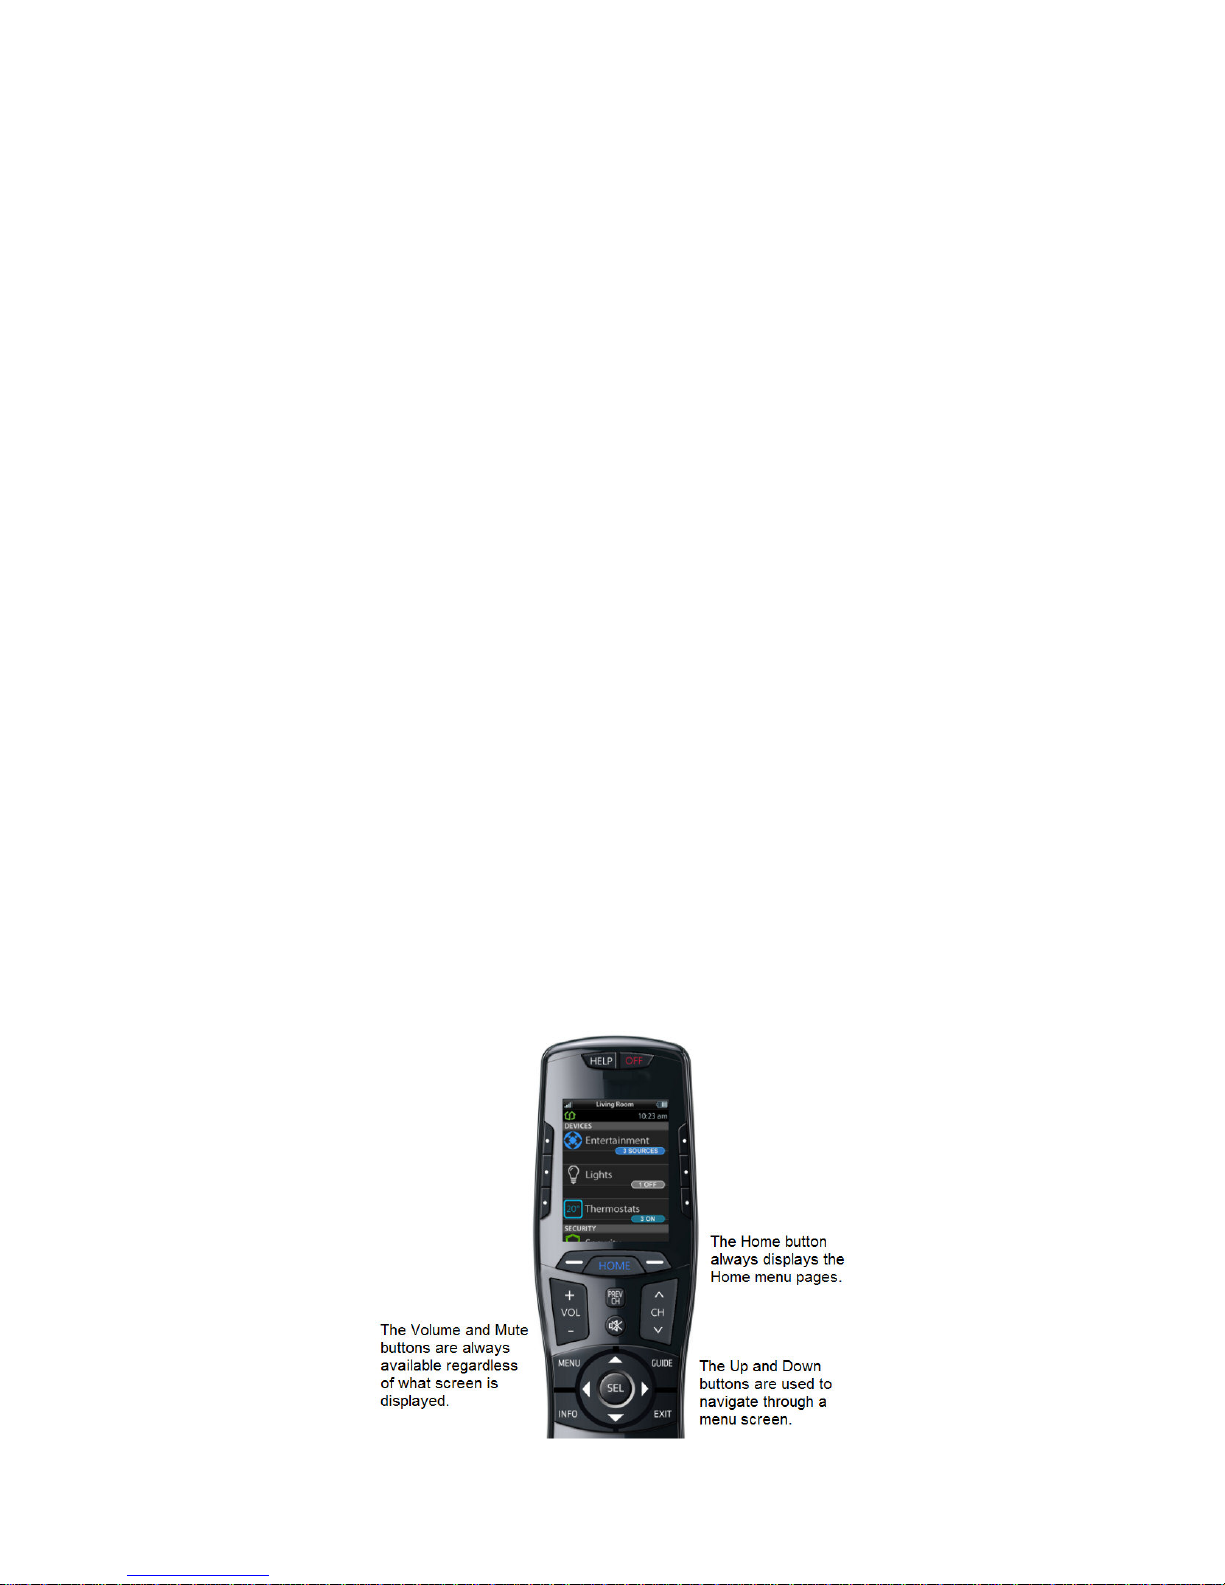
The HCM-R1’s Home Menu pages display the
activities and devices in your system. Press the
Home page button to view your activities and
devices. Navigate the Home page by using the
up and down buttons. Press any button
adjacent to the screen to select an activity or
device. Press the Home button to return to that
page and select a new device or activity.
Page 3
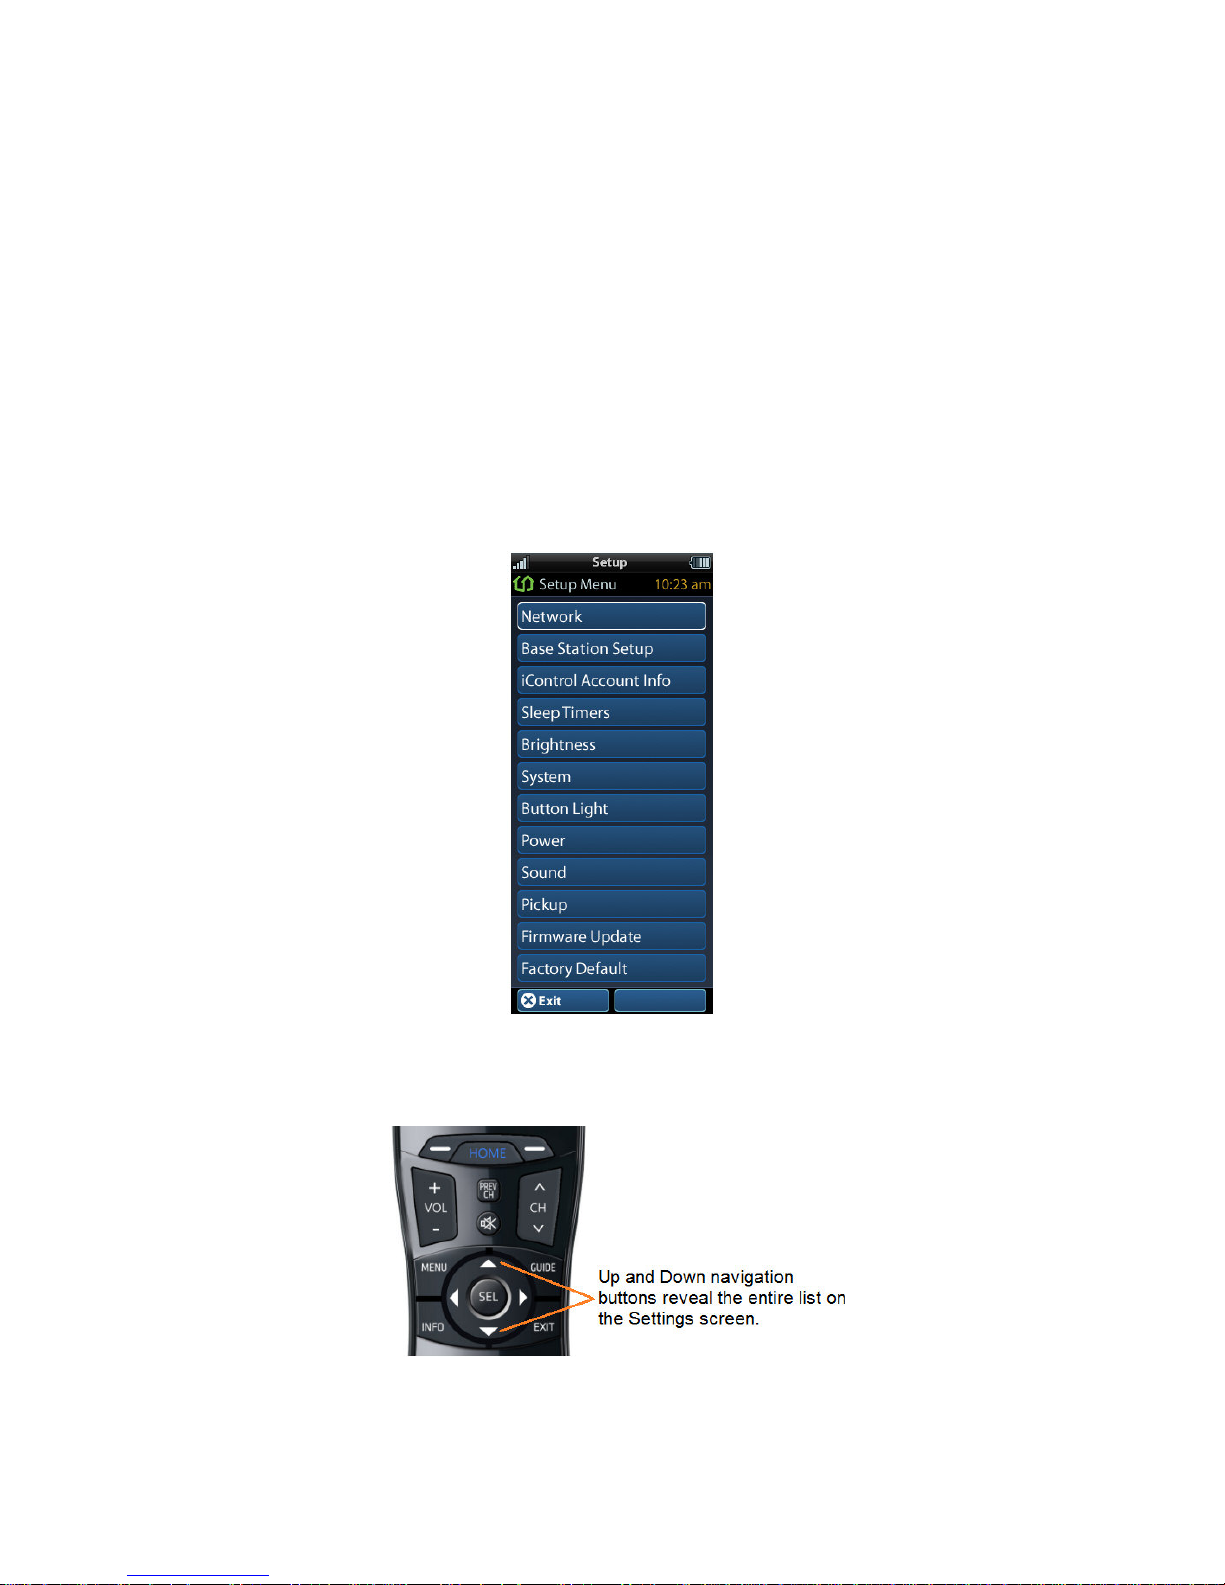
Settings Screen
You can enter the Settings menu by pressing
and holding the Home and Enter (ENT) buttons
for three seconds. When the Settings menu
appears, any further action must be completed
within 60 seconds, at which point the remote
reverts to the Home Menu screen. Use the Up
and Down buttons to navigate between the
Settings items. Select a setting when a line item
is highlighted, by pressing the adjacent button
on the LCD screen, or the Select button. Press
the Home button to return to a previous step or
exit the Settings menu.
The expanded view of the HCM-R1 Settings
Menu, displays all available Setup Menu
options.
Page 4
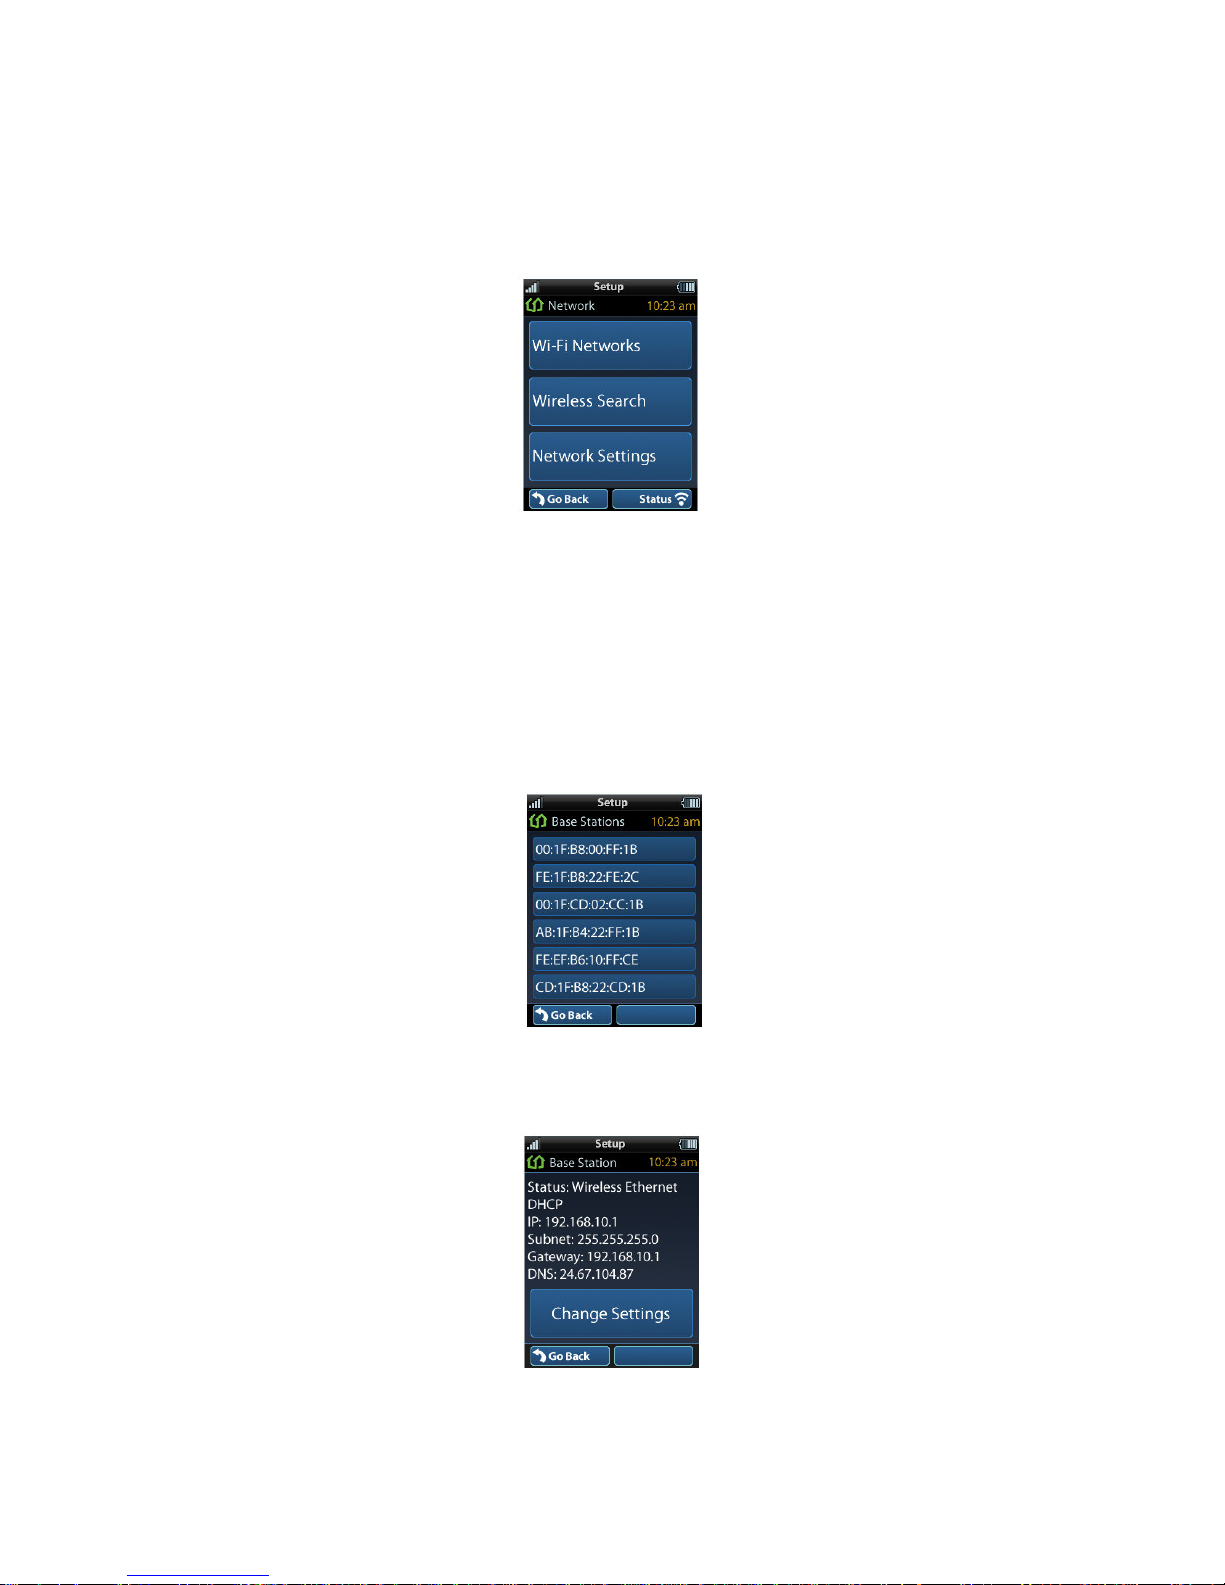
Network Settings
The screen displays network information about
your HCM-R1 Remote Control and the wireless
network it is connected to. Within this screen,
you can scan for a Wi-Fi Network, select a
network to connect to, and enter any required
custom network settings.
Base Station Setup
After connecting the HCM-C1 Base Station to
the local network, select the Base Station Setup
item to view a list of available HCM-C1’s within
the home. Base Stations are identified by their
MAC Address, which is displayed on a sticker
attached to the HCM-C1 Base Station.
Select an HCM-C1 Base Station to view and
configure its network properties.
Page 5
 Loading...