

Page 1
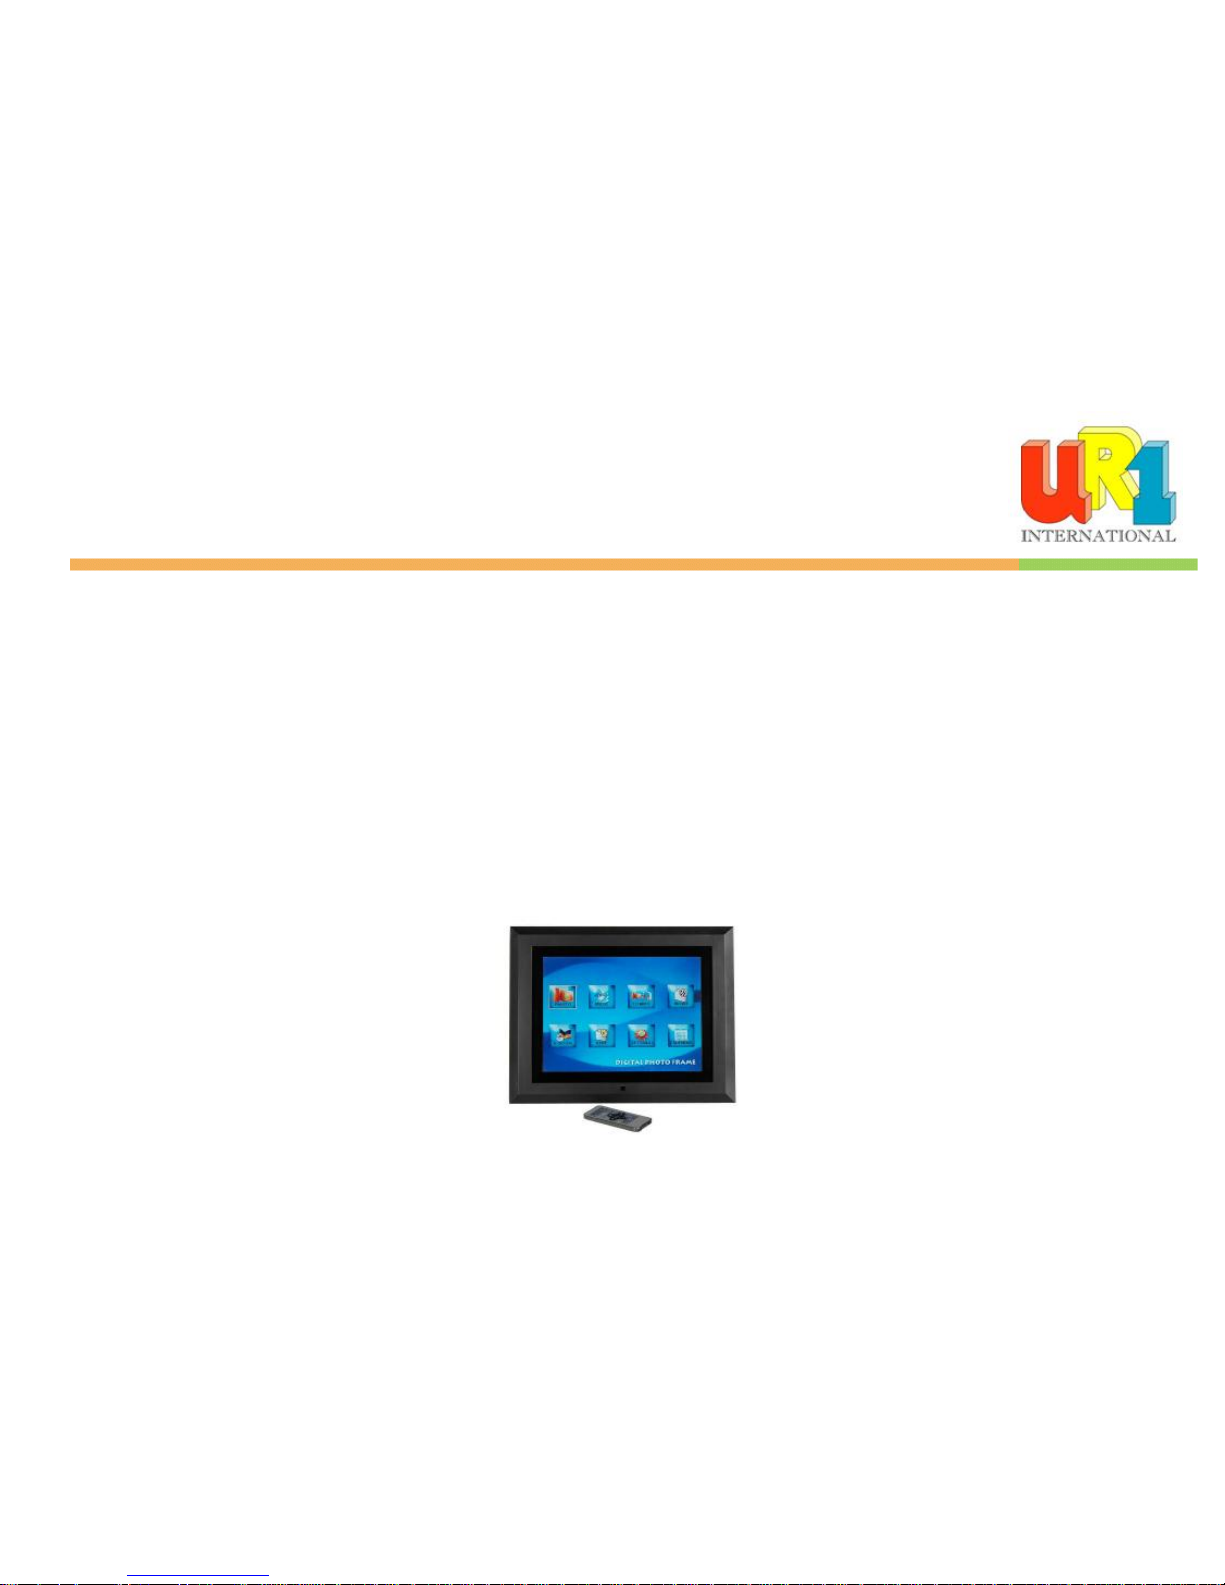
UR1 International MULTIMEDIA DIGITAL PICTURE FRAME
90242 – USER GUIDE
Page 2

2
Table of Contents
Introduction 3
Main Features 3
Getting Started 4
Package Contents 4
Installing your unit 4
Connecting to a PC 5
Controls 5
Using your Remote Control 6
Inserting Memory Cards 7
Main menu 7
Viewing Pictures 8
Changing the orientation for one picture 10
Zoom 10
Browsing Thumbnails 10
Watching video 10
Listening to MP3 music 11
Playing a slideshow with music 12
Viewing Text 13
Using the EDIT option 13
Copying and Deleting Files 13
Using the SETUP option 14
Language setup 14
Clock Set option 16
Alarm Set Option 16
Changing the slideshow speed 15
Video setup 17
Technical Support 18
Frequently asked questions 18
Service and Warranty 21
Your warranty 21
Specifications 22
Maintenance and Precaution 23
Cleaning the LCD screen 23
Regulatory Compliance 25
CE Declaration of Conformity 25
Federal Communications Commission (FCC) Notice (U.S. and Canada Only) 25
Commission Fédérale de la Communication (FCC Déclaration) Error! Bookmark not defined.
Page 3

3
End-of-Life Disposal 26
Introduction
Congratulations on your purchase of UR1 Digital Picture Frame. Model No.: 90242
Before operating the unit, please read this manual thoroughly, and retain it for future reference. This manual will help you use many of the exciting and useful
features that will make your Digital Picture Frame viewing more enjoyable.
This Digital Picture Frame lets you view digital pictures directly from your camera's memory cards or the internal memory. You will be able to create a slideshow
using multiple transition effects or display one picture at a time. No computer, digital camera or Internet connection is required.
This Digital Picture Frame is compatible with the following popular memory card formats: CompactFlash®, SD™, XD, MultiMediaCard™, and Memory Stick®.
It can also read files stored on a USB Flash drive using the USB host port.
Main Features
Displays digital pictures (JPEG) without a computer
Simply insert a compatible memory card into the Digital Picture Frame to show photos, play MP3 music or supported video files
Compatible memory cards include Secure Digital Card (SD), , Multimedia Card (MMC), Memory Stick (MS), XD Cards & Compact Flash
Able to read files located on a USB Flash drive
Instantly plays MP3 music with the integrated speakers.
Instantly plays MPEG1, Motion JPEG /DIVX/ XVID/ MS MPEG4 AVI files stored on supported memory cards*.
Supports up to 12 Mega Pixels image file. (JPEG format).
Compatible with most digital cameras’ stored JPEG images and motion JPEG files.
Includes a credit card style remote control
Bright TFT active matrix LCD screen.
Automatic slide show with multiple transition effects.
Plays slide show with MP3 music on the background.
User-friendly on-screen display lets you access all controls easily.
*Video files may not play properly if stored on a low speed card.
Page 4
4
Getting Started
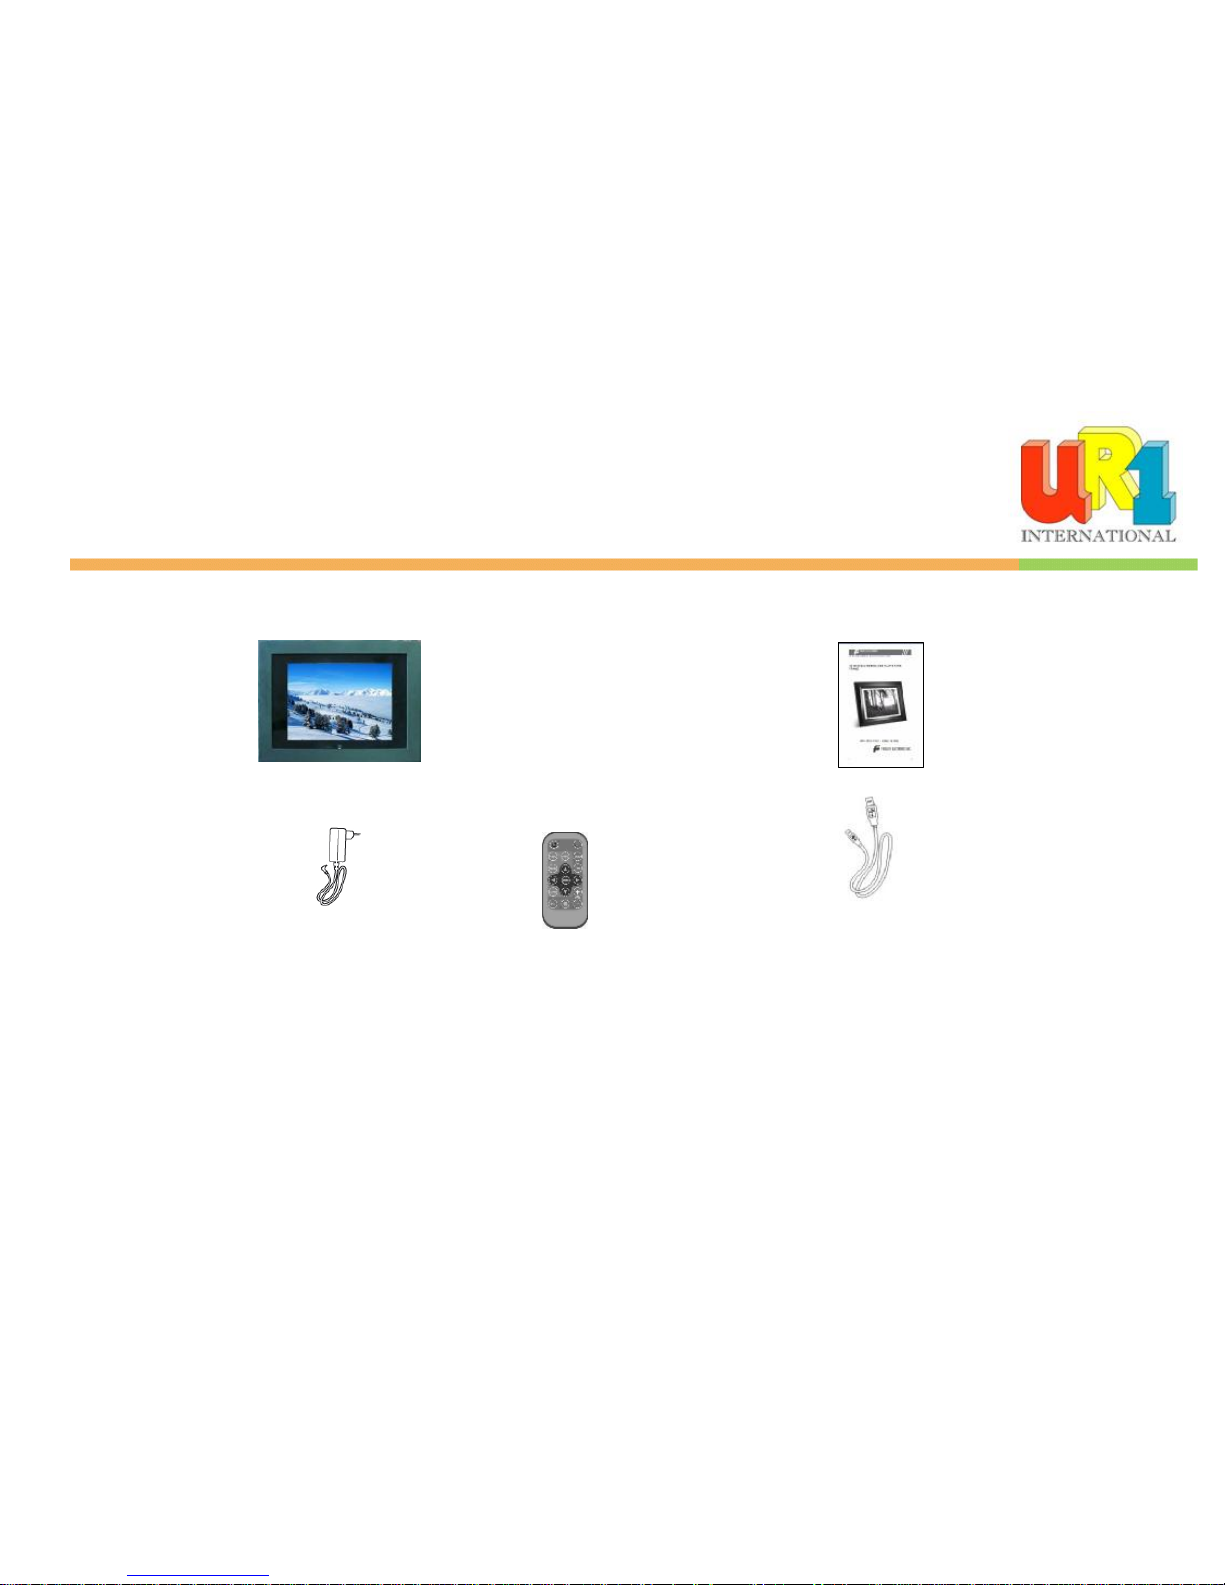
Package Contents
Digital Picture Frame and stand User Guide
AC/DC Adapter
Remote Control USB Cable
Installing your unit
Open the package and remove the protective foam. Remove the protective sleeve from the unit.
Install the Digital Picture Frame stand as the back of the unit.
Plug in the AC adapter into power outlet. Plug the other end into the unit.
After the content is stored on the target flash media; insert the media into the correct slot.
Turn power to ON position via the ON/OFF switch.
Page 5
5
Connecting to a PC
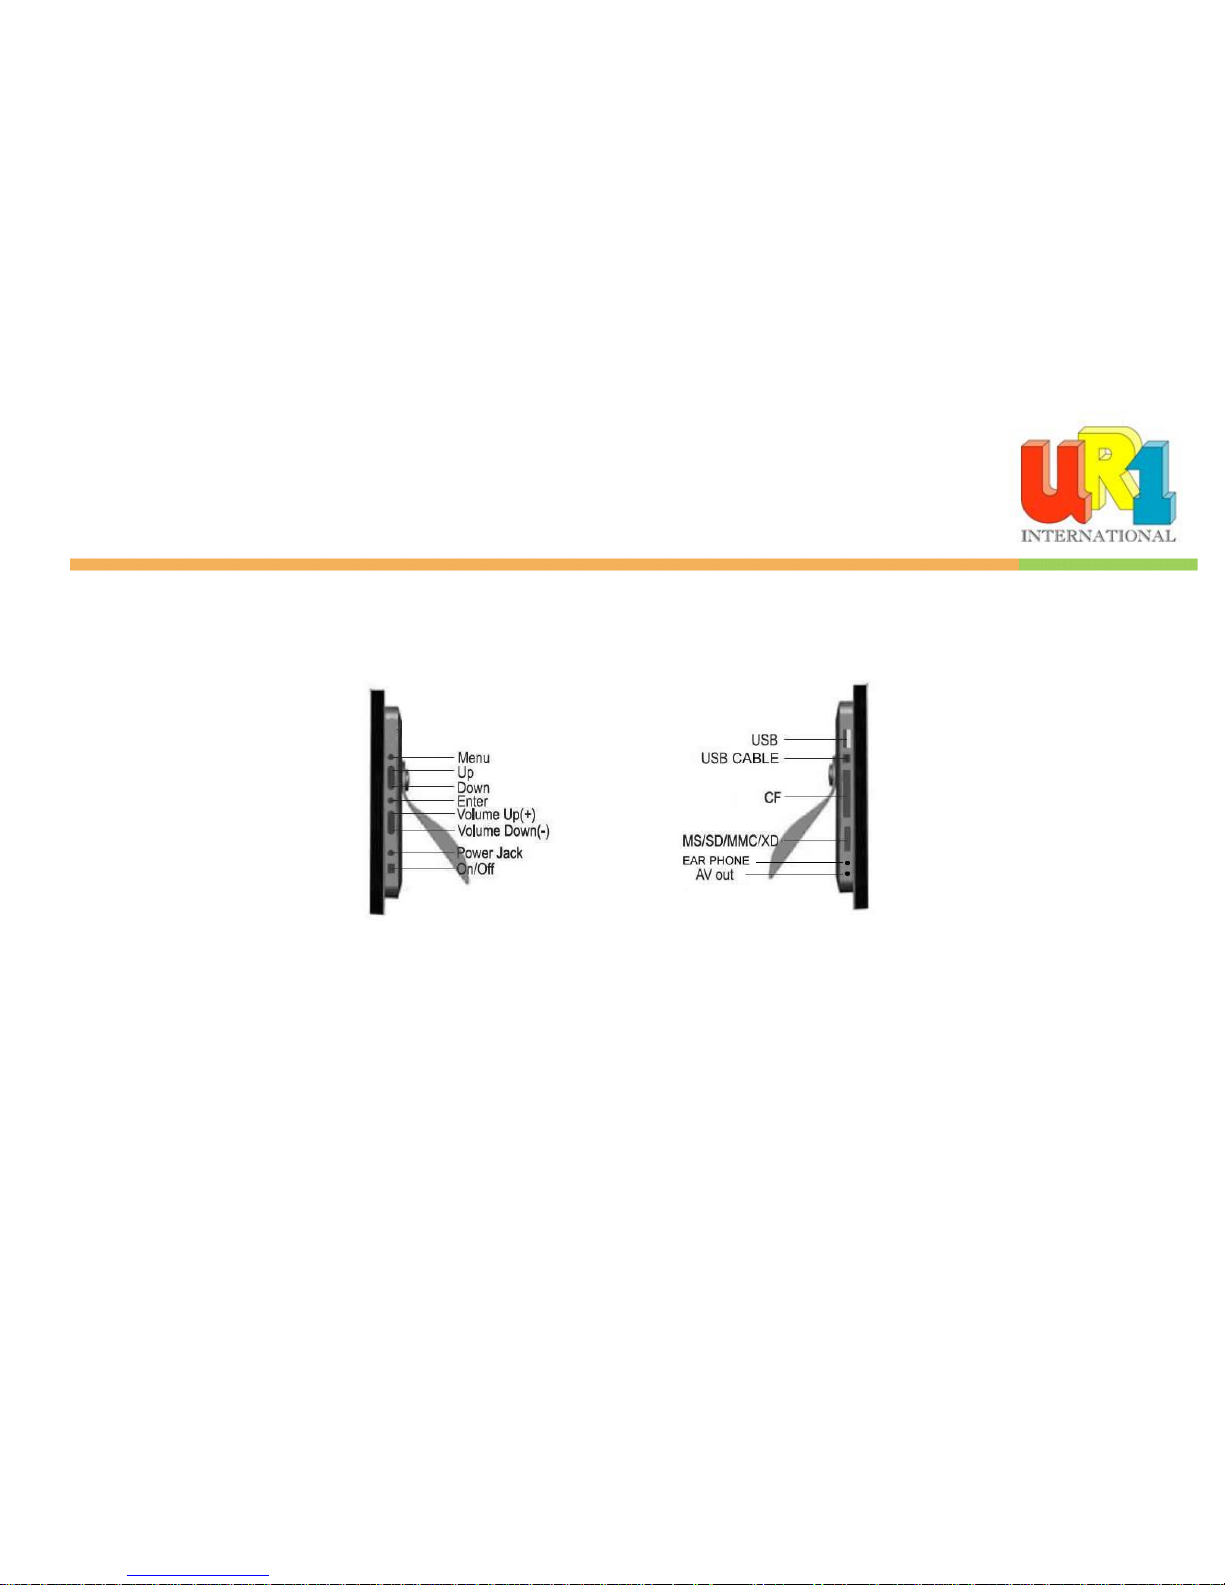
The Digital Picture Frame has a USB port for connection to a PC (USB Slave) and a second USB port for connection to other devices such as a Flash Drive, USB
card reader, or a camera (USB Host).
Controls
Page 6
6
Using your Remote Control
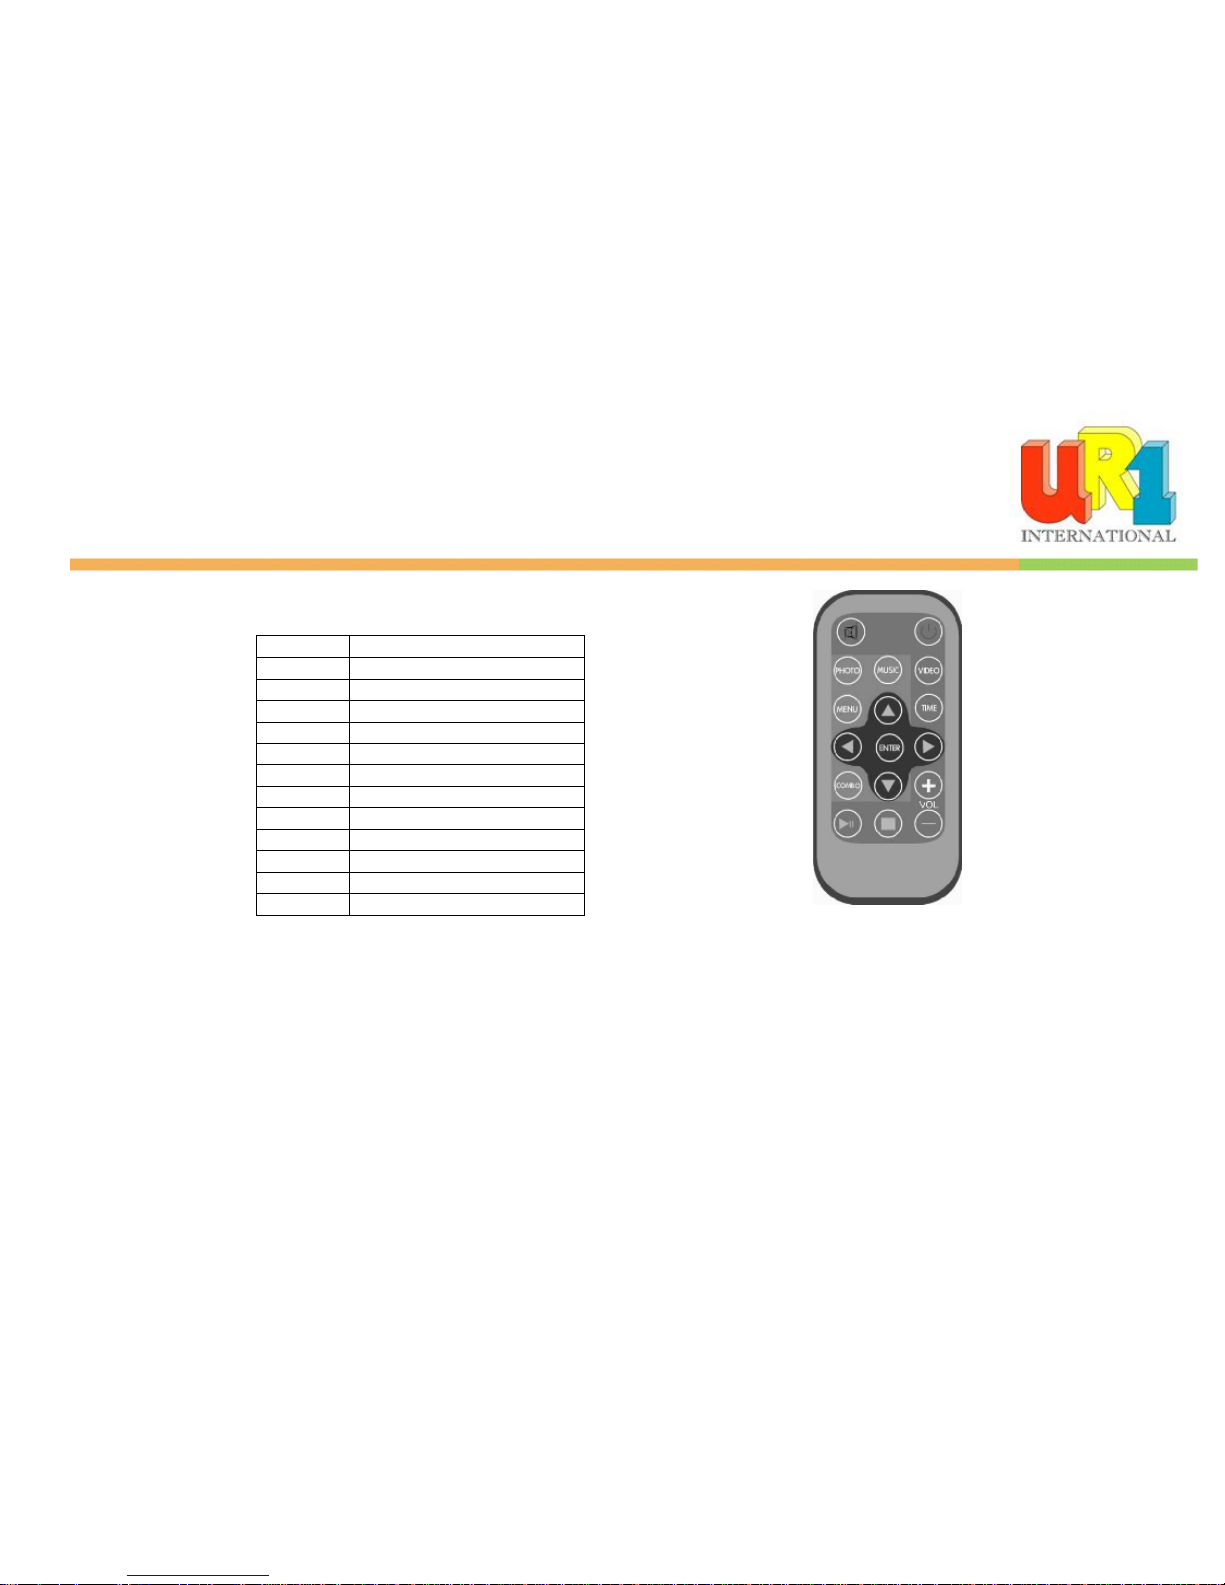
The following table briefly describes the remote control functions
Button Description
Power Turn on/off/AV Out
Photo Access your photo files
Music Access your music files
Video Access your videos files
Combo Start the slideshow
Time Display the time/ Calendar
Mute Mutes volume
Menu Displays the main menu
Enter Select highlighted item
VOL +/- Adjusts volume
Arrows Navigate on screen
u
/II
Play/ pause
Page 7
7
Inserting Memory Cards
The Digital Picture Frame is compatible with the following memory cards:
Secure DigitalTM Card (SD)
MultiMediaTM Card (MMC)
Memory StickTM
CompactFlashTM (CF) Card
XD Picture Cards
Insert the memory card with the front label facing AWAY from you. Do not force the memory card into the memory slot. If you are not able to easily insert the memory
card completely, you may have inserted it the wrong way.
Note:
The Digital Picture Frame will ONLY recognize digital pictures stored in JPEG format. Digital pictures stored in other formats will be ignored by the device.
Make sure you have at least one picture stored on the memory card. The frame will not function properly without a stored picture.
You also can use a USB flash drive in the exact same way as you would use a memory card. Simply copy files on the flash drive and insert it at the right side of the
unit in the USB Host plug.
Main menu
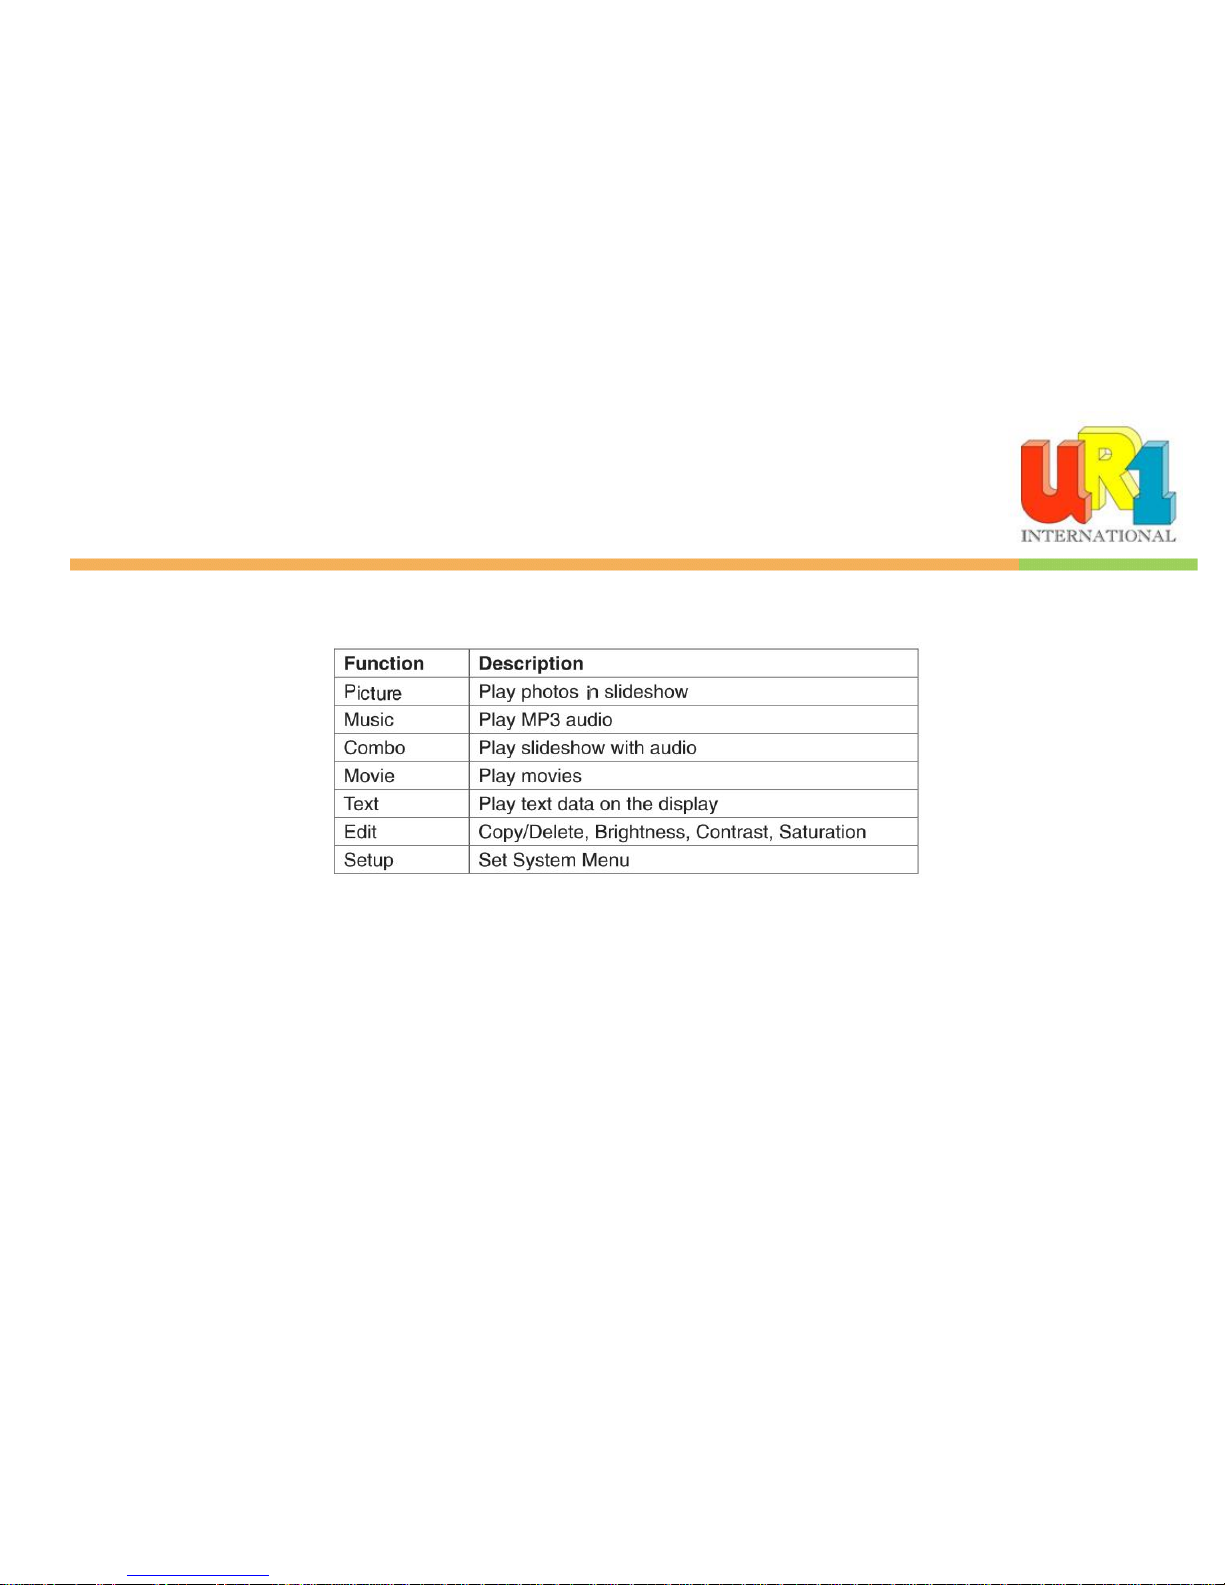
Upon turning on the Digital Picture Frame, the slideshow will automatically start. Press the “MENU” button to show the following menu:
Page 8
8
This screen will allow you choose the type of media to play.
Use the left and right arrows to move inside the menu and then press “Enter” to continue
Note: In all menus, pressing the “Menu” button will bring you back to the main menu
Viewing Pictures
Make sure you have at least one picture on your memory card/ USB flash drive or internal memory. When this is done:
Highlight the “PHOTO” option from the main menu and press “ENTER”
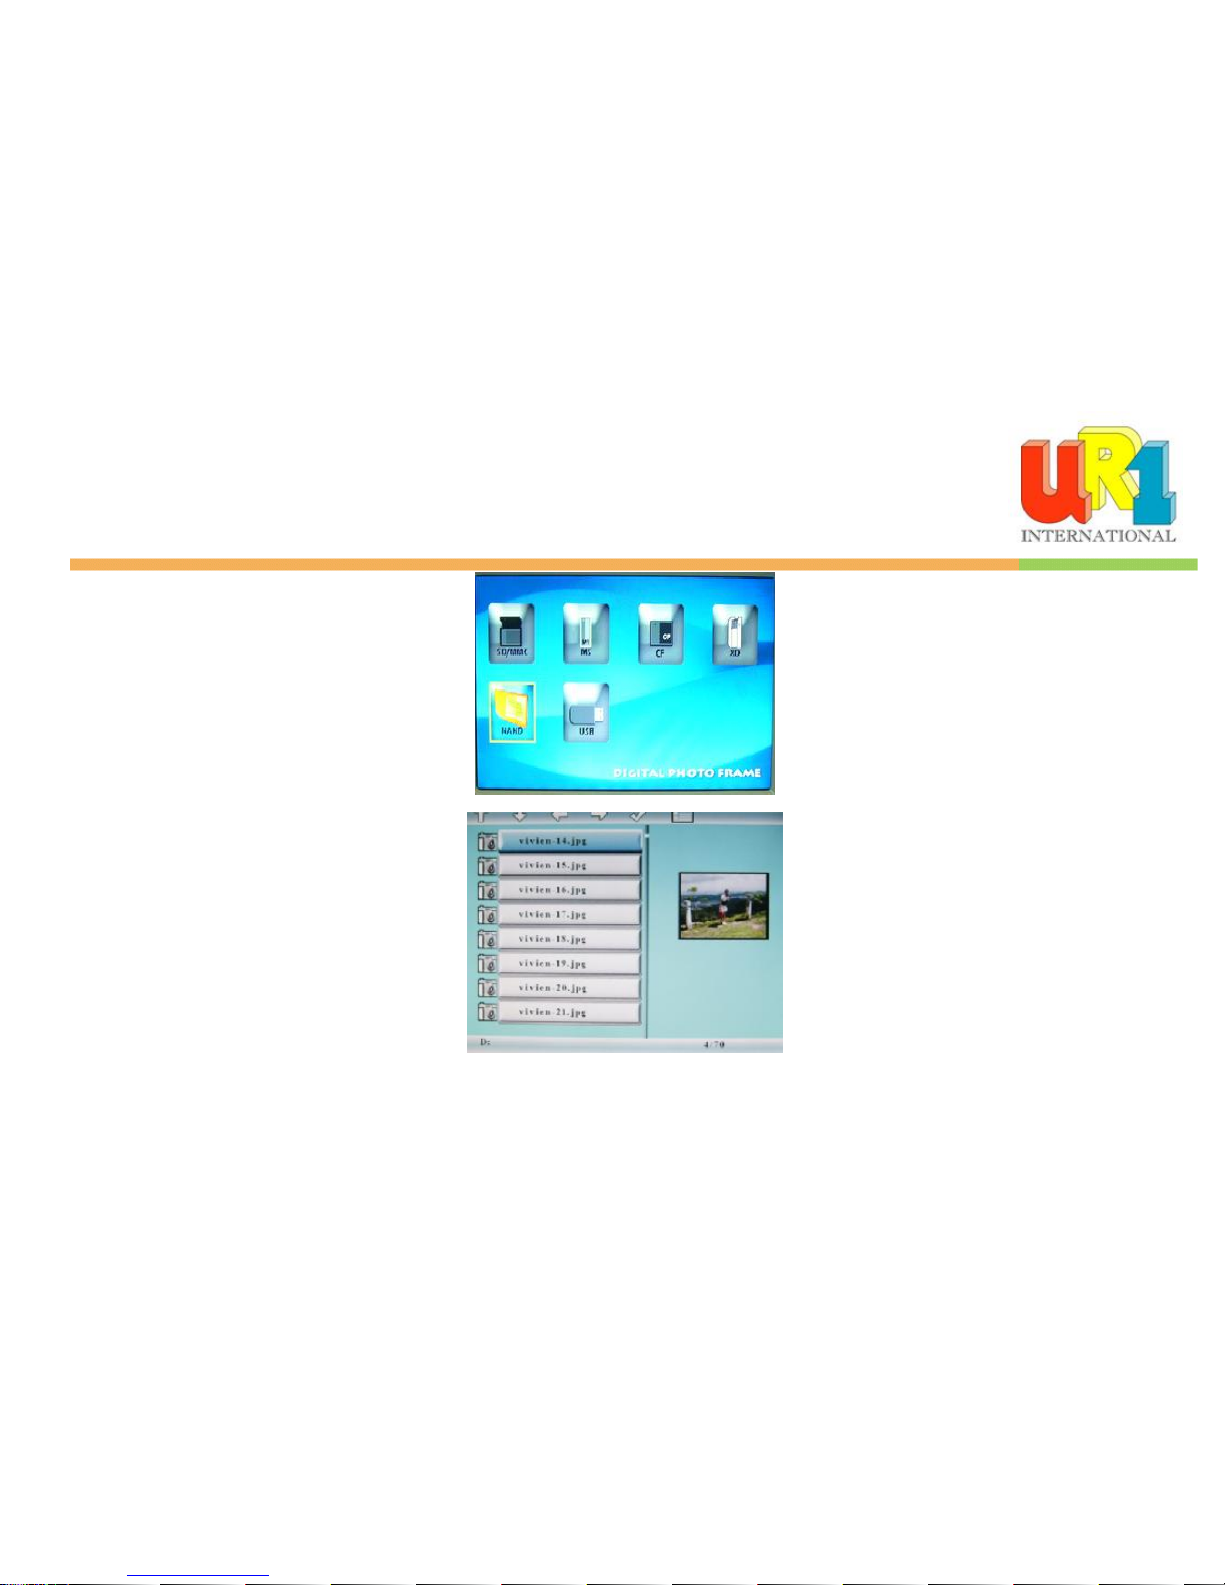
Select the desired flash media. (SD/xD/CF/MS/USB/ Internal Memory)
Page 9
9
A list of available pictures will be displayed. Use the up and down arrows to highlight the desired file and press “Enter” to continue
The slideshow will start
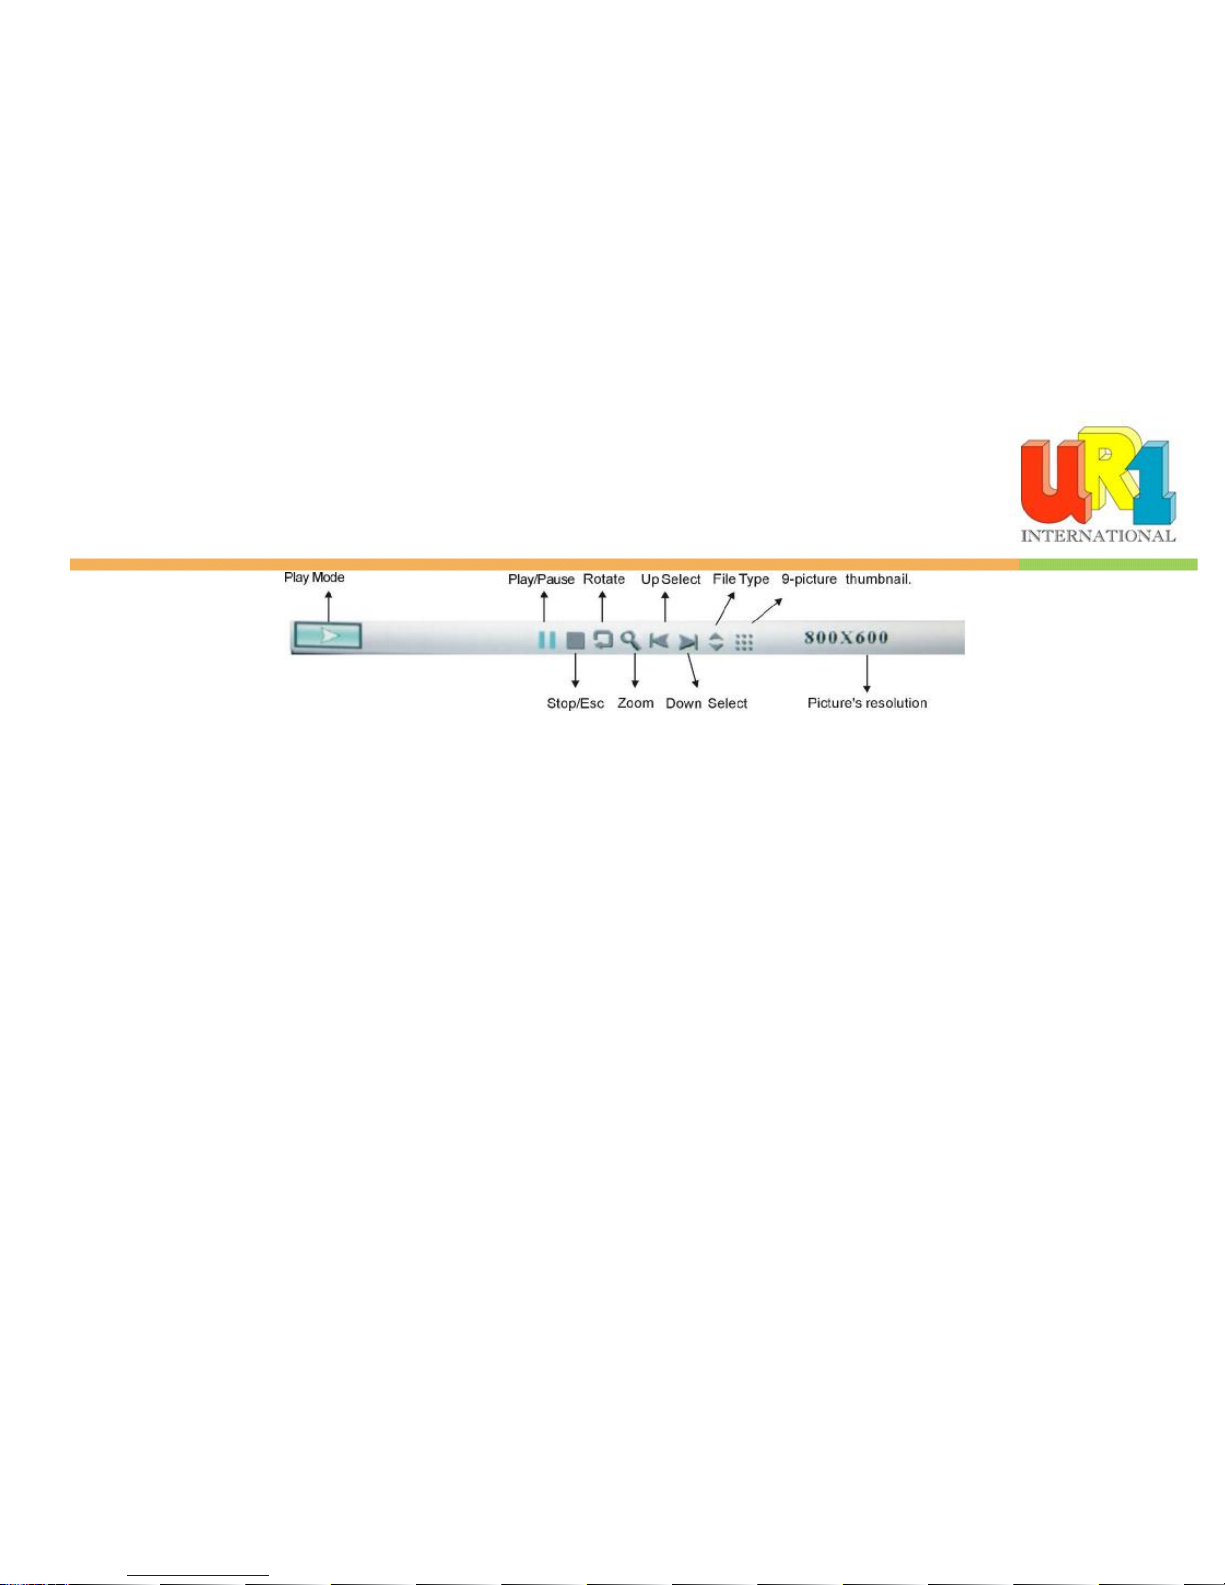
Once a slideshow is playing or a picture is being shown, press the ENTER button. (In a slideshow, using the remote control press “ENTER” twice to pause then
change settings on a specific picture). The following menu will appear:
Page 10
10
Changing the orientation for one picture
Use the rotate function to change the picture orientation to either portrait or landscape.
Zoom
Choose the Zoom function to magnify the image. Repeat this operation several times to further zoom in.
Browsing Thumbnails
Choose the thumbnail option on the menu (the icon with 9 bullets points) and you will be able to browse though your pictures in thumbnail format.
Watching video
The Digital Picture Frame supports the following video formats:
MPEG1, DIVX/XVID/ MPEG4 /Motion JPEG (AVI): video format used by most digital cameras
Make sure you have at least one video on your memory card or your USB flash drive. When this is done:
Choose the “MOVIE” option from the main menu and press “ENTER”
Select the desired flash media. (SD/xD/CF/MS/USB/Internal Memory)
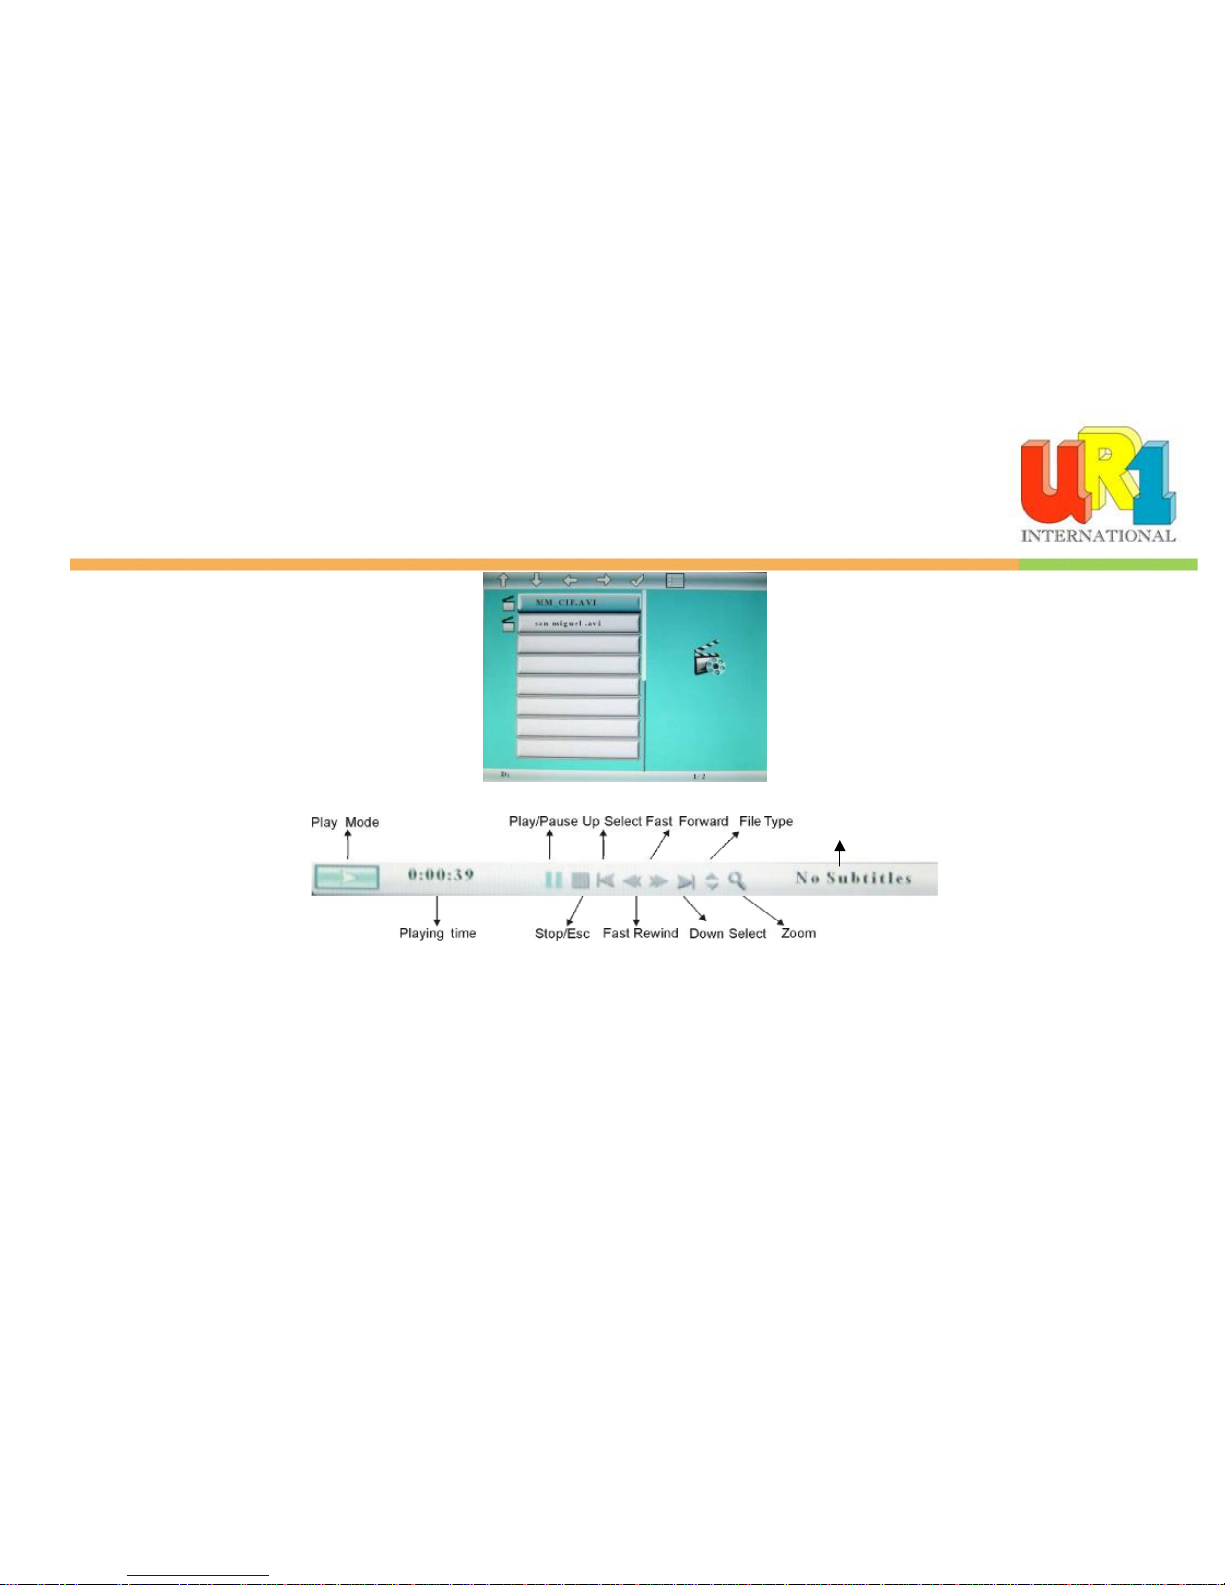
A list of available videos will be displayed. Use the up and down arrows to highlight your required file and press “Enter” to continue
Page 11
11
The video will begin playing
Once a movie is playing, press the ENTER button on the remote control. The following menu will appear:
Repeat
Use the arrow buttons to select the required function
Listening to MP3 music
Make sure you have at least one MP3 file on your memory card/USB flash drive or internal memory. When this is done:
Choose the “MUSIC” option from the main menu and press “ENTER”
Select the desired flash media. (SD/xD/CF/MS/USB/Internal Memory)
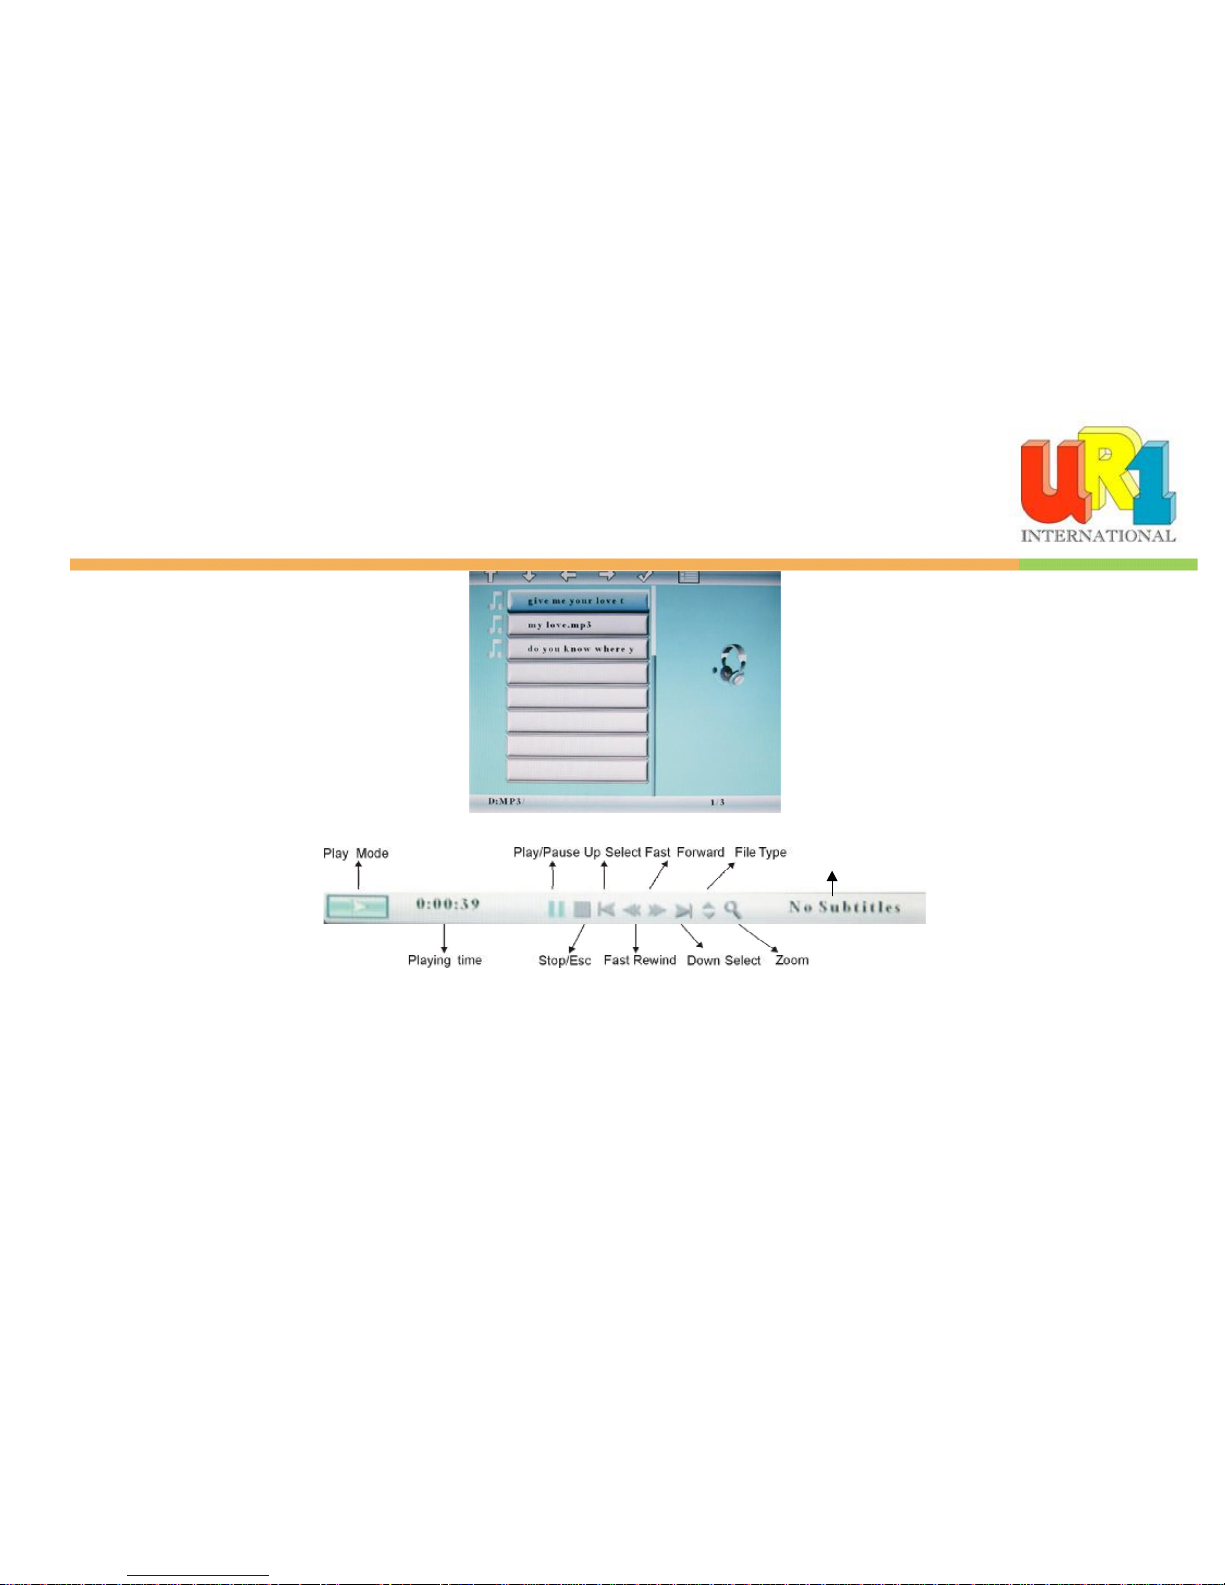
A list of available songs will be displayed. Use the up and down arrows to highlight your required file and press “Enter” to continue
Page 12
12
The song will be played
Once a song is playing, press the ENTER button on the remote control. The following menu will appear:
Repeat
Use the arrow buttons to select the required function
Playing a slideshow with music
Ensure you have at least one picture on your memory card/USB flash drive or internal memory. Additionally, you must have one MP3 file saved on the selected
memory card/USB/Internal Memory. When this is done:
Choose the “COMBO” option from the main menu.
Select the desired flash media. (SD/xD/CF/MS/USB/Internal Memory)
A list of available pictures will be displayed. Use the up and down arrows to highlight your required file and press “Enter” to continue
The slideshow will start while playing the first available song on the media
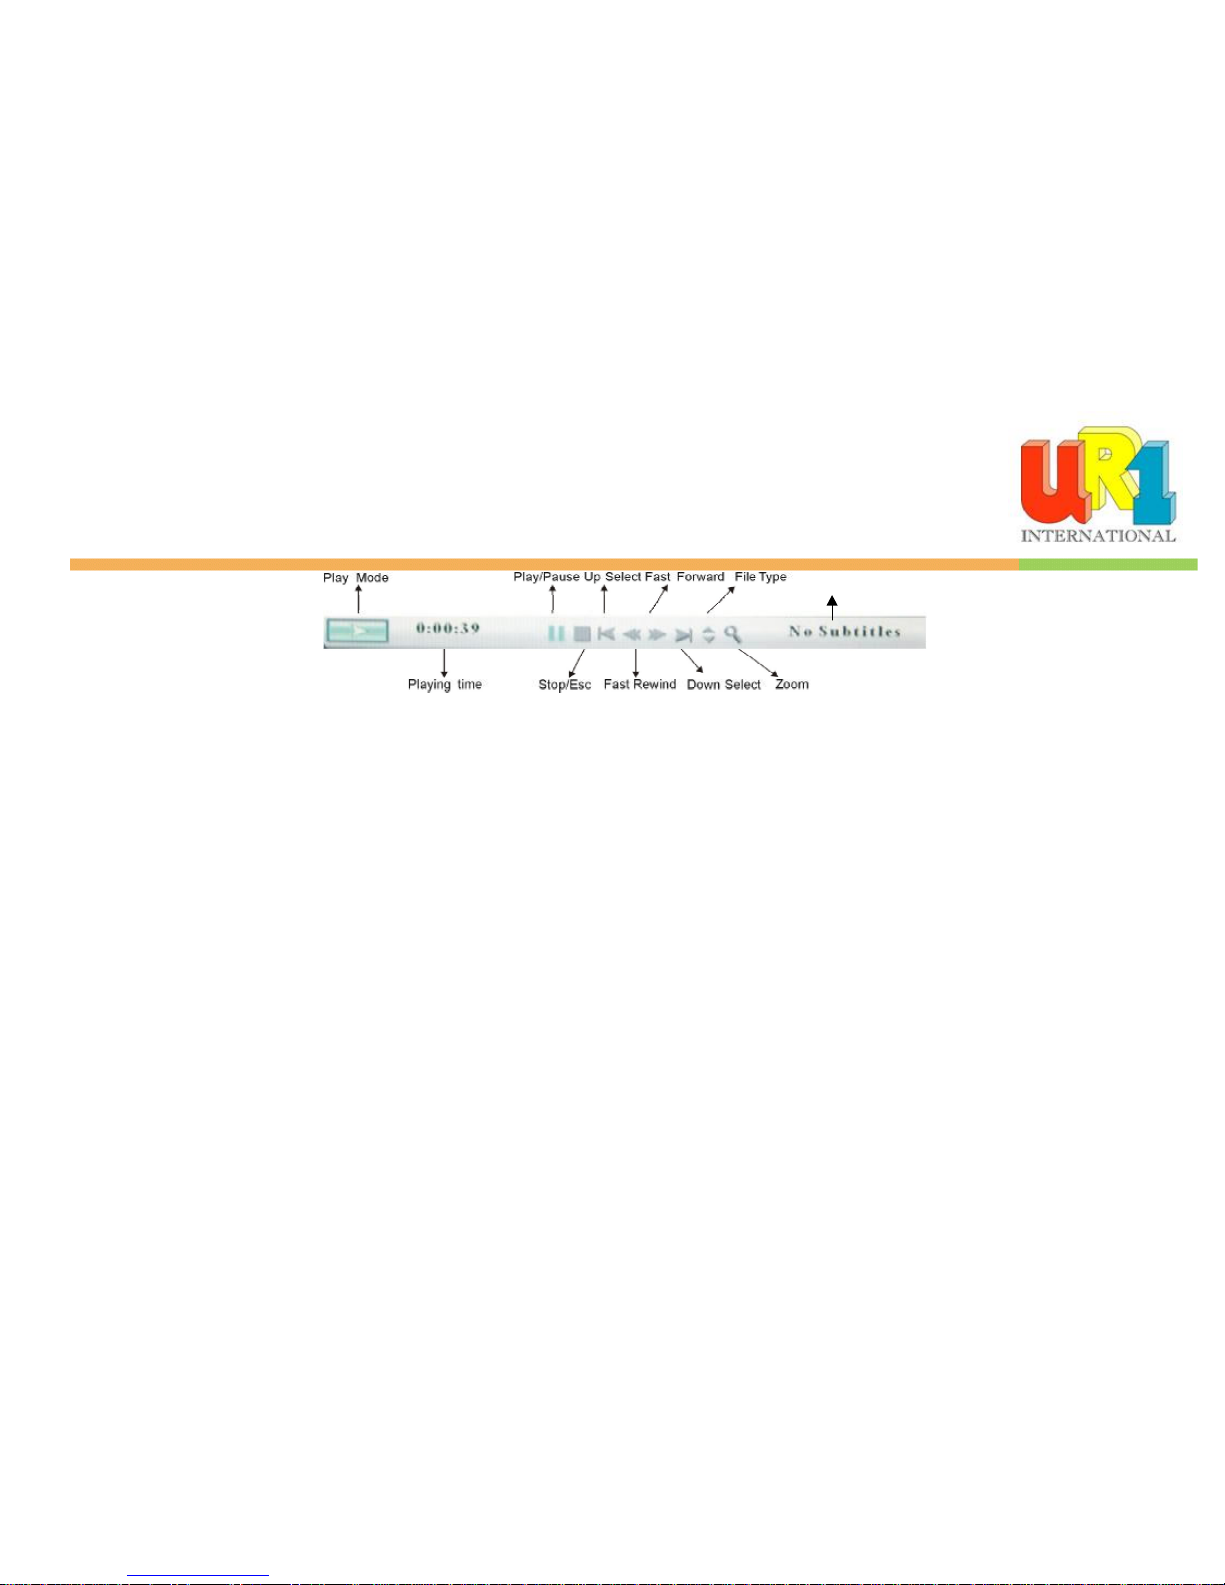
Once audio-slideshow has started, press the ENTER button on the remote control. The following menu will appear:
Page 13
13
Repeat
Use the arrow buttons to select the required function
Note: Please make sure that there has at least one MP3 file in your card when you play this function!
Viewing Text
Make sure you have at least a text file in ASCII format on your memory card or your USB flash drive. When this is done:
Choose the “TEXT” option from the main menu.
Select the desired flash media. (MMC/SD/xD/CF/MS/USB/ Internal Memory)
A list of available text files will be displayed. Use the up and down arrows to highlight your required file and press “Enter” to continue
The text will be displayed
The up and down arrows can be used to scroll through the on screen text.
AV Out:
Press the “POWER” button at the main menu after connected with other displayer, it will display on other monitors.
Caution: Please do not insert USB when the digital photo frames connecting computer!Using the EDIT
option
With the EDIT function you can Copy/Delete files as well as control the Color Setup.
Copying and Deleting Files
To copy and delete files on your memory card/ USB drive or internal memory:
Copy:
Choose the “EDIT” option from the main menu.
Select the desired flash media that you want to copy from. (SD/xD/CF/MS/USB/ NAND Internal Memory)
Page 14
14
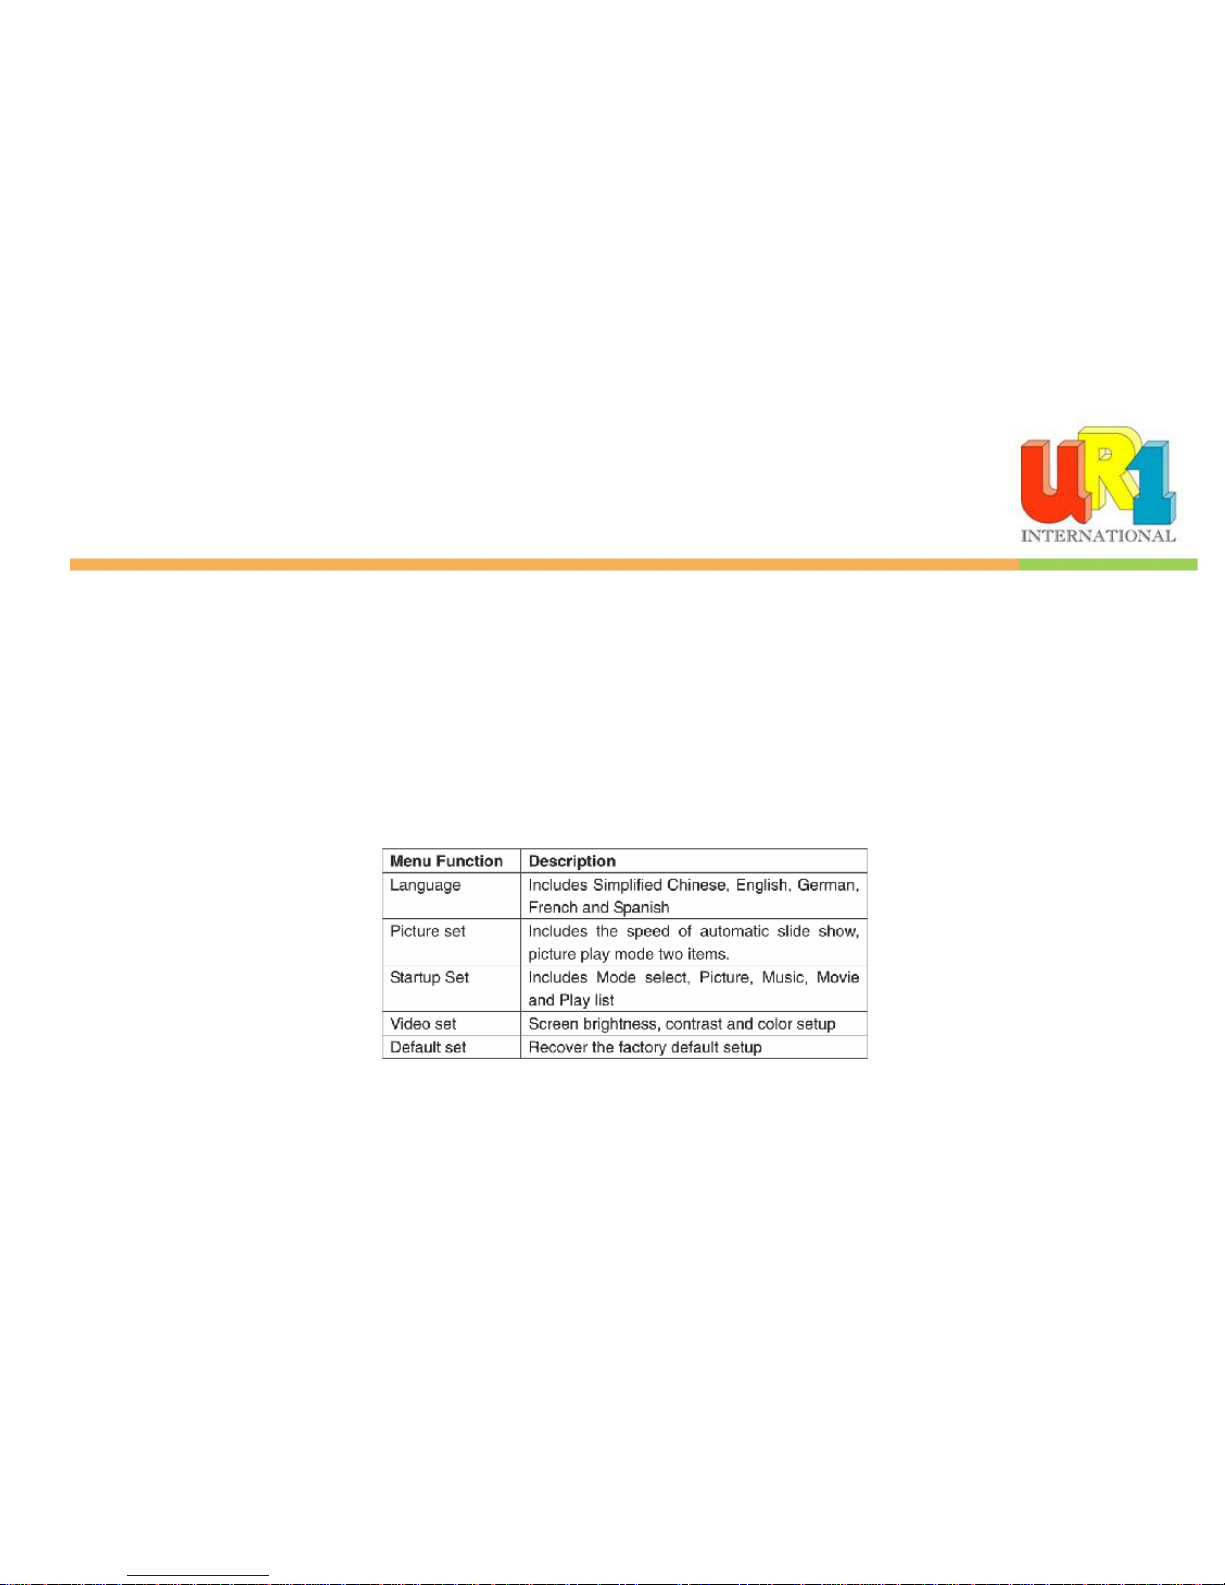
A list of available files will be displayed. Use the up and down arrows to highlight your required file and press the right arrow to highlight the desired file. Repeat for all
files that you want to copy
Press the “Menu” button to go back to the main display
Choose the “EDIT” option from the main menu.
Select the desired flash media that you want to copy to (SD/xD/CF/MS/USB/ Internal Memory)
Press the “MENU” button to display the Copy and Delete menu. Select the Suitcase icon and your file(s) will be copied.
Delete:
Choose the “EDIT” option from the main menu.
Select the desired flash media that you want to delete from. (SD/xD/CF/MS/USB/ NAND Internal Memory)
A list of available files will be displayed. Use the up and down arrows to highlight your required file and press the right arrow to highlight the desired file. Repeat for all
files that you want to delete
Press the “MENU” button to display the Copy and Delete menu. Select the Garbage Can icon and your file(s) will be deleted
Using the SETUP option
The following options can be changed by using the “SETUP” option from the main menu:
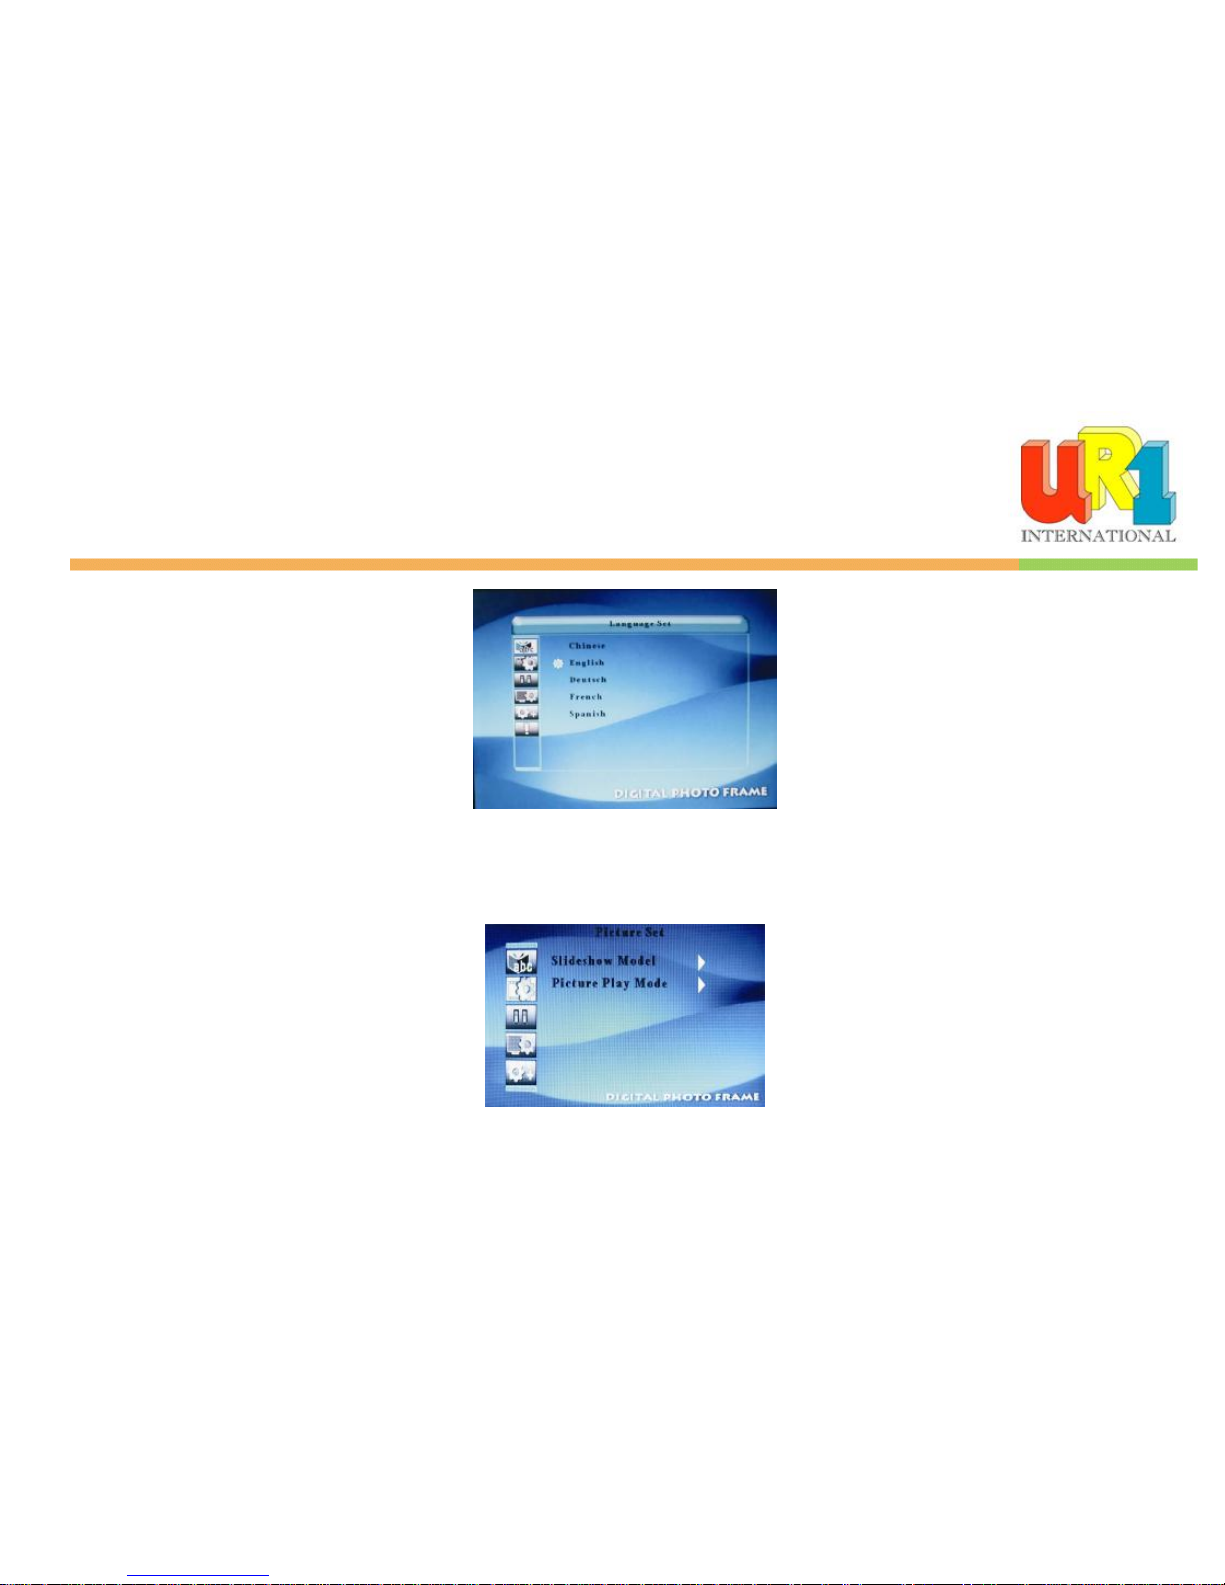
Language setup
You can change the default language used by the menu as follows:
Choose the “SETUP” option from the main menu.
Page 15
15
Choose the “ABC” option.
Use the up and down arrows to select your preferred language
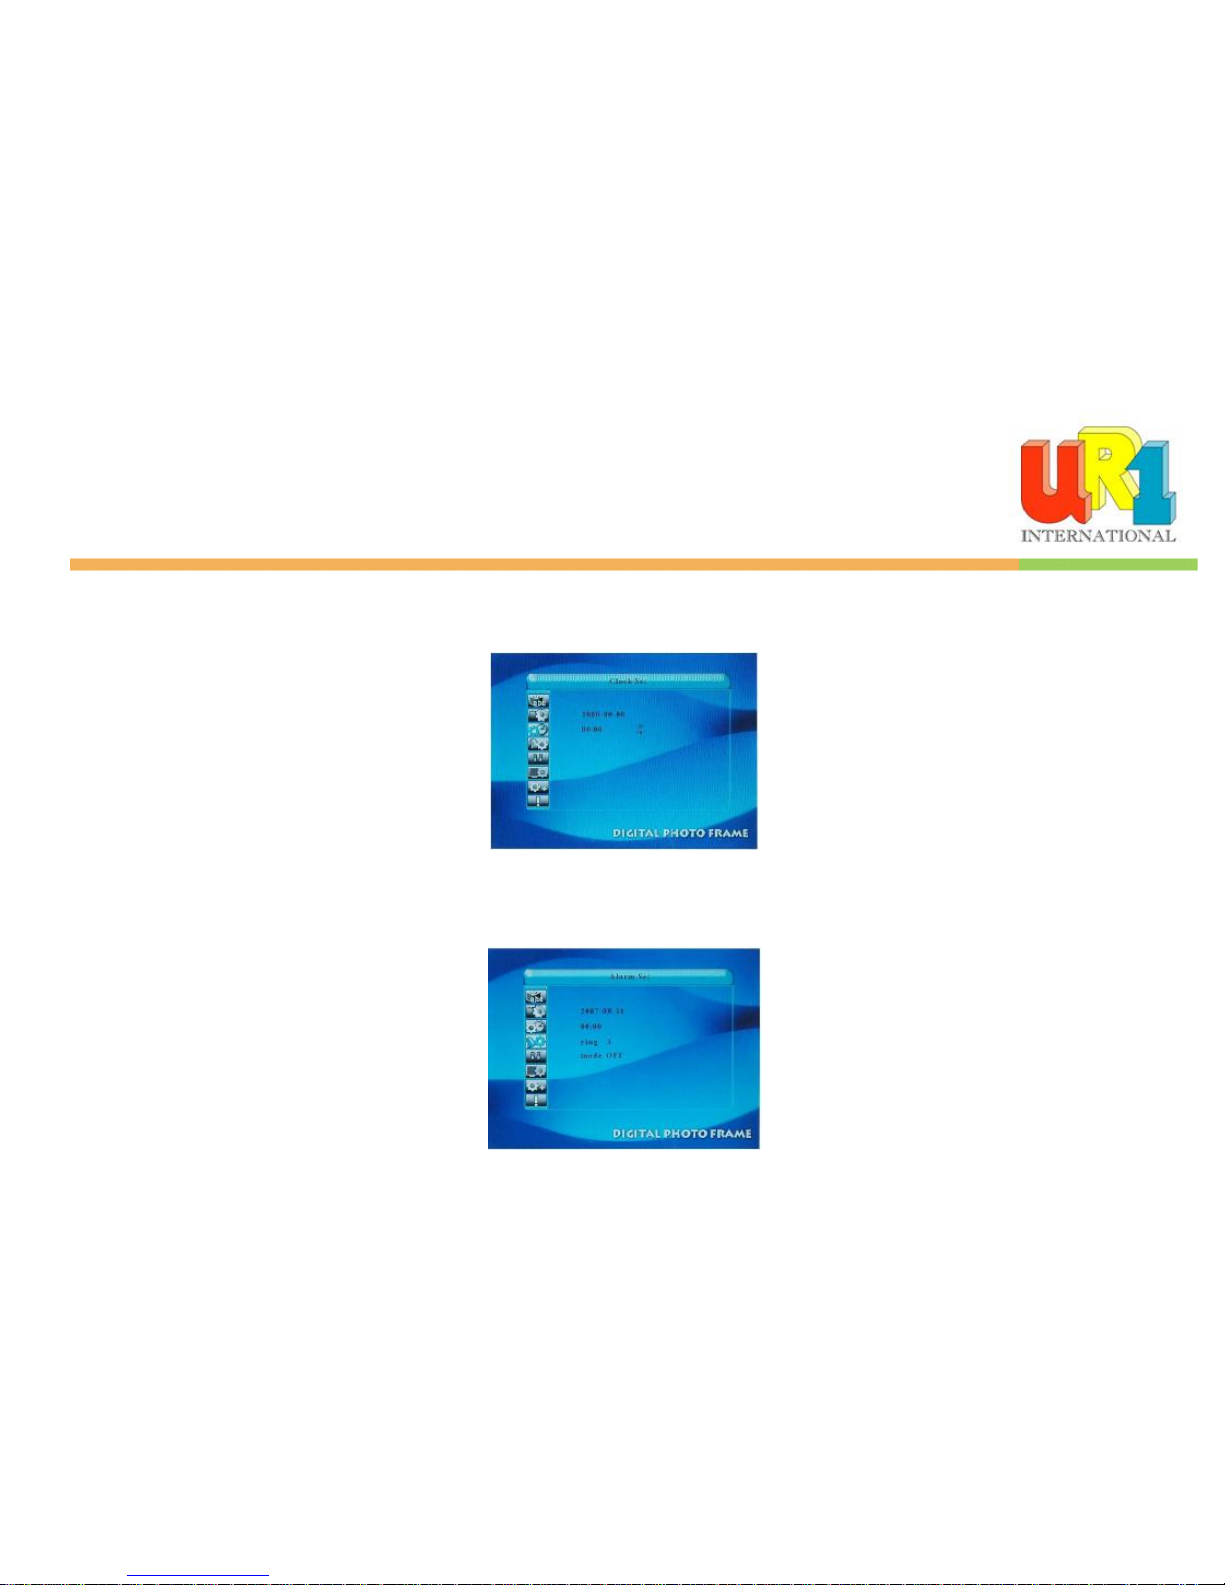
Changing the slideshow speed
You can change the slideshow speed as follows:
Choose the “SETUP” option from the main menu.
Choose the “Slideshow Model” option.
Page 16
16
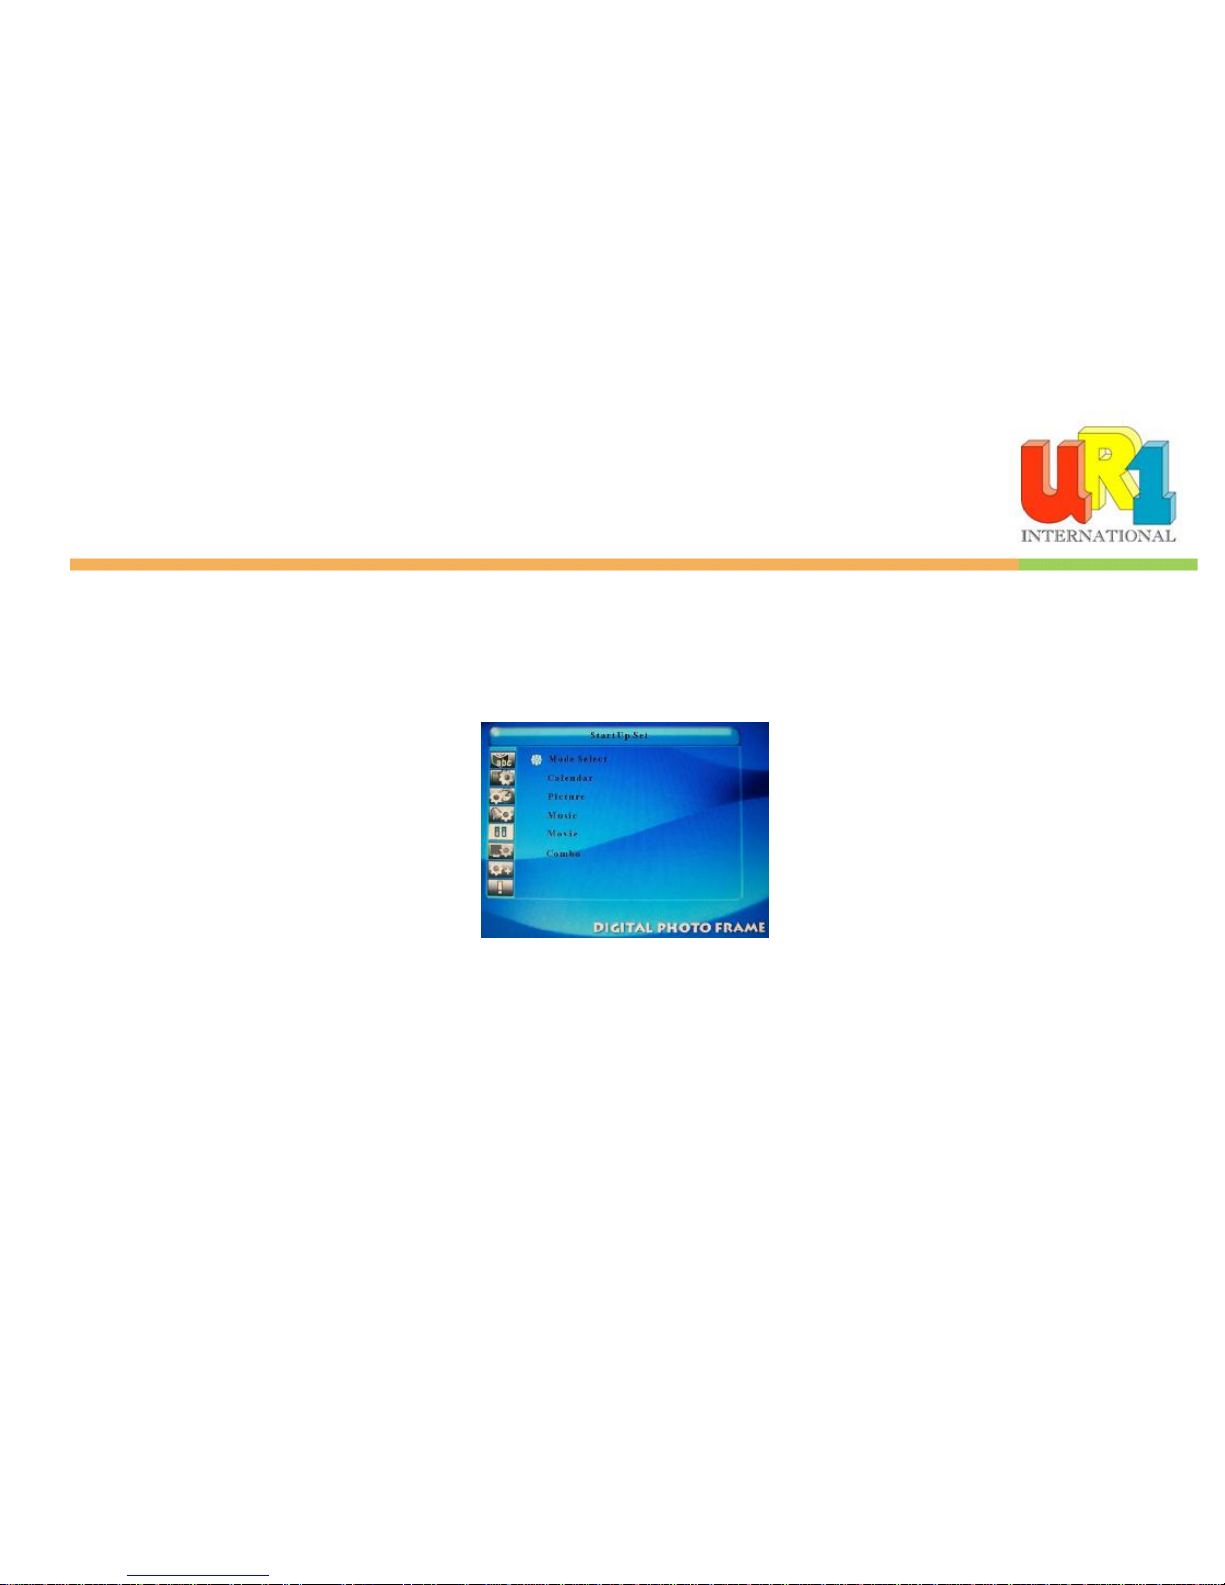
Clock Set option
You can change the clock as follows:
Choose the “SETUP” option from the main menu.
Choose the “Clock Set” option.
Use the right and left arrows to highlight the desired parameters and the up and down arrows to change the time/ date.
Press ENTER when finished
Alarm Set Option
Set the alarm for a specific time by:
Page 17
17
Choose the “SETUP” option from the main menu.
Choose the “Alarm Set” option
Use the right and left arrows to highlight the desired parameters and the up and down arrows to change the time/ date
Ensure that “mode” is turned to “ON”
Press ENTER when finished
Startup setup
You can change the startup from main menu to slideshow or calendar as you like, choose the option, and then select what you like.
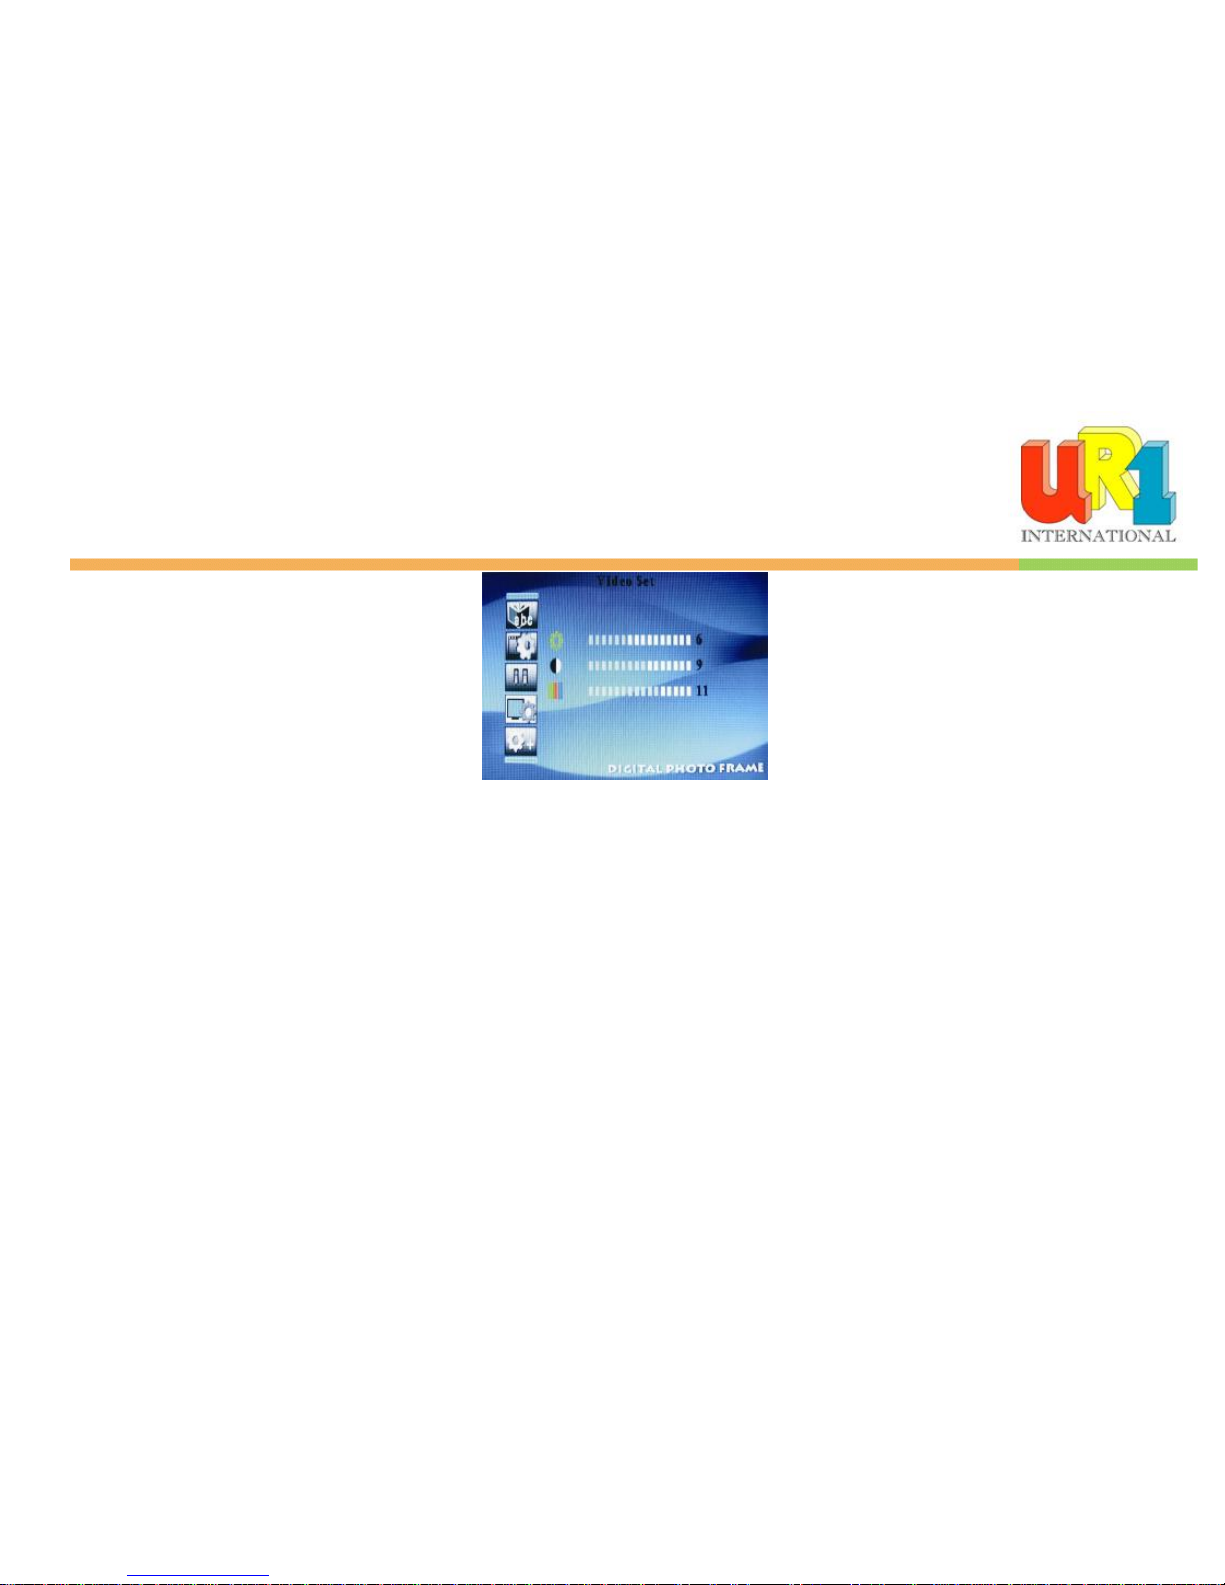
Video setup
You can change some of the display parameters in order to improve the picture quality. Those parameters are: Brightness, Contrast and Color
Choose the “SETUP” option from the main menu.
Choose the “Video Set” option.
Select the parameter to change and press “Enter”
Page 18
18
Use the right and left arrows to change the value
Technical Support
Frequently asked questions
1) Q: Why do my photos take so long to load?
A: Generally the higher the resolution of the photo, the longer it will take to load. Resizing your photos to a lower resolution will quicken the processing time.
2) Q: How do I store music files?
A: First, use a personal computer and popular audio editing software to convert your music to MP3 format. The Digital Picture Frame will only play MP3 files so all
Windows Media Player™ and/or iTunes™ files will have to be converted first. You can use a card reader or your digital camera to transfer those files to your memory
card.
3) Q: How come the Digital Picture Frame does not show some of my photos?
A: The Digital Picture Frame is designed to show photos following the same camera industry standards format as digital cameras. This format is a JPEG format.
Images, such as web images, scanned images, or photos in RAW format, are not stored according to camera industry standards and therefore cannot be displayed
correctly on the Digital Picture Frame. Please use your PC applications to convert such images into standard JPEG format before viewing them on the Digital Picture
Frame.
Page 19

19
4) Q: If I keep showing the same photo for a long time, will it damage the LCD screen?
A: No. The Digital Picture Frame can display the same photo continuously for a long time. But it is recommended not to show the same picture continuously for more
than 1 month.
5) Q: Why I can not show my video?
A: Please pay more attention about your video format, we can support most MP4 format and AVI format file.
6) Q: Why is my slideshow slow to transition?
A: The images you have loaded are too large. In order to get the Slideshow to transition correctly, you will need to reduce the size of the images to the frames
supported format.
Page 20
20
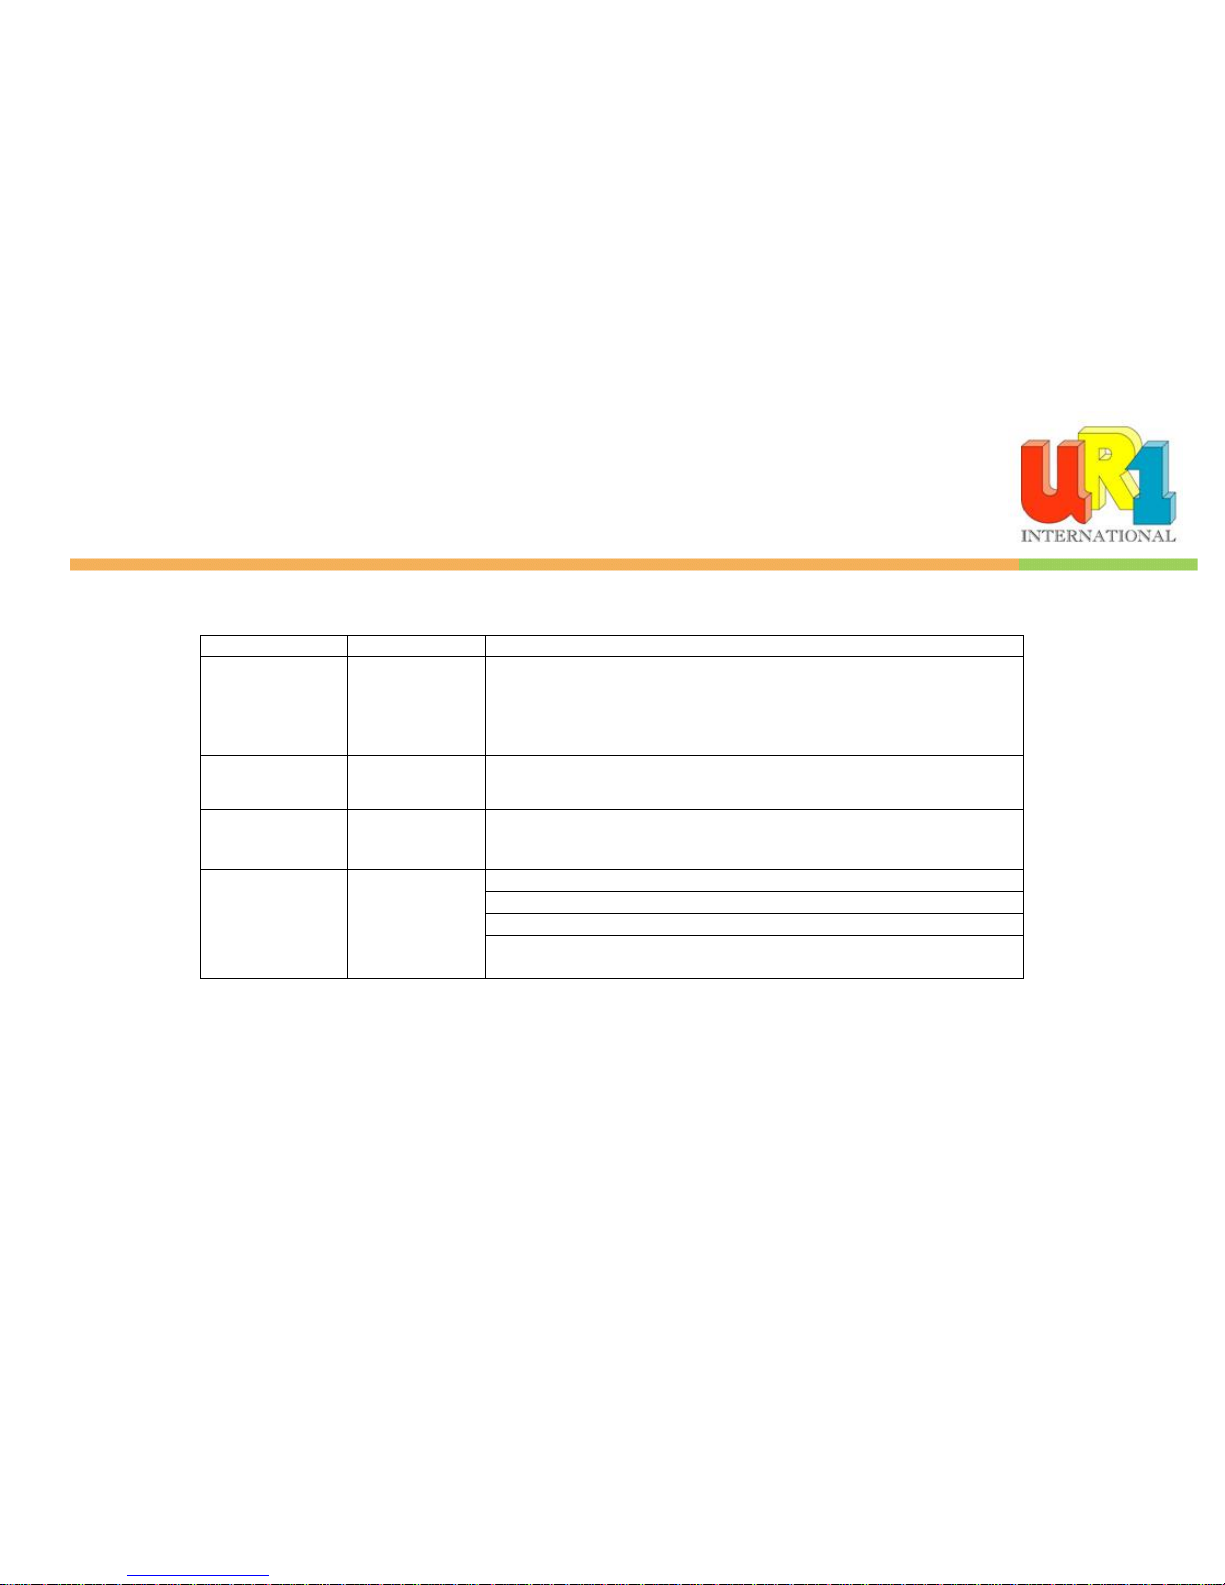
Troubleshooting
Symptom Cause Corrective Actions
Digital Picture
Frame doesn’t
power on
The POWER
connector to the
unit is not
securely inserted.
Make sure you connect the AC adapter to the frame properly. When you
connect the AC adapter to the frame and power up the unit, even without a
memory card, you should see a blank screen. If you don’t see the lit screen,
check if the power is connected to the Digital Picture Frame and make sure
it is securely attached.
No Start-up screen Memory card is
not inserted
correctly.
Insert a supported memory card
No photo, videos
or mp3 files on the
memory card
Card is wrongly
inserted
Verify if the way you inserted the card is correct. Make sure the front label of
the memory card is facing AWAY from you. Do not force the memory card
into the slot.
The File doesn’t
play
Incompatible File
Format
Make sure there is at least one supported photo file on the memory card.
Compatible Photo format: Compatible Photo format: JPEG
Compatible Music format: MP3
Compatible Video format: Motion JPEG/ DIVX/ XVID/ MS JPEG4 (AVI),
MPEG1
Page 21

21
Service and Warranty
Your warranty
Dear Consumer,
Thank you for purchasing the UR1 International Digital Frame, which has been designed and manufactured to the highest quality standards.
If, unfortunately, this product malfunctions, UR1 International guarantees free of charge labor and replacement parts during a period of 12 months from the date of
EXW
This guarantee applies granted that the product is handled properly and has been used only as intended, in accordance with its operating instructions and upon
presentation of the original receipt, indicating the date of purchase, retailer’s name, model and serial number of the product.
The warranty may not apply if:
The documents have been altered or made illegible;
LCD screen have been broken;
The model or serial number on the product has been altered, deleted, removed or made illegible;
Unauthorized service organizations or persons performed repairs, product modifications, or alterations to the unit.
Damage is caused by means not relating to the design or manufacturing of the product including water or fire, lightning, misuse or neglect.
Please note that this guarantee is void in any case that modification have been made in order for the product to comply with local or national technical standards
which apply in countries for which the product was not originally designed or manufactured for.
In case your product is not working correctly or is defective, please call UR1 International at +61 3 8793 0088 or send an email to [email protected]
Page 22
22
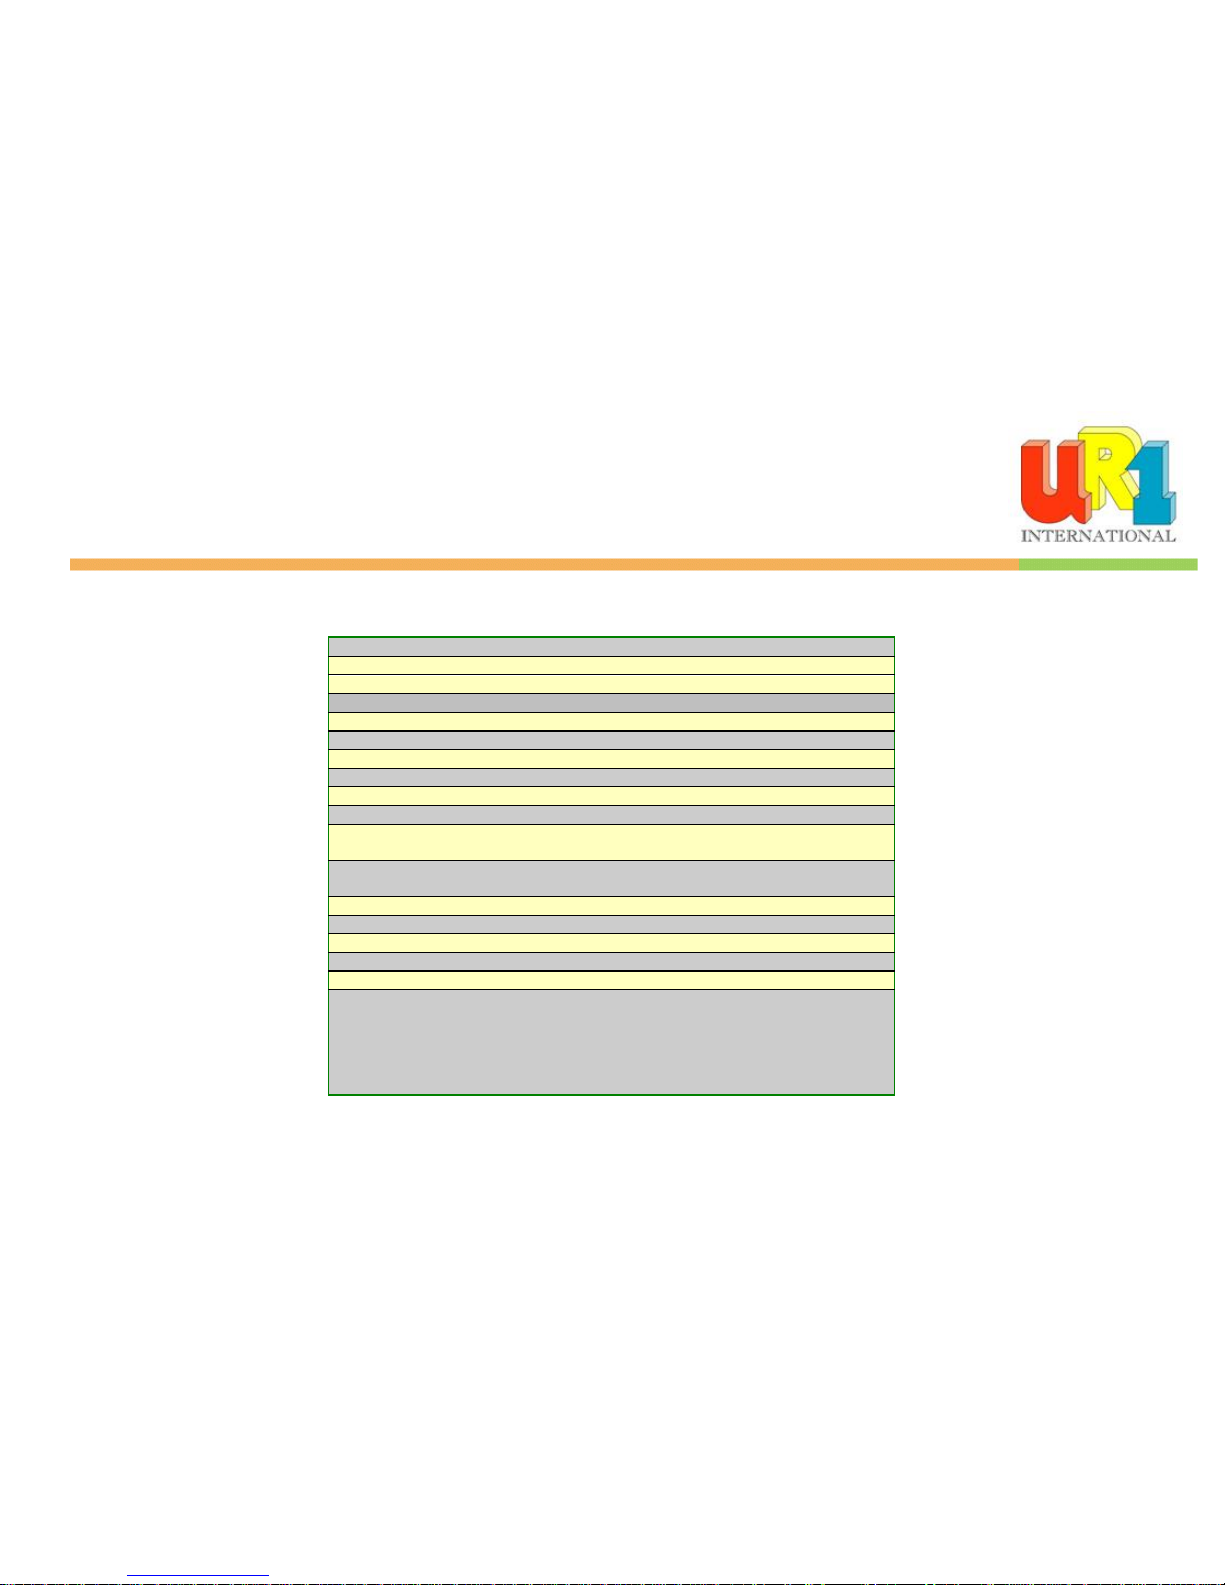
• Specifications
Type Longshow Digital Picture Frame
Resolution 640 x 480
Power Supply 12 V
Consumption 6 Watts
Working Temperature -20 to +65 degrees
Luminosity 350cd/m2 max.
Contrast 300:1
Viewing Angle 70/70/70/40 (CR=10)
Response Time 25ms
Display Mode 4:3
Photo Changing
Interval
Fast, Slow, Normal
File Format JPEG, MP3,MPEG1, AVI ( JPEG Motion,
DIVX/XVID/MS MPEG4)
Photo Size 12 Mega Pixels
Current AC100—240V (50HZ—60HZ)
Cards SD/MMC/MS/CF/XD/USB
USB ports USB Host, USB Slave
Start-up Slideshow/ main menu/ calendar
Package Contents Digital Picture Frame
AC/DC Adapter
User Guide
Remote control
USB Cable
Page 23

23
Maintenance and Precaution
The Digital Picture Frame is for indoor use only.
To reduce the risk of fire or electric shock; do not expose this appliance to rain or moisture.
Do not block the ventilation holes on the back of the Digital Picture Frame at any time.
Keep your Digital Picture Frames out of sunlight. Direct sunlight may cause damage.
Do not open the case of the Digital Picture Frame. There is a risk of electric shock, and there are no user serviceable parts inside. Opening the case will void your
warranty.
Do not use the Digital Picture Frame if conditions could allow condensation to occur, or damage may result.
Your Digital Picture Frame is a complicated electronic device and cannot withstand shock from drops.
Cleaning the LCD screen
Treat the screen gently. The screen on the Digital Picture Frame is made of glass and can be scratched or broken.
If fingerprints or dust make the LCD screen dirty, we recommend using a soft, non-abrasive cloth such as a camera lens cloth to clean the LCD screen.
If you use an LCD Cleaning Kit sold on the market, apply the cleaning liquid to the cloth. Do not apply the liquid directly to your LCD screen.
Page 24
24
Page 25

25
Regulatory Compliance
CE Declaration of Conformity
Attestation RSH05080201-1, RSH06080201-2
We declare under our responsibility that the product is in conformity with the following standards
EN55022:1998 (Radio Disturbance requirement of Information Technology Equipment)
EN55024:1998 (Immunity requirement of Information Technology Equipment)
EN61000-3-2:2000 (Limits for Harmonic Current Emission)
As assessed by the following applications standards:
89/336/EEC Electromagnetic Compatibility
This Product is produced by a manufacturing organization on ISO9000 level.
Federal Communications Commission (FCC) Notice (U.S. and Canada Only)
This equipment has been tested and found to comply with the limits for a Class B digital device, pursuant to Part 15 of the FCC Rules. These limits are designed to
provide reasonable protection against harmful interference in a residential installation. This equipment generates uses and can radiate radio frequency energy and, if
not installed and used in accordance with the instructions, may cause harmful interference to radio communications. However, there is no guarantee that interference
will not occur in a particular installation. If this equipment does cause harmful interference to radio or television reception, which can be determined by turning the
equipment off and on, the user is encouraged to try to correct the interference by one or more of the following measures:
Reorient or relocate the receiving antenna.
Increase the separation between the equipment and receiver.
Connect the equipment into an outlet on a circuit different from that to which the receiver is connected.
Consult the dealer or an experienced radio/TV technician for help.
Page 26

26
Changes or modifications not expressly approved by the party responsible for compliance could void the user's authority to operate the equipment.
Connections to this device must be made with shielded cables with metallic RFI/EMI connector hoods to maintain compliance with FCC Rules and Regulations.
To prevent damage which may result in fire or shock hazard, do not expose this appliance to rain or excessive moisture.
THIS CLASS B DIGITAL APPARATUS MEETS ALL REQUIREMENTS OF THE CANADIAN INTERFERENCE-CAUSING EQUIPMENT REGULATIONS.
FCC Declaration of Conformity
Model Number: DPF0800AAN.
This device complies with Part 15 of the FCC Rules. Operation is subject to the following two conditions:
(1) This device may not cause harmful interference, and (2) this device must accept any interference received, including interference that may cause undesired
operation.
End-of-Life Disposal
Your new product contains materials that can be recycled and reused. Specialized companies can recycle your product in order to reuse components of the product
and to minimize waste.
Please find out about the local regulations on how to dispose of your old unit from your local municipality.
Dispose of in accordance to local state, provincial, municipal or federal regulations.
Please find out about the local regulations on how to dispose of your old unit from your local municipality.
 Loading...