

Page 1
Environmental Monitoring System 400
TM
Thank you for purchasing the Environmental Monitoring System (EMS) 400TM from
Upsite Technologies
®
. This guide describes how to install and configure your unit.
If you need further assistance, please contact us via email at [email protected]
or call us at 1.888.982.7800.
Installation Supplies
Included with the EMS 400
TM
EMS 400TM device
24VDC power adapter
CAT 6 crossover network cable
Three 900MHz antennas
Available from Upsite, sold separately
Rack mount bracket
Rack mount tabs
Wall mount bracket
WireFree sensors as necessary for your application
Additional Supplies
18 – 22 AWG ground wire
18AWG shielded twisted pair stranded copper wire — no more than 2000 ft (610 m)
(Modbus RTU communication via EIA-485 port)
Straight-through CAT5 cable
Straight-through, nine-pin serial cable
Network Communications Information
Consult your IT administrator and determine the following network settings
for your EMS 400
TM
:
IP Address ___________________________________________________________________
Subnet Mask _________________________________________________________________
Default Gateway ______________________________________________________________
QUICK START GUIDE
8. Once you have assigned data and saved your changes for every page, your sensor
discovery is complete. Be sure to save a copy of your system configuration in a safe
location, should you ever need to reinstall it on this or another EMS 400
TM
.
Troubleshooting
Basic EMS 400TM troubleshooting information is included here. More in-depth
troubleshooting is available in the EMS 400
TM
User Guide, which can be found online at
www.upsite.com.
Sensors Are Not Automatically Discovered by the EMS 400
TM
If an installed WireFree sensor is not detected by the EMS 400TM, it is either too far
away from the EMS 400
TM
, or there is an obstruction in its path. To determine the
source of the problem, remove the sensor from its installed location and place it near
the EMS 400
TM
. If it’s then discovered by the EMS 400TM:
Its desired location may be too far away. Move the sensor away from the
EMS 400TM in small increments. This will help you determine the distance
threshold of the sensor.
An obstruction is blocking the signal. Find another suitable location for the
sensor that avoids the obstruction.
If it’s a single sensor application, installing a 900MHz sensor may be more
cost-effective than a repeater.
If the sensor is still not discovered by the EMS 400
TM
:
Verify the sensor’s serial number. Make sure you’re looking for the correct sensor at
that position.
Remove the sensor’s cover and make sure the battery pull tab has been completely
removed.
Check to see that the heartbeat LED is blinking, once every 10 seconds. You’ll find
the red LED in the bottom right corner of the circuit board.
If the red LED is not blinking, ensure there is not a gap between the battery clips
and the side of the battery. Remove the battery, gently squeeze the clips in, and
replace the battery.
Check the battery’s voltage. If the battery is reading a low voltage (lower than
3.4VDC), replace the battery with a 3.6V lithium AA battery.
Sensor Battery Issues
When you replace the battery, replace it with a 3.6V lithium battery. WireFree sensors
will NOT operate with a standard alkaline AA cell.
Make sure you replace the battery with the terminals facing the correct direction.
The sensor will not function if the battery is inserted backwards.
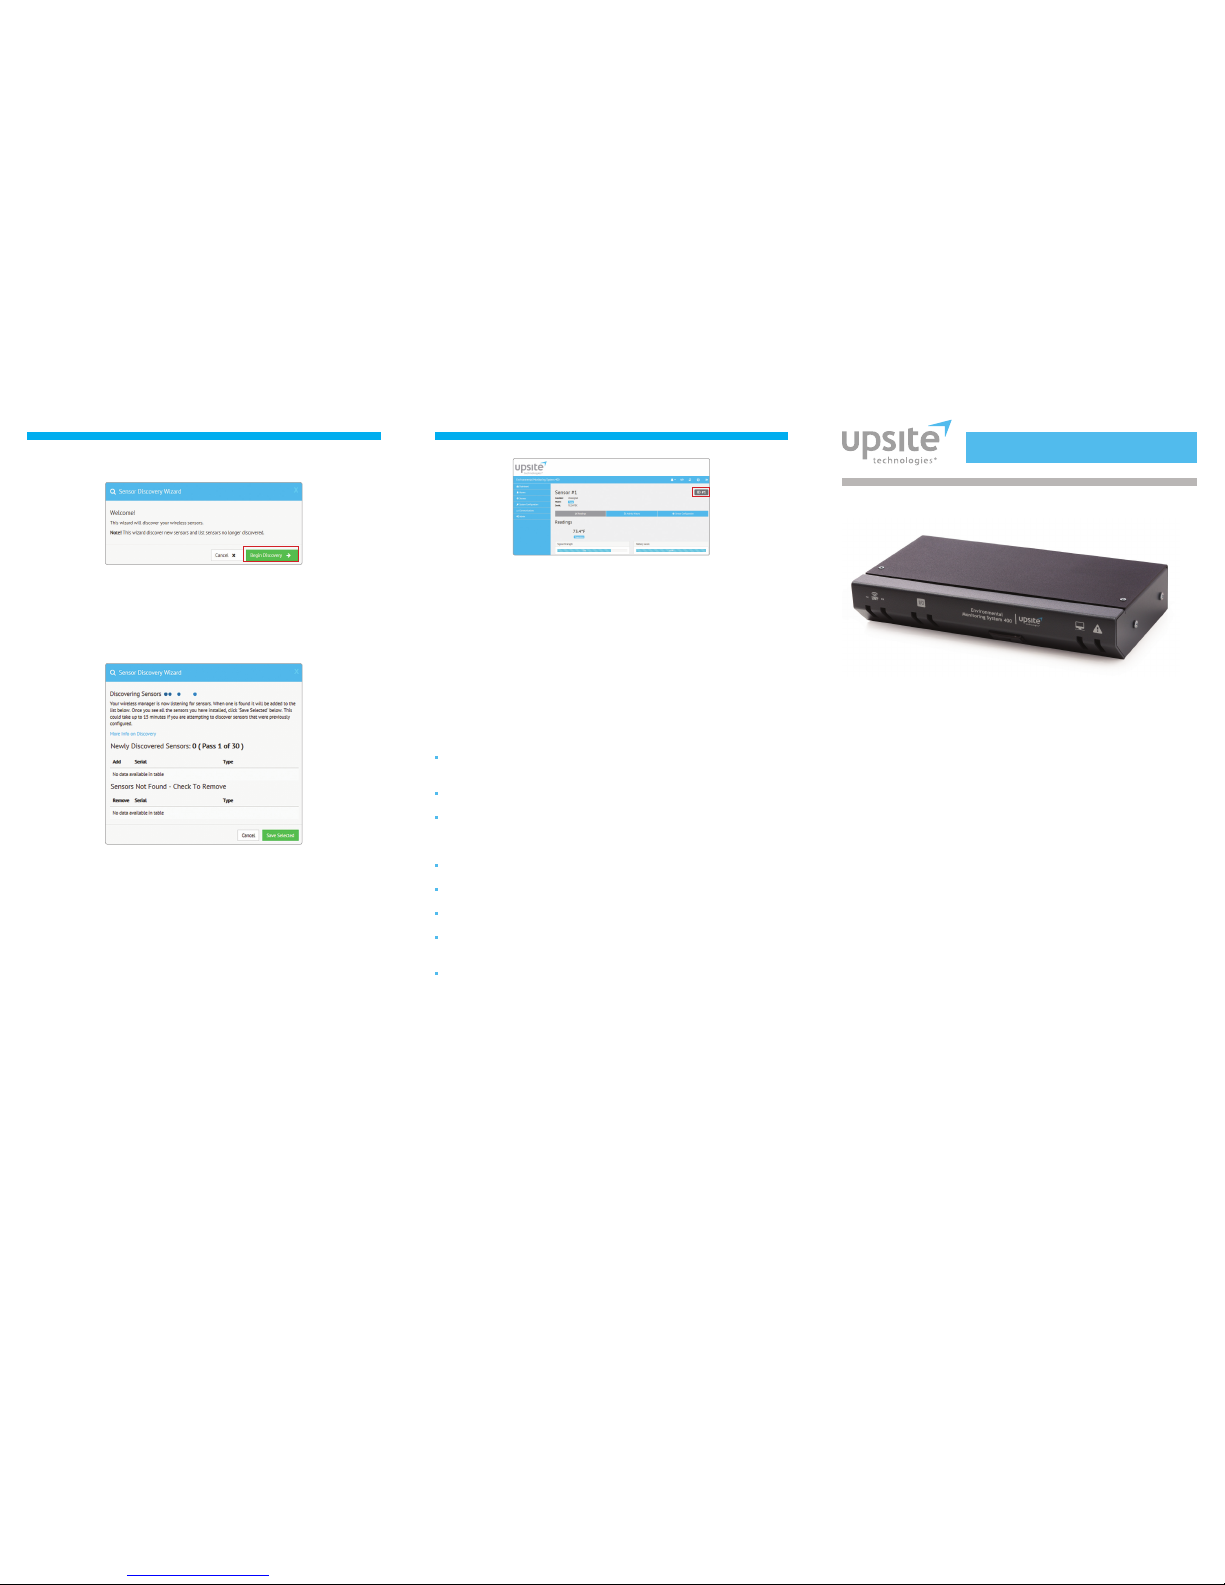
3. The sensor discovery wizard will launch. Click the Begin Discovery button.
4. The EMS 400
TM
will locate all sensors within its antenna range. They will all list in the
modal window. Note each sensor has a check box next to it. If you would like the
sensor to be associated with this EMS 400
TM
, leave the checkbox checked. Uncheck the
boxes next to the sensors that should NOT be configured within this EMS 400
TM
at this
time. Once you’ve made your selections, click the Configure Selected Sensors link.
5. From this screen you have two options:
a. Configure the discovered sensors individually. Click the skip button and sensor
discovery is complete. Proceed to the Sensors page in the main left hand
navigation and use the links there to configure your sensors.
b. Assign the same alarm parameters to all the sensors you’ve discovered. Often,
alarm and warning thresholds will be the same for groups of sensors. The
wizard provides a quick way to assign the same parameters to all the sensors
you’ve discovered. Fill in the fields as necessary and click the Apply to All and
Continue button.
6. Whether you’ve configured parameters for all your sensors at once or wish to
configure them individually, you will want to proceed to the Sensors page, accessible
through the Sensors link in the left hand navigation bar. Confirm the placement of all
the new sensors in the sensor list.
7. From this page you can also finish configuring fields for each sensor, including the
sensor’s name and location. Note that the EMS 400
TM
assigns an index number
to each sensor. This is listed as the ID# in the upper right corner of each sensor’s
individual configuration page. The EMS 400
TM
uses this number for reference,
particularly for Modbus, BACnet, and SNMP communications. If you’d like, place
a label or other marking on the sensor case to show its index number.
65
84034A ©2015
Page 2

7. Select the Configuration Menu link, then change the IP address, Subnet Mask, and
default Gateway to the one provided by your IT Department. Press the Submit
Changes button. The EMS 400
TM
will save the new IP address, Subnet Mask and
default Gateway and reboot.
8. Change the IP address of the computer back to its original IP address. If the
computer was configured as DHCP (the network domain controller assigns an IP
address) return it to this state. This may require assistance from your IT Department,
or you may need to consult the computer’s manual.
9. The computer and the EMS 400
TM
are now both configured to communicate on the
network. Both should be accessible via the network. Connect the PC and the EMS
400
TM
to the network. From the PC web browser, type in the new IP address of the
EMS 400
TM
. Enter the user name and password as stated above to verify network
access to the device.
EIA-232 Connection
The EMS 400TM can be connected directly to a PC through its EIA-232 port. Designed
for temporary use, this connection supports IP configuration, firmware downloads, and
troubleshooting. Connect via a straight through, 9-pin serial cable.
Wire the Digital Inputs and Relay Outputs
Four (4) wired digital inputs and two (2) wired relay outputs provide expanded
monitoring and notification capabilities. Your wired inputs may look like this:
2 3 4
Mount the Device
The EMS 400TM is designed to installed in a 19-inch rack or mounted on a wall.
If you’re installing it in the front of a rack, use our rack mount bracket.
If you’re installing it in the back of a rack, use our rack mount tabs.
If you’re mounting it on a wall, use Upsite’s wall mount bracket.
Remove the mounting screws from the side of the device, put the mounting bracket or
tabs in place, and reapply the screws. Use the proper anchoring method and hardware
to mount the unit securely in your desired location.
Provide a Power Supply and Ground Connections
1. Power the EMS 400TM from a UPS supply so the device can send alarm notifications
during a power outage. Power can be supplied to the EMS 400
TM
through either the
power jack and the provided wall adapter OR the power supply terminal block.
2. Connect an 18AWG ground wire from the ground terminal (marked on the upper left
side of the enclosure) to a suitable earth ground.
3. Plug the provided wall adapter into the jack at P1 and the UPS outlet. The wall
adapter has a five foot (1.524 m) power cord.
4. If you’re providing your own power supply, connect 24VDC to the unit through
the power terminal block.
Never connect both power sources simultaneously — you will damage the EMS 400
TM
.
Connect the EMS 400TM to the Network
The EMS 400TM needs network connectivity in order to access the web interface,
configuration screen, and to activate the email (SMTP), BACnet slave, Modbus slave,
and SNMP features. Use the provided CAT 6 crossover cable to the 10/100BASE-T
Ethernet port directly to a PC. Use a straight-through CAT 5 cable (purchased
separately) to connect the EMS 400
TM
to a network hub or switch.
Set the IP Address Using a Web Browser
If you have not set an IP address before, consult your IT Department for support.
Note: The default IP address for the EMS 400
TM
is 10.0.0.188
The default Subnet Mask is 255.255.255.0
The default user name is fds (all lowercase)
There is no default password — leave the password field empty.
1. Contact your IT Department to obtain an available IP address, Subnet Mask, and
default Gateway.
2. Plug a crossover network cable (provided) into the laptop or workstation that will be
used to configure the EMS 400
TM
.
3. You’ll need to change the IP address and Subnet Mask of your computer so it
can communicate with the EMS 400
TM
in its factory-configured state. Before you
change anything, write down the original IP address and Subnet Mask of your
computer — you’ll need to revert back to these original settings once the
EMS 400
TM
is configured.
4. Change the IP address and Subnet Mask of the computer from its existing address
to one that will allow it to communicate with the EMS 400
TM
, such as 10.0.0.189. It
may be beneficial to set the IP address to one that is one number different from the
EMS 400’s IP address (10.0.0.188).
5. Connect the other end of the crossover cable to the Ethernet port on the back
of the EMS 400
TM
.
6. Access the EMS 400
TM
through a Web browser — type the EMS 400’s IP address
(10.0.0.188) into the location bar. When prompted, enter the EMS 400
TM
user name,
which is fds. There is no default password, leave it blank.
Wired outputs may look like this:
Configure the digital inputs and relay outputs in the System Configuration section
of the EMS 400
TM
web interface. Refer to the EMS 400TM User Guide for more
detailed information.
Sensor Discovery Wizard
The EMS 400TM is equipped with a sensor discovery wizard. Run the wizard when you
install or need to locate new sensors. The wizard will discover available WireFree
sensors and enter them into the Sensors page in the web interface. Once the wizard
has run, it will automatically turn itself off.
To configure sensors to communicate with the EMS 400
TM
, follow these steps:
1. Install all your sensors in the desired locations. If necessary, pull the nylon tabs or
install batteries to activate the sensors.
2. In the EMS 400’s user interface, click the Admin link in the left navigation bar and
then click the Sensors link to go to the Sensors tab. Click the Sensor Discovery
Wizard button.
 Loading...