


Installation Guide
Rack Top Baffle Assembly Instructions
Covers Part Numbers:
10160 and 10161
The 2-pak carton contains
components to assemble
(2) AisleLok® Rack Top Baffles includes:
(2) Clear Plastic Panel Assemblies
(4) Magnet Tails Assemblies
(2) Adjustment Clips
SAFETY REQUIREMENTS
The AisleLok® Rack Top Baffle Assembly attaches to the tops of IT rack cabinets using strong rare earth magnets. Use extreme
caution when handling the powerful magnets. Make sure to keep fingers clear of the contact area between the magnets and
the metal mounting surface.
For proper mounting, the AisleLok® Rack Top Baffle magnets must make direct contact with a steel or other ferrous metal
surface, e.g. rack top panel, rack frame, etc. Any obstruction that prevents the magnets from making direct metal contact will
reduce the holding force of the magnets and may cause the AisleLok® Rack Top Baffle to fall. Installation will likely require the
use of a ladder or moveable stairs, caution should be exercised when climbing up and down ladders/stairs. When standing on
the ladder/stairs, be careful of overhead lighting or cabling.
Installation Instructions:
AisleLok® Rack Top Baffle Assembly
1. Determine the best attachment position for the Magnet Tails
The tail assembly can be mounted in a number of different
positions. The outer most positions often work best on many
cabinets. Before attaching the tails to the extrusion base, make
sure to inspect the top surface of the cabinet the AisleLok® Rack
Top Baffle Assembly will be mounted to. Many cabinets have cable
cutouts, or other potential interference issues that must be avoided.
2. Attach the Tail Assemblies to the Extrusion
The magnet comes preassembled to the magnet tail with a
thumbscrew. The magnet position is adjustable on the tail,
but movement of the magnet is rarely needed.
a. With the most optimum mounting location identified, remove
the thumbscrew from the tail assembly, which is NOT attached
to the magnet.
b. Position the tail assembly beneath the desired hole on the
extrusion base flange. Insert the thumb screw thru the required
hole on the extrusion base and thread into the receiving
threaded hole on the tail assembly. Tighten by hand. Repeat for
the 2nd tail assembly.
Installation Guide
3. Position the AisleLok® Rack Top Baffle Assembly on
top of the rack
a. To simplify full front to back and side to side
adjustability, the key is to keep the magnets elevated,
free from making any contact, until proper positioning
has been established.
b. Starting at the end of the aisle, rest the front contact
edge of the AisleLok® Rack Top Baffle Assembly
extrusion base as close to the front of the cabinet frame
(not the door) as allowable.
c. Maintain the AisleLok® Rack Top Baffle Assembly with
the magnet tails in the air, at approx a 15 – 30° angle to
the top of the rack, and then center the AisleLok
®
Rack
Top Baffle Assembly left to right.
d. When proper positioning has been established allow
the magnet tails to rotate downwards until the magnets
make contact with the sheetmetal with an audible ‘click’.
Note: To reposition the baffle, grab the middle top of the
clear panel and push up or in, in a continuous manner, such
that the action lifts the front edge of the extrusion base off
the cabinet and peels off the magnets from contact.
Important: Do not attempt remove Rack Top Baffle
Assembly by pulling down or forward.
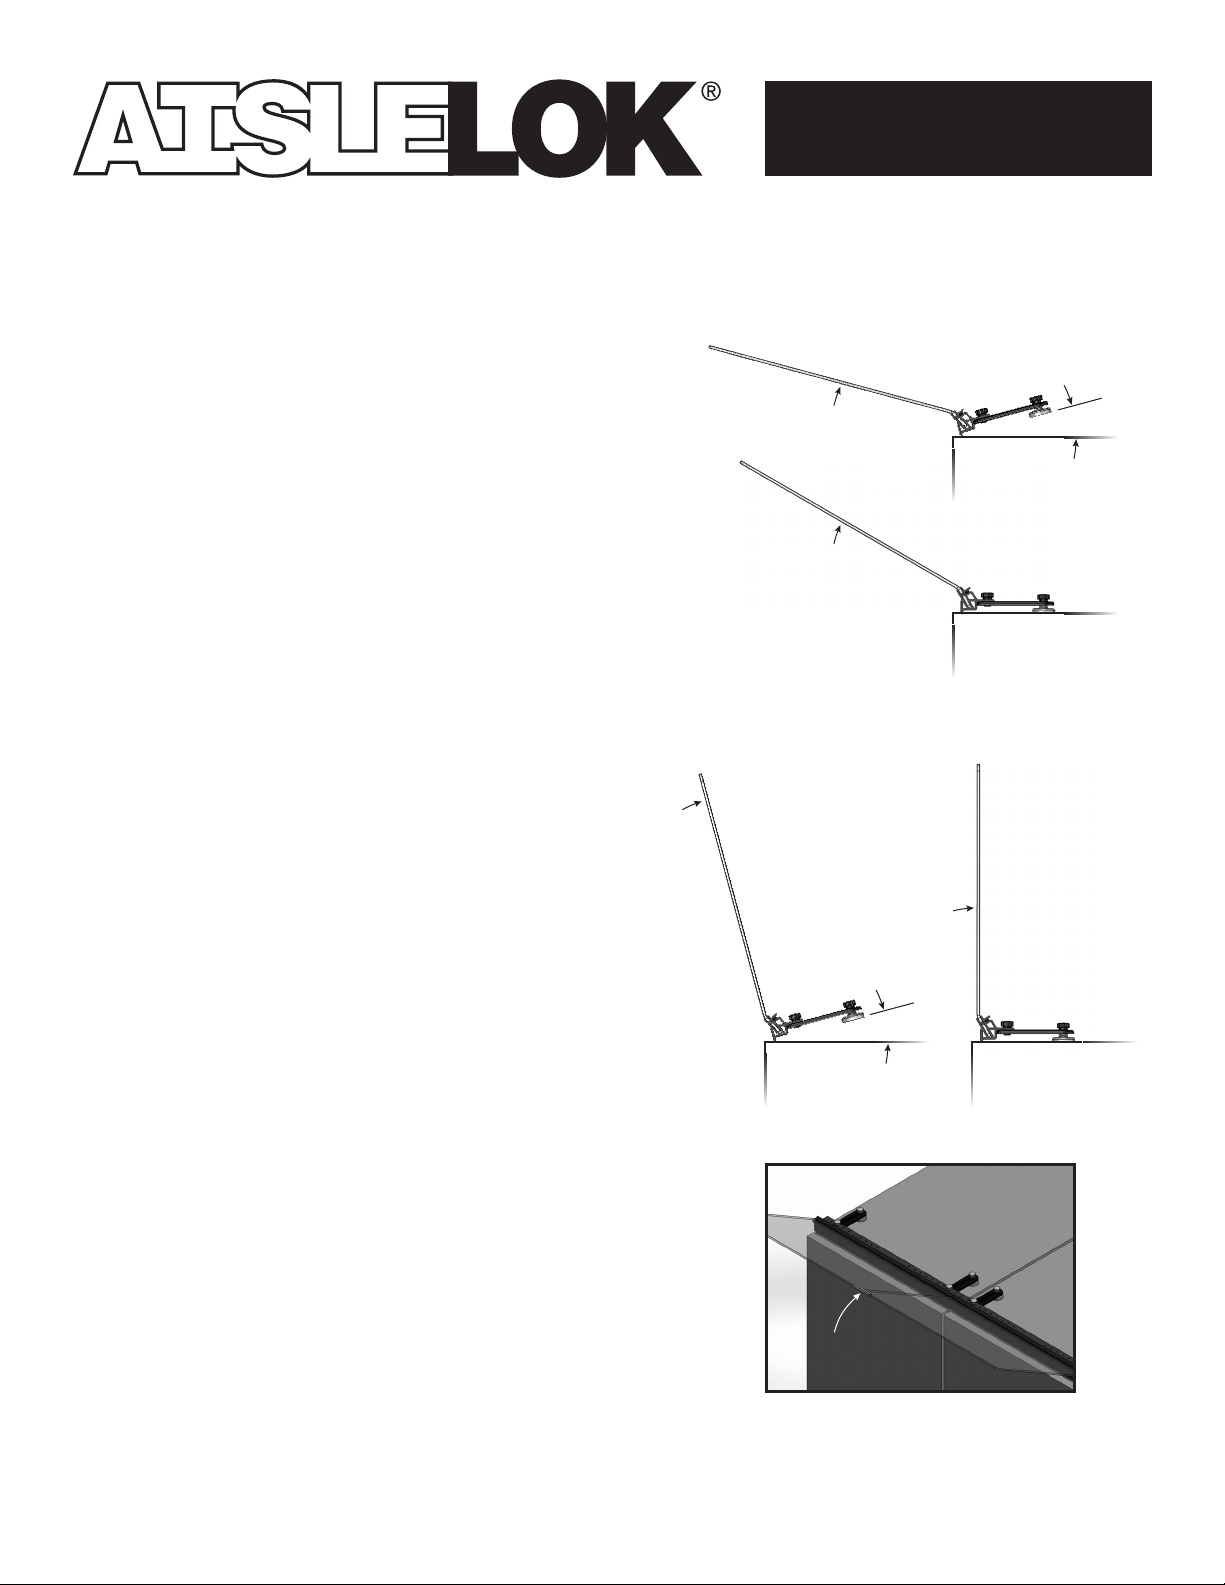
30° Angular Configuration
ENGAGE
Position then rotate up,
until magnets click.
15 – 30˚
DISENGAGE
To disengage
magnets, push up
90° Vertical Configuration
ENGAGE
Position then rotate up,
until magnets click.
4. Continue placing the AisleLok® Rack Top Baffle
Assembly on top of each rack in the aisle
a. Continue to populate the aisle by placing the AisleLok®
Rack Top Baffle Assembly on top of each rack in the
row. It is best to manage both sides of the aisle, as you
move down the rows.
b. Keep the gap between the plastic panels at a minimum
and align the Rack Top Baffle Assemblies evenly across
the top of the racks.
c. An optional alignment clip is provided to address any
baffle misalignment.
Use of the clips will help straighten out the alignment of the
baffles. Simply slide the clip to the top edge, across the
gap, of two adjacent panels.
Instructions for Cleaning
a. To clean clear plastic panels, mix warm water with a
small amount of liquid household detergent.
b. Using a micro fiber towel, lightly apply mixture to the
clear plastic. It is not recommended to use abrasive
cleaning items (i.e. scratch pads), as these items have
the potential to damage the product.
c. Wipe dry with a clean microfiber towel.
DISENGAGE
To disengage
magnets, push up
15 – 30˚
Alignment
Clip

Installation Guide
Limited Warranty
Upsite Technologies, Inc. (the Company) warrants to the original purchaser that products delivered hereunder will be free of defects
in materials and workmanship for a period of twelve (12) months from the date of purchase (the “Warranty Period”).
The Company shall, at its option, within the Warranty Period, either repair or replace free of charge, any product or part thereof
found, upon the Company’s inspection, to be defective in materials and workmanship, and will return the repaired or replaced
product to the purchaser at Company’s expense.
For warranty service and shipping instructions, contact the Company at the telephone number shown below. If the product is
under warranty and the defect appears to be covered by this Limited Warranty, the Company will issue to the purchaser a Notice of
Authorization For Warranty Return. Products returned to the Company for warranty service must be accompanied by a statement of
defect, the Notice of Authorization for Warranty Return provided by the Company, and proof of purchase.
This Limited Warranty is conditioned on the following:
1. The Company must be notified within 12 months of purchase and have been given the opportunity of inspection by return of any
alleged defective product free and clear of all liens and encumbrances to the Company or its manufacturer; and
2. The product must not have been abused, misused, or improperly maintained, and/or non-Upsite authorized repair performed
during such period; and
3. Such defect has not been caused by corrosion or exposure to other than ordinary wear and tear; and
4. The installation and use of the product has been in accordance with the manufacturer’s instructions and not been modified or
customized to include but not limited to cut, resized, burned, glued, bent, re-shaped, disassembled, attachments added to,
improperly installed or used in a manner other than intended.
The company makes no other express or implied warranty or representation of any kind whatsoever including any warranty of
merchantability or fitness for a particular purpose and all such other warranties are hereby included.
The Company’s maximum liability hereunder is limited to the purchase price of the product. In no event shall the Company be liable
for any consequential, indirect, incidental, or special damages of any nature arising from the sale or use of the product, whether
based in contract, tort, strict liability, or otherwise.
Note: Some jurisdictions do not allow limitations on incidental or consequential damages or how long an implied warranty lasts, so
that the above limitations may not fully apply. This warranty gives specific legal rights and you may also have other rights which may
vary from jurisdiction to jurisdiction.
For complete warranty and repair information Call (888) 982-7800 or visit upsite.com
U.S. and International Patents Pending
Designer and Manufacturer
888.982.7800
www.upsite.com
84018A ©2014
 Loading...