

Page 1
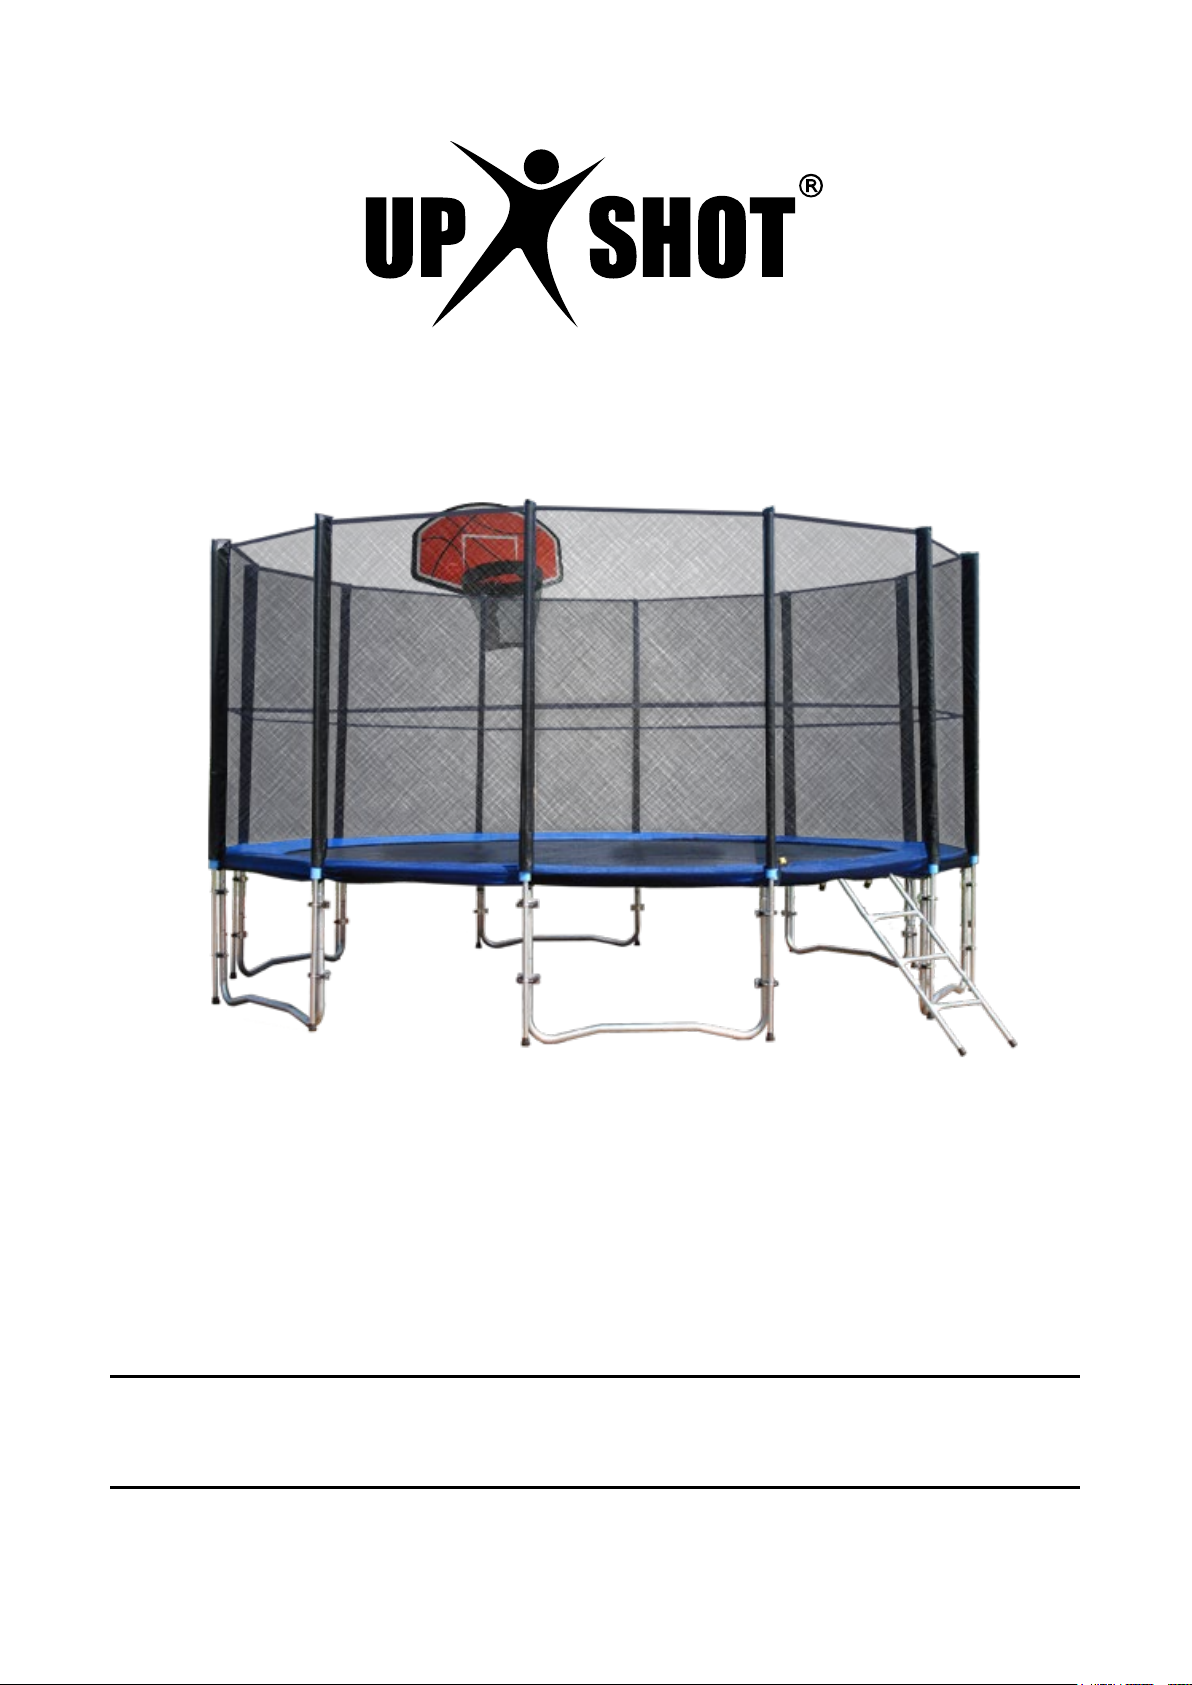
Internal Spring Trampoline
User Manual
[Revision 3.0 January 2018]
READ THIS MANUAL CAREFULLY BEFORE USE – FAILURE TO DO SO MAY RESULT IN INJURY,
PROPERTY DAMAGE AND MAY VOID WARRANTY. • KEEP THIS MANUAL FOR FUTURE REFERENCE.
• Products covered by this manual may vary in appearance, assembly, inclusions, specifications, description
and packaging.
E&OE ©2018 Upshot
Page 2
Internal Spring Trampoline
Safety
Safe use of a trampoline requires adequate knowledge of technique, as well as actions to
avoid. • Trampolines may propel users to unaccustomed heights and into a variety of body
movements – it is the responsibility of the owner of the equipment to ensure that all users are familiar with
rules for safe use. • Misuse and abuse of trampolines can be highly dangerous and may cause serious
injuries. • The owner/user of the equipment accepts all risk that may be involved in using the equipment.
• Maximum weight capacity = 150kg. Persons at or near 150kg weight should "test" spring action by
jumping lightly on the mat. If spring action is low, the person will not be propelled – stop use immediately.
Remove and inspect the springs. If the springs are stretched, the trampoline should not be used until the
springs have been replaced. Check the mat for stretching or tears and replace as necessary.
• This product is for domestic use only. Commercial or public use will void any warranty.
• Do NOT attempt to use the equipment until it has been fully assembled according to instructions. Failure
to fully and properly assemble the equipment may render its use dangerous and will void any warranty.
• Do NOT attempt or allow somersaults or other manoeuvres that may cause users to not land on their
feet. Landing on the head or neck can cause serious injury, paralysis or death.
• Do NOT allow more than one person to use the trampoline at the same time. Use by more than one
person may result in serious injury.
• Not suitable for children under 6 years of age.
• Children should always be under responsible adult supervision when using the equipment.
• When the equipment is not in use, remove the ladder to help prevent unsupervised use.
• When positioning the equipment, observe the following:
− Overhead clearance – A minimum of 8m from ground level is recommended. Provide clearance for
electrical wires, tree branches, gutters and other possible hazards.
− Avoid walls, structures, fences etc. Maintain clearance on all sides of the equipment.
− Install on a flat and level surface before use.
− Where possible, secure the equipment against unauthorised and unsupervised use.
− Remove any obstructions from beneath the equipment.
− The recommended surface is grass. If installing the equipment on hard surfaces such as concrete, a
high-density foam (similar to that used in public playgrounds) should be installed under each leg.
− It is recommended to securely anchor the equipment to prevent movement during use or from winds.
• Inspect the equipment before each use. Ensure the safety net and padding is correctly and securely
positioned. Replace any worn, defective, or missing parts.
• Do not jump on or off the equipment when mounting/dismounting. Do not use the equipment as a
springboard to other objects.
• Learn fundamental bounce control and body positions thoroughly before attempting more advanced
skills, higher bouncing etc.
• Do not use the equipment in wet conditions, gusty or strong winds.
• Always jump in the centre of the mat. Do NOT jump against the safety net or on the safety padding. The
safety net and safety padding are designed to reduce the severity of falls only, and are NOT intended as
play features.
• Do not use equipment when tired or under the influence of drugs, alcohol or medication.
• This equipment is not intended for use by persons with reduced physical, sensory or mental capabilities.
• If the equipment is to be moved after assembly, fully lift it off the ground and carry it to the new location.
Do NOT drag the equipment as this may weaken or damage the frame and will void any warranty.
E&OE ©2018 Upshot 2
Page 3

Internal Spring Trampoline
Table of Contents
Safety ................................................................................................................................................... 2
Parts Identification ............................................................................................................................. 4
Assembly ............................................................................................................................................ 5
Anchoring the Trampoline ................................................................................................................ 8
E&OE ©2018 Upshot 3
Page 4
Internal Spring Trampoline
Trampoline Size / Quantity
16'
108
12
6
12
12
12
spacer, rubber, 2 nuts)
24
36
12
1
1
1
1
1
1
1
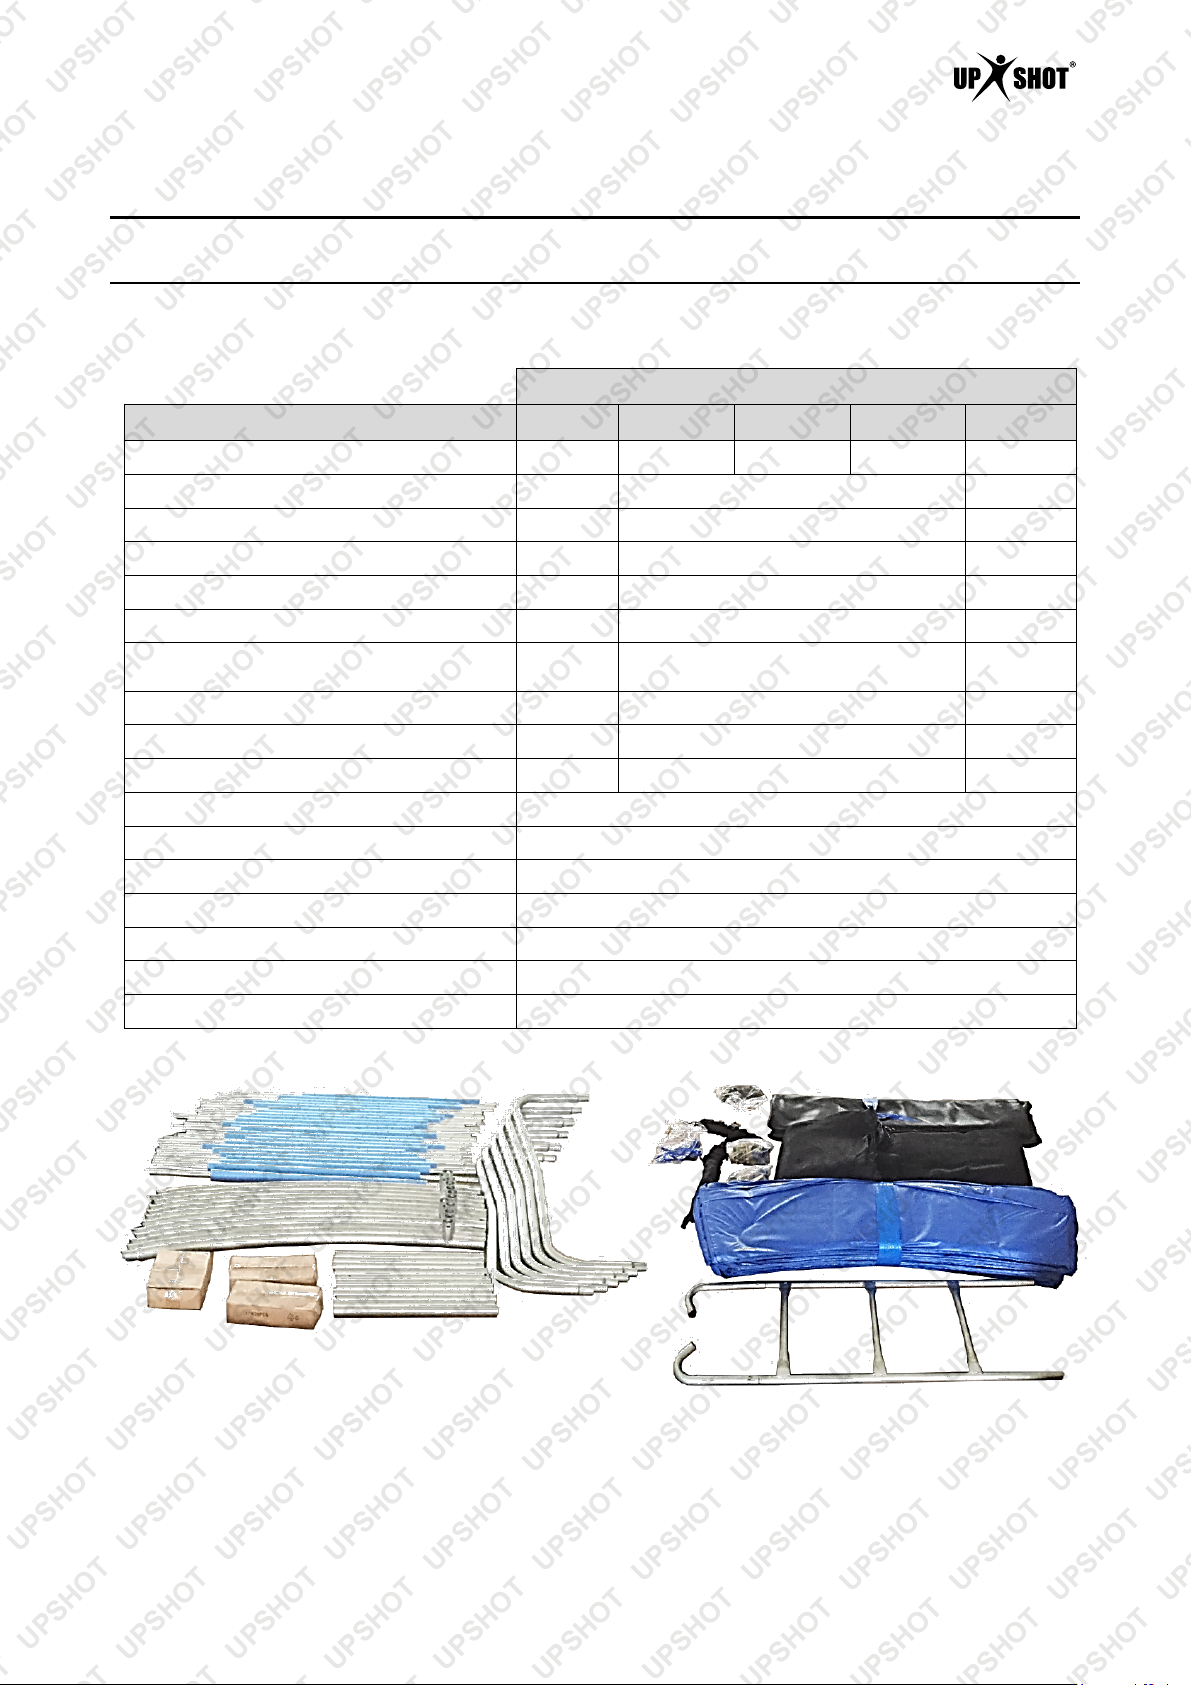
Parts Identification
NOTE: Depending on the size of the trampoline, the parts may come in one or more cartons – 8' and 10'
models – 1 carton; 12' models – 2 cartons; 14' and 16' models – 3 cartons.
Prior to assembly, ensure that all required parts are supplied and are undamaged. If any parts are missing or
damage is found, contact the retailer for assistance.
Part
Spring 48 64 72 88
Circular Frame Segment 6 8
Leg 3 4
Leg Extension Tube 6 8
Lower Safety Net Support Pole 6 8
Upper Safety Net Support Pole 6 8
Pole Clamp (includes U-bolt, bracket, tube
Safety Net Support Pole Padding 12 16
Phillips Head Screw 18 24
Pole Cap 6 8
Jumping Mat
Spring Padding
Safety Net
Ladder
* Basketball Hoop, Ball and Pump
* Shoe Net
Spring Tool
8' 10' 12' 14'
12 16
24
* Applicable to some models only.
Typical unpacked and unassembled trampoline
E&OE ©2018 Upshot 4
Page 5
Internal Spring Trampoline
Frame End
Mat End
Assembly
Do NOT attempt to use the equipment until it has been fully assembled according to
instructions. Failure to fully and properly assemble the equipment may render its use
dangerous and will void any warranty. • Secure the trampoline to a flat solid surface with pegs or
sandbags. During assembly, consider the position of the basketball hoop and the entry way. • Some tools
(not supplied) may be required for assembly, such as suitable screwdrivers and spanners.
Assembling the Frame and Mat
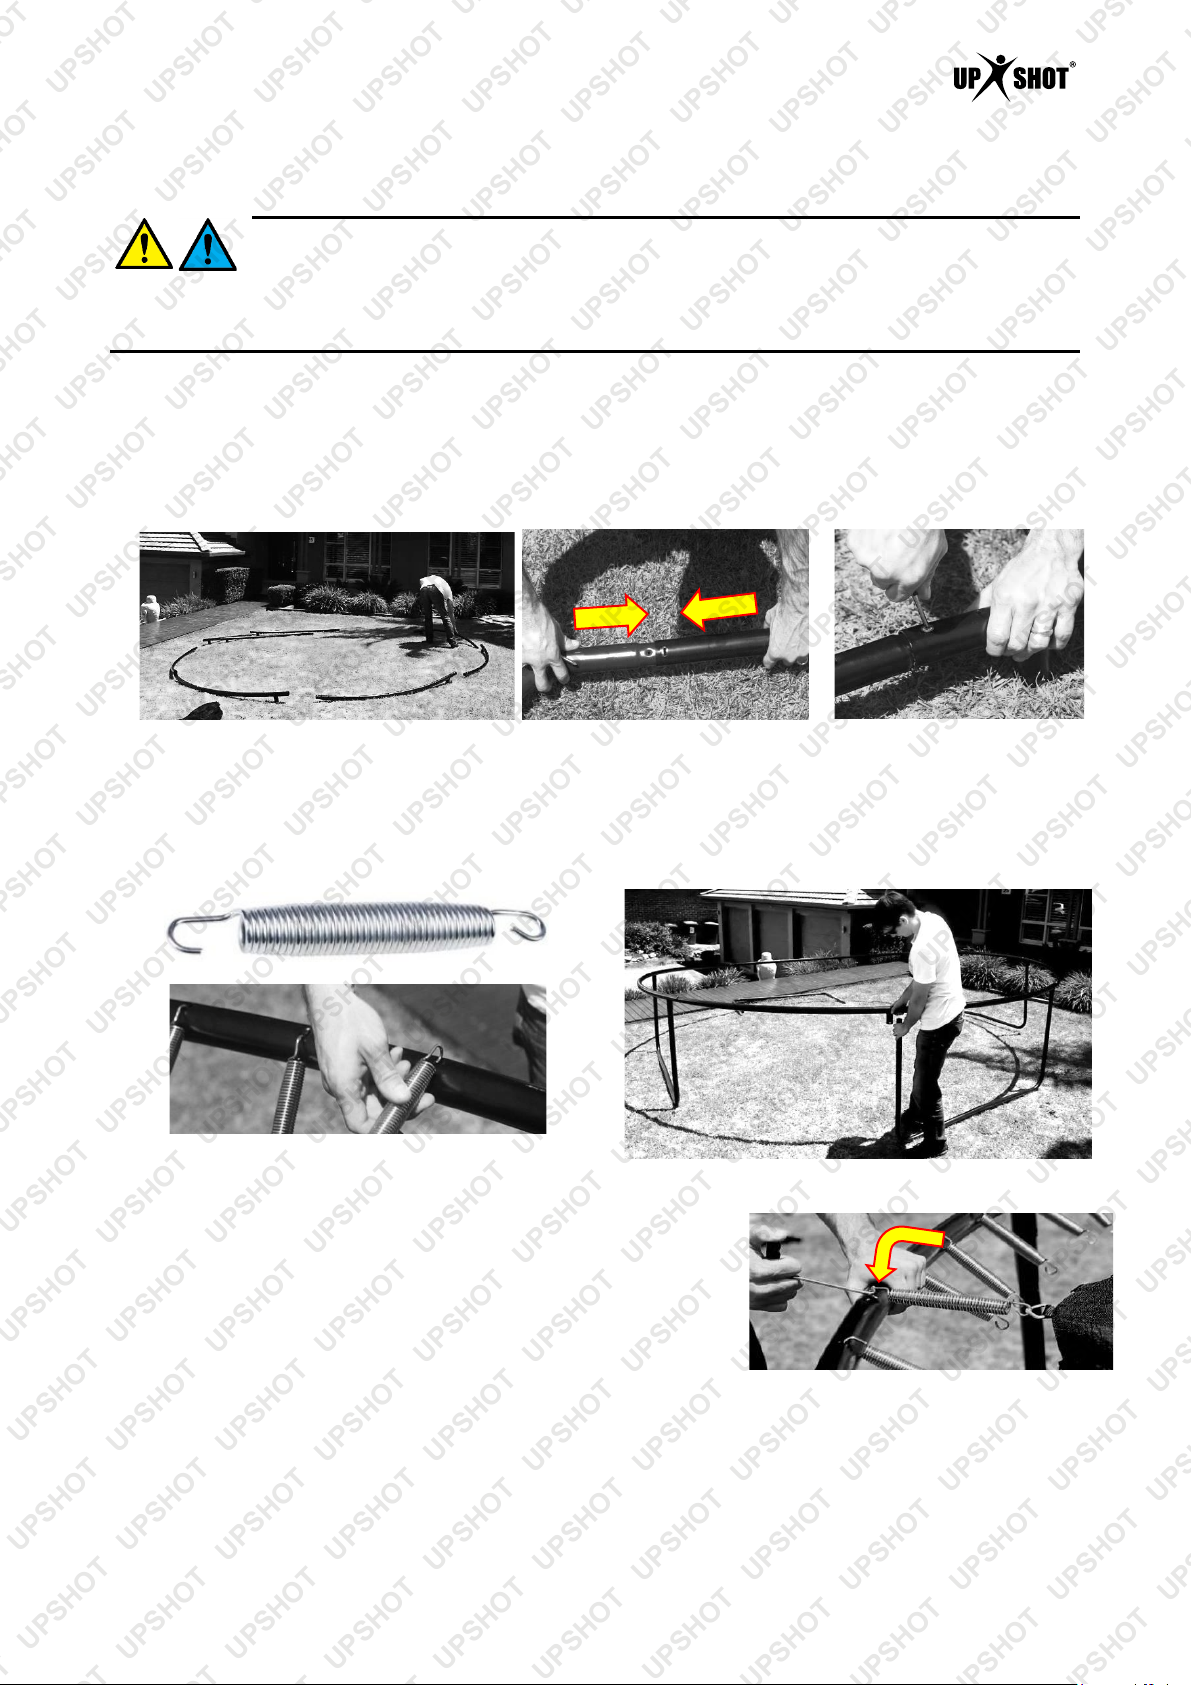
1. Start by laying out the circular frame segments in position (leg attachment tubes facing the ground).
2. Join the circular frame segments by pushing each tube into the next and securing using Phillips head
screws (1 screw at each joint). The last connection is made easier if you push both pieces towards the
centre of the circle while joining the segments.
3. Assemble the legs to the leg extension tubes using Phillips head screws (1 screw at each joint). Insert
the screws from the "inside" of the frame.
4. Lift the assembled frame and insert the leg assemblies to the leg attachment tubes of the frame using
Phillips head screws (1 screw at each joint). Insert the screws from the "inside" of the frame.
5. Hook all springs to the frame spring holes. The U shaped end goes into the frame. The "curly" end
(shown on the spring image right-hand side) hooks to the trampoline mat.
6. Spread the mat out to full size centrally under the
assembled frame.
7. Remove one spring from the frame, then lift the edge of the mat
and hook the "curly" end of the spring to a mat spring loop.
8. Use the hook end of the spring tool to pull the free end of the
spring toward the frame and to hook it into the frame spring hole.
9. Continue hooking the mat to springs and frame in the following
order (use the spring tool as pictured).
− First 2 springs at 12 and 6 o’clock positions. Be sure to count
the frame spring holes and mat spring loops accurately so the correct mat spring loop connects to
the correct frame spring hole.
− Next 2 springs at 3 and 9 o’clock positions.
− Then, continue with all remaining springs in any order.
E&OE ©2018 Upshot 5
Page 6
Internal Spring Trampoline
G
H
A
B
C
D
E
F
Fitting the Spring Padding and Safety Net
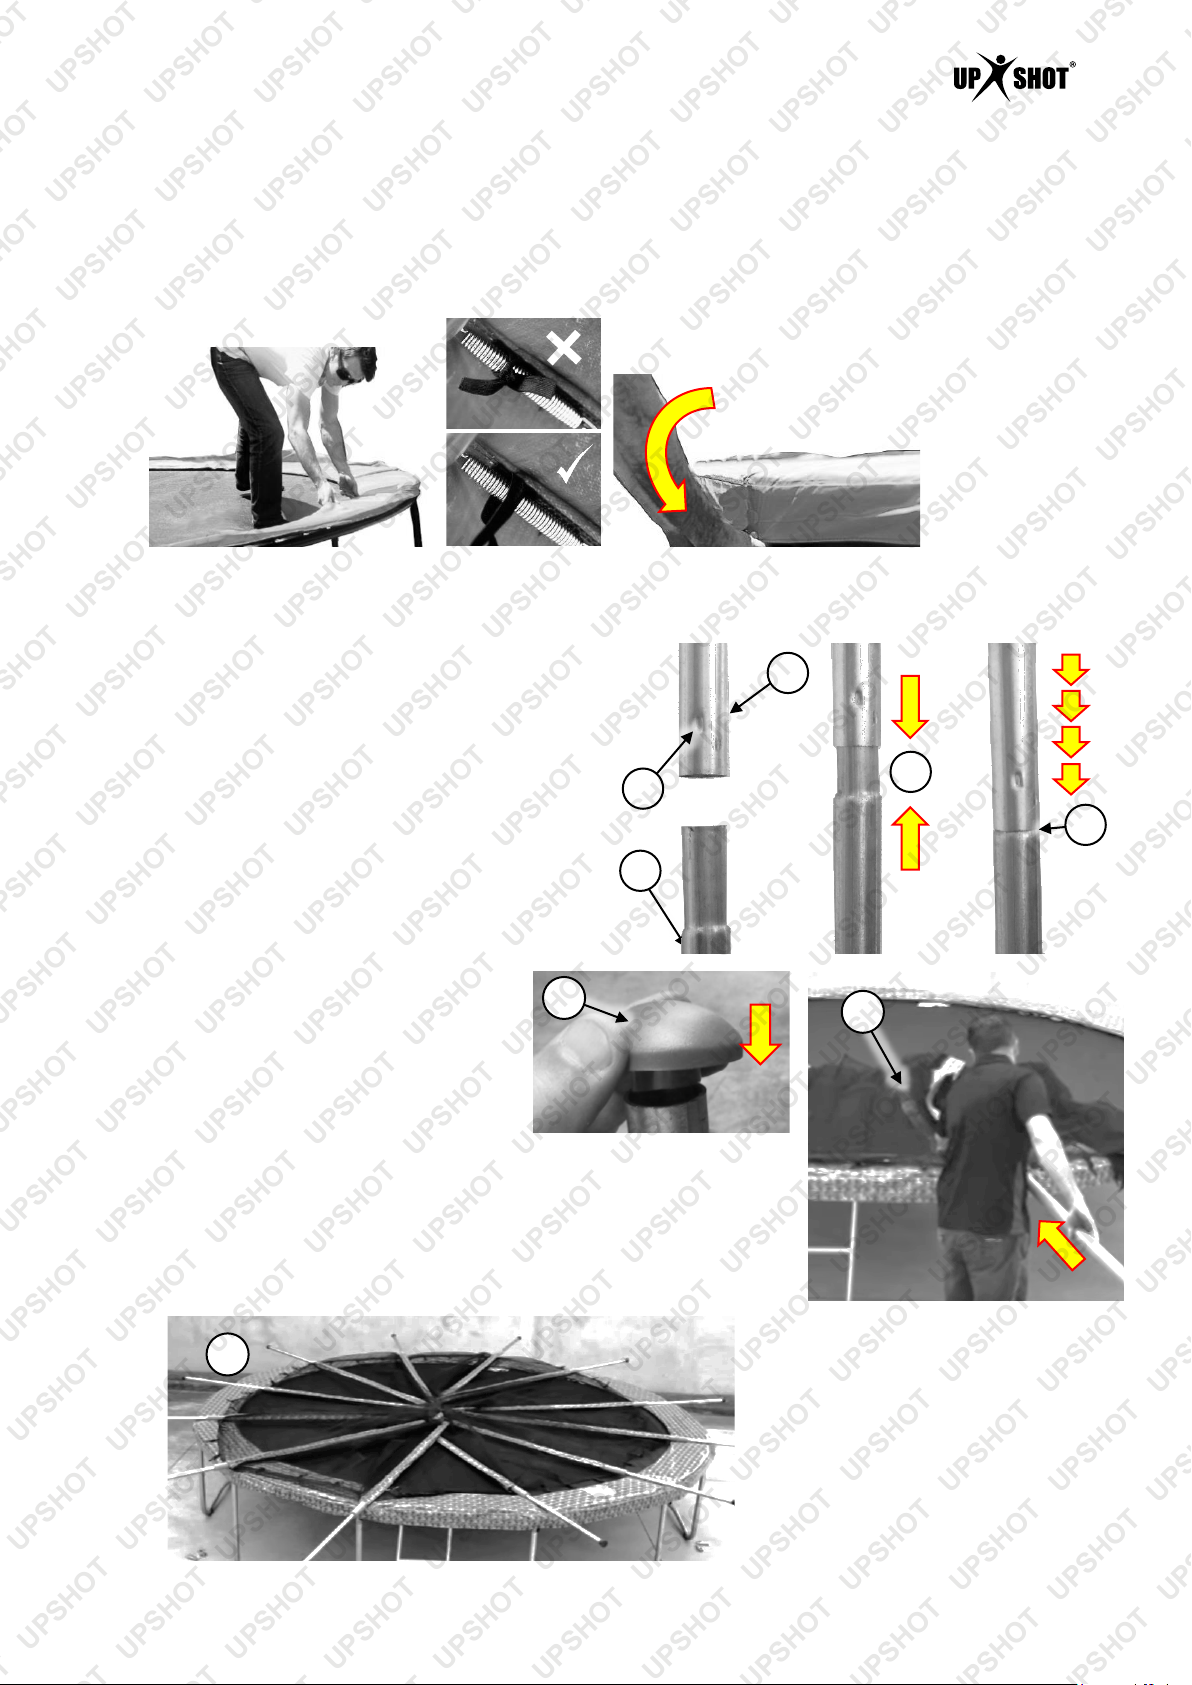
10. Unroll the spring padding and place it over the springs, then fold the outer flap of the spring padding over
the frame tubes.
11. Loosely tie the elastic straps under the spring padding to the springs, then fold the outer flap of the
spring padding over the frame tubes. If the elastic is tied too tightly, it will get caught in the spring and
likely be damaged or cut when the trampoline is in use.
12. Lay the net on the trampoline mat, with the base of the net [with the straps] towards the edge of the mat
and the entry way where you want it.
13. Join the safety net poles together – the pole with
the black plug in the end and the smaller diameter
section on the other is the lower pole (A). The
upper pole (B) has a small indent in the tube (C)
that is used to lock the poles together.
14. Bring the poles together and connect them by
hand (D). It will be necessary to hold the poles
vertically and strike the bottom of the pole against
a hard surface to force the upper pole down on to
the lower pole. Continue until the poles are fully
joined (E).
15. Slide 2 pieces of safety padding over the pole and
insert a pole cap (F) at the top of the
upper pole. Some models may come
with the pole caps and padding preassembled, so this step may be
unnecessary.
16. Slide a safety net pole, pole cap first, into
a sleeve in the safety net (G). The pole
cap will be up against the closed end of
the sleeve at the top of the net when fully inserted. Ensure that the
safety padding is fully inserted into the sleeve. Allow the pole to rest on
the trampoline mat.
17. Insert an assembled safety net pole into the next safety net sleeve, and
repeat for all remaining safety net poles. When finished, the trampoline
should look similar to H.
E&OE ©2018 Upshot 6
Page 7
Internal Spring Trampoline
I
K L M N O
J
S
R
Q
T
Trampoline
Outside
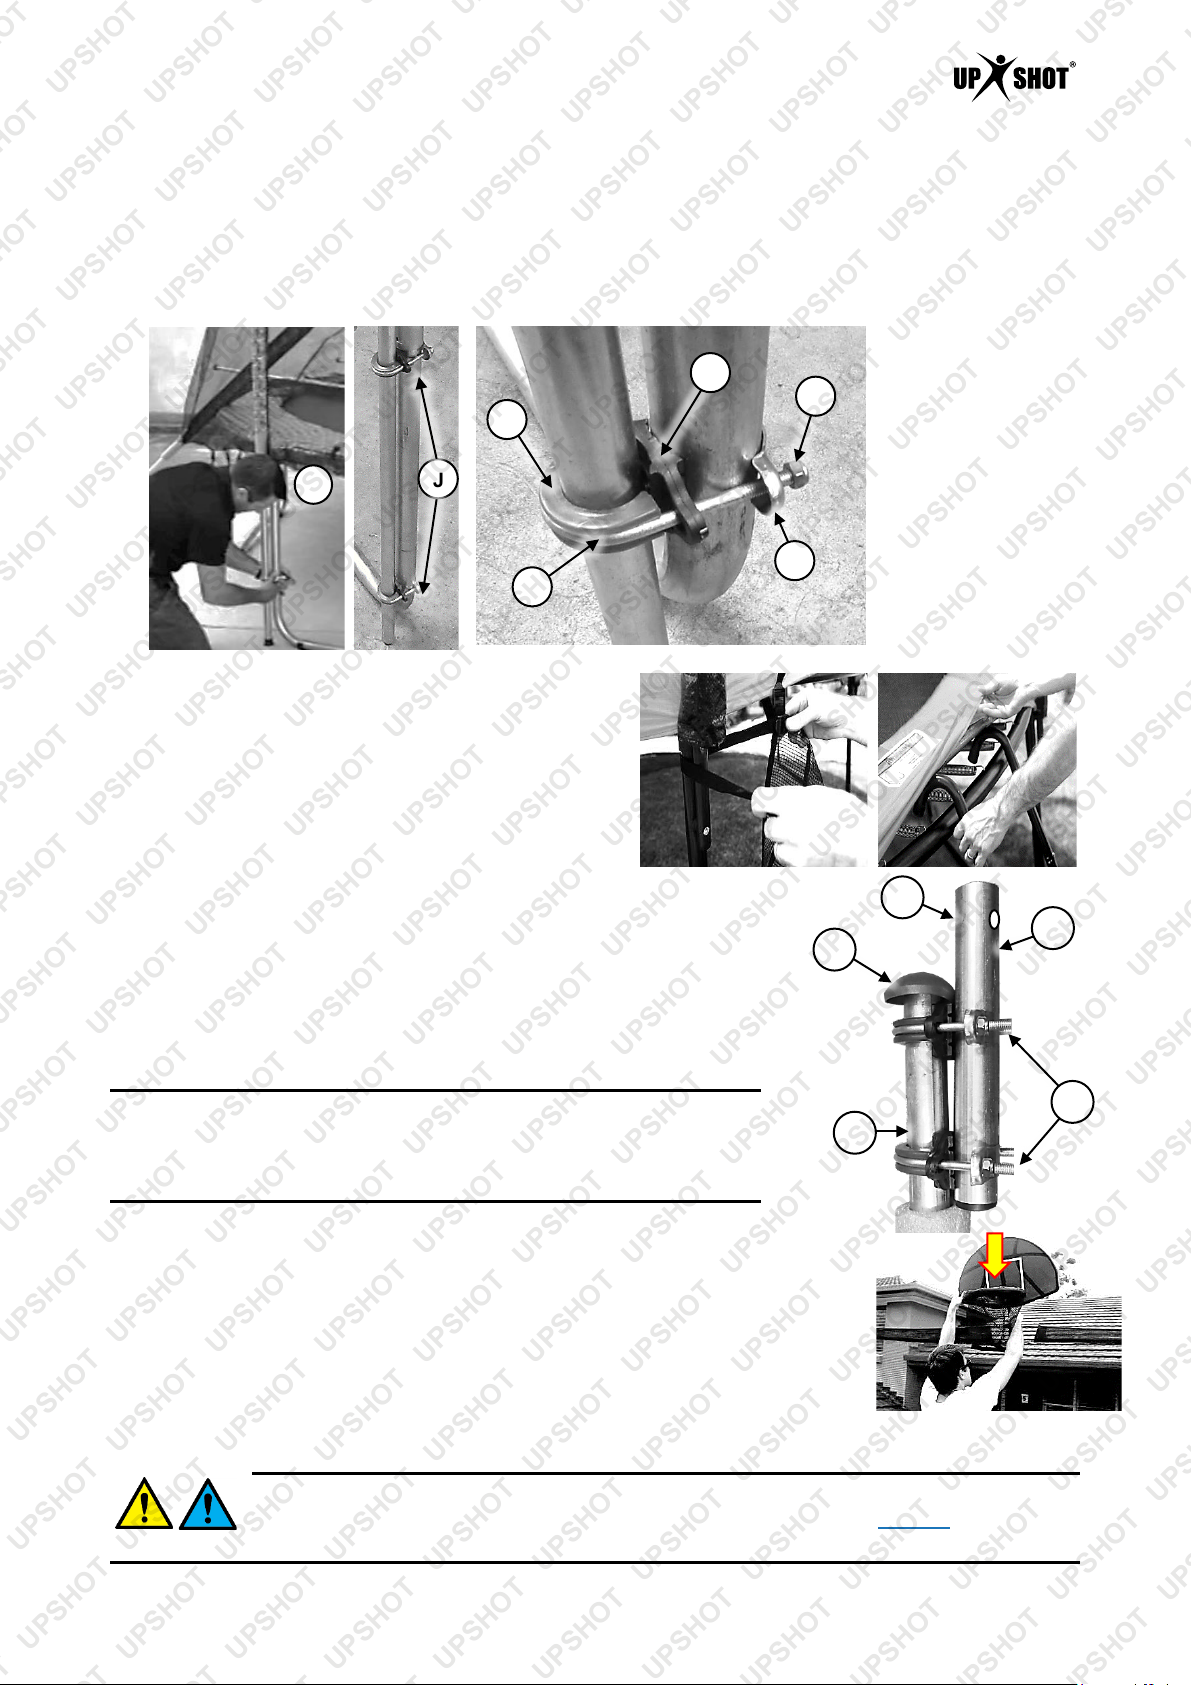
18. Carefully raise a safety net pole so it is vertical, and bring it up against the trampoline leg (I). The bottom
of the pole should be resting on the ground.
19. Attach the safety net pole to the trampoline leg using 2 pole clamps. Each clamp should be placed at the
bottom and the top of the leg, respectively (J). Attach each clamp by sliding a rubber (K) into the curved
section of the U-bolt (L), then place a tube spacer (M) between the safety net pole and trampoline leg.
Push the U-bolt legs through the holes in the tube spacer so the rubber is up against the safety net pole,
then place a bracket (N) over the U-bolt legs and secure using 2 nuts (O). Firmly tighten the nuts.
20. Repeat step 18/19 for all remaining safety net poles.
21. At the base of the safety net, wrap each elastic net
strap around the frame tube and secure it using the
strap clip.
22. Attach the shoe holder netting (some models only)
and ladder to the frame near the safety net entry
way. Ensure that ladder is securely assembled, then
hook it over the frame tube.
Fitting the Basketball Hoop
If applicable, assemble the basketball hoop according to its instructions.
Place the hoop attachment tube (P) against the outer side of the desired
safety net pole (Q) (opposite the safety net entry way is recommended).
Ensure that the small hole (R) in the side of the hoop attachment tube is
opposite the safety net pole and slightly above the pole cap (S). Secure
the attachment tube to the safety net pole using 2 clamps (T) – follow the
Inside
procedure described in step 19 to clamp the tubes.
Note: The safety net is not shown in the basketball hoop attachment
image. • You will have to push the clamp U-bolt legs through the safety
net – do this carefully and be sure not to tear the net. • Ensure that the
clamp bracket/nuts are on the outside of the trampoline.
Press in the spring-loaded alignment pin in the basketball hoop tube,
then slide the tube into the hoop attachment tube. Ensure that the spring-loaded pin
"pops" into the hole in the hoop attachment tube. To remove the basketball hoop
assembly, push the spring-loaded pin in, then pull the assembly up and out of the
hoop attachment tube. Note that the inflation needle for the ball may be stored in
the pump handle.
P
Using the Basketball Hoop
The basketball hoop should NOT be pulled down or 'slam-dunked'. Pulling down on the hoop will place
additional stress on the net support post. This can result in the post snapping and/or serious injury.
To help reduce movement of the trampoline during use or due to winds etc, it is strongly
recommended to fix the trampoline legs to the ground using a suitable anchors or pegs from
a hardware supplier. If the trampoline is set up on a hard surface, sandbags over the legs may suffice.
E&OE ©2018 Upshot 7
Page 8
Internal Spring Trampoline
Anchoring the Trampoline
Using anchors may not fully secure the trampoline during use or in strong winds, but may
reduce the possibility of movement. • Before installing anchor stakes, be sure that there are
no underground utilities such as electrical, gas, water etc where the stakes are to be installed. • Anchors may
vary in appearance from those shown in this manual. • If the equipment is to be moved after assembly,
lift it fully off the ground and carry it to the new location. Do NOT drag the equipment as this may
weaken or damage the frame and will void any warranty.
Your trampoline may be supplied with anchors. This is to help prevent movement of the trampoline when in
use or by wind etc.
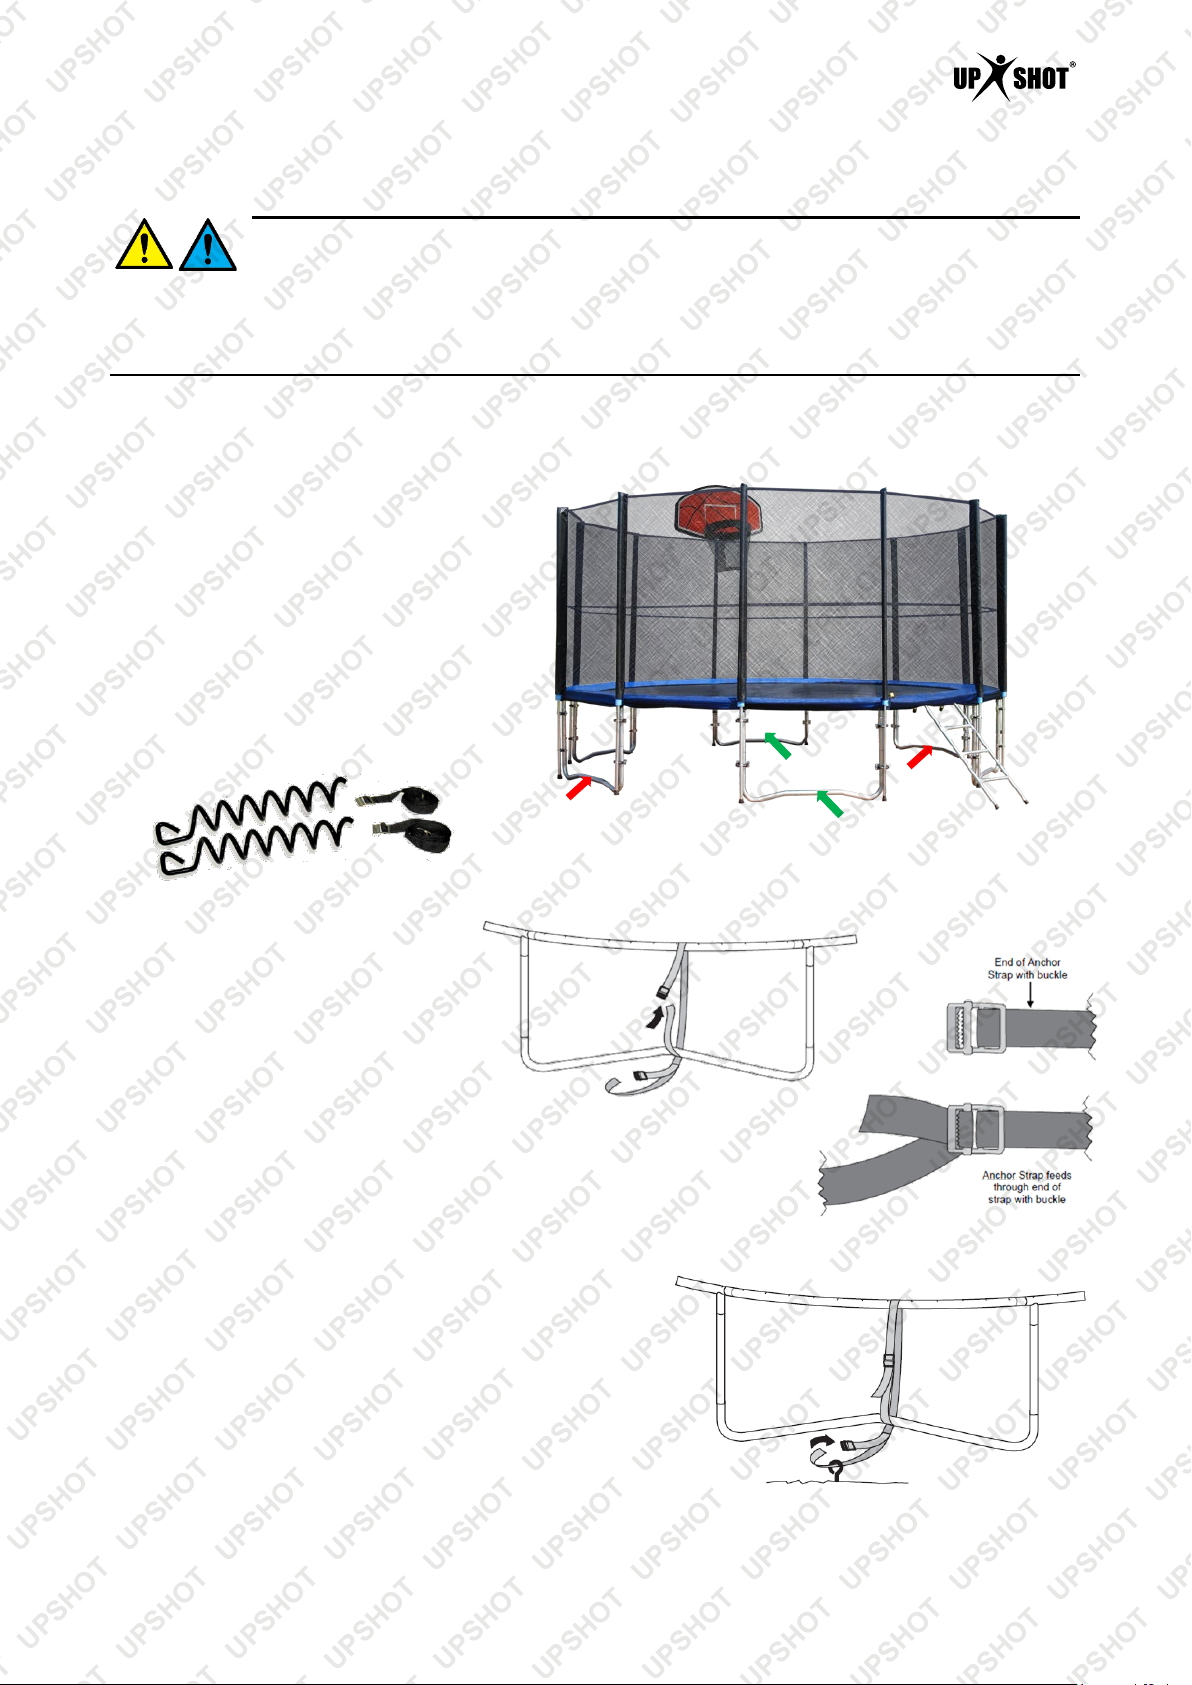
Installation
Install an anchor to each trampoline leg,
wherever possible. If there are not
enough anchors for all legs, ensure that
each pair of anchors are installed on
opposite sides of the trampoline (for
example, red or green in the adjacent
image). If the trampoline has 6 legs,
install an anchor to 2 adjacent legs, skip
a leg, then anchor the next 2 adjacent
legs. Anchor stakes should be installed
under the trampoline so they are not a
trip hazard.
1. Wrap a section of each anchor
strap around the trampoline frame
and the centre of the leg. Feed the
end of the strap into the buckle so
it wraps around the buckle pin then
under the buckle teeth. Pull the
end of the strap so the strap is
taught.
2. Insert each anchor stake as close
to the inside of the trampoline leg
as possible. Insert a screwdriver or
suitable tool into the eye of the
stake and rotate it right to "screw"
it into the earth until there is
roughly 50mm (2") from the ground
to the top of the stake. Ensure that the opening in the
eye of the stake is facing toward the centre of the
trampoline.
3. Feed the end of the remaining section of each anchor
strap through the eye of the anchor stake and into the
buckle so it wraps around the buckle pin then under the
buckle teeth. Pull the end of the strap so the strap is
taught.
4. Repeat the above procedure for each anchor.
E&OE ©2018 Upshot 8
Page 9
Internal Spring Trampoline
Some experts believe the incorrect or prolonged use of almost any product could cause serious
injury or death. For information that may reduce your risk of serious injury or death, consult the
points below and additionally, the information available at www.datastreamserver.com/safety
• Consult all documentation, packaging and product
labelling before use. Note that some products feature
online documentation which should be printed and
kept with the product.
• Check product for loose / broken / damaged / missing
parts, wear or leaks (if applicable) before each use.
Never use a product with loose / broken / damaged /
missing parts, wear or leaks (if applicable).
• Products must be inspected and serviced (if
applicable) by a qualified specialist every 6 months
assuming average residential use by a person of
average weight and strength, above average
technical aptitude, on a property matching average
metropolitan specification. Intended use outside these
guidelines could indicate the product is not suitable
for intended use or may require more regular
inspection or servicing.
• Ensure all possible users of the product have
completed an industry recognized training course
before being given access to the product.
• The p roduct has been supplied by a general merchandise retailer
that may not be familiar with your specific application or your
description of the application. Be sure to attain third-party approval
for your application from a qualified specialist before use regardless
of prior assurances by the retailer or its representatives.
• This product is not intended for use where fail-safe operation is
required. As with any product (take an automobile, aircraft, computer
or ball point pen for example), there is always a small chance of
technical issues that needs to be repaired or may require
replacement of the product or a part. If the possibility of such failure
and the associated time it takes to rectify could in any situation
inconvenience the user, business or employee then the product is
not suitable for your requirements. This product is not for use where
incorrect operation or a failure of any kind, including but not limited
to a condition requiring product return, replacement, service by a
technician or replacement of parts could cause a financial loss, loss
of employee time or an inconvenience requiring compensation.
• If this item has been purchased in error after considering the points
above, simply contact the retailer directly for details of their returns
policy, if required.
©2018 Upshot. All rights reserved. No part of this document, including descriptive content, concepts, ideas,
diagrams or images may be reproduced or transmitted in any form or by any means, electronic or
mechanical, including photocopying, scanning or recording, or any information storage and retrieval system,
without express permission or consent from the publisher.
E&OE ©2018 Upshot 9
 Loading...