

Page 1
®
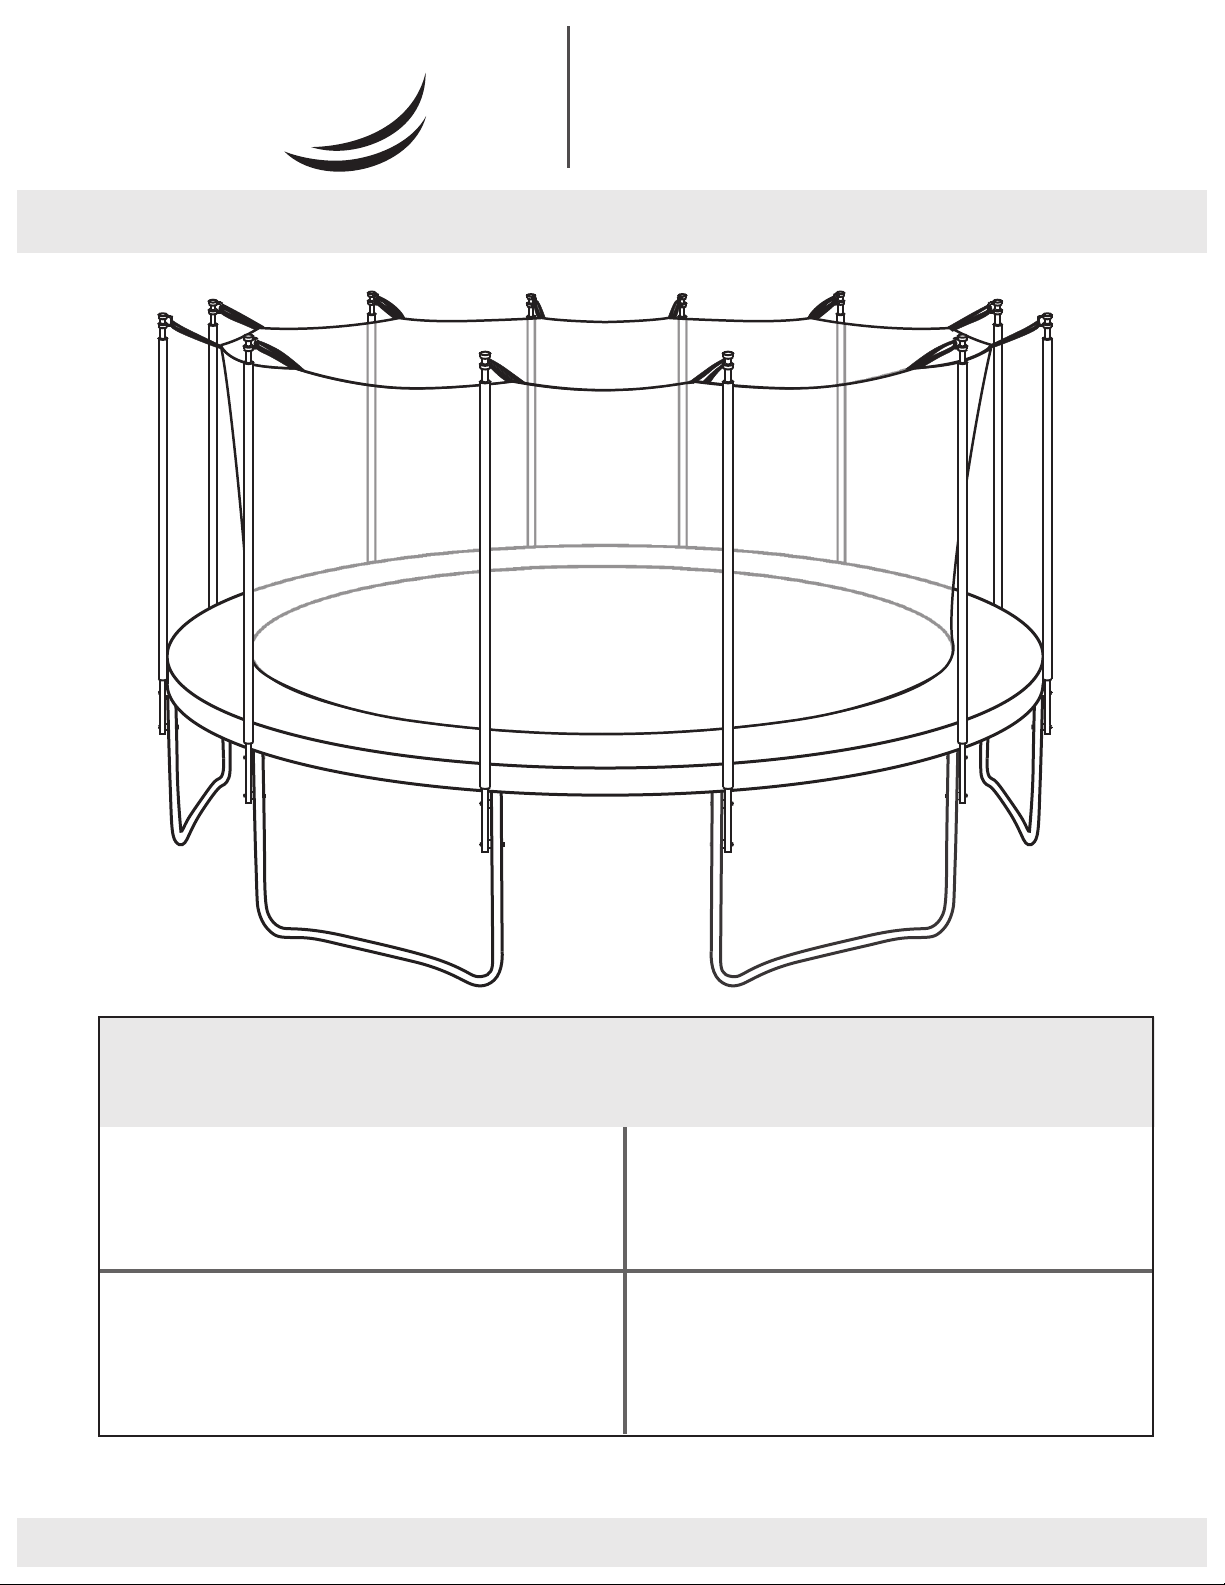
Enclosure Set &
UPPER
Enclosure Net
BOUNCE
USER MANUAL
Assembly, Installation, Care, Maintenance and Use Instructions.
This Instructions manual is for Upper Bounce Enclosure Sets and
Enclosure Nets which is designed to fit most model Trampolines.
Models begins with UBES:
for Inside type Enclosure Sets
Models begins with UBNET:
for Enclosure Nets Only
Manual Version #05
Upper Bounce Inc. 2 Mill St. Cornwall NY 12518, 1-888-965-3331, www.upperbounce.com
®
Models begins with UBESOS:
for Outside type Enclosure Sets
Models begins with UBESFG:
for FLEX ON TOP enclosure sets
Page 2
UPPER
BOUNCE
®
USA
UK
Call us
1-888-965-3331
020-3150-0484
Email us
Check out our website
www.upperbounce.com
THANK YOU FOR PURCHASING THE UPPER BOUNCE TRAMPOLINE PART
®
Simply follow the assembly and safety instructions in this manual and you will soon be starting your
UPPER BOUNCE exercise program and be on your way to a happier, healthier lifestyle.
MONDAY - THURSDAY
9:30 A.M. - 5:00 P.M.
Page
Measuring Tips For Enclosure Set 3
Measuring Tips For Enclosure Net 4
Enclosure Set Parts List 5
Pole Assembly 6-7
Inside type Enclosure Net Assembly 8
Outside type Enclosure Net Assembly
Arch type Enclosure Net Assembly 12
Ring on top Enclosure Net Assembly 13-14
®
Eastern Time.
TABLE OF CONTENTS
FRIDAY
9:00 A.M. - 12:00 P.M.
Eastern Time.
10-11
Replacement Parts List 15-16
Page 3
Thank you for choosing Upper Bounce for your trampoline and trampoline replacement needs!
When you select Upper Bounce®, you are choosing high quality trampolines, or replacement parts
and accessories. At Upper Bounce® we think about "fun and safety" for the whole family!
Before you are ready to start installing your new Enclosure Set, please verify that the enclosure set
you are going to install matches the trampoline size you have.
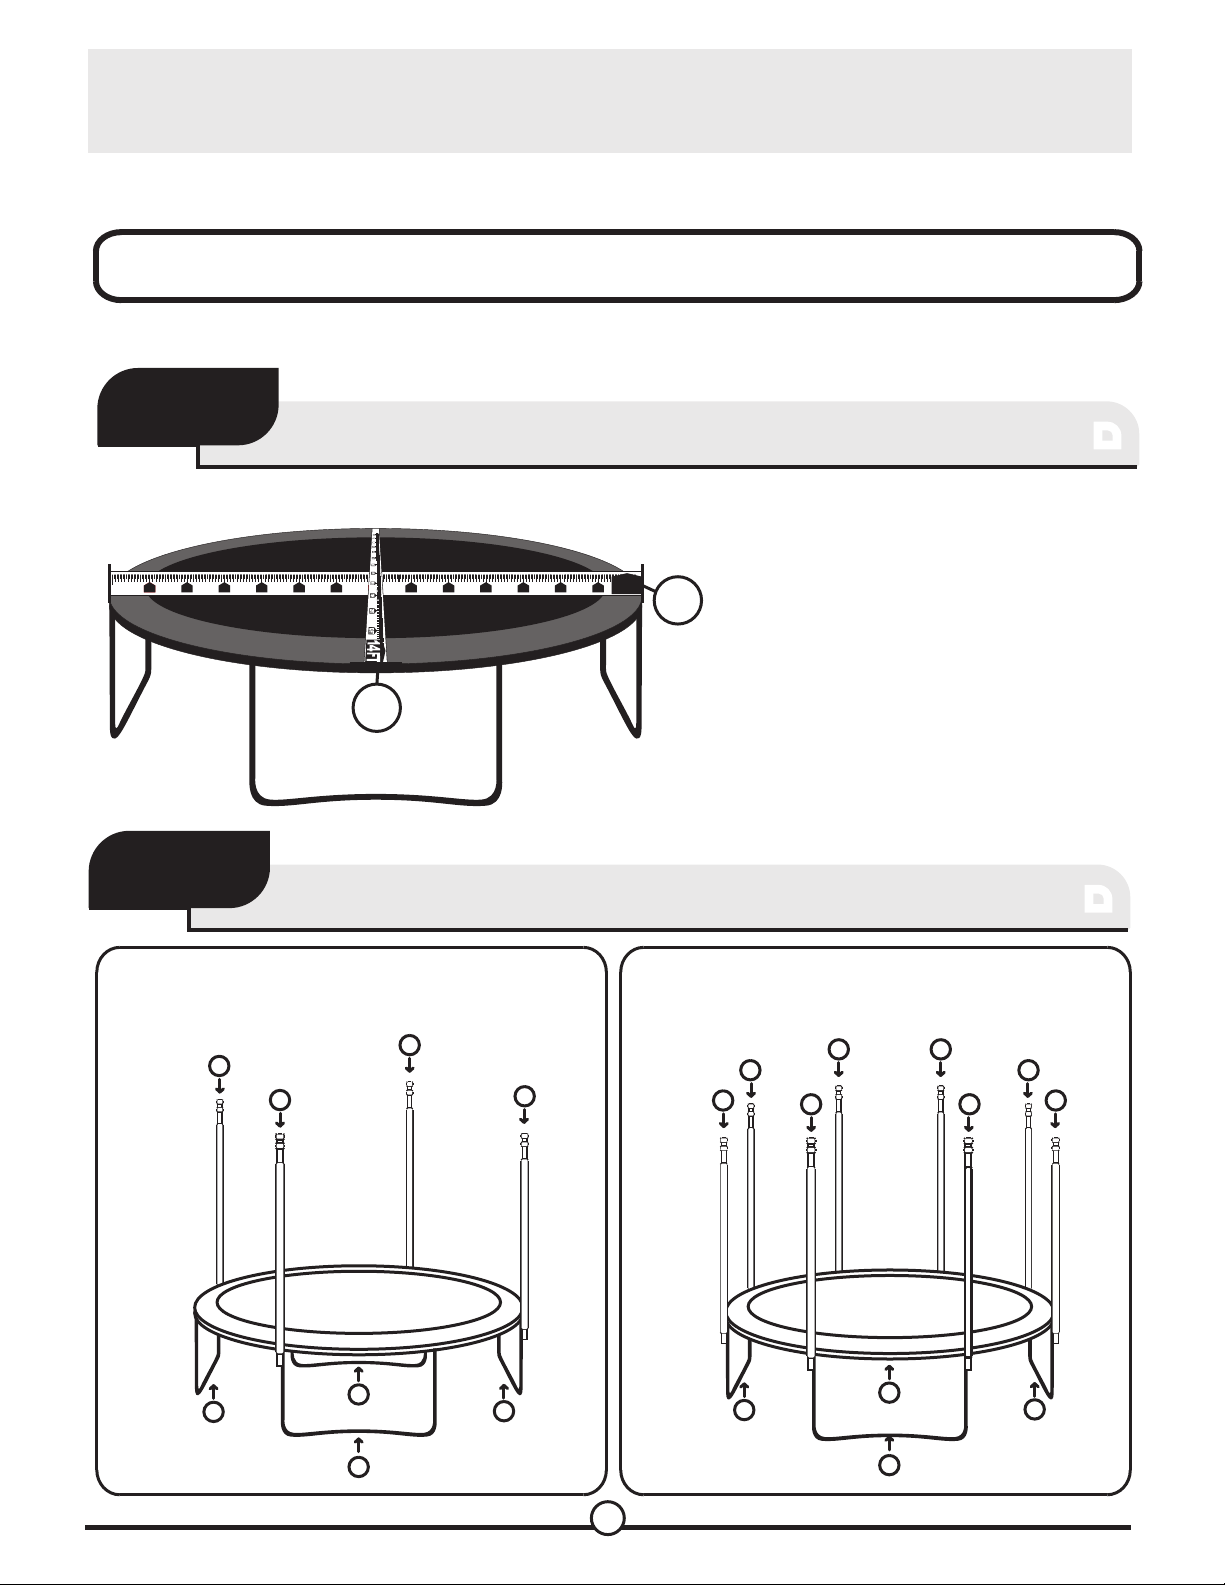
Measuring Tips For Enclosure Set
These are the steps to make sure you purchased the right Enclosure Set:
STEP-
STEP
1
1
FRAME SIZE
1FT
1FT
STEP-
STEP
3FT
2FT
2
2
5FT
4FT
7FT
6FT
14 FT
9FT 10FT
8FT
POLE AMOUNT
Count the legs. The amount of W shaped
legs you have that's the amount of poles
you will need.
2
1
4
Measure your frame from one
11FT
13FT
12FT
14 FT
14FT
outside edge vertically and
horizontally to the other outside
edge so you get the correct
measurements.
or connect 2 poles to each leg as shown in
figure 2.
3 4
2
3
1
5
78
6
Fig. 1
1
4
2
3
Fig. 2
1
4
3
2
3
Page 4
STEP-
STEP
3
3
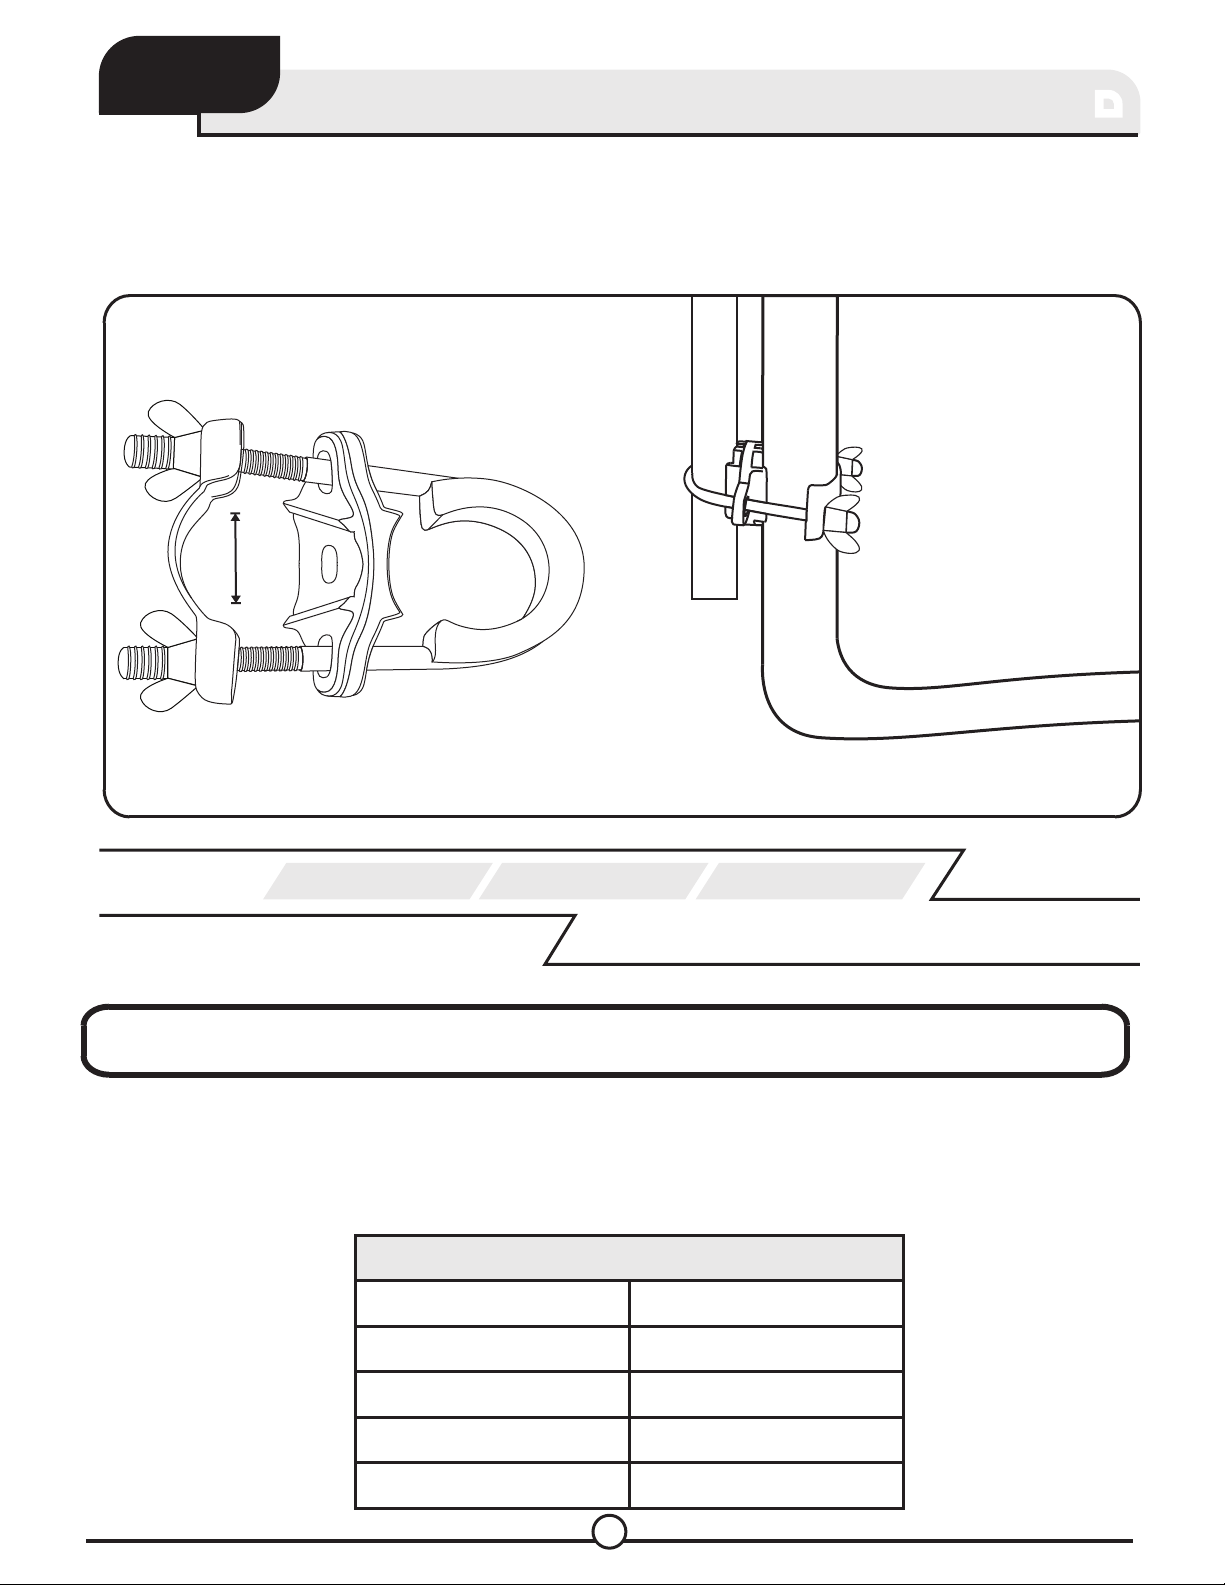
POLE CONNECTOR
Measure the diameter of your trampoline leg to make sure that the pole connecting tool
fits your trampoline. If the leg measures up to 1.75" you will need a 1.75" connector.
1
.
7
5
Based on the
1) Frame Size 2) Leg Amount 3) Leg Diameter
Determine if you bought the correct Enclosure Set
Measuring Tips For Enclosure Net
If you purchased an enclosure net only
1. Make Sure the Net size matches the frame size (see above how to measure the frame size).
2. Make sure the poles/arch amount of the product matches the amount of your trampoline.
3. Make sure the height of the product is matching to the height of your existing poles or arches.
Height chart of all type of nets
7.5 ft
8 ft
9 ft
10 ft
65"
65"
65"
64"
12 ft and +
71"
4
Page 5
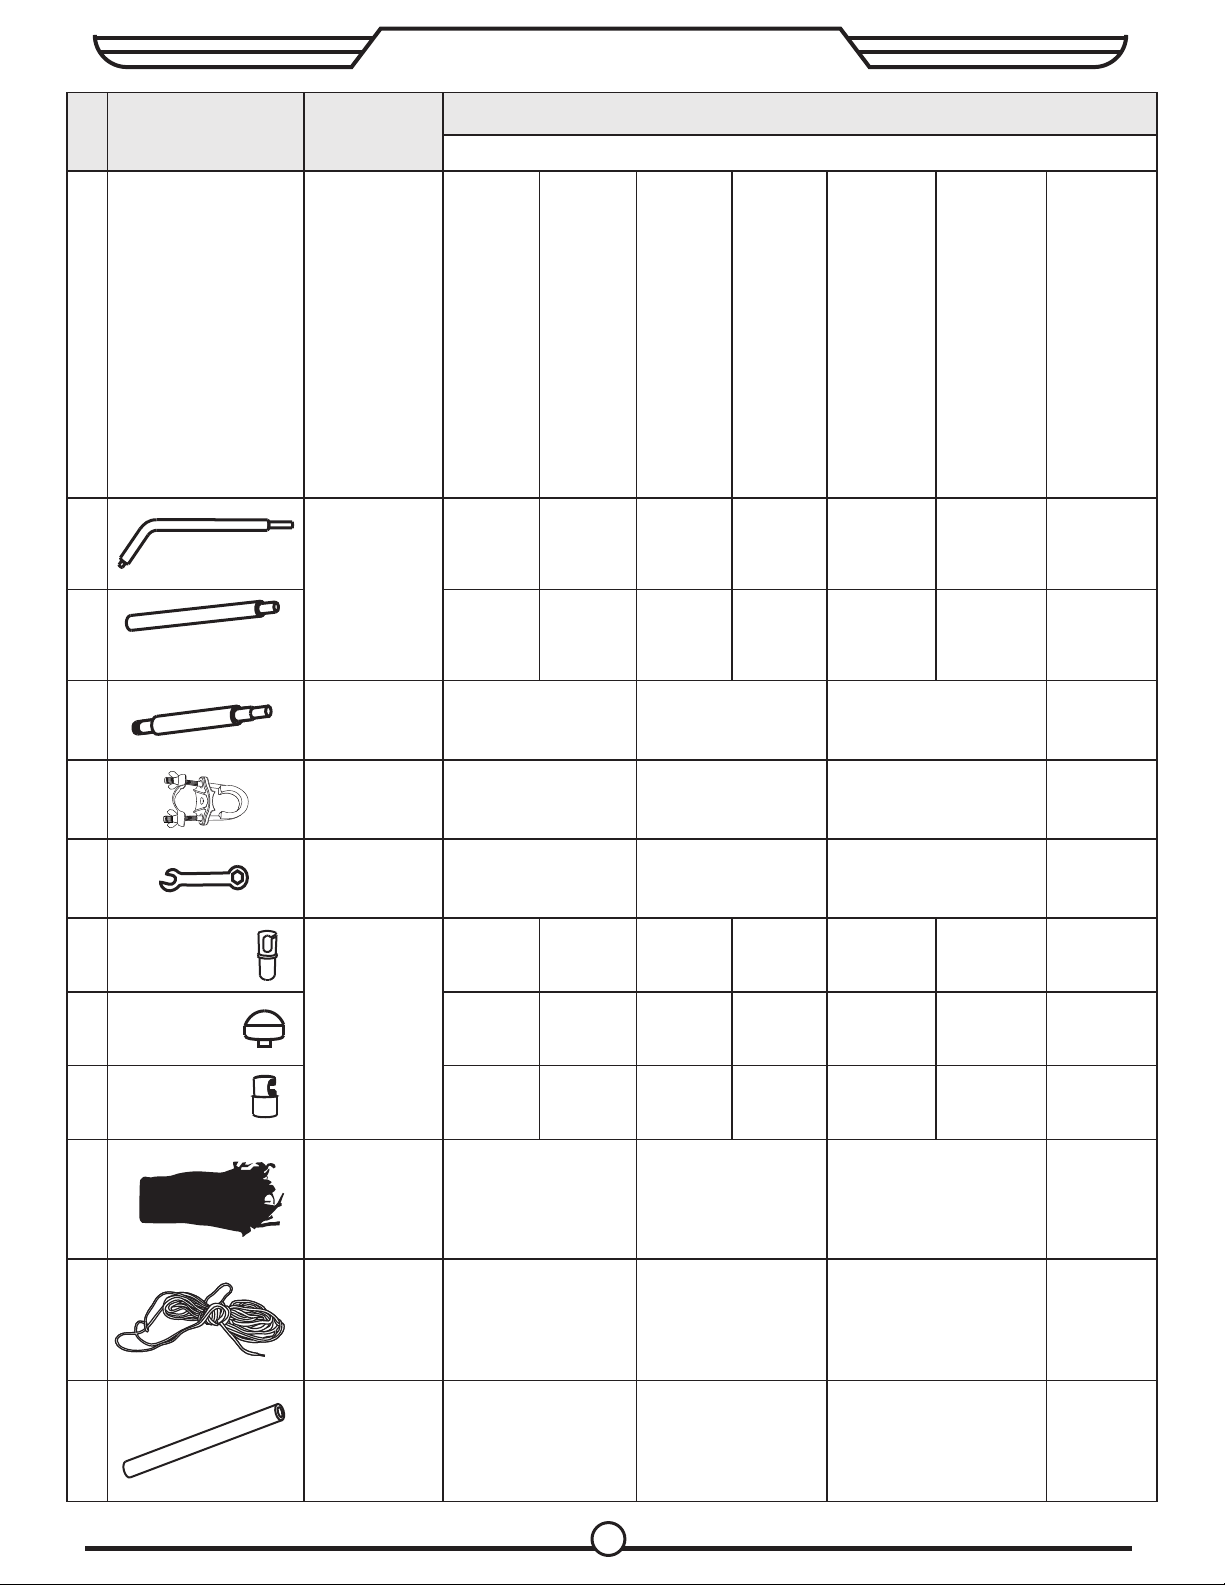
ITEM PART IMAGE
ENCLOSURE SET PARTS LIST
QUANTITY
NAME
MODELS
A
A-1
B
For FG Type
For ES/OS Type
Upper Pole
Lower Pole
UBES104
UBES124
UBES144
UBESOS124
4
UBESFG144
UBESFG124
UBES86
UBES126
UBES146
UBES156
UBES106
UBES136
UBES166
UBESOS7.56
UBESOS126
UBESOS136
UBESOS146
UBESOS156
40 0 0
UBESFG86
UBESFG116
UBESFG126
UBESFG136
UBESFG146
UBESFG156
6
UBES128
UBES148
UBES158
UBES138
UBESOS138
UBESOS148
UBESOS158
6 8
4 6 8
UBESFG158
UBESFG178
8
000
UBESFG155
5
0
5
C
D
E-1
E-2
E-3
F
G
For Inside
Type
For Outside
Type
For FG Type
Clamp
Tool Set
Tool
Pole Cap
Enclosure
Net
Big Rope
8
12
1 1 1
4 0
4
0 0
0
4
6
6 8
0
0
6
1 1 1
1 1 1
16
16
1
8
00
0 0
0
8
5
1
1
PVC Sleeve
T
(Do not use
these sleeves
if you have
an outside net)
4 6 8
5
5
Page 6
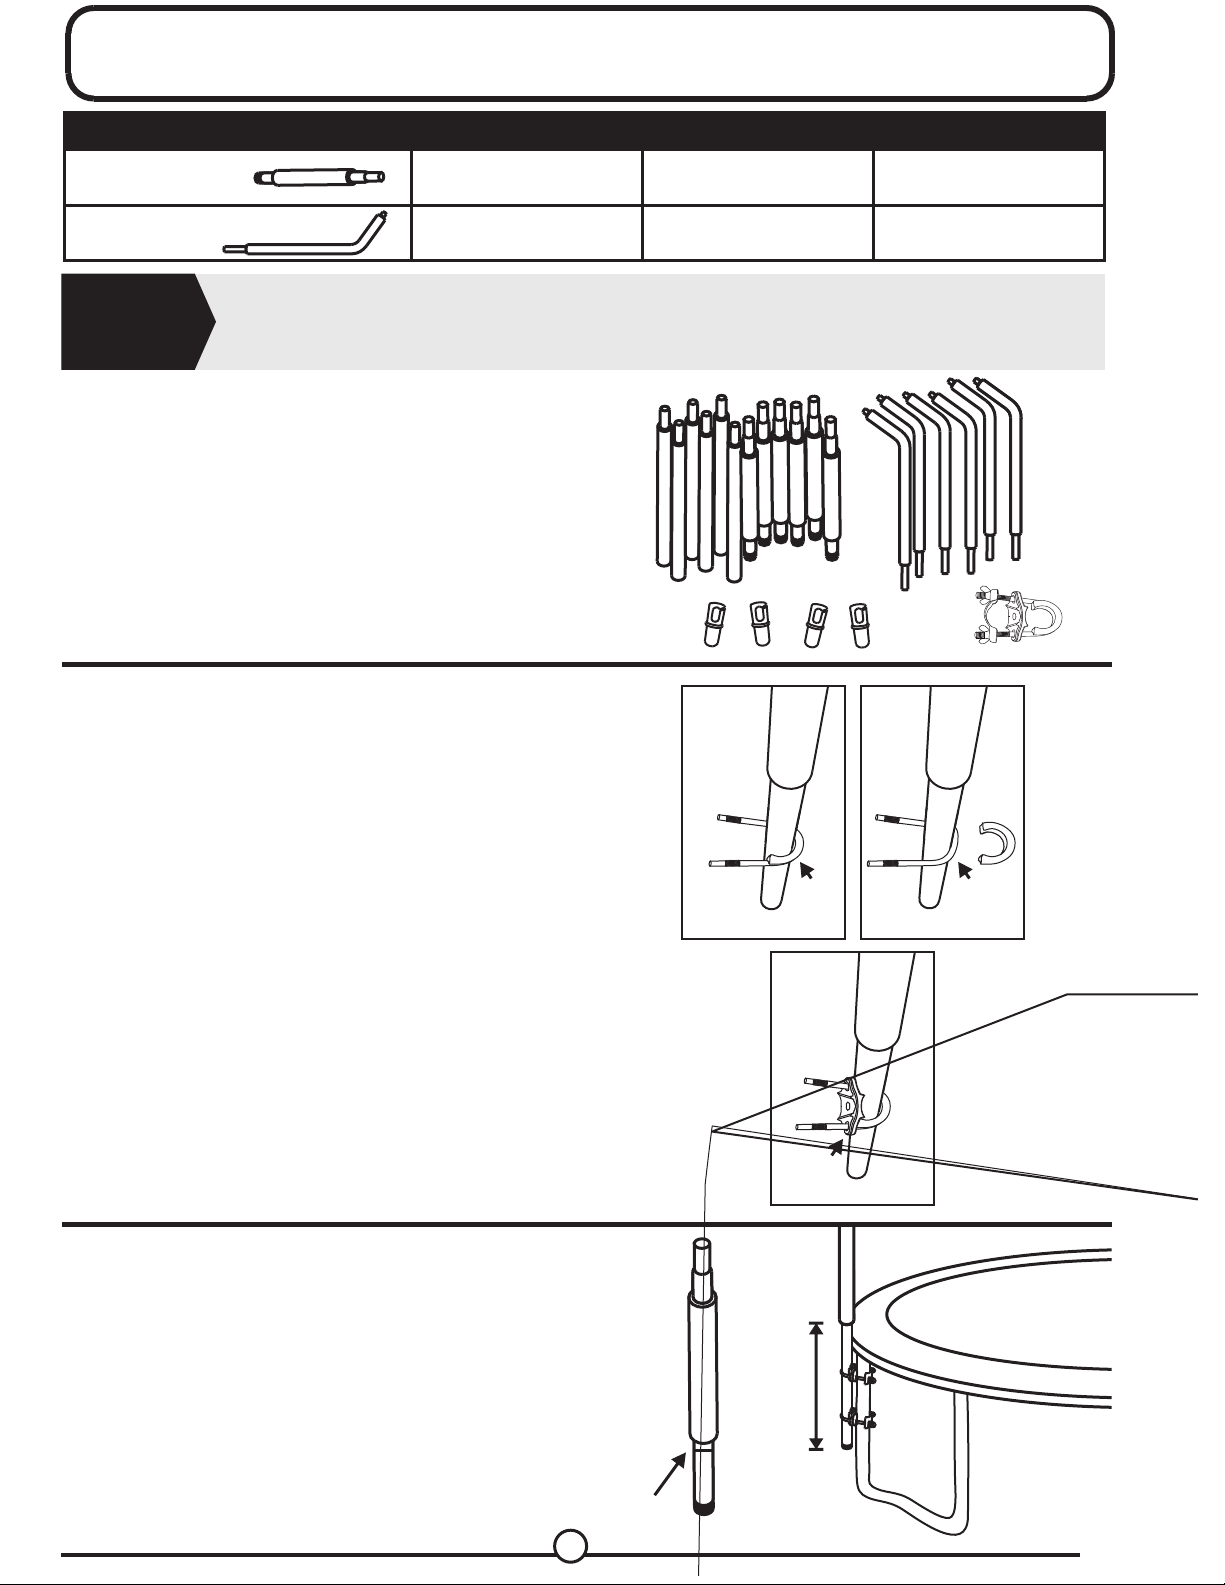
Pole Installation Instructions
This Page also to be used for these Models
Straight Poles
Curved Poles UBHWD-CPS4 UBHWD-CPS6 UBHWD-CPS8
2 adults in good physical condition are required for the following assembly.
Warning :
Wear proper shoes and maintain balance to prevent a fall. Failure to follow all
instructions and warnings may result in serious injury.
UBHWD-PS4 UBHWD-PS6 UBHWD-PS8
1. First, place all parts to be used in the process of
installation in front of you.
For straight poles - For the lower poles use the
ones that are tapered.
For curved poles - Use the curved pole as the
upper pole.
2. Take the clamp and clasp the lower enclosure
pole into the rounded end of the clamp. Make
sure that the black rubber cap of the lower pole
faces down.
a) If the pole fits too loosely, insert the green
rounded piece before clasping the pole so clamp
will tightly clasp the pole.
b) If the pole is too thick and does not fit into the
hole, remove the green rounded piece to create
more space for the pole. You should then be able
to clasp the trampoline pole into the clamp.
c) Once the pole is securely inserted into the
clamp, you should now insert the plastic bracket
until you reach the pole.
3. Be aware that the mark on the lower pole needs
to align with the trampoline frame. If there is no
line on the pole then please have it attached 18”
below the frame.
(a) (b)
(c)
18 inches
6
Page 7
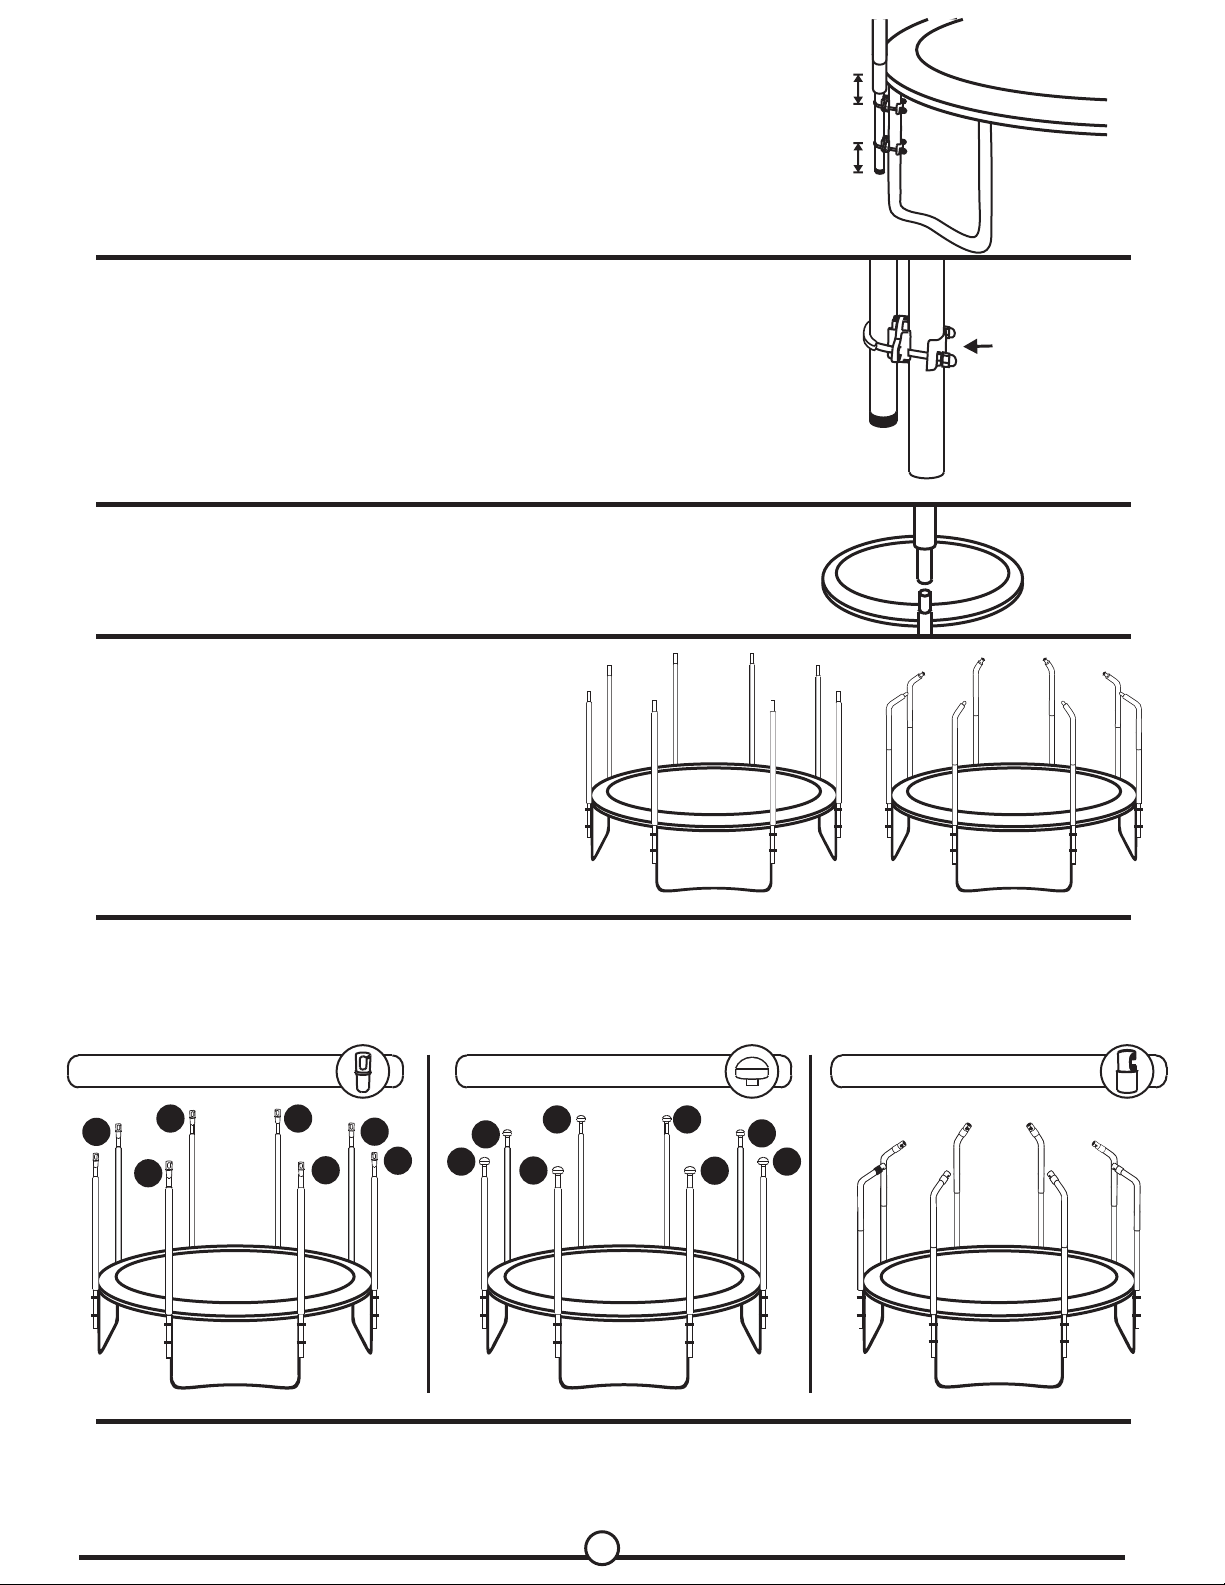
4. The set comes with 2 clamps per pole.
One being attached 2” below frame,
while the other being attached 2” above
the end of the lower pole.
5. Insert the plastic bracket, then clasp the
trampoline leg into the clamp. Secure
tightly with steel brackets and nuts.
6. Now you can have the upper part of the
pole inserted into the lower part that is
already attached to the leg.
2 inches
2 inches
7. Repeat the steps above to have all your
enclosure poles connected securely to
your trampoline legs.
Cover all the poles with the PVC Sleeve
(Item T).
8. After connecting all enclosure poles insert the pole caps, if you have an inside type net use
part number E1 and for outside type Net use E2. If you are using the curved poles, use the pole
caps provided.
For inside type net E-1 For outside type net E-2
E1
E1
E1 E1
E1
E1
E1
E1
E2
E2
E2
E2
E2
E2
E2
E2
For curved poles
After you installed the poles you should install the enclosure net. For instructions how to install the
enclosure net see next page for the inside type model and the outside type. Choose the one applies to
your purchase.
7
Page 8
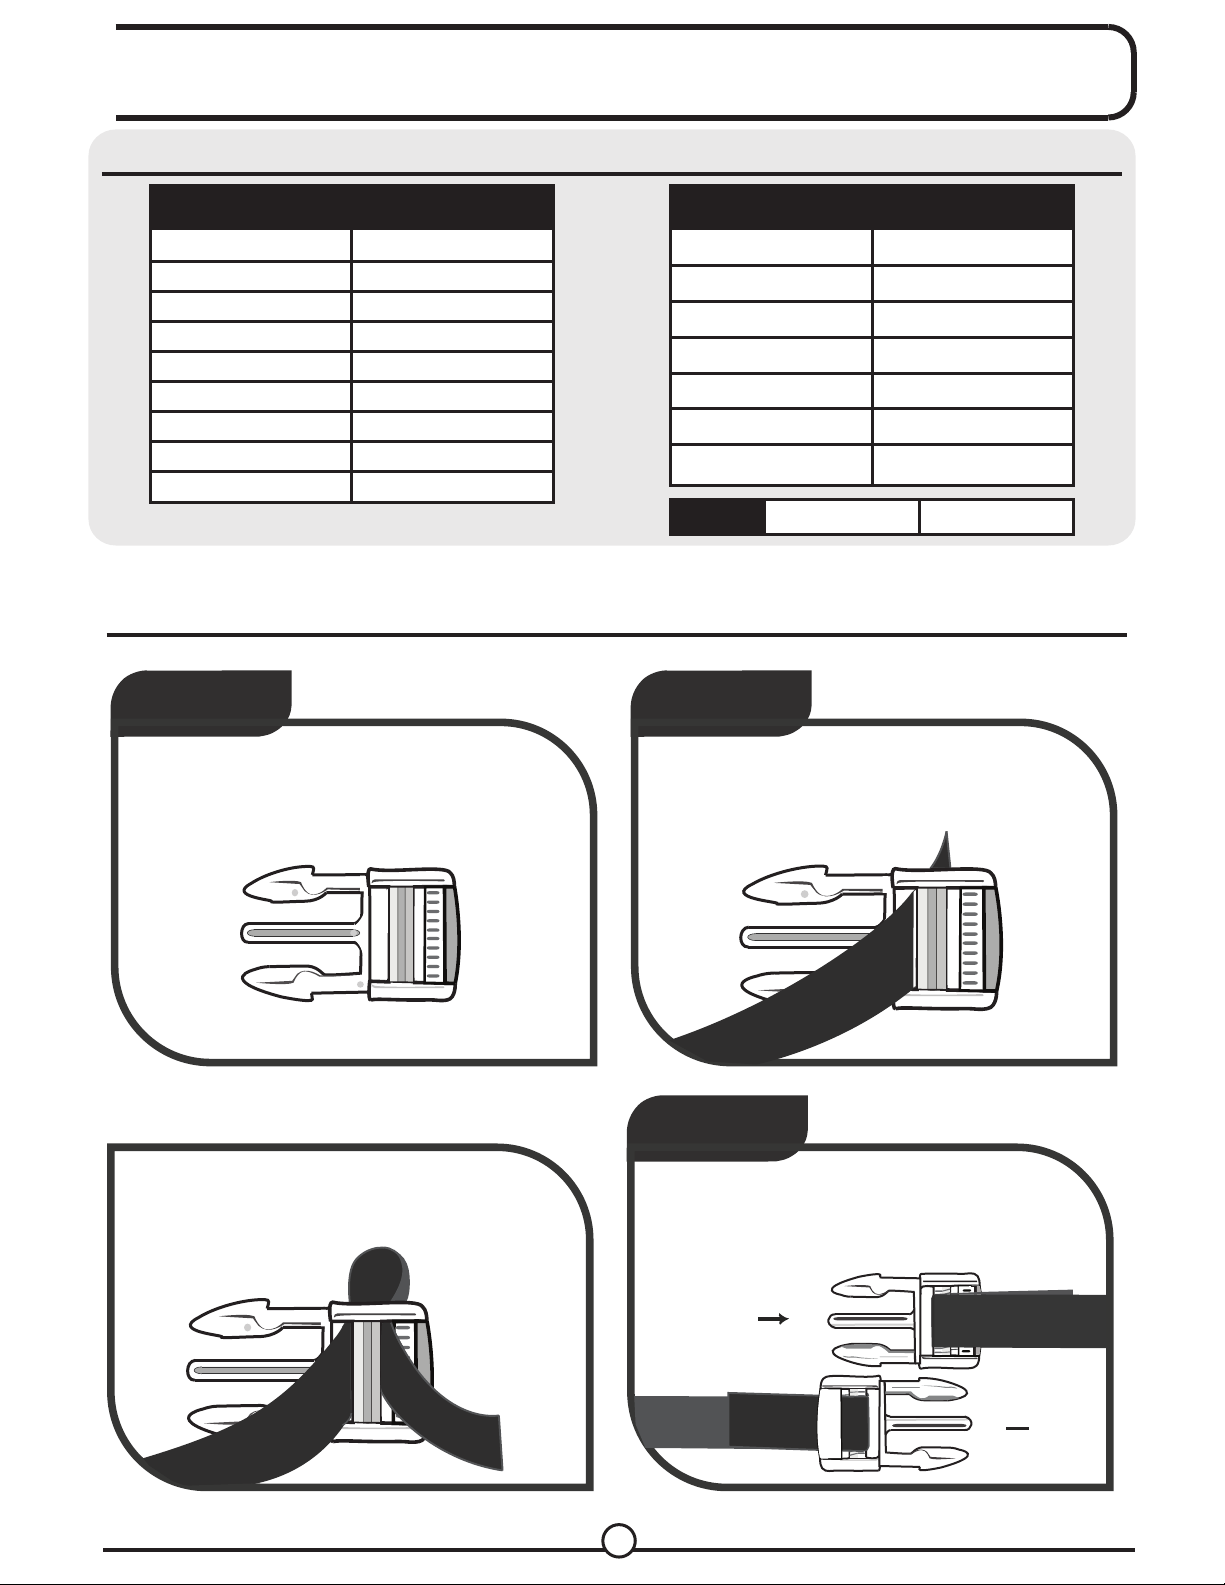
Net Installation Instructions
INSIDE TYPE MODELS
Enclosure Nets
UBNET-7.5-6-IS
UBNET-8-6-IS
UBNET-8-4-IS
UBNET-9-6-IS-Y
UBNET-10-4-IS
UBNET-10-6-IS
UBNET-10-8-IS
UBNET-12-8-IS
UBNET-12-4-IS
UBNET-12-6-IS
UBNET-13-6-IS
UBNET-13-8-IS
UBNET-14-4-IS
UBNET-14-6-IS
UBNET-14-8-IS
UBNET-15-6-IS
UBNET-15-8-IS
UBNET-16-6-IS
UBES86
UBES104
UBES124
UBES144
UBES126
UBES128
UBES146
Oval Net
Steps to install the clips
Step Step
Hold the clip piece with the ridges on the
outer bar facing you.
1
Holding the fabric tie with your other hand,
silde it through the left slot on the clip.
Enclosure Sets
UBNETO-1614
2
UBES148
UBES156
UBES158
UBES106
UBES136
UBES138
UBES166
UBNETO-1715
Step Step
Turn the tie back and thread the end back
through the clip through the right slot this
time.
3
Adjust to the appropriate length and pull
,
the tie horizontally until it is taut and
tightens in place.
68
4
Front
Back
Page 9
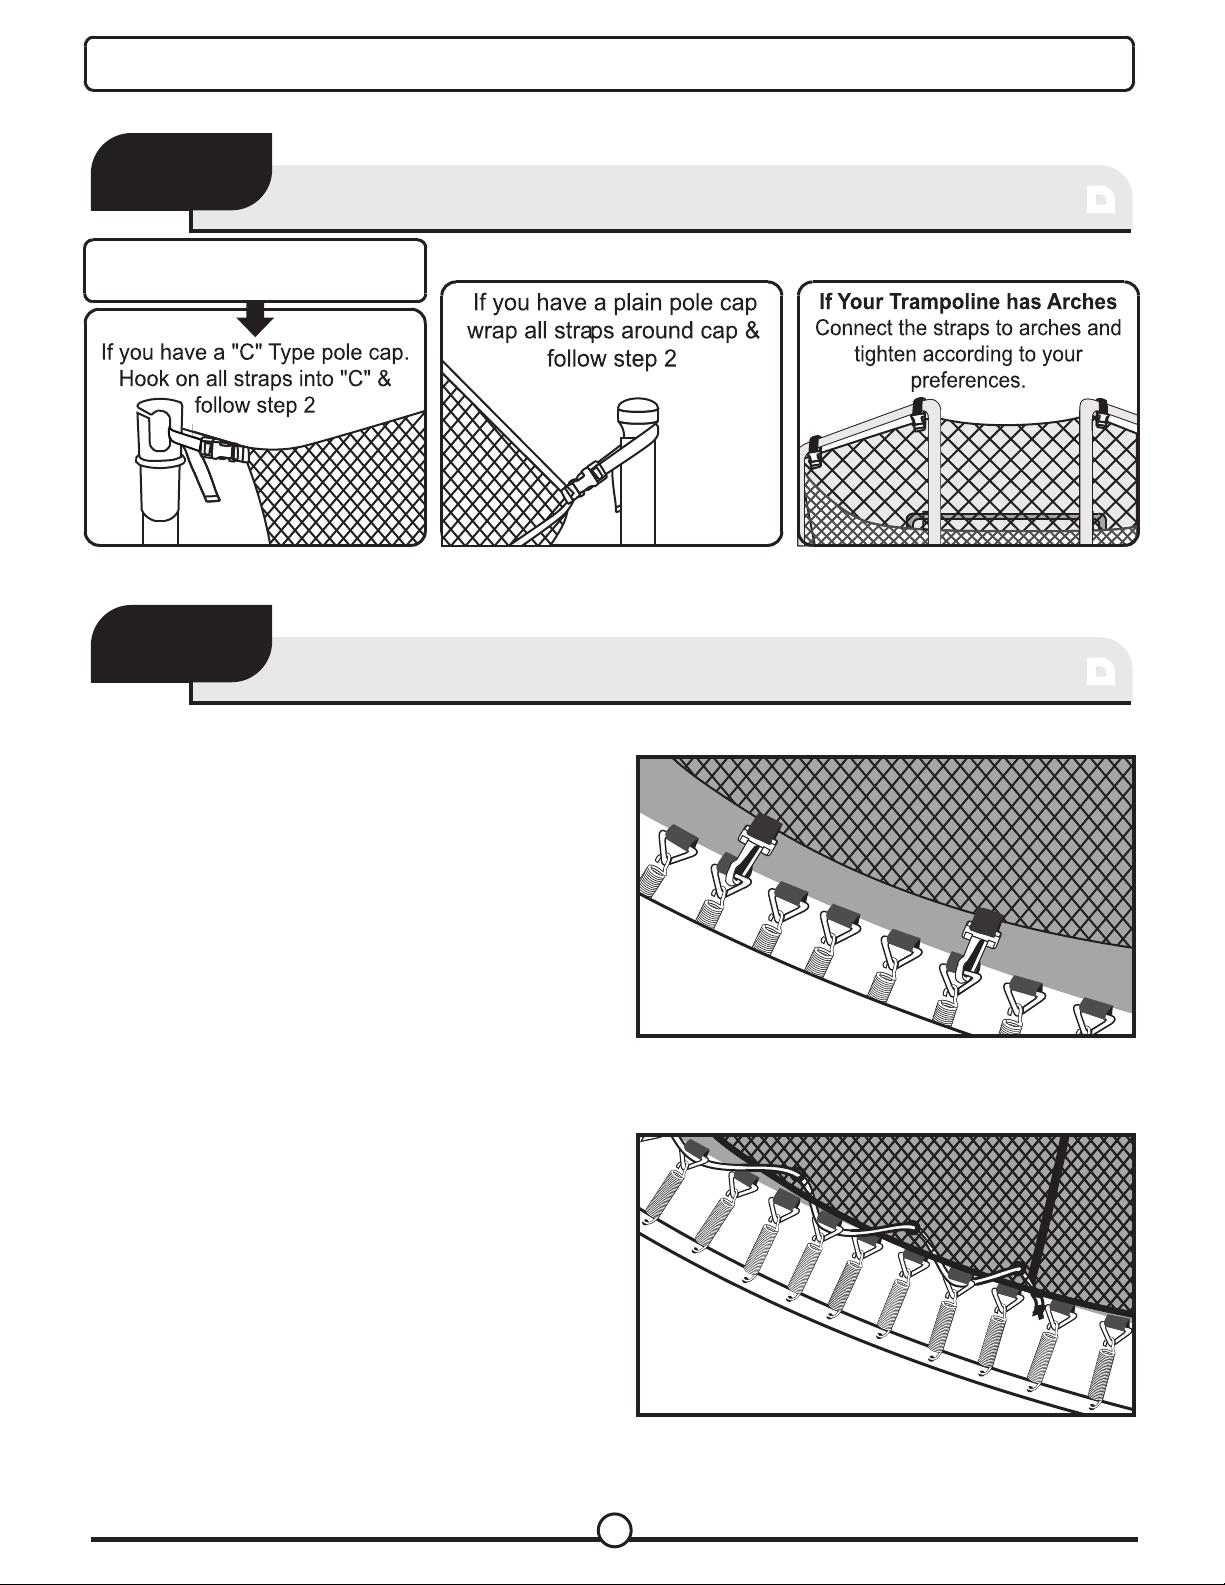
Note: When installing the net make sure that the Upper Bounce logo is placed on the outside of the trampoline.
STEP-
STEP
1
1
SECURING THE TOP OF THE NET
If you purchased a straight
pole Enclosure Set use this step
STEP-
STEP
2
2
NOTE: If you purchased a ring on top enclosure set continue to page 12.
SECURING THE BOTTOM OF THE NET
1. Connect the net to the V-rings of the
trampoline mat using the attached clips, securing
at regular intervals. This holds the net in place for
you to complete the attachment with rope.
2. Secure one end of the rope by knotting it to
the V-ring closest on one side to the trampoline
entrance zipper.
3. Weave the rope through the net and every
second v-ring successively, moving around the
trampoline in the direction away from the
entrance zipper.
4. When you complete the weaving and reach
the other side of the entrance zipper, secure the
other end of the rope also by knotting it to the
V-ring closest to the entrance on that side.
Your trampoline safety net is now fully secured.
Follow the safety checks in the ‘Testing the
Trampoline’ section before using the trampoline net.
9
Page 10
Net Installation Instructions
OUTSIDE TYPE MODELS
Enclosure Sets
UBESOS138
UBESOS146
UBESOS148
UBESOS156
UBESOS158
STEP-
STEP
UBESOS7.56
UBESOS108
UBESOS124
UBESOS126
UBESOS136
1
1
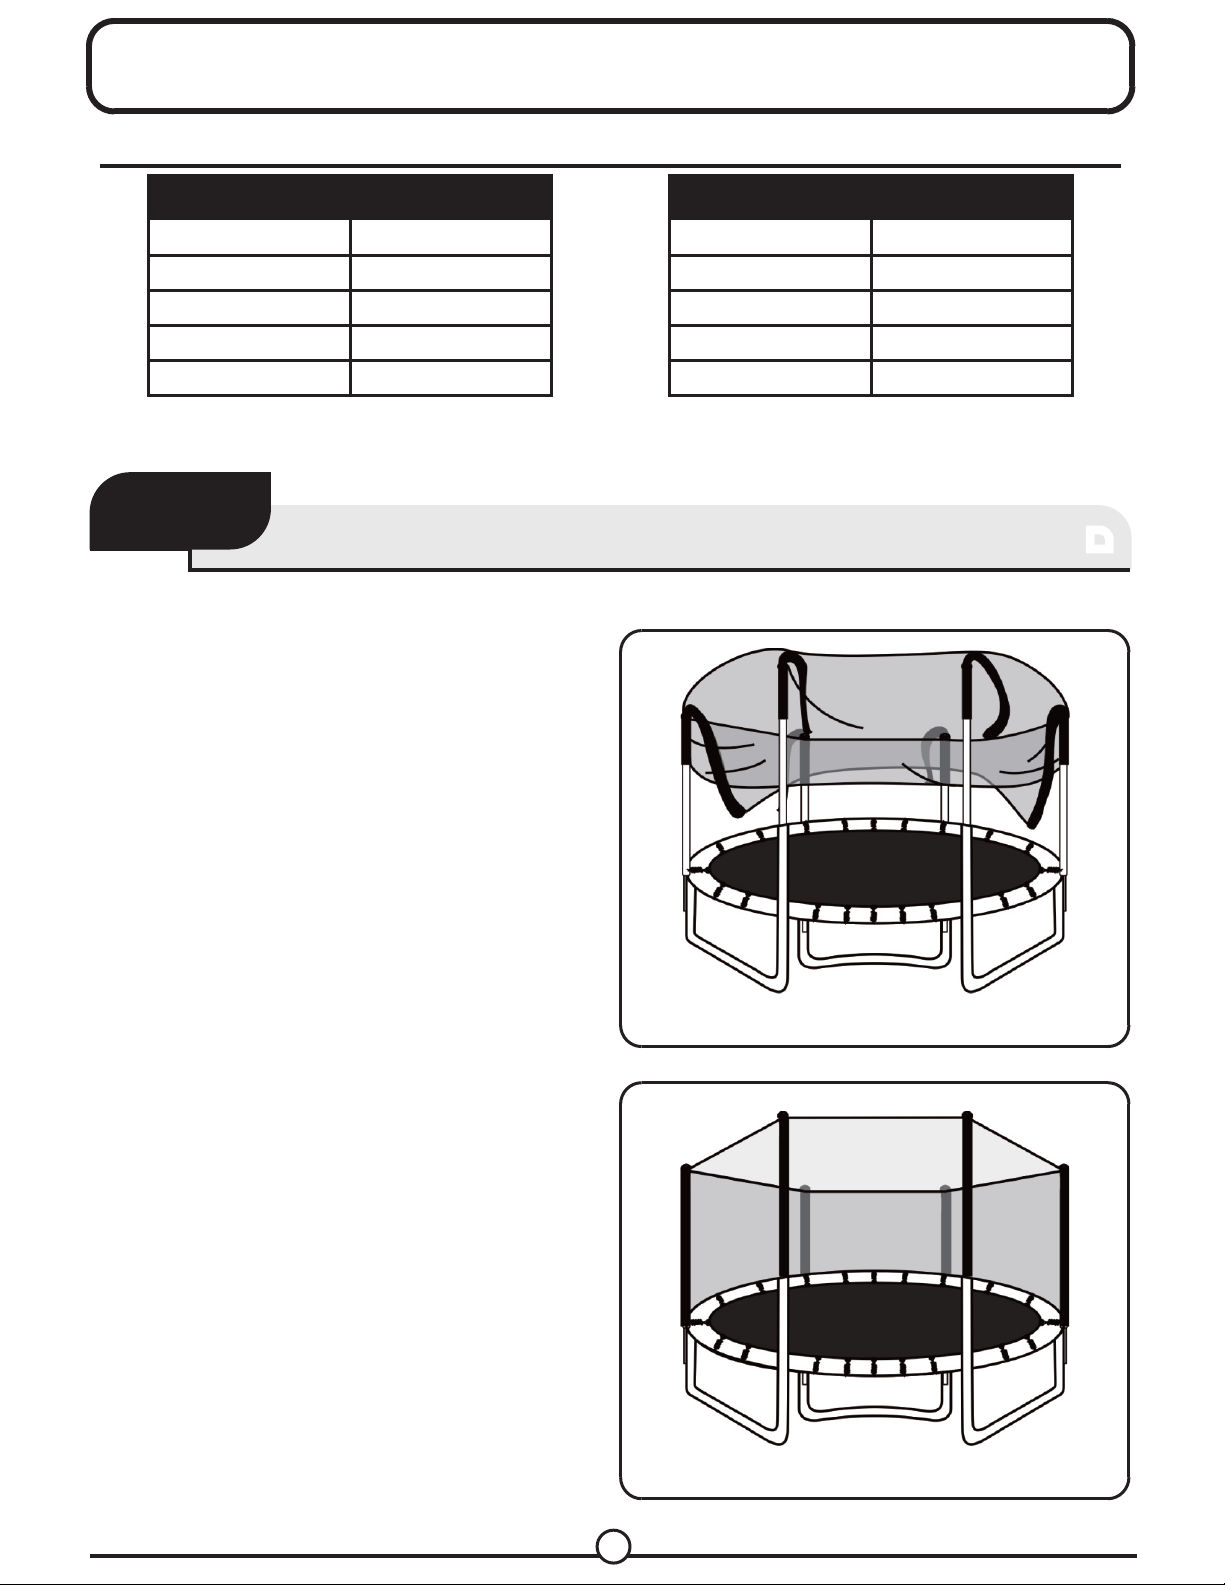
SECURING THE TOP OF THE NET
Start installing the Net to the poles by
inserting thebegining of the Sleeve
on the Poles Until it reaches 2 ft.
and continue doing the same to
Enclosure Nets
UBNET-7.5-6-OS
UBNET-10-8-OS
UBNET-12-4-OS
UBNET-12-6-OS
UBNET-13-6-OS
UBNET-13-8-OS
UBNET-14-6-OS
UBNET-14-8-OS
UBNET-15-6-OS
UBNET-15-8-OS
all poles as figure 1.
Pull down each sleeve, a few inches
at a time till all sleeves reac the bottom
of enclosure frame asshown in figure 2.
Fig. 1
10
Fig. 2
Page 11
STEP-
STEP
2
2
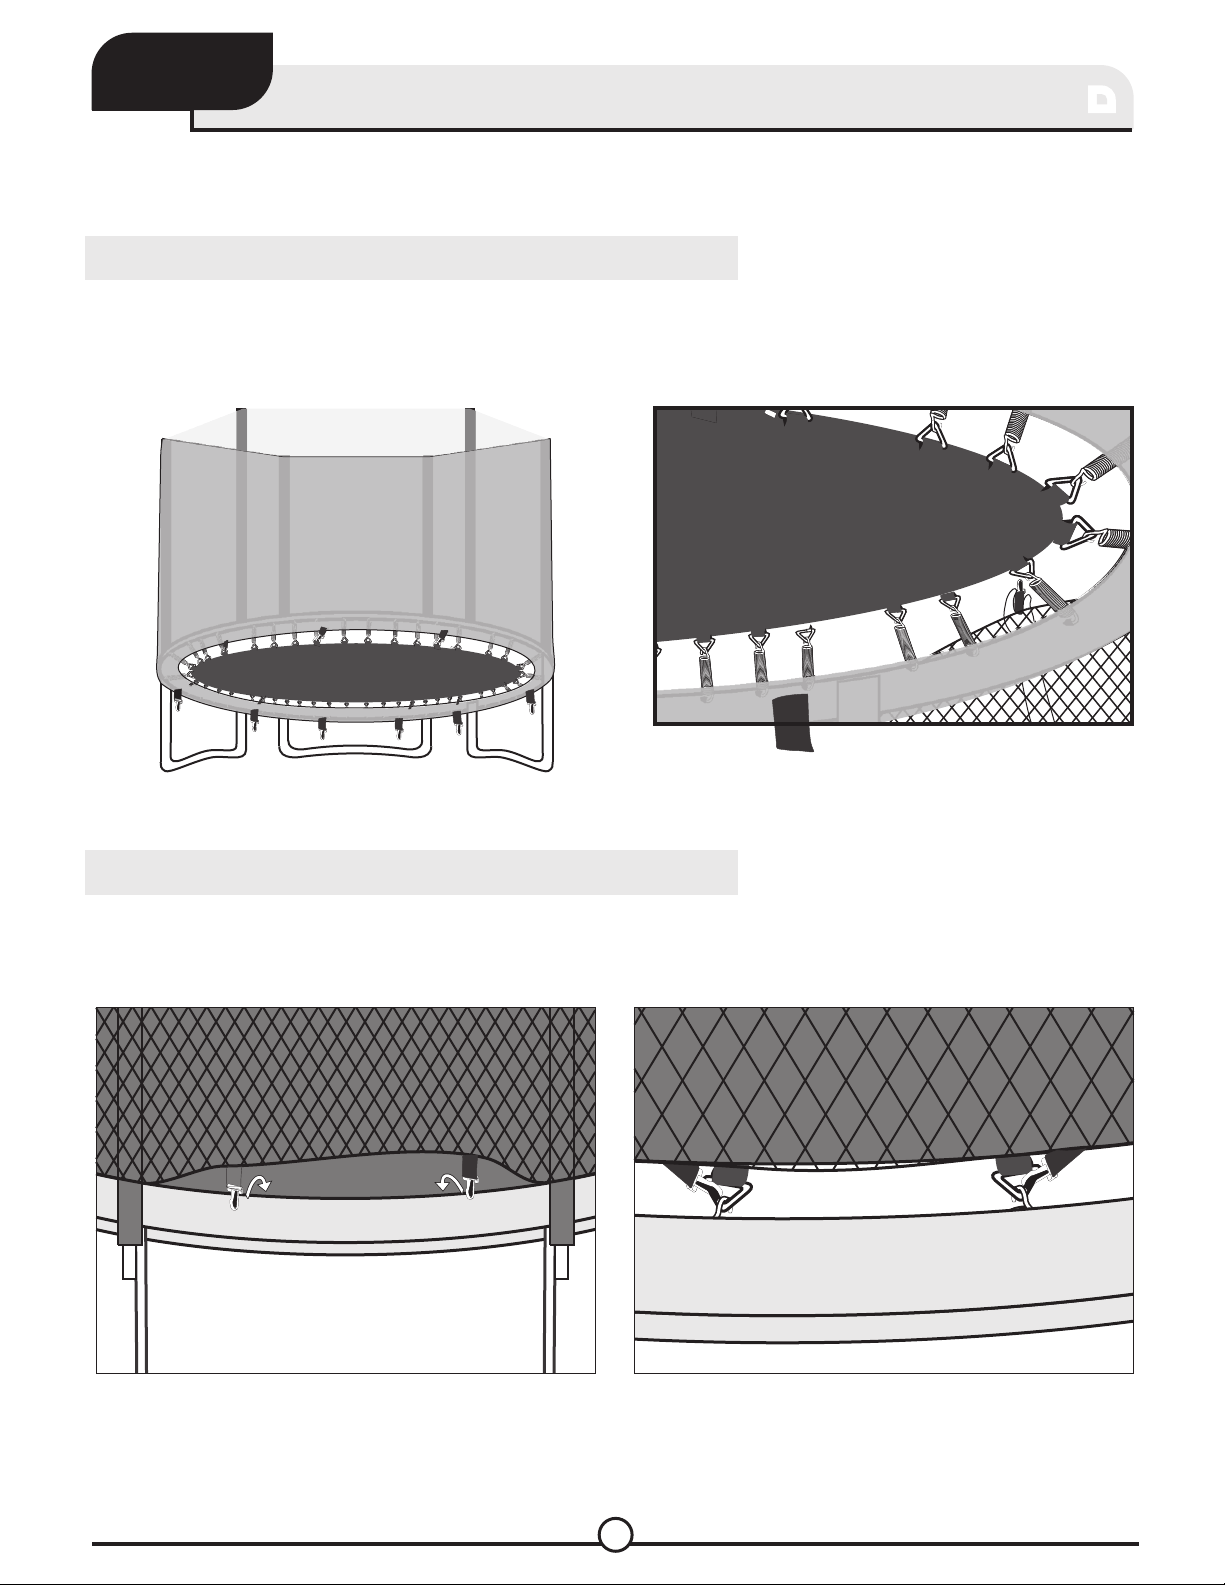
SECURING THE BOTTOM OF THE NET
Choose whether you would like to connect the net on the outside (Option A),
or the inside of the trampoline (Option B).
Option A - Attach the Net on the Outside of the trampoline
Connect bottom straps/clips to every few Jumping mat v-rings from under the Safety Pad.
Attach the clips from outside as figure shows.
Option B - Attach the Net on the Inside of the trampoline
Pull the net closer to the mat on the bottom, and Connect the bottom straps/clips to every few
jumping mat V-rings. The bottom of the net should be between the pad and the mat.
11
Page 12
Net Installation Instructions
FOR ARCH TYPE MODELS
Enclosure Nets
UBNET-6-3-AST
UBNET-7-3-AST
UBNET-8-2-AST
STEP- 1
STEP
1
UBNE1T-11-3-AST
UBNET-12-2-AST
UBNET-12-3-AST
SECURING
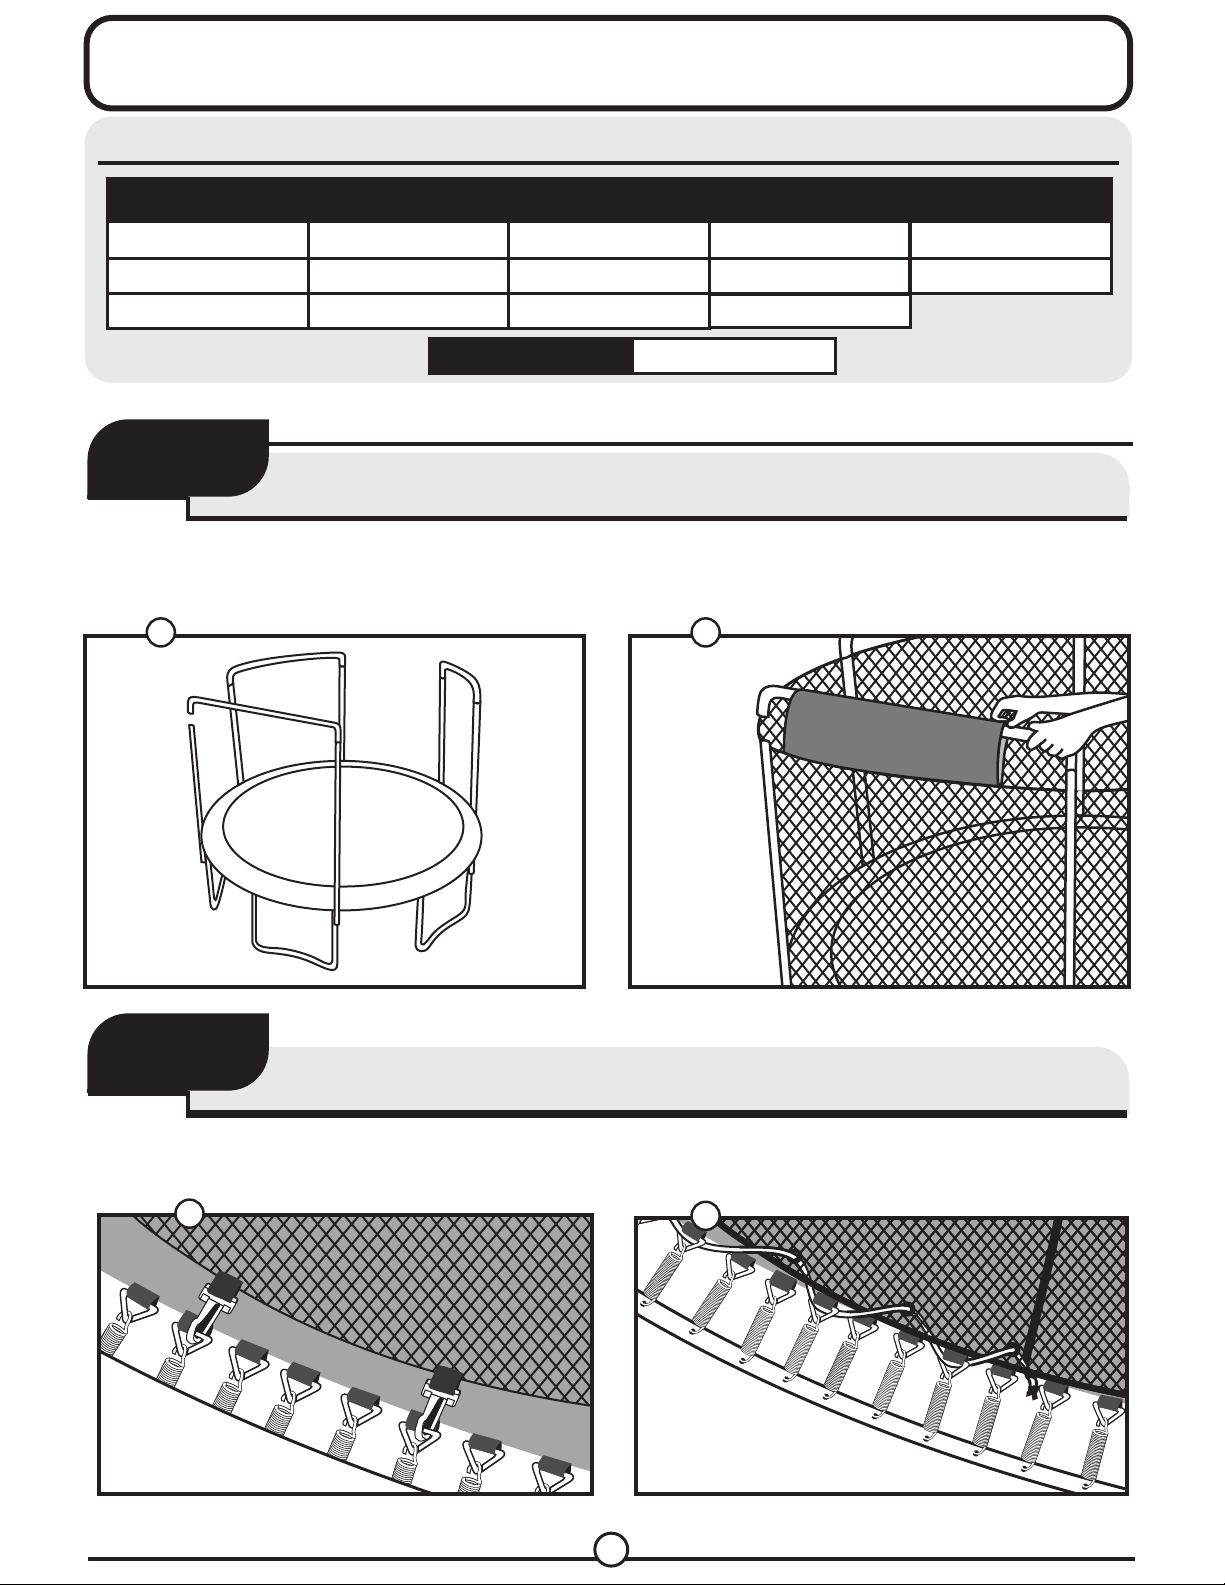
Disconnect the top arches, slide top arch part into sleeve.
When arch part and poles meet click them back together tightly.
1 2
UBNET-12-4-AST
UBNET-13-2-ASTR
UBNET-13-3-AST
UBNETSQ-1313-4Arch Net - Square
THE TOP OF THE NET
UBNET-13-4-AST
UBNET-14-3-AST
UBNET-14-4-AST
UBNET-15-3-AST
UBNET-15-4-AST
STEP- 2
STEP
See page 9 how to install the rope
2
SECURING THE BOTTOM OF THE NET
ROPE
2
12
Page 13
Net Installation Instructions
FLEX ON TOP MODELS
Enclosure Nets
UBNET-8FG-6
UBNET-11FG-6
SKNET-11-FG-6-LG
UBNET-12FG-6
UBNET-12FG-4
UBNET-13FG-6
UBNET-14FG-4
STEP-
STEP
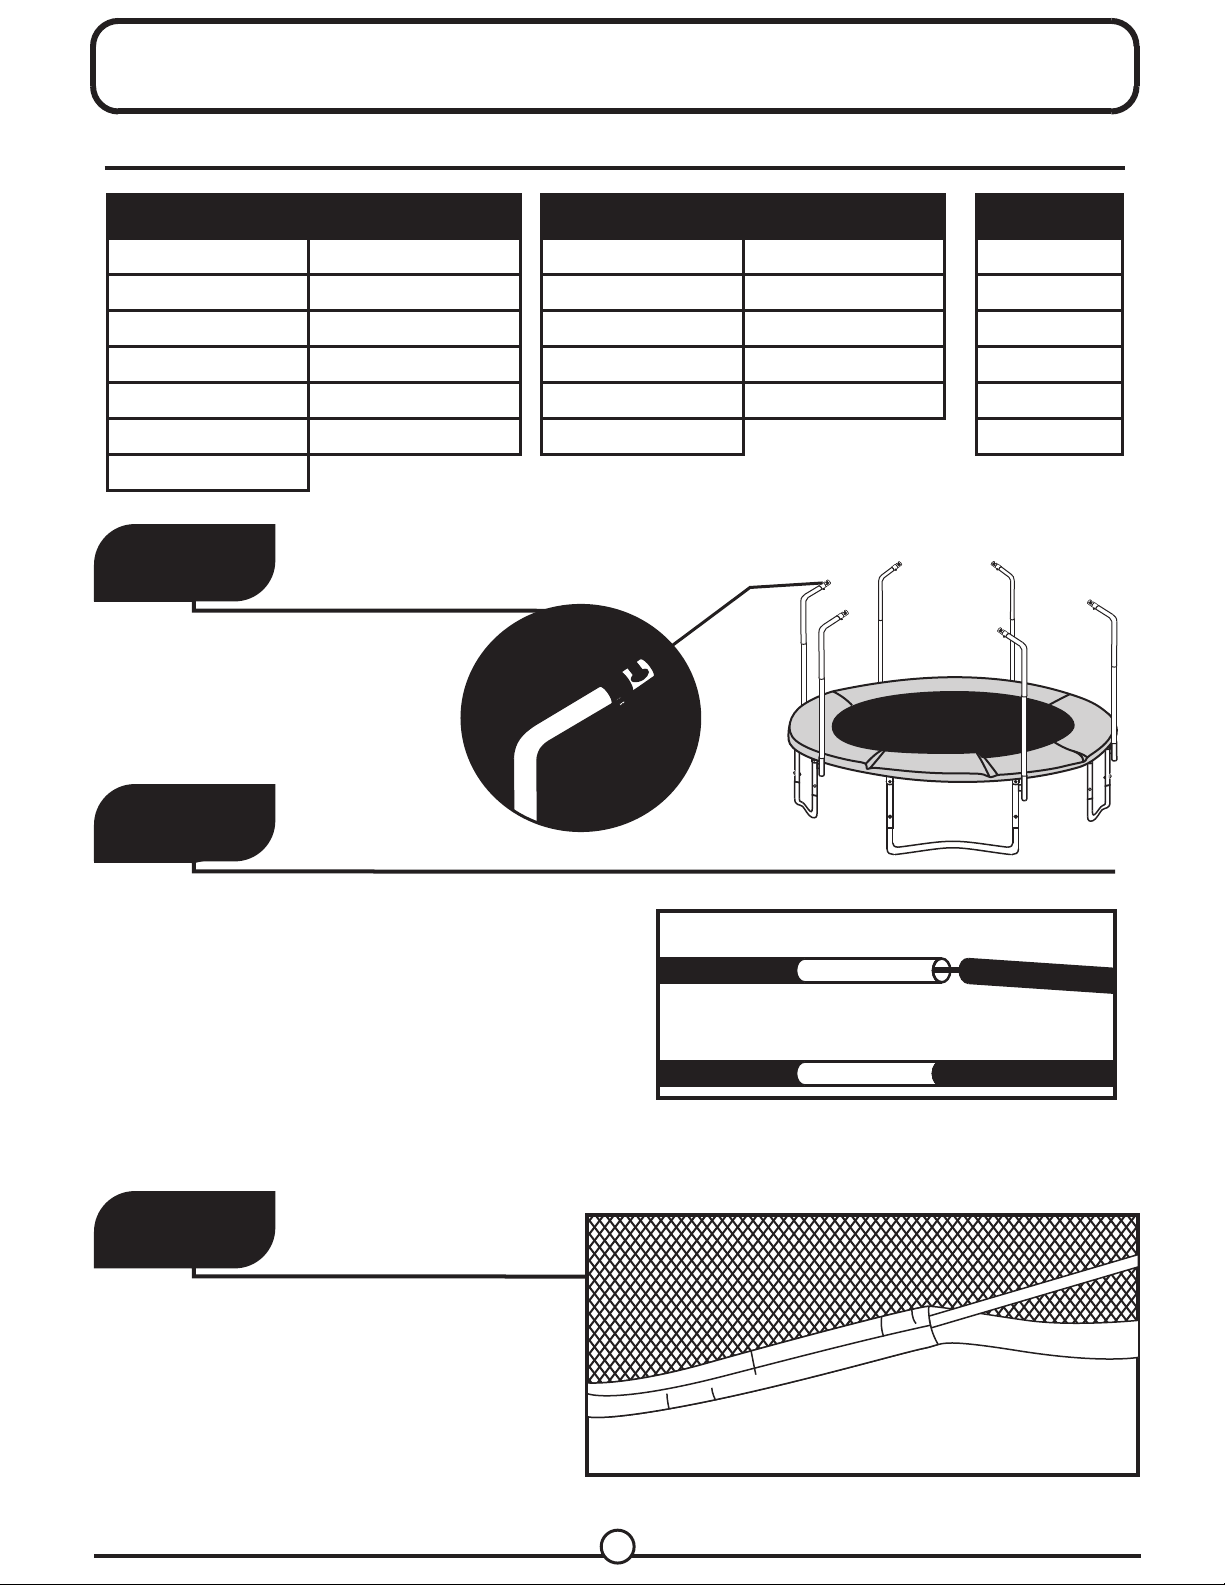
Connect the Pole Caps to the
top of the poles with screw.
1
1
UBNET-14FG-6
UBNET-15FG-5
UBNET-15FGB-5
UBNET-15FG-6
UBNET-15FG-8
UBNET-17FG-8
Enclosure Sets
UBESFG86
UBESFG116
UBESFG124
UBESFG126
UBESFG136
UBESFG144
UBESFG146
UBESFG155
UBESFG156
UBESFG158
UBESFG178
FG Set
UBFGPCS-8
UBFGPCS-11
UBFGPCS-12
UBFGPCS-13
UBFGPCS-14
UBFGPCS-15
STEP-
STEP
Note : You will need to run the fiberglass into the
top sleeves of the net, and connect 1 fiber to the
other while running it from 1 sleeve to the other,
there is various ways how to connect 1 to the other.
See step 4,
Start connecting the Fiber glass to each other, by
clicking them together, until you finish all the rods.
STEP-
STEP
Start by running the Fiberglass Rods
through the sleeves opening at the
upper edge of the safety net until you reach
the other side of the sleeve as figure 1.
2
3
2
3
13
Page 14
STEP- 4
STEP
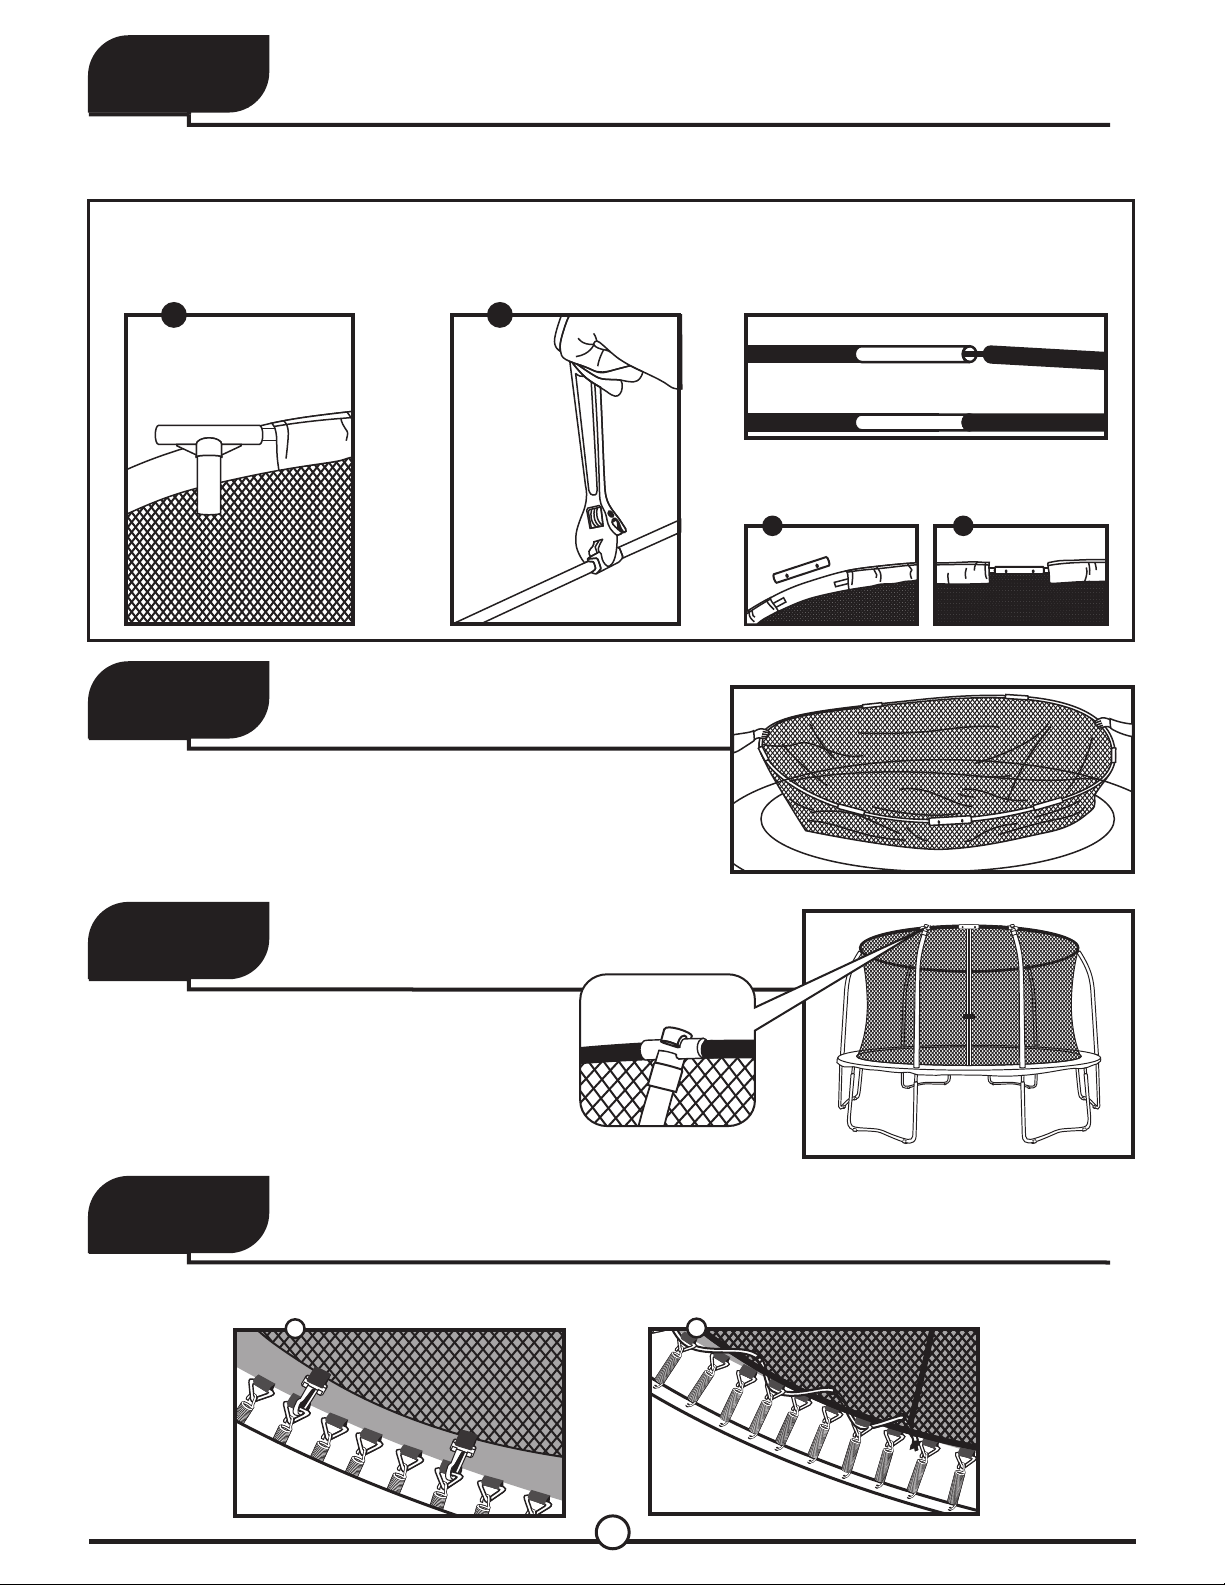
After inserting the top rods through all the sleeves you need to connect all rods together, there is
several ways to connect it:
4
1. With T pole caps
as figure 1.
STEP- 5
STEP o connect the ring, have another person
T
stand on the opposite side of you and push
the rods towards the center as shown in fig.
5
2. With nuts that connects
it together with Adjustable
Wrench as figure 2.
21
3. Connect each other by just
clicking them together.
At last point add the connector to
complete the circle
a
b
STEP- 6
STEP
Insert the assembled rod circle into the
opening of the pole cap.
STEP- 7
STEP
See page 9 how to install the rope
6
7
1
2
14
Page 15
VERS
e)
rame siz
Example
-BL(Blue)
UBWC-14(F
.
UBWC-12-BL
UBWC-14-BL
UBWC-15-BL
THER CO
WEA
Blac k Blue
or each item model name :
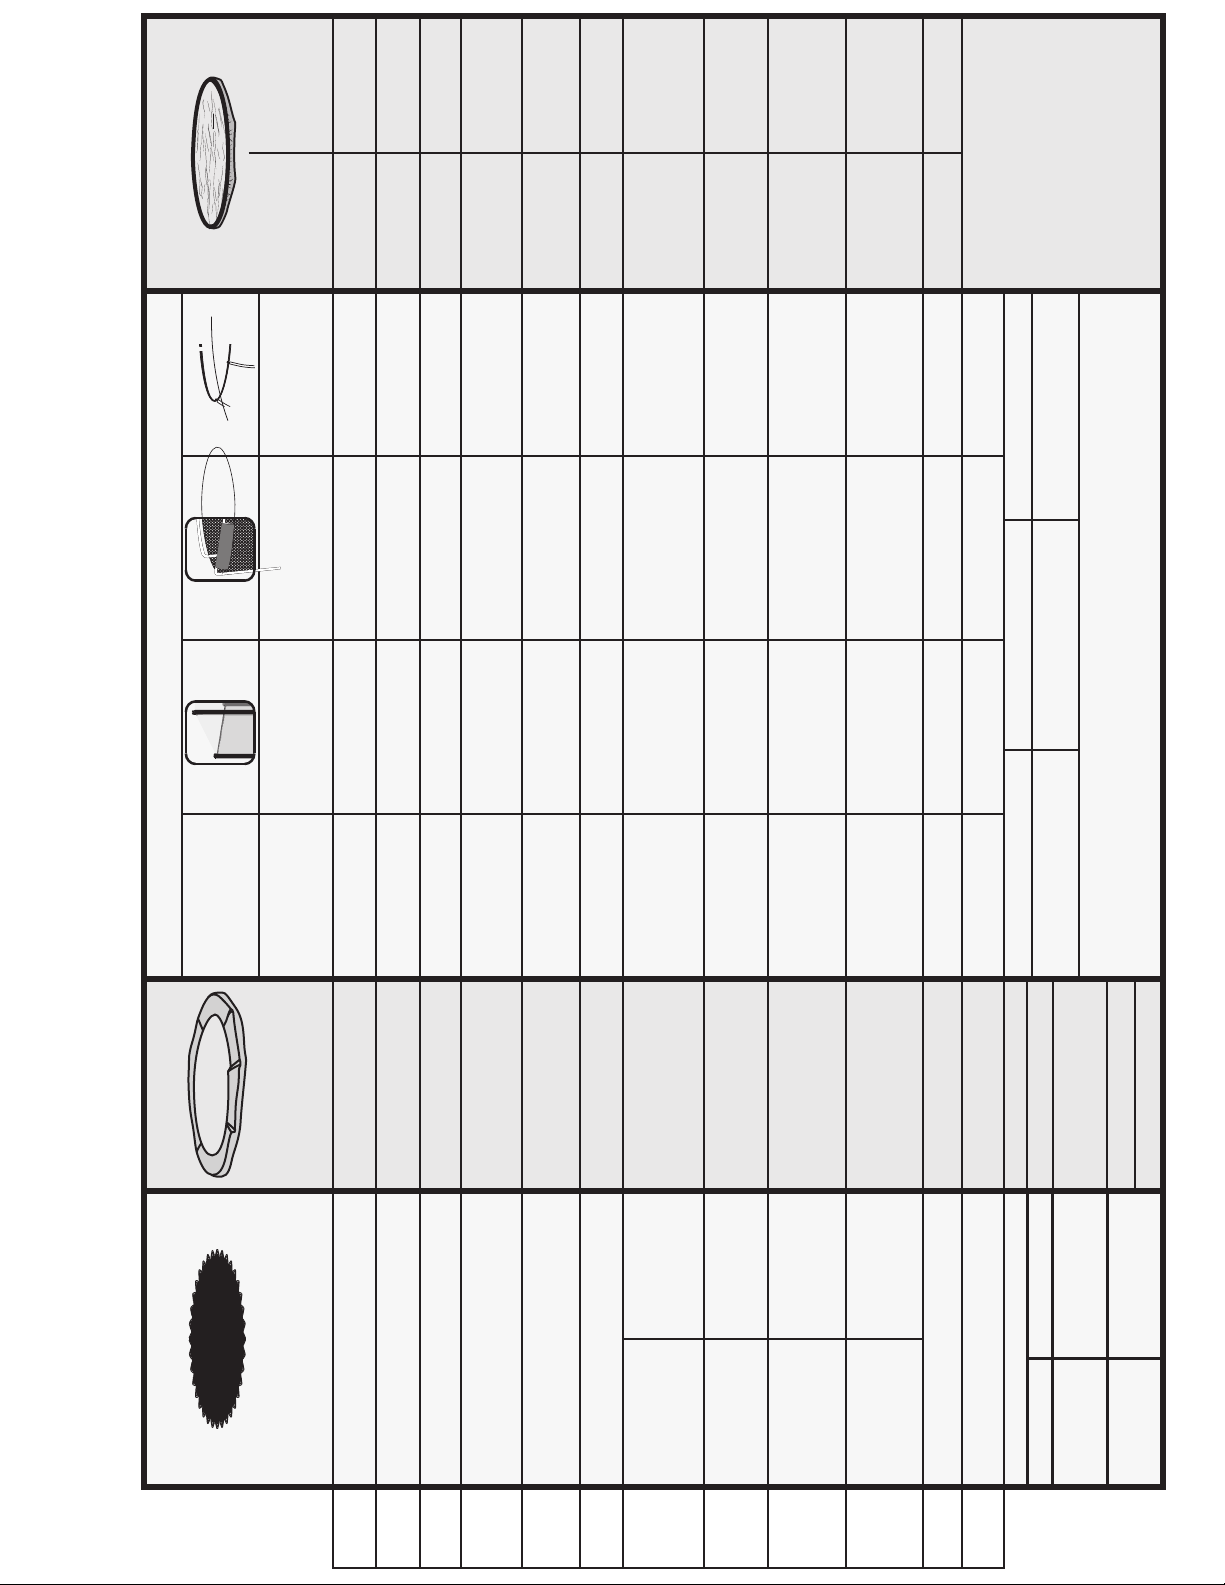
ts list below f
ARTS LIST
k)
rame size)
.
Example
-BK(Blac
UBWC-12(F
e)
oles
poles)
ame siz
Example
-8FG(F r
-6(Amount of
UBNET
e)
ame siz
-7 (F r
Example
UBNET
-3(Amt of arches)-AST
e)
ame siz
r
Example
-7.5(F
-6(Amt of poles)-OS
UBNET
e)
.
UBNET-6-3-AST
.
ved P
Top - Net (Arch) For Cur
ves on
Slee
ype Net (Outside)
T
p
a
Str
UBWC-7.5
UBNET-7-3-AST
-7.5-6-OS
UBNET
UBWC-8
UBNET-8FG-6
UBNET-8-2-AST
UBWC-10
-10-8-OS
UBNET
UBWC-11
UBNET-11FG-6
UBNET-11-3-AST
C-12-BK
UBW
UBNET-12FG-6
UBNET-12FG-4
UBNET-12-3-AST
UBNET-12-4-AST
UBNET-12-2-AST
-12-4-OS
-12-6-OS
UBNET
UBNET
C-13
UBW
UBNET-13FG-6
UBNET-13-2-ASTR
-13-6-OS
UBNET
C-14-BK
UBW
UBNET-14FG-4
UBNET-13-3-AST
UBNET-13-4-AST
UBNET-14-3-AST
-13-8-OS
-14-6-OS
UBNET
UBNET
UBNET-14FG-6
UBNET-14-4-AST
-14-8-OS
UBNET
C-15-BK
UBW
UBNET-15FG-6
UBNET-15FG-8
UBNET-15FG-5
UBNET-15FGB-5
UBNET-15-3-AST
UBNET-15-4-AST
-15-6-OS
-15-8-OS
UBNET
UBNET
UBWC-16
ype
T
sal Net
UBNET-17FG-8
er
v
Uni
Oval Net
UBNET-U1
UBNET-U2
O-1614
O-1715
UBNET
UBNET
ame siz
poles)-IS
r
ou can look for the Upper Bounce par
y
,
ype Net (Inside)
p T
a
Str
Example
-7.5(F
-6(Amount of
UBNET
.
UBNET-7.5-6-IS
ampoline
e)
ame siz
r
Example
-7.5(F
UBPAD-S (Super)
-B(Blue) / P(Premium) /
G(Green) / BG(Blue Green)
e)
ame siz e)
r
Example
-7.5 (F
T
-5.5 (Spring siz
-42 (Amt of springs)
UBMA
our tr
ADS SAFETY NETS
REPLACEMENT P
y
t of
SAFETY P
y par
TS
ou need to replace an
y
If
JUMPING MA
UBNET-8-6-IS
AD-S-8-B
UBP
UBPAD-S-7.5-B
-8-60-5.5
UBMA T-8-56-5.5
UBMA T
UBMA T-7.5-42-5.5
-8-40-5.5
UBMA T
UBMA T-8-48-5.5
UBNET-8-4-IS
UBNET-10-6-IS
UBNET-10-8-IS
UBNET-10-4-IS
AD-S-10-B
UBP
UBMA T-10-56-5.5
UBMA T-10-64-5.5
AD-S-11-B
UBP
-11-60-5.5
-11-72-5.5
T
UBMA T
UBMA
UBNET-12-4-IS
UBNET-12-6-IS
UBNET-12-8-IS
AD-S-12-BG
AD-S-12-B
UBPAD-S-12-G
UBP
UBP
-12-80-7
-12-84-5.5
-12-84-6.5
T
T
UBMA T
UBMA T-12-60-5.5
UBMA
UBMA
-12-72-5.5
-12-60-7
-12-72-7
T
UBMA T
UBMA T
UBMA
UBNET-13-6-IS
UBNET-13-8-IS
AD-S-13-B
UBPAD-P-12-B
UBP
-13-84-5.5
-13-84-7
UBMA T
UBMA T
-12-80-5.5
-13-80-5.5
-13-72-5.5
T
UBMA T
UBMA T
UBMA
UBNET-14-4-IS
AD-S-14-B
UBP
-13-88-7
-14-84-8.5
T
UBMA
UBMA T
-13-80-7
T
T-14-72-5.5
UBMA
UBMA
UBNET-14-6-IS
UBNET-14-8-IS
AD-P-14-B
AD-S-14-BG
UBPAD-S-14-G
UBP
UBP
-14-96-8.5
-14-88-8.5
T
T-14-88-7
T-14-96-7
T
UBMA
UBMA
UBMA
UBMA
-14-80-7
-14-80-5.5
T-14-72-7
T
T
T-14-84-7
UBMA
UBMA
UBMA
UBMA
UBNET-15-6-IS
UBNET-15-8-IS
AD-P-15-B
AD-S-15-B
AD-S-15-BG
UBPAD-S-15-G
UBP
UBP
UBP
-15-96-8.5
-15-96-6.5
-15-100-7
T
T
T
UBMA
UBMA
UBMA
-15-96-7
UBMA T-15-84-6.5
UBMA T-15-90-7
UBMA T
UBNET-16-6-IS
AD-S-16-B
UBP
-16-108-7.5
UBMA T
Arch Net - Square
UBNETSQ-1313-4
ads Square
ety P
Saf
TYPE
THER
O
G-S-148-B
ADSQ-13
ads Rectangular
ADRT
UBP
ety P
UBP
Saf
UBMA TSQ-13
UBMA TO-1715-96-7
UBMA TO-1614-96-7
t
ts
Oval Ma
Square Ma
UBPADO-1614
ads Oval
G-S-159-B
ety P
ADRT
Saf
UBP
ADO-1715
UBP
-1273
-1378
-1484
T
T
T
UB-BMA
UB-BMA
UB-BMA
UBMA TO-1614-96-5.5
ts
Band Ma
SIZE 6
SIZE 7
SIZE 7.5
SIZE 8
SIZE 10
SIZE 11
SIZE 12
SIZE 13
SIZE 14
SIZE 15
SIZE 16
SIZE 17
Page 16
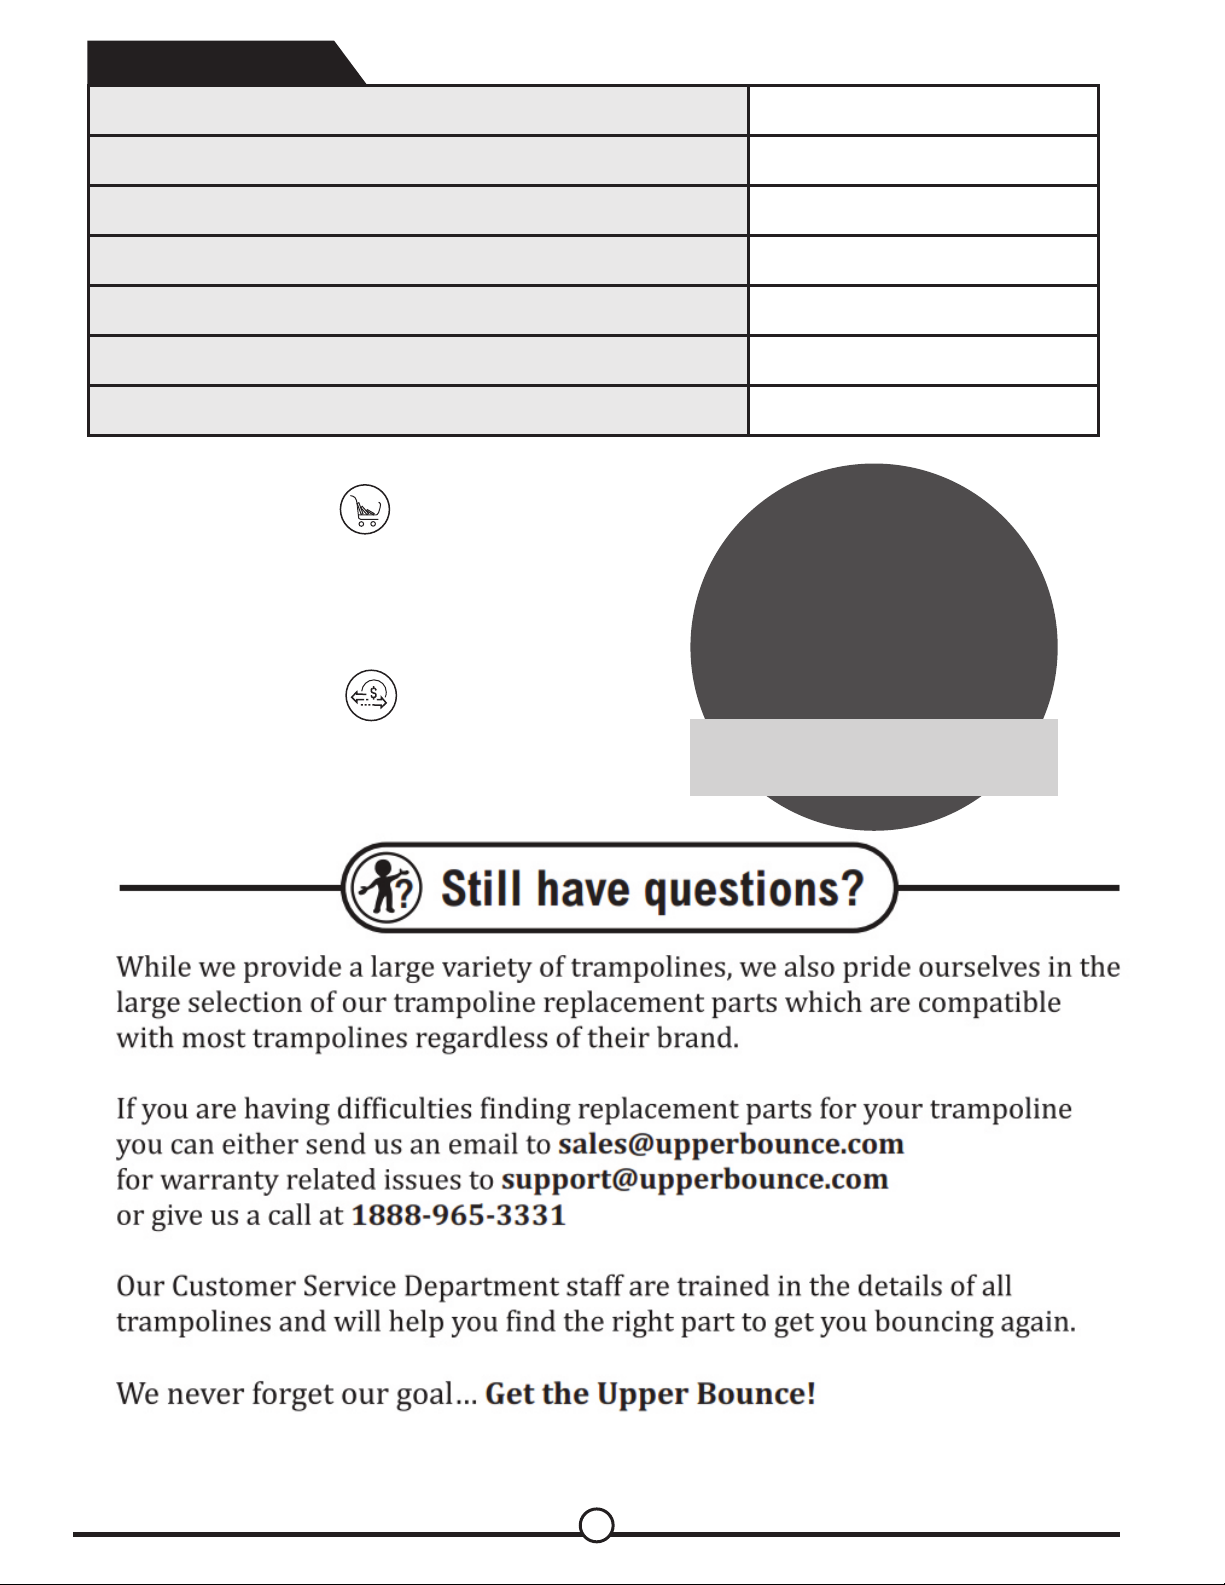
Other Accessories :
Ladder
Ladder with Flat Steps
Trampoline Shoe Bag
Trampoline Anchor Kit (Set of 4)
Deep Fastening Spiraled Anchor Kit - Set Of 4
Trampoline Spring Pull Tool (T-Hook)
Upper bounce Trampoline Jumping Skate
®
To explore all trampoline parts
Checkout our buying guide at
www.upperbounce.com/buyingguide
UBL3S-42-G
UBLBFS3-42
UBSHB-3
UBHWD-AK-4
UBHWD-AKB-4
UBHWD-TH
UB-TJB
Take
15% OFF
for any trampoline parts
purchased from us
To process an exchange go to
http://www.upperbounce.com/exchange
Still have questions?
?
USE CODE: 15OFFMANUAL
16
 Loading...