

Page 1
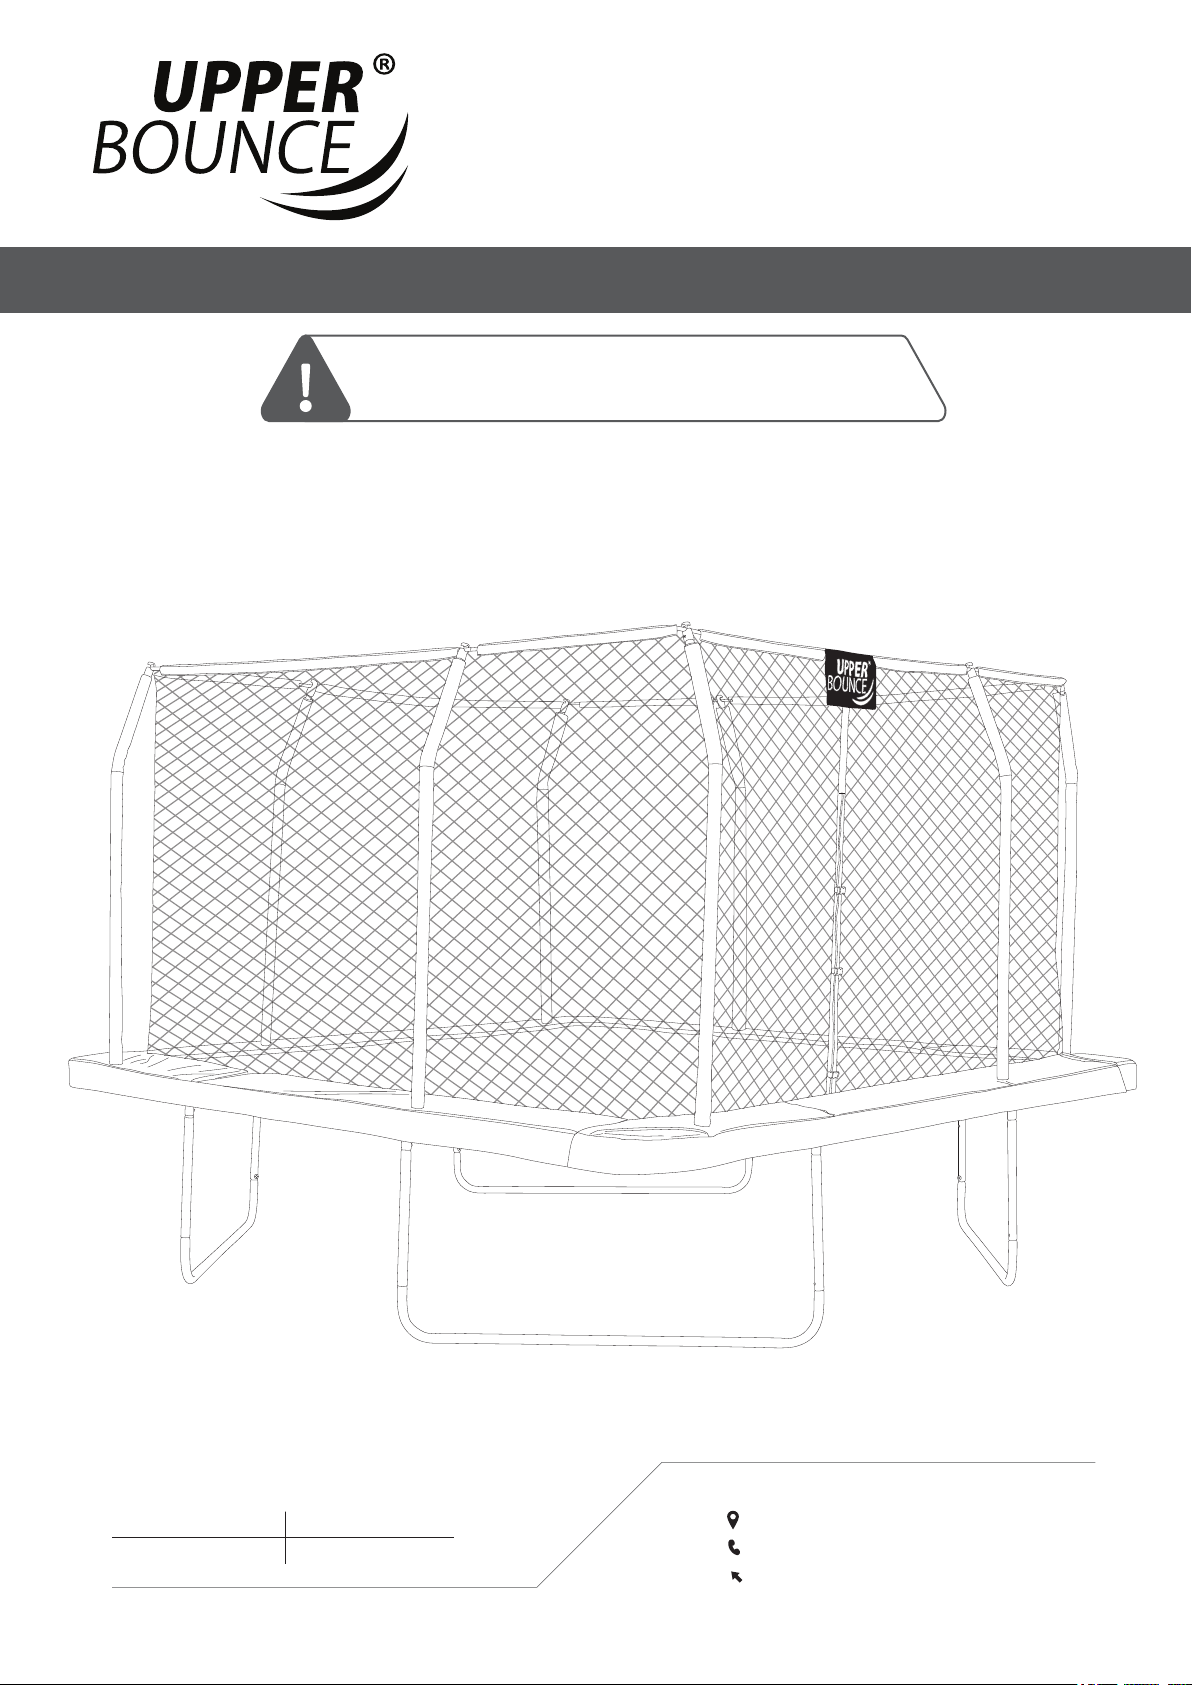
EASY ASSEMBLE/DISASSEMBLE
TRAMPOLINE
USER MANUAL
ASSEMBLY, INSTALLATION, CARE, MAINTENANCE AND USE INSTRUCTIONS.
WARNING: READ THESE MATERIALS PRIOR
TO ASSEMBLING AND USING THIS TRAMPOLINE.
MODEL#
UBSQ01-12-BG
UBSQ01-16-BG
UBSQ01-12-OB
UBSQ01-16-OB
UPPER BOUNCE INC.
2 MILL ST. CORNWALL NY 12518
1-888-965-3331
WWW.UPPERBOUNCE.COM
Page 2
USA UK
CALL US
EMAIL US
CHECK OUT OUR
WEBSITE
for purchasing the UPPER BOUNCE® Trampoline part
Simply follow the assembly and safety instructions in this manual and
you will soon be starting your UPPER BOUNCE
Should you have any questions, please call our Customer Service Department
1-888-965-3331 020-3150-0484
WWW.UPPERBOUNCE.COM
Thank you
®
exercise program for a
happier, healthier lifestyle and fun!
Toll-free number: 1-888-965-3331
MONDAY - THURSDAY
9:30 AM - 5:00 PM
Eastern Time
TABLE OF CONTENTS
Introduction, Guidelines, Additional Tips, Warnings................................ 3-7
Trampoline Frame Parts List........................................................................ 8
Overall Parts with Item Code ..................................................................... 9
Trampoline Frame Assemble................................................................ 10-11
Trampoline Mat Assembly......................................................................... 12
Trampoline Pad Assemble ......................................................................... 13
Enclosure Set Parts List............................................................................. 14
Enclosure Set Assemble .......................................................................15-16
FRIDAY
9:00 AM - 12:00 PM
Eastern Time
Enclosure Set Disassembly........................................................................ 17
Testing the Trampoline .............................................................................. 18
Fundamental Bounce Techniques .............................................................. 19
Replacement Parts List.............................................................................. 20
Page 3
INTRODUCTION
Before you begin to use this trampoline, you must read all the information in this manual. Just
like in any other type of physical recreational activity, participants can be injured. To reduce the
risk of injury, please carefully read and follow the appropriate safety rules and tips.
Misuse and abuse of this trampoline is dangerous and can cause serious injury!
Trampolines are rebounding devices which propel the performer to unaccustomed heights
through a variety of movements. So always use caution when playing on a trampoline.
Always inspect the trampoline before each use.
Proper assembly, care and maintenance of product, safety tips, warnings and proper techniques
in jumping and bouncing are included in this manual. All users and supervisors must read and
familiarize themselves with these instructions. Anybody who chooses to use this trampoline
must be aware of their own limitations in regards to permorming various jumps and bounces
with this trampoline.
Initially, you should get accustomed to the feel and bounce of the trampoline. The focus must be
on your body position and you should practice each fundamental bounce until you can do each
skill with bounce before moving on to more difficult and advanced bounces. Do not behave
recklessly on the trampoline, emphasis must be made on good control and the mastering of
various bounce techniques.
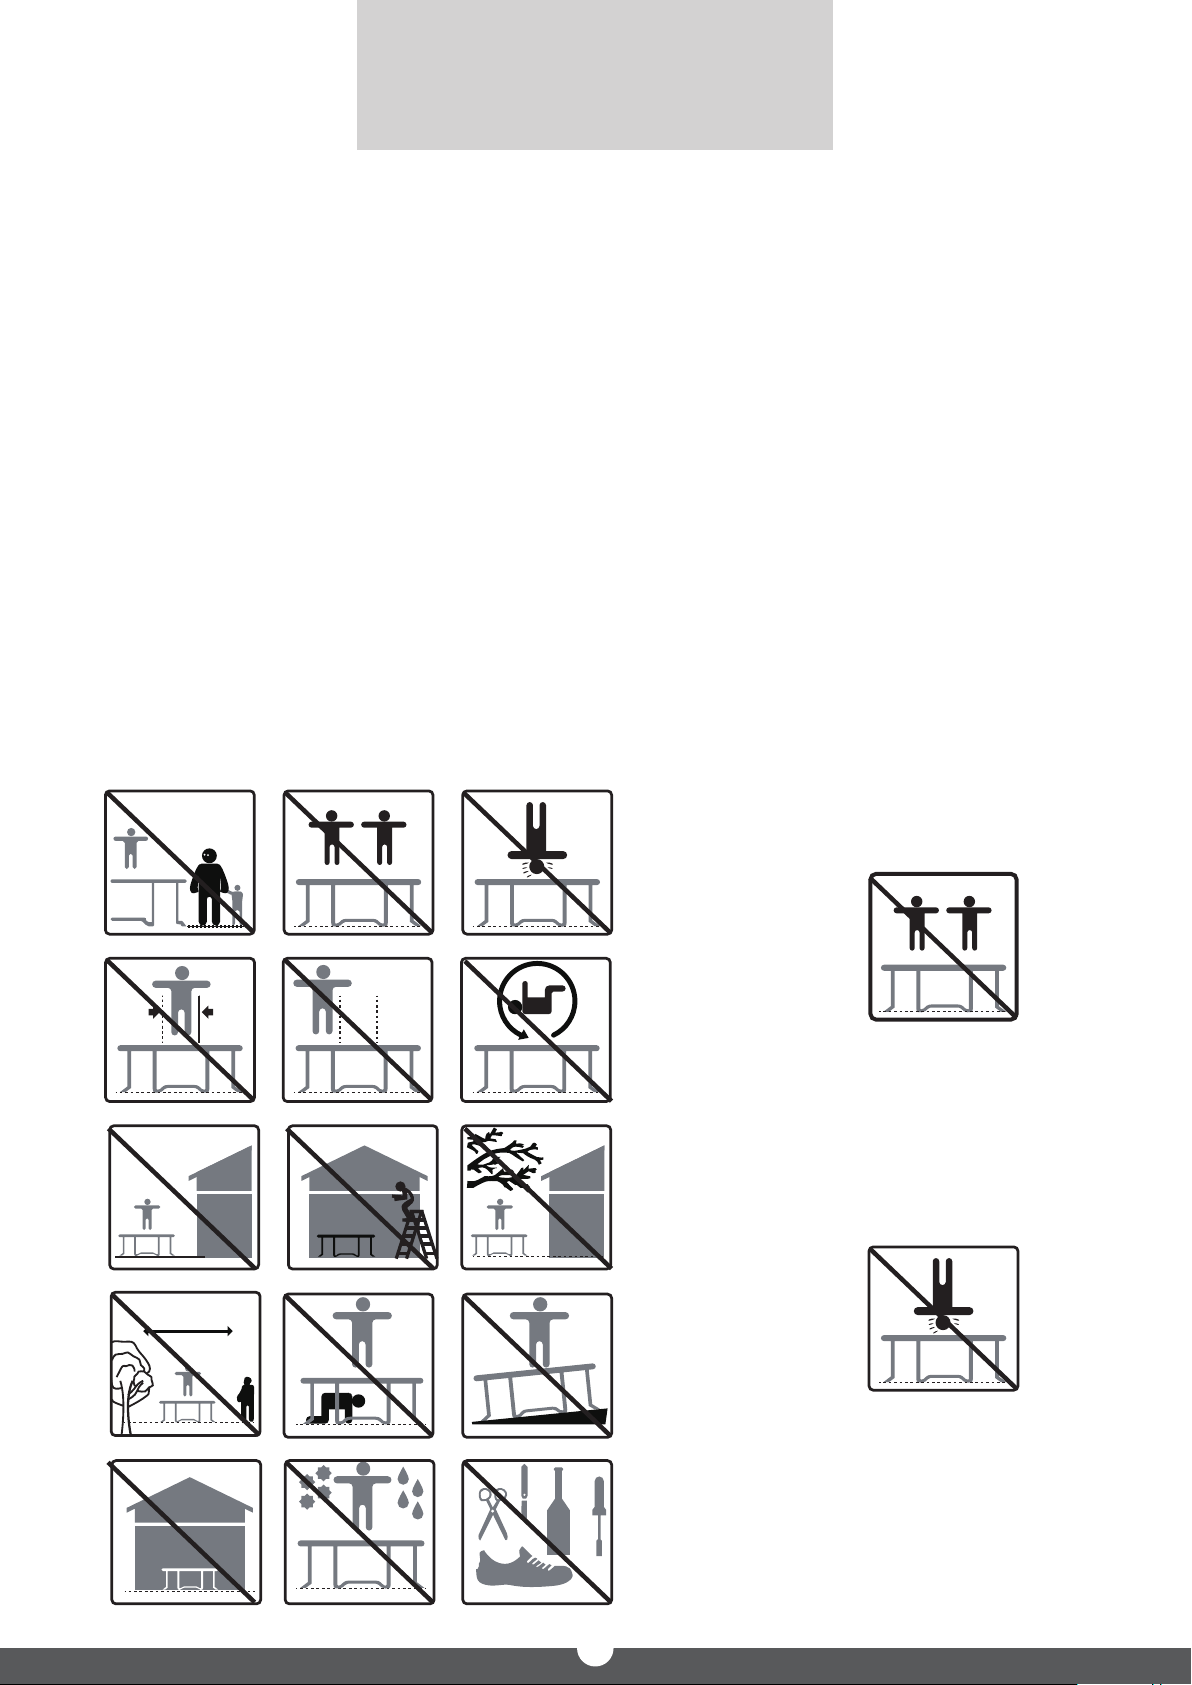
>8m
No more than one person is
allowed on the trampline!
Multiple jumpers increase the
risk of mid-air collisions
resulting in injury.
Do not perform somersaults
(flips) as this will increase the
chances of landing on your
head or neck. Paralysis or
even death can result.
3
Page 4

TRAMPOLINE GUIDELINES
1. GENERAL INSTRUCTIONS
1.1 Purpose
• The product is intended for home/domestic use only and is not suitable for
professional or medical uses.
• The maximum weight is 400 lbs. Overloading the trampoline above the
recommended user weight will cause damage to the trampoline which is not
covered by warranty.
1.2 Danger for children
• Do not let unsupervised children near this product. Carry out the necessary
safety precautions and supervise all trampoline activities. Be aware that the
packaging material is not suitable for children. There is a danger of suffocation!
• Trampolines over 51 cm (20 inches) in height are not recommended for children
under 6 years of age. Children do not recognize potential dangers of this product.
Keep children away from this product, it is not a toy. The product has to be
stored out of reach of children and pets.
1.3 Attention - Product Damages
• Do not alter the product. Only use original spare parts. Repairs should only be
carried out by qualified technicians. Improper repairs can compromise the safety
of your trampoline. Use this product only as described in this manual.
• Protect the product against humidity and high temperatures.
1.4 Advice for the assembly
• The assembly of the product must be done carefully by at least two able-bodied
adults. If in any doubt, ask a technically qualified person.
• Before you start assembling the trampoline, read all the instructions in this
manual.
• Remove all packaging materials and lay down all parts on a free space. This gives
you an overview and siplifies the assembly procedure.
• Confirm that all parts are present. Dispose of the packaging material when the
assembly is completed.
• Beware that when using tools or doing technical work there is always a risk of
injury, therefore assemble the product carefully.
• Create a danger free environment, for example: Do not leave tools scattered
around the workspace.
• Store the packaging material in a way that cannot cause any danger. Foils and
GENERAL INSTRUCTIONS
plastic bags are dangerous for children (danger of suffocation!)
4
Page 5

TRAMPOLINE GUIDELINES (Cont.)
• After installing the product according to the instruction manual, please make sure that all
screws, bolts and nuts are correctly installed and tightened and that all joints are tightly
fixed.
• A clearance space of at least 7.3m is necessary above the trampoline. An appropriated
clearance must be kept between the trampoline and possible sources of danger, such as
electric cable, tree branches, playing devices, swimming pools and fences.
• The trampoline must be set up properly before use.
• Never set up the trampoline in rainy, windy or stormy conditions. Especially lightening
conditions. It is recommended that the trampoline be taken apart and sored in bad
weather.
• The metal frame of the trampoline will conduct electricity, lighting, extension cords and
all electrical equipment must never be allowed to come in contact with the trampolline.
• The trampoline must not be used in the vicinity of other leisure devices and
constructions.
• When assembling or disassembling, please use gloves to protect your hands.
Additional Tips
• For additional stability you can place sand bags on the trampoline legs. This will prevent
the trampoline from tipping over in the event of any sideward force.
• Do not use during pregnancy.
• Do not use when suffering from high blood pressure.
• Do not wear shoes while jumping. This will damage the jumping mat which is not
covered by the warranty.
• No smoking.
• Do not put cigarettes, pets, sharp objecs or any other foreign objects on the
trampolines.
• Do not use the trampoline when under the influence of alcohol or drugs.
• Do not sit or lean on the cover pad as it needs to be flexible so it can move with the mat.
Please do not allow small children to pull themselves up onto the trampoline by using the
cover pads. Tears in stitching caused by obstructing frame pads are not covered by
warranty.
• Place trampoline on level ground. Preferably on grass. Locating the trampoline on a hard
surface will add stress to the frame and over time cause damage which is not covered by
the warranty. Placing the trampoline on uneven surfaces may result in the trampoline
tipping over.
• Do not expose the trampoline to direct contact with open flames.
• Secure the trampoline against unauthorized use.
• Do not use if trampoline is wet.
• Trampoline should be tied down with anchors during windy conditions or disassembled
and stored away.
GENERAL INSTRUCTIONS
5
Page 6
TRAMPOLINE GUIDELINES (Cont.)
WARNING:
1. Please ensure that the safety enclosure net zipper is 100% closed and all three
entrance clips are closed before jumping.
2. Do not intentionally jump into the safety net, it is only designed to stop persons
from falling off the trampoline. Intentional jumping into the safety net may cause
the trampoline to topple over, or may damage your net. Abuse of the safety net
is considered negligent use which is not covered by the warranty, please refer
to the disclaimer.
2. SAFETY INSTRUCTIONS FOR TRAMPOLINES
• All users of the trampoline need a supervisor. Regardless of the age or experience of the
user.
• The safety instructions of the trampoline should always be considered and obeyed.
• Somersaults should be avoided. Incorrect landings on the trampoline can lead to injuries,
particularly to the back, neck or head. Injuries may include paralysis, or even death.
• Only one person should use the trampoline at a time. Multiple users on the trampoline
will increase the risk of collision.
• The trampoline has to be examined for damaged, wearing or defective parts before each
usage, as they can impair the overall safety of the trampoline. The damaged, worn or
defecive parts should be replaced immediately. In the meantime the trampoline must be
restricted from access.
• No clothes with hooks or parts may be carried when jumping on the trampoline, in
order to avoid hooks getting caught.
• The trampoline must be set up only on a flat ground and non-slippery surfaces.
• Strong winds can blow the trampoline away. If strong winds are predicted, the
trampoline must be moved to a protected place and taken apart, or fastened to the
ground with cords and moorings.
• Try to avoid moving the assembled trampoline, it could bend during transportation.
Should it be necessary to move the trampoline, please consider the following: at least
four people must be evenly spaced around frame to lift the trampoline off the ground.
The trampoline must be carried horizontally, and if the frame shifts position use four
people to draw the trampoline into shape.
• Trampolines are jumping devices, enabling the user to jump to unusual heights as well as
SAFETY INSTRUCTIONS
into a multiplicity of body movements. Jumping into the trampoline, hitting the frame or
cover pads, and landing incorrectly on the trampoline, can lead to injury.
6
Page 7

TRAMPOLINE GUIDELINES (Cont.)
• Users should be familiar with the user manual. This manual contains assembly
instructions and selected precautionary measures as well as recommendations for
servicing and maintenance of the trampoline, in order to ensure a secured and fun use of
the trampoline.
• It is the responsibility of the owner or the supervisor to guarantee that all users of the
trampoline are informed about all safety rules and that there is sufficient space around
the trampoline as a safety precauion.
• Never place the trampoline near water, and keep sufficient space around it as a safety
precaution.
• Beware of moving parts which could catch your arms and legs.
• Do not stick any foreign objects into the trampoline.
• Do not allow anyone or any object to go under the trampoline while someone is jumping
on the mat. The jumping mat is flexible and the downward force created by someone
jumping can cause serious injuries.
• Implement all safety rules and make yourself familiar with the information in the user
manual.
• The trampolline can only be used if the jumping mat is clean and dry. Worn or damaged
jumping mats should immediately be replaced.
• Objects that could be dangerous should be vacated from the area.
• Avoid unsupervised use of the trampoline.
• Do not use the trampoline under influence of alcohol or drugs (incl. medication).
• Learn the Fundamental Bounce Techniques thoroughly. Before trying difficult jumps, see
section fundamental bounce Techniques.
• Carefully climb onto trampoline. Do not jump into it directly. Do not use the trampoline
as a jump board for other articles.
• For further information or exercise instructions, you can turn to a trained trampoline
teacher.
SAFETY INSTRUCTIONS
7
Page 8
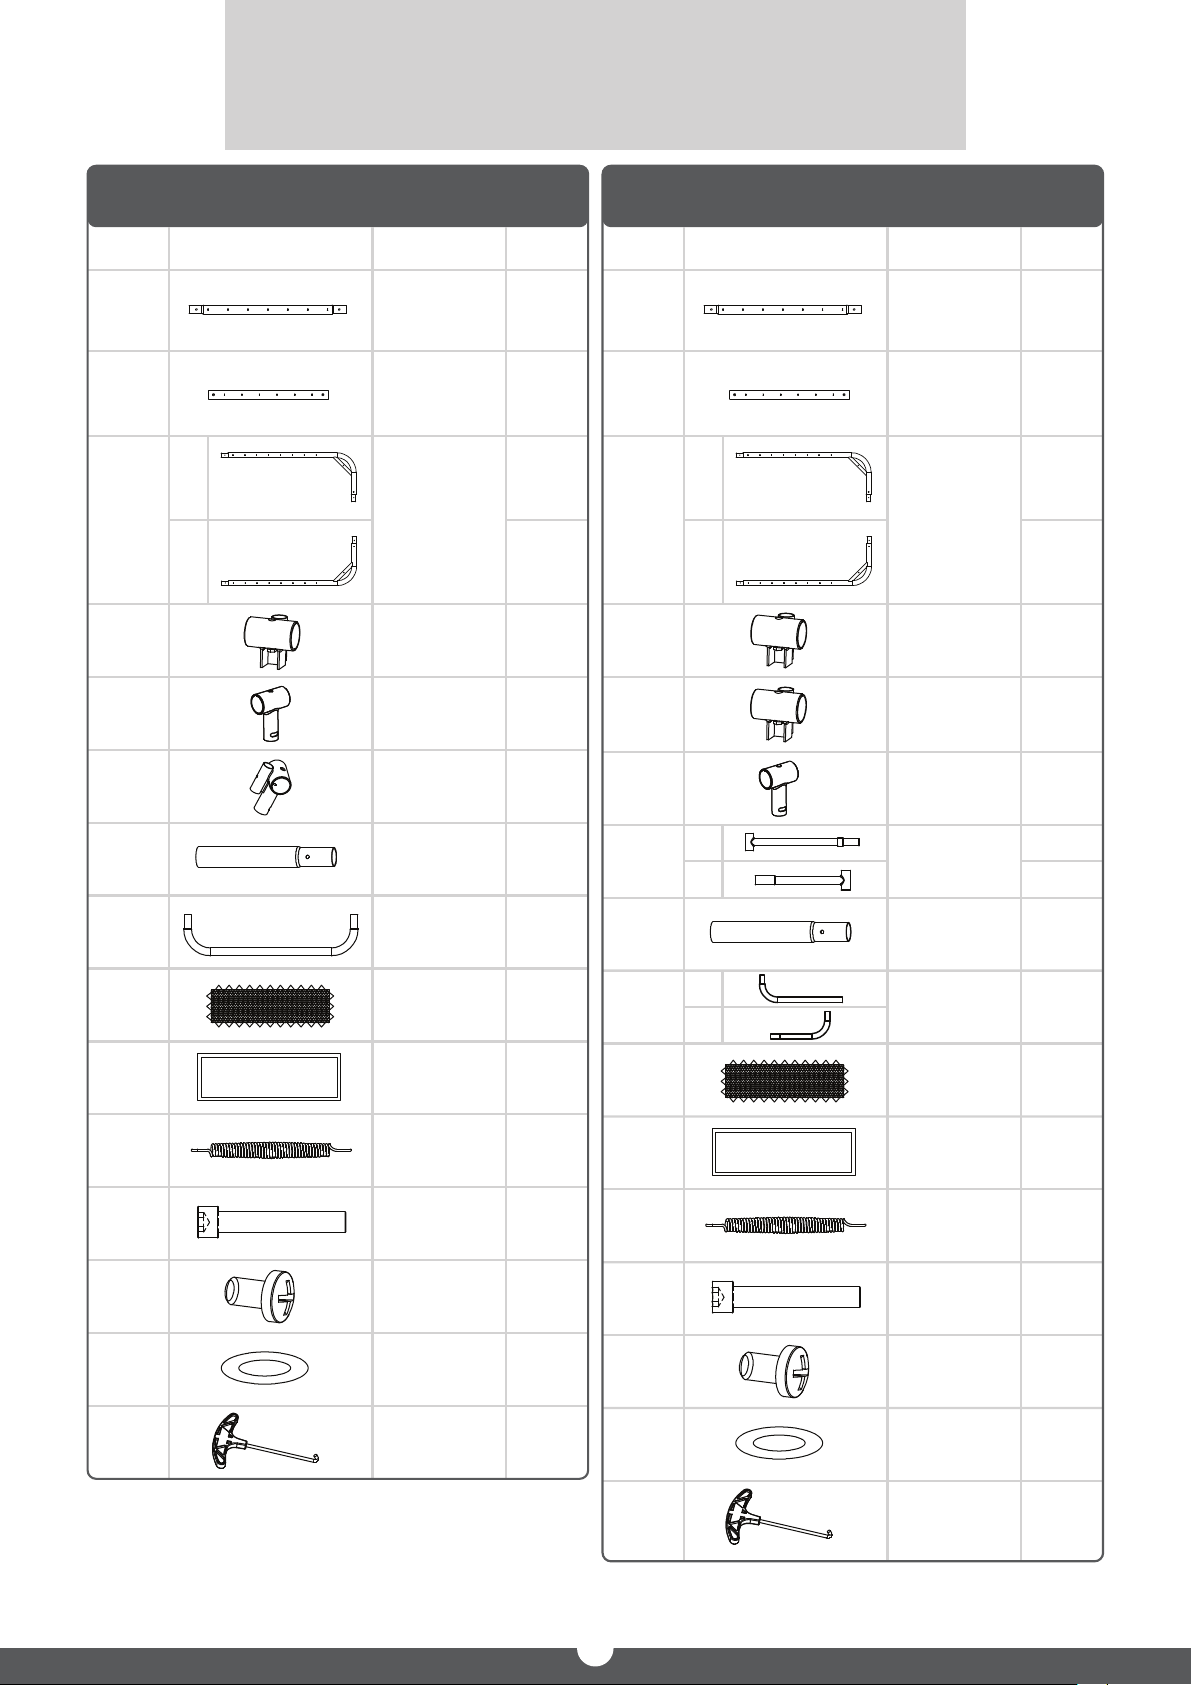
TRAMPOLINE PARTS LIST
UBSQ01-12
ITEM PART IMAGE MODEL QTY.
A
B
C1
C
C2
D
E
F
TOP RAIL A
TOP RAIL B
CORNER
TUBE
T-BAR
STYLE 1
T-BAR
STYLE 2
T-BAR
STYLE 3
4
4
2
2
4
4
4
UBSQ01-16
ITEM PART IMAGE MODEL QTY.
A
B
C1
C
C2
D 8
D-1
E
TOP RAIL A
TOP RAIL B
CORNER
TUBE
T-BAR
STYLE 1
SILVER
T-BAR
STYLE 2
T-BAR
STYLE 3
4
8
2
2
4
8
G
H
K
L
M
N
O
LEG
EXTENSION
LEG
BASE
I
J
JUMPING
MAT
COVER
PADS
SPRINGS
TOP RAIL
BOLTS
& NUTS
LEG BASE
BOLTS
WASHER
SPRING
PULLING
TOOL
8
4
1
1
100
12
16
16
1
F
G
H
K
L
M
N
F1
F2
H1
H2
I
J
LEG
SUPPORT
LEG
EXTENSION
LEG
BASE
JUMPING
MAT
COVER
PADS
SPRINGS
TOP RAIL
BOLTS
& NUTS
LEG BASE
BOLTS
WASHER
4
4
8
4
1
1
156
16
20
20
O
SPRING
PULLING
TOOL
1
8
Page 9
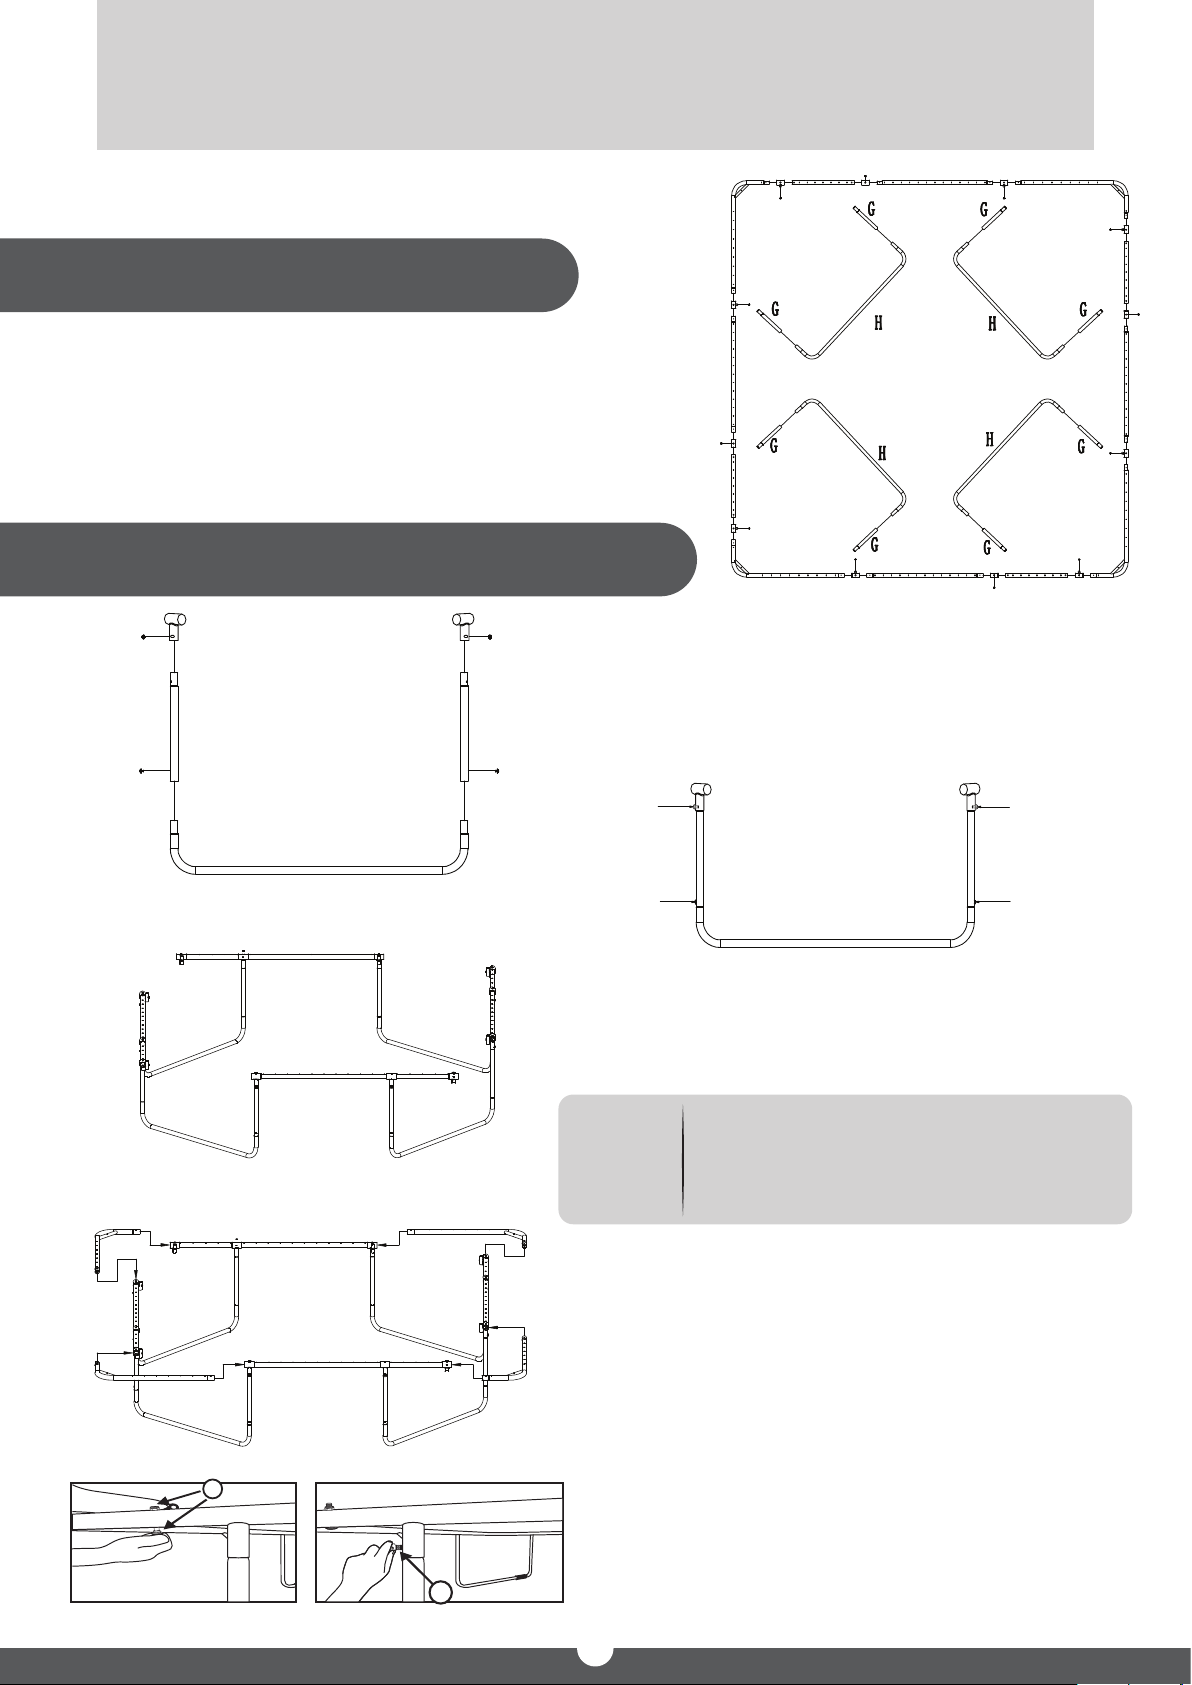
FRAME ASSEMBLY INSTRUCTIONS
FOR UBSQ01-12
Step 1 - Frame Layout
Layout the trampoline parts on the
ground so that you start to form a square
with the top rail sections. Make sure to
keep all the tubes in the same direction
all around the square.
Step 2 - Assemble the Rail with the Legs
M&N
M&N
E
G
F
M&N
1. Assemble each of the Leg Base (H) to the
Leg Extension (G)
Attach the leg extensions to the leg base and
G
tighltly secure together with the Part M bolts
and Part N Washers.
M&N
M&N
C2
F
A
E
B
D
E F
E
FAEBD
M&N
C1
D
B
E
A
F
C2
DBAFC1
C1
C2
H
M&N
B
G G
A
B
G
H H
A
B
A
HH
A
B
GG
G
2. Connect the Top Rails to Leg Bases
NOTE :
G G
M&N
H
Attach the leg supports you assembled in step 2
Part 1 to the top rails as shown on the diagram.
Make sure that all screw holes that
connect the B rails to the legs are
facing the inside of the frame.
B
G G
A
B
G
H H
A
HH
A
B
GG
C2
B
A
3. Attach all the Corners
Attach the corners to the frame.
G
C1
4. Secure
Secure the corner pieces with the bolts and nuts
to tightly put together the top rail
5. Secure Legs
Secure the top rails to the leg bases using bolts
and washers, securing at each leg.
9
Page 10
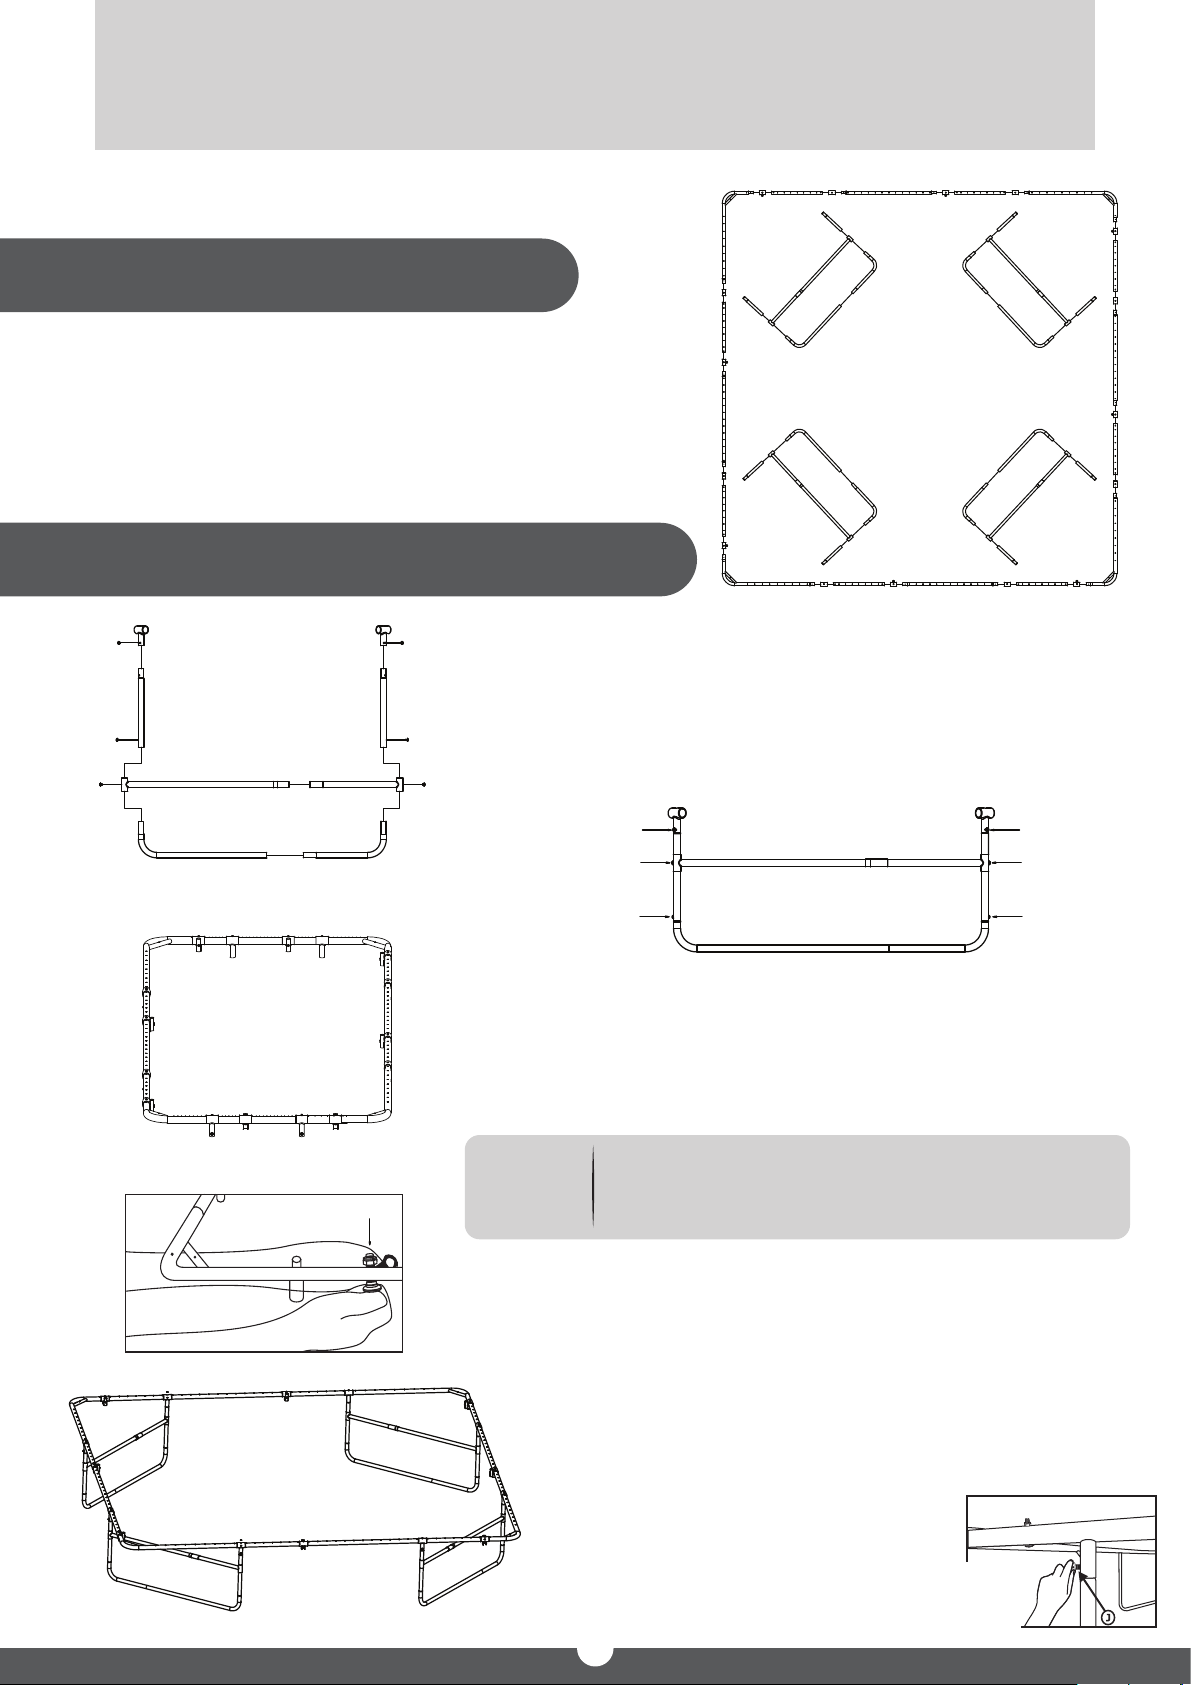
FRAME ASSEMBLY INSTRUCTIONS
FOR UBSQ01-16
Step 1 - Frame Layout
Lay out the trampoline parts on the
ground so that you start to form a
square with the top rail sections. Make
sure to keep all the tubes in the same
direction all around the square.
Step 2 - Assemble the Rail with the Legs
E
G
M&N M&N
F1 F2
H1 H2
C1 B A B E
E
M&NM&N
G
1. Assemble each of the Leg Base (E) to the Leg
Extension (D)
Attach the leg extensions to the base and tightly
secure together with the Part J bolts and Part K
M&NM&N
C2
Washers.
M&N
M&N
M&N
D B E D1 B E
C1
E
B
D1
A
G G
E
B
D
E
F1
G
F1 F1
F2 F2
H1
H1
F2
F1 F1
A C2
G G
H2
H2
G G
H2
H2
A DBED1BEC2
E
F2
D
B
GG
E
H1
H1
F2
M&N
M&N
G
M&N
A
D1
B
E
C1
C1
D1ED
E
B
D1
A
E
B
D1 DEE
B A B
D
D1
B
E
A
B
E
2. Connect the Top Rails Together and Form a
square
Connect 1 part to the other in the same layout
shown until it forms a complete frame.
C1C2
H1
H2
Make sure that all screw holes that connect
L
NOTE :
the A and B parts to the legs are facing the
inside of the frame.
3. Secure
Secure the parts with the bolts and nuts to tightly
put together the top rail.
F1
H2
B
C2
B
G
F1
4. Connect the Leg Bases to the Top Rail
A
D1
B
G
Attach the leg supports you assembled in step 1 to
the top rails as the image shows, repeat this step
to all 4 corners.
C1
5. Secure Legs
F2
G
H1
H2
Secure the top rails to the leg bases using
bolts and washers, securing at each leg.
B
F2
F1
B
D1
G
A
H2
H1 H1
B
F1
G
C2
H2
A
G
F2
G
H1
BD1
G
F2
B
D1
A
10
Page 11
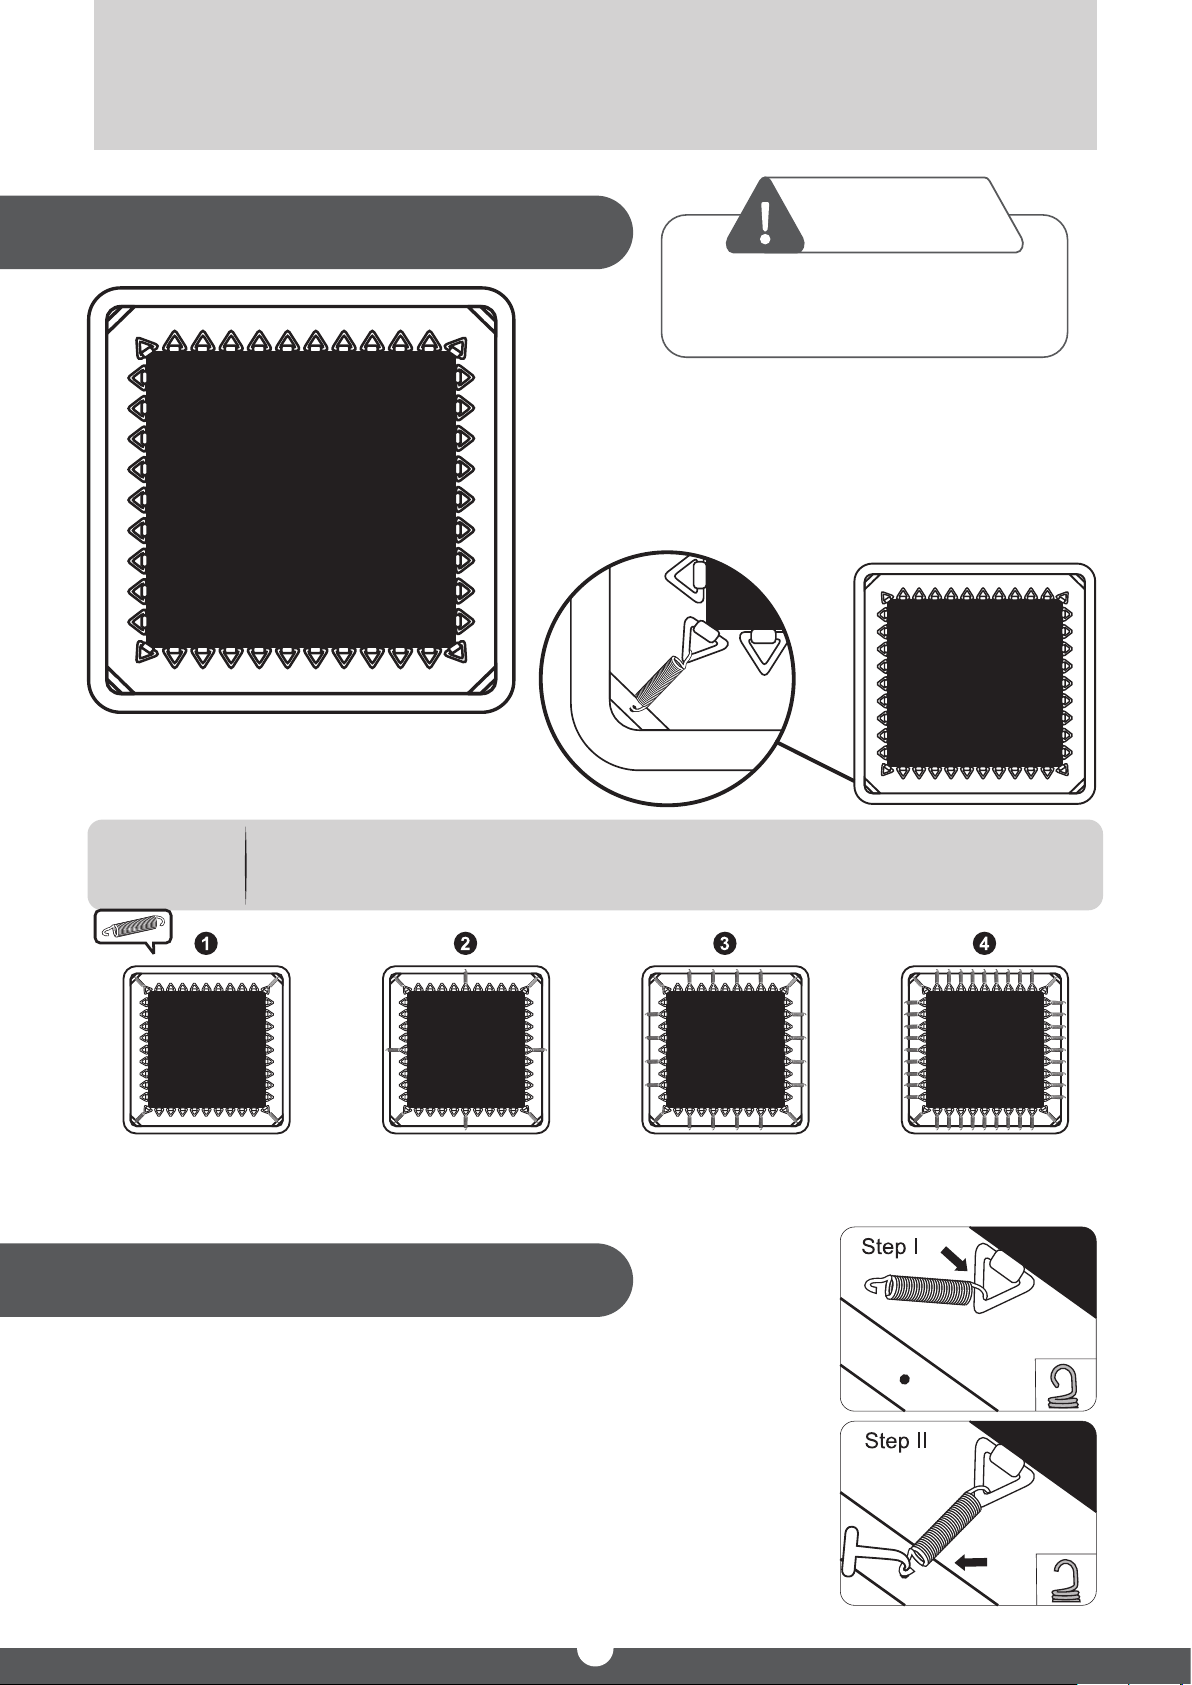
FRAME ASSEMBLY INSTRUCTIONS
Step 3 - Trampoline Mat Assembly
WARNING:
Be careful where you place your
hands during spring assembly as
connector points can pinch!
1. Lay out the Trampoline Mat
inside the frame.
2. Connect all 4 corner springs
to the corner top rails.
NOTE :
First connect
the 4 corner springs
When attaching the springs, attach to mat the end of the spring hooks
that is rounder.
Connect all middle
springs
Continue connecting
every few springs
How to use the Spring Pulling Tool
Step 1: Hook the more rounded end of the spring onto the
Trampoline mat's triangular rings.
Complete all the
rest of the springs
Step 2: Extend the spring pull tool and link it up with the
other end of the spring. Pull the tool in the direction
of the trampoline frame until the spring head is lined
up with the hole in the trampoline frame. Slide the
spring end into the hole as you remove the tool.
11
Page 12
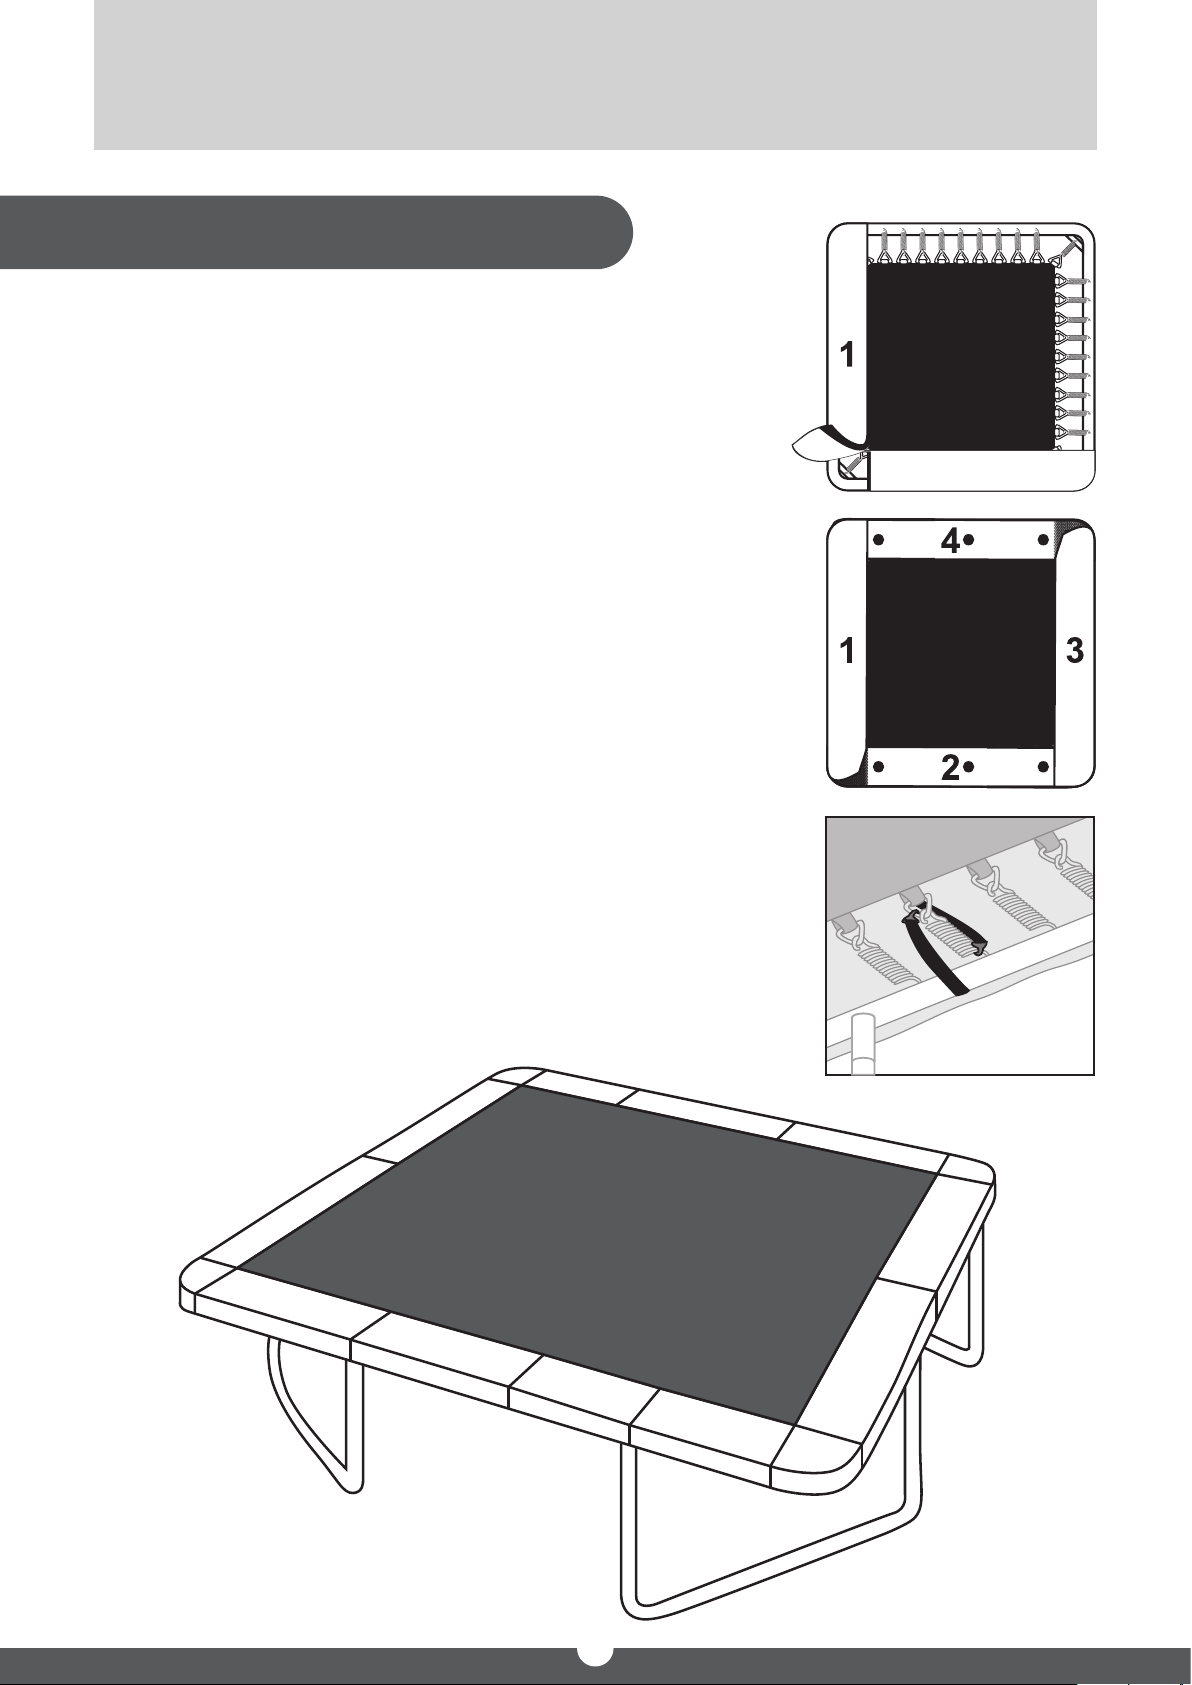
FRAME ASSEMBLY INSTRUCTIONS
Step 4 - Cover Pads Assembly
The trampoline is at a stage close to completion with all
the springs in place. Before using the Trampoline please
attach the provided safety pads.
STEP 1 :
Lay out 2 sides of the pad shown here and connect with
the attached velcro strip.
STEP 2 :
Lay out the other 2 pads and connect with velcro.
STEP 3 :
Tie all the cover pad straps onto the top rail of the
trampoline. The middle of the pad has a set of straps with
two S shaped hooks at the end. Attach one S shaped
hook to the springs of the mat, and the other S shaped
hook to the V-rings of the mat. Attach the hooks from
underneath the mat.
12
Page 13
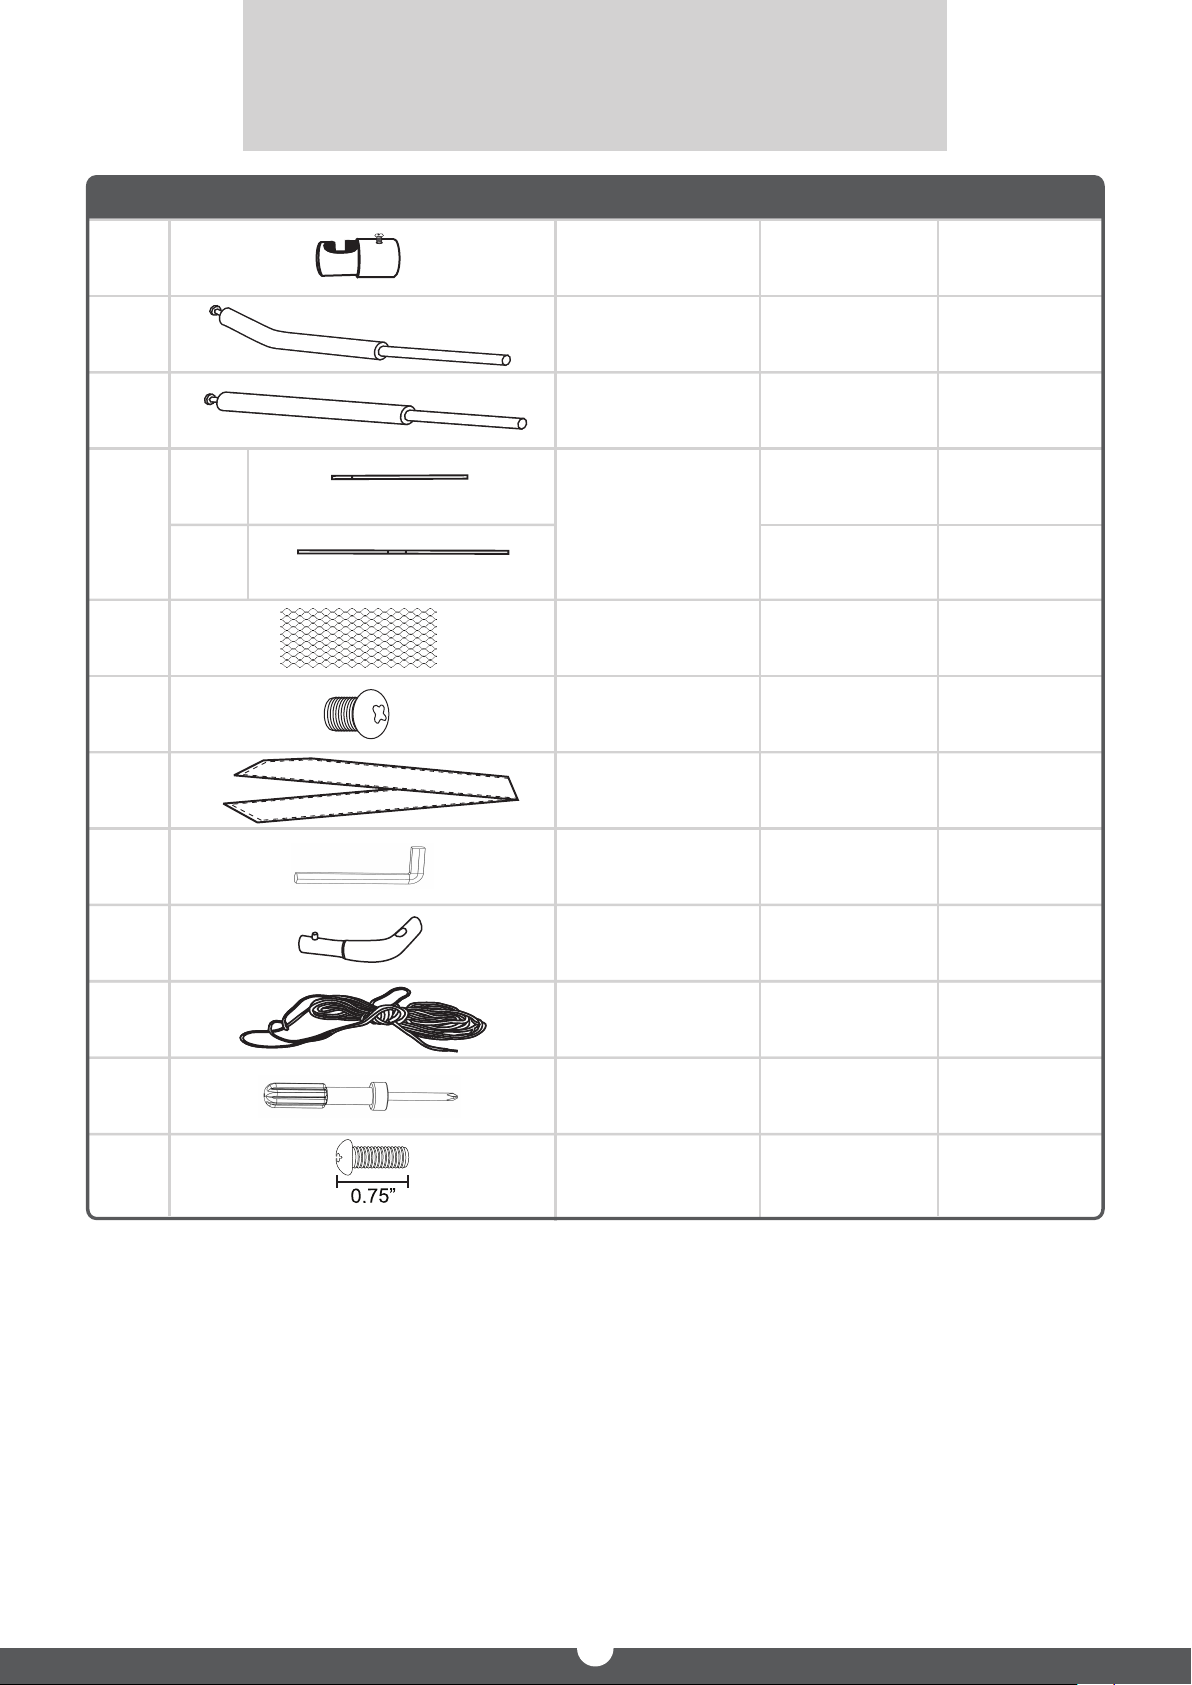
ENCLOSURE PARTS LIST
ITEM PART IMAGE MODEL UBSFQ01-12 UBSFQ01-16
A
B
C
D
E
G
POLE CAP
UPPER POLE
WITH FOAM
LOWER POLE
WITH FOAM
D1
D2
F
102cm
FIBERGLASS
RODS
109cm
SAFETY
ENCLOSURE NET
POLE SCREW
FOAM SLEEVES
COVER
8
8
8
2
1
1
16
8
8
8
8
1
3
1
16
8
H
J
L
I
K
HEX KEY
FIBER GLASS
CORNER
ROPE
SCREW
DRIVER
POLE CAP
bolts
1
4
1
1 1
8
1
4
1
8
13
Page 14
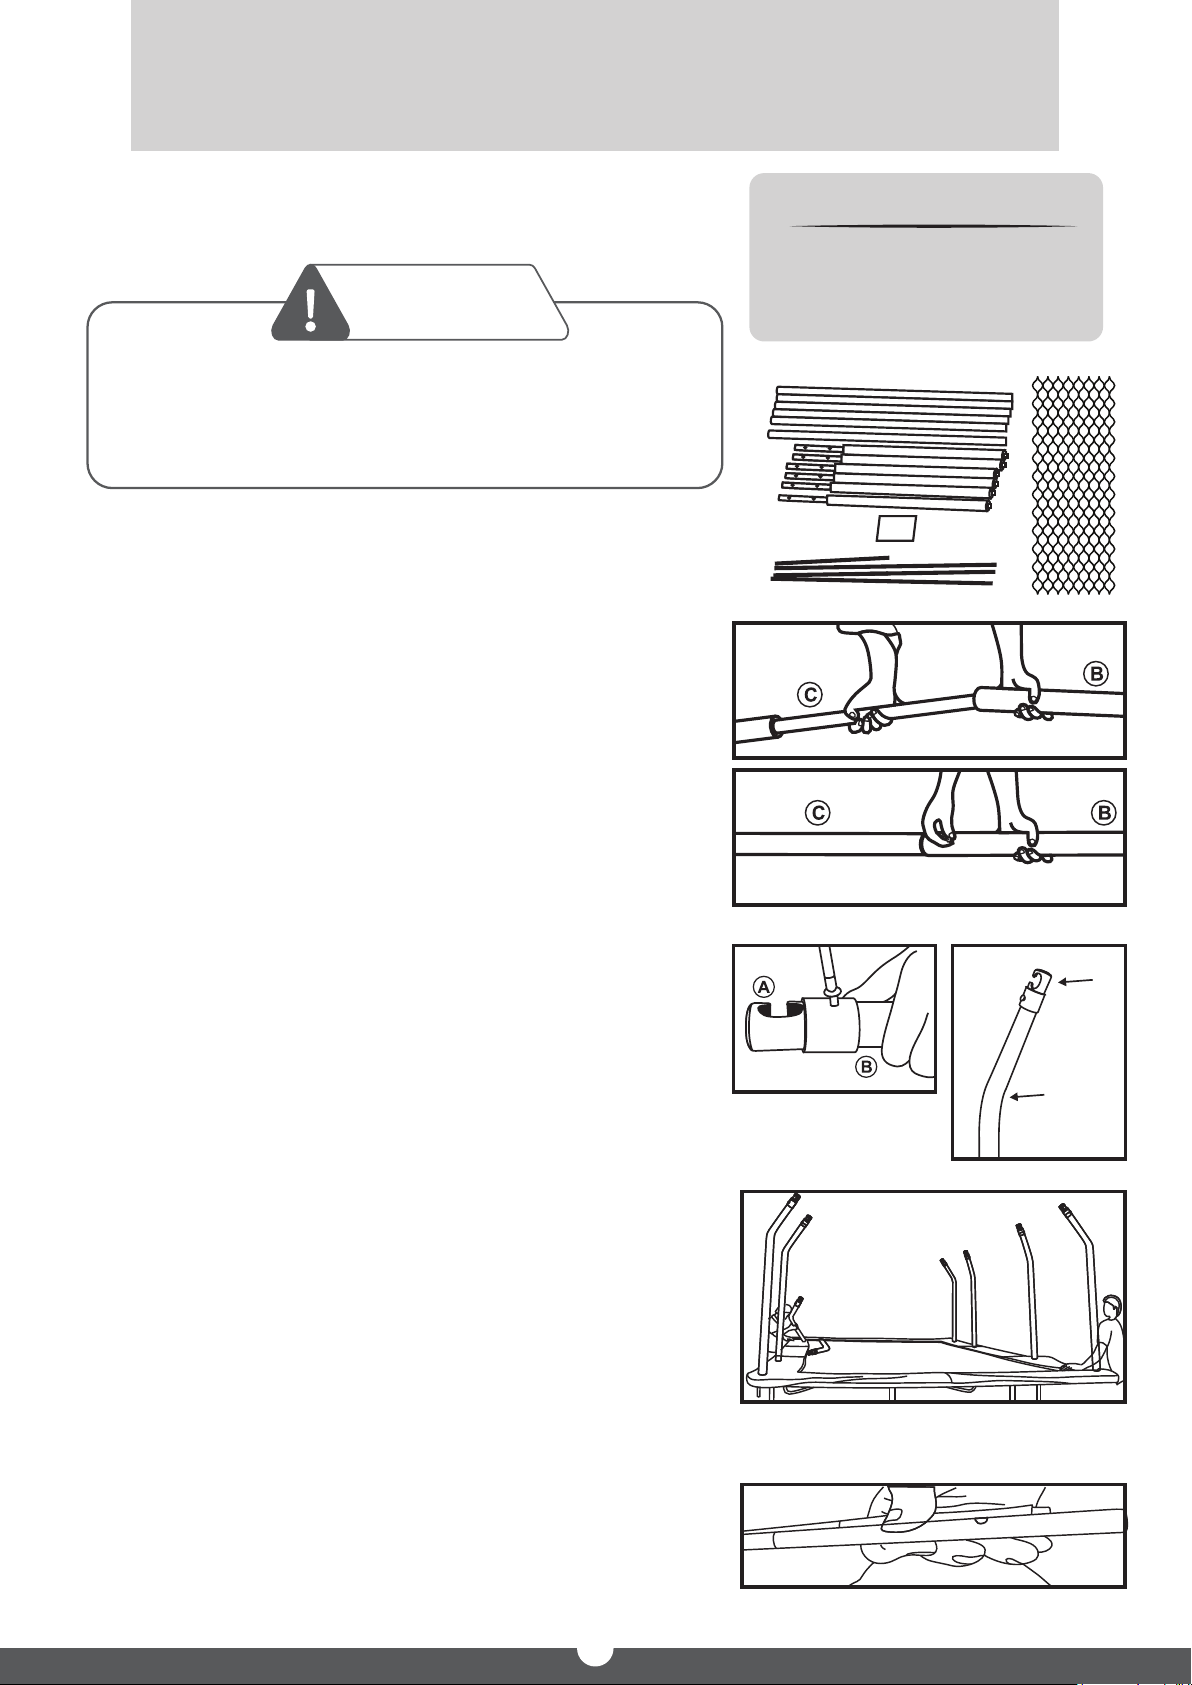
SAFETY ENCLOSURE ASSEMBLY
Refer to PARTS LIST for identification of parts.
WARNING:
Two adults in good physical condition are required for
the following assembly. For your safety, you should
wear proper shoes and clothing. Failure to follow
these instructions and warnings may result in injury.
STEP 1 :
Lay out all parts prior to assembly. We recomment
that two people carry out the assembly.
STEP 2 :
Both ends of the upper pole have openings for
bolts, the end with the bigger hole is meant to
connect to the lower pole. Therefore insert the
lower pole into the upper pole at the end of the
upperpole where the screw opening is bigger.
Then place a screw in the hole at the connection.
Make sure the EPE foam is covering the poles.
NOTE :
Picture may vary slightly
with the different
trampoline models.
STEP 3 :
Connect the pole cap (A) on the top of upper pole
(B). Repeat for each pole.
Refer to the picture to clearly see which way to
attach the pole cap, the opening of the pole cap
has to be on the same side as the outside bend of
the upper pole.
STEP 4 :
Cover all the poles with PVC sleeve (G)
STEP 5 :
Place the assembled poles with the opening of the
pole caps facing away from the trampoline, and
screw the poles into the trampoline frame with
pole bolts.
STEP 6 :
Connect the top ring frame using fiberglass parts
D1 and D2 with quantities specified on Page 13.
14
Page 15
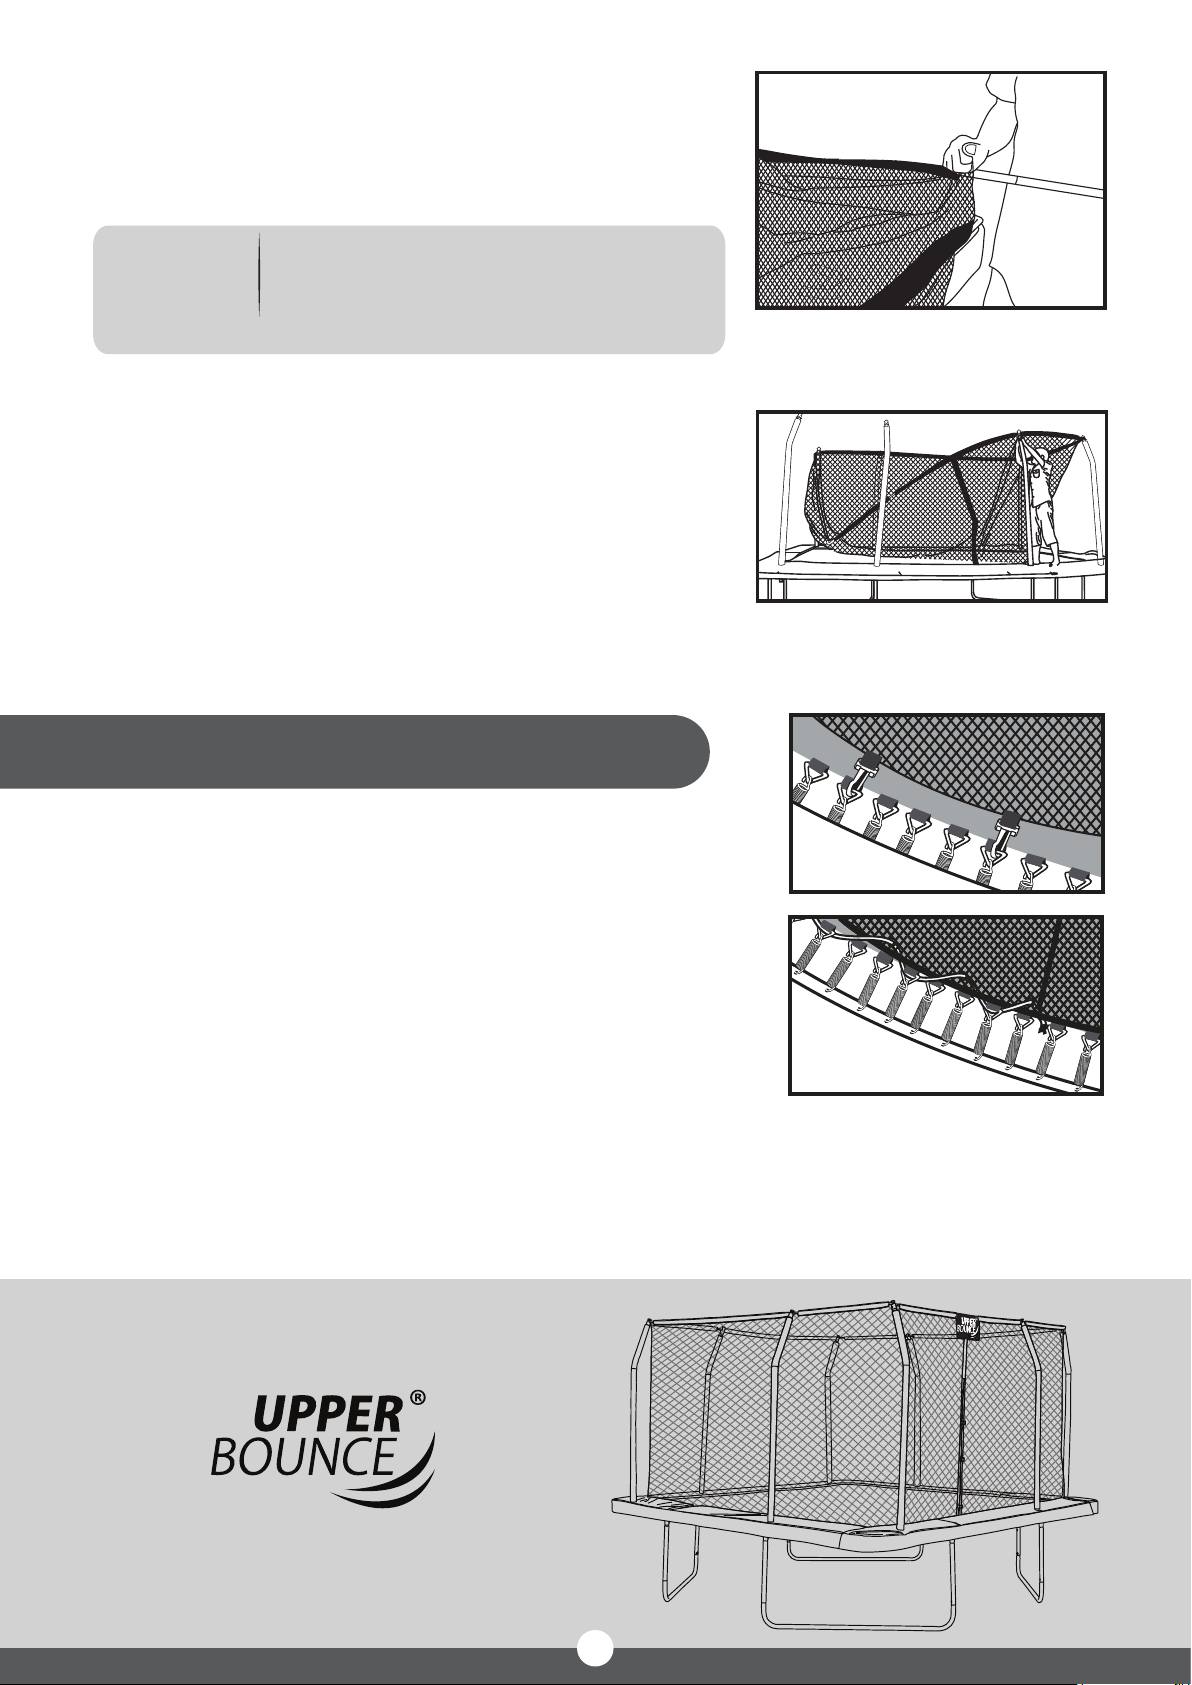
STEP 7 :
Insert the fiber glass into the channel at the top of the
safety net.
Make sure that the opening of the
NOTE :
net (the zipper) is placed
in the
middle of the wider section of net
between poles.
STEP 8 :
Connect
it into the pole caps. Do this step to all 8 poles.
the fiber glass to the top of the poles by clicking
Securing the bottom of the net
1. Connect the net to the V-rings of the trampoline mat using
the attached clips, securing at regular intervals. This holds the
net in place for you to complete the attachment with rope.
2. Secure one end of the rope by knotting it to the V-ring closest
on one side to the trampoline entrance zipper.
3. Weave the rope through the net and every second v-ring
succesively, moving around the trampoline in the direction
away from the entrance zipper.
4. When you complete the weaving and reach the other side of
the entrance zipper, secure the other end of the rope also by
knotting it to the V-ring closest to the entrance on that side.
5. Secure one end of the rope by knotting it to the V-ring closest
on one side to the trampoline entrance zipper.
15
Page 16

TESTING THE TRAMPOLINE
After assembling the trampoline, it is important that you
perform the following safety checks:
Trampoline Safety Checks:
• Using a screw driver, check if all the bolts are tightly secured.
• Look under the trampoline and check all the springs are hooked securely to the
frame and triangle rings.
• Move the Trampoline around and check the sturdiness of the frame.
• Using your two hands, put your body weight on one section of the trampoline
and release to check that the floor is even.
• Inspect the cover pads and check if they completely cover the springs and frame.
• Make sure the strings of the pads are tied securely.
Enclosure Net Safety Checks:
• Hold onto the safety net and shake it to check that all the enclosure poles are
sturdy. Re-tighten any that seem loose.
• Check the safety net for any tears in the stitching or fabric.
• Check the enclosure net zipper and attached to the triangle ring under the
trampoline.
Once all the checks are performed and the trampolines has passed all the initial tests
(above), then have one person test the trampoline by jumping on the centre continuously
for 5 minutes. If the trampoline feels sturdy then your trampoline passes the test.
Congratulations,
you have completed the
trampoline assembly!
Remember to abide by
all the safety rules.
Have fun, play safe...
TESTING THE TRAMPOLINE
16
Page 17
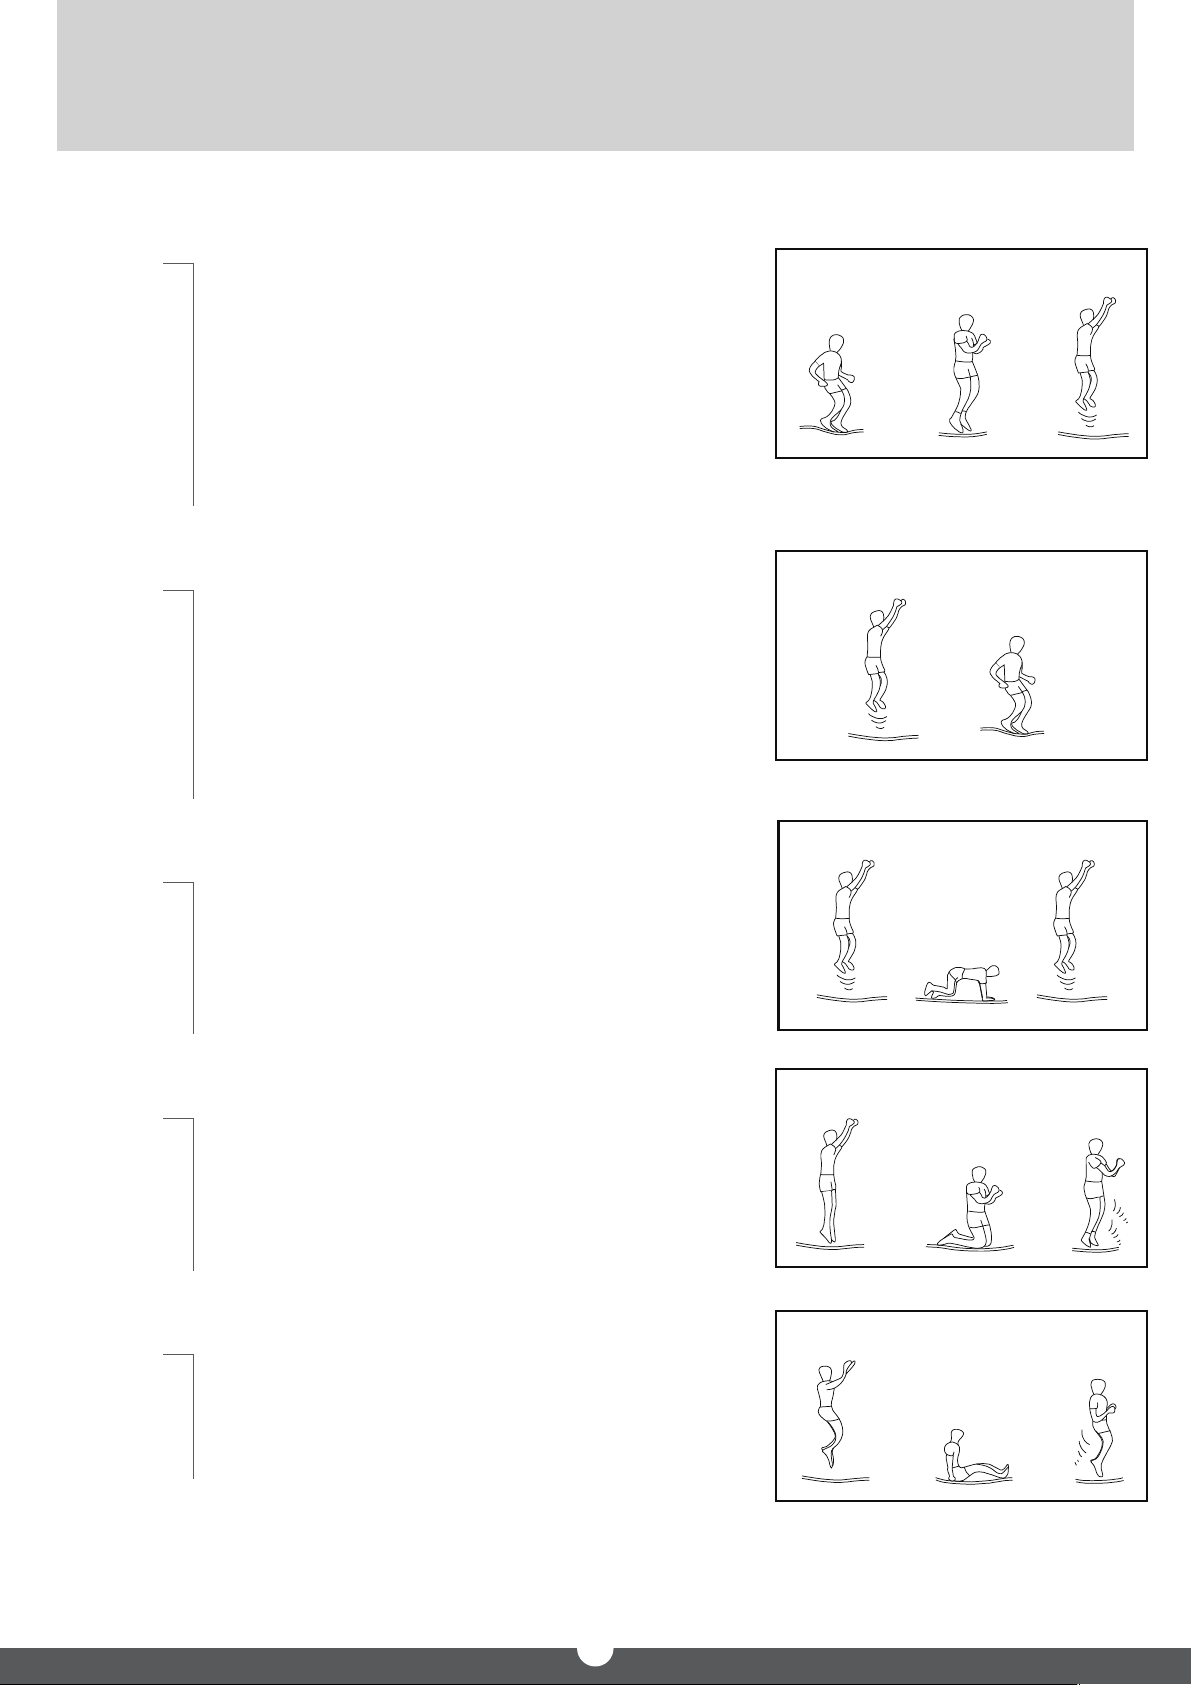
FUNDAMENTAL BOUNCE TECHNIQUES
The Basic Bounce
• Start from a standing position, feet shoulder width
apart with head straight and eyes on the mat.
• Swing your arms forward and up and around in a
circular motion.
• Bring feet together while in mid-air and point toes
downward.
• Keep feet shoulder width apart when landing on
mat.
The Breaking Maneuver
• Occasionally the user may lose control of their
jump and bounce
maneuver will allow the user to regain control of
the jump and their balance.
wildly. Performing the breaking
• Start with a basic bounce.
• As you land, bend your knees sharply and this will
allow you to stop your jump.
The Hands and knees bounce
• Start with a low controlled basic bounce.
• Land on your hands and knees keeping your back
straight.
• Emphasis should be directed at a good four-point
landing, and not on jumping height.
Knee Bounce
• Start with a low controlled basic bounce.
• Land on your knees keeping back straight, body
erect and use your arms to maintain balance.
• Bounce back to the basic bounce position by
swinging your arms up.
Seat Bounce
• Land in a flat sitting position.
• Place hands on the mat beside your hips.
• Return to erect position by pushing with your
hands.
FUNDAMENTAL BOUNCE TECHNIQUES
17
Page 18
OTHER ACCESSORIES
ITEM UBSQ01-16
Ladder UB3S-42-G
Ladder with Flat Steps UBLBFS3-42
Trampoline Shoe Bag UBSHB-3
Trampoline Anchor Kit (Set of 4) UBHWD-AK-4
Deep Fastening Spiraled Anchor Kit - Set of 4 UBHWD-AKB-4
Trampoline Spring Pull Tool (T-Hook) UBHWD-TH
Upper Bounce Trampoline Jumping Skate UB-TJB
Springs UBHWD-SP-7-15
Economy Trampoline Weather Protection Cover, Fits for 9x15 Ft. Rectangular Frames - Black UBWCRTG-159-BK
44 Inch Trampoline Pole Foam Sleeves, fits for 1.5" Diameter Pole - Set of 12 - Blue UBFS44-1.5D-S12
44 Inch Trampoline Pole Foam Sleeves, fits for 1.5" Diameter Pole - Set of 16 - Blue UBFS44-1.5D-S16
44 Inch Trampoline Pole Foam Sleeves, fits for 1.5" Diameter Pole - Set of 12 - Black UBSF44-1.5D-BK-S12
44 Inch Trampoline Pole Foam Sleeves, fits for 1.5" Diameter Pole - Set of 16 - Black UBSF44-1.5D-BK-S16
Trampoline pole sleeve protector - set of 4 - blue UBFPS-4
Trampoline pole sleeve protector - set of 6 - blue UBFPS-6
Trampoline Replacement Parts
While we provide a large variety of trampolines, we also
pride ourselves in the large selection of our trampoline
replacement parts which are compatible with most
trampolines regardless of their brand.
If you have difficulty finding the correct replacement part
for your trampoline,
PLEASE GIVE US A CALL
1-888-965-3331
OR
EMAIL US AT
TAKE
15% OFF
FOR ANY
TRAMPOLINE
PARTS
Our Customer Service Department staff are trained in the
details of all trampolines and will help you find the right
part to get you bouncing again.
We never forget our goal... Get the Upper Bounce!
18
USE CODE :
15OFFMANUAL
 Loading...