

Page 1

Assembly Manual For
Motorized Treadmill
Please read all precautions and instructions in this manual in detail before
using this equipment. Save this manual for future reference.
Page 2

1
CONTENTS
Contents 1
Safety Caution 2-3
Assembly instruction 4-10
Operation guide 11-15
How to fold and move 16
Suggested stretches 17-18
Maintenance 19-20
Exploded drawing 21
Part list
22
Trouble shooting guides
23- 24
Page 3

SAFETY CAUTIONS
2
When using this product, basic precautions should always be followed, including the following:
Please read the instruction carefully before starting to use this product.
Danger
– To reduce the risk of electric shock
1. Always unplug this product from the electrical outlet immediately after using and before cleaning.
Warning
– To reduce the risk of burns, fire, electric shock, or physical injury
1. The product should never be left unattended while plugged in. Unplug the product from the outlet
when not in use.
2. Close supervision is necessary when this product is used by or near children, invalids, or
disabled persons.
3. Be sure to use the product only for its intended use as described in this manual. Do not use any
attachment not recommended by the manufacturer in order to avoid any danger or accidents.
4. Never operate the product if it has a damaged cord or plug, if it is not working properly, if it has
been damaged, or dropped into water. Please return the product to the service center of seller
for examination and repair.
5. Do not carry this product by the supply cord or use the cord as a handle.
6. Keep the cord away from hot surfaces or ground.
7. Never operate the product with the air vents blocked. Keep the air vents free of lint, hair, etc.
8. Never drop or insert any objects into any openings.
9. Do not use or operate outdoors.
10. Do not operate where aerosol (spray) products are being used or where oxygen is thin.
11. Before turning the product power off, turn all controls to the off position then remove the plug
from the outlet.
12. Connect the product to a properly grounded outlet only.
13. If the treadmill is foldable, when user finishes using the treadmill, the elevation needs to be
back to original position.
14. When user is using the treadmill, it can not be folded at the same time.
15. Keep a safety zoom of 2000mm x 1000mm away from the treadmill.
16. This machine is only intended for household use.
17. For the treadmill with folding function and electric elevation, be sure that the elevation is 0
before folding (To avoid interference of the components).
18. Stop using the treadmill if you feel faint, dizzy, or short of breath.
19. Wear appropriate exercise clothes when using the treadmill. Do not wear loose clothes that
could become caught in the treadmill. Athletic support clothes are recommended for both men
and women. Always wear athletic shoes. Never use the treadmill with bare feet, wearing only
stockings, or in sandals.
Page 4

3
SAFETY CAUTIONS
GROUNDING INSTRUCTIONS
The products must be grounded first. If malfunction or breakdown occurs, grounding will provide a
path of least resistance for electric current to reduce the risk of electric shock.
The product is equipped with a cord having an equipment-grounding conductor and a grounding
plug.
The plug must be plugged into an appropriate outlet that is properly installed and grounded in
accordance with all local codes and ordinances.
Danger
–
Improper connection of the equipment-grounding conductor can result in a risk of
electric shock. Check with a qualified electrician or serviceman if you are in doubt as to whether
the products are properly grounded. Do not modify the plug provided with the product – if it will not
fit the outlet, have a proper outlet install by a qualified electrician.
The products is for use on nominal 220-240 volt and has a grounding plug that looks like the plug
illustrated in the figure . Make sure that the product is connected to an outlet having the same
configuration as the plug.
There is no need to use any adapter for this product.
Figure
Grounding methods
GROUNDED PIN
GROUNDED OUTLET
Page 5

4
ASSEMBLY INSTRUCTIONS Single function
OPEN THE BOX YOU CAN FIND THE ALL PARTS AS BELOW.
Part list
No. Description Quantity
1 Main frame 1 set
2 Right upright 1 pc
3 Left upright 1 pc
4 Console 1 pc
5 Base cover left 1 pc
6 Base cover right 1 pc
7 Bolt M8x15 8 pcs
8 Bolt M5x10 4 pcs
9 Screw M4x12 2 pcs
10 Washer 8 pcs
11 Safety key 1 pc
12 Lubricant oil 1 pc
13 Wrench 5# 1 pc
14 Wrench 6# 1 pc
15 Wrench & Screwdriver 1 pc
Page 6

5
ASSEMBLY INSTRUCTIONS Single function
STEP 1
1. Open the carton, put the main frame on the level
ground.
2. Connect the cable on the main frame with the
cable on right upright.
Pay attention to the connection of the cable, a
wrong connection would caused damage of the
connector.
3. Insert the left upright (2) and right upright (3) into
the main frame (1), and use the 5# wrench (5) to
fasten the left and right upright to the main frame
with each 4pcs M8x15 bolt (7) .
Be careful not to damage the connector during
inserting the upright onto the main frame.
STEP 2
1, Connect the cable extent from console with the
cable extent from right and left upright.
Pay attention to the connection of the cable, a
wrong connection would caused damage of the
connector.
2, Use the wrench & screwdriver (15) to fasten the
console (4) onto the left & right upright with each
2pcs M5x10 screw (8).
STEP 3
1, As the picture shows, use the wrench &
screwdriver to install the left base cover (5) onto the
base with screw M4x12. Do the same for right base
cover.
Page 7

6
ASSEMBLY INSTRUCTIONS Single function
NOTE: For your safety and comfort, please check if all screws are fastened.
Congratulation! A brand new motorized treadmill has been successful assembled!
Page 8
7
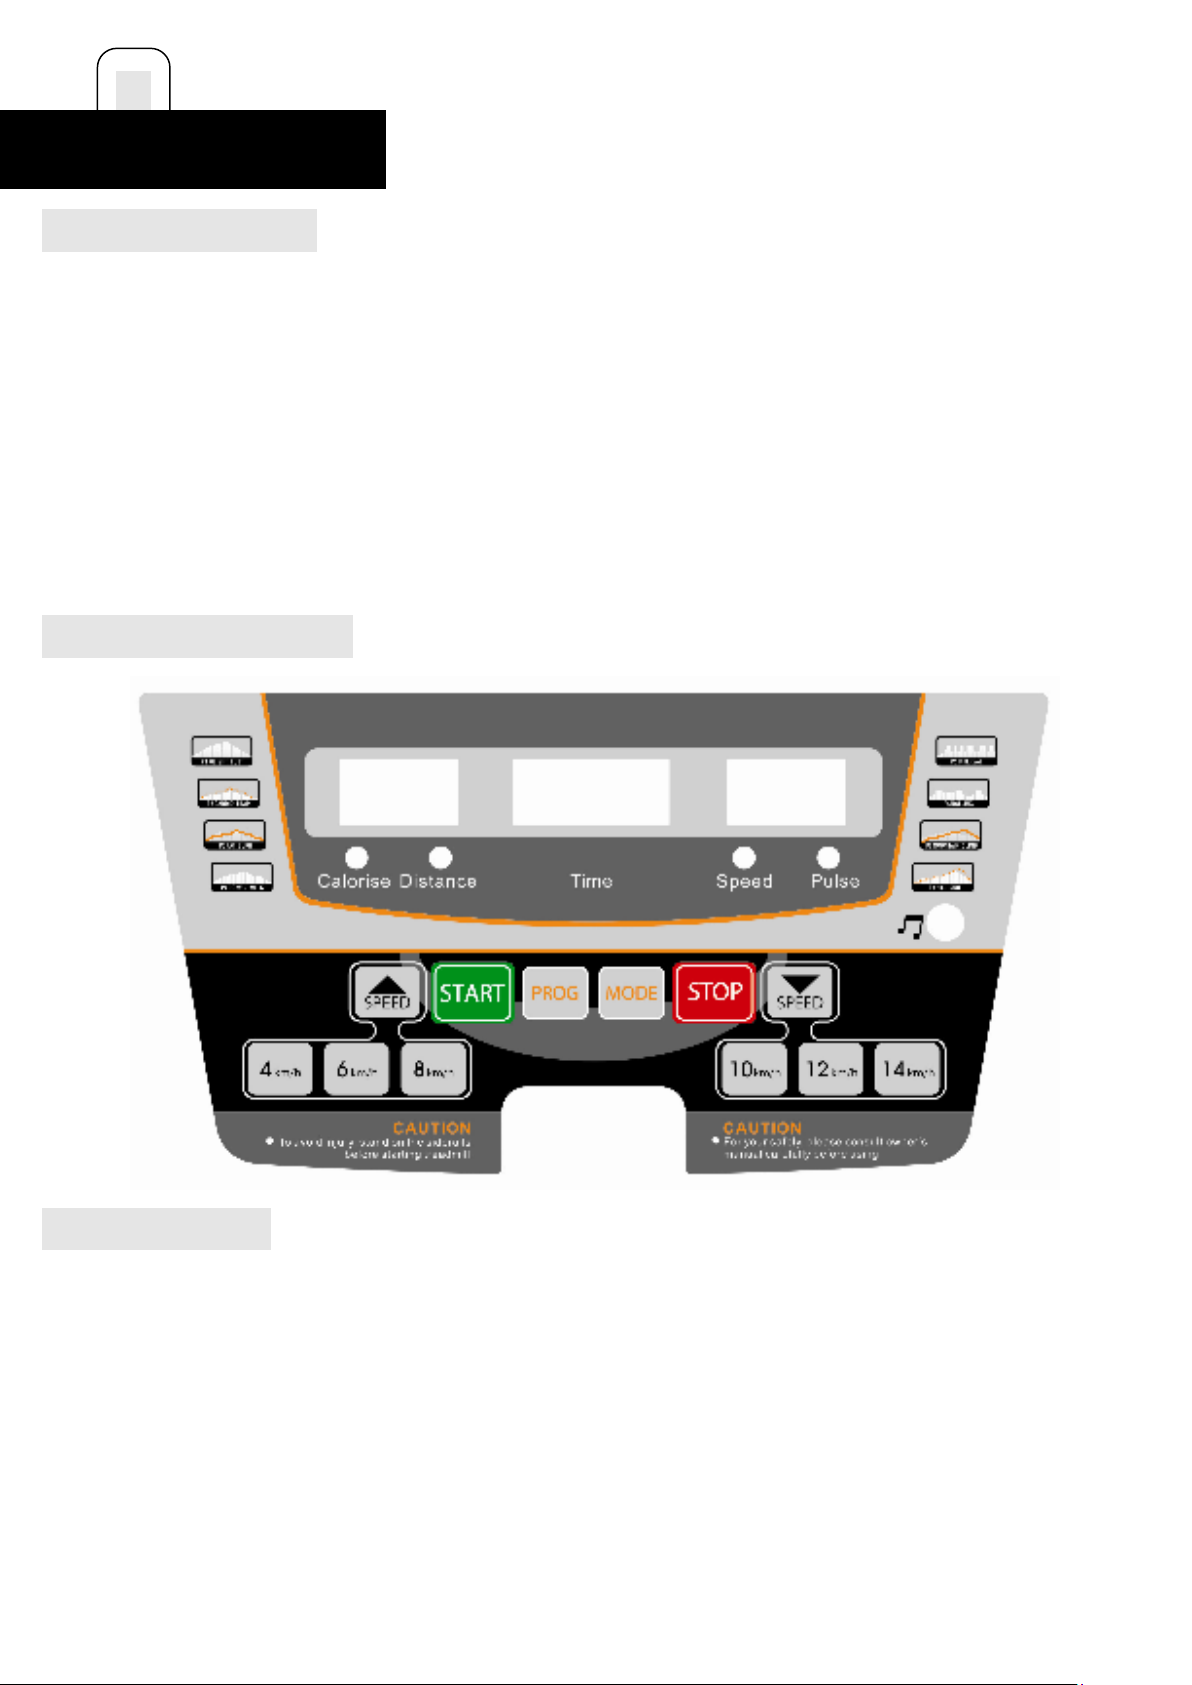
OPERATION GUIDE
GENERAL SAFETY TIPS
A. Practice mounting and dismounting your treadmill before beginning your workout.
B. Attach the Safety Key to the Computer (the treadmill will not operate without the Safety Key).
Clip the other end of the Safety Key to your clothing before exercising to ensure the treadmill
will stop if the user accidentally walks off the Treadmill.
C. If the user falls off the Treadmill, the Safety Key will come off the Computer and the treadmill
will stop at once to avoid further injury.
D. Do not stand on the Walking Belt while starting the Treadmill. Straddle the Belt and stand on
the plastic Foot Rails.
E. The Treadmill will start at 1.0KM/H after a 3, 2, 1, 0 countdown. If you are a new user, stay at
a slow speed and hold onto the Hand Grips until you become comfortable.
QUICK REFERENCE GUIDE
DISPLAY FUNCTION
TIME:
Accumulates total workout time from 0:00 to 99:59 minutes.
PULSE:
handrails, it will display your current heart rate in beats per minute from 50 to 200.
SPEED:
CALORIE: Accumulates calorie consumption during exercise. Max. Value is 999 kcal.
DISTANCE:
Accumulates total workout distance from 0.5 to 99.9 kilometers by count-down;
PULSE/SPEED share a same displayer, the PULSE/SPEED always displays SPEED data, and
only when the computer receive pulse signal, the PULSE/SPEED would display PULSE data.
CALORIE/DISTANCE share a same displayer, the computer will change display in turn by
pressing MODE button.
When pulse single is detected by grasping both stainless steel pick-ups on front
Displays the current belt speed from starting at 1.0Km/h to 14.0Km/h.
Accumulates total workout distance from 0.0 to 99.9 kilometers by count-up;.
Page 9

8
OPERATION GUIDE
GETTING STARTED
NOTES:
1
. Check to make sure nothing is on or will hinder the movement of the treadmill.
2. Plug in the power cord and turn the treadmill ON
Stand on the foot rails of the treadmill.
3.
4.
Attach the safety key clip to part of your clothing.
5.
Put the safety key into the safety key hole in the console, and then the treadmill will be on
start/ready status.
There are two buttons on both handrail, right is SPEED+ and SPEED-, left is START and
6.
STOP , and it will perform same functions as STOP, START and SPEED +/- buttons on the
computer.
7.
During your workout in any mode, when you press STOP button, the treadmill will be
paused, if you want to resume your workout, you can press STRAR button and all previous
data will resume counting, treadmill belt will begin movement after a 4 seconds count-down. If
you want to go to start/ready status, press STOP button again after pausing the treadmill.
During selecting program or setting information, press STOP button will return to start/ready
status.
8.
You have two options to start your workout:
A.
QUICK START
Simply press the START button to begin working out.
B.
SELECT A PROGRAM
Select manual program by pressing MODE button or pressing PROGRAM buttons to enter
manual program or 8 preset programs.
.
QUICK-START OPERATION
STEP 1: Attach the Safety key to wake display up; the treadmill then will be on start/ready
status.
STEP 2: Press the START button to begin belt movement after a 4 second count-down. Use
the SPEED +/- buttons to adjust the desired speed at any time during training. The speed can
also be adjusted by the buttons on right handrail.
STEP 3: To get a pulse reading, simply grasp stainless steel pick-ups on handrails. It may take
a few seconds for the display to reach the actual number. The pulse rate will be displayed on
PULSE window.
STEP 4:
Press STOP button to stop your workout or pull safety key away from its position to
shut down the computer. Press STOP button will pause the program, if you want to resume
your workout, you can press START button and all previous data will resume counting,
treadmill belt will begin movement after a 4 seconds count-down. If you want to go to
start/ready status, press STOP button again after pausing the treadmill.
STEP 5: During quick-start operation, TIME, CALORIE and DISTANCE will count up.
MANUAL PROGRAMS OPERATION
NOTES:
Under this program, one of DISTANCE, CALORIE and TIME shall be set count-down
Page 10
9
OPERATION GUIDE
for your workout, the others will count up during your workout, after one count-down
reach zero, program will be ended and stop the belt movement, if you need to continue,
press the START button to begin belt movement after a 5 second count-down.
STEP 1:
Attach the Safety key to wake display up; the treadmill then will be on start/ready
status.
STEP 2:
Press MODE button, the TIME window will display 30:00, press SPEED +/- button to
set count-down TIME from 5:00 minutes to 99:00 minutes.
If you do not like to set TIME for count-down and pass to others, then DO NOT PRESS
SPEED +/- button to set TIME, but directly press MODE again, the Calorie/Distance window
will display 1.0, you can set count-down DISTANCE from 1.0KM - 99.0KM.
If you do not like to set DISTANCE for count-down and pass to others, then DO NOT PRESS
SPEED +/- button to set DISTANCE, but directly press MODE again, the Calorie / Distance
window will display 20, you can set count-down CALORIE from 20 KCAL to 990 KCAL.
STEP 3:
After finishing setting count-down for your workout, press START to begin belt
movement after a 4 seconds count-down.
STEP 4:
During the program you can adjust the speed by pressing SPEED +/- button. The
speed can also be adjusted by the buttons on right handrail.
STEP 5:
Press STOP button to stop your workout or pull safety key away from its position to
shut down the computer. Press STOP button will pause the program, if you want to resume the
program, you can press START button and all previous data will resume counting, treadmill
belt will begin movement after a 4 seconds count-down. If you want to go to start/ready status,
press STOP button again after pausing the treadmill.
PRESET PROGRAMS OPERATION
NOTES:
All the preset programs are made up with 30 time-based segments; the speed is preset
on each segment. The elapse time of 30 segments on each program will be
automatically arranged according to the time you set for your workout time.
Step1: Attach the Safety key to wake display up; the treadmill then will be on start/ready
status.
Step2:Press Program button to scroll through the 8 preset programs, a program will be
selected once you press Program button, the program number P1-P8 will be displayed on
Calorie/Distance window, the elapse time will be displayed on TIME window, after selecting a
program, then turn to set the elapse time of each program.
STEP 3: The pre-set value of elapse time of each program is 30:00 minutes, and it can be set
from 5:00 to 99:00 minutes. Press SPEED+/- buttons to set the elapse time, and press START
button to accept and begin your workout.
STEP 4: During procession of program you can adjust the SPEED by pressing SPEED+/-
buttons. The speed can also be adjusted by the buttons on right handrail. However, the
SPEED you adjust will only be effective on the ongoing segment, after the segment finished,
the SPEED will process with preset values.
10
OPERATION GUIDE
Page 11
STEP 5:
Press STOP button to stop your workout or pull safety key away from its position to
shut down the computer. Press STOP button will pause the program, if you want to resume the
program, you can press START button and all previous data will resume counting, treadmill
belt will begin movement after a 4 seconds count-down. If you want to go to start/ready status,
press STOP button again after pausing the treadmill.
USING THE PULSE FUNCTION
The PULSE/SPEED Window on your Computer works in conjunction with the Pulse Sensors
on both handrails. When you are ready to read your pulse:
1. Place both hands firmly on the Pulse Sensors. For the most accurate reading, it is important
to use both hands.
2. Your estimated heart rate will display in the PULSE/SPEED window approximately 10
seconds after you grasp the Pulse Sensors.
3. This estimate is not exact and persons with medical conditions and/or a specific need for
accurate heart rate monitoring should not rely on the estimations provided.
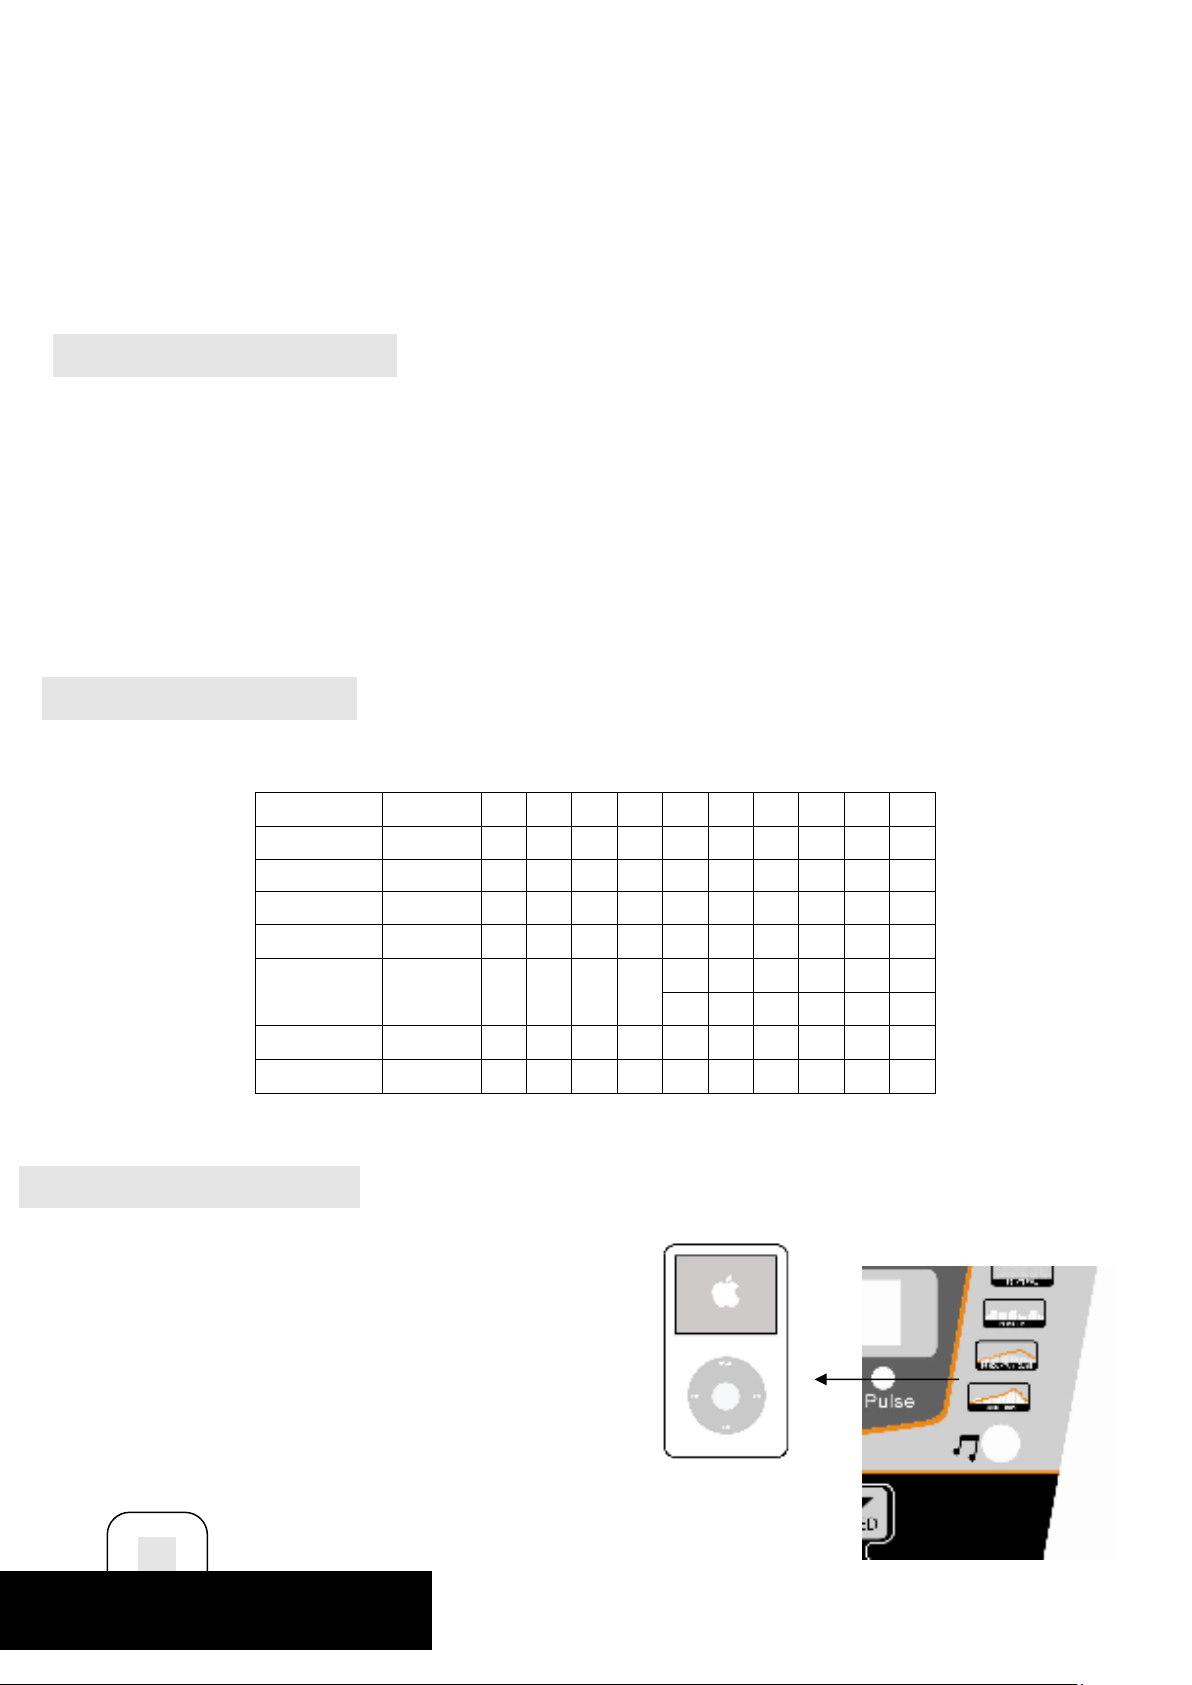
PRESET PROGRAM CHART
Each program divided moving time into 30 segments; the speed on each segments have been
pre-set in the factory.
Program
P1
P2
P3
P4
P5
P6
P7
P8
USING THE AUDIO FUNCTION
As the figure shows, plug one end of the
audio cable to the audio jack on
computer, and then plug the other end
of the audio cable to MP3 player.
The speaker on the computer will
then play the music from MP3 player.
The volume of speaker can only be
adjusted by MP3 player.
11
Segment 1 2 3 4 5 6 7 8 9 10
Speed 2 3 3 4 5 3 4 5 5 3
Speed 2 4 4 5 6 4 6 6 6 4
Speed 2 4 4 6 6 4 7 7 7 4
Speed 3 5 5 6 7 7 5 7 7 8
Speed 2 4 4 5 6 7 7 5 6 7
Speed 2 4 4 4 5 6 8 8 6 7
Speed 2 3 3 3 4 5 3 4 5 3
Speed 2 3 3 6 7 7 4 6 7 4
OPERATION GUIDE
Page 12
BODY FAT SCALE
This function is to estimate your body fat according to the basic information of you body
condition.
This estimate is not exact and persons with medical conditions and/or a specific need for
accurate body fat value should not rely on the estimations provided.
STEP 2: Press PROGRAM button repeatedly, on the “9” time pressing PROGRAM button, the
TIME window will display FAT. Press MODE button to set the relative parameters: GENDER, AGE,
HEIGHT, and WEIGHT.
STEP 3: After entering BODY FAT function, the Calorie/Distance window will display 1, the
Pulse/Speed window will display 1, it represents GENDER, press SPEED +/- button to set gender
from 1 - 2, 1 represents MALE, 2 represents FEMAL. Then press MODE button to go to next step.
STEP 4: After pressing MODE button, the Calorie/Distance window will display 2, the
Pulse/Speed window will display 25, it represents AGE, press SPEED +/- button to set age from
10-90. Then press MODE button to go to next step.
STEP 5: After pressing MODE button, the Calorie/Distance window will display 3, the
Pulse/Speed window will display 170, it represents HEIGHT, press SPEED +/- button to set height
from 100CM-200CM. Then press MODE button to go to next step.
STEP 6: After pressing MODE button, the Calorie/Distance window will display 4, the
Pulse/Speed window will display 70, it represents WEIGHT, press SPEED +/- button to set weight
from 20KG-150KG. Then press MODE button to go to next step.
STEP 7: After finished setting all the necessary information of your body condition, press MODE
button again, the Calorie/Distance window will then display “5”, the Pulse/Speed window will
display “00”, it means the computer start to work for calculating, then hold the pulse sensor on
handrail with both of your hands, around 8 seconds after, the body fat result will be displayed on
Calorie/Distance window.
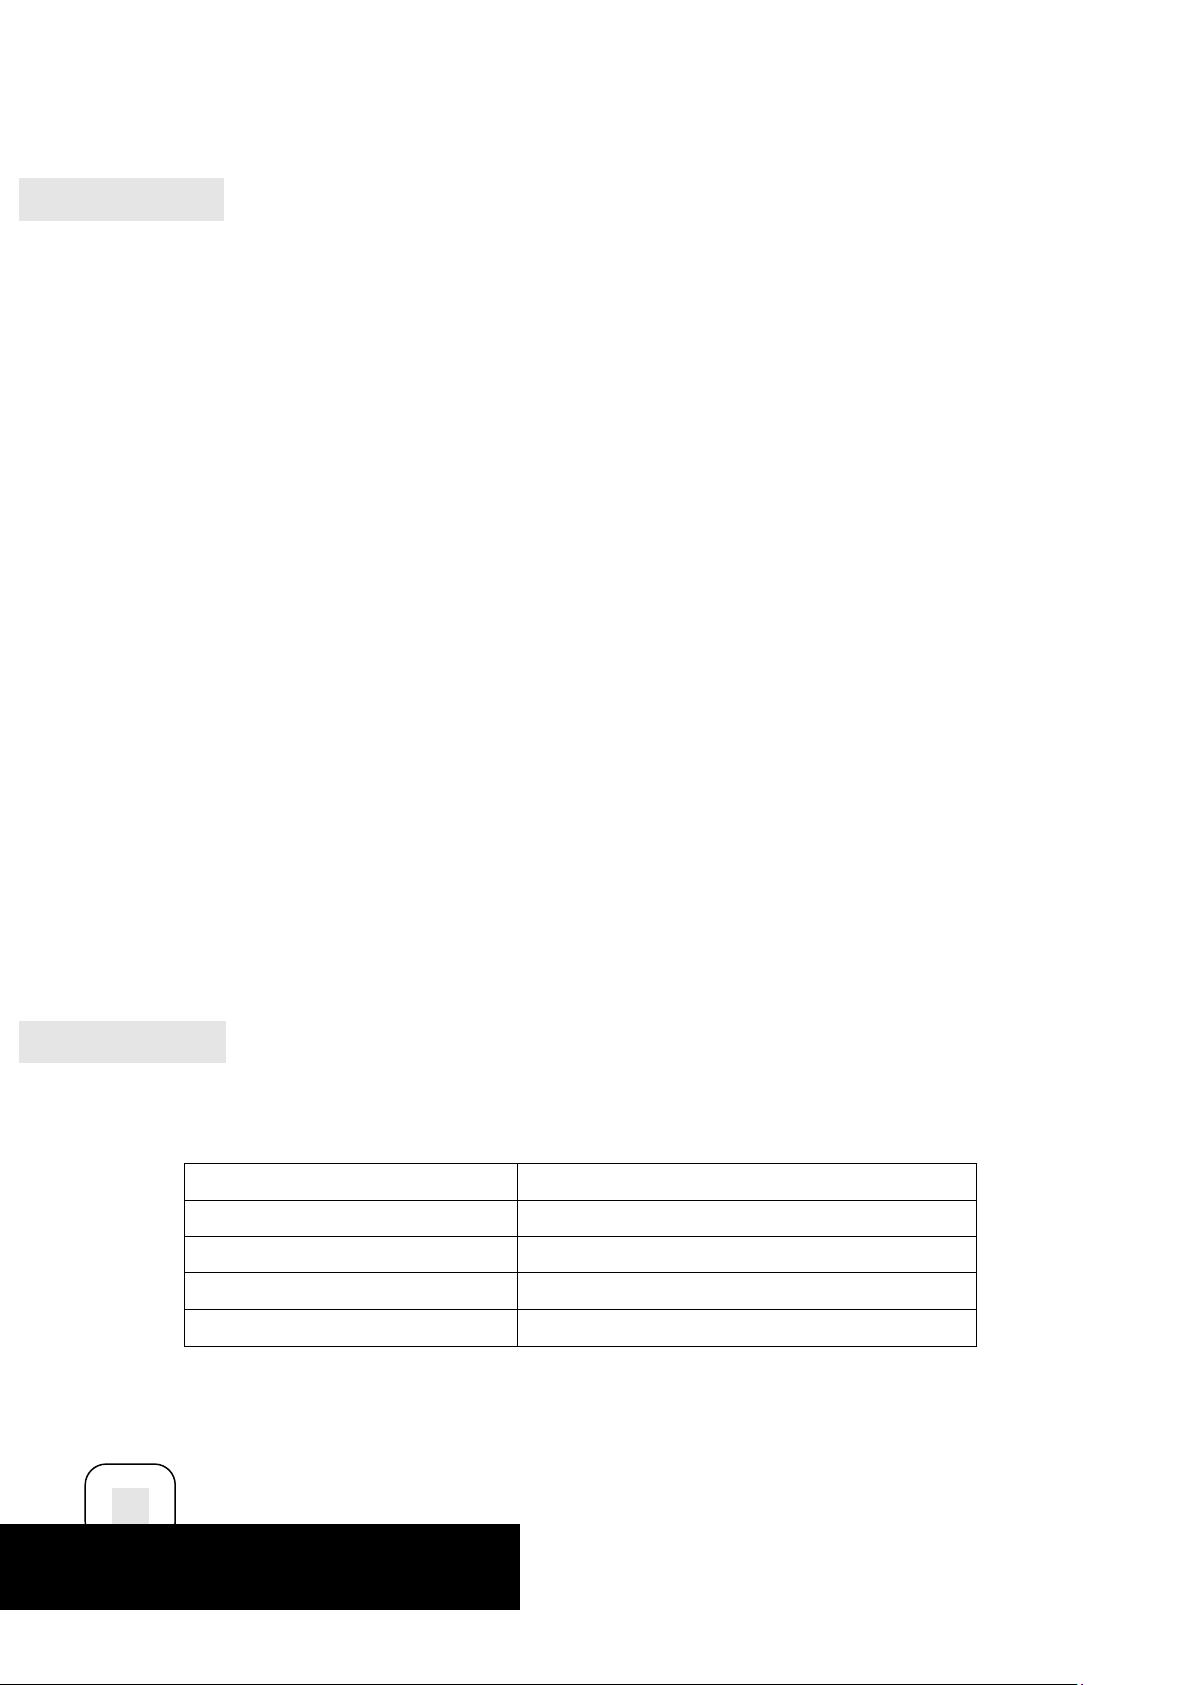
BODY FAT CHART
The result that given by body fat scale can be a reference of body condition, check your body
condition according to the left chart with the result you get from the treadmill.
Body condition Result
Fat BMI > 30
Overweight 26 < BMI < 30
Fit 19 < BMI <125
Thin
12
HOW TO FOLD AND MOVE
BMI < 19
Page 13
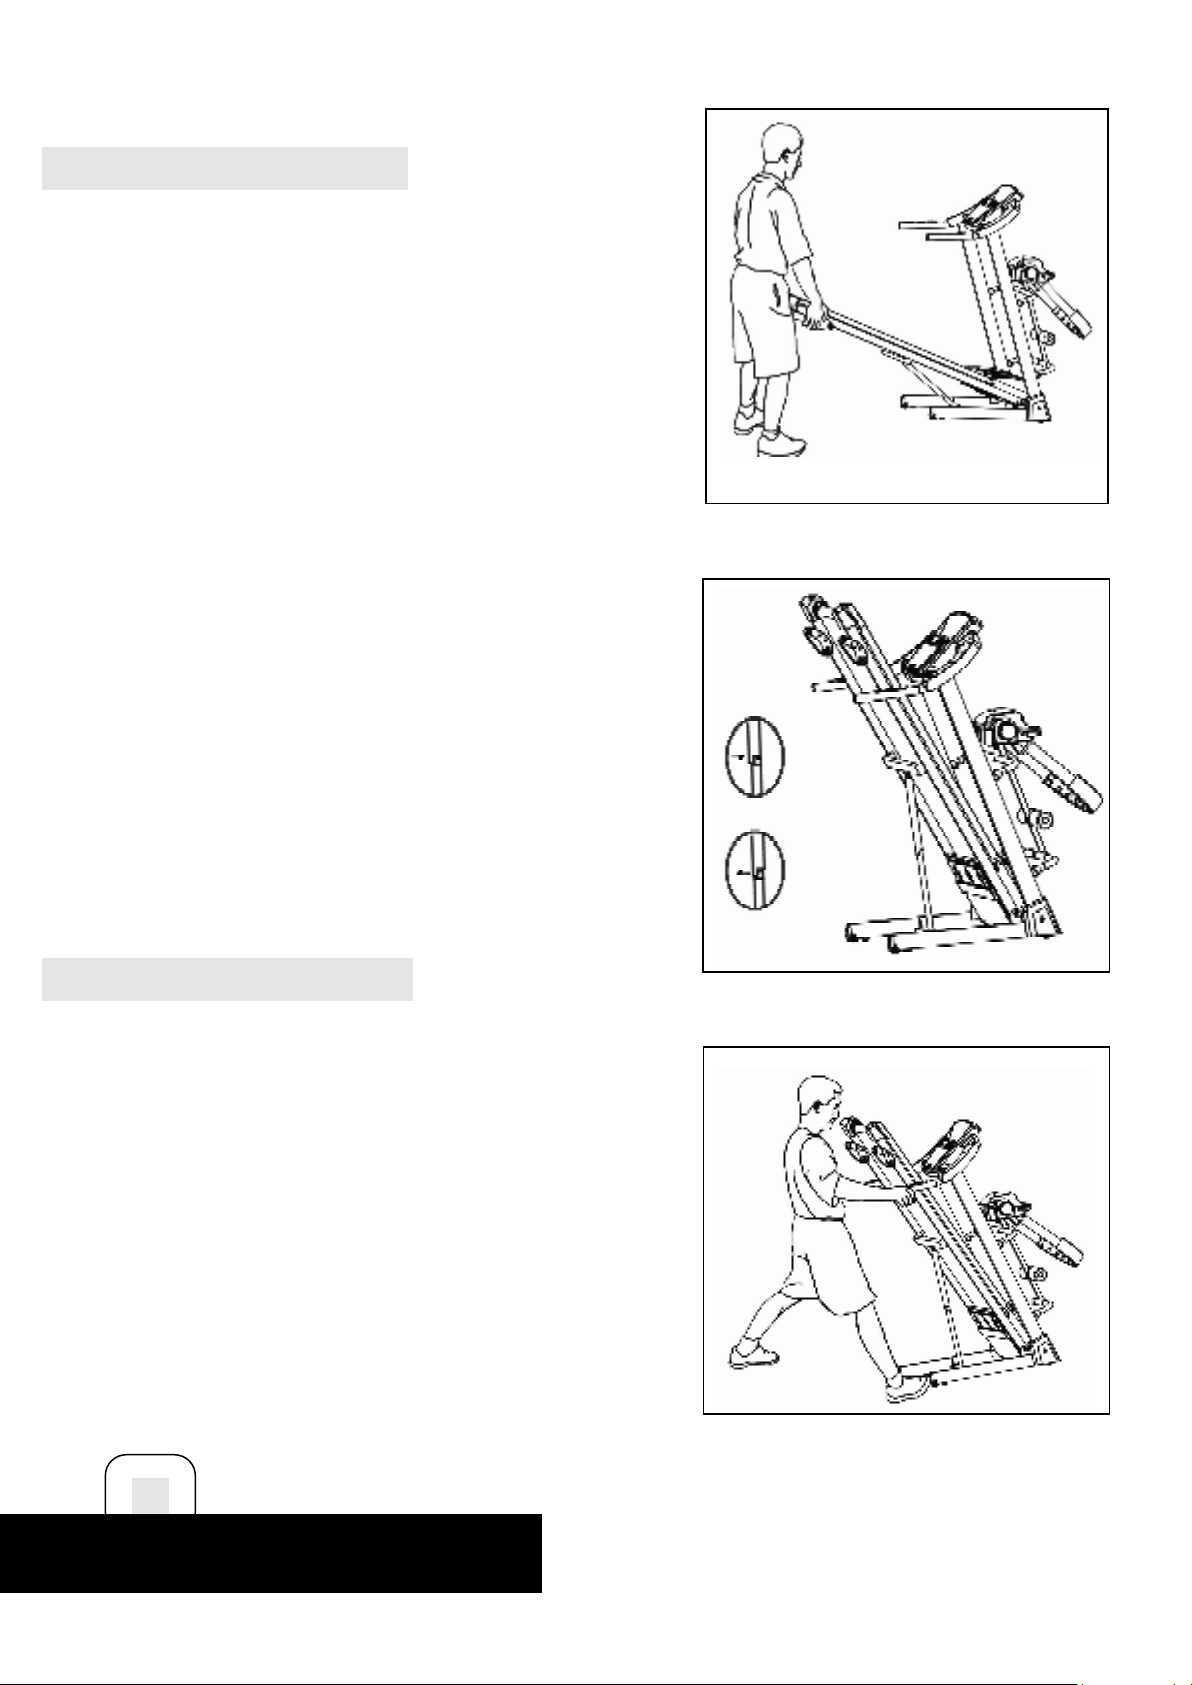
HOW TO FOLD THE TREADMILL
Before folding the treadmill, unplug the power cord.
CAUTION: You must be able to safely lift 45
pounds (20kg) in order to raise, lower, or move
the treadmill.
1. Hold the treadmill with your hands in the locations
shown at the right. CAUTION: To decrease the
possibility of injury, bend your legs and keep your
back straight. As you raise the treadmill, make sure
to lift with your legs rather than your back. Raise
the treadmill until the running deck is firmly held by the
folding pole as the right figure shows.
2. If you want to put the treadmill to the work position,
Firstly pull the folding knob outward as figure shows,
And then lay down the running deck light onto floor.
HOW TO MOVE THE TREADMILL
1. Hold the handrails as shown and place one foot
against a wheel.
2. Tilt the treadmill back until it rolls freely on the
wheels. Carefully move the treadmill to the desired
location.
Never move the treadmill without tipping it back.
To reduce the risk of injury, use extreme caution
while moving the treadmill. Do not attempt to
move the treadmill over an uneven surface.
3. Place one foot on a wheel, and carefully lower the
treadmill until it is resting in the storage position.
SUGGESTED STRETCHES
13
Page 14
14
A successful exercise program consists of a warm-up, aerobic exercise, and a cool-down.
Do the entire program at least two and preferably three times a week, resting for a day
between workouts. After several months, you can increase your workouts to four or five
times per week.
Warming up is an important part of your workout, and should begin every session. It
prepares your body for more strenuous exercise by heating up and stretching out your
muscles, increasing your circulation and pulse rate, and delivering more oxygen to your
muscles. At the end of your workout, repeat these exercises to reduce sore muscle
problems. We suggest the following warm-up and cool-down exercises:
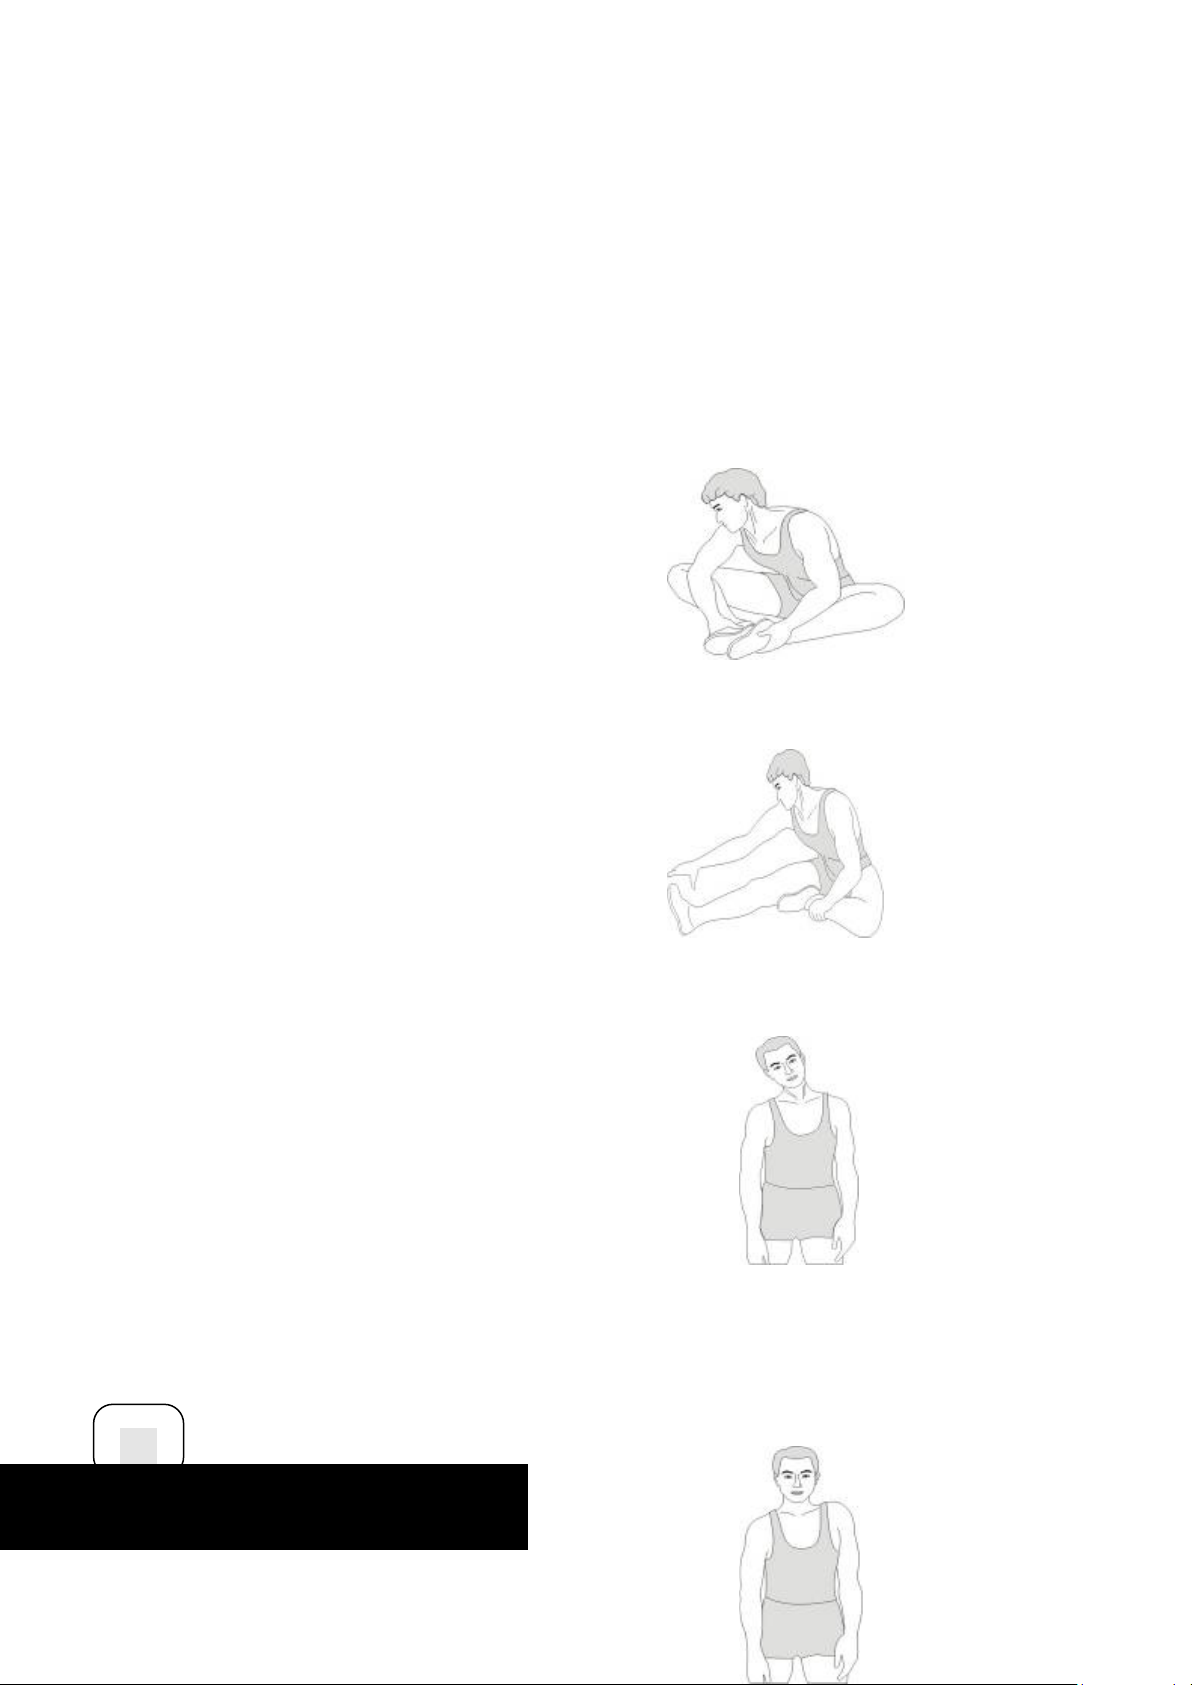
1. Inner Thigh Stretch
Sit with the soles of your feet together with your
knees pointing outward. Pull your feet as close
into your groin as possible. Gently push your
knees towards the floor. Hold for 15 counts.
2. Hamstring Stretch
Sit with your right leg extended. Rest the sole of
your left foot against your right inner thigh.
Stretch toward your toe as far as possible.
Hold for 15 counts. Relax and then repeat with left
leg extended.
3. Head Roll
Rotate your head to the right for one count, feeling the
stretch up the left side of your neck.
Next, rotate your head back for one count, stretching
your chin to the ceiling and letting your mouth open.
Rotate your head to the left for one count, and finally,
drop your head to your chest for one count.
SUGGESTED STRETCHES
4. Shoulder Lift
Page 15
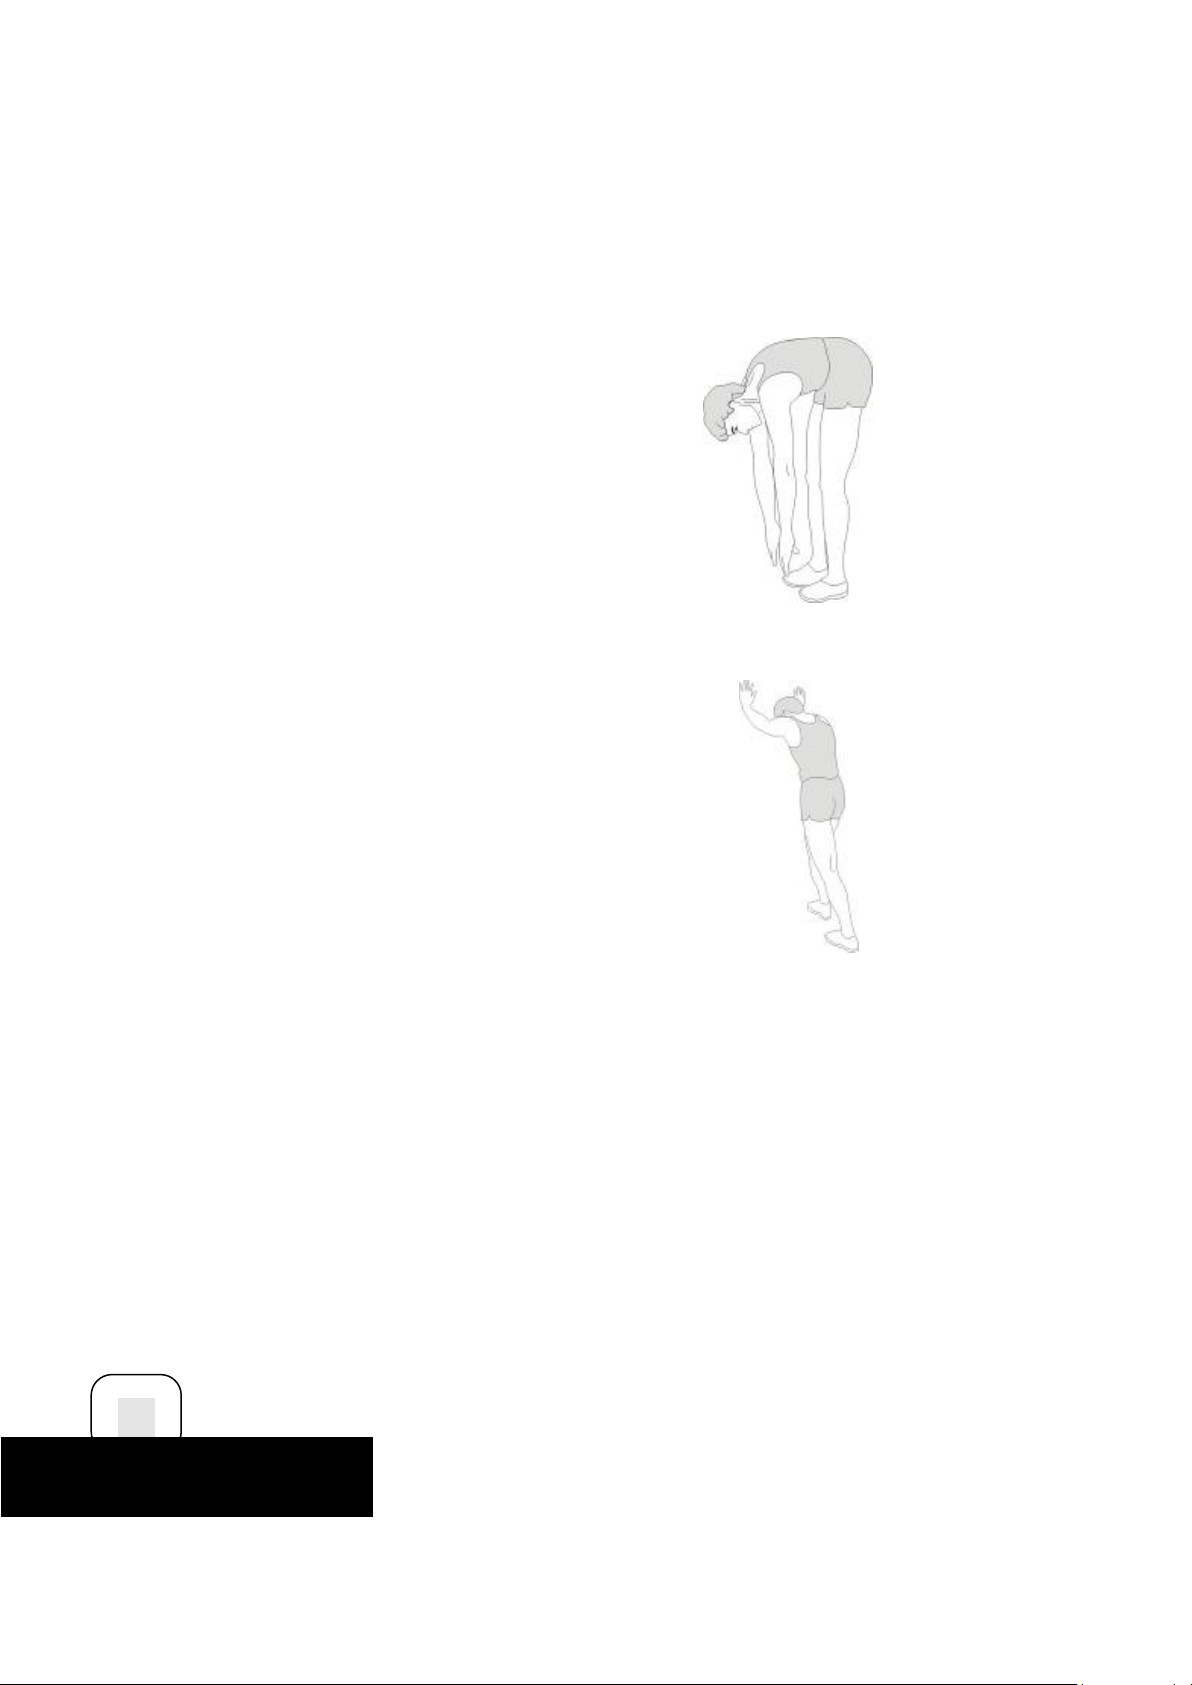
Lift your right shoulder up toward your ear for one count. Then
lift your left shoulder up for one count as you lower your right
shoulder.
5. Toe Touch
Slowly bend forward from your waist, letting your
back and Shoulders relax as you stretch toward your
toes.
Reach down as far as you can and hold for 15
counts.
6. Calf-Achilles Stretch
Lean against a wall with your left leg in front of the right
and your arms forward. Keep your right leg straight and
the left foot on the floor; then bend the left leg and lean
forward by moving your hips toward the wall. Hold, and
then repeat on the other side for 15 counts.
7. Side Stretch
Open your arms to the side and continue lifting them until they
are over your head.
Reach your right arm as far upward toward.
The ceiling as you can for one count.
Feel the stretch up your right side.
Repeat this action with your left arm.
15
MAINTENANCE
WARNING! Before performing any maintenance to your treadmill, always unplug the
power cord from the surge protector.
CLEANING: Routine cleaning of your TREADMILL will extend the life of your treadmill.
Page 16
WARNING! To prevent electrical shock, be sure the power to the treadmill is OFF and
the unit is unplugged from the wall electrical outlet before attempting any cleaning or
maintenance.
AFTER EACH WORKOUT: Wipe off the console and other treadmill surfaces with a
clean, water dampened soft cloth to remove excess perspiration. USE NO
CHEMICALS.
WEEKLY: Use of a treadmill mat is recommended for ease of cleaning. Dirt from your
shoes contacts the belt and eventually ends up underneath the treadmill. Vacuum
underneath the treadmill once a week.
DECK LUBRICATION: The walking belt has been pre-lubricated at the factory.
However, it is recommended that the walking board be checked periodically for
lubrication to ensure optimal treadmill performance. Every 10 days or 10 hours of
operation, lift the sides of the walking belt and feel the top surface of the walking board as
far under as you can reach. If you feel signs of silicone, no further lubrication is required.
If it feels dry to the touch, lubrication is needed. Ask your retailer or call Service line for
the type of silicone.
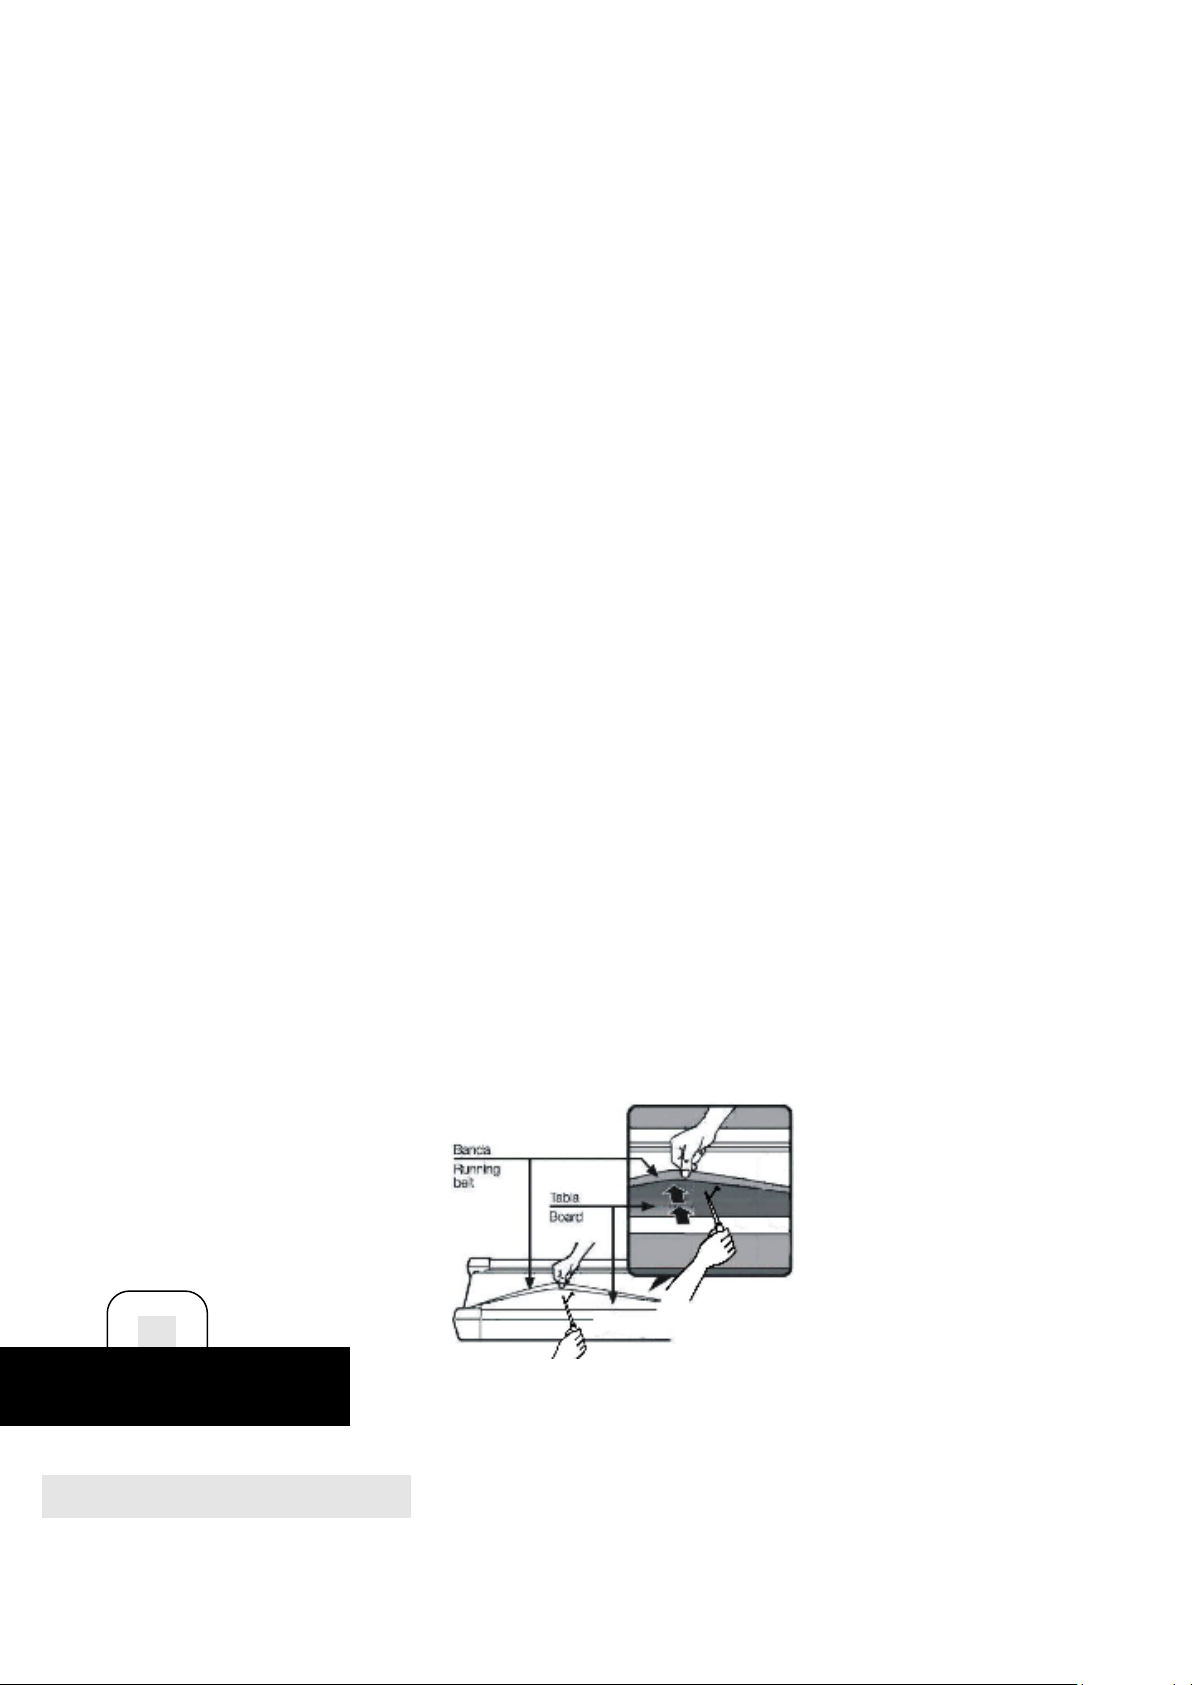
TO APPLY LUBRICANT TO THE WALKING BOARD
1) Position the walking belt so that the seam is located on top and in the center of the
center of the walking board.
2) Insert the spray nozzle into the spray head of the lubricant can.
3) While lifting the side of the walking belt, position the spray nozzle between the
walking belt and the board approximately 10cm from the front of the treadmill. Apply the
silicone spray to the walking board, moving from the front of the treadmill to the rear.
Repeat this on the other side of the belt. Spray approximately 4 seconds on each side.
4) Allow the silicone to 'set' for one minute before using the treadmill.
WARNING: Do not over-lubricate the walking board. Excess lubricant should be wiped
off with a clean towel.
16
MAINTENANCE
Running belt tension adjustment
The treadmill has been adjusted and passed QC inspection before leaving the factory. If
there is phenomenon of bias running of the belt, the possible reasons might be:
A. The frame is not stably laid
Page 17
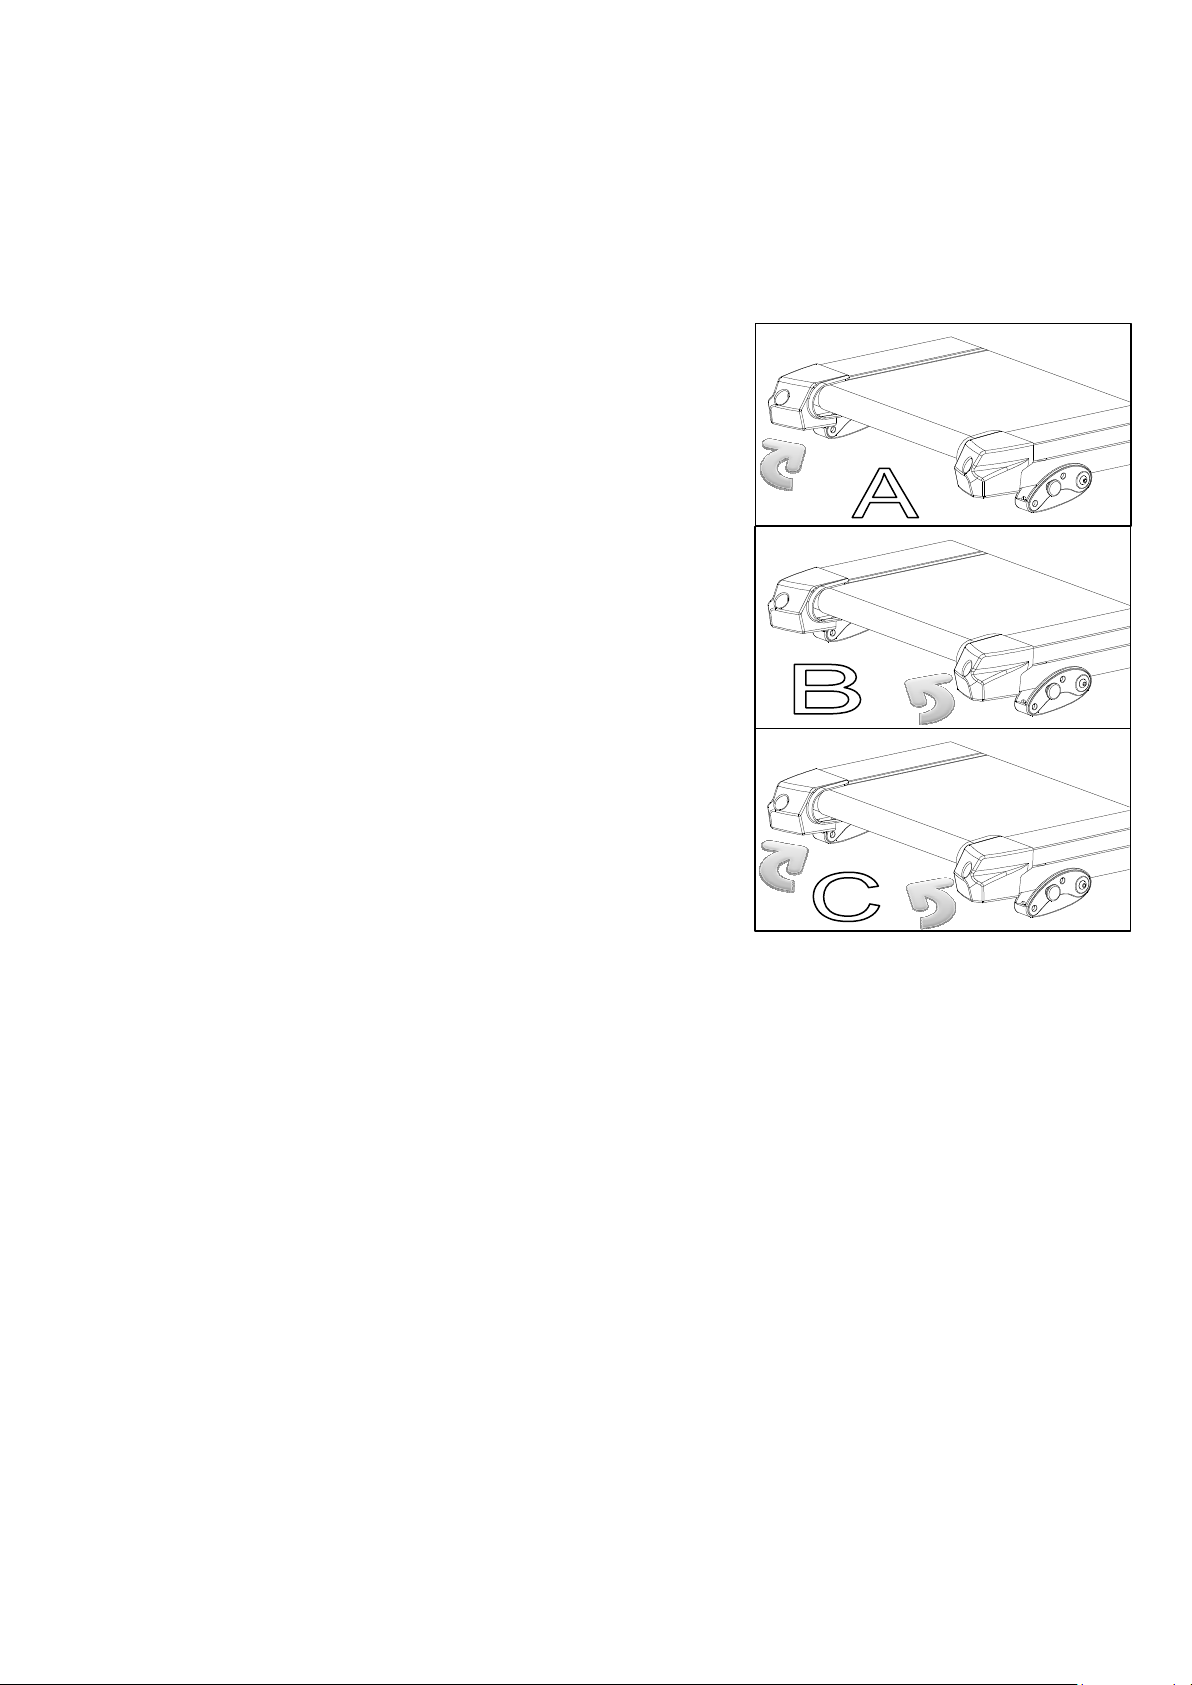
B. The user is not running on the center of the running belt;
C. The user’s two feet are not using even strength.
For bias which can not be fixed automatically, try the following methods to fix the belt,
as picture shown
If the belt tends to move to the right, you should turn the
belt adjustment screw on the right in clockwise
direction. We recommend you turn 1/4 turn each time
and check how it works. If the belt remains slanting to
the right ,then turn the belt adjustment screw on the left
in counterclockwise direction 1/4,as shown in the
picture A
If the belt tends to move to the left, then turn the belt
adjustment screw on the left in clockwise direction for
1/4 turn. If the belt remains slanting to the left ,then
turn the belt adjustment screw on the right in
counterclockwise direction for 1/4 turn, as shown in the
picture B
After having been used for a period, the belt might be
slightly elongated, and slipping and halting might
appear when a person is running on it. When these
phenomena appear, you should secure the screws on
both sides for 1/4 turn. If the belt is too tight, just
loosen the screw on both sides for 1/4 turn, as shown
in picture C.
Page 18
17
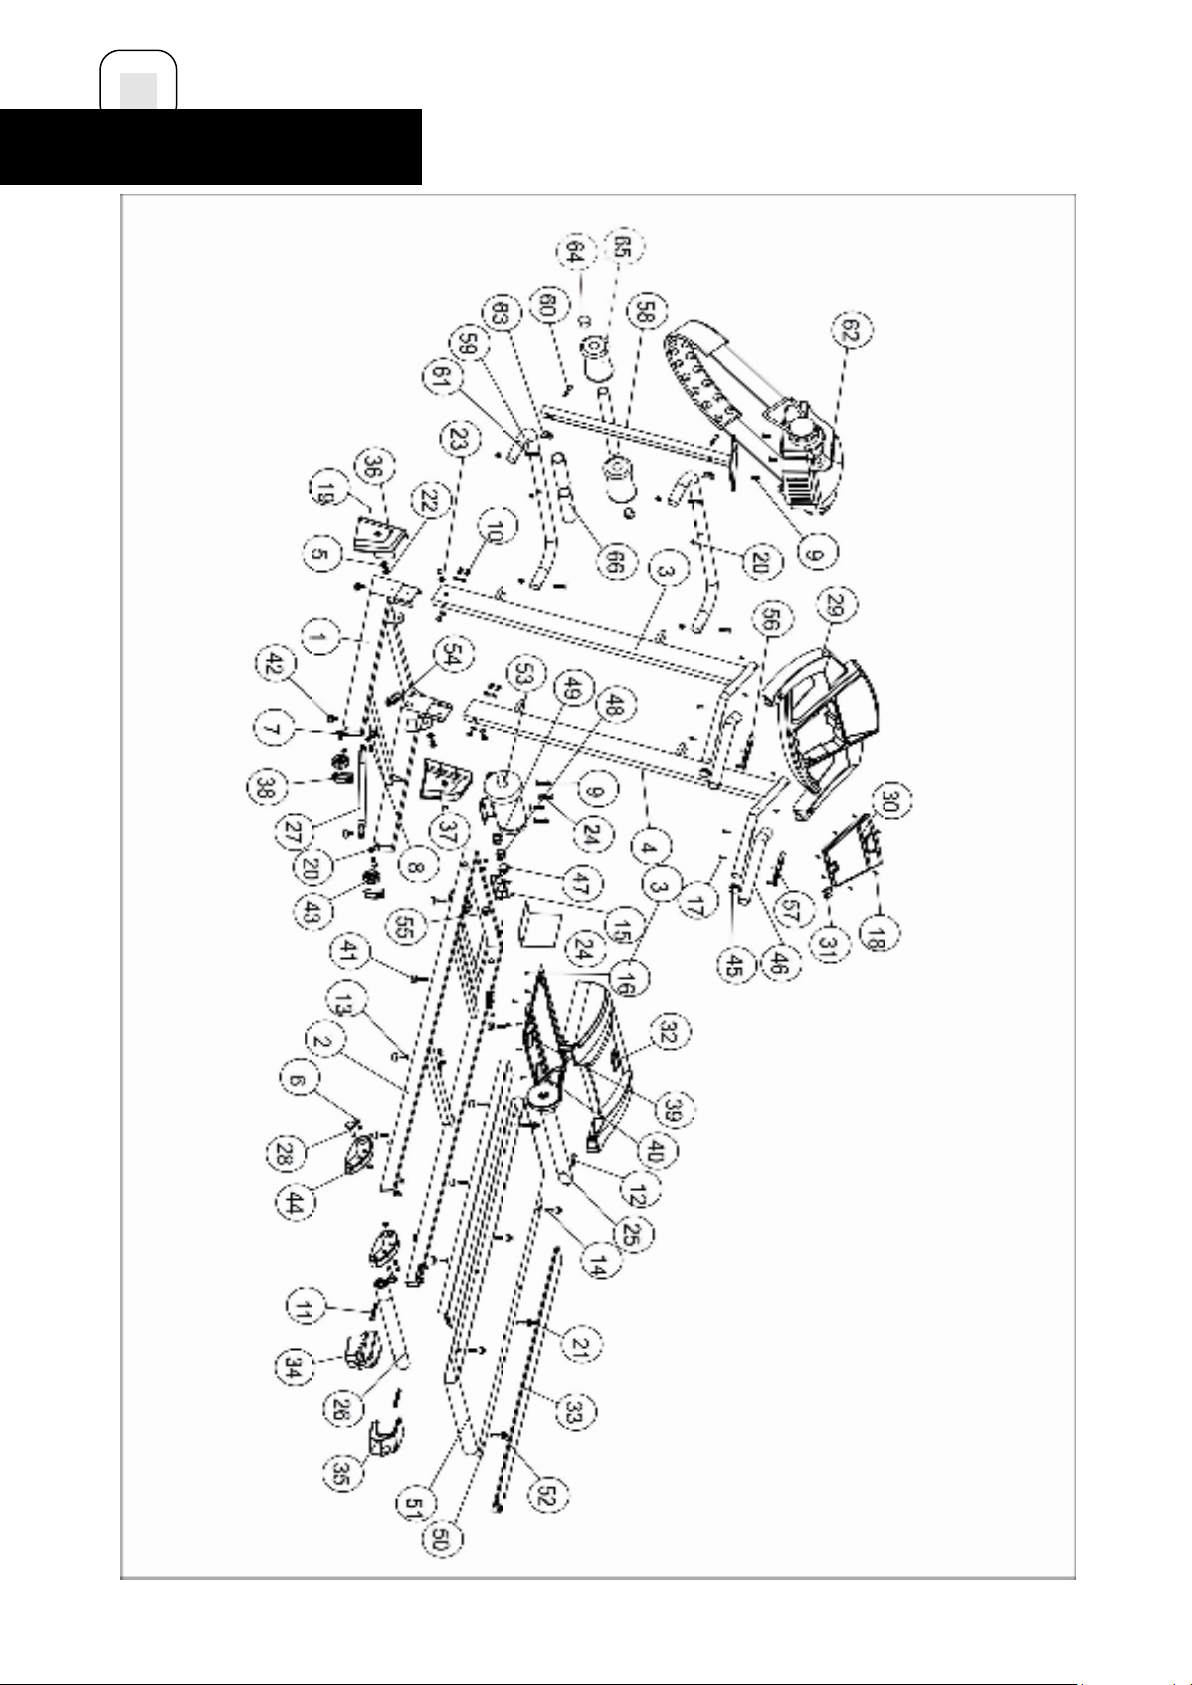
EXPLODED DRAWING
Page 19
18
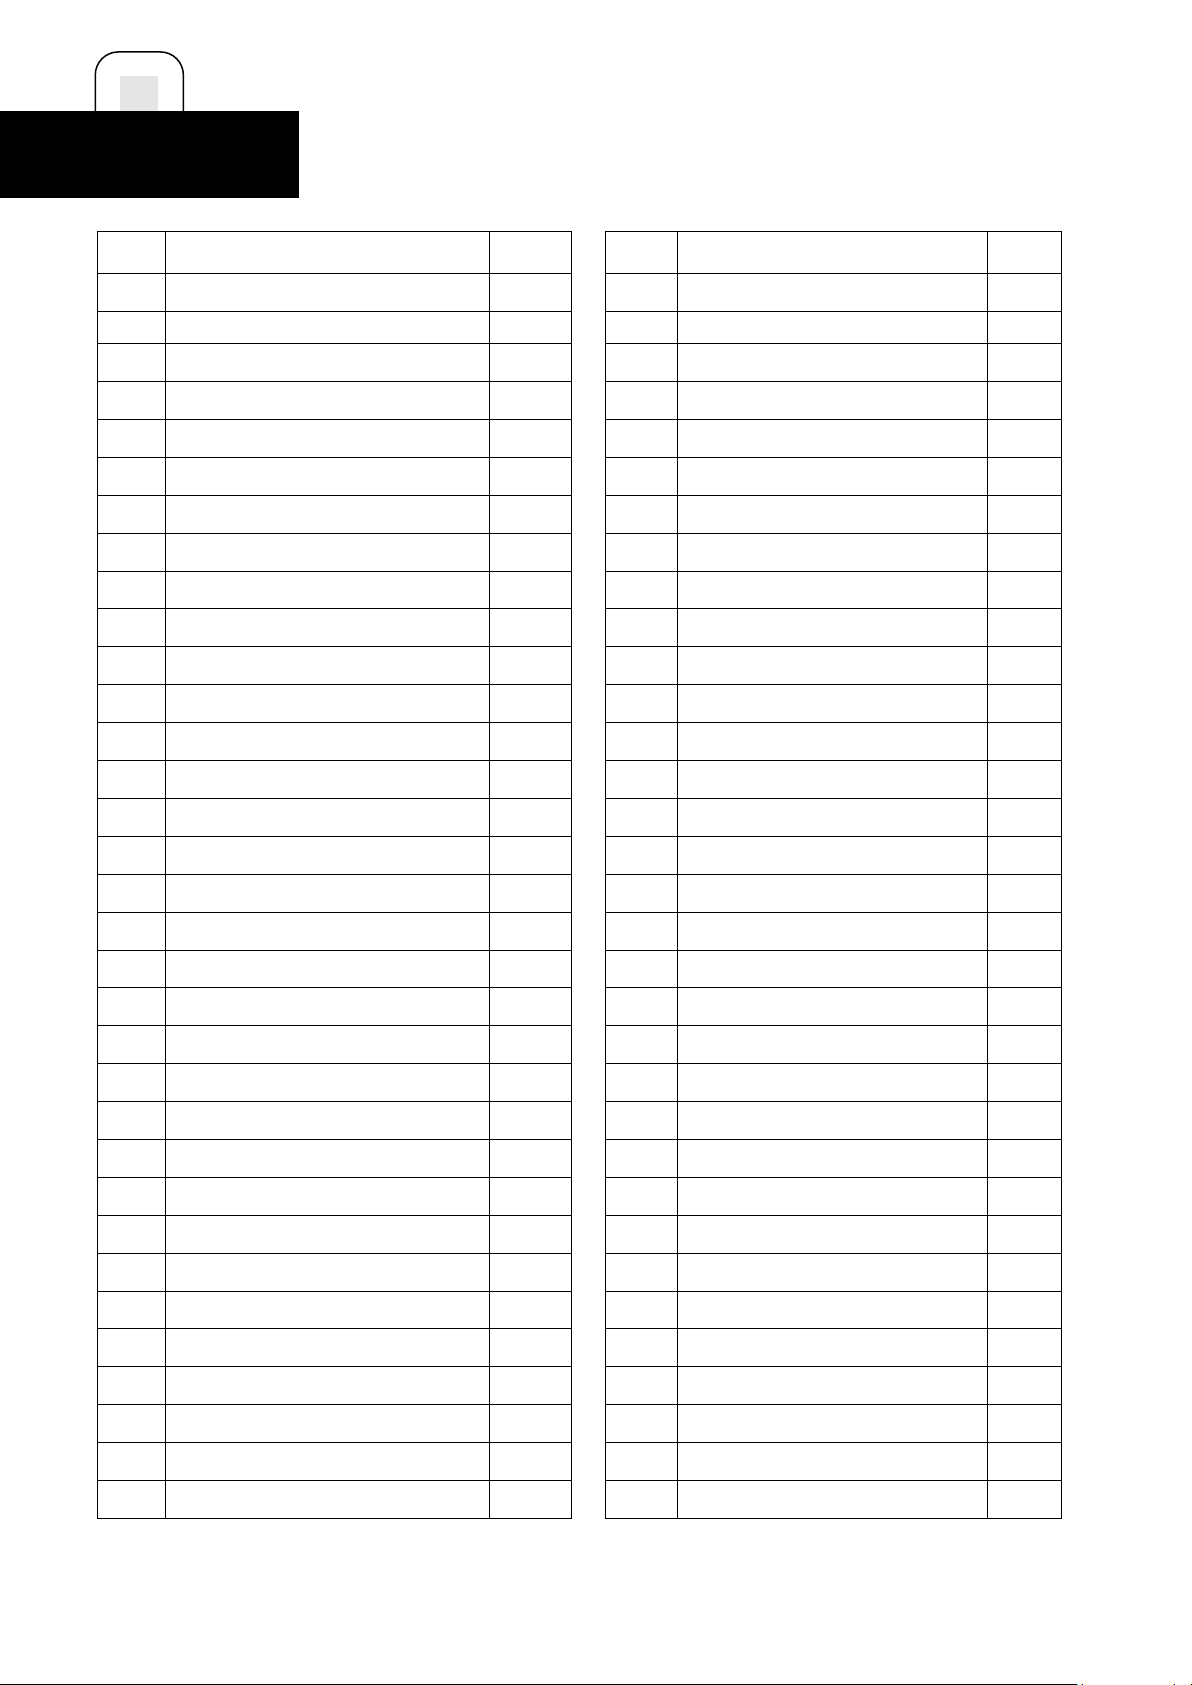
PART LIST
No. Description Qty No. Description Qty
1 Base 1 34 Rear end cap Left 1
2 Main frame 1 35 Rear end cap Right 1
3 Left upright 1 36 Base cover Left
4 Right upright 1 37 Base cover Right
5 Bolt M10x20 2 38 Base end cap
6 Bolt M8x45 2 39 Belly pan
7 Bolt M8x40 2 40 Motor belt
8 Bolt M8x25 2 41 Cushion
9 Bolt M8x20 4 42 Base foot
10 Bolt M8x15 8 43 Base wheels
11 Bolt M8x65 2 44 Incline leg
12 Bolt M8x35 1 45 Handrail end cap
13 Bolt M6x30 8 46 Handrail foam
14 Screw M5x25 6 47 Overload protector
15 Screw M5x10 10 48 Power plug jack
16 Screw M4x12 14 49 Power switch
17 Screw M4x25 4 50 Wooden deck
18 Screw M4x10 7 51 Running belt
1
1
2
1
1
8
4
2
2
2
2
1
1
1
1
1
19 Screw M4x12 2 52 Foot rail fastener
20 Nut M8 12 53 Motor
21 Nut M5
22 Washer M10
23 Washer M8
24 Spring washer M8
25 Front roller
26 Rear roller
27 Air cylinder
28 Incline lock pin
29 Console plastic housing
30 Display plastic
31 Safety key
32 Motor cover
33 Foot rail
6
2
12
4
1
1
1
2
1
1
1
1
2
54 Cable grommet
55 Magnetic ring
56 Handle pulse Left
57 Handle pulse Right
58 Sit-up foot rail
59 Multi-function rack
60 Bolt M8x55
61 Bolt M8x35 4
62 Beauty massager 1
63 Plastic washer 2
64 End cap 2
65 Sit-up foam 1 2
66 Sit-up foam 2 2
6
1
1
1
1
1
1
1
2
Page 20

19
TROUBLE SHOOTING
ERROR CODE POSSIBLE CAUSES CORRECTION
E01
E02
E03
E05
The cable is not connected
well or damaged.
1. Defection on motor. 1. Replace motor.
1. Defection on speed sensor.
1. Overloaded;
2. One of the parts of treadmill
stuck;
3. Lack of lubrication oil
4. Motor damaged
Connect the cable again or
change new one.
1. Check the cable connection;
2. Replace speed sensor.
1. Choose a high-power treadmill;
2. Check the stuck position;
3. Add lubrication oil to belt and
deck;
4. Replace motor.
E06
E07
E08
Error on self-calibration Replace controller
Safety key off Attached the safety key correctly.
EEPROM damaged Replace controller
Page 21

20
TROUBLE SHOOTING
PROBLEM POSSIBLE CAUSES CORRECTION
Console has no
display
Treadmill belt
slipping
Running belt not
smooth
Motor not work 1. Safety key not attached
1. Not plugged in.
2. Defection on whole set
cable or not plug well.
3. Overload protection.
4. Transformer burned.
1. Running belt too loose.
2. Motor belt too loose..
1. Lack lubrication oil
2. Running belt too tight.
correctly.
2. Power cord of motor not
connect well.
3. Whole set cable not plug
well.
4. Controller damaged.
5. Motor damaged.
1. Tighten into suitable outlet.
2. Plug every connector well.
3. Reset overload protector.
4. Replace transformer.
1. Tighten running belt.
2. Tighten motor belt.
1. Add lubrication oil to belt and
deck.
2. Loose running belt.
1. Insert safety pull pin.
2. Plug power cord of motor again.
3. Plug whole set cable again.
4. Replace controller.
5. Replace motor.
Treadmill power off
automatically after
high-speed running
for a period of time
1. Lack lubrication oil.
2. Protector damaged.
1. Add lubrication oil to belt and
deck.
2. Replace protector.
 Loading...