

Page 1

Uponor Smatrix
Base PRO R-147
KNX
EN INSTALLATION AND OPERATION
MANUAL
12 | 2016
Page 2

UK
CZ
DE
Table of contents
1 Copyright and disclaimer .....................................3
DK
EE
ES
FI
FR
HR
HU
IT
LT
LV
2 Preface ..................................................................4
2.1 Safety instructions ....................................................4
2.2 Correct disposal of this product (Waste Electrical
and Electronic Equipment) .......................................4
3 Description ...........................................................5
3.1 System overview .......................................................5
3.2 Required devices and softwares ................................5
3.3 Installation procedure ...............................................5
4 Install KNX gateway module ................................6
4.1 Prepare for installation .............................................6
4.2 Install Uponor Smatrix Base PRO system ..................6
4.3 Attach KNX gateway module to the wall
using DIN rail ............................................................6
4.4 Installation example ..................................................7
4.5 Disconnect the Smatrix Base PRO system from
AC power ..................................................................8
4.6 Disconnect the KNX bus from DC power ..................8
4.7 Connect the KNX gateway module to the
Smatrix Base PRO bus ..............................................9
4.8 Connect the KNX gateway module to
the KNX bus ...........................................................10
4.9 Connect the KNX bus to DC power .........................10
4.10 Connect the Smatrix Base PRO system to
AC power ................................................................11
4.11 Enable the KNX gateway module in the
interface I-147 ........................................................11
5 System setup ......................................................12
5.1 Prepare for system setup ........................................12
5.2 ETS® product data file ............................................12
5.3 Assign ETS® address to KNX gateway module ........12
5.4 Setting up a system ................................................13
6 Data point lists ...................................................16
NL
NO
PL
PT
RO
RU
SE
SK
7 Troubleshooting .................................................18
7.1 KNX gateway module LEDs ....................................18
7.2 KNX gateway module error codes ...........................19
7.3 Resetting the KNX gateway module .......................19
7.4 LED error codes ......................................................20
8 Technical data .....................................................23
8.1 Technical data ......................................................... 23
8.3 Dimensions .............................................................24
2
UPONOR SMATRIX BASE/BASE PRO · INSTALLATION AND OPERATION MANUAL
Page 3

1 Copyright and disclaimer
Uponor has prepared this installation and operation
manual and all the content included solely for
information purposes. The contents of the manual
(including graphics, logos, icons, text, and images)
are copyrighted and protected by worldwide copyright
laws and treaty provisions. You agree to comply with
all copyright laws worldwide in your use of the manual.
Modification or use of any of the contents of the
manual for any other purpose is a violation of Uponor’s
copyright, trademark and other proprietary rights.
The presumption for the manual is that the safety
measures have been fully complied with and, further,
that Uponor Smatrix Base, including any components
that are part of such system, covered by the manual:
• is selected, planned and installed and put into
operation by a licensed and competent planner and
installer in compliance with current (at the time
of installation) installation instructions provided
by Uponor as well as in compliance with all
applicable building and plumbing codes and other
requirements and guidelines;
• has not been (temporarily or continuously) exposed
to temperatures, pressure and/or voltages that
exceed the limits printed on the products or stated
in any instructions supplied by Uponor;
• remain in its originally installed location and is not
repaired, replaced or interfered with, without prior
written consent of Uponor;
While Uponor has made efforts to ensure that the
manual is accurate, Uponor does not guarantee or
warrant the accuracy of the information contained
herein. Uponor reserves the right to modify the
specifications and features described herein, or
discontinue manufacture of Uponor Smatrix Base
PRO Gateway Module R-147 KNX described at any
time without prior notice or obligation. The manual
is provided “as is” without warranties of any kind,
either expressed or implied. The information should be
independently verified before using it in any manner.
To the fullest extent permissible, Uponor disclaims
all warranties, expressed or implied, including,
but not limited to, the implied warranties of
merchantability, fitness for particular purpose and
non-infringement.
This disclaimer applies to, but is not limited to, the
accuracy, reliability or correctness of the manual.
Under no circumstances shall Uponor be liable for
any indirect, special, incidental or consequential
damages or loss that result from the use of or
the inability to use the materials or information
in the manual, or any claim attributable to errors,
omission or other inaccuracies in the manual, even
if Uponor has been advised of the possibility of
such damages.
This disclaimer and any provisions in the manual
do not limit any statutory rights of consumers.
UK
CZ
DE
DK
EE
ES
FI
FR
HR
HU
IT
LT
LV
• is connected to potable water supplies or
compatible plumbing, heating and/or cooling
products approved or specified by Uponor;
• is not connected to or used with non-Uponor
products, parts or components except for those
approved or specified by Uponor; and
• does not show evidence of tampering, mishandling,
insufficient maintenance, improper storage, neglect
or accidental damage before installation and being
put into operation.
NL
NO
PL
PT
RO
RU
SE
SK
UPONOR SMATRIX BASE/BASE PRO · INSTALLATION AND OPERATION MANUAL
3
Page 4

UK
CZ
DE
DK
2 Preface
This installation and operation manual describes how
to install and operate the Uponor Smatrix Base PRO
Gateway Module R-147 KNX.
2.2 Correct disposal of this product
(Waste Electrical and Electronic
Equipment)
EE
ES
FI
FR
HR
HU
IT
LT
LV
2.1 Safety instructions
Warnings used in this manual
The following symbols are used in the manual to
indicate special precautions when installing and
operating any Uponor equipment:
Wa r ni n g !
Risk of injury. Ignoring warnings can cause
injury or damage components.
Ca u ti o n !
Ignoring cautions can cause malfunctions.
Safety measures
Conform to the following measures when installing and
operating any Uponor equipment:
• Read and follow the instructions in the installation
and operation manual.
• Installation must be performed by a competent
person in accordance with local regulations.
• It is prohibited to make changes or modifications
not specified in this manual.
• All power supplies must be switched off before
starting any wiring work.
NOTE!
Applicable in the European Union and other
European countries with separate collection
systems
This marking shown on the product or its
literature indicates that it should not be
disposed with other household wasted at the
end of its working life. To prevent possible harm to the
environment or human health from uncontrolled waste
disposal, please separate this from other types of wastes
and recycle it responsibly to promote the sustainable
reuse of material resources.
Household users should contact either the retailer
where they purchased this product, or their local
government office, for details of where and how they
can take this item for environmentally safe recycling.
Business users should contact their supplier and check
the terms and conditions of the purchase contract. This
product should not be mixed with other commercial
wastes of disposal.
NL
NO
PL
PT
RO
RU
SE
SK
• Do not use water to clean Uponor components.
• Do not expose the Uponor components to
flammable vapours or gases.
Uponor cannot accept any responsibility for damage
or breakdown that can result from ignoring these
instructions.
Power
Wa r ni n g !
The Uponor system uses 50 Hz, 230 V AC
power. In case of emergency, immediately
disconnect the power.
Technical constraints
Ca u ti o n !
To avoid interference, keep installation/data
cables away from power cables of more than
50 V.
4
UPONOR SMATRIX BASE/BASE PRO · INSTALLATION AND OPERATION MANUAL
Page 5

3 Description
3.1 System overview
UK
CZ
DE
3.2 Required devices and softwares
An Uponor Smatrix Base PRO system can be connected
to a standard KNX bus via an Uponor Smatrix Base PRO
Gateway Module R-147 KNX (KNX gateway module).
The KNX gateway module will act as a bridge between
the wired Uponor Smatrix Base PRO system bus and the
wired KNX bus.
The KNX gateway module offers several possibilities
to operate and monitor an Uponor Smatrix Base PRO
system in a KNX environment, such as:
• Access to setpoints for every room.
• Access to readout of room temperatures.
• Access to alarm monitoring.
• Access to heat curve offset in Uponor Smatrix Move
PRO controller (if connected to a Base PRO system
bus).
• Usage of either Uponor or KNX thermostats in the
system.
• Usage of standard KNX system modes for Comfort/
ECO and heating/cooling.
The following list states what is needed to utilize a full
KNX connection for a Uponor Smatrix Base PRO system:
• Uponor Smatrix Base PRO Gateway Module R-147
KNX.
• Up to 16 Uponor Smatrix Base PRO controllers
(Base PRO controller) and an Uponor Smatrix Base
PRO Interface I-147 (interface I-147).
• KNX PSU and PC interface.
• Data point lists for the Base PRO controllers (found
in this manual).
• ETS® tool (version 5 or higher, software provided
by the KNX organisation) installed on a computer
connected to the KNX bus.
• ETS® product data file for Uponor Smatrix Base
PRO.
3.3 Installation procedure
Uponor recommends following the process described
below to guarantee the best possible installation results.
NOTE!
Installation of the KNX gateway module
requires basic knowledge and training on the
ETS® tool and KNX systems.
Stage Procedure Page
1 Prepare for installation __
2 Install Uponor Smatrix Base/Base PRO
system*
3 Power off the Smatrix Base PRO system
4 Power off the KNX system
5 Connect the KNX gateway module to the
Smatrix Base PRO bus
6 Connect the KNX gateway module to the
KNX bus
7 Power up the Smatrix Base PRO system __
8 Enable the KNX gateway module in the
interface I-147
9 Power up the KNX system __
10 System setup __
* See the installation and operation for Uponor Smatrix
Base/Base PRO for more information.
–
__
__
__
DK
EE
ES
FI
FR
HR
HU
IT
LT
LV
NL
NO
PL
PT
RO
RU
UPONOR SMATRIX BASE/BASE PRO · INSTALLATION AND OPERATION MANUAL
SE
SK
5
Page 6

UK
CZ
DE
DK
EE
ES
FI
FR
4 Install KNX gateway module
4.1 Prepare for installation
Before starting the installation:
• Study the wiring diagram in the end of this manual
or in the quick guide.
• Study the installation examples in manual.
See section 4.X Installation example for more
information.
• Ensure that the Smatrix Base PRO system is setup
correctly and powered off.
See the installation and operation manual
for Uponor Smatrix Base/Base PRO for more
information.
4.2 Install Uponor Smatrix Base PRO
system
Ensure that the Smatrix Base PRO system is setup
correctly before continuing with this installation
procedure.
See the installation and operation manual for Uponor
Smatrix Base/Base PRO for more information.
4.3 Attach KNX gateway module to the
wall using DIN rail
Attach the KNX gateway module to a DIN rail in a
cabinet (recommended), or to a DIN rail attached to a
wall using screws and wall plugs.
HR
HU
IT
LT
LV
NL
NO
PL
• Ensure that the KNX system is installed (not yet
setup in ETS) correctly and powered off.
See separate documentation (not supplied by
Uponor) for more information.
To determine where to best place the Uponor Smatrix
Base components, follow these guidelines:
• Ensure that the KNX gateway module can be
installed close to the Smatrix Base PRO bus.
• Ensure that the KNX gateway module can be
installed close to the KNX bus.
• Ensure that there is room for the KNX gateway
module on a DIN rail.
• Ensure that the KNX gateway module is protected
from running or dripping water.
• Check that connectors and switches are easily
accessible.
The figure below shows how to attach the KNX gateway
module using a DIN rail.
A
B
A
2
1
3
CLICK
B
3
2
1
PT
RO
RU
SE
SK
6
UPONOR SMATRIX BASE/BASE PRO · INSTALLATION AND OPERATION MANUAL
Page 7

A
UK
CZ
4.4 Installation example
DE
DK
EE
ES
FI
FR
HR
HU
IT
LT
LV
B
I-147
T-143
T-144
T-145
T-146
T-147
T-148
I-147
230 V AC
230 V AC
PRO
X-147
PRO
PRO
X-147
PRO
Modbus
Modbus
R-147
Bus
100...240 V AC
24...30 V DC
Bus
BMS
100...240 V AC
24...30 V DC
ets
A
B
ets
A
B
NL
NO
PL
PT
RO
RU
SE
SK
T-143
R-147
Ca u ti o n !
An Uponor Smatrix Wave PLUS Interface
I-147 is needed to enable en KNX Gateway
module.
Ca u ti o n !
A separate power supply is needed for the
KNX bus.
NOTE!
The KNX gateway module only sends Smatrix
Base PRO data point values to the KNX bus
when the data point has changed.
See also the wiring diagram in the end of the manual.
7
BMS
UPONOR SMATRIX BASE/BASE PRO · INSTALLATION AND OPERATION MANUAL
Page 8

a. Sy St e m W i t h up on o r t h er m o Stat S
Bus
...3
A connection example of an Uponor Base PRO system
connected to the KNX bus using the KNX gateway
module.
• The system is setup to use Uponor room
thermostats.
• An outdoor sensor is connected to a public
thermostat T-143 registered to the Smatrix Base
PRO system as a system device.
4.5 Disconnect the Smatrix Base PRO
system from AC power
Wa r ni n g !
Electrical installation and service behind
secured 230 V AC covers must be carried
out under the supervision of a qualified
electrician.
UK
CZ
DE
DK
• A building management system (BMS) is connected
to the KNX bus.
• The ETS® configuration tool is used to setup the
KNX system.
B. SyS te m Wi t h K nX t h er m o Stat S
A connection example of an Uponor Base PRO system
connected to the KNX bus using the KNX gateway
module.
• The system is setup to use KNX room thermostats.
• An outdoor sensor is connected to a public
thermostat T-143 registered to the Smatrix Base
PRO system as a system device.
• A building management system (BMS) is connected
to the KNX bus.
• The ETS® configuration tool is used to setup the
KNX system.
X-147
Disconnect the Smatrix Base PRO system from AC
power before continuing with the installation.
4.6 Disconnect the KNX bus from DC
power
Wa r ni n g !
There is 24 – 30 V DC in the KNX bus, if
connected to the mains.
Disconnect the KNX bus from DC power before
continuing with the installation.
24...30 V DC
EE
ES
FI
FR
HR
HU
IT
LT
LV
NL
NO
PL
PT
RO
RU
SE
SK
UPONOR SMATRIX BASE/BASE PRO · INSTALLATION AND OPERATION MANUAL
8
Page 9
AB
UK
CZ
DE
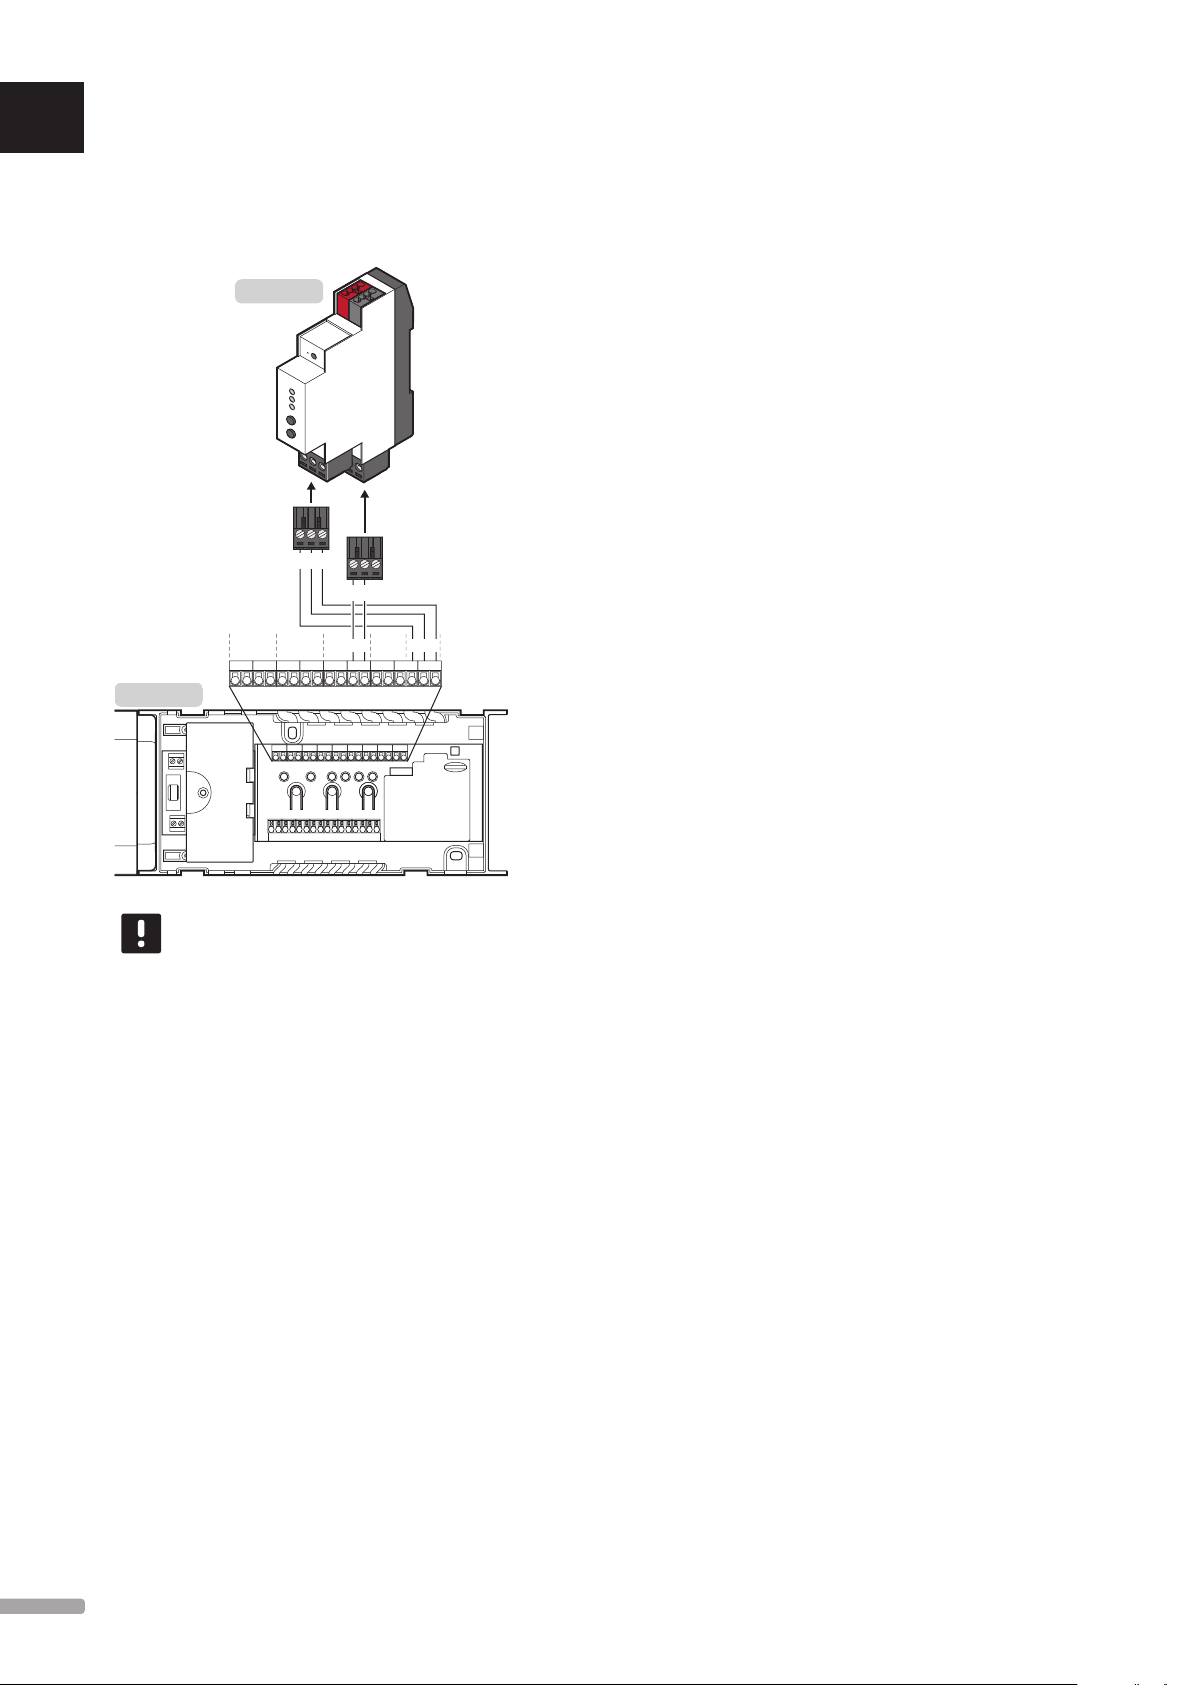
4.7 Connect the KNX gateway module
to the Smatrix Base PRO bus
The illustration shows the KNX gateway module
connected to the Smatrix Base PRO controller.
R-147
To connect the KNX gateway module to the Smatrix
Base PRO controller:
1. Study the wiring diagram to locate the connection
terminal positions.
2. Ensure that the power is disconnected from the
controller.
DK
EE
ES
FI
FR
HR
HU
IT
LT
LV
AB -
+- -
BBB++ --
X-147
NOTE!
The connection terminals on Smatrix Base
PRO controller and the KNX gateway module
are detachable to facilitate easy installation.
3. Remove the cover from the Smatrix Base PRO
controller.
See the installation and operation manual
for Uponor Smatrix Base/Base PRO for more
information.
4. Connect the wires from the thermostat bus on the
Smatrix Base PRO controller to the lower connector
on the KNX gateway module.
• + terminal on the controller to + terminal on the
KNX gateway module.
• - terminal on the controller to - terminal on the
KNX gateway module.
---+BAAAA
5. Connect the wires from the system bus on the
Smatrix Base PRO controller to the upper connector
on the KNX gateway module.
• A connector on the controller to A connector
on the KNX gateway module.
• B connector on the controller to B connector on
the KNX gateway module.
• - connector on the controller to - connector on
the KNX gateway module.
6. Tighten the screws fixing the wires to the
connectors.
NL
NO
PL
PT
RO
RU
SE
SK
9
UPONOR SMATRIX BASE/BASE PRO · INSTALLATION AND OPERATION MANUAL
Page 10

4.8 Connect the KNX gateway module
24...30 V DC
Bus
to the KNX bus
The illustration shows the KNX gateway module
connected to the KNX bus.
UK
4.9 Connect the KNX bus to DC power
CZ
DE
+-
Bus
R-147
Wa r ni n g !
There is 24 – 30 V DC in the KNX bus, if
connected to the mains.
NOTE!
The connection terminal KNX gateway
module is detachable to facilitate easy
installation.
To connect the KNX gateway module to the Smatrix
Base PRO controller:
1. Study the wiring diagram to locate the connection
terminal positions.
Wa r ni n g !
There is 24 – 30 V DC in the KNX bus, if
connected to the mains.
1. Check that all wiring is complete and correct:
• Smatrix Base PRO bus
• KNX bus
2. Connect power to the KNX bus.
DK
EE
ES
FI
FR
HR
HU
IT
LT
2. Ensure that the power is disconnected from the
KNX bus.
3. Connect the wires from the KNX bus to the KNX
connector on the KNX gateway module.
• + terminal on the controller to + terminal (red)
on the KNX gateway module.
• - terminal on the controller to - terminal (grey)
on the KNX gateway module.
LV
NL
NO
PL
PT
RO
RU
SE
UPONOR SMATRIX BASE/BASE PRO · INSTALLATION AND OPERATION MANUAL
SK
10
Page 11

UK
CZ
4.10 Connect the Smatrix Base PRO
system to AC power
4.11 Enable the KNX gateway module in
the interface I-147
DE
DK
EE
ES
FI
FR
HR
HU
IT
LT
X-147
1. Check that all wiring is complete and correct:
• Smatrix Base PRO bus
• KNX bus
• Power to the KNX bus
2. Connect power to the Smatrix Base PRO Controller.
3. The main 3 LEDs (PWR, KNX, and BUS) on the
KNX gateway module powers on and turns red. The
PWR LED (power) changes from red to green after a
couple of seconds.
R-147
ON
PWR
KNX
BUS
Integration
GPI: Heating/Cooling switch
Supply water controller: Disable
KNX Gateway: Enable
To connect the enable the KNX gateway module in
interface I-147:
1. Go to the Integration menu (Main menu >
Integration).
2. Press KNX Gateway: Disable.
3. Press Enable to activate communication between
the interface and the KNX gateway module.
The Modbus LED on the KNX gateway module
changes from red to green.
R-147
ON
PWR
KNX
BUS
LV
NL
NO
PL
PT
RO
RU
SE
NOTE!
A flashing LED indicates that the KNX
gateway module receives data via Modbus
and/or KNX.
NOTE!
When enabling the KNX gateway module,
in the interface I-147, all ECO setback
values and Cooling offset will be set to 0 °C
throughout the Smatrix Base PRO system.
SK
11
UPONOR SMATRIX BASE/BASE PRO · INSTALLATION AND OPERATION MANUAL
Page 12

UK
CZ
DE
DK
EE
5 System setup
5.1 Prepare for system setup
NOTE!
Installation of the KNX gateway module
requires basic knowledge and training on the
ETS® tool and KNX systems.
Before starting the system setup:
5.3 Assign ETS® address to KNX
gateway module
ets
ES
FI
FR
HR
HU
IT
LT
LV
NL
NO
PL
PT
RO
RU
• Ensure that the KNX gateway module is installed
correctly.
See section 4 Install KNX gateway module for more
information.
• Ensure that the Smatrix Base PRO system is setup
correctly and powered on.
See the installation and operation manual
for Uponor Smatrix Base/Base PRO for more
information.
• Ensure that the KNX system is installed (not yet
setup in ETS) correctly and powered on.
See separate documentation (not supplied by
Uponor) for more information.
• Ensure that the PWR (power) and BUS (Modbus)
LED on the KNX gateway module are green.
• Note where all Uponor Smatrix Base PRO devices
are placed and how they are connected to each
other.
• Download and install the ETS® tool (version 5 or
higher, software provided by the KNX organisation)
on a computer connected to the KNX bus.
• Download the ETS® product data file for Uponor
Smatrix Base PRO Gateway Module R-147 KNX
from the Uponor website.
See section 5.2 ETS® product data file for more
information.
• Locate the data point lists for the Base PRO
controllers (found in this manual).
5.2 ETS® product data file
To configure the KNX gateway module and other
connected Smatrix Base PRO devices a product data file
containing these devices is needed.
1. Download the product data file from the Uponor
website (http://www.uponor.com/smatrix/knx).
3
Bus
2 4
1
Ca u ti o n !
Do not disconnect the KNX gateway module
from the power source when the KNX LED
is flashing red (receiving data). It may cause
configuration issues with the controllers on
the Modbus side.
NOTE!
Ensure that no other KNX device is in
programming mode when completing these
steps.
To assign ETS® address to the KNX gateway module:
1. Press the programming button, using a pointed
object, on the KNX gateway module to set into
programming mode.
2. The programming LED is turned on (red).
3. Start the ETS® tool, add the KNX gateway module
to the Topology, and assign a unique ETS® address
to the KNX gateway module.
4. If the ETS® address is assigned succesfully, the
programming LED is turned off.
SE
SK
2. Load the product data file into the ETS® tool.
12
UPONOR SMATRIX BASE/BASE PRO · INSTALLATION AND OPERATION MANUAL
Page 13

5.4 Setting up a system
et S® t oo l
In order for the Uponor Smatrix Base PRO system to
communicate with the KNX bus, the KNX gateway
module must be programmed in the ETS® tool.
The ETS® tool is a software provided by the KNX
organisation which must be installed and run on a
computer connected to the KNX bus.
et S® C on f i gu r at io n fl a gS
There is usually no need to change the configuration
flags from default settings when programming the
system with the ETS® tool.
See section 6 Data point lists for more information.
Ca u ti o n !
Setting an invalid configuration flag can
cause an ETS® configuration alarm in the KNX
gateway module. An invalid configuration flag
can be one that is not supported or which not
allowed to combine with other flags (such as
TRANSMIT and WRITE, without READ ON
INIT)
See section 7 Troubleshooting for more
information.
mo v e pro Co n t ro l le r
Default ETS® configuration flag settings
Ca u ti o n !
If using a BMS to set the heating and/
or cooling curve offset (for the zone) it is
recommended to change the setting to send
setpoint data cyclically, even if the value
doesn’t change. Otherwise it is recommended
to set the setpoint configuration flag to
Read On Init to secure a fast recovery after
startup.
The ETS® configuration flags for each available zone in
the Move PRO controller are set, by default, as follows.
• The supply temperature data point is set to
COMMUNICATION and TRANSMIT. This enables
the thermostat to send the supply temperature (for
the zone) to other devices in the KNX system if
requested.
• The heating and/or cooling curve offset data points
are set to COMMUNICATION and WRITE. This
enables the heating and/or cooling curve offset (for
the zone) to be overwritten by values from other
devices in the KNX system if ordered to.
UK
CZ
DE
DK
EE
ES
FI
FR
HR
HU
Ch a ng e S t o S e tt i n gS i n to u C h S C re e n i n t er fa Ce
When the KNX gateway module is enabled in the touch
screen interface the following settings are, by default,
changed throughout the Smatrix Base PRO system.
• All ECO setback values are set to 0 °C.
• Cooling offset is set to 0 °C.
These changes are limiting the function of Forced ECO,
and setpoint offset when changing to cooling mode.
The changes to the settings are done to avoid possible
conflicts in the touch screen interface if the setpoint is
transmitted from the KNX system (i.e. BMS, Building
Management System).
However depending on which thermostats are used and
how the ETS® configuration flags are set, the system
can be setup to behave in different ways.
IT
LT
LV
NL
NO
PL
PT
RO
UPONOR SMATRIX BASE/BASE PRO · INSTALLATION AND OPERATION MANUAL
RU
SE
SK
13
Page 14

UK
up o no r th e r mo S tatS
Kn X t h e rm o Stat S
CZ
DE
DK
EE
ES
FI
FR
HR
HU
IT
LT
Default ETS® configuration flag settings
Ca u ti o n !
If using a BMS to set the setpoints of Uponor
thermostats it is recommended to change the
data point flag to WRITE, and to change the
setting to send setpoint data cyclically.
The ETS® configuration flags for an Uponor thermostat
are set, by default, to COMMUNICATION and
TRANSMIT. This enables the thermostat to send the
setpoint (and other values) to other devices in the KNX
system if requested.
Actuator settings in the ETS® tool
It is important that all controller parameter settings in
the ETS® tool which are set to “Use with actuator X”
(where X is the controller channel number), is referring
to an actuator parameter set to “Activated, Uponor
thermostat”.
However, if several actuators are controlled by the
same Uponor thermostat, only the actuator parameter
with the lowest index number is required to be set
to “Activated, Uponor thermostat” and still maintain
functionality. All other acutator zone settings
(registering a thermostat to an acutator channel) are
done at the controller in question.
If the KNX gateway module has lost communication
with an Uponor controller, all actuator data points in
the KNX will be displaying off until the issue is resolved.
The actual physical status of the actuator will remain
unchanged.
Ca u ti o n !
If using KNX thermostats it is recommended
to use thermostats that can send the
setpoint and room temperature cyclically,
even if the value doesn’t change. Otherwise
it is recommended to set the setpoint
configuration flag to Read On Init to secure
a fast recovery after startup.
Default ETS® configuration flag settings
The ETS® configuration flags for a KNX thermostat
are set, by default, to COMMUNICATION and
WRITE (except the actuator status which is set to
COMMUNICATION and TRANSMIT). This enables the
thermostat setpoint (and other values, except the
actuator status) to be overwritten by values from other
devices in the KNX system if ordered to.
Actuator settings in the ETS® tool
It is important that all controller parameter settings in
the ETS® tool which are set to “Use with actuator X”
(where X is the controller channel number), is referring
to an actuator parameter set to “Activated, KNX
thermostat”.
LV
NL
NO
PL
PT
RO
RU
SE
SK
14
UPONOR SMATRIX BASE/BASE PRO · INSTALLATION AND OPERATION MANUAL
Page 15

Co o li n g o f f Se t an d fo r Ce d eCo
Using only Uponor thermostats in a system
(default flag settings)
In this setup only Uponor thermostats are used and all
ETS® configuration flags are set to default. Setpoints are
transmitted to the controller and touch screen interface,
which sends it to the the KNX bus via the KNX gateway
module.
Forced ECO and Cooling offset can be activated again
in the Uponor system and used without limitations. To
activate the functions, ensure that all ECO setback
values and Cooling offset are set to default values (or
any other preferred setting).
To enable Forced cooling from the KNX bus, ensure that
the parameter setting Operating mode (Main menu
> Heating/Cooling > Operating mode), in the touch
screen interface, is set to H/C Master.
Using only KNX thermostats in a system (default
flag settings)
In this setup only KNX thermostats are used and all
ETS® configuration flags are set to default. Setpoints are
transmitted to the controller and touch screen interface
from the KNX bus via the KNX gateway module.
Forced ECO and Cooling offset is inactive in the Uponor
system. Instead the setpoint (already adjusted for
Forced ECO or Cooling offset) must be sent from the
KNX bus (i.e. from a BMS).
Using only KNX thermostats, or a mixture of
Uponor and KNX thermostats in a system, with
Cooling offset activated (requires changed flag
settings)
In this setup only KNX thermostats, or a mixture of
Uponor and KNX thermostats, are used with Cooling
offset activated in the Uponor system. For this setup
to work without setpoint conflicts, the KNX thermostat
ETS® configuration flags for setpoints must be
changed from WRITE to TRANSMIT. Setpoints are now
communicated from the controller and touch screen
interface to the KNX bus via the KNX gateway module.
Cooling offset (not Forced ECO) can be activated again
in the Uponor system and used without limitations. To
activate the function, ensure that the setting are set to
its default value (or any other preferred setting).
Forced ECO and Cooling offset in a system is
controlled by a BMS (requires changed flag
settings)
In this setup Forced ECO and Cooling offset is
controlled by a BMS. If any Uponor thermostats are
used the ETS® configuration flags for setpoints must
be set to WRITE. ETS® configuration flags for any
KNX thermostats remain unchanged. Setpoints are
transmitted to the controller and touch screen interface
from the KNX bus via the KNX gateway module.
Forced ECO and Cooling offset is inactive in the Uponor
system. Instead the setpoint (already adjusted for
Forced ECO or Cooling offset) must be sent from the
KNX bus (i.e. from a BMS).
UK
CZ
DE
DK
EE
ES
FI
FR
HR
HU
IT
LT
Ca u ti o n !
It is recommended not to use analogue
Uponor thermostats (T-143, T-144, and
T-145) in this setup.
The BMS cannot overwrite the analogue
thermostat setpoints, as they then will revert
back to their original analogue settings. This
may cause conflict in the Uponor controller
creating instability in the system. If the
override option is enabled in the interface
I-147, the thermostat setpoints cannot be
affected by the BMS.
LV
NL
NO
PL
PT
RO
RU
SE
UPONOR SMATRIX BASE/BASE PRO · INSTALLATION AND OPERATION MANUAL
SK
15
Page 16

UK
CZ
DE
6 Data point lists
Uponor provides default configuration flags (in the product data file) which normally does not need to be changed.
DK
EE
ES
FI
FR
HR
HU
IT
LT
General parameters Configuration flags, group objects
Data point Description ID KNX data type C T W R U ROI
Outdoor temperature Measured outdoor temperature 1 DPT_Value_Temp X X
Forced ECO System setback control 2 DPT_HVACMode X * X*
Operating Mode (Auto/H/C) Heating/Cooling control 3 DPT_HVACContrMode X * X*
Controller pump/boiler status Relay status:
0 = Open, 1 = Closed
Zone (circuit) parameters Configuration flags, group objects
Data point Description ID KNX data type C T W R U ROI
Circuit 1, supply temperature Measured supply temperature 4 DPT_Value_Temp X X
Circuit 1, heating curve offset Heating curve offset 5 DPT_Value_Temp X * X*
Circuit 1, cooling curve offset Cooling curve offset 6 DPT_Value_Temp X * X*
Circuit 2, supply temperature Measured supply temperature 7 DPT_Value_Temp X X
Circuit 2, heating curve offset Heating curve offset 8 DPT_Value_Temp X * X*
Circuit 2, cooling curve offset Cooling curve offset 9 DPT_Value_Temp X * X*
Circuit 3, supply temperature Measured supply temperature 10 DPT_Value_Temp X X
Circuit 3, heating curve offset Heating curve offset 11 DPT_Value_Temp X * X*
Circuit 3, cooling curve offset Cooling curve offset 12 DPT_Value_Temp X * X*
Circuit 4, supply temperature Measured supply temperature 13 DPT_Value_Temp X X
Circuit 4, heating curve offset Heating curve offset 14 DPT_Value_Temp X * X*
63,
DPT_Switch X X
112,
***,
749,
798
LV
NL
NO
PL
PT
RO
RU
SE
SK
Room parameters (X = 1–16, Y = 1–12) Configuration flags, group objects
Data point Description ID KNX data type C T W R U ROI
Uponor Room X.Y temperature Measured room temperature
Uponor Room X.Y set point Room setpoint temperature DPT_Value_Temp X X** **
Uponor Room X.Y actuator Actuator status:
0 = Closed, 1 = Open
Uponor Room X.Y relative humidity Measured relative humidity
level (%)
KNX Room X.Y temperature Measured room temperature
KNX Room X.Y set point Room setpoint temperature DPT_Value_Temp X ** X**
KNX Room X.Y actuator Actuator status:
0 = Closed, 1 = Open
KNX Room X.Y relative humidity Measured relative humidity
level (%)
* The TRANSMIT and WRITE flags cannot be combined without causing an error in the KNX gateway module, unless the READ ON INIT flag is set as
well.
** The TRANSMIT and WRITE flags is not recommended to be combined, unless the READ ON INIT flag is set as well.
*** The ID for each controller in order: 63, 112, 161, 210, 259, 308, 357, 406, 455, 504, 553, 602, 651, 700, 749, 798.
DPT_Value_Temp X X
15
DPT_BinaryValue X X
–
797
DPT_Value_Humidity X X
DPT_Value_Temp X X
15
DPT_BinaryValue X X
–
797
DPT_Value_Humidity X X
16
UPONOR SMATRIX BASE/BASE PRO · INSTALLATION AND OPERATION MANUAL
Page 17

ava i l aB l e e t S® C on f i gu r ati o n f l ag S
Flag Description
COMMUNICATION C Enables the KNX gateway
module to communicate with
the data point.
Must always be activated when
the data point is used.
TRANSMIT T Enables the KNX gateway
module to transmit Smatrix
Base PRO data points to the
KNX bus.
WRITE W Enables the KNX gateway
module to write KNX data
points to Smatrix Base PRO
system bus.
READ R Enables the KNX gateway
module to respond to read
requests from other device data
points.
UPDATE U Enables the KNX gateway
module to overwritte a data
point with read data after
sending a READ, or READ ON
INIT, request to another data
point.
READ ON INIT ROI Enables KNX gateway module
to do a read on init request for
data points on the KNX bus.
UK
CZ
DE
DK
EE
ES
FI
FR
HR
HU
Ca u ti o n !
Setting an invalid configuration flag can
cause an ETS® configuration alarm in the KNX
gateway module. An invalid configuration flag
can be one that is not supported or which not
allowed to combine with other flags (such as
TRANSMIT and WRITE, without READ ON
INIT)
See section 7 Troubleshooting for more
information.
IT
LT
LV
NL
NO
PL
PT
RO
UPONOR SMATRIX BASE/BASE PRO · INSTALLATION AND OPERATION MANUAL
RU
SE
SK
17
Page 18

UK
CZ
DE
DK
EE
ES
FI
FR
HR
HU
IT
LT
7 Troubleshooting
7.1 KNX gateway module LEDs
It is recommended to occasionally check the status LEDs
on the KNX gateway module for alarms.
D
A
B
C
Item Description
A Power LED
B KNX LED
C Modbus LED
D Programming LED
PWR
KNX
BUS
The table below describes the status of the KNX
gateway module LEDs.
LED Status
Power The power LED is always on.
• Red, on – software initialisation after
power on
• Green, on – KNX gateway module is
initialised
KNX The KNX LED is always on.
• Red, on – error, or software initialisation
after power on
• Green, on – KNX gateway module is
connected and setup vid KNX
• Red or green flashing – data is received
via KNX bus
Modbus The Modbus LED is always on.
• Red, on – error, or software initialisation
after power on
• Green, on – KNX gateway module is
connected and enabled via Modbus
• Red or green flashing – data is received
via Modbus
Programming • Red, on – KNX gateway module in
programming mode
• Off – KNX gateway module not in
programming mode
LV
NL
NO
PL
PT
RO
RU
SE
SK
18
UPONOR SMATRIX BASE/BASE PRO · INSTALLATION AND OPERATION MANUAL
Page 19
7.2 KNX gateway module error codes
3
UK
7.3 Resetting the KNX gateway module
If an error in the KNX gateway module has occured
during normal operation, the bus LED (KNX and/or
Modbus) changes to red.
To get more information about the error press the
button for the bus where the error is indicated. When
pressed, the bus LED flashes green a number of times,
indicating an error code. Only the first error is shown,
if multiple errors has occured they must be resolved in
order until the LED is green again.
See section 7.4 LED Error codes for more information.
PWR
KNX
BUS
A
B
Item Description
A
Button 1 – KNX
B
Button 2 – Modbus
1
2
If the KNX gateway module does not work as expected,
or if an error is indicated, it can be reset and maybe
solve the problem.
When reset, the KNX gateway module gets the
configuration from the KNX bus and pushes it to the
Smatrix Base PRO controllers. By doing so it is ensured
that any faults due to something being wrong with the
configuration is removed.
See section 7.4 LED Error codes for more information.
42 5
PWR
KNX
BUS
1
To reset the KNX gateway module:
1. Press and hold buttons 1 and 2 for at least 10
seconds.
2. All LEDs is turned off.
3. Release buttons 1 and 2.
CZ
DE
DK
EE
ES
FI
FR
HR
HU
IT
4. All three LEDs light up red again and the KNX
gateway module starts up again.
5. The power LED changes from red to green after
a couple of seconds. The Modbus and KNX LEDs
follows shortly when initialised.
NOTE!
A flashing LED indicates that the KNX
gateway module receives data via Modbus
and/or KNX.
LT
LV
NL
NO
PL
PT
RO
RU
UPONOR SMATRIX BASE/BASE PRO · INSTALLATION AND OPERATION MANUAL
SE
SK
19
Page 20

UK
7.4 LED error codes
CZ
DE
DK
EE
ES
FI
FR
HR
HU
IT
LT
LV
NL
NO
PL
PT
RO
RU
Kn X e r r or Co d e S
The table below shows error codes for the KNX bus and describes possible solutions. A common cause of a problem though may be due
to faulty wiring.
Error code Description Probable cause Solutions
1 Get ETS® configuration The KNX gateway module has not yet
received configuration from the ETS® tool.
2 Invalid ETS® flag An invalid manual configuration flag has
been set on KNX group objects in ETS®.
3 Incorrect ETS® actuator
configuration
4 Occupied thermostat
channel
5 Slave channel not
available
6 KNX Thermostat lost A KNX thermostat has timed out. The KNX
A parameter setting in the ETS® for
actuator control is incorrect.
A KNX thermostat is registered on the
same channel as an Uponor thermostat.
A KNX thermostat is registered to a
channel on an unavailable slave module.
gateway module hasn’t received data from
a KNX thermostat for at least 6 hours.
Ensure the KNX gateway module is installed correctly and
that it has been programmed by the ETS® tool.
If the error persists, perform a hard reset on the KNX gateway
module. See section 7.3 Resetting the KNX gateway module
for more information
Ensure all manual configuration flags on KNX group objects
in ETS® are correct.
Example: Activated data points which are only readable from
KNX must have READ or TRANSMIT flags set.
If many changes had been done in ETS® before the
error occured, Uponor recommends to remove all
COMMUNICATION flags from multiple group objects at once.
Then to add them one by one until the error occurs again.
See section 6 System setup for more information.
When using KNX thermostats
Ensure that all controller parameter settings, which are set
to “Use with actuator X” (where X is the controller channel
number), is referring to an actuator parameter set to
“Activated, KNX thermostat”.
When using Uponor thermostats
Ensure that all controller parameter settings, which are set
to “Use with actuator X” (where X is the controller channel
number), is referring to an actuator parameter set to
“Activated, Uponor thermostat”.
However, if several actuators are controlled by the same
Uponor thermostat, only the actuator parameter with the
lowest index number is required to be set to “Activated,
Uponor thermostat” and still maintain functionality. All
other acutator zone settings (registering a thermostat to an
acutator channel) are done at the controller in question.
1. Ensure that an Uponor thermostat is not registered to a
channel used by a KNX thermostat.
2. Unregister the Uponor thermostat from the controllers or
reprogram the KNX thermostat to an unused channel in
the ETS® tool.
3. If the error persists, perform a hard reset on the KNX
gateway module. See section 7.3 Resetting the KNX
gateway module for more information.
Ensure that the controller has a slave module installed (the
controller only have 6 channels by default).
If a slave module isn’t available, allocate the KNX thermostat
to another channel in the ETS®.
1. Ensure that the KNX thermostats are connected to the
KNX bus.
2. Ensure that the parameter settings for the KNX
thermostats in the ETS® are correct.
3. Ensure that the thermostats, if possible, are set to
send room temperature cyclically. Otherwise decrease
the temperature difference parameter which is allowed
before sending a new value via the KNX bus.
SE
SK
20
UPONOR SMATRIX BASE/BASE PRO · INSTALLATION AND OPERATION MANUAL
Page 21

mo d Bu S er r o r C od e S
The table below shows error codes for Modbus. A common cause of a problem though may be due to faulty wiring.
Error code Description Probable cause Solutions
1 KNX gateway module
and Smatrix Base
PRO Master controller
controller error
2 Touch screen interface
configuration error
The KNX gateway module has not received
transmission from the master controller for
a period of time.
The KNX gateway module has not received
transmission from the touch screen
interface for a period of time.
1. Ensure that the master controller is connected to a
power source.
2. Ensure that a touch screen interface is registered to the
master controller.
3. Ensure that the Modbus connectors on the master
controller and the KNX gateway module are connected
and wired correctly.
Ensure that the KNX gateway module is enabled in the touch
screen interface.
See section 4.11 Enable the KNX gateway module in the
interface I-147 for more information.
UK
CZ
DE
DK
EE
ES
A cooling request has been sent to the
KNX gateway module from the KNX bus,
but cooling is not setup correctly in the
touch screen interface.
3 Restarting controller An Uponor controller, in the system,
has restarted but has not been able to
communicate with the KNX gateway
module yet.
4 Touch screen interface
and Smatrix Base PRO
controller communication
error
5 Touch screen interface
and Smatrix Move PRO
controller communication
error
The touch screen interface has not received
transmission from one of the controllers for
a period of time.
The touch screen interface has not received
transmission from the Smatrix Move PRO
controller for a period of time.
Ensure that the parameter setting Operating mode (Main
menu > Heating/Cooling > Operating mode) is set to
H/C Master.
The alarm should be reset automatically, when the KNX
gateway module communicated with the restarted Uponor
controller again. How long it takes is dependent on how
many Uponor controllers are present in the system.
If the alarm is persistent (not automatically reset):
1. Ensure that all Uponor controllers in the system is
powered up.
2. Perform a hard reset on the KNX gateway module.
See section 7.3 Resetting the KNX gateway module for
more information.
3. Ensure that the numbers of Uponor controllers set in
the ETS® tool match the actual number of controllers
installed in the system.
1. Ensure that the Smatrix Move PRO controller is powered
up.
2. Check the Smatrix Move PRO controller Modbus wiring
and ensure it is correct.
FI
FR
HR
HU
IT
LT
LV
NL
NO
PL
UPONOR SMATRIX BASE/BASE PRO · INSTALLATION AND OPERATION MANUAL
PT
RO
RU
SE
SK
21
Page 22

UK
CZ
DE
DK
EE
ES
FI
FR
HR
Error code Description Probable cause Solutions
6 KNX gateway module
and Smatrix Base PRO
controller communication
error
7 KNX gateway module
and Smatrix Move PRO
controller communication
error
8 KNX configuration of
Uponor controller
The KNX gateway module has not received
any communication replies from one of the
controllers for a period of time.
The KNX gateway module has not received
any communication replies from the
Smatrix Move PRO controller for a period
of time.
The KNX gateway module has been
programmed with the ETS® tool and all
available Uponor controllers gets new KNX
configuration.
One or more of the available Uponor
controllers have restarted. A restart triggers
a transmission of the KNX configuration to
all connected devices.
1. Ensure that all Uponor controllers in the system is
powered up.
2. Perform a hard reset on the KNX gateway module.
See section 7.3 Resetting the KNX gateway module for
more information.
1. Ensure that the Smatrix Move PRO controller is powered
up.
2. Check the Smatrix Move PRO controller Modbus wiring
and ensure it is correct.
1. Ensure that all Uponor controllers in the system is
powered up.
2. Perform a hard reset on the KNX gateway module.
See section 7.3 Resetting the KNX gateway module for
more information.
3. Check the KNX bus for errors which might affect the
Uponor controllers.
HU
IT
LT
LV
NL
NO
PL
PT
RO
RU
SE
SK
22
UPONOR SMATRIX BASE/BASE PRO · INSTALLATION AND OPERATION MANUAL
Page 23
8 Technical data
8.1 Technical data
UK
CZ
DE
General
IP IP20 (IP: degree of inaccessibility to active parts of the product
and degree of water)
Operating temperature -5 °C to +45 °C
Storage temperature -25 °C to +70 °C
Relative humidity (non-condensing) 5 % to 93 %
Weight 55 g
CE marking
EAC marking
Tests according to Low Voltage Directive 2014/35/EU
EMV Directive 2014/30/EU
RoHS Directive 2011/65/EU
• EN 50581: 2012
• EN 50491-5-1: 2010
• EN 50491-5-2: 2010
• EN 50491-5-3: 2010
• EN 61000-6-2: 2005
• EN 61000-6-3: 2007 + A1: 2011
KNX
KNX connection 29 V DC
KNX bus current consumtion 10 mA
Compatible with ETS® ETS® version 5 (or higher)
Modbus
Power supply 5 V DC from controller thermostat bus
Modbus connection A, B, – on controller system bus
DK
EE
ES
FI
FR
HR
HU
IT
LT
http://www.uponor.com/ce-compliance
LV
NL
NO
PL
PT
RO
RU
SE
SK
UPONOR SMATRIX BASE/BASE PRO · INSTALLATION AND OPERATION MANUAL
23
Page 24
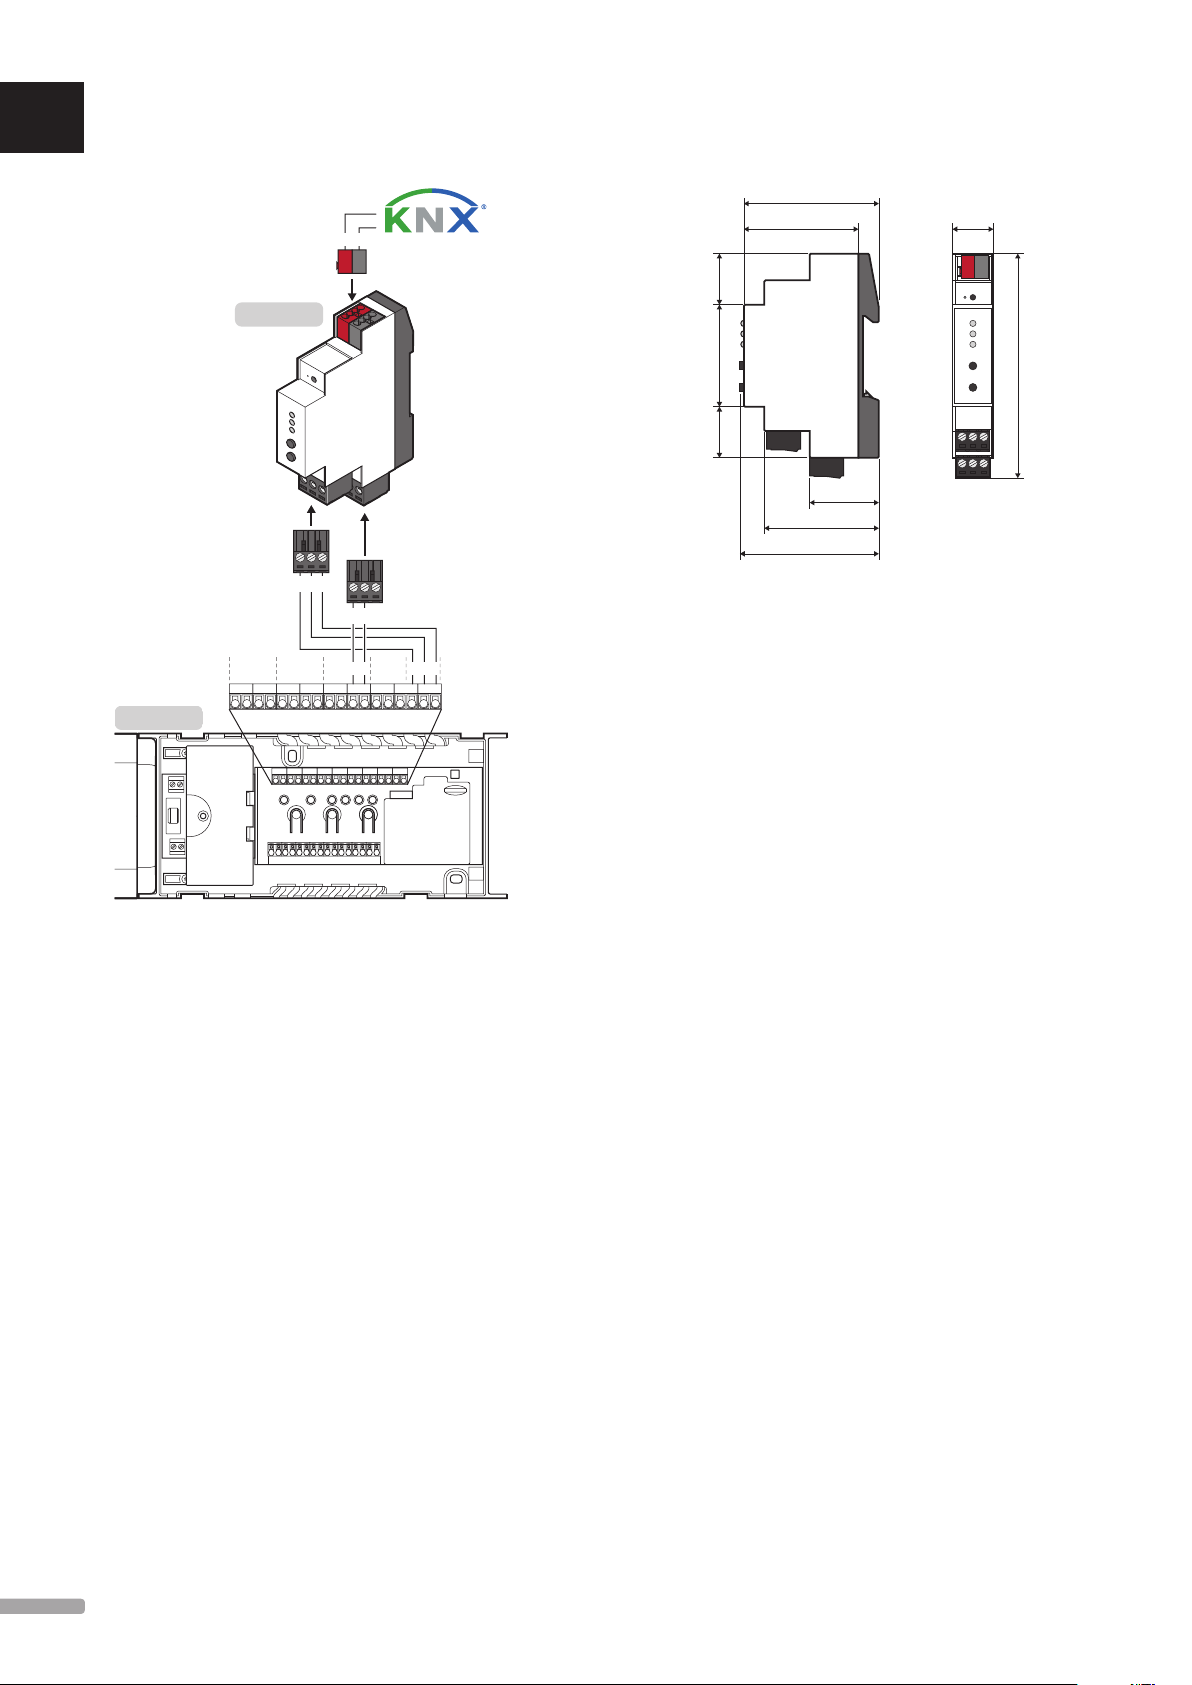
AB
60
UK
8.2 Wiring diagram
8.3 Dimensions
CZ
DE
DK
EE
ES
FI
FR
HR
HU
X-147
R-147
AB -
+-
+- -
Bus
BBB++ --
---+BAAAA
50.5
4522.522.5
30.5
51
62
18
(mm)
98,5
IT
LT
LV
NL
NO
PL
PT
RO
RU
SE
SK
24
UPONOR SMATRIX BASE/BASE PRO · INSTALLATION AND OPERATION MANUAL
Page 25

UK
CZ
DE
DK
EE
ES
FI
FR
HR
HU
IT
LT
LV
NL
NO
PL
PT
RO
UPONOR SMATRIX BASE/BASE PRO · INSTALLATION AND OPERATION MANUAL
RU
SE
SK
25
Page 26

1088247 12_2016_EN Production: Uponor AB, MRY, Virsbo; Sweden
Uponor Corporation
www.uponor.com
Uponor reserves the right to make changes, without prior notification, to the specification of
incorporated components in line with its policy of continuous improvement and development.
 Loading...