

Uovision UM565-SMS 12MP User Manual

www.uovisioneurope.com
UOVISION UM565-SMS 12MP
Wireless SMS controlled
Digital Scouting Camera
User’s Manual

www.uovisioneurope.com
Quick Start
1. Load 12pcs of the new AA alkaline batteries
or connect 6 V external power supply. If external power
used, the batteries can be inside the camera at the same
time
2. Insert the SD card (32GB or smaller) and SIM card
(Wireless cameras ONLY). Be sure that the PIN of the SIM
card is disabled; (You can disable the PIN of a SIM card via
your service provider.) (Wireless cameras ONLY)
3. Slide the power switch to the “SETUP” position to set up
the camera;
Note: When going into the setup mode, allow
approximately 10-20 seconds for the camera to
acquire a signal.
4. Press the “MENU” button to enter into the program menu,
then press the “up” or “down” arrow buttons for parameter
settings as described in the user’s manual. Press the “OK”
button to save parameter settings and exit;
5. Place the camera at the target area and turn on the
camera(slide the power switch to “ON”), the camera will
take pictures or videos as preset in step 4;
6. Press the “ ” button to capture photos or record a
video manually;
7. Press the “ ” button to playback the pictures. Use the
“up” or “down” arrow buttons to scroll through pictures on
the color monitor;
www.uovisioneurope.com
8. To delete an image in SETUP mode, press the “ ”
button to review the image and then press the “DEL” button
to delete the image.
Key Notes
a. “MENU”: enter the program menu in preview mode;
b. “▲”“▼”“◄”“►”: for parameter settings as described in
the user’s manual.
“▲” is the shortcut to choose “Video”, while “▼” for the
“Photo”.
c. “OK”: save parameter settings and play videos.
d. “ ”: exchange between playback and preview;
e. “DEL”: delete an image
f. “ ”: capture a photo or record a video manually.
g. Switch: OFF in the left; SETUP in the middle; ON in the
right position.
h. DC plug in diameter:4.0mm*1.7mm.

1 Instruction
Page 1
1 Instruction
1.1 General Description
This camera, is wireless digital surveillance camera, triggered by
any movement of humans or animals monitored by a high sensitive
Passive Infrared (PIR) motion sensor, and then automatically captures
high quality pictures, up to 12MP, varied by different models or
records video clips (QVGA and VGA) according to default settings or
preset customer settings. The wireless version cameras can send the
pictures instantly to your mobile device or e-mail via GSM/GPRS
network. You’ll be alerted just when the camera is triggered or per
custom settings.
It takes color pictures or videos under sufficient daylight. While at
night, the built-in infrared LED’s take clear pictures or videos
(monochrome).
There is a 2.0” color LCD display screen on the camera.
It is resistant against water and snow. The camera can also be
used as a portable digital camera.
1.2 Camera Body Interfaces
The camera has the following I/O interfaces: USB connector,
SD-card slot and external DC power connector.
On the back of camera, there is a lock for theft-proof and an
adjuster to change the tilt when mounting on an irregular interface e.g.
tree.
Take a few moments to familiarize yourself with the camera
controls and displays. It is helpful to bookmark this section and refer
to it when reading through the rest of the manual.
1 Instruction
Page 2
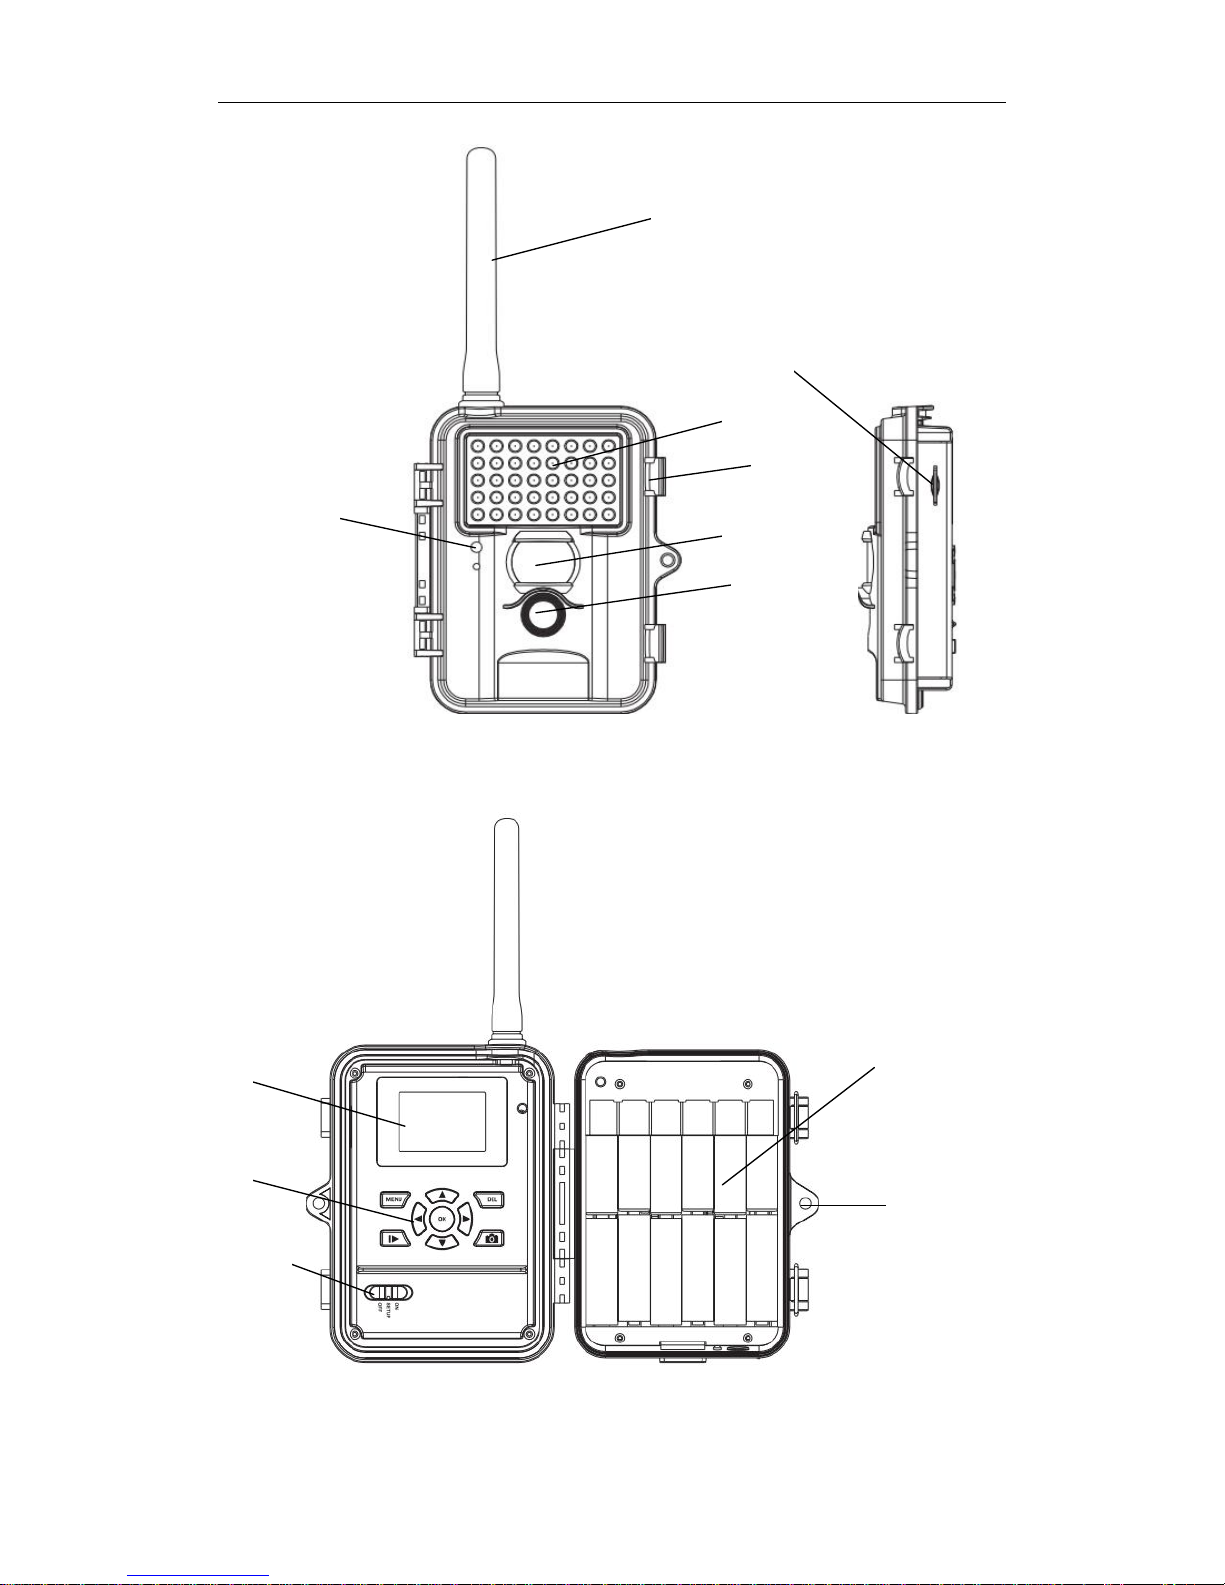
Figure 1: Front View
Figure 2: Operation Interface
Antenna1
Indication LED
PIR
Lens
Lock
Operation Panel
Power Switch
Battery Depot
Lock Hole
Display Screen
IR Flash
SIM card Slot2

1 Instruction
Page 3
Figure 3: Bottom view
1.2.1 Key Notes
a. “MENU”: enter the program menu in preview mode;
b. “▲”“▼”“◄”“►”: for parameter settings as described in the user’s
manual.
“▲”is the shortcut to choose “Video”, while “▼”for the “Photo”.
c. “OK”: save parameter settings and play videos.
d. “ ”: exchange between playback and preview;
e. “DEL”: delete an image
f. “ ”: capture a photo or record a video manually.
g. Switch: OFF in the left; SETUP in the middle; ON in the right
position.
h. DC plug in diameter:4.0mm*1.7mm.
SD-card Slot
DC In USB
Bottom Screw
DC Hole and Stopper

1 Instruction
Page 4
1.3 MMS function(For Wireless type
ONLY)
Wireless version camera can send pictures instantly to your mobile
device via GSM/GPRS network. You’ll be alerted just when a picture or
video has been taken. The camera sends MMS message through GPRS
network, so before using this function, you need to open GPRS service
from your service provider. It supports four band :850MHz, 900MHz,
1800MHz and 1900MHz. Pls insert SIM card correctly.
Be sure that the PIN of the SIM card is disabled before inserting
the SIM card. (You can disable the PIN of a SIM card via your mobile
phone. Then reinsert the card into your camera).
3 Quick Introductions
Page 5
2. Quick Start Guide
2.1 Power Supply
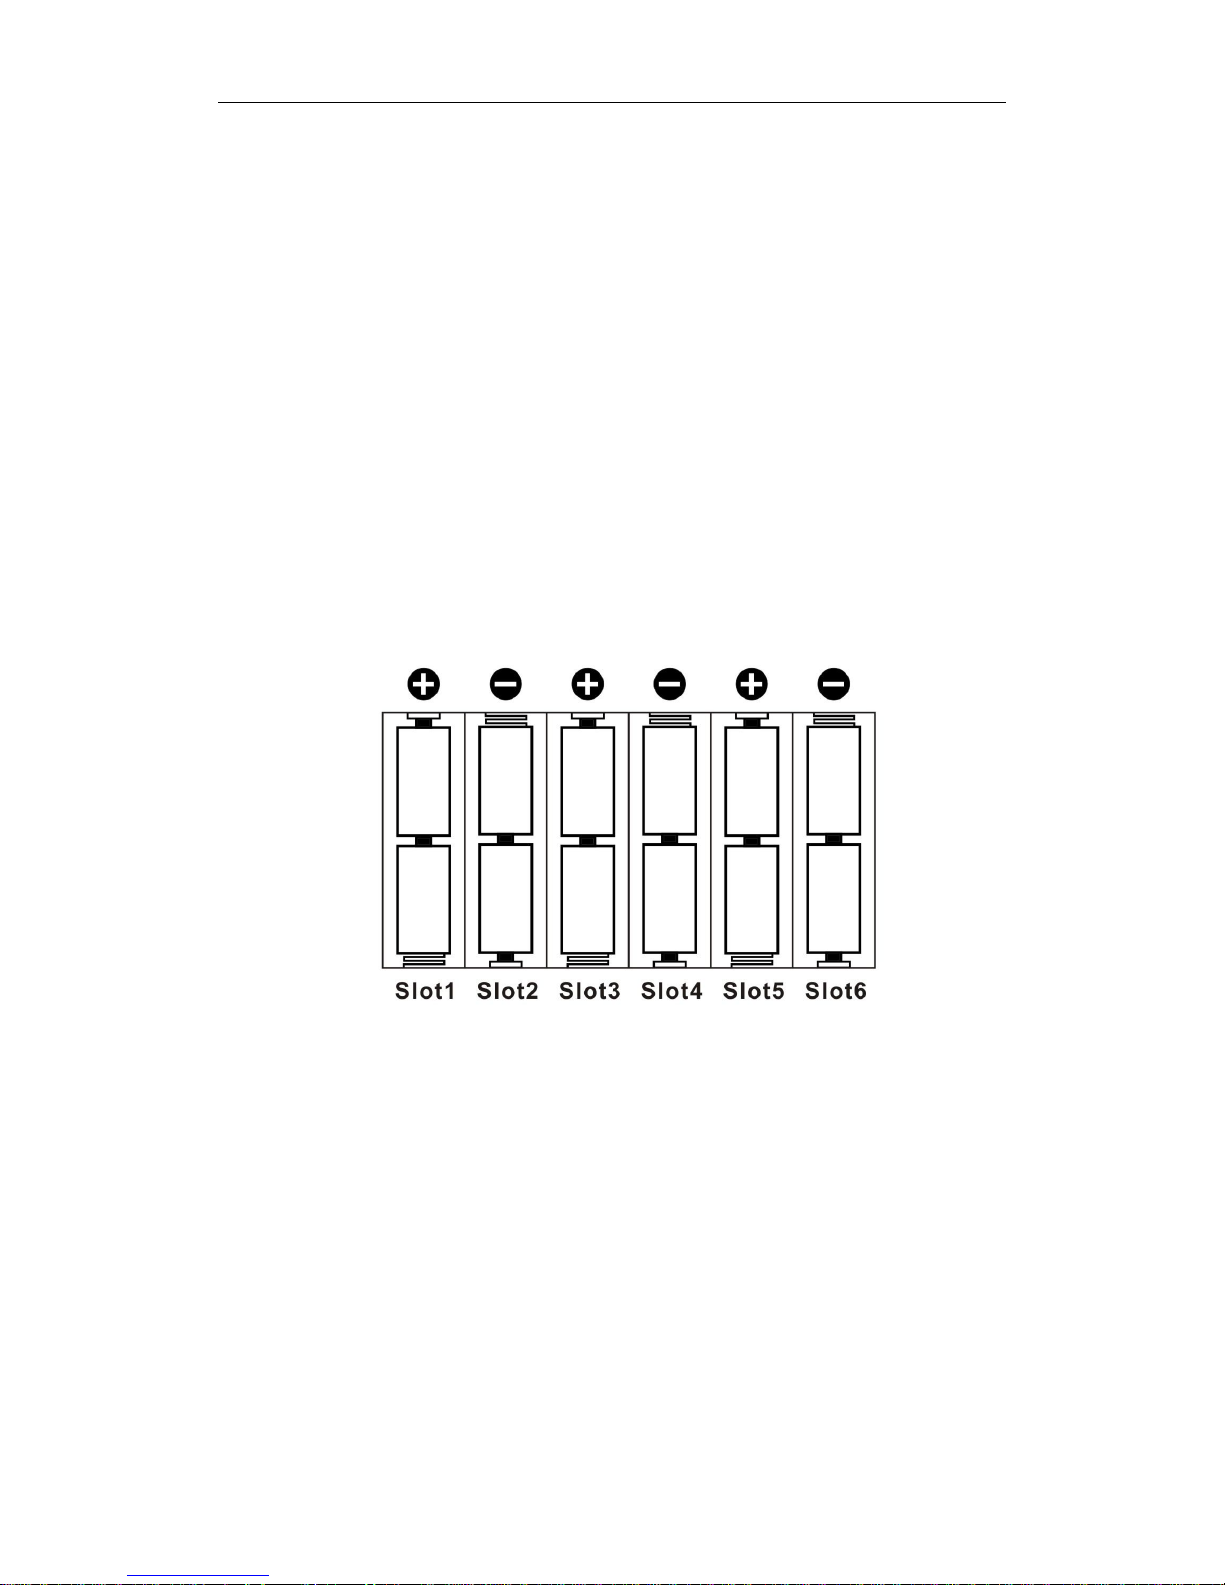
To supply power for the camera 12 size AA batteries are needed.
Confirm that the power switch is in the OFF position; load the fully
charged batteries into the pack according the polarities signs shown
below. The following batteries with 1.5V output can be used:
1. High-density and high-performance alkaline batteries
(Recommended)
2. Rechargeable alkaline batteries
3. Rechargeable NiMH batteries
There are 6 battery slots. Slot 1 and 2 form one group and is
marked “1”, slot 3 and 4 form the other group and is marked “2”, while
slot 5 and 6 form the other group and is marked “3”. Single “group” of
batteries is needed to supply power to the camera, but both can be
used and is recommended.
2.2 Insert the SD-card and the SIM-card
Open the bottom cover. Insert an SD-card into the card slot with
unmarked side upwards. Please note that the SD-card is on the
“write” (not locked) position otherwise the camera will not function
correctly.
NOTE: Please DO NOT USE the Micro SD card with adapter. Many
micro SD cards are not compatible with trail cameras
When using MMS/SMS/E-mail functions, be sure to insert a
SIM-card into the SIM-card slot with angle in the upper left.

3 Quick Introductions
Page 6
2.3 Power on and Enter into the ON
Mode
Before switching on, please pay attention to the following:
1. Avoid temperature and motion disturbances in front of the
camera such as a big leaf, curtain, air-conditioner, air outlet of
the chimney and other heat sources to prevent from false
triggering.
2. The height from the ground for placing the camera should vary
with the object size appropriately. In general, three to six feet
is preferred.
Slide the power switch to the ON position to power on the camera
and enter into the ON mode.
2.4 Enter into the SETUP Mode
Slide the power switch to the SETUP position and enter into the
SETUP mode. There are some functions in SETUP mode: custom
settings, manual capture, preview or send MMS manually.
2.4.1 Custom Settings
Press MENU on the user interface to enter into the menu setting.
The camera can be adjusted to manually customize the camera
settings which display on the LCD screen on the camera. The detailed
operations will be described in the “Advanced Operations” chapter.
2.4.2 Manual Capturing
You can press to manually capture photos or record a video.
2.4.3 View Images or Videos
Use LCD screen to view the captured images or videos:
Press to view images, the latest image or video will be shown
in the LCD screen on the camera. Press UP to view the previous image
and press DOWN for the next.
The detailed operations like deleting images or videos will be
described in the “Advanced Operations” chapter.
2.4.4 Send MMS(Wireless cameras ONLY)
Please refer to the instruction book “Guide on GSM Setup”.

3 Quick Introductions
Page 7
2.5 Power Off
Slide the power switch to the OFF position to power off the camera.
Please note that even in the OFF mode, the camera still consumes a
small amount of battery power. Therefore, please remove the
batteries if the camera is not in use for some time.

4 Advanced Operations
Page 8
3 Advanced Operations
Settings Menu and Default Settings
To view the camera settings menu, switch the camera to SETUP
mode and press MENU, the main menu and the default settings are
under below charts:
Main menu
Setting Items Description
CAM
Camera Mode
Choose Photo or Video
Photo Size Choose the image size, 5MP,8MP,12MP
Photo Burst
Choose the continuous shooting numbers
after each triggering.
Video Size Choose the video size
Video Length Set the video length as of required
Video Sound
Not Available
PIR
Sensitivity High, Low ,Normal and Off selectable
Trigger Interval
The duration the camera will stop
detecting motion after each triggering.
Time Lapse
Time lapse function defines the camera
records/captures automatically every
preset time period (5seconds~8hours),
which doesn’t work if it is set to Off.
Start-Stop
Start-stop “On” means that the camera
works only during that preset time;
Start-stop “Off” means that the camera
works round the clock.
GSM
(Wireless
cameras
ONLY)
Send Mode
There are 3 send modes: Daily report,
Instant and OFF.
Send Via
MMS and GPRS selectable
Send To
Defines to where the MMS to be sent,
Phone, Email or Both.
Recipients
Press “Enter” to review what you have set
to receive the MMS or GPRS pictures.
Location
Press enter to get the Longitude& Latitude
information.(show only in the display
screen)
Download Tool
Pls refer to the Advanced Chapter for
details
SYS
Set Clock
Enter to set the date and time
Time Stamp
Choose "On" or "Off" to show the time
 Loading...