


CarDroid
™
User Guide
UonMap™
uonmap .com/ udrive
support@uonmap.com

General Notes
Thank you for purchasing the CarDroid — an
innovative connected car device on Android™
4.4 OS. A CarDroid is an in-vehicle device
created for monitoring and telematic services.
This guide shows how to set up your CarDroid.
Please read this guide before using the device to
ensure safe and proper use. Some content may
differ, depending on the region, service provider,
or device’s software.
All specifications and information supplied herein
are subject to change without prior notice. Any
changes will be integrated in the latest release.
The manufacturer assumes no responsibility for
any errors or omissions in this document.

Contents
General notes 2
Contents 3
Device layout 4
Specifications 6
Features 7
Part and accessories 9
Applications 9
SIM card installation 10
SD card installation 11
Getting started 12
Emergency call 19
Factory data reset 19
Troubleshooting 20
Cautions 23
Trademarks and copyright 24
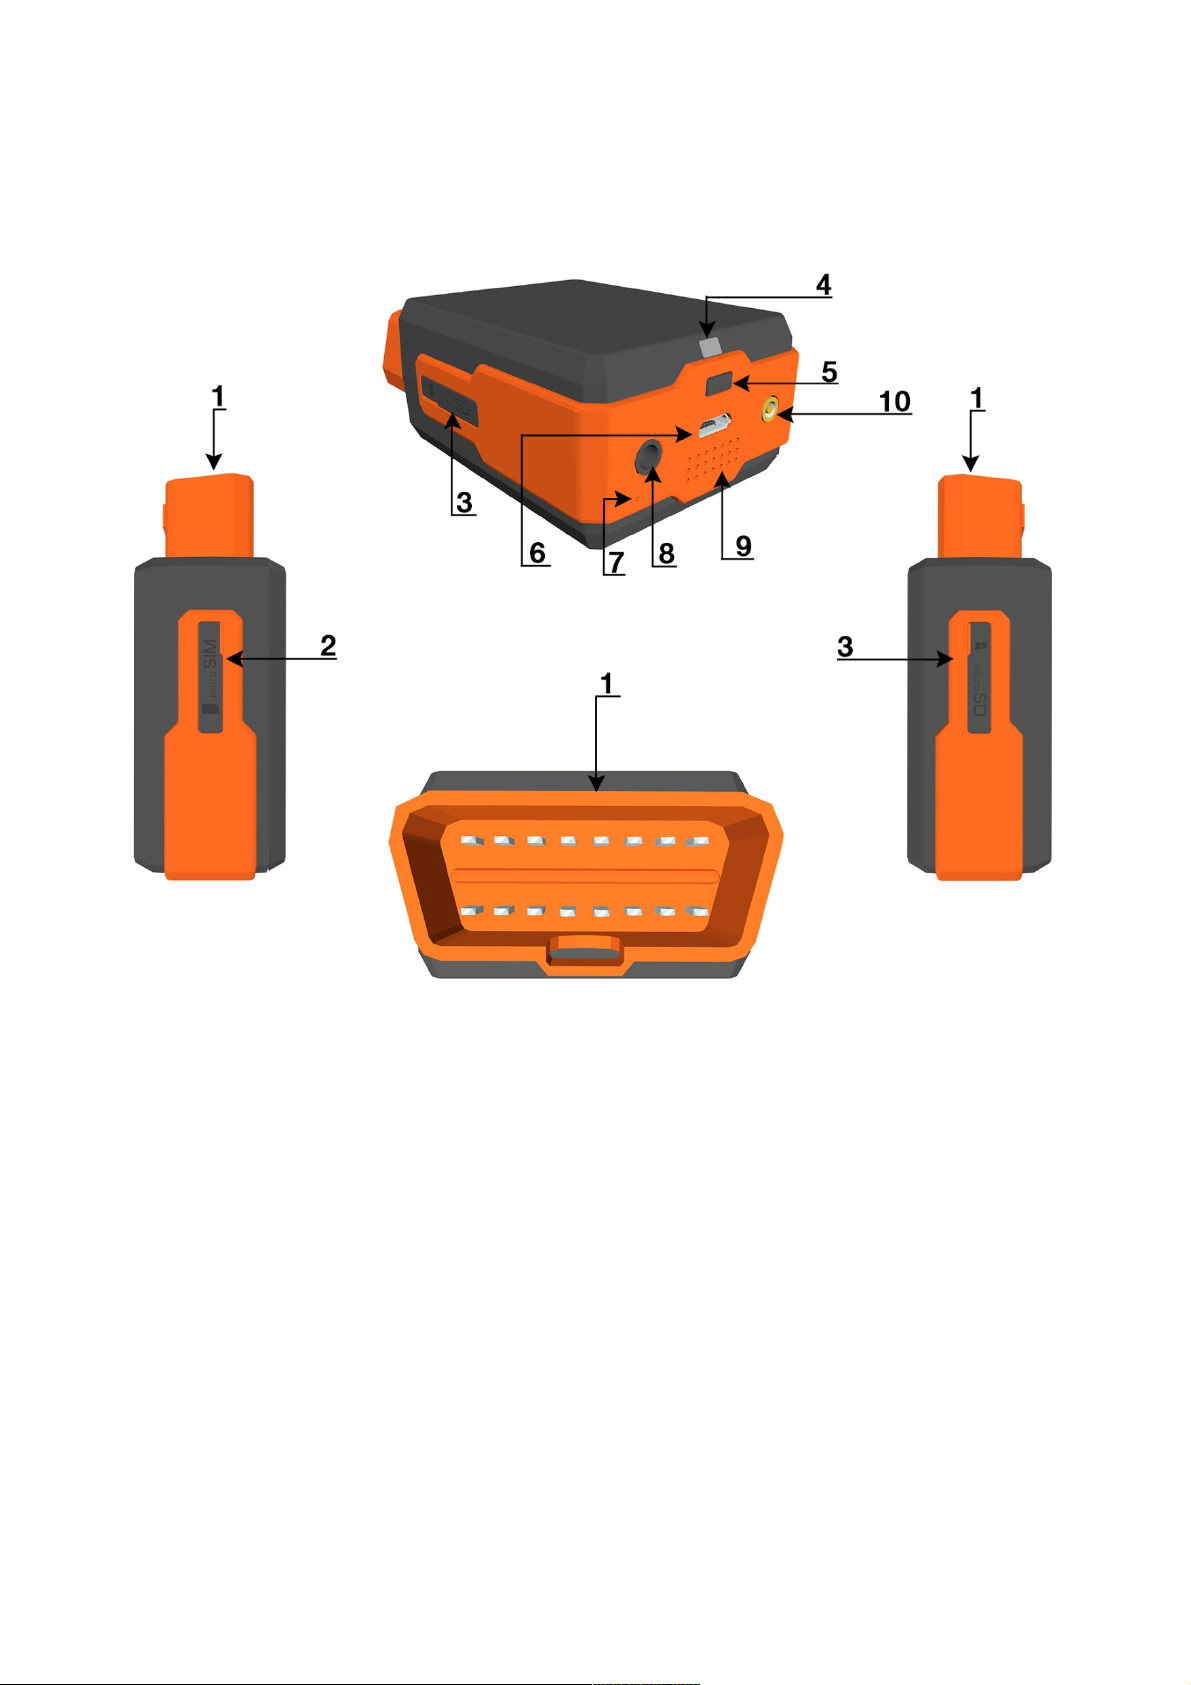
Device Layout
1 — OBD-II connector
2 — micro-SIM card slot
3 — microSD card slot
4 — power and status LED indicator
5 — power button
6 — micro-USB port
7 — microphone
8 — audio Jack 3.5mm
9 — speaker
10 — external GPS antenna connector

Notes:
MicroSD card expands local data storage. It
is optional to use a microSD card.
Power and status LED indicator shows if the
device is on and informs of different functions'
status.
USB port enables you to charge your
CarDroid when it is not connected to OBD-II
port, or connect it to a computer for the
parameters configuration and access internal
storage of the device.
The external GPS antenna connector allows
you to connect an external GPS antenna to
amplify GPS signal in the places where the
signal is low.

Specifications
Dimensions 48x77x29mm
Network 3G (and HSPA+), GPRS, EDGE
Band 850/900/1800/1900MHz
Wi-Fi 802.11 b/g/n (2 Wi-Fi modules)
Bluetooth BLE 4.0
Battery 1950 mAh Li-ion
Standby time up to 12 hours
OS Android™ 4.4
CPU MediaTek MT6572, Dual-core, 1.2
GHz
RAM 512MB
ROM 4GB
Storage
expansion
microSD up to 32GB
Microphone and
speaker
Yes
USB micro-USB
Audio jack 3.5mm
Sensors 9-axis Bosch orientation sensor
(accelerometer, magnetometer,
gyroscope), microwave motion
sensor
Positioning
accuracy
up to 5 meters

Features
Web account. A personal web account gives you
an access to the whole functionality of the
CarDroid. You will be able to monitor several
vehicles simultaneously, use the complete range
of services and choose which notifications you
want to receive. To be able to use your web
account on uonmap.com you need to complete
the registration process.
ESNaR (Emergency Situation Notification and
3D Reconstruction). In a case of an accident
you will instantly get an alert on your mobile
device. In your account you will be able to see
the detailed report including 3D reconstruction.
Note:
Fix your CarDroid in a car if you connect
CarDroid via an OBD-II extension cord to avoid
getting false notification.
Remote car diagnostics. The CarDroid
diagnoses your vehicle automatically and keeps
records of its condition. When an error is
detected, you will get a notification with its trouble
code. Once you log in to your web account, the
“Events” section will have trouble codes and their
descriptions. This data can be used for reports
and detailed statistics.
Driver behavior monitoring. You can also setup

your account to receive notifications in case of an
unsafe driver behavior: hard acceleration, hard
braking, speeding, risky maneuvering, etc.
Alarm system. If your vehicle is being towed
away, hit in a parking lot or in case of a break-in
you will receive an alert.
Vehicle state notifications. You will be notified
about the critical conditions of a vehicle: high
engine temperature, low fuel/oil level, unusually
high rpm, etc.
Positioning and tracking history. You can see
where your car is located at any moment, track it
online and check the vehicle route for any period
of time.
Microphone remote listening. The CarDroid
supports audio input/output through microphone.
To speak to the driver of a vehicle or listen what
is happening inside a car dial the number of the
SIM card installed inside your CarDroid (only
from the trusted numbers).
Wi-Fi hotspot. You can set up your CarDroid to
act as a Wi-Fi hotspot. A password can be set in
your UonMap account.
Geofencing. Set customized geofences on the
map in your web account. If your vehicle leaves,
enters or crosses the borders of such an area,
you will be notified.
Parts and Accessories
1. CarDroid
2. GPS antenna (optional)
3. OBD-II extension cord (optional)
4. User Guide
5. Warranty Card and Coupon
Applications
1. Please find applications for iOS / Android on
our website uonmap.com, as well as App Store
and Google Play Market. You can also scan the
CarDroid QR-code to open the web page with
our apps.
2. Install our app on your smartphone or tablet.
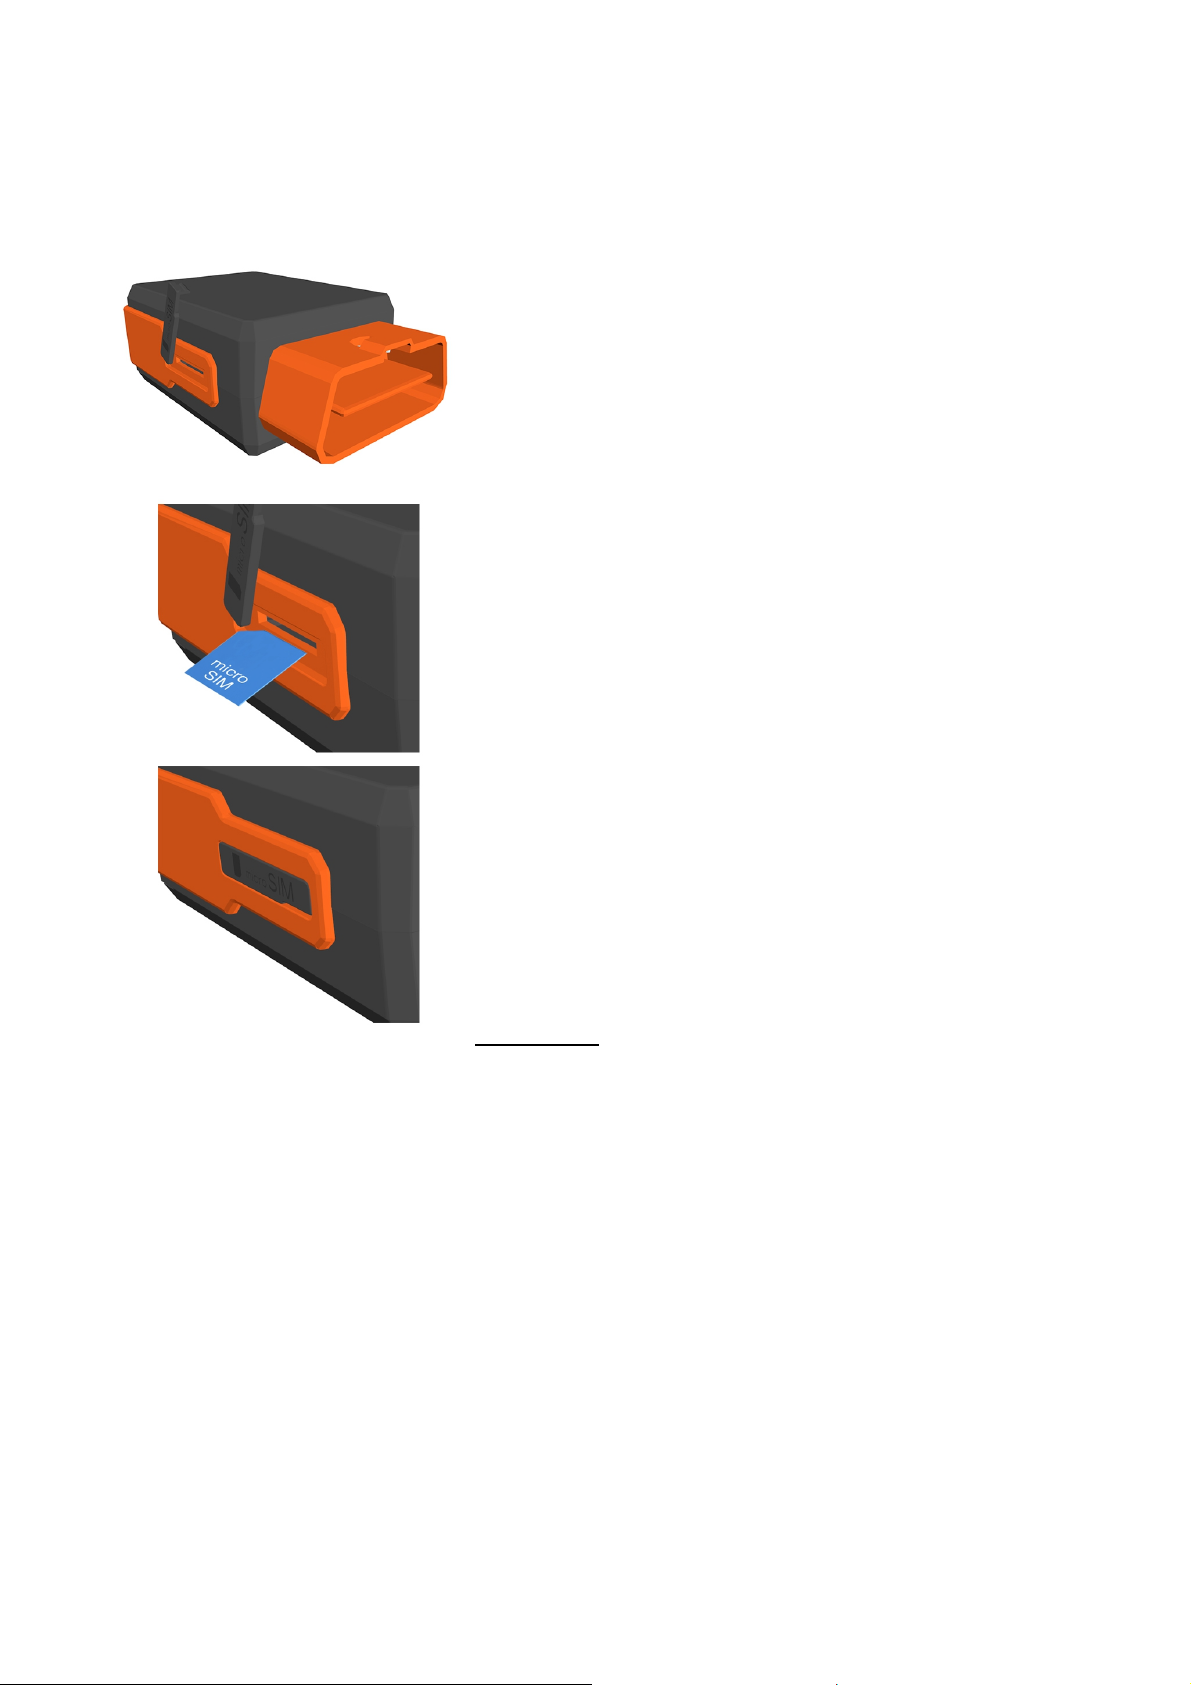
SIM Card Installation
Find and open a labeled SIM
card cover on the device.
Push a SIM card into the slot
as shown in the picture (make
sure the circuit chip is facing
down), until you hear a click
and the SIM card is fixed
securely in the slot.
Put the cover back on.
Notes:
1. To remove the SIM card push it until you hear the
click.
2. Confirm your SIM card is connected to mobile data
service (test it by using a smartphone).
3. Make sure your SIM card is unlocked (PIN function
is disabled) by turning it off in your smartphone
settings. If you do not know your PIN, contact your
service provider.
4. Additional charges for data transfers may apply.
Check with your carrier and use an appropriate mobile
data plan.

SD Card Installation
Find and open a labeled
SD card cover on the
device.
Push an SD card into the
slot as shown in the
picture, until you hear a
click and the SD card is
fixed securely in the slot.
Put the cover back on.
Note:
To remove the SD card push it until you hear the
click.
Getting Started
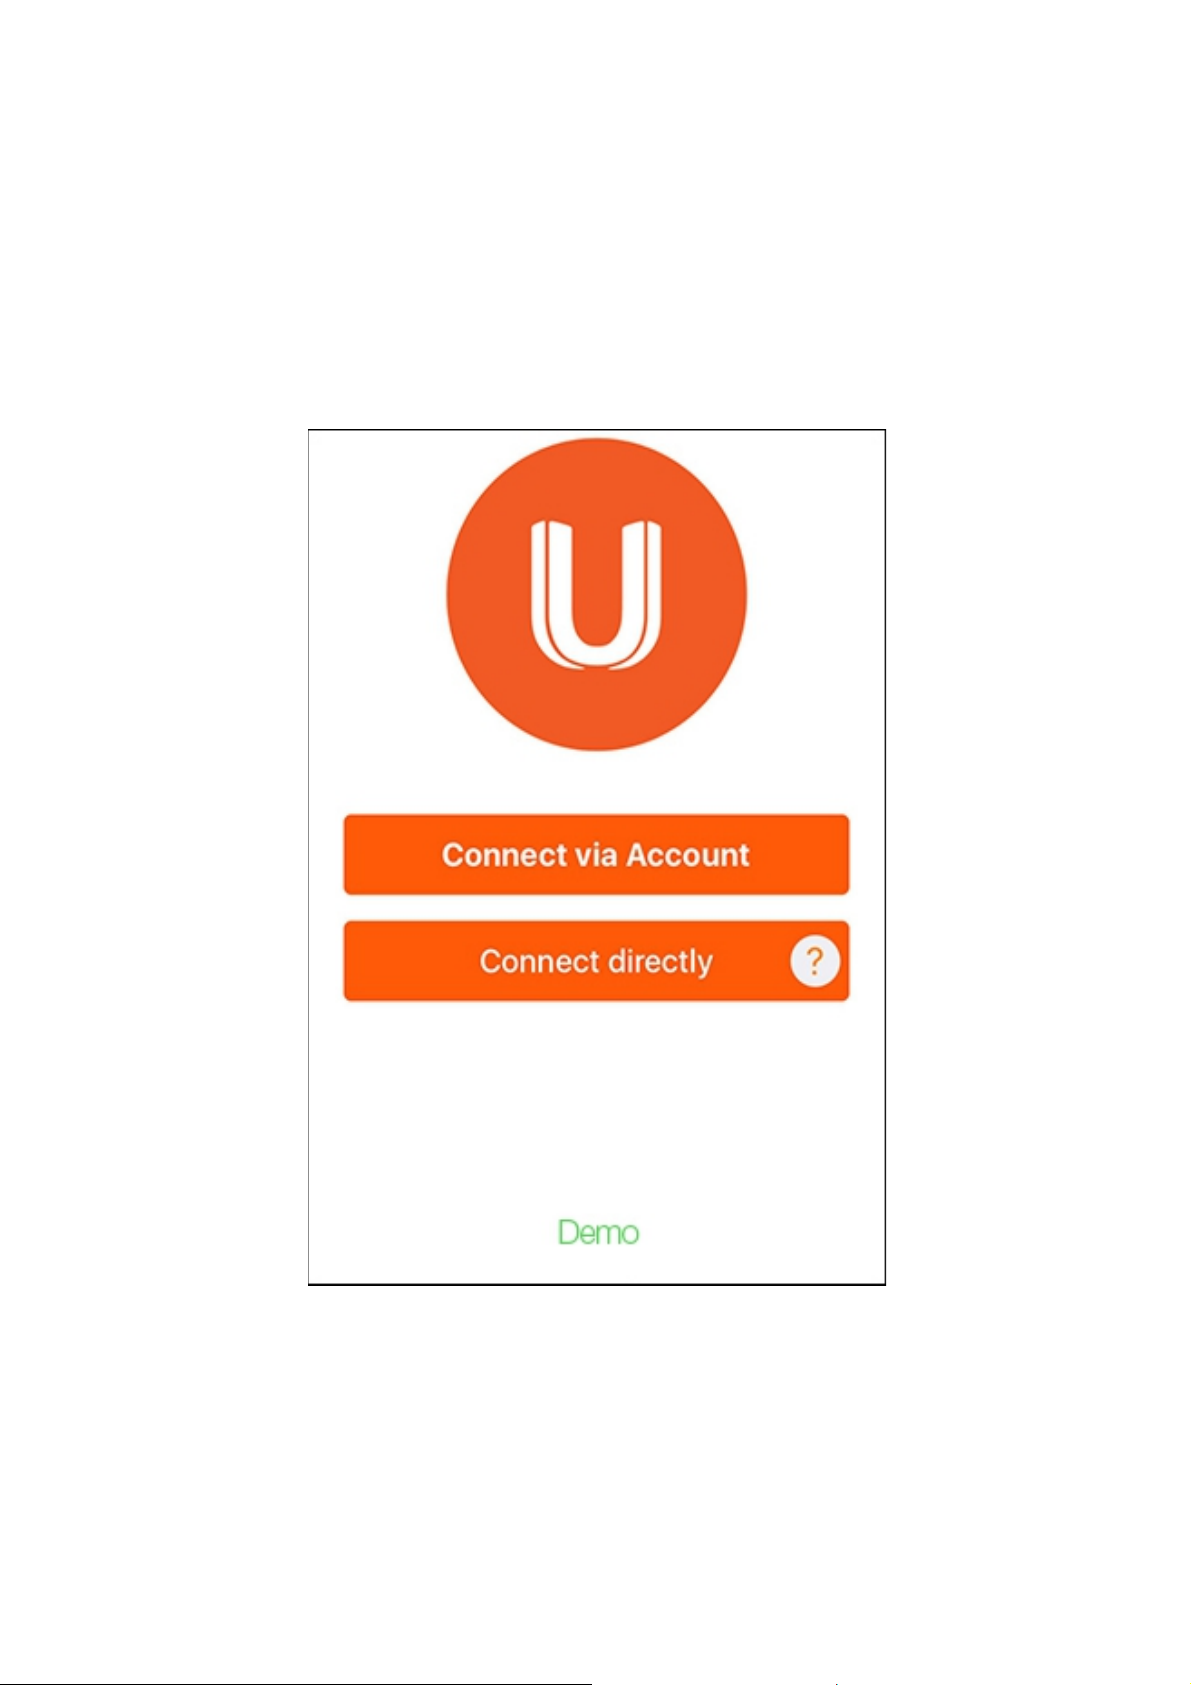
There are several ways to use the device.
Below you can see the main screen of
iOS/Android apps.
1. Mobile app direct connection (without a SIM
card)
Plug the device into the OBD-II port of your
vehicle. Check your car manual for the exact

location of the OBD-II port in your car.
Wait until the LED indicator lights up. When
the device is ready, you will hear a beep
sound. If you do not hear any sounds, your
CarDroid might be discharged. Leave it in the
OBD-II port for some time until it is charged
and turns on automatically.
Press ''Connect directly'' and follow the steps.
2. Mobile app remote connection (requires a SIM
card and mobile data)
Install a SIM card.
Plug the device into the OBD-II port of your
vehicle.
Wait until the LED indicator lights up. When
the device is ready, you will hear a beep
sound. If you do not hear any sounds, your
CarDroid might be discharged. Leave it in the
OBD-II port for some time until it is charged
and turns on automatically.
If your SIM card requires you to configure
APN (Access Point Name) manually, send an
SMS to the number of the inserted SIM card
with the following text:
cardroid.apn={apn}:{user}:{password}
Enter the necessary data into the brackets { }. Do

not insert brackets { } in your SMS text. Example:
cardroid.apn=mycar:JohnSmith:password1
2.1. iOS/Android Apps: New Account
Enter your email. It will be used to create
your account and send notifications to it.
Create and confirm your password.
Click “SIGN UP” to create the account.
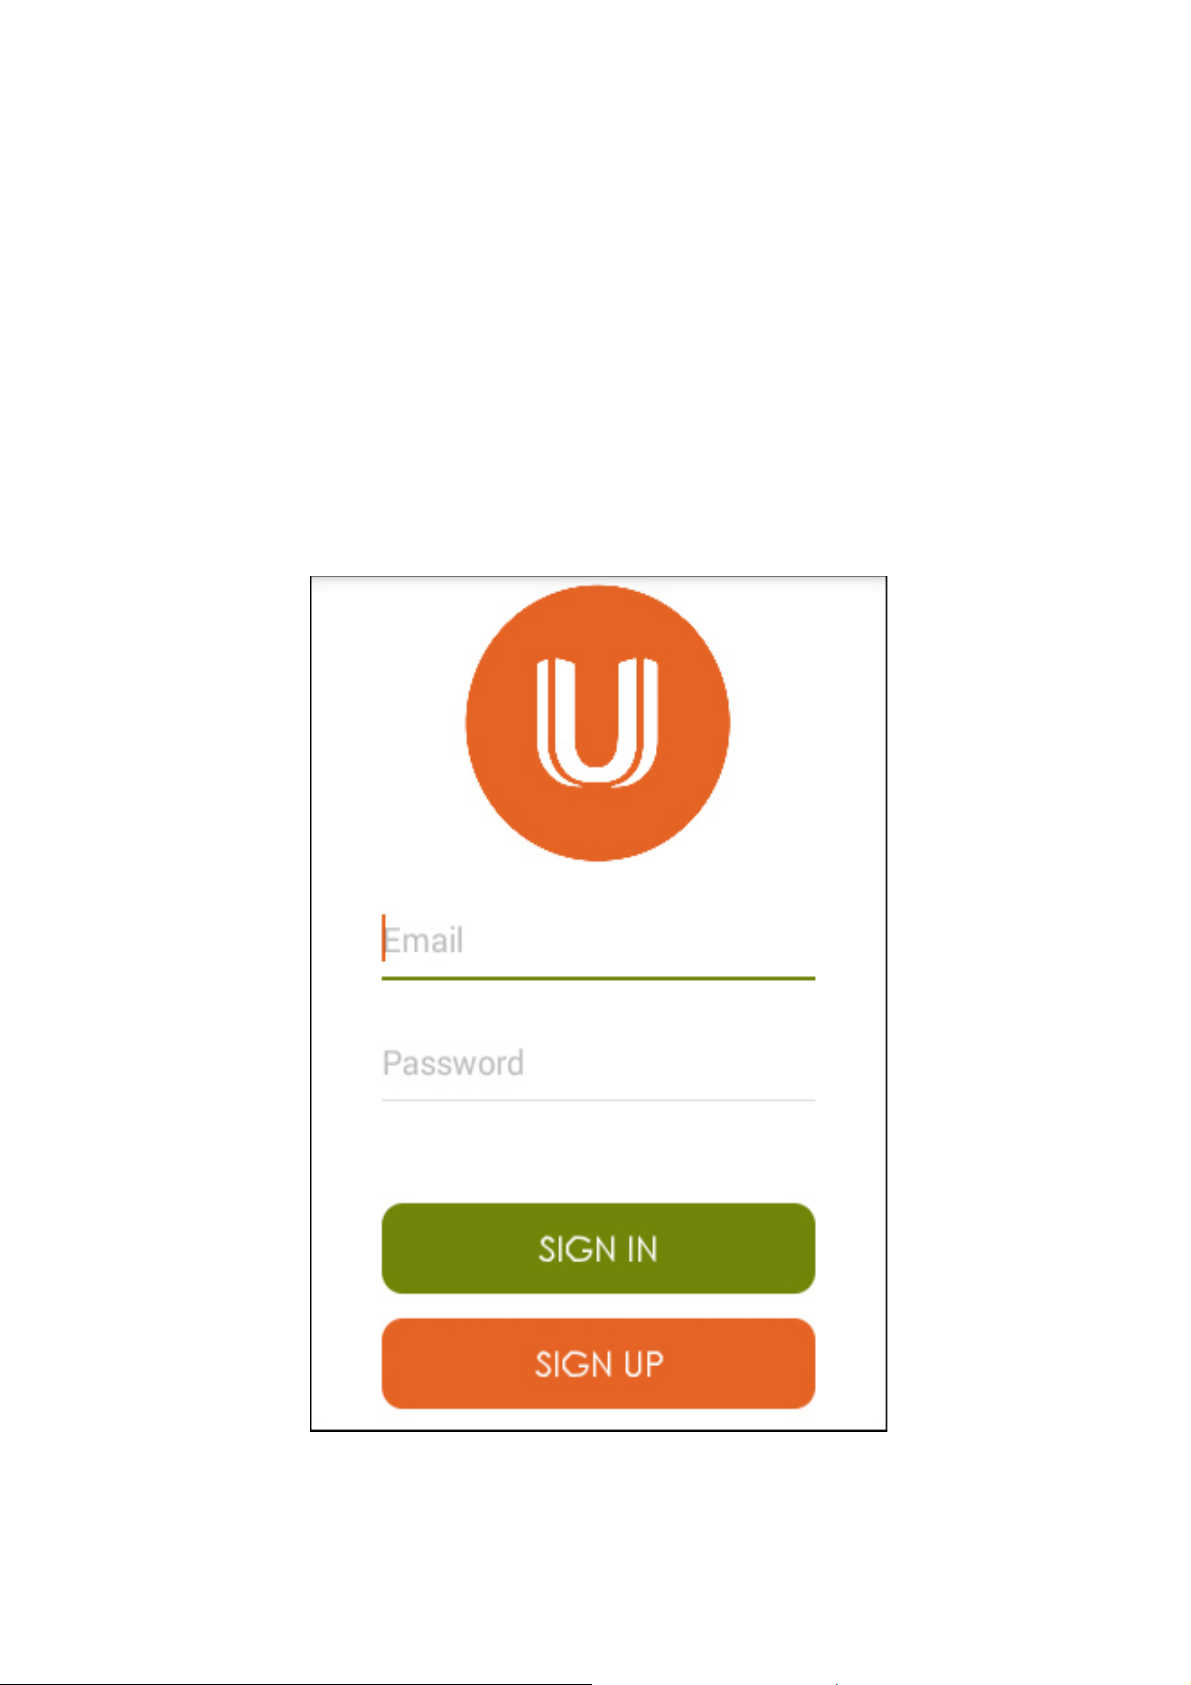
2.2. iOS/Android Apps: Existing Account
Enter the email which was used to create
your account.
Enter your password.
Click “SIGN IN” to enter the account.
Click “SIGN UP” to create a new account.

2.3. Managing Account
Add a CarDroid to your account by entering
the device's ID (IMEI).

In your account menu you can track and
check your vehicles data and see events
(notifications).

3. Web access from PC/laptop without an app
Find OBD-II port inside your car and plug the
CarDroid into the port.
Follow the URL written on your CarDroid
(uonmap.com/car).
Download the mobile app or add your
CarDroid to your web account by entering
IMEI of your device on the web page and
following the suggested steps.

Emergency Call
In case of an accident the CarDroid automatically
dials an emergency number preset by its user. It
is designed that way in case your phone is out of
reach, or you are unable to dial a number
yourself. Once the call is answered by your
emergency contact, you will be able to
communicate via built-in speaker.
If the volume of the built-in speaker is low, or the
sensitivity of the internal microphone is
insufficient, you can connect an external speaker
and a microphone to 3.5mm audio jack.
Note:
To activate this function set an emergency
number in your account.
Factory Data Reset
Turn on the device.
Press power button 10 times within 20
seconds to reset the device. The factory reset
process will begin when you will hear a beep
signal.
Warning!
All user data will be deleted from the device.

Troubleshooting
Before contacting a UonMap Service Center,
please attempt the following solutions.
1. Your CarDroid does not turn on (LED indicator
is off and there is no sound).
Reason:
If the battery is completely discharged and the
device has been disconnected from your car
OBD-II port for a long time, your CarDroid will not
turn on.
Solution:
Charge the battery before turning on the
CarDroid. To charge the device leave it plugged
into your car OBD-II port.
2. Your CarDroid does not send data via mobile
network.
Reasons:
When you are in the area with a weak or no
signal, you may lose reception. You may also
have connectivity problems due to issues with
the service provider’s base station.
You cannot access some options without an
appropriate mobile plan. For more information,

contact your service provider.
Solutions:
Check if the SIM card is installed correctly and if
your SIM card charge is overdue.
Ensure that you are not blocking the CarDroid
signal.
Move to another area and try again.
3. Your CarDroid does not connect or upload any
data, or LED indicator blinks abnormally.
Reason:
Your CarDroid freezes or has fatal errors.
Solutions:
If your CarDroid freezes, you may need to restart
your CarDroid to clear any temporary software
errors.
To restart your CarDroid turn it off and on again
(press and hold power button for about 5
seconds).
If this does not solve the problem, perform a
factory data reset.
4. Calls do not get through.
Solutions:
Ensure that your CarDroid has accessed the right
cellular network.

Ensure that you have not set call blocking for
your devices.
5. Your device cannot find your current location
or the location is incorrect.
Reason:
GPS signals may be obstructed in some
locations (underground or heavily forested
areas).
Solution:
You can connect an external GPS antenna to
your CarDroid to amplify GPS signal. The GPS
antenna can be purchased separately.
6. No data in your account and the device is
offline.
Solutions:
Check APN (Access Point Name). Send SMS to
the number of the inserted SIM card with the
following text:
cardroid.apn={apn}:{user}:{password}
Enter the necessary data into the brackets { }.
Do not insert brackets { } in your SMS text.
Example:
cardroid.apn=mycar:JohnSmith:password1

Warnings
1. Keep the device dry. Any liquid, i.e. rain or
moisture can damage it.
2. Do not store the CarDroid in sandy or dusty
places.
3. Ensure that your CarDroid is not exposed to
low and high temperatures while installing and
running.
4. Handle carefully.
5. Clean the device with a piece of dry cloth.
Don’t clean it with chemicals or detergents.
6. Do not disassemble or try to open the device
yourself. It will void your warranty.
7. Use the battery provided by the manufacturer.
8. Do not expose the battery to extreme
temperatures. It may result in explosion.
9. Additional charges for data transfers may
apply. Use an appropriate mobile data plan.

Trademarks
UonMap, the UonMap logo (including stylized U
logo), and CarDroid are trademarks of UonMap
International, Ltd.
Bluetooth® is a registered trademark of
Bluetooth SIG, Inc. worldwide.
Wi-Fi®, Wi-Fi Positioning, and the Wi-Fi logo are
registered trademarks of the Wi-Fi Alliance.
All other trademarks and copyrights are the
property of their respective owners.
Copyright
This document contains proprietary technical
information which is the property of UonMap
International, Ltd. This manual is protected under
international copyright laws. No part of this
manual may be reproduced, distributed, or
transmitted in any form or by any means,
electronic or mechanical, including photocopying,
recording, or storing in any information storage
and retrieval system, without the prior written
permission of UonMap.
© 2016 UonMap™
All rights reserved.

FCC Radiation Exposure Statement:
This equipment certified that complies with RF exposure requirement under mobile or portable condition, this
equipment is to be installed only in mobile or portable applications.
This equipment should be installed and operated with minimum distance 20cm between the radiator & your body
when installed in mobile application.
To be installed in portable application, it has also been tested against the SAR limit, the SAR limit of USA (FCC)
is 1.6 W/kg averaged over one gram of tissue. SAR information on this and other pad can be viewed on‐line
at http://www.fcc.gov/oet/ea/fccid/. Please use the equipment FCC ID number for search. This equipment was
tested for typical body-worn operations kept 5mm from the body. To maintain compliance with FCC RF exposure
requirements, use accessories that maintain a 5mm separation distance between the user's body and the equipment.
The use of belt clips, holsters and similar accessories should not contain metallic components in its assembly. The
use of accessories that do not satisfy these requirements may not comply with FCC RF exposure requirements,
and should be avoided.
FCC Warning
This device complies with Part 15 of the FCC Rules. Operation is subject to the following two conditions:
(1) This device may not cause harmful interference, and (2) this device must accept any interference received,
including interference that may cause undesired operation.
NOTE 1: This equipment has been tested and found to comply with the limits for a Class B digital device,
pursuant to part 15 of the FCC Rules. These limits are designed to provide reasonable protection against harmful
interference in a residential installation. This equipment generates, uses and can radiate radio frequency energy
and, if not installed and used in accordance with the instructions, may cause harmful interference to radio
communications. However, there is no guarantee that interference will not occur in a particular installation. If this
equipment does cause harmful interference to radio or television reception, which can be determined by turning
the equipment off and on, the user is encouraged to try to correct the interference by one or more of the following
measures:
- Reorient or relocate the receiving antenna.
- Increase the separation between the equipment and receiver.
-Connect the equipment into an outlet on a circuit different from that to which the receiver is connected.
-Consult the dealer or an experienced radio/TV technician for help.
NOTE 2: Any changes or modifications to this unit not expressly approved by the party responsible for
compliance could void the user's authority to oper ate th e equipment.
 Loading...