

Page 1

Bluetooth Wireless Home-Networking System
Bluetooth Wireless
Home-Networking System
User’s Manual
1
Page 2

Bluetooth Wireless Home-Networking System
Table of Contents
1. Overview…………………………….……………………..…………………………………3
2. Installation of Bluetooth Wireless Home-NetworkingSystem……………………………4
2.1 Software Installation…………………………………………………...…………………..4
2.2 Hardware Installation…………………………………………………..…………..………6
2.3 Removal of Bluetooth Wireless Home-Networking System……..……………………..7
3. Settings for Internet Sharing Using Home IP Locator…………………..………………..8
3.1 Start Home IP Locator…………………………….….……………………………………9
3.2 Setting up a computer to be a server sharing Internet with clients……………...…10
3.3 Setting up a computer to be a client sharing Internet from server………….……….12
3.4 Start surfing the Internet on client computers………………………………………….12
4. Running MiniBluelet_Pan…………………………………………………………………13
5. Establishing a Bluetooth Wirelss Network Using MiniBluelet_Pan……………….…..15
5.1 How to establish your first Bluetooth Wireless Network ……………………………..15
5.2 MiniBluelet_Pan pop-up menu and optional settings………..………………..……...19
6. NAP Settings Configuration………………………………………………………………..26
6.1 Setting up NAP on the server…………………..……………………………………….26
6.2 NAP client computers……………………………………………………………………26
7. Internet Sharing Concept………………………………………………………………….26
Model: B092H0
FCC ID: P3BB092H0
THIS DEVICE COMPLIES WITH PART 15 OF THE
FCCRULES. OPERATIONS IS SUBJECT TO THE
FOLLOWING TWO CONDITIONS: (1)THIS DEVICE
MAY NOT CAUSE HARMFUL INTERFERENCE AND
(2)THIS DEVICE MUST ACCEPT ANY INTERFERENCE
RECEIVED, INCLUDING INTERFERENCE THAT MAY
CAUSE UNDESIRED OPERATION
2
Page 3

Bluetooth Wireless Home-Networking System
1. Overview - Basic Concept of MiniBluelet_Pan (Personal Area Networking)
This document is for providing a step-by-step guide for users to setup B091H1 USB Bluetooth Dogle.
Before getting into details, we will now introduce some basic concepts about the usages of Bluetooth
Wireless Home-Networking System software.
MiniBluelet_Pan is basically implementing Bluetooth wireless technology for building up the personal area
network, so its functions follow standards defined in Bluetooth specifications. It is a very powerful tool but
with some limitations. In the following content or sub-sequent chapters, we will use the general terms
client
or
server
to represent the computer hosting Bluetooth
terms, client and server, can be commonly seen or used in technical documents for computer applications.
Slave and master are frequently used in Bluetooth technical documents. For detailed definition of
Bluetooth slave and master devices, please refer to Bluetooth’s official website: http://www.bluetooth.com
or related official Bluetooth technical documents for more information. Also from time to time, we will use
the acronym, PAN, for representing personal area network – a terminology defined in Bluetooth 1.1
specifications.
1) MiniBluelet_Pan can be installed on either desktop PC or notebook computer, please refer to the
quick installation guide for system requirements.
2) The computer installed with MiniBluelet_Pan can be used as either a server or a client.
3) There can only be one server within a PAN, besides, one server can connect up to 7 clients. So
there can be up to 8 computers interconnected within a PAN.
4) One server can serve seven clients for different requests concurrently.
5) Each client can only connect to one and only server.
6) The data transmission in and out of each client will slow down when the number of clients served
by the server increases. This is due to the limitation of the Bluetooth specified bandwidth
portioned out by connected clients respectively.
7) Due to the radio characteristics of Bluetooth technology, when the distance between the client
and server is getting farther the data transmission speed will slow down respectively.
8) There could be multiple stand-alone PANs coexisting within the same environment without
mutual interference .
9) Every client can join any coexistent PANs for accessing the network resources but only one at a
time.
10) Once the server is shut down or disconnected from the PAN, all connections from the clients will
be disconnected as well.
11) If the user wants to add one more client in the PAN, the user will only need to buy one more
Bluetooth wireless Home-Networking System USB dongle.
12) The software is used to build the PAN with Bluetooth wireless Home-Networking System USB
dongles. It cannot be used for other Bluetooth PAN profiles manufactured by third-party
companies.
slave
or
master
devices respectively. The
13)The software may not be compatible with the third-party companies’ software used by their
Bluetooth devices. If you run into trouble using this software on your computer installed with thirdparty Bluetooth software, please contact our customer service representatives for assistance.
3
Page 4
Bluetooth Wireless Home-Networking System
2. Installation of Bluetooth Wireless Home-Networking System
Before getting start, please notice the installation sequence below to ensure your smooth installation
process:
Step 1: Insert CD and install software
Step 2: Plug USB Bluetooth Dongle into USB Port
Step 3: Start software installation
Step 4: Join the BlueNetwork
2.1 Software Installation
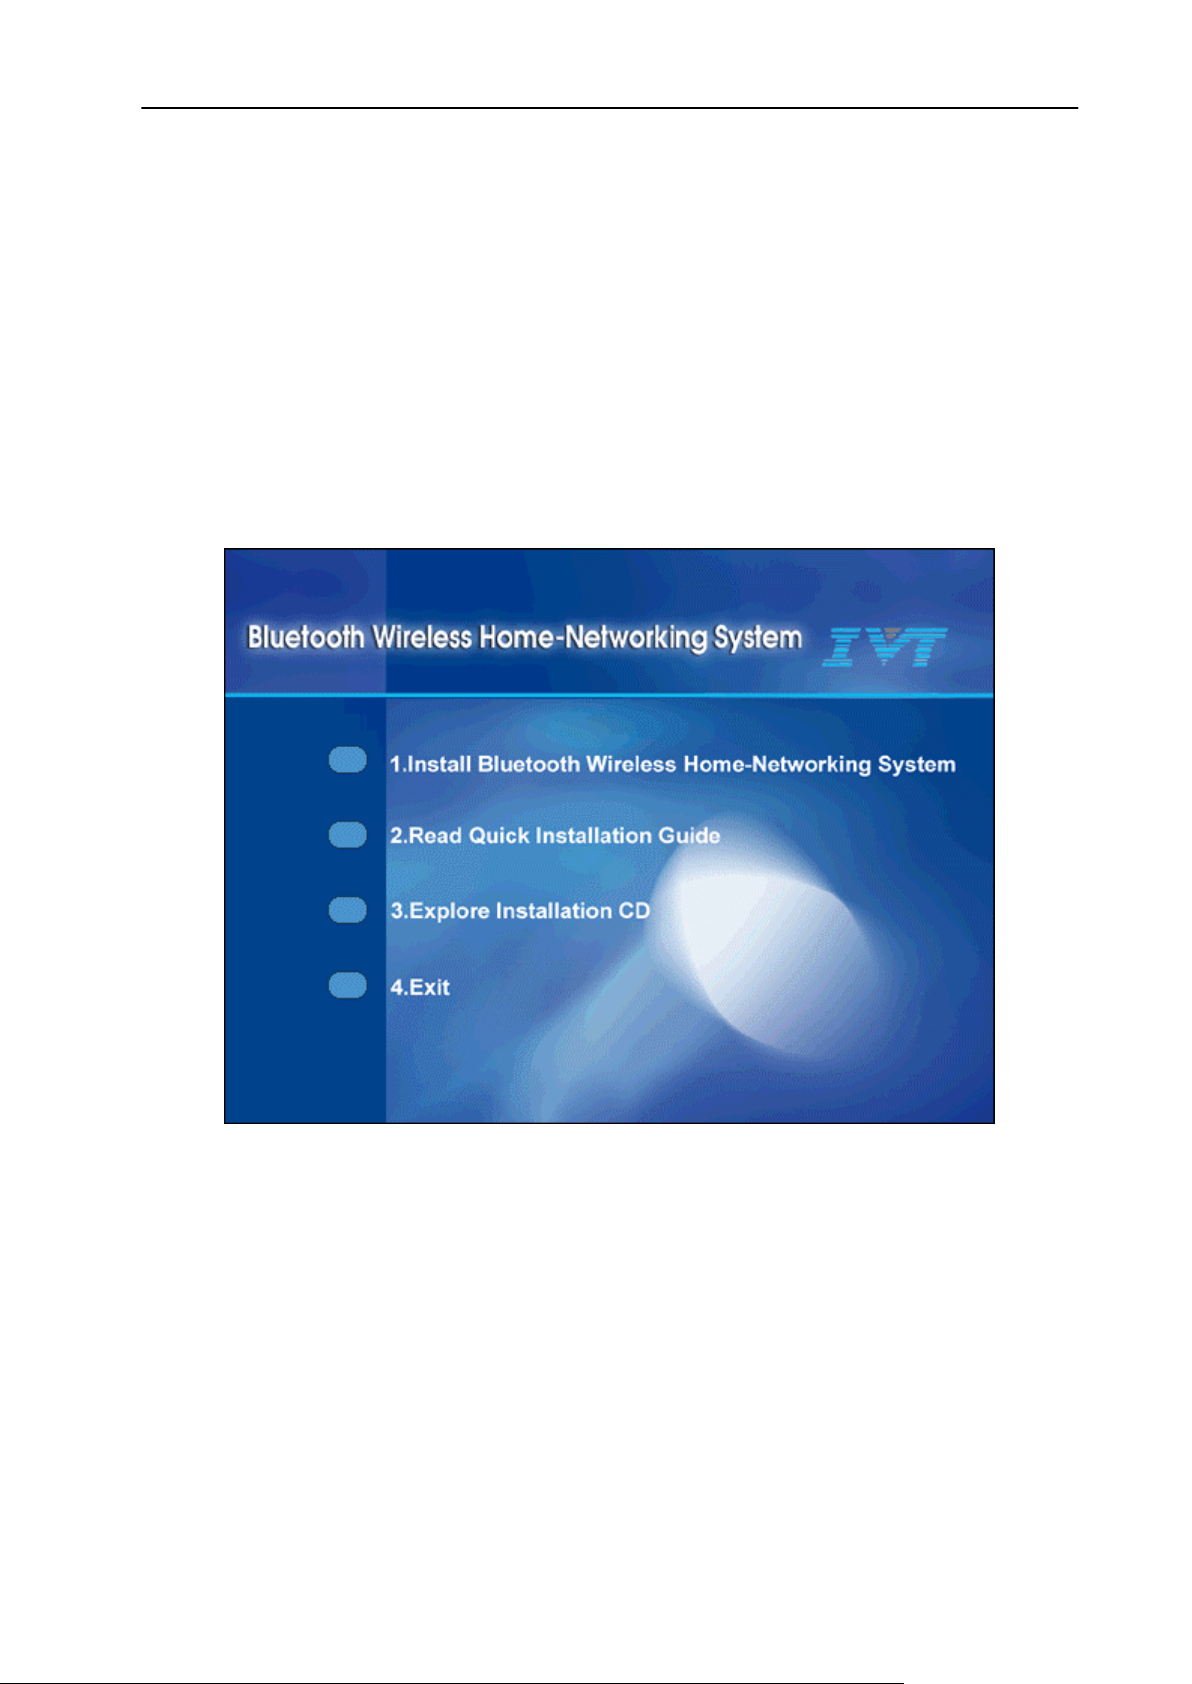
1). Insert the Bluetooth Wireless Home-Networking system utility CD and run the setup program then the
following picture will show up on your desktop:
· Install Bluetooth Wireless Home-Networking System :
· Read Quick Installation Guide:
· Explore Installation CD:
· Exit:
2). Click on the blue command button to install Bluetooth Wireless Home-Networking System
3). You can follow the instructions to finish the software installation
4
Page 5

Bluetooth Wireless Home-Networking System
Note:
1. After installation program has been activated, there would be two application programs
installed into your computer system. They are provided with specific functionality for
Bluetooth Wireless Home-Networking System. Please follow instructions completing
installation for both,
2. There would be items of information reserved for user’s preferred denomination, such as
user, company names and program folder name. You may modify them per your preference
according to instructions of installation software.
3. During software installation, some data and files are necessary to be loaded into computer
and it might take some time to proceed. Therefore, DO NOT interrupt or break off installation
process before installation software goes forward to next steps,
4. After you restart your computer, the system will automatically pup up the following window
to ask you enter “Device Name” and “passkey”.
5
Page 6
Bluetooth Wireless Home-Networking System
2.2 Hardware Installation
Before getting start, please ensure you have completed software installation whose process was
mentioned in Section 2.1 Software Installation.
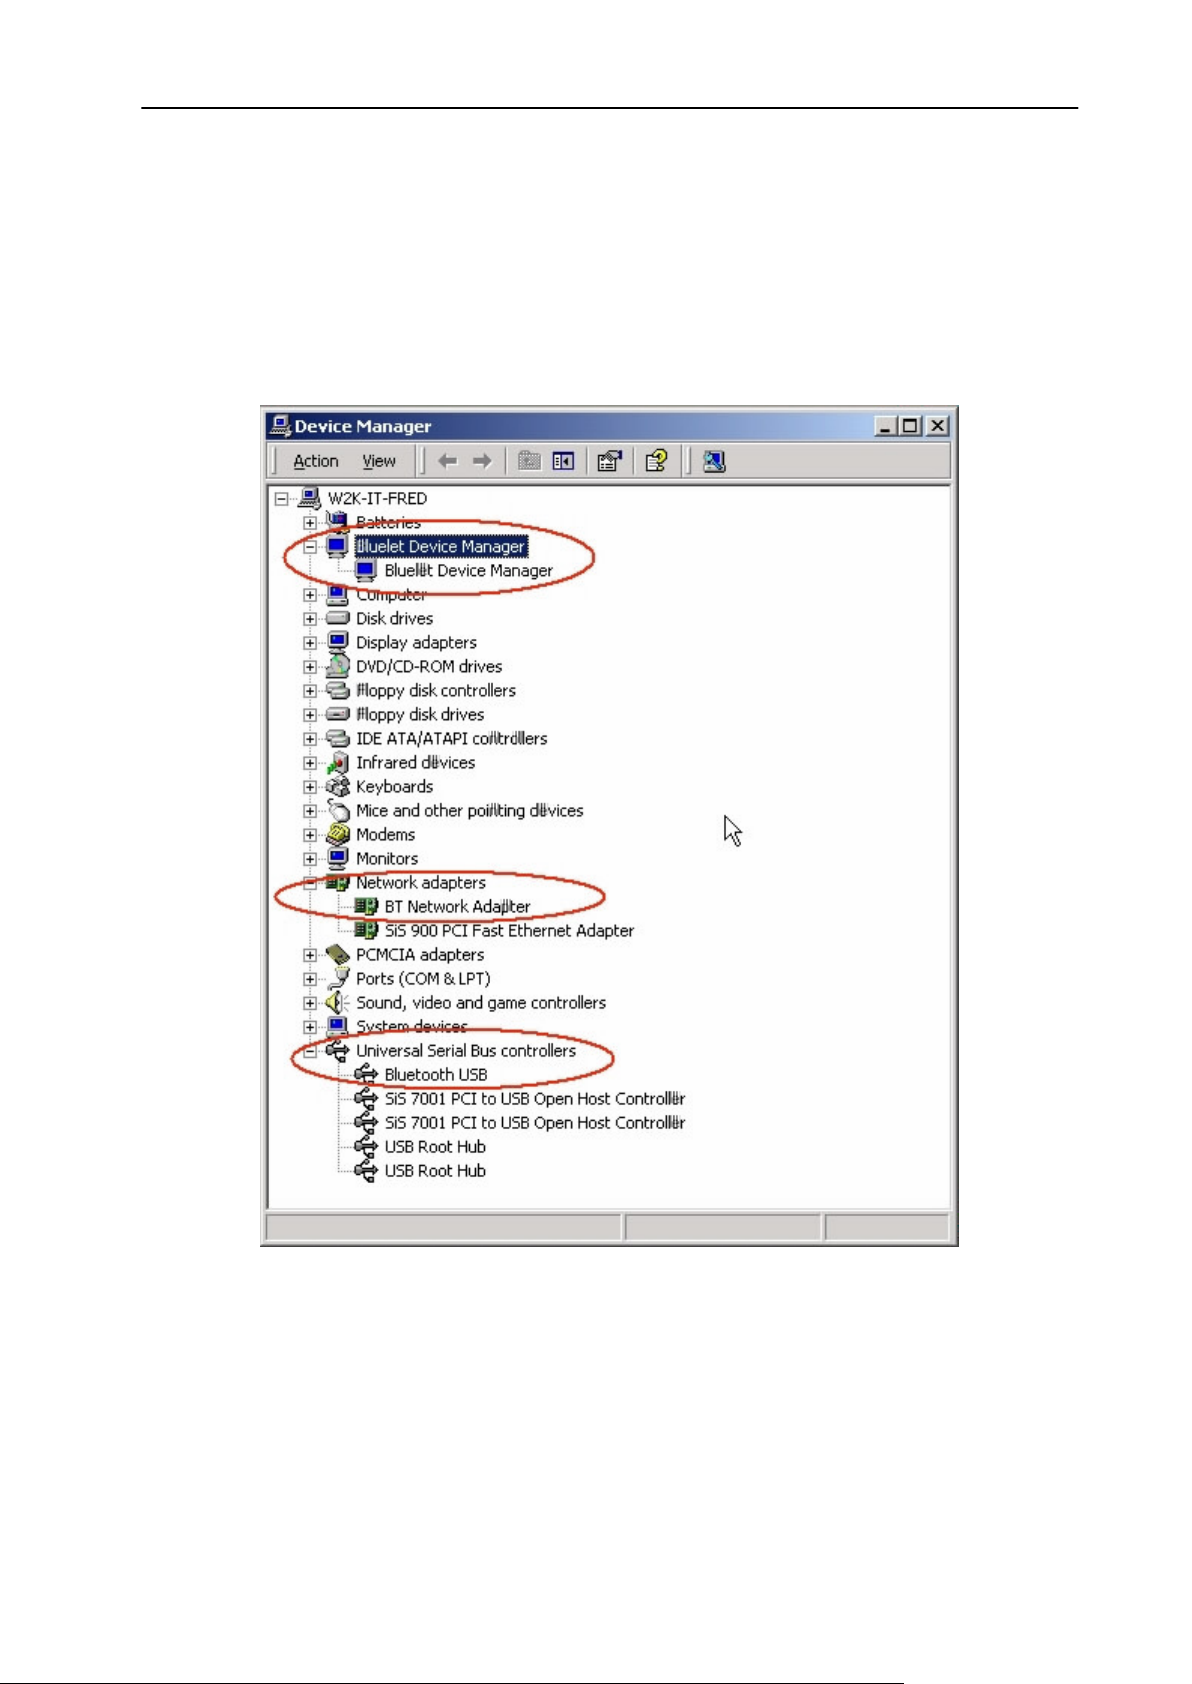
1). Plug in the USB dongle into the USB port of your computer and the system will automatically install
and configure the device driver for the USB adapter。
2). After the device driver is installed, you will find three items added into Device Manager:
2.3 Removal of Bluetooth Wireless Home-Networking system
1). Click on Start -> Programs -> MiniBluelet_Pan -> Uninstall Pan
2). Click on OK to remove MiniBluelet_Pan program from your computer
3). Bluetooth Wireless Home-Networking system program will be removed in couple of seconds
6
Page 7

Bluetooth Wireless Home-Networking System
3. Settings for Internet Sharing Using Home IP Locator
3.1 Start Home IP Locator:
a. Left click on the Home IP Locator icon, , on the Task Bar and you will have the following:
§ Show: For showing the program user interface of the Home IP Locator
§ Start BlueNAT: For starting or stopping the NAT and DHCP functions
provided by Home IP Locator
§ About: For showing the product information of Home IP Locator
§ Exit: For exiting the Home IP Locator program
b. Normally, Home IP Locator will be automatically activated after stat up. If you closed up the
Home IP Locator program, you can click Start -> Programs -> Home IP Locator ->
BlueNAT to start Home IP Locator.
7
Page 8
Bluetooth Wireless Home-Networking System
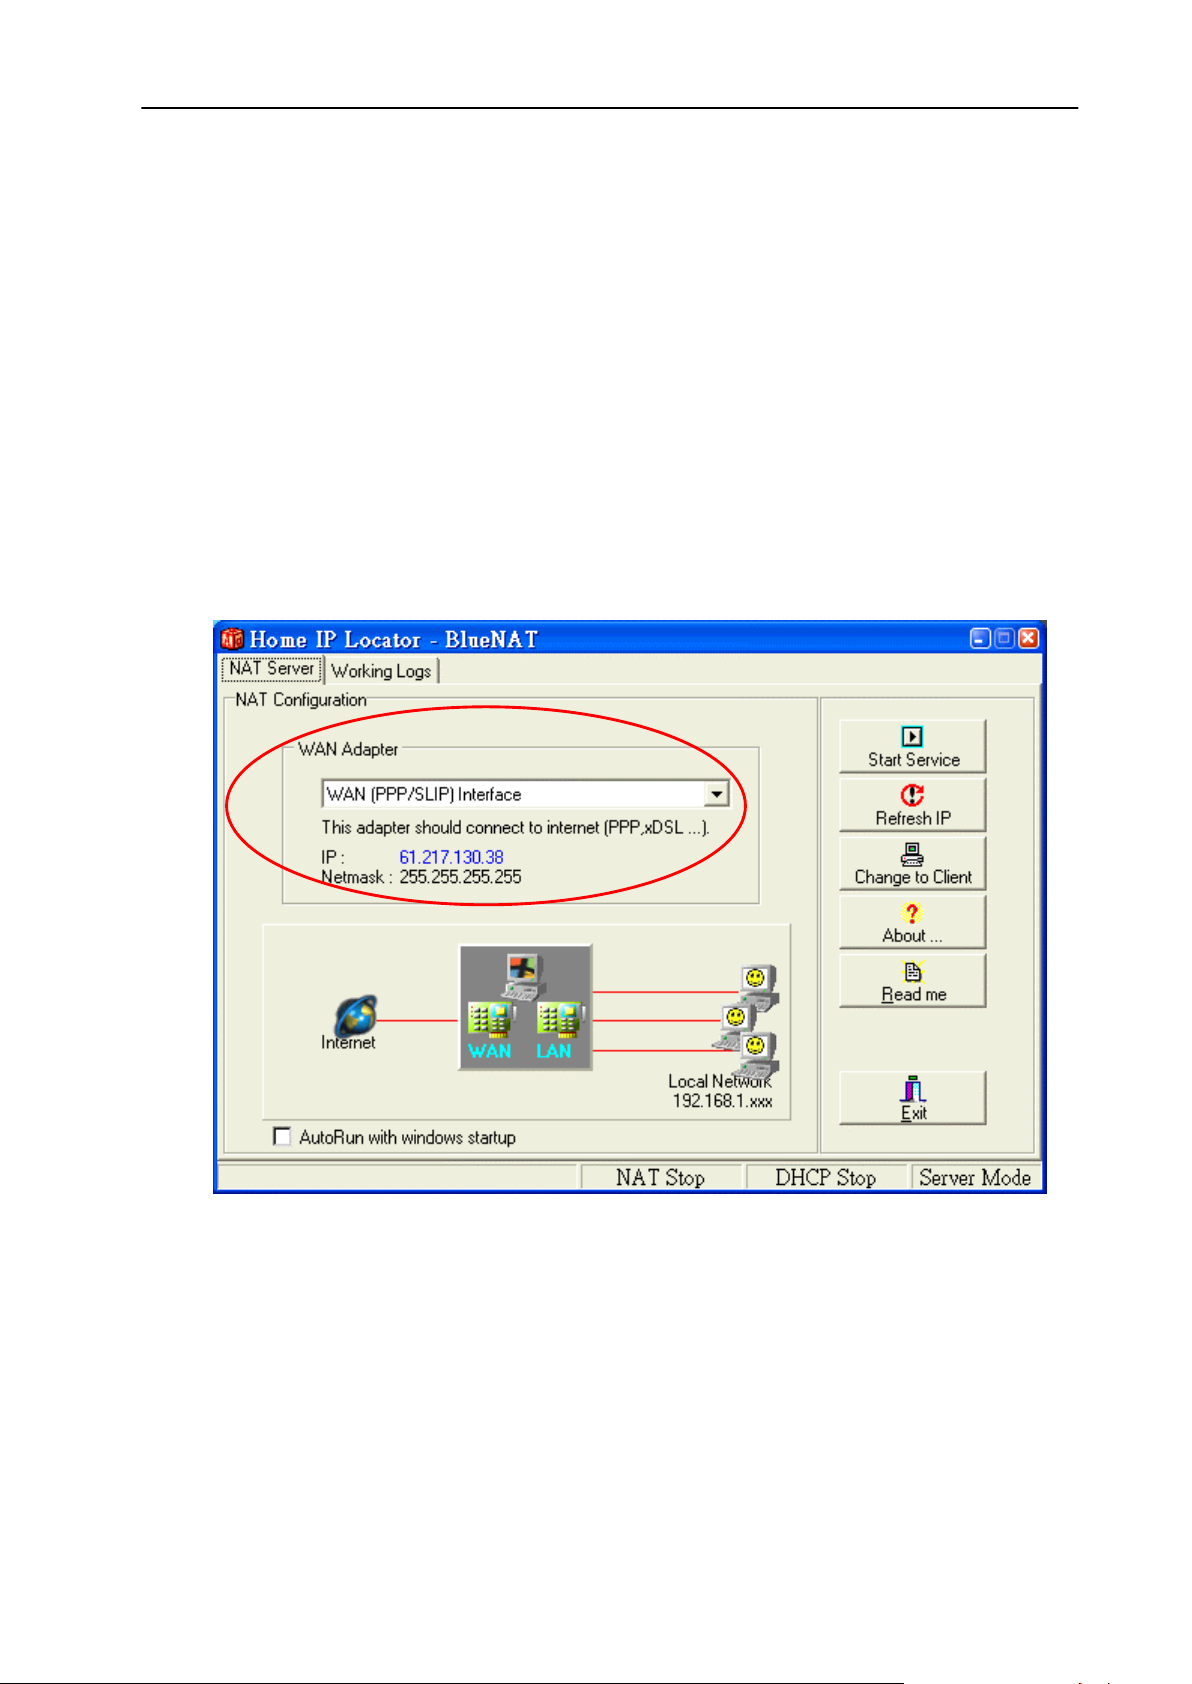
3.2 Setting up a computer to be a server sharing Internet with clients:
Note: By default the computer installed with Home IP Locator software is setup automatically to
be an NAT client. In order to share the Internet access from the computer with Internet
access to the other computers on the BlueNetwork, you need to change the role of
computer from a NAT client to a NAT server.
1) Left-click on the Home IP Locator icon on the Task Bar
2) Click on Show button to go to the Home IP Locator program user interface
3) Click on Refresh button to make sure the IP address is already acquired
4) Select your network adapter, which connects to Internet from combo-box of WAN adapter
menu. Then, Click on Change to Server button.
(If you are using Windows 98/ME, the system will need to restart for the new network settings
to take effect.)
5) Make sure the server computer is connected to the Internet
6) Once the server is reset, you need to start the NAT and DHCP service on the network
interface (LAN card or dial-up adapter) physically connected to the Internet by using the
Home IP Locator program.
7) Click on Start Service button to start the NAT and DHCP service:
8
Page 9
Bluetooth Wireless Home-Networking System
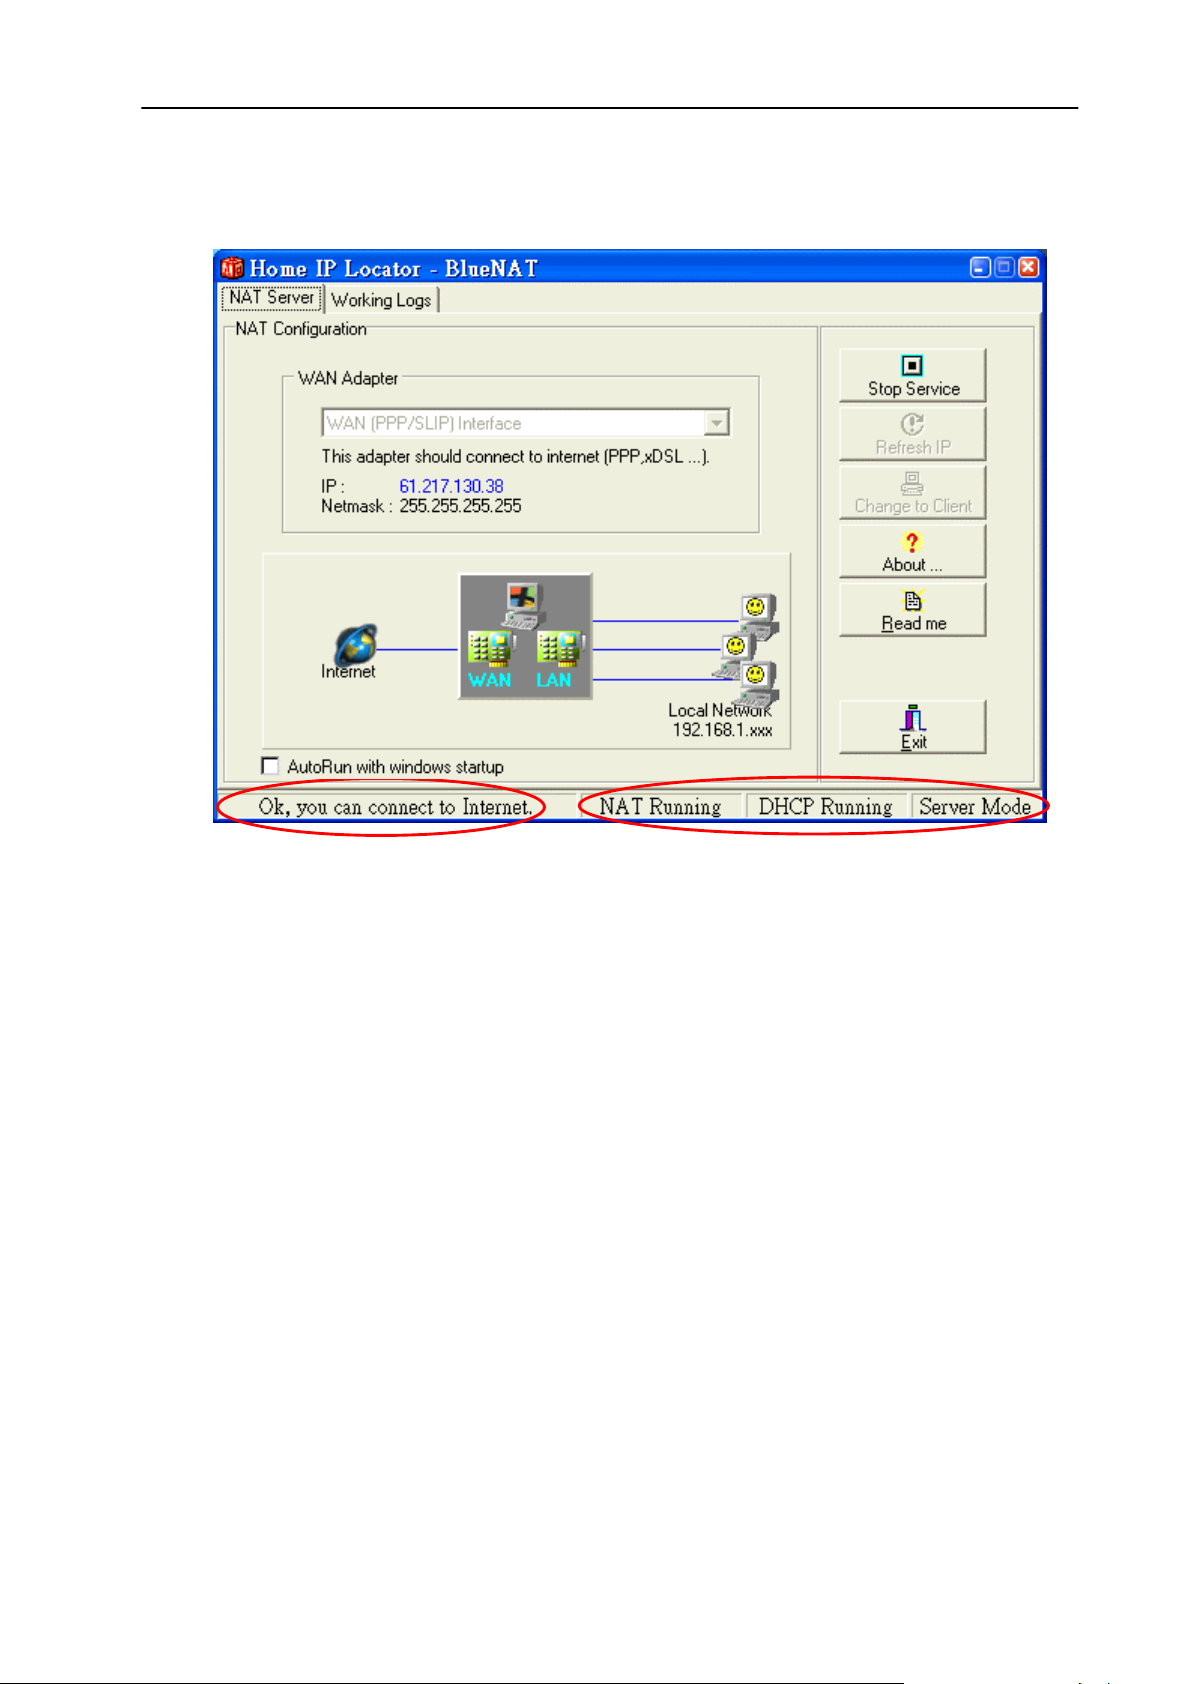
8) Now your server is able to provide Internet sharing service to other computers.
Note:
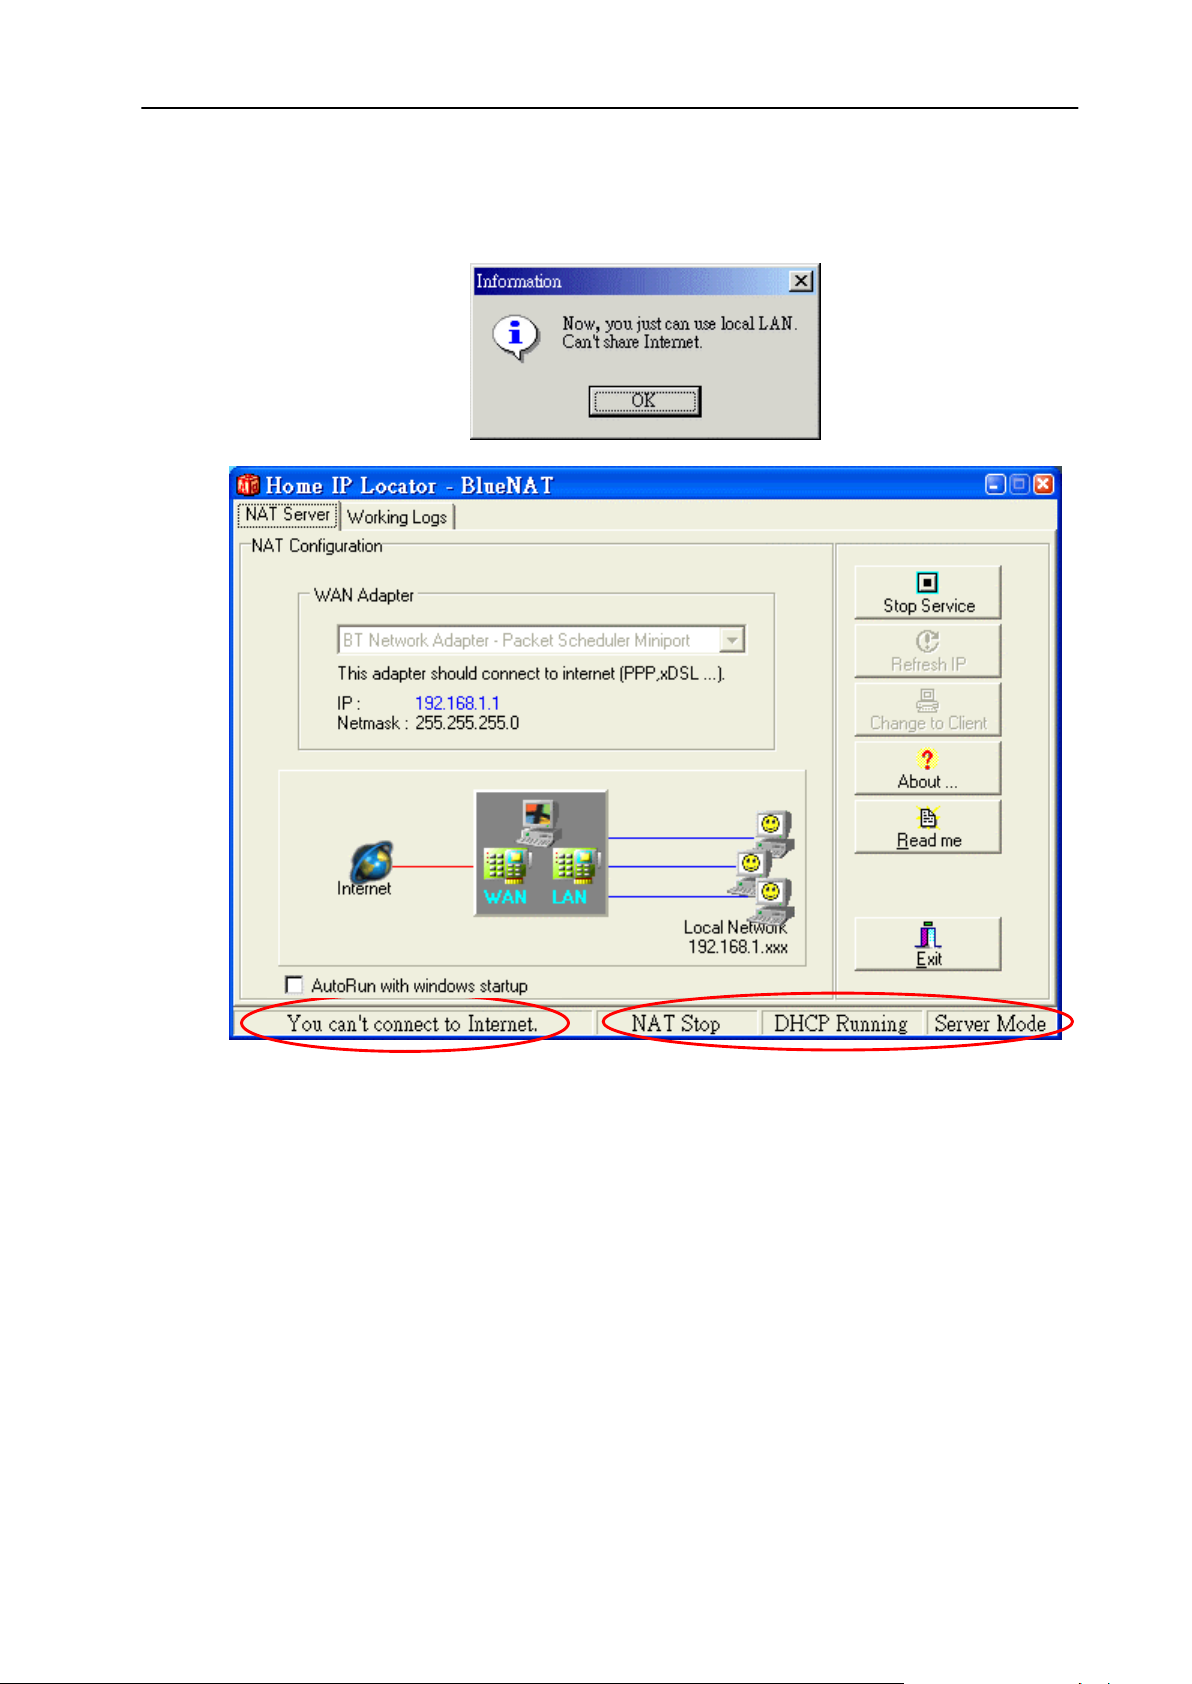
1. To ensure your Home IP Locator has been correctly set up, please check up the following
messages showing in message bar in the bottom of Home IP Locator interface. (See the
RED circle marked above)
a. “OK, you can connect to Internet”
It means your physical network adapter has been selected
b. “NAT Running/DHCP Running/Server Mode”
It means automatic IP assignment scheme has been successfully activated. Without
showing those messages on the message bar in the bottom, server computer will not be
able to serve clients correctly.
2. There might be several network adapter installed on your computer system. Before
selecting any of them, your can check with your computer retailer or ISP vendor which one
was installed for connection of Internet.
9
Page 10
Bluetooth Wireless Home-Networking System
9) If your server computer does not connect to the Internet, The server can only provide DHCP
service, which still allow client computers to connect with and assign them a proper IP
automatically. Under current configuration, Internet sharing is not available, but LAN service.
10
Page 11

Bluetooth Wireless Home-Networking System
3.3 Setting up a computer to be a client sharing Internet from server:
Note: By default the computer installed with Home IP Locator software is setup automatically to be an
NAT client. To change a role of computer from server to client will be unable to serve connected
computers any more.
Click on Change to Client button (If you are using Windows 98/ME, the system will need to restart
for the new network settings to take effect.)
3.4 Start surfing the Internet on client computers
Once you have finished setup the NAT server on the server computer, you can connect the client
computers to the server by joining the BlueNetwork. Then you can start surfing the Internet on the
client computers.
Note:
1. If the server computer use NTS PPPoE Program (RFC2516) to browse the Internet, there
will be some web pages cannot be opened on client computers. (EX:
Http://tw.yahoo.com)。
2. For Windows 2000 server and Windows 2000 advance server, you must stop DHCP
service by manual.
11
Page 12
Bluetooth Wireless Home-Networking System
4. Running MiniBluelet_Pan
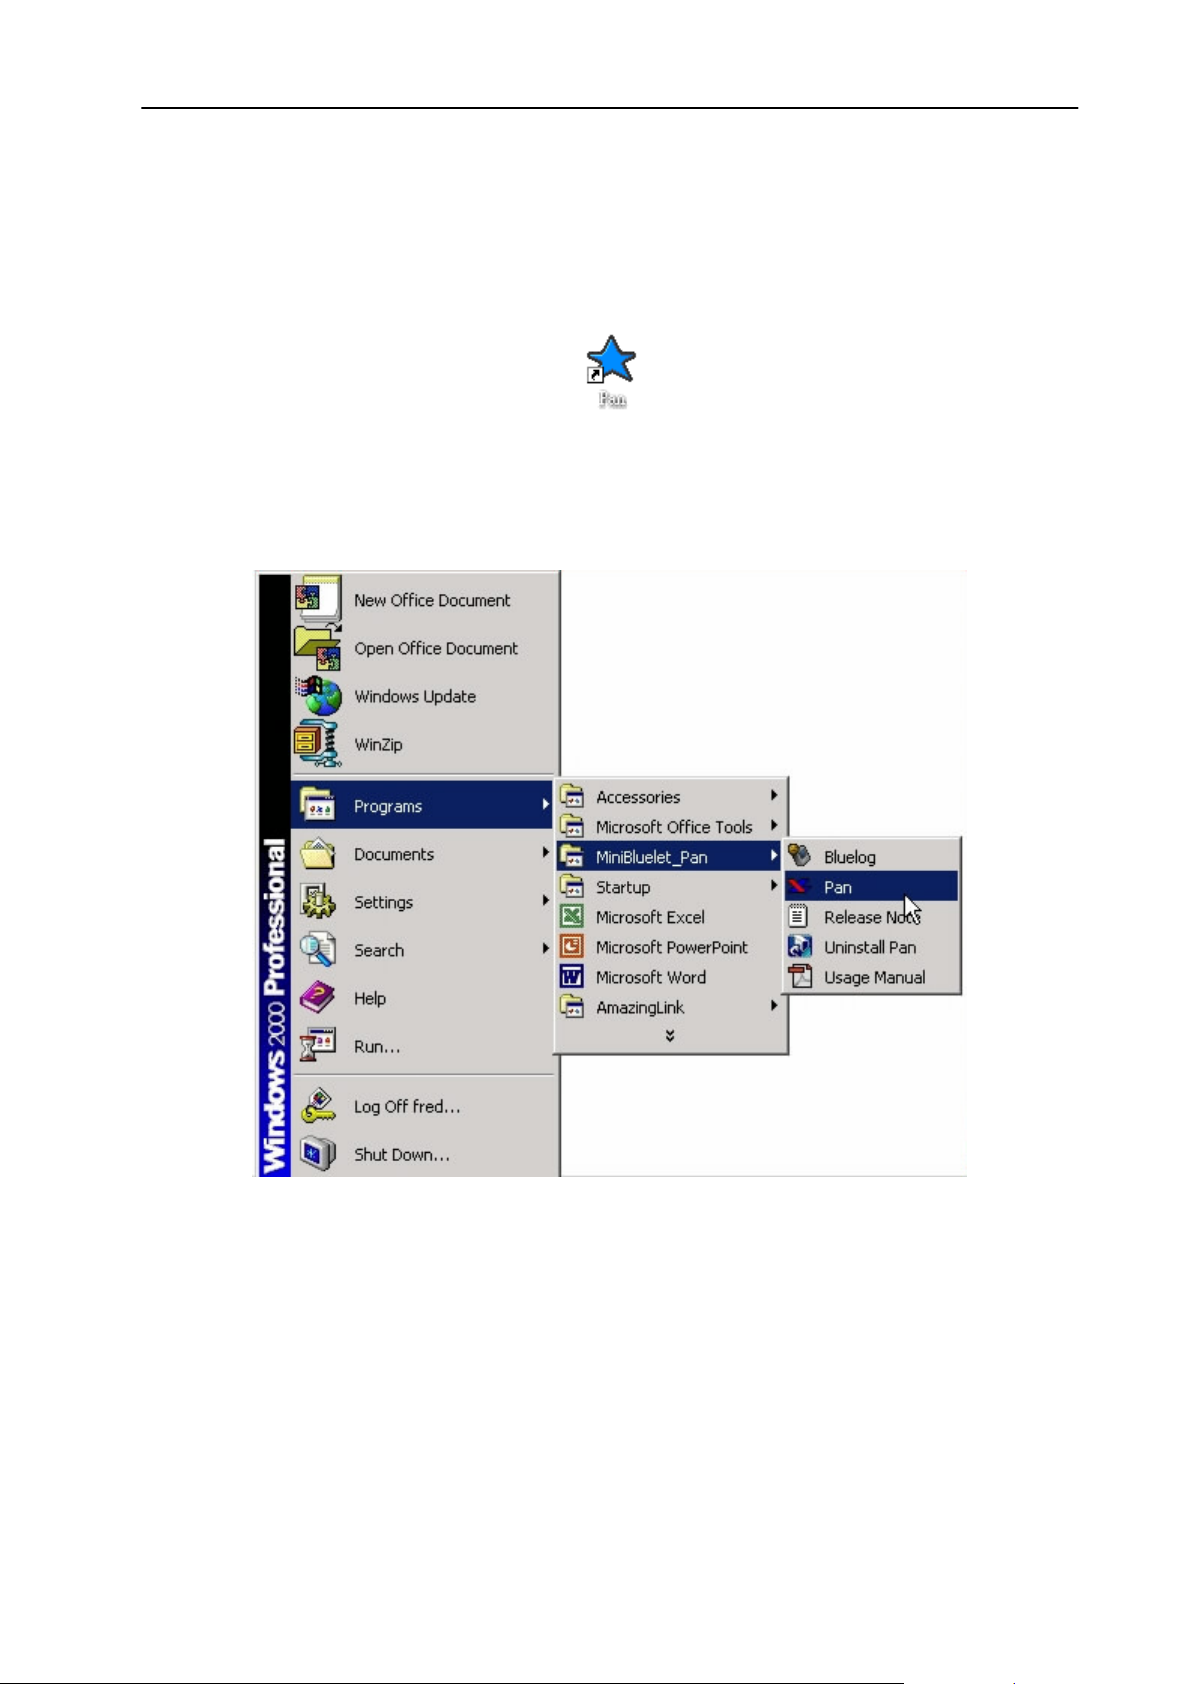
4.1 Start MiniBluelet_Pan program on the desktop area.
§ After MiniBluelet_Pan is installed on your computer, you will find the following icon showing on the
desktop area. Double-click it to start the program.
Figure1
4.2 Start MiniBluelet_Pan program from the Program Group.
§ Or you can click on Start -> Programs -> MiniBluelet_Pan -> Pan
Figure 2
Then you will have the following sub-items in the MiniBluelet_Pan program group:
o Pan
o Uninstall Pan
o Usage Manual
12
Page 13
Bluetooth Wireless Home-Networking System
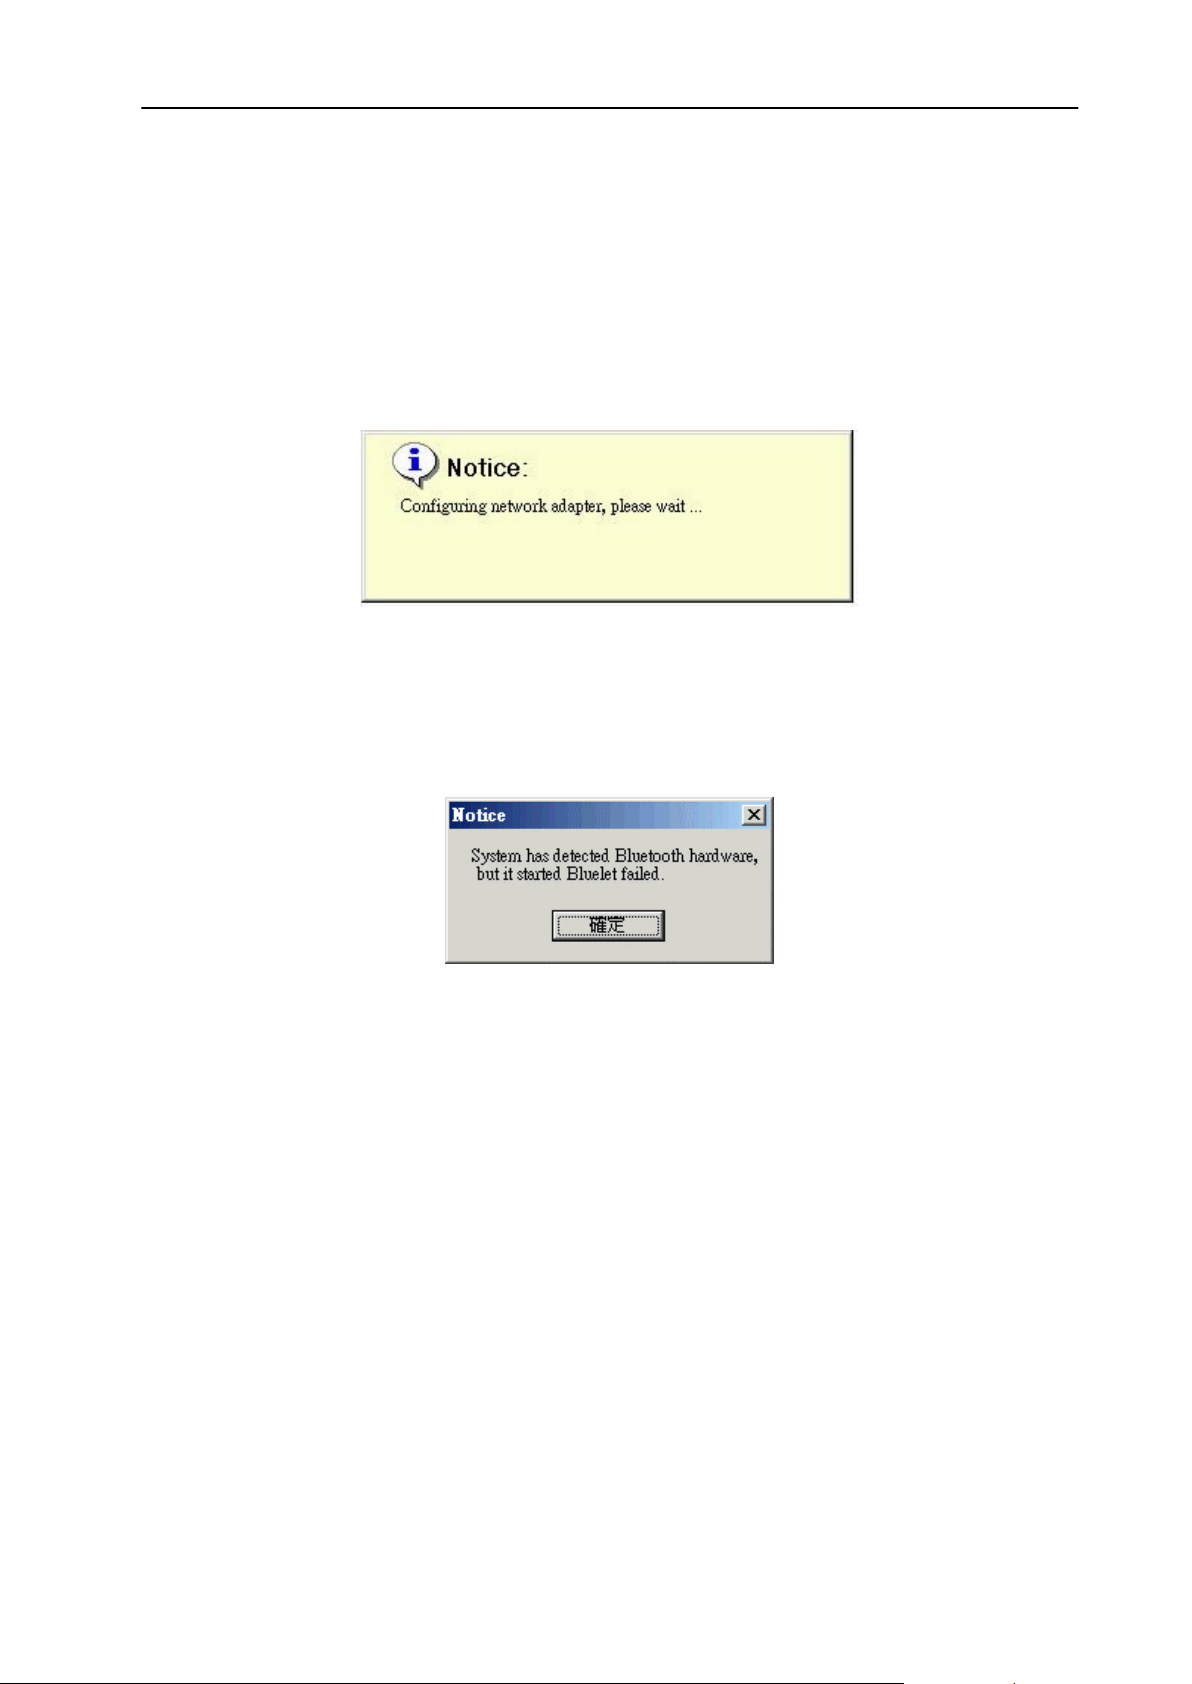
4.3 Popup notice window when MiniBluelet_Pan is started
· After running MiniBluelet_Pan, a window with notice message will pop up on the screen and you
will see a little blue star icon rotating in the Task Bar:
4.4 Popup notice window for running MiniBluelet_Pan the first time
· If you are running MiniBluelet_Pan the first time, you will see the following window popping up:
Figure 3
4.5 Popup dialogue box when running MiniBluelet_Pan without dongle plugged in
· If you have not plugged in the USB dongle into the USB port, then you will see the following
dialogue box popping up:
Figure 4
· You can simply click on Exit button to stop the MiniBluelet_Pan program and plug in the USB
dongle then restart the program.
13
Page 14

Bluetooth Wireless Home-Networking System
5. Establishing a Bluetooth Wireless Network Using MiniBluelet_Pan
5.1 How to establish your first Bluetooth Wireless Network
1). Double click on the blue star icon on the task bar and you will see the following dialogue box
popping up:
Figure 5
2). Click on Search button to find other Bluetooth devices or click on Cancel button to exit the
program.
14
Page 15

Bluetooth Wireless Home-Networking System
3). Double-click on the available device shown in blue color in the Network list, which you wish
to connect to or simply highlight it by left-click on the device and click on Join button to
connect:
§ Before connect to server, you need to confirm the following three items.
a. Make sure of the server is connected to Internet and there is no problem to
browse the Internet.
b. The role of a server computer needs to be set as a server of Home IP Locator.
Detailed instructions of settings are described in Section 3.2 for your reference.
c. Make sure of service has been started on the server of Home IP Locator.
Detailed instructions of settings are described in Section 3.2 for your reference.
Figure 6
15
Page 16

Bluetooth Wireless Home-Networking System
4). Then you will be prompted with the following login script window for you to enter the Passkey
for authentication purpose (the default passkey is root). Both server and client computers
are requested to enter the same Passkey and press OK button.
* Default Passkey is “root”:
Figure 7
Note:
1. For security consideration, both server and client computers will pop up this login script
window simultaneously and respectively. Please enter the default Passkey to authorize
the client computer to connect to server.
2. For future convenience consideration, experience users will be recommended to use
the fixed key on server computer to authorize clients’ connecting requests automatically
by system. Detailed instructions of settings are described in Section 5.2 for your reference.
5). Once you are successfully connected to server, you will notice the Bluelet_Pan on the task
bar rotating and the following window will pop up on the screen:
6). Then the following window will pop up and indicate the program is configuring the network
settings of the network adapter for you to start using the network resources:
Figure 8
Figure 9
16
Page 17

Bluetooth Wireless Home-Networking System
7). After couple of seconds the window indicated above will disappear. You can start to browse
your network neighborhood to find other computers connected through the BlueNetwork and
share network resources.
§ You can find out the IP address of your computer by moving the mouse cursor to the
blue star icon on the task bar.
Figure 10
8). To leave the BlueNetwork, you can simply double-click on the blue star icon on the Task
Bar and click OK button or right-click on it to select to Leave BlueNetwork.
Figure 11
17
Page 18

Bluetooth Wireless Home-Networking System
5.2 MiniBluelet_Pan pop-up menu and optional settings
Right-click on the blue star icon on the Task Bar and you will see the following pop-up menu:
v About Pan …
v Join BlueNetwork
v Options
v Exit
Figure 12
1). About Pan …
About Software Version、Device Name and BD Address:
Figure 13
18
Page 19

Bluetooth Wireless Home-Networking System
2). Join BlueNetwork
§ With this item, you may meet two different situations:
§ On clicking this item, the Join BlueNetwork dialog as shown in Figure 7 will appear, and
its usage has been introduced in the Shortcut Method. After you join in a BlueNetwork
successfully, the item Join BlueNetwork on the popup menu will change to Connection
Status as shown in Figure 14, and the blue star will begin to rotate. If you click the item
Connection Status and click the Disconnect button, the blue star will stop rotating
and a notice will appear on the blue star, as shown in Figure 11, which means that you
have left the BlueNetwork you had joined in, and the item name will change back to Join
BlueNetwork.
§ In another situation, you provide the BlueNetwork and wait for other Bluetooth devices to
join in you. Similarly, when the first device (client) connects to you, the blue star would
begin rotating with a notice on it, as show in Figure 15.
Figure 14
Figure 15
19
Page 20

§ After the IP address has been configured, this notice will disappear and another notice
§ On clicking the item User Management, a dialog as shown in Figure 17 Will occur to
Bluetooth Wireless Home-Networking System
will appear on the blue star, as shown in Figure 9. You also can find the item Join
BlueNetwork has become User Management, as shown in Figure 16.
Figure 16
show you the User Names and Addresses of the devices connected to you in a list.
Figure 17
§ Disconnect: If you want to disconnect from a user, select the user from the list and click the
Disconnect Button.
§ Refresh: You can click this button to refresh the list of users connected to you.
§ OK: Close this dialog.
§ If you have successfully disconnected from all of the users, a notice as shown in Figure 11
will appear.
20
Page 21

Bluetooth Wireless Home-Networking System
3). Options After the item, Options, is clicked, an Options dialog window will be shown, which
includes three parts: Change Access Passkey, NAP Settings, Automatic Start and
Advanced Settings, as shown in Figure 18.
Figure 18
§ Change Access Passkey:
§ a. Change the default Passkey from “root” to your preference:
If you choose to use fixed passkey, you can set and change the passkey. The clients who
want to connect to you must know the passkey.
§ b. Select to use fixed key to authorize clients’ connecting requests automatically:
If you chose to use fixed passkey, login dialog window will only pop up in clients’ computer.
S
erver computer will authorize clients’ connecting requests automatically by system
according to the fixed passkey you set.
§ NAP Settings: You can select a network adapter and enable NAP to make the computer act
as a Network Access Point in BlueNetwork. It is a must that the computer has a real Ethernet
network adapter and has connected to a LAN. Then other computers connected to the
BlueNetwork ( we call them PAN Users ) can access LAN through the NAP. About the
detailed information of NAP configuration, please refer to Chapter 6.
§ Automatically start PAN after boot the system: When choose this function, the program
will automatically start Pan, When you start your computer.
21
Page 22

Bluetooth Wireless Home-Networking System
§ Advanced Settings: You can do some configurations by clicking the Advanced button, a
property dialog will be shown which includes three pages: Security, Optimization, and
Bluetooth Device.
Figure 19
v Security:
Security Mode: You can select the security mode, as defined in Bluetooth Generic Access Profile:
§ No security for local device and services.
§ Assign security level for local device.
Miscellaneous: You can decide if the device is connectable, if it enables encryption, and if it is
visible to other Bluetooth device, also you can decide its visibility.
22
Page 23

v Optimize:
Bluetooth Wireless Home-Networking System
Figure 20
Search Mode: If you set the Search Mode at Auto Search, your PAN will automatically start to
search the available devices while PAN program launched.
Device Shortcut:If you know the address and name of the device that you want to connect to, you
can input the address and name manually in order to save time for searching the
device.
Automatic Join: If you select Automatic Join, your PAN will automatically join the last
BlueNetwork when PAN program launched.
23
Page 24

v Bluetooth Device:
§ You can set the Device Name.
§ Check Save link key, Check “Save link key” for fature easy connection to the same
device.
Bluetooth Wireless Home-Networking System
Figure 21
4). Exit
On clicking this item, you will exit from the PAN application and the blue star icon will
disappear at the same time.
24
Page 25

Bluetooth Wireless Home-Networking System
6. NAP Settings Configuration
If a Bluetooth enabled computer connects to a LAN, it can act as a NAP (Network Access Point). That
is, after other computers (so-called PAN Users) join it to form a BlueNetwork, these PAN Users can
access LAN through the NAP as if they are attached to LAN directly.
6.1 Setting up NAP on the server
1). Make sure the server computer is connected to the LAN
2). Right click on the blue star icon on the Task Bar and select Options
3). Check on the checkbox for Access Outside Networks in the NAP Settings section
4). In Netcard select your really network card
6.2 NAP client computers
NAP client computers will acquire the IP address automatically from the NAT server running NAP
for accessing the BlueNetwork as well as the Internet resources.
Note:
a. Your BT Network adapter will acquire an IP address automatically when you are using
Windows 98 or ME. Or you can manually setup a static IP address for the BT network
adapter but you need make sure no other computer is using the IP address
b. If you are using Windows ME, it will take longer time for connecting the client
computers to the server running NAP. Please be patient and after 3 to 4 minutes it will
connect to the BlueNetwork.
25
Page 26

Bluetooth Wireless Home-Networking System
c. If you are only utilizing BlueNetwork for file sharing, then you can leave the NAP
function unchecked to reduce unnecessary CPU overhead.
7. Internet Sharing Concept
§ There are basically three options for Internet sharing
1). NAT Internet sharing concept, Please refer to chapter 3。
2). NAP Internet sharing concept, Please refer to chapter 6
3). ICS (Internet Connection Sharing) is provided by windows OS, please refer to windows user
manual.
Note: We recommend you to use NAT for Internet sharing but not use ICS, because of the
complex setting.
26
Page 27

Bluetooth Wireless Home-Networking System
FCC INFORMATION
The Federal Communication Commission Radio Frequency Interference Statement includes the
following paragraph:
The equipment has been tested and found to comply with the limits for Class B Digital
Device, pursuant to part 15 of the FCC rules. These limits are designed to provide reasonable
protection against harmful interference in a residential installation. This equipment generates,
uses and can radiate radio frequency energy and, if not installed and used in accordance with
instruction, may cause harmful interference to radio communication. However, there is no
grantee that interference will not occur in a particular installation. If this equipment dose cause
harmful interference to radio or television reception, which can be determined by turning the
equipment off and on, the user is encouraged to try to correct the interference by one or more of
the following measures:
n Reorient or relocate the receiving antenna.
n Increase the separation between the equipment and receiver.
n Connect the equipment into an outlet on a circuit different from that to which
the receiver is connected.
n Consult the dealer or an experienced radio /TV technician for help.
The user should not modify or change this equipment without written approval from
UNIWILL COMPUTER CORP. Modification could void authority to use this equipment.
Notice: The changes or modifications not expressly approved by the party responsible for
compliance could void the user’s authority to operate the equipment.
27
 Loading...