

Page 1

Welcome to NeatWorks
Welcome to version 4.0 of NeatWorks software. We're happy to announce the
following new or enhanced features with this release:
• New User Interface: The menus and toolbars have been redesigned to make
the application faster and easier to use.
Quick Scan Center: Using a batch-type scanning process, you can quickly and
•
easily scan documents, receipts, business cards, and even create PDF files
without first launching the NeatWorks application.
Inbox: The Inbox is where your scanned items display so that you can verify,
•
edit and/or add notes before filing them in the appropriate organizer folder.
• Filmstrip View: The Filmstrip is used for viewing mult i-image items in the
image viewer of each organizer. If an item includes multiple images, the
filmstrip displays at the bottom of the image viewer, allowing you to quickly
scan through pages. If you click on a thumbnail in the filmstrip, it becomes t he
main image displayed.
• Keyword Search and Advanced Search: Use keyword search to find information
by typing in words in the search box or use Advanced Search by selecting
multiple criteria to drill down and find the receipt , business card, and document
information you need.
• Archive: The new Archive feature enables you to zip and save information
outside of the NeatWorks application for future retrieval. This will improve
application speed as you archive old data sets outside the NeatWorks
database.
• PDF: A new workflow makes scanning to PDF faster and easier, while the
image quality of scans has been improved.
Before getting started, we recommend taking a moment to familiarize yourself with
our help system. Even seasoned NeatWorks users may benefit from reviewing
information about our new features and how the software works. We appreciate your
support, and are committed to providing solutions that organize your paper and
simplify your life.
© 2008 The Neat Company
Getting Started: What do I need to know?
NeatWorks is a scanner and software solution that helps you organize your paper.
Receipts, bills, medical forms, business cards...everything. It scans, analyzes and
organizes your paper and stores it all in a database on your computer. There are a
few basic concepts that will help you better understand how to use NeatWorks.
Before getting started, it may be helpful to review our answers to the following
questions about folders, scanning, and finding your information:
Where can I get support and updates?
•
What are folders and why do I need them?
•
1
Page 2
Using the Quick Scan Center
The Quick Scan Center enables you to quickly and easily scan documents, receipts ,
business cards, and even create PDF files without first launching the NeatWorks
application. To do so, perform these steps:
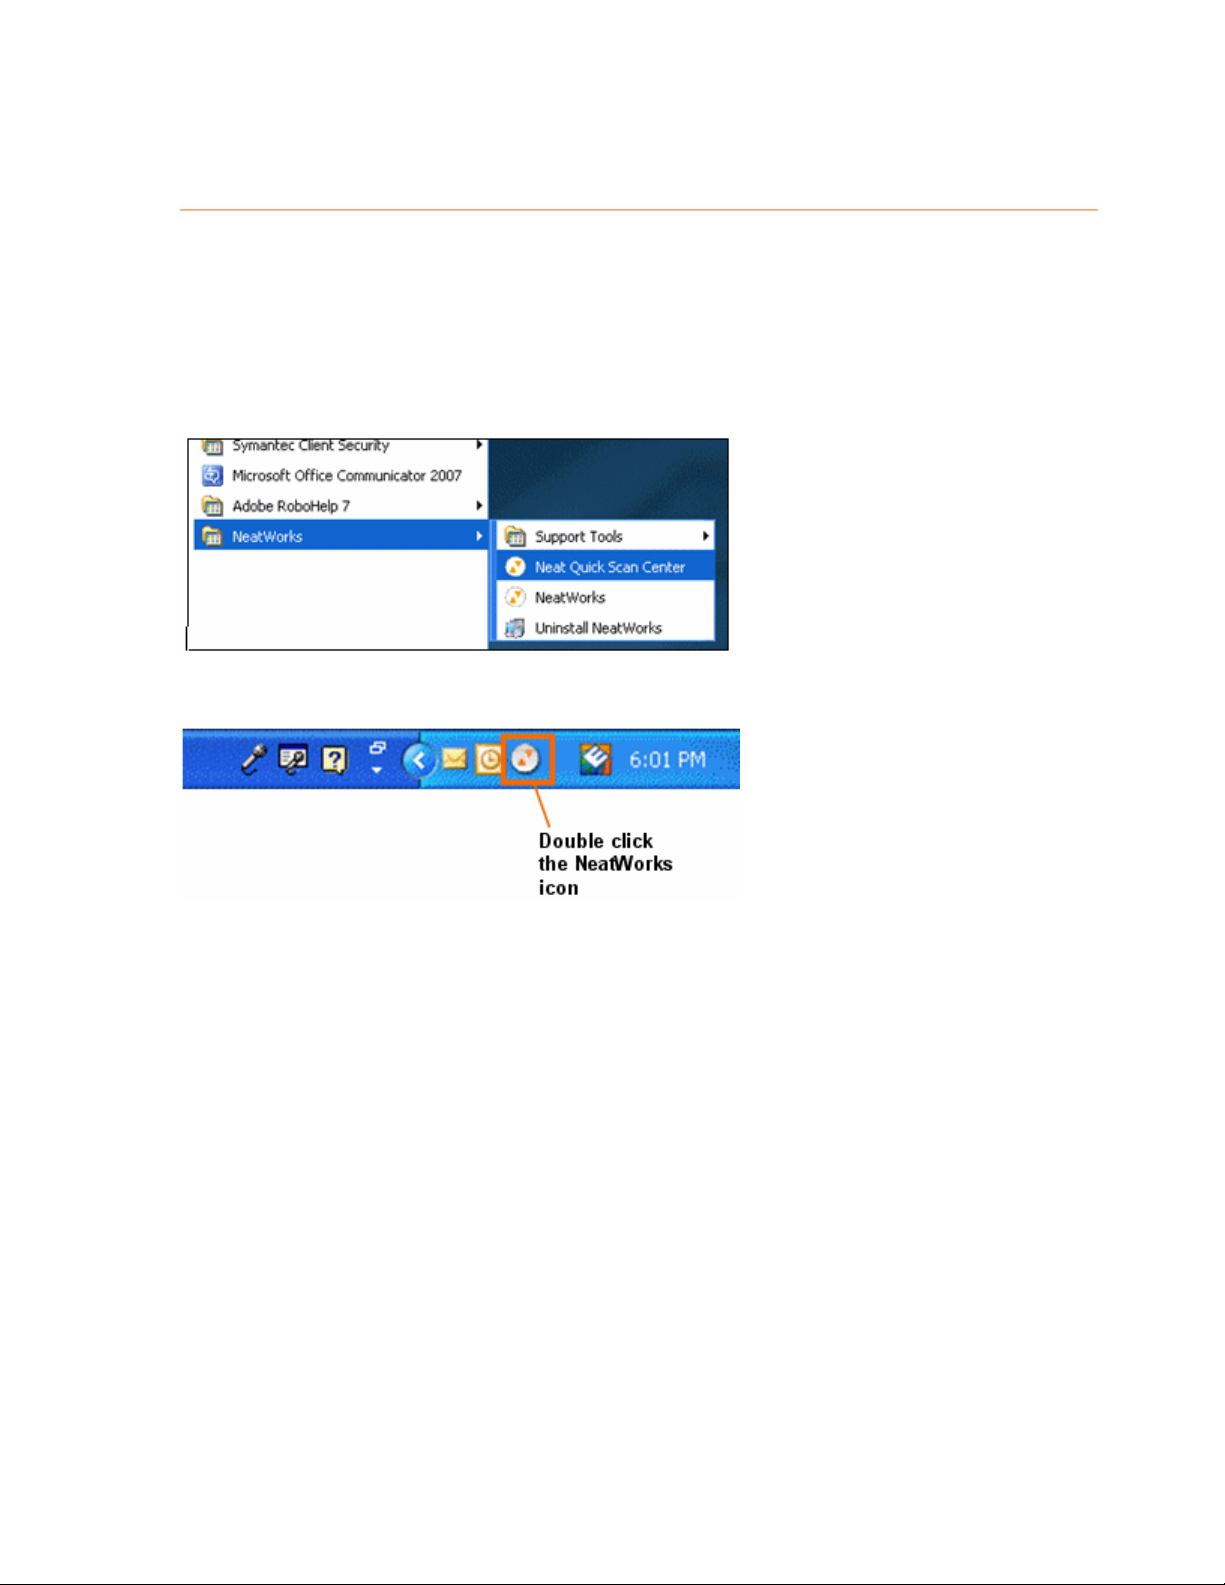
1. Start the Quick Scan Center by selecting
NeatWorks>Neat Quick Scan Center
2. Once the Neat Quick Scan Center is started, you can easily access it whenever
you wish by double clicking the NeatWorks icon in th e system tray on the
bottom right side of your screen.
Start > All Programs >
, as shown below:
3. The Neat Quick Scan Center displays, as shown in the following illustration:
2
Page 3
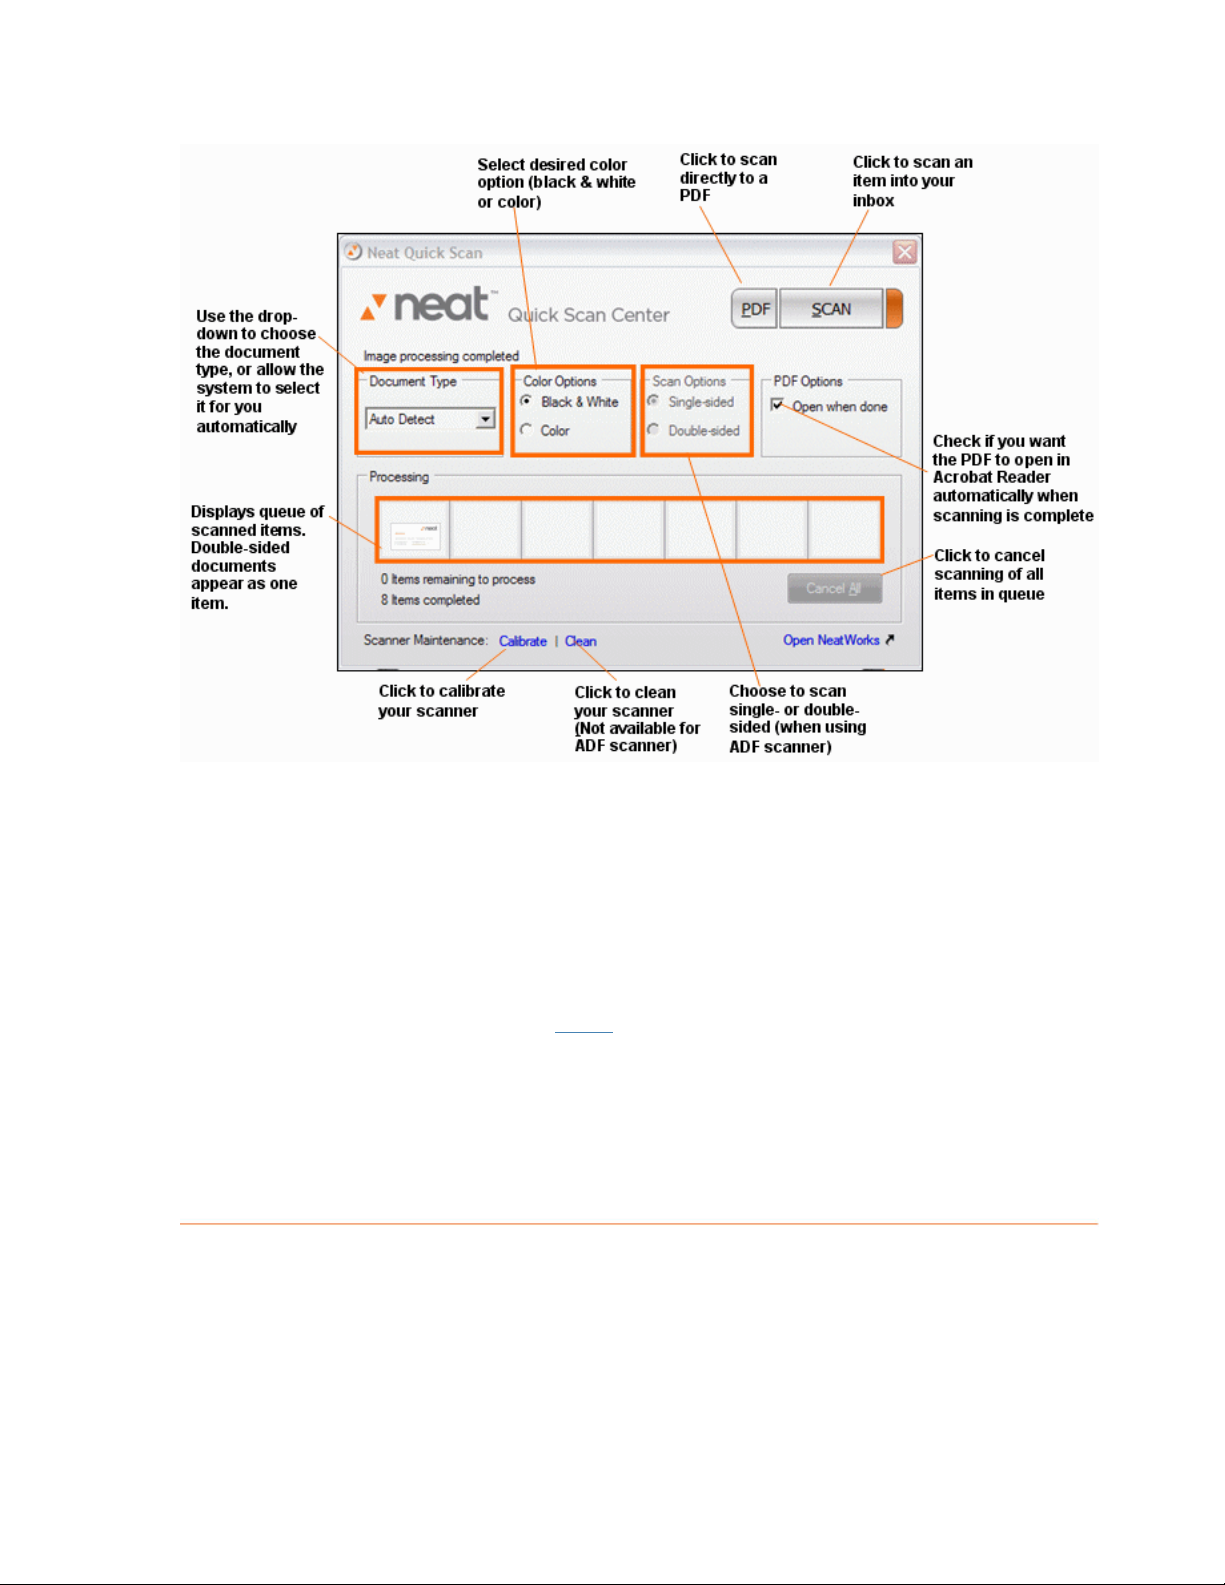
4. The system will detect the document type for you au tomatically, or you can
select the document type in the Document Type field.
5. Choose whether you want to scan in black & white or in color by selecting the
appropriate option in the Color Options area.
6. If you are using the NeatDesk ADF scanner, which can scan two-sided images, you'll be able to select single -sided or
double-sided scanning in the Scan Options field. Otherwise, the default setting is one-sided.
If you are scanning a PDF, you can specify that the PDF opens automatically
7.
upon completion of scanning. To do so, click
Open when done in the PDF
Options field.
Click Scan to scan an item; the item displays in your queue. Scanned items
8.
will automatically load into the
Inbox and be available for viewing and editing
the next time you open NeatWorks.
Note: If you scanned to PDF, the scanned item is not sent to the NeatWorks Inbox.
You can save the PDF directly to My Documents or another location on your
computer.
Using the Inbox
The Inbox is where your scanned items display so that you can verify their accuracy,
make edits or add notes before filing them in the appropriate organizer. The Inbox
consist of three bins: Receipts, Business Cards, and Documents. A scanned item
displays in the appropriate bin, which is highlighted with an orange upper border to
show it is active. For example, in the following illustration, a scanned business card
displays in the highlighted Business Card bin:
3
Page 4
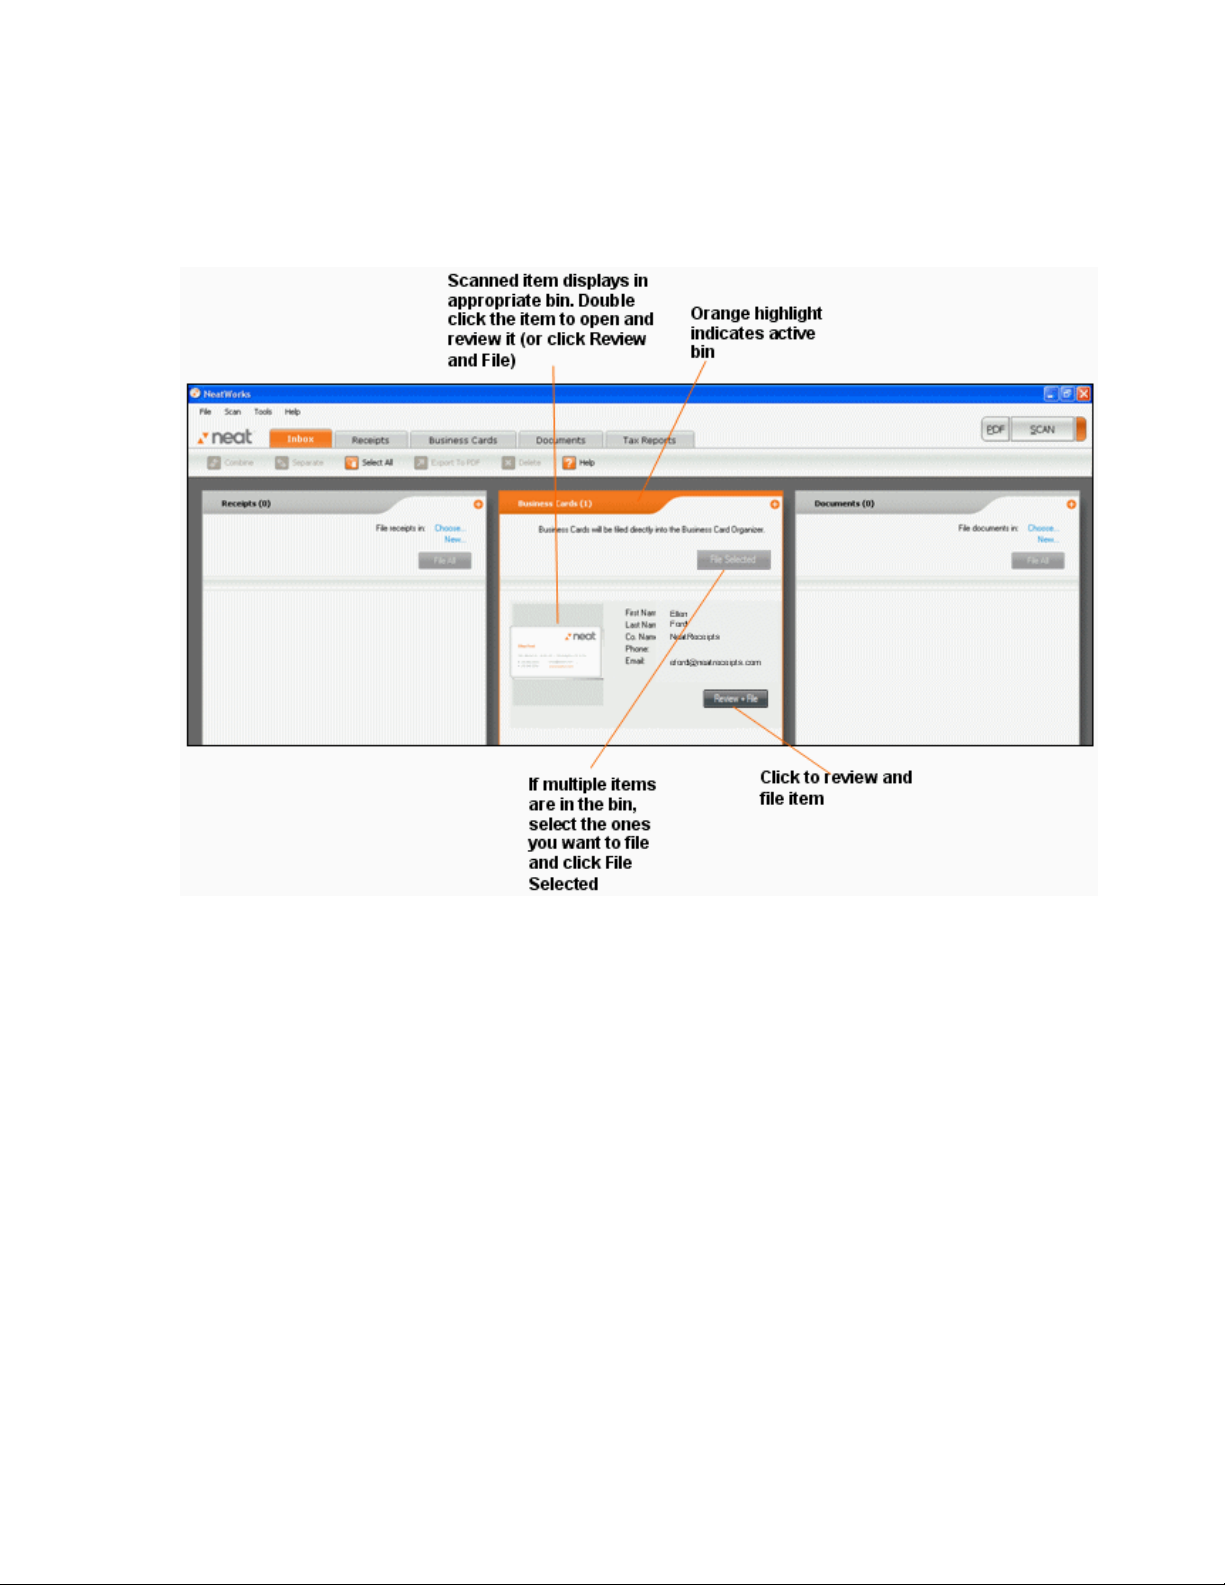
Note: You can drag and drop misclassified items between bins if desired. For
example, if a document accidently scanned as a receipt, you can drag it from the
receipt bin into the document bin. NeatWorks will now recognize it as a document
instead of as a receipt.
You can click the + sign to maximize your view of a bin, as shown below:
4
Page 5
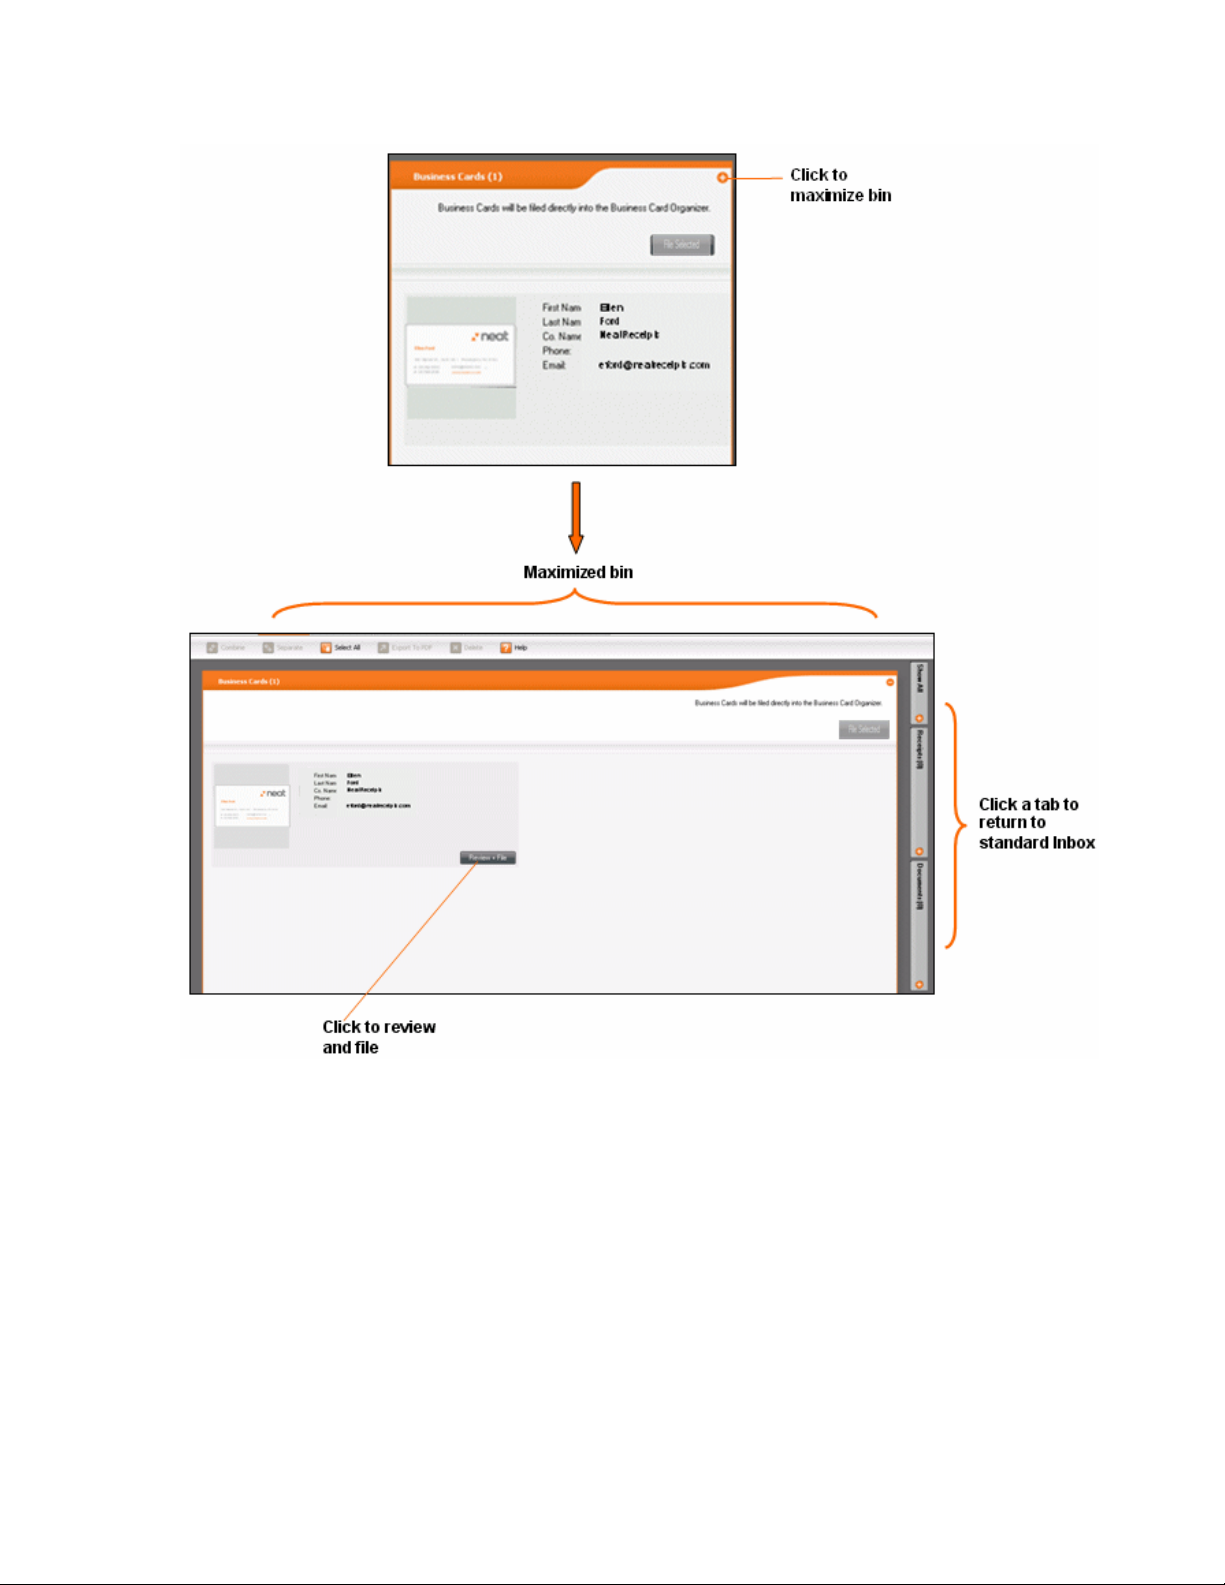
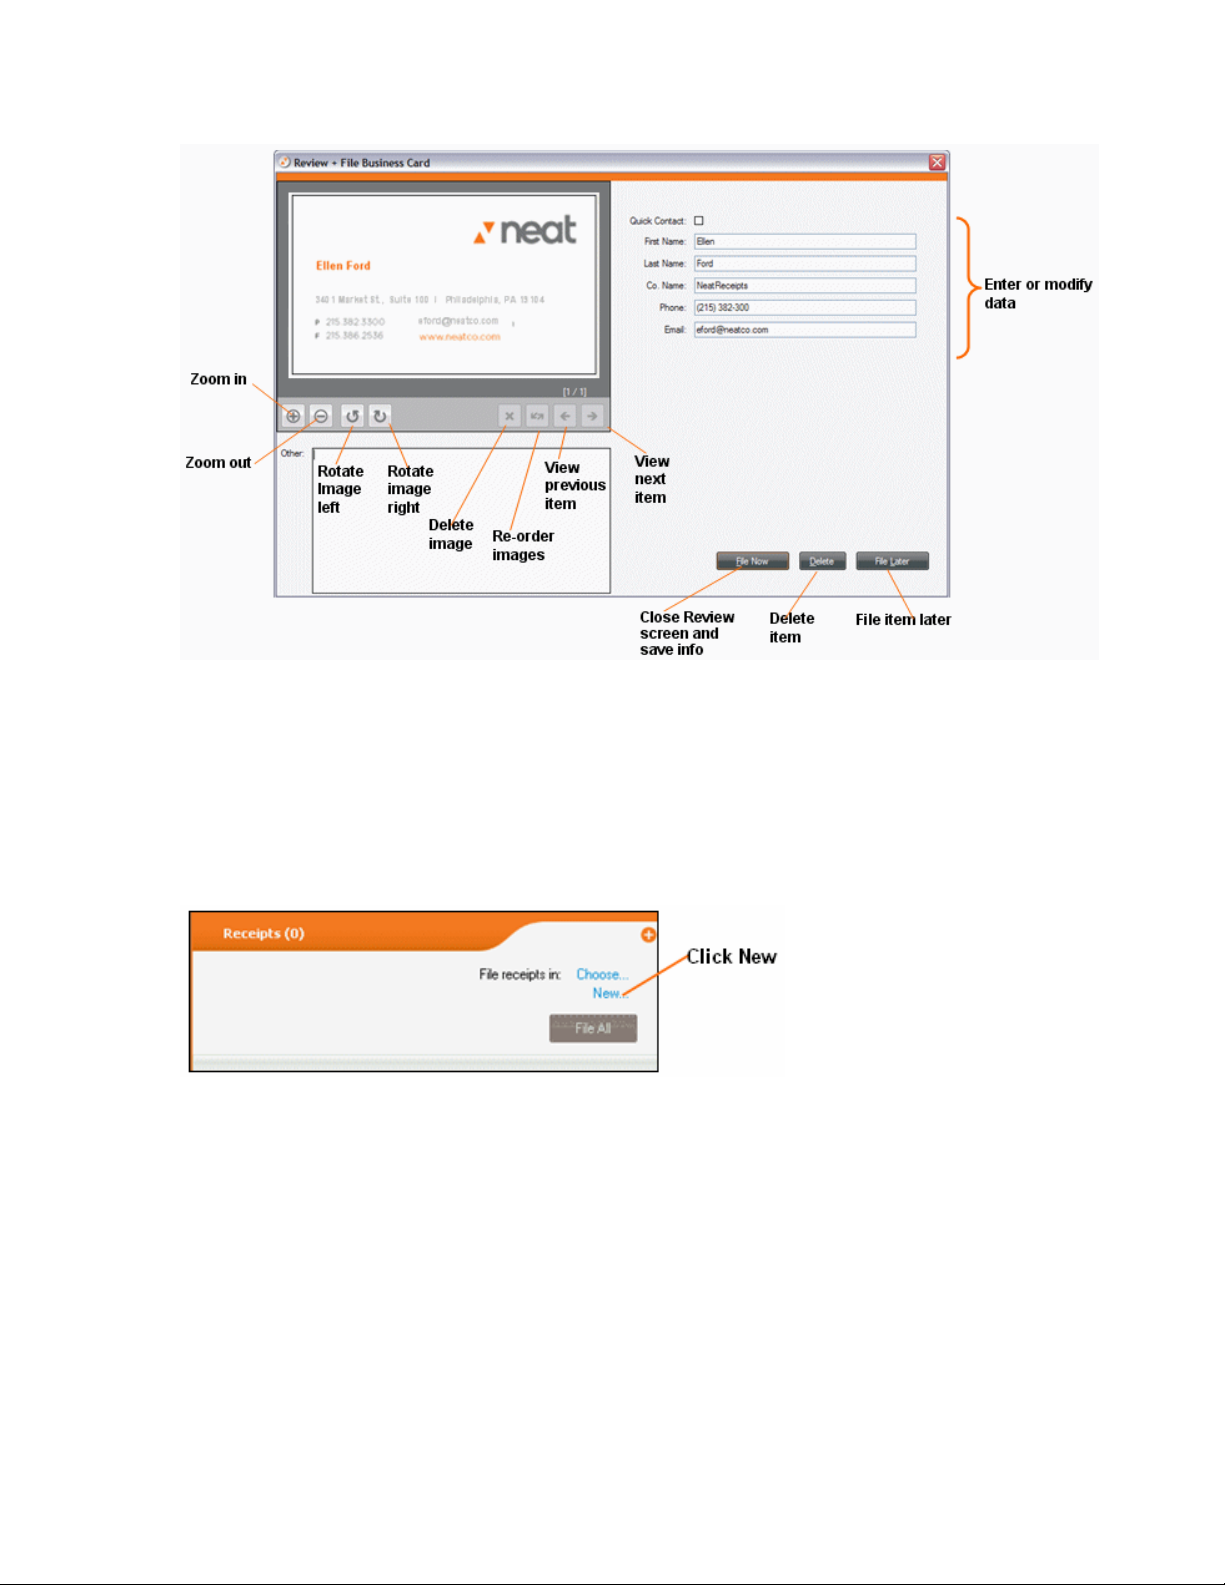
1. To review and modify any item in an Inbox bin, double click on that item, or
Review & File. This opens the Review screen, as illustrated below. The
click
Review screen enables you to adjust or delete the scanned image. In addition,
you can modify the scanned data (e.g., for a business card, you might change
the name of the contact, company name, phone number etc.). You can also
choose to file the item now or later.
Note: You can file a Receipt or Document from the review screen, or you can file
the contents of an entire bin from within that bin in the Inbox.
5
Page 6
2. If you've scanned a receipt or a document, you will have several filing options
after completing your review. (Business cards are automatically filed in the
Business Card organizer.) You can create a new folder, or choose an existing
folder for an item.
Creating a New Folder
1. To create a new folder, click New, as shown below:
2. The following screen displays:
6
Page 7
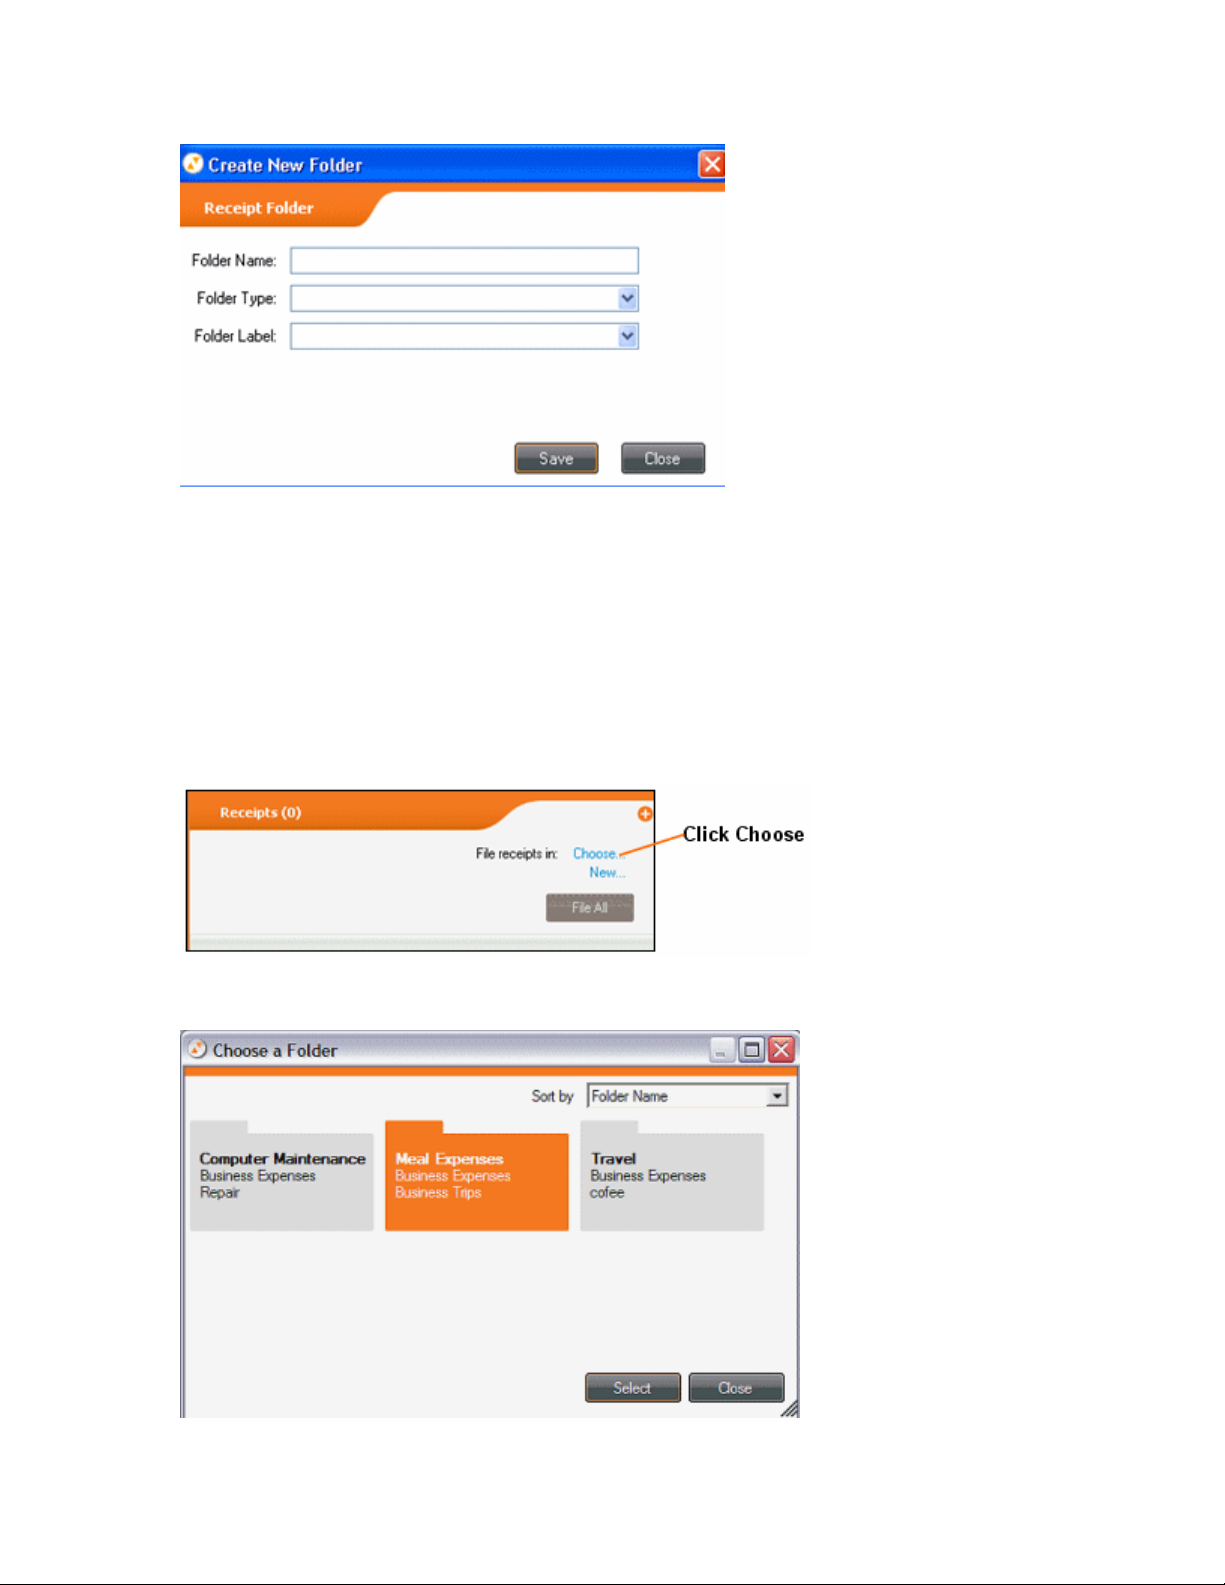
3. Type in a folder name.
4. Select a folder type by clicking the down arrow and choosing from the list that
displays, or type in the desired folder type.
5. Select a folder label by clicking the down arrow and choosing from the list t hat
displays, or type in the desired folder label.
6. Click
7. Click
Save.
File Selected to save the scanned item into the folder you created.
Choosing an Existing Folder
1. You can also choose an existing folder, as shown below:
2. The following screen displays:
7
Page 8
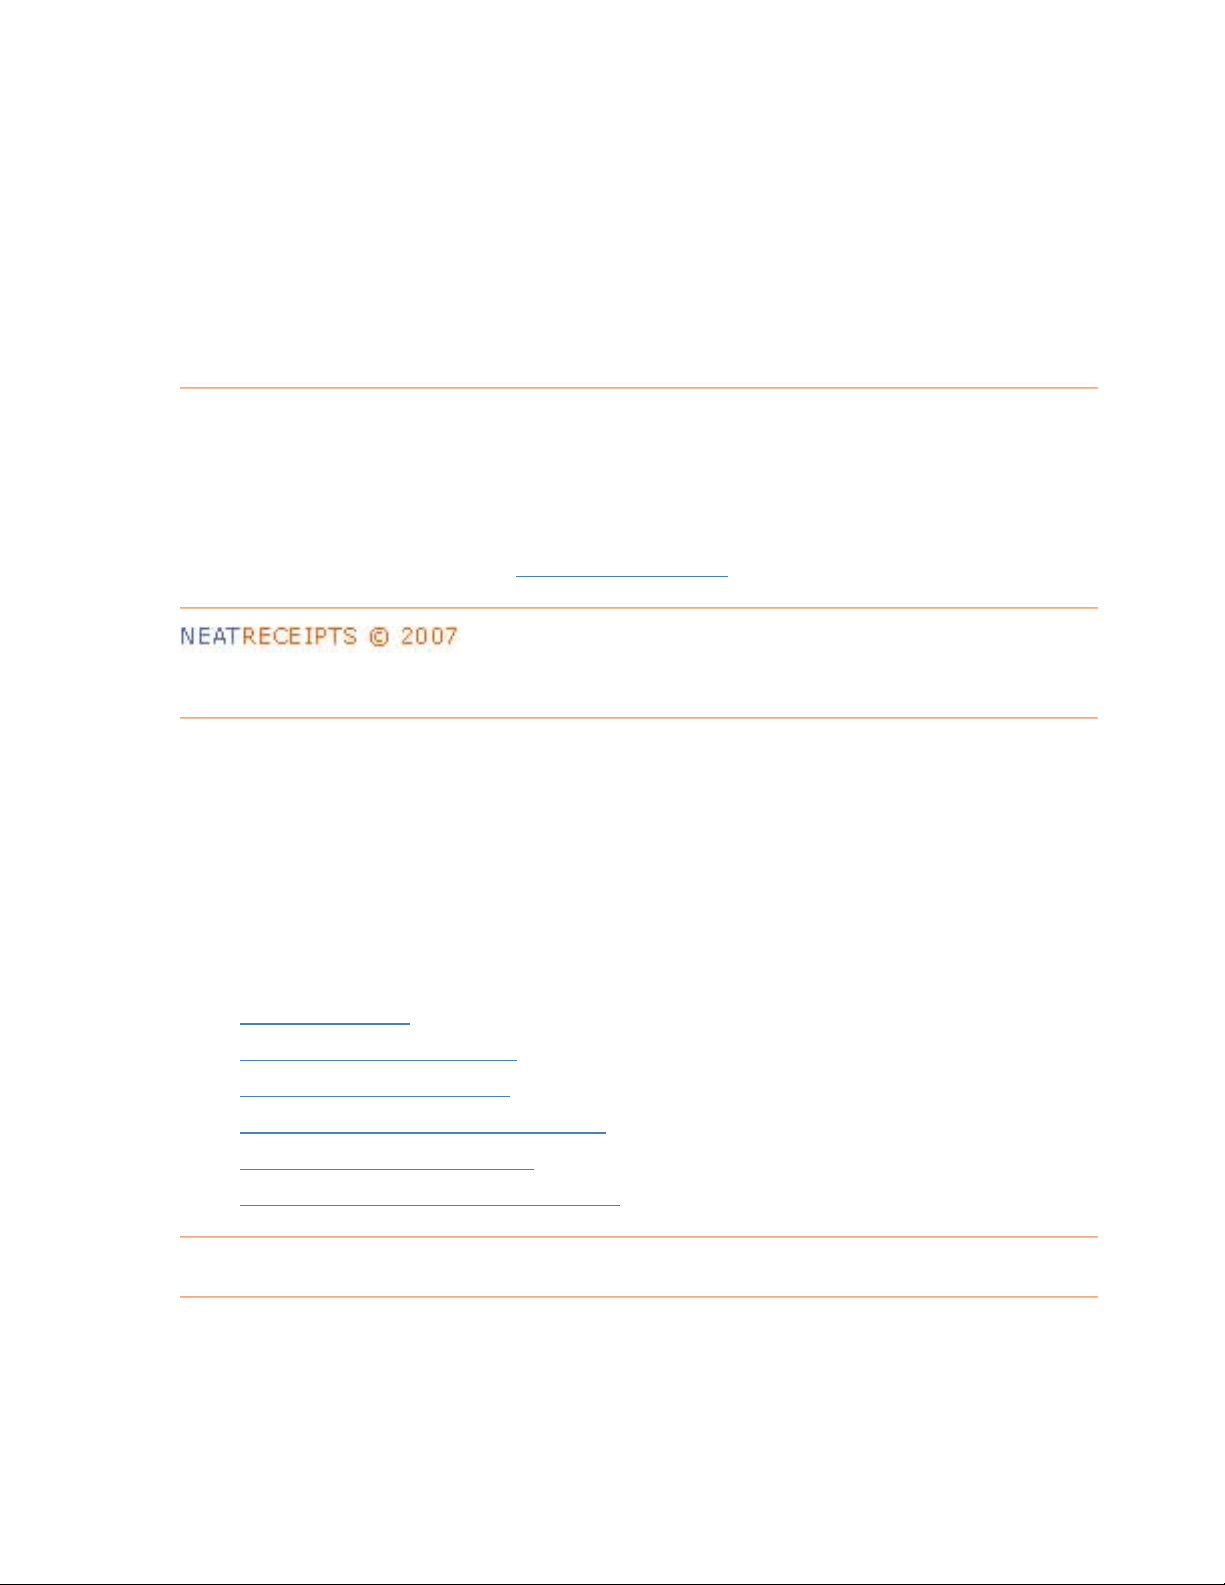
3. Choose the desired folder by clicking on it. The selected folder will be
highlighted in orange. You can sort by Folder Name, Folder Type, and Folder
Label.
4. If only one item is in the bin, click
items in the bin, select those you want to file by highlighting them and click
Review and File. If you have multiple
File Selected.
5. You can now scan additional items if desired by clicking the
buttons on the upper right side of the screen.
Scan or PDF
Using NeatWorks Folders
When you think about a folder on your computer, you might think of a typical file
folder or the icon associated with it, but in NeatWorks, a folder is actually
represented by a
Folders are used in the Document Organizer and the Receipt Organizer in
NeatWorks. The Business Card Organizer does not use folders.
row of information.
To learn more about folders, see
Working with Folders.
Working with Folders
The goal of this section is to help you better understand how folders work in
NeatWorks, as well as how to work with folders in what is called the Folders
Grid,
corresponds to a folder. That is, when you think about a typical folder on your
computer, you might think of those file folder icons associated w it h them, but in
NeatWorks, a folder is represented by a row of information. Each row is actually a
folder, and all the information you scan gets filed into an exist in g or new folder.
You will find the following topics addressed here:
or the upper grid of the Receipt Organizer. In the Folders Grid, each row
What is a folder?
•
What can I do with folders?
•
How can I find my folders?
•
How do I import and export folders?
•
How do I run a folder report?
•
Can I personalize columns and fields?
•
What is a folder?
In NeatWorks, a folder is where your information is organized and stored and
is represented by a row of information. Each row is a folder, and all the
information you scan gets saved in that folder. You can think of a folder as
8
Page 9

an electronic version of a physical filing receptacle for receipts, like a drawer
in a filing cabinet, for example. You can use folders to organize receipts into
any type of group you like. For example, you can create a folder to track
business expenses or a home improvement project. Three Folder Types have
been included to help you get started:
• Business Expenses (e.g., office supplies)
• Expense Report (e.g., sales trips)
• Personal Expenses (e.g., groceries)
Categorizing Folders
NeatWorks lets you assign categories and subcategories using the Folder
, Folder Label, and Folder Detail columns.
Type
• The
Folder Type category provides a general classification for a folder.
(Think of this as a drawer in a filing cabinet.) For example, you could
have an "expense report" drawer and a "personal expenses" drawer.
• The
Folder Label category provides a secondary level of classification
for a folder. (Think of this as a hanging file folder within the drawer.)
For example, you could have a hanging file folder for "vacation" receipts
within your "personal expenses" drawer.
• The
Folder Name category (hidden by default) provides an even more
specific classification for a folder. (Think of this as a manila envelope
within the hanging file folder.) For example, you could have a manila
envelope full of receipts from "Disney-2005" within your "vacation"
hanging file folder.
For example, if you wanted to track receipts chronologically by month, you
could organize your folders by month (such as Folder Type: Personal
Expenses, Folder Label: January 2005). Then you can use the columns in the
lower grid to further classify receipts by theme or event (i.e. use the Project
column to label a group of receipts as office supplies). Doing this will enable
you to search for your receipts by either month or by party theme.
Likewise, if you are organizing receipts for business, you might start with a
Folder Type called Custome rs and add Folder Labels such as North-East
Territory, Western Territory, etc. As you scan invoices in from your
customers, you could use the Client column to record a customer name and
the Project column to track development. By consistently taking advantage of
the categories and subcategories within these columns, you will later be able
to search for and locate virtually any information contained within your
folders.
What can I do with folders?
In NeatWorks, every receipt lives in a folder. Each time a new folder is created, a
new row is added to the Folders Grid. You can edit information in the Folders Grid
row, such as the Folder Type and Folder Label. You can also add comments to a
folder using the Information Tabs at the bottom of the screen. You will find the
following topics addressed in this section:
9
Page 10

• Creating a New Folder
Selecting Grid Rows
•
Viewing Multiple Folders Simultaneous ly
•
Editing Cells in a Folder
•
Adding Comments to a Folder
•
Deleting a Folder
•
Clearing Folder Rows
•
Creating Expense Reports
•
Splitting a Receipt Across Multiple Folders
•
Moving a Split Receipt Row to Another Folder
•
Creating a New Folder
T n do so in two ways:
o get started, you will need to create a new folder. You ca
• Click
• Select
New while in the appropriate bin of the Inbox
New > Folder from the organizer toolbar.
Selecting Grid Rows
Each time a new folder is created, a new row appears in the top grid. Select
within this grid is very similar t
s a
pre dsheet-type layouts:
• To select a single row, click any cell in the row.
• t, then
To select multiple adjacent rows, click in the first row you want to selec
hold down the
• lect,
To select multiple non-adjacent rows, click in the f irst row you want to se
then hold down the
Shift key and click in the last row you want to select.
o selecting rows in other programs that use
Ctrl key and click in each row you want to select.
ing rows
Viewing Multiple Folders Simultaneously
You can view receipts in multiple folders simultaneous ly by "pinning" those folders.
This is useful when you want to quickly total receipts from different folders. Click the
10
Page 11
pin icon in the Pin column to "pin" multiple folders (or choose Pin All Folders from the
Edit menu to quickly pin all folders).
Editing Cells in a Folder
You can edit folder cells anytime you need to modify the info rmation in them. To do
so:
1. Click the cell you want to modify.
2. Edit the cell information as needed, keeping in mind the following:
• Information in the
and all Total columns (such as Total Amount) is generated
automatically and cannot be edited. To modify the contents of a cell
using a dropdown menu, click on the down arrow on the right side of the
selected cell and choose an entry from the list or a date from the
calendar.
• To modify the contents of a cell manually, click in the cell and start
typing. The first time you type a new entry into a cell, it will
automatically be added to the dropdown list for that column, so you will
never have to type it again!
NeatWorks automatically saves every receipt you scan as well as any text added
automatically during the scan or typed manually by you.
Number, Date Created, Last Modified, User
Adding Comments to a Folder
Information Tabs (located under the Receipts Grid), allow you to add additional
information to cells in the Folders Grid.
1. In the Folders Grid, click in the cell where you wan t to add information.
• In the Additional Field Info area, the name of the selected cell appears in
the heading. For example, if you've clicked in a cell in the
column, the tab reads Folder - Folder Type.
2. Edit the info as needed, keeping in mind the following:
Folder Type
11
Page 12
• To add information to a field, click in the field and begin typing, use the
dropdown menus, or click the radio buttons.
• Cells containing comments will display a small red triangle in the upper
right corner of the cell.
Deleting a Folder
You can delete a folder whenever you no longer need it. To do so:
1. Select the folder(s) you want to delete.
2. Click the
3. When prompted, click on
Delete link on the upper right side of the Folder grid.
Yes to confirm the deletion.
Working with deleted folders
• To view the Deleted Folders window, choose Tools > Go To Deleted
Items > Folders
• To restore deleted folders, first view the Deleted Folders window (as described
above), then select the folder(s) and click on
• To close the Deleted Folders window, click on the
• To permanently erase deleted folders, choose
Items > Folders
Clearing Folder Rows
If you were finished reviewing a set of folders and wanted to "clear the slate" to work
with a different set of reports, you could do so by clearing your folder rows. Just go
to Edit > Clear All Grids to clear all rows in both the folder and receipts grids.
.
Restore.
Close button.
Tools > Empty Deleted
. Click Yes to confirm.
12
Page 13

Creating Expense Reports
Creating an Expense Report in NeatWorks is easy. In NeatWorks, an Expense Report
is a folder whose Folder Type has been assigned to the Expense Report category. If
you've already scanned the receipts that you want to use in an Expense Report, just
choose Expense Report in the Folder Type column.
To add additional receipts to an expense report, be sure to select that folder when
filing them.
Creating a New Expense Report
To create an expense report, choose New Folder from the toolbar and then assign
a folder type of Expense Report.
Now you can simply start scanning receipts. Each receipt you file will be added to
the Receipts Grid of the selected Expense Report. Some helpful hints:
• Use the Reimbursable column to check off receipts that your company or client
needs to reimburse you for.
• Use the Personal column to check off expenses that do not require reimbursement.
• Use the Bill Paid column to track expenses as you are compensated for them.
When you are ready to create and send the Expense Report to someone, simply
select the folder containing the expense report receipts and Click on Export >
Expense Report (PDF) You can save the report anywhere on your hard drive and the
email it as an attachment.
Splitting a Receipt Across Multiple Folders
A single receipt may contain multiple items that need to be expensed to more than
one client or project. NeatWorks makes it easy for you to split a receipt across
multiple Folders. First you will split the receipt into th e appropriate number of items,
which in turn creates a new row for each item. Then you will use the Cut and Paste
commands to move a row to a different Folder.
In the Receipts Grid, select the receipt you want to split.
1.
2. Click Split Receipt on the upper right side of the Receipts Grid.
3. In the
transactions to split the receipt into. You can:
4. In the
Step 1 area of the Split Receipts dialog box, indicate the number of
• type a number, OR
• use the up/down arrows to change the current number.
Note: The maximum number of transactions is 10. The number
•
indicated here dictates the number of items listed in the Step 2 area.
Step 2 area of the Split Receipts dialog box, do one of the following:
• Click
• Type a number or use the up/down arrows to change the current number
• Type a number or use the up/down arrows to change the current number
Split Equally to split the amount total equally among the items.
in the
in the
Amount field.
Percentage field.
13
Page 14
5. Click on the OK button. The receipt will be split into the designated number of
items and each item will be shown in its own row. An identifying number will
automatically be generated in the Split ID column of the Receipts Grid so you
can easily identify which items belong to the split receipt.
Moving a Split Receipt to Another Folder
You can also move a split receipt to a different folder. To do so:
1. Select the receipt row(s) you want to move.
2. Select the
Move link on the upper right side of the Receipt grid.
3. Select the folder you want to move the receipt row(s) to.
4. Click
Select.
What are Scan To PDF and Export To PDF?
You can use Export To PDF to create searchable or non-searchable PDFs from items
you already have in NeatWorks. Export To PDF has two options that are discussed in
this topic: Export To PDF (Report), and Export To PDF (Searchable); these options
are accessed via the Export To button on the toolbar, as shown below.
This topic answers some common questions about these PDF features. To learn more
about the
Scan To PDF
Export To PDF options, see Using Export To PDF. To learn more about
, see Using Scan to PDF.
What are the advantages to using Export To PDF (Searchable) and Scan To
PDF?
Export To PDF (Searchable) and Scan To PDF both produce what is referred
to as a "living" PDF. There are several advantages to creating a living PDF:
• The PDF is
of the PDF.
searchable, which means you can search anywhere within the text
14
Page 15

• The PDF is selectable, which means you can select, copy, and paste text from
the PDF into a text editor such as Microsoft Word or Notepad.
• You can save the PDF as other document types.
• Finally, the PDF creation process is quick and easy--you don't have to choose
from various print options, and the PDF always prints one image per page.
How do Export To PDF (Searchable) and Scan To PDF differ from Export To
PDF (Report)?
The more traditional Export to PDF (Report) feature produces what is referred to as a
"static" PDF. Simply put, a static PDF is in man y ways the opposite of a living PDF; it
is not searchable or selectable, and you cannot save it as another document type.
Why would I use one method of PDF creation versus the other?
You should use Export > PDF (Report) when you are fairly certain you won’t
need to search, select, copy, or paste text from the PDF. For example, many people
would choose this option for emailing a contract to someone. And in fact, NeatWorks
requires you to use Export > PDF (Report) for creating expense reports; this
way, the expense report you create is easy to send to someone for quick viewing and
cannot be edited, which makes it more secure.
On the other hand, you'll
whenever you think you'll need to search, select, copy, or paste text from the
PDF
scanned image.
You are most likely to use
Document Organizer to create living PDFs for already-existing documents that need
to be selectable or searchable. You might also use
while working with already-existing items in the Receipt Organizer, but only when
you want the resulting PDF to be selectable--something that should be carefully
considered, especially when creating PDFs related to receipt information.
Are there any drawbacks to using Scan To PDF or Export To PDF
(Searchable)?
We wouldn't really call it a drawback, but you should be aware of the fact that the
accuracy of any text that you select, copy, and paste is subject to the accuracy of
the Optical Character Recognition (OCR) engine. That is, your PDF image may look
fine, but when you select, copy, and paste text from a living PDF into a text editor,
you may, on occasion, notice that the pasted text contains an error that is not visible
in the PDF.
This reflects a limitation of the OCR engine that helped produce the PDF. Because
OCR is not an exact science, the best thing to do when selecting, copying, and
pasting text is to be diligent in re-reading the pasted text and always check that it is
accurate. If it is not accurate, you can try
to improve scanning results. Then,
want to use Export To PDF (Searchable) or Scan To
Export > PDF (Searchable) while working in the
Export To PDF (Searchable)
cleaning and/or recalibrating the scanner
rescan the material and recreate the PDF.
Taking these measures may increase the quality of the PDF, and subsequently
increase the quality of any text you then choose to select, copy, and paste from the
PDF into a text editor.
For more information, see the following:
• Using Export To PDF
15
Page 16

• Using Scan To PDF
Using Scan To PDF
As mentioned in How do I use Export To PDF and Scan To PDF?, you can use Scan
To PDF
selecting the
selecting
Scan screen.
to create PDFs. "on the fly" as you scan. This option is accessed by
PDF button on the upper right side of any organizer screen; by
Scan > Scan To PDF; or by clicking the PDF button in the Neat Quick
To scan using Scan To PDF, do the following:
1. Feed an item into the scanner.
2. Either click the
3. A dialog box will open, prompting you to name and save the PDF in the
location you choose.
PDF button, or select Scan > Scan To PDF.
Note: Be sure to remember where you save this item so you can find it
easily, later.
4. When this process is complete, your new PDF will open in Adobe Acrobat.
For more information about
•
How do I use Export To PDF and Scan To PDF?
Using Export To PDF
•
Scan To PDF, see the following topics:
Using Export To PDF
As mentioned in How do I use Export To PDF and Scan To PDF?, you can use
Export To PDF to create searchable or non-searchable PDFs from already-existing
documents, as this topic describes.
Click a link below to move to the following location in this topic:
Using Export To PDF (Searchable)
•
Using Export To PDF (Report) for Receipts and Documents
•
Using Export To PDF (Report) for Contacts
•
Export feature is accessed via the Export button on the toolbar. You have
The
two options: Searchable PDF , and Expense Report (PDF)
described in more detail, below.
Using Export To PDF (Searchable)
. Both of these options are
This feature allows you to export either Folder records, or Receipt, Document, or
Contact records directly to a living PDF. To do so:
1. To export a Folder record, select the row within the Folder Grid that contains
the material you wish to export. To export a receipt, document, or contact,
simply select the row containing the items you wish to export. Please note that
16
Page 17

you can export single or multiple records within the same grid but you cann o t
export records from different grids (e.g. Folders and Receipts) at the same
time.
Click Export > PDF (Searchable) on the toolbar
2.
3. A dialog box will open, prompting you make or confirm your selection of all
visible receipts in the selected folder(s) or the selected receipt(s).
Note: Be sure to remember where you save this item so you can find it
easily, later.
4. When this process is complete, the window above will disappear and your new
PDF will open in Adobe Acrobat.
Using Expense Report (PDF) for Receipts and Documents
Expense Report (PDF) allows you to create non-editable, non-searchable,
"static" PDFs. You should use
to search, select, copy, or paste text from the PDF. You must use this option when
creating an expense report. Selecting
Export Choices
dialog box, shown below.
this feature when you are pretty sure you won’t need
Expense Report (PDF) will open the
1. In the Receipt or Document Organizer, select the receipts(s), document(s), or
folder(s) that you want to export.
2. On the toolbar, click
Click Export > PDF (Report) .
17
Page 18
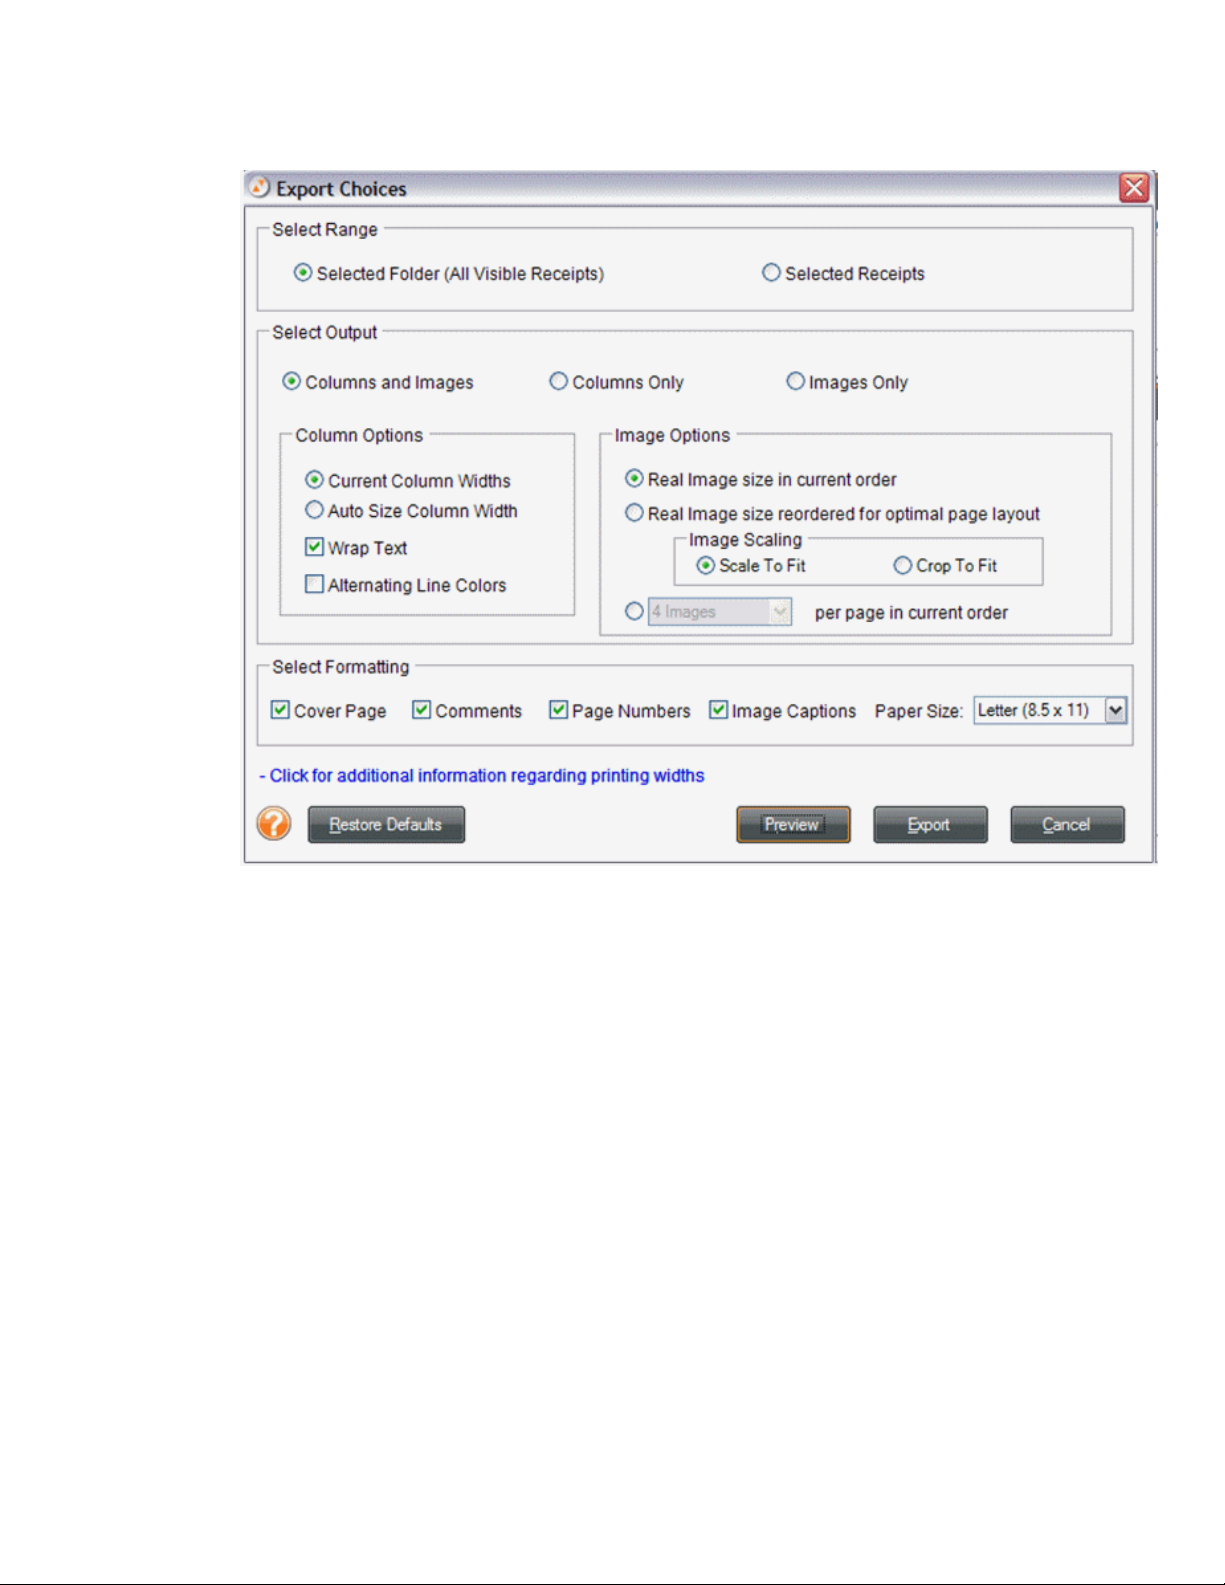
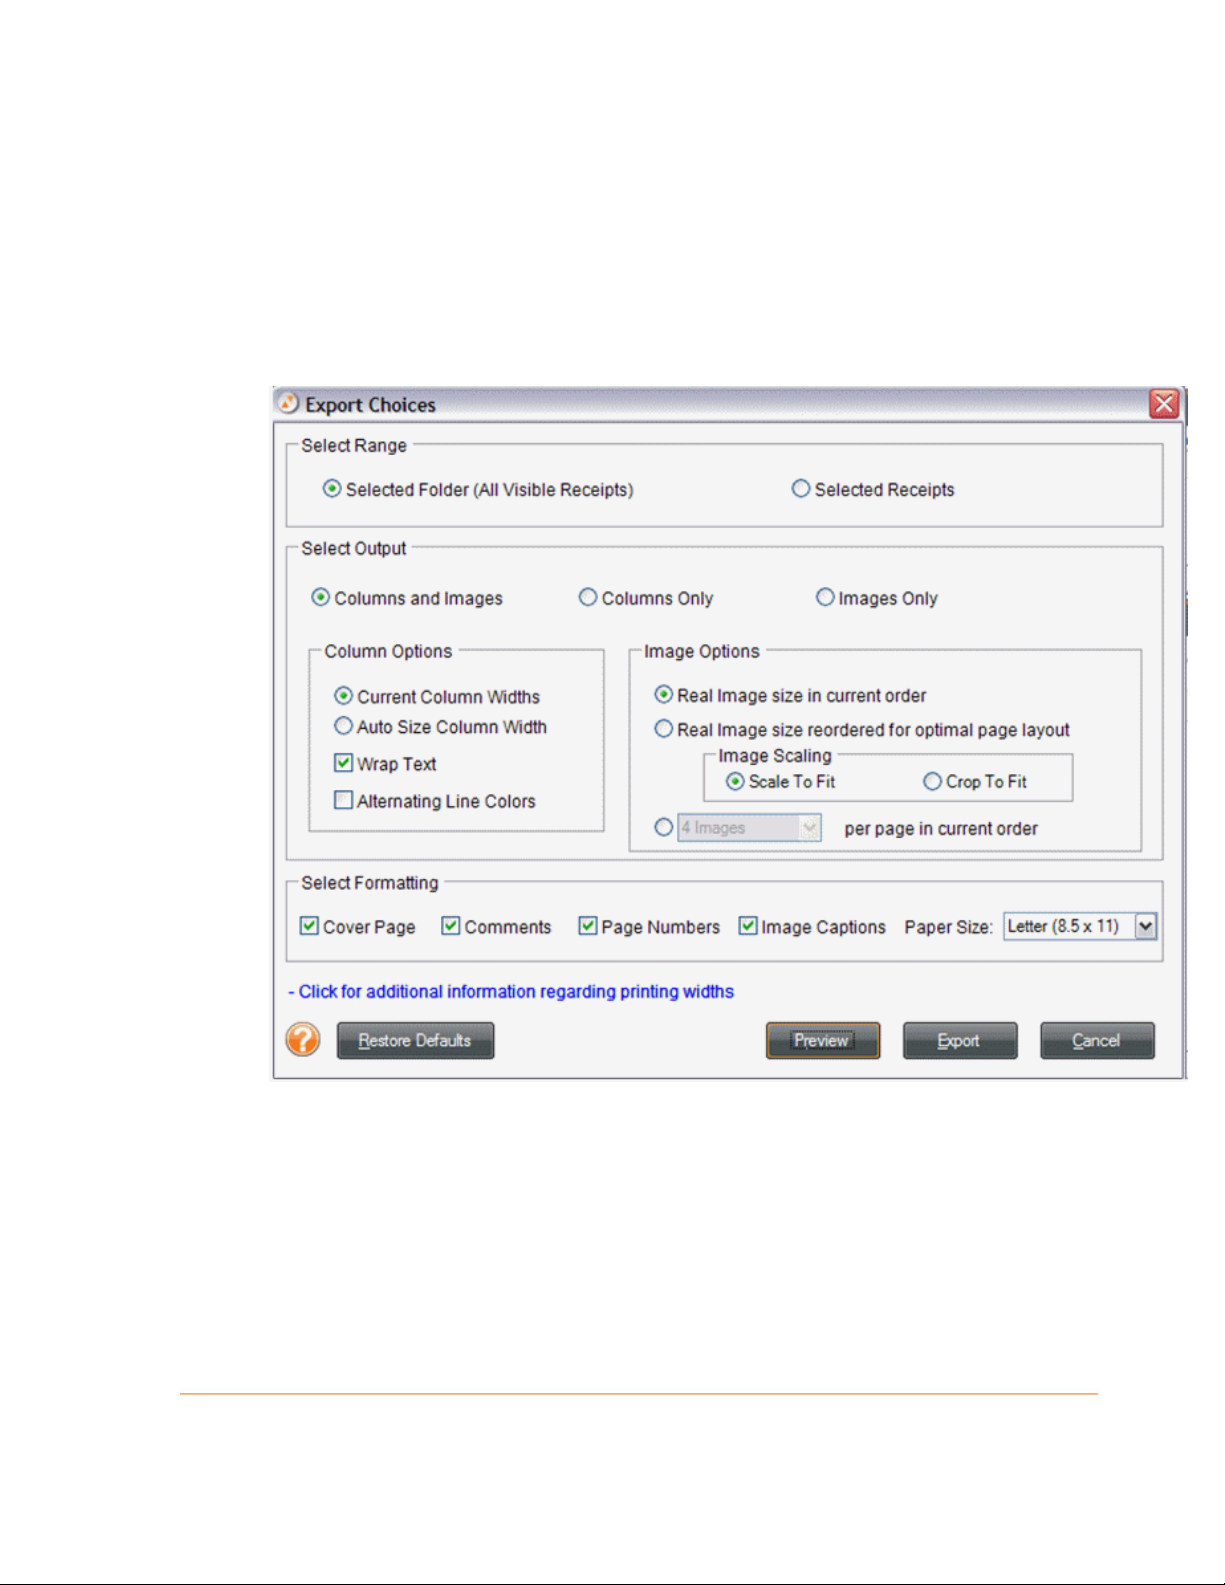
3. The Export Choices dialog box will open, as shown below.
4. Under the
export only those rows selected in the Receipts Grid or leave
Folder (All Receipts)
5. Under the
Images
Columns and Images.)
6. If you've selected
additional column selections under the
step 8.
7. If you've selected
additional image selections under the
Select Range heading, click the Selected Receipts button to
Selected
selected to export the entire folder.
Select Output heading, choose whether you want Columns and
, Columns Only, or Images Only to be exported. (The default is
Columns and Images or Columns in step 5, make
Column Options heading and skip to
Columns and Images or Columns in step 5, make
Image Options heading.
Note: See Printing a Receipt Row (previously in this section), for details on Column,
Image, and Formatting Options.
8. Under the
page (with user profile, folder, and receipt summary information), folder and
receipt comments, paper size, page numbers, and/or image captions (that
reference images to receipt rows). By default, all options are checked to be
included.
Select Formatting heading, choose whether to include a cover
18
Page 19
9. Under Image Scaling, choose either Scale To Fit or Crop To Fit.
10. Click
11. Click
12. Use the
13. In the
14. In the
15. Click
Using Export to PDF (Report) for Contacts
Preview to preview the exported data file.
Export to export the data file.
Save In dropdown list to navigate to the folder in which you want to
save the exported file.
File name field, type a name for the exported file.
Save as type dropdown list, leave the default file type suggested.
Save.
To use Export to PDF (Report) for contacts, do the following:
1. In the Business Card Organizer, select the contact(s) that you want to export.
2. Click
3. The
Export > PDF > PDF (Report)
Export Choices dialog box will open, shown below.
Under the Select Range heading, click the Selected Contacts button to
4.
export only those rows selected in the Contacts Grid or leave
Grid
selected to export all of your contacts.
All Contacts in
19
Page 20

5. Under the Set Orientation heading, choose a page orientation.
6.
Under the Set Output heading, select your output options.
7.
Click Preview to preview the exported data file.
8.
Click Export to export the data file.
9.
Use the Save In dropdown list to navigate to the folder in which you want to
save the exported file.
In the Save As dialog box, type a file name.
10.
11.
In the Save as type dropdown list, leave the default file type suggested.
12.
Click Save.
For more information about these PDF features, see the following topics:
How do I use Export To PDF and Scan To PDF?
•
Using Scan To PDF
•
How do I import and export folders?
NeatWorks allows you to share a folder of receipts by emailing it as a NeatWorks file
or by exporting it in a variety of other formats: PDF, Excel, Word, HTML, QuickBooks,
Quicken, MS Money, OFX and CSV (comma separated values).
You will find the following, related topics addressed in this section:
Importing Folders
•
Emailing a Folder
•
Exporting to a NeatWorks File
•
Exporting to Excel
•
Exporting to CSV (Comma Separated Values)
•
Exporting to RTF (Word), PDF, or HTML
•
Exporting QIF Files to Quicken (2004 and Earlier)
•
Exporting QIF Files to Quicken (2005 and Later)
•
Exporting OFX Files to MS Money
•
Exporting to QuickBooks
•
Importing Folders
It's easy to import a folder that has been emailed to you from another NeatWorks
user. To do so:
1. Download the .nrx (or .zip) file, taking note of where you are storin g it.
Do one of the following:
2.
Navigate to the folder containing the .nrx file and double-click on the
•
file's icon. NeatWorks will start automatically and import the file.
20
Page 21
• If NeatWorks is already running, choose Import > Receipt Folder File
from the toolbar, navigate to the folder containing the .nrx file
and select it.
The imported folder row(s) appears in the upper grid (.nrx file can contain one
3.
or more folders of receipts). The receipts contained in those folders will be
visible in the lower grid.
Emailing a Folder
The Email Folder link is the fastest way to send a NeatWorks folder to another
NeatWorks user. The link automatically opens an email message containing the
attached NeatWorks folder file. All that's left to do is address the message, add a
subject line, and click send.
To email a folder:
1. In the top grid, select the folder(s) you want to email.
lick the Email Folder link on the upper right side of the grid. The
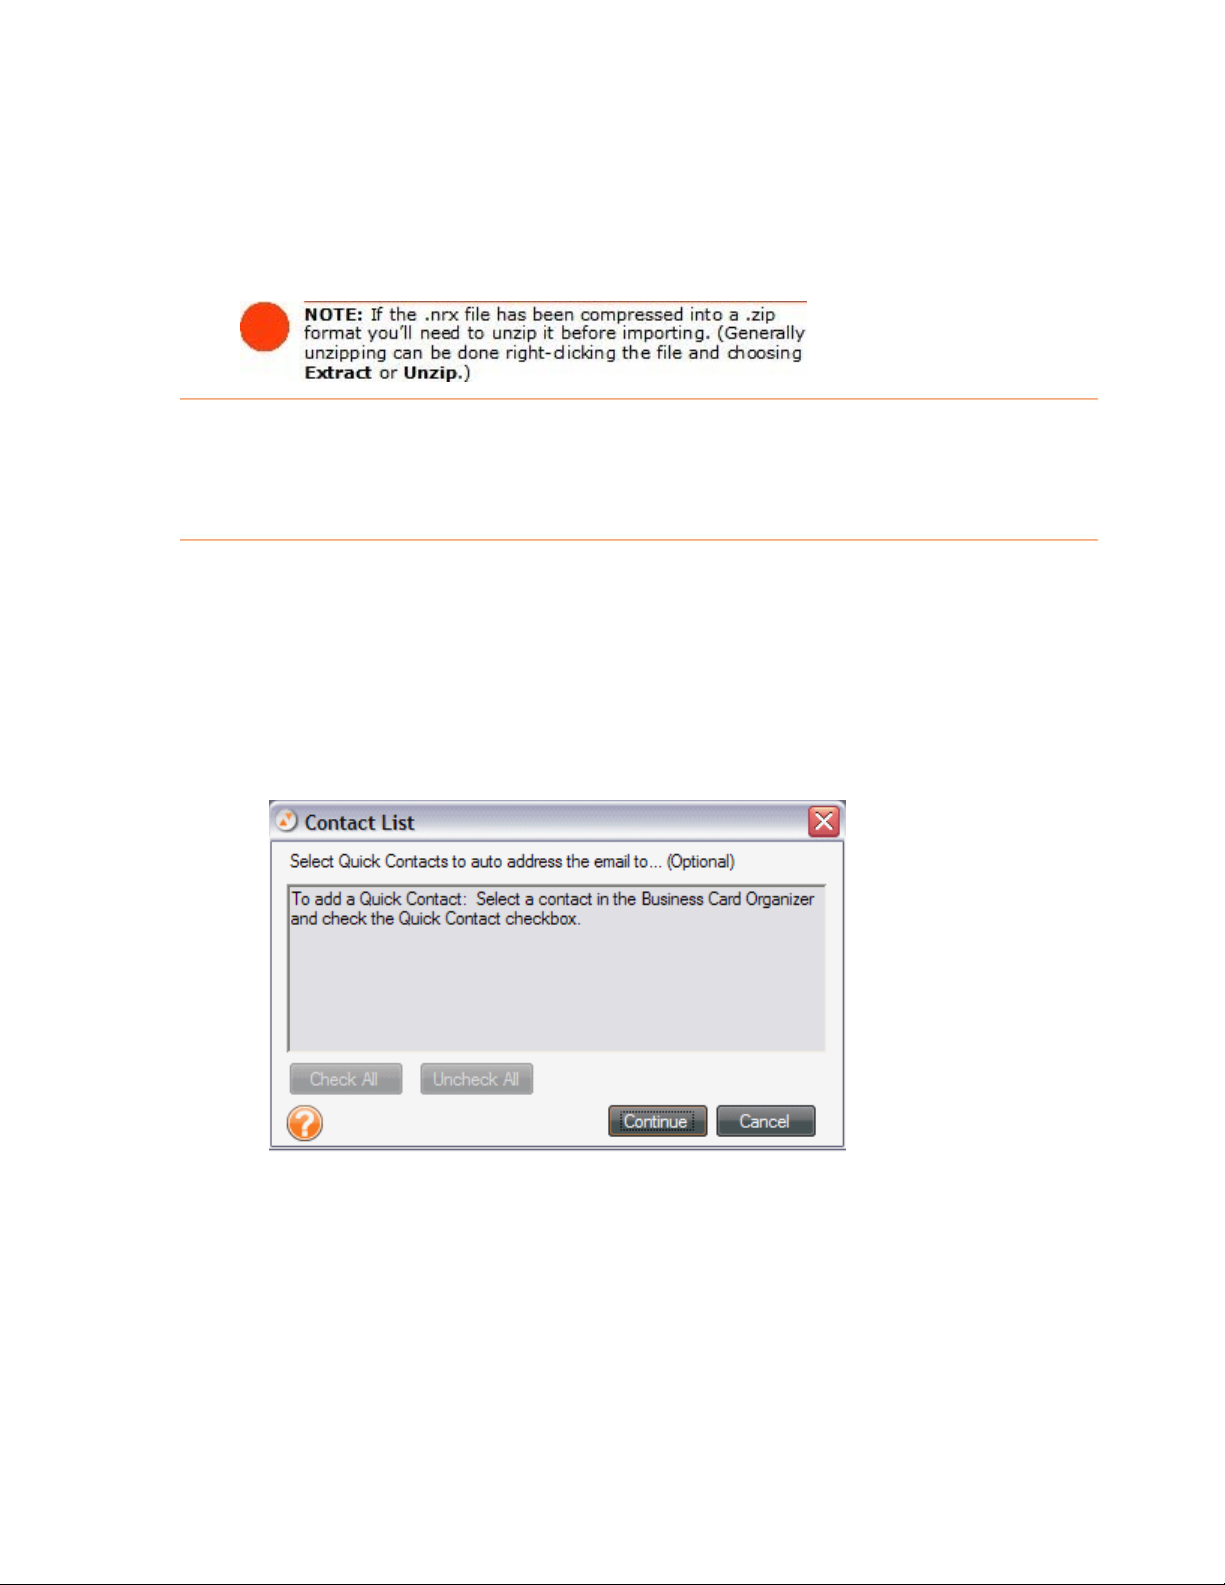
2. C
Contact List dialog box opens (shown below).
3. Click the checkbox next to each contact you want to send the receipt to (or use
Check All to select all of the contacts). Contacts are added to this list by
marking them as Quick Contacts in the Business Card Organizer (see Section
5: Using the Business Card Organizer). If the contact is not yet listed, just click
on the
address in the
Quick Contacts.)
Continue button. When the email message box opens, type an
To: field. (Contacts entered in this manner will not be added as
4. Click
Continue.
21
Page 22
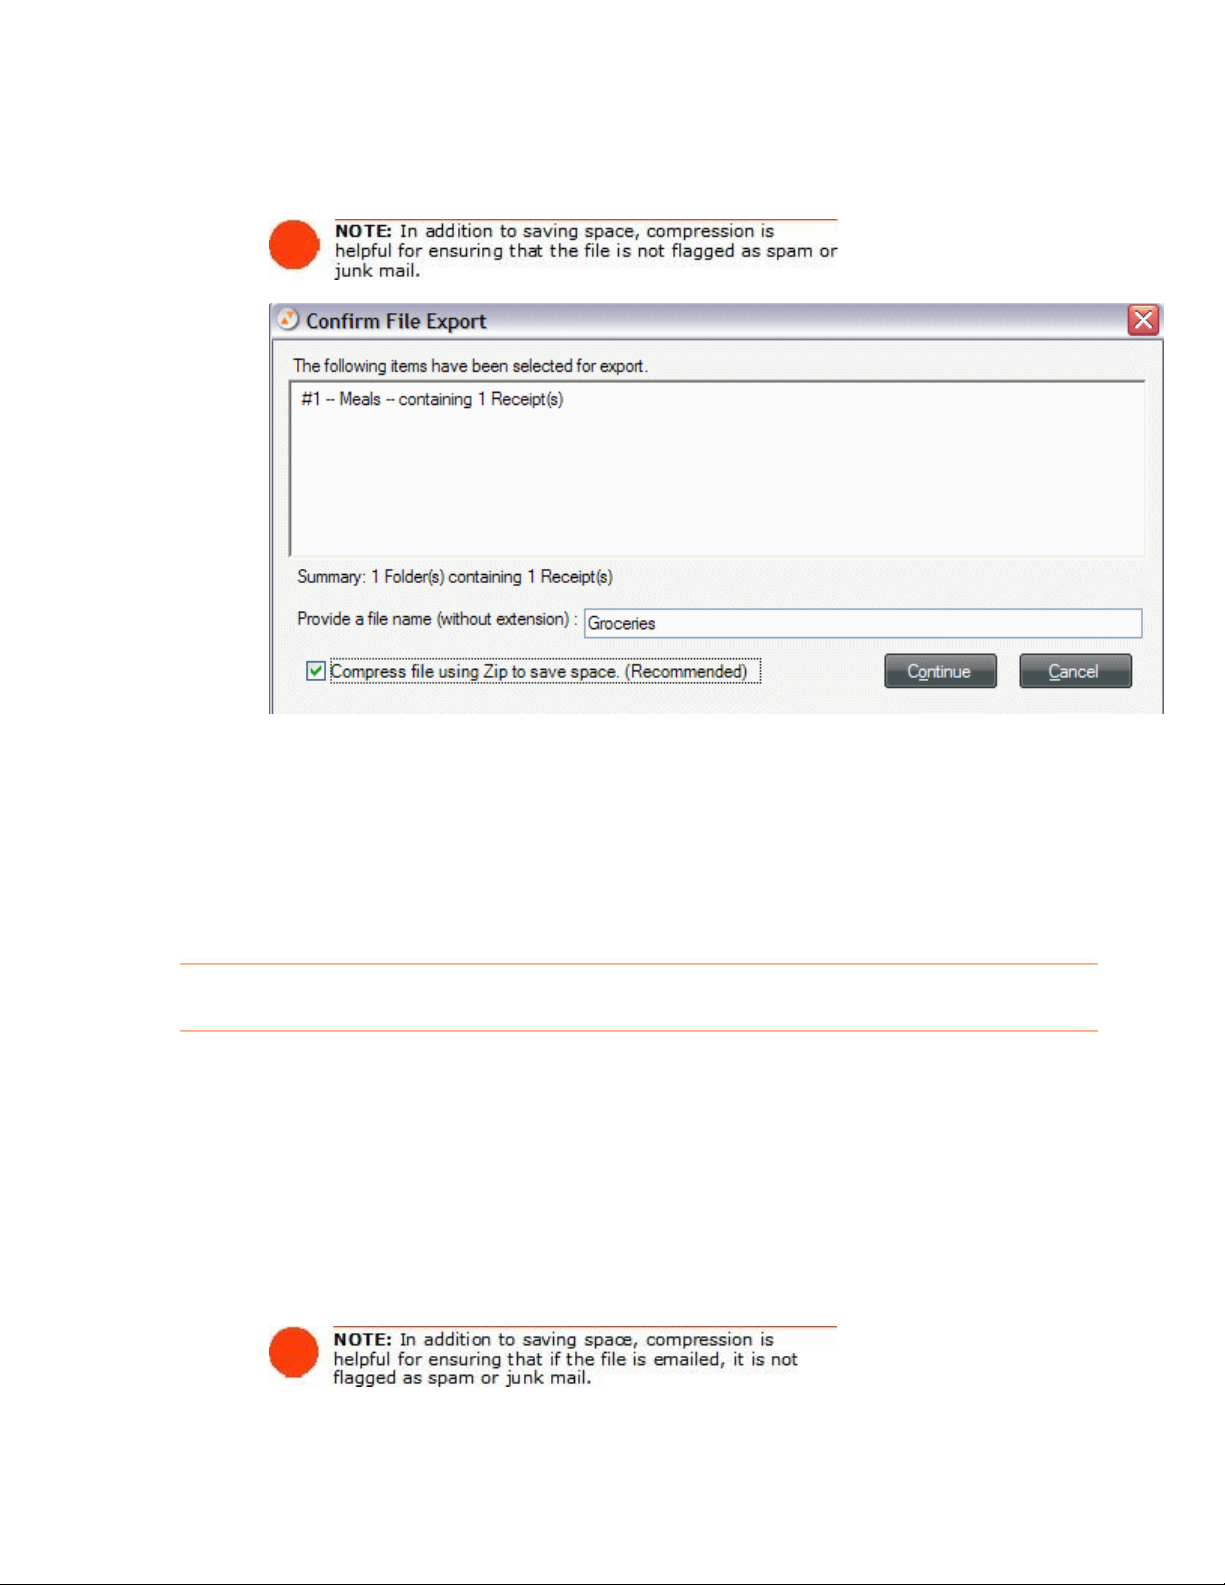
5. Type a file name in the Provide a File Name dialog box or confirm or edit
the file name already in the field (if applicable) and choose whether to
compress file.
6. Click
Continue.
7. Complete the email message and click Send.
Your default email program will launch and a new message opens. The To field of the
new message will be populated with the contacts selected in t he previous step; if you
did not choose any Quick contacts, you can simply type an email address. The
selected Folder(s) will automatically be attached to the message.
Exporting to a NeatWorks File
You can export data to a NeatWorks file. Note, though, that multiple folders will be
saved together as a single file.
To export to a NeatWorks file:
Select the folder(s) you want to export.
1.
From the Toolbar, choose Export > Receipt (or Document) Folder
2.
.
File
3.
Choose whether to compress the file and then click Continue.
22
Page 23
4. Use the Save In dropdown list to navigate to the folder in which you want to
save the exported file.
In the File Name dialog box, type a new file name, or accept the default
5.
name suggested.
Leave Receipt or Document Folder Files (*.nrx or *.nrf) or Zip
6.
Files (*.zip)
as the file type in the Save as type dropdown list and click on
Save.
Exporting to Excel
Before exporting to Excel, you must first create a plan that describes how your
NeatWorks data will flow into the Excel program. This plan is called a map. Mapping
is the process of associating one set of values or format (in this case, NeatWorks
data) to a different set of values or format, such as Exce
you can use it whenever you like. You can create as many maps as you need to
accommodate your data.
To learn more, see the following topics:
Creating an Excel Map
•
Updating an Excel Map Name
•
Exporting to an Excel Map
•
l. Once a map is created,
Creating an Excel Map
To create an Excel map, do the following:
1. From the Tools menu or the Toolbar, choose Personalize and then select
the
Export Maps tab on the Personalize screen that displays (pictured at the
very bottom of this page).
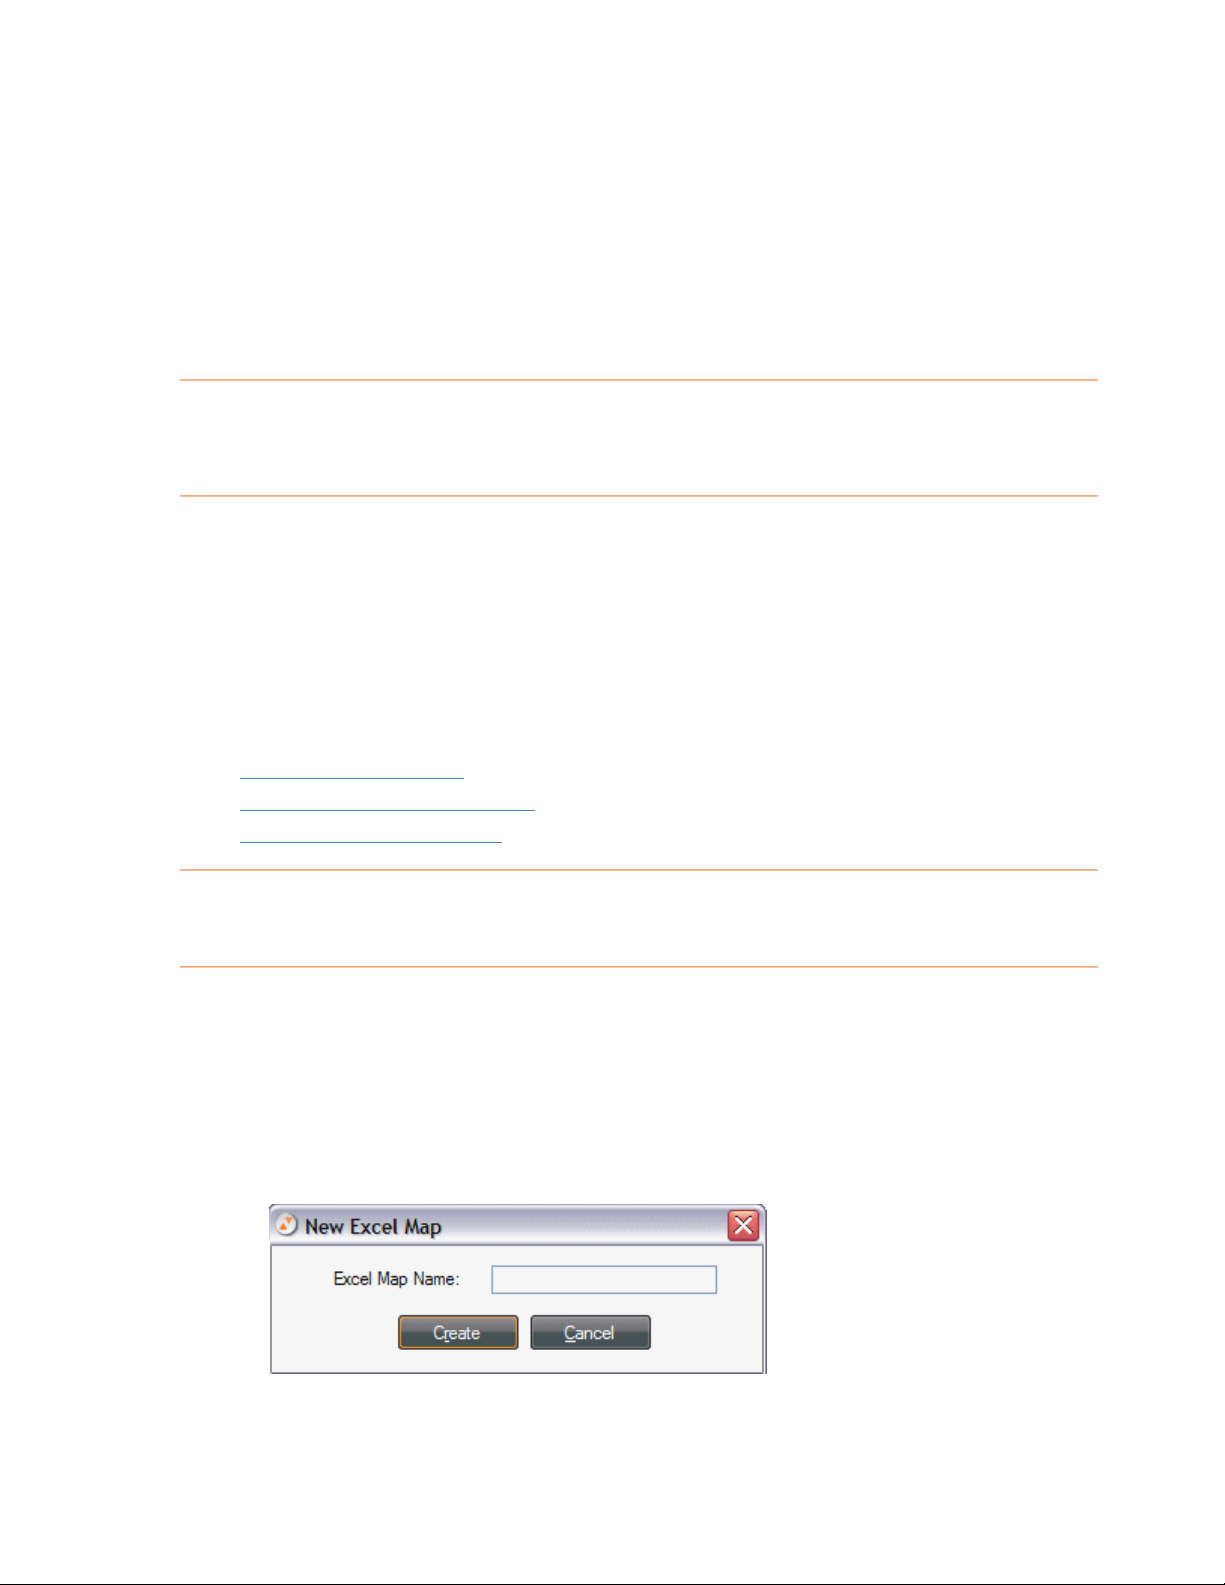
2. Under the Step 1 heading, click the
box opens.
3. Type a name in the
Excel Map Name field and click Create.
New button. The New Excel Map dialog
23
Page 24
4. Under the Step 2 heading, specify an MS Excel Template. The template can be
blank or it can contain information (such as a company logo or column header
names). The file can have either a .xlt or .xls file extension.
To specify an existing template file:
If an Excel Template file already exists, specify its location by typing the
explicit path or by using the Browse button to navigate to the .xlt or .xls
file, and select it.
To create a new template file in MS Office 2003:
If you do not already have an Excel Template file, you can quickly create a
new one by following these steps:
1. Launch MS Excel.
2. If using a NeatWorks sample Excel map, label three worksheets with the
following titles: Folder, Receipt Images, and Comments.
3. Type template values (such as an employee name) or simply leave the
sheets blank.
4. Under File, choose
5. From the Save type as drop down menu, choose
6. Navigate to the desired location on your hard drive.
7. Click
Save.
Save As.
Template (*.xlt).
To create a new template file in MS Office 2007:
1. Follow steps 1-3 above.
2. Click the MS Office button, select
2003 Workbook
3. Navigate to the desired location on your hard drive.
4. Click
5. NeatWorks will automatically separate the exported data into three separate
sheets in Excel, segregating receipt data, receipt images and receipt
comments. Under the Step 3 heading, specify the destination sheet for each of
these data types by entering its corresponding Excel sheet name.
6. Optionally, under the Step 3 heading, click the
starting row for receipt data.
Save.
.
Save As, and choose Excel 97-
Details button to specify a
24
Page 25
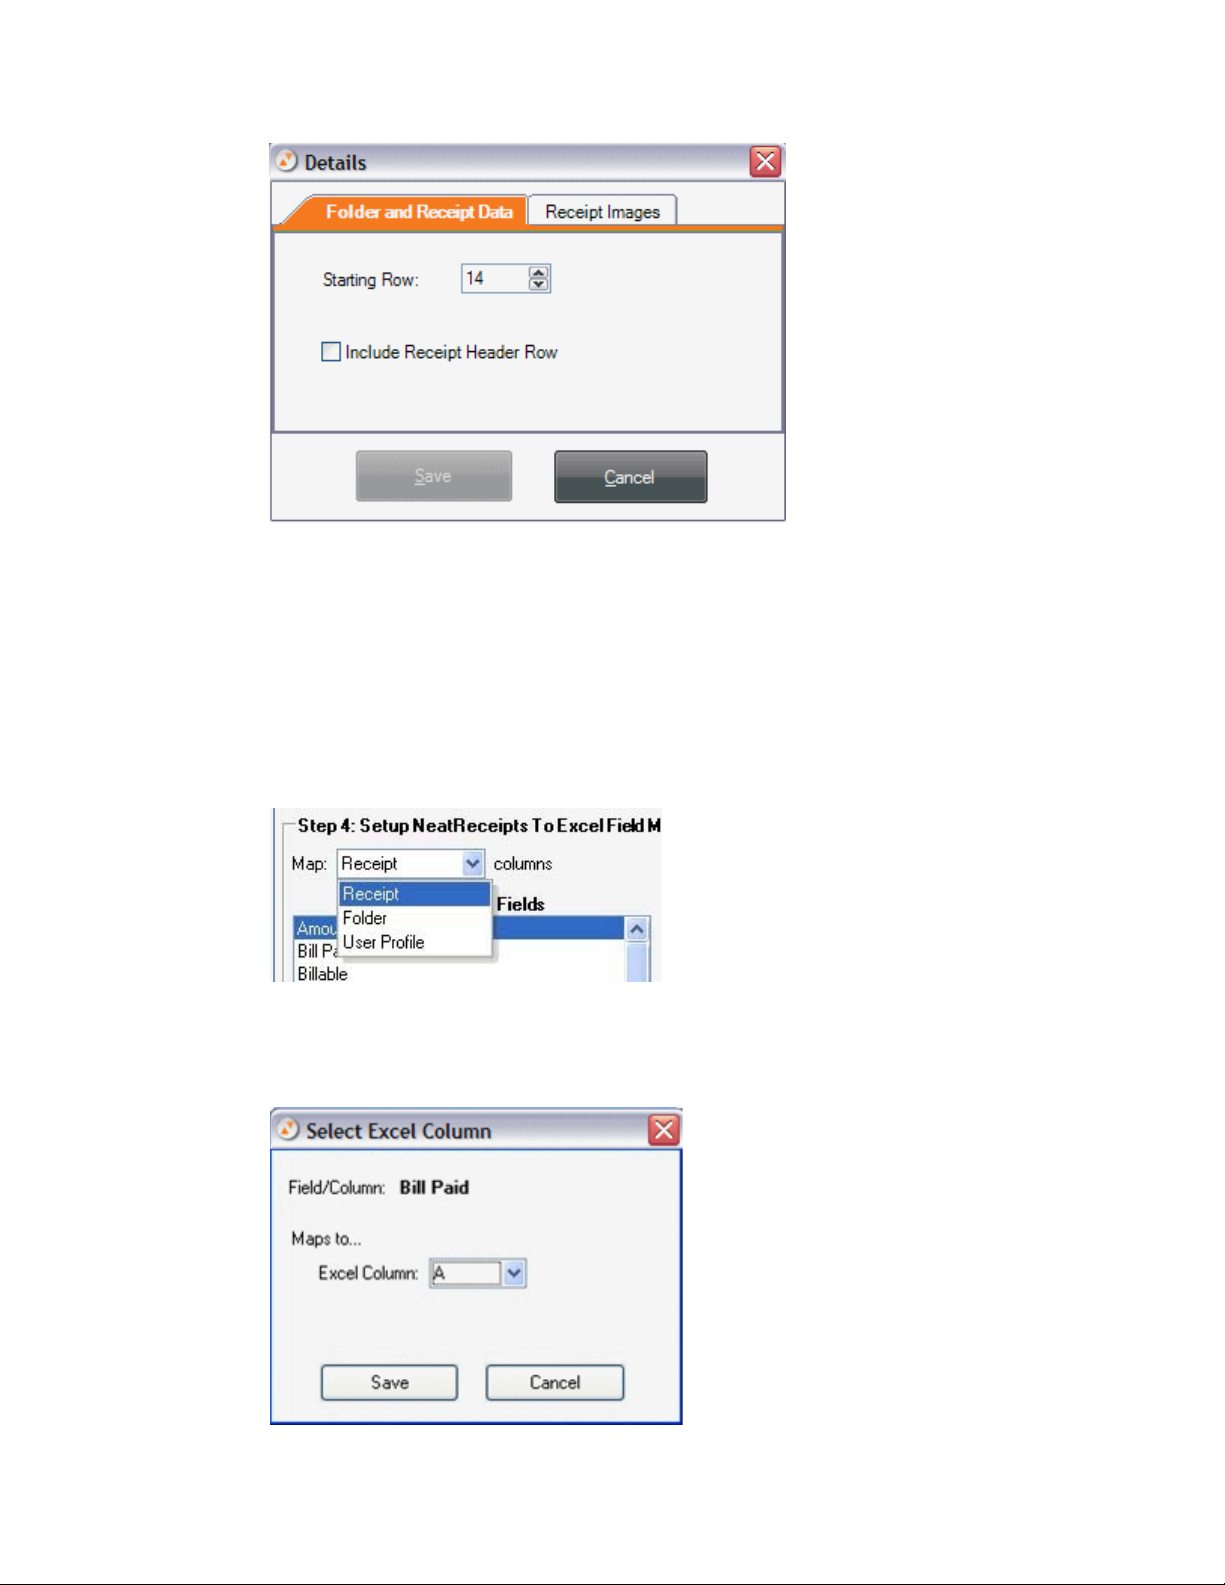
Click the
column header names to Excel.
Include Receipt Header Row checkbox to export NeatWorks
Click the
medium, or large). The Images Per Row field will adjust automatically.
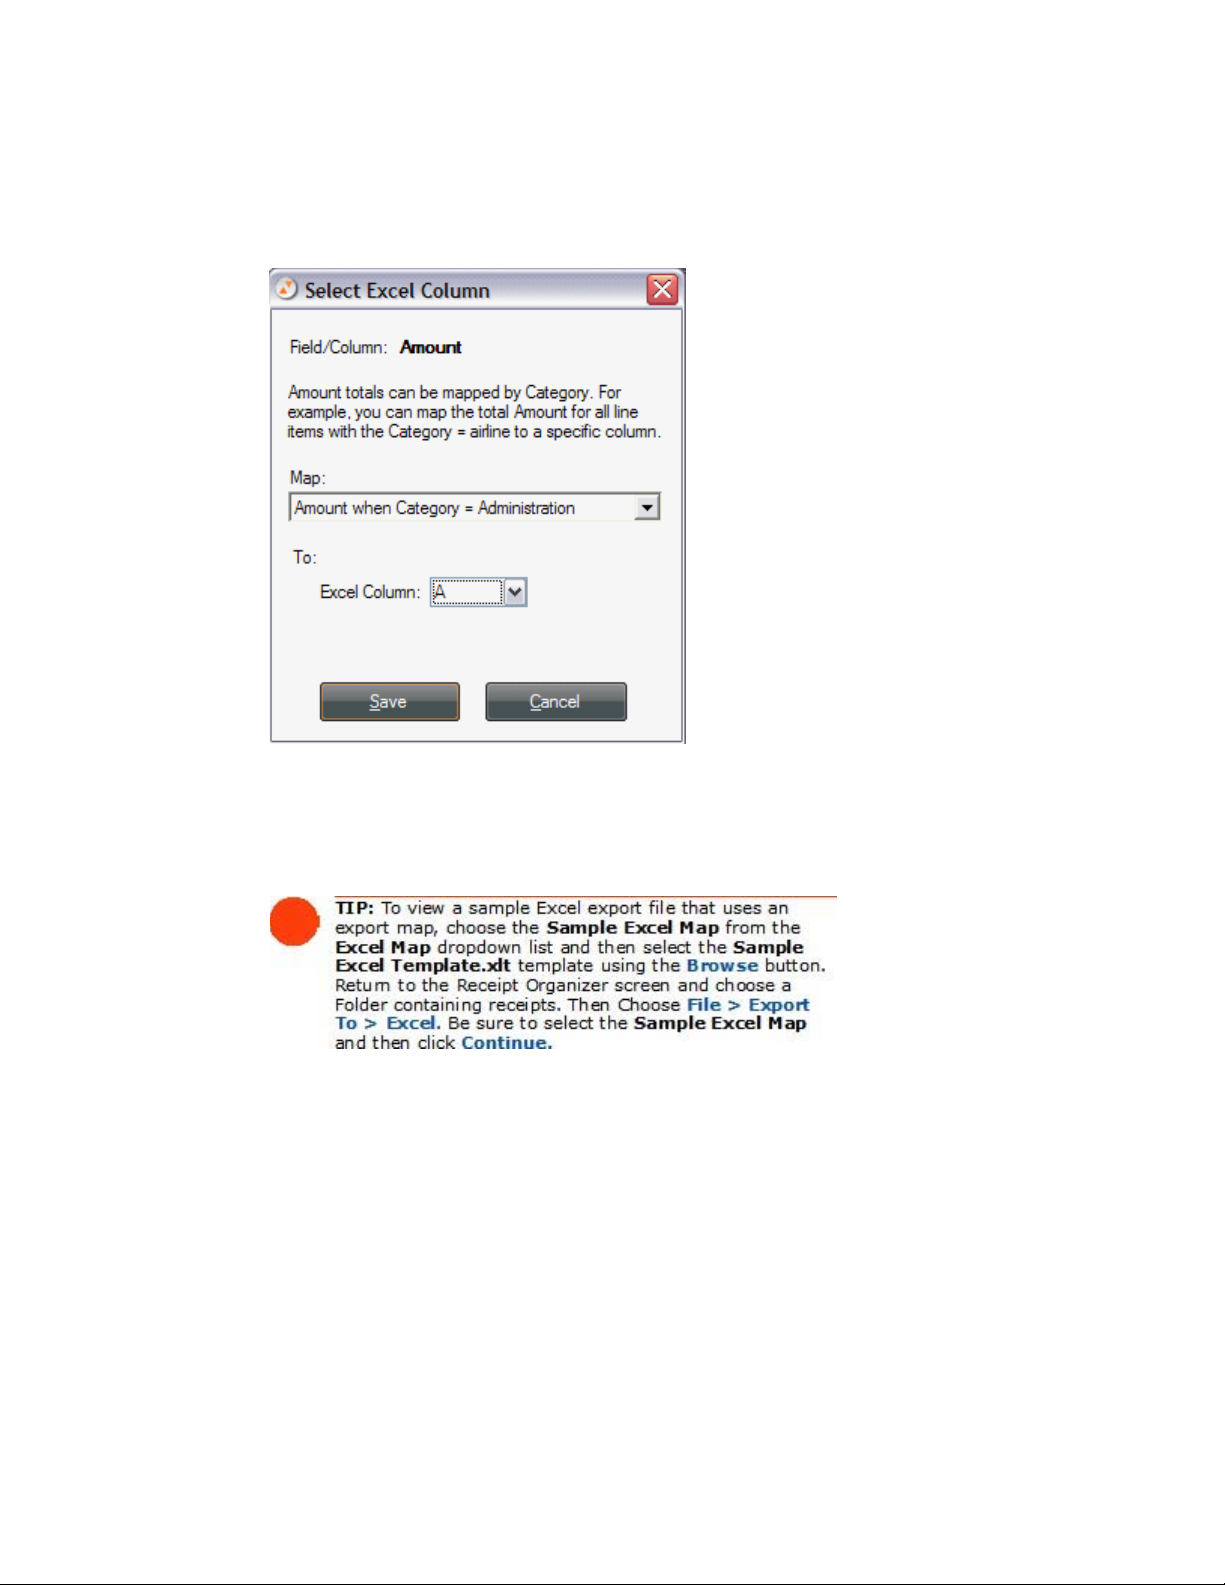
7. Under the Step 4 heading, define a column-to-column map between
NeatWorks and MS Excel. Unmapped columns appear on the left, mapped
columns appear on the right.
Use the
Folder columns, or User Profile fields.
Under the
Map button. In the
column destination.
Image Details tab to choose a preferred image size (small,
Map: dropdown list to choose among Receipt columns (default),
Unmapped Fields heading, select a field and then click on the
Select Excel Column dialog box, specify an Excel
25
Page 26
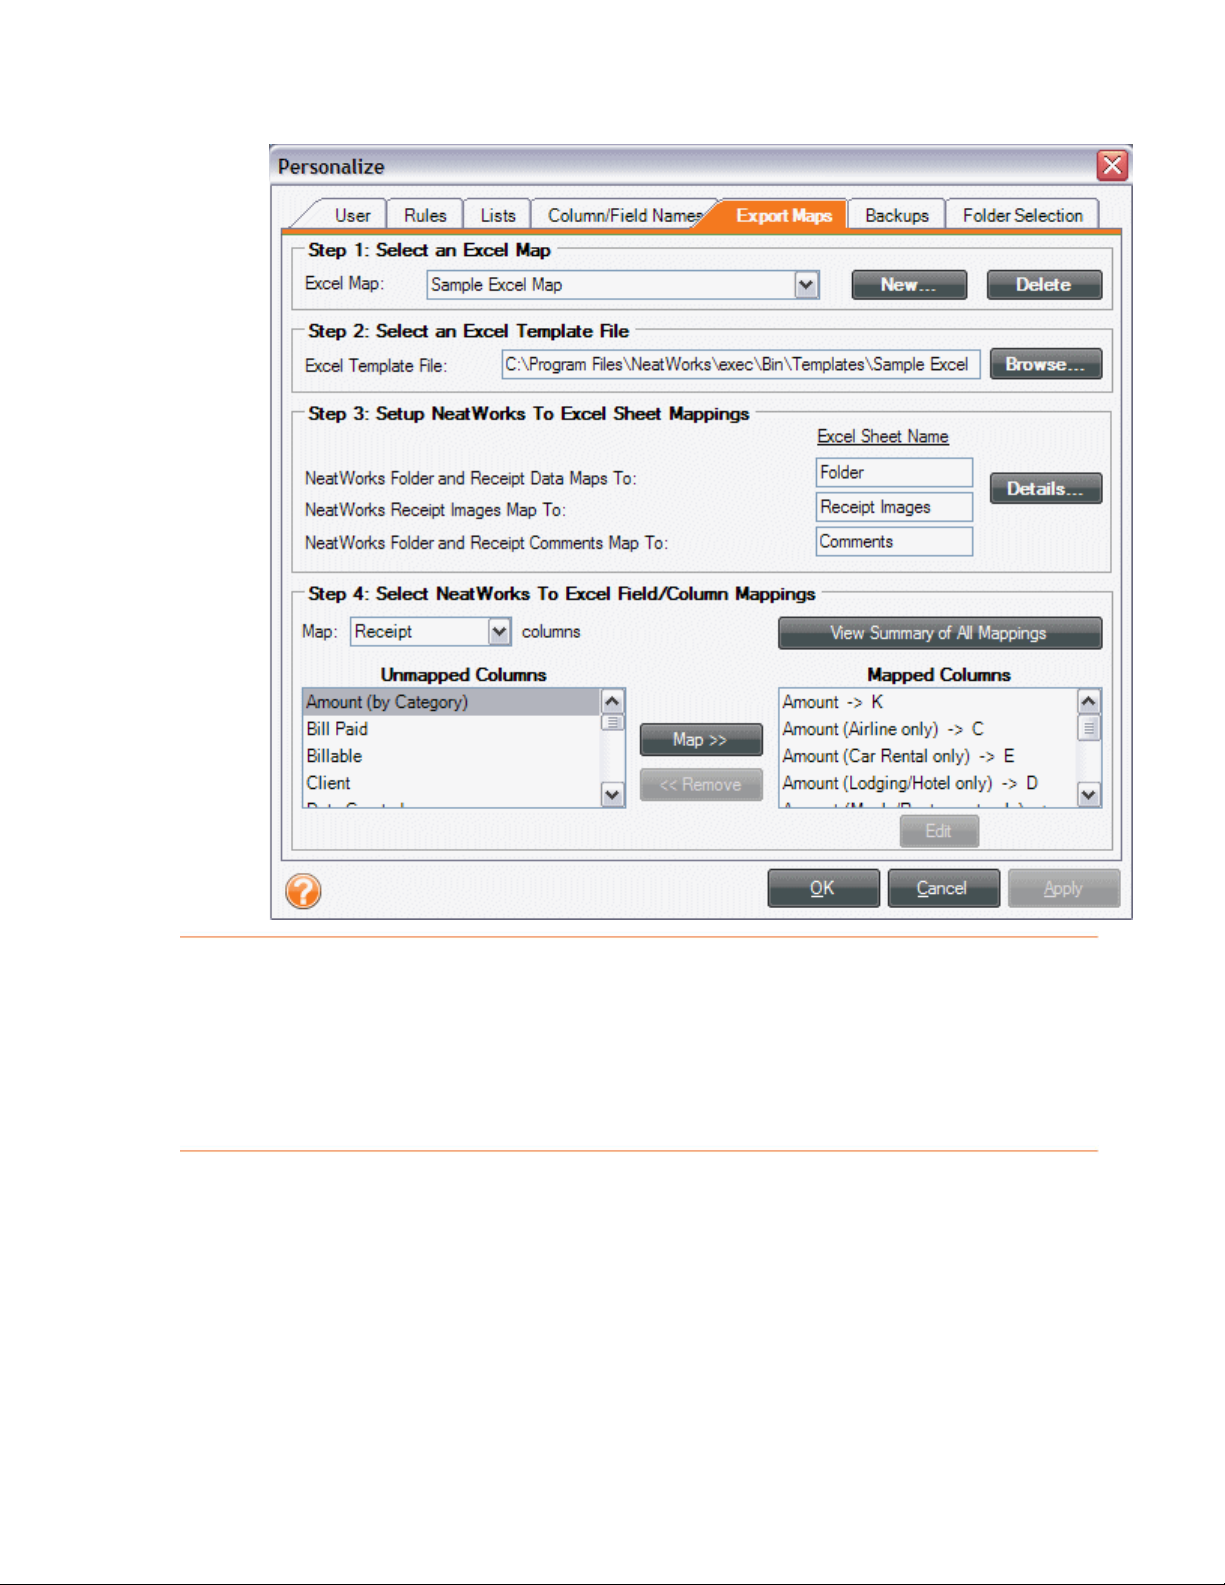
Under the
field allows for cross mapping by category. For example, you can map the
total amount for all receipts that are tagged as "airline."
Under the
fields require mapping.
To view a summary of all mapping values, click the
All Mappings
Unmapped Fields heading, the Amount (by category)
Mapped Fields heading, both the Amount and Category
View Summary of
button.
8. Click
OK to save the map and close the dialog box. You are now ready to
export NeatWorks data into an Excel worksheet.
26
Page 27
Updating an Excel Map Name
You can update an Excel map name whenever you like. To do so:
1. Click the Excel Map dropdown box.
2. Tap any key on the keyboard to open the Update Excel Map dialog box.
27
Page 28
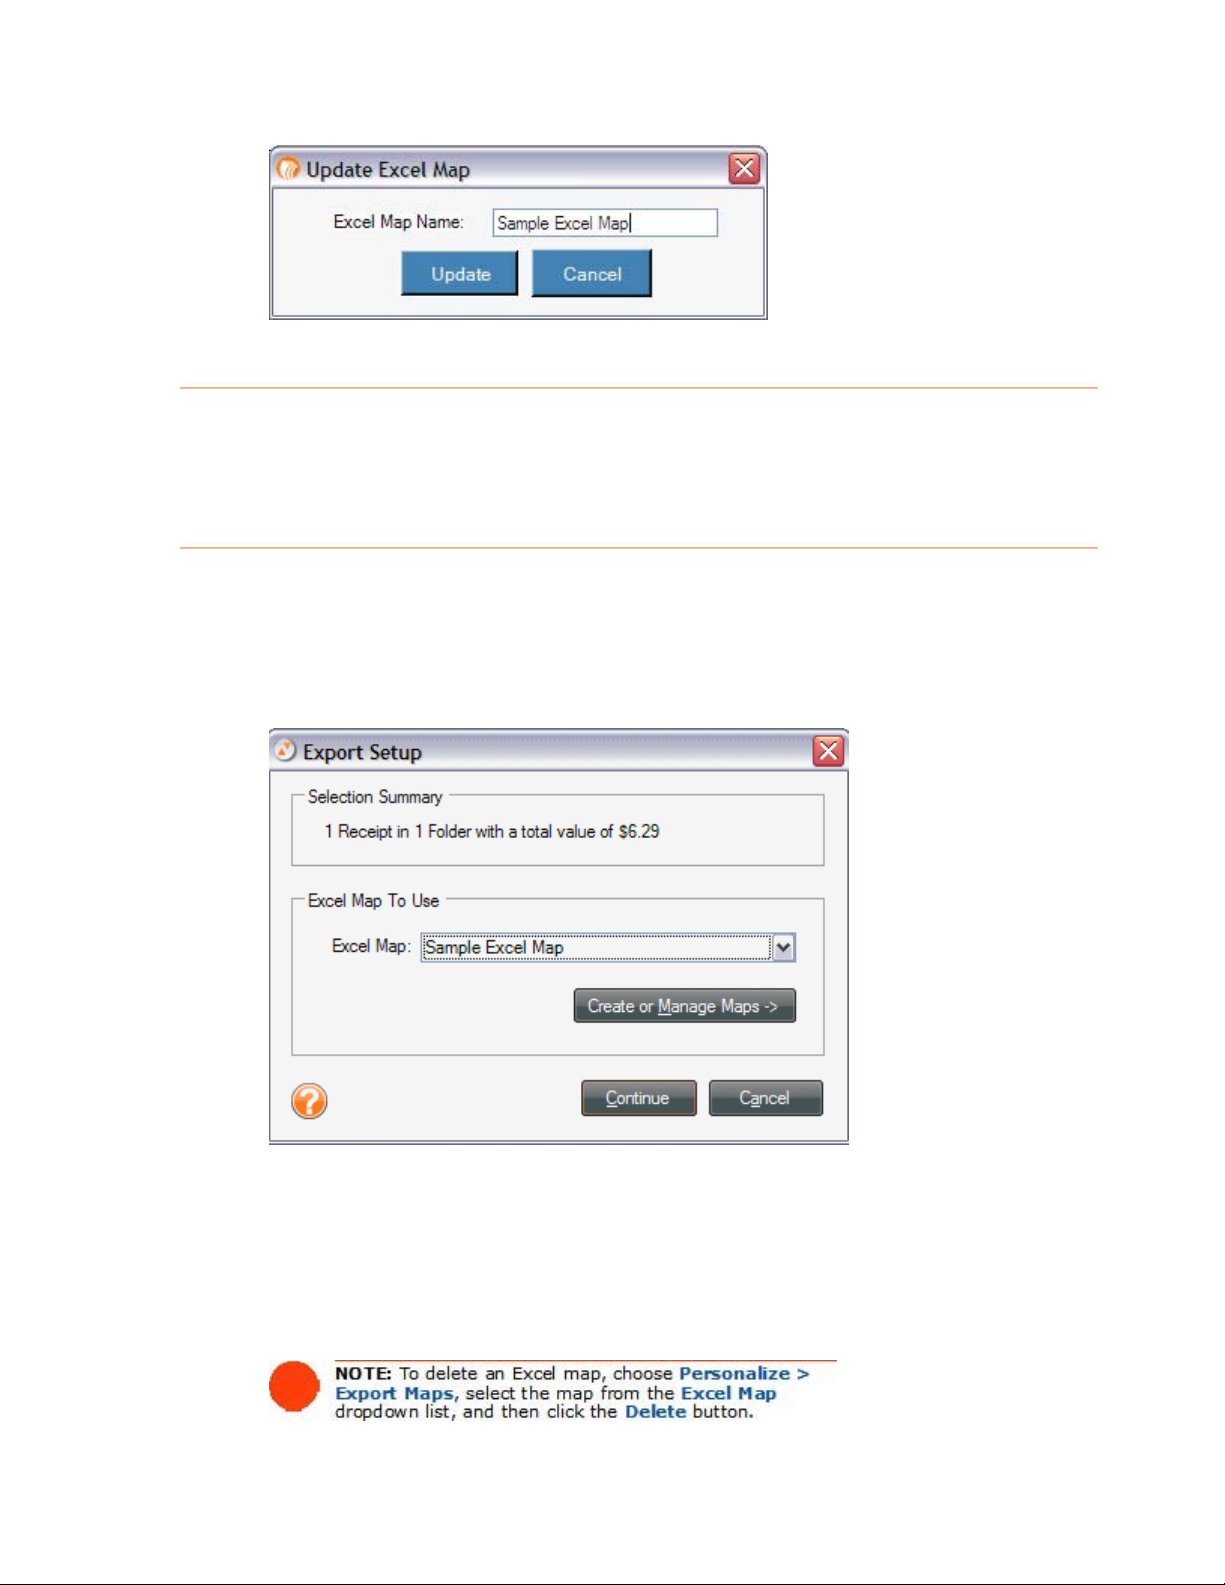
3. Edit the name in the Excel Map Name field and click
Update.
Exporting to an Excel Map
Once you have created an Excel map, you can export your data to Excel. To do so:
1. Select the receipt(s) or folder(s) you want to export.
2. From the Toolbar, choose
opens (shown below).
3. Under the
4. Under the
created a map yet, click on
under the Creating an Excel Map heading found previously in this chapter.)
Step 1 heading, select the information to export.
Step 2 heading, select an Excel map to use. (If you have not
Export > Excel. The Export Setup dialog box
Create or Manage Maps and refer to steps 2-5
5. Click on
data. Modify and save the worksheet in the usual manner.
Continue. An Excel worksheet opens, containing your NeatWorks
28
Page 29

Exporting to CSV (Comma Separated Values)
Exporting to CSV is a good way to get your data into an easy to use format. For
example, you could export to CSV if you wanted an easy way to get your data into a
simple Excel format that you could then manipulate w it hout building an Excel map.
Or, you could export your data to CSV and then import those contacts or receipts
into programs not directly supported through other export processes.
To export to CSV, do the following:
1. Select the receipt(s) or folder(s) you want to export.
2. From the
Choices dialog box opens.
3. Under the
4. Click on
5. Navigate to the folder where you want to save the .csv file, type a name for
the file, and click
Toolbar, choose Export > CSV (Access, Excel). The Export
Select Range heading, click the appropriate radio button.
Export. The Save As dialog box opens.
Save.
Exporting to RTF (Word), PDF, or HTML
NeatWorks allows you to export your data to MS Word, PDF, or HTML formats. To do
so:
1. Select the receipts or folders you want to export.
2. From the
3. From the submenu, choose an export format. The Export Choices dialog box
opens (pictured below).
(Report)
4. Under the
selected to export the entire folder or click the Selected Receipts button to
export only those rows selected in the Receipts Grid.
Toolbar, choose Export.
Note: For PDF, choose Export > PDF > PDF
.
Select Range heading, leave Selected Folder (All Receipts)
5. Under the
Images
Columns and Images.)
Select Output heading, choose whether you want Columns and
, Columns Only, or Images Only to be exported. (The default is
29
Page 30
6. If you've selected Columns and Images or Columns in step 5, make
additional column selections under the
step 8.
Column Options heading and skip to
7. If you've selected
additional image selections under the
8. Under the
page, comments, or page numbers. (By default, all options are checked to be
included.)
Select Formatting heading, choose whether to include a cover
Columns and Images or Images Only in step 5, make
Image Options heading.
9. Under Image Scaling, choose either Scale To Fit or Crop To Fit.
10. Click
11. Click
12. Use the
13. In the
14. In the
15. Click on
Preview to preview the exported data file.
Export to export the data file.
Save In dropdown list to navigate to the folder in which you want to
save the exported file.
File name field, type a name for the exported file.
Save as type dropdown list, leave the default file type suggested.
Save.
30
Page 31

Exporting QIF Files to Quicken 2004 (and Earlier)
If you work with Quicken and want to export your information to there, as QIF
file(s), just do the following:
1. Select the receipt(s) or folder(s) you want to export.
From the toolbar, Choose Export > QIF (Quicken).
2.
3.
Do one of the following:
To export all of the receipts in the selected folder, click the Selected
•
Folder (All Receipts)
•
To export only the receipts that are currently selected, click the
Selected Receipts radio button.
4.
Click Continue.
5.
Navigate to the desired destination location on your computer, type a name for
the file, and then click on
extension.
Start Quicken and choose File > Import > QIF.
6.
radio button.
Save. The exported file will be saved with the .qif
7.
Navigate to the folder containing the file you exported in step 5.
Choose the Account into which you want to import the transactions. Wh en
8.
the import is complete, the transactions will be in the
Approved
section of the Quicken register.
Transactions to be
For more information, see the following topics:
•
Setting Up a Cash Account in Quicken
Exporting a QIF File from NeatWorks
•
Tips for Working with QIF Files
•
Exporting QIF Files to Quicken 2005 (and Later)
NeatWorks uses a modified version of the .QIF export that will allow transactions to
be added to account types that are not normally available through .QIF imports. In
order to use the Quicken export in 3.0 SP1 to its fullest potential, you must "teach"
NeatWorks about your Quicken accounts. The easiest way to do that is to generate a
.QIF file from your copy of Quicken, and make sure it includes an account list. Import
31
Page 32

that .QIF file into NeatWorks using the File -> Import menu, and you'll be able to
display a list of your Quicken accounts inside the NeatWorks software.
After you have imported those Quicken accounts, you may use the export option
inside NeatWorks, and choose a destination account for your transactions inside
Quicken. This will create a modified version of our standard .QIF output, which will
allow you to bring transactions into checking, credit card or savings accounts.
When you import this .QIF into Quicken, select the "All Accounts" option during the
import process - the .QIF file will tell Quicken where to put the transactions without
any work on your part.
Note: Quicken only permits OFX/QFX files for importing transactions from financial
institutions.
After setting up a cash account in Quicken, you would then export the QIF file from
NeatWorks.
For more information, see the following topics:
• Setting Up a Cash Account in Quicken
•
•
Exporting a QIF File from NeatWorks
Tips for Working with QIF Files
Setting Up a Cash Account in Quicken
You need to set up a cash account in Quicken if you want to use the QIF export
feature in Quicken 2005 or later. To set up a cash account:
1. To set up a cash account in Quicken for importing, choose
Quicken Account
2. Choose
3. Select
savings, or credit card.
4. Type a name for the account.
This account is not held in a financial institution.
Cash as the account type. Be sure that you DO NOT choose checking,
.
New > New
Exporting a QIF File from NeatWorks
Before exporting the QIF, read this quick tip.
1. Select the receipt(s) or folder(s) you want to export.
From the Toolbar, choose the Export > QIF (Quicken).
2.
3.
Do one of the following:
To export all of the receipts in the selected folder, click the Selected
•
Folder (All Receipts)
•
To export only the receipts that are currently selected, click the
radio button.
Selected Receipts radio button.
32
Page 33
4. Click on Continue.
5.
Navigate to the desired destination location on your computer, type a name for
the file, and then click on
extension.
Start Quicken and select the newly created Quicken Cash Account from
6.
the
Cash Flow Center.
7.
Choose File > Import > QIF.
8.
Navigate to the folder containing the file you exported in step 5. When the
import is complete, you can move the transactions into any other Quicken
account you wish.
Save. The exported file will be saved with the .qif
Tips for Working with QIF Files
Be sure that your Category names in NeatWorks match the Category names in
Quicken
NeatWorks and assigning that category to all of your fuel receipts. That way, when
you import those receipts into Quicken, they will automatically be assigned to the
"Auto: Fuel" category in Quicken.
EXACTLY. For example, consider adding an "Auto: Fuel" category in
Exporting OFX Files to MS Money
If you work with MS Money and want to export your information there, as OFX
file(s), just do the following:
1. Select the receipt(s) or folder(s) you want to export.
2. From the
3. In
Step 1, do one of the following:
• To export all of the receipts in the selected folder, click the
• To export only the receipts that are currently selected, click the
Toolbar, choose Export > OFX (MS Money).
Folder (All Receipts)
radio button.
Selected
Selected Receipts radio button.
4. In
Step 2, provide the requested information and then click Continue.
Navigate to the desired destination location on your computer, type a name
for the file, and then click on
.ofx extension.
Save. The exported file will be saved with the
33
Page 34

Exporting to QuickBooks
You can quickly export multiple types of receipts into multiple accounts in
one simple step. These exports appear in your Quick Books ‘Bills’ section.
NeatWorks makes it quick and easy to connect ‘Category’ and “Payment’ type
to your QuickBooks Chart of Accounts.
Note for Vista users only: In order to use QuickBooks 2007 with Windows Vista,
you must have the latest QuickBooks updates installed.
Note for Windows XP users running QuickBooks 2007 only: In order to export to
QuickBooks 2007 with Windows XP Basic, you must first visit the Intuit website and
follow the instructions in
To export to QuickBooks, do the following:
1. Be sure that every receipt has a valid Transaction Date, a Vendor Name, and a
non-negative account.
this article.
2. Open the Receipts Organizer and select the folder, folders or selected receipts
you want to export.
3. From the
• Choose
• Choose
4. The Confirm Your Selection screen displays:
Toolbar, click Export and choose the desired export format.
QuickBooks (Direct)if the QuickBooks program is already
running on your computer.
QuickBooks (iif) if the QuickBooks program is not already
running on your computer.
34
Page 35
• To export all of the receipts in the selected folder, click the
receipts in the selected folder(s)
• To export only the receipts that are currently selected, click the
Receipts
radio button.
radio button.
All visible
Selected
3. Click
Next.
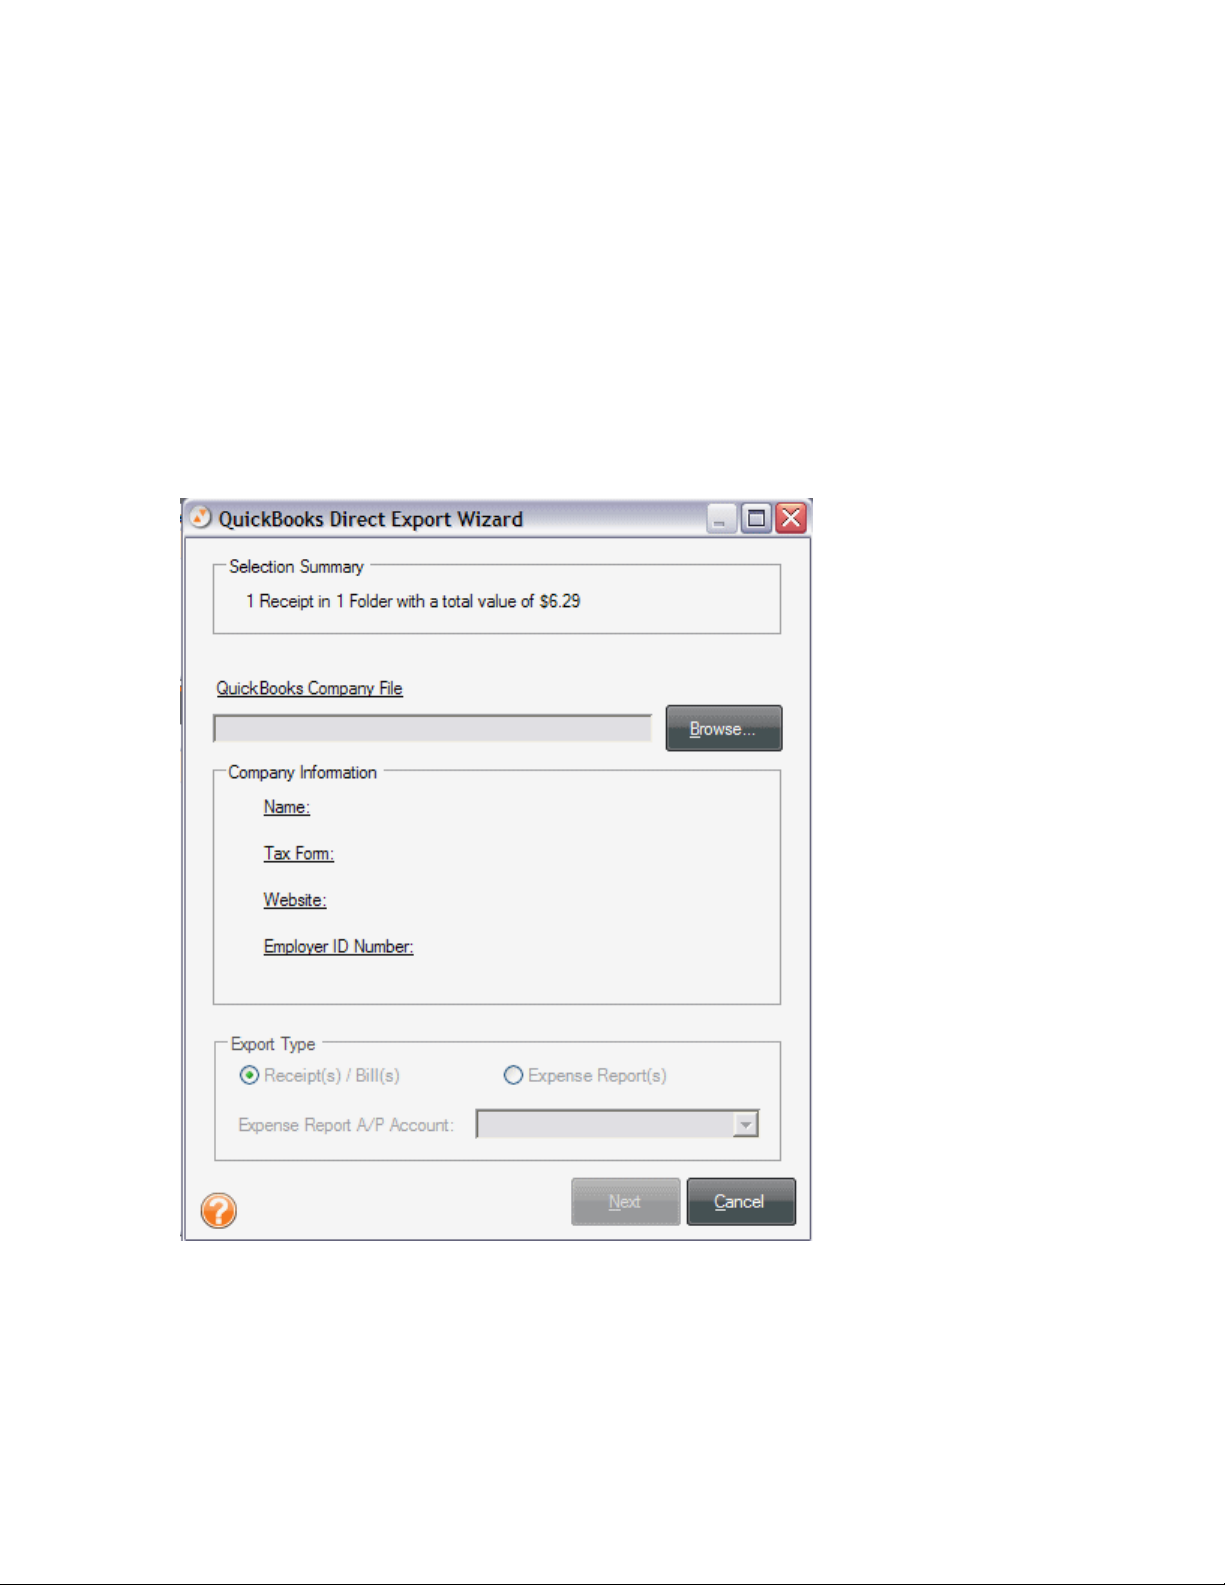
If you chose QuickBooks (Direct):
4. The QuickBooks Direct Export Wizard screen displays and shows you a
summary of the data you selected. You must then select a Company file to
export to.
5. Click
6. You can switch to the QuickBooks program to work with the exported file.
Browse, and NeatWorks will locate the company file.
• Be sure that QuickBooks is running and the desired QuickBooks Data File
is open. (NeatWorks will select this file automatically.) T he QuickBooks
Account fields will then be filled in for you. Click
Next.
35
Page 36

If you chose QuickBooks (iif):
1. The Export Setup screen displays:
2. Complete the Debt Account and Credit Account fields.
3. Click the appropriate radio dial (Receipt Vendor or User Name).
4. Click
5. Navigate to the desired location on your computer, type a name for the file,
Continue.
and then click on
extension.
Save. The exported file will be saved with the appropriate
Running Folder Reports
You can run folder reports whenever you want to see your information organized to
highlight certain relationships. For example, the
submenu offers a variety of summary reports you can run: Spending by Location,
Project, Purpose, Period End, and Client (Business & Personal view only). Reports are
run on all folders in the database. Use the options in the Reporting Wizard to narrow
the focus of the report by Folder Type and Period End date.
You will find the following topics addressed in this section:
Reports > Folder Reports
36
Page 37

• Using the Report Window Toolbar
Running a Report
•
Saving a Report
•
Using the Report Window Toolbar
The report window provides a toolbar for easy navigation, printing, and copying. The
toolbar is pictured below.
There are several ways to navigate within a report:
Use the Previous Page and Next Page buttons to move consecutively
•
between pages.
Type a number in the Current Page Number field and press Enter.
•
•
Use the Backward and Forward buttons to move between the currently
viewed page and the previously viewed page.
Running a Report
To run a folder report, do the following:
1. From the toolbar, go to to
2. From the
Wizard
3. Under the
report.
Folder Reports submenu, select a report type. The Reporting
dialog box opens (shown at the bottom of this page).
Step 1 heading, select the Folder Type(s) to include in the
Reports >Folder Reports.
37
Page 38

4. Under the Step 2 heading, define the Period End date criteria to narrow the
scope of the report. (Type dates in MM/DD/YYYY format, or click on the
dropdown menu to select from a calendar.)
5. Under the
Step 3 heading, select the preferred detail level (summary or
detailed). Detailed reports provide line item information for each receipt.
6. Click on Run Report to close the Reporting Wizard dialog box and run the
report. After you run a report, it opens in its own separate window.
38
Page 39

Saving a Report
To save a report, do the following:
1. Select a file type from the
Save/Export Report As dropdown list.
2. Click
3. Navigate to the folder you want to save the file in.
4. Type a name in the
5. Click
Go.
File name field.
Save.
Can I personalize columns and fields?
NeatWorks allows you the flexibility of being able to modify column headings in the
folder and receipts grids as well as field names on the User Profiles tab (Informat ion
Tabs).
You will find the following topics addressed in this section:
Showing / Hiding Grid Columns
•
Information Tabs
•
Moving Columns
•
Resizing Column Widths
•
Modifying a Column or Field Name
•
Understanding and Modifying the User Profile
•
Showing and Hiding Grid Columns
By default, not all columns are displayed in the Folders grid. You can choose to show
or hide columns as needed.
1. From the Tools menu, choose Show/Hide Columns > Folder
Columns
2.
Select an unchecked item in the menu to add it to the grid, or
Select a checked item in the menu to remove it from the grid. You can always
3.
add it back later.
.
39
Page 40

Information Tabs
Information tabs include the User Profile, FolderComments, and
ReceiptComments. Information tabs allow you to add comments to any of your
folders or receipts, and the comments section will actually change depending on the
folder or receipt selected. In other words, the fields on the tabs change, depending
on what is selected in the grids above. Entering information in the Information Tabs
is important, because the more information you can provide about each expense, the
more information NeatWorks will be able to retrieve on later on, when you need to
search for specific information related to a folder or receipt.
The following topics will help you modify the user profile and enter folder or receipt
comments:
• Understanding and Modifying the User Profile
Adding Comments to a Folder
•
Adding Comments to Receipts
•
Moving Columns
Columns within the Folders Grid can be placed in any order you wish. To move a
column, simply use your mouse to press and drag its heading to the new location.
Folder Number and Pin columns cannot be moved.
The
Resizing Column Widths
Columns within the Folders Grid can be resized by doing one of the following:
• To set all columns to their default widths, go toTools > Auto-Size Column
Widths > Folder Columns
•
To manually resize column widths, position the cursor on the line between two
column headings, and when you get the double-arrow cursor, press and drag
your mouse to the right or left.
.
40
Page 41
• Alternatively, to auto-resize the column to its default width, again position the
cursor on the line between two column headings, and when you get the
double-arrow cursor, just double-click with your mouse to auto-resize it.
Modifying a Column or Field Name
If the default column or field name is not specific enough for your needs, you can
modify it by doing the following:
1. From the Toolbar, choose
2. Under the
field name you want to change.
3. Under the Step 2: Edit the Column or Field Name heading, click the
Step 1: Select a Column or Field Name heading, select the
Personalize > Column/Field Names.
Use Custom Name radio button.
4. Type the new field name in the
5. Click
OK. NeatWorks must be restarted for the change(s) to take effect.
Use Custom Name field.
Understanding and Modifying the User Profile
When you started the NeatWorks program for the first time, you were prompted to
provide your first and last name. That information was used to create a basic default
User Profile. You can edit this existing profile to include additional or changed
information.
Modifying the User Profile
1. From the Toobar , choose Personalize > User. The Personalize dialog box
opens, with the User tab selected (pictured below).
2. Modify the User Profile fields as desired, keeping in mind the following:
• To hide a field, click the checkbox next to it to remove the checkmark.
• To include a field, click the checkbox next to it to add the checkmark.
3. In the Personalize dialog box, click on OK to apply the changes and close the
dialog box.
41
Page 42

Working With Receipts
The goal of this section is to help you learn how to work with receipts. We'll cov er
how to edit, sort, clear, delete, split, email, export, import and personalize receipt
information.
The Receipts organizer is shown below:
42
Page 43
• How do I scan a receipt?
What can I do with my receipt images?
•
How can I work with receipt rows?
•
Where is my information?
•
Can I split, sort, and print receipts?
•
How do I import and export receipts?
•
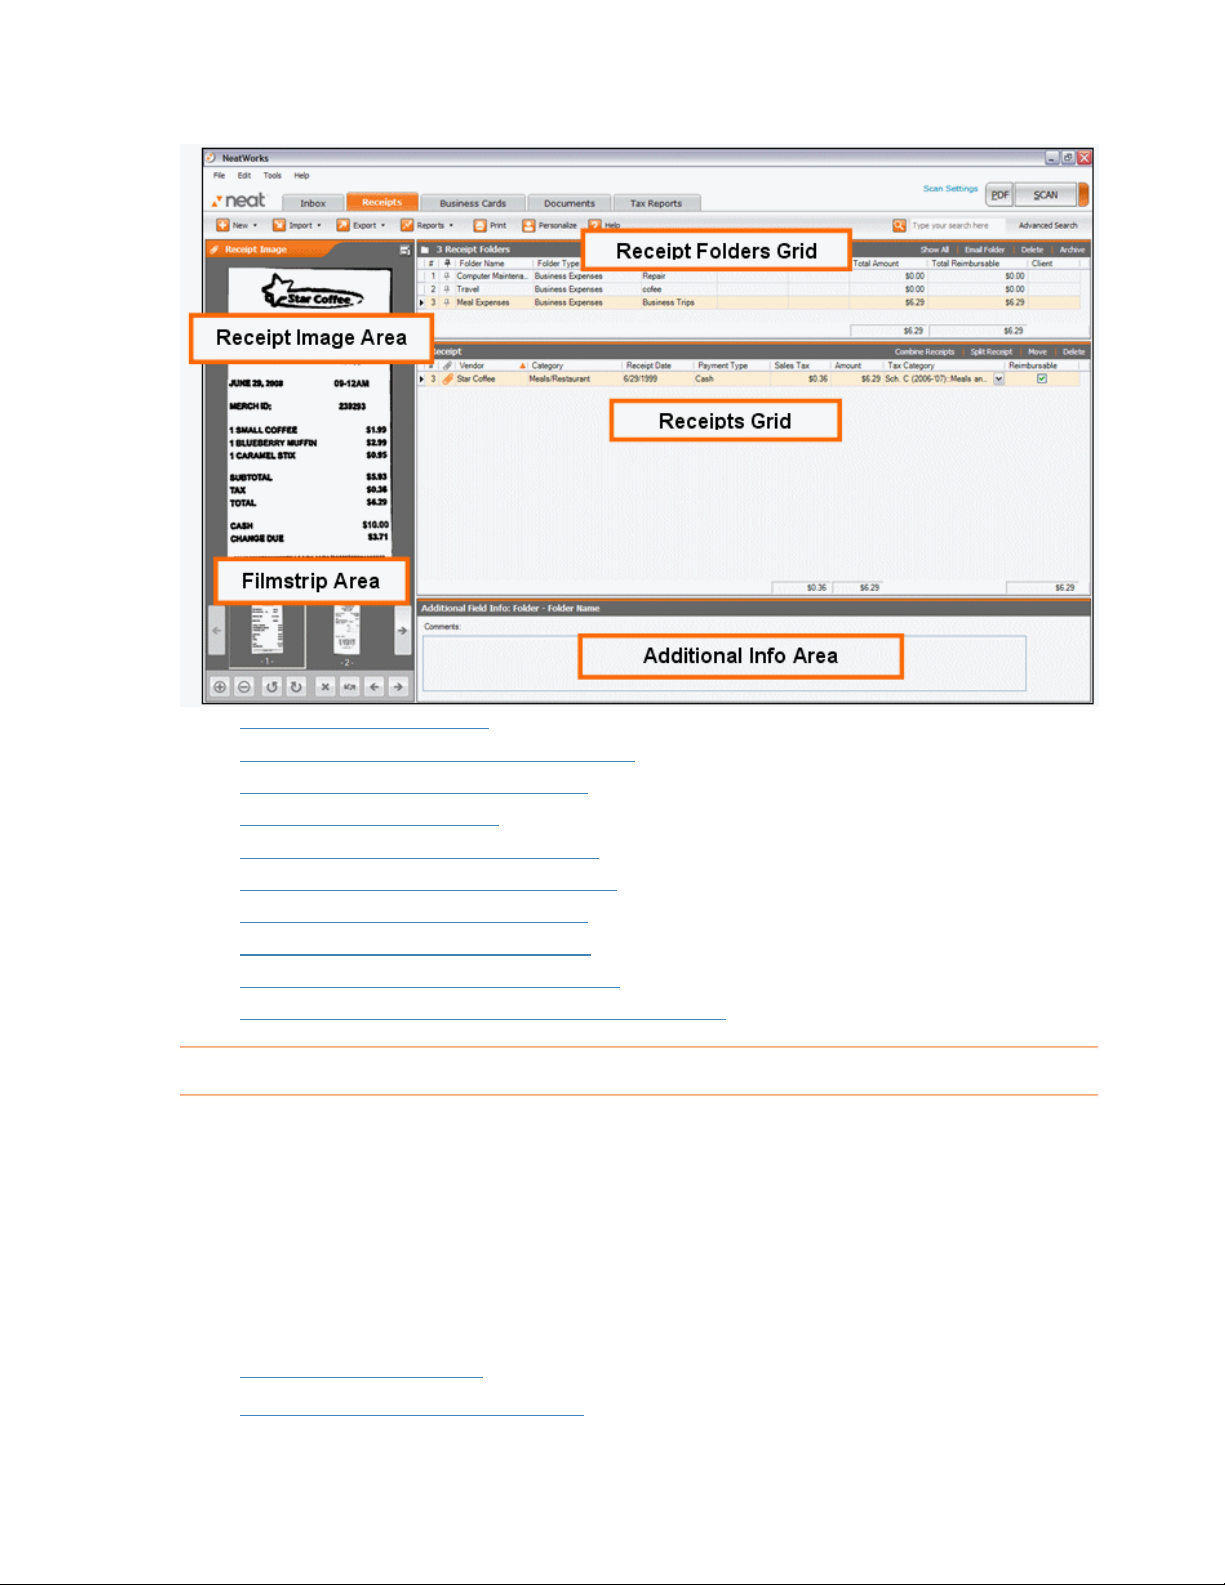
Why should I run a receipt report?
•
Can I edit vendor names and lists?
•
Can I personalize columns and fields?
•
Using the Scanning and Imaging Troubleshooter
•
How do I scan a receipt?
When you scan a receipt and it is filed in a folder, a new row is added to the Receipts
Grid. Key data from the receipt is then automatically placed into the appropriate
columns within the row. As you will see later in this section, y o u can also manually
add or edit information in a receipt row, add comments specific to a cell in a receipt
row, and combine scanned pages of a multi-page receipt to a row. You can also split,
sort, and print receipts.
Overview of the NeatWorks scanning process
1. Create or select a folder
Select number of pages (optional)
2.
43
Page 44

3. Place a receipt in the scanner and scan
Verify data and add a vendor name
4.
5.
Adjust your image
Create or Select a Folder
After scanning a receipt (see Using the Quick Scan Center), you need to select the
"container" into which your receipts will be scanned, stored, and organized. In
NeatWorks, all receipts are filed into Folders.
A Folder is simply an electronic version of a physical filing cabinet. You can create
and use folders to track a variety of expenses. For example, you might create
separate folders to track expenses for a business trip, office supplies, a family
vacation, and a home improvement project. You can manage your groceries, school
supplies, or medical expenses using separate folders.
To Create a New Folder:
You can create a new folder by performing these steps:
1. If you are in the Inbox, click
2. On the Create New Folder screen that displays, enter the Folder Name, Type,
and Label.
3. Click
Or, if you are in the Receipts organizer, you can click
toolbar.
Save.
New.
New > Folder on the
To Open a Folder:
1. If you are in the Inbox, click Choose.
2. On the Choose a Folder screen that displays, select the desired folder.
3. Click
Or, if you are in the Receipts organizer, you can select an existing f o lder by clicking
the desired folder on the Folders Grid.
Select.
Verify Data and Add a Vendor Name
Each time a receipt is filed into a folder, a new row is added to the Receipts Grid. Key
data from the receipt is then automatically placed into the appropriate columns
within the row.
NeatWorks attempts to read the following fields:
44
Page 45

• Transaction date
Total amount
•
Payment type
•
State sales tax (USA)
•
Vendor name
•
Category
•
PST/QST and GST/HST sales tax (Canada)
•
After each scan you will want to review and verify the data. To modify any of the
information, click
Review and File in the Inbox. You can also click in a grid cell
when in the Receipts organizer and edit as necessary.
Adding a vendor name
NeatWorks has a built-in vendor database of over 1500 popular stores, restaurants,
and hotels. Each vendor name has already been associated with an expense
category, such as "Restaurant" or "General Retail."
Although NeatWorks may not
have the name of your neighborhood supermarket in its database, you can easily
add it so that it will recognize it the next time. T o add a vendor name simply click in
the vendor name field and and enter the information. If you enter an expense
category for that vendor name, it will remember that as well.
Important: Note that NeatWorks currently does not read vendor names that are
stylized text or logos, only plain text. Keep this in mind when adding vendor names
as you must type them exactly the way they appear on the receipt.
For example, if a receipt had "Jim's Shop" in a stylized logo and "Jim's Repair Shop"
in plain text elsewhere, you should enter the plain t ext version, "Jim's Repair Shop."
To prevent false reads, you should enter as unique a name as possible. For example,
type "AM Shops" instead of simply "AM" since the letters AM could appear in many
other receipts.
Saving Your Information
NeatWorks automatically saves all information as soon as it is scanned or edited.
There is no need for a "Save" button in any of the Organizers because saving is done
for you by the program.
Using the Image Adjuster
After scanning, you may want to rotate, crop, and lighten or darken your image. You
can use the Image Adjuster to do so, as the following steps describe:
1. Click
Adjust Image on the Review screen.
45
Page 46

2. The Image Adjuster screen displays:
Step A: Rotate Your Image
If the image shown in the Image Manager needs to be rotated:
• Click the Rotate Clockwise or Rotate Counter-clockwise buttons in the top left
corner of the Adjust Image screen as needed.
Step B: Manually Crop the Image
NeatWorks automatically crops scanned images; however, in certain cases you may
wish to manually re-crop the image. To do so:
1. Position your mouse pointer over the top left corner of the receipt image.
46
Page 47

2. Click and press the left mouse button, dragging the cropping tool across the
image area you wish to crop.
3. When you’ve boxed in the area you wish to keep, release the left mouse
button.
4. Click the
Crop button in the top middle area of the window.
Tip: If you cropped the image to the wrong size, click the Reset button.
Note: Clicking the Reset button will undo all ch anges you’ve made to the image
(including lightening, darkening, and rotation).
Step C: Lighten or Darken the Image
NeatWorks automatically adjusts for optimal brightness; however, in certain cases
you may wish to manually lighten or darken the image. To do so:
1. With your mouse, press and drag the green-tipped arrow along the scale until
you achieve the desired brightness effect.
2. Release the arrow at the desired place along the scale by releasing the mouse.
Step D: Save Changes to the Receipt Image
Once you made the desired changes to your image:
• Click
• Alternatively, click
Keep Changes to save the image changes.
Keep Changes to save the image changes and to re-
scanalize (OCR) the image.
Best Practice for Using the Image Adjuster
Because the Image Adjuster does not allow for any additional changes after you
adjust the lighter/darker scale, we recommend the following best practice for using
the tool:
1. Rotate your image first, if necessary.
2. Crop your image next.
3. Adjust lighter/darker scale last.
4. Either keep changes or keep changes and scanalize.
Remember that clicking
to start over if necessary.
Reset will undo all changes you've made and will allow you
Working with Receipt Images
Once you scan your receipt, there are many ways to work with the image. You will
find the following topics addressed in this section:
• Rotating the receipt image
Zooming in or out of the image
•
View ing a receipt in full screen mode
•
Rescanning your receipt
•
Scanning additional images to a receipt row
•
47
Page 48

• Changing the order of multiple scanned images
Importing an image as a new receipt
•
Combining receipts
•
Printing a receipt image
•
Deleting a receipt image
•
Saving a receipt as a graphic file
•
Emailing receipts
•
Rotating the Receipt Image
If you scan a receipt and want to view it from a different orientation, you can rotate
the image, much as you would in any other image-editing tool. You can do so both in
the Inbox prior to filing the receipt, or in the Receipt Organizer once you have filed
the receipt.
To rotate a receipt image in the Inbox:
1. Click
2. On the Review screen, click the rotate icons.
3. Repeat as necessary until the scan is upright
To rotate a receipt in the Receipt Organizer:
1. In the Receipts Grid, select the receipt you want to rotate.
2. In the
3. Repeat as necessary until the scan is upright.
Review and File.
.
Receipt Image area, click the rotate icon,
Zooming In or Out of a Receipt Image
If you scan a receipt and want to see specific portions of the image more easily, you
can always zoom in or out of the image. You can do so both in the Inbox prior to
filing the receipt, or in the Receipt Organizer once you have filed the receipt.
To zoom in or out on a receipt image in the Inbox:
1. Click
2. On the Review screen, click the zoom in and zoom out icons.
Review and File.
To zoom in or out on a receipt image in the Receipt Organizer:
48
Page 49

1. In the Receipts Grid, select the receipt you want to zoom in or out on.
2. In the
Receipt Image area, click the zoom in/zoom out icons.
Viewing a Receipt in Full Screen Mode
If you want to see a much larger view of your receipt image, you can view the image
in full screen mode. To do so:
1. Click the icon on the upper right side of the Receipts Image area.
2. A full screen image of the receipt displays. You can change your view by
clicking the appropriate icon(s).
3. Click the
X icon (top right corner) to return to normal view.
Changing the Order of Multiple Scanned Images
If you have multiple images scanned into a single document row, you can change the
order in which they appear (and are numbered) by clicking the Reorder (
) icon
on the bottom of the Document Image area of the Organizer.
Importing an Image as a New Receipt
If you already have an image stored on your computer and would like to add it to a
receipts folder, you can do the following:
1. In the folders grid, click on the folder into which you want to import a receipt.
2. From the Toolbar, choose
3. Navigate to the folder on your computer that contains the image and select it.
4. Click
Open.
Import > Import as New Receipt.
Importing Additional Images into a Receipt Row
49
Page 50
If you already have an image stored on your computer and would like to add it to a
receipts row, you can do the following:
1. In the Receipts grid, select the receipt to which you want to add another
image.
2. From the Toolbar, choose
3. Navigate to the folder on your computer that contains the image and select it.
4. Click
Open.
Import > Image to Current Receipt.
Combining Receipts
You can group related receipts by combining them. To do so:
1. In the Receipts Grid, select the receipts you want to combine.
2. Click the Combine Receipts link on the upper right side of the receipts grid.
The receipts will be combined.
3. Click Combine. The receipts will be combined.
Printing a Receipt Image
If you ever need to provide someone with a printed copy of a receipt, or if you need
to print a receipt for any other reason, you can do so easily. Just do the following :
1. In the Receipts Grid, select the receipt you want to print.
2. From the Toolbar, choose
3. In the
selected for you).
Print Choices dialog box, click Print (print settings are automatically
Print Images.
Deleting a Receipt Image
You can always delete a receipt image if need be. To do so:
1. In the Receipts Grid, select the receipt you want to delete.
50
Page 51

2. Click Delete on the upper right side of the grid.
3. When prompted, click
deletion.
Yes to confirm the deletion or No to cancel the
Saving a Receipt as a Graphic File
NeatWorks alllows you to save a receipt as a graphic file, such as a JPEG, GIF, BMP,
PNG, or TIF. To save a receipt as a graphic file, do the following:
1. In the Receipts Grid, select the receipt you want to save as a graphic file
(JPEG, GIF, BMP, PNG, or TIF). You can save single or multi-page receipts.
When saving a multi-page receipt, each page will be saved as a separate
image and each filename will include the page number of the image.
2. In the
Current Visible Image As
being viewed, or choose
save a multiple page receipt. The
Receipt Image area, right click your mouse and choose Save
from the submenu to save the image currently
Save All Images of Selected Receipt As to
Save Image dialog box opens.
3. Chose a file type from the
4. Navigate to the appropriate destination folder (where you want to save the
image).
5. Type a name for the image in the
receipts, the page number will automatically be added to the end of the
filename.
6. Click the
Save button.
Save as type dropdown menu.
File name edit box. For multiple page
Emailing Receipts
Receipts are emailed as a group, by folder. To email your document(s) to another
NeatWorks user, do the following:
1. In the Receipts Grid, select the receipt(s) you want to work with.
2. Click the
3. You can optionally select a quick contact by checking the desired contact on
the Contact List screen that displays. You can also select all the contacts by
clicking
Email Folder link on the upper right side of the receipt folder grid.
Check All.
4. Click
Continue.
51
Page 52
5. On the Confirm File Export screen, type a file name in the Provide a F ile Name
dialog box or confirm or edit the file name already in the field (if applicable)
and choose whether to compress the file.
6. Click
opens. The To field of the new message will be populated with the contacts
selected in the previous step; if you did not choose any Quick contacts, then
type an email address. The selected folder(s) will automatically be attached to
the message.
Continue. Your default email program will launch and a new message
7. Complete the email message and click
For more information, see
Emailing a Folder.
Send.
How can I work with receipt rows?
Each time a receipt is scanned into a folder, a new row is added to the Receipts Grid.
Where possible, key data from the receipt is automatically placed into the
appropriate columns within the row. You can also manually add a new row (wit h or
without scanning a receipt), edit information in a receipt row, add comments about
any cell in a receipt row, and associate multiple scanned receipts to a row.
You will find the following, related topics addressed in this section:
Select a receipt row
•
Edit receipt row cells
•
Add comments to receipts
•
Adding a new receipt row
•
Move a receipt row to another folder
•
Move a receipt row to the Document Organizer
•
Delete a receipt row
•
View receipts together from multiple folders
•
Selecting Receipt Rows
Selecting rows in NeatWorks is very similar to selecting rows in other programs that
use spreadsheet-type layouts:
• To select a single row, click any cell in the row. The selected row has a blue
background.
52
Page 53

• To select multiple adjacent rows, click in the first row you want to select , then
hold down the Shift key and click in the last row you want to select.
• To select multiple non-adjacent rows, click in the f irst row you want to select,
then hold down the Ctrl key and click in each row you want to select.
Editing Receipt Row Cells
Anytime you need to modify information in a receipt row, you can do so by editing
your receipt row cells as follows:
1. In the Receipts Grid, click the cell you want to modify.
2. Edit the receipt's expense information as needed, keeping in mind the
following:
• To add a vendor name, simply click a receipt's Vendor cell and type the
name. The vendor name will automatically be added to the vendor name
database and recognized the next time you scan a receipt with that
name.
• Information in the Receipt Row Number, Date Created, Last Modified,
Attached and Split ID columns is generated automatically and cannot be
edited.
• To modify the contents of a cell using a dropdown menu, click on the
down arrow on the right side of the selected cell and choose an entry
from the list, a date from the calendar, or use the calculator that
displays.
• To modify the contents of a cell manually, click in the cell and start
typing. The first time you type a new entry into a cell, it will
automatically be added to the dropdown list for that column, so you will
never have to type it again!
NeatWorks saves every receipt you scan as well as any text added automatically
during the scan or entered manually by you.
Adding Comments to Receipts
Adding comments to your receipts is important, because the more information you
can provide about each expense, the more information NeatWorks will be able to
retrieve later on, when you need to search for a specific expense in one of your
folders. Any details you record about a specific receipt are then stored in the folder
with the receipt information.
To add comments to receipts:
1. In the Receipts Grid, click in the cell where you want to add information. In the
Additional Field info area, the name of the selected cell appears in the heading.
53
Page 54

For example, if you've clicked in a cell in the Amount column, the heading
reads Additional Field Info: Receipt - Amount.
2. Enter comments and other info as needed, keeping in mind the following:
• To add information to a field, click in the field and begin typing.
• Cells containing comments display a small red triangle in the upper right
corner of the cell (as shown below).
Adding a New Receipt Row
Each time a receipt is filed, a new row is added to the Receipts Grid. Rows can also
be added manually (without filing from the Inbox) .
To add a new receipt row:
Create or select a folder.
1.
From the toolbar, choose New > Receipt.
2.
3.
Add expense information in the appropriate columns of the new receipt row.
Moving a Receipt Row to Another Folder
If you ever need to recategorize a receipt because you feel it belongs in a different
folder, you can move the receipt row to that folder. To do so:
1. Select the receipt row(s) you want to move.
2. Choose the
3. The Move Receipt(s) screen displays.
4. Select the folder you want to move the receipt row to by clicking on it. (You can
sort the folders by Folder Name, Folder Type, and Folder Label.)
5. Click
Select.
Move link on the upper right side of the receipt grid.
Moving a Receipt Row to the Document Organizer
If you ever want to move a receipt that you've already scanned from the Receipt
Organizer into the Document Organizer, you can do the following:
1. Choose the
2. The Move Receipt(s) screen displays.
3. Select Document Folders from the Show menu. (You can sort the folders by Folder
Name, Folder Type, and Folder Label.)
4. Click
Select.
Move link on the upper right side of the receipt grid.
54
Page 55
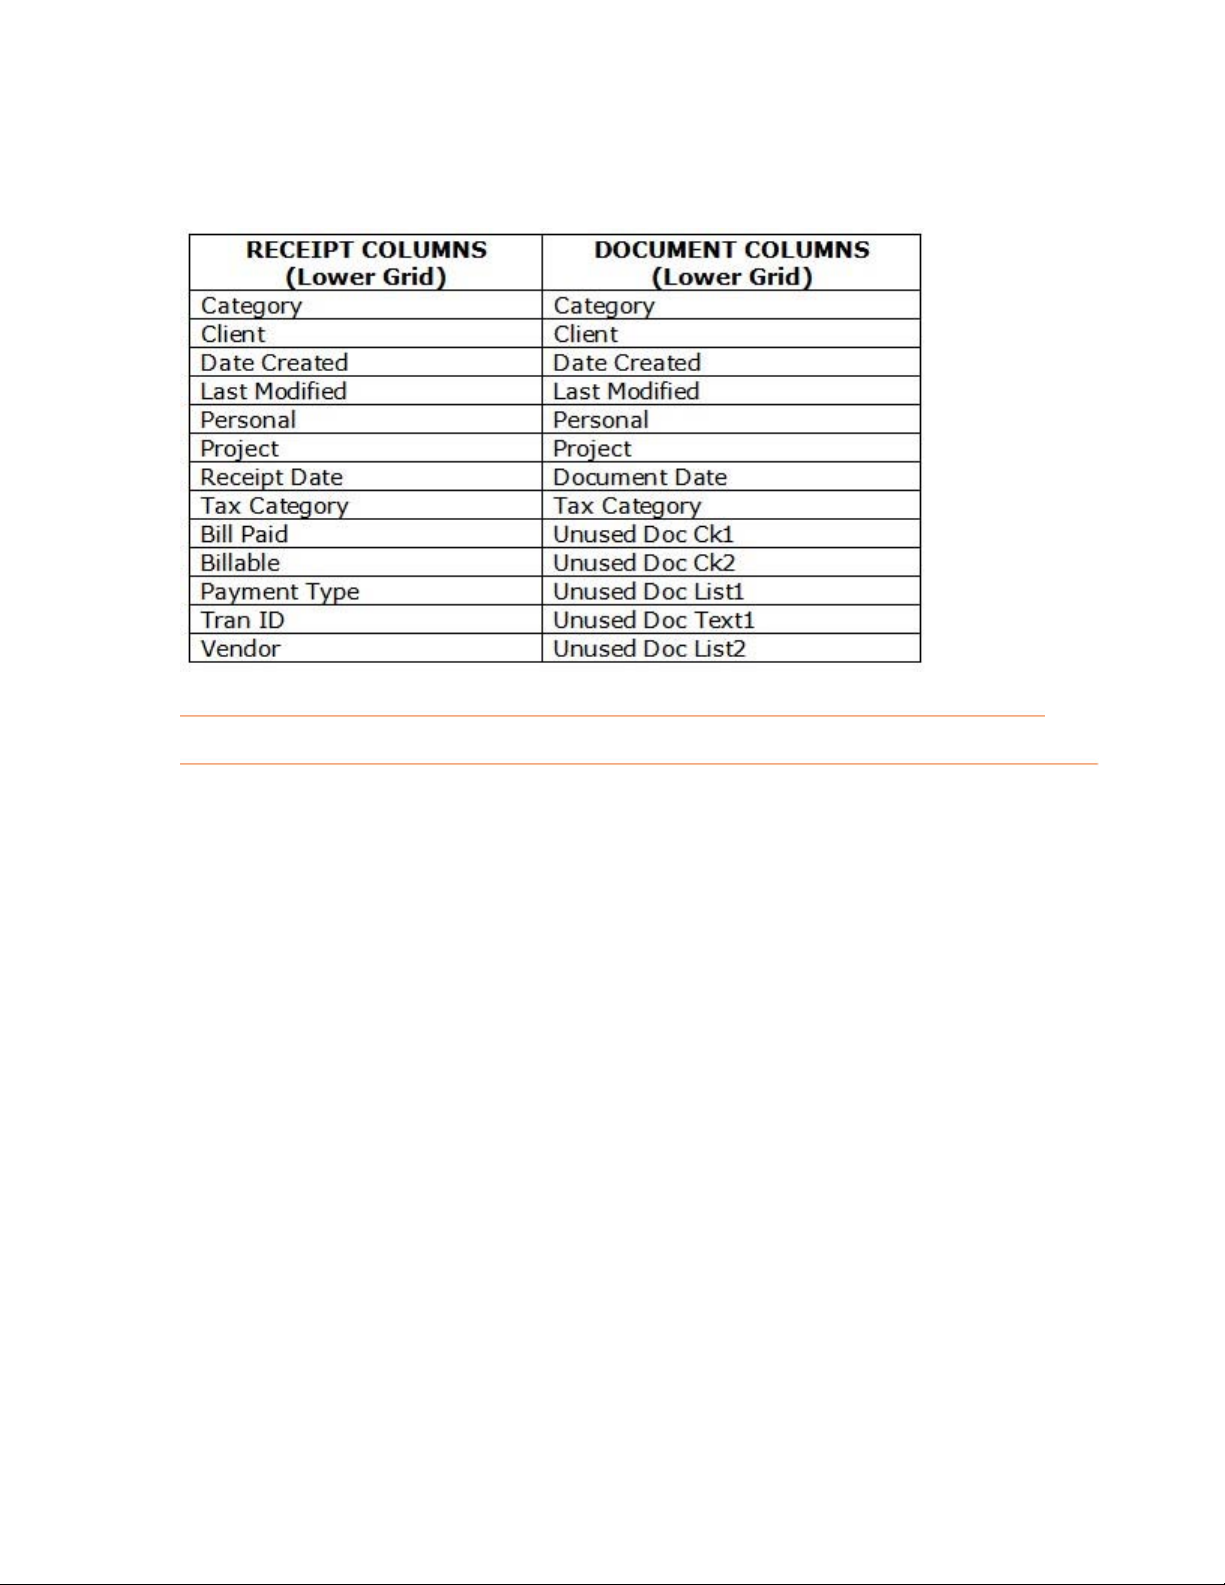
Use the following table when moving receipts from the Receipt Organizer and pasting
them into the Document Organizer, or when pasting documents into the Receipt
Organizer:
Deleting a Receipt Row
If you no longer need a receipt, you can delete the receipt row by doing the
following:
1. In the Receipts Grid, select the row(s) you want to delete.
2. Click the
3. When prompted, click on
Warning: If you simply want to clear the grid, select
then
Clear All Grids from the list that displays.
Delete link on the upper right side of the Receipts Grid.
Yes to confirm the deletion.
Edit from the main menu and
Working with deleted receipts
• To view the Deleted Receipts window, choose Tools > Go To Deleted
Items > Receipts
• To restore deleted receipts, first view the Deleted Receipts window (as
described above), then select the receipt(s) and click the
• To close the Deleted Receipts window, click the
• To permanently erase deleted receipts, choose
Items > Receipts
.
Restore link.
Close link.
Tools > Empty Deleted
. Click Yes to confirm.
55
Page 56

Viewing Receipts Together from Multiple Folders
If you need to simultaneously view receipts in multiple folders, you can do so by
"pinning" those folders. This is useful when you want to quickly total receipts from
different folders.
To view receipts together from multiple folders:
Click the pin icon (pictured below) in the Pin column to "pin " multiple folders,
•
or
Choose Edit > Pin All Folders to quickly pin all folders.
•
How do I find my information?
If you ever have trouble finding your information, you can use the
Find and Search options available in NeatWorks.
• Find Missing Key Data in Folders and Receipts
• Use the Search feature
Finding Missing Key Data in Folders and Receipts
• To find folders that are missing Period End values, choose Tools > Find
Folders Missing Key Data
• To find receipts that are missing Vendor Name, Receipt Date, Amount,
Payment Type, or Category values, choose
Missing Key Data
.
.
Tools > Find Receipts
How do I use the Search feature?
NeatWorks allows you to search any text in your receipts, contacts, and documents.
The Search feature not only retrieves information that you've entered manually, but
also retrieves text from scanned items, which means it can read OCR text, or the
text in your scanned images. The image below shows the
in the Receipts Organizer, but it appears in the same location in the Business Cards
and Documents Organizers as well. The
Organizer.
Search feature is not present in the Tax
Search area as it appears
56
Page 57

If you want to search for any and all receipts from "Business XYZ," but aren't
how many receipts you have, when you started working with that company, or even
how the company's name is spelled
any and all related search results. That is, if you're searching for
amount of information, you'll increase you r chances of finding all pert
in rm
fo ation by using the
h ev erstand that
ow er, and it is important to und
items that did not scan in clearly.
learn how to use search, see the following topics:
To
• Searching for a Keyword
Searching with the Wildcard
•
Search
To sear
1. Op zer in which you'd like to conduct your search.
ing for a Keyword
ch for text:
en the organi
Searc
, you should use the
h feature. Searching is not an exact science,
Search will not necessarily retrieve
Search feature to retrieve
a vast or unknown
inent
Note: The Search feature works on an organizer-by-organizer leve
which means you should open
receipt information
information, or the
documents.
, the
Document Organizer to search for information in
the
Receipt Organizer to search for
Business Card Organizer to search for contact
sure
l,
2. Click in the white box to the left of the
highlighted in the image below.
3. Enter a search term.
4. With your cursor stil
5. Your search results will then appear in the grid in which y ou're working.
l in the
Search
Advanced Search button, as
box, you can press Enter.
Note: It is a good practice to start your search with a clean slate (or a clean grid)
by selecting Edit > Clear All Grids prior to conducting your search. Clearing the grid
does not erase any data.
57
Page 58
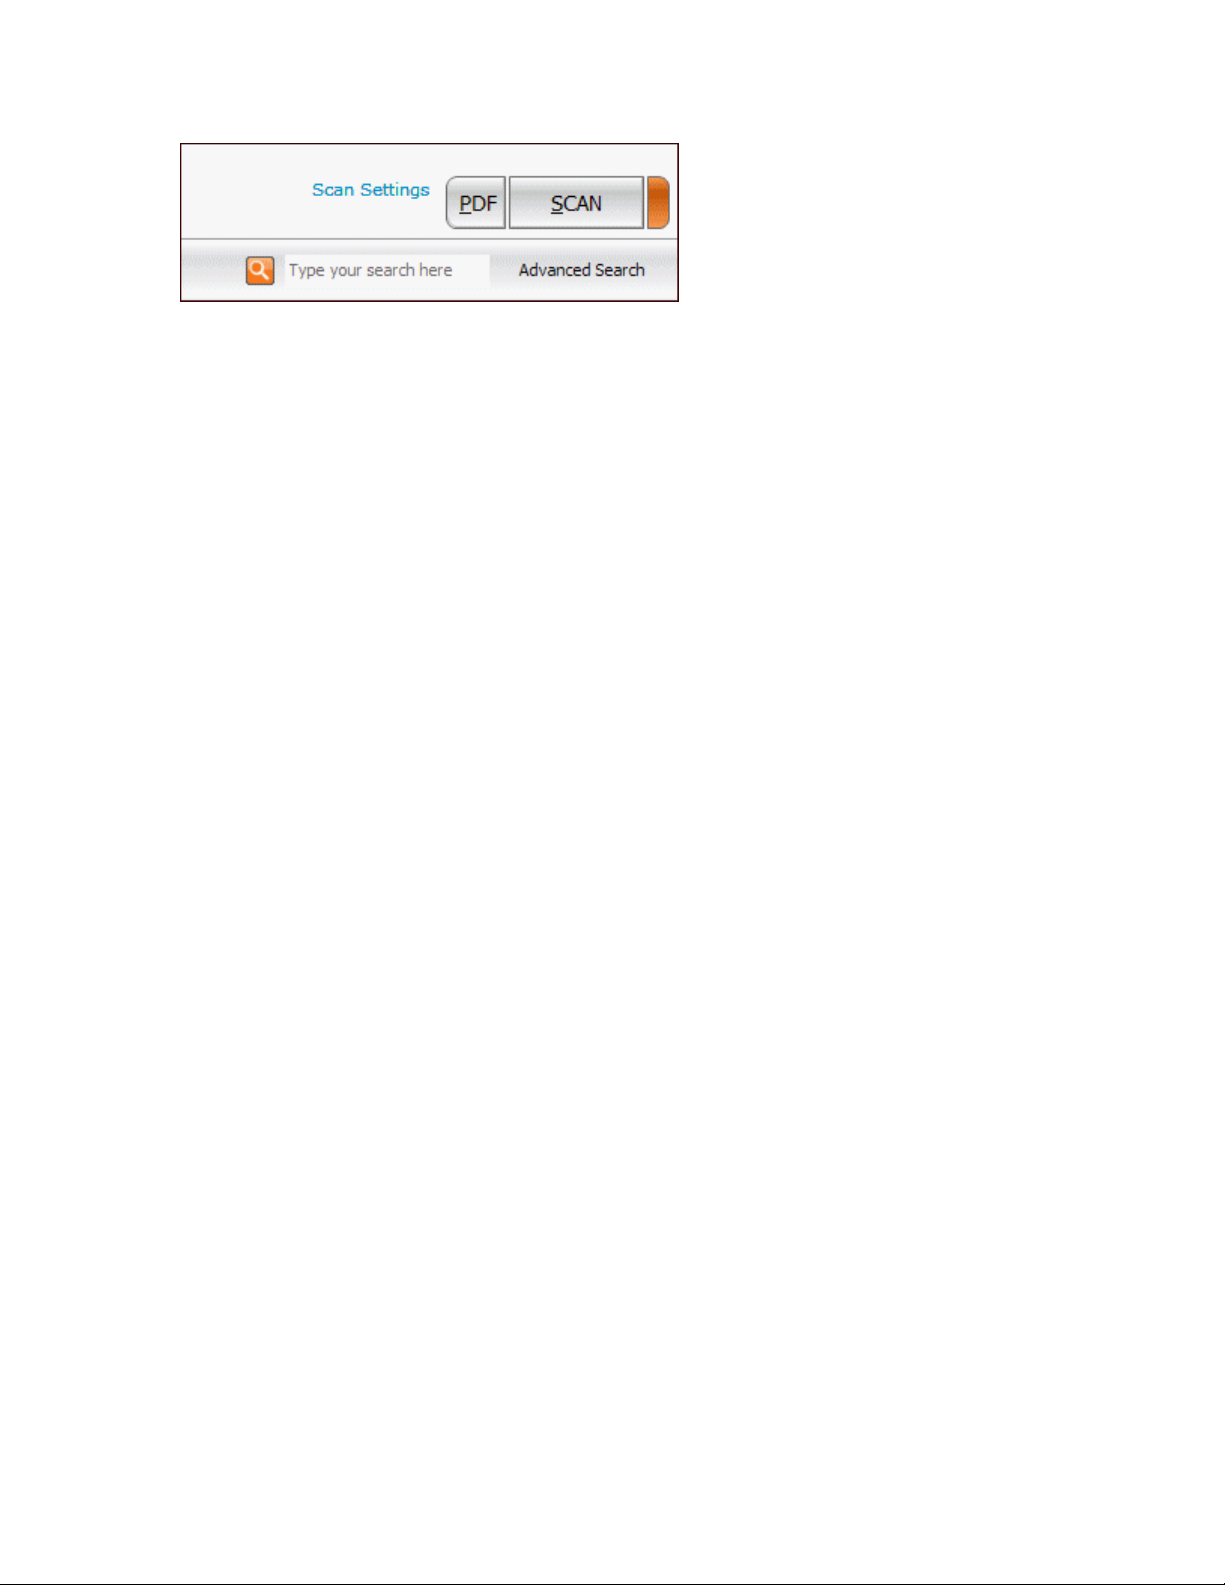
N e gine recognizes certain fields within each organizer, and is
ot : The search en
p ra retrieve information from these fields when searched upon.
rog mmed to easily
Li d e the recognized fields for each organizer. In addition, the search
ste below ar
en in for and retrieve information in your scanned images.
g e will look
Receipt Organizer fields recognized by Search:
• Category
• Client
• Payme
• Project
• Tax Category
• TranID
• User
• Vendor
nt Type
Document Organizer fields recognized by Search:
• Category
• Client
• Document Title
• Document
• Folder
• Project
• Tax Category
• Topic
• Unused Docum
Type
Type
ent Text 1
• Unuse
d Document Text 2
Business Card Organizer fields recognized by Search:
• Category
Client
•
• Project
• Payment type
• Tax ID
• Tax category
• User
58
Page 59
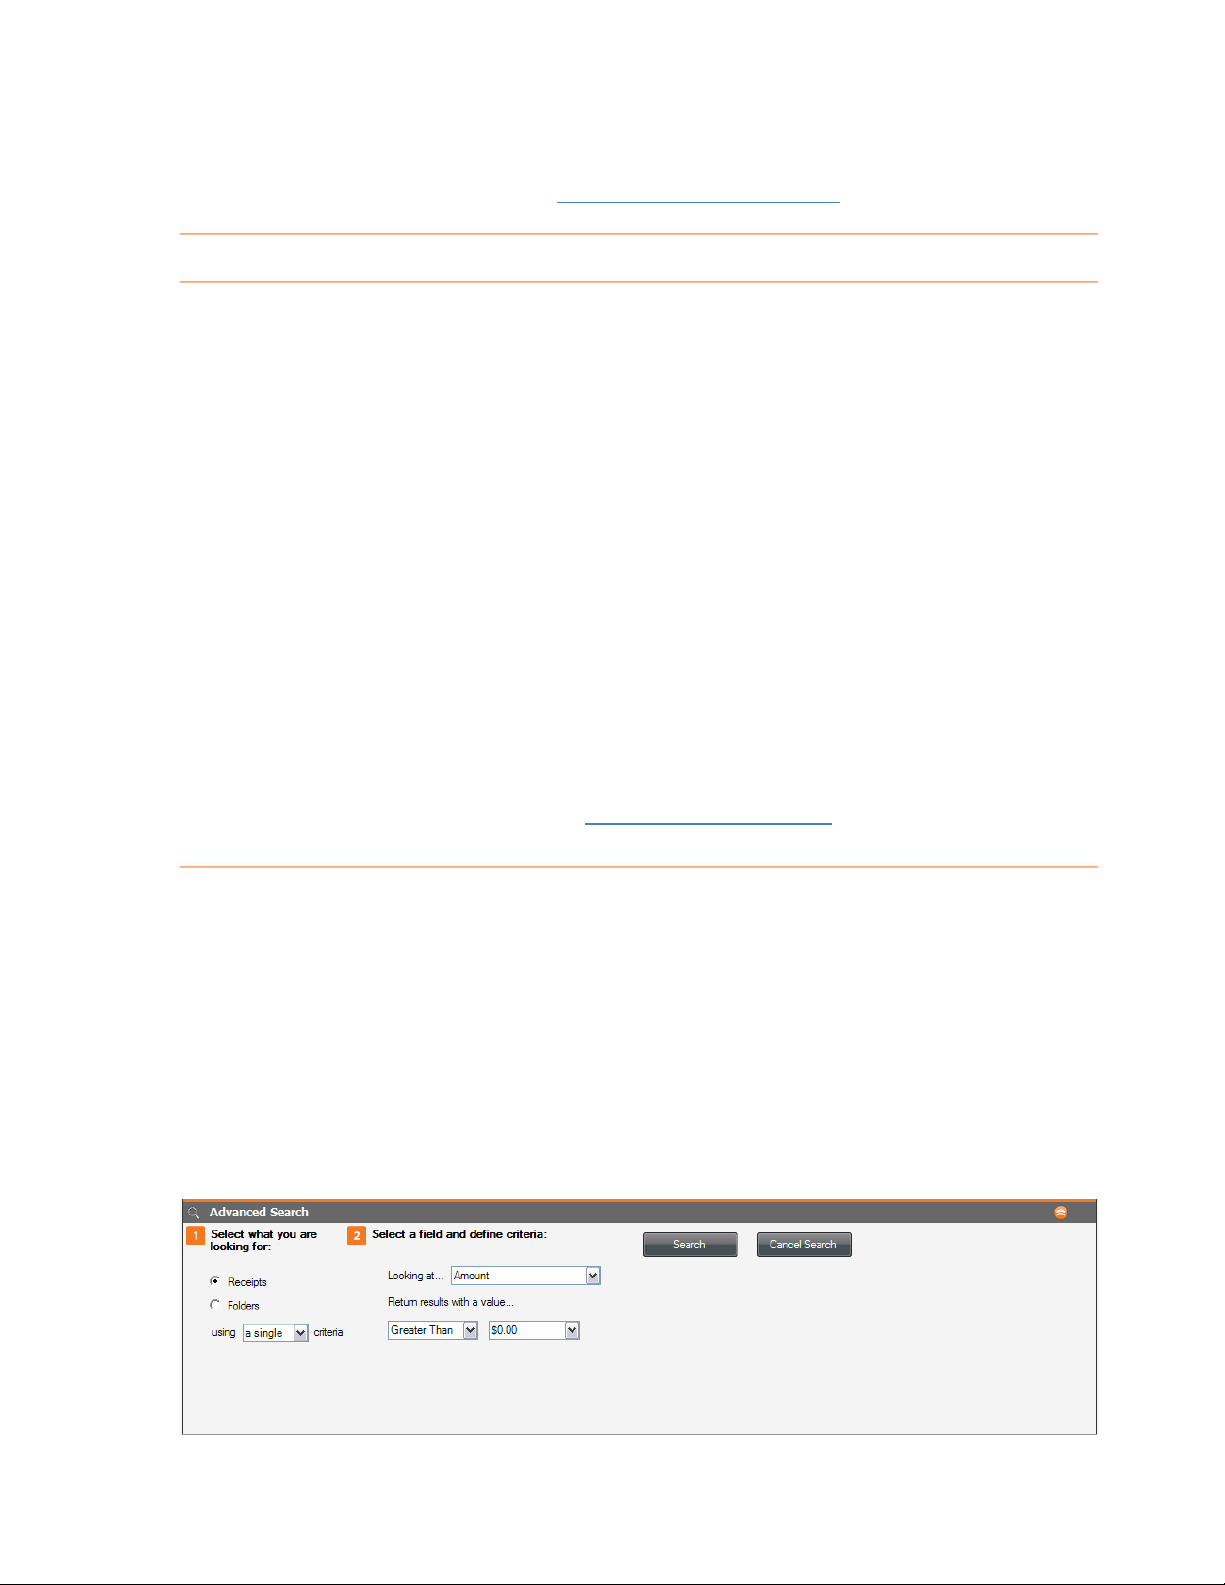
• Vendor
For more information on Search, see
S
earching with the Wildcard
The w
For ex e
the wi sults. The symbol for
th
To
Ti
will be returned. This is because you're giving the search engine more detailed
information, which allows it to return accurate result s more quickly.
ildcard lets you search for terms with missing pieces but still find match es.
ample, if you're unsure whether you've spelled a word correctly, you can us
ldcard to find the closest match and any other related re
e wildcard is an asterisk: *
conduct a wildcard search:
1. Click in the white box to the left of the Search button, as shown in the image
below.
2. Enter a search term, followed by the wildcard symbol; for exam
restaurant*
words, the wildcard symbol cannot be the first character of the search.
example:
With your cursor still in the Search box, press Enter.
3.
Note: A least one character must precede the w
Correct: restaurant*; Incorrect: *restaurant
p: The more information that precedes the wildcard, the faster your search results
Searching with the Wildcard.
ple:
ildcard. In other
For
For more information on search
ond
C
The Advanced Search capability enables you to drill down and locate more specific
information about your receipts, business cards, and documents. Each organizer has
an Advanced Search feature.
ucting an Advanced Search
ing, see
Searching for a Keyword
.
Receipts
1. Click the
Organizer screen. The following screen displays:
Advanced Search button on the upper right side of the Receipt
59
Page 60

Choose whether you want to search your receipts or folders by selecting the
2.
appropriate r
Click the dropdown menu and select whether to use single or mu ltiple criteria
3.
for your search.
4. Click the dropdown menu and choose the criteria you wish to use. If you
selected multiple in step 3, a new area displays on the screen. Each new
criteria you select adds another item to this area.
Specify results with a value higher than your desired amount.
5.
6. Click
B n
usi ess Cards
Click the
1.
Search.
Cards Or
adio dial.
Advanced Search button on the upper right side of the Business
ganizer screen. The following screen displays:
2. Click the dropdown menu to select the desired field.
3. Click the dropdown menu to select the desired search criteria.
4. If appropriate, select the desired values.
5. Click
u
Doc ments
1. Click the
search your documents or folders by selecting the
2. Choose whether you want to
d select whether to use single or multiple criteria
3. Click the dropdown menu an
Search.
Advanced Search button on the upper right side of the Documents
Organizer screen. The following screen displays:
appropriate radio d
for your search.
ial.
60
Page 61

4. Click the dropdown menu and choose the criteria you wish to use. If you
selected multiple in step 3, a new area
criteria you select adds another item to this area.
5. Enter any desired value.
6. Click
C
an I print, sort, and split receipts?
Search.
displays on the screen. Each new
Ne Work ng
at s allows for easy printing, sorting and splitting of receipts. The followi
to s
pic describe how to:
• Print and clear receipt rows
Sort receipt rows
•
Sort by multiple columns
•
Split a receipt
•
Printing and Clearing a Receipt Row
NeatWorks allows you to print and clear receipt rows as necessary.
T ri
o p nt a receipt row:
1. s Grid, select the receipt row y ou want to print.
In the Receipt
2. From the Toolbar, choose
3. In the
Print Choices dialog box, in the Select Range area, click the
Selected Receipts
4. Make the appropriate selections in the
Formatting
5. Click
6.
7. In the Print dialog box, click
Colu
mn Options
• Auto Size Column W
• n Width: leaves column widths equal to how they are sized in
• Alternating Line Colors: makes reading across long rows easier
• Wrap Text: lets rows double in height to accommodate text overruns (use in
Im g
a e Options
• prints images according to the current order
• Real Image Size Reordered for Optimal...: conserves paper by letting
Preview if you wish to see what will print.
Click
Print.
Current Colum
the grid
conjunction with Current Column Width)
Real Image Size in Current Order:
of the Receipts Grid rows
NeatWorks automatically calculate the most space-saving way to fit images on
each printed page
areas.
idth: makes a column as wide as the longest entry it holds
Print.
button.
Select Output and Select
OK.
61
Page 62
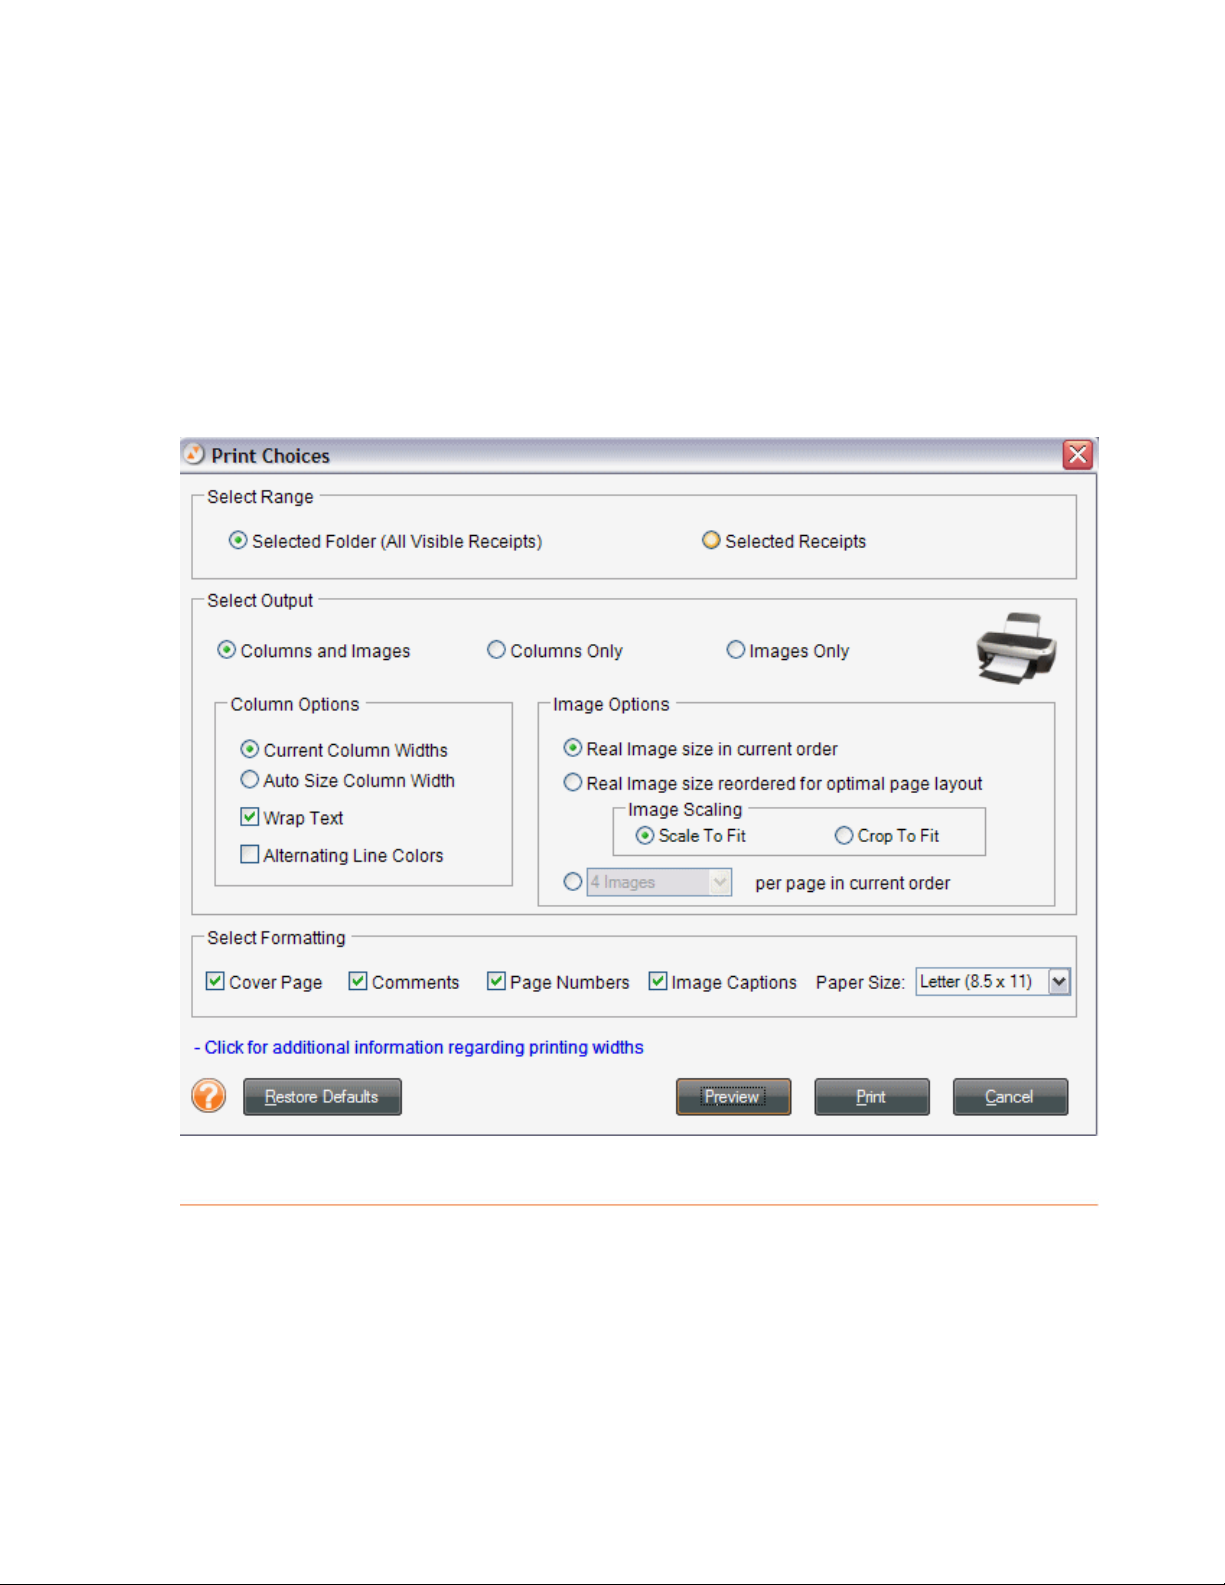
• 1 or 4 Images Per Page: shrinks images to fit on a quarter page (use when
reading receipt text is not required)
Formatting Options
• Cover Page: includes user profile information and expense summary
information
• Comments: includes folder and receipt comments
• Paper Size: choose between standard (8.5" x 11") or legal size (14" x 11")
• Page Numbers: provides a page number centered at the bottom of each page
• Image Captions: provides a row number to correlate the image back to the
receipt grid information
62
Page 63
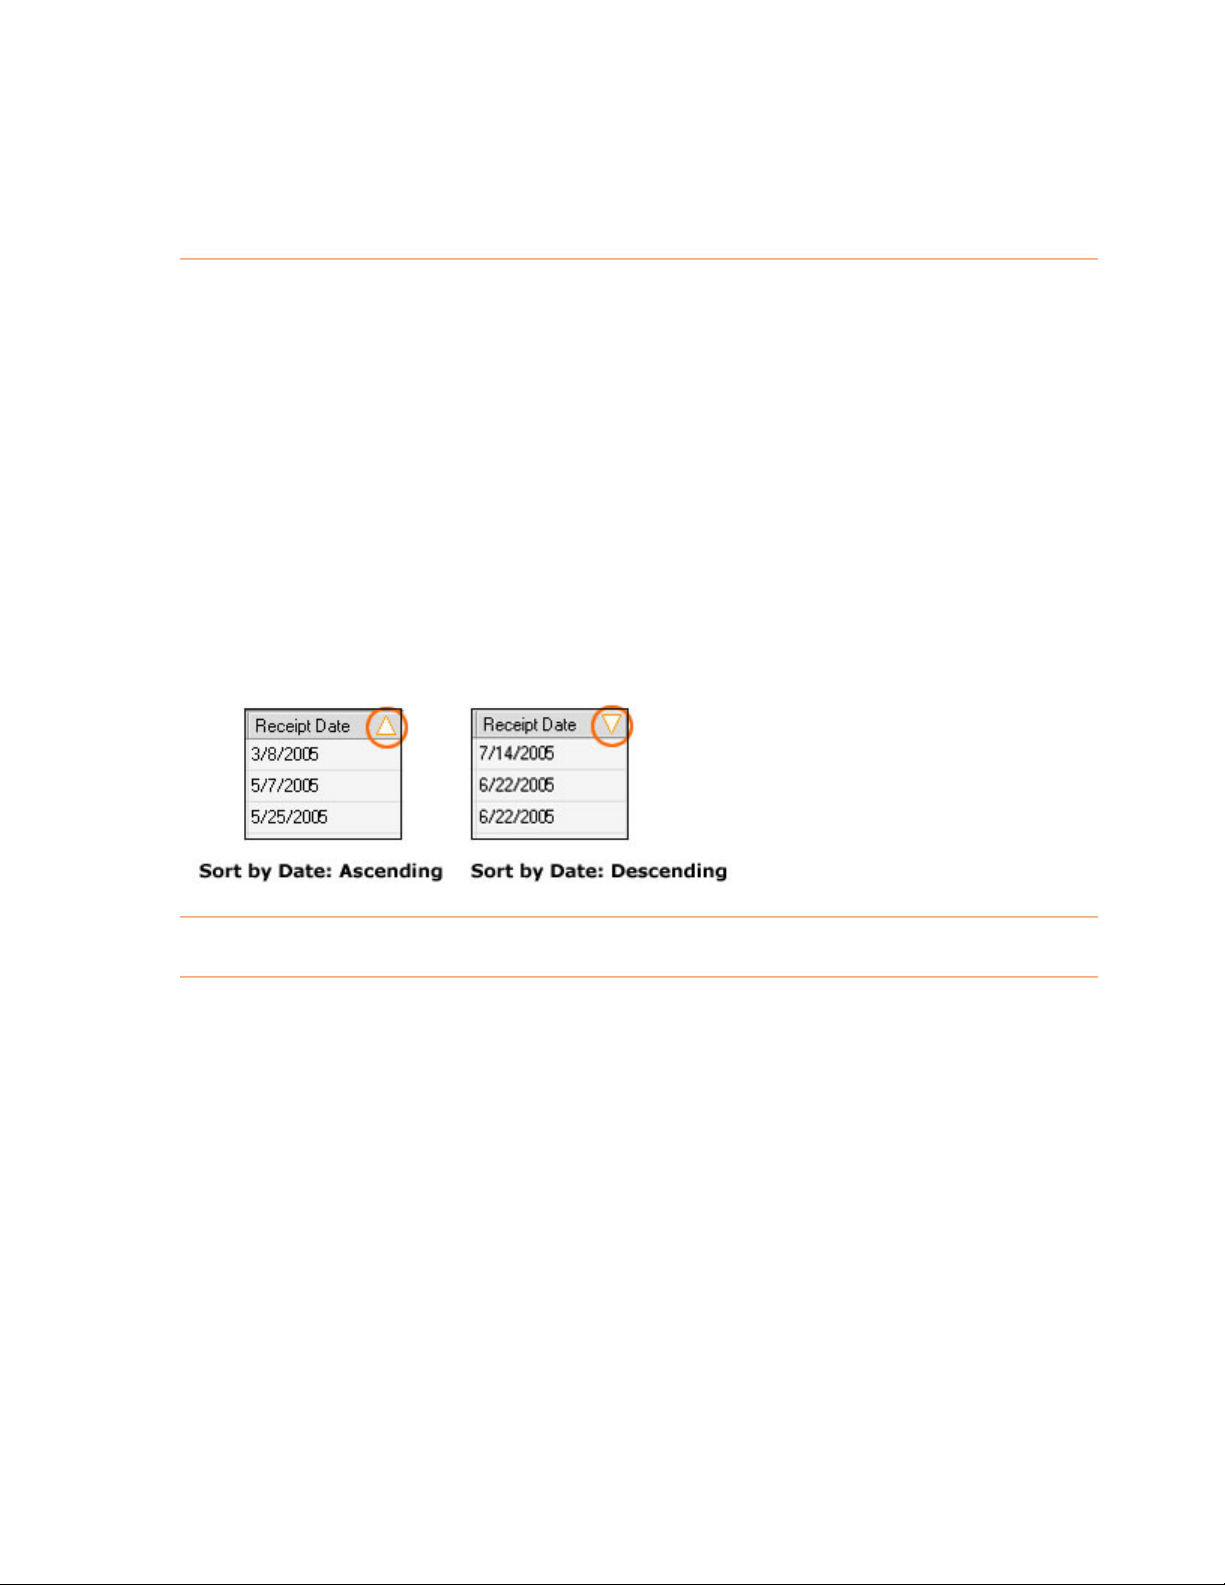
S ti
or ng Receipt Rows
Rows
in the Receipts Grid can be sorted by simply clicking on a column headin g.
Keep i
n mind the following:
• he
A small arrowhead in the top right corner of a column heading identifies t
column the rows are currently sorted by.
An "up" arrowhead (pictured below) indicates ascending sort order (A-Z, oldest
•
date to newest date).
A "down" arrowhead (pictured below) indicates descending sort order (Z-A,
•
newest date to oldest d
"down" arrowhead (pictured below) indicates descending sort order (Z-A,
•
newest date to oldest date).
Click once on a column heading to sort in ascending order; click again to sort
•
in descending order. T
(descending).
ate).
he default sort order for rows is by Date Created
Multiple Sort Order
The Sort dialog box can also be used to sort by more than one column.
1. To sort the Receipts Grid by multiple columns, from the Tools menu, choose
Sort > Receipts.
2. In the
Sort dialog box (pictured below), select a column heading from the
Sort by dropdown list, and then choose subsequent columns from the two
Then by dropdown lists.
63
Page 64

Splitting a Receipt into Multiple Transactions
The Split Receipts command lets you expense portions of a receipt to differen t client
or projects. For example, if the lodging costs of your hotel bill are to be paid by the
client, but any meals or business expenses are to be reimbursed by your company,
you can split the bill into two or more transactions. A separate row is created f
each portion of the split tran
ex n
pe se type for each row.
1. In the Receipts Grid, select the receipt(s) you want to split.
2.
Right click on any column heading and choose Split Receipt(s) from th e list
that displays, or select
receipt grid.
3.
In the
this pa
can:
Step 1 area of the Split Receipts dialog box (shown at the bottom
ge), indicate the number of transactions to split the receipt into. You
saction and you can then choose the appropriate
the Split Receipt link on the upper right side of the
or
64
s
of
Page 65

• Type a number, OR
•
Use the up/down arrows to change the current number.
Note: The maximum number of transactions is 10. The numb
here dictates the number of items listed in the Step 2 area.
er indicated
4. In he
5.
t Step 2 area of th e Split Receipts dialog box, do one of the following:
• Click
• e up/down arrows to change the current number
• /down arrows to change the current number
Click on the
items and each item will be shown in its own row. An identifying number will
generated automatically in the Split ID column of the Rece
can easily identify which items belong to the split receipt.
Split Equally to split the amount total equally among the items.
Type a number or use th
in the
Type a number or use the up
in the
Amount field.
Percentage field.
OK button. The receipt will be split into the designated number o
ipts Grid so you
f
For more information, please see
Moving a Split Receipt Row to Another Folder.
Splitting a Receipt Across Multiple Folders, and
65
Page 66

How do I import and export r
Impo
rting Receipts
It a
's e sy to import receipt folder(s) that have been emailed to you from other
Nea W
t orks users.
1. re storing it.
First, download the .nrx (or .zip) file, taking note of where you a
2. Next, do one of the following:
• Navigate to the folder containing the .nrx file and double-click on the
file's icon. NeatWor
and import the file
eceipts?
ks will start automatically (if it's not already running)
• If NeatWorks is already running, choose
der File
Fol
file and select it.
The new folder row(s) appears in the upper grid (.nrx file can contain one or
more folders of receipts). The receipts contained in those folders will be vi
in the lower grid.
Expo
rting Receipts
NeatW ,
HTML , Quicken, MS Money, OFX, and CSV (comma separated values).
N , and
HTML format. To to export QuickBooks, Quicken, MS Money, OFX, and CSV
fo
orks allows receipts to be exported in a variety of formats: PDF, Excel, Word
, QuickBooks
ote: The following steps describe how to export receipts in PDF, Excel, Word
learn how
rmats, see the topics in
1. Select the receipts(s) or folder(s) you want to export.
2. From the Toolbar, choose
3.
From the
dialog box opens (pictured at the bottom of this page).
4. Under the
export only those rows
Export submenu,
Select Range heading, click the Selected Receipts button to
Folder (All Receipts)
from the toolbar, navigate to the folder containing the .nrx
How do I import and export fold
Export.
choose an export format. The Export Choices
selected in the Receipts Grid or leave
selected to export the entire folder.
Import From > Receipt
sible
ers?
Selected
5. Under the
Images
Columns and Images.)
6. If you've selected
additional column selections under the
step 8.
7. If you've selected
additional image selections under the
Printing a Receipt Row (previously in this section), for details on Column,
Image, and Formatting Options.
8. Under the
page (with user profile, folder, and receipt summary information), folder and
receipt comments, paper size, page numbers, and/or image captions (that
Select Range heading, choose whether you want Columns and
, Columns Only, or Images Only to be exported. (The default is
Columns and Images or Columns in step 5, make
Column Options heading and skip to
Columns and Images or Columns in step 5, make
Image Options heading. Note: See
Select Formatting heading, choose whether to include a cover
66
Page 67
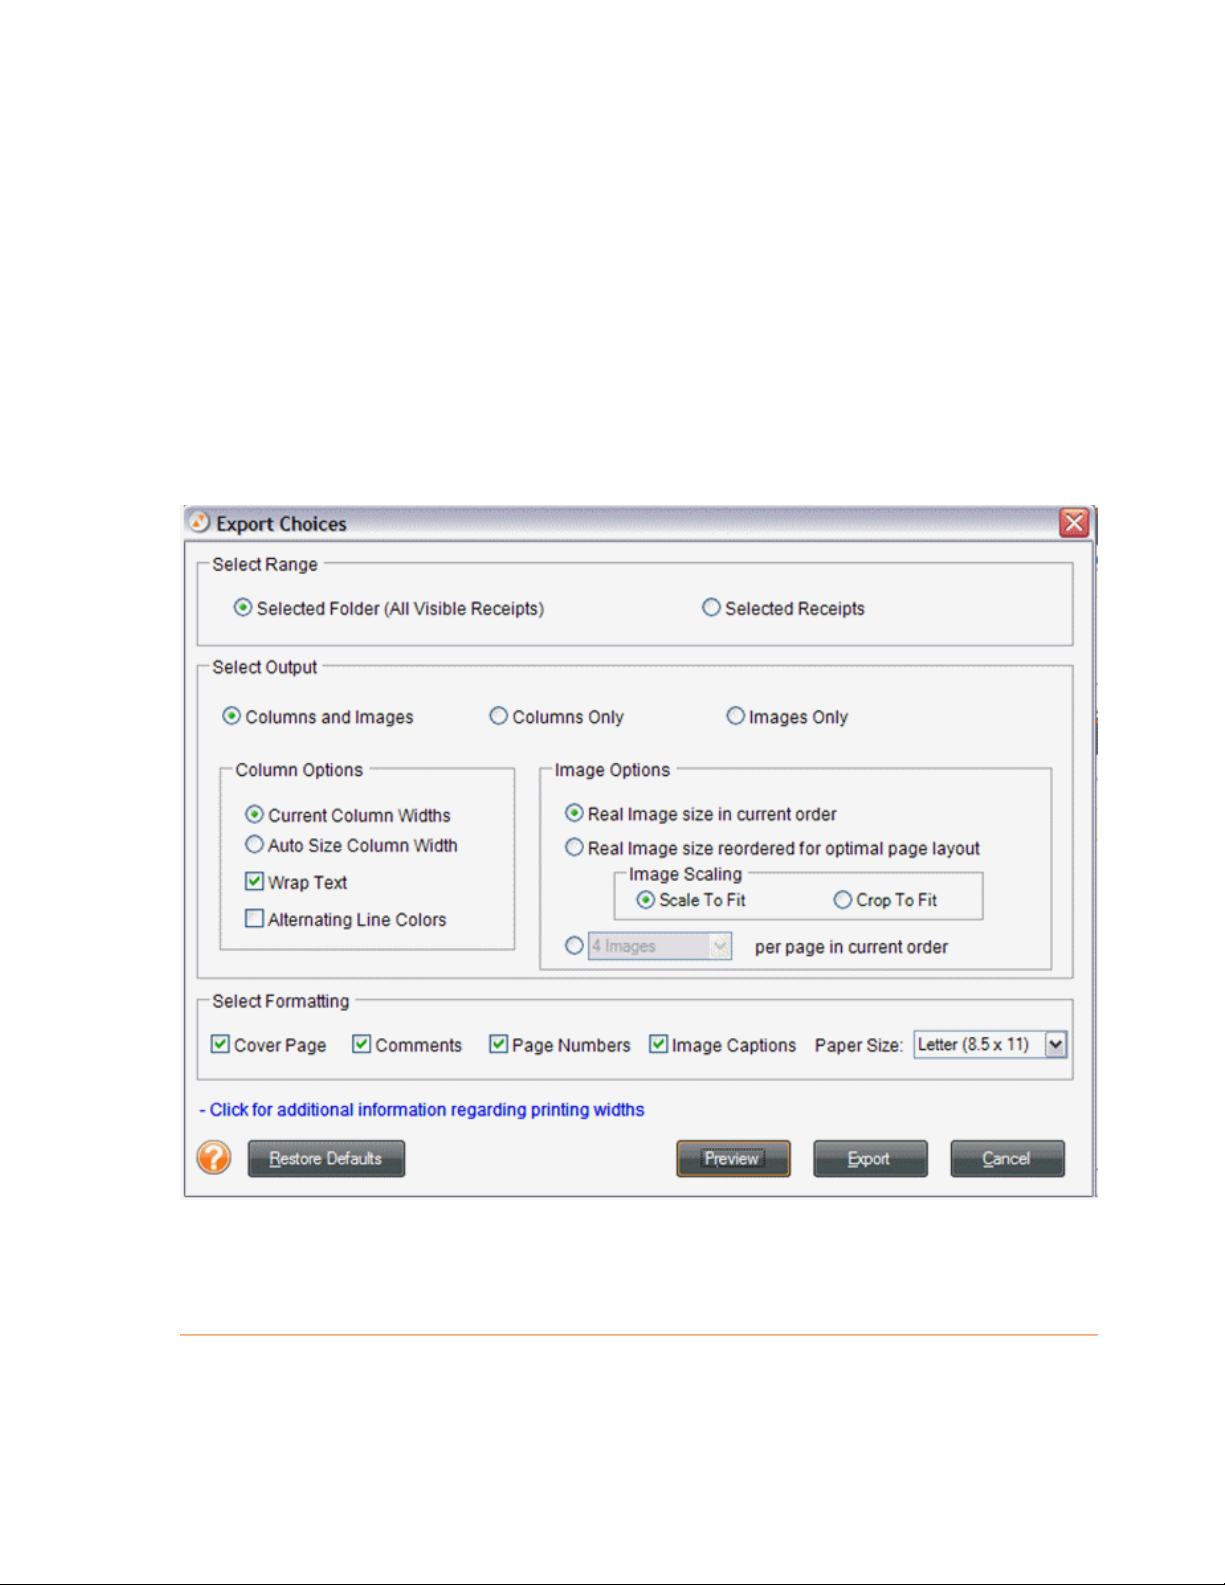
reference images to receipt rows). By default, all options are checked to be
included.
9. Under
10. Click
11. Click
12. Use the
save the exported file.
13. In the
14. In the
15. Click
Image Scaling, choose either Scale To Fit or Crop To Fit.
Preview to preview the exported data file.
Export to export the data file.
Save In dropdown list to navigate to the folder in which you want to
File name field, type a name for the exported file.
Save as type dropdown list, leave the default file type suggested.
Save.
67
Page 68

H
ow do I run a receipt report?
Y
ou can run receipts reports whenever want to see your information organized to
hi
ghlight certain relationships. For example, the
menu offers a variety of summary reports you can run: Spending by Client;
Category; Payment Type; Project; Vendor
ersonal, Reimbursable, or Bill Paid); and client (Business & Personal View only).
P
Reports are run on all receipts in the database. Use the options in the Reporting
Wizard to narrow the focus
You will find the followi
Use the report win
•
Run a report
•
Save a report
•
of a report by Folder Type and Receipt Date.
ng topics addressed in this section:
dow toolbar
or Payment Class (by Billable, Paid by Co.,
Reports > Receipt Reports
Using the Report Window Toolbar
e report window provides a toolbar for easy navigation, printing, and copying. The
Th
olbar is pictured below.
to
vigating in a Report
Na
There are several ways to navigate within a report:
• Use the Next P
between pages.
Type a number in the Current Page Number field and
•
•
Use the Backward and Forward buttons to move between the currently
viewed page and the previously viewed page.
age and Previous Page buttons to move consecutively
tap Enter.
68
Page 69

Running a Report
To run a receipt report, do the following:
1. On the toolbar, select
Reports > Receipt Reports.
2. Next, select
the bottom of this page).
3. Under the
4. Under the
to narrow the scope of the report. (Type dates in MM/DD/YYYY format, or click
on the dropdown menu to select from a calendar.)
5. Under the
Detailed). Detailed reports provide line item information for each receipt.
6. Click on
report. After you run a report, it opens in its own separate window.
a report type. The Reporting Wizard dialog box opens (shown at
Step 1 heading, select the Fo
lder Type(s) to include in the report.
Step 2 heading, define the date criteria according to Receipt Date
Step 3 heading, select the preferred detail level (Summary or
Run Report to close the Reporting Wizard dialog box and run the
69
Page 70
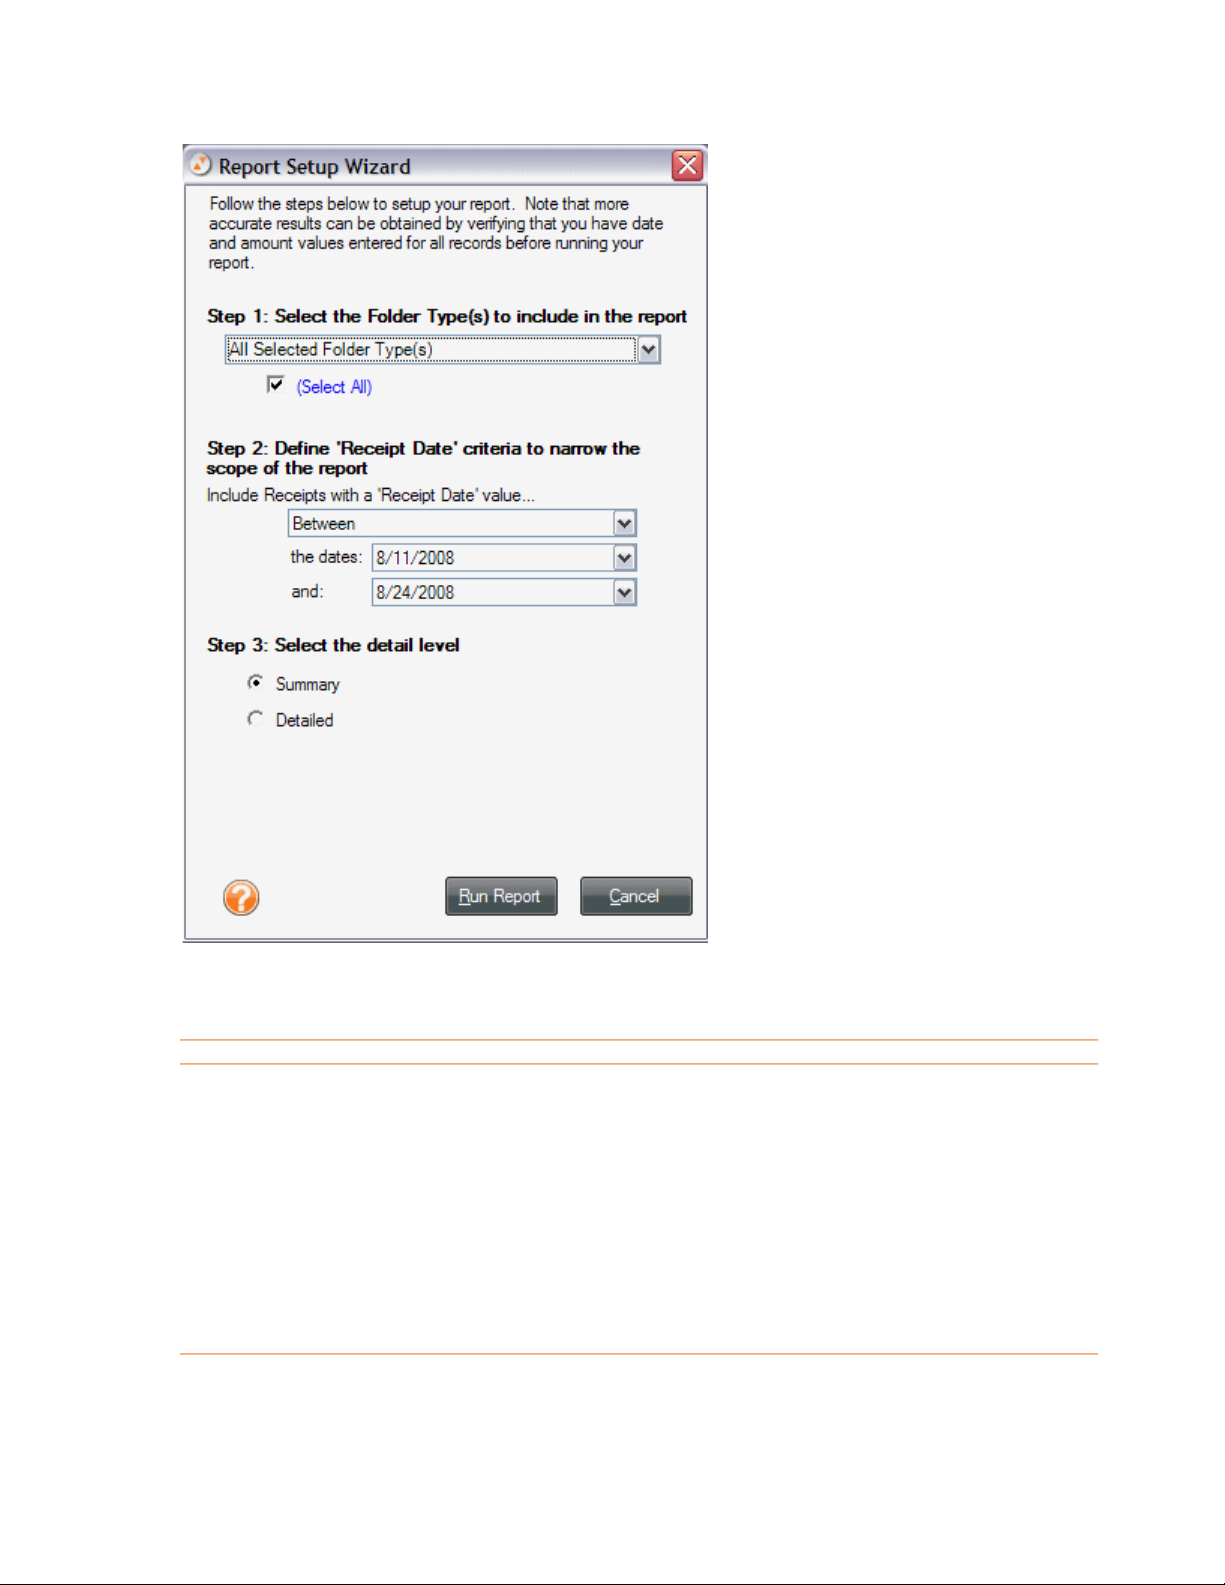
Saving a Report
To save a report, do the following:
. Select a file type from the
1
Save/Export Report As dropdown list.
2. Click
3. Navigate to the folder you want to save the file in.
4. Type a na
5. Click
Go
.
me in the
Save.
File name field.
70
Page 71

Can
I edit vendor names and other lists?
es, NeatWorks makes it easy for you to edit vendor names and other lists, and this
Y
section will help you with the following, related tasks:
Add an item to a list
•
Edit an item in a list•
Delete an item in a list
•
Overview of Vendor Names and lists
You can edit the values in the dropdown lists for the following columns:
• Folder Type
Folder Label
•
ndor
Ve
•
Project
•
Purpose
•
ocation
L
•
Client
•
Category
•
ote: The Folder Type, Vendor, and Category lists come pre-loaded with popular
N
oices that you can add to or edit. The Payment Type list comes pre-loaded with
ch
lues that you can add to (but not edit). The other Lists are blank until you do one
va
f the following:
o
Use the Personalize > Lists dialog box (pictured below) to add an entry to
•
a List.
Type a unique entry in one of the above l
•
isted columns.
71
Page 72
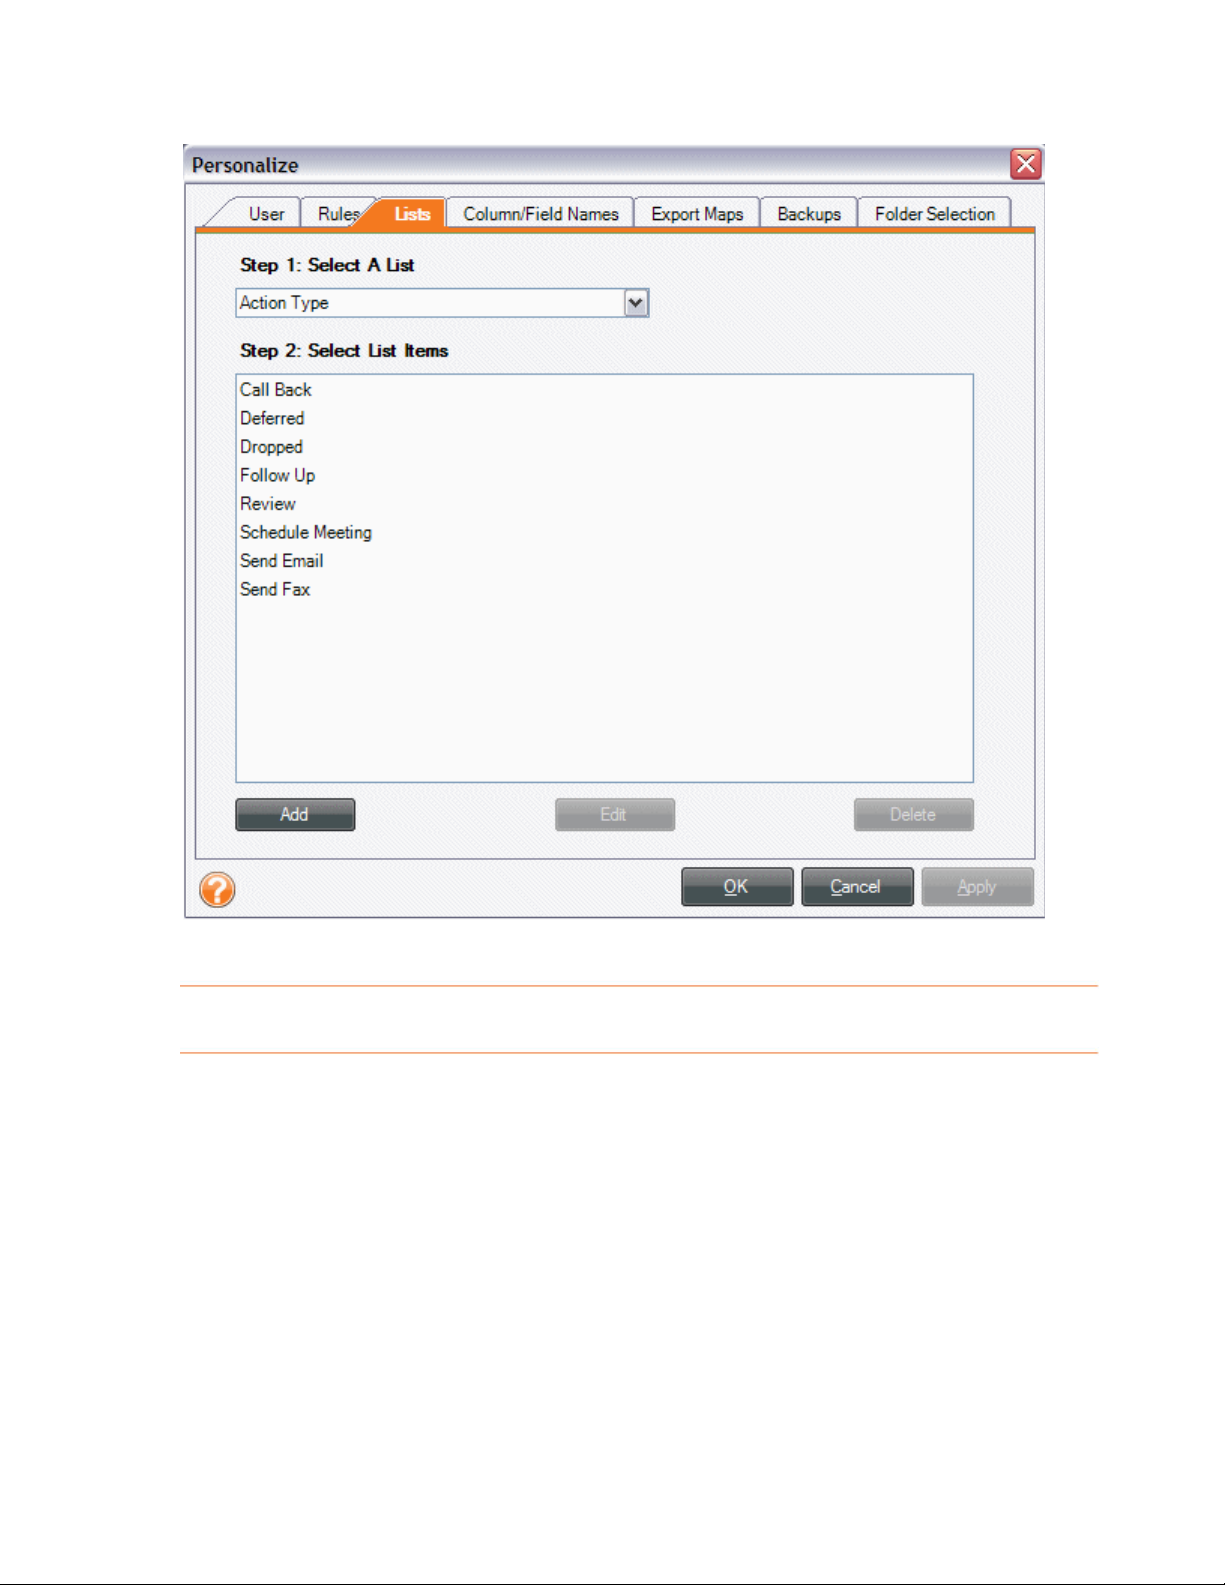
A i
dd ng an Item to a List
Anytime y , just go to the Personalize menu and do
th fo
e llowing:
1.
2.
3.
4.
ou want to add an item to a list
From the Toolbar, choose Personalize > Lists.
Under the Step 1: Select a List heading, select the list you want to add an
item to.
Click the Add button.
Type the new list item into the pop-up window an d click Save.
5.
Click on OK to apply the changes an
appear in the dropdown list of the appropriate column.
d close the dialog box. The new item will
72
Page 73

E i
dit ng an Item in a List
Anytim just go to the Personalize menu and do
th o
e you want to edit an item in a list,
e f llowing:
1. From the Toolbar, choose
2. Under the
you wish to edit.
3. Under the
item you wish to edit.
4. Click the
5. Type the new list item into the popup window and click
6. Click on
appear in the dropdown list of the appropriate column.
Step 1: Select a List heading, select the list containing the item
Step 2: Select List Items heading, click on the name of the list
Edit button.
OK to apply the changes and close the dialog box. The new item will
Personalize > Lists.
Save.
Deleting an Item in a List
Anytime you want to delete an item from a list, just go to the Personalize menu and
do the following:
1. From the Toolbar, choose
2. Under the
3. Under the
item you want to delete.
4. Click the Delete button.
5. Click
6. Click on
Step 1: Select a List heading, select the list you want to work in.
Step 2: Select a List Item heading, click on the name of the
Yes to confirm the deletion of the item.
OK to apply the changes and close the dialog box.
Personalize > Lists.
73
Page 74
Can I personalize columns and fields?
Yo can personalize columns and fields in the Receipts Grid by showing/hiding
u
columns, moving columns,
name. These tasks are described in the following topics:
• Showing/Hiding Columns
Moving Columns
•
Resizing Column Widths
•
Modifying a Column or Field Name
•
Understanding and Modifying User Rules
•
Understanding the Attached Column Icons
•
resizing column widths,
or modifying a column or field
Showing and Hiding Columns
By default, not all columns are displayed in the Receipts Grid, but you can choose to
show or hide columns as needed.
1.
From the Tools menu, choose Show/Hide Columns > Receipt
Columns
2.
Select an unchecked item in the menu to add it to the grid. OR
Select a checked item in the menu to remove it from the grid. You can always
3.
add it back later.
Movi
ng Columns
Columns within the Receipts Grid can be placed in any order you wish.
To move a colum
location.
Note: The Folder Number and Attached columns cannot be mo
.
n, simply use your mouse to press and drag its heading to the new
ved.
Resizing Column Widths
You can resize column widths to your liking.
• To set all columns to their default widths, go toTools > Auto-Size Column
Widths > Receipts Columns
.
74
Page 75

• To manually resize column widths, position the cursor on the line between two
column headings, and when you get the double-arrow cursor, press and drag
your mouse to the right or left.
Alternatively, to auto-resize the column to its default width, again position the
•
cursor on the line between two column headings, and when you get the
double-arrow cursor, just double-click with your mouse to auto-resize it.
Modifying a Column or Field Name
If the default column and field names are not specific enough for your purposes, you
can modify them as needed. To modify column and field names, do the following:
From the Toolbar, select Personalize > Column/Field Names
1.
(pictured at the bottom of this page).
2. Under the
Step 1: Select a Column or Field Name heading, select the
field name you want to change.
3. Under the
Step 2: Edit the Column or Field Name heading, click the
Use Custom Name radio button.
4. Type the new field name in the
5. Click
OK. NeatWorks must be restarted for the change(s) to take effect.
Use Custom Name field.
75
Page 76

hat follows is a comprehensive list of column and field names in the Receipt W
Organizer:
76
Page 77

77
Page 78

Understanding and Modifying User Rules
e NeatWorks program employs a few simple user rules that help to automate the
Th
anning process and customize your own experience of the software. These rules
sc
n be personalized to suit your needs. There are four main categories of user rules:
ca
Auto-Populate Rules: If checked,
tomatically populated with the values fau
default payment type for those instances where the payment type used was u
to be determined.
when a new row is created its cells are
rom the previous row. You can also select a
nable
Restaurant Receipt Rules: When checked, a tip of 15% (default) is
automatically taken on the subtotal of
Amount. Optionally, you can choose to have the subtotal rounded to the near
dollar before the tip is applied.
Rate Per s you specify the rate per mile used for a Fuel-
A c .
uto omment. The default is 0.35
System Rules: ptions in the System Rules section: the Reset
button is Tip Again" messages, and the checkbox for "Show major
u at
pd es."
• First, when using N
Next, you can decide whether or not you want NeatWorks to display a
•
Mile Rules: This rule let
There are two o
for "Don't Show Th
eatWorks, you will often notice that certain features have
pop-up tips associated with them; the
them that says "Don't Show This Tip Again." If you select the checkbox, the tip
will no longer appear when you use the feature associated with it. However, if
you later decide that you do want to start seeing these tips again, you can click
Reset button in the System Rules section. Clicking Reset will reset the
the
tips, allowing them to appear
notification when major updates are available. Leaving this checkbox selected
enables this feature, while desel
means NeatWorks will not display update notificat
restaurant receipts and added to calculate the
est
se tips each have a checkbox next to
when using certain features.
ecting the checkbox disables the feature, which
ions.
M if
od ying User Rules
Rules , do
can and should be personalized to suit your needs. To modify them
th fo
e llowing:
1. Fr
om the Toolbar, choose Personalize > Rules.
he Personalize dialog box opens with the Rules tab selected
T
(pictured below). A checkmark next to a rule indicates that the rule
is enabled; no checkmark indicates that the rule is disabled.
78
Page 79

2. Modify rules as desired, keeping in mind the following:
• To disable a rule, remove the checkmark in the corresponding checkbox.
• To enable a rule, add the checkmark in the corresponding checkbox.
• To change the default payment type, make a selection from the dropdown
menu. (Cash is the default.)
• To change the tip percentage used, check the field and then type a number in
the box or use the up and down arrows to change the amount.
To add a rate per mile, type a number in the
•
use the calculator-like selector.
3. Click
to cancel the changes, click
OK to apply the changes and close the dialog box. Alternatively, if you want
Cancel.
Understanding the Attached Column Icons
box, or click the down arrow to
79
Page 80

T id indicates whether a scanned receipt
he Attached column in the Receipts Gr
im e
ag is associated with that receipt row, as shown below:
A ig
ss ning Tax Categories
If you use NeatWorks for tax purposes, it's a good idea to get in the habit of
a gn his
ssi ing tax categories to documents or receipts anytime you scan a new item. T
way, possibly
you're taking steps to organize your tax information ahead of time,
savin ory column
g yourself a lot of work during tax season. By default, the Tax Categ
(shown
ta ca
x tegory, you can select a pre-defined category from the dropdown list.
Tax Cat
below) depicts a value of "No form: Non-deductible." To assign a different
egories versus Regular Categories
It's important to point out that a "Tax Category" is different from a regular
ategory" in NeatWorks. That is, in both the Document and Receipt
"C
ganizers, a regular "Category" is a column heading used to describe the
Or
general type of receipt or do
"Lodging/Hotel." A "Tax Cate
cument category, such as "Grocery Store," or
gory" is the column heading you assign if you
want to track receipts or other documents using the Tax Organizer.
If your Tax Category colum
re i
ad ng
Showing and Hiding Columns.
n is not visible, you can learn how to enable it by
To assign a
1. In the Receipt or Document Organizer, select either a receipt in the Receipt
Grid or a document in t
2. Click on the down arrow in the Tax Category cell to view and select a tax
category from the pre-defined
U g
sin the Quick Tips Box
If you n
selec t Organizer and then look in the
t it in the Receip
appears in the Additional Field Info section at the bottom of your screen.
tax category for a receipt or document, do the following:
he Document Grid.
values.
are unsure about the meaning of a particular tax category, you ca
Quick Tip box that
The
80
Page 81
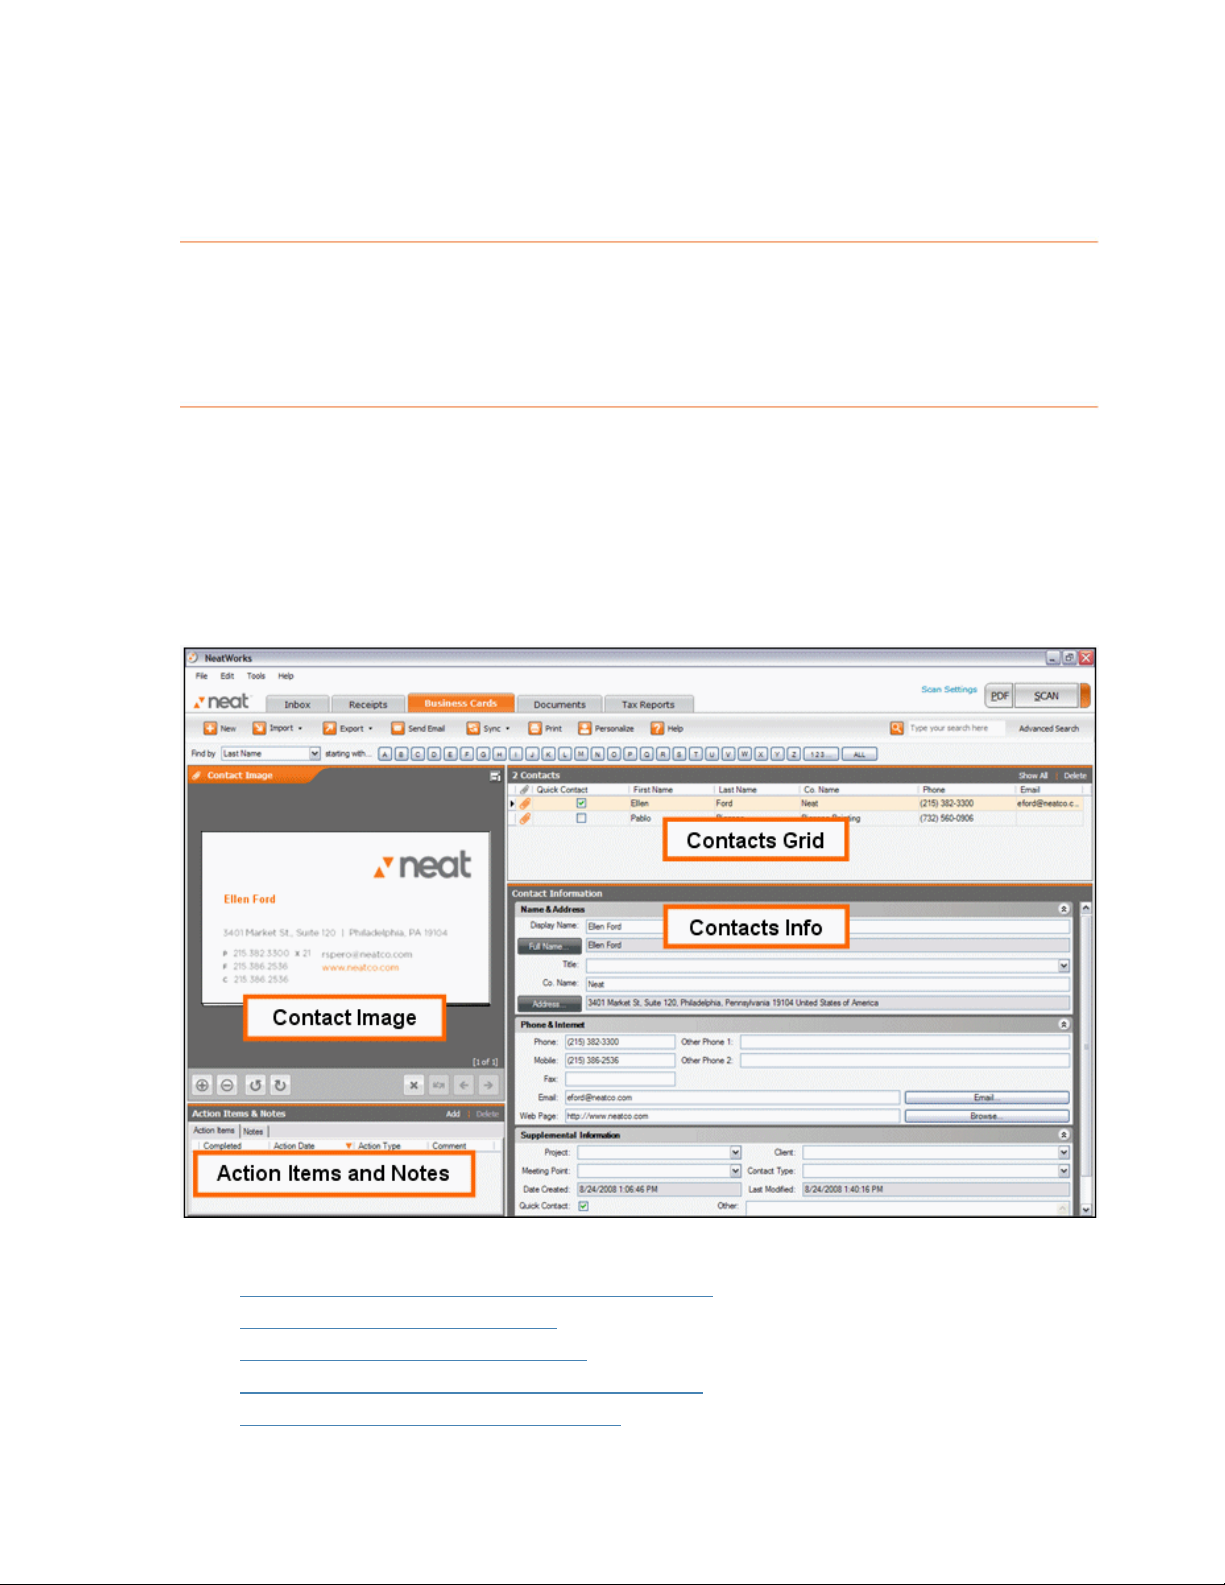
Quick Tip section will display a helpful description of the tax category you
have selected and a link to the appropriate IRS website.
Using the Business Card Organizer
e goal of this section is to provide you with a better understanding of the Business
Th
Card Organizer. We describe how to work with business card images; and how to
edit, sort, delete, print, import
The Business Card organizer is shown below:
, and export contact information.
You will find dressed here:
E lo
•
H dow o I scan a business card?
•
How can I work wi
•
What can I do with my business card images?
•
How do I import and export contact
•
the following topics ad
xp ring the Business Card Organizer Window
th my contacts?
s?
81
Page 82

Exploring the Business Card Organizer Window
To access the Business Card Organizer, click on the Business Cards tab. The
Business Card Organizer is easy to navigate
various screen areas. Each area is d
escribed below.
once you become familiar with its
• The Contacts Grid allows you to create and manage Contacts.
not all columns are displayed in the Contacts Grid. You can choose to show or
hide columns as needed.
• The
• The
•
Contact Informa
currently selected contac
Image Viewer on the left side of the screen displays the image
associated with the selected contact.
Action Items & Notes provides an area for you to specify additional note
or add an action item.
tion Area displays all contact information for the
t in the Contacts Grid.
How do I scan a business card?
In rt
se paper into the scanner then:
• Press the scan bu
• Click the
Click the
•
scanning is complete, the Quick Scan Center will process the image(s), which
can then be reviewed and filed from within the Inbox.
Scan button on the Quic
Scan button on the upper right side any organizer screen. When
tton on the scanner.
k Scan Center screen.
By default,
s
H
ow can I work with contacts?
E
ach time a business card is filed into NeatWorks, a new row is added to the
Co a
nt cts Grid. You can also manually add a new contact, edit information (directly in
a row
or in the Contact Information area), delete, sort or print contacts, as well as
add action items or notes to contacts.
following topics describe the ways in which you can work with contacts:
The
Selecting a Contact Row
•
Editing Contact Information
•
Adding a Contact without Scanning a Business Card
•
82
Page 83

• Deleting a Contact
Sorting the Contacts Grid
•
Printing a Contact
•
Adding an Action Item for a Contact
•
Selecting a Contact Row
Selecting rows in NeatW
use spreadsheet-type layouts:
• To select a single row, click an
orks is very similar to selecting rows in other programs that
y cell in the row.
To select multiple adjacent rows, click in the first row you want to
•
hold down the
•
To select multiple non-ad
then h
E i
dit ng Contact Information
Anytime you need to modify contact information, you can do so directly in a cell in
Contacts Grid or the Contact Information area. Your chan ges will be saved
thaue
tomatically.
old down the
Shift key and click in the last ro
jacent rows, click in the first row you want to select,
Ctrl key and click in each row you want to select
w you want to select.
select, then
.
To edit contact information in the Contacts Grid:
1. In the Contacts Grid, click in the cell you want to m
2. Edit the contact's information as needed.
T ed e Contacts Information Area:
o it contact information in th
ictured at the bottom of this page), click the
1. In the Contact Information area (p
field you want to modify.
needed.
2. Edit the contact's information as
3. Click the
your email contacts list. Your changes will be saved automatically.
Quick Contact checkbox if you would
odify.
like this contact to appear in
83
Page 84

Adding a tact without Scanning a Business Card
Con
You do not need to scan a business card in order to add a contact to the Contacts
id.
Gr
add a contact without scanning a business card, please do the following:
To
From the toolbar, choose
1.
2.
Type the contact's information in the Contact Inf
in the
D
eleting a Contact
You can always delete a business card image if need be. To do so:
. In the Contacts Grid, select the contact(s) you want to delete.
1
Click the Delete link on the up
2.
Contacts Grid cells. The new contact will be saved automatically.
New.
ormation area or directly
per right side of the gr id.
84
Page 85

3. When prompted, click on Yes to confirm the deletion.
W k
or ing with Deleted Contacts
To view the Deleted Contacts window, choose
•
Items
• To restore one or more deleted contacts, first view the Deleted Contacts
window, then select the contact(s) and click on
To permanently erase one or more deleted contacts, first view the Deleted
•
Contacts window, then select the contact(s) and click on
.
Tools > Go To Deleted
Restore.
Delete.
• To close the Deleted Contacts window, click on the
• To permanently erase all deleted contacts without re
Close button.
viewing them, choose
Tools > Empty Deleted Items > Contacts. Click Yes to confirm.
Sorting the Contacts Grid
Rows
in the Contacts Grid can be sorted by simply clicking on a column heading.
Keep
in mind the following:
•
A small arrowhead in the top right corner of a column heading identifies the
column the rows are currently sorted by.
An "up" arrowhead (pictured below) indicates ascending sort order (A-Z, oldest
•
date to newest date).
A "down" arrowhead (pictured below) indicates descending sort order (Z-A,
•
newest date to oldest date).
Click once on a column heading to sort in ascending order; click again to sort
•
in descending order.
(descending).
The d
efault sort order for rows is by Date Created
To sort by more than one
column, see
Multiple Sort Order.
85
Page 86

Multiple Sort Order
The Sort dialog box can be used to sort by more than one column.
1. To sort the Contacts Grid by multiple columns, from the Tools menu, cho
Sort Contacts.
ose
2.
In the Sort dialog box, select a column heading from the Sort by
list, and then choose subsequent columns from the two
lists.
Click on OK to perform the sort
3.
.
Then by dropdown
dropdown
P t
rin ing a Contact
N tW ws you to print contacts as necessary. To do so:
ea orks allo
Grid, select the contact you want to print.
1. In the Contacts
e Toolbar, choose
2. From th
In the
Print Choices dialog box, do the following:
Print.
86
Page 87

• In the Select Range area, choose whether to include all visible contacts
or selected contacts.
• Click the appropriate orientation button (Landscape or P
• In the Set
ages, contact info only, or images only.
im
3. Click
box, click
4. In the Print dialog
Print.
Adding an Action I
Y m em to a contact if, for example, you want to remind
ou ay want to add an action it
yourself to email a contact at a later date.
Output area, choose whether to include full contact info and
OK.
tem for a Contact
ortrait).
To add an a tem for a contact:
tacts Grid, select the contact you want to work with.
1. In the Con
2. In the
3. Click on the
select a date for the action item in the
4. Type or
an action type in the
5. Type or select
additional comments in the
6. Type any
In addition to adding an action item for a contact you can also do the following:
•
•
•
•
ction i
on Items & Notes area below the Contact Image viewer, click
Acti
on the
new a
Add a Note for a Contact
Mark a Contact as a Quick Contact
Email a Contact
Mark an Action Item as Complete
ction Items tab (if necessary).
A
d link.
Ad
ction type adds that action to the list so you can use it in the future.
Action Date column.
Action Type column. Note that typing a
Comment field.
A i
dd ng a Note for a Contact
You c :
an use the Notes field to add additional information about a contact. To do so
1. with.
In the Contacts Grid, select the contact you want to work
2. In the
the
Action Items & Notes area below the Cont
Notes tab (if necessary).
act Image area, click on
87
Page 88

3. Type a note in the Notes field.Note: Each note is associated with a specific
cell. Be sure that you have selected the cell associated with the note you w
to change.
Marking a Contact as a Quick Contact
ant
Marking a contact as a quick contact adds that
streamlining the email process.
1. In the Contacts Grid, select the contact with whom you want to work.
Click the checkbox in the Quick Contact column of the Contacts Grid
2.
uick Contact must contain either a display name, first name or last name
A Q
and an email address.
E ai
m ling a Contact
W n n email them from within
he it's time to get in touch with a contact, you ca
N tW
ea orks. To email a contact:
1. In the Contacts Grid, select the contact you want to work with.
. From the
2
Do one of the following:
3.
•
Toolbar, choose Send Email.
Select a Quick Contact from the Contact List and then click on
contact to the list, thereby
Continue.
• Click on
email message box when it opens.
M k
ar ing an Action Item as Complete
Continue and type an email address in the To field of the
. Note:
Once you follow-up with your contact, you can th
complete. To mark an action item as complete:
1. In the Contacts Grid, select the contact you want to work with.
2. In the Action Items & Notes tab, click the
item you wish to mark as completed.
en mark that action item as
Completed checkbox next to the
What can I do with my business card images?
As the be, there are various ways that you can work with your
business card images:
topics below descri
88
Page 89
• Rotating a Business Card Image
Zooming a Business Card Image
•
Viewing a Business Card Image in Full Screen
•
Deleting a Business Card Image
•
Saving a Business Card Image as a Graphic File•
Saving C ontact Information
NeatWorks automatically saves all contact information as soon as it's scanned or
edited. There is no Save button (or menu command) because saving is done for you
by the program.
Rotating
a Business Card Image
If you scan u can
rotate the im as you would in any other image-editing tool.
To rotate your image:
1. In the Image Viewer, select the contact you want to work with.
2. Click the left and right rotate arrows.
3. Repeat as necessary until the scan is upright.
a business card and want to view it from a different orientation, yo
age, much
Zooming a Business Card Image
If you scan a business card and want to see specific portions of the image more
easily, you can always zoom in or out of the image.
To zoom in or out of a business card image:
1. In the Image Viewer, select the contact you want to work with.
2. Click the zoom in or zoom out icons.
3. Repeat as necessary.
Viewing a Business Card Image in Full Screen
If you want rd image, you can view it
in full s e
to see a much larger view of your business ca
cre n mode. To do so:
89
Page 90
1. In he
t Contacts Grid, select the contact you want to work with.
2. Click
3. Click
Deleting a Busines
You can always delete a business card image if need be. To do so:
In the Contacts Grid, select the contact you want to work with.
1.
Click the delete icon in the Contact Image area.
2.
3. When prompted, click
the icon on the upper right side of the Contact Image area.
p right corner) to return to normal view.
X (to
the
s Card Image
Yes to
confirm the deletion.
Saving a Business Card Image as a Graphic File
atWorks allows you to save a business card as a graphic file, such as a JPEG, GIF,
Ne
P, PNG, or TIF. When saving a multiple page business card, each page will be
BM
ved as a separate image and each filename will include the page number of the
sa
image.To save a business card as a graphic file, do the following:
1. Click in the Contact Image area with
2. From the menu that displays when you click your right mouse button, choose
Save Current Visible Image As to save the current image in the Image
View, or choose
front and back of business cards. The
3. Chose a file type from the
appropriate destination folder (where you want to save the image).
4. Type a name for the image in the
How
do I find my contacts?
NeatWorks provides three ways to find your saved receipts and other information. As
th o
e f llowing topics describe, you can:
• Use Fi
N e
nd Contacts to locate a contact by Last Name, First Name, or Compa
am with just a few quick clicks.
Save All Images of Selected Contact As to save the
Save as type dropdown menu. Navigate to the
the right mouse button.
Save Image As dialog box opens.
File name edit box.
ny
dvanced Search
Use A to search by any field in the Contacts Grid.
•
90
Page 91
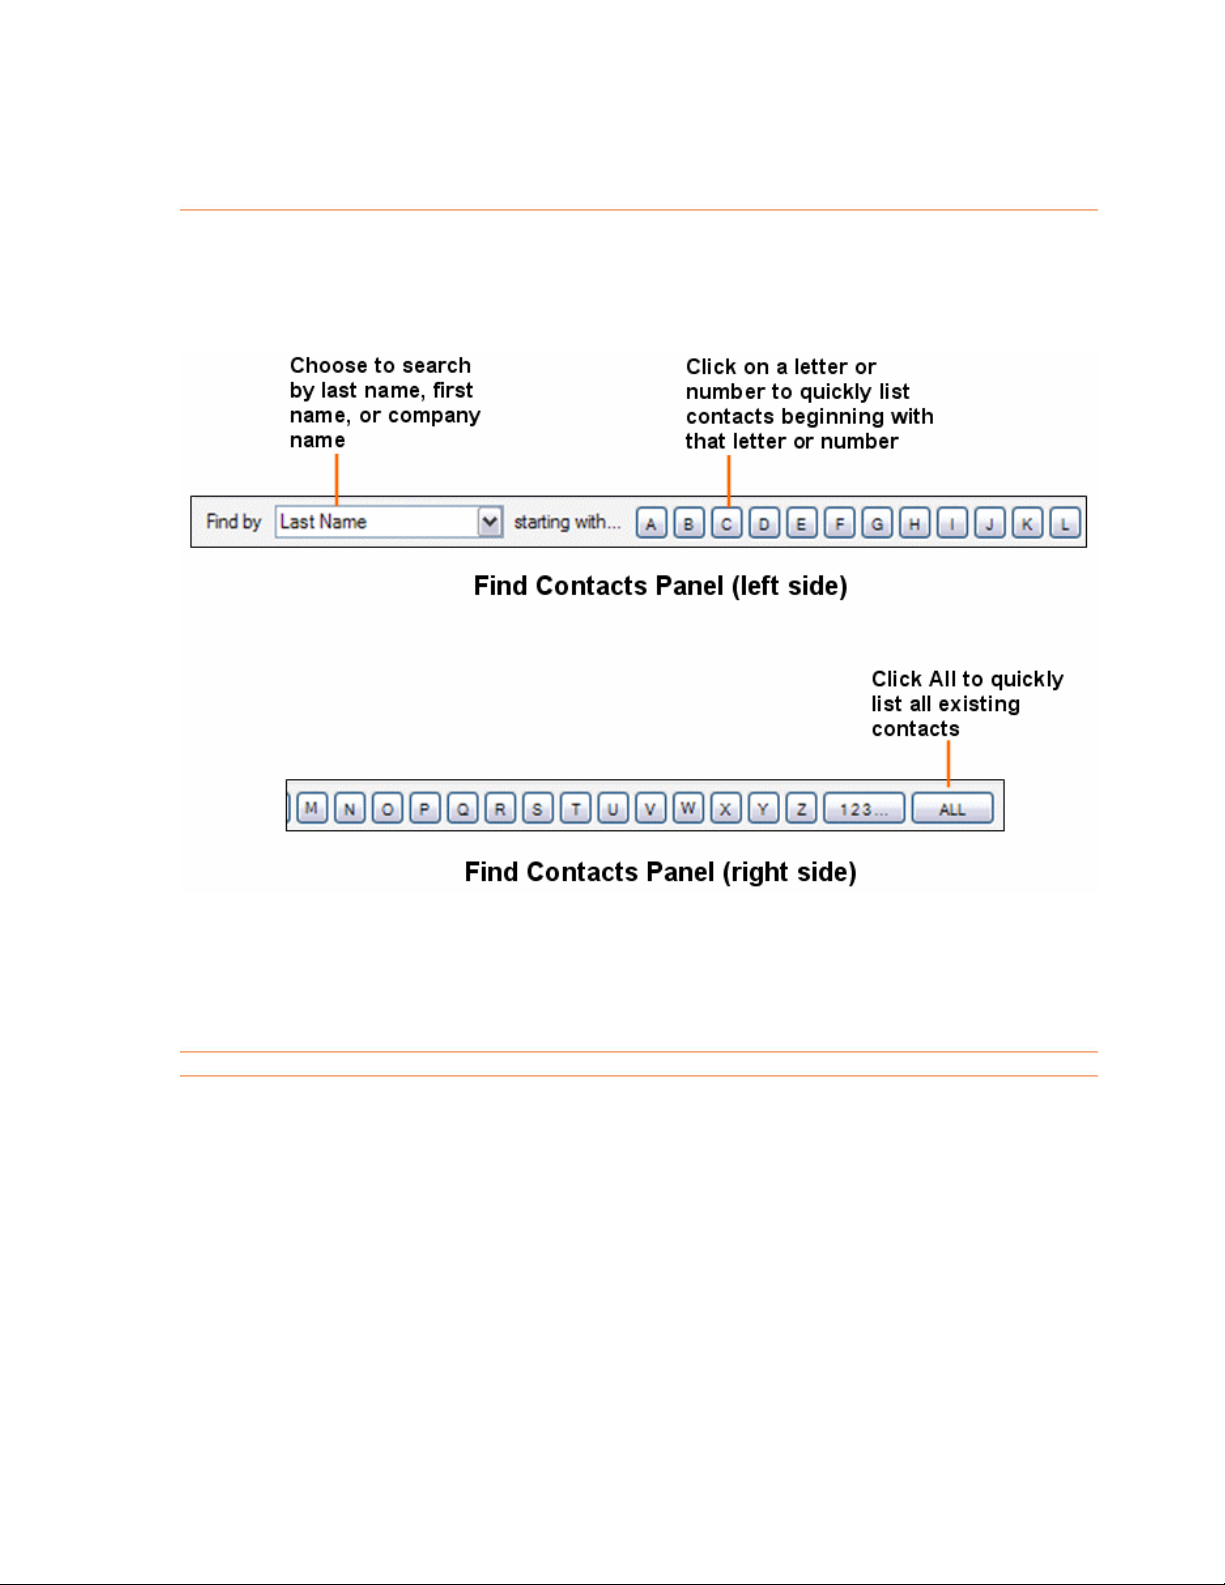
U
sing Find Contacts
The Fi
nd Contacts panel stretches across the top of the Business Organizer, making
it quic
by La irst Name, or Company Name.
k and easy to find contacts fast.
st Name, F
You can use Find Contacts to locate a contact
1. Choose Last Name, First Name, or Company Name from the Find by dropdown
list.
Click on the letter or number that the contact's first name, last name, or
2.
company name begins with or click on ALL to view all of your contacts.
Contacts matching your criterion will appear in the Contacts Grid.
Searching for a Keyword
search for text:
To
1. Open the organizer in which you'd like to conduct your search.
Note: The Search feature works on an organizer-by-organizer level,
which means you should open the
receipt information, the
information, or the
documents.
2. Click in the white box to the left of the
highlighted in the image
3. Enter a search term.
Business Card Organizer to search for co
Document Organizer
below.
Receipt Organizer to search for
ntact
to search for information in
Advanced Search button, as
91
Page 92

4.
With your cursor still in the Search box, you can press Enter.
5. Y in the grid in which you're working.
our search results will then appear
Note: It is a good practice to start your
by sele g
does no
ctin Edit > Clear All Grids prior to conducting your search. Clearing the grid
t erase any data.
search with a clean slate (or a clean grid)
Note: The search engine recognizes certain fields within each organizer, and is
programmed to easily retrieve information from these fields when searched upon.
Listed below are the recognized fields for each organizer. In addition, the search
engine will look for and retrieve information in your scanned images.
Receipt Organizer fields recognized by Search:
• Category
• Client
• Payment Type
• Project
• Tax Category
• TranID
• User
• Vendor
Document Organizer fields recognized by Search:
Category
•
Client
•
• Document Title
• Document Type
• Folder Type
• Project
• Tax Category
• Topic
• Unused Document Text 1
• Unused Document Text 2
Busi
ness Card Organizer fields recognized by Search:
•
Category
•
Client
92
Page 93

• Project
• Payment type
• Tax ID
• Tax category
•
User
Vendor
•
For more information on Search, see
Searching with the Wildcard
.
Searching with the Wildcard
T sing pieces but still find matches.
he wildcard lets you search for terms with mis
For exampl you can use
th y other related results. The symbol for
e wildcard to find the closest match and an
th ildcard
e w is an asterisk: *
To co
1. Click in the white box to the left of the Search button, as shown in the image
2. Enter a search term, followed by the wildcard symbol; for example:
3. With your cursor still in the Search box, press Enter.
e, if you're unsure whether you've spelled a word correctly,
nduct a wildcard search:
below.
restaurant*
words, the wildcard symbol cannot be the first character of the search.
example:
Note: A least one character must precede the wildcard. In other
Correct: restaurant*; Incorrect: *restaurant
For
Tip: The more information that precedes the wildcard, the faster your search results
will be returned. This is because you're giving the search engine more detailed
information, which allows it to return accurate result s more quickly.
For more information on searching, see
Searching for a Keyword
.
How do I import and export contacts?
NeatWorks makes it easy to exchange contacts in a variety of convenient formats.
The following topics describe the different ways that you can exchange your
contacts:
• Exchanging Contacts with other NeatWorks Receipts Users
Choosing to sync with Plaxo or MS Outlook
•
Syncing Contacts with Plaxo
•
Syncing Contacts with MS Outlook
•
Exchanging Contacts Using vCards
•
93
Page 94
• Exporting Contacts to PDF or RTF (MS Word)
Exporting to CSV (Comma Separated Values)
•
Exch rs
anging Contacts with other NeatWorks Use
It's easy to exchange with other NeatWorks users.
contacts
To im NeatWorks file:
port contacts from a
1. Open the email containing the NeatWorks file an
your computer.
2. From the
Toolbar, choose Import > Contact File.
d save the .nrt (or .zip) file to
To export contacts to a NeatWorks file:
1. In the Contacts Grid, select the Contact(s) you wish to sync. (Hold down the
Shift key to select multiple contacts.)
2. From the
3. Choose whether to compress the file and then click
4. Use the
save the exported file.
5. In the
name suggested.
6.
Leave
Save as type dropdown list and click
Choosing
N W u the option of syncing contacts with either Plaxo or MS
eat orks allows yo
Outlook.
Toolbar Export > Contact File.
, choose
Continue.
Save In dropdown list to navigate to the folder in which you want to
File Name dialog box, type a new file name, or accept the default
Contact Files (*.nrt) or Zip Files (
on Save.
*.zip) as the file type in the
to Sync With Plaxo or MS Outlook
To begin, choose Sync > Configure Sync from the toolbar.
1.
• If you are currently managing your contacts with Plaxo, choose
• If you are currently managing your contacts with Outlook and you sync
with Plaxo, choose
Plaxo
.
Plaxo.
94
Page 95
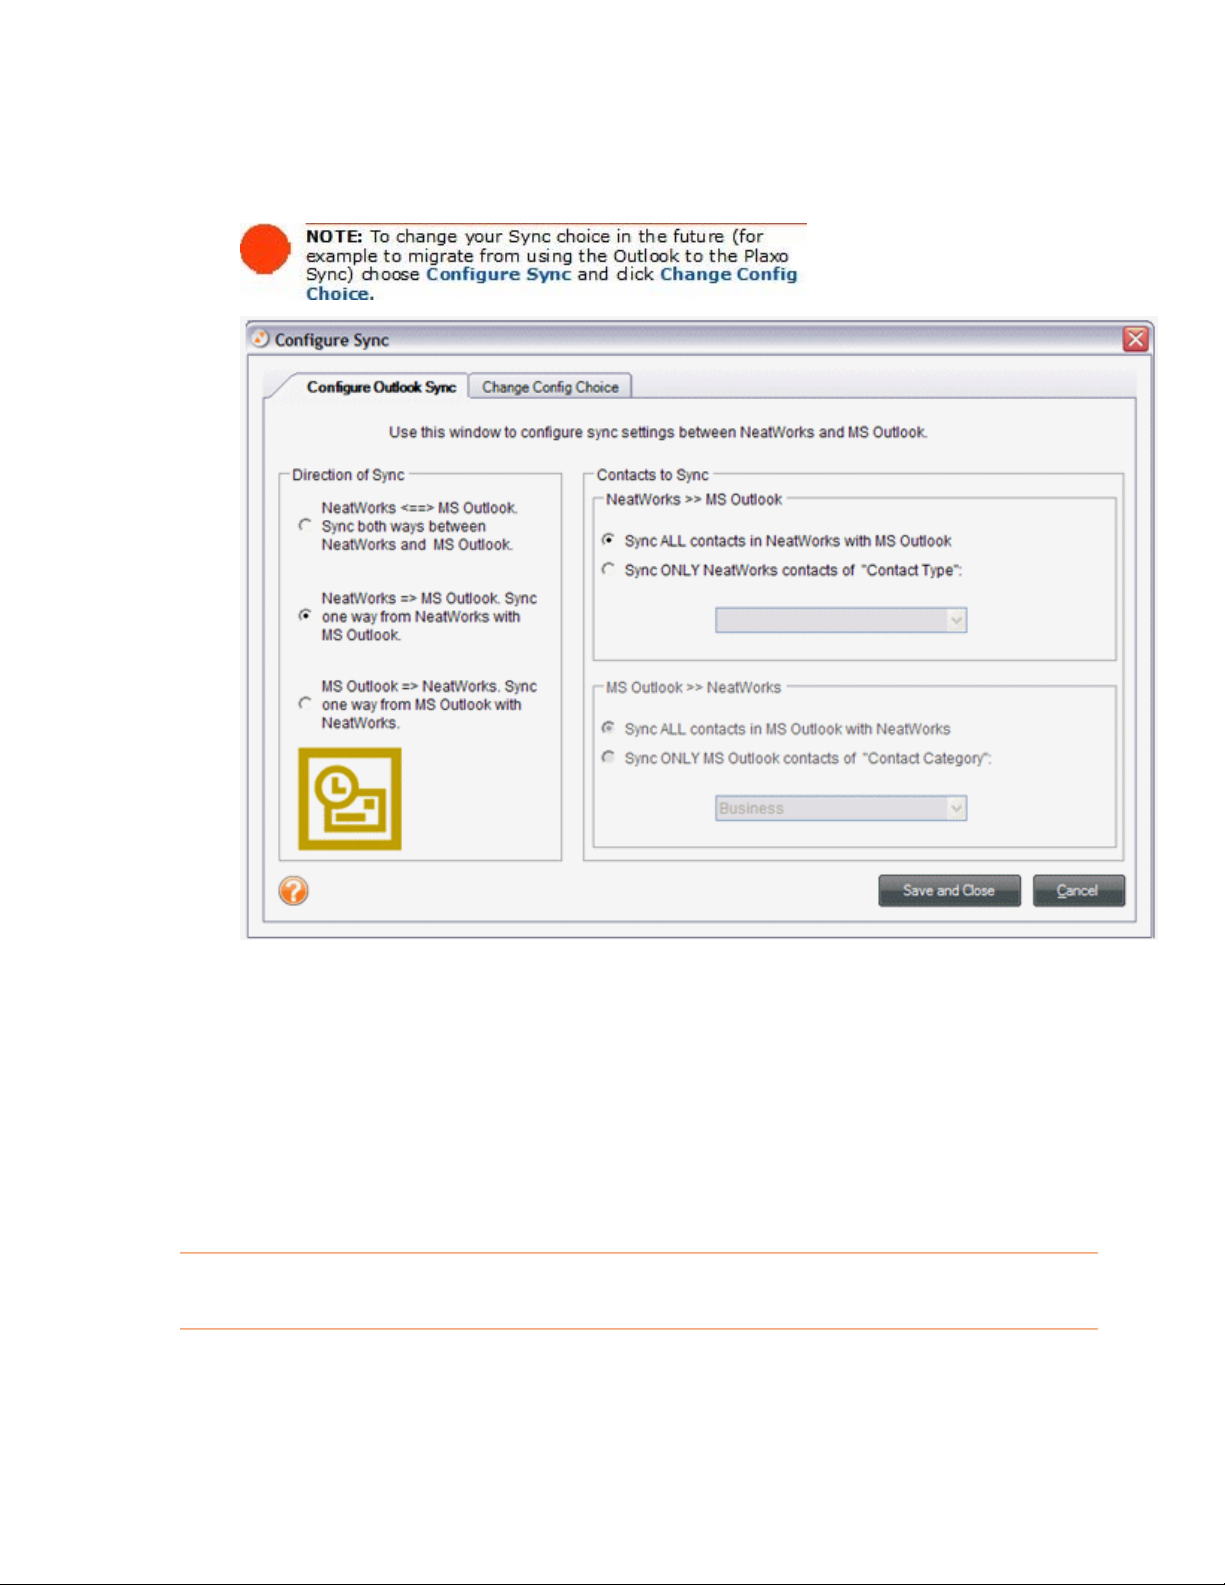
• If you are currently managing your contacts with Outlook, choose
Outlook.
2. If you choose Plaxo:
Type your Plaxo login and password.
•
• Click the
to be online). Click the
remember your login and password, so you won't have to type them
again.
If you chose MS Outlook:
3.
• Verify the default selections under the
Test button to validate your login and password (you will need
Contacts to Sync headings.
• Click on the
Save and Close button.
Syncing Contacts with Plaxo
Save and Close b
Direction of Sync and
utton. NeatWorks will
95
Page 96

Syncing your contacts with Plaxo requires that you have an internet connection, and
that you run the Config Sync Wizard. If you have not yet run this wizard, please
refer to the topic,
Choosing to Sync with Plaxo or MS Outlook.
When you are ready to sync and whenever you need to sync again, just click
with Plaxo
NeatWorks to Plaxo Field Mappings
The following table highlights the NeatWorks to Plaxo field mappings:
.
Sync
Syncing
To syn S Outlook, run the Sync with Outlook tool.
In rd ure that Outlook and NeatWorks are
o er to sync with MS Outlook, please ens
both i ync with Outlook tool, you may
b ro eck the Allow Access for box and
e p mpted to grant access to NeatWorks. Ch
c s
hoo e 10 minutes.
Contacts with MS Outlook
c a large number of contacts with M
nstalled on your computer. When you use the S
96
Page 97

1. Before syncing contacts with MS Outlook for the first time, be sure to verify the
sync settings by choosing
menu.
Configure Sync with Outlook from the Tools
2. Specify the
• The default setting syncs all contacts in NeatWorks to Outlook. This
3. Specify the
4. The settings default to syncing contacts of all types from NeatWorks to
Outlook. To sync a single type of contact (for example, Business), select that
type from the dropdown list. Only those contacts labeled with that type will be
synced.
5. From the
established in the previous steps will be saved and applied whenever you use
this tool.
Direction of Sync.
means that, during the sync, NeatWorks contacts that are not already in
Outlook will be copied into Outlook. However, Outlook contacts will not
be copied into NeatWorks. Choose another option to have contacts in
Outlook transferred into NeatWorks as well, if desired.
Contacts to Sync.
Tools menu, choose Sync with Outlook. The settings you
97
Page 98

K . For
eep in mind that syncing does not delete contacts in NeatWorks or Outlook
e after running Outlook Sync, the contact
xample, if you delete a contact in Outlook
will not be time you run the sync. Also, if you delete a
c utlook Exchanges, the contact will not be
ontact in NeatWorks after running O
deleted in Outlook the next time you run the sync.
te for MS Office 2007 users
No
• Please make sure you have categories assigned for any contacts you wish to
•
deleted in NeatWorks the next
sync with NeatWorks.
If you are running Office 2007 and see the dialog box below, you must follow
these instructions to enter a category name
1. Create or open your contact.
2. Click the All Fields tab.
for a new or current contact:
3. Choose
4. Manually enter the category name.
Select From > Frequently Used Fields > Ca
tegories.
98
Page 99

N W
eat orks to Outlook Field Mappings
T o
he f llowing table highlights the NeatWorks to Outlook field mappings:
99
Page 100
Exchanging Contacts Using vCards
To sync a small number of contacts with MS Outlook or to export to other contact
management applications, simply export them as vCards.
To export a contact as a vCard:
1. In the Contacts Grid, select the Contact(s) you wish to export. (Hold down the
Shift key to select multiple contacts.)
2. From the Toolbar, choose
contact, you will be prompted to export them as
files.
3. In the
destination.
import a contact as a vCard:
To
1. From the Toolbar, choose Import > vCard File.
2. Navigate to the folder containing the file, select the file, and click
contacts will be imported into the Contacts Grid and automatically saved in
your database.
Export g
Save As or Browse For dialog box navigate to the desired
in Contacts to PDF or RTF (MS Word)
Export > vCard File. If you select more than one
a single vCard or as separate
Open. The
NeatWorks or RTF (MS Word). To do so:
Select the contact(s) you want to export.
1.
2. From the Toolbar, choose
3. From the
allows you to export your contacts to PDF
Export .
Export submenu, choose PDF > PDF (Report) or RTF (MS
Word)
. The Export Choices dialog box opens.
100
 Loading...