

Page 1
MP-100
PERFECT PEELER
OPERATORS
MANUAL
Persons under the age of 18 years are not permitted to operate or
have accessibility to operate this equipment
per U.S. Department of Labor Employment Standards
Administration Fact Sheet No. ESA91-3.
MP-100 12/09
ED 1
Page 2

TO INSURE BOTH SAFE AND TROUBLE-FREE PERFORMANCE, WE STRESS
THAT ALL PERSONNEL THAT WILL BE INVOLVED WITH YOUR NEW UNIVEX
MP-100 MELON PEELER MUST READ AND UNDERSTAND THESE
INSTRUCTIONS BEFORE ATTEMPTING TO OPERATE THIS UNIT.
..............................
WE APPRECIATE YOUR COOPERATION AND YOUR BUSINESS.
SHOULD THERE BE A QUESTION OR IF WE CAN BE OF FURTHER
ASSISTANCE, PLEASE CALL US
1-603-983-6191
Page 3

TABLE OF CONTENTS
DESCRIPTION PAGE
TABLE OF CONTENTS . . . . . . . . . . . . . . . . . . . . . . . . . . . . . . . . . . . . . . . . . . . . . . . . . . . . .1
LIST OF ILLUSTRATIONS . . . . . . . . . . . . . . . . . . . . . . . . . . . . . . . . . . . . . . . . . . . . . . . . . .1
INTRODUCTION . . . . . . . . . . . . . . . . . . . . . . . . . . . . . . . . . . . . . . . . . . . . . . . . . . . . . . . . . .2
INSPECTION . . . . . . . . . . . . . . . . . . . . . . . . . . . . . . . . . . . . . . . . . . . . . . . . . . . . . . . . . . . . . .2
SAFETY INSTRUCTIONS . . . . . . . . . . . . . . . . . . . . . . . . . . . . . . . . . . . . . . . . . . . . . . . . . . .2
INSTALLATION . . . . . . . . . . . . . . . . . . . . . . . . . . . . . . . . . . . . . . . . . . . . . . . . . . . . . . . . . . .2
ASSEMBLY INSTRUCTIONS . . . . . . . . . . . . . . . . . . . . . . . . . . . . . . . . . . . . . . . . . . . . . . . .4
OPERATOR’S INSTRUCTIONS . . . . . . . . . . . . . . . . . . . . . . . . . . . . . . . . . . . . . . . . . . . . . .5
PREPARATION OF MELONS FOR PEELING . . . . . . . . . . . . . . . . . . . . . . . . . . . . .5
MELON SANITIZING . . . . . . . . . . . . . . . . . . . . . . . . . . . . . . . . . . . . . . . . . . . . . . . . .5
MELON SIZING . . . . . . . . . . . . . . . . . . . . . . . . . . . . . . . . . . . . . . . . . . . . . . . . . . . . .5
KNIFE SELECTION . . . . . . . . . . . . . . . . . . . . . . . . . . . . . . . . . . . . . . . . . . . . . . . . . .6
KNIFE CHANGING . . . . . . . . . . . . . . . . . . . . . . . . . . . . . . . . . . . . . . . . . . . . . . . . . .6
PROCESSING PRODUCT . . . . . . . . . . . . . . . . . . . . . . . . . . . . . . . . . . . . . . . . . . . . .7
CLEANING . . . . . . . . . . . . . . . . . . . . . . . . . . . . . . . . . . . . . . . . . . . . . . . . . . . . . . . . . . . . . . .8
SHARPENING THE KNIVES . . . . . . . . . . . . . . . . . . . . . . . . . . . . . . . . . . . . . . . . . . . . . . . . .8
WARRANTY . . . . . . . . . . . . . . . . . . . . . . . . . . . . . . . . . . . . . . . . . . . . . . . . . .BACK COVER
LIST OF ILLUSTRATIONS
DESCRIPTION PAGE
FIGURE 1 OVERALL VIEW OF THE MP-100 MELON PEELER . . . . . . . . . . . . . . . .3
FIGURE 2 CRANK ASSEMBLY . . . . . . . . . . . . . . . . . . . . . . . . . . . . . . . . . . . . . . . . . . .4
FIGURE 3 CENTER HEAD ASSEMBLY . . . . . . . . . . . . . . . . . . . . . . . . . . . . . . . . . . . . .4
FIGURE 4 KNIFE ASSEMBLY . . . . . . . . . . . . . . . . . . . . . . . . . . . . . . . . . . . . . . . . . . . . .4
FIGURE 5 KNIFE SELECTION GUIDE . . . . . . . . . . . . . . . . . . . . . . . . . . . . . . . . . . . . .6
FIGURE 6 FRUIT RELEASE . . . . . . . . . . . . . . . . . . . . . . . . . . . . . . . . . . . . . . . . . . . . . .7
Page 1
Page 4

INTRODUCTION
Thank you for purchasing the Univex Perfect Peeler. The Perfect Peeler MP-100 is the world’s most
perfect melon peeler. The MP-100 allows you to produce perfectly peeled melon halves in a matter of
seconds with minimal handling of the edible fruit.
The MP-100 is equipped with two interchangeable peeling knives that will peel melons from 4 inch
wide to 7 inch wide. The MP-100 is not limited to the length of any particular melon, but the width or
diameter of the melon to be peeled must be between 4 and 7 inches. This size range spans melons from
No. 5 Count Honeydew to No. 18 Count Cantaloupe. Refer to page 5, Process Section 2 Melon Sizing
and Knife Selection.
The MP-100 is safe and simple to operate, increases the yeld of edible fruit over hand peeling
methods, is 4 to 5 times faster than hand peeling and it is easy to clean. In addition, reduced handling
results in less bruising, thereby extending the shelf life of the peeled fruit.
The finished product of the Perfect Peeler cannot be duplicated by hand peeling and allows chefs to
present their customers with creative presentations of melons not possible before the Perfect Peeler.
INSPECTION
All Univex MP-100 Perfect Peelers are inspected prior to packaging to assure the quality of the
machine. However, upon unpackaging the machine, all items should be carefully inspected and verified
that they are correct. Any damage, imperfection, or shortages should be reported immediately to your
dealer or directly to the Univex Customer Service Department, and /or the shipping carrier.
OPERATOR SAFETY
• Read and understand all instructions and safety warnings prior to operating the unit.
• Never put fingers or any utensils in the entry of the peeler or in the knife area of the peeler.
• CAUTION:
The knives are sharp and can cut fingers; the center head pins are sharp.
• Always fully assemble the machine before using it.
INSTALLATION
The Univex MP-100 Perfect Peeler is a table-top unit designed to be mounted and used on a table.
Make sure that a comfortable working clearance is provided around the machine for safety and ease of
operation and that the machine is installed where it will save the operator steps. Proper location should
include space for the melon collection container. Determination of where the MP-100 Perfect Peeler will
be placed during operation should take into consideration, the flow of the whole melons, the placement
of the peeled melons and the disposal of the waste skin and seeds.
Page 2
Page 5

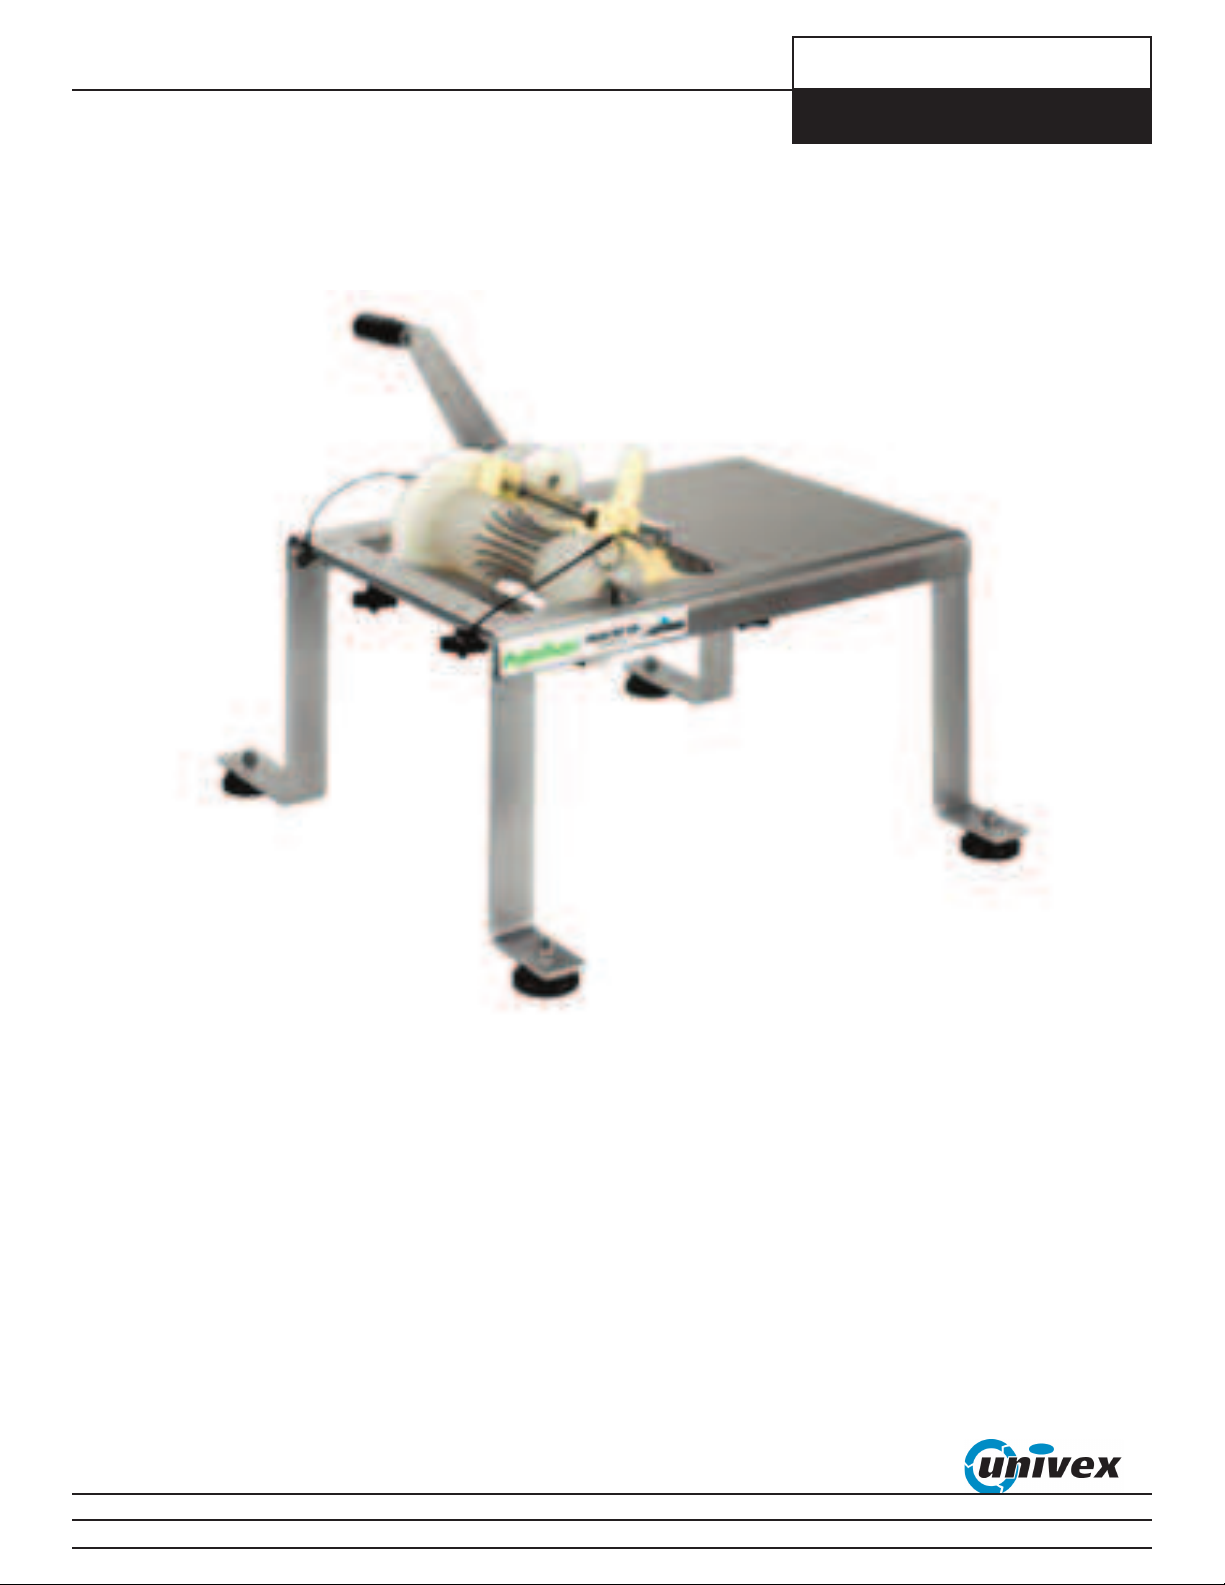
LEG
OPERATING HANDLE
RELEASE PIN
SHAFT SUPPORT
LARGE GEAR
PILLOW BLOCK
CENTER HEAD
SMALL GEAR
SHAFT SUPPORT PIN
FOOT
FRUIT RELEASE
SIDE HEAD
KNIFE ASSEMBLY KNOB
SUPPORT
SIDE HEAD
SUPPORT KNOB
KNIFE ASSEMBLY
OVERALL VIEW OF MP-100
MELON PEELER
FIGURE 1
Page 3
Page 6

ASSEMBLY INSTRUCTIONS
Assemble the MP-100 Perfect Peeler in the following order:
1. Attach the support with the two side heads to the under side of the top plate with the two knobs.
2. Assemble the small gear and shaft through one spacer and the pillow block then the other spacer
and into the handle assembly and secure it with the release pin. Refer to the crank assembly
figure 2.
3. Slide the center head with the large gear onto the center head shaft. Place this assembly into the
peeler meshing the gear teeth and placing the square ends of the shaft under the shaft supports.
Secure the assembly to the shaft supports with the release pins. Refer to the center head assembly
figure 3
4. Place the knife assembly under the top plate and onto the studs and install and tighten the knobs
securely. Be sure to place each side head in the appropriate knife assembly slot. Refer to figure 4.
5. Insure all parts are secure and the center head rotates freely when the handle is turned.
WARNING:
The knife and center head pins are sharp and can cut fingers.
CRANK ASSEMBLY
FIGURE 2
Page 4
SPACER
SPACER
PILLOW BLOCK
RELEASE PIN
HANDLE ASSEMBLY
SMALL GEAR
SHAFT SUPPORT
AND GEAR ASSEMBLY
CENTER HEAD SHAFT
RELEASE PIN
RELEASE PIN
CENTER HEAD
SHAFT SUPPORT
CENTER HEAD ASSEMBLY
FIGURE 3
RIGHT SIDE HEAD
LEFT SIDE HEAD
KNOBS
KNIFE ASSEMBLY
SLOTS
KNIFE ASSEMBLY
FIGURE 4
Page 7

OPERATOR’S INSTRUCTIONS
PREPARATION OF MELONS FOR PEELING:
1. Melon Sanitizing:
The melons should be sanitized on the outside prior to handling and peeling.
2. Melon Sizing:
To accommodate the full range of cantaloupe and honeydew melon sizes, the MP-100 Perfect
Peeler comes with 2 interchangeable knife sets.
The smaller knife “A” is used mainly for No. 18-12 count cantaloupes and the smaller 9-6 count
honeydew melons.
The larger knife “B” is used for larger cantaloupes, No. 9-5 count and for large Honeydew
melons, No. 6-5 count.
When peeling melons, select the knife that corresponds to the melon size to be processed. Refer
to the Knife Selection Guide on page 6.
PLEASE NOTE: Melon sizes and shapes vary considerably between melon varsities, location
of crop and time of year. In general, melons are longer along their stem axis than through their
diameter. The MP-100 will accept melons fed along the stem axis or fed perpendicular to the
stem axis(sideways). For optimum yield and performance, feed the melon into the MP-100 with
the melon oriented such that the melon width, as it is fed to the MP-100 closely matches the
width of the opening to the MP-100 knife. You may find that a melon 5 1/2 inches wide by 6
inches long can be peeled by feeding the melon lengthwise over knife “A”, and equally as well
by feeding the melon sideways over knife “B”. Please take some time to experiment with the
MP-100 to find all the various ways to feed the melons to achieve the optimum results with a
minimum number of knife changes.
3. Melon Halving:
Prior to peeling the melons with the MP-100, the melons must be sliced in half. Carefully slice
the melons in half through the stem axis and remove the seeds. Place the melon halves in a
convenient location on the worktable beside the peeler.
Page 5
Page 8

KNIFE SELECTION:
Before processing, choose the correct knife for your melon size. The MP-100 comes with a small
and a large knife as standard equipment and a double knife is available as an option.
The side heads require adjustment corresponding to the knife selection. the side heads can be
fastened in three positions. The narrowest position is for use with the small knife. The widest
position is for use with the large knife. The middle position is for use with both the large and
small knife for melons with varying skin thickness. Insure both side heads are located in the
same position.
MP-100
KNIFE SELECTION GUIDE
FIGURE 5
RECOMMENDED USE OPTIMUM FRUIT SIZE
Side Head
Knife Position Cantaloupe Honey Dew
Small &
Optional Narrow #12 - #23 #8 - #10
Large Wide #6 - #9 #5 - #6
Large Middle #6 - #9 #6
Melon ripeness affects results dramatically.
KNIFE CHANGING INSTRUCTIONS:
1. Unscrew the knife knobs and remove the knife assembly. Refer to figure 4.
2. Remove the two center head release pins. Refer to figure 3.
3. Loosen the side head fastners and slide both the left and the right side heads in or out to one
of the three slot locations in the side head support. Refer to figure 4.
4. Tighten the side head fasteners.
5. Replace the knife assembly with the correct size knife on the mounting studs and tighten the
knobs securely.
6. Reinstall the two center head release pins.
Page 6
Page 9

PROCESSING PRODUCT:
Make sure the MP-100 is completely assembled and all knobs are tight before operating the melon
peeler. For first time use see the installation instructions on page 2.
Feeding the Perfect Peeler MP-100:
WARNING: Be carefully of the knives and the center head gripping pins. They are sharp and can cut
fingers. When used correctly and according to the operating instructions the operators hand will never
come near the knives or the pins during normal operation.
Grasp a melon half by its skin and place it cut side down on the top plate of the Perfect Peeler. Orient
the melon such that the width or length that is closest to the demnsion of the knife opening (distance
between side heads) is parallel to the sides of the MP-100. While holding the melon by the end opposite the center head pins, guide the leading edge of the melon onto the center head and into a row of
gripping pins.
Place your left hand on the back end of the melon (opposite the gripping pins) and gently push the
melon forward while simultaneously turning the crank handle, slowly, away from you (clockwise). As
soon as the gripping pins on the center head grip the melon and begin to draw the melon forward,
remove your left hand from the melon and continue to crank the handle with your right hand. The
melon will be rotated around the peeling knife 180 degrees. Let the Perfect Peeler do the work. Each
melon half will be peeled after 2 to 3 turns of the crank handle(depending on the length of the melon).
While cranking with your right hand, pick up another melon half with your left hand and prepair to
feed it into the Perfect Peeler. As the first melon half nears the end of its peeling cycle, feed the next
half of the melon into the Perfect Peeler and repeat the peeling process.
The melon halves may tend to hang up between the peeling knives and the guide rollers. The next
melon half will force the last melon through the knife and rollers and deposit the peeled melon in the
container beneath the MP-100.
You will soon develop a rhythm in feeding the MP-100. When you arrive at your last melon half to be
peeled, use the fruit release to push the melon through the knife.
FRUIT RELEASE
FIGURE 6
Page 7
Page 10

CLEANING:
A brush is supplied to aid in cleaning the MP-100 Perfect Peeler. The Perfect Peeler can be cleaned
fully assembled, by immersing it in a sink and using the brush and a mild detergent to wash it. Once
the Perfect Peeler has been thoroughly washed, rinse, sanitize and are dry the peeler. The Perfect
Peeler can also be disassembled in the reverse of the assembly instructions and the subassemblies can
be washed individually.
WARNING:
The knifes and the center head gripping pins are sharp and can cut fingers. Use extreme
caution when handling the knife assemblies or the center head assembly to prevent injury or damage to
the knives or pins.
SHARPENING:
The knife edges are designed for years of trouble-free service. In the event the knife edges require
sharpening, contact a commercial knife sharpening service or replace the knife.
Page 8
Page 11

Warranty
The Univex MP-100 Perfect Peeler is warranted by Univex
Corporation against any defects in materials or workmanship for
a period of one year from the date of purchase by the end user.
Please call the Univex Warranty Service Department at
800-258-6358 to report warranty claims before arranging for
repair of the unit. The unit must be delivered to a Univex
authorized service agent or to the Univex facility for warranty
repairs. The end user is responsible for all shipping or travel
charges arising from the repair or servicing of this unit under
warranty. Univex will not cover overtime charges of any kind.
Any service or repair must take place in the United States.
Damages incurred in transit or incurred because of installation
error, accident, alteration or misuse are not covered. Transit
damages should be reported to the carrier immediately.
Univex will not be liable for any consequential, compensatory
incidental or special damages.
Toll free ordering fax 1-800-356-5614
3 Old Rockingham Road, Salem, N.H. 03079-2140 Telephone 1-603-893-6191 Fax 1-603-893-1249
 Loading...