

Page 1

PREPSAVER MANUAL
OPERATOR’S MANUAL
4509-4510-4512
Persons under age 18 are not permitted to operate or have accessibility
U.S. Dept. Of Labor Employment Standards Administration Fact Sheet
PREPSAVER REV A
to operate this equipment per
No. ESA913.
Page 2

2
04/09
TO INSURE BOTH SAFE AND TROUBLE-FREE PERFORMANCE
WE STRESS THAT ALL PERSONNEL THAT WILL BE INVOLVED
WITH YOUR NEW UNIVEX SLICER MUST READ AND UNDERSTAND
THESE INSTRUCTIONS BEFORE ATTEMPTING TO OPERATE THIS
UNIT.
..............................
WE APPRECIATE YOUR COOPERATION AND YOUR
BUSINESS. SHOULD THERE BE A QUESTION OR IF WE
CAN BE OF FURTHER ASSISTANCE, PLEASE CALL US,
1-603-893-6191.
2
Page 3

TABLE OF CONTENTS
3
04/09
DESCRIPTION PAGE
Table of Contents .................................................................................................. 3
List of Illustrations ...........................................................................
Introduction ...........................................
...........................................
Installation Instructions ...............................................................
....................... 3
...................... 5
........................... 5
Safety Warnings ................................................................................................... 5-6
Operating Instructions ...........................................................................
................. 6
Sharpening Instructions ......................................................................................... 7
Operator's Care of Slicer Cleaning Instructions ..................................................... 8
Lubrication Instructions .......................................................................................... 9
Warranty Information .................................................................................. Back Cover
LIST OF ILLUSTRATIONS
ILLUSTRATIONS PAGE
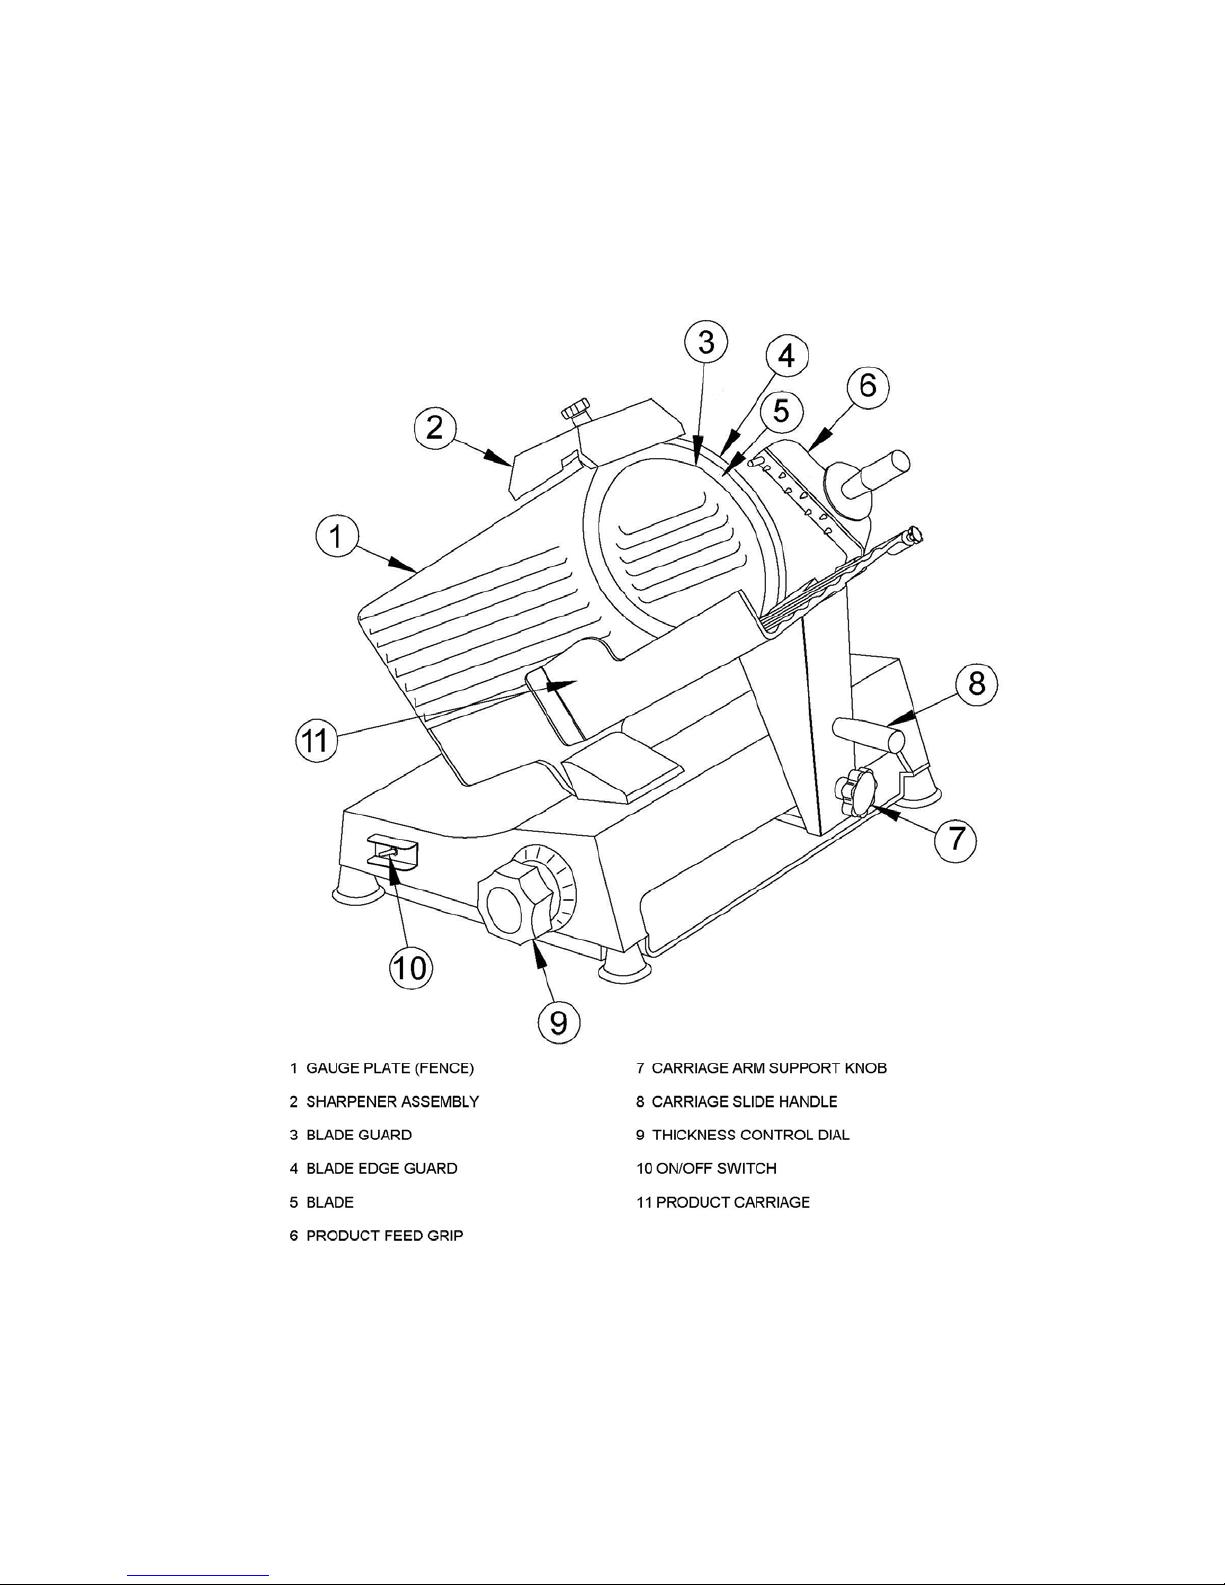
Figure 1 Overall View of Meat Slicer .........................................................……......4
Figure 2 Sharpener Operation ...................................................................……......9
Figure 3 Lubrication Assembly ...................................................................……......9
Page 4
4
04/09
Page 5

INSTRUCTION MANUAL
5
04/09
INTRODUCTION
This manual contains instructions for the Installation, Operation, and Care of the Meat Slicing Machine. A
trouble shooting guide is provided. A complete Replacement Parts List with identifying figures is also
included to facilitate identification and ordering of replacement parts.
INSTALLATION INSTRUCTIONS
INSPECTION
All Univex slicers are inspected and tested at the factory; however, they should be inspected
carefully by the person making the installation for loose, damaged or broken parts. Detached parts
and fixtures should be checked against packing list to determine all are present. Any damages,
imperfections or shortages should be reported to the dealer or Univex and shippi ng carrier.
Warning:
After slicer has been inspected, wash slicer completely with warm water and mild soap.
For SAFETY, follow the cleaning instructions on Page 8.
INSTALLATION
The most efficient installation of your Univex slicer will depend upon the layout of your kitchen.
Locate your slicer where it will save steps for the operator and be sure to provide sufficient
clearance around it for ease of maintenance and cleaning, as well as for efficient and safe use.
Slicer should be operated on a sturdy bench or table with the height determined to suit the
operator. It is most important that the forearm of the operator be at the proper level for ease and
safety of operation, as well as for maximum production. This height is considered optimum when
the carriage handle (Figure
1 [7]) of the slicer is at approximately the height of the operator's
elbow when standing.
IMPORTANT
Warning/Caution:
Before making electrical connections, CHECK the specifications on the nameplate to
make sure that they agree with those on your electrical service. A grounding type
three terminal plug is provided for 120 volt, 60Hz units. If you do not have a mating
receptacle, have a qualified electrician provide one with grounding provisions in
accordance with local safety codes.
IMPORTANT SAFETY WARNINGS
It is a violation of United States Department of Labor regulations to permit operation of the slicer
by any person under the age of 18 years.
Warning:
The slicer knife is extremely sharp! Never touch the knife, always keep hands and fingers clear
of the knife. Never run slicer without the guard and all other parts in place and securely
fastened. Take extra care to avoid accidents by keeping the knife guard and sharpening
assembly cover ON at all times. When the machine is not in use, the slice adjustment knob
should be turned fully back to the closed position (beyond "0") so that the knife edge is not
exposed.
Page 6

Observe the cleaning instruction on Page 8 for best results and for safety. Also remember to
6
04/09
always turn off the slicer and disconnect the electrical supply cord before cleaning.
When slicing, always work the carriage using only the carriage arm handle (Figure 1 [8]). Do not
hold or push the carriage from any other place.
OPERATION INSTRUCTIONS
The Univex slicer is designed to meet the cook's demand for an efficient, sturdy slicer. The
Univex slicer will give unfailing performance over a period of years, when operated and
maintained according to instructions contained herein.
START/STOP SWITCH
The slicer is started by moving the ON/OFF toggle switch (Figure 1 [10]).
SLICE ADJUSTMENT
Warning: Dial type knob adjustment (Figure 1 [9]) allows for slice thickness ranging from
paper thin up to .5". Dial graduations allow you to precisely set up specific slice
thickness for various needs. When not in use, always return knob back to its fully
closed position (beyond "0") so that the knife edge is not exposed.
PRODUCT CARRIAGE
Caution: A last slice gravity feed grip (Figure 1 [6]) is provided to hold the product in place as it
is being sliced. Do not use this last slice device to work the carriage back and forth.
Use only the carriage arm handle (Figure 1 [8]). Always make sure the carriage is
positively secured to the slicer by checking to see that the carriage arm knob (Figure 1
[7]) is fully tightened.
PROTECTIVE GUARD
Warning: The protective guard (Figure 1 [4]) covers the knife edge completely except at the
forward edge where slicing will be performed. This forward edge is covered by the
edge of the fence, but only when the slice adjustment is completely closed. The knife
guard (Figure 1 [3]) can be removed for cleaning by unscrewing the knife guard knob.
For safety, keep the knife guard on at all times except when cleaning. Never operate
the slicer with the knife guard removed.
SHARPENING INSTRUCTIONS
This slicer is equipped with a knife having a concave or hollowed surface for superior slicing, of
course, any knife, however superior, must be sharpened regularly and properly in order to
produce the highest quality slices, but also to allow it to maintain its productivity. The knife sharpener
for this machine is a top mounted design. Since the sharpener is not exposed during the slicing
operation, the stones remain free of food contamination and in the best possible condition for
sharpening.
Page 7

Warning: The following sharpening procedure will provide high quality sharpening
7
04/09
Results and should be followed for safety considerations:
1. The blade should be cleaned and free from all grease and food remnants. Food
particles and oils will clog and impair the stones.
2. Turn the slicer OFF.
3. Adjust the Thickness control dial (Figure 1, [9]) to beyond the “0”. This will
ensure that the blade edge is not exposed to the operator.
4. Move the carriage all the way to the start position (closest to Thickness Control
Dial).
5. Loosen the sharpener assembly lock knob (Figur
6. Lift the sharpener and rotate 180
The sharpening stone will contact the blade.
7. Tighten the sharpener assembly lock knob to secure sharpener into position.
8. Turn the slicer ON. It is normal to see sparks from the underside of the blade as
it is being sharpened.
9. Run this for 1-2 minutes.
10. After 1-2 minutes, depress the button for the honing (Figure
and release.
11. Turn the slicer OFF.
12. Remove the sharpener from the blade, reversing the installation procedure.
13. Clean the sharpener and blade thoroughly after sharpening to remove blade and
stone dust.
o
(Figure 2 [2]). Stones will align with the blade.
e 2 [1]).
2 [4]) for 3 seconds
FIGURE
2
Sharpener Operation
Page 8

OPERATORS CARE OF SLICER
8
04/09
CLEANING
Warning:
1. Never touch the knife edge. Always keep your hands, fingers and arms clear
of knife.
Warning:
2. Turn off slicer and DISCONNECT ELECTRICAL CORD before cleaning.
3. Turn slice adjustment knob (Figure 1 [9]) to the fully closed position (beyond
"0") so that the knife edge is not exposed.
Caution:
4. Remove Product Carriage (Figure 1 [11]), which may be washed in a sink, by
loosening knob (Figure 1 [7]) and lifting the assembly off the mounting stud.
Use only warm water and mild soap. Rinse carriage assembly with warm water
and dry thoroughly using a clean soft cloth. Never wash the slicer or any of its
parts in a dishwashing machine or the clear protective finish will be damaged.
Warning:
5. Wash body of slicer using warm water and mild soap using a clean soft cloth.
IMPORTANT: DO NOT RINSE OR WASH SLICER USING A HOSE. WATER
DAMAGE TO ELECTRICAL COMPONENTS WILL VOID WARRANTY!
6. Remove knife guard (Figure 1 [3]) by loosening knife guard knob on rear of
slicer.
7. Then carefully lift and remove guard by pushing up on the blade guard shaft.
Warning:
8. CAREFULLY wash the front and rear of the knife with a cloth using warm
water and mild soap. CAREFULLY wash between the knife edge and
protective guard (Figure 1 [4]) using a soft cloth inserted between knife edge
and guard on both front and rear of knife using extreme caution to never touch
the knife edge. Rinse with warm water applied with a cloth. Dry thoroughly with
a clean soft cloth.
Caution:
9. Following cleaning, a commercial nontoxic sanitizer may be wiped on the
clean surfaces with a soft clean cloth or sprayed as recommended on the
container labeling. It is important that the sanitizer be compatible with
anodized aluminum or the clear protective finish on the slicer will be damaged.
Surface should be wetted completely, but not to the point of running or
puddling.
Warning:
10. Replace the knife guard. Never leave the slicer without its knife guard
installed!
Page 9

LUBRICATION & FUNCTION CHECK
9
04/09
Warning:
Turn off slicer and DISCONNECT ELECTRICAL CORD before lubricating. Close fence all
the way.
General lubrication should be performed in accordance with the lubrication instructions below. During this
lubrication sequence, be sure to check for free operation and movement of related parts as well as for
excessive wear and looseness of various parts. Be sure to check all handles and knobs for tightness.
LUBRICATION INSTRUCTIONS
Figure 3
A – APPLY PETROGEL AS PART OF MONTHLY MAINTENANCE
B – APPLY MINERAL OIL WEEKLY
Page 10

TROUBLESHOOTING GUIDE
1.1 Check electrical service.
blade not
10
04/09
TROUBLE POSSIBLE C AUSE REMEDY
1. Slicer will
not operate.
2. Motor
running,
3. Excessive
noise.
4. Not cutting
properly.
1.1 Electrical service
down
1.2 Knife guard knob
not tight
1.3 Circuit breaker
tripped
1.4 Bad switch
1.5 Motor capacitor
defective.
1.6 Burned out motor
Replace fuse or reset
circuit breaker as
necess ary
1.2 Tighten knob
1.3 Reset circuit breaker
1.4 Replace switch
1.5 Replace capacitor
1.6 Replace motor
2.1 Broken belt 2.1 Replace belt
3.1 Blade contacting
knife guard
3.2 Deflector
contacting blade
4.1 Dull blade or
improperly
sharpened blade.
4.2 Soft cheese.
4.3 Knife dirty with
hard, dried-on
3.1 Check for loose knife
guard knob. Shim
tapered bushing.
3.2 Adjust deflector.
4.1 Sharpen blade
following outlined
procedures.
4.2 Chill for best slicing
results.
4.3 Clean knife thoroughly
product.
10
Page 11

11
04/09
The Univex Prepsaver Slicers carry a
one-year,
against any defects i
workmanship. The one-year period begins on
the date of purchase by the end user and
remains in full effect provided the unit is used
properly in accordance with our
instructions. Any work to be performed under this
warranty must be performed between the hours
of 8:00 a.m. and 5:00 p.m. local time, Monday
through Friday. Univex will not cover overtime
charges of any kind. Please call the Univex
Warranty Service Department at 800-258-6358
to report warranty claims before arranging repair
or attempting to return the unit to Univex
Corporation.
Damages incurred in transit or incurred because
of installation error, accident, alteration or
misuse are not covered. Transit damages should
be reported to the carrier immediately.
Univex will not be liable for any consequential,
compensatory, incidental or special damages.
carry-in parts and labor warranty
Warranty
n materials or
3 Old Rockingham Road, Salem, NH 03079-2140 Telephone 1-603-893-6191 Fax 1-603-893-1249
TOLL FREE ORDERING FAX 1-800-356-5614
 Loading...