

Page 1

UB2-2111-S User
’
s Manual
With the Bluetooth Software BTW 1.2.x or above
Trademark Information
BTW is a product of Widcomm Inc.
Windows, Windows 98, Windows NT, Windows Millennium, Windows XP are trademarks of Microsoft
Corporation. Internet Explorer is a product of Microsoft Corporation.
The BLUETOOTH trademarks are owned by Bluetooth SIG and used by USI under license.
T39 handset is a product of Ericsson.
All other trade names mentioned in this document or the other documentation provided with this
product are trademarkes or registered trademarks of their respective holders.
Page 1 135, Lane 351, Taiping Road, Sec . 1, Nan-Tou , Taiwan; (049)2325876; www.usi.com.tw Rev2.0 Oct/29/2002
Page 2

UB2-2111-S User
’
s Manual
With the Bluetooth Software BTW 1.2.x or above
Table of Contents
Item Page
Hardware Specification 3
Connector Pin outs 4
Mounting Guide for Antenna Radiation 5
Impedance Matching of Antenna 6
System Requirement 7
Bluetooth Software Install step by Step 8-14
Start Connection Over The Bluetooth Airwaves – File Transfer 15 - 18
Connecting Over The Bluetooth Airwaves – Security 19 - 20
Start Connection Over The Bluetooth Airwaves – Dial Up Networking Profile 21 -23
Technical Support 24
Page 2 135, Lane 351, Taiping Road, Sec . 1, Nan-Tou , Taiwan; (049)2325876; www.usi.com.tw Rev2.0 Oct/29/2002
Page 3

UB2-2111-S User
’
s Manual
With the Bluetooth Software BTW 1.2.x or above
Hardware Specification
l Conducted Power: 0.8mW
l Frequency Range: 2.402GHz~2.4835GHz
l Modulation: GFSK
l Sensitivity: -80 dbm
l Data Rate:
Asynchronous:723.2kbps/57.6kbps
Synchronous:433.9kbps/433.9kbps
l Operating Voltage:
+3.3VD
l Operating systems:
Windows 98SE
Windows ME
Windows 2000
Windows XP
l Antenna Peak Gain @ 2.45GHz: 0.5dBi
l Dimesion
Length: 36.00 mm
Width: 13.80 mm
Height: 3.8 mm
Page 3 135, Lane 351, Taiping Road, Sec . 1, Nan-Tou , Taiwan; (049)2325876; www.usi.com.tw Rev2.0 Oct/29/2002
Page 4

UB2-2111-S User
’
s Manual
Connector pinouts
With the Bluetooth Software BTW 1.2.x or above
Type-A
PIN #
1 2
2 4
3 6
4 8
5 10
6 1
7 7
8 5
9 3
10 9
Type-B
PIN #
Module Pin Name
GND GND
USB_D+ USB_D+
USB_D- USB_D-
USB_PWR USB_PWR
RSVD Test Point, COEX1
HW_RADIO_DIS# HW_RADIO_DIS#
RSVD Test Point, COEX2
+3.3V +3V_SUS
LED_BT_RadioState BT_RADIO_ON
GND NC
Usage for
Platforms
Description
Ground.
USB Data +. Must be routed with USB_D- as a
90Ω differential pair.
USB Data –. Must be routed with USB_D+ as a
90Ω differential pair.
This is a 5V rail that is used by bus-powered USB
devices. The module does not actually draw
power from this pin, uses this pin to detect
whether the USB host port is powered so as to
avoid latch-up conditions.
Reserved. This pin may be used for resolving
coexistence with the 802.11 radio(s) on the MPCI
card in the platform.
Active low input from the platform to the card to
disable all the radios on the module from
transmitting.
Reserved. This pin may be used for resolving
coexistence with the 802.11 radio(s) on the MPCI
card in the platform. .
This is the rail from which the module powers
itself (as a self-powered USB device).
Active-high LED drive signal for indicating the
state of the Bluetooth Radio. This LED should
not have a flashing feature.
Page 4 135, Lane 351, Taiping Road, Sec . 1, Nan-Tou , Taiwan; (049)2325876; www.usi.com.tw Rev2.0 Oct/29/2002
Page 5
UB2-2111-S User
’
s Manual
With the Bluetooth Software BTW 1.2.x or above
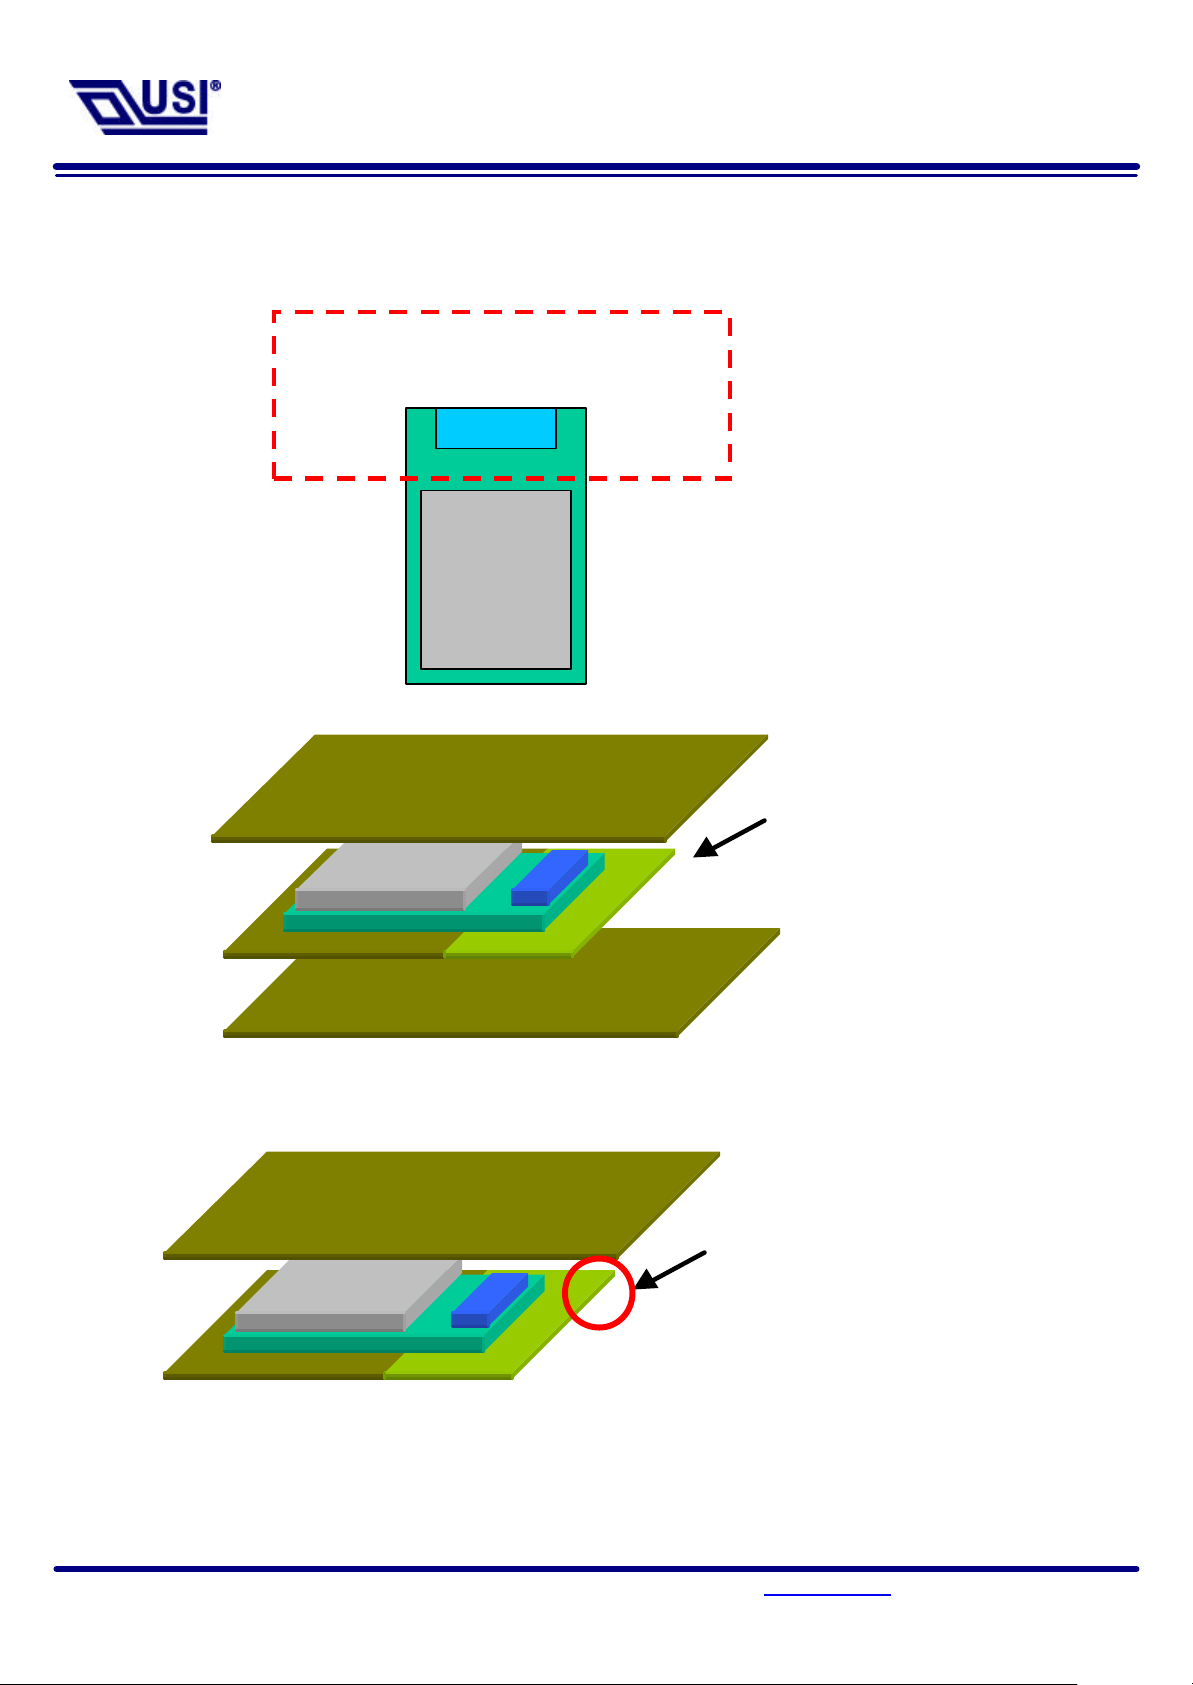
Antenna
Mounting Guide for Antenna Radiation
In order to achieve longest communication range, please keep the area surrounding antenna free of grounding or metal
housing.
Ground should not come in this area
UB2-2111-S
Ground
Ground
Do not completely cover
the antenna portion with
ground plates.
Ground
Covering only one side of
the antenna is acceptable.
But the distance between
ground plate and antenna
should be keep as far as
possible.
Page 5 135, Lane 351, Taiping Road, Sec . 1, Nan-Tou , Taiwan; (049)2325876; www.usi.com.tw Rev2.0 Oct/29/2002
Page 6

UB2-2111-S User
’
s Manual
With the Bluetooth Software BTW 1.2.x or above
Impedance Matching of Antenna
UB2-2111-S utilizes a monopole printed antenna for radiate communication. Application environments,
such as notebooks, PDAs, printers or other handheld devices, both have plastic housings, different
motherboards and other mechanism structures. These factors will cause the deviation of antenna
central frequency. Therefore, impedance matching of antenna should be optimized for various
applications to achieve longest communication range. Please consult USI for further information.
Page 6 135, Lane 351, Taiping Road, Sec . 1, Nan-Tou , Taiwan; (049)2325876; www.usi.com.tw Rev2.0 Oct/29/2002
Page 7

UB2-2111-S User
’
s Manual
With the Bluetooth Software BTW 1.2.x or above
System Requirements
BTW runs under:
- Windows 98 (Second edition)
- Millennium (Windows 98 ME)
- Windows 2000
- Windows XP
During the installation, you need a CD-ROM driver for access to the bundle software.
Page 7 135, Lane 351, Taiping Road, Sec . 1, Nan-Tou , Taiwan; (049)2325876; www.usi.com.tw Rev2.0 Oct/29/2002
Page 8
UB2-2111-S User
’
s Manual
With the Bluetooth Software BTW 1.2.x or above
Windows 2000 system. Your images may
Bluetooth Software Install step by step
Step 1 Insert the Widcomm BTW CD into the PC’s CDROM drive. Installation proceeds automatically.
Since Windows NT does not support USB, the installation of the CD should be done on
systems with Windows ’98 or Windows 2000.
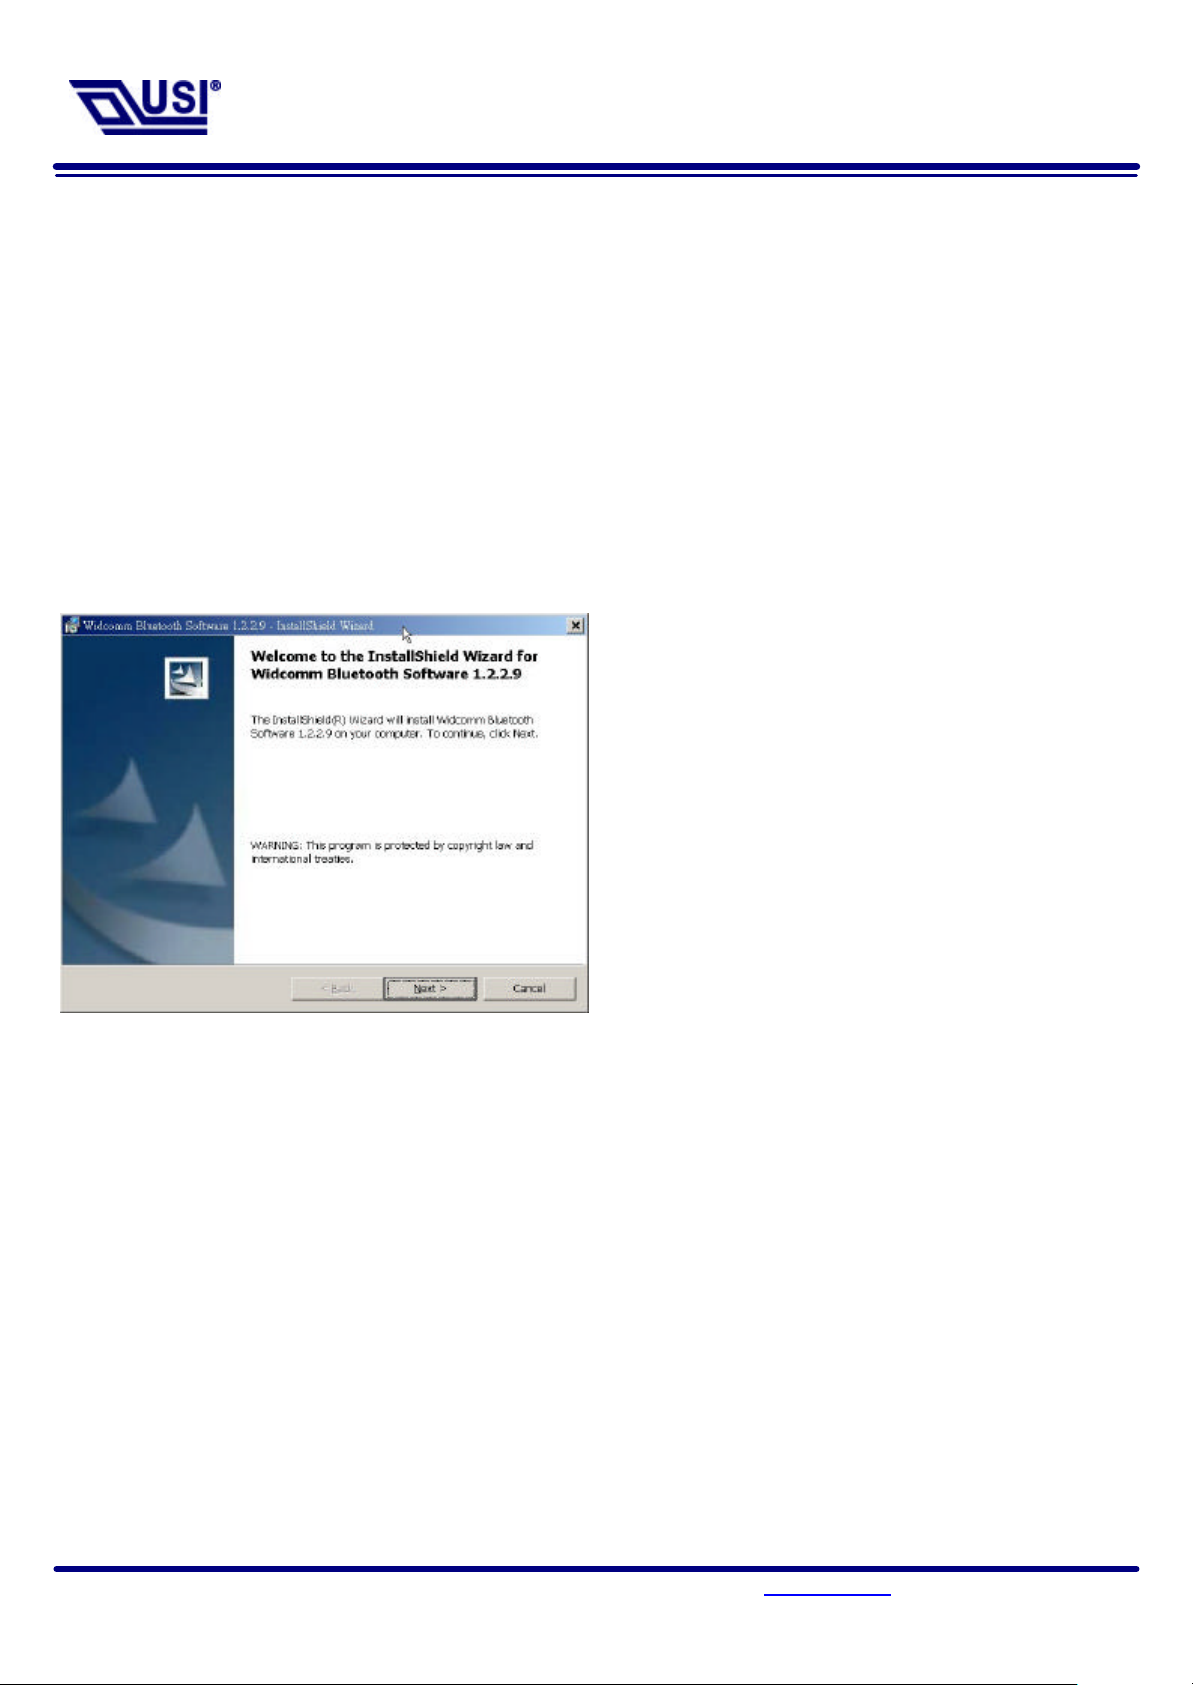
Step 2 An InstallShield box appears to inform you the installation Wizard is being set up. Please wait.
Step 3 A Welcome To The Installation Wizard
window appears as shown in Figure 2.
Select Next to continue the installation
process.
Figure 2. Welcome Window
Note: These images were captured from a
look slightly different.
Page 8 135, Lane 351, Taiping Road, Sec . 1, Nan-Tou , Taiwan; (049)2325876; www.usi.com.tw Rev2.0 Oct/29/2002
Page 9

UB2-2111-S User
’
s Manual
With the Bluetooth Software BTW 1.2.x or above
proceed. If you do
not accept the conditions of
A Device Information window opens as shown in
Figure 3. License Agreement Window
Step 4 The license agreement window appears as
shown in Figure 3. If you accept, mark the “I
accept the terms in the license agreement”
option and click on Next. The installation will
the agreement, the installation process will
terminate.
Figure 4. Device Information Window
Step 5
Figure 4. Enter a device name and choose a
device type. These options will not affect the
functionality. The device information is used to
inform the master device what kinds of other
devices are within range to connect to so the
user can identify which device is the one they
need to connect to if there is more than one
device within range. Select the Next Button.
Page 9 135, Lane 351, Taiping Road, Sec . 1, Nan-Tou , Taiwan; (049)2325876; www.usi.com.tw Rev2.0 Oct/29/2002
Page 10

UB2-2111-S User
’
s Manual
With the Bluetooth Software BTW 1.2.x or above
Figure 5. Destination Folder Window
Step 6 A Destination Folder window appears as shown
in Figure 5, which states the default location and
gives you the opportunity to choose an
alternative folder. When the location is
acceptable, select Next.
Figure 6. Ready to Install Window
Step 7 A Ready to Install Program window appears as
shown in Figure 6. Select Install when you are
ready to proceed.
Page 10 135, Lane 351, Taiping Road, Sec . 1, Nan-Tou , Taiwan; (049)2325876; www.usi.com.tw Rev2.0 Oct/29/2002
Page 11

UB2-2111-S User
’
s Manual
Figure 7. Installing Window
Please be patient, this may take up to 5 minutes.
completes. In that case
click
OK
and restart
With the Bluetooth Software BTW 1.2.x or above
Step 8 An Installing Widcomm Status window appears.
Step 9 A notification window appears asking you to
restart your system. Select Yes to proceed.
Figure 8. Install Complete Window
Step 10 You will be informed when the installation is
completed. Select Finish. Follow the
instructions thereafter. You may be asked to
restart the computer after the installation
the computer.
Page 11 135, Lane 351, Taiping Road, Sec . 1, Nan-Tou , Taiwan; (049)2325876; www.usi.com.tw Rev2.0 Oct/29/2002
Page 12

UB2-2111-S User
’
s Manual
With the Bluetooth Software BTW 1.2.x or above
Step 11 A Bluetooth Neighborhood logo has appeared on your desktop and a small Bluetooth icon has
appeared on your icon tray (lower right-hand side of the screen).
Figure 9. Device Manager Window
Step 12 And you can check it in the My computer > Device Manager.
You may now remove the Widcomm CD from
your CD drive.
Page 12 135, Lane 351, Taiping Road, Sec . 1, Nan-Tou , Taiwan; (049)2325876; www.usi.com.tw Rev2.0 Oct/29/2002
Page 13

UB2-2111-S User
’
s Manual
With the Bluetooth Software BTW 1.2.x or above
Step 14 A pull down window appears with two words,
Step 13 Let’s configure your devices. On your icon tray (lower right-hand side of the screen), right click on
the small Bluetooth Neighborhood icon on your icon tray.
Security (which we will discuss later) and
Configuration . Choose Configuration.
Step 15 A Bluetooth Configuration window appears as
shown in Figure 10. In this document, there are
three tabs-of-interest: General, Information
Exchange, and Hardware. Select the General
tab.
Step 16 Type in a name for your device and choose
either Laptop or Desktop. The security
option’s default is medium; leave that as it is
for now. Select OK.
Figure 10. Bluetooth Configuration Window -
General Tab
Page 13 135, Lane 351, Taiping Road, Sec . 1, Nan-Tou , Taiwan; (049)2325876; www.usi.com.tw Rev2.0 Oct/29/2002
Page 14

UB2-2111-S User
’
s Manual
With the Bluetooth Software BTW 1.2.x or above
called File Transfer. My Inbox Directory is the
Step 17 Now choose the Information Exchange tab
as shown in Figure 11. The My Shared
Directory window allows you to determine
where you would like to locate files you want
to share with other devices. The default is
dialogue window that allows you to determine
where you wish to put incoming files.
Configure the many choices on this tab now
or leave them at the default settings and then
select OK.
Figure 11. Bluetooth Configuration Window –
Information Exchange Tab
Step 18 Now choose the Hardware tab. Once you
have established a connection, you will see
the BD Address and other interesting
information about the device.
Figure 12. Bluetooth Configuration Window -
Hardware Tab
Page 14 135, Lane 351, Taiping Road, Sec . 1, Nan-Tou , Taiwan; (049)2325876; www.usi.com.tw Rev2.0 Oct/29/2002
Page 15

UB2-2111-S User
’
s Manual
With the Bluetooth Software BTW 1.2.x or above
Start Connecting Over The Bluetooth Airwaves – File Transfer
Step 1 Double click on the Bluetooth Neighborhood icon located on your desktop. A Bluetooth Neighborhood
window appears as shown in Figure 13. Double click on the Entire Bluetooth… icon. This will
perform an inquiry and search for other nearby devices.
Figure 13. Bluetooth Neighborhood Window
Double click here
Figure 14. Found Configured Device
Note: Because of over-the-air interference and
if you have a lot of devices in the
evaluation area, then you might have to
click on Search for Devices a few times .
Step 2 Then, Double click on the Search For Devices
icon. It will find your other bluetooth device
as shown in Figure 14. If you have other
Bluetooth devices in the area, they will be
located and appear on your screen as
Unknown. Only the devices that you have
configured will have a name.
Page 15 135, Lane 351, Taiping Road, Sec . 1, Nan-Tou , Taiwan; (049)2325876; www.usi.com.tw Rev2.0 Oct/29/2002
Page 16

UB2-2111-S User
’
s Manual
With the Bluetooth Software BTW 1.2.x or above
Figure 15. Found Configured Device
Step 3 On your master device, double click on the
icon named after your slave device as shown
in Figure 15. It will show all profile that the
slave support as shown in Figure 16.
Figure 15. Explore Serices window
Step 4 Double click on the icon Public Folder. It will
connect to the Shared Directory of the slave
device (See the step 17). And show all the files
in the Share Directory.
Page 16 135, Lane 351, Taiping Road, Sec . 1, Nan-Tou , Taiwan; (049)2325876; www.usi.com.tw Rev2.0 Oct/29/2002
Page 17

UB2-2111-S User
’
s Manual
Figure 17. Explore files window
With the Bluetooth Software BTW 1.2.x or above
Step 5 Figure 17 show there are no files in the Share
Directory.
Figure 18. Windows 2000 Files Manager
Step 6 Now, you can copy files from the Files Manager
master device.
Page 17 135, Lane 351, Taiping Road, Sec . 1, Nan-Tou , Taiwan; (049)2325876; www.usi.com.tw Rev2.0 Oct/29/2002
Page 18

UB2-2111-S User
’
s Manual
With the Bluetooth Software BTW 1.2.x or above
Step 8 When the copy is completed, you will see the file
Step 7 Then, Paste this file into Public Folder,
A Copying Window appears as shown in Figure
20.
Figure 19. Paste files to Public Folder
Figure 20. Copying…
name listed in the Public Folder.
Figure 21. Copy completed window
Page 18 135, Lane 351, Taiping Road, Sec . 1, Nan-Tou , Taiwan; (049)2325876; www.usi.com.tw Rev2.0 Oct/29/2002
Page 19

UB2-2111-S User
’
s Manual
With the Bluetooth Software BTW 1.2.x or above
Connecting Over The Bluetooth Airwaves – Security
Step 1 Go back to the icon tray (lower right-hand side of the screen) and right click on the small Bluetooth
Neighborhood icon. Highlight Configuration on the pull down window.
Step 2 The Bluetooth Configuration window opens as shown in Figure 22. Select the General tab. Under
Security, choose the High option. This will enable encryption. Click OK. (If you choose the Medium
option, encryption will be disabled.)
Figure 22. Bluetooth Configuration Window – Encryption Enabled
Step 3 Send any file(s) in encrypted mode by repeating
Step 2.
Step 4 For additional security, right click on the icon
tray’s small Bluetooth Neighborhood icon
again. On the pull down window, highlight
Security. The window shown in Figure 23
opens with two sections. All of your found
devices will be on the left-hand side.
Figure 23. Bluetooth Security Window
Page 19 135, Lane 351, Taiping Road, Sec . 1, Nan-Tou , Taiwan; (049)2325876; www.usi.com.tw Rev2.0 Oct/29/2002
Page 20

UB2-2111-S User
’
s Manual
With the Bluetooth Software BTW 1.2.x or above
Step 7 On the other device, the Bluetooth icon on the
pairing. If there is any Security Error message,
Step 5 Highlight a device and click on the Execute
Pairing button. Now this is the only device(s)
that can connect to your computer. The user is
asked for a passkey. The Bluetooth Passkey
Request window opens as shown in Figure
24.
Step 6 Click on the OK button after entering the
passkey in the Bluetooth Passkey window.
Figure 24. Bluetooth Passkey Request
icon tray (lower right-hand side of the screen)
will blink. On clicking the icon a Bluetooth
passkey request window pops up requesting
the user to enter passkey. Enter the same
passkey as given on the first device. Click on
OK button.Successfully finding the Available
services on the second device will Be an
indication that we are in connection using
make sure that the passkeys given on both
devices are the same.
Page 20 135, Lane 351, Taiping Road, Sec . 1, Nan-Tou , Taiwan; (049)2325876; www.usi.com.tw Rev2.0 Oct/29/2002
Page 21

UB2-2111-S User
’
s Manual
With the Bluetooth Software BTW 1.2.x or above
Extras
Bluetooth
Paired devices
Add to paired
Add types
Start Connecting Over The Bluetooth Airwaves –Dial-up Networking Profile
Example 1 : Use the ERICSSON T39mc mobile ( with the Bluetooth module and GPRS service
and provide Dial-up Networking Profile)
Step 1 Execute the BTW program。
Step 2 Before you using this application you must to pair the master device and T39mc,
After pairing successfully at the first time, the PC and T39mc will recognize each other,
Then, you can use the all services of the T39mc without being recognized again。
Step 3 Make pair from T39mc。
T39mc setting :
5 Synchronization
6 Bluetooth
7 Time
1 All types
2 Headset
3 PC
In this step you must enter the Passkey : xxx (for wmample: 123) on the T39mc side,and then you will see a
Bluetooth connection request detected message on the PC screen ,click the icon and enter the same
passkey(123) into the column。
1 Discoverable
2 Paired devices
3 Discover
USI12162
Add to paired
devices?
Add device
Add to paired
Passkey :xxx
Pairing …
1 Phone initiates
2 Phone accepts
Pairing successful
Name tag :
USI12162
Figure 25 Bluetooth Passkey Request
Page 21 135, Lane 351, Taiping Road, Sec . 1, Nan-Tou , Taiwan; (049)2325876; www.usi.com.tw Rev2.0 Oct/29/2002
Enter tag name Completed
Add device
USI12162
Page 22

UB2-2111-S User
’
s Manual
With the Bluetooth Software BTW 1.2.x or above
Figure 26. Found Configured Device
Step 4 After pairing finished, click and you
can see the icon .
Figure 27. Explore Serices window
Step 5 Double click icon ,you can see what are
the services T39mc support, click icon
.
Page 22 135, Lane 351, Taiping Road, Sec . 1, Nan-Tou , Taiwan; (049)2325876; www.usi.com.tw Rev2.0 Oct/29/2002
Page 23

UB2-2111-S User
’
s Manual
With the Bluetooth Software BTW 1.2.x or above
Step 6 Enter the username、password and Dial_up
number, then click Dial.
If it connect successful you see the Message
BluetoothConnection .
Figure 28. Bluetooth Dial_up Window
Step 7 Before you connect to web side, be sure to
set the BluetoothConnection device to be
your default connection.
Now, you can connect to web.
Figure 29. Internet Option Window
Page 23 135, Lane 351, Taiping Road, Sec . 1, Nan-Tou , Taiwan; (049)2325876; www.usi.com.tw Rev2.0 Oct/29/2002
Page 24

UB2-2111-S User
’
s Manual
With the Bluetooth Software BTW 1.2.x or above
Technical Support
The identification of the product:
Product Name: UB2-2111-S Bluetooth USB Module
Model Name: UB2-2111-S
Application: Desktop PC, Notebook
Technical Contact:
Universal Scientific Industrial Co., Ltd.
Address: 135, Lane 351, Taiping Rd., Sec. 1, Sec. 1, Tsao Tuen, Nan Tou, Taiwan
Contact Person: Chuei-Tang Wang
Telephone: +886-49-2325876 Ext.1800
Fax: +886-49-2329561
Email:ctwang@ms.usi.com.tw
Website: www.usi.com.tw
CAUTION: To maintain compliance with FCC’s RF exposure guidelines, this equipment should
be installed and operated with minimum distance 2.5cm between the radiator and your body. Use
on the supplied antenna. Unauthorized antenna, modification, or attachments could damage the
transmitter and may violate FCC regulations and may void the user's right to operate the
equipment.
This device complies with Part 15 of the FCC Rules. Operation is subject to the following
Two conditions:
(1) This device may not cause harmful interference.
(2) This device must accept any interference received, including interference that may
Cause undesired operation.
Page 24 135, Lane 351, Taiping Road, Sec . 1, Nan-Tou , Taiwan; (049)2325876; www.usi.com.tw Rev2.0 Oct/29/2002
Page 25

Federal Communication Commission Interference Statement
This equipment has been tested and found to comply with the limits for a Class B digital device,
pursuant to Part 15 of the FCC Rules. These limits are designed to provide reasonable
protection against harmful interference in a residential installation. This equipment generates,
uses and can radiate radio frequency energy and, if not installed and used in accordance with
the instructions, may cause harmful interference to radio communications. However, there is no
guarantee that interference will not occur in a particular installation. If this equipment does cause
harmful interference to radio or television reception, which can be determined by turning the
equipment off and on, the user is encouraged to try to correct the interference by one of the
following measures:
- Reorient or relocate the receiving antenna.
- Increase the separation between the equipment and receiver.
- Connect the equipment into an outlet on a circuit different from that to which the receiver is
connected.
- Consult the dealer or an experienced radio/TV technician for help.
FCC Caution: To assure continued compliance, (example - use only shielded interface cables
when connecting to computer or peripheral devices) any changes or modifications not expressly
approved by the party responsible for compliance could void the user's authority to operate this
equipment.
This device complies with Part 15 of the FCC Rules. Operation is subject to the following two
conditions: (1) This device may not cause harmful interference, and (2) this device must accept
any interference received, including interference that may cause undesired operation.
IMPORTANT NOTE:
FCC Radiation Exposure Statement:
This equipment complies with FCC radiation exposure limits set forth for an uncontrolled
environment.
This transmitter must not be co-located or operating in conjunction with any other antenna or
transmitter.
Page 26

This device is intended only for OEM integrators under the following
conditions:
1) The transmitter module may not be co-located with any other transmitter or
antenna.
As long as conduction above is met, further transmitter test will not be required.
However, the OEM integrator is still responsible for testing their end-product
for any additional compliance requirements required with this module installed
(for example, digital device emissions, PC peripheral requirements, etc.).
IMPORTANT NOTE: In the event that these conditions can not be met (for
example certain laptop configurations or co-location with another transmitter),
then the FCC authorization is no longer considered valid and the FCC ID can
not be used on the final product. In these circumstances, the OEM integrator
will be responsible for re-evaluating the end product (including the transmitter)
and obtaining a separate FCC authorization.
End Product Labeling
The final end product must be labeled in a visible area with the following:
“Contains TX FCC ID: IXMUB22111S ”.
Manual Information That Must be Included
The OEM integrator has to be aware not to provide in formation to the end user
regarding how to install or remove this RF module in the users manual of the
end product which integrate this module.
The users manual for OEM integrators must include the following information
in a prominent location “ IMPORTANT NOTE: To comply with FCC RF
exposure compliance requirements. The antenna must not be co-located or
operating in conjunction with any other antenna or transmitter.
 Loading...