


Owner’s Manual
BL00004999-200
EN

Introduction
Thank you for your purchase of this product. Be sure that
you have read this manual and understood its contents before using the camera. Keep the manual where it will be
read by all who use the product.
For the Latest Information
The latest versions of the manuals are available from:
http://fujifilm-dsc.com/en/manual/
The site can be accessed not only from your
computer but also from smartphones and
tablets. It also contains information on the
software license.
For information on rmware updates, visit:
http://www.fujifilm.com/support/digital_cameras/software/
ii

Chapter Index
P
Menu List
1 Before You Begin
2 First Steps
3 Basic Photography and Playback
4 Movie Recording and Playback
5 Taking Photographs
6 The Shooting Menus
7 Playback and the Playback Menu
8 The Setup Menus
9 Shortcuts
iv
1
37
55
61
67
103
171
197
249
10 Peripherals and Optional Accessories
11 Connections
12 Technical Notes
263
281
295
iii

Menu List
1⁄
2⁄
3⁄
1⁄
2⁄
3⁄
Camera menu options are listed below.
Shooting Menus
Adjust settings when shooting photos or movies.
Menu List
See page 103 for details.
N
H IMAGE QUALITY SETTING
IMAGE SIZE 104
IMAGE QUALITY 105
RAW RECORDING 106
FILM SIMULATION 107
1⁄
B & W ADJ.
GRAIN EFFECT 108
COLOR CHROME EFFECT 109
SMOOTH SKIN EFFECT 109
DYNAMIC RANGE 110
D RANGE PRIORITY 111
WHITE BALANCE 112
HIGHLIGHT TONE 115
2⁄
SHADOW TONE 115
COLOR 115
SHARPNESS 115
NOISE REDUCTION 116
LONG EXPOSURE NR 116
LENS MODULATION OPTIMIZER 116
COLOR SPACE 116
3⁄
PIXEL MAPPING 117
SELECT CUSTOM SETTING 117
EDIT/SAVE CUSTOM SETTING 118
ab
(Warm/Cool)
P
G AF/MF SETTING
FOCUS AREA 119
AF MODE 120
AF-C CUSTOM SETTINGS 121
STORE AF MODE BY ORIENTATION 124
1⁄
108
AF POINT DISPLAY
NUMBER OF FOCUS POINTS 125
PRE-AF 125
AF ILLUMINATOR 125
FACE/EYE DETECTION SETTING 126
AF+MF 128
MF ASSIST 129
FOCUS CHECK 129
2⁄
INTERLOCK SPOT AE & FOCUS AREA 130
INSTANT AF SETTING 130
DEPTH-OF-FIELD SCALE 131
RELEASE/FOCUS PRIORITY 131
3⁄ TOUCH SCREEN MODE 132
yz
P
124
iv

Menu List
1⁄
2⁄
1⁄1⁄
2⁄2⁄
3⁄3⁄
44⁄⁄
A SHOOTING SETTING
SELF-TIMER 135
SAVE SELF-TIMER SETTING 135
INTERVAL TIMER SHOOTING 136
INTERVAL TIMER SHOOTING
1⁄
EXPOSURE SMOOTHING
AE BKT SETTING 138
FILM SIMULATION BKT 138
FOCUS BKT 139
PHOTOMETRY 140
SHUTTER TYPE 141
FLICKER REDUCTION 142
ISO 142
2⁄
IS MODE 143
MOUNT ADAPTER SETTING 144
35mm FORMAT MODE 146
WIRELESS COMMUNICATION 147
F FLASH SETTING
FLASH FUNCTION SETTING 148
RED EYE REMOVAL 148
TTL-LOCK MODE 149
LED LIGHT SETTING 149
MASTER SETTING 150
CH SETTING 150
P
B MOVIE SETTING
MOVIE MODE 151
H.265(HEVC)/H.264 153
MOVIE COMPRESSION 153
F FILM SIMULATION
137
F B & W ADJ.
ab
F DYNAMIC RANGE
F WHITE BALANCE
F HIGHLIGHT TONE
F SHADOW TONE
F COLOR
F SHARPNESS
F NOISE REDUCTION
V INTERFRAME NR
F-Log/HLG RECORDING 158
PERIPHERAL LIGHT CORRECTION
F
F FOCUS AREA
P
MOVIE AF MODE 159
F AF-C CUSTOM SETTING
F FACE/EYE DETECTION SETTING
F MF ASSIST
F FOCUS CHECK
4K MOVIE OUTPUT 162
FULL HD MOVIE OUTPUT 162
HDMI OUTPUT INFO DISPLAY 163
4K HDMI STANDBY QUALITY 163
HDMI REC CONTROL 163
ZEBRA SETTING 164
ZEBRA LEVEL 164
AUDIO SETTING 165
TIME CODE SETTING 167
TALLY LIGHT 169
MOVIE SILENT CONTROL 170
(Warm/Cool)
P
154
154
155
155
156
156
156
157
157
157
159
159
160
161
161
161
Menu List
v

The Playback Menu
1⁄
2⁄
3⁄
Adjust playback settings.
See page 177 for details.
N
C PLAY BACK MENU
Menu List
SWITCH SLOT 177
RAW CONVERSION 178
ERASE 180
SIMULTANEOUS DELETE
1⁄
(RAW SLOT1/JPG SLOT2)
CROP 182
RESIZE 183
PROTECT 184
IMAGE ROTATE 185
P
C PLAY BACK MENU
RED EYE REMOVAL 186
VOICE MEMO SETTING 187
COPY 188
IMAGE TRANSFER ORDER 189
182
2⁄
WIRELESS COMMUNICATION 190
PHOTOBOOK ASSIST 191
PRINT ORDER (DPOF) 193
instax PRINTER PRINT 194
3⁄ DISP ASPECT 195
P
vi

Setup Menus
1⁄
2⁄
1⁄
2⁄
3⁄
Adjust basic camera settings.
See page 197 for details.
N
D USER SETTING
FORMAT 198
DATE/TIME 199
TIME DIFFERENCE 199
Qa
1⁄
MY MENU SETTING 200
SENSOR CLEANING 201
BATTERY AGE 201
RESET 202
2⁄ REGULATORY 202
D SOUND SETTING
AF BEEP VOL. 203
SELF-TIMER BEEP VOL. 203
OPERATION VOL. 204
SHUTTER VOLUME 204
SHUTTER SOUND 204
PLAYBACK VOLUME 204
P
200
P
Menu List
D SCREEN SETTING
EVF BRIGHTNESS 205
EVF COLOR 205
EVF COLOR ADJUSTMENT 205
LCD BRIGHTNESS 206
1⁄
LCD COLOR 206
LCD COLOR ADJUSTMENT 206
IMAGE DISP. 207
AUTOROTATE DISPLAYS 207
PREVIEW EXP./WB IN MANUAL MODE 208
NATURAL LIVE VIEW 208
FRAMING GUIDELINE 209
AUTOROTATE PB 209
2⁄
FOCUS SCALE UNITS 210
DUAL DISPLAY SETTING 210
DISP. CUSTOM SETTING 211
LARGE INDICATORS MODE(EVF) 212
LARGE INDICATORS MODE(LCD) 213
LARGE INDICATORS DISP. SETTING 214
INFORMATION CONTRAST ADJ. 214
3⁄
SUB MONITOR SETTING 215
REAR SUB MONITOR SETTING 218
SUB MONITOR BACKGROUND COLOR
REAR SUB MONITOR BRIGHTNESS 220
P
220
Menu List
vii

1⁄
2⁄
Menu List
D BUTTON/DIAL SETTING
FOCUS LEVER SETTING 221
EDIT/SAVE QUICK MENU 222
FUNCTION (Fn) SETTING 223
COMMAND DIAL SETTING 226
1⁄
SHUTTER AF 227
Menu List
SHUTTER AE 227
SHOOT WITHOUT LENS 228
SHOOT WITHOUT CARD 228
FOCUS RING 229
FOCUS RING OPERATION 229
AE/AF-LOCK MODE 230
2⁄
AWB-LOCK MODE 230
EXPO. COMP. BUTTON SETTING 230
TOUCH SCREEN SETTING 231
LOCK 232
D POWER MANAGEMENT
AUTO POWER OFF 233
PERFORMANCE 234
SHOOTING STAND BY MODE 235
AUTO POWER SAVE 235
P
D SAVE DATA SETTING
FRAME NO. 236
SAVE ORG IMAGE 237
EDIT FILE NAME 237
CARD SLOT SETTING (STILL IMAGE) 237
SELECT SLOT(xSEQUENTIAL)
SELECT SLOT(FSEQUENTIAL)
SELECT FOLDER 238
COPYRIGHT INFO 239
D CONNECTION SETTING
Bluetooth SETTINGS 240
NETWORK SETTING 242
instax PRINTER CONNECTION SETTING
PC CONNECTION MODE 244
WIRELESS COM. FREQUENCY SETTING 245
GENERAL SETTINGS 246
P
INFORMATION 247
RESET WIRELESS SETTING 247
P
238
238
P
243
viii

Table of Contents
Before You Begin 1
P
Introduction ........................................................................................................... ii
For the Latest Information ............................................................................................ ii
Menu List................................................................................................................ iv
Shooting Menus ................................................................................................................iv
The Playback Menu .........................................................................................................vi
Setup Menus .......................................................................................................................vii
Supplied Accessories ....................................................................................... xix
About This Manual ............................................................................................. xx
Symbols and Conventions .........................................................................................xx
Terminology ........................................................................................................................xx
Before You Begin 1
1
Parts of the Camera ............................................................................................. 2
The Serial Number Plate ................................................................................................5
The Focus Stick (Focus Lever) .....................................................................................5
The DRIVE mode dial .......................................................................................................6
The DRIVE Button ...............................................................................................................7
The Command Dials ........................................................................................................8
The Indicator Lamp ..........................................................................................................9
The LCD Monitor .............................................................................................................10
The View nder ....................................................................................................12
Attaching the View nder ........................................................................................... 13
The Eye Cup .......................................................................................................................14
Focusing the View nder .............................................................................................15
Camera Displays .................................................................................................16
The Electronic View nder .......................................................................................... 16
The LCD Monitor .............................................................................................................18
Choosing a Display Mode .........................................................................................20
Adjusting Display Brightness ................................................................................... 21
The DISP/BACK Button ................................................................................................ 22
The Dual Display .............................................................................................................. 23
Customizing the Standard Display ...................................................................... 24
The Secondary LCD Monitor .................................................................................... 26
The Rear Secondary Monitor ................................................................................... 29
Using the Menus ................................................................................................30
Touch Screen Mode ...........................................................................................31
Shooting Touch Controls ...........................................................................................31
Playback Touch Controls ............................................................................................35
ix

Taking Pictures in Portrait Orientation .......................................................36
First Steps 37
Basic Photography and Playback 55
Movie Recording and Playback 61
Taking Photographs 67
Display Rotation ............................................................................................................... 36
First Steps 37
2
Attaching the Strap ...........................................................................................38
Attaching a Lens .................................................................................................40
Charging the Batteries .....................................................................................41
Inserting the Batteries ......................................................................................45
Inserting Memory Cards ..................................................................................47
Using Two Cards .............................................................................................................. 48
Compatible Memory Cards ......................................................................................49
Turning the Camera On and O ...................................................................50
Checking the Battery Level.............................................................................51
Basic Setup ...........................................................................................................52
Choosing a Di erent Language.............................................................................54
Changing the Time and Date .................................................................................. 54
Basic Photography and Playback 55
3
Taking Photographs (Mode P) .......................................................................56
Viewing Pictures .................................................................................................59
Deleting Pictures ................................................................................................60
Movie Recording and Playback 61
4
Recording Movies ..............................................................................................62
Adjusting Movie Settings ........................................................................................... 64
Viewing Movies ...................................................................................................65
Taking Photographs 67
5
P, S, A, and M Modes ..........................................................................................68
Mode P: Program AE .....................................................................................................68
Mode S: Shutter-Priority AE ......................................................................................70
Mode A: Aperture-Priority AE .................................................................................. 73
Mode M: Manual Exposure ....................................................................................... 75
Autofocus ..............................................................................................................77
Focus Mode ........................................................................................................................ 78
Autofocus Options (AF Mode) ................................................................................ 80
Focus-Point Selection...................................................................................................82
Manual Focus.......................................................................................................85
Checking Focus ................................................................................................................ 87
x

Table of Contents
The Shooting Menus 103
Sensitivity..............................................................................................................90
AUTO .......................................................................................................................................91
Metering ................................................................................................................92
Exposure Compensation .................................................................................93
Focus/Exposure Lock ........................................................................................94
Other Controls .................................................................................................................. 95
Bracketing .............................................................................................................96
O AE BKT ............................................................................................................................. 97
W ISO BKT .......................................................................................................................... 97
X FILM SIMULATION BKT ........................................................................................97
V WHITE BALANCE BKT ............................................................................................ 98
Y DYNAMIC RANGE BKT .......................................................................................... 98
Z FOCUS BKT ................................................................................................................. 98
Continuous Shooting (Burst Mode) ............................................................99
Multiple Exposures ......................................................................................... 101
The Shooting Menus 103
6
IMAGE QUALITY SETTING ............................................................................. 104
IMAGE SIZE ....................................................................................................................... 104
IMAGE QUALITY ............................................................................................................ 105
RAW RECORDING ......................................................................................................... 106
FILM SIMULATION ........................................................................................................ 107
B & W ADJ. ab(Warm/Cool) ............................................................................. 108
GRAIN EFFECT ................................................................................................................ 108
COLOR CHROME EFFECT......................................................................................... 109
SMOOTH SKIN EFFECT .............................................................................................. 109
DYNAMIC RANGE ......................................................................................................... 110
D RANGE PRIORITY ...................................................................................................... 111
WHITE BALANCE ........................................................................................................... 112
HIGHLIGHT TONE .........................................................................................................115
SHADOW TONE ............................................................................................................. 115
COLOR .................................................................................................................................115
SHARPNESS ...................................................................................................................... 115
NOISE REDUCTION ...................................................................................................... 116
LONG EXPOSURE NR .................................................................................................. 116
LENS MODULATION OPTIMIZER ......................................................................... 116
COLOR SPACE ................................................................................................................. 116
PIXEL MAPPING ............................................................................................................. 117
SELECT CUSTOM SETTING ...................................................................................... 117
xi

1
Introduction
EDIT/SAVE CUSTOM SETTING ............................................................................... 118
AF/MF SETTING ................................................................................................ 119
FOCUS AREA ................................................................................................................... 119
AF MODE ........................................................................................................................... 120
AF-C CUSTOM SETTINGS ......................................................................................... 121
STORE AF MODE BY ORIENTATION .................................................................... 124
AF POINT DISPLAY yz ........................................................................................124
NUMBER OF FOCUS POINTS ................................................................................. 125
PRE-AF ................................................................................................................................. 125
AF ILLUMINATOR ..........................................................................................................125
FACE/EYE DETECTION SETTING .......................................................................... 126
AF+MF ................................................................................................................................ 128
MF ASSIST ......................................................................................................................... 129
FOCUS CHECK ................................................................................................................ 129
INTERLOCK SPOT AE & FOCUS AREA................................................................130
INSTANT AF SETTING .................................................................................................130
DEPTH-OF-FIELD SCALE ........................................................................................... 131
RELEASE/FOCUS PRIORITY .....................................................................................131
TOUCH SCREEN MODE ............................................................................................. 132
SHOOTING SETTING ....................................................................................... 135
SELF-TIMER .......................................................................................................................135
SAVE SELF-TIMER SETTING...................................................................................... 136
INTERVAL TIMER SHOOTING .................................................................................. 136
INTERVAL TIMER SHOOTING EXPOSURE SMOOTHING .........................137
AE BKT SETTING ............................................................................................................ 138
FILM SIMULATION BKT .............................................................................................. 138
FOCUS BKT ....................................................................................................................... 139
PHOTOMETRY .................................................................................................................140
SHUTTER TYPE ...............................................................................................................141
FLICKER REDUCTION .................................................................................................. 142
ISO ......................................................................................................................................... 142
IS MODE ............................................................................................................................. 143
MOUNT ADAPTER SETTING ................................................................................... 144
35mm FORMAT MODE ............................................................................................. 146
WIRELESS COMMUNICATION ............................................................................... 147
FLASH SETTING ................................................................................................ 148
FLASH FUNCTION SETTING ................................................................................... 148
RED EYE REMOVAL ...................................................................................................... 148
xii

Table of Contents
TTL-LOCK MODE ........................................................................................................... 149
LED LIGHT SETTING ....................................................................................................149
MASTER SETTING .........................................................................................................150
CH SETTING .....................................................................................................................150
MOVIE SETTING ............................................................................................... 151
MOVIE MODE .................................................................................................................. 151
H.265(HEVC)/H.264 ..................................................................................................... 153
MOVIE COMPRESSION .............................................................................................. 153
F FILM SIMULATION ................................................................................................. 154
F B & W ADJ. ab(Warm/Cool) ...................................................................... 154
F DYNAMIC RANGE .................................................................................................. 155
F WHITE BALANCE .................................................................................................... 155
F HIGHLIGHT TONE .................................................................................................. 156
F SHADOW TONE ...................................................................................................... 156
F COLOR ......................................................................................................................... 156
F SHARPNESS .............................................................................................................. 157
F NOISE REDUCTION ..............................................................................................157
V INTERFRAME NR ................................................................................................... 157
F-Log/HLG RECORDING ........................................................................................... 158
F PERIPHERAL LIGHT CORRECTION ............................................................... 159
F FOCUS AREA ............................................................................................................ 159
MOVIE AF MODE ..........................................................................................................159
F AF-C CUSTOM SETTING .................................................................................... 160
F FACE/EYE DETECTION SETTING ...................................................................161
F MF ASSIST .................................................................................................................. 161
F FOCUS CHECK ......................................................................................................... 161
4K MOVIE OUTPUT ...................................................................................................... 162
FULL HD MOVIE OUTPUT ........................................................................................ 162
HDMI OUTPUT INFO DISPLAY............................................................................... 163
4K HDMI STANDBY QUALITY ................................................................................. 163
HDMI REC CONTROL .................................................................................................. 163
ZEBRA SETTING .............................................................................................................164
ZEBRA LEVEL ................................................................................................................... 164
AUDIO SETTING ............................................................................................................165
TIME CODE SETTING ..................................................................................................167
TALLY LIGHT ..................................................................................................................... 169
MOVIE SILENT CONTROL ......................................................................................... 170
1
Introduction
xiii

1
Playback and the Playback Menu 171
The Setup Menus 197
Introduction
Playback and the Playback Menu 171
7
The Playback Display ..................................................................................... 172
The DISP/BACK Button ............................................................................................. 173
Viewing Pictures .............................................................................................. 175
Playback Zoom .............................................................................................................. 176
Multi-Frame Playback ................................................................................................ 176
The Playback Menu ........................................................................................ 177
SWITCH SLOT .................................................................................................................. 177
RAW CONVERSION ...................................................................................................... 178
ERASE ................................................................................................................................... 180
SIMULTANEOUS DELETE(RAW SLOT1/JPG SLOT2) ................................... 182
CROP .................................................................................................................................... 182
RESIZE .................................................................................................................................. 183
PROTECT ............................................................................................................................ 184
IMAGE ROTATE ............................................................................................................... 185
RED EYE REMOVAL ...................................................................................................... 186
VOICE MEMO SETTING ............................................................................................. 187
COPY ....................................................................................................................................188
IMAGE TRANSFER ORDER ........................................................................................ 189
WIRELESS COMMUNICATION ............................................................................... 190
PHOTOBOOK ASSIST .................................................................................................. 191
PRINT ORDER (DPOF) ................................................................................................. 193
instax PRINTER PRINT ................................................................................................. 194
DISP ASPECT ...................................................................................................................195
The Setup Menus 197
8
USER SETTING .................................................................................................. 198
FORMAT ............................................................................................................................. 198
DATE/TIME ........................................................................................................................ 199
TIME DIFFERENCE ........................................................................................................199
Qa ................................................................................................................. 200
MY MENU SETTING .....................................................................................................200
SENSOR CLEANING ..................................................................................................... 201
BATTERY AGE .................................................................................................................. 201
RESET ................................................................................................................................... 202
REGULATORY .................................................................................................................. 202
SOUND SETTING .............................................................................................. 203
AF BEEP VOL. ...................................................................................................................203
SELF-TIMER BEEP VOL. ............................................................................................... 203
xiv

Table of Contents
OPERATION VOL. ........................................................................................................... 204
SHUTTER VOLUME ....................................................................................................... 204
SHUTTER SOUND .........................................................................................................204
PLAYBACK VOLUME .................................................................................................... 204
SCREEN SETTING .............................................................................................205
EVF BRIGHTNESS ........................................................................................................... 205
EVF COLOR ....................................................................................................................... 205
EVF COLOR ADJUSTMENT ...................................................................................... 205
LCD BRIGHTNESS .......................................................................................................... 206
LCD COLOR ......................................................................................................................206
LCD COLOR ADJUSTMENT ..................................................................................... 206
IMAGE DISP. ...................................................................................................................... 207
AUTOROTATE DISPLAYS ............................................................................................ 207
PREVIEW EXP./WB IN MANUAL MODE ............................................................. 208
NATURAL LIVE VIEW .................................................................................................... 208
FRAMING GUIDELINE ................................................................................................. 209
AUTOROTATE PB ........................................................................................................... 209
FOCUS SCALE UNITS .................................................................................................. 210
DUAL DISPLAY SETTING ........................................................................................... 210
DISP. CUSTOM SETTING ............................................................................................ 211
LARGE INDICATORS MODE(EVF) ......................................................................... 212
LARGE INDICATORS MODE(LCD) ........................................................................ 213
LARGE INDICATORS DISP. SETTING .................................................................... 214
INFORMATION CONTRAST ADJ. .......................................................................... 214
SUB MONITOR SETTING ...........................................................................................215
REAR SUB MONITOR SETTING .............................................................................. 218
SUB MONITOR BACKGROUND COLOR ............................................................ 220
REAR SUB MONITOR BRIGHTNESS ..................................................................... 220
BUTTON/DIAL SETTING ................................................................................ 221
FOCUS LEVER SETTING ............................................................................................. 221
EDIT/SAVE QUICK MENU..........................................................................................222
FUNCTION (Fn) SETTING ......................................................................................... 223
COMMAND DIAL SETTING .....................................................................................226
SHUTTER AF..................................................................................................................... 227
SHUTTER AE..................................................................................................................... 227
SHOOT WITHOUT LENS ............................................................................................ 228
SHOOT WITHOUT CARD ..........................................................................................228
FOCUS RING .................................................................................................................... 229
FOCUS RING OPERATION ........................................................................................ 229
1
Introduction
xv

1
Shortcuts 249
Introduction
AE/AF-LOCK MODE ..................................................................................................... 230
AWB-LOCK MODE ........................................................................................................ 230
EXPO. COMP. BUTTON SETTING .......................................................................... 230
TOUCH SCREEN SETTING ........................................................................................ 231
LOCK.....................................................................................................................................232
POWER MANAGEMENT ................................................................................. 233
AUTO POWER OFF ....................................................................................................... 233
PERFORMANCE ..............................................................................................................234
SHOOTING STAND BY MODE ................................................................................ 235
AUTO POWER SAVE ..................................................................................................... 235
SAVE DATA SETTING ....................................................................................... 236
FRAME NO. ....................................................................................................................... 236
SAVE ORG IMAGE ......................................................................................................... 237
EDIT FILE NAME ............................................................................................................. 237
CARD SLOT SETTING (STILL IMAGE) .................................................................. 237
SELECT SLOT(xSEQUENTIAL) .............................................................................238
SELECT SLOT(FSEQUENTIAL) ............................................................................. 238
SELECT FOLDER ............................................................................................................238
COPYRIGHT INFO ......................................................................................................... 239
CONNECTION SETTING .................................................................................240
Bluetooth SETTINGS ................................................................................................... 240
NETWORK SETTING ....................................................................................................242
instax PRINTER CONNECTION SETTING ......................................................... 243
PC CONNECTION MODE.......................................................................................... 244
SMARTPHONE WIRELESS COM. FREQUENCY SETTING ......................... 245
GENERAL SETTINGS .................................................................................................... 246
INFORMATION ................................................................................................................ 247
RESET WIRELESS SETTING .......................................................................................247
Shortcuts 249
9
Shortcut Options ............................................................................................. 250
MY MENU ........................................................................................................... 251
MY MENU SETTING .....................................................................................................251
The Q (Quick Menu) Button ......................................................................... 253
The Quick Menu Display .........................................................................................253
Viewing and Changing Settings ......................................................................... 254
Editing the Quick Menu ........................................................................................... 255
The Fn (Function) Buttons ...........................................................................256
Assigning Roles to the Function Buttons ...................................................... 259
xvi

Table of Contents
Peripherals and Optional Accessories 263
Connections 281
Peripherals and Optional Accessories 263
10
Lenses ..................................................................................................................264
Lens Parts .......................................................................................................................... 264
Lens Care ........................................................................................................................... 265
Removing Lens Caps ................................................................................................. 265
Attaching Lens Hoods .............................................................................................. 265
Aperture ring .................................................................................................................. 266
View nder Tilt Adapters ...............................................................................267
Attaching the EVF-TL1 .............................................................................................. 268
Using the EVF-TL1 ........................................................................................................ 269
External Flash Units ........................................................................................ 270
Flash Settings ................................................................................................................. 271
SYNC TERMINAL ............................................................................................................ 272
SHOE MOUNT FLASH ................................................................................................273
MASTER(OPTICAL) ....................................................................................................... 276
Connections 281
11
HDMI Output .................................................................................................... 282
Connecting to HDMI Devices ..............................................................................282
Shooting ............................................................................................................................ 283
Playback .............................................................................................................................283
Wireless Connections (Bluetooth®, Wireless LAN/Wi-Fi) ................... 284
Smartphones and Tablets: FUJIFILM Camera Remote .......................... 284
Tethered Shooting: Capture One Pro Fuji lm/
Adobe® Photoshop® Lightroom® Classic CC + FUJIFILM Tether
Shooting Plug-in PRO for GFX/FUJIFILM X Acquire ............................. 286
Connecting to Computers via USB ........................................................... 287
Tethered Shooting: Capture One Pro Fuji lm/
Adobe® Photoshop® Lightroom® Classic CC + FUJIFILM Tether
Shooting Plug-in PRO for GFX/FUJIFILM X Acquire ............................. 290
Copying Pictures to a Computer ........................................................................ 291
Converting RAW Images: FUJIFILM X RAW STUDIO ............................... 292
Backing up and Restoring Camera Settings
(FUJIFILM X Acquire)................................................................................................292
instax SHARE Printers ....................................................................................293
Establishing a Connection ..................................................................................... 293
Printing Pictures ............................................................................................................ 294
1
Introduction
xvii

1
Technical Notes 295
Introduction
Table of Contents
Technical Notes 295
12
Accessories from Fuji lm.............................................................................. 296
Software for Use with Your Camera .......................................................... 298
FUJIFILM Camera Remote ...................................................................................... 298
MyFinePix Studio .......................................................................................................... 298
Capture One Express Fuji lm ............................................................................... 298
RAW FILE CONVERTER EX ........................................................................................ 298
Capture One PRO Fuji lm ....................................................................................... 299
Adobe® Photoshop® Lightroom® Classic CC + FUJIFILM Tether
Shooting Plug-in PRO for GFX ........................................................................... 299
FUJIFILM X Acquire ..................................................................................................... 299
FUJIFILM X RAW STUDIO ......................................................................................... 299
For Your Safety ................................................................................................. 300
Product Care ..................................................................................................... 309
Cleaning the Image Sensor .........................................................................310
Firmware Updates ...........................................................................................311
Checking the Firmware Version .......................................................................... 311
Troubleshooting ..............................................................................................312
Warning Messages and Displays ............................................................... 321
Memory Card Capacity .................................................................................324
Speci cations ................................................................................................... 325
xviii

Supplied Accessories
The following are included with the camera:
NP-T125 rechargeable batteries (× 2)
•
BC-T125 battery charger
•
Plug adapter
•
EVF-GFX2 interchangeable electronic view nder
•
Body cap (comes attached to camera)
•
Metal strap clips (× 2)
•
Clip attaching tool
•
Protective covers (× 2)
•
Shoulder strap
•
Cable protector
•
Hot shoe cover (comes attached to hot shoe)
•
Sync terminal cap (comes attached to camera)
•
Owner’s Manual (this manual)
•
• The plug adapter supplied with the camera varies with the country
N
or region of purchase; be sure to use the adapter appropriate to your
country or region as described in the enclosed notice.
For information on compatible computer software, see “Software for
•
Use with Your Camera” (P 298).
1
Introduction
xix

About This Manual
This manual contains instructions for your FUJIFILM GFX100
digital camera. Be sure you have read and understood its
contents before proceeding.
Symbols and Conventions
The following symbols are used in this manual:
1
Introduction
Information that should be read to prevent damage to the
O
product.
Additional information that may be helpful when using the
N
product.
Pages on which related information may be found.
P
Menus and other text in the displays are shown in bold. Illustrations
are for explanatory purposes only; drawings may be simpli ed,
while photographs are not necessarily taken with the model of
camera described in this manual.
Terminology
The optional SD, SDHC, and SDXC memory cards the camera uses
to store pictures are referred to as “memory cards”. The electronic
view nder may be referred to as the “EVF” and the LCD monitor
as the “LCD”.
xx

Before You Begin
1

Parts of the Camera
1
Before You Begin
Fn2 button .....................................................256
A
Secondary LCD monitor mode button .....27
B
Secondary LCD monitor................................26
C
Secondary monitor backlight button .......28
D
Hot shoe .........................................................271
E
DRIVE mode dial release button ................... 6
F
DRIVE button ...................................................... 7
G
DRIVE mode dial ...............................................6
H
AF-assist illuminator................................... 125
I
Self-timer lamp ............................................ 135
Strap eyelet .......................................................38
J
Connector cover 1
K
Connector cover 2
L
Sync terminal ................................................ 272
M
Lens signal contacts
N
Battery tray latch ............................................45
O
Battery tray .......................................................45
P
2
Vertical grip front command dial
Q
............................................................8, 36, 226
Vertical grip Fn3 button ................................36
R
Lens release button ........................................40
S
Fn3 button ..................................................... 256
T
Front command dial ............................... 8, 226
U
ON/OFF switch .................................................50
V
Shutter button .................................................58
W
Fn1 button
X
d (exposure compensation) button ......93
Microphone jack .......................................... 165
Y
Headphone jack ........................................... 166
Z
USB connector (Type-C) ..................... 44, 287
a
HDMI Micro connector (Type D) .............282
b
15 V DC-IN connector ....................................43
c
Hot shoe cover .............................................. 273
d
Body cap ............................................................40
e

Parts of the Camera
1
Before You Begin
b (delete) button ...........................................60
f
AE-L (exposure lock) button ............... 95, 256
g
Focus stick (focus lever)...................5, 82, 221
h
Focus mode selector ......................................78
i
AF-ON button ......................................... 95, 256
j
Rear command dial .......................8, 175, 226
k
Fn4 button ..................................................... 256
l
Q (quick menu) button ............................... 253
m
Indicator lamp1 ...............................................9
n
Memory card slot cover ................................47
o
Memory card slot cover latch ......................47
p
Remote release connector cover ................72
q
Indicator lamp2 ........................................9, 43
r
Rear secondary monitor ...............................29
s
LCD monitor ................................10, 18, 20, 21
t
Touch screen ................................. 31, 132, 231
a (playback) button ...................................59
u
DISP (display)/BACK button ............... 22, 173
v
MENU/OK button .............................................30
w
Memory card slot1 ........................................47
x
Memory card slot2 ........................................47
y
Remote release connector ............................72
z
3
1
Before You Begin
Vertical grip focus stick (focus lever)
0
..................................................................... 5, 36
Vertical grip AF-ON button .................36, 256
1
Vertical grip rear command dial
2
............................................................8, 36, 226
Vertical grip Fn2 button ...................... 36, 256
3
Vertical grip Fn1 button
4
d (exposure compensation) button
..........................................................36, 93, 256
Vertical grip shutter button ..................36, 58
5
The Cable Protector
The cable protector prevents
A
accidental disconnection of the
USB cable or AC adapter. Attach
the protector as shown and
tighten the lock screw.
Connect the cable and pass it
B
through the protector as shown.
4
Vertical grip control lock ...............................36
6
Speaker .................................................... 65, 204
7
Vertical grip Fn4 button ...................... 36, 256
8
Vertical grip Q (quick menu) button
9
................................................................ 36, 253
Tripod mount
-
Fn5 button ..............................................80, 256
^
Vertical grip AE-L (exposure lock)
\
button .............................................36, 95, 256
A B
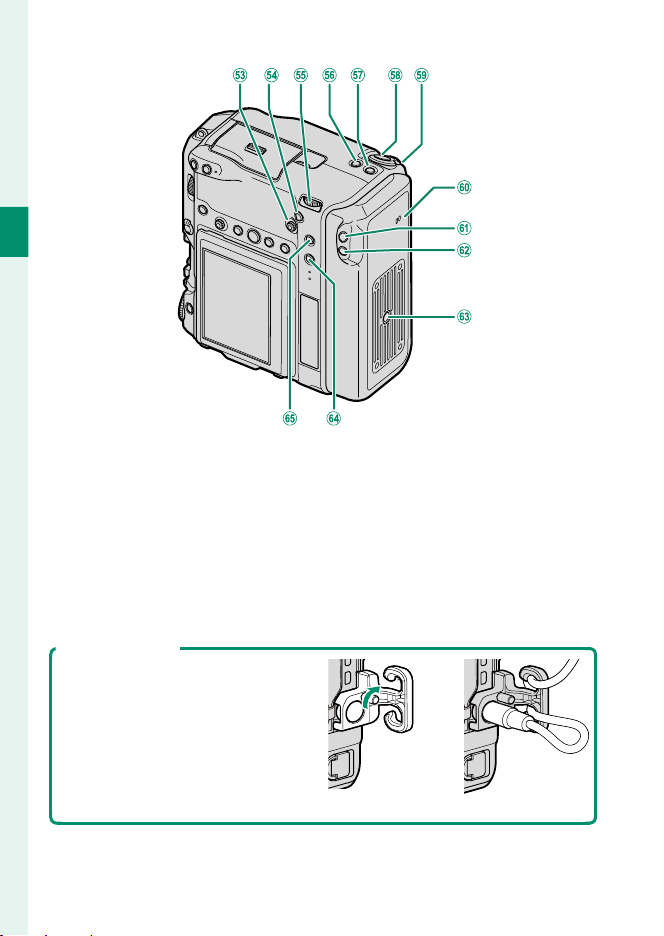
The Serial Number Plate
Do not remove the serial number plate,
which provides the FCC ID, KC mark,
CMIIT ID, serial number, and other im-
portant information.
The Focus Stick (Focus Lever)
Tilt or press the focus stick to select the focus area. The focus stick can also be used
to navigate the menus.
Parts of the Camera
1
Before You Begin
Serial number plate
5

The DRIVE mode dial
Option
Description
The DRIVE mode dial is used to select the
drive mode. Hold the DRIVE mode dial
release button while rotating the dial to
select the desired mode.
1
Before You Begin
Option
STILL
MULTI
MOVIE
Take pictures one at a time or in bursts (P 56, 99).
Record a multiple exposures or take a series of photographs
using bracketing (P 96, 101).
Shoot movies (P 62).
Description
6

The DRIVE Button
Pressing the DRIVE button when STILL or
MULTI is selected with the DRIVE mode dial
displays drive mode options. Pressing the
button when MOVIE is selected displays
movie mode options (P 151).
Drive mode options (STILL) Drive mode options (MULTI)
STILL IMAGE
MOVIE MODE
16:9
Drive mode options (MOVIE)
Parts of the Camera
1
Before You Begin
AE BKT
7

The Command Dials
Rotate
Press
Rotate or press the command dials to:
Front command dial Rear command dial
1
Before You Begin
Select menu tabs or page
•
through menus
Choose the desired combina-
•
tion of shutter speed and aperture (program shift)
Adjust aperture
•
View other pictures during
Press
•
playback
Switch between aperture and
•
ISO sensitivity
Press and hold to choose the op-
•
tion selected for D BUTTON/
DIAL SETTING> COMMAND
DIAL SETTING in the D(setup)
menu
Rotate
1 Can be changed using D BUTTON/DIAL SETTING> COMMAND DIAL SETTING.
2 If the lens is equipped with an aperture ring with a “C” position, the camera command
dials can be used to adjust aperture when the aperture ring is rotated to C.
3 Available only if FOCUS CHECK is assigned to a function button.
4 Only if a value other than auto is selected for shutter speed.
1, 2
2
Highlight menu items
•
Choose the desired combina-
•
tion of shutter speed and aperture (program shift)
Choose a shutter speed
•
Adjust exposure compensation by
•
pressing the d button and rotating the dial
Adjust settings in the quick menu
•
Choose the size of the focus frame
•
Zoom in or out in full frame play-
•
back
Zoom in or out in multi-frame
•
playback
Zoom in on the active focus point
•
Press and hold to choose the
•
manual focus mode focus display
Zoom in on the active focus
•
point during playback
1
1, 4
3
3
8
Parts of the Camera
Indicator lamp
Camera status
The Indicator Lamp
Camera status is shown by the indicator
lamp1.
Indicator lamp11
Glows green Focus locked.
Blinks green Focus or slow shutter speed warning. Pictures can be taken.
Camera on: Recording pictures. Additional pictures can be
Blinks green and
orange
Glows orange
Blinks red Lens or memory error.
* Displayed only if pictures are selected for upload.
• Warnings may also appear in the display.
N
The indicator lamp remains o while your eye is to the view nder.
•
•
taken.
Camera o : Uploading pictures to a smartphone or tablet.
•
Recording pictures. No additional pictures can be taken at
this time.
Camera status
If the camera is o , the two lamps designated as “indicator lamp 2” light green
while the batteries are charging. The
lamp on the right shows the status of the
battery in the right battery chamber, that
on the left the status of the battery in the
left battery chamber (P 43).
1
Before You Begin
*
9

The LCD Monitor
The LCD monitor can be tilted for easier viewing, but be careful not to touch
the wires or trap ngers or other objects
behind the monitor. Touching the wires
could cause camera malfunction.
1
Before You Begin
The LCD monitor also functions as a touch screen that can be used for:
N
Touch photography (P 32)
•
Focus area selection (P 31)
•
Function selection (P 34)
•
Muting camera controls during movie recording (P 33)
•
Full-frame playback (P 35)
•
10

Parts of the Camera
“Tall” (Portrait) Orientation
The display can also be tilted to take pictures from high or low angles when
the camera is rotated to take pictures in “tall” (portrait) orientation.
Press the tilt lock release and tilt the display as shown in Figure 1.
•
To take high-angle shots, hold the camera in the orientation shown in
•
Figure 2.
Figure 1 Figure 2
1
Before You Begin
11

The View nder
1
Before You Begin
Hot shoe .................................................267, 273
A
Viewfi nder lock releases ...............................13
B
VIEW MODE button ......................................... 20
C
Eye sensor .........................................................20
D
Electronic viewfi nder (EVF) ................... 16, 20
E
The EVF-TL1
The optional EVF-TL1 tilt adapter lets you swivel
the view nder left or right ±45° or up or down
between 0° and 90° (P267).
Eye cup ..............................................................14
F
Diopter adjustment control ........................15
G
Connectors ....................................................... 13
H
Hot shoe cover
I
Connector cover
J
12

Attaching the View nder
Using the view nder makes it easier to
frame your subject accurately. Remove
the hot shoe cover from the camera and
slide the view nder onto the hot shoe,
stopping when it clicks into place.
Removing the View nder
Keeping the lock releases pressed (
down on the front of the view nder (B) and
slide it o as shown.
), press
A
The View nder
1
Before You Begin
13

The Eye Cup
To remove the eye cup, press the bottom
in with both thumbs and slide eye cup
up.
1
Before You Begin
14

The View nder
Focusing the View nder
If the indicators displayed in the view nder are blurred, put your
eye to the view nder and rotate the diopter adjustment control
until the display is in sharp focus.
To focus the view nder:
Lift the diopter adjustment control.
A
Rotate the control to adjust view nder focus.
B
Return the control to its original position and lock it in place.
C
Lift the control before use. Failure to observe this precaution could
O
cause product malfunction.
1
Before You Begin
15

Camera Displays
This section lists the indicators that may be displayed
during shooting.
For illustrative purposes, displays are shown with all indicators lit.
O
The Electronic View nder
1
Before You Begin
K LD E M N O P
ALL-Intra
CABxFGHIJ
QRS T UVW X
01/01/2019 10:00 AM
H.264
w
v
Y
u
5
5
4
4
3
3
2
2
1
t
1
0
0
-1
-1
-2
-2
-3
-3
-4
-4
-5
-5
s
Z
a
b
r
1.0
cedfghilm
jknopq
16

Camera Displays
2
IS mode
A
B
C
D
E
F
G
H
I
J
K
L
M
N
O
P
Q
R
S
T
U
V
W
X
Y
1 Shows “9999” if there is space for over 9999 frames.
2 Not displayed when ON is selected for D SCREEN SET-UP> LARGE INDICATORS
MODE(EVF).
3 Displayed during movie recording only.
......................................................... 143
Flash (TTL) mode .........................................273
Flash compensation ................................... 273
35mm format mode ................................... 146
Movie compression ..................................... 153
Self-timer indicator .....................................135
Continuous mode ...........................................99
Shutter type ................................................... 141
AF+MF indicator
Bluetooth ON/OFF ....................................... 240
White balance ..............................................112
AWB lock ........................................................230
Film simulation ............................................ 107
F-Log/HLG recording ..................................158
Dynamic range ............................................110
D-range priority ...........................................111
Image transfer status ........................240, 284
Date and time ..................................52, 54, 199
Movie mode
Time remaining
Card slot options ................................... 48, 237
Number of available frames
Image size ...................................................... 104
Image quality................................................ 105
Touch screen mode .............................. 31, 132
2
........................................ 128
3
.......................................... 62, 151
3
.............................................63
1
................... 324
Temperature warning ................................323
Z
Virtual horizon .................................................25
a
Focus frame ...............................................82, 94
b
Histogram .........................................................25
c
External power source in use .......................43
d
Battery level ......................................................51
e
Sensitivity ..........................................................90
f
Exposure compensation ...............................93
g
Aperture ............................................... 69, 73, 75
h
Shutter speed .....................................69, 70, 75
i
TTL lock .........................................149, 225, 261
j
AE lock ...................................................... 95, 230
k
Metering ............................................................92
l
Shooting mode ...............................................68
m
Focus mode
n
Focus indicator
o
Manual focus indicator
p
AF lock ...................................................... 95, 230
q
Distance indicator
r
Recording level
s
Exposure indicator ...................................75, 93
t
Location data download status .....246, 284
u
Depth-of-fi eld preview ...........................74, 87
v
H.265(HEVC)/H.264 .................................... 153
w
Focus check ............................................ 88, 129
x
2
....................................................78
2
..............................................79
2
........................78, 85
2
........................................87
2, 3
......................................... 165
1
Before You Begin
17

The LCD Monitor
D E G H
H.264
ALL-Intra
CFBAJKLMNOP
1
Before You Begin
x
w
v
u
t
s
r
jknopq
01/01/2019 10:00 AM
QI
R
S
T
U
V
W
X
Y
Z
a
cbdefgihlm
18

Camera Displays
Flash ( TTL) mode ......................................... 273
A
B
C
D
E
F
G
H
I
J
K
L
M
N
O
P
Q
R
S
T
U
V
W
X
Y
1 Shows “9999” if there is space for over 9999 frames.
2 Not displayed when ON is selected for D SCREEN SET-UP> LARGE INDICATORS
MODE(LCD).
3 Displayed during movie recording only.
4 Camera functions can also be accessed via touch controls.
2
IS mode
......................................................... 143
Focus check ............................................ 88, 129
Depth-of-fi eld preview ...........................74, 87
H.265(HEVC)/H.264 .................................... 153
Location data download status .....246, 284
35mm format mode ................................... 146
Movie compression ..................................... 153
Bluetooth ON/OFF ....................................... 240
Image transfer status ........................240, 284
Movie mode
Time remaining
Card slot options ................................... 48, 237
Number of available frames
Image size ...................................................... 104
Image quality................................................ 105
Date and time ..................................52, 54, 199
Tou ch screen mode
AWB lock ........................................................230
White balance ..............................................112
Film simulation ............................................ 107
F-Log/HLG recording ..................................158
Dynamic range ............................................110
D-range priority ...........................................111
Tem perature warning ................................ 323
3
.......................................... 62, 151
3
.............................................63
1
................... 324
4
............................ 31, 132
Focus frame ...............................................82, 94
Z
Histogram .........................................................25
a
External power source in use .......................43
b
Battery level ......................................................51
c
Distance indicator
d
Sensitivity ..........................................................90
e
Exposure compensation ...............................93
f
Aperture ............................................... 69, 73, 75
g
Time code ....................................................... 167
h
Shutter speed .....................................69, 70, 75
i
TTL lock .........................................149, 225, 261
j
AE lock ...................................................... 95, 230
k
Metering ............................................................92
l
Shooting mode ...............................................68
m
Focus mode
n
Focus indicator
o
Manual focus indicator
p
AF lock ...................................................... 95, 230
q
AF+MF indicator
r
Shutter type ................................................... 141
s
Recording level
t
Continuous mode ...........................................99
u
Self-timer indicator ..................................... 135
v
Exposure indicator ...................................75, 93
w
Flash compensation ...................................273
x
2
........................................87
2
....................................................78
2
..............................................79
2
........................78, 85
2
........................................ 128
2, 3
......................................... 165
1
Before You Begin
19

Choosing a Display Mode
Option
Description
EE EYE SENSOR
EVF ONLY
LCD ONLY
EVF ONLY +
EE EYE SENSOR +
LCD IMAGE DISP.
Press the VIEW MODE button to cycle
through the following display modes.
1
Option
Before You Begin
Putting your eye to the viewfi nder turns the viewfi nder on and
EYE SENSOR
EVF ONLY Viewfi nder on, LCD monitor off .
LCD ONLY LCD monitor on, viewfi nder off .
EVF ONLY + EE
EYE SENSOR +
LCD IMAGE DISP.
The Eye Sensor
The eye sensor may respond to objects other
•
than your eye or to light shining directly on
the sensor.
The eye sensor is disabled while the LCD mon-
•
itor is tilted.
the LCD monitor off ; taking your eye away turns the viewfi nder
off and LCD monitor on.
Putting your eye to the viewfi nder turns the viewfi nder on; taking it away turns the viewfi nder off . The LCD monitor remains off .
Putting your eye to the viewfi nder during shooting turns the
viewfi nder on, but the LCD monitor is used for the display of
images once you remove your eye from the viewfi nder after
shooting.
Description
20
Eye sensor

Camera Displays
Adjusting Display Brightness
The brightness and hue of the view nder and LCD monitor can
be adjusted using the items in the D SCREEN SET-UP menu.
Choose EVF BRIGHTNESS or EVF COLOR to adjust view nder
brightness or hue, LCD BRIGHTNESS or LCD COLOR to do the
same for the LCD monitor.
1
Before You Begin
21

The DISP/BACK Button
The DISP/BACK button controls the display
of indicators in the view nder and LCD
monitor.
Indicators for the EVF and LCD must be
N
selected separately. To choose the EVF dis-
1
Before You Begin
play, place your eye to the view nder while
using the DISP/BACK button.
Viewfi nder
Full screen
Full screen
(no indicators)
Dual display
(manual focus mode only)
22
Standard indicators
Standard (no indicators)

LCD Monitor
Standard indicators No indicators
Camera Displays
1
Before You Begin
Dual display
(manual focus mode only)
Info display
The Dual Display
The dual display consists of a large full-frame window and a
smaller close-up of the focus area.
23

Customizing the Standard Display
To choose the items shown in the standard indicator display:
Display standard indicators.
1
Use the DISP/BACK button to display standard indicators.
Select DISP. CUSTOM SETTING.
2
1
Before You Begin
Select D SCREEN SET-UP> DISP. CUSTOM SETTING in the
setup menu.
Choose items.
3
Highlight items and press MENU/OK to select or deselect.
FRAMING GUIDELINE
•
ELECTRONIC LEVEL
•
FOCUS FRAME
•
AF DISTANCE INDICATOR
•
MF DISTANCE INDICATOR
•
HISTOGRAM
•
LIVE VIEW HIGHLIGHT ALERT
•
SHOOTING MODE
•
APERTURE/S-SPEED/ISO
•
INFORMATION BACKGROUND
•
Expo. Comp. (Digit)
•
Expo. Comp. (Scale)
•
FOCUS MODE
•
PHOTOMETRY
•
SHUTTER TYPE
•
FLASH
•
Save changes.
4
Press DISP/BACK to save changes.
CONTINUOUS MODE
•
DUAL IS MODE
•
TOUCH SCREEN MODE
•
WHITE BALANCE
•
FILM SIMULATION
•
DYNAMIC RANGE
•
BOOST MODE
•
FRAMES REMAINING
•
IMAGE SIZE/QUALITY
•
MOVIE MODE & REC. TIME
•
35mm FORMAT MODE
•
IMAGE TRANSFER ORDER
•
MIC LEVEL
•
GUIDANCE MESSAGE
•
BATTERY LEVEL
•
FRAMING OUTLINE
•
Exit the menus.
5
Press DISP/BACK as needed to exit the menus and return to the
shooting display.
24

Camera Displays
Virtual Horizon
Selecting ELECTRONIC LEVEL displays a virtu-
al horizon. The camera is level when the two
lines overlap. Note that the virtual horizon may
not be displayed if the camera lens is pointed
up or down. For a 3D display (shown), press the
function button to which ELECTRONIC LEVEL
is assigned (P 223, 259).
Framing Outline
Enable FRAMING OUTLINE to make the borders of the frame easier to see
against dark backgrounds.
Histograms
Histograms show the distribution of tones in the image. Brightness is
shown by the horizontal axis, the number of pixels by the vertical axis.
Number of pixels
Pitch Roll
1
Before You Begin
Shadows Highlights
Optimal exposure: Pixels are distributed in an even curve
•
throughout the tone range.
Overexposed: Pixels are clustered on the right side of
•
the graph.
Underexposed: Pixels are clustered on the left side of
•
the graph.
To view separate RGB histograms and a display showing areas of the frame that will be
overexposed at current settings superimposed
on the view through the lens, press the function button to which HISTOGRAM is assigned
(P 223, 259).
Overexposed areas blink
A
RGB histograms
B
Pixel brightness
25

The Secondary LCD Monitor
Default
Among the settings that can be viewed
in the secondary LCD monitor are shutter
speed, aperture, and ISO sensitivity.
1
Before You Begin
Secondary LCD monitor
S.S.
E
L
A
F
L
T
T
L
A
SHUTTER SPEED
B
APERTURE
C
ISO
D
SHOOTING MODE
E
IMAGE SIZE/QUALITY
F
WHITE BALANCE
The settings displayed can be selected using D SCREEN SET-UP>
N
SUB MONITOR SETTING.
4000
F
2.8
ISO
1024 00
L
L
M
9999
1
AA
BB
CCKK
V
RL
Default
G
FILM SIMULATION
H
BATTERY LEVEL
I
FRAMES REM.
J
CARD SLOT OPTIONS
K
d Scale
DD EE FF GG
LVL
M
9999
IIJJ
1
RL
HH
26

Cycling Through Indicators in the Secondary LCD Monitor
The indicators displayed in the secondary LCD monitor change each time the
secondary LCD monitor mode button is
pressed.
INFORMATION DIALS
S.S.
E
L
A
F
L
T
T
L
4000
F
2.8
ISO
1024 00
L
L
M
9999
V
1
RL
HISTOGRAM
Camera Displays
1
Before You Begin
27

The secondary LCD monitor backlight button
To turn on the secondary LCD monitor backlight when you nd the secondary LCD monitor
too dark to read, press the secondary LCD monitor backlight button. Press the button again to
turn the backlight o .
1
Background Color
Before You Begin
The background color (black or white) for the secondary LCD monitor can
be selected using the D SCREEN SET-UP> SUB MONITOR BACKGROUND
COLOR option in the D (setup) menu. Note that the background is dis-
played in white whenever the secondary LCD monitor backlight is on.
28

Camera Displays
Default
The Rear Secondary Monitor
Among the indicators that can be viewed
in the rear secondary monitor are histograms and the exposure compensation
indicator.
Rear secondary monitor
AA BB CC
FF EE DDFF
Default
A
APERTURE
B
SHUTTER SPEED
C
ISO
Use D SCREEN SET-UP> REAR SUB MONITOR SETTING to choose
•
N
the indicators displayed or turn the rear secondary monitor o .
Putting your eye to the view nder when the eye sensor is enabled
•
turns o the rear secondary monitor.
D
WHITE BALANCE
E
FILM SIMULATION
F
EXPO. COMP.
1
Before You Begin
29

Using the Menus
Shooting
Playback
To display the menus, press MENU/OK.
1
Before You Begin
To navigate the menus:
Press MENU/OK to display the menus.
1
Press the focus stick (focus lever) left
2
to highlight the tab for the current
menu.
Press the focus stick up or down to highlight the tab (H, G,
3
A, F, B, E, C or D) containing the desired item.
Shooting
IMAGEQUALITYSETTING
IMAGE SIZE
IMAGEQUALITY
RAWRECORDING
FILMSIMULATION
B & WADJ.
(Warm/Cool)
GRAIN EFFECT
COLORCHROMEEFFECT
SMOOTHSKINEFFECT
EXIT
Playback
BACK MENU
PLAY
SLOT
SWITCH
RAW
CONVERSION
ERASE
SIMULTANEOUS DELETE(RAW SLOT1/JPG SLOT2)
CROP
RESIZE
PROTECT
IMAGE
ROTATE
IMAGEQUALITYSETTING
IMAGE SIZE
IMAGEQUALITY
RAWRECORDING
FILMSIMULATION
B & WADJ.
(Warm/Cool)
GRAIN EFFECT
COLORCHROMEEFFECT
SMOOTHSKINEFFECT
IMAGEQUALITYSETTING
IMAGE SIZE
IMAGEQUALITY
RAWRECORDING
FILMSIMULATION
B & WADJ.
(Warm/Cool)
GRAIN EFFECT
COLORCHROMEEFFECT
SMOOTHSKINEFFECT
Ta b
EXIT
EXIT
EXIT
Press the focus stick right to place the cursor in the menu.
4
Use the front command dial to select menu tabs or page through
N
menus and the rear command dial to highlight menu items.
30

Touch Screen Mode
The LCD monitor also functions as a touch screen.
Shooting Touch Controls
To enable touch controls, select ON for
D BUTTON/DIAL SETTING> TOUCH
SCREEN SETTING> x TOUCH SCREEN
SETTING.
EVF
The LCD monitor can be used to select the focus area while pictures are being framed in the electronic view nder (EVF). Use
D BUTTON/DIAL SETTING> TOUCH SCREEN SETTING> EVF
TOUCH SCREEN AREA SETTINGS to choose the area of the mon-
itor employed for touch controls.
TOUCH SCREEN SETTINGS
TOUCH SCREEN SETTING
DOUBLE TAP SETTING
ON
TOUCH FUNCTION
OFF
TOUCH SCREEN SETTING
EVF TOUCH SCREEN AREA SETTINGS
1
Before You Begin
If n FACE SELECT op is enabled when FACE DETECTION ON is
N
selected for G AF/MF SETTING> FACE/EYE DETECTION SETTING,
the face used for focus can be chosen via touch controls.
31

LCD Monitor
Mode
Description
AREA
OFF
Touch controls can be used for such operations as focusing, choosing the focus area,
and taking photographs. The operation
performed can be selected by tapping the
touch screen mode indicator in the display
to cycle through the following options.
1
Before You Begin
Mode
AF
AFOFF
AREA
In focus mode S (AF-S), the camera focuses when you tap your
•
subject in the display. Focus locks at the current distance until
you tap the AFOFF icon.
In focus mode C (AF-C), the camera initiates focus when you
•
tap your subject display. The camera will continue to adjust
focus for changes in the distance to the subject until you tap
the AFOFF icon.
In manual focus mode (MF), you can tap the display to focus
•
on the selected subject using autofocus.
Tap to select a point for focus or zoom. The focus frame will
move to the selected point.
Description
OFF
Di erent touch controls are used during focus zoom (P 134).
O
• To disable touch controls and hide the touch screen mode indica-
N
tor, select OFF for D BUTTON/DIAL SETTING> TOUCH SCREEN
SETTING> x TOUCH SCREEN SETTING.
Touch control settings can be adjusted using G AF/MF SETTING>
•
TOUCH SCREEN MODE. For information on the touch controls available during movie recording, see “Movie Recording (TOUCH SCREEN
MODE; P 133)”.
Touch focus disabled.
32

Touch Screen Mode
Muting Movie Controls
Movie settings can be adjusted using
touch-screen controls, preventing the
sounds made by camera controls being
recorded with the movie. When ON is se-
lected for B MOVIE SETTING> MOVIE
SILENT CONTROL in the shooting menu,
a F SET icon will be displayed in the LCD
monitor; tap the icon to access the following controls:
SHUTTER SPEED
•
APERTURE
•
EXPOSURE COMPENSATION
•
ISO
•
INTERNAL MIC LEVEL
•
ADJUSTMENT/EXTERNAL MIC
LEVEL ADJUSTMENT
* Selecting ON for B MOVIE SETTING> MOVIE SILENT CONTROL disables
dial controls.
*
*
WIND FILTER
•
HEADPHONES VOLUME
•
F FILM SIMULATION
•
F WHITE BALANCE
•
F
SET icon
1
Before You Begin
33

Touch Function
Functions can be assigned to the following ick gestures in much the same way
as function buttons (P 256):
Flick up: T-Fn 1
•
Flick left: T-Fn 2
•
Flick right: T-Fn 3
•
1
Flick down: T-Fn4
•
Before You Begin
• In some cases, touch-function ick ges-
N
tures display a menu; tap to select the
desired option.
Touch-function gestures are disabled by
•
default. To enable touch-function gestures, select ON for D BUTTON/DIAL
SETTING> TOUCH SCREEN SETTING>
c TOUCH FUNCTION.
INTERNAL MIC LEVEL ADJUSTMENT
25.5
SET CANCEL
34

Touch Screen Mode
Playback Touch Controls
When ON is selected for D BUTTON/DIAL SET TING > TOUCH
SCREEN SETTING> a TOUCH SCREEN SETTING, touch controls
can be used for the following playback operations:
Swipe: Swipe a nger across the display to
•
view other images.
Pinch-out: Place two ngers on the display
•
and spread them apart to zoom in.
Pinch-in: Place two ngers on the display
•
and slide them together to zoom out.
Pictures can be zoomed out until the entire image is visible but no
N
further.
Double-tap: Tap the display twice to zoom in
•
on the focus point.
1
Before You Begin
Drag: View other areas of the image during
•
playback zoom.
35

Taking Pictures in Portrait Orientation
The vertical-grip buttons, command dials, and focus stick (focus
lever) make the camera easier to
use when rotated to take pictures
in portrait (“tall”) orientation.
1
Before You Begin
• To use the vertical-grip buttons, command dials, and focus stick, slide
N
the vertical grip control lock from LOCK to z. Selecting LOCK prevents
you accidentally using the vertical-grip controls when the camera is
rotated to take pictures in landscape (“wide”) orientation.
The vertical-grip command dials perform the same functions as their
•
landscape-orientation counterparts.
Display Rotation
When ON is selected for D SCREEN SET-UP> AUTOROTATE
DISPLAYS, the indicators in the view nder and LCD monitor au-
tomatically rotate to match camera orientation.
Landscape
(“wide”)
orientation
orientation
Portrait
(“tall”)
36

First Steps
37

First Steps
Attaching the Strap
Attach the strap clips to the camera and then attach the
strap.
Attach a protective cover.
1
Place a protective cover over the eyelet as shown, with the black side of
the cover toward the camera.
2
Open a strap clip.
2
Use the clip attaching tool (A) to
open a strap clip (B).
Slide the clip onto the tool.
3
Slide the clip onto the tool so that it
hooks over the projection.
Protective cover
(A)
(B)
38

Place the strap clip on an eyelet.
4
Hook the strap eyelet in the clip
opening. Remove the tool, using the
other hand to keep the clip in place.
Keep the tool in a safe place, as you
N
will need it to open the strap clips
when removing the strap.
Pass the clip through the eyelet.
5
Rotate the clip fully through the eyelet until it clicks closed.
Fasten the strap.
6
Insert the strap through a protective
cover and strap clip and fasten the
buckle as shown.
Attaching the Strap
2
First Steps
To avoid dropping the camera, be
O
sure the strap is correctly secured.
Repeat the above steps for the second eyelet.
Strap clip
Buckle
39

Attaching a Lens
The camera can be used with lenses for the FUJIFILM
G-mount.
Remove the body cap from the camera
and the rear cap from the lens. Place the
lens on mount, keeping the marks on the
lens and camera aligned (A), and then
rotate the lens until it clicks into place
2
(B).
First Steps
• When attaching lenses, ensure that dust or other foreign matter does
O
not enter the camera.
Be careful not to touch the camera’s internal parts.
•
Rotate the lens until it clicks securely into place.
•
Do not press the lens release button while attaching the lens.
•
Removing Lenses
To remove the lens, turn the camera o , then
press the lens release button (A) and rotate the
lens as shown (B).
To prevent dust accumulating on the lens
O
or inside the camera, replace the lens caps
and camera body cap when the lens is not
attached.
Lenses and Other Optional Accessories
The camera can be used with lenses and accessories for the FUJIFILM
G-mount.
Observe the following precautions when attaching or removing (ex-
O
changing) lenses.
Check that the lenses are free of dust and other foreign matter.
•
Do not change lenses in direct sunlight or under another bright light
•
source. Light focused into the interior of the camera could cause it to
malfunction.
Attach the lens caps before exchanging lenses.
•
See the manual provided with the lens for information on use.
•
40

Charging the Batteries
The batteries are not charged at shipment. Before use,
charge the batteries in the supplied battery charger.
• The camera is supplied with NP-T125 batteries.
O
Charging takes about 140 minutes.
•
Connect the plug adapter.
1
The plug adapter supplied with the camera varies with the coun-
O
try or region of purchase; use the adapter appropriate to your
country or region as described in the enclosed notice.
Place the battery in the charger.
2
Insert the battery in the orientation
shown by the arrow.
Plug the charger in.
3
Plug the charger into an indoor power outlet. The charging indicator will
light.
2
First Steps
Charge the battery.
4
Remove the battery when charging is complete.
41

The Charging Indicator
Charging indicator
Battery status
Action
The charging indicator shows battery charge
status as follows:
First Steps
2
O
Charging indicator
Off
On Battery charging. —
Blinks Battery fault.
• The supplied charger is compatible with power supplies of 100 to 240
volts (a plug adapter may be needed for overseas use).
Do not a x labels or other objects to the battery. Failure to observe
•
this precaution could make it impossible to remove the battery from
the camera.
Do not short the battery terminals. The battery could overheat.
•
Read the cautions in “The Battery and Power Supply”.
•
Use only genuine Fuji lm rechargeable batteries designated for use
•
in this camera. Failure to observe this precaution could result in product malfunction.
Do not remove the labels from the battery or attempt to split or peel
•
the outer casing.
The battery gradually loses its charge when not in use. Charge the
•
battery one or two days before use.
If the battery fails to hold a charge, it has reached the end of its
•
charging life and must be replaced.
Unplug the charger when it is not in use.
•
Remove dirt from the battery terminals with a clean, dry cloth. Failure
•
to observe this precaution could prevent the battery from charging.
Note that charging times increase at low or high temperatures.
•
Battery status
Battery not inserted. Insert the battery.
Battery fully charged. Remove the battery.
Action
Unplug the charger and
remove the battery.
42

Charging the Battery
Battery status icon (camera on)
Indicator lamp
(camera o )
Battery status
Charging via AC Adapter
The battery inserted in the camera will also charge when the camera is
powered by an optional AC-15V AC adapter. Charging takes about 120 min-
utes.
Battery charge status is shown by battery status
icons when the camera is on (playback mode)
and by the two lamps designated as “indicator
lamp 2” when the camera is o . The left lamp
shows the status of battery in chamber “L”, the
right lamp that of the battery in chamber “R”.
Battery status icon (camera on)
Y (yellow)
N (green)
Z (red)
Charging times may increase if the camera is left on during charging.
O
The camera will display an “external power
N
source” icon when powered via an AC-15V
AC adapter.
Indicator lamp 22
On Battery charging
Off Charging complete
Blinks Battery fault
(camera o )
Battery status
2
First Steps
43

Charging the Battery
Indicator lamp
Battery status
Charging from a Computer or Portable Battery
The batteries also charge if the camera is connected to a computer or portable battery. Turn the camera o , insert the batteries, and connect a USB
cable.
2
First Steps
USB connector (Type-C)
Battery status is shown by indicator lamp 2.
•
Indicator lamp 22
On Battery charging
Off Charging complete
Blinks Battery fault
Connect the camera directly to the computer; do not use a USB hub or
•
keyboard.
Charging stops if the computer enters sleep mode. To resume charging,
•
activate the computer and disconnect and reconnect the USB cable.
Charging may not be supported depending on the model of computer,
•
computer settings, and the computer’s current state.
Information on supported portable batteries is available on the Fuji lm
•
website.
If the camera is turned on during charging, charging will end and the
O
battery level will begin to gradually decline.
The camera will display an “external power
N
source” icon when powered via USB.
Battery status
44

Inserting the Batteries
After charging the batteries, insert them in the camera as
described below.
Remove the battery tray.
1
Rotate the battery tray latch and remove the battery tray.
• Do not remove the battery tray when
O
the camera is on. Failure to observe
this precaution could damage image
les or memory cards.
Do not use excessive force when
•
handling the battery tray.
Insert the batteries as shown.
2
2
First Steps
• Insert the battery in the orientations shown. Do not use force or
O
attempt to insert the batteries upside down or backwards.
Con rm that the battery are secure.
•
45

Inserting the Battery
Insert the battery tray and hold it in place while rotating the
3
latch to its original position.
2
First Steps
Removing the Batteries
After turning the camera o , rotate the battery tray latch and remove the
battery tray. Remove the batteries as shown.
The battery may become hot when used in high-temperature environ-
O
ments. Observe caution when removing the battery.
46

Inserting Memory Cards
Pictures are stored on memory cards (sold separately).
The camera can be used with two cards, one in each of its two slots.
N
Open the memory card slot cover.
1
Unlatch and open the cover.
Do not open the memory card-slot cover when the camera is on.
O
Failure to observe this precaution could damage image les or
memory cards.
Insert the memory card.
2
Holding the card in the orientation
shown, slide it in until it clicks into
place at the back of the slot. Close
and latch the memory card slot cover.
Be sure card is in the correct orientation; do not insert at an angle
O
or use force.
2
First Steps
Format the memory card (P 198).
3
Format memory cards before rst use, and be sure to reformat all
O
memory cards after using them in a computer or other device.
47

Removing Memory Cards
Option
Description
Display
Before removing memory cards, turn the camera o and open the memory
card slot cover.
Press and release the card to eject it part way (to
prevent the card falling from the slot, press the
center of the card and release it slowly, without
removing your nger from the card). The card
can then be removed by hand.
2
First Steps
Using Two Cards
The camera can be used with two cards, one in each of its two
slots. At default settings, photos are saved to the card in the second slot only when the card in the rst slot is full. This can be
changed using D SAVE DATA SET-UP> CARD SLOT SETTING
(STILL IMAGE).
Option
The card in the second slot is used only when the card in
SEQUENTIAL
(default)
BACKUP Each picture is recorded twice, once to each card.
RAW / JPEG
the fi rst slot is full. If the second slot is selected for D SAVE
DATA SET-UP> SELECT SLOT(xSEQUENTIAL), re-
cording will start on the card in the second slot and switch
to the fi rst slot when the card in the second slot is full.
As for SEQUENTIAL, except that the RAW copy of pictures taken with SUPER FINE+RAW, FINE+RAW, or
NORMAL+RAW selected for H IMAGE QUALITY
SETTING> IMAGE QUALITY will be saved to the card
in the fi rst slot and the JPEG copy to the card in the second
slot.
Description
Display
The card used to store movies can be selected using D SAVE
DATA SET-UP> SELECT SLOT(FSEQUENTIAL).
48

Inserting Memory Cards
Compatible Memory Cards
The camera can be used with SD, SDHC, and SDXC memory
•
cards. Both the UHS-I and UHS-II bus interfaces are supported.
UHS-II cards are recommended for high-speed burst photography.
•
Use cards with a video speed class of V60 or better to record
•
movies at a bit rate of 400Mbps. To record movies with lower
bit rates, use cards with a UHS speed class of 3 or better or a
video speed class of V30 or better.
A list of supported memory cards is available on the Fuji lm
•
website. For details, visit:
http://www.fujifilm.com/support/digital_cameras/compatibility/.
• Do not turn the camera o or remove the memory card while the memo-
O
ry card is being formatted or data are being recorded to or deleted from
the card. Failure to observe this precaution could damage the card.
Memory cards can be locked, making it
•
impossible to format the card or to record
or delete images. Before inserting a memory card, slide the write-protect switch to
the unlocked position.
Memory cards are small and can be swallowed; keep out of reach of
•
children. If a child swallows a memory card, seek medical assistance
immediately.
miniSD or microSD adapters that are larger or smaller than memory
•
cards may not eject normally; if the card does not eject, take the camera to an authorized service representative. Do not forcibly remove
the card.
Do not a x labels or other objects to memory cards. Peeling labels
•
can cause camera malfunction.
Movie recording may be interrupted with some types of memory card.
•
Formatting a memory card in the camera creates a folder in which
•
pictures are stored. Do not rename or delete this folder or use a computer or other device to edit, delete, or rename image les. Always
use the camera to delete pictures; before editing or renaming les,
copy them to a computer and edit or rename the copies, not the
originals. Renaming the les on the camera can cause problems
during playback.
2
First Steps
49

Turning the Camera On and O
Use the ON/OFF switch to turn the camera on and o .
Slide the switch to ON to turn the camera
on, or to OFF to turn the camera o .
2
Fingerprints and other marks on the lens or view nder can a ect pic-
O
First Steps
tures or the view through the view nder. Keep the lens and view nder clean.
Pressing the a button during shooting starts playback.
•
N
Press the shutter button halfway to return to shooting mode.
•
The camera will turn o automatically if no operations are performed
•
for the length of time selected for D POWER MANAGEMENT>
AUTO POWER OFF. To reactivate the camera after it has turned o
automatically, press the shutter button halfway or turn the ON/OFF
switch to OFF and then back to ON.
50

Checking the Battery Level
Indicator
Description
After turning the camera on, check the battery level in the
display.
Battery level is shown as follows:
Indicator
e
f
g
h
i
i
(red)
j
(blinks red)
• The display shows the level of inserted batteries only.
N
When a full complement of batteries are inserted in the camera, the
•
batteries will be used in the following order:
A
B
Battery partially discharged.
Battery about 80% full.
Battery about 60% full.
Battery about 40% full.
Battery about 20% full.
Low battery. Charge as soon as possible.
Battery exhausted. Turn camera off
and recharge battery.
The battery (L)
The battery (R)
Description
2
First Steps
51

First Steps
Basic Setup
When you turn the camera on for the rst time, you can
choose a language and set the camera clock. At default
settings, you can also pair the camera with a smartphone
or tablet so that you can later synchronize the clocks or
download pictures. Follow the steps below when turning
the camera on for the rst time.
If you intend to pair the camera with a smartphone or tablet, install
N
2
and launch the latest version of the FUJIFILM Camera Remote App on
the smart device before proceeding. For more information, visit:
http://app.fujifilm-dsc.com/en/camera_remote/
Turn the camera on.
1
A language-selection dialog will be
displayed.
Choose a language.
2
Highlight a language and press
MENU/OK.
Pair the camera with the smartphone or tablet.
3
Press MENU/OK on the camera and tap
PAIRING REGISTRATION in FUJIFILM
Camera Remote.
To skip pairing, press DISP/BACK.
N
52
PAIRING REGISTRATION
PAIR WITH SMARTPHONE?
IMAGES CAN BE EASILY TRANSFERRED
TO SMARTPHONE BY PAIRING
SCAN QR CODE OR SEARCH FOR "FUJIFILM
Camera Remote" APP ON THE WEB
SKIP HELPSET

Basic Setup
Check the time.
4
When pairing is complete, you will be
prompted to set the camera clock to
the time reported by the smartphone
or tablet. Check that the time is cor-
PAIRING REGISTRATION
PAIRING COMPLETE
1/ 1/2019 12:00 PM
SET DATE/TIME FROM SMARTPHONE?
rect.
SET CANCEL
To set the clock manually, press DISP/BACK (P 54).
N
Synchronize the camera settings with
5
the settings confi gured on your smartphone or tablet.
The option selected can be changed at any time using
N
SMARTPHONE SYNC. SETTING
LOCATION&TIME
LOCATION
TIME
OFF
SET
D CONNECTION SETTING> Bluetooth SETTINGS.
Set the clock.
6
Press MENU/OK to set the camera clock to the time reported by
the smartphone or tablet and exit to shooting mode.
If the battery is removed for an extended period, the camera clock will
N
be reset and the language-selection dialog will be displayed when the
camera is turned on.
Skipping the Current Step
If you skip a step, a con rmation dialog will be displayed; select NO to avoid
repeating any steps you skipped the next time the camera is turned on.
2
First Steps
53

Choosing a Di erent Language
To change the language:
Display language options.
1
Select D USER SETTING> Qa.
Choose a language.
2
Highlight the desired option and press MENU/OK.
Changing the Time and Date
2
To set the camera clock:
First Steps
Display DATE/TIME options.
1
Select D USER SETTING> DATE/TIME.
Set the clock.
2
Press the focus stick (focus lever) left or right to highlight the
year, month, day, hour, or minute and press up or down to
change. Press MENU/OK to set the clock.
Basic Setup
54

Basic Photography and
Playback
55

Taking Photographs (Mode P)
Setting
P
This section describes how to take pictures using program
AE (mode P). See pages 68–76 for information on S, A,
and M modes.
Rotate the DRIVE mode dial to STILL.
1
3
Basic Photography and Playback
Adjust settings for program AE.
2
Setting
Aperture A (auto) 68
A
Shutter speed Auto 68
B
Focus mode S (single AF) 78
C
Press the button to which SHOOTING MODE is assigned (at de-
N
fault settings, the Fn2 button) to switch between shutter speeds
of auto and User-selected (manually selected shutter speed). This
function can be assigned to a di erent button if desired (P 259).
56
P

Check the shooting mode.
3
Con rm that P appears in the display.
Ready the camera.
4
Hold the camera steady with both
•
hands and brace your elbows
against your sides. Shaking or unsteady hands can blur your shots.
To prevent pictures that are out of
•
focus or too dark (underexposed),
keep your ngers and other objects
away from the lens and AF-assist
illuminator.
Frame the picture.
5
Lenses with Zoom Rings
Use the zoom ring to frame the picture in
the display. Rotate the ring left to zoom
out, right to zoom in.
Taking Photographs (Mode P)
3
Basic Photography and Playback
57

3
Basic Photography and Playback
Taking Photographs (Mode P)
Focus.
6
Press the shutter button halfway to
focus.
Focus indicator
Focus frame
If the camera is able to focus, it will beep twice and focus frame
•
and focus indicator will glow green.
If the camera is unable to focus, the focus frame will turn red, s
•
will be displayed, and the focus indicator will blink white.
• If the subject is poorly lit, the AF-assist illuminator may light to
N
assist the focus operation.
Focus and exposure will lock when the shutter button is
•
pressed halfway. Focus and exposure remain locked while the
button is kept in this position (AF/AE lock).
The camera will focus on subjects at any distance in the macro
•
and standard focus ranges for the lens.
Shoot.
7
Smoothly press the shutter button the rest of the way down
to take the picture.
58

a Viewing Pictures
Pictures can be viewed in the view nder or LCD monitor.
To view pictures full frame, press a.
100-0001
Additional pictures can be viewed by pressing the focus stick (focus lever) left or right or rotating the front command dial. Press
the focus stick or rotate the dial right to view pictures in the order
recorded, left to view pictures in reverse order. Keep the focus
stick pressed to scroll rapidly to the desired frame.
Pictures taken using other cameras are marked with a m (“gift image”)
N
icon to warn that they may not display correctly and that playback
zoom may not be available.
Two Memory Cards
If two memory cards are inserted, you can press and hold the a button
to choose a card for playback. You can also select a card using the C PLAY
BACK MENU> SWITCH SLOT option.
59
3
Basic Photography and Playback

b Deleting Pictures
Use the b button to delete pictures.
Deleted pictures cannot be recovered. Protect important pictures or
O
copy them to a computer or other storage device before proceeding.
With a picture displayed full frame, press the b button and
1
select FRAME.
3
Basic Photography and Playback
Press the focus stick (focus lever) left or right to scroll through
2
pictures and press MENU/OK to delete (a con rmation dialog is
not displayed). Repeat to delete additional pictures.
• Protected pictures cannot be deleted. Remove protection from any
N
pictures you wish to delete (P 184).
Pictures can also be deleted from the menus using the C PLAY BACK
•
MENU> ERASE option (P 180).
ERASE
FRAME
SELECTED FRAMES
ALL FRAMES
60

Movie Recording and
Playback
61

F Recording Movies
Setting
P
This section describes how to lm movies in auto mode.
Rotate the DRIVE mode dial to MOVIE.
1
Adjust settings for program AE.
2
4
Movie Recording and Playback
Setting
Aperture A (auto) 68
A
Shutter speed Auto 68
B
Focus mode S (single AF) 78
C
Press the button to which SHOOTING MODE is assigned (at de-
N
fault settings, the Fn2 button) to switch between shutter speeds
of auto and User-selected (manually selected shutter speed). This
function can be assigned to a di erent button if desired (P 259).
62
P

Recording Movies
Press the shutter button to start re-
3
cording. A recording indicator (V)
and the time remaining are displayed
while recording is in progress.
Press the button again to end recording. Recording ends
4
automatically when the maximum length is reached or the
memory card is full.
• Sound is recorded via the built-in microphone or an optional external
O
microphone. Do not cover the microphone during recording.
Note that the microphone may pick up lens noise and other sounds
•
made by the camera during recording.
Vertical or horizontal streaks may appear in movies containing very
•
bright subjects. This is normal and does not indicate a malfunction.
• Indicator lamp1 lights while recording is in progress.
N
Zoom can be adjusted using the zoom ring on the lens (if available).
•
If the lens is equipped with an aperture ring, select the aperture
•
mode before beginning recording. If an option other than A is selected, shutter speed and aperture can be adjusted while recording is in
progress.
During recording, you can change exposure compensation by up to
•
±2EV.
Recording may be unavailable at some settings, while in other cases
•
settings may not apply during recording.
4
Movie Recording and Playback
63

Recording Movies
Adjusting Movie Settings
Frame size and rate can be selected using B MOVIE SETTING>
•
MOVIE MODE.
To choose the card used to store movies, use D SAVE DATA
•
SET-UP > SELECT SLOT(FSEQUENTIAL).
Focus mode is selected using the focus mode selector; for con-
•
tinuous focus adjustment, select C, or choose S and enable In-
telligent Face Detection. Intelligent Face Detection is not available in focus mode M.
Depth of Field
Choose low f-numbers to soften background details.
4
Movie Recording and Playback
64

a Viewing Movies
Focus stick
(focus lever)
Full-frame playback
Playback in
progress (
Playback
paused (
View movies on the camera.
In full-frame playback, movies are identi ed by a W icon. Press the focus stick (focus lever) down to start movie playback.
The following operations can be performed while a movie is displayed:
Focus stick
(focus lever)
Full-frame playback
Up — End playback
Down Start playback Pause playback Start/resume playback
Left/right
View other pictures
Playback in
progress (xx))
Adjust speed
01/01/2019 10:00 AM
PLAYPLAY
+1.0
12800
Playback
paused (yy))
Single frame rewind/
advance
4
Movie Recording and Playback
Progress is shown in the display during
playback.
Do not cover the speaker during playback.
O
PAUSESTOP
Press MENU/OK to pause playback and display volume controls. Press
N
the focus stick (focus lever) up or down to adjust the volume; press
MENU/OK again to resume playback. Volume can also be adjusted using
D SOUND SET-UP> PLAYBACK VOLUME.
29m59s
65

Viewing Movies
Playback Speed
Press the focus stick (focus lever) left or right to
adjust playback speed during playback. Speed
is shown by the number of arrows (M or N).
4
Movie Recording and Playback
29m59s29m59s
Arrows
66

Taking Photographs
67

P, S, A, and M Modes
Setting
P, S, A, and M modes give you varying degrees of control
over shutter speed and aperture.
Mode P: Program AE
Let the camera choose shutter speed and aperture for optimal
exposure. Other values that produce the same exposure can be
selected with program shift.
5
Taking Photographs
Setting
DRIVE mode dial STILL
A
Aperture A (auto)
B
Shutter speed Auto
C
Con rm that P appears in the display.
If the subject is outside the metering range of the camera, the shutter
O
speed and aperture displays will show “– – –”.
Press the button to which SHOOTING MODE is assigned (at default
N
settings, the Fn2 button) to switch between shutter speeds of auto and
User-selected (manually selected shutter speed). This function can be
assigned to a di erent button if desired (P 259).
68

P, S, A, and M Modes
Program Shift
If desired, you can rotate the rear command dial
to select other combinations of shutter speed
and aperture without altering exposure (program shift).
Aperture
Shutter speed
Program shift is not available in any of the following circumstances:
O
With ash units that support TTL auto
•
When an auto option is selected for H IMAGE QUALITY SETTING>
•
DYNAMIC RANGE
In movie mode
•
To cancel program shift, turn the camera o .
N
5
Taking Photographs
69

Mode S: Shutter-Priority AE
Setting
Choose a shutter speed and let the camera adjust aperture for
optimal exposure.
Setting
DRIVE mode dial STILL
A
Aperture A (auto)
B
5
Taking Photographs
Shutter speed User-selected
C
Con rm that S appears in the display.
• If the correct exposure cannot be achieved at the selected shutter
O
speed, aperture will be displayed in red.
If the subject is outside the metering range of the camera, the aper-
•
ture display will show “– – –”.
70

P, S, A, and M Modes
• Shutter speed can be adjusted while the shutter button is pressed
N
halfway.
Press the button to which SHOOTING MODE is assigned (at default
•
settings, the Fn2 button) to switch between shutter speeds of auto
and User-selected (manually selected shutter speed). This function
can be assigned to a di erent button if desired (P 259).
Shutter speed can be locked by pressing and holding the button to
•
which SHOOTING MODE is assigned. To unlock shutter speed, press
the button again.
At shutter speeds slower than 1 second, a count-down timer will be
•
displayed while the exposure is in progress.
To reduce “noise” (mottling) in long time-exposures, select ON for
•
H IMAGE QUALITY SETTING> LONG EXPOSURE NR. Note that
this may increase the time needed to record images after shooting.
The picture will go out of focus if the camera is moved during a long
•
time-exposure; use of a tripod is recommended.
5
Taking Photographs
71

Bulb (B)
Select a shutter speed of B (bulb) for long time-exposures in
which you open and close the shutter manually. Use of a tripod
is recommended to prevent the camera moving during the exposure.
Set shutter speed to B.
1
Press the shutter button all the way down. The shutter will
2
remain open for up to 60 minutes while the shutter button
is pressed; the display shows the time elapsed since the ex-
5
Taking Photographs
posure started.
• Selecting an aperture of A xes shutter speed at 30 s.
N
To reduce “noise” (mottling) in long time-exposures, select ON for
•
H IMAGE QUALITY SETTING> LONG EXPOSURE NR. Note that
this may increase the time needed to record images after shooting.
Using a Remote Release
A remote release can be used for long time-exposures. When using an optional RR-100 remote
release or an electronic release from third-party
suppliers, connect it to the camera’s remote release connector.
72

P, S, A, and M Modes
Setting
Mode A: Aperture-Priority AE
Choose an aperture and let the camera adjust shutter speed for
optimal exposure.
Setting
DRIVE mode dial STILL
A
Aperture User-selected
B
Shutter speed Auto
C
Con rm that A appears in the display.
• If the correct exposure cannot be achieved at the selected aperture,
O
shutter speed will be displayed in red.
If the subject is outside the metering range of the camera, the shutter
•
speed display will show “– – –”.
• Aperture can be adjusted even while the shutter button is pressed
N
halfway.
Press the button to which SHOOTING MODE is assigned (at default
•
settings, the Fn2 button) to switch between shutter speeds of auto
and User-selected (manually selected shutter speed). This function
can be assigned to a di erent button if desired (P 259).
5
Taking Photographs
73

Previewing Depth of Field
When PREVIEW DEPTH OF FIELD is assigned
to a function button, pressing the button displays a L icon and stops aperture down to the
selected setting, allowing depth of eld to be
previewed in the display.
5
Taking Photographs
74

P, S, A, and M Modes
Setting
Mode M: Manual Exposure
In manual mode, the user controls both shutter speed and aperture.
Shots can be deliberately overexposed (brighter) or underexposed
(darker), opening the door for a variety of individual creative expression. The amount the picture would be under- or over-exposed
at current settings is shown by the exposure indicator; adjust shutter speed and aperture until the desired exposure is reached.
Setting
DRIVE mode dial STILL
A
Aperture User-selected
B
Shutter speed User-selected
C
Con rm that M appears in the display.
5
Taking Photographs
• Press the button to which SHOOTING MODE is assigned (at default
N
settings, the Fn2 button) to switch between shutter speeds of auto
and User-selected (manually selected shutter speed). This function
can be assigned to a di erent button if desired (P 259).
Shutter speed can be locked by pressing and holding the button to
•
which SHOOTING MODE is assigned. To unlock shutter speed, press
the button again.
75

P, S, A, and M Modes
Exposure Preview
To preview exposure in the LCD monitor, select an option other than OFF
for D SCREEN SET-UP> PREVIEW EXP./WB IN MANUAL MODE.
Select OFF when using the ash or on other occasions on which ex-
N
posure may change when the picture is taken.
5
Taking Photographs
76

Autofocus
Take pictures using autofocus.
Rotate the focus mode selector to S
1
or C (P 78).
Choose an AF mode (P 80).
2
Choose the position and size of the
3
focus frame (P 82).
Take pictures.
4
For information on the autofocus system, visit:
N
http://fujifilm-x.com/af/en/index.html
5
Taking Photographs
77

Focus Mode
Mode
Description
Use the focus mode selector to choose
how the camera focuses.
Choose from the following options:
Mode
Single AF: Focus locks while the shutter button is pressed halfway.
S
5
Taking Photographs
(AF-S)
(AF-C)
(manual)
• Regardless of the option selected, manual focus will be used when
N
Choose for stationary subjects.
Continuous AF: Focus is continually adjusted to refl ect changes in the
C
distance to the subject while the shutter button is pressed halfway.
Use for subjects that are in motion.
Manual: Focus manually using the lens focus ring. Choose for manual
M
control of focus or in situations in which the camera is unable to focus
using autofocus (P 85).
the lens is in manual focus mode.
If ON is selected for G AF/MF SETTING> PRE-AF, focus will be ad-
•
justed continuously in modes S and C even when the shutter button
is not pressed.
Description
78

The Focus Indicator
Focus indicator
Focus status
Focus status is shown by the focus indicator.
Focus indicator
Focus status
( ) Camera focusing.
z (lights green)
Subject in focus; focus locked (focus
mode S).
Subject in focus (focus mode C).
(z) (lights green)
Focus is automatically adjusted for
changes in distance to subject.
A (blinks white)
j
Camera unable to focus.
Manual focus (focus mode M).
Autofocus
Focus indicator
5
Taking Photographs
79

Autofocus Options (AF Mode)
Focus Mode S (AF-S)
Option
Description
Sample image
Choose how the camera focuses in modes S and C.
Press a function button (by default,
1
Fn5) to display AF mode options.
Choose an AF mode.
2
The Fn5 button can be assigned other roles using D BUTTON/DIAL
•
N
SETTING> FUNCTION (Fn) SETTING. The role described above can
also be assigned to other function buttons (P 259).
AF mode can also be selected using G AF/MF SETTING> AF MODE.
•
How the camera focuses depends on the focus mode.
5
Focus Mode S (AF-S)
Taking Photographs
Option
Description
Sample image
r
SINGLE POINT
y
ZONE
80
Camera focuses on subject in
selected focus point. Use for pinpoint focus on selected subject.
Camera focuses on subject in selected focus zone. Focus zones include multiple focus points, making it easier to focus on subjects in
motion.
 Loading...