

Page 1
URC-1059
OWNER’S MANUAL
KAMELEON™-C6
TOUCHSCREEN REMOTE
Kameleon C6_v10.qxd 5/14/03 9:16 AM Page 1
Page 2
TABLE OF CONTENTS
Introduction . . . . . . . . . . . . . . . . . . . . . . . . . .3
2Table of Contents
KAMELEON-C6 REMOTE
STEP 01
Installing Batteries . . . . . . . . . . . . . . . . . . . . . . . . .4
STEP 02
Kameleon-C6 Remote
Keypad Overv iew . . . . . . . . . . . . . . . . . . . . . . . .5-6
Keypad Functions . . . . . . . . . . . . . . . . . . . . . . .7-10
Preprogrammed Devices . . . . . . . . . . . . . . . . . . .10
STEP 03
Programming Your Kameleon-C6 Remote . . . . .11
Searching for Your Device’s Manufacturer Code 12
Manufacturer Codes . . . . . . . . . . . . . . . . . . . .28-41
Handling and Care . . . . . . . . . . . . . . . . . . . . . . . .13
ADVANCED OPTIONS
Device Code Verification . . . . . . . . . . . . . . . . . . .14
Adjusting Keypad Brightness . . . . . . . . . . . . . . .14
Vol um e L o ck an d Unl ock . . . . . . . . . . . . . . . . . . .15
Channel Control Lock . . . . . . . . . . . . . . . . . . . . .16
Cr
eating Custom Keys
. . . . . . . . . . . . . . . . . .17
The Learning Feature . . . . . . . . . . . . . . . . . . .17-19
Creating the Power Macro . . . . . . . . . . . . . . . . . .20
Creating Other Macros . . . . . . . . . . . . . . . . . .20-21
Reassigning Device Mode Keys . . . . . . . . . . . . . .22
T
rouble Shooting
. . . . . . . . . . . . . . . . . . .23
Glossar
y
. . . . . . . . . . . . . . . . . . . . . . . . . . .24-25
Additional Information . . . . . . . . . . . . .26
FCC Statement . . . . . . . . . . . . . . . . . . . . . .27
Manufactur
er Codes
. . . . . . . . . . . . .28-41
Kameleon C6_v10.qxd 5/14/03 9:16 AM Page 2
Page 3

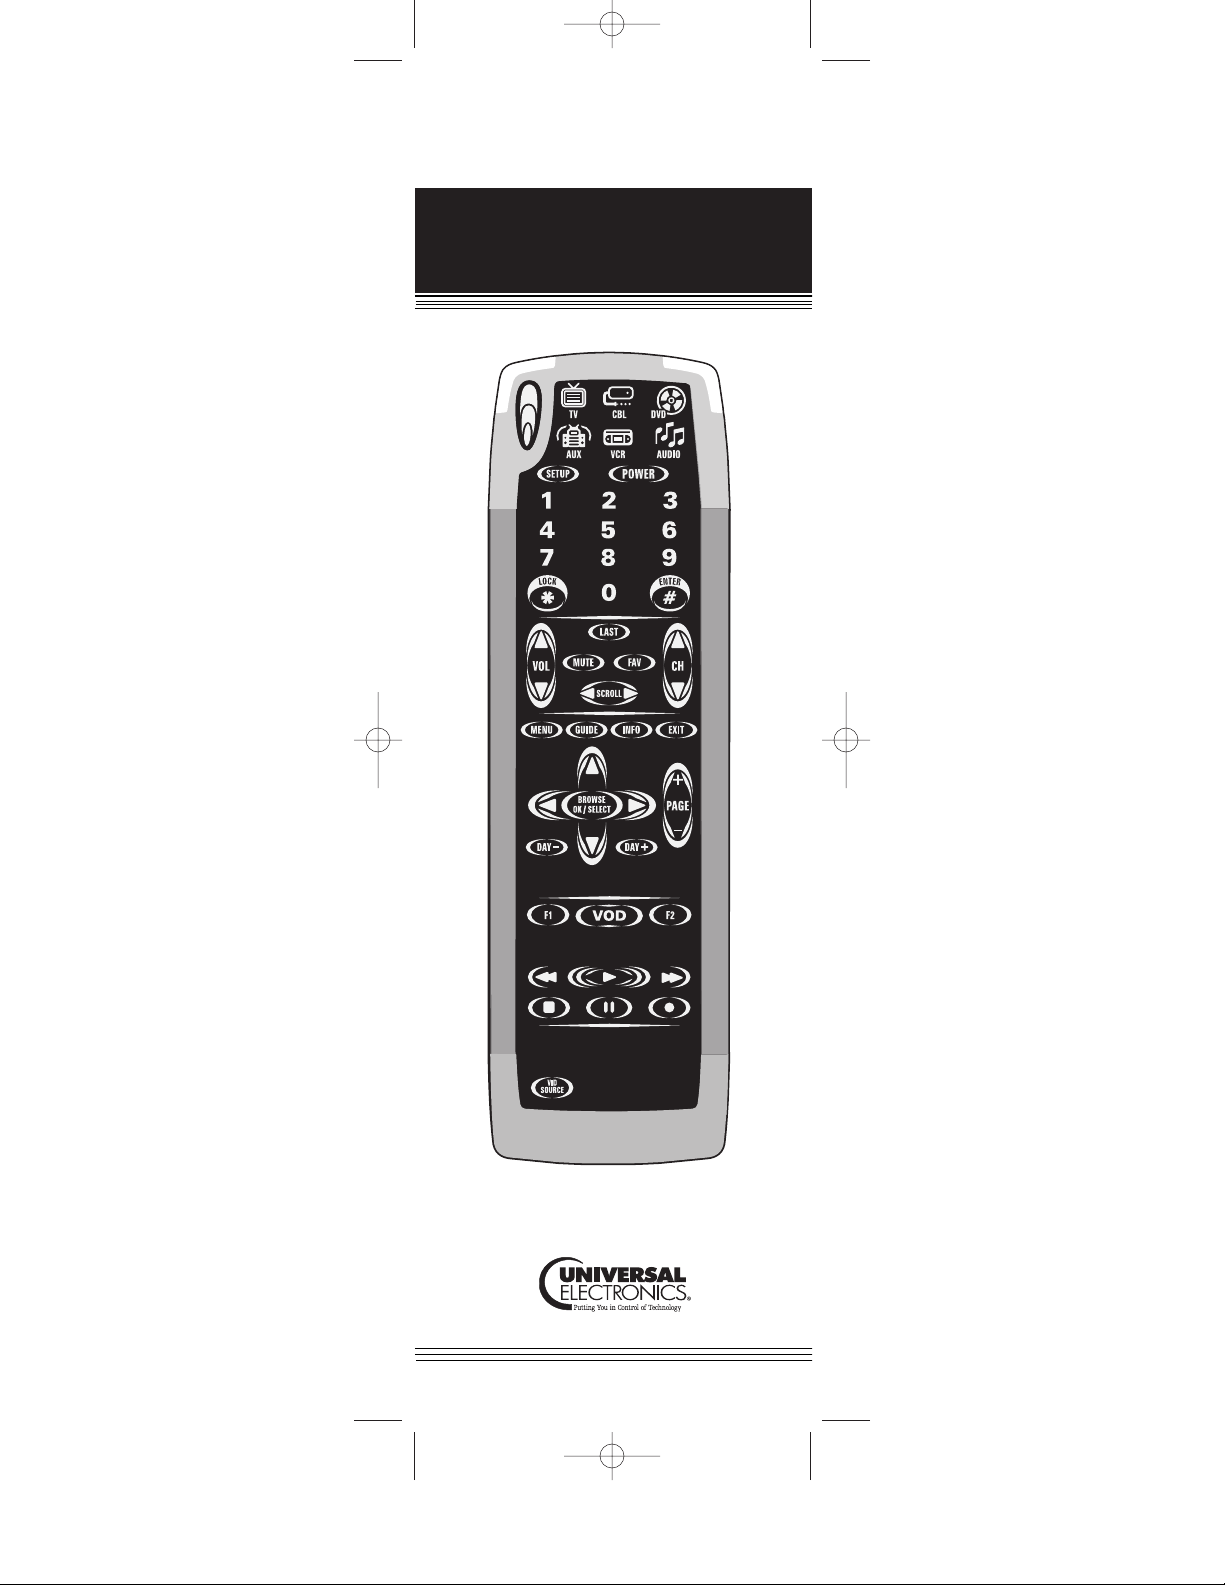
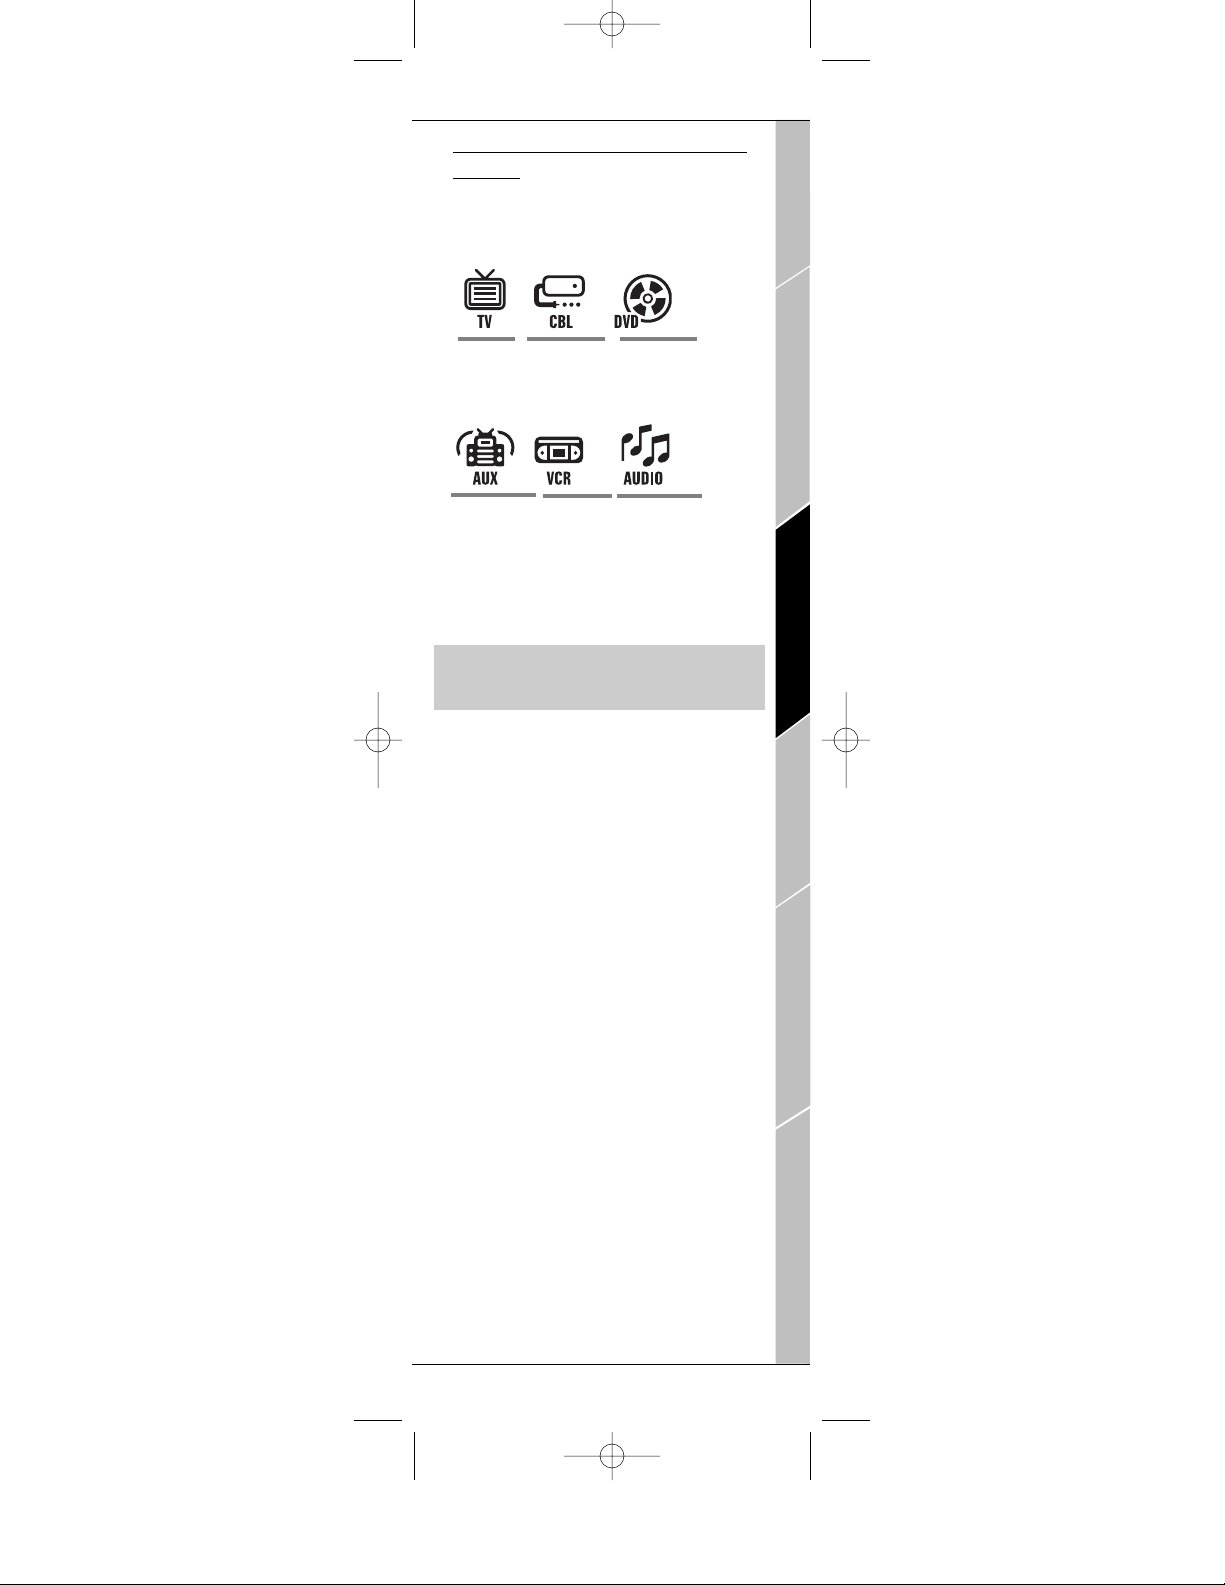
Your Kameleon-C6 Remote is the next generation in remote control technology.Powered by
Kameleon, a unique technology that combines
the functionality of a traditional remote with
the advantages of a touch-screen,your
Kameleon-C6 Remote’s innovative design operates up to six home entertainment devices
including:
Uni que screens identify the specific keys
required to operate the digital cable set-top
box provided by your cable system. The intuitive interface displays only the active keys for
each selected device and the device icon key
animates to indicate your selected device.
Let’s get started programming your KameleonC6 Remote!
Introduction 3
Introduction
Batteries\Keypad OverviewGlossary\Trouble Shooting Programming Remote
Advanced Options
Manufacturer Codes
INTRODUCTION
Kameleon C6_v10.qxd 5/14/03 9:16 AM Page 3
Page 4
Installing Batteries
Your Kameleon-C6 Remote requires batteries.
Four AAA alkaline batteries are included so you
can immediately enjoy your Kameleon-C6
Remote.
ABOUT REPLACING BATTERIES
• Use only new batteries of the required size and
recommended type.
• Do not mix old and new batteries,different
types of batteries (e.g.standard, alkaline or
rechargeable), or rechargeable batteries of different capacities.
• If you do not plan to use the remote for an
extended period of time,remove the batteries.
Batteries can leak chemicals that can destroy electronic parts.
• Dispose of old batteries promptly and properly.
• Do not burn or bury them.
Replace your batteries when one of the following conditions occurs:
• The bottom segment of the IR indicator blinks 5
times after each keypress.
• The remote no longer responds to movement.
TO INSTALL BATTERIES
1. Unscrew and remove the battery cover from
the back of your Kameleon-C6 Remote.
2. Match the batteries to the “+”and “-”marks
inside the battery case,then insert the batteries
accordingly.
3. Reposition the battery cover and tighten the
screw.
R
EMEMBER
• YOUR KAMELEON-C6 REMOTE HAS PERMANENT MEMORY RETENTION.
REMOVING THE BATTERIES WILL NOT REQUIRE YOU TO REPROGRAM THE
REMOTE.
• YOUR KAMELEON-C6 WILL “SLEEP”(TURN OFF) AFTER 7 SECONDS OF
INACTIVITY TO CONSERVE THE BATTERIES
.PICKING UP THE REMOTE OR
PRESSING ANY KEY WILL TURN ON THE REMOTE AND THE KEYPAD BACK-
LIGHT.
• T
HE FIRST TIME YOU INSTALL BATTERIES,YO U WILL NEED TO PRESS THE
TOUCH-PANEL TO ACTIVATE THE REMOTE CONTROL.
4 Installing Batteries
KAMELEON-C6 REMOTE
Kameleon C6_v10.qxd 5/14/03 9:16 AM Page 4
Page 5
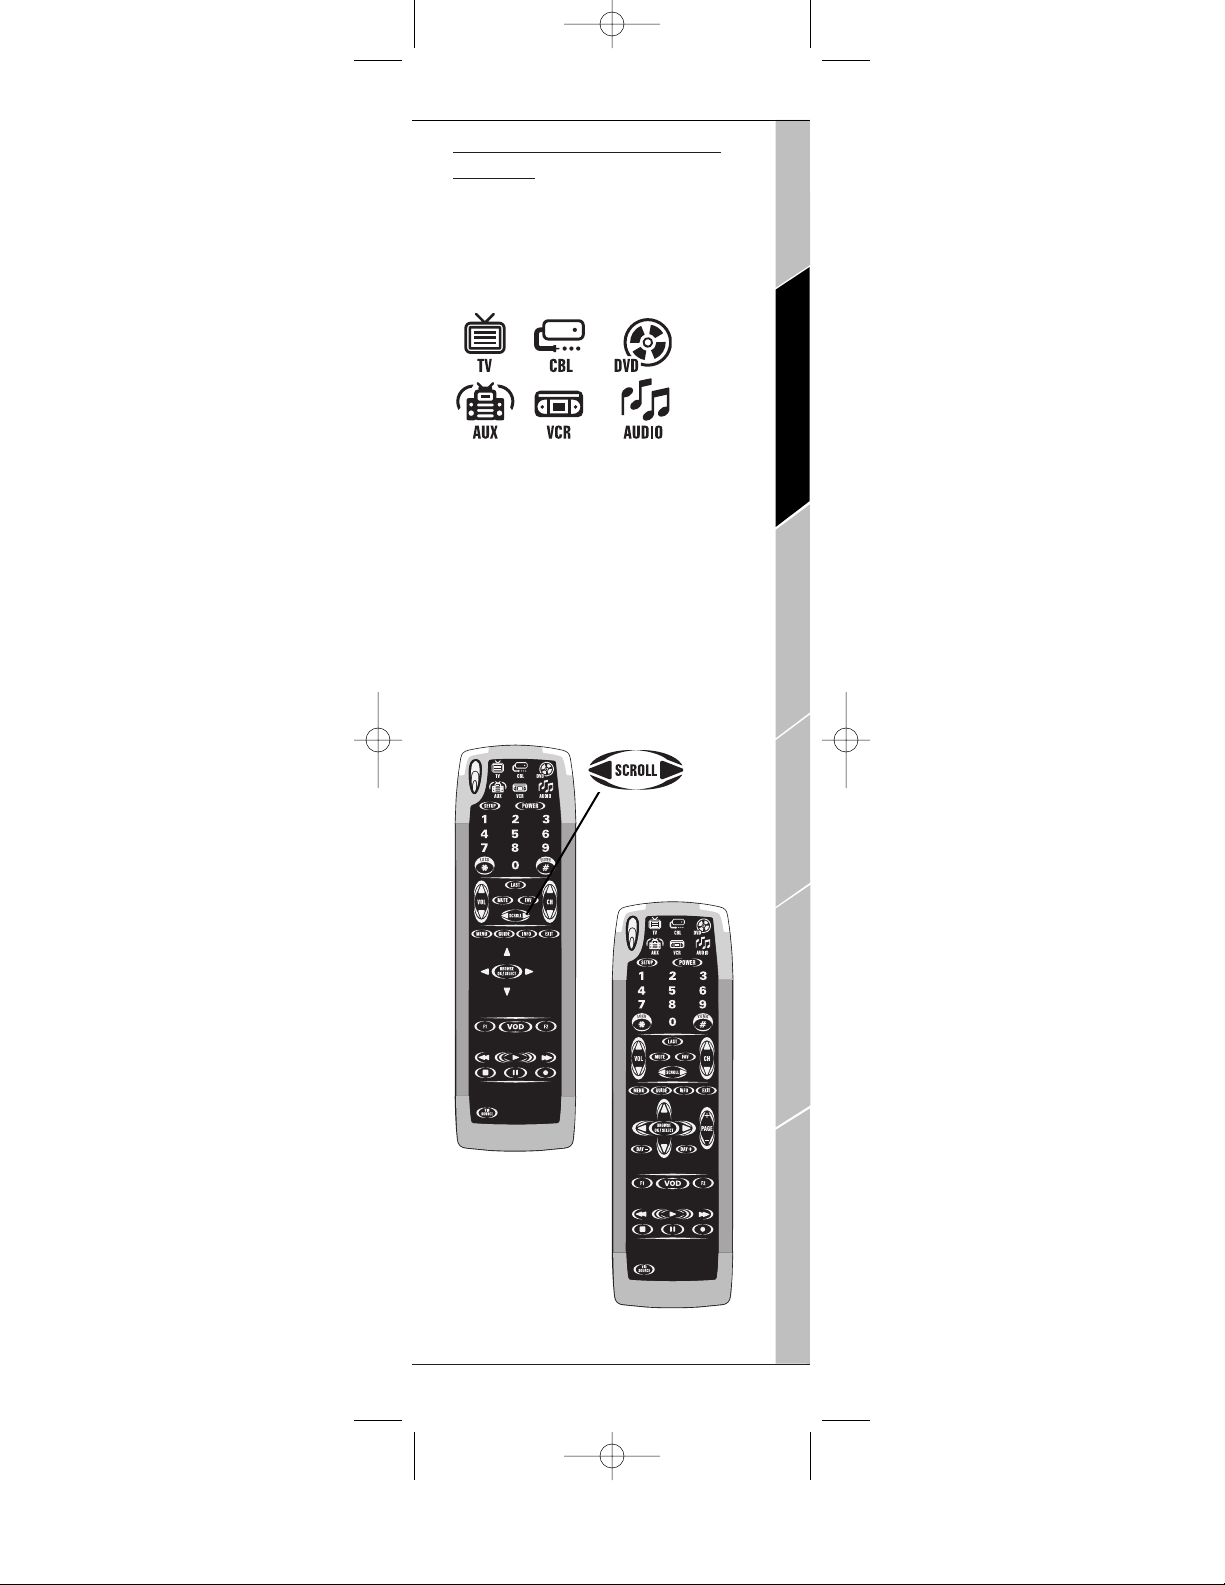
Kameleon-C6 Remote Keypad
Overview
Famil iarize yourself with the unique features of
your Kameleon-C6 Remote.Up to six devices
can be controlled by your Kameleon-C6
Remote, as indicated by the icons on the top of
the keypad.
You can program your Kameleon-C6 Remote to
control your devices using these device mode
keys.
Each device mode has a main and a menu
screen– you can readily switch between these
two screens for each device mode by hitting
the scroll key. Your Kameleon-C6 intuitively
displays only the active keys for each device
mode.
Kameleon-C6 Remote Keypad Overview 5
Introduction
Batteries\Keypad OverviewGlossary\Trouble Shooting Programming Remote
Advanced Options
Manufacturer Codes
BATTERIES/KEYPAD OVERVIEW
CABLE MAIN SCREEN
CABLE MENU SCREEN
PRESS THE SCROLL
K
EY TO SWITCH TO
THE MENU S
CREEN
FOR EACH DEVICE
.
D
EVICE
MODE KEYS
Kameleon C6_v10.qxd 5/14/03 9:16 AM Page 5
Page 6
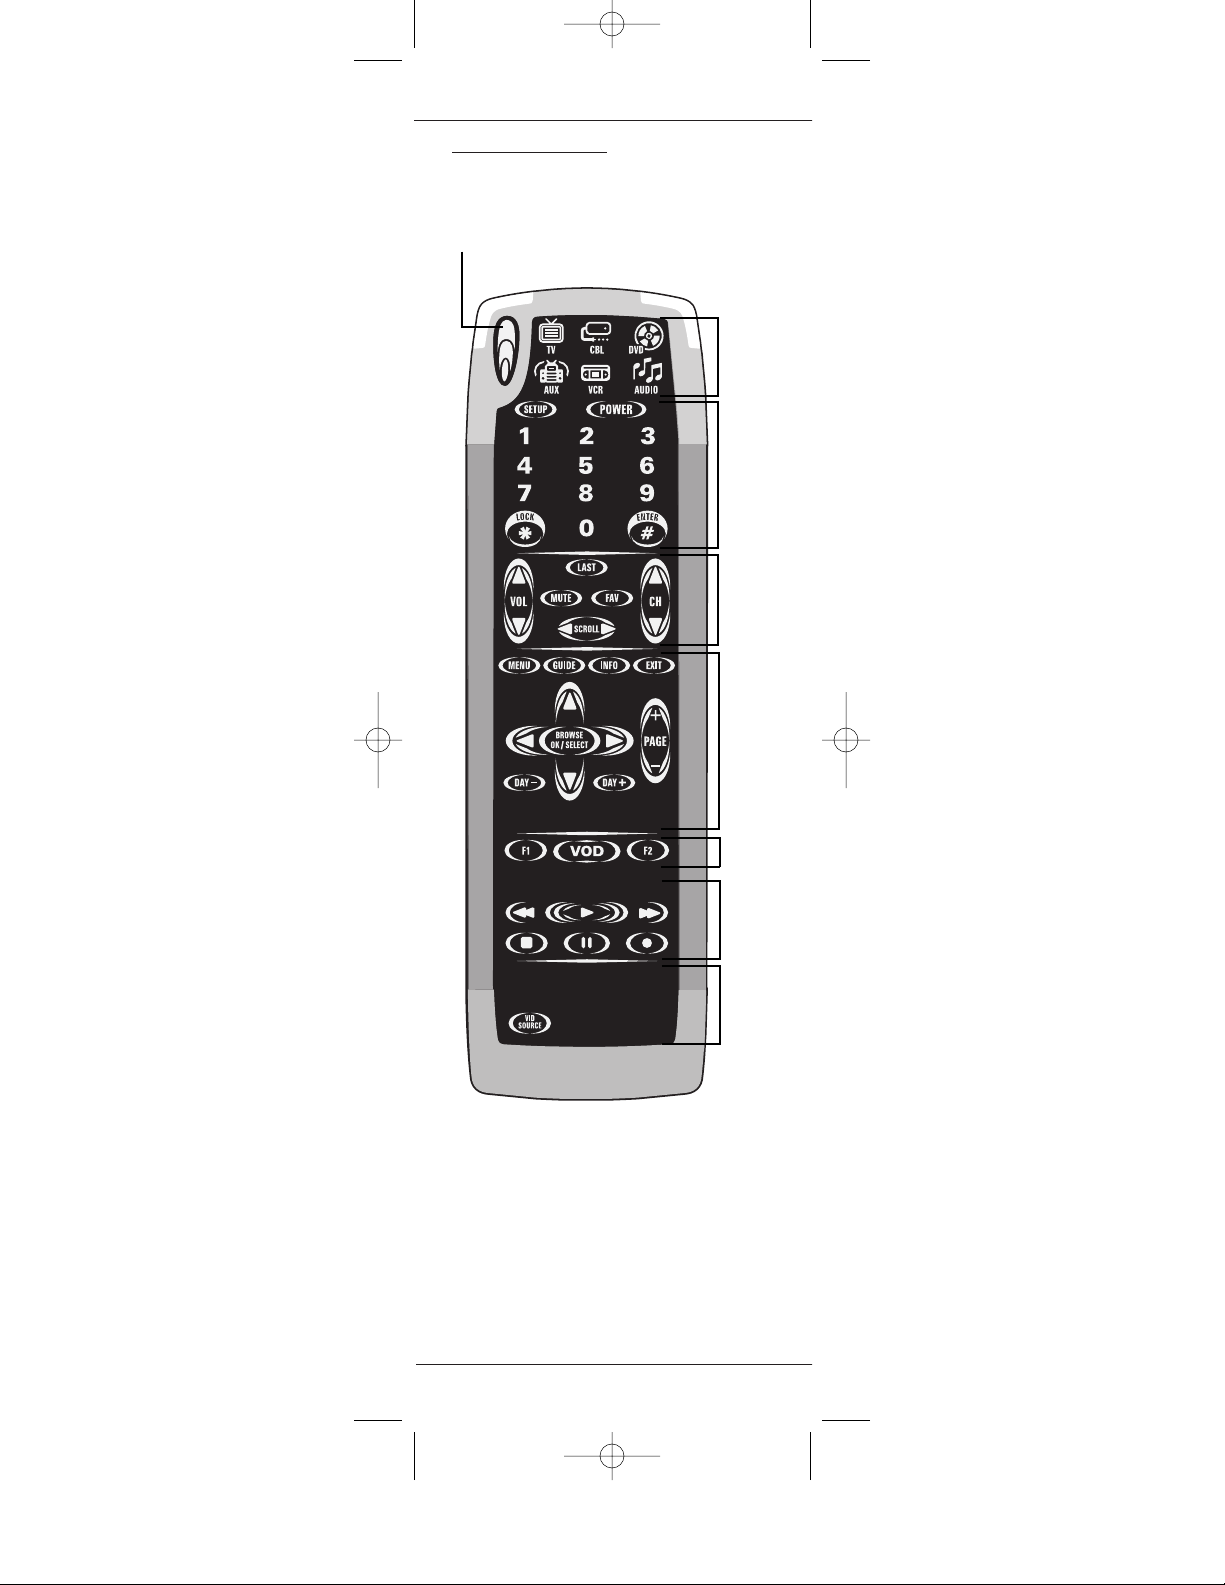
Keypad Overview
Your Kameleon-C6 Remote is designed to control
the following functions:
6 Kameleon-C6 Remote Keypad Overview
KAMELEON-C6 REMOTE
C
ABLE M
ENU SCREEN
IR (infrared) Indicator
Device
Mode s
Keys
Main
Func tion
Screens
Channel
& Volume
Control
Keys
Menu
Navi gati on
Macro Keys
VCR/PVR/
DVD
Tr a n s p o r t
Keys
TV/SetTop Bo x
Controls
Kameleon C6_v10.qxd 5/14/03 9:16 AM Page 6
Page 7
Keypad Functions
IR (INFRARED)INDICATOR
The IR Indicator animates when IR is being
“se nt” o r “re cei ved” . T he IR will show “o ut go ing
IR”whenever a functional key is pressed.
DEVICE MODE KEYS
The TV, CBL, DVD,AUX,VCR, AUDIO are
device mode keys that select the device that
you want to control. For example, pressing the
TV key allows the remote to control the
functions of your Television. The selected
device mode key animates to indicate the current device mode you are in.
MAIN FUNCTION SCREENS
Setup [ ]
Press Setup key for all programming
sequences.When you press and hold the Setup
key for at least 3 seconds, the bottom of the IR
Indicator will blink twice to indicate a successful action.
Power [ ]
The Power key controls the same function as
on your original remote.
Digit Keys [ ]
The Digit (1-9, 0) keys control the same
function as on your original remote.
Lock [ ]
Use Lock key to parentally lock out channels
from viewing.
Enter [ ]
Use Enter key to control the same function as
on your original remote.
CHANNEL & VOLUME CONTROL KEYS
Vo l [ ]
Use Vol+ or (Vol-) key to raise (or lower) the
audio’s volume.
Last [ ]
Press Last key once to recall the last channel.
Mute [ ]
Press Mute key once to turn the sound off or
on.
Keypad Functions 7
Introduction
Batteries\Keypad OverviewGlossary\Trouble Shooting Programming Remote
Advanced Options
Manufacturer Codes
BATTERIES/KEYPAD OVERVIEW
Kameleon C6_v10.qxd 5/14/03 9:16 AM Page 7
Page 8

CHANNEL & VOLUME CONTROL KEYS continued
Fav [ ]
Use Fav key to cycle through your favorite channels stored in your cable converter.
Scroll [ ]
Use the Scroll key to cycle through the available
device screens for the selected mode.
CH [ ]
Use CH+ (or CH-) key to select the next higher
(or lower) channel.
For amplifiers/receivers, use these keys to select the
next higher (or lower) preset station.
MENU NAVIGATION
Menu [ ]
Press Menu key once to display the selected
device’s menu options.
Guide [ ]
Use Guide key to display the program Guide.
Info [ ]
Use Info key to display the current channel and
program information.
Exit [ ]
Use Exit key to exit out of the selected device’s
menu or guide.
Settings [ ]
Press Settings key once to access additional cable
features.
For DVD, use Settings to access the DVD Players
internal SETUP menu.
Surround [ ]
In AUDIO or AUX mode,use Surround key to
change the surround sound settings.
Cursor [ ]
Use the Cursor keys to move the cursor in the program guide and menu screens and to navigate
within the interactive service. Use OK/SELECT
key to choose options while using the Guide or
Menu key of the selected device.
Page [ ]
Use Page + (or Page -) key to page up (or page
down) through menu screens and the program
guide.
8 Keypad Functions
KAMELEON-C6 REMOTE
Kameleon C6_v10.qxd 5/14/03 9:16 AM Page 8
Page 9
MENU NAVIGATION continued
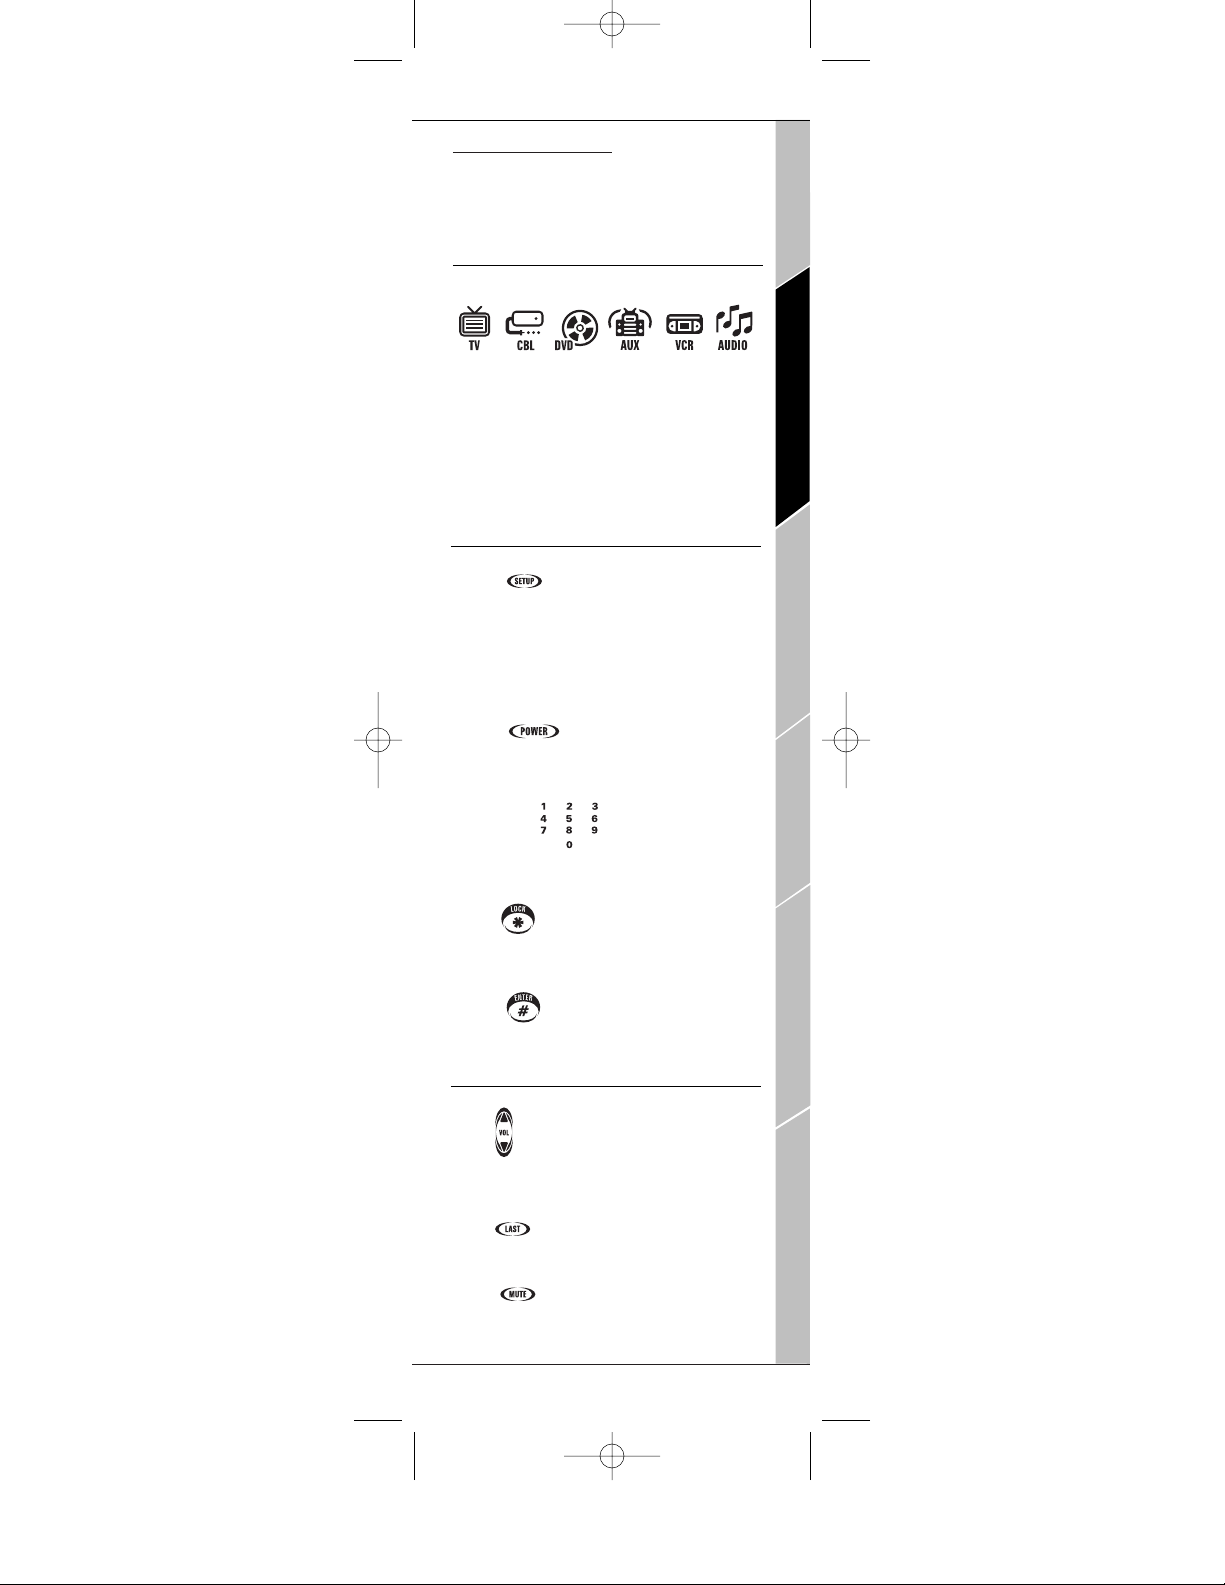
Day [ , ]
Use DAY+ (or DAY-) key to move a day forward
(or back) on your cable converter’s program
guide.
A, B,C [ , , ]
Use A, B, or C keys to access additional cable
features (see your cable converter’s manual).
MACRO KEYS
F1,VOD, F2 [ , , ]
Reserved for use as “Tune-In”keys
(see “Creating Other Macros”on page 20).
VCR/PVR/DVD TRANSPORT KEYS
Replay [ ]
Use Replay key to command your PVR to
instantly replay the last 7 seconds of a program
you are watching.
List [ ]
Press List key once to display a list of recorded
shows on your PVR.
Press -->| to advance to the next Chapter while
viewing a DVD
Live [ ]
Press Live key to return to watching live TV.
Rewind Ar row
[ ]
In all modes except CBL, use REW, PLAY,
FFWD,STOP, and PAUSE to control a VCR,
DVD player, or a PVR (after selecting a desired
device). To record in the VCR mode,press REC
twice.
In the CBL mode, use above keys to control
DVR/PVR functions of the set-top box.
TV OR SET-TOP BOX CONTROLS
Pip [ ]
Use PIP ON-OFF key to switch the Picture-InPicture feature on or off (if available on your
TV or cable service).
Vid Source [ ]
The Vid Source key performs same functions
as the TV/VCR or Input key on your original
remote .
Swap [ ]
Use PIP SWAP key to switch images and sound
between the main and window pictures.
Keypad Functions 9
Introduction
Batteries\Keypad OverviewGlossary\Trouble Shooting Programming Remote
Advanced Options
Manufacturer Codes
BATTERIES/KEYPAD OVERVIEW
Kameleon C6_v10.qxd 5/14/03 9:16 AM Page 9
Page 10
TV OR SET-TOP BOX CONTROLS continued
Move [ ]
Use PIP MOVE key to move the window picture to
different positions in the main picture.
Sur Snd [ ]
Use the Sur Snd + (or Sur Snd -) keys to adjust
the surround sound speaker levels.
PIP Ch [ ]
Use PIP CH + (or PIP Ch -) keys to select the next
higher (or lower) PIP channel.
PREPROGRAMMED DEVICES
If you have any of the following preprogrammed
devices, you may start using your Kameleon-C6
Remote immediately. Your Kameleon-C6 Remote
is preprogrammed to operate the following
brands:
10 Preprogrammed Devices
KAMELEON-C6 REMOTE
Brand
RCA
RCA
RCA
Scientific Atlanta
Pioneer
Pioneer
Device
TV
VCR
DVD
Cable
AUX
Aud io
Code
0047
0060
0522
1877
0032
0123
Kameleon C6_v10.qxd 5/14/03 9:16 AM Page 10
Page 11
Pr
ogramming Your Kameleon-C6
Remote
The device mode keys located at the top of
your Kameleon-C6 Remote are designed to
control:
TO PROGRAM YOUR KAMELEON-C6
REMOTE
To s et up ot he r devices,perform the following
steps to program your Kameleon-C6 Remote.
Repeat the steps for each desired device one at
a time.
1. Turn your device on.
2. Find your device code in the Manufacturer
Code section (see page 28-41). The most common code for each brand is listed first.
3. Press the desired device mode key on your
Kameleon-C6.
4. Press Setup for at least 3 seconds.The bottom of the IR indicator will blink twice.
5. Enter the first four-digit Manufacturer
Code. The bottom of the IR indicator will
blink twice.
6. Lastly,aim the Kameleon-C6 at your device
and press Power.If the device does not
respond, repeat steps 3-5 using the next
Manufacturer Code listed under your brand.
7. Repeat the process for each additional device
you would like to program into the remote.
Programming Your Kameleon-C6 Remote 11
Introduction
Batteries\Keypad OverviewGlossary\Trouble Shooting Programming Remote
Advanced Options
Manufacturer Codes
PROGRAMMING REMOTE
TV
•Cable Box
•Video
Accessory
•DVD
•VCR
•PVR
•Amp/Tuner
•Amplifier
•CD
•Home
Theater in
Box
•VCR
•DVD
•PVR
•Amp/Tuner
•Amplifier
•CD
•Home
Theater in
Box
Kameleon C6_v10.qxd 5/14/03 9:16 AM Page 11
Page 12
REMEMBER
• I
F THE LISTED DEVICE’S MANUFACTURER CODES DO NOT WORK, TRY
“S
EARCHING FOR YOUR DEVICE’S MANUFACTURER CODE.” S EE BELOW.
• I
F THE ORIGINAL REMOTE CONTROL FROM YOUR VCR DOES NOT HAVE A
POWER KEY
, PRESS PLAY INSTEAD OF POWER ON STEP 6.
• Y
OU CAN ALSO SET UP A SECOND TV, CBL ,DVD,AUX,VCR, OR AUD.
SEE “REASSIGNING DEVICE MODE KEYS”ON PAGE 21.
Searching for Your Device’s
Manufacturer Code
If you have tried all of your Device’s Manufacturer
Codes and your device still does not respond to
the Kameleon-C6 Remote,“Searching for Your
Device’s Manufacturer Codes”allow you to manually find the Manufacturer Code for your device.
Kameleon-C6 Remote can cycle through all the
codes in its code library memory until it finds a
code that properly operates the device you wish to
program.
TO SEARCH FOR YOUR DEVICE’S
MANUFACTURER CODE
1. Turn your device on.
2. Press the desired device mode key on your
Kameleon-C6.
3. Press Setup for at least 3 seconds.The bottom
of the IR indicator will blink twice.
4. Press 9 9 1 on the keypad. The bottom of the IR
indicator will blink twice.
5.Aim your remote at your device and press the
device mode key followed by Power.
5a. If your device turns off, press and release the
Setup key to store the code.
5b.If your device does not turn off, press the
device mode key to cycle through the next set of
codes and press Power again.
Repeat step 5b until you find the code that turns
off your device.
R
EMEMBER
• K
EEP THE REMOTE POINTED AT YOUR DEVICE WHILE REPEATING THE
STEPS
.PLEASE BE PATIENT.
• I
FAKEY IS NOT PRESSED WITHIN 30 SECONDS DURING STEP 5, YOUR
KAMELEON-C6 REMOTE WILL EXIT THE SETUP MODE AND RETURN TO
THE PREVIOUSLY SELECTED CODE
.
• IF THE ORIGINAL REMOTE CONTROL FROM YOUR VCR DOES NOT HAVE A
POWER KEY, PRESS PLAY INSTEAD OF POW ER IN STEP 5.
12 Searching for Your Device’s Manufacturer’s Code
KAMELEON-C6 REMOTE
Kameleon C6_v10.qxd 5/14/03 9:16 AM Page 12
Page 13
Handling and Car
e
The following are some tips for caring for your
Kameleon-C6 Remote:
• Keep the remote dry.If it accidentally gets
wet, wipe it dry immediately.
• Handle the remote gently and carefully. Don’t
drop or throw the remote.
• Use and store the remote only in normal temperature environments.
• Keep the remote away from dust and dirt.
• When necessary, wipe the remote with a
damp cloth to keep it looking new.
• Modifying or tampering with internal parts
can cause damage.
Congratulations! Yo ur Kameleon-C6 is ready
to operate your home entertainment components.You can maximize all of Kameleon-C6
features by setting up the remote with
advanced options like Adjusting Keypad
Brightness, Volume Lock and Unlock, Channel
Control Lock,and Creating Custom Keys.
Handling and Care 13
Introduction
Batteries\Keypad OverviewGlossary\Trouble Shooting Programming Remote
Advanced Options
Manufacturer Codes
PROGRAMMING REMOTE
Kameleon C6_v10.qxd 5/14/03 9:16 AM Page 13
Page 14

Device Code Verification
You ca n verify any device code that you have programmed. This will be helpful in retrieving an
existing device’s Manufacturer Code programmed
into your Kameleon-C6 Remote for future reference.
TO VERFIY A DEVICE CODE
1. Press the desired device mode key on your
Kameleon-C6 Remote.
2. Press Setup for at least 3 seconds.The bottom
of the IR indicator will blink twice.
3. Press 9 9 0 on the keypad. The bottom of the IR
indicator will blink twice.
4. To determine the first digit of your 4-digit
code, press 1 and count the number of blinks
on the bottom part of the IR indicator. For
example, if there is one blink, then the digit is “1”
-– if there is two blinks,the digit is “2”– and so
on. If there are no blinks, the digit is “0.”
5. For the second digit,press 2 and count the
number of blinks .
6. For the third digit,press 3 and count the number of blinks .
7. Lastly,for the fourth digit,press 4 and count
the number of blinks .
R
EMEMBER
• Y
OU ARE VERIFYING THE CODE FOR THE SELECTED DEVICE
.
• I
F AFTER PRESSING 9 9 0, ANY DIGIT OTHER THAN 1 IS PRESSED,YO UR
K
AMELEON-C6 WILL EXIT THE SETUP MODE.
• I
FAKEY IS NOT PRESSED WITHIN 30 SECONDS, YOU R KAMELEON-C6
REMOTE WILL EXIT THE DEVICE CODE VERIFICATION.
Adjusting Keypad Brightness
You ca n c us to mize the backlight setting on your
Kameleon-C6 keypad.
TO ADJUST BRIGHTNESS
1. Press Setup for at least 3 seconds.The bottom
of the IR indicator will blink twice.
2. Press 9 7 4 on the keypad. The bottom of the IR
indicator will blink twice.
3. To increase the brightness press CH+. To
decrease the brightness press CH-.
4. Lastly, press Setup again to save the new
brightness setting.
14 Device Code Verification/Adjusting Keypad Brightness
KAMELEON-C6 REMOTE
Kameleon C6_v10.qxd 5/14/03 9:16 AM Page 14
Page 15

V
olume Lock and Unlock
You ca n c us to mize the volume control in your
Kameleon-C6 Remote by “locking” or “unlocking”the volume control for a device (e.g.TV)
while in a different device mode (e.g.VCR). For
example, if you are watching a movie on your
VCR , you can adjust the volume on your TV
without first pressing the TV device mode key.
The volume default setting for each device
mode is locked to the TV device mode. With
the Volume Unlock feature,you can customize
the volume setting for any device.
TO UNLOCK THE VOLUME CONTROL FOR
A DEVICE
1. Press the desired device mode key.
2. Press Setup for at least 3 seconds.The bottom of the IR indicator will blink twice.
3. Press 9 9 3 on the keypad. The bottom of the
IR indicator will blink twice.
4. Lastly,press the VOL (-) key once.The bottom of the IR indicator will blink four times.
Now, when you are in that selected device
mode, you will be able to adjust the volume
using the VOL +/- keys on your Kameleon-C6
Remote.
TO LOCK THE VOLUME CONTROL FOR
ONE DEVICE WHILE IN A DIFFERENT
DEVICE MODE
1. Press Setup for at least 3 seconds.The bottom of the IR indicator will blink twice.
2. Press 9 9 3 on the keypad. The bottom of the
IR indicator will blink twice.
3. Lastly,press the device mode key for the
device you want to Lock. The bottom of the IR
indicator will blink twice.
Volume Lock and Unlock 15
Introduction
Batteries\Keypad OverviewGlossary\Trouble Shooting Programming Remote
Advanced Options
Manufacturer Codes
ADVANCED OPTIONS
Kameleon C6_v10.qxd 5/14/03 9:16 AM Page 15
Page 16

Channel Control Lock
The Kameleon-C6 Remote includes a programming feature that allows you to program the
remote’s channel control capabilities to be locked
to the cable converter using the following keys:
0~9, CH+,CH-, ENTER,and LAST*.This will
guarantee that you do not inadvertently change a
channel on your TV or VCR.
This feature is de-activated by default and can be
activated or de-activated by following the steps
below.
*NOTE: THIS FEATURE DOES NOT AFFECT THE
AUD OR AUX MODES.
TO ACTIVATE CHANNEL CONTROL LOCK
1. Press CBL device mode key once. It will blink
once.
2. Press Setup until the CBL key blinks twice,then
relea se Setup.
3. Enter 9 7 3.The CBL key will blink twice.
4. Press CH + once.The CBL key will blink two
times.
5. Now, regardless of what mode you select
(except AUD or AUX), only the channel control
capability of your cable converter will be
accessible.
TO DE-ACTIVATE CHANNEL CONTROL LOCK
1. Press CBL device mode key once. It will blink
once.
2. Press Setup until the CBL key blinks twice,then
relea se Setup.
3. Enter 9 7 3.The CBL key will blink twice.
4. Press CH- once.The CBL key will blink four
times.
5. Now, the remote control will provide TV and
VCR channel-control capabilities while in the TV
or VCR mode.
16 Channel Control Lock
KAMELEON-C6 REMOTE
Kameleon C6_v10.qxd 5/14/03 9:16 AM Page 16
Page 17

Cr
eating Custom Keys
You ca n easily create custom keys on your
Kameleon-C6 keypad by two ways:
• The Learning Feature allows you to transfer
functions from your original remote to your
Kameleon-C6 Remote.See below.
• Macros allow you to program a sequence of
events into one convenient press button.See
“Creating the Power Macro” on page 20.
You ca n c om b in e a Learned key in a Macro
sequence, creating an even more personalized
Kameleon-C6 remote.Furthermore, even if a
Learned function used in a Macro is subsequently deleted, the Macro will revert to the
keys original function.
The Lear
ning Feature
Your Kameleon-C6 Remote comes with a complete library of pre-programmed codes.After
you have set up your Kameleon-C6 –for your
device, you may find that there are one or more
keys on the device’s original remote control
that you would like to have on the KameleonC6 keypad.
Your Kameleon-C6 Remote includes a Learning
Featu re so you can add functions that are
unique to your home entertainment devices
(e.g.VCR Tracking Up or Down).You may
assign the Learned Function to any key, except
for the Setup, Scroll and device mode keys (TV,
CBL, DVD,AUX,VCR and Audio).
REMEMBER
• YOUR ORIGINAL REMOTE CONTROL MUST BE IN WORKING ORDER FOR
THE LEARNING FEATURE TO WORK PROPERLY.
• L
EARNED FUNCTIONS ARE DEVICE MODE SPECIFIC, SO EACH KEY CAN
STORE A UNIQUE FUNCTION FOR EACH DEVICE MODE.
• L
EARNED KEYS CAN BE USED IN MACRO S (SEE “CREATING OTHER
MACROS ” ON PAGE 20.)
• ASSIGNING LEARNED FUNCTIONS TO THE SETUP,SCROLL OR DEVICE
MODE KEYS WILL OVERWRITE THE KEYS
’ ORIGINAL FUNCTIONS.
• W
HEN PROGRAMMING LEARNED KEYS, AVOIDHIGHLEVELS OF
AMBIENT LIGHT SUCH AS NATURAL SUNLIGHT OR ENERGY
-EFFICIENT
FLUORESCENT LIGHTS
.
• H
AV EYOUR ORIGINAL REMOTE CONTROLS HANDY WHEN PROGRAM-
MING THE LEARNING FEATURE.
• B
ESURE TO PRESS EACH KEY WITHIN
30 SECONDS OF THE PREV IOUS
ENTRY
.IFNOT, THE KAMELEON-C6 REMOTE WILL TIME OUT AND
THE CUSTOM KEY YOU WISH TO LEARN WILL NEED TO BE PRESSED
AGAIN
.
Creating Custom Keys 17
Introduction
Batteries\Keypad OverviewGlossary\Trouble Shooting Programming Remote
Advanced Options
Manufacturer Codes
ADVANCED OPTIONS
Kameleon C6_v10.qxd 5/14/03 9:16 AM Page 17
Page 18

TO PROGRAM A LEARNED FUNCTION
1. Place your Kameleon-C6 Remote and your original remote control on a flat surface. Position the
remote s no more than 1 to 2 inches apart. Make
sure the ends that you normally point at your
device are facing each other.See image below.
2. On your Kameleon-C6 Remote, press Setup for
at least 3 seconds. The bottom of the IR indicator
will blink twice.
3. Press 9 7 5 on the Kameleon-C6 keypad. The
bottom of the IR indicator will blink twice.
4. On your Kameleon-C6 Remote,press the
device mode key for which you want to copy the
learned function from your original remote.
5. On your Kameleon-C6 Remote,press the key
(e.g., F1 key) you want to save the Learned
function.The bottom of the IR indicator will
blink an “incoming IR”three times and your
Kameleon-C6 Remote will switch off.
6. Press and hold the original remote control’s
key (e.g., mono/stereo key on your original
remote control) until Kameleon-C6 keypad
switches back on. The bottom of the KameleonC6’s IR indicator will blink twice to indicate a
successful transfer. A long blink indicates failure.
7. If you want to copy other functions from the
same original remote,simply repeat steps 5 and
6, pressing the next key you want to copy.
8. Lastly,to exit the Learning Feature, press Setup
on your Kameleon-C6 for at least 3 seconds.The
bottom of the IR indicator will blink twice.
R
EMEMBER
• AFTER THE KAMELEON-C6 KEYPAD SWITCHES OFF IN STEP 5, YOU NEED
TO PRESS THE KEY ON YOUR ORIGINAL REMOTE WITH IN 5 SECONDS.
OTHERWISE,YOU R KAMELEON-C6 REMOTE WILL EXIT THE LEARNING
MODE.
• A
FTER 30 SECONDS OF INACTIVITY WHILE IN LEARNING FEATURE, THE
REMOTE WILL EXIT THE
LEARNING MODE.
• I
N THE LEARNING MODE, KEYS SUCH AS “TV MENU” WILL NOT CHANGE
THE SCREEN WHEN PRESSED.
• I
FYOU WANT A KEY THAT IS NOT IN THE MAIN SCREEN TO LEARN A
FUNCTION, USE THE SCROLL KEY TO CHANGE THE SCREEN.
18 The Learning Feature
KAMELEON-C6 REMOTE
KAMELEON
-C6 REMOTE
ORIGINAL
REMOTE
1 TO
2
INCHES
APART
Kameleon C6_v10.qxd 5/14/03 9:16 AM Page 18
Page 19

• THE LEARNING FEATURE IS DEVICE MODE SPECIFIC-– THEREFORE,
YOU CAN PLACE ONE LEARNED FUNCTION PER DEVICE MODE ON THE
SAME KEY
.
• T
HE KAMELEON-C6 CAN LEARN UP TO 25 FUNCTIONS.
• Y
OU CAN OVERRIDE A LEARNED FUNCTION BY PROGRAMMING A
NEW LEARNED FUNCTION ON THE SAME KEY.
• L
EARNING SHOULD NOT BE DONE IN DIRECT SUNLIGHT OR UNDER
INCANDESCENT LIGHTS
.
• M
AKE SURE YOU ARE USING FRESH BATTERIES WHEN USING THE
LEARNING
FEATURE.
• W
HEN CHANGING BATTERIES
, YOUR LEARNED FUNCTIONS WILL BE
RETAINED
.
ABOUT THE LEARNING FEATURE
• Some device functions are not learnable,
including those with multi-frequency codes,
some high-frequency codes,and other unusual
formats.
• You will be able to transfer only one function
at a time from your original remote to your
Kameleon-C6 Remote.
• To perform a sequence of Learned Functions,
you can program Macros. See “Creating Other
Macros” on page 20.
Deleting a Learned Function
You ca n delete a single learned function or all
learned functions for a certain device mode.
TO DELETE A SINGLE LEARNED FUNCTION
1. Press Setup for at least 3 seconds.The bottom of the IR indicator will blink twice.
2. Press 9 7 6 on the keypad. The bottom of the
IR indicator will blink twice.
3. Press the Custom Key that holds the function you wish to delete.
4. Lastly, press the Custom Key again to confirm deletion.
TO DELETE ALL LEARNED FUNCTIONS
WITHIN A CERTAIN DEVICE MODE
1. Press Setup for at least 3 seconds.The bottom of the IR indicator will blink twice.
2. Press 9 7 6 on the keypad. The bottom of the
IR indicator will blink twice.
3. Press the device mode key in which you want to
delete all funct ions.
4. Lastly,press the device mode key again to confirm.
The Learning Feature 19
Introduction
Batteries\Keypad OverviewGlossary\Trouble Shooting Programming Remote
Advanced Options
Manufacturer Codes
ADVANCED OPTIONS
Kameleon C6_v10.qxd 5/14/03 9:16 AM Page 19
Page 20

Creating the Power Macro
You ca n p ro g ra m the Power key on your
Kameleon-C6 Remote to turn on and off multiple
devices at the same time. You can command up to
six devices with one press of your Power key!
TO PROGRAM THE MACRO FOR THE
POWER KEY
1. Press the Cable device mode key.
2. Press Setup for at least 3 seconds.The bottom
of the IR indicator will blink twice.
3. Press 9 9 5 on the keypad. The bottom of the IR
indicator will blink twice.
4. Press the Power key.
5. Press the mode key for the first device that
you want to program, followed by the mode
keys for each device you want to command (up
to six devices).
6. Lastly, press Setup for at least 3 seconds. The
bottom of the IR indicator will blink twice.
Cr
eating Other Macros
In addition to programming the Power key as a
Macro, you can program other custom keys on
your Kameleon-C6 Remote to conveniently perform a sequence of commands at the press of one
button. For example, if your cable system has a
VOD service that has information available on
channel 0-0-1, you can program the VOD key to
tune to this channel with one key press.
You ca n install a Macro on any key, except for the
Setup key and the devices mode keys (TV, CBL,
DVD, AUX,VCR, and Audio).
20 Creating the Power Macro
KAMELEON-C6 REMOTE
Kameleon C6_v10.qxd 5/14/03 9:16 AM Page 20
Page 21

TO PROGRAM A MACRO
1. Press Cable device mode key.
2. Press Setup for at least 3 seconds.The bottom of the IR indicator will blink twice.
3. Press 9 9 5 on the keypad. The bottom of the
IR indicator will blink twice.
4. Press VOD key.
5. Press Cable Device mode key followed by
0-0-1.
6. Lastly,to save the Macro,press Setup for at
least 3 seconds.The bottom of the IR indicator
will blink twice.
Now, whe never you press the programmed
custom VOD key, the Kameleon-C6 Remote will
tune the cable converter to channel 001.
REMEMBER
• EACH MACRO CAN CONSIST OF A MAXIMUM OF 15 KEYSTROKES.
• Y
OU CAN COMBINE A LEARNED KEY IN A MAC RO SEQUENCE, CREAT-
ING AN EVEN MORE PERSONALIZED KAMELEON-C6 REMOTE.(IFA
L
EARNED FUNCTION USED IN A
MACRO IS SUBSEQUENTLY DELETED,
THE MAC RO WILL REVERT TO THE KEY’SORIGINAL FUNCTION.)
• T
OINCLUDE AFUNCTION FROM A PARTICULAR SCREEN IN A DEVICE
MODE, USE THE SCROLL KEY.
• M
AKE SURE THAT YOU PROGRAM A
MACRO ON A SPARE KEY THAT
YOU D ON
’TUSEINANY DEVICE MODE.
• O
NCE YOU PROGR AM A MACRO ON ASPECIFIC KEY,THE SEQUENCE
WILL WORK REGARDLESS OF THE DEVICE MODE YOU ARE IN.THIS
MEANS THAT THE FUNCTION ORIGINALLY PROGRAMMED ON THAT SPE
-
CIFIC KEY WILL BE OVERWRITTEN.
• T
OAVOIDACCIDENTAL RECORDINGS,YO U MUST PRESS THE RECORD
KEY ON YOUR KAMELEON-C6 REMOTE TWICE TO RECORD.PLEASE
NOTE THAT IF YOU ASSIGN A
MACRO TO THE RECORD KEY,YOU WILL
DE
-ACTIVATE THE DOUBLE KEY PRESS– THEREFORE WE DO NOT REC-
OMMEND ASSIGNING A MACRO TO THIS KEY.
• I
FYOU HAD TO HOLD DOWN A KEY FOR A FEW SECONDS ON THE
ORIGINAL REMOTE CONTROL TO GET A FUNCTION
, THIS FUNCTION MAY
NOT WORK I N A
MACRO ON YOUR KAMELEON-C6 REMOTE.
• A
KEY THAT IS PROGRAMMED WITH A MACRO WORKS IN ANY
DEVICE MODE INCLUDED ON THAT MAC RO.
You ca n delete a Macro for any of the keys that
were assigned a macro.
TO DELETE A MACRO
1. Press Setup for at least 3 seconds.The bottom of the IR indicator will blink twice.
2. Press 9 9 5 on the keypad. The bottom of the
IR indicator will blink twice.
3. Press the desired custom Macro key.
4. Press Setup for at least 3 seconds.The bottom of the IR indicator will blink twice.
Creating Other Macros 21
Introduction
Batteries\Keypad OverviewGlossary\Trouble Shooting Programming Remote
Advanced Options
Manufacturer Codes
ADVANCED OPTIONS
Kameleon C6_v10.qxd 5/14/03 9:16 AM Page 21
Page 22

Reassigning Device Mode Keys
Setting up an Additional Device
The six device mode key icons are designed to
easily identify the most common combination of
home entertainment devices.
However, any device mode key can be programmed to control any home entertainment
device, even though the icon may not match that
particular device.For instance,if you want to control two televisions, one cable, and a DVD player,
you can assign one television, one cable, and one
DVD player to the mode keys with the appropriate
icons.Then assign the second television to any
one of the remaining keys (AUX, VCR, or Audio).
Simply follow the steps in “Programming Your
Kameleon-C6 Remote on page 11.”
TO CREATE SECOND DEVICE MODE KEY
Example 1:Ifyou wish to program a second TV
on the DVD key. Follow the steps to change the
DVD key into a TV key:
1. Press Setup for at least 3 seconds.The bottom
of the IR indicator will blink twice.
2. Press 9 9 2 on the keypad. The bottom of the IR
indicator will blink twice.
3. Press the TV device mode key.
4. Lastly,press the DVD device mode key.The
bottom of the IR indicator will blink twice.
5. Repeat steps 1-4,pressing a different device
mode key to create the additional device.
6. Refer to “Programming Your Kameleon-C6
Remote” on page 11 to program in the
Manufacturer Code for your device.
TO RESET A DEVICE KEY
Example 1 (continued): If you wish to reset the
DVD key to its original mode, follow the steps:
1. Press Setup for at least 3 seconds.The bottom
of the IR indicator will blink twice.
2. Press 9 9 2 on the keypad. The bottom of the IR
indicator will blink twice.
3. Press the DVD device mode key.
4. Lastly,press the DVD device mode key again.
The bottom of the IR indicator will blink twice.
22 Reassigning Device Mode Keys
KAMELEON-C6 REMOTE
Kameleon C6_v10.qxd 5/14/03 9:16 AM Page 22
Page 23

T
rouble Shooting
Problem: No icons or keys light up when you
press a key.
Solution: Replace the batteries with new 4 AAA
Alkaline Batteries. See “Installing Batteries”on page 4.
Problem: Device mode key blinks when you press
a key, but home entertainment device does not
respon d.
Solution: Make sure you are aiming your
Kameleon-C6 Remote directly at your home
entertainment device and that you are within 15
feet of the device you are trying to control.
Problem: My Kameleon-C6 Remote does not control home entertainment devices or commands
are not performing properly.
Solution: Tr y a ll listed device manufacturer
codes. Make sure all devices can be operated with
an infrared remote control.
Problem: TV/VCR Combo does not respond properly.
Solution: Use the VCR codes for your brand.
Some combo units may require both a TV code
and a VCR code for full operation.
Problem: There is no volume on the second TV.
Solution: Follow the instructions in “Volume
Lock and Unlock”on page 15.
Problem: CH+, CH- and LAST do not work on
my RCA TV.
Solution: Due to RCA design (1983 -1987),only
the original remote control will operate these functions.
Problem: Tr i ed “ Se a rc h i ng for Your Device’s
Manufacturer Code” and still could not find a
working device code.
Solution: Clear out the device mode key and then
try “Searching for Your Device’s Manufacturer
Code”on page 12 again.
TO CLEAR THE DEVICE MODE KEY
1. Press Setup for at least 3 seconds.The IR indicator will blink twice.
2. Press 9 9 2 on the keypad. The bottom of the IR
indicator will blink twice.
3. Lastly,press the desired device mode key.
4. Lastly,press the same device mode key.
Problem: Kameleon-C6 Remote control does not
turn on Sony or Sharp TV/VCR Combo.
Solution: To tu rn on So ny or Sharp TV/VCR
Combo,program the following Manufacturer
Codes on the appropriate device mode keys:
Sony – TV: 0000,VCR: 0032
Sharp-V: 0093,VCR: 0048
See “Programming Your Kameleon-C6 Remote”
on page 11.
Trouble Shooting 23
Introduction
Batteries\Keypad OverviewGlossary\Trouble Shooting Programming Remote
Advanced Options
Manufacturer Codes
TROUBLE SHOOTING
Kameleon C6_v10.qxd 5/14/03 9:16 AM Page 23
Page 24

Glossary
Amp/Tuner- n. short for Amplifier and Tuner. It
is one of the devices that can be programmed
under the AUX and AUDIO device mode keys on
your Kameleon-C6. See “Your Kameleon-C6
Keypad Overv iew” on page 11.
AU D- n. short for Audio. .
AU X- n. short for Auxiliary. It is one of the device
modes on your Kameleon-C6 Remote.See “Your
Kameleon-C6 Keypad Overview”on page 6.
Blink- v. It describes an action or animation.
Mainly used to describe how the IR indicator displays when a step is followed correctly.
CD- n. short for Compact Disk.It is one of the
devices that can be programmed under the AUX
device mode key on your Kameleon-C6 Remote.
See “Your Kameleon-C6 Keypad Overview”on
page 11.
Code- n. see Device’s Manufacturer Codes.
Combo- n. See TV/VCR Combos.
Device- n.A device is a home entertainment
component or system.
Device Modes, Device Keys- n.These are the
keys with icons located at the top of your
Kameleon-C6 Remote.See Your “Kameleon-C6
Keypad Overv iew” on page 6.
Device Codes- n. see Device Manufacturer’s
Codes.
Device’s Manufacturer Code- n. The Device’s
Manufacturer Code section of the manual lists
codes for each device with the most common
code listed first. See page 28.
DVD - n.short for Digital Video Disk.It is one of
the device modes on your Kameleon-C6 Remote.
See “Your Kameleon-C6 Keypad Overview”on
page 11.
Home Theater in Box- n.It is an audio device
that can be programmed under the Audio device
mode key. See “Your Kameleon-C6 Keypad
Overview”on page 11.
IR- n. short for Infrared.It is located in the upper
left corner of your Kameleon-C6 Remote. See
“Your Kameleon-C6 Keypad Overview” on page 6.
24 Glossary
KAMELEON-C6 REMOTE
Kameleon C6_v10.qxd 5/14/03 9:16 AM Page 24
Page 25

Learn- v. It is the ability to transfer functions
from your original remote to your KameleonC6 Remote.See “The Learning Feature”on
page 17.
Learning Feature- n.The Learning Feature is
a feature of your Kameleon-C6 Remote that
allows it to “learn” functions from your original
remote . See page 17.
Macro- v. To program a sequence of actions
into one key press.See “Creating Other
Macros” on page 20.
Original Remote- n. Refers to the original
remote control that your Kameleon-C6 Remote
is replacing.
PIP- n. short for Picture in Picture.It is one of
the TV/Set-top box controls on your
Kameleon-C6 Remote.
Power - n. Power is a key on the top middle of
your Kameleon-C6 remote.See your
“Kameleon-C6 Keypad Overview”on page 6.
PVR- n. short for Personal Video Recorder. It is
one of the devices that can be programmed
under the DVD and VCR device mode key on
your Kameleon-C6 Remote.
Setup,Setup Key- n.It is a key on the top
middle of your Kameleon-C6 Remote. It is
mainly used in all of the programming steps.
See “Kameleon-C6 Keypad Overview” on page 6.
TV- n. short for Television. It is one of the
device modes on your Kameleon-C6 Remote.
See “Kameleon-C6 Keypad Overview” on page 6.
TV/VCR Combo- n.It is a device that includes
both a TV and a VCR in one unit. See “Trouble
Shooting”on page 23.
VCR - n. short for Video Cassette Recorder. It is
one of the device modes on your Kameleon-C6
Remote. See “Kameleon-C6 Keypad Overview “
on page 6.
VOD - n. short for Video on Demand.It is one
of the Macro keys on your Kameleon-C6
Remote. See “Kameleon-C6 Keypad Overview”
on page 6.
Glossary 25
Introduction
Batteries\Keypad OverviewGlossary\Trouble Shooting Programming Remote
Advanced Options
Manufacturer Codes
GLOSSARY
Kameleon C6_v10.qxd 5/14/03 9:16 AM Page 25
Page 26

Additional Information
This product does not have any user-serviceable
parts. Opening the case,except for the battery
cover,may cause permanent damage to your
Kameleon-C6 remote.
Copyright 2003 by Universal Electronics Inc.No
part of this publication may be reproduced, transmitted, transcribed,stored in any retrieval
system, or translated to any language,in any form
or by any means, electronic, mechanical, magnetic, optical,manual, or otherwise, without prior
written permission of Universal Electronics Inc.
Manual #M1059 . . . . . . . . . . . . . . . . . . . . . . . .5/03
26 Additional Information
KAMELEON-C6 REMOTE
Kameleon C6_v10.qxd 5/14/03 9:16 AM Page 26
Page 27

FCC Statement
This equipment has been tested and found to
comply with the limits for a class B digital
device, pursuant to part 15 of the FCC Rules.
These limits are designed to provide reasonable
protection against harmful interference in a residential installation. This equipment generates,
uses and can radiate radio frequency energy and
if not installed and used in accordance with the
instructions, may cause harmful interference to
radio communications.
However, there is no guarantee that interference
will not occur in a particular installation. If this
equipment does cause harmful interference to
radio or television reception, which can be determined by turning the equipment on and off,the
user is encouraged to try to correct the interference with one or more of the following measures:
• Reorient or relocate the receiving antenna.
• Increase the separation between the equipment
and receiver.
• Connect the equipment into an outlet on a
circuit different from that to which the receiver is
connected.
• Consult the dealer or an experienced radio/TV
technician for help.
This equipment has been verified to comply with
the limits for a class B computing device,pursuant to FCC Rules. In order to maintain
compliance with FCC regulations,shielded cables
must be used with this equipment.Operation
with noon-approved equipment or unshielded
cables is likely to result in interference to radio
and TV reception. The user is cautioned that
changes and modifications made to the equipment without the approval of manufacturer
could void the user’s authority to operate this
equipment.
FCC Statement 27
Introduction
Batteries\Keypad OverviewGlossary\Trouble Shooting Programming Remote
Advanced Options
Manufacturer Codes
ADDITIONAL INFORMATION/FCC STATEMENT
Kameleon C6_v10.qxd 5/14/03 9:16 AM Page 27
Page 28

SETUP CODES FOR
AMPLIFIERS
GE
0078
Harma n/Kardon
0892
JVC
0331
Left Coast
0892
Marantz
0892
Optimus
0395
Philips
0892
Polk Audio
0892
Realistic
0395
Soundesign
0078
Victor
0331
Wards
0078
Ya m ah a
0354
SETUP CODES FOR
CABLE
ABC
0003
0008
Americast
0899
Bell South
0899
Director
0476
General Instrument
0476
0003
0276
GoldStar
0144
Jerrold
0476
0003
0276
Memorex
0000
Motorola
0476
0276
Pace
0237
Panasonic
0000
28 Manufacturer Codes
KAMELEON-C6 REMOTE
Paragon
0000
Philips
0305
Pioneer
0877
0144
0533
1877
Pulsar
0000
Quasar
0000
Runc o
0000
Samsung
0144
Scientific Atlanta
0877
0008
0477
1877
Sony
1006
Starcom
0003
Supercable
0276
To r x
0003
To s h i b a
0000
Zenith
0000
0525
0899
SETUP CODES FOR
CD PLAYERS
Aiwa
0157
Burmester
0420
California Audio Labs
0029
Carver
0157
Classic
1297
DKK
0000
DMX Electronics
0157
Denon
0873
0003
GPX
1296
Garrard
0393
0420
Kameleon C6_v10.qxd 5/14/03 9:16 AM Page 28
Page 29

Genexxa
0032
Harma n/Kardon
0157
Hitachi
0032
Integra
0101
JVC
0072
1294
KLH
1318
Kenwood
0681
0626
0028
0037
0190
Krell
0157
Linn
0157
MCS
0029
MTC
0420
Magnavox
0157
Marantz
0626
0029
0157
Miro
0000
Mission
0157
NSM
0157
Onkyo
0868
0101
Optimus
1063
0000
0032
0037
0145
0420
0468
Pana sonic
0029
Para sound
0420
Philips
0626
0157
Pioneer
1063
1062
0032
0468
Manufacturer Codes 29
MANUFACTURER CODES
Polk Audio
0157
Proton
0157
QED
0157
Quasar
0029
RCA
1062
0032
0053
0468
Realisti c
0420
Rotel
0157
0420
SAE
0157
Sansui
0157
Sharp
0861
0037
Sonic Frontiers
0157
Sony
0490
0000
0100
0185
Soundesign
0145
TAG McLaren
0157
TDK
1208
Ta s c a m
0420
Te a c
0393
0420
Te c hnics
0029
Vic tor
0072
Wa r d s
0157
0053
Ya m a h a
0888
0036
1292
Yo r x
0461
Introduction
Batteries\Keypad OverviewGlossary\Troubleshooting Programming RemoteAdvanced OptionsManufacturer Codes
Kameleon C6_v10.qxd 5/14/03 9:16 AM Page 29
Page 30

SETUP CODES FOR
VIDEO
Hewl ett Packard
1272
Microsoft
1272
Pana sonic
1120
Pioneer
1010
Princeton
0113
0295
Samsung
1190
Sensory Science
1126
Sharp
1010
SETUP CODES FOR
RECEIVERS
ADC
0531
Aiwa
1089
1405
0158
0189
1388
Alco
1390
Anam
1609
Apex Digital
1257
Aud iot ron ic
1189
Aud iovo x
1390
Bose
1229
1253
Capetronic
0531
Carver
1089
1189
0189
Denon
1360
Harma n/Kardon
0110
0189
Integra
0135
JBL
0110
JVC
0074
1374
30 Manufacturer Codes
KAMELEON-C6 REMOTE
KLH
1390
Kenwood
1313
1027
1570
1569
0027
Lasonic
1798
Linn
0189
MCS
0039
Magnavox
1089
1189
1269
0189
0531
Marantz
1089
1189
0039
0189
Mus icmagic
1089
Norcen t
1389
Onkyo
0135
0842
Optimus
1023
0531
Pana sonic
1518
0039
Philips
1089
1189
1269
0189
Pioneer
1023
0014
0531
1384
Polk Audio
0189
Proscan
1254
Quasar
0039
RCA
1023
1254
0531
1390
1609
Samsung
1295
Kameleon C6_v10.qxd 5/14/03 9:16 AM Page 30
Page 31
Sansui
1089
0189
Sony
1058
1258
1158
0158
1558
1658
1758
Stereophonics
1023
Sunfire
1313
Te c hnics
1308
1309
1518
0039
Thorens
1189
Ve n t u r e r
1390
Vic tor
0074
Wa r d s
0014
0158
0189
Ya m a h a
0176
1176
SETUP CODES FOR
TELEVISION
A-Mar k
0003
AOC
0030
0003
0052
0185
Abex
0032
Admi ral
0093
0463
Advent
0761
Advent ura
0046
Aiko
0092
Aiwa
0701
Akai
0030
0702
Alaron
0179
Manufacturer Codes 31
MANUFACTURER CODES
Ambassador
0177
America Action
0180
Ampro
0751
Anam
0180
Anam National
0055
Apex Digital
0748
0765
0767
Archer
0003
Aud iovo x
0451
0180
0003
0092
0623
Baysonic
0180
Bell & Howell
0154
0016
Bradford
0180
Broksonic
0236
0463
0003
CCE
0217
CXC
0180
Candle
0030
0056
0046
0186
Carnivale
0030
Carver
0054
Celebrity
0000
Celera
0765
Changhong
0765
Cineral
0451
0092
Introduction
Batteries\Keypad OverviewGlossary\Troubleshooting Programming RemoteAdvanced OptionsManufacturer Codes
Kameleon C6_v10.qxd 5/14/03 9:16 AM Page 31
Page 32

SETUP CODES FOR
TELEVISION continued
Citizen
0060
0030
0056
0039
0046
0092
0186
0280
Clairtone
0185
Clarion
0180
Concerto
0056
Contec
0180
0157
0185
Craig
0180
Crosley
0054
Crown
0180
0039
Curtis Mathes
0047
0054
0154
0451
0093
0060
0030
0145
0056
0016
0039
0166
0466
0702
0747
1147
1347
Daewoo
0451
0039
0092
0623
Denon
0145
Dumont
0017
Dwin
0720
0774
32 Manufacturer Codes
KAMELEON-C6 REMOTE
Electroband
0000
0185
Electrohome
0381
Emerson
0154
0236
0463
0180
0282
0178
0179
0039
0038
0177
0185
0280
0623
Envision
0030
Fisher
0154
0159
Fujitsu
0179
0683
Funai
0180
0179
0171
Future tech
0180
GE
0047
0051
0451
0282
0178
0021
0055
0027
0135
0747
1147
1347
Gibralter
0017
0030
GoldStar
0030
0178
0001
0032
Gradiente
0053
0056
Grunpy
0180
0179
Kameleon C6_v10.qxd 5/14/03 9:16 AM Page 32
Page 33

Hall mark
0178
Harley Davidson
0179
Harma n/Kardon
0054
Harvard
0180
Havermy
0093
Hitachi
0145
0056
0016
0032
0038
0151
1145
Infinity
0054
Inteq
0017
JBL
0054
JCB
0000
JVC
0463
0053
Janei l
0046
KEC
0180
KTV
0180
0030
0039
0185
0217
0280
Kaypani
0052
Kenwood
0030
Kloss
0024
0046
Kon ka
0707
LG
0056
LXI
0047
0054
0154
0156
0178
0747
Logik
0016
Manufacturer Codes 33
MANUFACTURER CODES
Luxman
0056
MEI
0185
MGA
0150
0030
0178
MTC
0060
0030
0056
0185
Magnavox
0054
0030
0179
0020
0024
0096
0186
0187
0386
1254
1454
Majest ic
0016
Marantz
0054
0030
Matsushita
0250
Megat ron
0178
0145
0003
Memore x
0154
0250
0463
0150
0178
0179
0016
Mercu ry
0001
Midland
0047
0017
0051
0039
0032
0135
0747
Minutz
0021
Mitsubishi
0093
0150
0178
Introduction
Batteries\Keypad OverviewGlossary\Troubleshooting Programming RemoteAdvanced OptionsManufacturer Codes
Kameleon C6_v10.qxd 5/14/03 9:16 AM Page 33
Page 34

SETUP CODES FOR
TELEVISION continued
Motorol a
0093
0055
Mult ite ch
0180
0217
NAD
0156
0178
0166
NEC
0030
0056
0497
NTC
0092
Nikko
0030
0178
0092
Nosh i
0018
Onwa
0180
Optimus
0154
0250
0166
Optonica
0093
0165
Orion
0236
0463
0179
Pana sonic
0250
0051
0055
Pen ney
0047
0156
0051
0060
0030
0178
0021
0018
0039
0003
0027
0032
0135
0747
1347
34 Manufacturer Codes
KAMELEON-C6 REMOTE
Philco
0054
0463
0030
0145
0020
0096
Philips
0054
0690
1454
Pilot
0030
0039
Pioneer
0038
0166
0679
Por tland
0039
0092
Princeton
0717
Prism
0051
Proscan
0047
0747
Proton
0178
0003
0052
0466
Pulsar
0017
Quasar
0250
0051
0165
0055
RCA
0047
0018
0038
0090
0135
0679
0747
1047
1147
1247
1347
1447
1547
RadioShack
0047
0154
0165
0180
0030
0178
0056
0039
0032
0747
Kameleon C6_v10.qxd 5/14/03 9:16 AM Page 34
Page 35

Realisti c
0154
0165
0180
0030
0178
0056
0039
0032
Rhapsody
0185
Runc o
0017
0030
0497
0603
SSS
0180
Sampo
0030
0039
0032
0052
Samsung
0060
0030
0178
0056
0032
0702
0766
Samsux
0039
Sansei
0451
Sansui
0463
Sanyo
0154
0146
0159
Scotch
0178
Scott
0236
0180
0178
0179
Sears
0047
0054
0154
0156
0178
0179
0056
0146
0159
0171
0747
Manufacturer Codes 35
MANUFACTURER CODES
Semivox
0180
Semp
0156
Sharp
0093
0165
0039
0157
0386
0688
0689
Signature
0016
Simpson
0186
0187
Sony
0000
0080
0111
1100
Soundesign
0180
0178
0179
0186
Spectricon
0003
Squareview
0171
Starlite
0180
Supre-Macy
0046
Supreme
0000
Sylvania
0054
0030
0020
0096
0171
0381
Symp honic
0180
0171
TMK
0178
0056
0177
TNCi
0017
TVS
0463
Ta n d y
0093
Ta t u ng
0055
0003
Introduction
Batteries\Keypad OverviewGlossary\Troubleshooting Programming RemoteAdvanced OptionsManufacturer Codes
Kameleon C6_v10.qxd 5/14/03 9:16 AM Page 35
Page 36

SETUP CODES FOR
TELEVISION continued
Te c hnics
0250
0051
Te ch n ol A ce
0179
Te c hw ood
0051
0056
0003
Te k nika
0054
0180
0150
0060
0179
0056
0016
0039
0092
0186
Te l ef u n ke n
0056
0702
To s h i b a
0154
0156
0060
1256
1356
To s on i c
0185
To t e v i si o n
0039
Tr i c a l
0157
Uni vers al
0027
Vec to r Re se arc h
0030
Vic tor
0053
Vidi kron
0054
Vidt ech
0178
Vik ing
0046
Wa r d s
0054
0165
0030
0178
0021
0179
0056
0016
0020
0027
0080
0096
0111
36 Manufacturer Codes
KAMELEON-C6 REMOTE
Way c on
0156
White Westinghouse
0463
0623
Ya m a h a
0030
0769
Zenith
0017
0463
0178
0016
0092
Zonda
0003
SETUP CODES FOR
VCR
Admi ral
0048
0209
Advent ura
0000
Aiko
0278
Aiwa
0037
0000
America Action
0278
American High
0035
Asha
0240
Aud iovo x
0037
0278
Beaumark
0240
Bell & Howell
0104
Broksonic
0184
0121
0209
0002
0479
1479
CCE
0278
Calix
0037
Canon
0035
Carver
0081
Cineral
0278
Kameleon C6_v10.qxd 5/14/03 9:16 AM Page 36
Page 37

Citizen
0037
0278
1278
Craig
0037
0047
0240
Curtis Mathes
0060
0035
0162
0760
1035
Cybe rnex
0240
Daewoo
0045
0278
1278
Denon
0042
Dynatech
0000
Electrohome
0037
Electrophonic
0037
Emerex
0032
Emerson
0037
0184
0000
0121
0043
0209
0002
0278
0479
1278
1479
Fisher
0047
0104
Fuji
0035
0033
Funai
0000
GE
0060
0035
0240
0760
0807
1035
1060
Garrard
0000
Go Video
0432
Manufacturer Codes 37
MANUFACTURER CODES
GoldStar
0037
1237
Gradiente
0000
HI-Q
0047
Harley Davidson
0000
Harma n/Kardon
0081
Hitachi
0000
0042
Hughes Network
Systems
0042
JVC
0067
KEC
0037
0278
Kenwood
0067
Kod ak
0035
0037
LXI
0037
Lloyd's
0000
MEI
0035
MGA
0240
0043
MGN Technology
0240
MTC
0240
0000
Magnasonic
1278
Magnavox
0035
0039
0081
0000
0563
1781
Magni n
0240
Marantz
0035
0081
Marta
0037
Matsushita
0035
0162
Introduction
Batteries\Keypad OverviewGlossary\Troubleshooting Programming RemoteAdvanced OptionsManufacturer Codes
Kameleon C6_v10.qxd 5/14/03 9:16 AM Page 37
Page 38

SETUP CODES FOR
VCR continued
Memore x
0035
0162
0037
0048
0039
0047
0240
0000
0104
0209
0479
1162
1237
1262
Minolta
0042
Mitsubishi
0067
0043
0807
Motorol a
0035
0048
Mult ite ch
0000
NEC
0104
0067
Nikko
0037
Nobl ex
0240
Olympus
0035
Optimus
1062
0162
0037
0048
0104
0432
1162
1262
Orion
0184
0209
0002
0479
1479
Pana sonic
1062
0035
0162
0225
0616
1035
1162
1262
38 Manufacturer Codes
KAMELEON-C6 REMOTE
Pen ney
0035
0037
0240
0042
1035
1237
Pentax
0042
Philco
0035
0209
0479
Philips
0035
0081
0618
1081
1181
Pilot
0037
Pioneer
0067
Polk Audio
0081
Profitronic
0240
Proscan
0060
0760
1060
Pulsar
0039
Quasar
0035
0162
1035
1162
RCA
0060
0240
0042
0760
0807
1035
1060
RadioShack
0000
Radix
0037
Randex
0037
Realisti c
0035
0037
0048
0047
0000
0104
Replay TV
0614
0616
Kameleon C6_v10.qxd 5/14/03 9:16 AM Page 38
Page 39
Runc o
0039
STS
0042
Samsung
0240
0045
Sanky
0048
0039
Sansui
0000
0067
0209
0479
1479
Sanyo
0047
0240
0104
Scott
0184
0045
0121
0043
Sears
0035
0037
0047
0000
0042
0104
1237
Semp
0045
Sharp
0048
0807
Shogun
0240
Sonic Blue
0614
0616
Sony
0035
0032
0000
0033
0636
1032
1232
Sylvania
0035
0081
0000
0043
1781
Symp honic
0000
TMK
0240
Manufacturer Codes 39
MANUFACTURER CODES
Te a c
0000
Te c hnics
0035
0162
Te k nika
0035
0037
0000
Thomas
0000
Tivo
0618
0636
To s h i b a
0045
0043
0845
To t e v i si o n
0037
0240
Uni tec h
0240
Ve c t o r
0045
Video Concepts
0045
Vide omag ic
0037
Vide oson ic
0240
Vil lain
0000
Wa r d s
0060
0035
0048
0047
0081
0240
0000
0042
0760
White Westinghouse
0209
1278
XR-1000
0035
0000
Zenith
0039
0000
0209
0033
0479
1479
Introduction
Batteries\Keypad OverviewGlossary\Troubleshooting Programming RemoteAdvanced OptionsManufacturer Codes
Kameleon C6_v10.qxd 5/14/03 9:16 AM Page 39
Page 40

SETUP CODES FOR
DIGITAL VIDEO
DISC
Aiwa
0641
Apex Digital
0672
0717
0755
0794
0795
0796
0797
0830
Aud iol og ic
0736
B & K
0655
Blaupunkt
0717
Blue Parade
0571
Broksonic
0695
DVD2000
0521
Daewoo
0784
Denon
0490
0634
Emerson
0591
Enterprise
0591
Fisher
0670
GE
0522
0717
0815
GPX
0699
0769
Go Video
0715
Gradiente
0651
Greenhill
0717
Harma n/Kardon
0582
0702
Hitachi
0573
0664
Hiteker
0672
Integra
0627
40 Manufacturer Codes
KAMELEON-C6 REMOTE
JBL
0702
JVC
0558
0623
0867
KLH
0717
Kenwood
0490
0534
0682
Kon ka
0711
0719
0721
Koss
0651
Lasonic
0798
Magnavox
0503
0675
Malata
0782
Marantz
0539
Microsoft
0522
Mintek
0717
Mitsubishi
0521
Nesa
0717
Onkyo
0503
0627
Oritron
0651
Pana sonic
0490
0632
1362
1490
Philips
0503
0539
0646
0854
Pioneer
0525
0571
0632
Polk Audio
0539
Proscan
0522
Qwestar
0651
Kameleon C6_v10.qxd 5/14/03 9:16 AM Page 40
Page 41

RCA
0522
0571
0717
0822
1022
Rotel
0623
Rowa
0823
Sampo
0698
Samsung
0573
0820
Sansui
0695
Sanyo
0670
0695
Sharp
0630
Shinsonic
0533
Sony
0533
0864
Sylvania
0675
0821
Te c hnics
0490
Theta Digital
0571
To s h i b a
0503
0695
1045
Tre de x
0799
Urban Concepts
0503
XBox
0522
Ya m a h a
0490
0539
0545
Zenith
0503
0591
Manufacturer Codes 41
MANUFACTURER CODES
Introduction
Batteries\Keypad OverviewGlossary\Troubleshooting Programming RemoteAdvanced OptionsManufacturer Codes
Kameleon C6_v10.qxd 5/14/03 9:16 AM Page 41
Page 42
42
KAMELEON-C6 REMOTE
Kameleon C6_v10.qxd 5/14/03 9:16 AM Page 42
 Loading...