

UNIVERSAL AUDIO UAD-2 Satellite Thunderbolt 3 OCTO Custom, UAD-2 Satellite Thunderbolt 3 QUAD Core, UAD-2 Satellite Thunderbolt 3 OCTO Core, UAD-2 Satellite USB OCTO Custom, UAD-2 Satellite USB QUAD Core UAD System Manual.pdf
Page 1

UAD System Manual
Software Version 9
Manual Version 200710
www.uaudio.com
Page 2

Table of Contents
Tip: Click any section or
page number to jump
directly to that page.
Introduction ......................................................................................... 6
The Authentic Sound of Analog ........................................................................... 6
Features ........................................................................................................... 7
UAD Documentation Overview ............................................................................. 8
Additional Resources & Technical Support ........................................................... 9
UAD Installation ................................................................................. 10
System Requirements ...................................................................................... 11
Installation on Windows Systems (FireWire and/or PCIe) ...................................... 13
Installation on Windows Systems (Thunderbolt and/or USB) ................................. 14
Installation on Mac Systems ............................................................................. 15
Installed Software Locations ............................................................................. 16
UAD-2 PCIe Card Installation ............................................................................ 17
Online Authorization ........................................................................................ 18
Offline Authorization ........................................................................................ 18
Verifying Installation ........................................................................................ 20
Software Removal ............................................................................................ 21
UAD System Overview ......................................................................... 22
The UAD Environment ...................................................................................... 22
The UAD Hardware .......................................................................................... 23
The UAD Software ........................................................................................... 26
The DAW Environment ..................................................................................... 28
UA Account & Store ............................................................................ 31
Account Overview ............................................................................................ 31
Store Overview ................................................................................................. 32
UAD Authorization Overview .............................................................................. 33
Demo Mode ..................................................................................................... 34
Buying UAD Plug-Ins ....................................................................................... 35
UAD System Manual 2 Table Of Contents
Page 3

UAD Meter & Control Panel ................................................................. 37
Launching the Application ................................................................................ 37
UAD Meter Window .......................................................................................... 38
Meter Menu .................................................................................................... 40
UAD Control Panels ......................................................................................... 42
System Information Panel ................................................................................. 43
Plug-Ins Panel ................................................................................................. 46
Configuration Panel .......................................................................................... 48
FireWire Panel ................................................................................................. 53
Help Panel ...................................................................................................... 58
Using UAD Plug-Ins ............................................................................ 59
Launching a UAD Plug-In ................................................................................. 59
The UAD Plug-In Interface ................................................................................ 60
UAD Toolbar .................................................................................................... 61
LiveTrack Mode ............................................................................................... 64
Adjusting Parameters ....................................................................................... 65
Shortcuts ........................................................................................................ 66
DSP Loading Information .................................................................................. 67
Automation ..................................................................................................... 68
External MIDI Control ....................................................................................... 68
Mono (m) UAD plug-ins .................................................................................... 68
Tempo Sync ....................................................................................... 69
Tempo Sync Plug-Ins ....................................................................................... 69
Sync Activation ............................................................................................... 70
Available Note Values ....................................................................................... 70
Entering Values ............................................................................................... 71
Precision Delay Modes with Tempo Sync ............................................................ 72
Galaxy Tape Echo & Roland RE-201 Sync .......................................................... 72
UAD System Manual 3 Table Of Contents
Page 4

Latency & Delay Compensation ............................................................ 73
UAD Plug-Ins with Additional Latency................................................................ 74
Live Processing (without Apollo) ........................................................................ 75
UAD-2 Satellite Thunderbolt ................................................................ 76
Hardware Setup ............................................................................................... 78
Hardware Connections ...................................................................................... 79
UAD-2 Satellite Thunderbolt Operation .............................................................. 81
UAD-2 Satellite USB .......................................................................... 84
Hardware Setup ............................................................................................... 86
Windows Setup ................................................................................................ 88
UAD-2 Satellite USB Operation ......................................................................... 91
UAD-2 Satellite FireWire ..................................................................... 92
UAD-2 Satellite FireWire Installation ................................................................. 94
UAD-2 Satellite FireWire Operation ................................................................... 97
FireWire Bandwidth.......................................................................................... 99
Important UAD-2 Satellite FireWire Notes ........................................................ 100
FireWire Bandwidth vs. UAD DSP .................................................................... 102
FireWire Bus Power ........................................................................................ 102
FireWire Basics .............................................................................................. 103
Bus Powering Example ................................................................................... 107
UAD-2 SOLO/Laptop ......................................................................... 109
UAD-2 SOLO/Laptop Features ......................................................................... 110
Software Installation ...................................................................................... 110
ExpressCard/34 to ExpressCard/54 Adapter ...................................................... 111
Inserting the UAD-2 SOLO/Laptop Hardware .................................................... 111
Removing the UAD-2 SOLO/Laptop Hardware ................................................... 112
Important SOLO/Laptop Notes ........................................................................ 113
Multiple UAD Devices ....................................................................... 114
Multi-Device Overview .................................................................................... 114
Multi-Device Constraints ................................................................................. 115
Multi-Device DSP Loading .............................................................................. 118
Power Requirements ...................................................................................... 119
UAD System Manual 4 Table Of Contents
Page 5

History............................................................................................. 120
Bill Putnam Sr. .............................................................................................. 120
Pros Talk UA ................................................................................................. 127
Thank You ..................................................................................................... 131
Notices ............................................................................................ 132
Warranty ....................................................................................................... 132
Repair Service ............................................................................................... 132
Maintenance ................................................................................................. 132
Important Safety Information .......................................................................... 133
Technical Support ............................................................................. 136
Universal Audio Knowledge Base ..................................................................... 136
YouTube Support Channel ............................................................................... 136
Universal Audio Community Forums ................................................................ 136
Contact Universal Audio Support ..................................................................... 136
UAD System Manual 5 Table Of Contents
Page 6

Introduction
The Authentic Sound of Analog
From project studios to multi-platinum mix engineers, UAD Powered Plug-Ins have been
winning over audio professionals for more than 15 years with their stunning analog
sound. The UAD library now features more than 100 plug-ins, co-created with the
biggest brands in audio. Developed by UA’s world-renowned team of DSP engineers, UAD
plug-ins set the standard by which all other audio plug-ins are judged.
The World’s Finest Analog Emulation Plug-Ins
From rare tube compressors and equalizers, to vintage reverb processors and tape
machines, UAD Powered Plug-Ins inject three-dimensional “out-of-the-box” analog sound
to your in-the-box mixes. Access over 90 plug-ins from Ampex, Lexicon, Fender, Studer,
Neve, Manley, SSL, EMT, API, MXR and more.*
Offload your Computer’s CPU with DSP Acceleration
With UAD Powered Plug-Ins, the actual processing is offloaded to UAD-2 hardware. This
frees up your computer to do other things, like mixing audio and running samplers or soft
synths.
Cross-Platform Compatibility with All Major DAWs
UAD Powered Plug-Ins are compatible with both Mac and Windows, and run smoothly in
all major DAWs including Pro Tools, Logic Pro, Cubase, Ableton Live, and more.
UAD Plug-In Craftsmanship: The Science Behind the Scenes
In developing UAD plug-ins, UA’s engineering group undertakes a thorough physical
modeling of classic audio hardware — “rebuilding” vintage analog gear in the digital
world, component by component. That’s how UAD plug-ins replicate the exact,
sometimes quirky, behavior of analog hardware — bringing its rich, three-dimensional
sound and harmonics “in the box.”
*All trademarks are recognized as property of their respective owners. Individual UAD Powered Plug-Ins sold separately.
UAD System Manual Introduction 6
Page 7

Features
All UAD-2 Devices
• 1, 2, 4, or 8 Analog Devices SHARC floating-point processors
• Multi-device support for up to six UAD-2’s in one system
• Compatible with VST, RTAS, AAX 64, and Audio Units plug-in formats
• Drivers optimized for modern multi-thread and multi-processor architectures
• Real-time and faster than real-time processing for mix bounces
• LiveTrack low-latency mode for monitoring, tracking, and performance
(not available with UAD-2 FireWire devices)
• L.O.D.E. (Live Optimizing DSP Engine) automatically balances DSP loads
• LoadLock ensures resource availability on loaded plug-ins
• UAD Toolbar for preset management and accessing information
• Award-winning UAD Powered Plug-Ins from Ampex, Lexicon, Neve, Manley, SSL,
Studer, and more*
• 14-day full function demo for all UAD plug-ins; try before you buy
• UAD plug-ins available at the Universal Audio online store
UAD Meter & Control Panel application
• Configures global UAD-2 and UAD plug-in settings
• Facilitates automatic authorization of UAD plug-in licenses and UAD-2 devices
• UAD-2 resource meters for DSP and Memory loads
UAD-2 Satellite
• External form factor
• Thunderbolt: QUAD or OCTO in Thunderbolt enclosure
• FireWire: DUO or QUAD in FireWire enclosure
• USB: QUAD or OCTO in USB 3 enclosure
UAD-2 PCI Express Cards
• High-bandwidth x1 PCIe
• Full-height, short card form factor
• UAD-2 QUAD and OCTO card models available
*All trademarks are recognized as property of their respective owners. Individual UAD Powered Plug-Ins sold separately.
UAD System Manual Introduction 7
Page 8

UAD Documentation Overview
This section describes the various instructional and technical resources that are available
for installing, using, and troubleshooting UAD Powered Plug-Ins. Documentation for the
product line is available in written, video, and online formats.
Operation Manuals
Documentation for UAD-2 devices and UAD Powered Plug-Ins are separated by areas
of functionality, as described below. The user manuals are placed on the system drive
during software installation, and they can be downloaded at www.uaudio.com.
Note: All manual files are in PDF format. PDF files require a free PDF reader
application such as Adobe Acrobat Reader (Windows/Mac) or Preview (Mac only).
UAD System Manual
The UAD System Manual is the operation manual for overall UAD functionality and
applies to the entire UAD-2 product line. It contains detailed information about
installing, configuring, and operating UAD devices and plug-ins.
The UAD System Manual includes everything about UAD except Apollo-specific
information, and individual UAD plug-in descriptions.
UAD Plug-Ins Manual
The features and functionality of all the individual UAD Powered Plug-Ins are detailed in
the UAD Plug-Ins Manual. Refer to this document to learn about the operation, controls,
and interface of each plug-in.
Direct Developer Plug-Ins
UAD Powered Plug-Ins includes plug-ins from our Direct Developer partners.
Documentation for these 3rd-party plug-ins are separate files that are written and
provided by the plug-in developers themselves. The filenames for these plug-ins are the
same as the plug-in names.
Apollo Manuals
Apollo models have separate software and hardware manuals that document all the
features and functionality of Universal Audio’s line of audio interface products. These
manuals are installed along with the Apollo software. Arrow has its own manual.
Host DAW Documentation
Each host DAW software application has its own particular methods for configuring and
using plug-ins. Refer to the host DAW’s documentation for specific instructions about
using plug-in features within the DAW.
Hyperlinks
Links to other manual sections and web pages are highlighted in blue text. Click a
hyperlink to jump directly to the linked item.
Tip: Use the “back” button in the PDF reader application to return to the previous
page after clicking a hyperlink.
UAD System Manual Introduction 8
Page 9
Accessing Installed Manuals
To open the documentation folder, click the “Product Manuals” button in the Help Panel
within the UAD Meter & Control Panel application.
File locations
The UAD and Direct Developer manual files are copied to the hard drive by the software
installer to the following locations:
Windows
• Start Menu>All Programs>UAD Powered Plug-Ins>Documentation
Mac
• /Applications/Universal Audio/Documentation
Additional Resources & Technical Support
For additional instructional information or if you need to contact Universal Audio for
assistance, see the Technical Support page.
UAD System Manual Introduction 9
Page 10

UAD Installation
The UAD Powered Plug-Ins software must be installed to use UAD-2 devices. The UAD
installer places all the software necessary to configure and use UAD-2 hardware and UAD
plug-ins onto the computer’s startup drive. Complete details are in this chapter.
Additional Instructions
This UAD products below have unique connection and operation instructions. Refer to
the chapters below for detailed procedures with these products:
• UAD-2 Satellite Thunderbolt
• UAD-2 Satellite USB
• UAD-2 Satellite FireWire
• UAD-2 SOLO/Laptop
• Apollo interfaces have their own installation procedures and system requirements.
See the Apollo Manuals for specific details.
Windows & Mac
Software installation and removal for Windows and Mac platforms have their own
particular procedures. Instructions for each platform are detailed separately.
Software Updates
The most recent UAD software is always recommended so you’ll have access to the
latest UAD plug-ins and stability updates. The most recent software is available at the
UA website. If the UAD software is already installed, the UAD Meter & Control Panel
application has a convenient Check for Updates button that checks for the most recent
version.
Firmware Updates
For optimum results, always update the firmware if prompted by the software. Follow the
onscreen instructions to complete the process before attempting to use the software.
Preparation
Close all open files and applications before starting the software installation procedure.
The installer requires a restart after installation.
If you are updating to a newer version of UAD software or installing additional UAD
devices, it is not necessary to remove the previous UAD software or hardware from the
system.
Technical Assistance
If you need help, see the Technical Support page.
UAD System Manual UAD Installation 10
Page 11

System Requirements
Note: For complete compatibility information, including operating system and
storage requirements, visit help.uaudio.com.
All Platforms (Mac & Windows)
• Internet connection to download software and authorize UAD plug-ins
• Compatible VST, Audio Units, RTAS, or AAX 64 plug-in host DAW software
FireWire Systems (Mac & Windows)
• Available FireWire 800 port*
*Note: On Windows systems, a qualified PCIe-to-FireWire adapter card is required
Thunderbolt Systems (Mac & Windows)
• (Mac) Apple computer with available Thunderbolt port
• (Win) PC computer with available built-in Thunderbolt 3 port
Note: Thunderbolt cable and adapter not included
USB Systems (Windows only)
• Available built-in* USB 3 SuperSpeed port
• Intel Core i3, Core i5, Core i7, or Xeon processor*
• USB 3.0 SuperSpeed cable (included)
*Notes:
• 2-in-1 systems (notebook/tablet) are not recommended
• USB 3 adapters (such as PCIe-to-USB 3 expansion cards) are not tested for
Apollo Twin USB connection
• Quad Core i7 or better processor recommended
UAD-2 PCIe Card Systems (Mac & Windows)
• Available PCI Express (PCIe) slot for each UAD-2 card
UAD System Manual UAD Installation 11
Page 12

Compatible DAW Host Applications
UAD Powered Plug-Ins are compatible with VST, RTAS, AAX 64, and Audio Units host
DAW applications, and are widely used with a variety of major DAW software — including
Pro Tools, Logic Pro, Cubase, Nuendo, Live, and more.
However, due to plug-in host differences between DAWs — and our own rigorous testing
standards — Universal Audio only officially tests the latest UAD software with:
• Avid Pro Tools 10, 11, and 12
• Apple Logic Pro X
• Steinberg Cubase 10
• Steinberg Nuendo 8
• Ableton Live 10
DAW Application Notes
• The most recent maintenance release of the DAW application is recommended.
• Pro Tools 10 is incompatible with UA Thunderbolt audio interfaces on Windows.
UAD System Manual UAD Installation 12
Page 13

Installation on Windows Systems (FireWire and/or PCIe)
Note: To install UAD-2 Satellite USB on Windows systems, see the next page.
Install UAD Software First
Note: For optimum results, install the UAD software before installing/connecting
the UAD-2 hardware.
To install, register, and authorize UAD plug-ins:
Important: Verify the computer system date and time are set correctly before
installing the software and/or launching the UAD Meter & Control Panel
application for the first time.
1. Download the latest UAD software installer: www.uaudio.com/download
2. Open the downloaded installer application. The installer will guide you. Be sure to
restart the computer when prompted.
3. Shut down (power off) the computer. If the UAD device(s) is already installed or
you are updating to a newer version, bypass this step.
4. Install/connect and power on the UAD device(s) then start the computer.
Note: If prompted to update the firmware, see the procedure below.
5. After restarting, the default web browser launches and connects to the UA online
store. Follow the instructions on the web pages to create an account, register the
hardware, and authorize bundled UAD plug-ins.
6. After registration is complete, authorize the UAD device by following the
instructions on the registration web pages. The system is ready for use.
If the device was already registered, when the computer restarts the UAD Meter &
Control panel automatically opens and UAD plug-ins are automatically authorized in the
background.
Tip: You can use the UAD Meter & Control Panel to verify installation. See
Verifying Installation for details.
Firmware Update Procedure
If prompted by the “Firmware Update” dialog window to update the UAD-2 firmware:
1. Click “Load” to begin the process. The “firmware is updating” window appears.
2. Wait for the “Power Off UAD Device” dialog window, which appears after the
firmware is updated.
3. Power OFF the UAD-2 hardware, then power it back ON. The firmware update is
complete.
UAD System Manual UAD Installation 13
Page 14

Installation on Windows Systems (Thunderbolt and/or USB)
Note: To install UAD-2 FireWire devices or PCIe cards on Windows systems, see
the previous page.
Connect And Power Hardware First
Note: For optimum results, connect and power the UAD-2 Satellite USB hardware
before installing the UAD software.
To install, register, and authorize Apollo and UAD plug-ins software:
1. Connect UAD-2 Satellite USB to a built-in USB 3 port on the computer with the
included USB 3 cable, then power on UAD-2 Satellite USB.
2. Download the latest UAD software installer: www.uaudio.com/download
3. Open the downloaded installer program. The installer will guide you. Be sure to
restart the computer when prompted.
Important: If prompted to update the firmware, see the procedure below.
4. After restarting, the default web browser launches and connects to the UA online
store. Follow the instructions on the web pages to create an account, register the
hardware, and authorize bundled UAD plug-ins.
5. After registration is complete, authorize the UAD device by following the
instructions on the registration web pages. The system is ready for use.
6. Proceed to UAD-2 Satellite USB Windows Setup to complete the setup process.
If the device was already registered, when the computer restarts the UAD Meter &
Control Panel automatically opens and UAD plug-ins are automatically authorized in the
background.
Note: To authorize a UAD system that is not connected to the Internet, see
“Offline Authorization Procedure” in the UAD System Manual.
Firmware Update Procedure
If prompted by the “Firmware Update” dialog window to update the firmware:
1. Click “Load” to begin the process. The “firmware is updating” window appears.
2. Wait for the “Power Off UAD Device” dialog window, which appears after the
firmware is updated.
Power OFF UAD-2 Satellite USB, then power ON UAD-2 Satellite USB. The firmware
update is complete.
UAD System Manual UAD Installation 14
Page 15

Installation on Mac Systems
Install/Connect UAD Hardware First
Note: For optimum results, install/connect the UAD-2 hardware before installing
the UAD software.
To install, register, and authorize UAD plug-ins:
Important: Verify the computer system date and time are set correctly before
installing the software and/or launching the UAD Meter & Control Panel
application for the first time.
1. Shut down (power off) the computer.
2. Install/connect and power the UAD-2 device(s) then start the computer.
3. Download the latest UAD software installer: www.uaudio.com/download
4. Open the downloaded installer application. The installer will guide you. Be sure to
restart the computer when prompted.
5. After restarting, the default web browser launches and connects to the UA online
store. Follow the instructions on the web pages to create an account, register the
hardware, and authorize bundled UAD plug-ins.
Note: If prompted to update the firmware, see the procedure below.
6. After registration is complete, authorize the UAD device by following the
instructions on the registration web pages. The system is ready for use.
If the device was already registered, when the computer restarts the UAD Meter &
Control panel automatically opens and UAD plug-ins are automatically authorized in the
background.
Tip: You can use the UAD Meter & Control Panel to verify installation. See
Verifying Installation for details.
Firmware Update Procedure
If prompted by the “Firmware Update” dialog window to update the UAD-2 firmware:
1. Click “Load” to begin the process. The “firmware is updating” window appears.
2. Wait for the “Power Off UAD Device” dialog window, which appears after the
firmware is updated.
3. Power OFF the UAD-2 hardware, then power it back ON. The firmware update is
complete.
UAD System Manual UAD Installation 15
Page 16

Installed Software Locations
The UAD Meter & Control Panel application, UAD plug-ins, and UAD documentation are
copied to the locations below on the system drive during installation:
Windows
• C:\Program Files\Universal Audio\Powered Plug-Ins
These can be accessed from the Windows Start Menu at:
• Start>All Programs>UAD Powered Plug-Ins
The DAW plug-in files are installed to these locations during installation:
64-bit VST plug-ins directory:
• C:\Program Files\Steinberg\VstPlugins\Powered Plugins\
32-bit VST plug-ins directory:
• C:\Program Files (x86)\Steinberg\VstPlugins\Powered Plugins\
Note: To ensure access to the mono (m) plug-ins, set the host application to use
the directories above.
AAX 64 UAD plug-ins directory:
• C:\Program Files\Common Files\Avid\Plug-Ins\
Mac
• Macintosh HD/Applications/Universal Audio
The DAW plug-in files are installed to the standardized OS X locations:
• VST: /Library/Audio/Plug-Ins/VST/Powered Plug-Ins
• Audio Units: /Library/Audio/Plug-Ins/Components
• RTAS: /Library/Application Support/Digidesign/Plug-Ins
• AAX 64: /Library/Application Support/Avid/Audio/Plug-Ins
UAD System Manual UAD Installation 16
Page 17

UAD-2 PCIe Card Installation
About PCI and PCI Express
PCI and PCI-X are different than PCI
Express (also known as PCIe). UAD-2
PCIe cards are not compatible with PCI
or PCI-X because PCIe uses a completely
different connector (as shown at right).
UAD-2 SOLO, DUO, QUAD, and OCTO
cards are all PCIe cards and will only
work in PCI Express (PCIe) slots. Be
careful to only install the UAD-2 card
into a PCIe slot.
UAD-2 PCIe Speed
UAD-2 cards are “x1” PCIe cards. Although these cards can be installed into any speed
PCIe slot (x1/x4/x8/x16), putting a them in any PCIe slot faster than x1 will not improve
UAD performance.
PCIe Card Handling
PCI/PCI-X and PCIe
connectors are incompatible
Before handling the UAD card, discharge any static electricity by touching the metal
casing of the power supply. Do not touch the gold edge connector contacts.
Installing UAD PCIe Cards
If necessary, refer to the computer manufacturer’s documentation for instructions about
installing PCIe cards.
Important: Ensure the computer (and PCIe expansion chassis, if applicable) is
powered off before installing the UAD-2 PCIe cards.
1. Power off the computer system (and PCIe expansion chassis, if applicable), then
open the computer case and remove the rear screw and cover of an available PCIe
expansion slot.
2. Hold the PCIe card gently by the top edges, and line up its connector with the slot
inside the computer.
3. When the connector and slot are aligned, press the card into the slot with firm,
even pressure. The card should “pop” into place. The top of the slot on the
motherboard should be flush and parallel with the edge of the UAD card.
4. Secure the card with the previously removed screw and replace the computer
case.
PCIe Installation is complete.
UAD System Manual UAD Installation 17
Page 18

Online Authorization
Note: UAD devices must be registered, and UAD plug-ins must be authorized,
before they can be used.
After initial registration, UAD authorization is automatic. Simply restart the computer
and authorization is accomplished automatically in the background by the UAD Meter &
Control Panel application.
Whenever a new UAD-2 or Apollo device is connected (and the UAD software is
already installed), registration will begin automatically via the web browser. Follow the
instructions on the web pages to create an account, register the UAD device(s), and
claim bundled UAD plug-ins.
Automatic authorization requires the UAD host computer to be connected to the Internet.
To authorize a system that is not online, see the instructions below.
Offline Authorization
Note: UAD devices must be registered, and UAD plug-ins must be authorized,
before they can be used.
If the UAD computer is not connected to the Internet, you will need to manually
transfer the registration URL into the browser of a web-enabled computer, download an
authorization file on the web computer, then transfer the authorization file back to the
UAD computer.
To obtain and apply the UAD authorization file if not connected to the internet:
1. Install UAD Powered Plug-Ins software and the UAD hardware using the
procedures detailed in this chapter (the system must be operating properly).
2. Launch the UAD Meter & Control Panel application and open the Plug-Ins Panel.
3. Click the Authorize Plug-ins button. The default web browser opens with the
registration URL in the address bar (and you may get an error that the computer is
not connected to the Internet).
(continued)
UAD System Manual UAD Installation 18
Page 19
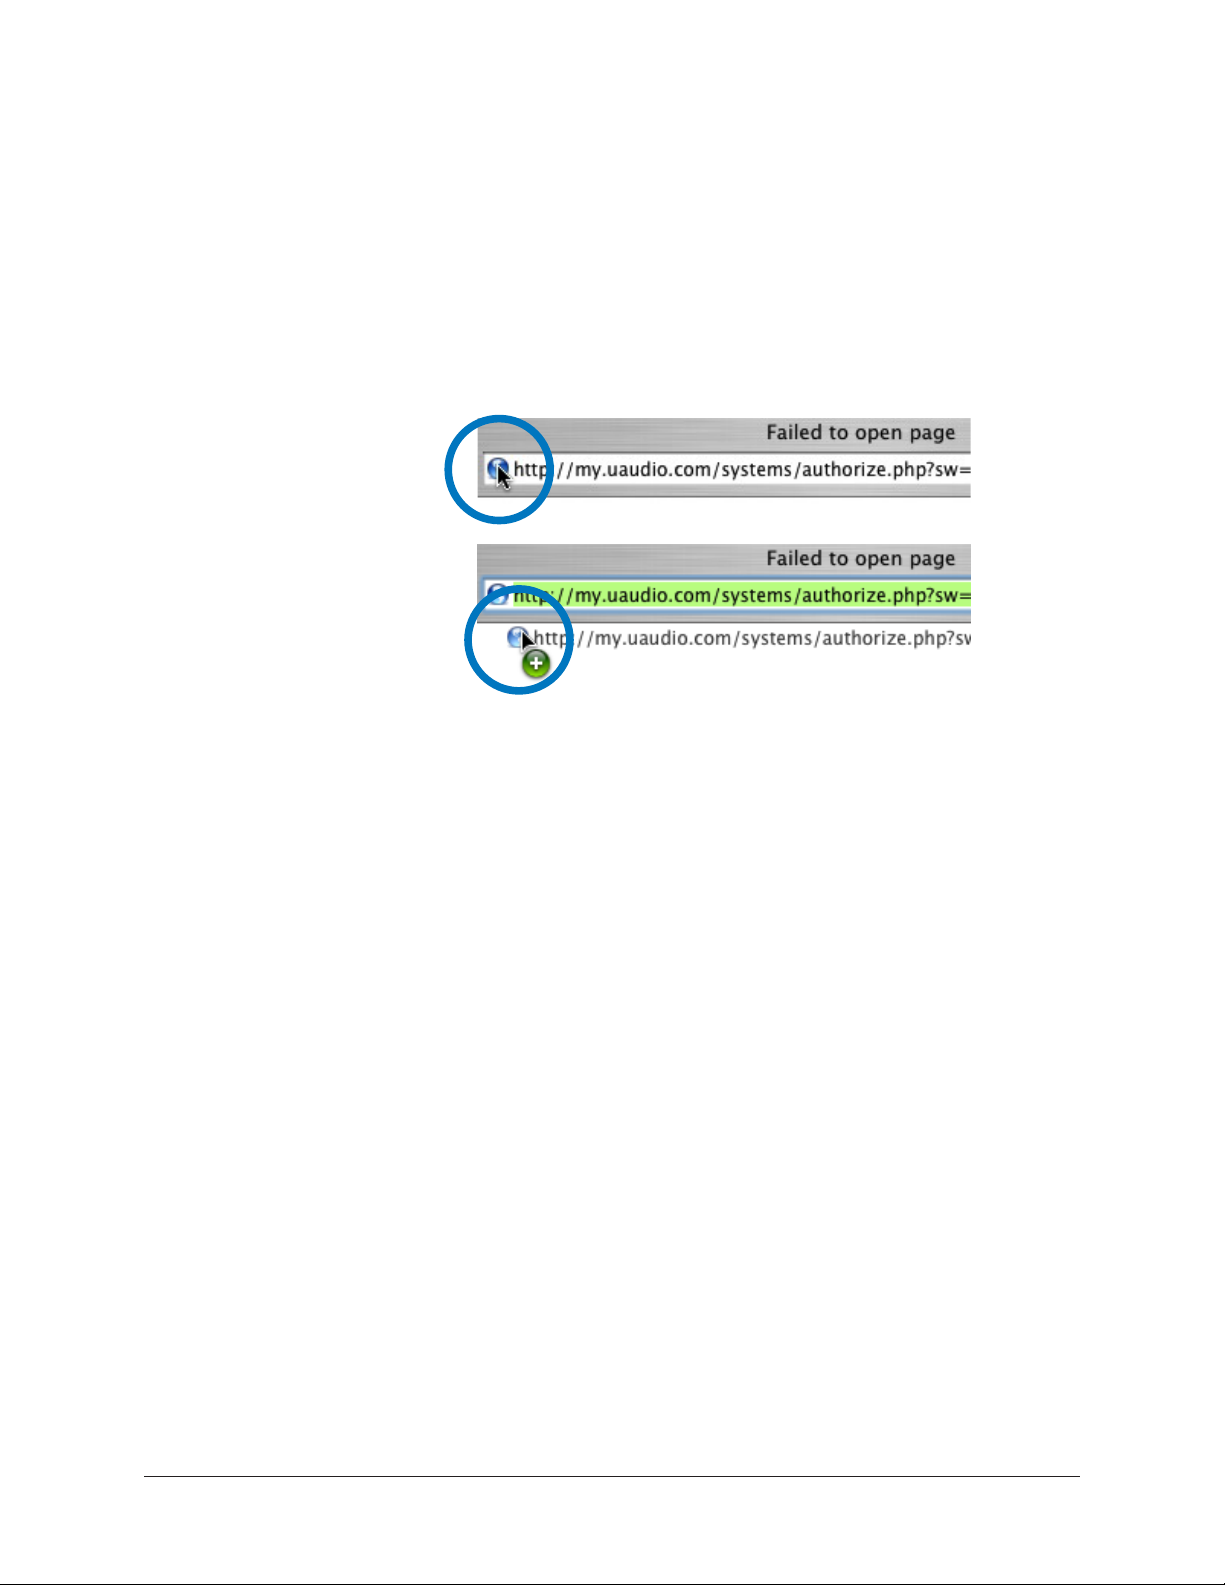
4. You must enter this exact URL into a web-connected computer, so either:
a. Drag the URL icon in the browser’s address bar to the Desktop to create a
weblink shortcut (preferred; avoids transcription errors) then transfer the
weblink shortcut to the internet computer via a storage device or network, OR
b. Copy/paste the exact URL into a file that can be transferred (or carefully write
down the URL, EXACTLY as it appears in the address field).
1. Click+Hold URL icon
in browser address bar
2. Drag URL icon to
Desktop or flash drive
to create a link shortcut
Creating a web location shortcut on the offline UAD system
for easier transfer of the URL file to an online system
5. Go to the URL using a web browser on an Internet-connected computer. Doubleclick the transferred weblink shortcut, or enter the URL as previously noted.
• If you don’t already have a UA account, you are directed to create one. Follow
the instructions online.
• If you already have a UA account, login with your email address and password.
If your password is lost, the store can email password reset link to you.
6. Your device will be automatically registered and added to your My UA Hardware
page, and your authorization file is generated.
7. The authorization file named “auth.uad2” should begin downloading automatically
(if not, click the download authorization link).
8. Transfer the authorization file to the UAD computer via a storage device or
network.
9. For optimum results, quit all open audio host applications (DAWs).
10. Double-click the authorization file. The authorization is loaded onto the UAD
device(s) and after a few seconds the “Authorizations Status” window appears.
Offline UAD authorization is complete and UAD plug-ins are ready for use.
UAD System Manual UAD Installation 19
Page 20

Verifying Installation
The UAD Meter & Control Panel contains the System Information panel, where UAD
software and hardware installation can be verified to ensure the system is working
properly.
To confirm proper UAD installation and operation:
1. Launch the UAD Meter & Control Panel application (see Launching the
Application).
2. Open the System Information Panel.
3. When the UAD device is displayed in the Hardware area and its status is “OK”
then the UAD driver is communicating with the UAD device and the system is
operating properly.
UAD-2 LED
The UAD-2 has an LED indicator. This LED provides certain indications about the
operational state of the UAD-2. The location of the LED depends on the UAD-2 product.
On UAD-2 PCIe cards, the LED is on the mounting bracket of the card. On SOLO/Laptop,
the LED is next to the UA logo on the black housing. On UAD-2 Satellite, the LED is on
the rear panel.
Alternating red and green
When the LED alternates between solid red and solid green, the device is powered up
properly but the UAD driver is not yet loaded or communicating with the device. This is
the expected state if the device is installed but the software is not yet installed, or after
booting the system and the UAD driver is not yet loaded. The driver loads when the UAD
Meter & Control panel or host DAW application is launched.
Solid green
When the LED is solid green, the UAD driver is loaded and properly communicating with
the device. This is the normal state when using UAD Powered Plug-Ins.
Solid red or other blinking patterns
When the LED is producing any pattern other than the two conditions above, there is
a problem with communication between the driver and the device. Try a cold reboot
(complete power down) and/or reinstalling the UAD software before contacting customer
support.
UAD System Manual UAD Installation 20
Page 21

Software Removal
Important: Power down the computer before removing any UAD cards.
To remove all UAD software from the computer:
Windows
1. Go to: Control Panel>Programs>Programs and Features
2. Select “UAD Powered Plug-Ins”
3. Click “Uninstall”
The UAD software is removed.
Mac
1. Go to: Mac HD/Applications/Universal Audio
2. Launch the “Uninstall Universal Audio Software” application
3. Click “Uninstall UA Software” in the application’s window
The UAD software is removed.
Learn More
After installation, registration, and authorization, you’re ready to use UAD Powered
Plug-Ins. The Universal Audio Knowledge Base contains helpful videos that explain how
to install the hardware and software, register, authorize, and use the product, obtain
optional plug-ins, and more.
For additional instructional information or if you need to contact Universal Audio for
assistance, see the Technical Support page.
UAD System Manual UAD Installation 21
Page 22

UAD System Overview
The UAD Environment
UAD Powered Plug-Ins is a hardware-plus-software system that consists of one or more
UAD-2 DSP accelerator devices and/or Apollo audio interfaces combined with the UAD
Powered Plug-Ins software.
Various UAD-2 products are available to accommodate your particular computer system,
processing needs, and budget. For the complete product lineup, visit the Universal Audio
website at www.uaudio.com.
System Components
The complete UAD Powered Plug-Ins environment consists of various components. These
components are:
• One or more UAD-2 DSP hardware accelerator devices
• The UAD plug-ins
• The UAD device drivers
• The host computer system
• The plug-in host application software (DAW)
• A computer audio hardware input/output interface and its drivers
• Your UA account and the UA store
All these components operate together simultaneously within one computer to form the
complete UAD audio processing system. An overview of these components is provided in
this chapter.
UAD System Manual UAD System Overview 22
Page 23
The UAD Hardware
The UAD-2 DSP (Digital Signal Processing) hardware accelerator devices provide
the power behind UAD Powered Plug-Ins. Most UAD plug-ins use extremely complex
algorithms to provide the quality sound and accurate modeling Universal Audio is famous
for. The UAD processor engines are significantly more optimized to perform the complex
DSP routines required for these algorithms than a standard desktop computer CPU can
deliver.
All UAD-2 devices are Mac and Windows compatible unless otherwise specified. The
cross-platform hardware is identical for both OS platforms.
Note: Multiple UAD hardware types can be used concurrently in the same
computer system. For details, see Multiple UAD Devices.
UAD-2 Products
UAD-2 is UA’s second-generation UAD product line that offers many
improvements over the original UAD-1; most notable is significantly
increased DSP horsepower. Each UAD-2 DSP provides approximately 2.5
times the processing power of the UAD-1, therefore one UAD-2 OCTO
offers approximately 20 times the processing power of UAD-1.
A variety of UAD-2 models are available to suit various processing and protocol needs.
Each model is defined by its number of SHARC DSP cores (1, 2, 4, 6, or 8) and its
connection protocol (PCIe, FireWire, Thunderbolt, or USB 3). Up to six UAD-2 devices
can be run concurrently in one system; see the UA Knowledge Base for specific details
about compatibility with each model.
Note: UAD-1 is a discontinued product.
DSP Core Complement
The DSP core complement of UAD-2 devices is designated as
SOLO, DUO, QUAD, HEXA, or OCTO. These designations indicate
the number of SHARC® DSP (Digital Signal Processing) chips in
each device.
SOLO devices have one DSP core, DUO devices have two DSP
cores, QUAD devices have four DSP cores, HEXA devices (Apollo
X Series audio interfaces only) have six DSP cores, and OCTO devices have eight DSP
cores.
You can increase the amount of UAD DSP power by adding UAD devices to your system
as your UAD processing needs grow.
UAD System Manual UAD System Overview 23
Page 24

UAD-2 PCIe Cards
UAD-2 PCI Express (PCIe) cards are available in QUAD and
OCTO core configurations. All UAD-2 PCIe cards use the PCIe x1
architecture, providing plenty of data bandwidth for even the most
demanding audio processing requirements, such as four UAD-2
OCTOs (32 DSP cores) in the same system.
Note: UAD-2 PCIe SOLO and UAD-2 PCIe DUO are discontinued products.
UAD-2 SOLO/Laptop
UAD-2 SOLO/Laptop is a self-contained UAD-2 SOLO device
housed entirely within an ExpressCard/34 expansion card
for use with notebook computers. No external cables or
power is required, for the ultimate in mobile DSP capability.
UAD-2 SOLO/Laptop has special instructions for installation,
connectivity, and use. For details, see UAD-2 SOLO/Laptop.
Note: UAD-2 SOLO/Laptop is a discontinued product.
UAD-2 Satellite
UAD-2 Satellite enables UAD plug-in QUAD or OCTO
processing with a variety of modern computer systems.
Three UAD-2 Satellite models are available, and each
model uses a different connection protocol. All models are
housed in rugged and attractive external enclosures.
• For Thunderbolt model details, see UAD-2 Satellite
Thunderbolt.
• For USB 3 model details, see UAD-2 Satellite
USB.
• For FireWire model details, see UAD-2 Satellite
FireWire.
UAD System Manual UAD System Overview 24
Page 25
UA Audio Interfaces
Apollo are Arrow are UA’s line of high-resolution audio interfaces with class-leading
sound quality, Realtime UAD Processing, FireWire, Thunderbolt, or USB 3 connectivity,
and elegant hardware design and workflow.
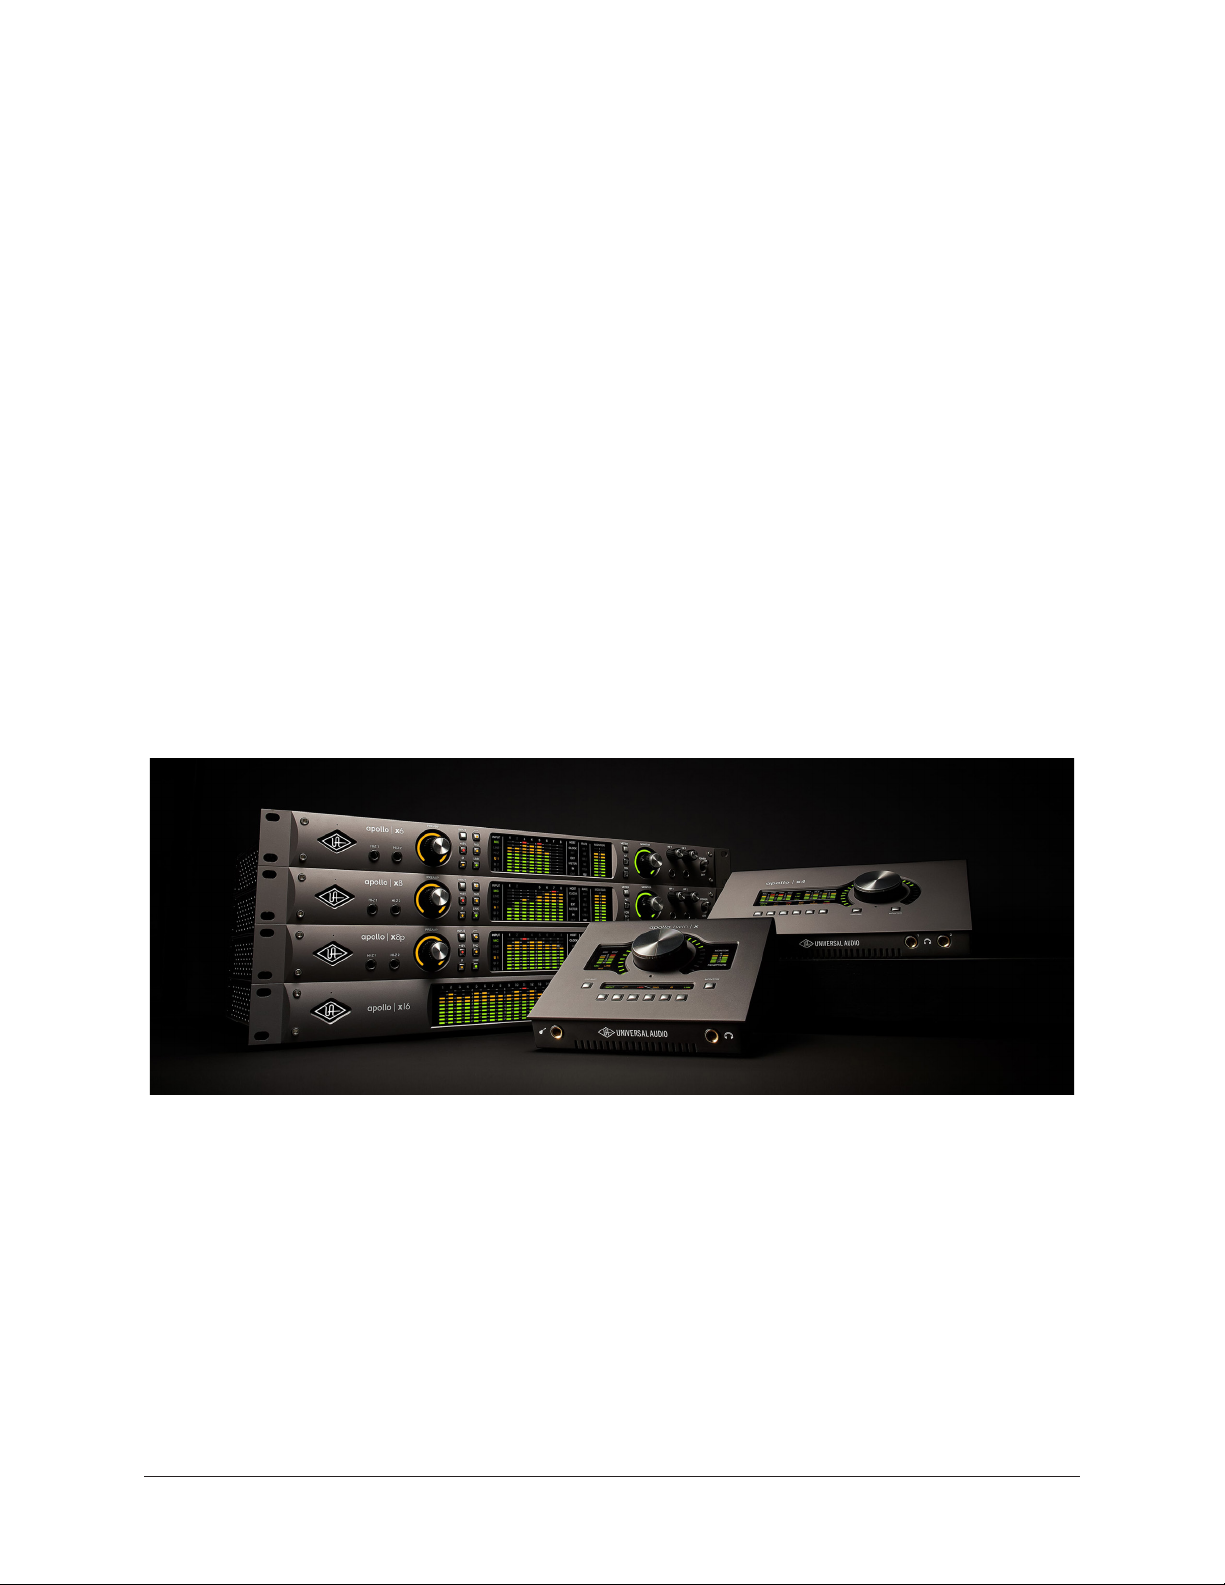
The Apollo X Series is UA’s flagship audio interface lineup. Apollo X rackmount models
are the Apollo x6, Apollo x8, Apollo x8p, and Apollo x16, all of which feature HEXA core
DSP processing onboard. Apollo X Series desktop models include the Apollo x4 with
QUAD core processing, and Apollo Twin X with DUO or QUAD cores.
Other Apollo models include Apollo DUO/QUAD, Apollo FireWire, Apollo 8, Apollo 8p,
Apollo Twin, Apollo Twin USB, Apollo Twin MkII, Apollo 16, and Apollo 16 MkII.
Arrow is UA’s entry-level audio interface model with professional features at an affordable
price.
UA Audio Interface Documentation
UA audio interface products feature onboard UAD-2 processing. The UAD-2 functionality
of UA audio interface UAD-2 processing is documented in this manual. However,
functionality that is unique to UA audio interfaces is documented separately in the
Apollo Manuals.
Note: Throughout this manual, all mentions of “Apollo” refers to all Apollo models
unless noted otherwise.
Universal Audio’s family of audio interface models
UAD-2 Packages
UAD-2 devices are available in a variety of retail configurations to best accommodate
your budget and processing requirements. The products have various DSP core
complements (SOLO/DUO/QUAD/HEXA/OCTO), form factors (internal, rack mount,
desktop), connectivity (PCIe, Thunderbolt, FireWire, USB 3), and included plug-in
bundles. For complete details about all available products, visit the Universal Audio
website.
UAD System Manual UAD System Overview 25
Page 26

The UAD Software
The UAD Powered Plug-Ins software consists of the UAD installer, the UAD plug-ins,
the UAD Meter & Control Panel application, the UAD device drivers, and the product
documentation.
UAD Installer
The UAD Powered Plug-Ins software installers contain all the UAD
software components (plug-ins, drivers, and documentation) and copies
them to the system drive during installation. The UAD software installers
support all variations of UAD-2 and Apollo devices.
UAD Powered Plug-Ins
UAD plug-ins are the VST, RTAS, AAX 64, and Audio Units plug-in files
that are loaded within the digital audio workstation application (DAW).
The plug-ins are where the graphical user interface (GUI) is seen and
where the various control parameters can be manipulated to achieve the
desired sonic results.
The UAD software installer always installs the complete suite of all
available UAD Powered Plug-Ins. However, all of the installed UAD plug-ins may not be
licensed. The included licenses depends on the retail package’s Bundled Plug-Ins.
Optional Plug-Ins
Most UAD plug-ins require optional licenses to run without restrictions. Optional
plug-in licenses are obtained at the UA online store. Plug-in licenses can be purchased
separately or in bundles.
Demo Mode
UAD plug-ins that are unlicensed can be run in Demo Mode as a 14-day trial period
without any functional restrictions.
Bundled Licenses and Coupons
The UA Account & Store is where bundled software and coupons are redeemed and
where additional licenses can be purchased.
Note: When you purchase an optional license, you don’t download that individual
plug-in. Instead, you download a newer authorization, which enables the plug-in
file that is already installed.
UAD System Manual UAD System Overview 26
Page 27

UAD Meter & Control Panel
The UAD Meter & Control Panel application is used to authorize UAD
plug-ins after purchasing and to monitor/configure UAD device resources.
It has two main windows: the UAD Meter, and the UAD Control Panel.
The UAD Meter Window displays the current DSP, program, and memory
status of the UAD hardware. The UAD Control Panels has multiple panels
that display and modify various system, plug-in, and global configuration
parameters.
UAD Drivers
The UAD device drivers are the low-level system software files that instruct the host
computer system on how to communicate with the UAD hardware device(s). The UAD
drivers are loaded during system startup so the UAD devices are ready to be used when
the plug-in host DAW application is launched.
In addition to instructing the OS on how to control the UAD hardware, the driver acts as
a software “middleman” between the host application and the UAD hardware. The host
application uses the driver to route UAD signals in the DAW.
Each UAD device family (UAD-2 or Apollo) has its own set of drivers that are placed on
the system drive during UAD software installation.
UAD Buffers and Latency
The UAD drivers use buffers to shuttle audio signals to and from the device. This means
the digital data is transferred in small batches instead of continuously. Buffering induces
a very small audio latency (delay) that is inherent in most digital audio systems and can
be detected in certain situations.
UAD latency is managed automatically by most host DAW applications and can be
reduced to undetectable levels in the UAD-2 PCIe and UAD-2 Satellite Thunderbolt
using LiveTrack Mode. Latency and buffers are discussed in greater detail in Latency &
Delay Compensation.
Tip: Universal Audio’s line of Apollo high-resolution audio interfaces feature
Realtime UAD Processing for monitoring and tracking with UAD plug-ins at nearzero latency, regardless of the DAW’s I/O buffer size.
Product Documentation
Various instructional and technical resources are available for installing, operating,
and troubleshooting UAD Powered Plug-Ins. UAD documentation is available in
written, video, and online formats. For details about user documentation, see UAD
Documentation Overview.
UAD System Manual UAD System Overview 27
Page 28

The DAW Environment
The DAW (digital audio workstation)
environment is a system where audio
production takes place (either with
or without UAD Powered Plug-Ins).
The UAD system is an add-on to
a computer-based DAW that can
dramatically improve the sonic
quality and performance of the DAW,
while still working entirely from
within the DAW.
A computer-based DAW consists of
the host computer hardware and
its operating system (OS) software, the plug-in host application (DAW software), and an
audio input/output (I/O) interface and its drivers.
Host Computer
The host computer is the system that the host DAW application software runs on and
the UAD devices are installed in or connected to. The host computer must meet certain
hardware and software System Requirements to use UAD Powered Plug-Ins.
Operating System
The host computer runs an operating system (macOS or Windows) that defines the
OS platform of the system. UAD Powered Plug-Ins is a cross-platform product that is
essentially functionally identical on Windows and Mac systems (except as otherwise
noted).
Host Application
The plug-in host application is the software DAW environment where audio recording,
playback, mixing, and other production functions are controlled. UAD plug-ins are
accessed and operated from within the host software application.
Each host application has a unique feature set and different methods of operation,
including how to use plug-ins. However, once UAD plug-ins are loaded, UAD plug-in
operation is identical in all host applications.
Because the host application environment is integral to the UAD system but is
completely out of our control, we cannot claim compatibility with all hosts that may
support use of the UAD plug-in formats. See for additional details.
Apollo Console
Universal Audio’s Apollo audio interfaces include a host application called Console.
Console controls Apollo’s functionality and enables Realtime UAD Processing, where I/O
buffering latency doesn’t exist.
UAD System Manual UAD System Overview 28
Page 29

Plug-In Formats
UAD Powered Plug-Ins includes support for VST, RTAS, AAX 64, and Audio Units plug-in
formats. These formats define the software protocols that the host application uses for
plug-in processing.
UAD Powered Plug-Ins operations are (for practical purposes) functionally identical in all
three plug-in formats. The format of the installed UAD plug-in files are specified during
UAD software installation.
VST
The VST (Virtual Studio Technology) plug-in format is developed
by Steinberg and is supported by various Windows and Mac host
applications such as Cubase and Nuendo.
RTAS
The RTAS (Real-Time AudioSuite) plug-in format is developed by Avid
and is supported by Pro Tools 10 (and lower) on Windows and Mac
platforms.
AAX 64
The 64-bit AAX plug-in format is developed by Avid and is supported by
Pro Tools 11 (and higher) on Windows and Mac platforms.
Audio Units
The Audio Units (AU) plug-in format protocol was developed by Apple
and is supported by various host applications on the Mac platform only.
UAD System Manual UAD System Overview 29
Page 30

Audio Interface
The audio hardware I/O (input/output) interface is how audio signals get into and out of
the host computer. An audio interface is a hardware+driver device that can have analog
or digital I/O (or both).
The interface is usually where the analog-to-digital (A/D) and digital-to-analog (D/A)
audio conversions take place. Universal Audio’s line of Apollo and Arrow products are
audio interfaces.
I/O Drivers
The audio interface is a hardware device that requires a software device driver for the
host computer OS. In addition to instructing the OS on how to control the interface
hardware, the driver acts as a software “middleman” between the host application and
the I/O ports. The host application uses the driver to access the I/O for signal routings.
I/O Buffers and Latency
As with UAD devices, audio interfaces also use buffers to shuttle audio signals to and
from the I/O. For details, see UAD Buffers and Latency.
Smaller I/O buffer settings produce lower latencies which is useful when monitoring
tracks while recording performances, but usually results in a higher host computer CPU
load since the system has to work harder transferring data. Latency and buffers are
discussed in greater detail in Latency & Delay Compensation.
Tip: Universal Audio’s line of Apollo high-resolution audio interfaces feature
Realtime UAD Processing for monitoring and tracking with UAD plug-ins at nearzero latency, regardless of the DAW’s I/O buffer size.
UA Store
The UA online store is where optional UAD plug-in licenses are purchased and where UA
coupons are redeemed.The UA store is where your UA account and its associated UAD
devices and plug-ins are managed. For details, see UA Account & Store.
Authorization
All UAD plug-ins must be authorized before they can be used. Authorization is automatic
when the UAD computer is connected to the Internet. For complete details about the
authorization system, see the UAD Authorization Overview.
UAD System Manual UAD System Overview 30
Page 31

UA Account & Store
Account Overview
Your Universal Audio account is where all UAD devices, and their associated UAD
plug-ins, are registered and managed. An account is required to register and authorize all
UAD devices, download UAD software, and receive customer support.
Device Registration
The account creation and device registration process is triggered automatically whenever
a new UAD device is recognized by the UAD software. Our web pages guide you through
the process.
Accessing Your Account
To view your account pages, click
the MY ACCOUNT link at the top of
web of pages at www.uaudio.com.
If you’re not already logged in, click
the LOG IN link.
When you revisit your account, you’ll be prompted to login. You have the option to
stay logged in so you don’t have to enter credentials with each visit. If you forgot your
password, the store can email a password reset link to you.
Account Details
The My Account pages are available when logged in. These pages
contain all details about the account such as registered UAD
devices, licensed UAD plug-ins, and account preferences.
The account menu, shown at right, is used to navigate the
account pages. Click an item in the menu to view that account
page.
UAD System Manual UA Account & Store 31
Page 32

Store Overview
The Universal Audio online store is where optional UAD plug-in licenses are purchased
and UA coupons are redeemed.
Bundled Plug-Ins
UAD plug-ins that are bundled (included) with the UAD device are automatically
issued to your UA account when the device is registered. After registration is complete,
authorize the UAD system to run the bundled plug-ins.
Note: UAD devices must be registered and authorized to run bundled plug-ins.
Optional Plug-Ins
UAD Powered Plug-Ins that are not bundled with the UAD device require an optional
license to run without restrictions. After purchasing a UAD plug-in, the UAD device(s) in
the system need to be manually authorized to run the additional plug-in.
Our web pages guide you through the purchasing and authorization process.
Plug-Ins are already installed
The UAD software installer always installs the complete suite of available UAD plug-ins
during installation. When you purchase an optional license, you don’t download that
individual plug-in. Instead, you simply re-authorize your system, which activates the
plug-in file that is already installed.
Important: Older versions of UAD software may not include all the latest UAD
plug-ins. To ensure all UAD plug-ins are installed, and for optimum performance,
update to the latest UAD version (see Check for Updates).
Coupons
Promotional coupons have dollar values that are as “good as cash” for buying UAD plugins. Coupons are applied to your UA account automatically. The coupon dollar amount is
displayed in your account as a credit, ready to be applied to your store purchase.
Coupons expire after a limited time period, and they can be used only once.
Tip: Coupons are a great reason to sign up for UA’s promotional emails. These
options are set in the Newsletter Subscriptions page in My Account.
UAD System Manual UA Account & Store 32
Page 33

UAD Authorization Overview
Note: This section is an overview of the UAD authorization system. For step-bystep authorization instructions, see UAD Installation.
My UA Hardware
The UAD devices and plug-ins that you own are found on your MY HARDWARE page
at www.uaudio.com/my/account/hardware. The My Hardware page keeps track of your
registered UAD devices and UAD plug-in licenses and is managed automatically by the
UA store and the UAD software. UA analog hardware is also managed here.
Tip: The current UAD plug-in license state is also shown in the Plug-Ins Panel
within the UAD Meter & Control Panel application.
UAD System
All UAD devices registered to an UA account, and all UAD plug-in licenses for those
devices, are referred to as a System on the My Hardware page. Licensed UAD plug-ins
are only authorized to run on the UAD devices associated with the same account and
system.
Account Creation and Device Registration
Creating a UA account and registering the UAD hardware is only needed once during
initial device installation. After registration, authorization is performed automatically in
the background by the UAD Meter & Control Panel application each time the computer is
started.
Adding Additional UAD Devices
If a second (or more) UAD device is added to the computer that already has the UAD
software installed, the new device(s) is automatically detected by the UAD software.
Upon detection, the web browser opens, you are guided to register the new device, and
the new device is added to your account.
Authorizing Newly-Purchased UAD Plug-Ins
When a UAD plug-in is purchased at the UA store, it needs to be manually authorized.
The store guides you through the process; see Authorization Procedure for instructions.
Authorizations Are Stored On UAD Device
During authorization, the UAD plug-in license state is stored on the UAD-2 device. If the
UAD-2 is moved to another computer, it is not necessary to reauthorize the device.
UAD System Manual UA Account & Store 33
Page 34

Demo Mode
All unlicensed UAD plug-ins include a free 14-day trial evaluation period. When the
demonstration mode is activated, the plug-in will run without functional limitations for
14 days. Demo mode can be activated once only. After the demo trial period has expired,
demo mode cannot be activated again on the same UAD device.
If an unlicensed plug-in is loaded and its demo has never been started, a dialog appears
with instructions to start the demo and the option to visit the UA store to purchase the
license. If you don’t start the demo or purchase a license, the plug-in interface appears
and its controls can be manipulated, but audio is not processed by the plug-in.
Important: The 14 day demo period can only be activated once, and cannot be
stopped or restarted during this period. Activate demo mode only when you have
adequate time to thoroughly evaluate its sound and functionality.
Demo Reset
As a courtesy, each time a new UAD plug-in is purchased, all expired demo periods are
automatically reset so all UAD plug-ins with expired demos can be evaluated again.
Demo Activation
To activate demo mode:
1. Ensure UAD Powered Plug-Ins is already installed and configured properly (see
UAD Installation).
2. Open the Plug-Ins Panel within the UAD Meter & Control Panel application.
3. Locate the row for the UAD plug-in you want to evaluate (scroll if necessary).
4. In the Status Column, click the START DEMO button for the UAD plug-in. A
confirmation window appears and the timed demo can be activated or demo
activation can be cancelled.
Note: If loading a DAW session that contains multiple instances of a UAD plug-in
that is not yet authorized and you want to start its 14-day demo period, close
then reopen the DAW session after starting the demo to enable processing on all
instances of the plug-in.
Important: Manipulating the computer’s system date and time will result in a
decreased demo period.
UAD System Manual UA Account & Store 34
Page 35

Buying UAD Plug-Ins
To obtain optional UAD plug-in licenses, simply visit www.uaudio.com, browse the
available plug-ins at our secure store, complete your purchase with several payment
options, and authorize the plug-in(s). You can also apply any coupon credit that is
available from promotional offers.
Lots of product information such as features, specifications, audio/video examples, and
reviews are available on the plug-in product pages to help you make informed buying
decisions.
Purchase Procedure
To purchase optional UAD plug-in licenses:
1. Visit the UA store at www.uaudio.com.
2. Add the items you want to purchase to your shopping cart. You’ll need to login to
your UA account if not already logged in.
3. When ready to complete your purchase, click the Shopping Cart icon at the top of
the page, then click the CHECKOUT button. The payment page appears.
4. Select payment method and provide payment details. If applicable, apply any
discount coupon codes.
5. Click the PLACE YOUR ORDER button once only. The transaction is processed,
the order confirmation page appears, a confirmation email is sent, and the UAD
plug-in license(s) is issued to your UA account.
6. Authorize the UAD device(s) by following the instructions on the next page.
UAD System Manual UA Account & Store 35
Page 36

Authorization Procedure
To authorize optional UAD plug-ins to run on the UAD device:
1. Open the UAD Meter & Control Panel application (see Launching the Application
for methods).
2. Access the Plug-Ins Panel within the application by clicking the blue UAD-2
button in the UAD Meter window.
3. Click the Authorize Plug-ins button in the Plug-Ins panel.
4. After a few moments the Authorization Status window appears.
The purchased UAD plug-in is now authorized and ready for use.
Transferring UAD devices and licenses
Ownership of UAD devices and UAD plug-in licenses can be transferred from one
UA account to another to accommodate the used equipment marketplace. Certain
restrictions apply. For instructions, policies, and FAQ, visit the UAD transfer page:
• help.uaudio.com
Transfer Video
Our Videos page has a video about UAD device transfers:
• www.uaudio.com/videos
UAD System Manual UA Account & Store 36
Page 37
UAD Meter & Control Panel
The UAD Meter & Control Panel application is used to monitor and configure UAD device
resources. It has two main windows: the UAD Meter, and the UAD Control Panel.
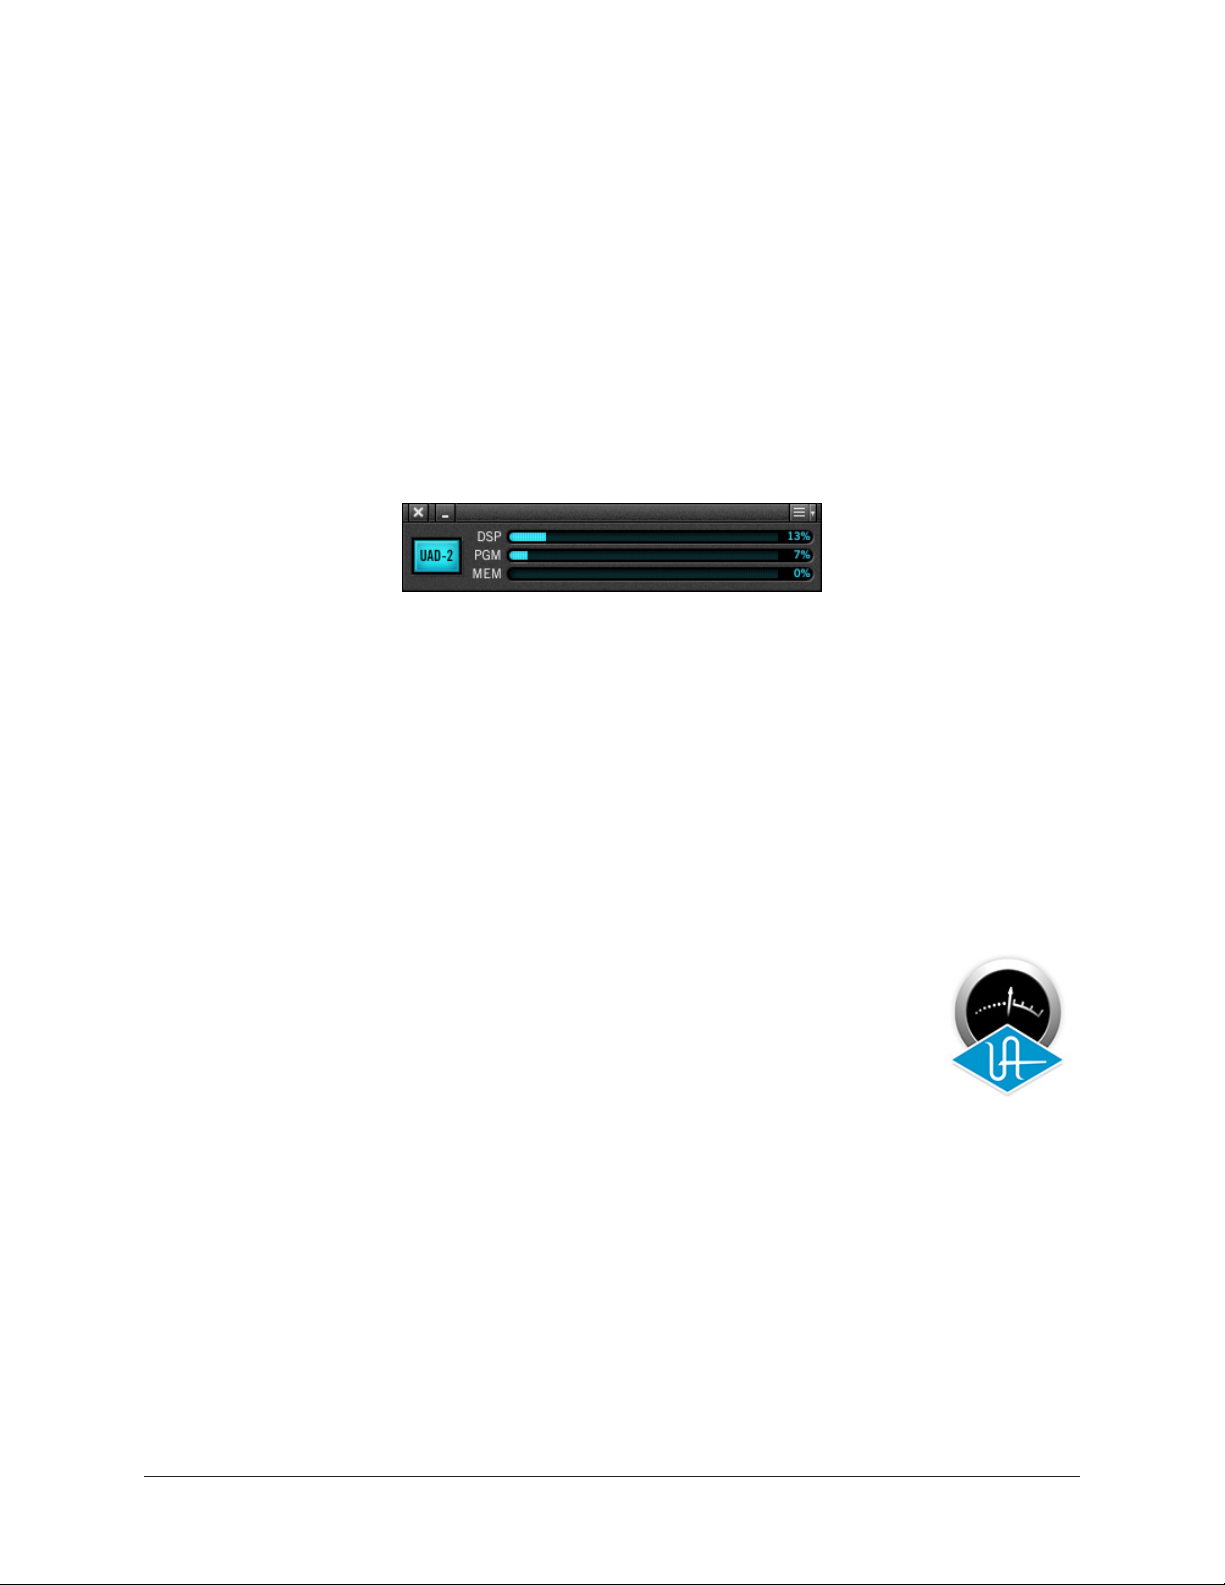
The UAD Meter displays the current DSP, program, and memory status of the UAD
hardware in realtime. The UAD Control Panel has multiple panels that display and
modify various system, plug-in, and global configuration parameters. It also shows
the FireWire bandwidth (FBW) meter when a UAD FireWire device is connected to the
system.
UAD Meter Window
The UAD Meter & Control Panel application can be launched or quit at any time. It does
not need to be open or active to use UAD plug-ins. It is completely independent and
does not require a host DAW application. You can move the UAD Meter to a convenient
location on your screen by dragging its window title bar.
Note: If “No Devices Found” appears in the UAD Meter instead of the expected
buttons and meters, the UAD software is not communicating with the UAD
hardware. If this occurs, double-check hardware and software installations and/or
contact Technical Support.
Launching the Application
The UAD Meter & Control Panel application can be opened using the
techniques listed for each operating system below.
Windows
• Access the application from:
Start Menu>All Programs>UAD Powered Plug-Ins
Mac
• Single-click the UAD Meter & Control Panel icon that was placed in the Mac OS X
Dock during installation
• Double-click the UAD Meter & Control Panel application that was installed at:
/Applications/Universal Audio/
UAD Meter &
Control Panel
application icon
UAD System Manual UAD Meter & Control Panel 37
Page 38
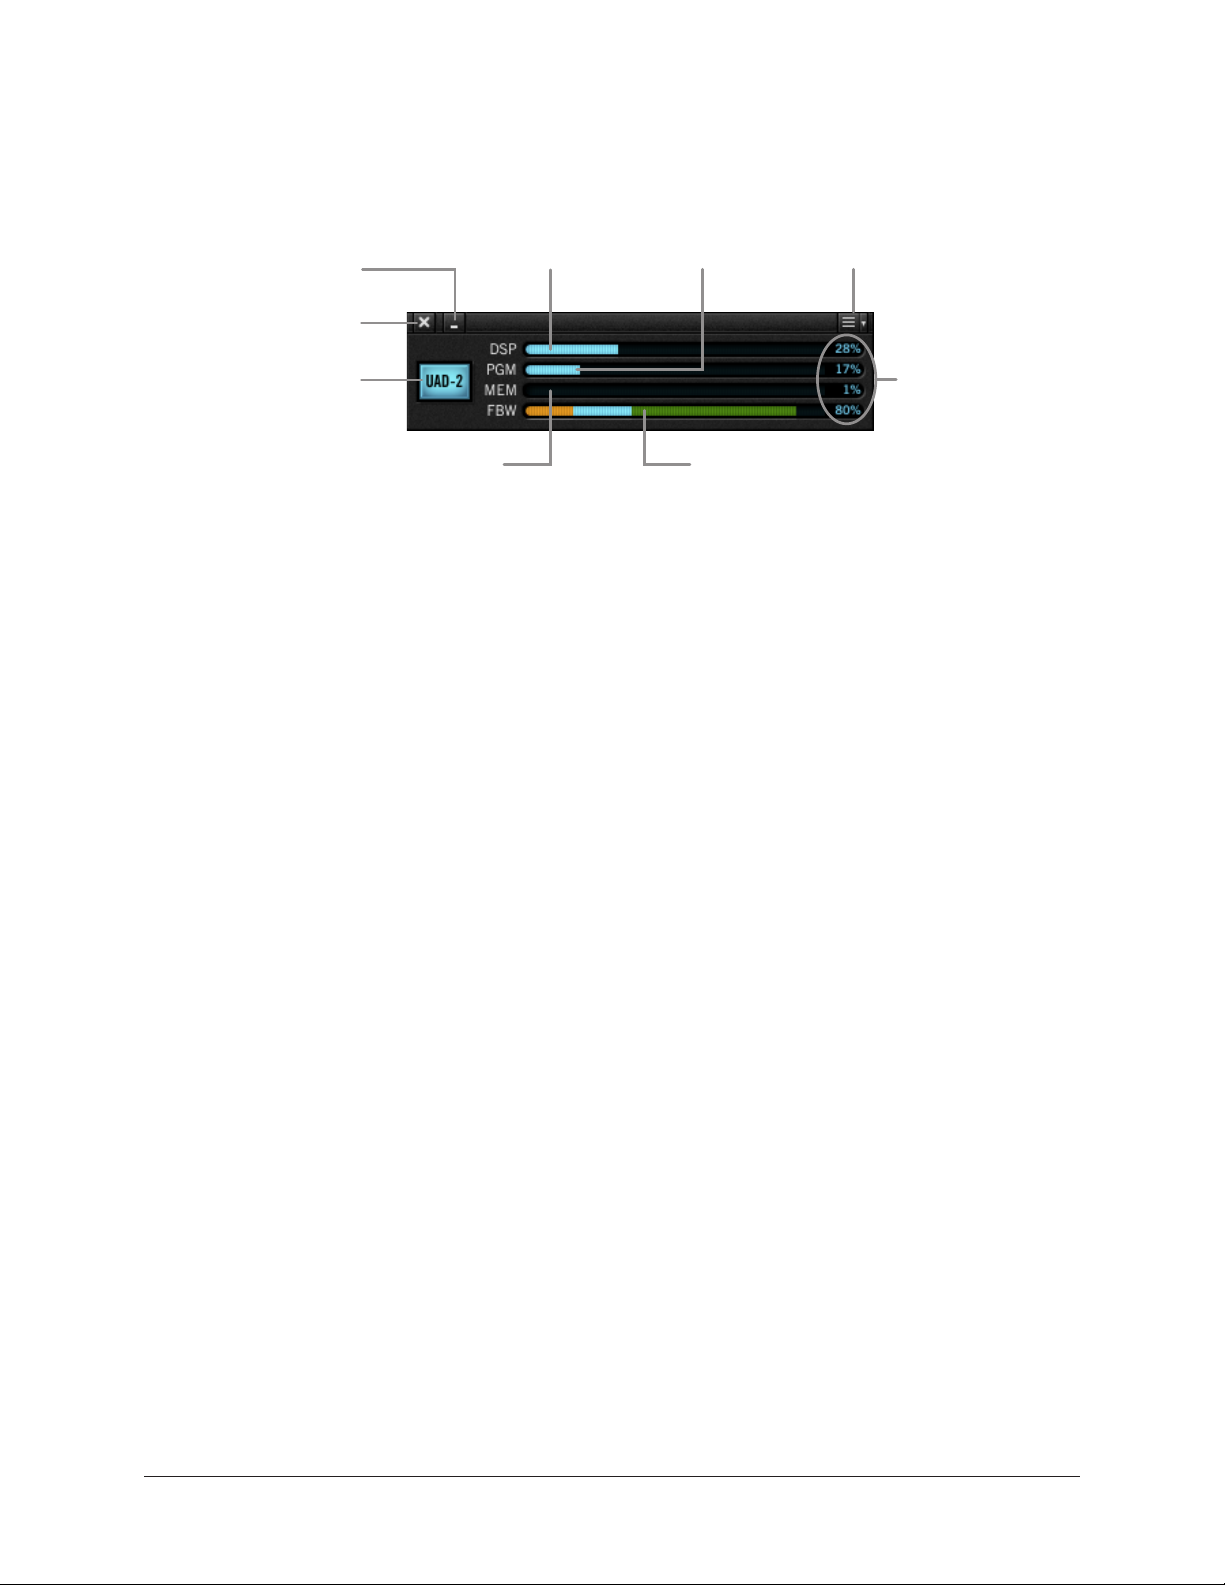
UAD Meter Window
Refer to the illustration below for descriptions in this section
Minimize
Quit
Open Plug-Ins
Panel Button
Memory
Meter
DSP Load
Meter
Program Memory
Meter
FireWire Bandwidth Meter
(FireWire devices only)
Meter Menu
Button
Averaged
Loads
The UAD Meter window elements
Title Bar
The Title Bar (the strip across the top of the UAD Meter window) contains buttons to quit
the UAD Meter & Control panel application, minimize the UAD Meter window, and access
the Meter Menu.
Note: The Quit, Minimize, and Menu button positions shown above are as they
appear on Mac systems. These button positions are reversed on Windows systems,
reflecting the OS conventions.
Plug-Ins Panel Button
Clicking this button opens the Plug-Ins Panel. It has the same function as selecting
“Plug-Ins...” from the Control Panel drop menu.
Resource Meters
UAD resource loads are displayed in the UAD Meter window. Loads are constantly
updated, even when the UAD Meter is not the foreground application. This allows you to
monitor UAD loads as needed, for example when deciding which UAD plug-ins to load,
based upon how much DSP is available.
The UAD resources are displayed as bar graphs and as percentages.
Averaged Loads
The load for each meter represents the average for all UAD devices in use. For example,
if one UAD-2 QUAD is installed, the UAD-2 DSP load is an average of the four SHARC
DSP processors on the QUAD. If two UAD-2 QUADs are installed, then the eight
processors are averaged.
UAD System Manual UAD Meter & Control Panel 38
Page 39

Individual Loads
The loads of individual devices in a multi-device setup (or the individual DSP loads in a
multi-DSP UAD-2 device) can be viewed in the System Information Panel.
DSP
The DSP meters display the amount of digital signal processing resources that are being
used by the UAD plug-in algorithms. DSP is the primary hardware “juice” that powers
the algorithms. When UAD plug-ins are disabled in the host, DSP requirements are
decreased.
PGM (Program Memory)
This resource shows how much UAD-2 program memory is in use. Program memory is an
on-chip memory that is specific to the UAD-2 DSP processor(s) and is used for certain
UAD plug-in resources.
Each unique UAD-2 plug-in uses a bit of program memory. If many different UAD-2
plug-ins are loaded simultaneously, it is possible for this resource to run out before DSP
overload occurs. Conversely, program memory is shared by the same plug-in, so multiple
instances of the same plug-in may not increase the program memory load. These factors
are considered by the automatic UAD-2 load balancing routines.
MEM (RAM Memory)
The Memory meters indicate the percentage of UAD random access memory that is
currently in use. It indicates the total available UAD RAM available, regardless of the
number of DSP processors that are installed.
Memory is used for echo, delay lines, reverb, and similar spatial processing. When UAD
plug-ins are disabled but not unloaded, memory requirements are not decreased. In this
case, the memory remains loaded so that reverb tails and delay lines are not cut off when
the plug-in is disabled (if supported by the host).
FBW (FireWire Bandwidth)
This meter reflects the FireWire bus bandwidth currently used by UAD-2 Satellite
FireWire, Apollo FireWire, and all other FireWire peripheral devices (e.g., all FireWire
audio interfaces and FireWire hard drives).
Note: The FBW meter is visible only when a UAD FireWire device is connected to
the system.
UAD System Manual UAD Meter & Control Panel 39
Page 40
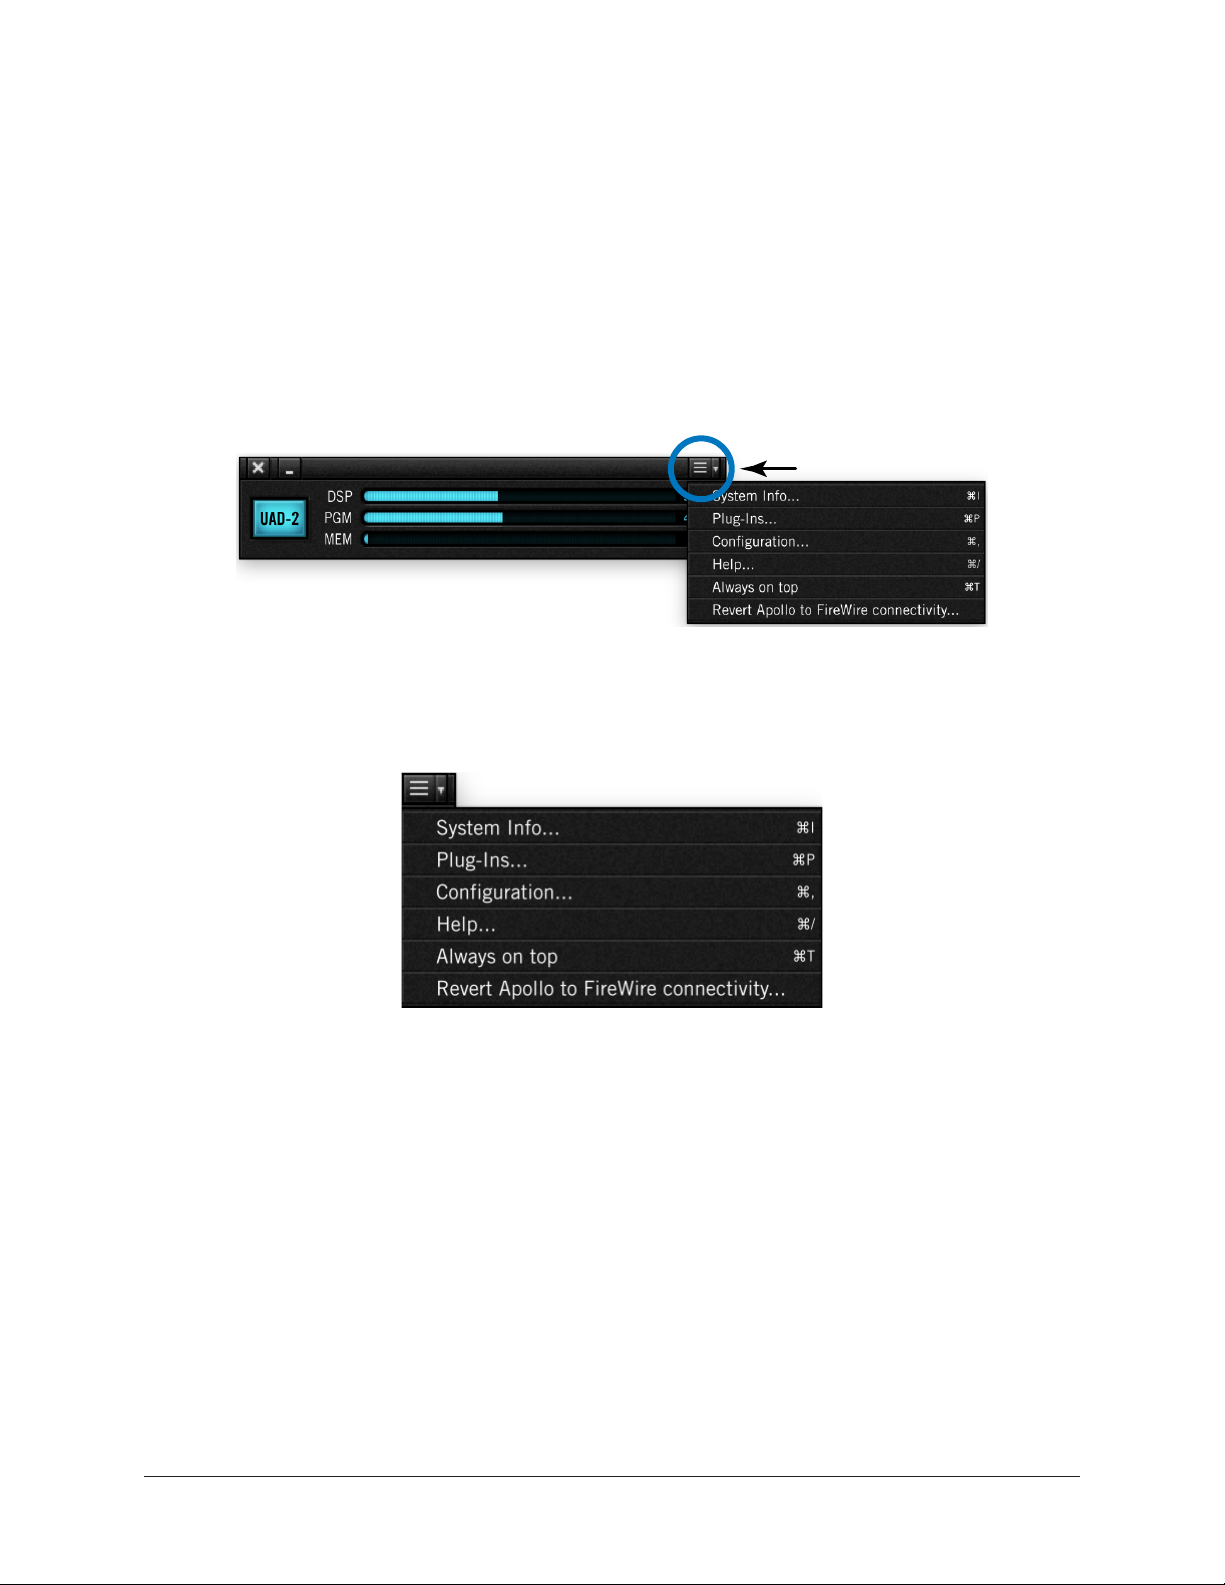
Meter Menu
The Meter Menu can be used to access the UAD Control Panels and other functions. To
view the Meter Menu, click the menu button in the UAD Meter window title bar as shown
below. After clicking the menu button, the available functions are listed in the drop
menu. To execute a function, select it from the menu.
Note: The items that appear in the Meter Menu can vary depending on the active
system configuration. For example, the FireWire menu item only appears if a UAD
FireWire device is connected.
Click Menu Button
Accessing the Meter Menu
Meter Menu functions
Control Panels
The UAD Control Panels (System Info, Plug-Ins, Configuration, FireWire, Help) can be
accessed by selecting them from the Meter Menu.
Tip: The UAD Control Panels can also be accessed by using the keyboard
shortcuts listed in the Meter Menu.
UAD System Manual UAD Meter & Control Panel 40
Page 41

Always On Top
The UAD Meter & Control Panel windows can be set to either normal or Always on top
view modes.
Always on top mode
In this mode, the UAD Meter and UAD Control Panel windows always float on top of other
windows, even when other applications are in the foreground.
To enable Always on top mode, click the Meter Menu button in the UAD Meter window
title bar and select Always on top from the drop menu. Always on top is active when a
check mark appears next to the item in the menu.
Tip: The Always on top setting can be toggled by using the keyboard shortcut
listed in the Meter Menu.
Normal mode
In this mode, the UAD Meter and UAD Control Panel windows are covered by the
windows of the foreground application. Normal mode is active when the Always on top
menu item is unchecked.
Revert to FireWire connectivity...
This menu function restores FireWire connectivity to Apollo FireWire models that have
been updated with Thunderbolt firmware.
To change the Apollo firmware from Thunderbolt to FireWire, select this item from the
Meter Menu, then follow the on-screen instructions.
Note: This function only appears when an Apollo or Apollo 16 FireWire unit (silver
rack models only) is equipped with the Thunderbolt Option Card, the unit is
connected to the computer via Thunderbolt, and Thunderbolt firmware is installed
in the unit.
UAD System Manual UAD Meter & Control Panel 41
Page 42

UAD Control Panels
The UAD Control Panels are where detailed system information is displayed and global
UAD plug-in settings are modified. The main UAD Control panel window has up to five
panels, organized into similar areas of functionality: System Information, Plug-Ins,
Configuration, FireWire, and Help.
Accessing the Control Panels
The UAD Control Panel window is accessed from the UAD Meter window. To open the
Control Panel, click the menu button in the UAD Meter window title bar as shown below.
After clicking the menu button, the available functions are listed in the drop menu.
Tip: The Plug-Ins panel can also be accessed by clicking the blue Plug-Ins Panel
Button labeled “UAD-2.”
Tip: The UAD Control Panels can also be accessed by using the keyboard
shortcuts listed in the Meter Menu.
Click Menu Button
Control Panel drop menu
When the main UAD Control Panel window is open, the individual window panels are
accessed by clicking the title buttons at the top of the Control Panels window, as shown
below, or typing the keyboard shortcuts shown in the Control Panel drip menu.
Control Panel selector buttons
Note: The FireWire button is only displayed if a UAD FireWire device is connected.
UAD System Manual UAD Meter & Control Panel 42
Page 43

System Information Panel
The System Information panel displays detailed UAD software and hardware information
and contains several useful buttons. Refer to the screenshot below for parameter
descriptions in this section.
Software Section
Version String
The currently installed UAD Powered Plug-Ins software version is displayed here.
Check for Updates
This button checks the Universal Audio web servers for a newer version of the UAD
software. Running the latest version of UAD Powered Plug-Ins is recommended for
maximum stability and the latest features, such as new plug-ins.
UAD System Manual UAD Meter & Control Panel 43
Page 44

Plug-In Latency Section
UAD plug-in latency is displayed here. The calculation is based on the audio I/O
interface buffer size and the sample rate. The window uses this information to calculate
and display the resulting latency in samples and milliseconds.
Note: Displayed latency does not reflect the actual lowered latency value when
LiveTrack Mode is active, nor Apollo’s Realtime UAD Processing via Console.
The displayed latency is the audio I/O interface buffer size when Extra Buffering is off.
When Extra Buffering is on, the displayed latency is the audio I/O interface buffer size
plus 64 samples.
Note: The displayed sample latency number does not include the extra samples
produced by UAD plug-ins with additional latency. For more detailed information
about the extra samples and latency, see Latency & Delay Compensation.
Hardware Section
Detailed information about each UAD device and its DSP is displayed in the Hardware
area. If you have several devices installed, use the scrollbar to see the other devices.
Device Status
For each installed device, a small picture of the hardware and its status is displayed.
When the device displays Status: OK the hardware is operating properly. The total
number of UAD plug-ins loaded on each device is also displayed here.
Device Enabled
Individual UAD devices can be disabled using the Device Enabled button. This
can be useful, for example, if creating a session on a system with multiple
devices that will be transferred to a system with fewer devices or to streamline
the performance of the host system when multiple devices are not needed.
Click the button to disable an individual device. The device is enabled when
the button is blue. For additional information regarding multi-device use, see
Multiple UAD Devices.
Devices remain disabled only while the UAD Meter & Control Panel application is open.
When the UAD Meter & Control Panel is quit, disabled devices are re-enabled.
Note: Disabling devices does not disable plug-ins already running on the device; it
only prevents additional plug-ins from being loaded onto it.
Important: For optimum results, quit any host applications using UAD plug-ins
before disabling/enabling devices.
UAD System Manual UAD Meter & Control Panel 44
Page 45

DSP Load
If more than one UAD DSP is installed, information for each of the processors is
displayed. DSP, Program (PGM), and Memory (MEM) loads are displayed as a percentage
of total available load for that processor. The number of UAD plug-ins (PLG) running on
each individual processor is also displayed.
Save Detailed System Profile
Clicking this button will generate a detailed UAD system profile and prompt you for a
location to save the text file to disk. This file contains an even greater level of detail than
the System Information panel, which can be useful for troubleshooting or if UA Customer
Support requests this document when providing assistance.
The profile lists the version strings of the individual UAD software components, installed
device type(s) with serial and hardware ID numbers, host computer information, and
detailed authorization status for all UAD plug-ins.
UAD System Manual UAD Meter & Control Panel 45
Page 46

Plug-Ins Panel
The Plug-Ins panel displays the current authorization status of all UAD plug-ins. This is
also where you can activate plug-in Demo Mode and configure UAD plug-ins to run on a
specific device. Use the scrollbar to view plug-ins that are not visible in the list. Refer to
the screenshot below for parameter descriptions in this section.
Authorize Plug-ins button
This button links directly to your account at the UA online store to
automatically authorize licensed UAD plug-ins.
Note: Click this button whenever you buy a plug-in in the UA online store to claim
your plug-in authorizations.
The complete procedure for UAD device authorization is detailed in UAD Installation. If
the UAD computer is not connected to the internet, see the Offline Authorization.
Important: UAD plug-ins require authorization before they can be used. For
detailed information, see the Authorization Procedure.
Plug-In Column
All currently installed UAD plug-ins are displayed in the Plug-In column. Use the scroll
bars to view the entire list if necessary. Plug-Ins are listed in order of release date, with
newest plug-ins at the top of the list.
UAD System Manual UAD Meter & Control Panel 46
Page 47

Status Column
The Status column reflects the current state of each UAD plug-in. After authorization,
the status will show one of the following:
Authorized for devices
When the plug-in is licensed and authorized to run on all devices in the system
“Authorized for all devices” is displayed in white text.
When a plug-in is licensed but not all devices in a multi-device system are authorized
with the license, the Status column indicates which of the devices is authorized (for
example, “Authorized for device 1 only”).
Start Demo
The demo period has not been started for the plug-in. Click the START DEMO button to
begin the 14-day trial period.
UAD plug-in demo periods can also be initiated by the START DEMO button in the UAD
Toolbar in the plug-in window. See Demo Mode for detailed information.
Important: The 14-day demo period can only be activated once, and cannot be
stopped or restarted during this period. Don’t activate demo mode unless you have
adequate time to thoroughly evaluate its sound and functionality.
Demo Active (days remaining)
If the 14-day trial period has been activated but is not yet expired, the number of days
remaining is displayed here in green text.
Demo Expired
If the 14-day trial period has ended, DEMO EXPIRED is displayed here in red text.
Help Column
Clicking the Help button (“?”) opens a link to the plug-in product page at the UA
online store.
Buy Column
Clicking the Buy button (“$”) adds the plug-in to your shopping cart at the UA
online store. See the Purchase Procedure for details. This button does not appear
if the plug-in is already licensed.
Tip: The BUY button provides a quick visual reference to determine which plug-ins
are licensed.
UAD System Manual UAD Meter & Control Panel 47
Page 48

Configuration Panel
The UAD Configuration Panel is where most of the global UAD settings and preferences
are specified for all UAD devices. Refer to the screenshot below for parameter
descriptions in this section.
The parameters that are displayed in the Configuration Panel depend on the UAD
hardware that is currently installed and the OS platform (Windows or Mac). For example,
if you have only UAD devices installed in a Windows system, you will not see Macspecific parameters.
Note: All UAD parameters apply to UAD-2 PCIe cards, UAD-2 SOLO/Laptop,
UAD-2 Satellite, and Apollo unless otherwise noted.
UAD System Manual UAD Meter & Control Panel 48
Page 49

UAD-2 DSP Settings
Overview
Without UAD Powered Plug-Ins installed, overloading the host system with native (host
based) plug-ins can cause dropouts and possibly system lockup. Steinberg hosts, for
example, provide a switch that allows you to trade latency for stability when the system
is overloaded. Similarly, the UAD DSP load cannot exceed 100% without unpredictable
behavior.
With the Limit DSP Load feature, the UAD DSP can also be limited so the load cannot
exceed 100%, thereby increasing overall system stability in high load situations. With
very heavy UAD loads, DSP load limiting may also improve host CPU performance.
There are many variables that affect DSP load (sample rate, I/O buffer size, parameter
values, mono/stereo, automation, host system, etc). Although these variables are taken
into account, the resulting measurement cannot be absolutely accurate. This is due
to variations in system configurations, including PCIe bus loading which is impossible
to predict. Systems that are heavily loaded due to the presence of other devices or
suboptimal configuration may cause additional DSP loading that cannot be predicted by
the UAD plug-in load calculator. The DSP load limit should be reduced in this case.
It is possible for certain (non-typical) conditions to be met where another UAD plug-in
can’t be added, even when the UAD Meter says you should have DSP available when
compared to the DSP Load Limit value.
Note: When Limit DSP Load is enabled and the DSP load limit is exceeded when
instantiating a new UAD plug-in, an overload message will appear and the plugin’s Toolbar will display DISABLED. In this case, even though the plug-in loads, it
will not process audio.
Limit DSP Load
This setting determines the maximum UAD DSP load. If performance issues such as
overloads, dropouts, stuttering, and/or other artifacts persist, change the UAD DSP load
value by clicking the triangles to the right of the percentage display.
UAD-2 DSP load limiting is always on. 100% (the default value) is the maximum
available setting.
DSP LoadLock
DSP LoadLock reserves the maximum UAD-2 DSP load required by each plug-in, even
if certain plug-in features are disabled. This ensures there will always be enough DSP
if those features are later enabled, or when automating parameters that affect the DSP
load.
Disabling LoadLock increases available UAD-2 DSP by turning off unused features in
certain plug-ins, but may cause problems with previously saved sessions that had all
plug-in features enabled, or when automating parameters that affect the DSP load.
UAD System Manual UAD Meter & Control Panel 49
Page 50

Enabling DSP LoadLock is recommended for optimum performance. Disable LoadLock
when you need to squeeze in that extra bit of DSP resources.
Note: Changes to this setting do not take effect until all open sessions containing
UAD plug-ins are reloaded.
Extra Buffering
Extra Buffering adds an additional 64 samples of buffering for increased host application
compatibility. DAWs that are known to require Extra Buffering include Cakewalk SONAR,
Cockos REAPER, and Sony Vegas/Acid/Soundforge.
In other hosts, you can disable this mode to reduce latency. If your application is
incompatible with reduced latency when Extra Buffering is off, a dialog will be displayed
indicating that Extra Buffering is required.
Note: Changes to this setting do not take effect until all open sessions containing
UAD plug-ins are closed.
Host Compatibility Settings
Release all DSP resources on Audio Unit bypass (Mac only)
Some Audio Unit hosts dynamically bypass plug-ins when they are not being used during
playback, for example when no audio is present at the current playback position. During
this dynamic bypassing, UAD plug-ins stay loaded on the device, which reduces glitches
in playback.
This setting affects the Audio Units platform only. Checking the option will unload UAD
plug-ins from the device during dynamic bypassing. When the option is checked, UAD
DSP use may be reduced during dynamic bypassing, but the possibility of artifacts
during playback is increased.
Note: Changes to this setting do not take effect until all open sessions containing
UAD plug-ins are closed.
UAD System Manual UAD Meter & Control Panel 50
Page 51

Force Logic to use “live mode” for tracks with UAD plug-ins (Mac only)
When UAD plug-ins and Logic 7.2.1 (and higher) are used together and this setting
is checked, all Logic tracks with UAD plug-ins are forced into Logic’s “live mode”
and latency is reduced. Reduced latency is useful for tracking when Logic’s Software
Monitoring feature is active.
Important: This setting should be enabled only when using UAD-2 PCIe cards,
UAD-2 Satellite Thunderbolt, UAD-2 Satellite USB, and/or when Apollo is
connected via Thunderbolt. Do not enable this setting when using UAD-2 Satellite
FireWire or when Apollo is connected via FireWire.
When this setting is active, UAD latency is the same as the hardware interface I/O buffer.
In Logic versions prior to 7.2.1 (and later versions when live mode is disabled), UAD
latency is determined by the larger of the audio interface hardware I/O buffer size and
the Process Buffer Range setting within Logic.
When Logic’s “live mode” is inactive and this setting is not enabled, the minimum
Process Buffer Range setting (“Small”) in Logic corresponds to 512 samples, meaning
the minimum possible UAD latency is 512 samples for UAD-2 (the current latency is
displayed in the UAD Meter System Information panel). Latency can be further reduced
by using LiveTrack Mode (UAD-2 PCIe, UAD-2 Satellite Thunderbolt, and Apollo
Thunderbolt only).
Note: Logic’s “live mode” is unrelated to UAD-2’s LiveTrack Mode.
On multi-processor machines, Logic’s “live mode” forces all plug-ins on tracks with UAD
plug-ins (and any aux/buses fed by those tracks) to run on one processor only. To allow
host-based (native) plug-ins to run on all processors under these conditions, deactivate
this setting.
Note: Changes to this setting do not take effect until all open sessions containing
UAD plug-ins are closed.
User Interface Settings
Controls Mode
This setting determines how UAD plug-in parameter knobs respond to adjustment. Three
control modes are offered: Circular, Relative Circular, and Linear. Select the desired
mode from the drop menu.
Tip: To increase resolution when in adjusting rotary controls in circular and relative
circular modes, increase the radius of the mouse relative to the knob while
dragging (move the mouse farther away from the knob while dragging in a circular
motion).
Linear (slider)
In Linear mode, the knob is adjusted by dragging horizontally or vertically instead of by
rotating. This behavior is similar to moving a fader or other slider control.
UAD System Manual UAD Meter & Control Panel 51
Page 52

Circular (jump)
In Circular mode, the software knobs behave like physical rotary knobs. Values are
changed by clicking on the knob then rotating in a circular direction. When the edge of
the knob is clicked, the parameter value instantly jumps to the mouse position.
Relative Circular (grab)
Relative Circular mode operates similar to Circular mode, but the knob value does not
jump to the mouse position when clicked. Instead, the knob value is modified relative to
its original value.
In this mode you can click anywhere on the knob to make an adjustment originating at
the original value (it’s not necessary to click on the current knob position).
Use Host Setting
When Use Host Setting is checked, the control mode that is set within the host
application preferences is used (if this feature is supported by the host). This setting
forces the host to override the control mode set in the UAD user interface settings.
Note: When Use Host Setting is checked, the UAD Meter user interface settings
have no effect unless control mode is NOT supported by the host.
Toggle initial value modifier (Mac only)
Holding the specified modifier key while clicking a parameter control will toggle between
the value of the control when the editor was opened and its last edited value. This
feature is not supported under Windows.
This parameter also affects the “select + click” modifier. See Shortcuts for a complete
list of keyboard shortcuts.
Automatically send usage statistics to Universal Audio
Enabling this option helps make UAD software better. If checked, statistics will be
periodically sent to Universal Audio in the interest of product improvement. These
statistics are minimal, and do not impact your system performance. If this box is
unchecked, statistics are not sent.
Info Display
This area displays helpful text about parameters in the Configuration panel. Hover the
mouse over a Configuration setting to view the informational text.
UAD System Manual UAD Meter & Control Panel 52
Page 53
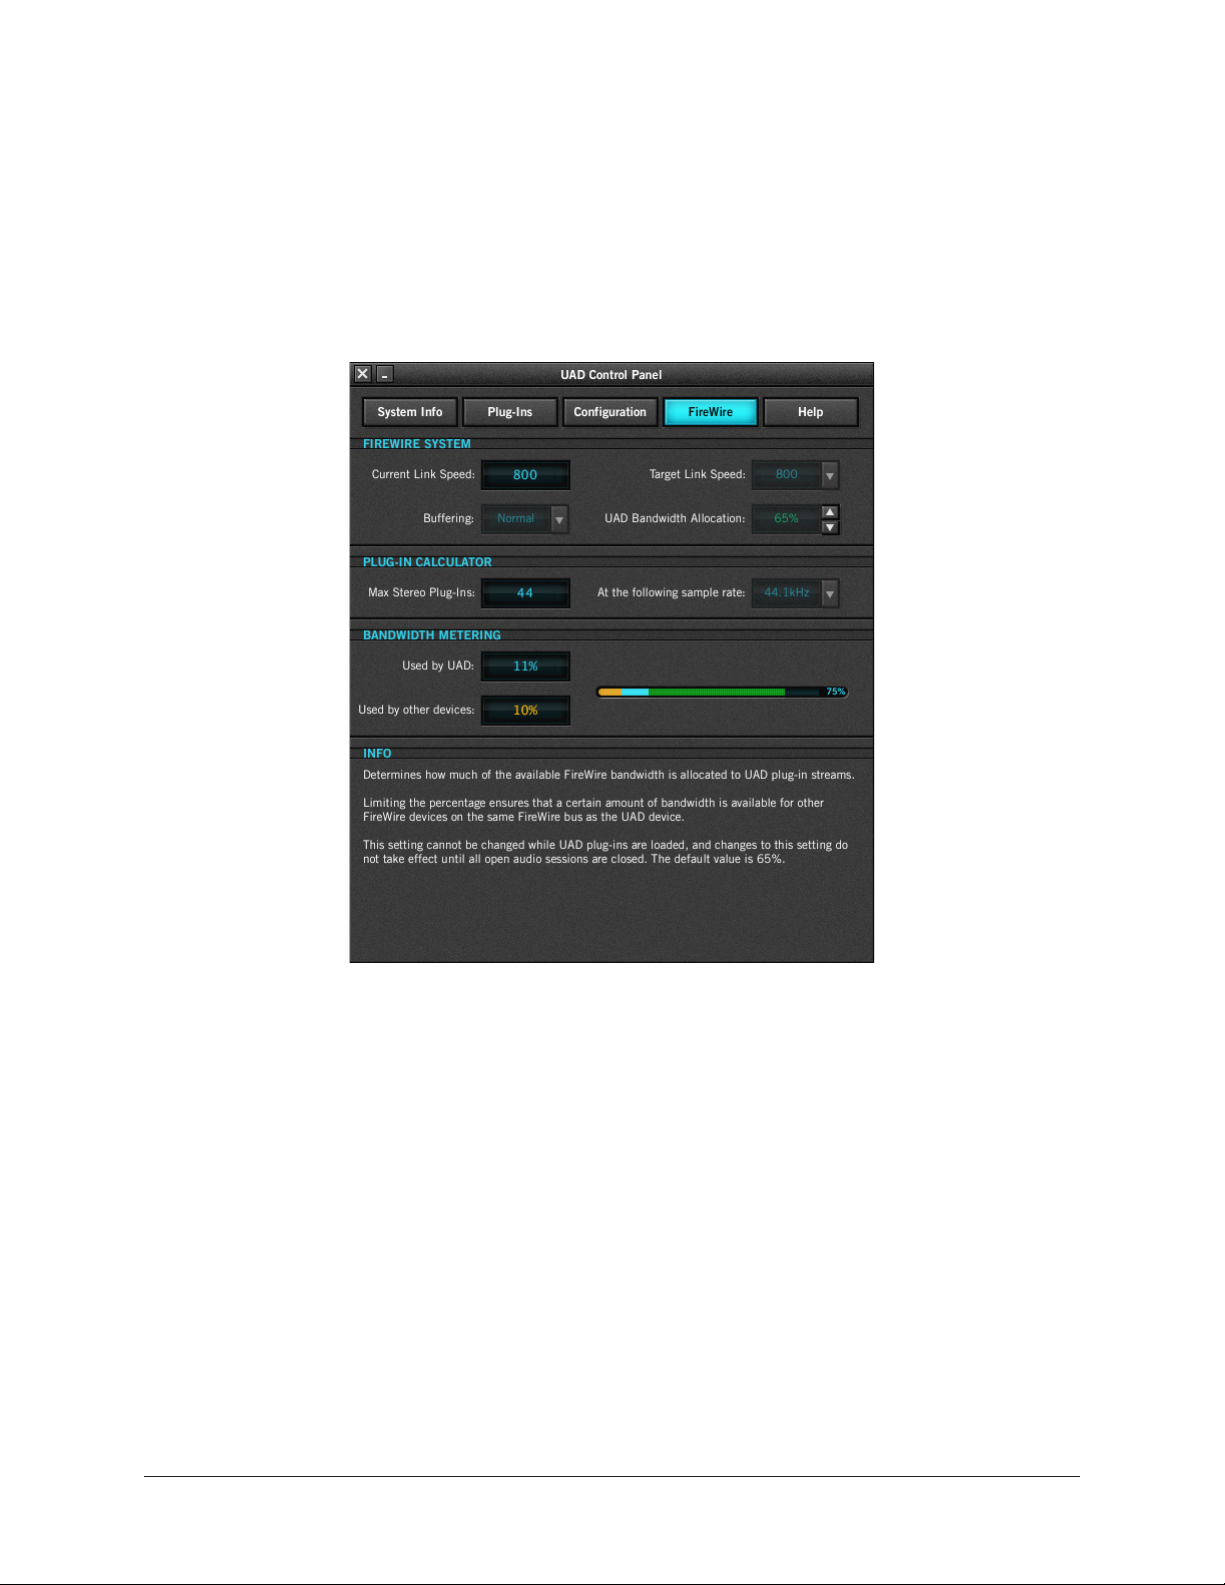
FireWire Panel
Settings specific to UAD FireWire devices (UAD-2 Satellite FireWire and Apollo interfaces
connected via FireWire) are configured in the FireWire Panel. Refer to the screenshot
below for parameter descriptions in this panel.
Note: The FireWire Panel is only displayed when a UAD FireWire device is
connected.
FireWire System Settings
The FireWire System parameters affect the configuration of the FireWire bus. These
settings affect UAD-2 Satellite FireWire performance and can also affect FireWire audio
interfaces (such as Apollo, when connected via FireWire) and hard drive performance if
they are connected to the same FireWire bus.
Note: The FireWire System settings cannot be changed when UAD plug-ins are
loaded. Quit all UAD plug-in host software to make changes to these settings.
The primary function of the FireWire System settings is to reduce the UAD FireWire
bandwidth allocation and/or link speed when other FireWire devices are on the same bus,
or if other performance issues arise.
Important: FireWire device connection methods can affect the FireWire bus speed.
For details, see FireWire Bandwidth.
UAD System Manual UAD Meter & Control Panel 53
Page 54
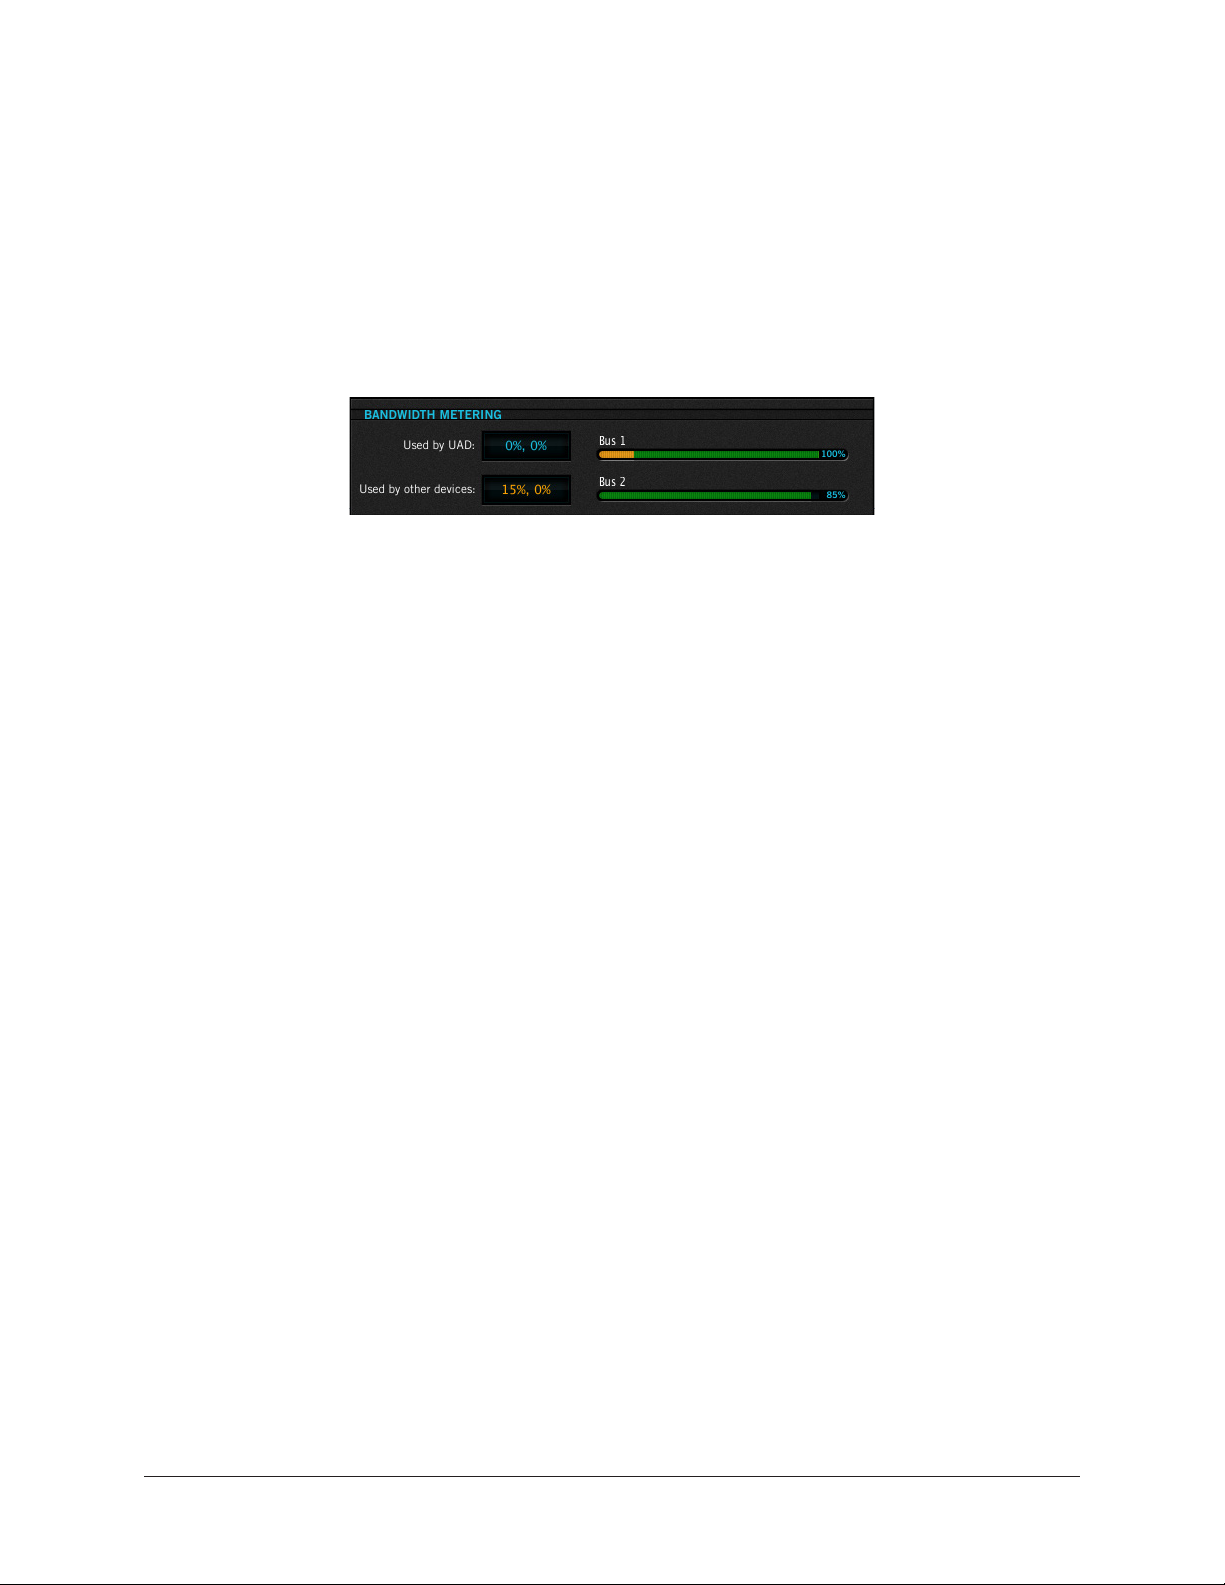
For more information about FireWire and using it with UAD-2 Satellite and Apollo, see
FireWire Basics, FireWire Bandwidth vs. UAD DSP, and FireWire Bus Power.
Current Link Speed
The current speed of the FireWire link between the host computer and UAD FireWire
devices is displayed here. The active link speed can be changed with the Target Link
Speed control if FW400 and FW800 are both supported by the host system.
If the host computer has multiple FireWire buses (this is rare), up to two speeds will be
displayed, with the values separated by a comma.
Note: If the host computer supports FireWire 800 and the Target Link Speed is
set to 800, but the Current Link Speed still displays 400, check the bus ordering
of the FireWire devices. See for information on how to properly combine FireWire
400 and FireWire 800 devices on the same bus.
Target Link Speed
The desired speed of the FireWire link between the host computer and the UAD FireWire
device is set here (the actual link speed is shown in the Current Link Speed display). To
change the value, click the down arrow to display the drop menu, then select the desired
value. The setting cannot be changed when UAD plug-ins are loaded.
Note: The Target Link Speed is fixed at FW800 on Windows systems.
Target Link Speed should be set to 800 when supported by the host computer. However,
some FireWire devices may not always perform flawlessly. Changing the Target Link
Speed to 400 may actually improve performance and/or stability on systems not
optimized for FireWire 800 operation.
Tip: Twice as many UAD plug-ins can be run at FireWire 800 versus 400, so
configure the FireWire system to run at 800 if supported by the computer.
Buffering (Mac)
The buffering mode adjusts overall FireWire performance. Normal is the default value
and has less latency than Safeguard mode. Set to Safeguard if host CPU spikes occur
when using UAD plug-ins that have high DSP requirements.
UAD Bandwidth Allocation
This parameter determines how much of the total available FireWire bus bandwidth will
be reserved for UAD plug-ins on UAD FireWire devices. Limiting the bandwidth used
by UAD FireWire devices ensures that other FireWire devices on the same bus will have
enough bandwidth to function properly.
UAD System Manual UAD Meter & Control Panel 54
Page 55

To change the value, either a) click the increment/decrement arrows, b) click/hold the
current target value to display a drop menu, or c) double-click the value for direct text
entry. The maximum available value is 85%.
Note: The value cannot be changed when UAD plug-ins are loaded.
Although the amount of FireWire bandwidth reserved by UAD FireWire devices depends
on the UAD Bandwidth Allocation setting, the amount of DSP used by any UAD plug-in
does not affect FireWire bandwidth (UAD plug-ins that use very little DSP require the
same FireWire bandwidth as DSP-intensive UAD plug-ins). See FireWire Bandwidth vs.
UAD DSP for details.
Important: To avoid UAD authorization errors, set the UAD Bandwidth Allocation
so the FireWire Bandwidth (FBW) gauge in the UAD Meter displays less than
100%.
It is important to note that all devices on the FireWire bus share the available data
bandwidth of the bus, including hard drives and audio interfaces as well as UAD FireWire
devices. Therefore all of the bandwidth cannot be allocated for UAD use if FireWire hard
drives and/or FireWire audio interfaces are on the same bus. See FireWire Bandwidth for
additional information.
Important: FireWire bandwidth increases proportionally as the system sample
rate is increased (higher sample rates require more FireWire bandwidth). Before
increasing the sample rate, the UAD Bandwidth Allocation may need to be
reduced accordingly to prevent audio dropouts.
To determine the proper value for the UAD Bandwidth Allocation:
1. Connect and power on all FireWire devices (host computer, audio interfaces, hard
drives, UAD-2 Satellite FireWire) on the FireWire bus.
2. If running an audio interface on the FireWire bus, ensure the audio interface
drivers are installed and configured correctly (specifically, all the audio inputs and
outputs that will be used should be enabled).
3. Run the host DAW software (but DO NOT run any UAD plug-ins) at the HIGHEST
SAMPLE RATE that will be used in the session (the sample rate may be reduced
after UAD Bandwidth Allocation is set).
4. View Used by other devices in the Bandwidth Metering section of the FireWire
Meter when UAD plug-ins are NOT running. The value indicated in orange is the
percentage of FireWire bandwidth that is used by audio interface I/O streams.
5. Subtract the Used by other devices percentage from 100% and enter the
difference as the UAD Bandwidth Allocation.
6. If you are using FireWire hard drives for audio session data on the same bus, the
UAD Bandwidth Allocation will need to be reduced to accommodate the FireWire
hard drive use.
UAD System Manual UAD Meter & Control Panel 55
Page 56

UAD Bandwidth Allocation Example
If all the FireWire devices on the bus except UAD-2 Satellite FireWire use 20% of the
available FireWire bandwidth (from steps 1 through 4 above), enter 80% as the UAD
Bandwidth Allocation (100% – 20% = 80%).
Tip: If FireWire performance issues occur, leave a bit of unused FireWire
bandwidth as headroom, so the total use for all devices is less than 100%. To
leave 5% of the bandwidth available for headroom in the example above, you’d
enter 75% for UAD Bandwidth Allocation (20% bandwidth without UAD-2
Satellite + 75% for UAD-2 Satellite = 95% total FireWire bandwidth). This is
especially applicable if using FireWire hard drives on the same bus for audio
session data.
Plug-In Calculator
The Plug-In Calculator displays the maximum number of stereo UAD plug-ins that can be
run on UAD FireWire devices with the current FireWire System Settings at a given sample
rate.
Note: The Plug-In Calculator is for informational purposes only; it does not affect
UAD FireWire or DSP performance in any way.
Max Stereo Plug-Ins
The maximum number of stereo UAD plug-ins that can run on UAD FireWire Devices,
based on the FireWire System Settings and an entered session sample rate, is displayed
here. The number changes if/when session sample rate changes.
The UAD instantiation count at the current settings could exceed this number If used in
true mono configurations. Note that some DAWs use stereo plug-in processing even when
used on a mono audio file.
At the following sample rate
This parameter selects the sample rate used by the Plug-In Calculator. To change the
value, click the down arrow to display the drop menu, then select the desired value from
the menu.
When a UAD plug-in is loaded by the host software, the session sample rate is entered
automatically. In this scenario, the parameter cannot be modified until the host is quit.
Note: The “At the following sample rate” parameter is only used by the PlugIn Calculator; it does not affect the sample rate of the UAD system or the host
software.
UAD System Manual UAD Meter & Control Panel 56
Page 57
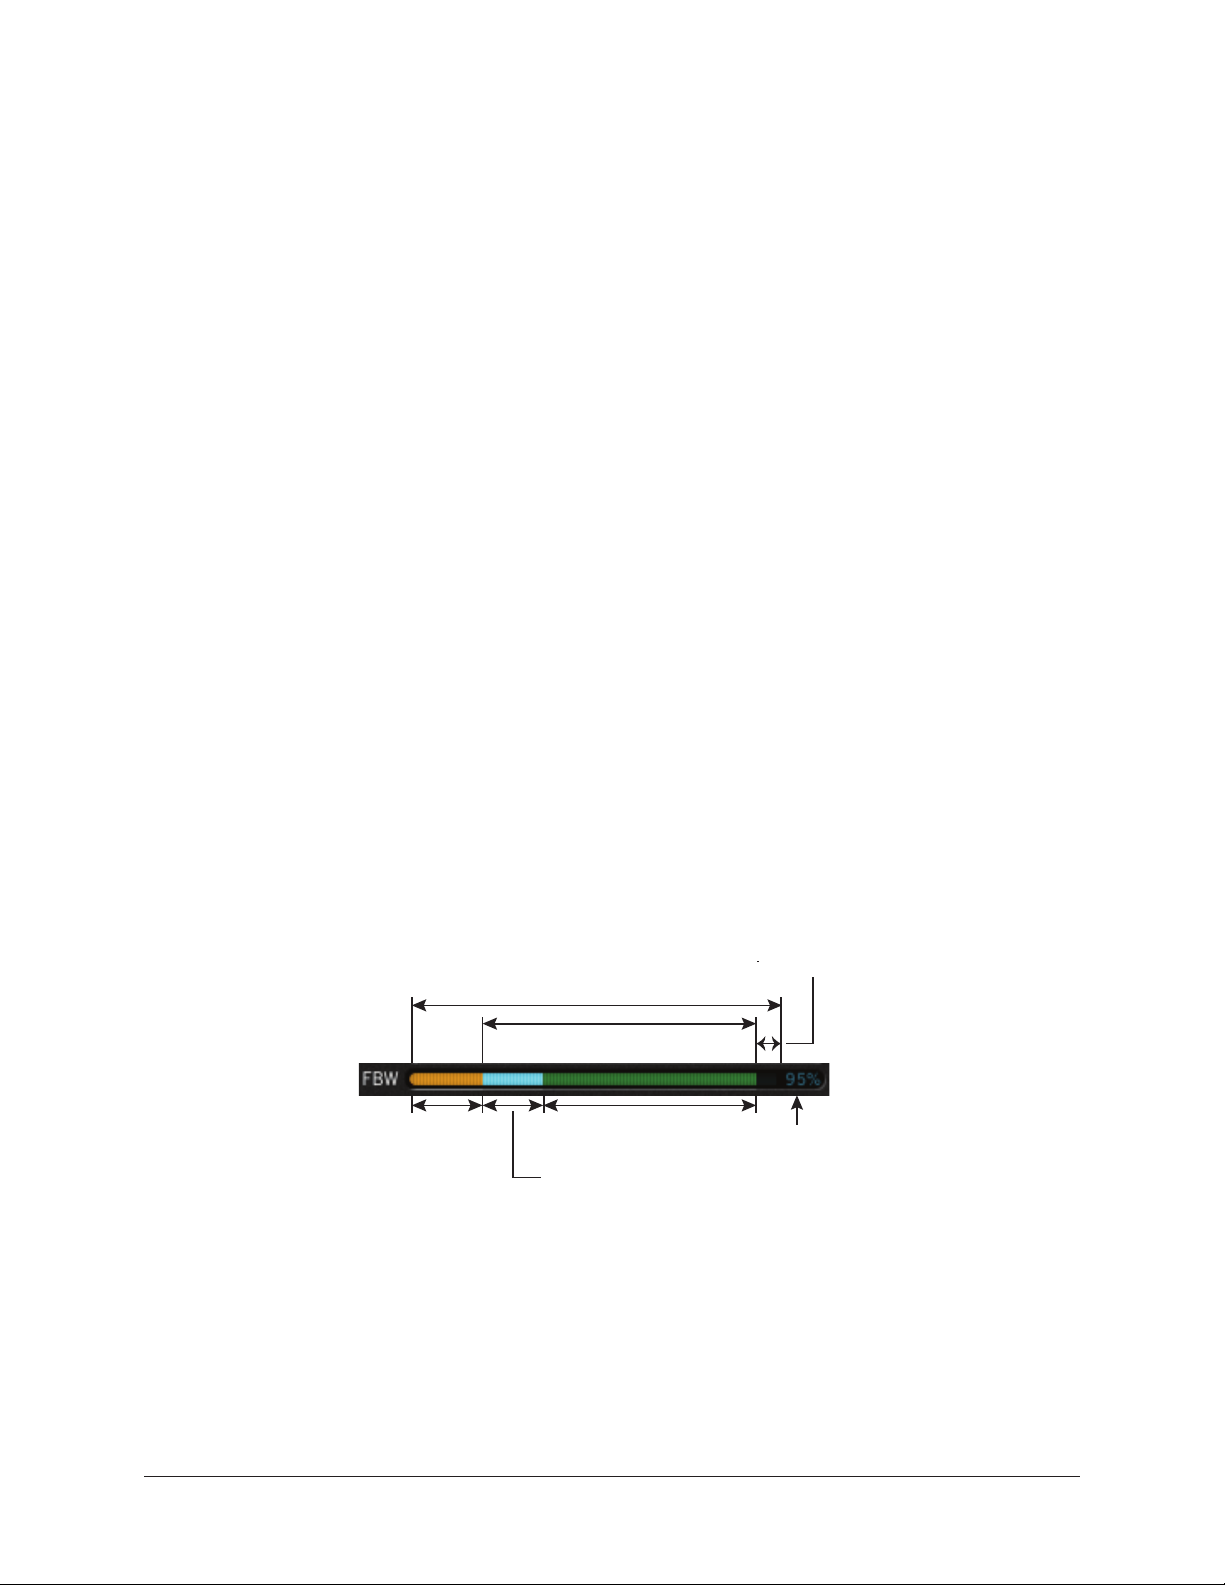
Bandwidth Metering
Bandwidth Metering pertains to the FireWire bus that UAD FireWire devices are attached
to. The items displayed in this area are for informational purposes only; there are no
settings here that can be changed.
If the host computer has multiple FireWire buses (this is rare), up to two bandwidth
meters will be displayed, one for each bus.
Used by UAD
This number displays the percentage of FireWire bus bandwidth that is used by UAD
plug-ins running on UAD FireWire devices. The number cannot exceed the value set by
the UAD Bandwidth Allocation parameter.
Used by other devices
This number displays the percentage of FireWire bus bandwidth that is used by all
FireWire audio interface I/O devices connected to the bus (including Apollo). The number
is used to help determine an optimum value for the UAD Bandwidth Allocation.
FireWire Meter
The FireWire Bandwidth (FBW) meter, illustrated below, reflects the FireWire bus
bandwidth currently used by UAD FireWire devices and all other FireWire peripheral
devices (e.g., audio interfaces and hard drives).
The meter graphically displays the UAD Bandwidth Allocation (green), the bandwidth
used by active UAD plug-ins (blue), bandwidth used by FireWire audio interface I/O
streams (orange), and bandwidth available for FireWire hard drives (black).
Tip: The FireWire meter in the FireWire control panel is also displayed in the main
UAD Meter window when UAD FireWire devices are connected.
Available FW bandwidth (headroom)
Total available Firewire bus bandwidth
UAD Bandwidth Allocation
(blue + green)
Used by
other devices
(orange)
Available for UAD
Used by
UAD (blue)
(green)
Total allocated
bandwidth
(UAD + other
devices)
FireWire meter elements
Important: FireWire bandwidth is unrelated to UAD DSP loads. See FireWire
Bandwidth vs. UAD DSP for details.
Info Display
This area displays helpful text about parameters in the FireWire panel. Hover the mouse
over a FireWire setting to view the informational text.
UAD System Manual UAD Meter & Control Panel 57
Page 58

Help Panel
The Help & Support Resources panel (shown below) contains helpful buttons to help you
get the most out your UAD Powered Plug-Ins experience.
The button names are self-explanatory. Click a button to open its URL in the default web
browser. If the UAD computer isn’t online, much of the information is in the manual
you’re reading now; find it in the Table of Contents or the PDF reader’s search feature.
Product Manuals is the only button that doesn’t link to the internet. Instead, this button
opens the UAD Documentation folder containing all the product operation manuals. See
the UAD Documentation Overview for related information.
UAD System Manual UAD Meter & Control Panel 58
Page 59

Using UAD Plug-Ins
After the UAD hardware and software have been properly installed and configured, UAD
plug-ins are accessed and used just like any native (host-based) plug-in. All UAD plugins can run concurrently with each other and with native plug-ins simultaneously, in any
combination. Note that UAD plug-ins running at 96 kHz use twice as much UAD DSP
resources than those used at 48 kHz, and so forth.
Launching a UAD Plug-In
Each DAW application has its own particular methods for instantiating (inserting/
launching) a plug-in. Consult the DAW application documentation for specific
instructions on loading and using plug-ins with the application.
Cubase & Nuendo
Logic Pro
Launching a UAD plug-in in Steinberg Cubase and Nuendo
Launching a UAD plug-in in Apple Logic Pro
UAD System Manual Using UAD Plug-Ins 59
Page 60

The UAD Plug-In Interface
One typical UAD plug-in is shown below. The graphical user interface (GUI) typically
contains several control parameters for modifying the sound of the plug-in, and display
elements such as meters, for visual feedback. The UAD Toolbar (common to all UAD
plug-ins) is also displayed.
Typical interactive
control parameters
Typical display-only element
(not a control parameter)
UAD Toolbar
(common to all UAD plug-ins)
Typical UAD plug-in interface
Controls View
Some DAW applications have an alternate plug-in display mode feature called Controls
View, Parameter Mode, or similar terminology. This mode typically displays the control
parameters as a list with simple sliders, switches, and menus (the appearance is
controlled by the DAW), which some users may prefer. Consult the DAW documentation
for how to display this view.
Typical UAD plug-in showing controls view
UAD System Manual Using UAD Plug-Ins 60
Page 61

UAD Toolbar
The UAD Toolbar is located at the bottom of every UAD plug-in (when the plug-in is not
in Controls View). The UAD Toolbar has several useful features that make using UAD
plug-ins more convenient. Refer to the illustration below for control descriptions in this
section.
Status indicator
LiveTrack Mode switch
UAD Toolbar elements
Help drop menuPreset/Settings drop menu
Buy plug-in
UAD Presets and Settings
The current settings within a UAD plug-in can be saved to disk as a preset file. The
preset can then be subsequently loaded into another instance of the same UAD plug-in
title and/or shared with other users. Current UAD plug-in settings can also be copied and
pasted between instances of the same UAD plug-in title.
These functions are available via the UAD Preset/Settings Menu.
Note: UAD plug-in settings are saved within a project session file by the DAW
software, and settings are recalled when the project file is loaded. This occurs
automatically without using the UAD Preset/Settings Menu.
Additional Factory Presets
Many UAD plug-ins include additional factory presets that are not within the factory
bank (factory bank presets are accessed directly within the DAW). The additional factory
presets are automatically installed to the Default Preset Location.
To access the additional presets, use the Load Preset function in the UAD Preset/
Settings menu within the UAD Toolbar.
Preset/Settings Compatibility
Load/save and copy/paste of parameter values between the same UAD plug-in title is
allowed, as well as load/save/copy/paste between SE and standard plug-ins of the same
title (for example, between Neve 33609 and Neve 33609SE).
Note: Presets and settings between Legacy titles and their newer equivalents with
the same title are not compatible (e.g., Fairchild 670 Legacy and Fairchild 670).
UAD System Manual Using UAD Plug-Ins 61
Page 62

Load/Save Preset
UAD Preset/Settings Menu
The UAD Preset/Settings menu is used to load/save plug-in presets and
copy/paste plug-in settings. To access these functions, click the folder
icon in the UAD Toolbar, then select an item from the drop menu.
The Preset load/save features support presets but not banks. To load
and save banks, use the DAW’s bank management feature (if available).
When Load Preset or Save Preset is selected from the Preset/Settings Menu, the
standard operating system load/save file dialogs are presented. Preset files can then be
loaded (if the plug-in is the same type), or saved to any disk location.
Note: When using UAD plug-ins within Apollo’s Console application, the Presets
Manager within Console is recommended for managing presets (instead of the
UAD Toolbar) because of its improved functionality.
Copy/Paste Settings
Settings can copied and pasted directly between UAD plug-ins
(within the Preset/Settings Compatibility guidelines) without
using the interim step of creating a preset file.
To copy/paste settings between UAD plug-ins, select Copy
Settings from the drop menu of the source plug-in, then select
Paste Settings from the drop menu of the destination plug-in.
Note: If the menu displays “Cannot Paste Settings” then settings were not copied
first or the paste destination has incompatible settings.
Default Preset Location
When the load/save functions are used, the OS load/save file dialogs are automatically
directed to the default preset location. Although UAD presets can be loaded from (and
saved to) any disk location, using the default preset location automatically organizes all
your presets of the same UAD plug-in title within the same folder.
The Presets folder path below is the parent folder for all UAD plug-in presets. Within
the parent folder is a subfolder for each individual UAD plug-in title, and the subfolder
contains all the presets for that UAD plug-in.
Windows:
• C:\Program Files (x86)\Universal Audio\Powered Plugins\Presets
Mac:
• /Library/Application Support/Universal Audio/Presets
UAD System Manual Using UAD Plug-Ins 62
Page 63

Status Indicator
The Status indicator in the UAD Toolbar displays information about the current state of
the plug-in. Each state is described below.
Start Demo
When START DEMO is displayed, the 14-day trial period for the particular plug-in has
never been activated. Clicking this button will start the demonstration period (you can
also start the demo in the UAD Control Panel’s Status Column.
Important: The 14-day demo period can only be activated once, and cannot be
stopped or restarted during this period. Don’t activate demo mode unless you have
adequate time to thoroughly evaluate its sound and functionality.
Demo Active
After starting the demo, and when the plug-in is still within the active 14-day trial
period, the number of days remaining in demo mode is displayed here.
Disabled
When DISABLED is displayed in red, the plug-in will not process audio. This can occur
in two situations: either the demo period has expired (click the Buy button!), or the UAD
DSP is overloaded and there are not enough device resources to run the plug-in.
Status Blank
When no text is displayed in the Status area, the plug-in is licensed and operating
normally. In this state, the Buy button is not displayed.
Buy Button
When the plug-in is not licensed, the Buy button is displayed. If the computer is
connected to the internet, clicking Buy links to the UA online store so you can purchase
the license. See Buying UAD Plug-Ins for purchasing details.
Help Menu
The Help drop menu contains two convenient shortcuts. To select the
shortcuts, click the “?” icon in the UAD Toolbar, then a choose shortcut from
the drop menu.
Manual
This option opens the UAD Plug-Ins Manual, where all features and functions of all
individual UAD plug-ins are documented.
Web Info
This option opens the product page for the UAD plug-in on the Universal Audio website
(Internet connection required).
UAD System Manual Using UAD Plug-Ins 63
Page 64

LiveTrack Mode
LiveTrack Overview
LiveTrack Mode reduces latency on an active UAD plug-in to the lowest possible
amount. This feature is useful for monitoring UAD-processed audio when recording live
performances.
Reduced latency in LiveTrack Mode is accomplished by circumventing the standard
buffering processes. Normally, UAD signal data is buffered at the audio interface I/O
sample buffer size which results in a processing delay. In LiveTrack Mode, UAD signal
data is transferred and processed immediately instead of being buffered, resulting in
reduced latency.
LiveTrack Mode is available exclusively with UAD-2 devices that use PCIe, Thunderbolt,
and/or USB 3 as the connection protocol. LiveTrack is unavailable with UAD-2 FireWire
devices (UAD-2 Satellite FireWire and/or Apollo connected via FireWire). Additionally,
whenever any UAD-2 FireWire device is connected, LiveTrack Mode becomes unavailable
on all of the non-FireWire UAD-2 devices.
Note: LiveTrack Mode is unavailable on all UAD-2 devices whenever any UAD-2
FireWire device is connected to the system.
Increased Host Loading using LiveTrack
When LiveTrack is active, host CPU loading increases. The host load is directly
proportional to the DSP load of the UAD plug-in(s) in LiveTrack mode, however host CPU
is never used for UAD plug-in processing.
Extra Latency with LiveTrack
When Extra Buffering is enabled or when UAD Plug-Ins with Additional Latency are used
with LiveTrack, latency is increased. Extra Buffering adds 64 samples, and each plug-in
with additional latency using LiveTrack adds the value from the chart in the UAD PlugIns Manual.
Note: For more detailed information about latency and buffers, see Latency &
Delay Compensation
LiveTrack Activation
To activate LiveTrack Mode, click the microphone icon switch in the UAD
Toolbar. LiveTrack Mode is active when the mic icon is red.
LiveTrack Mode can be activated simultaneously on multiple UAD plug-ins.
However, host system CPU loads will increase with each LiveTrack Mode instance.
Note: The LiveTrack switch not available when UAD-2 Satellite FireWire and/or
Apollo FireWire are connected
UAD System Manual Using UAD Plug-Ins 64
Page 65

Adjusting Parameters
The parameter settings within each UAD plug-in can be adjusted to achieve a desired
sonic effect. Parameter values are easily modified by dragging sliders, rotating knobs,
clicking switches and buttons, or by selecting values in a drop menu. The functions of all
plug-in parameters are detailed in the UAD Plug-Ins Manual.
The parameter adjustment style can be Circular, Relative Circular, or Linear. For related
information, see User Interface Settings.
Tip: To increase resolution when adjusting rotary controls in circular and relative
circular modes, increase the radius of the mouse relative to the knob while dragging (i.e. move the mouse farther away from the knob while dragging).
Text Entry
Parameters that have a value display field can be modified directly with text entry. To
enter a parameter value using text entry, single-click the parameter value text field. The
text value will highlight, indicating it is ready to receive a new value. Type in a new value,
then press Return, Enter, or Tab, or click outside of the text box. Press Esc if you want to
revert to the prior setting without entering the new value.
Values entered via text entry are rounded to the closest significant digit. If an entered
value is out of range, it will be ignored.
Time Values
To enter time values, the units must be specified; m = milliseconds, and s = seconds.
For example: To enter 400 milliseconds, type 0.400s or 400m. To enter 1.5 seconds,
type 1.5s or 1500m.
Mouse Scroll
If your input device has a scroll function, it can be used to adjust knob and slider
controls if the DAW supports this functionality. Place the mouse cursor over any knob
or slider control, then use the scroll function to increment or decrement the parameter
value.
Keyboard Control (Mac)
If you control-click a parameter, that control is selected for keyboard control. This feature
is particularly useful when control adjustment is set to circular mode, and you want to
fine-adjust a value.
Normally, clicking on a control in circular mode makes the value jump to where you
clicked. Control-clicking will select the control so that you can use the keyboard to adjust
the value without causing its value to jump to the cursor location first.
UAD System Manual Using UAD Plug-Ins 65
Page 66

Shortcuts
The table below lists the keyboard shortcuts that are available for modifying parameter
values. When using keyboard shortcuts, the last edited control will be modified.
On Mac systems, you can use control-click to select a different control as the target for
keyboard shortcuts without changing the control’s value.
Note: Not all DAW applications support sending keystrokes to plug-ins.
UAD Plug-In Keyboard shortcuts
Keyboard Action Result
Control + Click Parameter (Mac only) Select parameter for keyboard control
(without changing its value)
Shift + Drag Fine Control
UpArrow
RightArrow
Shift + PageUp
DownArrow
LeftArrow
Shift + PageDown
Shift + UpArrow
Shift + RightArrow
PageUp
Shift + DownArrow
Shift + LeftArrow
PageDown
Control + Click parameter (Windows)
Modifier* + Click parameter (Mac)
Control + Shift + Click parameter (Windows)
Modifier* + Shift + Click parameter (Mac)
*Modifier key set in UAD Meter & Control Panel application’s Configuration panel
Increment Fine
Decrement Fine
Increment Coarse
Decrement Coarse
Toggle initial editor setting (the value when the
editor window was last opened)
Revert to initial editor setting (the value when the
editor window was last opened)
UAD System Manual Using UAD Plug-Ins 66
Page 67

DSP Loading Information
UAD devices feature either one (UAD-2 SOLO), two (UAD-2 DUO), four (UAD-2 QUAD),
or eight (UAD-2 OCTO) on-board SHARC DSP chips for UAD plug-in processing.
Multi-DSP systems use sophisticated load balancing routines. UAD-2 plug-ins are always
allocated as efficiently as possible, which is not necessarily on the DSP with the lowest
resource use.
UAD FireWire Devices
Because FireWire has significantly less bandwidth than the PCIe protocol, if UAD-2
Satellite FireWire and/or Apollo (when connected via FireWire) is running with UAD-2
PCIe card(s) in a multi-device system, UAD plug-ins will load on the UAD-2 card(s)
before the FireWire device in order to maximize FireWire bandwidth. See FireWire
Bandwidth vs. UAD DSP for more information.
More Loading Notes
• Depending on the UAD plug-in, lower session sample rates may use less UAD
plug-in DSP resources than higher sample rates.
• Bypassing individual components will conserve DSP on some UAD plug-ins. For
example, bypassing the compressor in the Precision Channel Strip when only the
EQ is in use, and/or bypassing any of the unused bands of the Precision Channel
Strip EQ will use less UAD DSP (unless DSP LoadLock is enabled).
• A chart showing expected plug-in counts is available on the UA website:
www.uaudio.com/support/uad/compatibility/instance-chart.html
Host CPU Loads
• The host computer system memory and CPU are never used for UAD plug-in
processing. However, there will always be a small amount of load on the host CPU
induced by data transfers and user interface operations.
• When LiveTrack Mode is active, host CPU load is increased.
UAD System Manual Using UAD Plug-Ins 67
Page 68

Automation
Most UAD plug-in parameters can be automated if this feature is supported by the DAW
application. Each DAW has its own particular methods for automation; consult the DAW
documentation for specific instructions on using automation with the DAW.
UAD plug-ins reduce their DSP load when bypassed or disabled, but not their memory
load. This feature allows for automatable load balancing of DSP power, and keeps the
track delay constant to avoid on/off clicks.
Note: If there is not enough DSP available when automating, the plug-in may not
activate. When this occurs, DISABLED is displayed in the UAD Toolbar.
External MIDI Control
UAD plug-in parameters can be controlled by an external MIDI controller, if this feature
is supported by the host DAW application. Each DAW has its own particular methods for
external MIDI control. Consult the DAW documentation for specific instructions on using
external MIDI control with the DAW.
Mono (m) UAD plug-ins
UAD VST plug-ins with “(m)” in the name are monophonic versions of the plug-in.
The standard VST plug-ins (which support both stereo and mono configurations) do not
consume additional UAD DSP on mono sources when loaded in DAWs that use true-mono
processing (for example, Apple Logic Pro, Avid Pro Tools, and Steinberg Cubase/Nuendo).
Some DAWs (for example, Ableton Live and Cakewalk Sonar) do not use true-mono
processing on mono signals. In these DAWs, using the mono (m) versions may conserve
UAD DSP when used on mono sources.
UAD mono (m) plug-ins are not available in Audio Units, RTAS, or AAX format. All
qualified AU, RTAS, and AAX 64 DAWs (e.g., Apple Logic Pro, Avid Pro Tools) support
true-mono processing.
Note: Some UAD plug-ins do not consume less DSP even when used in a truemono configuration. For details about mono vs. stereo DSP use, see the UAD
Instance Count Chart.
UAD System Manual Using UAD Plug-Ins 68
Page 69
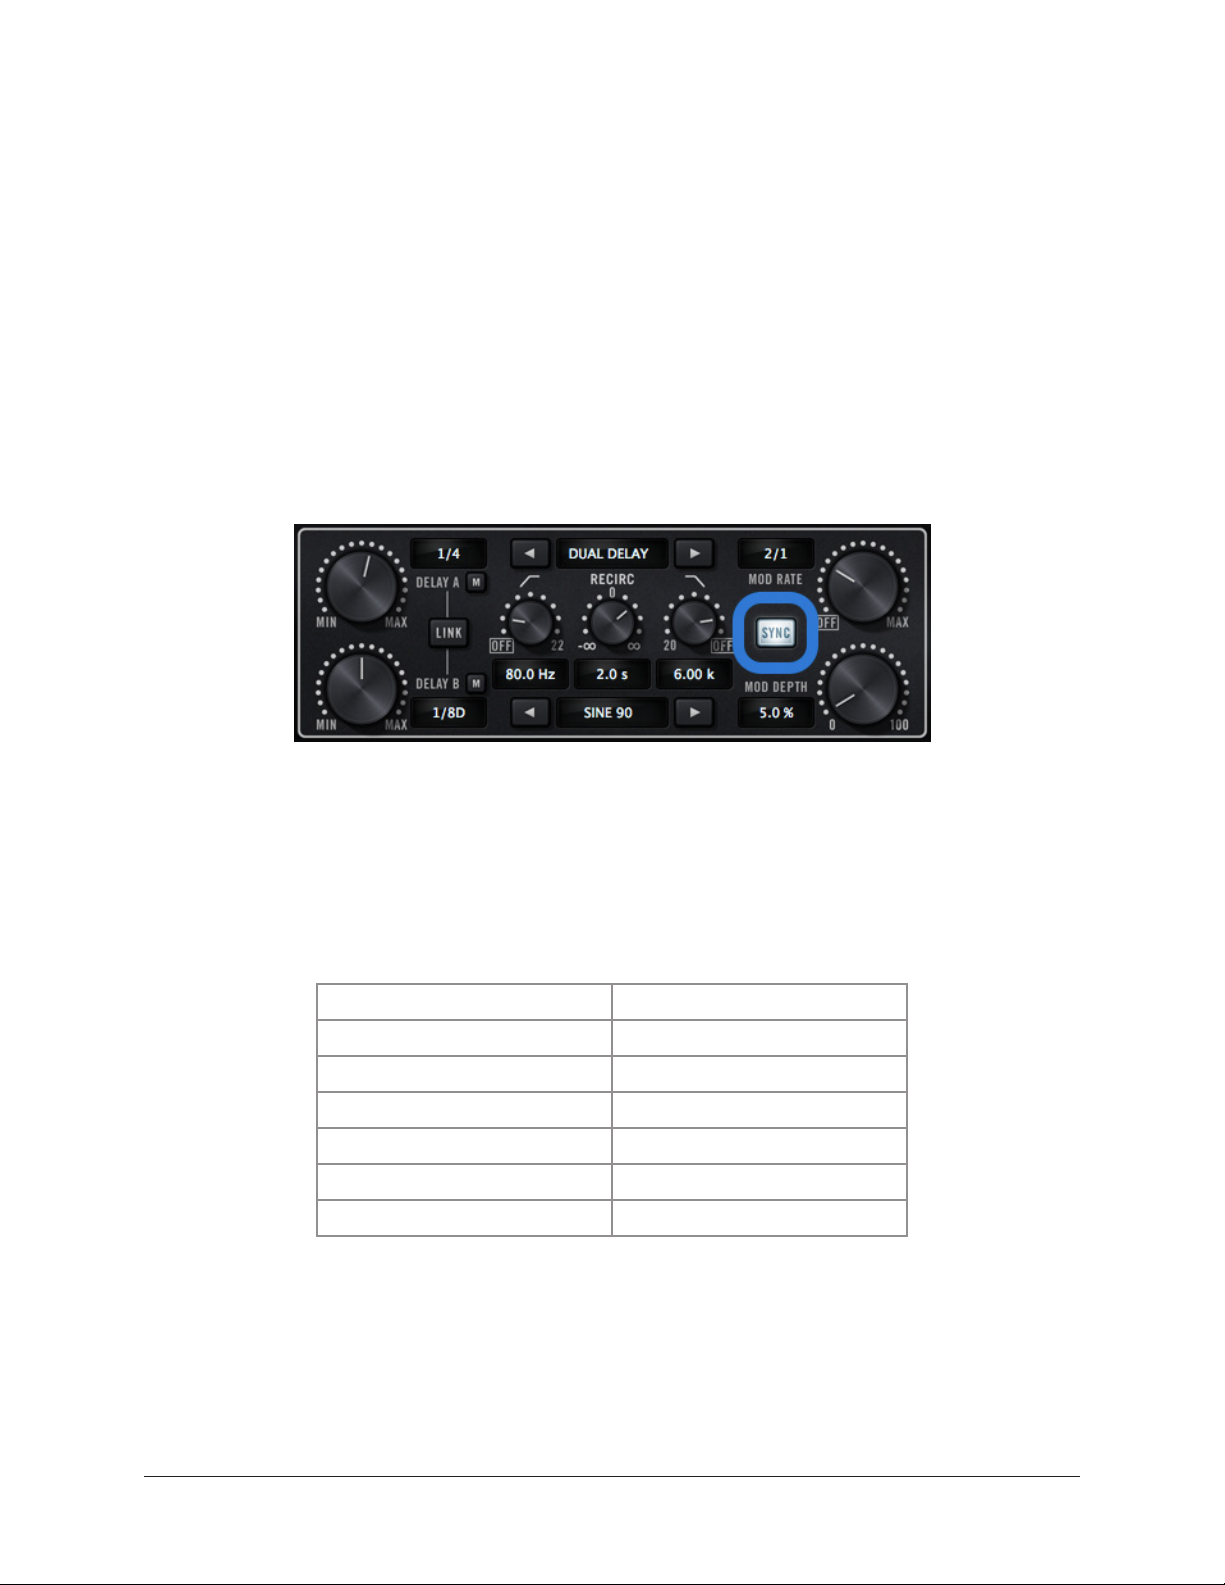
Tempo Sync
The time-based parameters of some UAD plug-ins can be synchronized to the tempo of
the host application using the Tempo Sync feature.
Note: Not all DAW applications support Tempo Sync. In such hosts, the tempo
sync features will not function.
When Tempo Sync is activated, the time-based parameters that are available for
synchronization are changed to note duration values, and will sync to the tempo of the
host application using the displayed note value.
Tempo Sync switch within Precision Delay Mod
Tempo Sync Plug-Ins
The Tempo Sync feature is available with the UAD plug-ins listed below.
CS-1 Channel Strip Moog Multimode Filter XL
Cooper Time Cube MXR Flanger/Doubler
Galaxy Tape Echo Precision Delay Mod
EP-34 Classic Tape Echo Precision Delay Mod L
Korg SDD-3000 Digital Delay Precision Reflection Engine
Moog Multimode Filter Roland RE-201 Space Echo
Moog Filter Multimode SE
Note: This table does not include UAD Direct Developer (3rd-party) plug-ins.
UAD System Manual Tempo Sync 69
Page 70

Sync Activation
To activate Tempo Sync, click the “Sync” button within the plug-in interface. The Sync
button LED will illuminate and the time parameters will change from a time-based
display to a note value display.
Note: When Tempo Sync is activated, the plug-in will automatically switch the
time or rate parameter(s) to the nearest available note value(s) given the range of
the parameter in question and the current tempo.
Available Note Values
The note values that are available for selection are listed below. The values are listed in
musical notation as a division of measures. For example, 1/4 = one quarter note, 1/1 =
one whole note, 4/1 = four whole notes, and so forth.
The available note values were chosen to allow syncing to tempo in odd time signatures
as well the common 4/4 time signature.
LFO rate parameters have their note values listed from longest to shortest, since long
note values correspond to slow LFO rates.
Available Tempo Sync Note Values
1/64D* 1/8 5/8 4/1
1/64 5/32* 1/1T 5/1
1/32T 1/4T 1/2D 6/1
1/32 1/8D 1/1 8/1
1/16T 1/4 5/4 9/1
1/32D 5/16 1/1D 12/1
1/16 1/2T 7/4 16/1
1/8T 1/4D 2/1
1/16D 1/2 3/1
D = Dotted
T = Triplet
* = Galaxy Tape Echo & RE-201 only
A quarter note is always a quarter note, independent of the time signature. In different
time signatures a quarter note can represent different numbers of musical beats (e.g.
6/8 ) or different fractions of a bar (e.g. 5/4). For example, say the time signature is 6/8
and the delay time tempo sync note value is 1/4. If a sound occurs on beat one of the
measure then its delay will occur on beat 3, which is 1/4 note (i.e. two 8th notes) later.
Note: The “beat” value in a sequencer’s BPM tempo setting always refers to a
quarter note, independent of time signature.
UAD System Manual Tempo Sync 70
Page 71
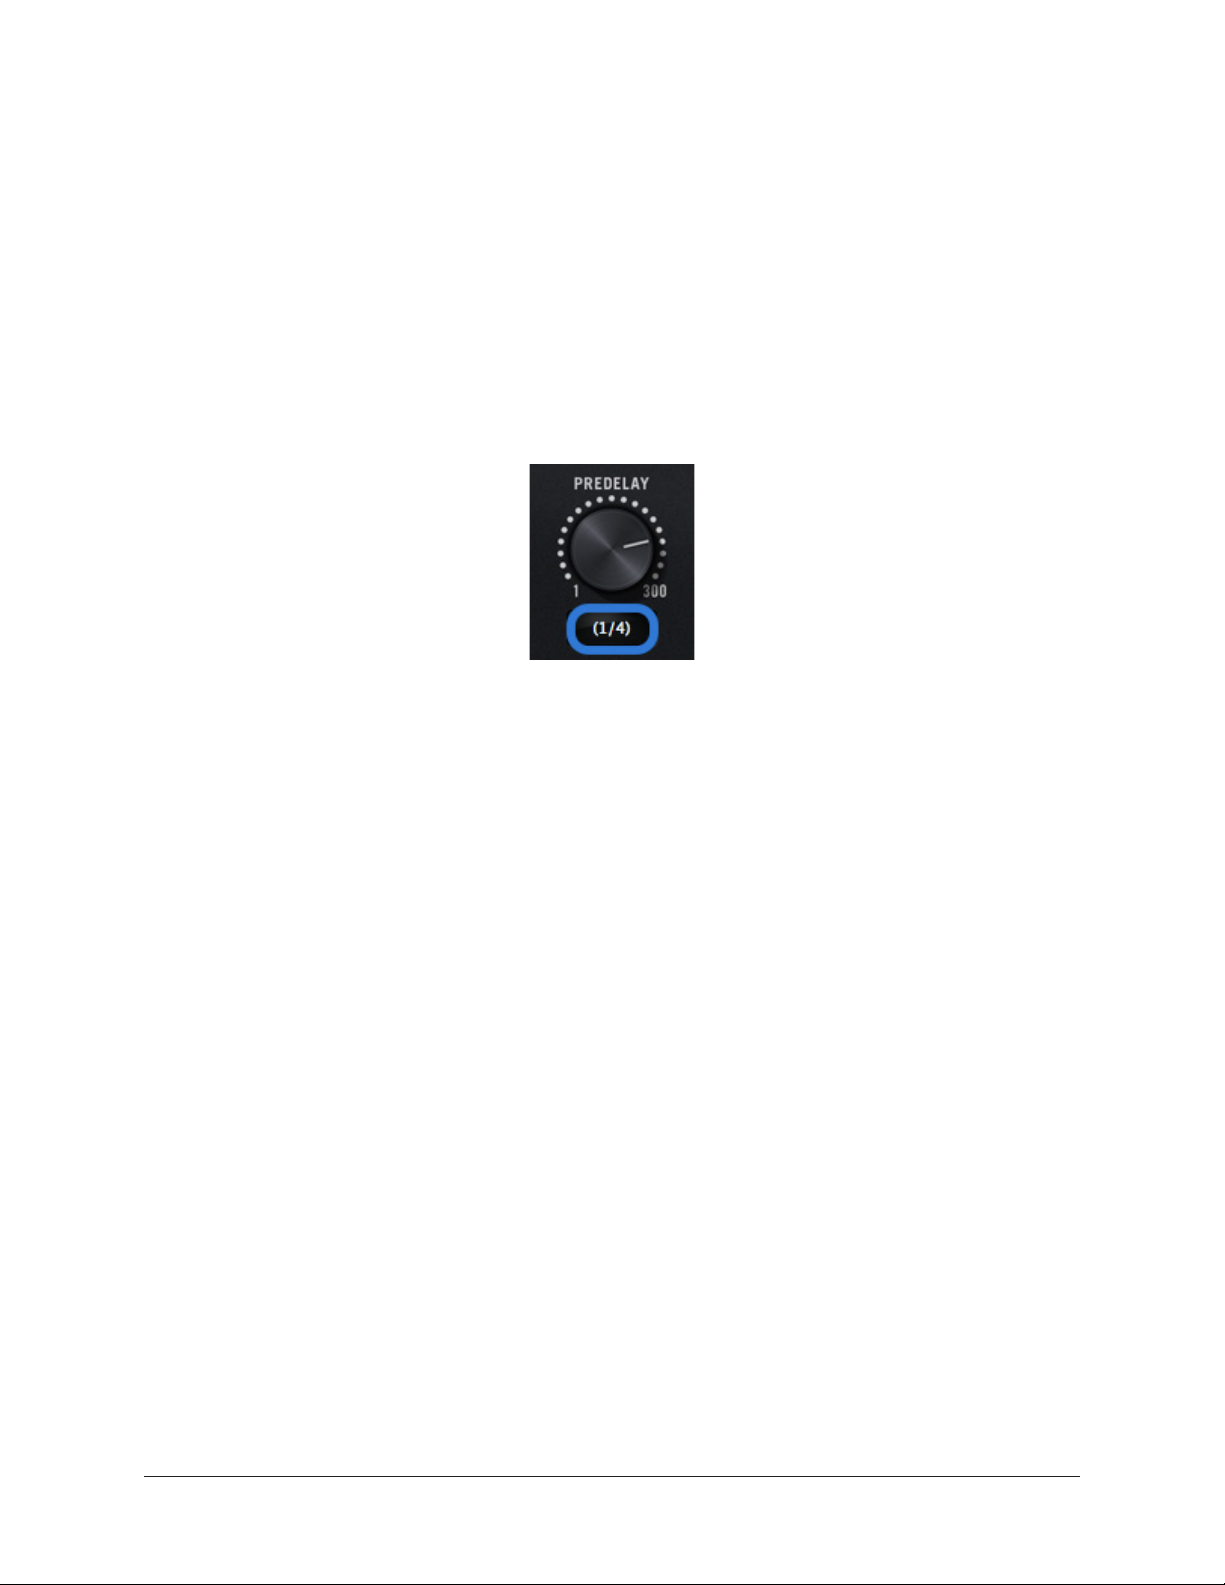
Range Limits
Some Tempo Sync parameters cannot access the entire note range in Available Tempo
Sync Note Values. Because the original (non-tempo sync) range of the time-based
parameters within each plug-in is limited, if the host tempo is too fast or too slow, the
tempo sync note value may not be able to be achieved within the constraints of the
original parameter.
Out of range
When a parameter note value is out of range of the current tempo note value, the note
value is displayed in parentheses. In this case, the parameter’s minimum (slow tempo) or
maximum (fast tempo) value is used instead of the displayed value.
Tempo Sync value out of range (parentheses)
Entering Values
In addition to adjusting the parameter control, the following methods can be used for
entering Tempo Sync values.
Arrow Keys
After clicking the parameter to select it, the computer’s arrow keys can be used to scroll
through available note values.
Text Entry
Any notation values can be entered (fraction or decimal), and the values are
automatically converted to the nearest appropriate setting.
Example: If 3/4 or 6/8 is entered using text entry, 1/2D is displayed because a dotted
half note equals three quarter notes, which is the duration of one measure in a time
signature of 3/4 or 6/8. If 12/8 is entered with text entry, 1/1D is displayed because a
dotted whole note equals six quarter notes, which is the duration of one measure in a
time signature of 12/8 (or two measures in a time signature of 3/4 or 6/8).
This means you can create a tempo sync duration of one measure for any time signature
by simply typing in the time signature (assuming there is a match in the beat table).
Similarly, if 1/12 is entered with text entry, 1/8T is displayed because an eighth note
triplet is equivalent to one-twelfth of a measure (if in 4/4 time).
UAD System Manual Tempo Sync 71
Page 72

Precision Delay Modes with Tempo Sync
The UAD Precision Delay Mod and UAD Precision Delay Mod L plug-ins have a Mode
menu that switches the plug-in operation between delay, chorus, and flanger mode. In
these plug-ins, when the Mode is set to DUAL DELAY and PING PONG, the delay Time
and modulation Rate parameters are simultaneously available for Tempo Sync.
However, when the plug-in is set to a CHORUS or FLANGER mode, only the Rate is
available for Tempo Sync. This enables the more typical and musical chorus/flange
effect by only syncing the modulation Rate to the tevmpo while the delay time remains
constant.
Galaxy Tape Echo & Roland RE-201 Sync
When the Galaxy Tape Echo and Roland RE-201
plug-ins are in Tempo Sync mode, note values
can be imprecise due to the fixed tape head
relationships.
Values that are imprecise approximations (but are within the available delay time
range) are displayed with a “+” or “-” symbol. The leading head in the current mode is
accurately synced; the other values are based on the fixed tape head relationship.
Note: When a parameter note value is out of range of the current tempo note value
in these plug-ins, the note value flashes instead of in being parentheses.
UAD System Manual Tempo Sync 72
Page 73

Latency & Delay Compensation
When UAD plug-ins are used, audio data to be processed by a UAD plug-in is sent by the
host DAW application to the UAD device. The audio is then processed by the UAD device
and sent back to the DAW. This back-and-forth shuffling of digital audio data is called
buffering and it produces a latency (delay) in the audio signal being processed.
Latency is inherent in digital audio systems and it can be detected in certain situations.
Latency time in a DAW is usually determined by the session sample rate and audio I/O
interface hardware buffer size settings.
If this latency is not compensated, the processed audio will not be perfectly aligned
(synchronized) with unprocessed audio. Fortunately, modern DAW applications
automatically compensate for this latency by simply enabling the delay compensation
function in the DAW’s preference settings. Most DAWs provide full plug-in delay
compensation throughout the entire signal path, including inserts, sends, groups/buses,
and outputs.
UAD latency and UAD plug-in delay compensation is managed automatically by all
modern DAWs using automatic plug-in delay compensation as long as the feature is
enabled. Additionally, latency can be reduced to near-undetectable levels in UAD-2 PCIe
cards and UAD-2 Satellite Thunderbolt by enabling LiveTrack Mode in the UAD Toolbar.
Note: Delay compensation is fully automatic and requires no user intervention
when UAD plug-ins are used in DAWs that support latency delay compensation.
Host DAW Application Settings
For optimum results, the delay compensation feature should be enabled in the DAW
application, so delay compensation is automatic when UAD plug-ins are used. This
option is usually found in the audio or plug-in preference settings window. The specific
location of the setting for this option can be found in the DAW documentation.
Latency compensation has various names depending on the DAW. It’s usually referred
to as “Automatic Delay Compensation” (ADC), “Plug-In Delay Compensation” (PDC) or
similar name.
Realtime UAD Processing with Apollo
With all of Universal Audio’s Apollo High-Resolution Audio Interface models, there is no
buffering latency on input because the UAD plug-in processing occurs on input within
the interface itself; the data does not need to be shuttled to the DAW and back.
This feature, called Realtime UAD Processing, is only available when UAD plug-ins are
used within Apollo’s Console application. I/O buffering latency still applies with Apollo
when UAD plug-ins are used within a DAW.
UAD System Manual Latency & Delay Compensation 73
Page 74

UAD Plug-Ins with Additional Latency
Some UAD plug-ins introduce additional latency to achieve sonic design goals (for
example, upsampling). When these UAD plug-ins are used in a DAW, additional latency
is induced in the signal path. Therefore, they require more compensation to remain
perfectly synchronized with other tracks.
Although the latency added by these UAD plug-ins is negligible (typically between 0 –
300 samples, depending on the plug-in and session sample rate), this extra latency can
affect phase coherency in a session if not properly compensated.
Note: Compensating additional latency from UAD plug-ins is performed
automatically by the host DAW application when the latency compensation
function is enabled in the DAW.
Additional Latency Values
The latency values (in samples) of UAD plug-ins with additional latency are listed in the
last chapter within the UAD Plug-Ins Manual.
Latency Compensation Notes
• To automatically compensate for UAD plug-ins with additional latency, simply
enable the delay compensation function in the Host DAW Application Settings.
• Compensating for UAD plug-ins with additional latency is not required when these
plug-ins are used for program material on the output bus, where latency is not a
consideration because the entire mix is delayed by the same amount.
• The latency in UAD plug-ins with additional latency is also produced when
LiveTrack Mode is used with these UAD plug-ins.
• Additional latencies cannot be displayed in the Plug-In Latency Section within the
System Information panel due to technical limitations.
• The Ampex ATR-102, AKG BX 20, and Precision Multiband plug-ins have a
significantly larger latency than other UAD plug-ins with additional latency
because of their complex algorithms. Because manually compensating for these
plug-ins in DAWs that don’t support full plug-in delay compensation can be
complicated, to avoid timing errors in these DAWs, using these plug-ins only on
outputs is recommended so no manual compensation is required.
Note: Use the Ampex ATR-102, AKG BX 20, and Precision Multiband only on
outputs (as their design was intended), or only in DAWs that have full plug-in
delay compensation.
UAD System Manual Latency & Delay Compensation 74
Page 75

Live Processing (without Apollo)
The previous information about delay compensation applies primarily to playback and
mixing of existing tracks on (non-Apollo) UAD-2 devices. During recording (tracking),
the primary concern usually centers around getting the absolute lowest possible latency
out of your hardware and software combination. The lower the latency is, the closer
you can get to a real-time “ears match the fingers” performance situation in the digital
environment where some latency is unavoidable.
Realtime latency is displayed in the System Information Panel within the UAD Meter &
Control Panel application.
Live processing latency is determined by the session sample rate and the audio interface
I/O buffer size setting. Higher sample rates and lower buffer sizes produce lower
latencies.
UAD-2 LiveTrack Mode
UAD-2 PCIe cards and UAD-2 Satellite Thunderbolt offer an advanced buffering
architecture that can deliver reduced latency when tracking through UAD plug-ins that
are loaded in a DAW. To enable the feature, activate LiveTrack Mode in the UAD Toolbar
on the UAD plug-in(s) within the DAW.
UAD System Manual Latency & Delay Compensation 75
Page 76

UAD-2 Satellite Thunderbolt
The rich analog sound of UAD plug-ins over Thunderbolt
The UAD-2 Satellite Thunderbolt DSP Accelerator is a sleek, powerful way for
Thunderbolt-equipped users to “supercharge” their systems and run larger mixes filled
with acclaimed UAD plug-ins. This convenient desktop unit gives you full access to UA’s
award-winning plug-in library.
With improved performance and reduced plug-in latency versus FireWire, UAD-2 Satellite
Thunderbolt makes the perfect introduction to UAD plug-ins, or ideal DSP expander for
Apollo audio interfaces.
Once installed and configured, UAD-2 Satellite Thunderbolt is functionally similar to its
UAD-2 PCIe card counterparts.
Features
• 44.1 – 192 kHz DSP Audio Accelerator for Thunderbolt Computers
• Thunderbolt 3 or Thunderbolt 2 connectivity (depending on model)
• UAD-2 QUAD or OCTO in an attractive external housing
• Same potent DSP power as UAD-2 PCIe QUAD or OCTO
• Kensington Security Slot for anti-theft cables
• Fan-free construction for silent operation
Retail Package Contents
• UAD-2 Satellite Thunderbolt unit (QUAD or OCTO version)
• External 12VDC power supply with region-specific AC cable
• Getting started URL card
UAD System Manual UAD-2 Satellite Thunderbolt 76
Page 77

QUAD and OCTO Models
UAD-2 Satellite Thunderbolt is available in two DSP configurations: QUAD and OCTO.
The only difference between these two configurations is the number of SHARC DSP
processors inside the device (and therefore the available DSP horsepower for UAD
plug-in processing). The QUAD or OCTO designator is on a sticker on the bottom of the
unit.
Thunderbolt 3 and Thunderbolt 2 Models
Depending on the model, UAD-2 Satellite Thunderbolt has either two Thunderbolt 3
ports, or two Thunderbolt 2 ports. Other than the location of the power switch, the only
functional difference between these two models is the type of Thunderbolt ports on the
device.
Note: To use UAD-2 Satellite Thunderbolt 2 models with Windows 10 computers,
or Mac computers with Thunderbolt 3 ports, a compatible Thunderbolt 3 to
Thunderbolt 2 adapter (not included) is required. For details, visit help.uaudio.
com.
Documentation
This UAD System Manual is the primary resource for UAD-2 Satellite Thunderbolt
operations. Individual UAD Powered Plug-Ins are detailed separately in the UAD Plug-Ins
Manual. For complete documentation information, see the UAD Documentation Overview.
Instructions in this chapter are specific to UAD-2 Satellite Thunderbolt operations only,
and apply in addition to the other chapters in this manual. To get the most from your
UAD-2 Satellite Thunderbolt, please review the information in this chapter and the rest
of this manual.
Setup Overview
UAD-2 Satellite Thunderbolt setup includes hardware setup, installing the software, and
registration/authorization to claim bundled UAD plug-ins.
Hardware setup is detailed below. After the hardware is connected, install the UAD
software and authorize the device using the procedures detailed in UAD Installation.
Note: For optimum results, connect and power UAD-2 Satellite Thunderbolt
before software installation.
System Requirements
To use UAD-2 Satellite Thunderbolt, the computer must meet the System Requirements.
UAD System Manual UAD-2 Satellite Thunderbolt 77
Page 78

Hardware Setup
POWER IN
Install Location
When selecting a location to position UAD-2 Satellite Thunderbolt for installation and
operation, consider these points:
• The unit should be positioned on a secure, stable surface and not moved during
operation. This will help prevent the disruption of signals from cables and/or
connectors if they are accidentally bumped or disconnected.
• For proper ventilation to prevent overheating, place UAD-2 Satellite Thunderbolt
on a hard, flat surface and do not cover the unit. This will allow air to circulate
underneath the chassis and through the housing vents.
• Multiple UAD-2 Satellite Thunderbolt units may be stacked. Apollo Twin may be
stacked on top of UAD-2 Satellite Thunderbolt.
• High levels of radio-frequency radiation could interfere with proper operation.
If possible, avoid placement near unshielded monitors, radio transmitters, and
similar equipment.
Security Slot
The air vents on the rear panel are sized to fit
Kensington® Security Slot products. This feature helps
prevent theft when used with an optional locking cable
such as a Kensington ClickSafe® or MicroSaver®
OFF ON
security cable. Refer to the instructions included with the
optional cable.
External Power Supply
UAD-2 Satellite Thunderbolt includes an external 12VDC power supply with a regionspecific changeable AC cable. The external power supply is required for operation.
Important: UAD-2 Satellite Thunderbolt cannot be bus powered via Thunderbolt.
The included external power supply must be used.
UAD System Manual UAD-2 Satellite Thunderbolt 78
Page 79

Hardware Connections
About Thunderbolt 3 Ports and Cables
Important: Although Thunderbolt 3 always uses USB-C connectors, not all USB-C
ports are Thunderbolt 3 ports. Similarly, not all USB-C cables are Thunderbolt 3
cables. Always connect UAD-2 Satellite Thunderbolt 3 models to a Thunderbolt 3
port with a Thunderbolt 3 cable.
USB-C is not Thunderbolt 3
Thunderbolt 3 uses USB-C connections to transfer data and power. However, USB-C is
simply a connector type; it doesn’t determine the type of data used by the connector. For
example, USB-C connections can be used for Thunderbolt 3, USB 3.1, and other data
protocols, so USB-C connections are not always interchangeable.
Does your USB-C connector support Thunderbolt 3?
To determine if a USB-C port or cable connector supports Thunderbolt 3, look
for the Thunderbolt icon. The Thunderbolt icon on a USB-C port or cable
means the connector supports Thunderbolt 3. Alternately, confirm Thunderbolt
3 compatibility with the device and/or cable manufacturer.
Thunderbolt icon on Thunderbolt 3 cable (left) and Thunderbolt 3 port (right)
About Thunderbolt 2 ports and Cables
Important: Thunderbolt 2 and Mini DisplayPort both use the same connector.
However, not all Mini DisplayPort ports are Thunderbolt 2 ports. Similarly, not all
Mini DisplayPort cables are Thunderbolt 2 cables. Always connect UAD-2 Satellite
Thunderbolt 2 models to a Thunderbolt 2 port with a Thunderbolt 2 cable (or to a
Thunderbolt 3 port via a compatible Thunderbolt 3 to Thunderbolt 2 adapter).
Mini DisplayPort is not Thunderbolt 2
UAD-2 Satellite Thunderbolt cannot be used by
connecting it to a Mini DisplayPort connector.
Although Thunderbolt 2 and Mini DisplayPort
devices have the same physical connector, the
underlying communication protocol used by
these devices is different.
The type of device port can be determined by the
icon next to the port. Thunderbolt 2 ports have a
lightning bolt icon, while Mini DisplayPort ports
have a display icon, as shown at right.
UAD System Manual UAD-2 Satellite Thunderbolt 79
Page 80

Connecting and Powering UAD-2 Satellite Thunderbolt
For optimum results, connect and power UAD-2 Satellite Thunderbolt before installing
the software. However, UAD-2 Satellite Thunderbolt may be connected and powered after
the software is installed.
Note: Per the Thunderbolt specification, the UAD-2 Satellite Thunderbolt
hardware may be connected and/or powered while the computer is running.
However, quit any audio applications using UAD plug-ins before powering off or
disconnecting.
To connect and power UAD-2 Satellite Thunderbolt:
1. Select a suitable Install Location for the UAD-2 Satellite Thunderbolt unit.
2. Connect the female end of the included AC cable to the AC input on the included
external power supply. Connect the male end of the AC cable to an AC power
outlet.
3. Connect the output (4-pin XLR connector) of the included external power supply
to the 12VDC input on the rear panel of UAD-2 Satellite Thunderbolt.
4. Connect one end of a Thunderbolt cable (not included) to a Thunderbolt port on
the computer.
5. Connect the other end of the Thunderbolt cable to one of the Thunderbolt ports on
UAD-2 Satellite Thunderbolt (either port may be used).
Important: Do not connect both Thunderbolt ports to the computer. The
Thunderbolt protocol is bidirectional, so only one Thunderbolt cable is needed.
6. Apply power to UAD-2 Satellite Thunderbolt by using the POWER switch on the
front panel (Thunderbolt 3 models) or rear panel (Thunderbolt 2 models). The
Universal Audio logo and text on the front panel illuminate when the unit is
properly powered.
Hardware connections are complete and UAD-2 Satellite Thunderbolt is ready for UAD
Installation.
UAD System Manual UAD-2 Satellite Thunderbolt 80
Page 81

UAD-2 Satellite Thunderbolt Operation
After hardware and software setups are complete, UAD-2 Satellite Thunderbolt is ready
for use. UAD-2 Satellite Thunderbolt operation is essentially the same as UAD-2 PCIe
cards. Refer to the other chapters in this manual for general operating instructions.
Important: Operations specific to UAD-2 Satellite Thunderbolt are detailed in this
chapter.
HOST Indicator
The HOST indicator on the front panel indicates the operating state of the unit. The
indicator color can be white or red. Three HOST states are possible:
Blinking white (starting) – The unit is starting up after power is applied. Full boot time is
approximately 8 to 10 seconds.
Blinking white and red (host undetected) – The host computer is not connected and/
or the UAD device drivers are not installed. Check connections and/or reinstall the UAD
software.
Solid white (normal) – The unit connected to the host computer and communicating with
the UAD device drivers. This is the state during normal operation.
Powering On
Follow these guidelines when bringing up the computer and DAW systems:
• Power on UAD-2 Satellite Thunderbolt and wait for the solid white HOST Indicator
before opening a DAW or other audio applications.
• UAD-2 Satellite Thunderbolt may be powered on before or after the computer is
started.
Powering Off
Follow these guidelines when shutting down the DAW and computer systems:
• Close all audio applications before powering down or disconnecting UAD-2
Satellite Thunderbolt.
• UAD-2 Satellite Thunderbolt may be powered down and/or disconnected while the
computer is running, as long as no UAD plug-ins are loaded.
UAD System Manual UAD-2 Satellite Thunderbolt 81
Page 82
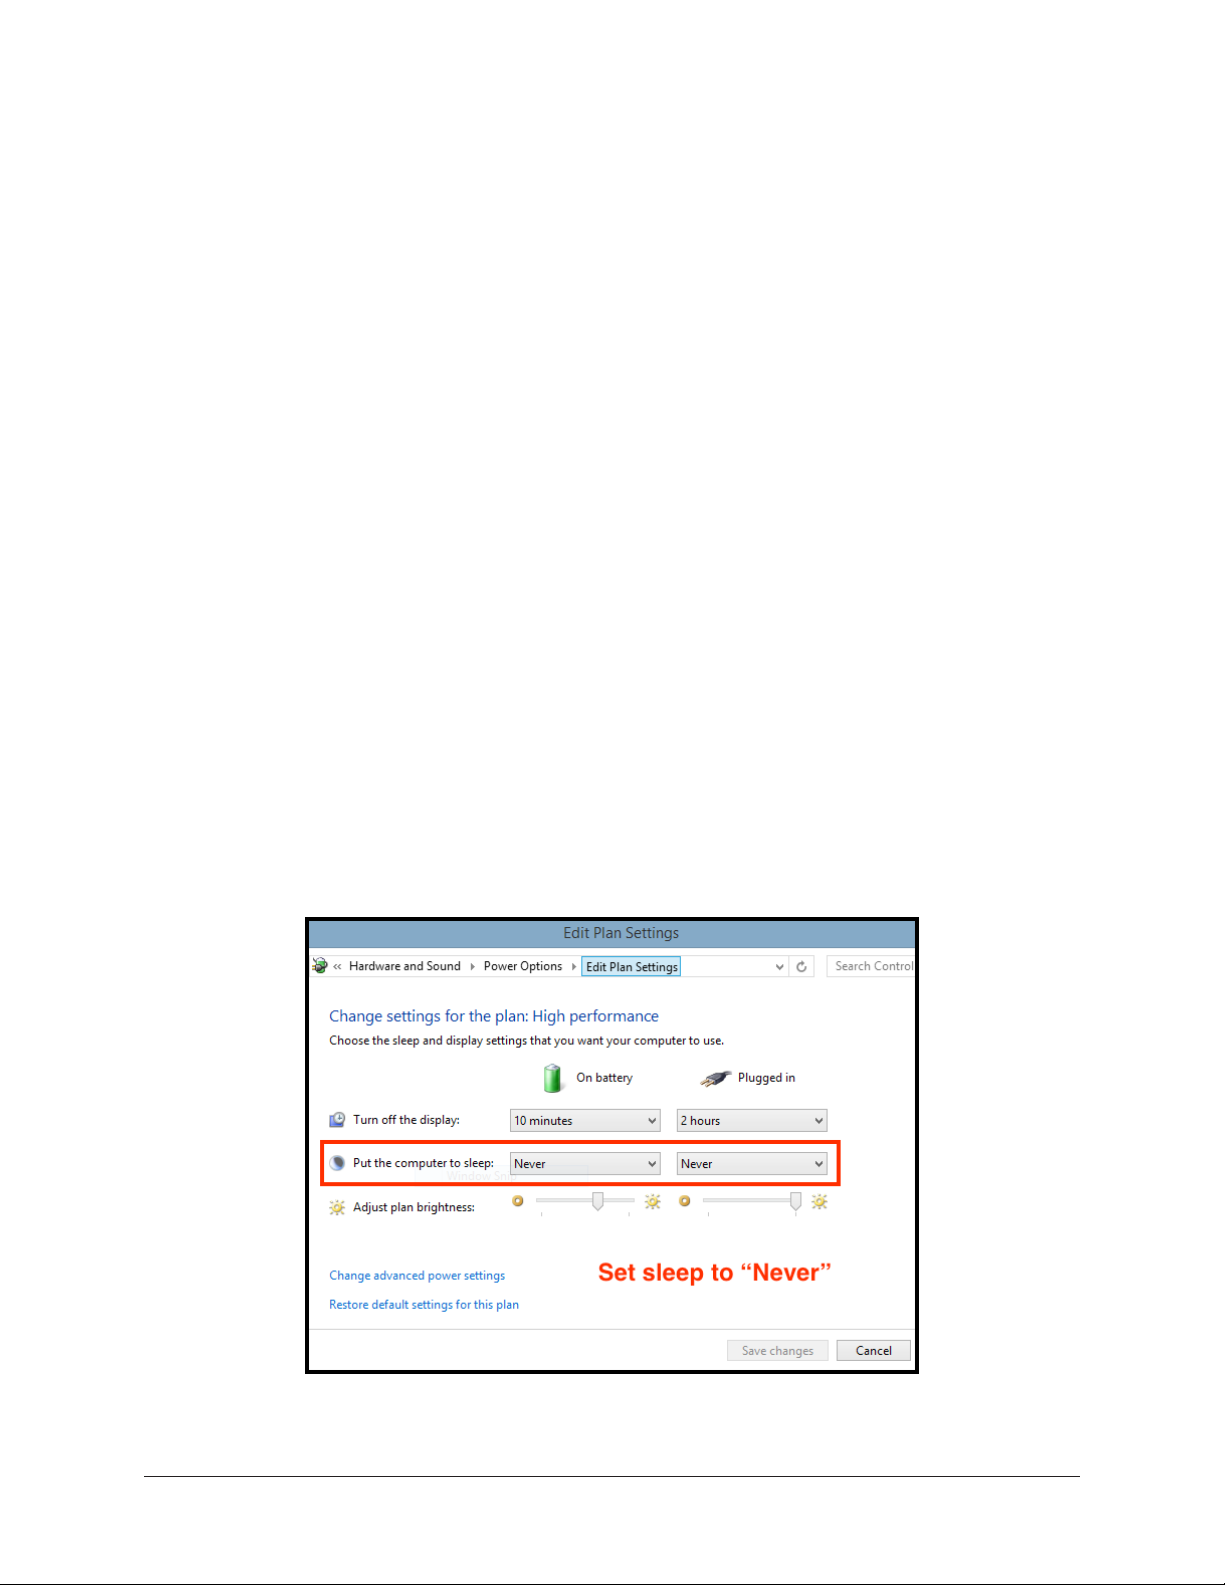
System Sleep
Per the Thunderbolt protocol specification, system sleep is supported with UAD-2
Satellite Thunderbolt. However, disabling sleep when using DAW software is generally
recommended. For optimum results when using UAD-2 Satellite Thunderbolt with DAW
software, follow these guidelines to disable sleep.
Note: Before sleeping the system, quit any DAW software using UAD plug-ins.
Mac
• Open the System Preferences>Energy Saver panel and drag the “Computer Sleep”
slider (if available) to “Never” (far right position).
Tip: To access System Preferences, click the Apple icon in the macOS Menu Bar
(at upper left corner of screen) then select it from the drop menu.
Windows
1. Go to: Control Panel > Hardware and Sound > Power Options. The Power Options
window opens.
2. In the Power Options window:
a. Select the High performance option.
b. Click the Change plan settings link for the High performance option. The Edit
Plan Settings window opens.
3. In the Edit Plan Settings window:
a. Select Never from the Turn off the display drop menu(s).
b. Select Never from the Put the computer to sleep drop menu(s).
4. Click the Save changes button to activate the settings.
Correct setting shown – Sleep disabled in Edit Plan Settings
UAD System Manual UAD-2 Satellite Thunderbolt 82
Page 83

Connecting Thunderbolt peripherals
Daisy Chains
Thunderbolt peripheral devices (such as an Apollo audio interface or external hard
drive) may be serially connected to the available port on the rear panel of UAD-2
Satellite Thunderbolt. The Thunderbolt protocol supports a maximum of six Thunderbolt
peripherals per Thunderbolt bus.
Note: UAD-2 Satellite Thunderbolt must be powered on for the computer to
recognize the daisy-chained device.
Device Compatibility
UAD-2 Satellite Thunderbolt is officially certified as Thunderbolt compliant and is
therefore compatible with other certified Thunderbolt devices when used in the same
chain.
Thunderbolt Bus Power
Per the Thunderbolt protocol specification, bus power is supplied by UAD-2 Satellite
Thunderbolt to downstream (daisy chained) peripheral Thunderbolt devices connected to
the available Thunderbolt port on the rear panel.
Note: UAD-2 Satellite Thunderbolt cannot be bus powered. The included external
power supply must be used.
UAD System Manual UAD-2 Satellite Thunderbolt 83
Page 84
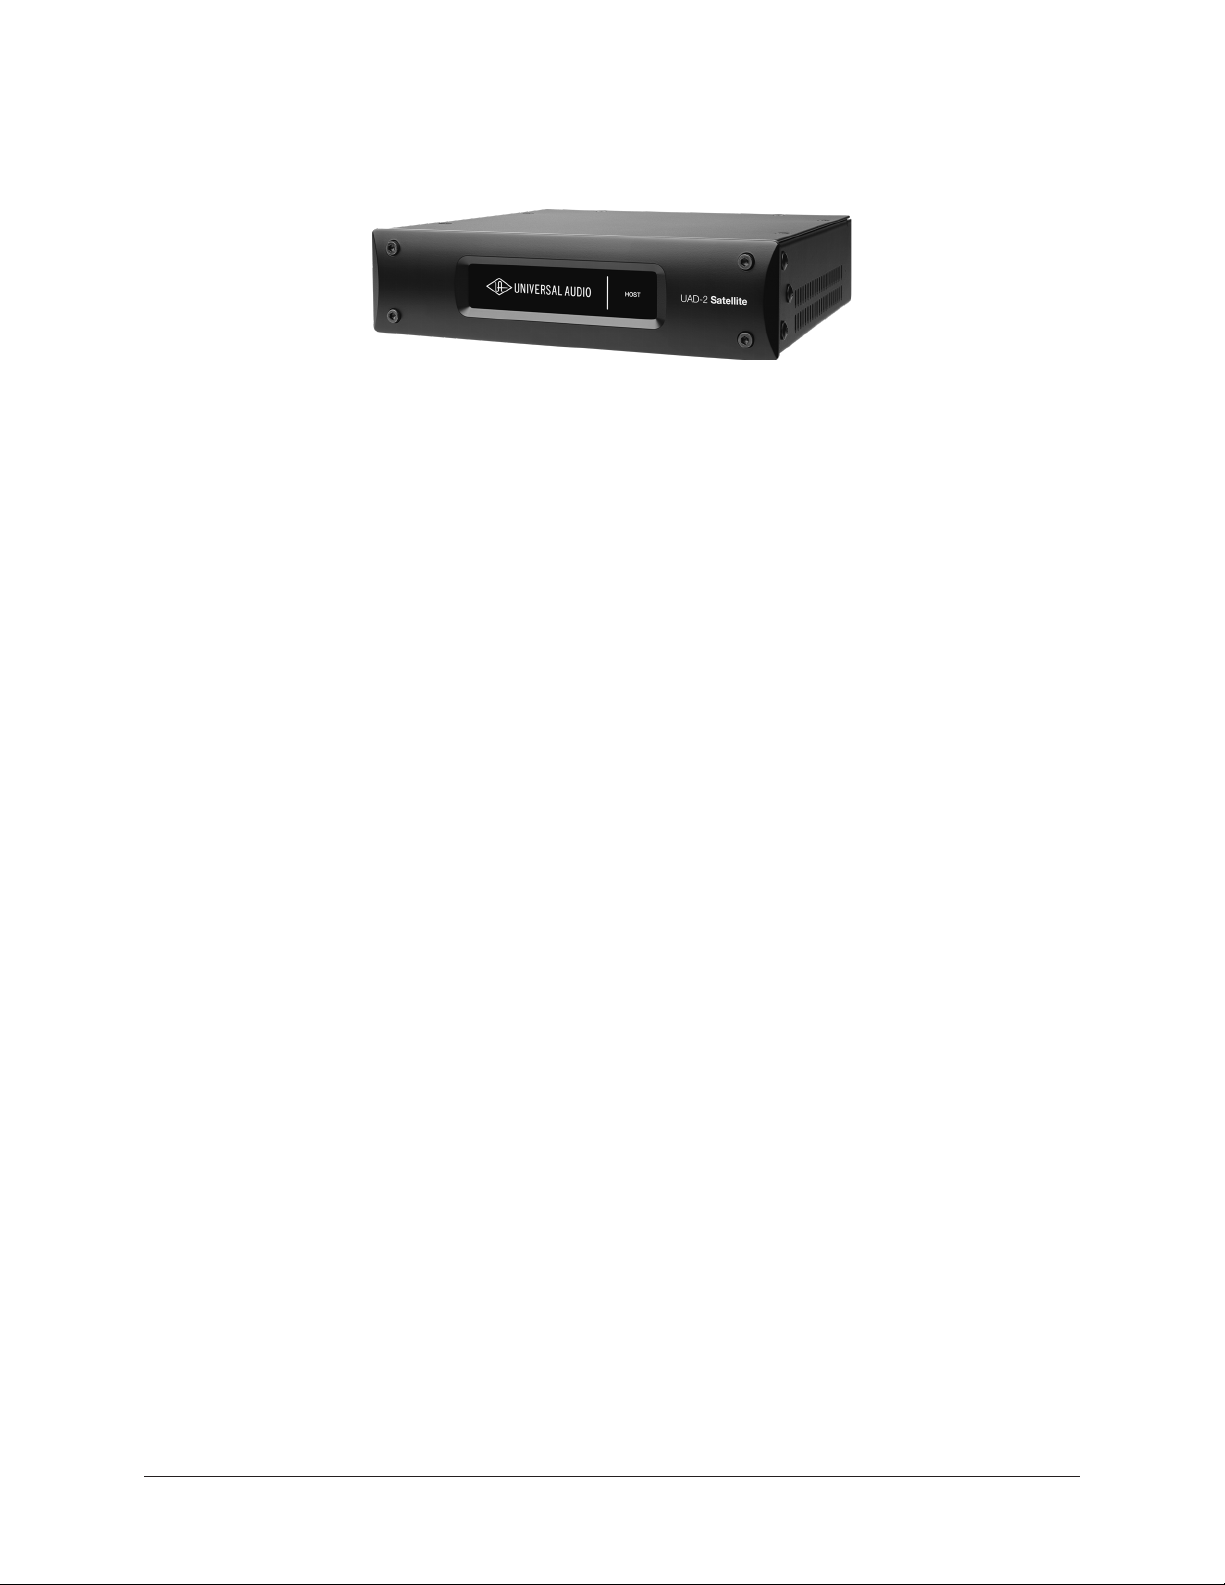
UAD-2 Satellite USB
The rich analog sound of UAD plug-ins over USB 3
The UAD-2 Satellite USB DSP Accelerator is a sleek, powerful way for Window-based
PC users to “supercharge” their systems and run larger mixes filled with acclaimed
UAD plug-ins. This convenient desktop unit gives you full access to UA’s award-winning
plug-in library, including exclusive titles from Studer, Lexicon, Neve, and more. With
improved performance and reduced plug-in latency versus FireWire, UAD-2 Satellite USB
makes the perfect introduction to UAD plug-ins, or an ideal DSP expander for Apollo
Twin USB audio interfaces.
Once installed and configured, UAD-2 Satellite USB is functionally similar to its UAD-2
PCIe card counterparts.
QUAD and OCTO Versions
UAD-2 Satellite USB is available in two versions: QUAD and OCTO. The only difference
between these two models is the number of SHARC DSP processors inside the device
(and therefore the available DSP horsepower for UAD plug-in processing). The QUAD or
OCTO designator is on a sticker on the bottom of the unit.
Features
• UAD-2 QUAD or OCTO in an attractive external housing
• Same potent DSP power as UAD-2 PCIe QUAD or OCTO
• 44.1 – 192 kHz DSP Audio Accelerator for Windows PC’s
• USB 3 connectivity
• Kensington Security Slot for anti-theft cables
• Fan-free construction for silent operation
Retail Package Contents
• UAD-2 Satellite USB unit (QUAD or OCTO version)
• External 12VDC power supply with region-specific AC cable
• Getting started URL card
UAD System Manual UAD-2 Satellite USB 84
Page 85

Documentation
This UAD System Manual is the primary resource for UAD-2 Satellite USB operations.
Individual UAD Powered Plug-Ins are detailed separately in the UAD Plug-Ins Manual.
For complete documentation information, see the UAD Documentation Overview.
Instructions in this chapter are specific to UAD-2 Satellite USB operations only, and
apply in addition to the other chapters in this manual. To get the most from your UAD-2
Satellite USB, please review the information in this chapter and the rest of this manual.
Setup Overview
UAD-2 Satellite USB setup includes hardware setup, installing the software, and
registration/authorization to claim bundled UAD plug-ins.
Hardware setup is detailed below. After the hardware is connected, install the UAD
software and authorize the device using the procedures detailed in UAD Installation.
Note: For optimum results, connect and power UAD-2 Satellite USB before
software installation.
System Requirements
To use UAD-2 Satellite USB, the computer must meet the System Requirements.
UAD System Manual UAD-2 Satellite USB 85
Page 86
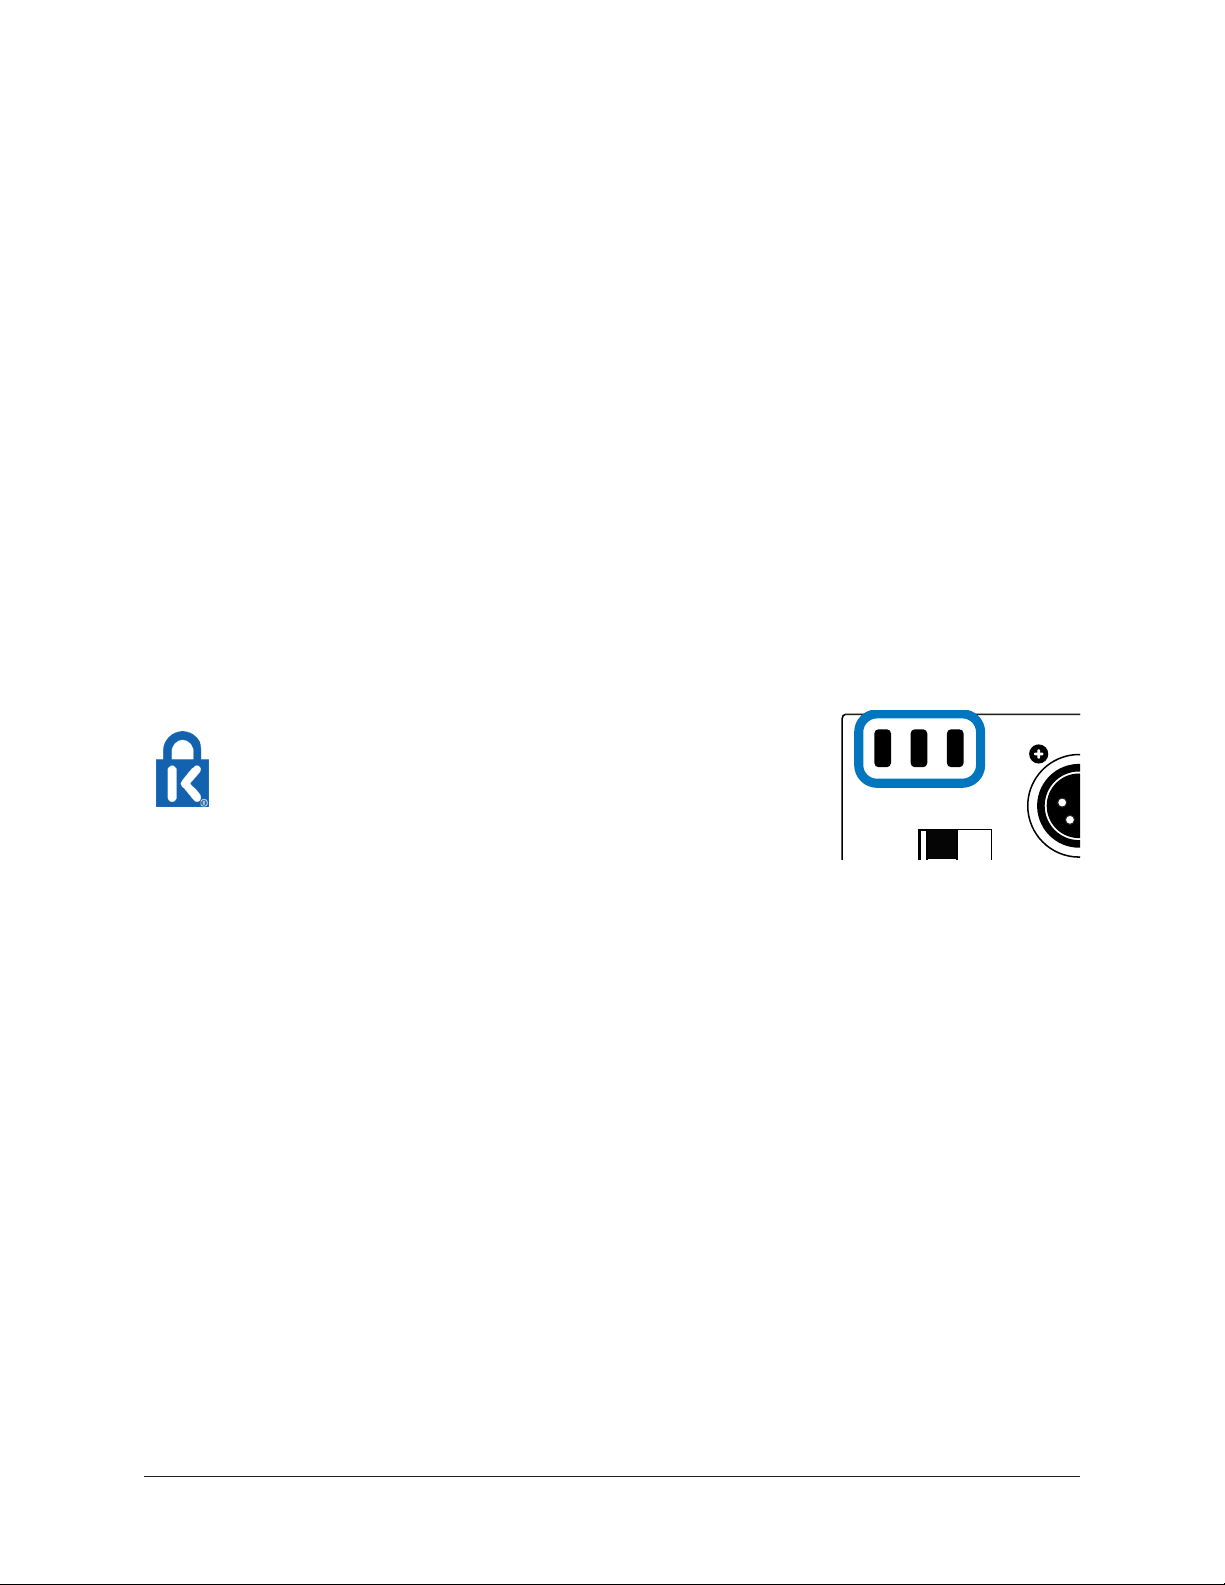
Hardware Setup
POWER IN
Install Location
When selecting a location to position UAD-2 Satellite USB for installation and operation,
consider these points:
• The unit should be positioned on a secure, stable surface and not moved during
operation. This will help prevent the disruption of signals from cables and/or
connectors if they are accidentally bumped or disconnected.
• For proper ventilation to prevent overheating, place UAD-2 Satellite USB on
a hard, flat surface and do not cover the unit. This will allow air to circulate
underneath the chassis and through the housing vents.
• Multiple UAD-2 Satellite USB units may be stacked. Apollo Twin may be stacked
on top of UAD-2 Satellite USB.
• High levels of radio-frequency radiation could interfere with proper operation.
If possible, avoid placement near unshielded monitors, radio transmitters, and
similar equipment.
Security Slot
The air vents on the rear panel are sized to fit
Kensington® Security Slot products. This feature helps
prevent theft when used with an optional locking cable
such as a Kensington ClickSafe® or MicroSaver®
OFF ON
security cable. Refer to the instructions included with the
optional cable.
External Power Supply
UAD-2 Satellite USB includes an external 12VDC power supply with a region-specific
changeable AC cable. The external power supply is required for operation.
Important: UAD-2 Satellite USB cannot be bus powered via USB 3. The included
external power supply must be used.
UAD System Manual UAD-2 Satellite USB 86
Page 87

Hardware Connections
For optimum results, connect and power UAD-2 Satellite USB before installing the
software. However, UAD-2 Satellite USB may be connected and powered after the
software is installed.
Note: Per the USB 3 specification, the UAD-2 Satellite USB hardware may be
connected and/or powered while the computer is running. However, quit any audio
applications using UAD plug-ins before powering off or disconnecting.
To connect and power UAD-2 Satellite USB:
1. Select a suitable Install Location for the UAD-2 Satellite USB unit.
2. Connect the female end of the included AC cable to the AC input on the included
external power supply. Connect the male end of the AC cable to an AC power
outlet.
3. Connect the output (4-pin XLR connector) of the included external power supply
to the 12VDC input on the rear panel of UAD-2 Satellite Thunderbolt.
4. Connect one end of the USB 3 cable (included) to a USB 3 port on the PC.
5. Connect the other end of the USB 3 cable to the USB 3 port on UAD-2 Satellite
USB.
6. Apply power to UAD-2 Satellite USB by using the POWER switch on the rear
panel. The Universal Audio logo and text on the front panel illuminate when the
unit is properly powered.
Hardware connections are complete and UAD-2 Satellite USB is ready for UAD
Installation.
USB 3 versus USB 2
UAD-2 Satellite USB cannot be used by connecting it to a USB
2 connector. Although USB 3 and USB 2 devices have a similar
physical connector, the underlying communication protocol used by
these ports is different.
USB 3 ports contain blue plastic inside the port. They can
sometimes be identified by a “SuperSpeed” “SS” label next to the
port (as shown at right).
UAD System Manual UAD-2 Satellite USB 87
Page 88
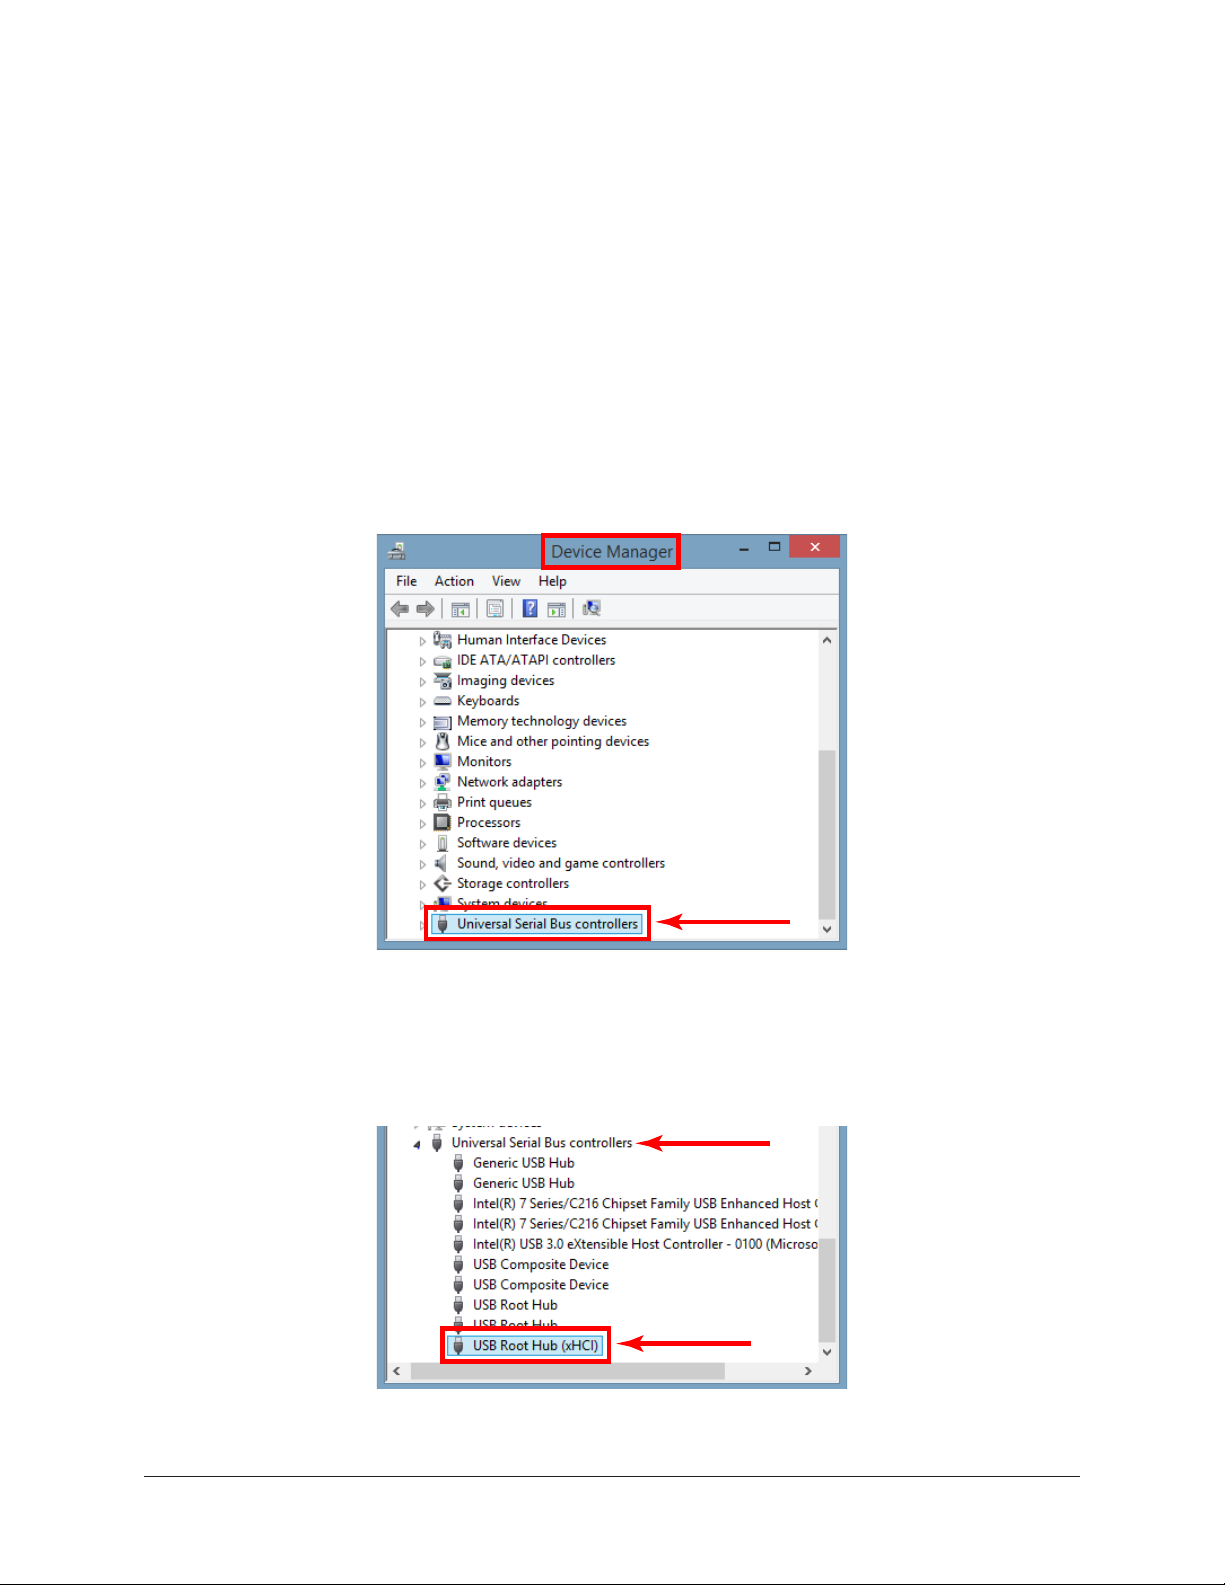
Windows Setup
The Windows operating system settings below are important to ensure optimum
performance with UAD-2 Satellite USB.
Prevent Windows from powering off USB 3 devices
Default Windows settings can interrupt USB data streams. Follow the procedure below to
prevent Windows from powering off USB devices.
1. Open the Windows Device Manager. The Device Manager can be accessed by
right-clicking the Windows Start Menu and selecting the item from the contextual
menu.
2. Double-click the Universal Serial Bus controllers branch in the Device Manager
window. The individual USB controllers in the branch are displayed in a list.
Double-Click
The USB controllers branch in Device Manager
3. Double-click the USB Root Hub device in the USB controllers branch list. The
Properties window for the individual device opens. (continued on next page)
Branch
Double-Click
USB Root Hub controller device in branch list
UAD System Manual UAD-2 Satellite USB 88
Page 89

4. Click the Power Management tab within the device’s Properties window. The
power management options are displayed.
5. Uncheck the “Allow the computer to turn off this device to save power” option.
6. Click the OK button to activate the new setting.
Click Tab
NO check in box
Click OK
Correct setting shown — “Allow” option is disabled in device properties window
7. Repeat steps 3 – 6 for all individual devices that include “USB Root Hub” in its
name.
Repeat for every
USB Root Hub
Repeat procedure for all USB Root Hubs
UAD-2 Satellite USB is now ready for use.
UAD System Manual UAD-2 Satellite USB 89
Page 90

System Sleep
System sleep is supported with UAD-2 Satellite USB. However, disabling sleep when
using DAW software is generally recommended. For optimum results when using UAD-2
Satellite USB with DAW software, follow these guidelines:
• Disable sleep. Open Control Panel>Hardware and Sound>Power Options>Edit
Plan Settings, then select “Never” from the “Put the computer to sleep” menus.
• Before sleeping the system, quit any DAW software using UAD plug-ins.
Computer sleep disabled in the Edit Plan Settings window within Control Panels
Additional Windows Optimizations
• Visit the UAD-2 Satellite USB Knowledge Base at help.uaudio.com for updated
technical news, known issues, and system optimization information.
UAD System Manual UAD-2 Satellite USB 90
Page 91

UAD-2 Satellite USB Operation
After hardware and software setups are complete, UAD-2 Satellite USB is ready for use.
UAD-2 Satellite USB operation is essentially the same as UAD-2 PCIe cards. Refer to the
other chapters in this manual for general operating instructions.
Important: Operations specific to UAD-2 Satellite USB are detailed in this
chapter.
HOST Indicator
The HOST indicator on the front panel indicates the operating state of
unit. The indicator color can be white or red. Three HOST states are
possible:
Blinking white (starting) – The unit is starting up after power is
applied. Full boot time is approximately 8 to 10 seconds.
Blinking white and red (host undetected) – The host computer is not connected and/
or the UAD device drivers are not installed. Check connections and/or reinstall the UAD
software.
Solid white (normal) – The unit connected to the host computer and communicating with
the UAD device drivers. This is the state during normal operation.
Powering On
Follow these guidelines when bringing up the computer and DAW systems:
• Power on UAD-2 Satellite USB and wait for the solid white HOST Indicator before
opening a DAW or other audio applications.
• UAD-2 Satellite USB may be powered on before or after the computer is started.
Powering Off
Follow these guidelines when shutting down the DAW and computer systems:
• Close all audio applications before powering down or disconnecting UAD-2
Satellite USB.
• UAD-2 Satellite USB may be powered down and/or disconnected while the
computer is running, as long as no UAD plug-ins are loaded.
UAD System Manual UAD-2 Satellite USB 91
Page 92

UAD-2 Satellite FireWire
Serious analog sound for FireWire-equipped Macs and PCs
A simple FireWire connection is all it takes to plug your Mac or PC into the world’s finest
analog hardware emulations. UAD-2 Satellite DSP Accelerators offer full access to UAD
Powered Plug-Ins, including exclusive titles from Studer, Ampex, Lexicon, Neve, Manley,
SSL and more.
UAD-2 Satellite FireWire features a sleek, ultra-portable FireWire 800-based processing
unit, plus the Analog Classics plug-in bundle, giving you massive analog character, right
out of the box.
Once installed and configured, UAD-2 Satellite FireWire is functionally similar to its
UAD-2 PCIe card counterparts. The main difference between UAD-2 Satellite FireWire
and UAD-2 PCIe cards is differing architectures (FireWire versus PCIe).
DUO and QUAD Versions
UAD-2 Satellite FireWire is available in two versions: DUO and QUAD. The primary
difference between these two models is the number of processors inside the device (and
therefore the available DSP horsepower for running UAD plug-ins). The DUO or QUAD
designator is silk-screened on the bottom of the UAD-2 Satellite FireWire housing.
Note: UAD-2 Satellite FireWire DUO is a discontinued product.
Documentation
UAD-2 Satellite FireWire is designed for use with UAD Powered Plug-Ins, the companion
software package that includes the drivers, plug-ins, and documentation.
Instructions in this chapter are specific to UAD-2 Satellite FireWire operations only,
and apply in addition to the other chapters. To get the most from your UAD-2 Satellite
FireWire, please review the information in this chapter and the rest of this manual.
About FireWire
This chapter contains information about the FireWire protocol and how to use it with
UAD-2 Satellite FireWire. For details, see all sections in FireWire Basics.
UAD System Manual UAD-2 Satellite FireWire 92
Page 93

Features
• UAD-2 DUO or QUAD in an external housing chassis
• 44.1 - 192 kHz DSP Audio Accelerator for FireWire computers
• FireWire 800 & 400 interface
• Same potent DSP power as UAD-2 PCIe DUO or QUAD
• Kensington Security Slot for anti-theft cables
Retail Package Contents
• UAD-2 Satellite FireWire unit (DUO or QUAD version)
• External power supply with international AC plug adapters
• FireWire 800 (9-pin) cable
• Important Information Sheet
System Requirements
To use UAD-2 Satellite FireWire, the computer must meet the System Requirements.
UAD System Manual UAD-2 Satellite FireWire 93
Page 94

UAD-2 Satellite FireWire Installation
Install Software First
The software installation procedure for UAD-2 Satellite FireWire is the exact same
procedure as those for UAD cards. Install the software before the hardware unless you
are updating a previous installation. Refer to UAD Installation for detailed procedures.
UAD-2 Satellite FireWire Install Location
When selecting a location to position UAD-2 Satellite FireWire during installation and
use, consider these points:
• The unit should be positioned on a secure, stable surface and not moved during
operation. This will help prevent the disruption of signals from cables and/or
connectors if they are accidentally bumped or disconnected.
• For proper ventilation to prevent overheating, place UAD-2 Satellite FireWire on a
hard, flat surface and do not cover the unit. Allow air to circulate underneath the
chassis. Two UAD-2 Satellite FireWire units may be safely stacked.
• High levels of radio-frequency radiation could interfere with proper operation.
If possible, avoid placement near unshielded monitors, radio transmitters, and
similar equipment.
Security Slot
The Kensington Security Slot is on the rear panel. This
feature helps prevent theft when used with an optional
locking cable such as the Kensington MicroSaver Security
Cable. Refer to the instructions that come with the
optional cable.
UAD System Manual UAD-2 Satellite FireWire 94
Page 95

External Power Supply
UAD-2 Satellite FireWire includes an external international DC power supply with
changeable AC connectors to match the AC socket in various countries.
Important: UAD-2 Satellite FireWire cannot be bus powered via FireWire. The
included power supply must be used.
External DC power supply and changeable AC connectors
To change the AC connector:
1. Press and hold the button on the AC connector marked PUSH.
2. Rotate the AC prongs counter-clockwise to remove the connector.
3. Insert the desired connector and rotate clockwise until it snaps into place.
To remove AC connector:
1. Press and hold button 2. Rotate counter-clockwise
Note: The removable connectors are keyed so they cannot be inserted incorrectly.
UAD System Manual UAD-2 Satellite FireWire 95
Page 96

Connecting UAD-2 Satellite FireWire
Important: Install the UAD software before connecting UAD-2 Satellite FireWire.
UAD-2 Satellite FireWire may be connected before or after the system is booted.
To connect UAD-2 Satellite FireWire:
1. Ensure that the UAD Powered Plug-Ins software is already installed and that the
system was powered down after software installation (Mac systems can be hotplugged after restarting). See UAD Installation for specific instructions.
2. Ensure that all UAD plug-in host software is quit.
3. Select a suitable see UAD-2 Satellite FireWire Install Location for the unit.
4. Connect the AC end of the external power supply to an AC outlet.
5. Connect external power supply output cable to the DC input on the rear panel of
the UAD-2 Satellite FireWire unit.
6. Connect one end of the FireWire cable to the FireWire port on the host computer.
7. Connect the other end of the FireWire cable to the UAD-2 Satellite FireWire
chassis.
Important: Do not connect more than one FireWire port to the computer. The
FireWire protocol is bidirectional, so only one FireWire cable is needed.
8. Turn on UAD-2 Satellite FireWire using the power switch on the rear panel. The
unit may be powered on before connecting without consequence.
9. Start the computer system.
UAD-2 Satellite FireWire connections are complete and the device is ready for UAD-2
Satellite FireWire Operation. Additional connection methods are detailed later in this
chapter.
Disconnecting UAD-2 Satellite FireWire
Important: The proper sequence must be followed before disconnecting UAD-2
Satellite FireWire from the computer to avoid unpredictable behavior and/or data
loss.
To disconnect UAD-2 Satellite FireWire:
1. Save your sessions and quit all audio software (DAW applications and the UAD
Meter & Control Panel).
2. Disconnect UAD-2 Satellite FireWire from the FireWire port.
Note: UAD-2 Satellite FireWire may be disconnected when it and/or the computer
is powered, as long as the steps above are followed.
UAD System Manual UAD-2 Satellite FireWire 96
Page 97
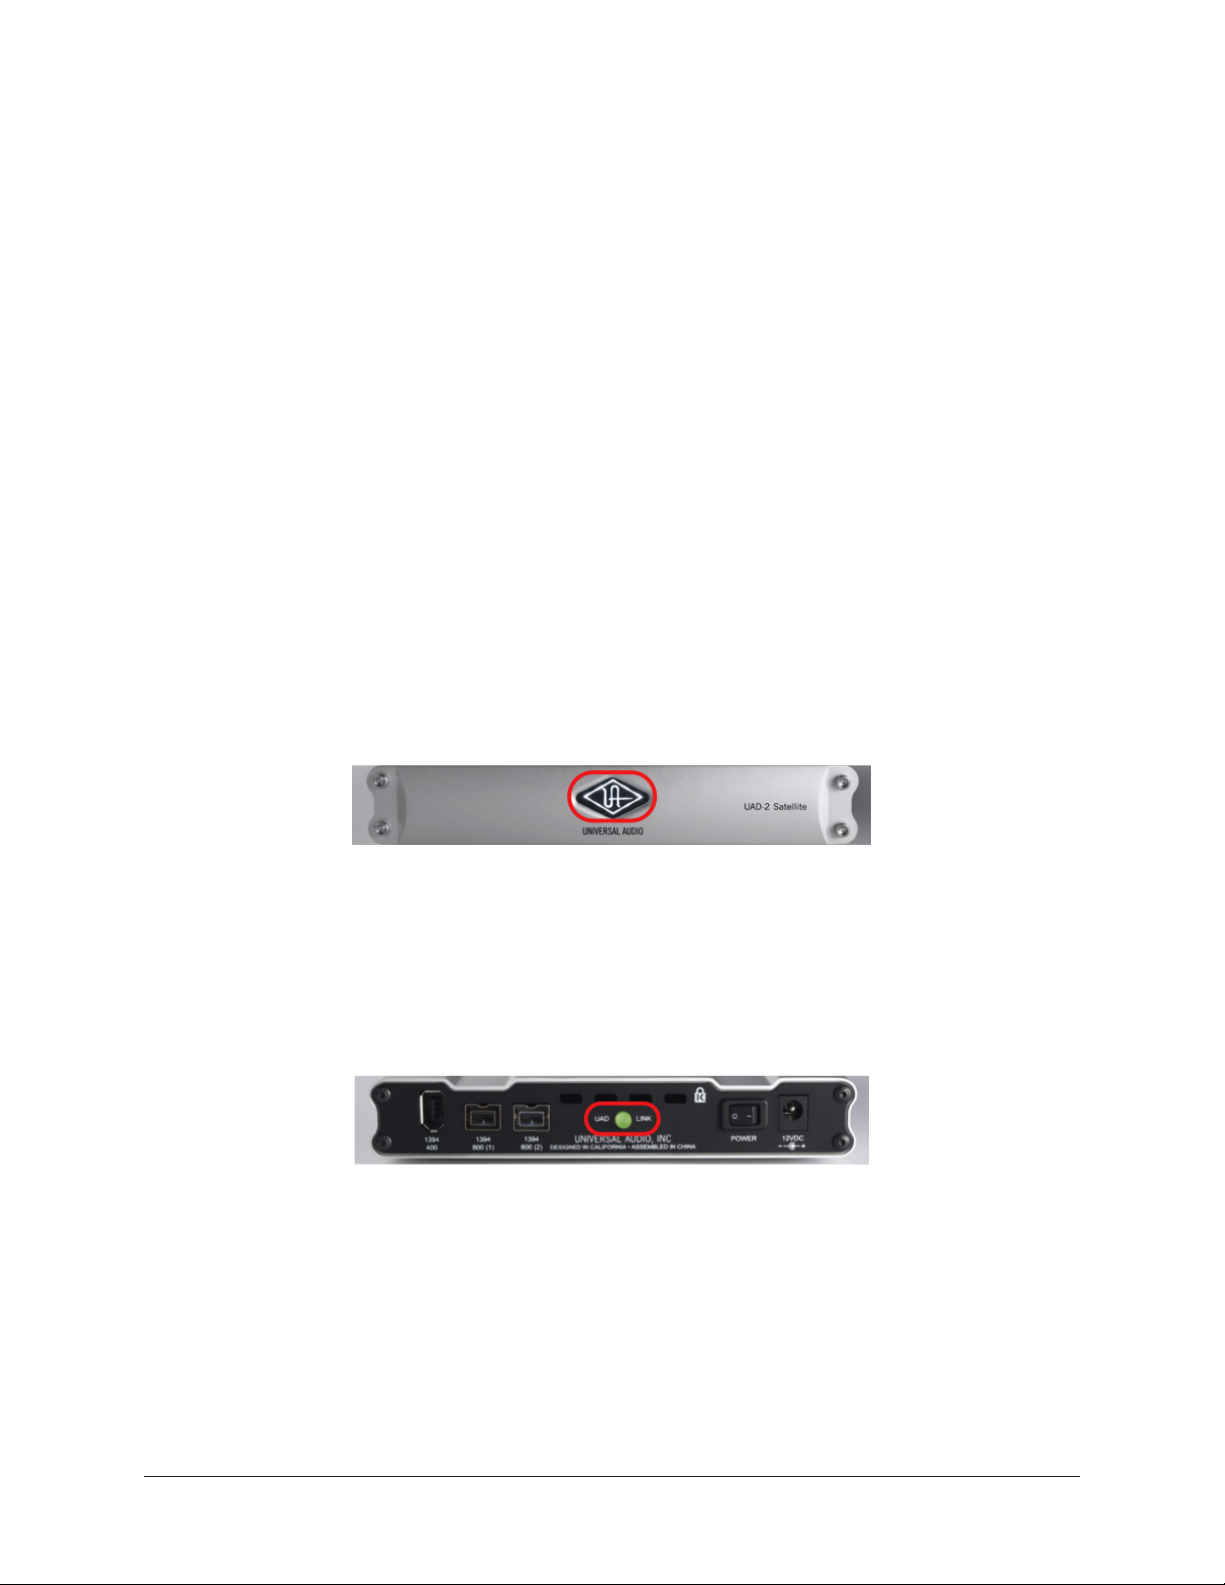
UAD-2 Satellite FireWire Operation
After the UAD Powered Plug-Ins software is installed and UAD-2 Satellite FireWire is
properly connected to the computer via FireWire, the system is ready for use. Refer to
other chapters in this manual for UAD software operating instructions.
All UAD-2 Satellite FireWire operations (except for hardware setup) are similar to the
operation of other UAD-2 devices. See Important UAD-2 Satellite FireWire Notes for
exceptions specific to UAD-2 Satellite FireWire.
About FireWire
For general information about FireWire and how it is used with UAD-2 Satellite FireWire
and other FireWire devices, see FireWire Basics and FireWire Bandwidth.
Note: Available FireWire bandwidth is unrelated to UAD DSP loads. See FireWire
Bandwidth vs. UAD DSP for details.
Power Indicator
When power is applied to UAD-2 Satellite FireWire via the rear switch, the UA logo on
the front panel glows. This power indicator does not represent the state of the UAD
drivers or their link to UAD-2 Satellite FireWire (the Rear Panel LED indicates the
operational state).
UAD-2 Satellite FireWire Power Indicator
Rear Panel LED
UAD-2 Satellite FireWire has a UAD link indicator on the rear panel. This LED provides
information about the operational state of the device and its drivers. For more details,
see UAD-2 LED.
UAD-2 LED on Satellite FireWire rear panel
UAD System Manual UAD-2 Satellite FireWire 97
Page 98

Connect/Reconnect
Quit all audio software before connecting or reconnecting UAD-2 Satellite FireWire. The
device can be connected or reconnected when the device and/or the host computer is
already powered on. The device will be detected and the UAD drivers will automatically
load upon connection.
Adding a device to the active bus
Connecting or disconnecting any FireWire device to an active FireWire bus causes a
“bus reset” (as specified by the FireWire protocol). When a FireWire bus reset occurs,
all active UAD plug-ins are disabled. The session must be reloaded to reactivate UAD
plug-ins.
Note: Connect all FireWire devices to the bus before activating UAD plug-ins.
Disconnect
UAD-2 Satellite FireWire can be disconnected when it and/or the host computer is active
or sleeping as long as no UAD host applications (including UAD Meter & Control Panel)
are running.
Important: Do not disconnect UAD-2 Satellite FireWire while UAD plug-ins are
loaded.
System Sleep
System sleep while UAD-2 Satellite FireWire is active is not supported. Before sleeping
the system, quit all audio plug-in host applications (including the UAD Meter & Control
Panel) and disconnect UAD-2 Satellite FireWire. After wake, UAD-2 Satellite FireWire
may be reconnected.
Important: Quit all hosts and disconnect UAD-2 Satellite FireWire before system
sleep.
Hot Plugging (Mac only)
Note: FireWire hot-plugging may work on Windows systems but these operations
are not tested.
Hot plugging refers to the ability to disconnect UAD-2 Satellite FireWire while the
host computer is active or sleeping, and reconnect it at a later time without rebooting.
UAD-2 Satellite FireWire supports hot plugging (hot plugging is part of the FireWire
specification) on Mac systems.
As long as the UAD drivers are properly installed, if UAD-2 Satellite FireWire is hotplugged into an active FireWire bus, the UAD drivers will load automatically and be ready
for use.
However, disconnecting UAD-2 Satellite FireWire when UAD plug-ins are loaded could
cause session data loss and/or unpredictable behavior. Quit all UAD hosts and the UAD
Meter & Control Panel before disconnecting the device.
UAD System Manual UAD-2 Satellite FireWire 98
Page 99
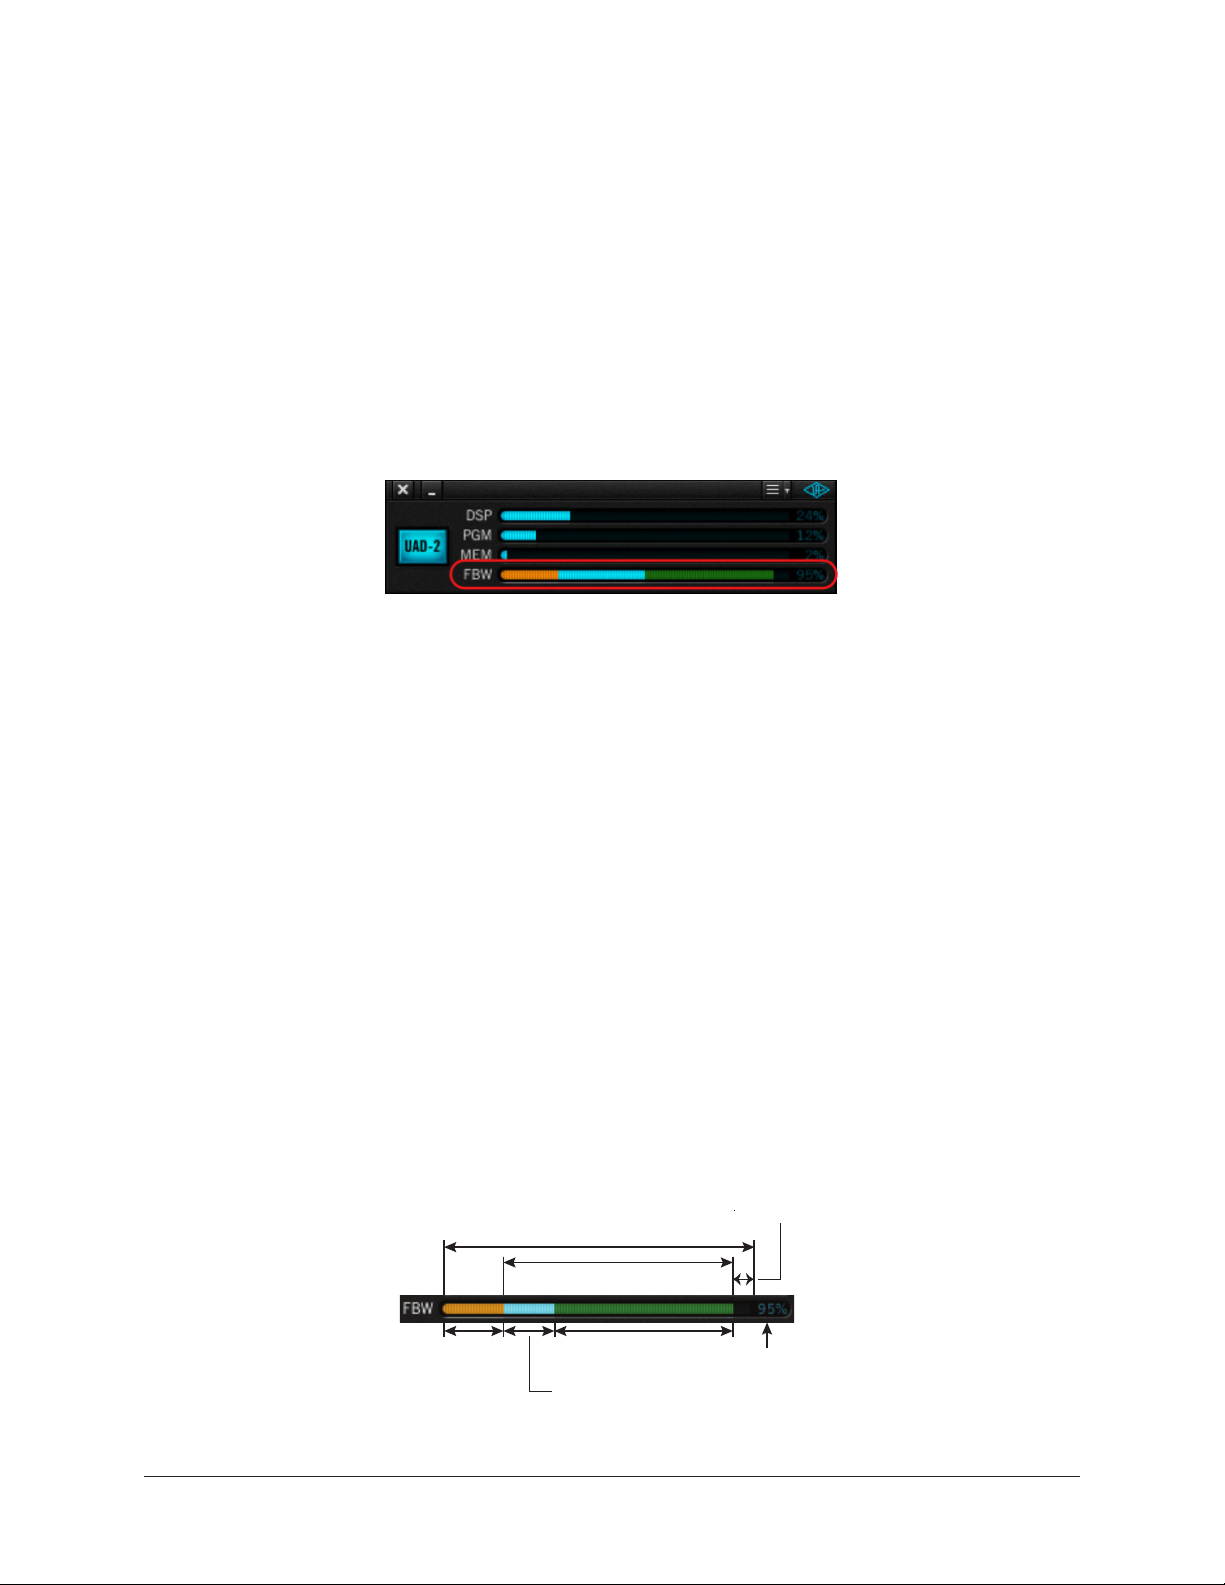
FireWire Bandwidth
All devices on a FireWire bus must share the available data bandwidth of the bus,
including hard drives and audio interfaces as well as UAD-2 Satellite FireWire. If there
is not enough FireWire bandwidth to handle all the data traffic on the bus, performance
issues (such as audio clicks/pops/dropouts or UAD overloads) could occur.
FireWire Bandwidth Meter
When UAD-2 Satellite FireWire is connected, the UAD Meter window displays the
FireWire Bandwidth (FBW) meter, showing the amount of FireWire bandwidth being used
by UAD-2 Satellite FireWire and other FireWire devices on the bus. Elements of the UAD
FireWire Meter illustrates all of the elements in the meter.
The FireWire Bandwidth meter is visible when a UAD FireWire device is connected
Important: FireWire bandwidth is unrelated to UAD DSP loads. See FireWire
Bandwidth vs. UAD DSP for details.
Sharing Bandwidth
If UAD-2 Satellite FireWire is the only device on the FireWire bus, UAD processing traffic
can use the entire bandwidth of the bus. However, if other FireWire devices are on the
bus, the amount of bandwidth used for UAD traffic must be reduced so those devices will
have enough bandwidth for their processes as well.
Bandwidth Control
The FireWire bandwidth used for UAD traffic is controlled using the UAD Bandwidth
Allocation control. By using the FireWire Bandwidth Meter, it’s easy to determine how
much bandwidth is being used by the non-UAD devices, so appropriate choices can be
made when setting the UAD Bandwidth Allocation.
These settings, and all other UAD-2 Satellite FireWire parameters, are made in the
FireWire Panel. See that section for detailed descriptions of the FireWire controls.
Available FW bandwidth (headroom)
Total available Firewire bus bandwidth
UAD Bandwidth Allocation
(blue + green)
Used by
other devices
(orange)
Available for UAD
Used by
UAD (blue)
(green)
Total allocated
bandwidth
(UAD + other
devices)
Elements of the UAD FireWire Meter
UAD System Manual UAD-2 Satellite FireWire 99
Page 100

Important UAD-2 Satellite FireWire Notes
For maximum system stability and reduced possibility of data loss, please observe the
requirements below when operating UAD-2 Satellite FireWire:
Note: Only FireWire 800 connections are tested.
• Due to differing architectures, LiveTrack Mode is unavailable when UAD-2
Satellite FireWire is connected. LiveTrack Mode is also unavailable with UAD-2
PCIe cards or Apollo via Thunderbolt when UAD-2 Satellite FireWire is connected
to the same system as these devices.
• UAD-2 Satellite FireWire has a minimum hardware buffer requirement of 512
samples. The hardware I/O buffer setting for the host and audio interface can be
adjusted to a value lower than 512 samples when UAD-2 Satellite FireWire is
connected, and the UAD-2 Satellite FireWire drivers dynamically adjust to allow
for the lower buffer setting while still maintaining UAD-2 Satellite FireWire’s
minimum buffer requirement of 512 samples.
Note: For the lowest latency while tracking, disable any plug-ins currently running
on UAD-2 Satellite FireWire from the input tracks and the monitoring and/or
master output paths.
• All devices on the FireWire bus share the available data bandwidth of the bus,
including external hard drives and audio interfaces as well as UAD plug-ins. The
amount of UAD DSP that is available for UAD plug-in processing can exceed the
available FireWire bandwidth. For these reasons, the value of the UAD Bandwidth
Allocation setting is critical. See FireWire Bandwidth and FireWire Bandwidth vs.
UAD DSP for more details.
• All three FireWire ports on UAD-2 Satellite FireWire may be used concurrently
as a FireWire hub, however FireWire bus power is not supplied to downstream
devices. See Bus Power for details.
• See Mixing FireWire Speeds for important information about using FireWire 800
and FireWire 400 devices on the same bus.
• Although hot-plugging is supported on Mac systems, disconnecting UAD-2
Satellite FireWire when UAD plug-ins are running could cause unpredictable
behavior. Quit all UAD hosts and the UAD Meter & Control Panel before
disconnecting or powering down UAD-2 Satellite FireWire.
Important: Do not disconnect UAD-2 Satellite FireWire while UAD plug-ins are
loaded.
(Continued)
UAD System Manual UAD-2 Satellite FireWire 100
 Loading...