

Page 1
OX Operation Manual
Manual Version 180130
www.uaudio.com
Page 2

A Letter from Bill Putnam Jr.
Thank you for choosing the OX Amp Top Box as part of your music making experience.
We know that any new piece of gear requires an investment of time and money — and
our goal is to make your investment pay off.
Universal Audio’s family of products represent the best examples of what UA has stood
for over its long history; from its original founding in the 1950s by my father, to our
current vision of delivering the best of both analog and digital audio technologies.
The OX Amp Top Box allows you to play and record your tube amp in its perfect tonal
sweet spot — anywhere, and at any volume. Featuring the world’s best all-analog reactive
load, OX also offers album-quality mic and speaker cabinet emulations, UA’s Dynamic
Speaker Modeling, onboard UAD effects, and much more.
At UA, we are dedicated to the idea that technology should serve the creative process
— not be a barrier. These are the very ideals my father embodied as he invented audio
equipment. We believe the OX Amp Top Box will earn its way into your creative workflow
by providing stunning guitar tones and rock-solid reliability for years to come.
Please feel free to reach out to us via our website www.uaudio.com, and via our social
media channels. We look forward to hearing from you, and thank you once again for
choosing Universal Audio.
Sincerely,
Bill Putnam Jr.
OX Amp Top Box Letter From Bill Putnam Jr.2
Page 3

Table Of Contents
Tip: Click any section or page number
to jump directly to that page.
A Letter from Bill Putnam Jr. ................................................................. 2
Welcome to OX Amp Top Box! ................................................................ 5
About OX Documentation .................................................................................... 6
Critical Operation Notes ........................................................................ 7
Critical Notes — Avoid Equipment Damage .......................................................... 7
Important Notes — Reduce Equipment Wear ........................................................ 8
Quick Start .......................................................................................... 9
Important Setup Steps ....................................................................................... 9
Amp & Speaker Connections ............................................................................. 10
Output Connections ......................................................................................... 11
Control Knobs ................................................................................................. 12
Quick Operation Notes ..................................................................................... 12
Controls & Connectors ......................................................................... 13
Front Panel ..................................................................................................... 13
Rear Panel ...................................................................................................... 16
OX Software App ................................................................................ 22
OX App Features .............................................................................................. 22
Essential App Concepts .................................................................................... 23
RIG View ......................................................................................................... 25
Presets Management ........................................................................................ 28
Loading Presets ............................................................................................... 30
Saving Presets ................................................................................................. 31
Effect Editors .................................................................................................. 33
ASSIGN View .................................................................................................. 34
Store Individual Rigs to OX’s RIG Knob .............................................................. 35
Store Rig Sets to OX’s RIG Knob........................................................................ 35
SETTINGS View ............................................................................................... 36
Rig, Cabinet, & Mic Descriptions .......................................................... 37
Default RIG Control Cab & Mic Presets .............................................................. 37
Default Rig Sets .............................................................................................. 38
Speaker Cabinets ............................................................................................. 39
Cabinet Microphones ...................................................................................... 42
Room Microphones .......................................................................................... 44
OX Amp Top Box Table Of Contents3
Page 4

OX System Overview ............................................................................ 45
OX Wi-Fi Networking ........................................................................... 49
OX Wi-Fi Hotspot ............................................................................................. 49
External Wi-Fi Networking................................................................................. 50
OX Registration .................................................................................. 51
OX Registration Overview .................................................................................. 51
OX Registration Procedure ................................................................................ 52
Troubleshooting .................................................................................. 54
Wi-Fi Reset ..................................................................................................... 54
Factory Reset .................................................................................................. 54
Specifications .................................................................................... 55
Block Diagram .................................................................................... 57
Notices .............................................................................................. 58
Warranty ......................................................................................................... 58
Repair Service ................................................................................................. 58
Maintenance ................................................................................................... 58
Technical Support ............................................................................... 63
Universal Audio Knowledge Base ....................................................................... 63
YouTube Support Channel ................................................................................. 63
Universal Audio Community Forums .................................................................. 63
Contact Universal Audio Support ....................................................................... 63
OX Amp Top Box Table Of Contents4
Page 5

Welcome to OX Amp Top Box!
Get Legendary Studio Tones from your Tube Amp — Anywhere, at Any Volume.
OX is a premium reactive load box and guitar recording system, giving you perfectly
studio-miked amp sounds from your favorite tube amp. OX lets you play and record your
amp in its sweet spots — from huge clean tones and edge-of-breakup to fully cranked —
at any volume level, and with mic, room, and speaker cabinet emulations at the turn of a
knob.
Featuring Universal Audio’s breakthrough Dynamic Speaker Modeling, OX is the first
system to accurately emulate speaker drive, breakup, and cone cry — making it the
world’s finest speaker attenuator and guitar amp recording solution.
Now You Can:
• Play and record your tube amp in its tonal sweet spot — anywhere, at any volume,
with full dynamics
• Get stunning mic and guitar cabinet combinations at the turn of a RIG knob — no
miking required
• Audition, tweak, and save more than 100 jaw-dropping custom Rigs from
compatible iPad or Mac
• Get authentic “edge of destruction” sounds, complete with UA Dynamic Room
Modeling, speaker breakup, and cone cry
The World’s Best Reactive Load Box
With decades of analog hardware engineering expertise, Universal Audio’s dream team of
engineers set out to design a reactive load box that retains the tone, dynamics, and feel
of your tube amp — no matter how much it’s attenuated. The goal was for your tube amp
to “see” OX as an actual speaker — with continuously variable impedance and response
— so you don’t lose a drop of tone or playing dynamics.
A Complete Guitar Recording System
OX’s front-panel, six-position RIG control allows you to quickly choose from complete
setups — including emulated speaker cabinets, close mics, ambient room mics, and up
to four simultaneous studio effects. OX is also the only guitar recording system to offer a
complete selection of expertly placed room mics, giving you the authentic experience of
pushing air while recording your cranked amp in a world-class tracking room.
OX Amp Top Box Welcome to OX Amp Top Box! 5
Page 6

Dynamic Speaker Modeling
UA’s groundbreaking Dynamic Speaker Modeling faithfully emulates speaker breakup,
drive, and cone cry — an essential ingredient to authentic tube amp tones. Using
the Speaker Breakup knob in the OX app, you can control the harmonics and sonic
complexity that occurs only at certain frequencies and volume levels on various
speakers — far beyond a static Impulse Response system — giving you the same sonic
phenomenon that occurs with a real speaker cabinet.
A Beautiful Software App
Most guitar products do digital awkwardly. They’re ugly and hard to understand. The
OX software app, on the other hand, offers slick, intuitive control over all of OX’s RIG
settings via Wi-Fi — letting you tweak, store and recall hundreds of presets from your
iPad or Mac. You can then save your six favorite tones onto OX’s front-panel RIG knob for
instant recall in the studio or at a gig.
The Right Connections
Not only does OX Amp Top Box feature a front-panel headphone jack for silent practice
with your cranked tube amp, it also sports a bevy of connections for all kinds of recording
and live workflows. Stereo S/PDIF digital outputs via RCA and optical TOSLINK, as well
as balanced TRS stereo line outputs with front panel level control, give you the necessary
connections for studio monitors, DAW, or live mixing console inputs.
About OX Documentation
This manual is your primary resource for connecting and operating OX hardware and
software. See the Table Of Contents to find the information you’re looking for.
Links to other manual sections and web pages are highlighted in blue text. Click the link
to jump directly to the item.
Tip: Use the “back” button in the PDF reader application to return to the previous
page after clicking a link.
For additional resources such as videos and knowledge base articles, or to contact our
technical support team, see Technical Support.
OX Amp Top Box Welcome to OX Amp Top Box! 6
Page 7

Critical Operation Notes
Caution: Connecting and/or operating OX incorrectly can cause permanent
damage to your amplifier, OX, and/or other equipment connected to OX.
Universal Audio is not responsible for equipment damage resulting from
improper OX connections and/or operations. Review the important information
in this chapter before connecting or using OX!
Critical Notes — Avoid Equipment Damage
Amp Output Load
DON’T operate any tube amp without an output load such as a guitar speaker or OX. Using a
tube amp without an output load can permanently damage the tube amp.
Caution: Always POWER OFF the tube amp before connecting or disconnecting its
speaker output to guitar speakers or OX.
OX’s Red FROM AMPLIFIER Input Jack
DON’T connect the tube amp’s high-power speaker output to ANYTHING other than OX’s FROM
AMPLIFIER input jack. The nut on this jack is RED to indicate this input is ONLY for the tube
amp’s speaker output.
OX’s TO SPEAKER Output Jack
DON’T connect OX’s high-power TO SPEAKER output jack to ANYTHING other than a guitar
speaker cabinet to avoid equipment damage to other gear.
Amp Power Rating
DON’T use OX with amplifiers exceeding 150 Watts RMS output power. Any tube amp with an
output power rating of 150 Watts RMS or less can be safely used with OX.
Speaker Cable Insertions
DON’T partially insert ¼” speaker cable plugs halfway into the jack or only to the first click. The
cable from the amp’s speaker output must be fully inserted into OX’s red FROM AMPLIFIER
jack to connect the ground return for proper amp loading.
Speaker Cables
Use only high-quality 12 to 16 gauge unshielded ¼” mono TS (tip-sleeve) speaker cables for
OX’s high-power FROM AMPLIFIER and TO SPEAKER connections. “Speaker” is usually printed
on these cables.
Tip: As a general guideline, the longer a speaker cable is, the smaller its cable gauge
needs to be (smaller gauge = bigger wires).
OX Amp Top Box Critical Operation Notes 7
Page 8

Rated Speaker Power
DON’T connect OX’s TO SPEAKER output to any speaker that is rated for a power level that is
significantly less than the connected amplifier’s output power to avoid speaker damage.
Moisture and Liquids
DON’T expose OX to moisture or liquids. Make a habit of never putting beverages on your OX. If
liquid is spilled into the unit, immediately unplug the power cord from the AC socket.
Cooling Airflow
DON’T cover OX’s air vents or otherwise restrict airflow around OX. The amp’s output power is
converted to heat by OX’s fanless attenuation circuit, and the air vents must be unrestricted to
dissipate this heat.
Solid State Amplifiers
Using OX with solid state amplifiers (amps without vacuum tubes) is not recommended and not
supported. OX is designed and optimized for use with tube amplifiers only.
Important Notes — Reduce Equipment Wear
Circuit Wear with Power Attenuation
Circuitry within an attenuated amp is subject to the same wear and tear that would occur if
its output power was not attenuated. If an amp is constantly run at higher power levels, the
lifespan of an amp’s components is reduced accordingly.
Increased circuit wear applies especially to the amp’s vacuum tubes, capacitors, and
transformers due to the increased heat and current generated at higher power levels.
Tip: A tube amp’s sweet spot might not be at full output power — a “dimed” amp
doesn’t always sound better. Less power and soak might deliver better tone AND better
tube life.
Impedance
Set OX’s IMPEDANCE knob to match the impedance of the tube amp’s speaker output.
Similarly, the total impedance of speaker(s) connected to OX’s TO SPEAKER jack should match
OX’s IMPEDANCE knob setting.
Many tube amps have multiple speaker output jacks with different impedance labels (4Ω, 8Ω,
etc.) for each output jack. If the amp’s speaker output impedance cannot be determined, set
OX’s IMPEDANCE knob to 8 ohms.
Note that when multiple speakers are combined (such as in a multi-speaker cabinet), the total
impedance depends on how the speakers are wired together. For example, two 8 ohm speakers
wired in series has a total combined impedance of 16 ohms, but if they are wired in parallel,
the total combined impedance is 4 ohms.
OX Amp Top Box Critical Operation Notes 8
Page 9
Quick Start
Caution: To avoid equipment damage, read the Critical Operation Notes before
connecting or using OX!
This chapter provides brief instructions to help you get started with OX. For complete
details about every knob, switch, and jack, see Controls & Connectors.
Important Setup Steps
Follow these steps to properly connect and power OX and your tube amp. For visual
references, see the Amp & Speaker Connections and Output Connections diagrams on
the following pages.
Caution: Always POWER OFF the tube amp before connecting or
disconnecting its speaker output!
1. POWER OFF the tube amplifier.
2. Connect OX’s included power supply to an AC outlet and the power input jack on
OX’s rear panel.
3. Set OX's rear panel IMPEDANCE knob to match the tube amp’s speaker output
impedance. If the amp’s speaker output impedance cannot be determined, set
this knob to 8 ohms.
4. Connect a 1⁄4” speaker cable between the tube amp’s speaker output and the red
FROM AMPLIFIER input jack on OX’s rear panel.
5. Set OX’s SPEAKER VOLUME, LINE OUT, and HEADPHONE knobs to position 0.
6. Connect OX's outputs as desired (see Output Connections).
7. Power on OX with its rear panel POWER switch, then power on the tube amp.
After following the important setup steps, OX is ready for use. Adjust the tube amp and
OX controls as desired.
Important: If your amp doesn't seem loud enough or the SPEAKER VOLUME knob
behaves unexpectedly (for example, it changes line/mon output levels or OX app
signal levels, or speaker volume levels are not smoothly stepped), confirm the tube
amp's speaker output is connected to OX's red FROM AMPLIFIER input jack, not
OX's TO SPEAKER output jack.
Setup Notes
• To download the full-color Quick Start Guide and Rig Control Cab & Mic Presets
reference sheets included in the OX retail package, click here.
• Remember to connect OX to AC power. OX requires the included external power
supply to be operated.
OX Amp Top Box Quick Start 9
Page 10
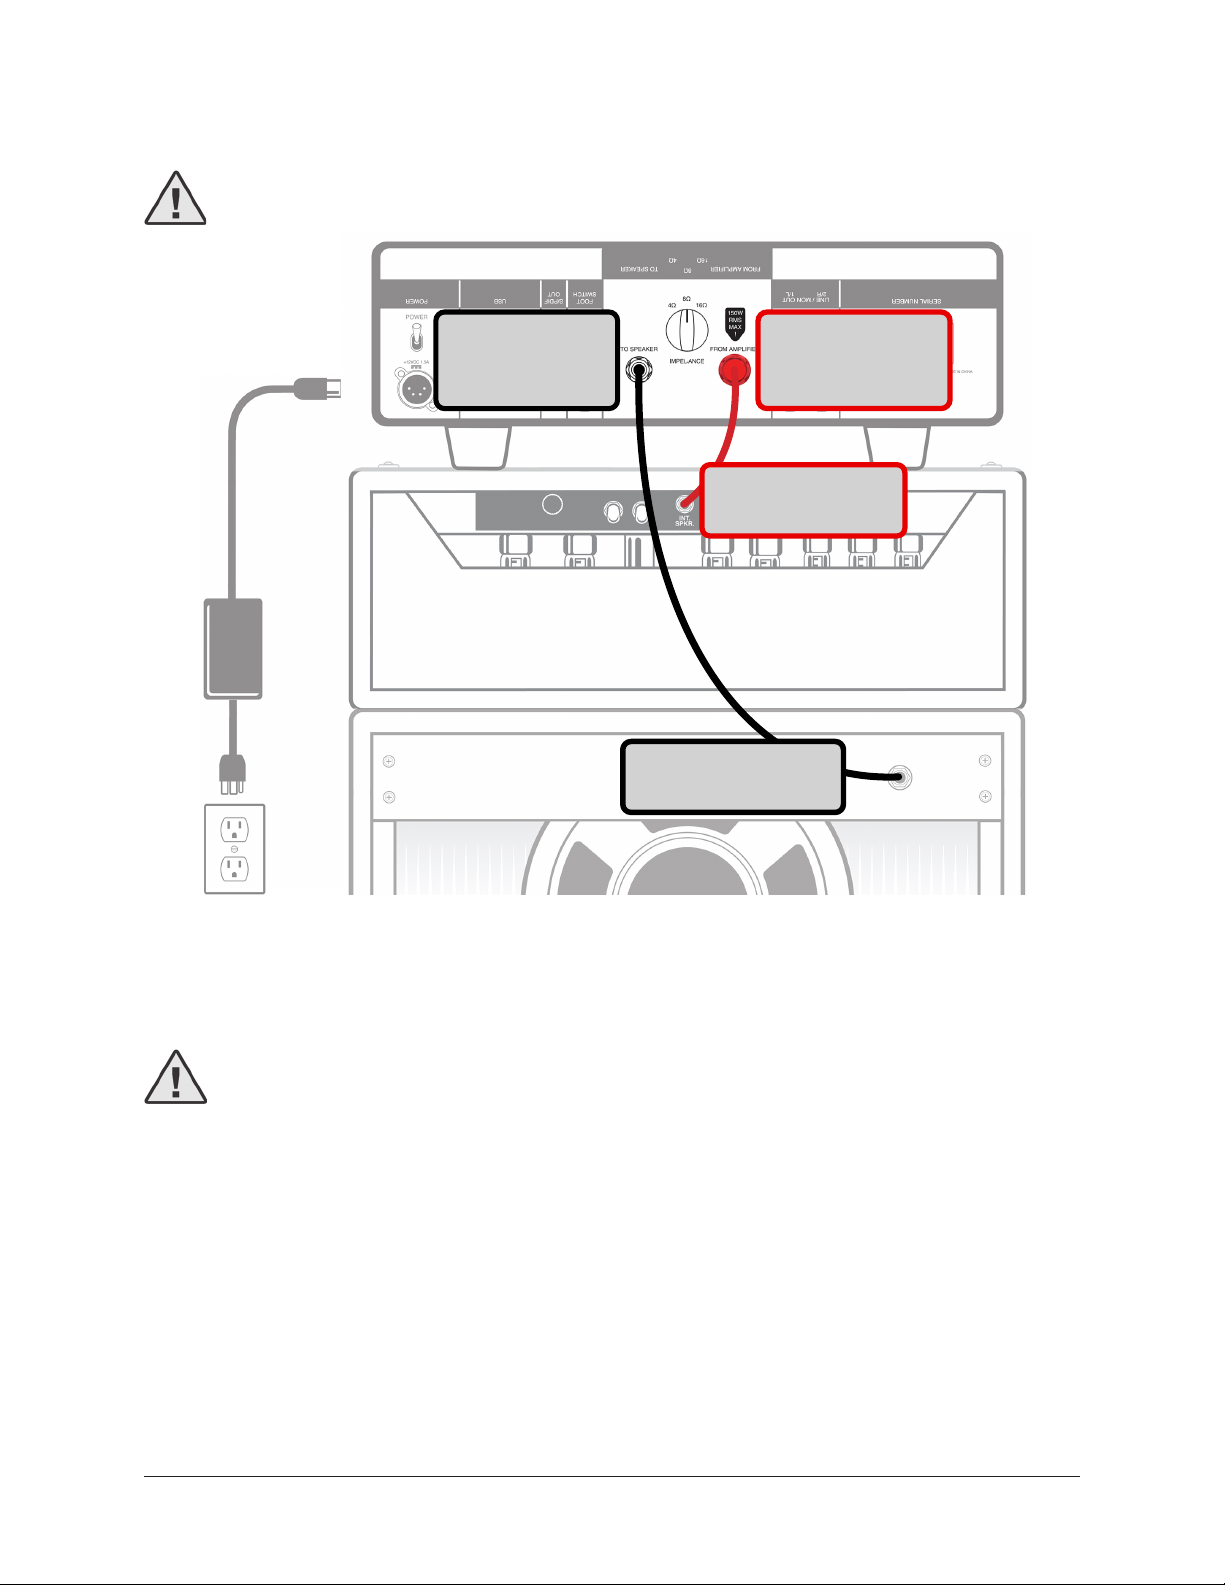
Amp & Speaker Connections
Caution: Always POWER OFF the tube amp before connecting or disconnecting
its speaker output!
Power Supply
OX OUTPUT
“TO SPEAKER”
Amp Speaker Output
(to OX input)
OX INPUT
“FROM AMPLIFIER”
Tube Amplifier
Guitar Speaker
Cabinet
OX speaker wire connections to amp and speaker cabinet
Speaker Cab Input
(from OX output)
Amp & Speaker Connection Notes
Caution: To avoid equipment and/or hearing damage, be careful to connect
and power the amp and OX in the proper sequence. See the Important Setup
Steps for specific instructions.
• Use only high-quality 12 to 16 gauge unshielded ¼” mono TS (tip-sleeve) speaker
cables for OX’s high-power FROM AMPLIFIER and TO SPEAKER connections.
“Speaker” is usually printed on these cables.
Tip: As a general guideline, the longer a speaker cable is, the smaller its cable
gauge needs to be (smaller gauge = bigger wires).
• If connecting a tube combo amp (speaker and amp in the same cabinet), you
might need a male-to-female speaker extension cable with (not included) to reach
between OX's TO SPEAKER output jack and the guitar speaker.
OX Amp Top Box Quick Start 10
Page 11
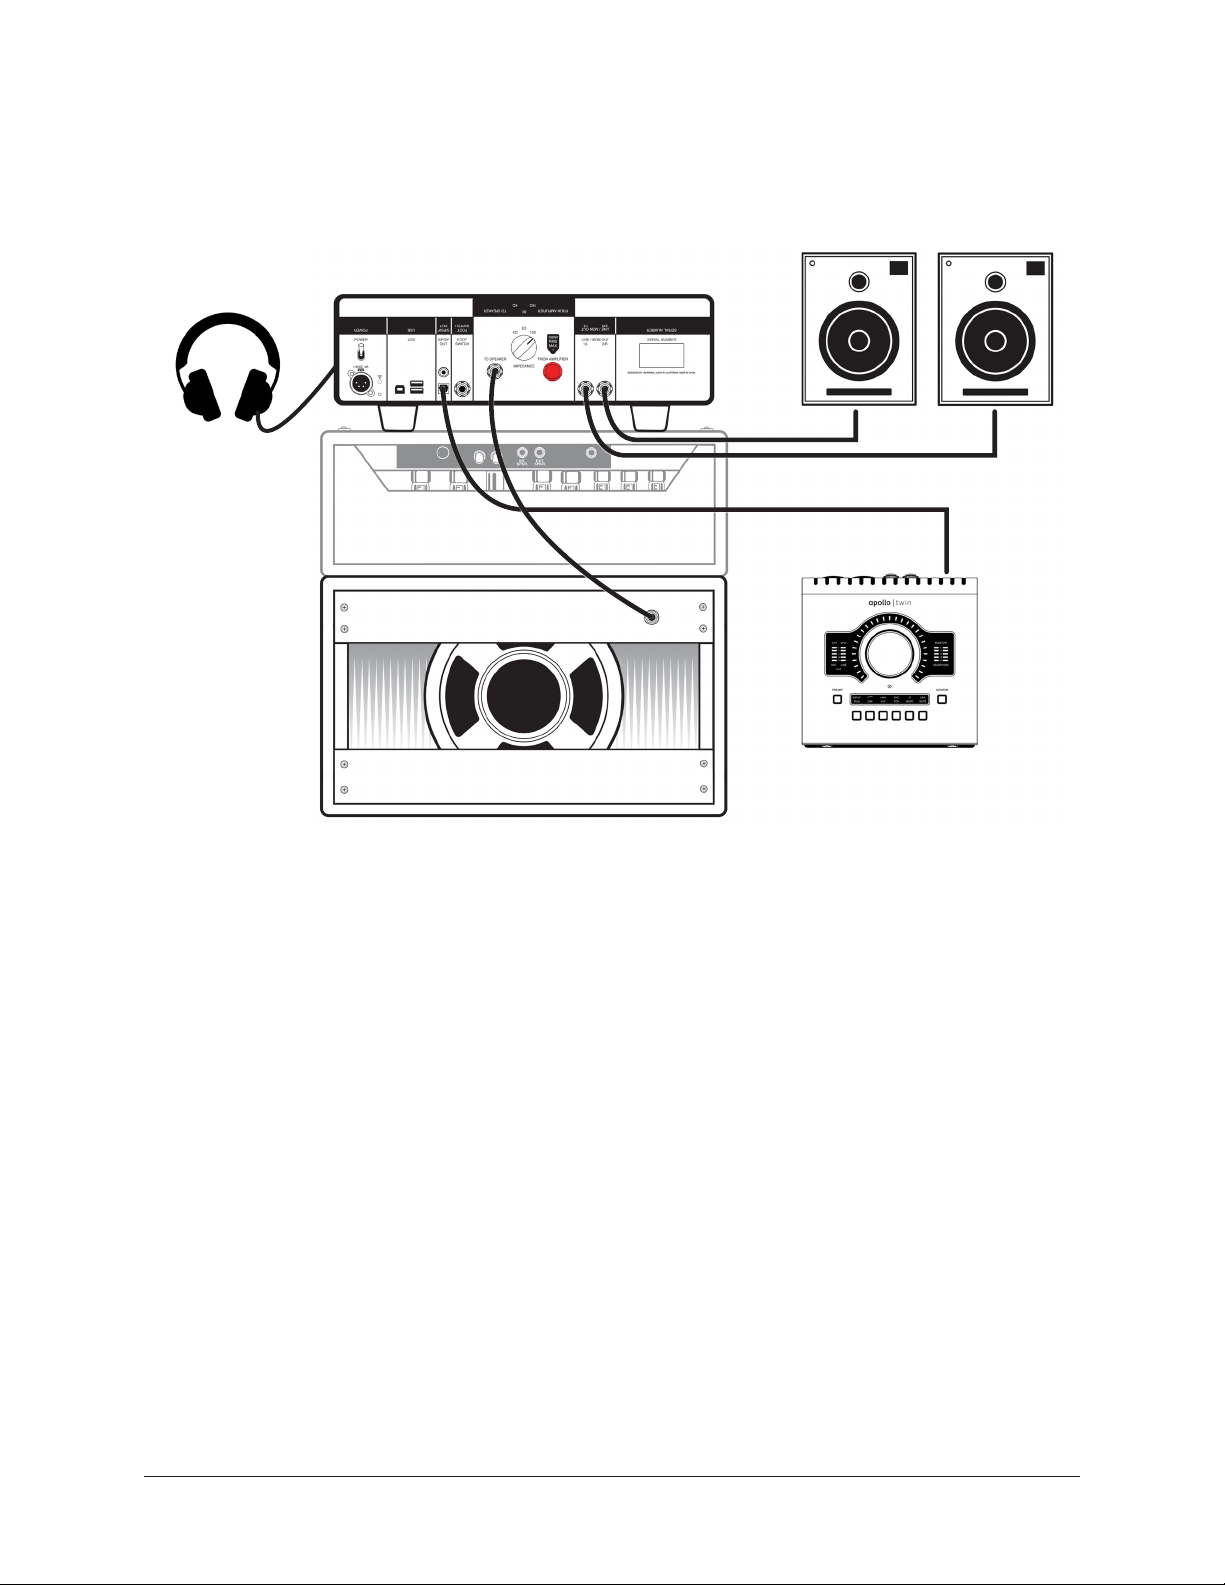
Output Connections
Tip: All of OX's output connections are optional. You only need to connect the
outputs you want to use.
LINE / MON
HEADPHONE
(front panel)
DON'T connect OX
outputs to the amp!
OX "TO SPEAKER"
DIGITAL
Guitar Speaker Cabinet
Typical OX output connections
Guitar Speaker Cabinet
Connect a 1⁄4" speaker cable between OX’s rear panel TO SPEAKER jack and the guitar
speaker cabinet.
Line / Monitor Outputs
Connect OX’s rear panel LINE / MON OUT jacks to the line-level inputs of a stereo
monitor system, computer audio interface, or other audio gear. Use shielded 1⁄4"
balanced TRS or unbalanced TS line / instrument cables (not speaker cables).
Headphones
Connect stereo headphones to the 1⁄4" jack on OX’s front panel.
S/PDIF Digital Outputs
Connect OX’s rear panel S/PDIF digital output(s) to the digital input(s) of a computer
audio interface or other digital audio gear. The optical TOSLINK and coaxial RCA outputs
can both be used at the same time.
OX Amp Top Box Quick Start 11
Page 12
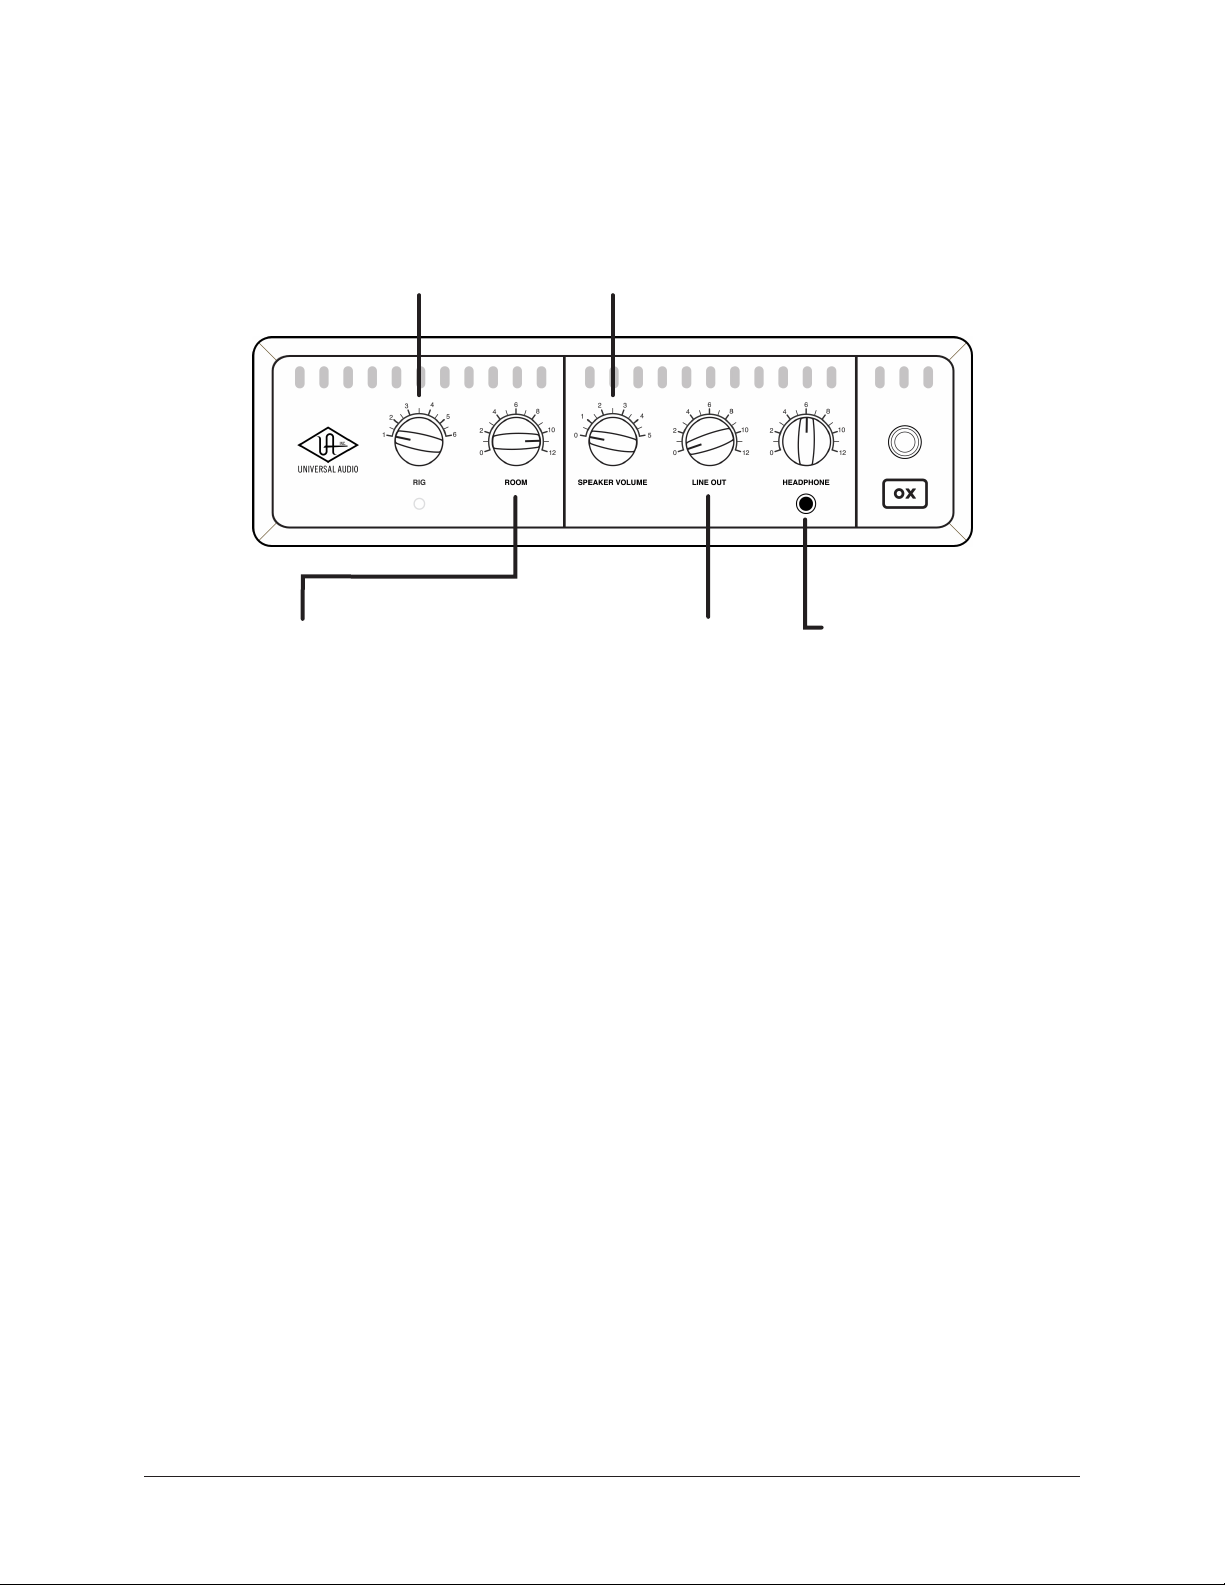
Control Knobs
RIG
Choose from six complete guitar
cabinet+mic+room+effect presets.
ROOM
Instant access to mic’d
studio ambience and air.
Quick Operation Notes
SPEAKER VOLUME
Adjusts the volume of the guitar speaker cabinet
connected to OX. Set to 0 for silent operation.
LINE OUT
Adjusts the level at OX's
stereo LINE/MON outputs.
HEADPHONE
Adjusts the volume of stereo
headphones connected here.
Tip: See Controls & Connectors for complete details about OX's knobs and jacks.
• RIG and ROOM knobs don’t affect OX's guitar speaker output. Rig preset sounds
are heard in OX’s Headphone, Line/Mon, and Digital outputs only. OX’s guitar
speaker output is pure analog amp tone.
• Changing RIG presets and/or settings can cause sudden level jumps in OX's
headphone, line/mon, and digital outputs. Be careful when adjusting the RIG
knob, and settings in the OX software app, when volumes are at higher levels.
• Digital output levels can be adjusted with the OX software app.
Tweak and Save Your Rigs with Free OX Software
OX includes free software for Mac and iPad (OX registration required). With the OX
software app, RIG presets can be wirelessly accessed, edited and stored over OX’s builtin Wi-Fi network. For complete details, see OX Software App.
Get the OX Software App
• From your Mac, visit www.uaudio.com/ox/app
• From your iPad, search “OX Amp Top Box” in the iOS App Store
OX Amp Top Box Quick Start 12
Page 13
Controls & Connectors
Note: See Quick Start for important power sequence and setup instructions.
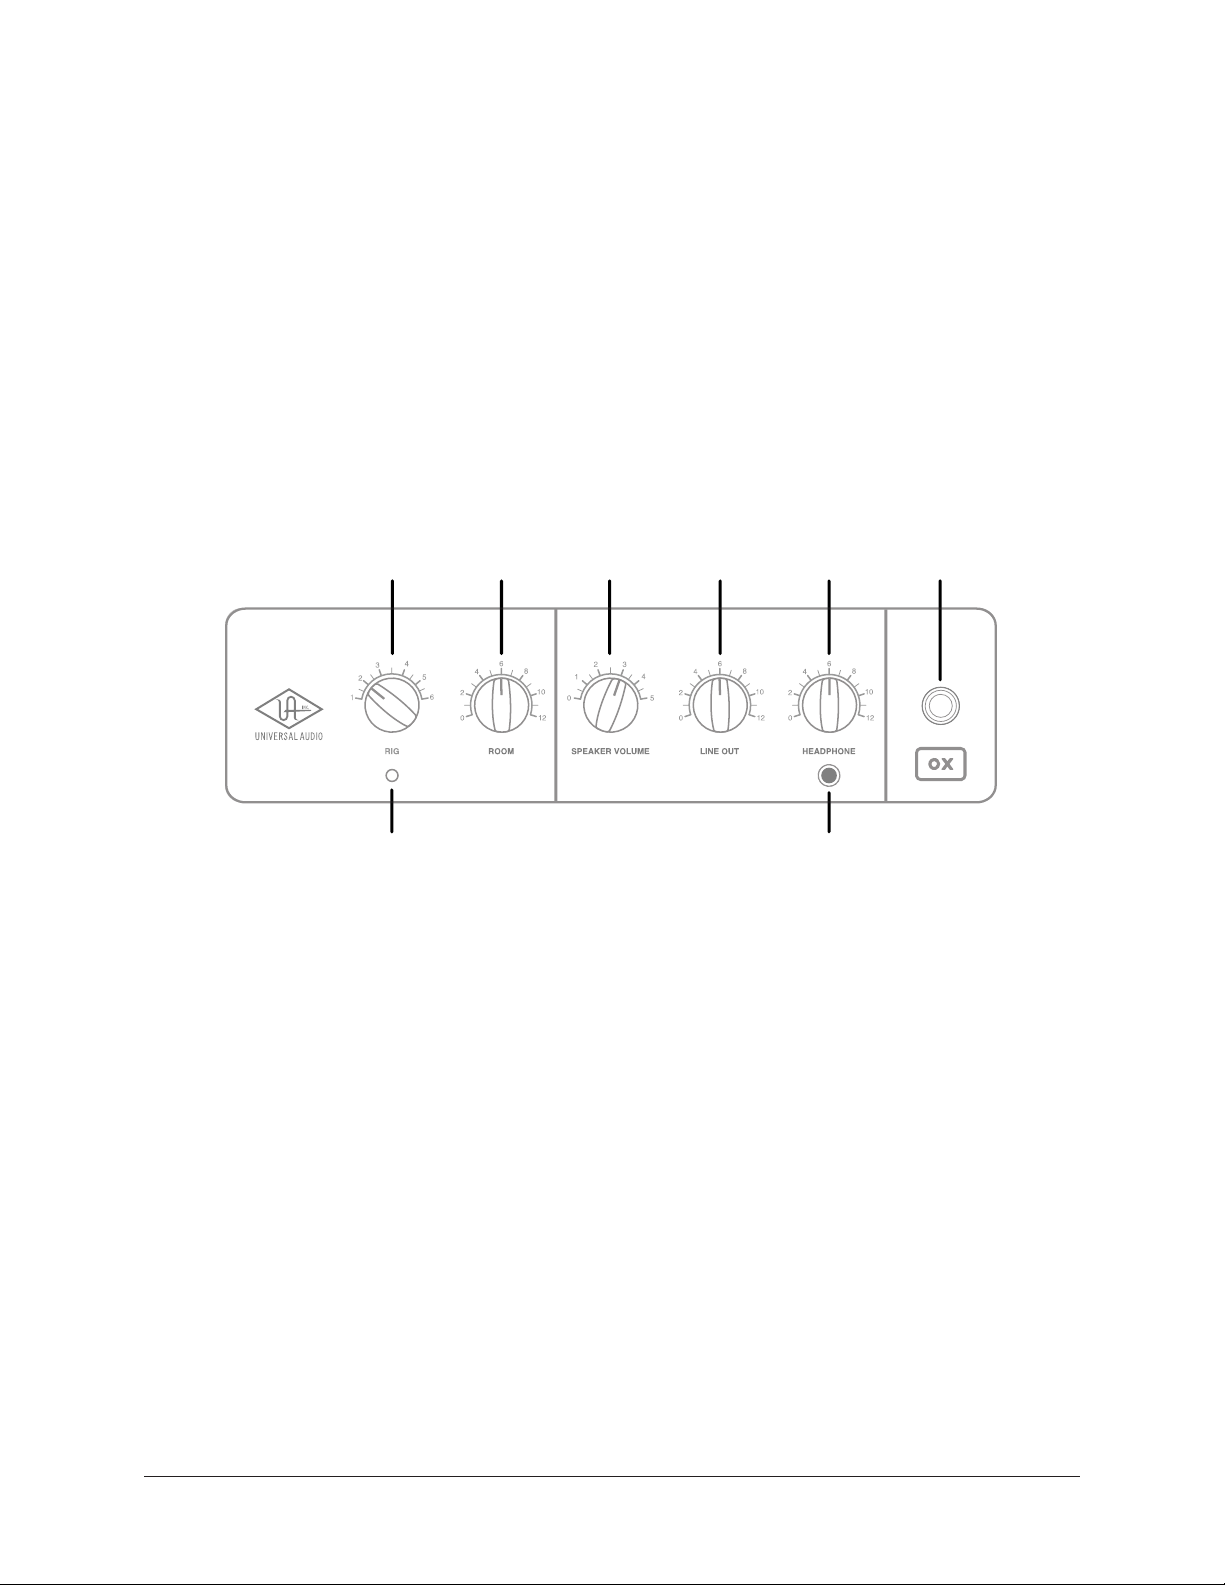
Front Panel
Refer to the illustration below for descriptions in this section.
1
2
3 4 5 6 8
7
OX’s front panel elements
RIG (1)
Each of the six available RIG knob positions recalls a complete cabinet/mic/room/effects
preset. RIG tones are heard in the HEADPHONE, LINE / MON, and S/PDIF outputs, but
not in the TO SPEAKER output.
For a table of the six factory RIG knob assignments and the cabinet/mic/room/effect
settings used in each RIG knob position, see Default RIG Control Cab & Mic Presets.
Tip: RIG settings can be modified and stored with the OX software app.
OX Amp Top Box Controls & Connectors 13
Page 14
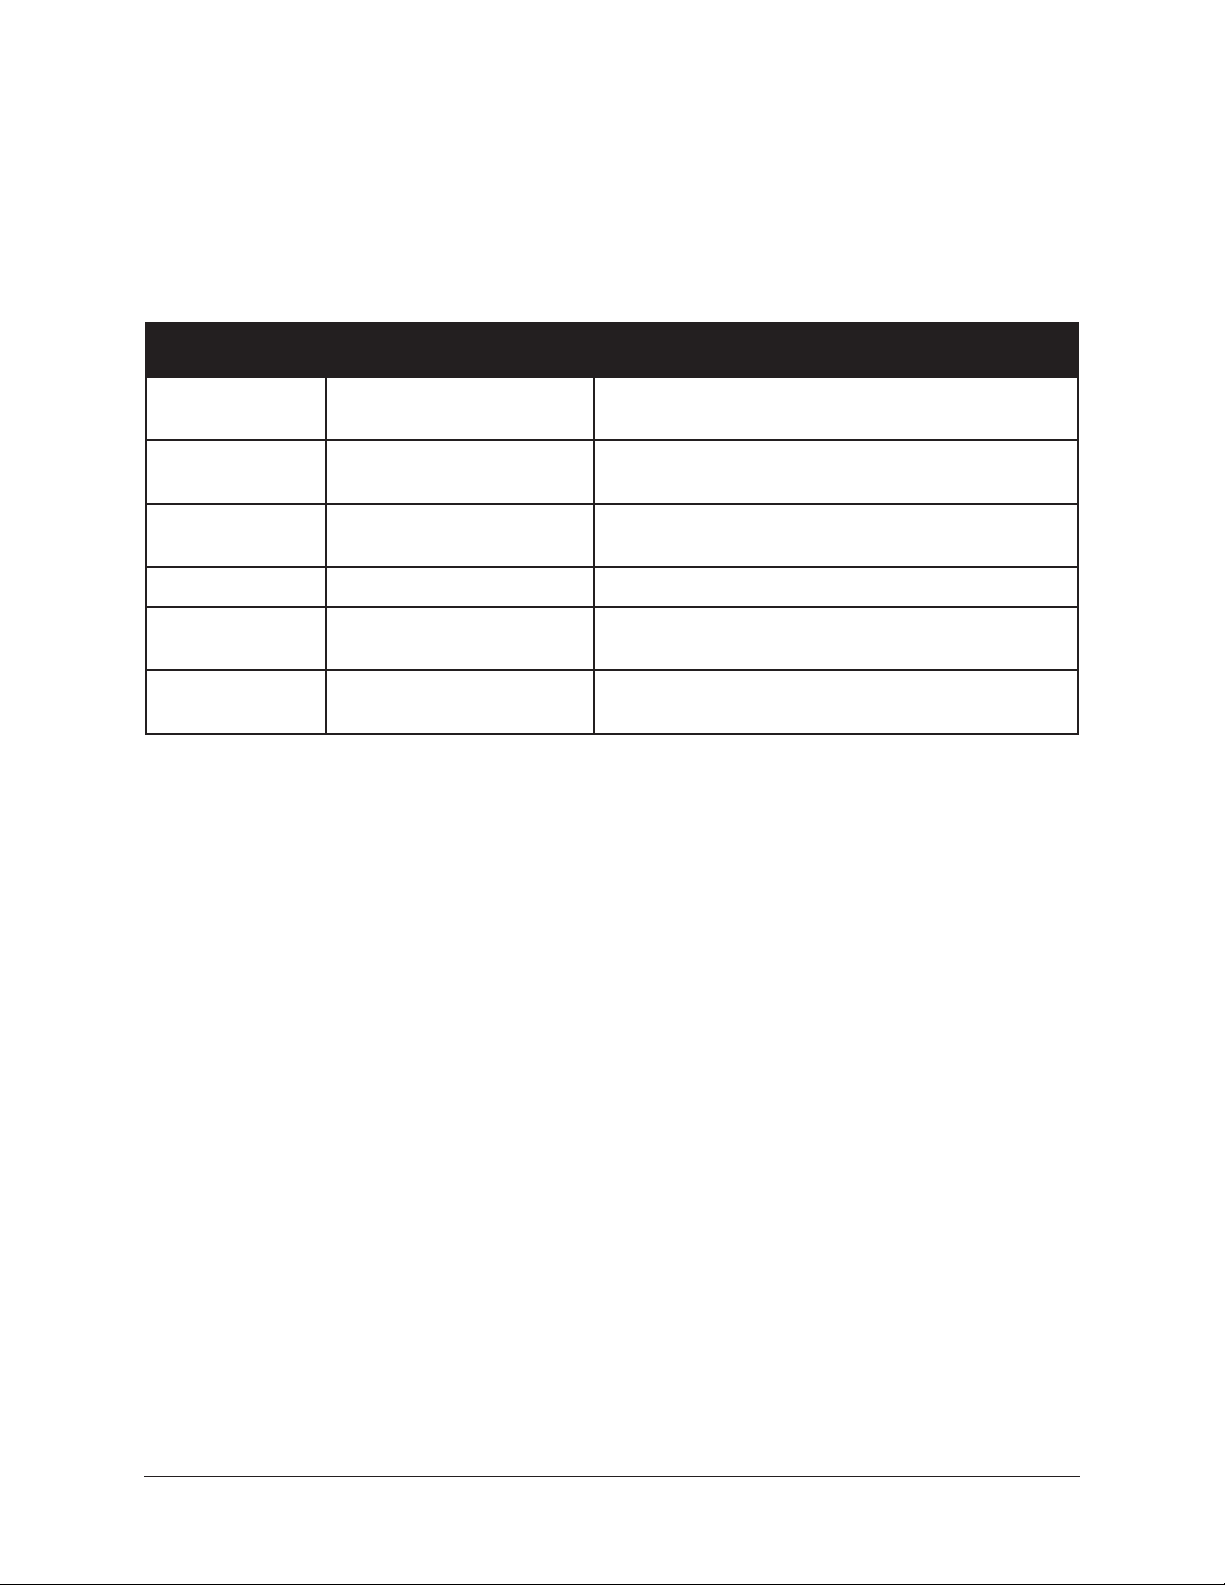
RIG LED (2)
The LED beneath the RIG knob illuminates to indicate certain operating conditions. The
LED states encountered during normal operation are listed in the table below.
Note: If RIG LED states not listed below are encountered, please contact UA
Technical Support.
RIG LED State Indication Notes
Off OX not powered
Green (solid) RIG not modified
Amber (solid) RIG modified
Amber (blinking) Firmware update Firmware update is in process
Green (blinking)
Red (blinking)
Wi-Fi reset initiated and
awaiting user confirmation
Factory reset initiated and
awaiting user confirmation
Rear panel POWER switch is in down position and/
or AC adapter is not properly connected
Active RIG has been loaded via RIG knob or OX app
and is unchanged from stored version
Active RIG has been edited via ROOM knob or OX
app and is not stored
Press reset switch again within 10 seconds to
confirm Wi-Fi reset
Press reset switch again within 10 seconds to
confirm factory reset
ROOM (3)
The ROOM knob adjusts the amount of mic’d studio ambience and air. Increase this
knob for more room ambience, or decrease for a drier close-mic tone.
When ROOM is adjusted, the RIG LED illuminates in amber, indicating the ROOM
amount is different than the value stored in the active RIG preset.
ROOM sounds are heard in the LINE / MON, HEADPHONE, and S/PDIF outputs, but not
in the TO SPEAKER output.
Tip: ROOM settings can be edited and stored with the OX software app.
OX Amp Top Box Controls & Connectors 14
Page 15

SPEAKER VOLUME (4)
This knob adjusts the loudness of the guitar speaker(s) connected at OX’s rear panel TO
SPEAKER output jack. Six knob positions and five carefully crafted attenuation levels are
available.
Position 1 is the quietest available setting. Position 5 is the loudest available setting. At
position 0, the speaker is OFF for silent operation.
SPEAKER VOLUME does not change the signal level being routed into the digital
section, which receives signal before this loudness control. This feature allows you
to change the guitar speaker volume without changing levels at the LINE / MON,
HEADPHONE, and S/PDIF outputs.
Note: The guitar speaker volume is determined by the overall combination of
amplifier power and output impedance, guitar speaker impedance, and OX’s rear
panel IMPEDANCE knob.
LINE OUT (5)
The signal level at OX’s rear panel stereo LINE / MON outputs is adjusted with this
knob. LINE OUT does not change the level at OX’s SPEAKER, HEADPHONE, or S/PDIF
outputs.
Rotating this knob fully counter-clockwise to the “0” position shuts off the LINE / MON
outputs.
HEADPHONE Knob (6)
The volume of OX’s front panel stereo HEADPHONE output is adjusted with this knob.
HEADPHONE does not change the level at OX’s SPEAKER, LINE / MON, or S/PDIF
outputs.
Rotating this knob fully counter-clockwise to the “0” position shuts off the HEADPHONE
output.
HEADPHONE Output (7)
This TRS stereo unbalanced output jack accepts standard ¼” stereo headphones.
Headphone volume is adjusted with the HEADPHONE knob above the jack.
Important: Changing RIG settings and/or presets can cause a sudden jump in
headphone output levels. Exercise caution when adjusting Rigs (via RIG knob or
OX software app) when HEADPHONE output is at higher levels.
OX Amp Top Box Controls & Connectors 15
Page 16
POWER Lamp (8)
POWER S/PDIF
OUT
FOOT
SWITCH
TO SPEAKER
IMPEDANCE
FROM AMPLIFIER
LINE / MON OUT
USB
1/L 2/R
SERIAL NUMBER
8Ω
4Ω16Ω
USB POWERS/PDIF
OUT
FOOT
SWITCH
TO SPEAKERFROM AMPLIFIER
1/L2/R
LINE / MON OUT
150W
RMS
MAX
!
+12VDC 1.5A
14
17
12
The power lamp illuminates when OX is properly connected to AC power and the rear
panel POWER switch is in the UP position. When power is OFF, the lamp is unlit.
During system startup, OX’s outputs are inactive.
Important: OX outputs are active only when OX is powered on and system startup
is complete.
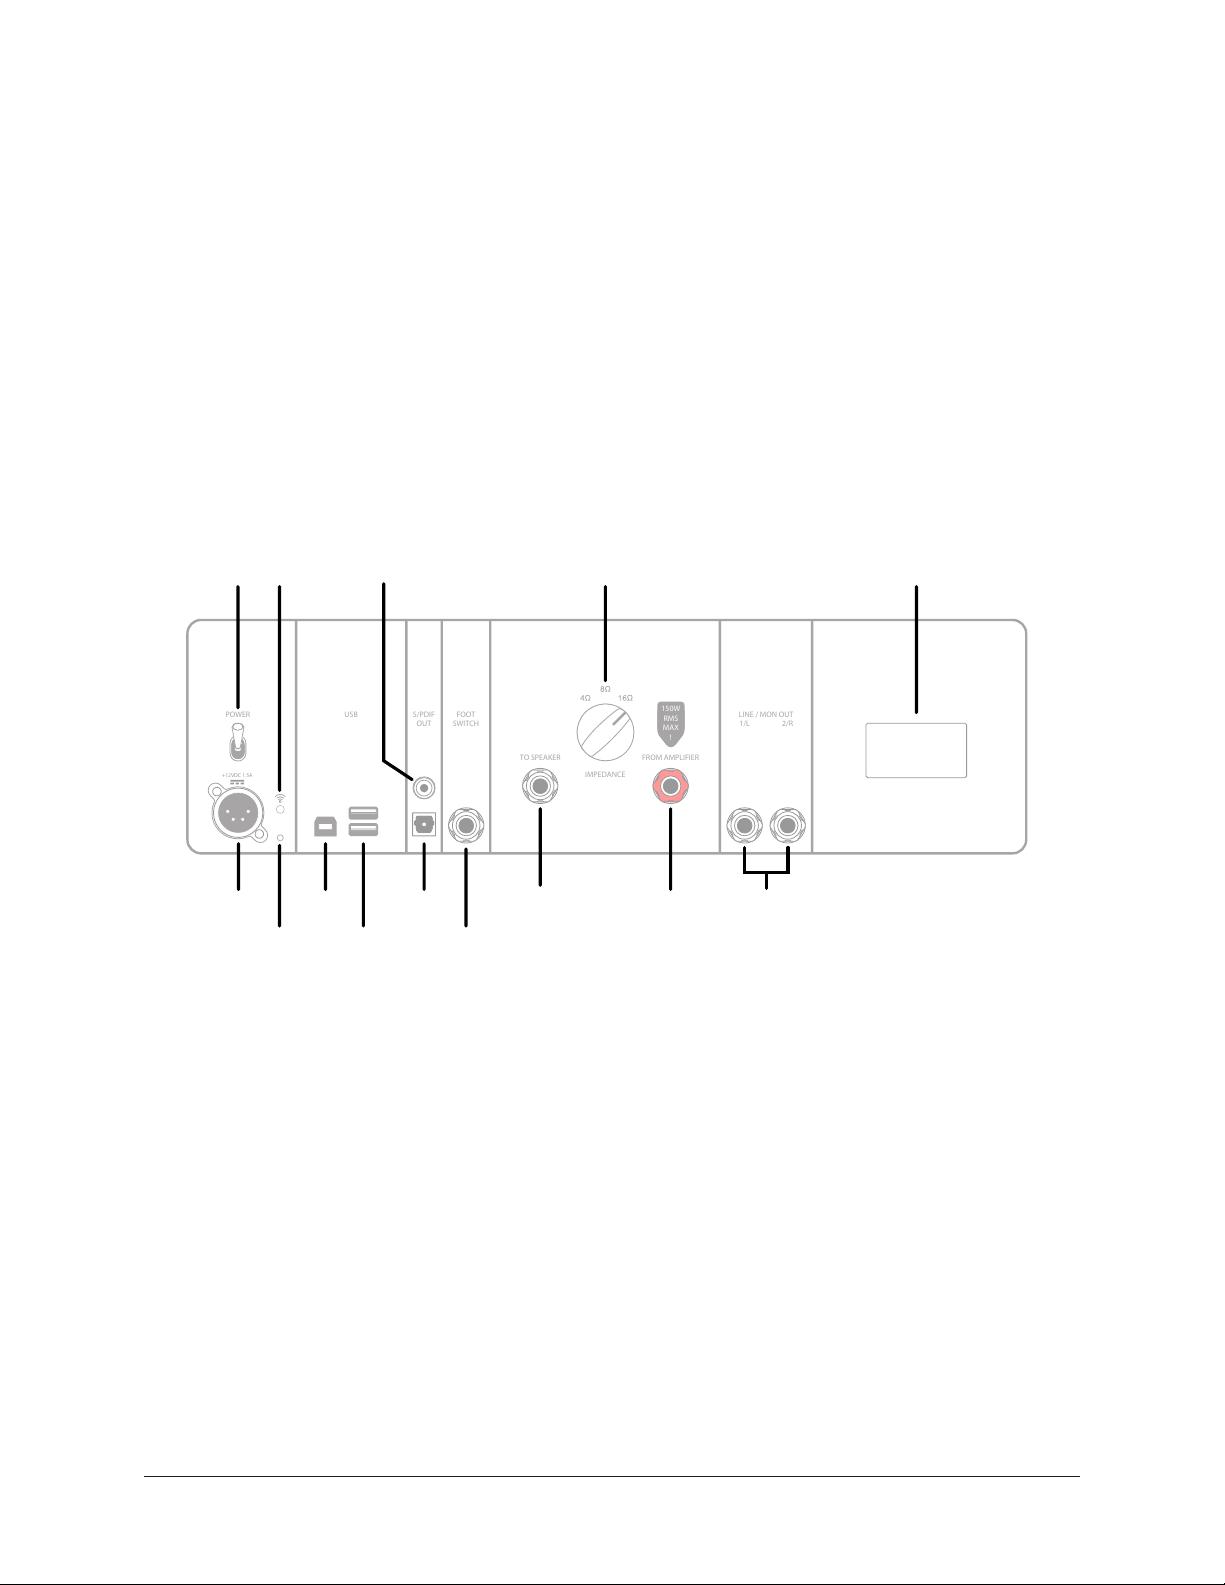
Rear Panel
Refer to the illustration below for descriptions in this section.
9
11
15
19
22
POWER Switch (9)
Use this toggle switch to apply power to OX. The included external power supply must be
properly connected (10) to apply power to OX.
Important: Power must be ON to enable OX outputs.
In the up position, power is ON and the front panel POWER lamp (8) illuminates. In the
down position, OX power is OFF and the POWER lamp (8) is unlit.
System startup begins when OX is powered ON. While the system is starting, OX outputs
remain inactive. After startup is complete, the POWER lamp remains lit and OX outputs
are enabled.
Note: When power is OFF, OX presents a 16 ohm load at the FROM AMPLIFIER
input to prevent tube amp damage that could occur with an unloaded amp output.
OX Amp Top Box Controls & Connectors 16
10 13
16
18
20 21
OX’s rear panel elements
Page 17
POWER Input (10)
Caution: Connect only the included external power supply to the POWER
input. Using a different power supply could damage OX and void the
warranty.
This 4-pin locking XLR jack accepts the DC output plug from OX’s included external
power supply. OX requires 12 volts DC power and its power supply draws approximately
18 Watts.
Connect the included IEC power cable to the inlet of the included external power supply
and an AC power outlet.
Note: The following statement is provided for electrical compliance conformity:
“The POWER input is the primary disconnect device.”
Wi-Fi Status LED (11)
This LED indicates activity on OX’s built-in WI-Fi network. The LED states encountered
during normal operation are listed in the table below. For instructions on how to use OX’s
Wi-Fi networking, see OX Software.
Note: If Wi-Fi LED states not listed below are encountered, please contact UA
Technical Support.
Wi-FI LED
State
Off No network connection
Blue (solid) Hotspot connection Device is paired with OX’s internal Wi-Fi hotspot
Green (solid)
Green (blinking)
Indication Notes
No device is paired with OX’s internal Wi-Fi hotspot
and OX is not paired with external Wi-Fi network
External network
connection
Attempting external
network connection
OX is paired with external Wi-Fi network
OX is attempting to pair with external Wi-Fi network
that was selected in OX app
Reset Switch (12)
This small pushbutton switch is used to reset OX’s Wi-Fi settings and reset OX to factory
defaults. For more information, see Troubleshooting.
Note: Reset is not necessary during normal operation.
OX Amp Top Box Controls & Connectors 17
Page 18

USB Type-B Port (13)
This port is not functional.
USB Type-A Ports (14)
These ports are not functional.
S/PDIF Digital Outputs
The S/PDIF digital output ports are for connecting OX’s left/right stereo output signals to
the digital input(s) of a computer audio interface or other digital audio equipment.
The stereo signal at the digital outputs is same stereo signal as the signal at the MON /
LINE and HEADPHONE outputs. Both digital outputs carry the same stereo signal, and
both digital outputs can be used at the same time.
Digital signal levels can be adjusted with the master fader in the OX software app. Digital
levels cannot be changed with OX’s hardware controls.
Note: The sample rate of the digital outputs is fixed at 44.1 kHz.
Tip: If connecting OX to the S/PDIF input of an Apollo audio interface, activate the
realtime S/PDIF sample rate conversion feature (SR CONVERT) in Apollo Console’s
S/PDIF channel input strip to enable compatibility with all Apollo sample rates.
Coaxial S/PDIF Digital Output (15)
This stereo S/PDIF digital output jack accepts a 75-ohm coaxial RCA (phono) digital
audio cable.
Tip: Use this port to digitally connect OX’s stereo output signal to the S/PDIF
input port on Universal Audio’s Apollo FireWire and Apollo 8 audio interfaces.
Note: For optimum results, use a 75-Ohm RCA cable that is specifically designed
for digital audio.
Optical S/PDIF Digital Output (16)
This stereo S/PDIF digital output port accepts a TOSLINK optical cable.
Tip: Use this port to digitally connect OX’s stereo output signal to the S/PDIF
optical input port on Universal Audio’s Apollo Twin, Apollo Twin MkII, and Apollo
8p audio interfaces.
Important: Although TOSLINK optical cables are also used for digital connections
in ADAT format, this port outputs S/PDIF format only and is incompatible with
ADAT optical inputs.
OX Amp Top Box Controls & Connectors 18
Page 19

FOOT SWITCH Input (17)
This input is not functional.
TO SPEAKER Output (18)
Caution: This is a high power output! DO NOT connect this output
to the input of studio monitors, audio mixers, PA speakers, audio
interfaces, computers, or similar inputs. Connect this output to a
guitar speaker cabinet ONLY.
Caution: DO NOT connect this output to a guitar speaker cabinet
that is rated for a power level that is significantly less than the
connected amplifier’s output power.
Important: Use only a high-quality 12 to 16 gauge unshielded ¼” mono TS
(tip-sleeve) speaker cable for the high power TO SPEAKER connection. “Speaker”
is usually printed on these cables.
The guitar amp’s attenuated (power soaked) speaker signal with OX’s reactive load is
output here. Connect a high quality ¼” speaker cable between this jack and a guitar
speaker cabinet.
OX’s front panel SPEAKER VOLUME knob controls the loudness at this output. At the
knob’s minimum position (0), the speaker connected here is OFF for silent operation.
The signal path between OX’s FROM AMPLIFIER and TO SPEAKER jacks is pure analog.
Because this output is dry without cabinet/mic/room/effects processing, OX’s RIG and
ROOM knobs do not change the sound of the guitar speaker connected here.
SPEAKER Output Notes
• To avoid sudden loud speaker volume, reduce the amp’s volume knob and/or OX’s
SPEAKER knob to before connecting a guitar speaker cabinet.
• This output is designed specifically for guitar speakers. Full-range flat-response
speakers are not recommended for this output connection.
IMPEDANCE Knob (19)
This three-position knob sets the reactive load impedance that is present at OX’s FROM
AMPLIFIER input (and the tube amp’s speaker output). Settings of 4, 8, and 16 ohms
are available.
Note: Set the IMPEDANCE knob to match your tube amp’s speaker output
impedance. If the amp’s speaker output impedance cannot be determined, set
this knob to 8 ohms.
OX Amp Top Box Controls & Connectors 19
Page 20

FROM AMPLIFIER Input (20)
Caution: To avoid permanent damage to the amplifier and/or OX:
• POWER OFF the tube amp before connecting or disconnecting its speaker
output.
• DON’T power or operate any tube amp without an output load such as a
guitar speaker or OX.
• DON’T partially insert ¼” speaker cable plugs halfway or only to the first
click. DO fully insert all speaker cable plugs to ensure proper ground returns.
• DON’T use OX with amplifiers exceeding 150 Watts RMS output power.
This jack is OX’s reactive load input. Connect a ¼” speaker cable between the tube
amp’s speaker output and this RED input jack. The signal received here is attenuated
(soaked) by the reactive load then passed to OX’s SPEAKER OUT jack.
Important: Use only a high-quality 12 to 16 gauge unshielded ¼” mono TS
(tip-sleeve) speaker cable for the high power FROM AMPLIFIER connection.
“Speaker” is usually printed on these cables.
Note: When OX power is OFF, OX presents a 16 ohm load at the FROM
AMPLIFIER input to prevent tube amp damage that could occur with an unloaded
amp output.
OX Amp Top Box Controls & Connectors 20
Page 21

LINE / MONITOR Outputs (21)
The Left and Right LINE / MON outputs are for connecting OX to the analog line-level
stereo inputs of studio monitors, a computer audio interface, or other audio equipment.
Both ¼” jacks can accept balanced TRS (tip-ring-sleeve) or unbalanced TS (tip-sleeve)
connections.
OX’s front panel LINE OUT knob controls the level at these outputs. At the minimum
position (0), the outputs are off.
Note: Use only shielded line/instrument cables with these outputs. Don’t connect
unshielded speaker cables here.
Wi-Fi Address (22)
The hotspot name (SSID) and password for OX’s built-in wireless Wi-Fi network is printed
here. These login credentials are used when connecting the device running OX’s remote
control software application to the unit.
Note: Every OX unit as a unique hotspot name and password.
Tip: OX’s default hotspot name and password can be changed from within the
software OX app.
OX Amp Top Box Controls & Connectors 21
Page 22

OX Software App
OX includes free software for Mac and iPad (OX registration required). With the OX
software application, OX Rigs can be wirelessly accessed, modified, and stored with OX’s
built-in Wi-Fi networking.
The OX app provides deep access to all RIG and ROOM settings, allowing you to create
a near-infinite variety of complete guitar tones and store hundreds of Rig presets. 100
carefully crafted default Rigs provide a wide variety of album-quality tones, or use the
default Rigs as a starting place for your own custom tones.
With the OX app, you can easily assign different Rigs to the OX’s six RIG knob slots, for
access to your favorite Rigs when the OX app is not being used. Rig Sets can be easily
assembled to quickly assign a batch of six Rigs to OX’s RIG knob slots for standalone
stage and studio use.
The OX app can control OX by pairing directly to its built-in Wi-Fi hotspot, or by
connecting both OX and the Mac or iPad to an existing Wi-Fi network.
OX App Features
• Full control of OX Amp Top Box Rigs via Wi-Fi on iPad or Mac
• Over 100 Rig presets for instant album-quality guitar tones
• Select from 17 classic speaker cabinets with vintage, NOS, and modern speakers
• Choose from 8 boutique direct mics and 6 room mic combinations
• Create, manage, and save your own Rigs to OX hardware for standalone use
• Perfect your studio amp tones with EQ, Compression, Delay, and Plate Reverb
OX App Requirements
• OX Amp Top Box
• Apple Mac or iPad
• iPad: iOS 11
• macOS: Sierra or High Sierra
• Wi-Fi network with internet connection to register (once only)
Note: Operating systems not listed above are untested. Although untested
operating systems may work, they are not supported by Universal Audio.
Get OX App
• Mac: From your computer, visit www.uaudio.com/ox/app
• iPad: From your iPad, search “OX Amp Top Box” in the iOS App Store
OX Amp Top Box OX Software App 22
Page 23

Essential App Concepts
This section outlines several key concepts that will help you understand how the OX app
interacts with the OX hardware so you can get the most benefit from your OX system.
Similarly, reviewing the OX System Overview and OX Wi-Fi Networking chapters is
recommended to help you get the most from the app.
OX’s Remote Control
The OX app is simply a wireless remote control interface to the completely self-contained
OX hardware unit. The app literally has no controls or settings of its own — EVERY
control and setting you see in the app is an exact mirror of OX’s current internal state.
The app controls OX’s digital functions. The app cannot control or store OX’s SPEAKER
VOLUME knob value because the reactive load and attenuation circuitry is pure analog.
Note: OX signal processing — Dynamic Speaker/Room Modeling, mic mixing, EQ,
master effects, and everything else — is performed in the OX hardware, not the app.
Everything Is Stored In OX
All OX data is stored within the OX hardware. Stored data includes all user Rig presets,
Rig Sets, effect presets, assignments, networking, and system settings. OX data is not
stored within the OX app or the Mac/iPad file system.
Tip: The OX app can be safely deleted — or all Mac/iPad data removed (via reformat,
reset, etc.) — and user data will remain intact in the OX hardware.
Current State Is Retained
When OX is powered off, the current state of all OX settings and data is retained. When
OX is powered on again, OX will be in the same state as when it was powered off. This
includes all Wi-Fi networking and system settings, as well as RIG knob assignments.
This feature allows you to set OX the way you want with the app, and OX will sound the
same later without the app, even if OX was powered down.
For example, you can assign your favorite Rigs to the RIG knob, and access those Rigs
later — even if you power off OX and/or don’t have the OX app with you.
Tip: If a Rig was modified but not yet saved when OX is powered off then on again,
the Rig LED is amber, indicating the Rig is still in the same modified state that it
was in before powering off.
Accessing Factory Rigs
OX includes 100 carefully-crafted factory Rig presets for instant album-quality guitar
tones. The factory Rigs can be used as-is, or as starting points when creating custom
Rigs. Factory Rig presets are loaded in the same way as user Rig presets.
Tip: To access the factory Rigs, see Loading Presets.
OX Amp Top Box OX Software App 23
Page 24

App Views
The app has three main view screens: RIG, ASSIGN, and SETTINGS. Each view contains
the settings related to these functions.
RIG – Rig settings are adjusted in Rig view. Every sonic setting that changes the tone of
an individual Rig is contained within this view. Individual Rig presets are also managed
in this view.
ASSIGN – Individual Rigs and Rig Sets are assigned to OX’s RIG knob slots in Assign
view.
SETTINGS – OX’s Wi-Fi networking settings and global system settings are accessed in
Settings view. A link to UA’s OX Knowledge Base is available here for technical support.
Choosing App Views
To display any app view, select its view name at the top right of any app view.
Tip: The name of the active view is highlighted in amber.
App view selectors with RIG view active
Terms
Specific terms are used in this chapter when describing the various OX component
functions. These terms are defined below.
OX – The self-contained OX hardware unit. OX does not refer to the OX software app or
the Mac/iPac device unless specifically noted otherwise.
App – OX’s remote control software application.
Rig – One complete guitar tone that contains the settings of all available sonic controls.
Rig Set – A collection of six individual Rigs that can be quickly assigned to OX’s RIG knob.
Effect(s) – OX’s four independent effect processors (EQ, compression, delay, and reverb).
Preset – One complete set control values stored within OX. OX has Rig presets and effect
presets. Presets are loaded, saved and renamed in the Presets Manager.
OX Amp Top Box OX Software App 24
Page 25

RIG View
All Rig settings are adjusted in Rig view. Every sonic setting that changes the tone of a
Rig is contained in this view. Individual Rig presets are also managed within this view.
In all, more than 60 parameters (many with dozens, and even hundreds, of possible
values) are available for sonic control of a Rig, for vast tonal possibilities.
Displayed Settings
All settings displayed in Rig view are a mirror of the current RIG knob selection on OX’s
front panel. If the RIG knob selection is changed, or the ROOM knob is adjusted, the
settings in Rig view are updated to reflect the new settings.
Note: As with all OX app views, Rig view is simply a mirror of OX’s internal state.
RIG view with typical settings
OX Amp Top Box OX Software App 25
Page 26

Modifying Rigs
Every control and setting in Rig view is always active. To modify (edit) the Rig, simply
adjust any control to any available value, and the new setting is active.
Sonic settings available for modifying include the speaker cabinet, two cab mics, stereo
room mic, four master effects (each with individual controls), and the mic mixer with
its individual channel controls (mic off-axis and low-cut filter, mic EQ, pan, solo, mute,
channel faders), and master fader.
Modified (and unmodified) Rigs can be stored as a user preset. For methods, see Saving
Presets.
Important: If a Rig is modified and a preset is loaded before the modified Rig is
saved, the modified Rig is discarded. If you want to keep the modified Rig, save
the modified Rig as a preset before loading Rig presets.
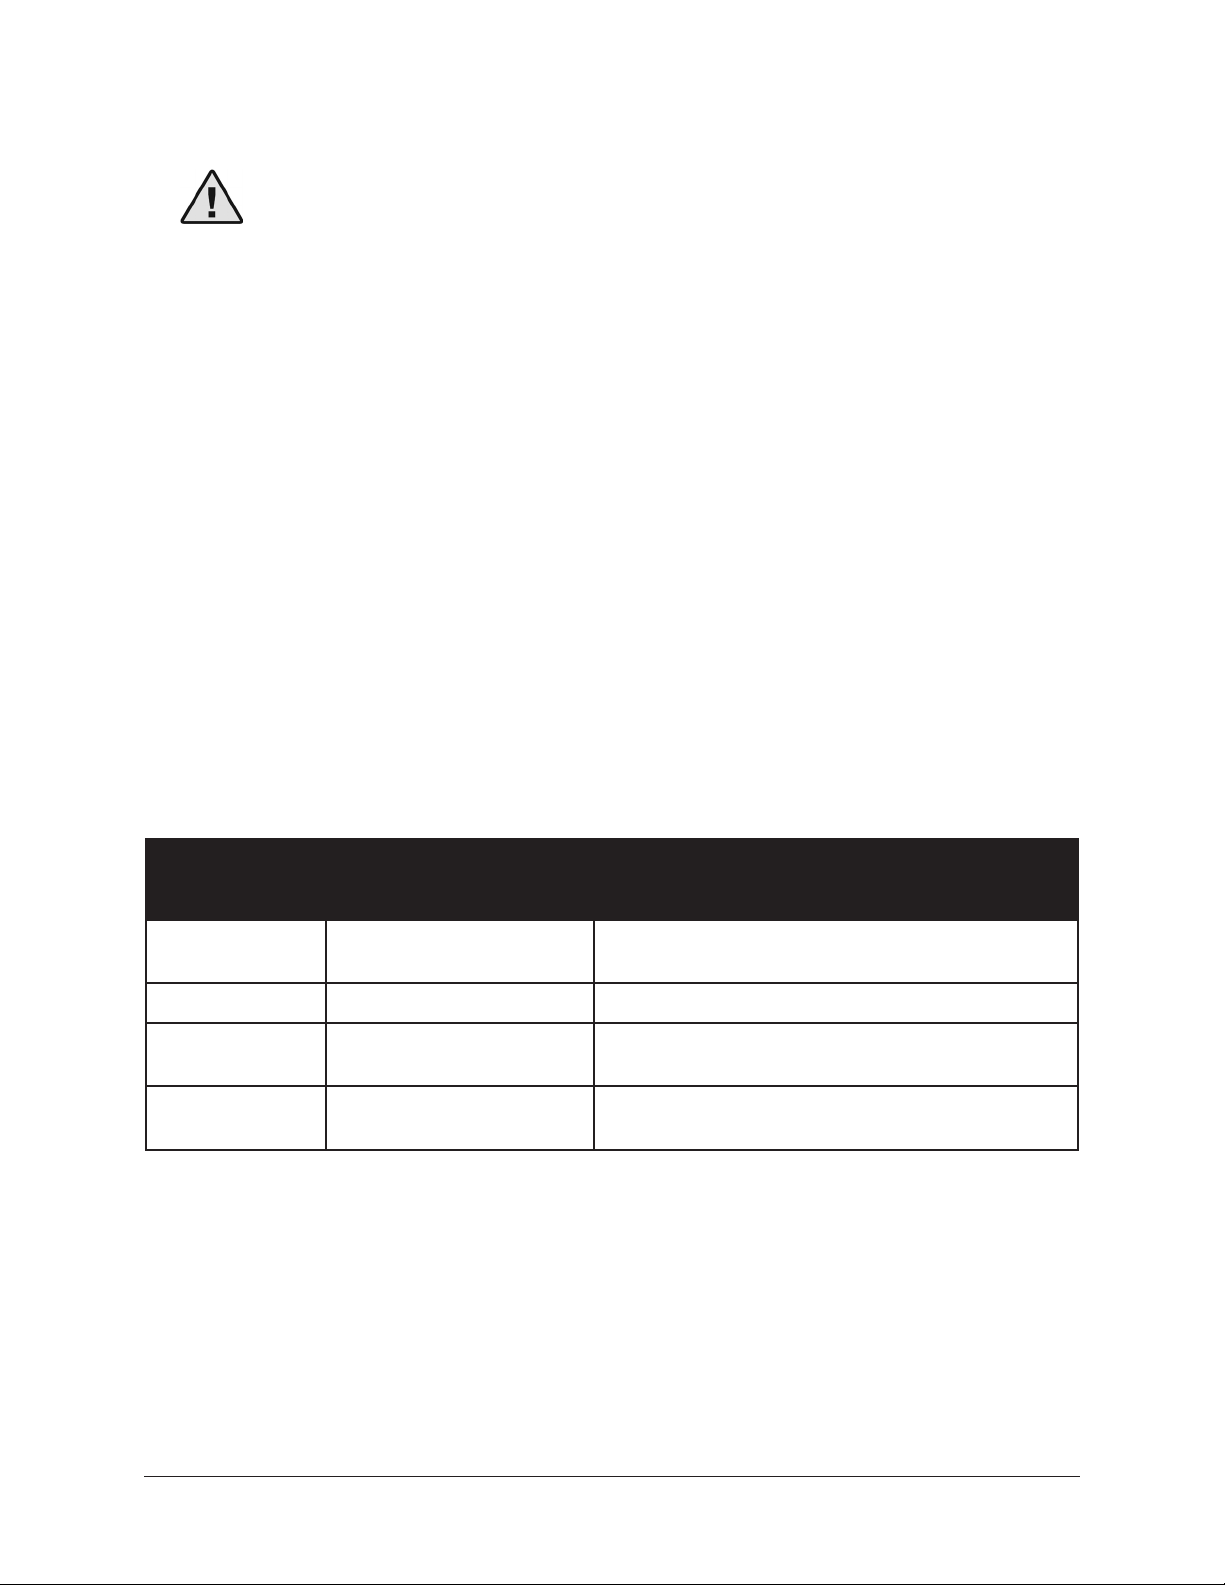
Stored or Modified?
• If a Rig is not modified, the Rig name (at the upper left of the view screen) is
white, and the Rig LED on OX’s front panel is green, indicating the Rig was
previously stored.
• If a Rig has been modified with the app, or with the ROOM knob on OX’s front
panel, the Rig name and OX’s Rig LED are amber, indicating the modified Rig is
not yet stored.
• Additionally, SAVE appears in amber next to the Rig name to indicate the modified
Rig is not yet stored.
Stored Rig (left) and modified Rig (right) in OX app
OX Amp Top Box OX Software App 26
Page 27

Input Level
The INPUT LEVEL switch sets the level from the tube amp (after OX’s reactive load) into
OX’s processors. The switch helps match the power output of the tube amp with optimum
levels for Dynamic Speaker Modeling.
As a general guideline when modifying Rigs, this switch should be “set-and-forget” to
the following values:
• If the tube amp outputs 50 Watts or less, set INPUT LEVEL to 50W.
• If the tube amp outputs more than 50 Watts, set INPUT LEVEL to 100W.
This general guideline does not mean you need to be concerned about levels being set
correctly, or that you need change this switch in factory Rigs to match your amp, or that
input levels are too low or too high.
Even if INPUT LEVEL is set to 50W with a 100-watt amp, or set to 100W with 5-watt
amp, you never need to worry. OX is designed to ensure input levels are never wrong.
Speaker Drive
SPEAKER DRIVE adjusts (in the simplest terms) the dynamic response of the speaker
cabinet. This unique and powerful control adjusts different aspects of OX’s Dynamic
Speaker Modeling.
At lower SPEAKER DRIVE ranges, the cabinet sounds more like the speaker(s) is new:
tighter and thicker, with more punch and bottom end. As SPEAKER DRIVE is increased,
you can hear, and feel, the cab get softer and spongy with more breakup, like a broken-in
speaker.
At higher ranges, breakup is more obvious, with crumbling of the lows and smearing of
the highs as the speaker is pushed harder. At the highest ranges, the speaker approaches
end of life: weaker, looser, darker, and sub-octave notes (cone cry) may be apparent with
certain note/cab combinations.
Master Fader and Output Meters
The master fader (at the lower right of RIG view) is the output level control for OX’s
stereo outputs. The stereo output level meters (next to the master fader) indicate signal
levels at the outputs.
When OX’s digital output level exceeds 0 on the meter, the top LED segment is RED,
indicating that the digital outputs are clipped. If connecting OX digitally to the inputs of
other digital audio equipment, avoid clipping the stereo output meters by reducing the
master fader.
Tip: When creating Rigs, it’s optimum to keep the output meters below maximum
so OX’s digital outputs won’t clip when connecting to other digital audio gear.
OX Amp Top Box OX Software App 27
Page 28

Presets Management
A preset is one complete set related control values stored within OX. OX has Rig presets
and effect presets. Effect presets include the cab/room mic EQ presets and the master
effect presets. OX presets are saved, loaded, and renamed within the Presets Manager.
Preset Contents
• A Rig preset contains ALL Rig settings, including all mic EQ and effect settings.
EQ and effect settings don’t need to be saved separately from the Rig.
• An effect preset contains all settings for one individual effect (EQ, compression,
delay, or reverb). To save all Rig effect settings at once, simply save the Rig.
Preset Types
Factory Preset
OX includes 100 factory Rig presets and dozens of factory effect presets. Factory presets
are read-only; they can be loaded and modified, but not overwritten. All factory presets
are within the FACTORY folders.
If a factory preset is modified, pressing SAVE opens the presets manager so the preset
can be named and saved into a user folder.
User Preset
User presets can be created, renamed, and deleted. Any Rig or effect preset you save is
a user preset. By default, user presets are saved in the USER folders.
If a user preset is modified, pressing SAVE stores the preset in place, overwriting the
existing preset. To create a new user preset, press SAVE AS (located within the presets
manager popover) instead.
Important: Deleting a user preset permanently erases the preset. A confirmation
dialog appears when deleting presets so you can cancel the operation.
Favorite Preset
Any factory or user preset can be tagged as a favorite. Favorite presets appear in the
FAVORITES folders for quick access. To tag favorite presets, press the STAR icon in
preset lists. To un-favorite, press the STAR icon again.
Note: Favorite presets remain in their original folders when tagged as a favorite.
OX Amp Top Box OX Software App 28
Page 29

Preset Folders
By default, the preset manager has three folders: FACTORY, FAVORITES, and USER. All
presets are within these folders.
• FACTORY folders, and their presets, cannot be renamed or deleted.
• FAVORITES folders cannot be renamed or deleted, but their contents can be
changed by tagging favorite presets with the STAR icon.
• USER folders can be created, renamed, and deleted. More than one user folder
can exist for more precise organization if desired.
Important: Deleting a user folder permanently erases the folder AND all user
presets within the folder. A confirmation dialog appears when deleting folders so
you can cancel the operation.
Presets Manager
Preset management functions — such as load, save, rename, delete, and favorites
tagging — are done in the presets manager popover within Rig view. How the presets
manager is accessed depends on the preset type:
• Rig presets – The popover appears when the RIG NAME area (at top left of RIG
view) is pressed.
• Effect presets – The popover appears when PRESET (at top left of effect editor) is
pressed.
Tip: You can keep the presets manager open to perform additional preset
operations. When finished, press DONE to close the popover.
New User Folder
Selected Folder (highlight)
Factory Folder (lock)
User Folders (no lock)
Presets Manager Popover
Options (dots)
Favorite Rig (starred)
Factory Rig (lock)
Rig Folders Rig Presets
Elements in the presets manager popover. In this example, FAVORITES is the
selected folder (left column) and all favorite Rig presets are in the right column.
OX Amp Top Box OX Software App 29
Page 30

Loading Presets
Important: If a Rig is modified and a preset is loaded before the modified Rig is
saved, the modified Rig is discarded. If you want to keep the modified Rig, save
the modified Rig as a preset before loading Rig presets.
How to load Rig and Effect presets:
1. Access the Presets Manager popover:
• Rig preset – Press the RIG NAME area at top left of RIG view screen.
• Effect preset – Press PRESETS at top left of the effect editor view.
Accessing the presets manager for Rigs (left) and effects (right)
2. Select any folder in left column of the popover. All presets within the folder are
displayed in the right column.
Note: You may need to scroll to see all presets in the folder.
3. Select a preset in the right column. The preset is loaded immediately.
Tip: Keep the presets manager open to continue auditioning presets. When
finished, press DONE to close the popover.
OX Amp Top Box OX Software App 30
Page 31
Saving Presets
How a preset is saved varies slightly depending on if you’re saving a modified factory
preset, saving an existing user preset, or creating a new user preset. Each method is
detailed below. Refer to the Presets Manager illustration if needed.
How to save modified factory presets:
1. Press SAVE at the top left of RIG view. The presets manager popover appears.
SAVE is visible when a Rig is modified
2. Select any user folder in left column of the presets manager popover. To create a
new user folder, press the new folder icon at top left of the popover.
3. Press SAVE AS, enter a name for the new user preset (optional), then press OK.
The new preset is saved in the selected user folder.
How to save an existing user preset in place:
To save a user preset to the same location and with the same name (overwriting the
existing preset), simply press SAVE at the top left of RIG view (not the Rig name). The
preset is saved, the existing preset is replaced with the new settings, and the popover
does not open.
Press SAVE to replace (discard) the same user preset
OX Amp Top Box OX Software App 31
Page 32

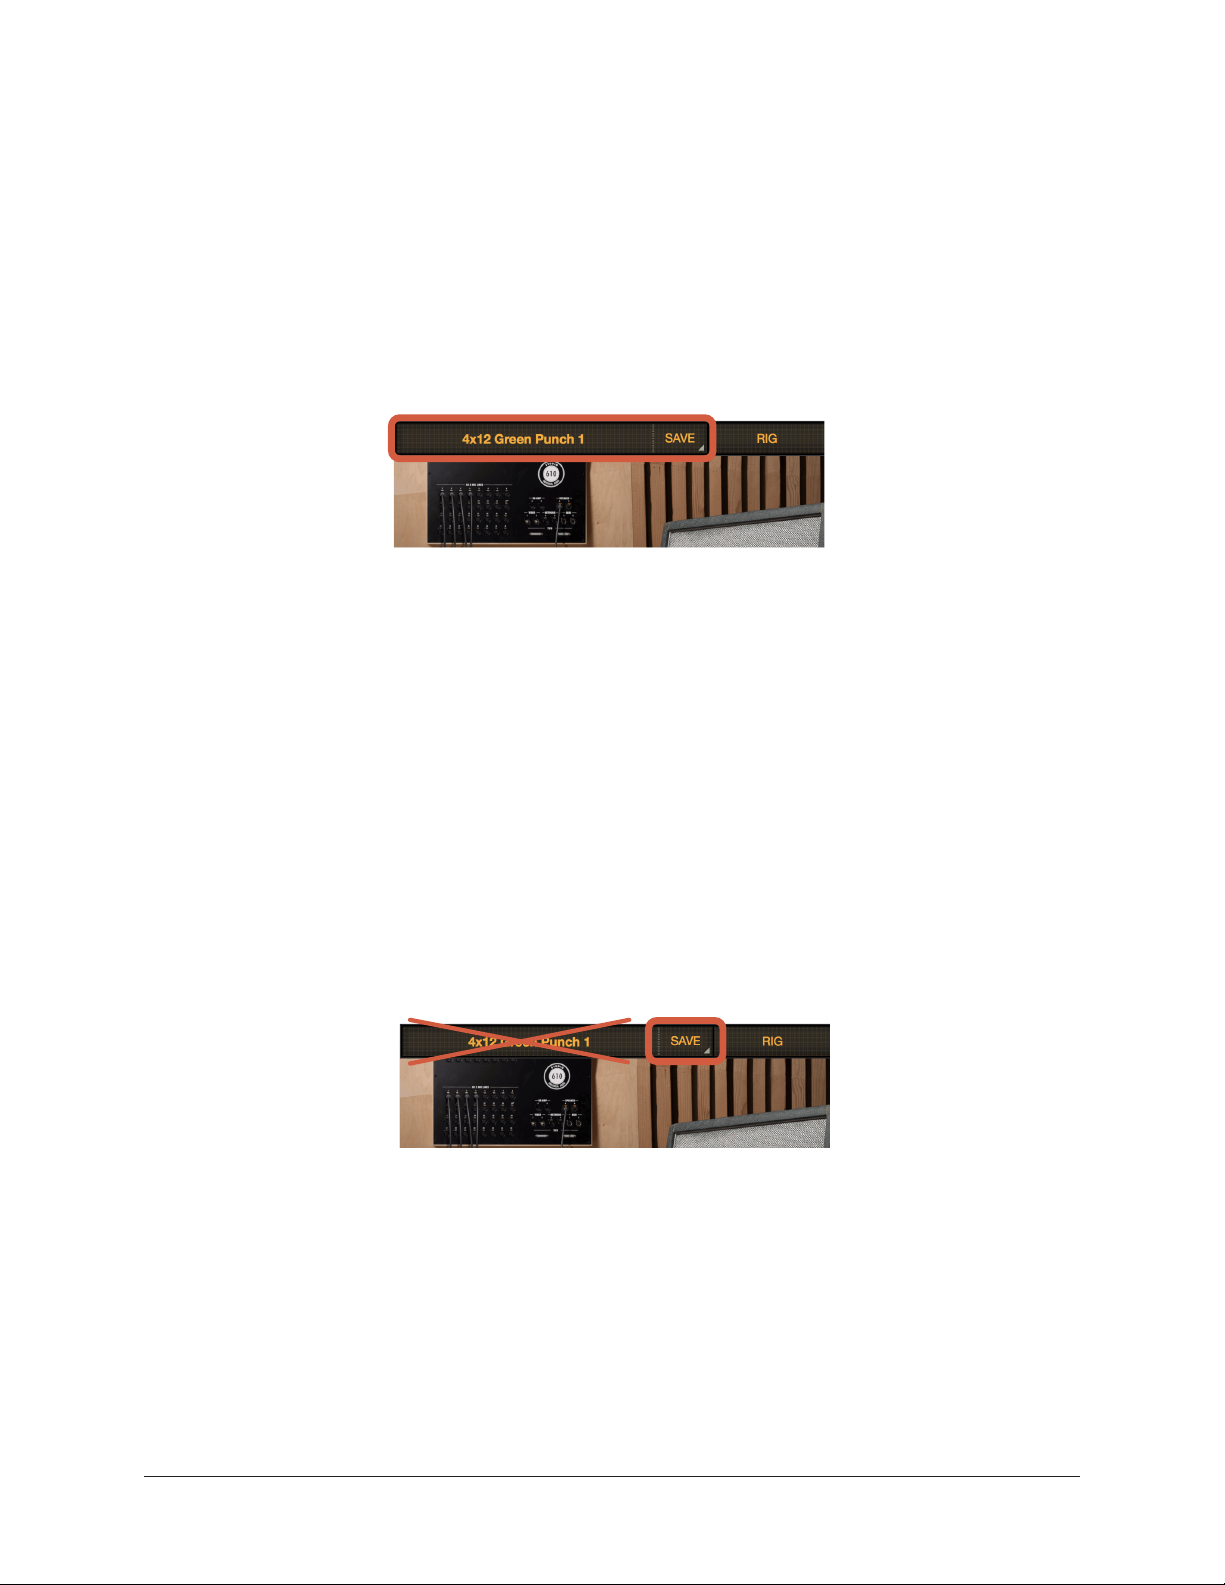
How to create a new user preset (SAVE AS):
1. Press the PRESET NAME area at top left of RIG view (not SAVE). The presets
manager popover appears.
To SAVE AS, press the preset name instead of SAVE
2. Select any user folder in left column of the popover. To create a new user folder,
press the new folder icon at top left of the popover.
3. Press SAVE AS, enter a name for the new user preset, then press OK. The new
user preset is created in the selected user folder.
1.
The rename field appears after pressing SAVE AS
1.
2.
Renaming & Deleting Presets & Folders
User presets and user folders can be renamed and deleted. To access the rename and
delete functions, press the options dots to the right of any user preset or user folder to
see the rename and delete options.
Important: Deleting a user preset or user folder permanently erases the preset or
folder (AND all user presets within the folder). A confirmation dialog appears when
deleting presets and folders so you can cancel the operation.
Press the options dots to display the rename and delete options
OX Amp Top Box OX Software App 32
Page 33

Effect Editors
The effect editors are where the controls for each individual effect processor are viewed
and adjusted. Press any effect name to open its editor in a popover.
Effect presets are also loaded and saved within its effect editor. For details, see Presets
Management.
Each of OX’s four studio-quality effects — 4-band EQ, 1176 SE compression, stereo
modulated delay, and stereo plate reverb — has a unique editor. EQ has two editors; it
can be viewed in graphic mode or touch mode.
Each effect editor is shown below.
OX’s effect editors
OX Amp Top Box OX Software App 33
Page 34

ASSIGN View
Assign view is where Rigs are stored to OX’s hardware RIG knob slots. Individual Rigs can
be assigned to a single knob slot, or all six slots can be assigned at once.
All Rig assignments in Assign view reflect current assignments stored in the hardware. As
with all OX app views, ASSIGN view is simply a mirror of OX’s internal state.
Important: Rigs modified in RIG view that are not saved can be discarded by
assign operations. If you want to keep a modified Rig, save the modified Rig as a
preset in RIG view before entering ASSIGN view.
Rig Sets
A Rig Set is a collection of six individual Rigs. OX features 16 Rig Sets. Each Rig Set can
be renamed and/or modified to contain any six Rigs.
The main screen in Assign view displays the contents of one complete Rig Set. To see the
list of 16 Rig Sets, press “< Rig Sets” at upper left of the main Assign screen.
Tip: When the Rig Sets list is displayed, pressing any Rig Set instantly stores its
contents to all six OX RIG knob slots.
Rig Slots
OX’s RIG knob has six position slots. The six Rigs slots displayed in Assign view mirror
OX’s current RIG knob slot assignments. When a different Rig is assigned to a knob
slot in the app, the Rig is instantly assigned to the hardware RIG knob slot and the
assignment is stored in OX.
RIG Knob
The graphic RIG knob displayed at the bottom of
Assign view mirrors the position of OX’s hardware
RIG knob. The lines from the knob to each Rig
indicate which Rig is assigned to each slot.
To change the knob position in the app, change
OX’s RIG knob position. However, you never need
to move the hardware knob to do any operations in
Assign view.
At left: Rig slots in Assign view. The six Rigs displayed
here are the contents of one Rig Set. The Rig Set
displayed here always mirrors OX’s current RIG knob
slot assignments.
OX Amp Top Box OX Software App 34
Page 35

Store Individual Rigs to OX’s RIG Knob
1. In Assign view, press the Rig in any Rig slot. The slot’s Rig selector appears.
Rig slot selector — choose any Rig to assign it to the knob slot
2. In the slot’s Rig selector, choose a Rig to store in the slot. The Rig is instantly
stored to OX’s RIG knob slot.
Store Rig Sets to OX’s RIG Knob
1. In Rig Slot view, press “< Rig Sets” at upper left of the
screen. The Rig Sets list is displayed, as shown at right.
2. Press any Rig Set in the list. The Rig Set is instantly
stored to OX’s six RIG knob slots.
Rename a Rig Set
1. In Rig Sets list view, press the options dots to the right
of any Rig Set name. The rename field appears.
2. Enter a new Rig Set name.
Renaming a Rig Set
OX Amp Top Box OX Software App 35
Page 36

SETTINGS View
OX’s Wi-Fi networking settings and global system settings are accessed on two different
screens in Settings view.
System View
This view includes a convenient link to the OX Knowledge Base for technical support.
Wi-Fi View
This view contains the Wi-Fi network selector. Use this function to pair OX to a different
external Wi-Fi network.
Pairing OX to a Wi-Fi Network
For instructions, follow steps 2, 3, and 4 in the OX Registration Procedure.
Settings view — Wi-Fi settings (left) and system settings (right)
OX Amp Top Box OX Software App 36
Page 37

Rig, Cabinet, & Mic Descriptions
This chapter contains descriptions of the guitar speaker cabinets, close cabinet mics,
and room ambience mics used in OX’s Dynamic Speaker Modeling and Dynamic Room
Modeling, as well as the factory RIG knob assignments and Rig Sets.
Default RIG Control Cab & Mic Presets
The default Rig values for each of the six RIG knob settings when OX is shipped from the
factory are listed in the table below. RIG knob assignments can be changed with the OX
app.
Tip: A full-color RIG Control Cab & Mic Presets pamphlet is included in the OX
retail package.
Download the RIG Control Cab & Mic Presets Pamphlet
RIG
Knob
1
2
3
4
5
6
RIG Name Cabinet Close Mics Room
4x12 Green
Punch
1x12 50s
Twang
2x12 Honkin
Silvers
4x10 Pristine
Clean Room
1x10 Roomy
Tiny Combo
2x12
Comfortable
Lead
4x12 GB 25
PUNCH
1x12 BLUE J
2x12 ACE TOP
4x10 BMAN
1x10 BLACK
CHA
2x12
BOUTIQUE D65
Condenser 67 &
Ribbon 121
Dynamic 57 &
Ribbon 121
Ribbon 160 &
Condenser 67
Condenser 414
& Condenser 67
Dynamic 421 &
Condenser 414
Condenser 414
& Condenser 67
Carpeted w/ Condenser
Stereo Mics
Carpeted w/ Ribbon
Stereo Mic
Live w/ Condenser
Mono Mic
Live w/ Condenser
Stereo Mics
Live w/ Condenser
Stereo Mics
Carpeted w/ Condenser
Stereo Mics
Master
Effects
None
Plate Reverb
None
Plate Reverb
None
Delay &
Plate Reverb
OX Amp Top Box Rig, Cabinet, & Mic Descriptions 37
Page 38

Default Rig Sets
The default Rig Sets when OX is shipped from the factory are listed in the table below.
Rig Sets can be customized, renamed, and/or assigned to OX’s RIG knob in ASSIGN view
within the OX app.
RIG SET NAME RIG SET NAME
1 Studio Standards 9 Stoner Rock
2 Big 80s 10 Open Backs
3 70s Rock 11 Closed Backs
4 60s Rooms 12 Warm and Lush
5 Crystal Cleans 13 Ambient Post
6 Dirty Rhythms 14 UK Tones
7 Modulated 15 Studio DI Tricks
8 Squashed 16 Bright and Tweaky
OX Amp Top Box Rig, Cabinet, & Mic Descriptions 38
Page 39

Speaker Cabinets
The 17 speaker cabinets available with OX’s Dynamic Speaker Modeling are listed below.
The cabinets can be individually selected within the OX software app.
1x10 Black Cha
This small, open-back vintage 10-inch speaker has that classic small amp honk. When
SPEAKER DRIVE is pushed, this speaker has resonant sub-octave tones in the high F
and B range.
1x12 Blue J
This ‘50s-era cabinet and speaker delivers classic American open-back 12-inch speaker
tones. When SPEAKER DRIVE is pushed, this well worn speaker breaks up on high notes
around E, A, B, and C#.
1x12 GB25
This ‘50s-era open-back cabinet is paired with a more overdrive-friendly British 25
“green” speaker. When SPEAKER DRIVE is pushed, this speaker breaks up on high notes
in the F and A range.
1x12 Blu 15
Using a low-wattage “blue” 15-watt speaker, this open-back cabinet breaks up on high
notes in the F, G#, and C range when SPEAKER DRIVE is pushed.
1x12 Black D-ux
This mid ‘60s-era cabinet and speaker delivers classic open-back 12-inch speaker
combo tones. This pristinely-kept speaker breaks up on high notes around F, G#, and C
when SPEAKER DRIVE is pushed.
1x12 Black GB30
This open-back cabinet is paired with a more overdrive friendly British 30 “green”
speaker. When SPEAKER DRIVE is pushed, this speaker breaks up on high notes around
E, G#, B, and C.
2x10 V-ux
This late ‘60s-era cabinet and speaker delivers classic open-back two 10-inch speaker
combo tones. These pristinely-kept speakers break up on high notes around F when
SPEAKER DRIVE is pushed.
OX Amp Top Box Rig, Cabinet, & Mic Descriptions 39
Page 40

2x12 Two Verb
The classic pairing of american made 12-inch vintage speakers in an open-back cabinet
has great bottom and punch. When SPEAKER DRIVE is pushed these speakers break up
on high notes around A and C#.
2x12 Black 8H
This custom half-closed cabinet features the highly sought after “black” high-wattage
speakers favored by early ‘80s metal players. These aluminum-capped speakers cut right
through any mix with ease. These vintage speakers break up on high notes around G and
F# when SPEAKER DRIVE is pushed.
2x12 Ace Top
This mid ‘60s-era cabinet with “silver” speakers delivers classic British open-back 12inch speaker combo tones. When SPEAKER DRIVE is pushed, these well-used speakers
break up on high notes around G# and C.
2x12 Boutique D65
This custom ported cabinet features British style 65-watt speakers and is the choice of
many modern blues and rock players. The speaker and cabinet combination delivers tight
bottom end clarity. When SPEAKER DRIVE is pushed, these speakers break up on high
notes around F# and C#.
2x12 Alnico 50
This closed-back cabinet features two modern, American made Alnico 50-watt speakers.
Designed for smooth and singing single note tones when using high-gain, these speakers
break up on high notes in the F#, A#, B, and C# range when SPEAKER DRIVE is
pushed.
4x10 Bman
Although this classic pairing of four 10-inch speakers in an open-back cabinet was
originally meant for bass, it’s just as great for guitar tones. This setup has a scooped
midrange and extended presence. When SPEAKER DRIVE is pushed, these speakers
break up on high notes around C.
4x12 GB25 Thick
This vintage closed-back cabinet with four 12-inch speakers is the sound of rock guitar.
With original “green” 25-watt speakers, it breaks up on high notes around F#, G#, and
C when SPEAKER DRIVE is pushed. This specific vintage cabinet has an extended low
midrange and bass response.
OX Amp Top Box Rig, Cabinet, & Mic Descriptions 40
Page 41

4x12 GB25 Punch
This vintage closed-back cabinet with four 12-inch speakers is the sound of rock guitar.
With original “green” 25-watt speakers, it breaks up on high notes around F#, G#, and
C when SPEAKER DRIVE is pushed. This specific vintage cabinet has a moderately
scooped midrange delivering a tighter sound.
4x12 Super 80
This custom ported cabinet features four 12-inch vintage “lead” 80-watt speakers. These
speakers have a soft treble response, but with an aggressive and forward midrange. They
break up on high notes around F, A#, and C# when SPEAKER DRIVE is pushed.
4x12 White 75
This custom ported cabinet features 12-inch “white/cream” 75-watt modern British
speakers. These speakers have an extended treble/presence frequency response and
break up on high notes around G# and C# when SPEAKER DRIVE is pushed.
OX Amp Top Box Rig, Cabinet, & Mic Descriptions 41
Page 42

Cabinet Microphones
The six close mics (and one DI box) used on each of the speaker cabinets are listed
below. The close mics can be individually accessed for any cabinet within the OX
software app.
Dynamic Speaker Modeling allows any single close mic, or any two different close mics,
to be used on any cabinet. The close mics can be panned for stereo captures.
Additionally, because Dynamic Speaker Modeling allows each close mic to be individually
positioned on or off axis, an extraordinarily broad sonic pallet is available.
DYN 57
The dynamic “57” has been the industry standard in the US for recording loud guitar
amps since the late ’60s. Our model is based on a vintage unit from the ‘70s. With a
natural bass roll off and accentuated upper midrange, this mic always cuts through any
mix with practically no need for console EQ.
DYN 421
The dynamic “421” has been a favorite choice for guitar in Europe since the early ‘60s.
Our model is based on a vintage white unit from 1963. The “421” has thicker bottom
end and smoother treble response than the dynamic “57” making it a great choice for
smooth distorted tones.
RIB 160
The ribbon “160” was used by England-based recording engineers to capture loud guitar
amps and drums on some of the greatest rock records of the late ‘60s. Our model is
based on a vintage silver unit from the ’60s. It has a smooth midrange and warm treble
response.
RIB 121
The ribbon “121” is a modern classic for electric guitar. With its silky high end and
extended bass frequency range, many engineers pair the “121” with the “57” to even
out the sound. The “121” is also great on its own, but depending on the speaker, you
may want to use LOW CUT on the mic channels.
CON 414
The condenser “414” is the perfect mic for capturing high end clarity and low end
punch. This solid-state condenser mic can instantly deliver a modern-sounding “smile”
EQ curve. Depending on the speaker, you may want to use LOW CUT on the mic
channels.
OX Amp Top Box Rig, Cabinet, & Mic Descriptions 42
Page 43

CON 67
The condenser “67” can be heard on the biggest pop and rock records of the ‘60s, ‘70s,
and ‘80s. This tube condenser mic has a wide frequency range without sounding harsh
or bottom heavy. It has a gentle upper midrange that’s great for distorted rhythm guitars.
DIRECT
In direct mode you get the raw sound of your amp, without a guitar speaker, while still
responding as if the amp is driving a proper reactive speaker load.
OX Amp Top Box Rig, Cabinet, & Mic Descriptions 43
Page 44

Room Microphones
The five room mics capture the ambience of a high quality recording studio room for OX’s
Dynamic Room Modeling. Matched stereo pairs are available for stereo ambience.
The room mics can be individually accessed for every Rig within the OX software app.
RIBBON STEREO
These ribbon mics are placed in the drum area of the tracking room. In “live” mode
(DAMP off), this pair has a warm treble response with an overall vintage ‘50s and ‘60s
session vibe. With DAMP enabled, baffles and carpeting remove midrange and make for a
quicker response time.
CONDENSER STEREO
These tube condenser mics are placed in the drum area of the tracking room. In “live”
mode (DAMP off), this pair has high-end clarity and a thick bottom end. With DAMP
enabled, baffles and carpeting help tighten up the bottom end and make for a quicker
response time.
CONDENSER MAN MONO
This tube condenser mic is placed in the left side of the tracking room (when viewed
from control room). In “live” mode (DAMP off), this mic has a punchy midrange and
thick bottom end. With DAMP enabled, baffles and carpeting help tighten up the bottom
end and tame the midrange.
CONDENSER 67 MONO
This tube condenser mic is placed in the right side of the tracking room by the drum
overheads (when viewed from control room). In “live” mode (DAMP off), this mic has
a smooth midrange and aggressive low end. With DAMP enabled, baffles and carpeting
remove subsonic low end.
RIBBON 84 MONO
This ribbon mic has an old school recording studio vibe. In “live” mode (DAMP off),
it has a dark treble response and overall midrange-based sound. With DAMP enabled,
baffles and carpeting remove midrange, add some treble, and make for a quicker
response time.
RIBBON 121 MONO
This modern ribbon mic adds depth and punch without getting in the way of the close
mics’ high end. In “live” mode (DAMP off), it has a smooth treble response and extended
bass response. With DAMP enabled, baffles and carpeting tighten up the bottom end and
there is a quicker response time.
OX Amp Top Box Rig, Cabinet, & Mic Descriptions 44
Page 45

OX System Overview
Note: This chapter provides a general overview of OX features. Complete details
about all OX hardware and software functions are provided in other chapters.
OX is a reactive load, power attenuator, and speaker cabinet/microphone/room simulator,
and effects processor. When combined with a tube guitar amplifier, OX delivers albumquality studio tones without compromise.
OX connects to the speaker output of a tube amp and features a variety of output
connections for interfacing with other audio gear.
Key Features
• Premium, no-compromise analog reactive load box and guitar recording system for
tube guitar amps
• Instant album-quality mic and speaker cabinet tones via front-panel RIG knob
• Get record-ready sounds quickly with expertly-placed virtual mics and cabs — no
amp miking needed
• Five finely-tuned guitar amp attenuation levels, from off to whisper quiet to full
band volume
• UA Dynamic Speaker Modeling emulates speaker drive, breakup and cone cry
• World-class Universal Audio EQ, compression, delay, and reverb effects built-in
• Selectable 4, 8, and 16-ohm operation
• Front-panel Headphone out for silent practice with cranked tones
• Balanced TRS line outs and S/PDIF digital outs for stereo recording
• Pair with OX mobile or desktop app over Wi-Fi for editing and saving Rig presets
• Fanless design for silent operation
Reactive Load
OX’s reactive load presents a dynamically responsive impedance to the amplifier’s output.
OX’s impedance varies according to the amp’s output signal, just as a real speaker
does — which makes the amp respond to a guitarist’s touch and a speaker’s tonal
characteristics as if a real speaker is connected to the amp.
Power Attenuator
The reactive load safely attenuates (soaks) a tube guitar amp’s high-power speaker
output so the amp’s power tubes can be pushed to where they sound and feel best.
When a guitar speaker is optionally connected, the amp’s attenuated signal can be
delivered to the speaker at different levels so the amp’s high-volume output can be heard
at lower volumes. Five carefully crafted volume levels are available. The speaker can also
be turned off for silent operation.
Tip: OX’s reactive load includes a safety load feature. When OX power is OFF,
OX presents a 16 ohm load at the FROM AMPLIFIER input to prevent tube amp
damage that could occur with an unloaded amp output.
OX Amp Top Box OX System Overview 45
Page 46

Dynamic Modeling
OX’s breakthrough Dynamic Speaker Modeling and Dynamic Room Modeling are
advanced technologies developed by Universal Audio. Together, these technologies
deliver the most authentic simulations available.
Far more advanced than simple static impulse responses, the individual components
that comprise Dynamic Modeling — guitar speakers, cabinet microphones, recording
rooms, and room microphones — are all dynamically interactive and respond differently
depending on which elements within each component are active.
Dynamic Speaker Modeling
Guitar Speakers – The complex dynamic response of guitar speaker cabinets are
captured, including nuances such as speaker breakup and cone cry. A huge backline
of 17 coveted vintage, new original stock, and modern guitar speakers and cabinet
combinations are available.
Cabinet Microphones – Six high-end cabinet microphones and expert mic placements
capture the complex tonal interactions that occur between real guitar cabinets and mics.
A Direct Input (DI) box is also available to bypass the microphones if desired.
Dynamic Speaker Modeling presets can be selected with OX’s front panel RIG knob. RIG
presets can be accessed, edited, and stored with the OX app.
Dynamic Room Modeling
Dynamic Room Modeling adds air, weight, and three dimensional space to Dynamic
Speaker Modeling. Room ambience is a critical component of how it feels to play in a
great-sounding room with a cranked tube amp.
With OX, six selectable high-end room microphone options capture the reverberant
characteristics of a great sounding live recording studio.
The amount of Dynamic Room Modeling ambience and air can be instantly adjusted with
OX’s front panel ROOM knob. ROOM settings can be accessed, edited, and stored with
the OX app.
Master Effects
OX includes four studio-quality master effects by Universal Audio. 4-band EQ, 1176 SE
compression, stereo modulated delay, and stereo plate reverb are available, and each
of these effects can be used individually or all at the same time. OX’s master effects
are completely independent from the Dynamic Modeling processors and the 4-band EQ
available on each mic mixer channel.
Master Effects are applied after Dynamic Modeling. Note that the master effects cannot
be applied to OX’s speaker output, nor inserted before cabinet/mic/room processing.
OX Amp Top Box OX System Overview 46
Page 47

Rigs
TO GUITAR SPEAKER
A RIG is a complete album-quality studio tone preset. Each OX Rig is comprised of
the various Dynamic Speaker Modeling, Dynamic Room Modeling, and Master Effects
settings. Six Rig presets can be instantly recalled with OX’s front panel RIG knob.
Complete wireless Rig control is available with the OX app.
Rig Set
One Rig Set is a collection of six individual Rig presets that can be assigned to OX’s front
panel RIG knob. With Rig Sets, you can quickly store your six favorite Rigs to the RIG
knob for standalone use without the OX app. Rig Sets are assembled and assigned to the
RIG knob with the OX app.
Signal Flow
OX has analog and digital signal paths. The reactive load and power attenuation circuitry
is pure analog — the tube amp’s output feeds OX’s reactive load and power attenuator,
which can then be sent to a real guitar speaker cabinet.
Dynamic Speaker Modeling, Dynamic Room Modeling, and UA master effects use stereo
digital signal processing (DSP) to generate the finished album-quality studio tones. The
output of the analog portion feeds the input of the digital path. Finally, the stereo path
is routed to the line, headphone, and digital outputs for monitoring and/or recording, as
illustrated below.
FROM TUBE AMP
Reactive Load
Power Attenuator
ANALOG
Dynamic
Speaker
Modeling
L
R
Dynamic
Room
Modeling
DIGITAL (RIG)
Simplified signal flow within OX
L
Master
Effects
R
L
R
STEREO
OUTPUTS
• Line/Mon
• Headphone
• S/PDIF
Outputs
All OX outputs can be used at the same time, and all OX output connections are optional
— you can mix-and-match any or all outputs as desired. For example, you can connect
a guitar speaker without connecting LINE / MON or HEADPHONE outputs, and/or use
headphones without connecting a guitar speaker. See Controls & Connectors for details.
OX Amp Top Box OX System Overview 47
Page 48

Analog Speaker Output
OX’s SPEAKER OUT is the analog reactive load output without digital signal processing
— it’s a pass-through of the tube amp’s output signal after power attenuation. Because
the SPEAKER OUT is purely analog and doesn’t contain Dynamic Speaker Modeling,
Dynamic Room Modeling, or master effects, the RIG and ROOM controls don’t change
the sound of OX’s speaker output.
DSP Outputs
The LINE / MON, HEADPHONE, and S/PDIF outputs contain OX’s reactive load with
digital signal processing (DSP). The RIG and ROOM controls change the sound at these
outputs.
OX App
OX includes a free software application for Mac
and iPad (registration required). With the OX app,
Rig presets can be wirelessly accessed, edited, and
stored over OX’s built-in Wi-Fi network.
The app provides deep access to all RIG and
ROOM settings, allowing you to create a nearinfinite variety of complete guitar tones and store
hundreds RIG presets. 100 carefully crafted
factory Rigs deliver a wide variety of album-quality
tones, or use the factory Rigs as a starting point for
your own custom tones.
With the OX app, you can easily assign different
Rigs to the six front panel RIG knob slots, for quick
standalone access to your favorite Rigs without the
app. Rig Sets can be easily assembled to quickly
assign a batch of six Rigs for standalone stage and
studio use.
For complete details, see OX Software App.
Additional Resources
For additional resources such as videos and the UA Knowledge Base, or to contact our
technical support team, please see Technical Support.
OX Amp Top Box OX System Overview 48
Page 49

OX Wi-Fi Networking
OX has built-in Wi-Fi network connectivity. OX’s Wi-Fi is used by the OX software app for
wireless remote control of OX’s Rigs, Rig Sets, and all other OX settings. To view all OX
app screens and settings, the Mac/iPad running the OX app must be connected to OX via
Wi-Fi.
The Mac/iPad running the OX app can connect to OX in two ways. The Mac/iPad can be
paired directly to OX’s Wi-Fi hotspot, or both the Mac/iPad and OX can both be paired to
an existing external Wi-Fi network at the same time.
OX Wi-Fi Hotspot
OX’s standalone Wi-Fi hotspot is always active. OX’s default Wi-Fi hotspot network name
(SSID) and password are printed on OX’s serial number label on the rear panel. Every OX
hardware unit has a unique hotspot name and password.
Tip: OX’s default hotspot name and password can be changed in SETTINGS View
within the OX software app.
The Mac/iPad device running the OX app is typically paired directly to OX’s hotspot for
wireless remote control of OX when an external Wi-Fi network (such as an existing home
Wi-Fi network) is unavailable.
How To Pair With OX’s Hotspot
To pair a Mac/iPad with OX, go into the Mac/iPad system Wi-Fi settings and select OX’s
hotspot name, then enter the password — just as you would when connecting the device
to any other Wi-Fi network.
Note: Pairing to OX’s Wi-Fi hotspot is done within the system settings of the Mac/
iPad device, not within the OX app.
OX Amp Top Box OX Wi-Fi Networking 49
Page 50

External Wi-Fi Networking
The OX hardware can be paired as a client to an existing external Wi-Fi network. By
pairing both the OX hardware and the Mac/iPad running the OX app to the same external
Wi-Fi network, the Mac/iPad can connect to both the internet and OX at the same time.
Tip: Pairing OX and the Mac/iPad to the same external Wi-Fi network is the most
convenient setup because you don’t need to change Wi-Fi settings when you want
to use the OX app.
How To Pair OX With External Wi-Fi Network
Pairing OX to an external Wi-Fi network is a three-step process. For detailed instructions,
follow steps 2, 3 and 4 in the OX Registration Procedure.
1. Within the Mac/iPad Wi-Fi system settings, pair the Mac/iPad to OX’s internal
hotspot so the OX app can control OX’s network settings.
2. Within the OX app, pair the OX hardware to the external Wi-Fi network.
3. Pair the OX app device to the same external Wi-Fi network as OX.
Now the Mac/iPad and the OX hardware are both clients of the external Wi-Fi network,
with internet connectivity.
Note: To use the OX app, the OX hardware must be paired to an internetconnected external Wi-Fi network at least once to complete OX registration.
OX Amp Top Box OX Wi-Fi Networking 50
Page 51

OX Registration
To enable the OX app, the OX hardware needs to be registered with Universal Audio, and
the OX hardware must be connected to the internet via Wi-Fi to register. After registration
is complete, the OX app can access and control all available OX settings. This chapter
will guide you through the Wi-Fi and registration process.
Note: The OX registration process needs to be completed only once.
During registration, you’ll use the OX app to control OX’s network settings and connect
OX to an external Wi-Fi network. Registration occurs automatically when the OX hardware
and the OX app are both connected to the external Wi-Fi network at the same time.
Note: The existing external Wi-Fi network must be connected to the internet to
complete registration.
OX Registration Overview
To register OX, you’ll follow the steps below. Complete details for each step are provided
in the OX Registration Procedure on the next page.
1. From the Mac or iPad, download and open the OX app.
2. Pair the device that will run the OX app with OX’s Wi-Fi hotspot.
3. Connect OX to an external Wi-Fi network that is connected to the internet.
4. Pair the OX app device to the same external Wi-Fi network as OX.
5. Open the OX app and complete registration. The app guides you through creating
your UA account, then OX registration is completed automatically through its
internet connection.
OX Amp Top Box OX Registration 51
Page 52

OX Registration Procedure
Note: In the following instructions, the “OX app device” is the Mac or iPad device
that is running the OX software app.
To register OX:
1. Download and open the OX software app.
• Mac: From your computer, visit www.uaudio.com/ox/app
• iPad: From your iPad, search “OX Amp Top Box” in the iOS App Store
2. Pair the OX app device with OX’s Wi-Fi hotspot.
Go to the Wi-Fi system settings within the OX app device (the Mac/iPad device
system settings, not settings within the OX app), then select OX’s Wi-Fi hotspot
and enter the unique hotspot password on OX’s rear panel label.
OX AMP TOP BOX
0000123456
HOTSPOT: OX123456
PASSWORD: RandomWords
OX’s hotspot name & password label on rear panel
(example only – every unit has a unique name and password)
3. Pair OX to an external Wi-Fi network.
Open the OX app and press Find My OX
to display the available Wi-Fi network
names. Choose a network from the list,
enter its password, then press OK.
Tip: Enter the external Wi-Fi network
password, not OX’s hotspot password.
At right: OX app screenshot showing OX
connected to external Wi-Fi network
OX Amp Top Box OX Registration 52
Page 53

4. Pair the OX app device to the same external Wi-Fi network as OX.
Go to the Wi-Fi system settings within the OX app device (the Mac/iPad device
system settings, not settings within the OX app), and pair the device to the same
external Wi-Fi network that was selected for OX in step three.
Tip: Enter the external Wi-Fi network password, not OX’s hotspot password.
5. Open the OX app and complete registration.
The OX app takes you to the OX registration web pages and they will guide you.
Press “Create an account” if you don’t already have one (or login if you do). After
account creation or login, OX is registered automatically.
When you see the confirmation page, registration is complete. Return to the OX app,
press Find My OX, and you’ll have complete access to all OX controls.
Registration confirmation page
OX Amp Top Box OX Registration 53
Page 54

Troubleshooting
If OX isn’t behaving as expected, first check all system setups, connections, cables, and
operating instructions. For answers to most questions and solutions for most issues, or to
contact our support team, see the Technical Support page.
Wi-Fi Reset
OX Wi-Fi reset clears all OX network and password settings.
Important: Wi-Fi reset permanently deletes previously-entered network passwords.
To perform a Wi-Fi reset:
1. Make sure nothing is plugged into OX’s USB ports.
2. Make sure OX is powered on and system startup is complete (RIG LED lit solid green or
amber).
3. Press and hold the reset switch.
4. When OX’s front panel RIG LED begins blinking green (after approximately 10 seconds),
release the reset switch. The RIG LED continues to blink green.
5. Press the reset switch again within six seconds to confirm the action. The RIG LED is
unlit, indicating Wi-Fi initialization is in process.
6. When the RIG LED is solid green again, OX Wi-Fi is reset and ready for use.
Factory Reset
OX factory reset deletes all user settings and returns OX to its original factory state.
Important: Factory Reset permanently deletes ALL user data, including ALL user Rigs,
Rig Sets, effect presets, networks, network passwords, and registration status.
To perform a factory reset:
1. Make sure nothing is plugged into OX’s USB ports.
2. Power off OX with the rear panel POWER switch.
3. Press AND HOLD the reset switch while powering on OX. Continue depressing the reset
switch.
4. When OX’s front panel RIG LED begins blinking red (after approximately 10 seconds),
release the reset switch. The RIG LED continues to blink red.
5. Press the reset switch again within six seconds to confirm the action. The RIG LED is
unlit, indicating OX initialization is in process.
6. When the RIG LED is solid green again, OX is in its factory state and ready for use.
OX Amp Top Box 54
Troubleshooting
Page 55

Specifications
Note: All OX Amp Top Box specifications are subject to change without notice.
SYSTEM
I/O Complement
Amplifier Input One
Speaker Output One
Line Outputs Two (one stereo left/right)
Headphone Output One (stereo left/right)
Digital Outputs Two (mirrored)
ANALOG I/O
Amplifier Input
Connector Type ¼” Female TS Unbalanced
Input Impedance 4/8/16 Ohms (selectable)
Maximum Input Power 150 Watts RMS, 200 Watts RMS peak
Safety Load (power off) 16 Ohms
Speaker Output
Connector Type ¼” Female TS Unbalanced
Output Attenuation Amount Six Steps (dB): 0, 6, 12, 24, 36, ∞ (speaker off)
Line Outputs 1 – 2
Connector Type ¼” Female TRS Balanced
Dynamic Range 114.5 dB (A-weighted)
Frequency Response 20 Hz – 20 kHz, ±0.1 dB
Signal-to-Noise Ratio 114.0 dB (A-weighted)
Total Harmonic Distortion + Noise -110 dB @ -3 dBFS
Channel Separation 129 dB
Output Impedance 100 Ohms
Maximum Output Level 20.2 dBu (balanced)
Stereo Headphone Outputs
Connector Type ¼” Female TRS Stereo
Dynamic Range 113.0 dB (A-weighted)
Frequency Response 20 Hz – 20 kHz, ±0.1 dB
Signal-to-Noise Ratio 113.0 dB (A-weighted)
Total Harmonic Distortion + Noise -107 dB @ -3 dBFS
Maximum Output Power 80 milliwatts into 600 Ohms
(continued)
OX Amp Top Box Specifications 55
Page 56

DIGITAL OUTPUTS
Format S/PDIF IEC958
Connector Type 1 Female Phono (RCA)
Connector Type 2 Optical TOSLINK JIS F05
Sample Rate 44.1 kHz
Bit Depth 24
ELECTRICAL
Power Supply External AC to DC Power Supply, Level VI compliant
AC Input Connector Type IEC Male
AC Requirements 100V – 240V AC, 50 – 60 Hz
DC Connector Type XLR 4-Pin Locking Male (Neutrik P/N NC4MDM3-H)
DC Requirements 12 VDC ±5%, 1.5A
Maximum Power Consumption 18 Watts
Operating Temperature Range 32° to 104° Fahrenheit (0° to 40° Celsius)
Storage Temperature Range –40° to 176° Fahrenheit (–40° to 80° Celsius)
Operating Humidity Range 10% – 95%, non-condensing
COMPLIANCE
EMC and Safety Standards
FCC Part 15 for Class B digital device EN 610003-3-3:2013 EN 301489-17
ICES-003 EN 55103-2 KN 301489-1
VCCI-CISPR 32:2016 KN32 KN 301489-17
EN 55032 KN35 UL/cUL 60065
CIPSR 32:2012 CNS 13438 EN 60065
EN 61000-3-2:2014 EN 301489-1 IEC 60065
PHYSICAL
Dimensions
Width 15.01 in / 381.25 mm
Height, Chassis Only 4.45 in / 112.94 mm
Height, Including Rubber Feet 5.45 in / 138.44 mm
Depth, Chassis Only 8.05 in / 204.5 mm
Depth, Including Knob & Jack Protrusions 9.04 in / 229.58 mm
Shipping Box (Width x Depth x Height) 20 3/4” x 12 15/16” x 11 5/16”
(52.7 cm x 32.9 cm x 28.7 cm)
Weight
Weight (unit only) 14.1 Lbs / 6.40 Kg
Package Contents
OX Amp Top Box Unit
External Power Supply
IEC Power Cable — US, EU, or UK (region dependent)
Quick Start Guide
RIG Preset Guide
Safety & License Sheet
OX Amp Top Box Specifications 56
Page 57

Block Diagram
POWER AMP IN/OUT
FOOTSWITCH
USB HOST
USB DEVICE
POWER SUPPLY INPUT
OX Amp Top Box Hardware Block Diagram
v180130
LINE / MON OUT L/R
D/A
LINE OUT
1/4” TRS
HEADPHONE L/R
D/A
VOLUME
OPTO
S/PDIF OUT
VOLUME
HEADPHONE
AUDIO I/O
RCA
LED
POWER / STATUS
AUDIO
PROCESSING
SYSTEM CONTROL
WiFi/BT WiFi/BT
Antenna Antenna
(RED / GREEN)
WiFi STATUS LED
Radio Module
DDR3
WiFi + Bluetooth
PCIe
DRAM
Flash
eMMC
Clock
Time
Real-
SELECT
IMPEDANCE
FROM AMPLIFIER
A/D 2 x 1/4” TRS
RIG
SELECT
200Ω
REACTIVE
4Ω 8Ω 16Ω
4
3
5
VOLUME
SPEAKER
1/4” TS
TO SPEAKER
RIG LED
(RED / GREEN)
LOAD
2
1
OFF
AMP GND
1/4” TS
ROOM
CONTROL
10KΩ
OX Amp Top Box Block Diagram 57
SWITCH
PUSHBITTON
Power
Internal
Supplies
POWER SWITCH
USB 2.0
USB 2.0
1/4” TRS
TYPE B
TYPE A
XLR MALE
Page 58

Notices
Warranty
Universal Audio provides a limited warranty on all UA hardware products. To learn more,
visit help.uaudio.com. The limited warranty gives you specific legal rights. You may also
have other rights which vary by state or country.
Repair Service
If OX isn’t behaving as expected, first check all system setups, connections, cables, and
operating instructions. Answers to most questions are available in the Universal Audio
Knowledge Base at help.uaudio.com.
If you still need help, or to learn about repair service, please visit help.uaudio.com.
Maintenance
• CAUTION: These servicing instructions are for use by qualified service personnel
only. To reduce the risk of electric shock do not perform any servicing other than
that contained in the operating instructions unless you are qualified to do so.
• CAUTION: OX circuitry contains a replaceable lithium battery. Danger or explosion
if battery is incorrectly replaced. The battery should only be replaced by a
qualified technician. Replace only with the same or equivalent type battery.
• OX does not contain a fuse or any other user-replaceable parts. The unit is
internally calibrated at the factory. No internal user adjustments are available.
OX Amp Top Box Notices 58
Page 59

Disclaimer
The information contained in this manual is subject to change without notice. Universal
Audio, Inc. makes no warranties of any kind with regard to this manual, including, but
not limited to, the implied warranties of merchantability and fitness for a particular
purpose. Universal Audio, Inc. shall not be liable for errors contained herein or direct,
indirect, special, incidental, or consequential damages in connection with the furnishing,
performance, or use of this material.
End User License Agreement
Your rights to the Software are governed by the accompanying OX Software End User
License Agreement, a copy of which can be found at www.uaudio.com/eula.
Open Source License Information
OX open source license information can be found at www.uaudio.com/eula.
Universal Audio Trademarks
UA trademark information can be found at www.uaudio.com/terms.html.
Copyright
Copyright ©2018 Universal Audio, Inc. All rights reserved.
This manual and any associated software, artwork, product designs, and design concepts
are subject to copyright protection. No part of this document may be reproduced, in any
form, without prior written permission of Universal Audio, Inc.
OX Amp Top Box Notices 59
Page 60

Compliance
Important Safety Information
Before using this unit, be sure to carefully read the applicable items of these operating instructions and the safety
suggestions. Afterwards, keep them handy for future reference. Take special care to follow the warnings indicated on the unit,
as well as in the operating instructions.
1) Read these instructions.
2) Keep these instructions.
3) Heed all warnings.
4) Follow all instructions.
5) Do not use this apparatus near water.
6) Clean only with dry cloth.
7) Do not block any ventilation openings. Install in accordance with the manufacturer’s instructions.
8) Do not install near any heat source such as radiators, heat registers, stoves, or other apparatus (including amplifiers) that produce
heat.
9) Do not defeat the safety purpose of the polarized or grounding-type plug. A polarized plug has two blades with one wider than the
other. A grounding type plug has two blades and a third grounding prong. The wide blade or the third prong are provided for your
safety. If the provided plug does not fit into your outlet, consult an electrician for replacement of the obsolete outlet.
10) Protect the power cord from being walked on or pinched particularly at plugs, convenience receptacles, and the point where they
exit from the apparatus.
11) Only use with attachments/accessories specified by the manufacturer.
12) Use only with the cart, stand, tripod, bracket, or table specified by the manufacturer, or sold with the apparatus. When a cart is
used, use caution when moving the cart/apparatus combination to avoid injury from tip-over.
13) Unplug this apparatus during lightning storms or when unused for long periods of time.
14) Refer all servicing to qualified service personnel. Servicing is required when the apparatus has been damaged in any way, such
as power-supply cord or plug is damaged, liquid has been spilled or objects have fallen into the apparatus, the apparatus has been
exposed to rain or moisture, does not operate normally, or has been dropped.
Note: It is safe to install and operate OX Amp Top Box on top of a guitar or bass amplifier.
Description of symbols used
The lightning flash represented by the arrow symbol in an equilateral triangle is intended to alert users to the presence of
high voltage within the unit that could cause an electrical shock hazard.
The exclamation mark in an equilateral triangle is intended to alert users to the existence of important instructions in the
manual relating to the use and maintenance of the unit.
OX Amp Top Box Notices 60
Page 61

FCC Compliance Information
This device complies with Part 15 of the FCC Rules. Operation is subject to the following two conditions: (1) this device may not
cause harmful interference, and (2) this device must accept any interference received, including interference that may cause
undesired operation.
This product does not contain any user serviceable components. Any unauthorized product changes or modifications will invalidate
warranty and all applicable regulatory certifications and approvals, including authority to operate this device.
FCC Part 15 Digital Emissions Compliance
We Universal Audio, Inc., 4585 Scotts Valley Drive, Scotts Valley, CA, 95066, USA, +1-831-440-1176, declare under our sole
responsibility that the product OX Amp Top Box complies with Part 15 of the FCC Rules. Operation is subject to the following two
conditions: (1) this device may not cause harmful interference, and (2) this device must accept any interference received, including
interference that may cause undesired operation.
WARNING: This equipment has been tested and found to comply with the limits for a Class B digital device, pursuant to Part 15 of
the FCC Rules. These limits are designed to provide reasonable protection against harmful interference in a residential installation.
This equipment generates and radiates radio frequency energy and, if not installed and used in accordance with the instructions, may
cause harmful interference to radio communications.
However, there is no guarantee that interference will not occur in a particular installation. If this equipment does cause harmful
interference to radio or television reception, which can be determined by turning the equipment off and on, the user is encouraged to
try to correct the interference by one or more of the following measures:
• Reorient or relocate the receiving antenna.
• Increase the separation between the equipment and receiver.
• Connect the equipment into an outlet on a circuit different from the one the receiver is connected to.
• Consult the dealer or an experienced radio/TV technician for help.
FCC Radiation Exposure Statement
The product comply with the FCC portable RF exposure limit set forth for an uncontrolled environment and are safe for intended
operation as described in this manual. The further RF exposure reduction can be achieved if the product can be kept as far as
possible from the user body or set the device to lower output power if such function is available.
Industry Canada Notice
This device complies with Canadian RSS-210.
This device complies with Industry Canada license-exempt RSS standard(s). Operation is subject to the following two conditions:
(1) this device may not cause interference, and (2) this device must accept any interference, including interference that may cause
undesired operation of the device.
Ce dispositif est conforme à la norme CNR-210 d’Industrie Canada applicable aux appareils radio exempts de licence. Son
fonctionnement est sujet aux deux conditions suivantes: (1) le dispositif ne doit pas produire de brouillage préjudiciable, et (2) ce
dispositif doit accepter tout brouillage reçu, y compris un brouillage susceptible de provoquer un fonctionnement indésirable.
Industry Canada Radiation Exposure Statement
The product complies with the Canada portable RF exposure limit set forth for an uncontrolled environment and are safe for intended
operation as described in this manual. The further RF exposure reduction can be achieved if the product can be kept as far as
possible from the user body or set the device to lower output power if such function is available.
Europe – EU Declaration of Conformity
Marking by the above symbol indicates compliance with the Essential Requirements of the R&TTE Directive of the European Union
(1999/5/EC). This equipment meets the following conformance standards:
EN300 328, EN 301 893, EN 301 489-17, EN60950, EN 62311
OX Amp Top Box Notices 61
Page 62

Radiolan Compliance Statements
cs
da
de
et
en English
es
el
fr
it
lv
lt
mt
hu
nl
no
pl
pt
sl
sk
sk
Česky
[Czech]
Dansk
[Danish]
Deutsch
[German]
Eesti
[Estonian]
Español
[Spanish]
Ελληνική
[Greek]
Français
[French]
Íslenska
[Icelandic]
Italiano
[Italian]
Latviski
[Latvian]
Lietuvių
[Lithuanian]
Malti
[Maltese]
Magyar
[Hungarian]
Nederlands
[Dutch]
Norsk
[Norwegian]
Polski
[Polish]
Português
[Portuguese]
Slovensko
[Slovenian]
Slovensky
[Slovak]
Suomi
[Finnish]
Svenska
[Swedish]
Universal Audio, Inc. tímto prohlašuje, že tento Radiolan je ve shodě se základními požadavky a dalšími
příslušnými ustanoveními směrnice 1999/5/ES.
Undertegnede Universal Audio, Inc. erklærer herved, at følgende udstyr Radiolan overholder de væsentlige
krav og øvrige relevante krav i direktiv 1999/5/EF.
Hiermit erklärt Universal Audio, Inc. dass sich das Gerät Radiolan in Übereinstimmung mit den grundlegenden Anforderungen und den übrigen einschlägigen Bestimmungen der Richtlinie 1999/5/EG bendet.
Käesolevaga kinnitab Universal Audio, Inc. seadme Radiolan vastavust direktiivi 1999/5/EÜ põhinõuetele ja
nimetatud direktiivist tulenevatele teistele asjakohastele sätetele.
Hereby, Universal Audio, Inc., declares that this Radiolan is in compliance with the essential requirements and
other relevant provisions of Directive 1999/5/EC.
Por medio de la presente Universal Audio, Inc. declara que el Radiolan cumple con los requisitos esenciales y
cualesquiera otras disposiciones aplicables o exigibles de la Directiva 1999/5/CE.
ΜΕ ΤΗΝ ΠΑΡΟΥΣΑ Universal Audio, Inc. ΔΗΛΩΝΕΙ ΟΤΙ Radiolan ΣΥΜΜΟΡΦΩΝΕΤΑΙ ΠΡΟΣ ΤΙΣ
ΟΥΣΙΩΔΕΙΣ ΑΠΑΙΤΗΣΕΙΣ ΚΑΙ ΤΙΣ ΛΟΙΠΕΣ ΣΧΕΤΙΚΕΣ ΔΙΑΤΑΞΕΙΣ ΤΗΣ ΟΔΗΓΙΑΣ 1999/5/ΕΚ.
Par la présente Universal Audio, Inc. déclare que l'appareil Radiolan est conforme aux exigences essentielles et
aux autres dispositions pertinentes de la directive 1999/5/CE.
Hér með lýsir Universal Audio, Inc. yr því að Radiolan er í samræmi við grunnkröfur og aðrar kröfur, sem
gerðar eru í tilskipun 1999/5/EC.
Con la presente Universal Audio, Inc. dichiara che questo Radiolan è conforme ai requisiti essenziali ed alle
altre disposizioni pertinenti stabilite dalla direttiva 1999/5/CE.
Ar šo Universal Audio, Inc. deklarē, ka Radiolan atbilst Direktīvas 1999/5/EK būtiskajām prasībām un citiem
ar to saistītajiem noteikumiem.
Šiuo Universal Audio, Inc. deklaruoja, kad šis Radiolan atitinka esminius reikalavimus ir kitas 1999/5/EB
Direktyvos nuostatas.
Hawnhekk, Universal Audio, Inc., jiddikjara li dan Radiolan jikkonforma mal-ħtiġijiet essenzjali u ma provvedimenti oħrajn relevanti li hemm d-Dirrettiva 1999/5/EC.
Alulírott, Universal Audio, Inc. nyilatkozom, hogy a Radiolan megfelel a vonatkozó alapvetõ követelményeknek és az 1999/5/EC irányelv egyéb elõírásainak.
Hierbij verklaart Universal Audio, Inc. dat het toestel Radiolan in overeenstemming is met de essentiële eisen
en de andere relevante bepalingen van richtlijn 1999/5/EG.
Universal Audio, Inc. erklærer herved at utstyret Radiolan er i samsvar med de grunnleggende krav og øvrige
relevante krav i direktiv 1999/5/EF.
Niniejszym Universal Audio, Inc. oświadcza, że Radiolan jest zgodny z zasadniczymi wymogami oraz
pozostałymi stosownymi postanowieniami Dyrektywy 1999/5/EC.
Universal Audio, Inc. declara que este Radiolan está conforme com os requisitos essenciais e outras disposições da Directiva 1999/5/CE.
Universal Audio, Inc. izjavlja, da je ta Radiolan v skladu z bistvenimi zahtevami in ostalimi relevantnimi
določili direktive 1999/5/ES.
Universal Audio, Inc. týmto vyhlasuje, že Radiolan spĺňa základné požiadavky a všetky príslušné ustanovenia
Smernice 1999/5/ES.
Universal Audio, Inc. vakuuttaa täten että Radiolan tyyppinen laite on direktiivin 1999/5/EY oleellisten vaatimusten ja sitä koskevien direktiivin muiden ehtojen mukainen.
Härmed intygar Universal Audio, Inc. att denna Radiolan står I överensstämmelse med de väsentliga egenskapskrav och övriga relevanta bestämmelser som framgår av direktiv 1999/5/EG.
OX Amp Top Box Notices 62
Page 63

Technical Support
Universal Audio Knowledge Base
The UA Knowledge Base is your complete online technical resource for configuring,
operating, troubleshooting, and repairing all UA products.
You can watch helpful support videos, search the Knowledge Base for answers, get
updated technical information that may not be available elsewhere, and more.
UA Knowledge Base
YouTube Support Channel
The Universal Audio Support Channel at youtube.com includes helpful support videos for
setting up and using UA products.
UA YouTube Support Channel
Universal Audio Community Forums
The unofficial UA discussion forums are a valuable resource for all Universal Audio
product users. This website is independently owned and operated.
www.uadforum.com
Contact Universal Audio Support
To contact the UA support team for technical or repair assistance, please visit:
help.uaudio.com
Universal Audio Technical Support63
Page 64

www.uaudio.com
 Loading...