


m
ST L T
READ AND FOLLOW ALL SAFETY RULES AND OPERATING
iNSTRUCTiONS BEFORE USINGTHIS EQUIPMENT
Assembled in U.S.A.of domesticand imported components 6000393=REV A 1/10

Safety Rules
This is the safety alert symbol. It is used to alert you to
A
Read and understand all safety rules and operating instructions before using this
tractor attachment.
Follow all safety rules and operating instructions provided by your vehicle's
manufacturer when using attachment.
Never allow children or untrained persons to operate vehicle or attachment.
Do not exceed the vehicle manufacturer's towed weight limit.
Reduce vehicle speed and allow extra stopping distance when towing heavy
loads.
potential personal injury hazards, Obey all safety messages
that follow this symbol to avoid possible injury or death,
Reduce vehicle speed and towed weight when operating on slopes.
Operate up and down slopes, never across the face of slopes.
Do not carry passengers on vehicle or attachment.
Avoid sudden turns or maneuvers.
Do not tow attachment on public roadways.
Do not remove warning decals from product.
Check product for worn, loose, or damaged parts before each use. If any damage
is present, repair the product before using.
Check product for loose or missing fasteners before each use. Tighten or replace
fasteners as needed before using.
Do not exceed vehicle speed of 6 miles per hour when towing Dump Cart.
Do not exceed Dump Cart rated weight capacity of 1250 pounds.

Carton Contents
6
- 3 (xl)
I
27 (x2)
30 (xl)
28 (xl)
29 (xl)
31 (x2)
6 (x2)
32 (x4)
3 (x2)
41 (xl)
t
33 (x48)
37 (xl)
TOOLS REQUIRED FOR ASSEMBL Y:
• Large Flat Screwdriver
• 7/16" Wrench and Socket
34 (x46)
38 (x2)
35 (x2)
D
39 (xl) 40 (x3)
2
42 (x3)
1/2" Wrench or Socket
Grease Gun

Assembly Instructions
11
Place Body Halves on a smooth, flat surface
so they are square and fasten together with
hardware as shown.
Attach Front Support to Body and tighten
hardware.
Attach Undercarriage to Body and
tighten hardware.
34
-33
3

Assembly Instructions
Attach Front Gate to inside of Body as shown and tighten hardware.
+ !rlr,,,' It, it ir
I
5_ Attach Corners to Body and tighten hardware.
_'_33 34
Insert Axle into Undercarriage halfway as shown. Center Spacer inside
Swivel Clevis and align with Axle.
25
4
Assembly Instructions
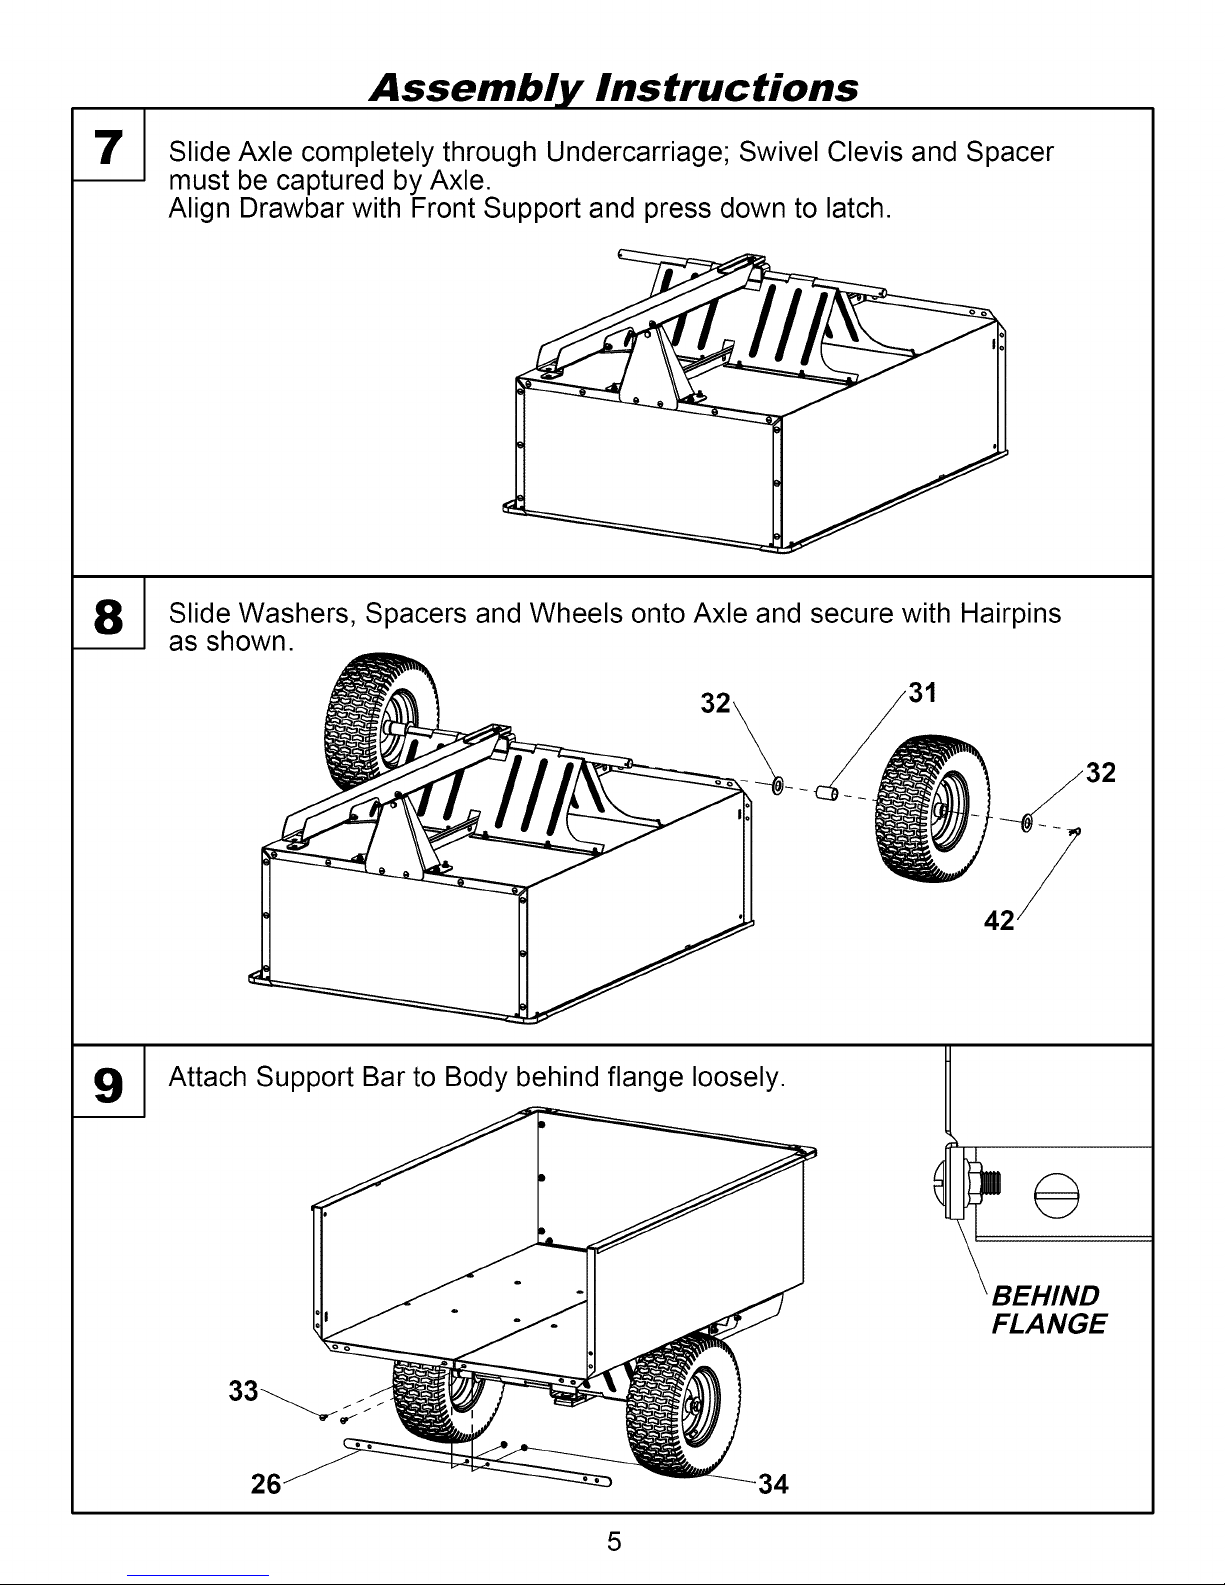
'1 Slide Axle completely through Undercarriage; Swivel Clevis and Spacer
must be captured by Axle.
Align Drawbar with Front Support and press down to latch.
Io
B
_J
8
9
Slide Washers, Spacers and Wheels onto Axle and secure with Hairpins
as shown.
Attach Support Bar to Body behind flange loosely.
33
26 _ _"___34
\
BEHIND
FLANGE
5

Assembly Instructions
Attach Corner Gussets to Body and tighten all hardware.
3(
Attach Latch Bars to Handle as shown.
Do not tighten hardware completely;
Latch Bars must rotate freely.
Slide Grip onto Handle.
27
I
Slide Latch Bars into Tailgate retainers as shown. Align Handle with
mounting hole on Tailgate.
6

Assembly Instructions
Slide Washer between Handle and Tailgate and secure with
hardware. Handle must be tight, yet free to rotate.
/ _ _37
r
1141
I_ Install Hitch Pin as shown.
Attach Tailgate to Body as shown. Do not tighten hardware completely;
Tailgate must rotate freely.
41
7

Operating Instructions
Before Using Dump Cart:
1. Apply grease to wheels using grease gun until grease can be seen
squeezing out from both sides of the wheel.
2. Check tire pressure and inflate to 28 psi if needed.
3. Read all Safety Rules found on page 1.
How to Use Dump Cart:
1. Attach Dump Cart to your tractor using the supplied hitch pin.
2. Do not exceed 1250 pounds when loading material into the cart body.
3. Distribute the weight of the load as evenly as possible in the cart body for
best handling.
4. When hauling heavy loads, verify that your vehicle has adequate towing and
braking capacity.
5. Do not exceed 6 miles per hour when towing Dump Cart.
How to Empty Dump Cart:
.
Step down the foot pedal to release the latch mechanism.
2.
Swivel as desired to guide the material to preferred location.
3.
Lower the body and guide the latch into the drawbar and relatch.
Periodic Maintenance:
Tighten fasteners as needed before each use
Check tire pressure before each use
Grease wheels annually
8

Warranty
If this product fails due to a defect in material or workmanship within TWO
YEARS from the date of purchase, we will at our option repair or replace it free of
charge. This warranty excludes tires and wheels, which are expendable and
become worn during normal use.
This warranty does not cover:
• Repairs necessary because of operator abuse or negligence.
• Equipment used for commercial or rental purposes.
• Paint that is worn or faded due to normal use or exposure.
To arrange for product repair call 1-800-652-2321, or return this product to place
of purchase for replacement.
This warranty gives you specific legal rights, and you may also have other rights
which may vary from state to state. This warranty applies only while this product
is in use in the United States.
In the space below record the purchase date of your Dump Cart.
Model Number 610-24356
Purchase Date
Keep this Owner's Manual and your receipt in a safe place for future reference.
After the two year warranty period all replacement parts may be ordered by
calling 1-800-652-2321.
When ordering replacement parts, always give the following information:
• Product 16 cu ft STEEL SWIVEL DUMP CART
• Model Number 610-24356
• Part Number
• Part Description
9

Repair Parts
5_ 33--------_ 35,. 39_29\ ..,._40
34.--_ . _ _ _ "33
• 'i I
ITEM
1
2
3
4
5
6
7
8
9
10
11
12
13
14
15
16
17
18
19
20
21
16\ \o / '-------19 "\
42------------J-_-'" S u_ 'IZ \4_ /
11 _ 17/ \20 '' _-_
PART NO
6000399
6000400
401062
401032
6000396
6000283
6000315
6000383
6000369
3000720
300061
6000324
6000370
300055
300052
6000305
6000309
300075
6000368
6000325
6000312
Body Half, Right 1 22 401121
Body Half, Left 1 23 401051
Undercarriage 1 24 401132
Front Gate 1 25 6000402
Tailgate 1 26 300002
Wheel 2 27 6000401
Drawbar Assembly (incl 8-22) 1 28 6000389
Drawbar 1 29 6000403
Shoulder Bolt 1 30 6000310
3/8" USS Flat Washer 1 31 6000382
318-16 C-Lock Nut 5 32 300076
Bushing 2 33 300054
318-16 x 3-1/2" Hex Bolt 2 34 6000418
3!8-16 x 3" Hex Bolt 1 35 3000616
3t8-16 x 3/4" Hex Bolt 1 36 6000463
Foot Pedal 1 37 6000420
Latch 1 38 6000421
1!2" USS Washer 1 39 3000716
Spring Washer 1 40 300065
Latch Spring 2 41 300083
Swivel Clevis 1 42 300084
DESCRIPTION QT"( ITEM PART NO
DESCRI PTION QTY
Hitch Bracket 1
Corner 2
Rear Support Bar 1
Tailgate Latch 2
Axle 1
Corner Gusset 2
Handle Grip 1
Tailgate Handle 1
Front Support 1
Spacer 2
1" SAE Flat Washer 4
5/16-18 x 3/4" Truss Hd Screw 48
5/16-18 Flange Lock Nut 46
5t16-18 Nyloc Nut 2
Spacer 1
1/4-20 x 3/4" Hex Head Bolt 1
1/4-20 x 3/4" Carriage Bolt 2
1/4" SAE Flat Washer 1
1/4-20 Nyloc Nut 3
Hitch Pin 1
Hairpin Cotter, 2-5/16" 3
10
 Loading...