

Page 1
Operator Instructions
Includes - Foreseen Use, Work Stations, Putting Into Service, Operating,
Dismantling, Assembly and Safety Rules
Important
Read these instructions carefully before installing, operating,
servicing or repairing this tool. Keep these instructions in a safe
accessible place.
Manufacturer/Supplier Product Type
Universal Air Tool Company Limited
Unit 8
Lane End Industrial Park
High Wycombe
Bucks
Spray Gun - Syphon Type
(1 litre cup) 1.8mm
Model No/Nos Serial No
UT57A
HP14 3BY
Tel No Fax No(01494) 883300 (01494) 883237
RPM
N/A
Cycles Per Min
N/A
Product Nett Weight
1.85
0.84 5/16 8 30 10
Recommended Working
Recommended Minimum
Maximum
Use - Safety Glasses
Use - Safety Gloves
Use - Safety Boots
Use - Breathing Masks
lbs
Kg
Air Pressure
Personal Safety Equipment
Recommended Use Of
Balancer Or Support
No
2.06
n/a
4.83
bar
bar
bar
30
n/a
70
Yes
Yes
Yes
Recommended Hose Bore
Size - Minimum
Ins M/M Ft M
Noise Level Sound Pressure Level TBA dB(A)
PSI
Test Method Tested in accordance with ISO
PSI
Standard 3744
PSI
Sound Power Level TBA dB(A)
Vibration Level
Test Method Vibration testing not required for a
spray gun
Recommended Max.
N/A
Metres / Sec²
Use - Ear Protectors
Foreseen Use of Tool
This product is designed for the purpose of applying liquids in the form
of paint, lacquers, etc. to a surface for the purpose of providing a
decorative or protective finish. It must not be used for or modified for
any other purpose unless first consulting the manufacturer or an
authorised representative.
Work Stations
The spray gun should only be used as a handheld hand-operated
device. It is always recommended that the spray gun is used when
standing on the solid floor. It can be used in other positions provided the
spray gun is kept near vertical and the operator has a firm grip and
footing. Any work station must take account that the liquid being
sprayed should not be breathed in and the liquid can be highly
flammable and spraying should never be undertaken near naked flames
or hot surfaces. Do not smoke. It should also take account that not all of
the liquid being sprayed will be applied to the object being sprayed and
account must be taken that this surplus, i.e. “over spray” will be
deposited in the surrounding area.
(see later). The gun is fitted with a quart (2 pints/1.13 litres) syphon cup
complete with paint strainer.
Use 1.8mm diameter nozzle for polymer paints, oil base paints, epoxy
paints for metals, acrylic lacquers, urethane.
Before spraying any material first read any instructions concerning its
safe use and if nothing is available check with the manufacturer about its
use and the need to use personal safety equipment.
Prepare the paint in accordance with the manufacturer’s
recommendations and place in syphon container. Do not overfill.
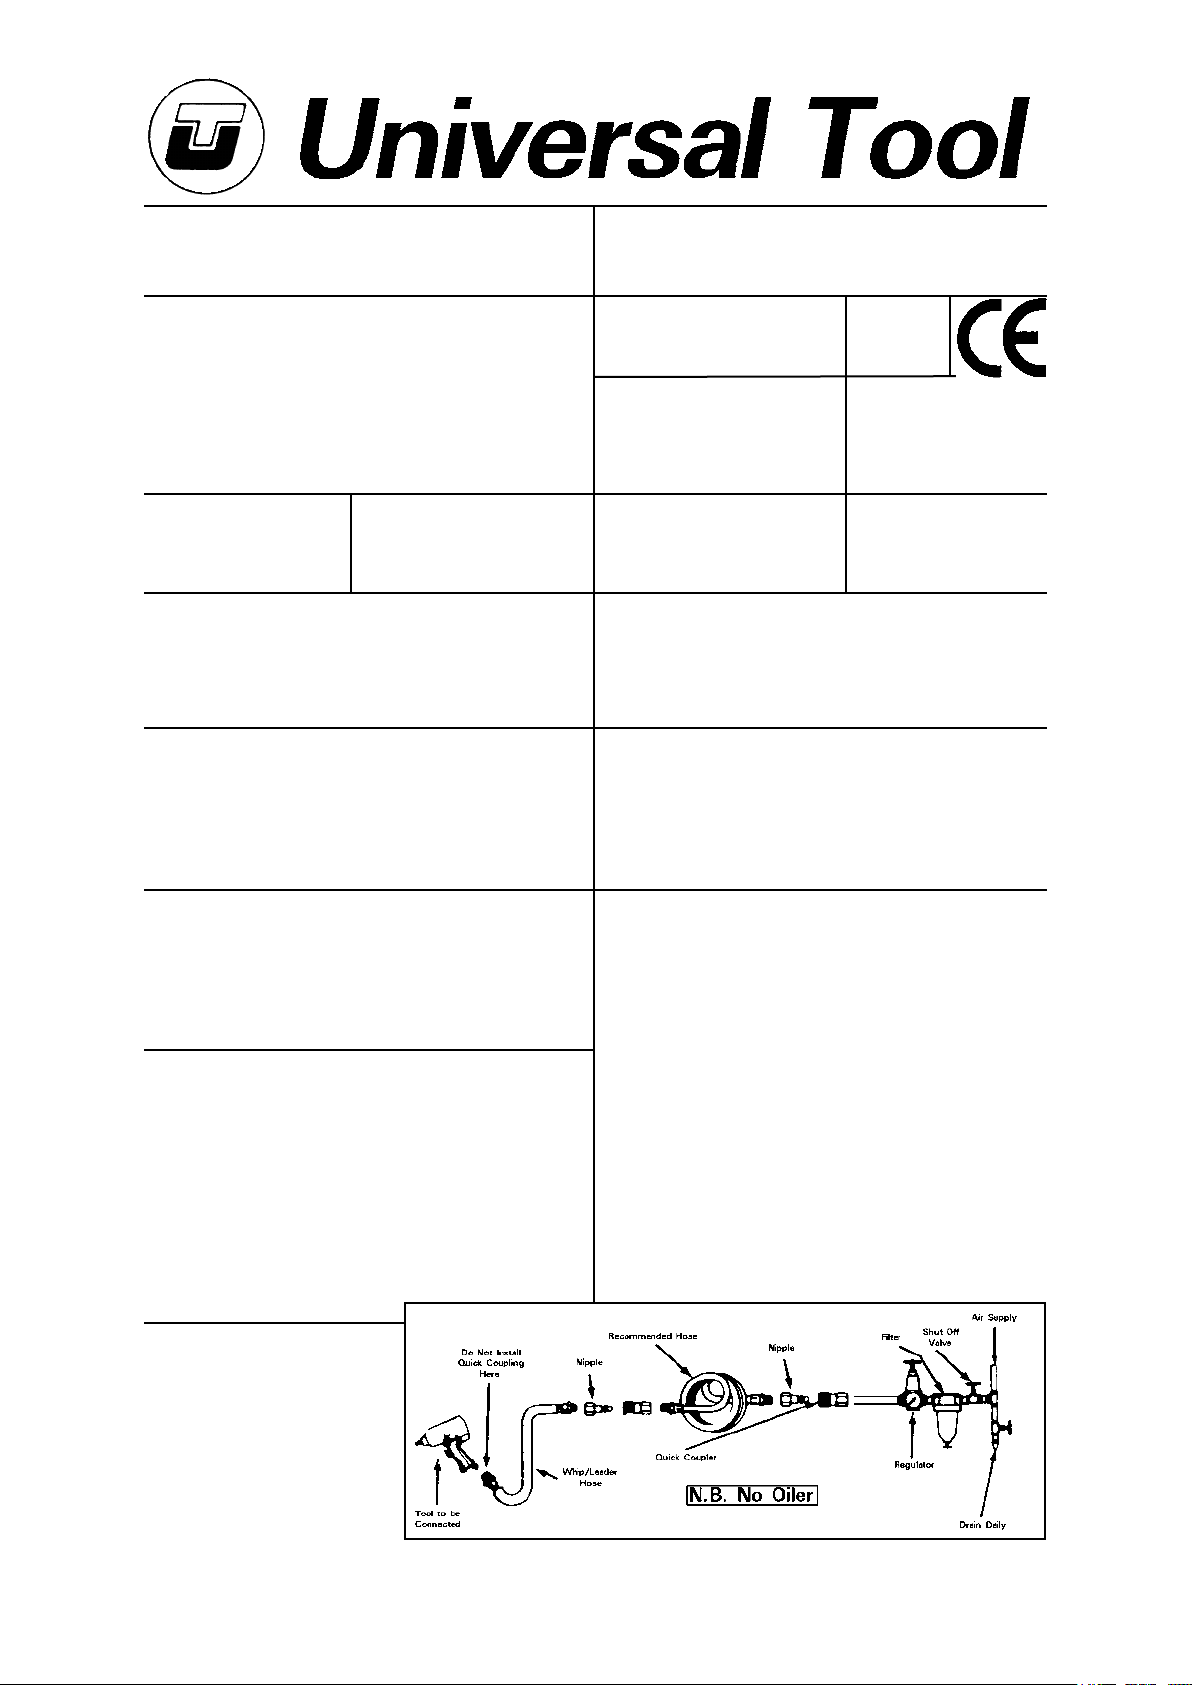
Connect the gun to a clean, moisture/oil free air supply at the right
pressure. Fit container to the gun and lock in position. Use the material
adjustment control screw (18) to adjust material flow and the fan
adjustment assembly (17) to adjust from round to fan spray pattern.
Make all adjustments before attempting to spray the work piece.
Note the spray gun can work at pressures of between 30 and 70 psi
and the air consumption is approximately for these pressures from 3 to
7 cfm.
For advice on spraying, using, cleaning, etc., the spray gun, see
attached sheets 4 to 7.
Hose Length
Operating
The Spray Gun is a handheld syphon type
compressed air atomising spray gun
suitable for use with most liquids for paint
spray finishing or the application of
surface coatings. It is a non bleeder type
with external mix nozzle air cap assembly
and full control for material application
and spray pattern between round and fan
Page No 1
Page 2

Dismantling & Assembly Instructions
Disconnect the spray gun from the air supply.
Remove the basic cup container by use of the cam lever on the top of
the lid and empty the contents of the cup into a safe, suitable container.
Such a container should be kept in an approved paint storage area.
Unscrew the lock nut on top of the cup lid assembly to remove the lid
assembly from the spray gun body.
Pull off the paint strainer from the body of the lid assembly centre tube
and unscrew the nut on the underside of the lid. It is then possible to
separate the lid, centre tube assembly, the locking cup arm and the
cam lever.
Take off the E ring (24) from the trigger stud (23) and re move the trigger
(21).
Unscrew nipples (6) & (19) from the spray gun body (5). Unscrew air
cap (1) and nozzle (2) then unscrew the nipple at the top rear of the
body (1) and remove the pattern adjustment assembly (7) complete.
Unscrew the fluid adjusting screw (18) and take out the needle (16)
packing holder (9) and O-ring (10) take off the fluid adjust guide set (15)
spring (14) air valve seat set (13 & 13-1) air valve seat set (12 & 12-1)
and gasket (11).
Plug (24) and packing (3) can now be removed from the air valve body.
Unscrew packing screw (8) and remove packing (9).
Reassembly
Clean all parts thoroughly to remove all traces of paint with suitable paint
removal liquids. Be careful when cleaning paint air cap (1), nozzle (2)
particularly from the small holes. Clean out holes using wooden
cocktail sticks or non metallic toothpick as any increase in hole
size, deformation or raising of burrs will change the spray pattern.
Carefully check packing (3) and (9) for paint contamination, splitting
and hardening and replace with other worn or damaged parts as
necessary. Replace parts with parts obtained from the manufacturer or
an authorised distributor.
Safety Rules when Using or Cleaning a
Spray Gun
Warning
Many fluids that will clean painted surfaces are very flammable and
the vapours should not be breathed. Always ensure that such
cleaning materials are correctly stored, used away from hot surfaces
and flames and cleaning takes place in well ventilated areas.
There are available special spray gun cleaning devices where the
spray gun may be partially or totally dismantled and the parts cleaned
within a container.
Smoking should be totally banned in areas where spray painting is
performed or cleaning takes place.
Use of spray guns should conform with all legislation relating to spray
painting.
Fire extinguishers should be readily available in the spray application
and cleaning areas.
All work stations must be provided with adequate ventilation to
remove any fumes resulting from the spray painting work and
cleaning process.
Paint flowing through hoses can create static electricity which if a
spark occurs could cause fire or an explosion. Such risks should be
eliminated by the use of “earthing” techniques.
Certain materials that can be used with spray guns may give off toxic
vapours that can be poisonous, irritants or create a general hazard to
health. The instruction supplied with any material should be carefully
read and understood before using the material. If such information is
not availabe - find out - never use if such information is not available.
Always follow the manufacturer’s instructions.
It is recommended that respiratory equipment is always used when
paint spraying and the type and efficiency of the equipment to match
the requirement of the material being used.
Use protective gloves when spraying and cleaning.
Use eye goggles when spraying and cleaning.
It is recommended that all operators connected with any aspect of
spray painting, including cleaning are fully trained by personnel
competent to train.
Certain solvents are in the category “Halogenated Hydrocarbon
Solvents” and these solvents can have a chemical reaction with
zinc plated, galvanized or aluminium parts and can cause an
explosion hazard particularly if the parts are under pressure. This
equipment as supplied is suitable for use with these materials but the
instructions supplied with the solvent must always be carried out.
Golden Rule - Before using any equipment with “Halogenated
hydrocarbons solvents” Check that it is acceptable to do so.
Misuse
Never ever point a spray gun in operating mode at any other
person. Make sure that the ejected spray from the nozzle never
comes in contact with any part of the body.
Never exceed the maximum allowed working pressure.
Before attempting to change materials or clean the spray gun
disconnect from the air supply and tip any unused material into
suitable containers, seal and store as required by legislation, i.e.
fireproof stores, etc.
Cleaning the Gun
It cannot be emphasized too strongly that the care, cleaning and
maintenance of the gun are of utmost importance. At the end of each
day or shift, the gun should be thoroughly cleaned. Never immerse
the complete gun in a cleaning solvent. This allows sludge and dirt to
collect in passages/holes within the gun which may eventually be
blown on to the surface being sprayed. Solvents also remove
lubricants from packings and cause the air valve and material needle
to stock.
The air cap/spreader should be removed and immersed in clean
cleaning fluid. If the holes have become clogged never never use
wire or other metallic devices to clean them. The small holes are
precision drilled to very close tolerances and any enlargement by the
abrasive action of metal will permanently affect and distort the spray
pattern when the only remedy is a replacement part.
Some additional advice is given in the following diagrams
(see page 7).
Hints on Paint Spraying
Having selected the type of system/gun to be used and the paint to
be sprayed, it is important to make sure that the compressor has
sufficient capacity to supply the gun on a continual basis. As most
compressors deliver air with oil/moisture content and sometimes
small particles of dirt, it is strongly recommended that an air
filter/moisture remover is incorporated in the air line between the
gun and the compressor. Most compressors produce the
compressed air at 100 psi and above so the incorporation of a
pressure reducing valve may be necessary as most spray guns are
designed to work at between 30 and 80 psi with the average being
50 psi. The importance of this equipment cannot be stressed
enough as oil and moisture in the airline combined with over
pressure, can almost certainly lead to very poor contaminated paint
finishes.
It is important to remember that a spray gun is a highly efficient
compact and delicate piece of equipment. The care with which it is
used will pay dividends in the form of superior finishes and reduction
in rejects to the operator who familiarises himself/herself with its
possibilities and limitations. It is the daily routine cleaning that keeps
the equipment at peak efficiency, not the occasional attention of the
operator who only remembers when the desired finish is not
achieved.
Handling the Spray Gun
To use a spray gun efficiently, there are a number of very
important general principles and fundamental motions of
Page No 2
Page 3
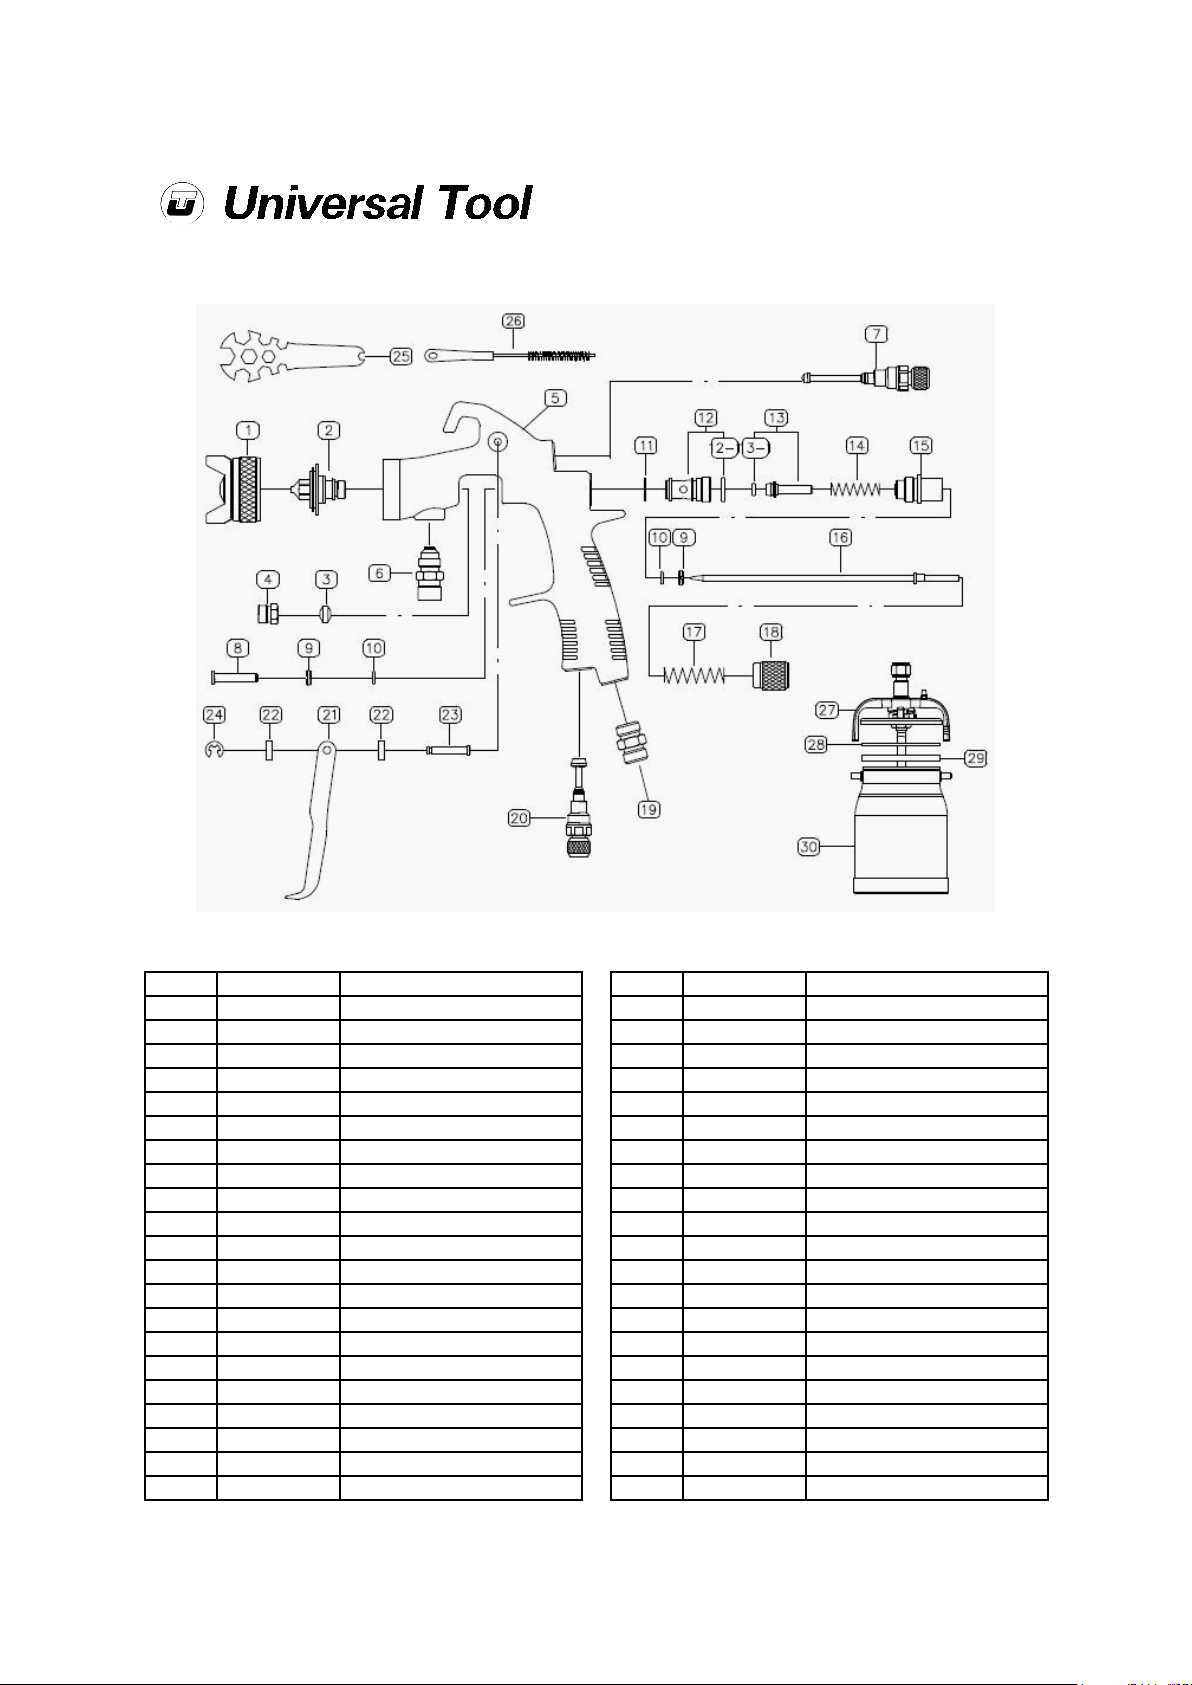
UT57A Spray Gun - Syphon Type
Ref No Part No Description
1 9920000201 Air Cap
2 9930000101 Fluid Nozzle 1.3
2 9930000102 Fluid Nozzle 1.4
2 9930000103 Fluid Nozzle 1.5
2 9930000106 Fluid Nozzle 1.8
2 9930000107 Fluid Nozzle 2.0
2 9930000109 Fluid Nozzle 2.5
3 9000000100 Needle Packing Set
4 9000000200 Needle Packing Seat
5 9910000200 Body Set
6 9000000300 Fluid Nipple
7 9000000401 Pattern Adj.Set
8 9000000500 Air Valve Shaft
9 9000000600 Packing Holder
10 9000000700 O-Ring
11 9000000800 Gasket
12 9000000900 Air Valve Seat Set
12-1 9000000910 O-Ring
13 9000001000 Air Valve Seat Set
13-1 9000000700 O-Ring
14 9000001100 Air Valve Spring
May 2008 Ver 1.10
Ref No Part No Description
15 9000001200 Fluid Adj.Guide Set
16 9940000101 Fluid Needle 1.3
16 9940000102 Fluid Needle 1.4
16 9940000103 Fluid Needle 1.5
16 9940000106 Fluid Needle 1.8
16 9940000107 Fluid Needle 2.0
16 9940000109 Fluid Needle 2.5
17 9000001300 Needle Spring
18 9000001401 Fluid Adj.Knob
19 9000001500 Air Inlet Nipple
20 9000001601 Air Adj.Set
21 9000001700 Trigger
22 9000001800 Gasket
23 9000001900 Trigger Stud
24 9000002000 E-Ring
25 9710001400 Spanner
26 9720002100 Brush
27 9830000310 Complete Lid Ass’y
28 9830000330 Gasket
29 9830000340 Gasket
30 9830001920 Cannister
Page No 3
Page 4

which the operator of the gun should study closely,
practise and follow.
Firstly, the gun at all times should be held in a comfortable
position and at a distance of about 7 to 9 inches from the
surface to be coated and, most importantly, at right
angles to the surface. The working strokes should be
made in straight uniform passes backwards and forwards
across the surface in such a manner that the spray pattern
overlaps the previous by about 50%.
Secondly, the speed of the stroke must be constant to
maintain uniform thickness of coat and each stroke
should be made with a relaxed arm and flexible wrist so
that the gun is kept at right angles to the surface
throughout the whole operation.
Thirdly, trigger control should always be by a smooth
even pressure of the finger and never pulled abruptly or
released with a jerk. A little time spent in practising fine
pressure control of the trigger as distinct from using the
material needle adjusting screw, is amply rewarded
when complex shaped articles are to be coated. Correct
triggering of the spray gun is an essential part of the stroke
technique. To prevent paint build up at the beginning and
end of each stroke, the movement of the gun should
commence before the trigger is pulled and the trigger
released again before movement ceases.
Common Errors in Handling
1) Holding the Gun at the Wrong Distance
When the gun is held too close to the surface, the paint is
concentrated into a smaller area and unless very rapid
strokes are made, the surface will be overloaded
inevitably resulting in “sags” and “runs”. When held too far
from the surface, a coarse dry coating that has an
“orange peel” effect results.
2) Varying the Speed of the Stroke
A smooth uniform finish depends largely upon the even
stroke of an operator in relation to the volume of paint flow
and this should be regulated to conform to the operator’s
natural speed of movement.
3) Tilting the Gun
If the gun is tilted out of the vertical position this will result
in an uneven coat. It may also affect the paint supply if the
level of paint in a gravity or syphon cup is low.
4) Swinging or Arcing the Gun
This is perhaps the most common fault in handling a spray
gun and is caused by keeping the arm and wrist rigid
resulting in the gun swinging in an arc from the shoulder,
consequently not pointing at the surface at right angles
throughout the whole stroke, resulting in uneven paint
deposit.
5) Incorrect Overlapping
If the spraying strokes are too far apart and do not overlap
by about 50%, a streaky finish will result whilst too much
overlap can easily overload the surface. The perfect finish
will be only obtained if the many factors involved in spray
painting receive the necessary care and attention. It can
be taken for granted with the high degree of perfection in
the design and manufacture of spray guns that failure to
achieve a good finish is more likely to be attributed to poor
operator technique than equipment fault.
6) It should also be noted that a spray gun may have a
choice of nozzle and air cap combinations called
“settings”. Each setting will control the air consumption
and type and amount of paint that can be applied in a
given time. The incorrect choice of setting to paint type
can give poor results. Seek advice from the manufacturer.
Terms to Describe a Poor Paint Finish
1) Orange Peel
This is a finishing effect so called because it resembles the
texture and appearance of orange
peel.
Common causes - unsuitable paint thinners
- atomising pressure too high or low
- material viscosity too high
- material not thoroughly mixed
- material too cold
- conditions in the finishing room (i.e.
draughts, temperature, humidity)
- poorly prepared surface or
contaminated surface
- holding gun too close or far from
surface
- applying too thin a coat
2) Runs and Sags
Common causes - too much material applied
- material being too thin
- tilting gun at an angle causing spray
pattern to strike surface unevenly
3) Streaky Finish
Common causes - tilting the gun
- split spray pattern
- incorrect overlapping of spray strokes
- spraying with heavy top or bottom
spray pattern
4) Mist or Fog
Common causes - over atomisation due to too high an
atomising air pressure
- improper use of the gun arcing or
swinging too far from surface, not
releasing trigger at the end of the
spray stroke
5) Starving
Common cause - insufficient air or material feeding the
gun
Page No 4
Page 5

Faults & Remedies
Air leaking from Spray Gun
Cause Remedy
- Dirt on air valve seating - Remove and clean
- Worn or damaged seating - Replace
- Broken air valve spring - Replace
- Air Valve Sticking - Lubricate gland and loosen gland nut
- Bent air valve stem - Replace air valve
Material (Paint) leaking from Spray Gun
Cause Remedy
- Material nozzle or needle worn or damaged - Replace
- Foreign body in material nozzle - Remove nozzle and clean
- Broken material needle spring - Replace
- Wrong size of needle - Replace
- Material needle sticking - Remove gland, lubricate and adjust gland nut
- Material nozzle loose - Tighten
- Dirt or lumps in paint - Strain
Jerky or spitting spray
Cause Remedy
- Loose material nozzle and/or air cap - Tighten
- Insufficient material (paint) in container - Replenish
- Dry gland packing or gland nut loose - Lubricate and/or tighten gland nut
- Loose or cracked centre tube in syphon cup
or lid assembly
- Obstructed fluid passageways - Clean
- Damaged material needle tip or worn and
damaged nozzle seating
- Replace
- Replace
Jerky or Spitting Spray
Cause Remedy
- Material too viscous to syphon - Thin
- Blocked vent in lid/plastic tube - Clean
- Poor seal in lid - Replace
- Loose, dirty or damaged container lid and
coupling
Poor quality spray patterns
Cause and remedy - See separate page
- Tighten, clean or replace
Page No 5
Page 6

Spray Gun Paint Patterns
Faults and Remedies
Faulty Spray Patterns
Top Heavy Spray
Cause
a) Wing holes partially obstructed
b) Damaged or obstruction of material
nozzle tip
c) Air cap or material nozzle not seating
correctly due to dirt or damage
Bottom Heavy Spray
Cause
a) Wing holes partially obstructed
b) Damage or obstruction to bottom of
material nozzle tip
c) Air cap or material nozzle not seating
correctly due to dirt or damage
Remedy
Turn the air cap through 180°. If defective pattern is reversed, fault is
due to air cap
Remove and clean air cap
If defective pattern does not reverse then fault is with the material nozzle
Remove nozzle and clean
Do not use metal objects to clear holes
Cause
a) Air hole in either wing of air cap restricted
or blocked allowing full pressure of air on
the other side to force the spray pattern in
direction of restricted or blocked side
b) Material nozzle tip damaged or having
particles of dirt or dried paint on one side
Correct Spray Patterns
The spray pattern is
variable from round to fan
Cause
a) Too high an
atomising
air pressure
b) Attempting
to obtain a
too wide fan
spray with
thin material
Cause
A fan spray pattern that is heavy in the
middle or a pattern that has an
anatomised “salt & pepper” effect
indicates too low an atomising
pressure
Remedy
Increase air pressure from your air
supply. Correct air pressures are
discussed elsewhere in this booklet
Remedy
Reducing air pressure will cure
cause (a)
To correct cause (b) open
material control to fully open
position. At same time reduce
width of spray pattern
If material is being pressure fed,
increase pressure on container
to give increased material flow
with all patterns in
between
Spitting
Air in material
passages
Remedy
As above
Do not use metal objects to clear holes
Cause
Dried material around nozzle tip
restricts the passage of atomising air
at one point through the centre
opening of air cap and results in this
pattern being obtained. Can also be
caused by a loose fitting air cap
Cause
a) Dirt in material nozzle or a loosely fitted
nozzle/air cap
b) Dried out gland packing around
material needle valve
c) Loose fitting nut or fractured feed tube
in container
d) Insufficient material in container
e) Obstructed fluid passageways
Page No 6
Remedy
If dried material is causing
the trouble, remove air cap
and wipe off material tip,
using a rag wetted with
thinners
Tighten air cap
Remedy
a) Clean and refit tightly
b) Lubricate and tighten (if
necessary replace
gland packing)
c) Tighten or replace
d) Replenish material
e) Clean
Page 7

Advice on Cleaning Spray Guns
When used with a cup, thinner or
suitable solvent should be syphoned
through the gun by inserting tube in
open container of that liquid. Move
trigger constantly to flush passageway
and clean tip of needle.
Ensure Adequate Ventilation.
When the gun is used with a pressure
fed container or gravity bucket, remove
the hose, turn the gun upside down and
pour thinners into the fluid opening whilst
moving the trigger constantly. This will
flush all passageways.
It is extremely poor practice to place an
entire gun in thinners. When this is done
the solvent dissolves the oil in the gland
packing and causes the gun to split.
It is good practice to place the nozzle
and fluid connection in thinners. Vessel
used should be shallow enough to
prevent thinner from reaching the
pickings.
Page No 7
Page 8
Declaration of Conformity
Universal Air Tool Company Limited
Unit 8, Lane End Industrial Park, High Wycombe, Bucks, HP14 3BY, England
declare under our sole responsibility that the product
Model UT57A Spray Gun, Serial Number
to which this declaration relates is in conformity with the following standard(s) or other normative document(s)
EN792 (Draft), EN292 Parts 1 & 2, ISO 8662/1
following the provisions of
89/392/EEC as amended by 91/368/EEC & 93/44/EEC Directives
Lane End D.H.Moppett (Man. Director)
Place and date of issue Name and signature or equivalent marking of authorised person
Accessories
Notes
Distributor
This document may not be copied wholly or in part by anyone without the consent of the Directors of Universal Air Tool Company Limited
Designed & Written in the U.K.
©Copyright of Universal Air Tool Company Limited, established in the United Kingdom, 1994
Page No 8
 Loading...