

Page 1

Operator Instructions
Includes - Foreseen Use, Work Stations, Putting Into Service, Operating,
Dismantling, Assembly and Safety Rules
Important
Read these instructions carefully before installing, operating,
servicing or repairing this tool. Keep these instructions in a safe
accessible place.
Manufacturer/Supplier Product Type
Universal Air Tool Company Limited
Unit 8
Lane End Industrial Park
High Wycombe
Bucks
18V Lithium-Ion Cordless
1/2” Impact Wrench
Model No/Nos Serial No
HP180LI
HP14 3BY
Tel No Fax No(01494) 883300 (01494) 883237
RPM
1,800
Cycles Per Min
Product Nett Weight
7.04
3.20
Vibration Level
lbs
Kg
Recommended Use Of
Balancer Or Support
No
a =12.8 & K = 1.5 m/sec²
Test Method Tested in accordance with
BS EN 60745
2-axis test standard = 5.89 m/sec
Noise Level Sound Pressure Level 85.2 dB(A)
Test Method Tested in accordance with
BS EN 60745
Personal Safety Equipment
Use - Safety Glasses Yes
Use - Safety Gloves Yes
Use - Safety Boots
Use - Breathing Masks
Use - Ear Protectors Yes
Foreseen Use Of Tool
The impact wrench is designed for the tightening and loosening of
threaded fasteners within the range as specified by the manufacturer. It
should only be used in conjunction with suitable impact type 1/2"
square female drive nut running sockets. Only use sockets which are of
the impact type.
It is allowed to use suitable extension bars, universal joints and socket
adaptors between the square output drive of the impact wrench and
the square female drive of the socket.
Do not use the tool for any other purpose than that specified without
consulting the manufacturer or the manufacturer's authorised supplier.
To do so may be dangerous.
Never use an impact wrench as a hammer to dislodge or straighten
cross threaded fasteners. Never attempt to modify the tool for other
uses and never modify the tool for even its recommended use as a
nutrunner.
Work Stations
The tool should only be used as a handheld hand operated tool. It is
always recommended that the tool is used when standing on the solid
floor. It can be in other positions but before any such use, the operator
must be in a secure position having a firm grip and footing and be aware
that when loosening fasteners the tool can move quite quickly away
from the fastener being undone. An allowance must always be made
for this rearward movement so as to avoid the possibility of
hand/arm/body entrapment.
Warning
Important Safety Instructions For Charger &
Battery
1. To reduce risk of injury, charge only specific type rechargeable
batteries. Other types of batteries may burst causing personal injury and
damage.
2. Before using battery charger, read all instructions and cautionary
markings on batteries, chargers and products using batteries.
2
3. Do not expose charger to rain or snow.
4. To reduce the risk of damage to electric plug and cord, pull by plug
rather than cord when disconnecting charger.
5. Use of an attachment not recommended or sold by the battery
charger manufacturer may result in a risk of fire, electric shock, or injury
to persons.
6. Make sure cord is located so that it will not be stepped on, tripped on,
tripped over, or otherwise subjected to damage or stress.
7. Do not operate a charger with damaged cord or plug. Replace them
immediately.
8. Do not operate charger in rain or snow.
9. To reduce risk of electric shock, unplug charger from outlet before
attempting any maintenance or cleaning. Turning off controls will not
reduce this risk.
10. Do not disassemble charger or battery cartridge, take it to a
qualified service center while repair is required. Incorrect reassembly
may result in a risk of electric shock or fire.
Additional Charger & Battery Safety Rules
1. Do not charge battery cartridge when temperature is below 0°C
(32°F) or above 40°C (104°F).
2. Do not attempt to use a set-up transformer, an engine generator or
DC power receptacle.
3. Do not allow anything to cover or clog the charger vents.
4. Always cover the battery terminals with the battery cover when the
battery cartridge is not used.
5. Do not short the battery cartridge. A battery short can cause large
current flow, overheating, possible burns and even a breakdown:
Do not touch the terminals with any conductive material.
Avoid storing battery cartridge in a container with
other metal objects such as nails, coins, etc.
Do not expose battery cartridge to water or rain,
6. Do not store the machine and battery cartridge in locations where the
temperature may reach or exceed 50°C (122°F).
7. Do not incinerate the battery cartridge even if it is severely damaged
or completely worn out. The battery cartridge can explode in a fire.
8. Be careful not drop, shake or strike battery.
9. Do not charge inside a box or container of any kind. The battery must
be placed in a well ventilated area during charging.
10. The charger should be cooled at least one hour after continuous
charging three times.
General Operational Precautions
1. Consider work area environment. Do not expose tools to rain. Do not
Page No 1
Page 2
use tools in damp or wet locations: keep work area well lit. Do not use
tools in the present of flammable liquids or gases.
2. Guard against electric shock. Avoid body contact with earthed or
grounded surfaces.
3. Keep children away. Do not let visitors touch the tools or extension
cord. All visitors should be kept away from work area.
4. Store idle tools. When not in use, tool should be stored in a dry locked
up place, out or reach of children.
5. Do not force the tool. It will do the job better and safer at the rate for
which it was intended.
6. Do not abuse the cord. Never yank the cord to disconnect it from the
socket. Keep the cord away form heat, oil and sharp edges.
7. Avoid unintentional starting. Ensure switch is off when plugging in.
8. Use outdoor extension leads. When tools is used outdoors only
extension cords intended for out door use and so marked.
9. Stay alert. Watch what you are doing: Use common sense. Do not
operate tool when you are tired. Check for damaged parts. Before
further use of the tool, if a guard or other part is damaged should be
carefully checked to determine that it will operate properly and perform
its intended function.
10. Check for alignment of moving parts, blinding of moving parts,
breakage of parts, mounting and any other condition that may affect its
operation.
11. A guard or other parts that are damaged should be properly
repaired or replaced by an authorized service centre unless otherwise
indicated in this instruction manual. Have defective switches replaced
by an authorized service centre. Do not use tool if switch does not turn
it on and off.
12. To ensure the designed operational integrity of power tools, do not
remove installed cover or screws.
13. Do not touch movable parts or accessories unless the power
source has been disconnected.
14. Use your tool at lower input than specified on the nameplate,
otherwise, the finish may be spoiled and working efficiency reduced by
motor overload.
15. Do not wipe plastic parts with solvent. Solvents such as gasoline,
thinner, benzene, carbon tetrachloride, alcohol, ammonia and oil
containing chloric annex may damage and crack plastic parts. Wipe
plastic parts with a soft cloth lightly dampened with soap water.
either does not comply or is defective. Please contact your retailer.
11. Plug charger into a100-240V a.c outlet only.
Battery Pack LED Status
Push the button on the Battery Pack to see the current status.
LED Indicator Remaining Capacity (RC)
LED 1 (green) 0-25%
LED 1, 2 (green) 26-50%
LED 1, 2, 3 (green) 51-75%
LED 1, 2, 3, 4 (green) 76-100%
LED 1 Blinking Fully Depleted
LED 1, 2, 3, 4 Blinking Over Temperature (Too Hot)
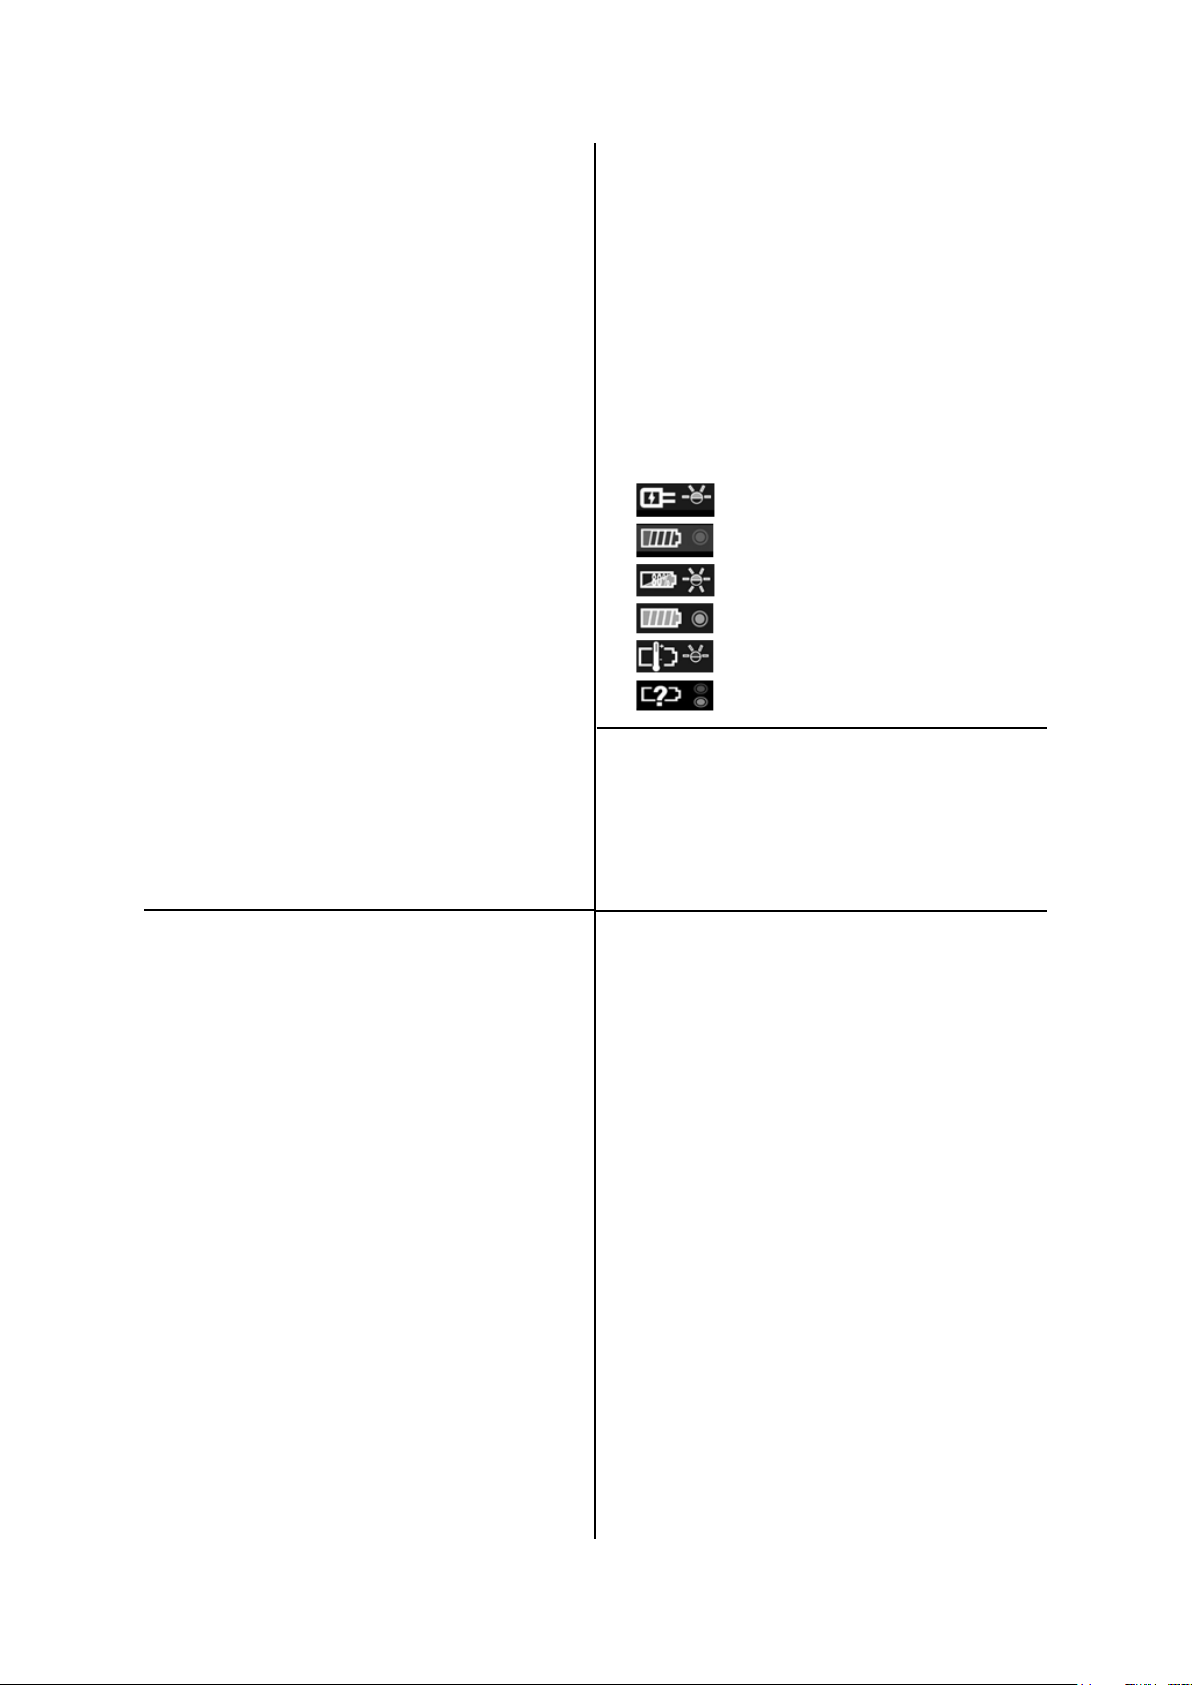
Charger LED Status
Power On
(Green light flashes slowly)
Battery Low
(Red light stays illuminated)
Battery charged 80%
(Green light flashes rapidly)
Battery charged 100%
(Green light stays illuminated)
Battery Pack temperature is too hot or too cold
(Red light flashes slowly)
Battery Pack malfunction
(Red and Green lights stay illuminated)
Maintenance
Replaceable carbon brush
1. Loosen the nut counterclockwise.
2. Take out the carbon brush.
3. Insert the new carbon brush. Note: use only approved spare parts,
otherwise you will damage the motor.
4. Tighten the nut clockwise.
Operating Instructions
Installing or removing battery cartridge
1. Always switch off the machine before insertion or removal of the
battery pack.
2. To remove the battery pack, push the button on the battery pack and
pull the tool unit from the battery pack in the direction.
3. To insert the battery pack, align the tool unit slides with the battery
pack sliding groove and push the tool unit into place.
4. Do not force the battery pack in sliding it into tool unit. If the battery
pack does not slide in easily, it is not being inserted correctly.
Charging
1. Your new battery pack is not charged. Charge it before use.
2. Plug the fast charger into the power source.
3. Slide the battery pack into the charger as the arrow direction shown
on the charger.
4. Push the battery pack into place and make sure the red light on the
charger is “ON”. The battery pack is now starting the charging cycle.
5. After the charging cycle is finished, the light will turn into green. The
battery pack is now ready for use.
6. If you try to charge a battery pack from a just-operated machine,
sometimes the charging light will not come on. If this occurs, let the
battery pack cool for a while then re-insert it and try to charge again.
7. When you charge a new battery pack or a battery pack which has not
been used for a long period, it may not accept a full charge. This is a
normal condition and does not indicate a problem. You can recharge
the battery pack fully after discharging it completely a couple of times.
8. While charging the second battery, allow the charger to cool down
for 15 minutes before start the second charging process.
9. Unplug the charger from the power source after finish the charge.
10. If both red and green indicator lights are “ON” the battery pack
General Safety Rules
WARNING! Read all instructions Failure to follow all
instructions listed below may result in electric shock, fire
and/or serious injury. The term “cordless tool” in all of the
warnings listed below refers to your battery-operated
(cordless) power tool.
Work area
1. Keep work area clean and well lit. Cluttered and dark areas invite
accidents.
2. Do not operate cordless tools in explosive atmospheres, such as in
the presence of flammable liquids, gases or dust. Cordless tools can
create sparks which may ignite the dust or fumes.
3. Keep children and bystanders away while operating a cordless tool.
Distractions can cause you to lose control.
Electrical safety
1. Avoid body contact with earthed or grounded surfaces such as
pipes, radiators, ranges and refrigerators. There is an increased risk of
electric shock if your body is earthed or grounded.
2. Do not expose cordless tools to rain or wet conditions. Water
entering a cordless tool will increase the risk of electric shock.
Personal safety
1. Stay alert, watch what you are doing and use common sense when
operating a cordless tool. Do not use a cordless tool while you are tired
or under the influence of drugs, alcohol or medication. A moment of
inattention while operating cordless tools may result in serious personal
injury.
2. Use safety equipment. Always wear eye protection. Safety
equipment such as dust mask, non-skid safety shoes, hard hat, or
hearing protection used for appropriate conditions will reduce personal
Page No 2
Page 3

HP180LI
18V Lithium-Ion Cordless 1/2” Impact Wrench
Ref No Part No Description
1 HP180-01 Front Cover Assy
2 HP180-02 Rubber Washer
3 HP180-03 Washer
4 HP180-04 Front Impact Assy
5 HP180-05 Rear Impact Assy
6 HP180-06 Bearing Holder
7 HP180-07 Rubber Washer
8 HP180-08 Planetary Gears Assy
9 HP180-09 Ring Gear
10 HP180-10 Washer
11 HP180-11 Screw (2)
12 HP180-12 Gear Box Cover
13 HP180-13 O-Ring
14 HP180-14 Pad
Dec 2013 Ver 1.00
Ref No Part No Description
15 HP180-15 Motor Assy
16 HP180-16 Carbon Brush (2)
17 HP180-17 Carbon Brush Nut (2)
18 HP180-18 Forward/Reverse Rod
19 HP180-19 Main Switch
20 HP180-20 Discharge Protector
21 HP180-21 Battery Connector
22 HP180-22 Main Housing L&R
23 HP180-23 Belt
24 HP180-24 Body Screw (8)
25 HP180-25 Front Cover Screw (4)
28 HP180BAT Battery Pack
31 HP180BC Charger
Page No 3
Page 4

Declaration of Conformity
Universal Air Tool Company Limited
Unit 8, Lane End Industrial Park, High Wycombe, Bucks, HP14 3BY, England
declare under our sole responsibility that the product
Model HP180LI, 18V Lithium-Ion Cordless 1/2” Impact Wrench, Serial No
to which this declaration relates is in conformity with the following standard(s) or other normative document(s)
BS EN 60745-1 : 2009 and EN 60745-2-2 : 2003 + A11 : 2007
following the provisions of
Machinery Directive 2006/42/EC
Lane End C. Moppett, Managing Director
Place of issue For and on behalf of the company
injuries.
3. Remove any adjusting key or wrench before turning the cordless tool
on. A wrench or a key left attached to a rotating part of the cordless tool
may result in personal injury.
4. Do not overreach. Keep proper footing and balance at all times. This
enables better control of the cordless tool in unexpected situations.
5. Dress properly. Do not wear loose clothing or jewellery. Keep your
hair, clothing and gloves away from moving parts. Loose clothes,
jewellery or long hair can be caught in moving parts.
Cordless tool use and care
1. Ensure the switch is in the off position before inserting battery pack.
Inserting the battery pack into cordless tools that have the switch on
invites accidents.
2. Recharge only with the charger specified by the manufacturer. A
charger that is suitable for one type of battery pack may create a risk of
fire when used with another battery pack.
3. Use cordless tools only with specifically designated battery packs.
Use of any other battery packs may create a risk of injury and fire.
4. When battery pack is not in use, keep it away from other metal
objects like paper clips, coins, keys, nails, screws, or other small metal
objects that can make a connection from one terminal to another.
Shorting the battery terminals together may cause burns or a fire.
5. Under abusive conditions, liquid may be ejected from the battery;
avoid contact. If contact accidentally occurs, flush with water. If liquid
contacts eyes, additionally seek medical help. Liquid ejected from the
battery may cause irritation or burns.
6. Do not force the cordless tool. Use the correct cordless tool for your
application. The correct cordless will do the job better and safer at the
rate for which it was designed.
7. Do not use the cordless tool if the switch does not turn it on and off.
Any cordless tool that cannot be controlled with the switch is
dangerous and must be repaired.
8. Remove the battery pack from the power source before making any
adjustments, changing accessories, or storing cordless tools. Such
preventive safety measures reduce the risk of starting the cordless tool
accidentally.
9. Store idle cordless tools out of the reach of children and do not allow
persons unfamiliar with the cordless tool or these instructions to
operate the cordless tool. Cordless tools are dangerous in the hands of
untrained users.
10. Maintain cordless tools. Check for misalignment or binding of
moving parts, breakage of parts and any other condition that may affect
the cordless tools operation. If damaged, have the cordless tool
repaired before use. Accidents can be caused by poorly maintained
cordless tools.
11. Use the cordless tool, accessories and tool bits etc. in accordance
with these instructions and in the manner intended for the particular
type of cordless tools, taking into account the working conditions and
the work to be performed. Use of the cordless tool for operations
different from intended could result in a hazardous situation.
Service
1. Have your cordless tool serviced by a qualified repair person using
only identical replacement parts. This will ensure that the safety of the
cordless tool is maintained.
Accessories
Notes
Distributor
This document may not be copied wholly or in part by anyone without the consent of the Directors of Universal Air Tool Company Limited
Designed & Written in the U.K.
©Copyright of Universal Air Tool Company Limited, established in the United Kingdom, 1994
Page No 4
 Loading...