

Page 1
—
I
—
-
/
/
/
/
t
.a:+
4
r
r
—
—
a
-‘
K
4-
-j
-
/
Page 2
INDEX
Features
Needle
Inserting
Winding
Threading
Placing
Upper
Setting
Sewing
Adjusting
Feeding
Thin
or
Darning
Preparing
Removing
and
and
Thread
the
Needle
the
Bobbin
the
Bobbin
Threading
the
Stitch
in
Reverse
the
Tensions
of
Fabric
Light
Weight
and
Monogramming
to
Sew
the
Work
Parts
Bobbin
Case
Chart
Case
in
Length
Fabrics
Shuttle
7-8
10
10
2
3
4
4
5
5
6
7
7
8
9
9
Straight
Zigzag
Sewing
Satin
Stitch
Blind
Stitch
Sewing
Making
Narrow
Embroidering
Cording
Quilting
Seam
Care
Cleaning
Accessories
Check
on
Buttonholes
Hemmer
&
Guide
Guage
and
and
Up
Stitching
Hem
Buttons
with
Zipper
Maintenance
for
or
Cloth
Oiling
Smooth
Foot
a
the
Hoop
Guide
of
Your
Shuttle
Sewing
Machine
11
11-12
12
13
14
15
16-17
17
18
19
19
20
21
22
23
Page 3
2
1.
2.
3.
4.
5.
6.
7.
8.
9,
Thread
Pressure
Arm
Top
Plate
Blind
Z-Bdial
Bobbin
Hand
Stitch
Takeup
Release
Thread
Stitch
Winder
Wheel
Length
Lever
Guides
Lever
Control
(Darning>
Dial
FEATURES
I
10.
11,
12.
13.
14.
15.
16.
17.
18.
Drop
Push
Tension
Needle
Needle
Feed
Bobbin
Presser
Presser
Feed
Button
Regulator
Clamp
Plate
Cover
Foot
Foot
AND
Buttons
Reverse
Thumb
Plate
PARTS
Fig.
1
Screw
19.
20.
21.
22.
23.
24.
25.
26.
27.
Thread
Thread
Face
Lamp
Presser
Head
Motor
Stop
Spool
Cutter
Bar
Plate
Switch
Bar
Hinge
Belt
Motion
Pins
and
Guide
Lifter
Mounting
Cover
Knob
Holes
Page 4
3
Extremely
tarpaulin,
canvas,
Heavy
fabric,
denim,
Medium
fabric,
suiting,
Medium
percale,
chintz,
wool,
Sheer
dimity,
handkerchief
plastic
Very
batiste,
ninon,
duck,
upholstery
ticking,
leatherette
heavy
velveteen,
felt,
broadcloth,
gingham,
taffeta,
shantung,
voile,
crepe,
.
.
film,
sheer
lace,
net,
Fabric
heavy
sacking,
etc.
drapery
terry,
sheer
etc.
lawn,
linen,
etc.
chiffon,
organdy,
marquisett,
etc.
linen,
NEEDLE
Needle
etc.
No.
19
18
16
14
11
9
THREAD
Machine
Stitches
Per
(Plastic
to
8
16
20
FABRIC
Inch
6
to
8
8
to
10
10
to
12
12
to
14
14
to
16
film)
10
to
STITCHING
Cotton
Thread
10
to
30
30
to
40
40
to
60
60
to
80
80
to
100
100
to
150
GUIDE
Mercerized
Thread
Heavy
Duty
Heavy
Duty
Heavy
Duty
50
50
50
Silk
or
Nylon
A
A
A
Page 5
4
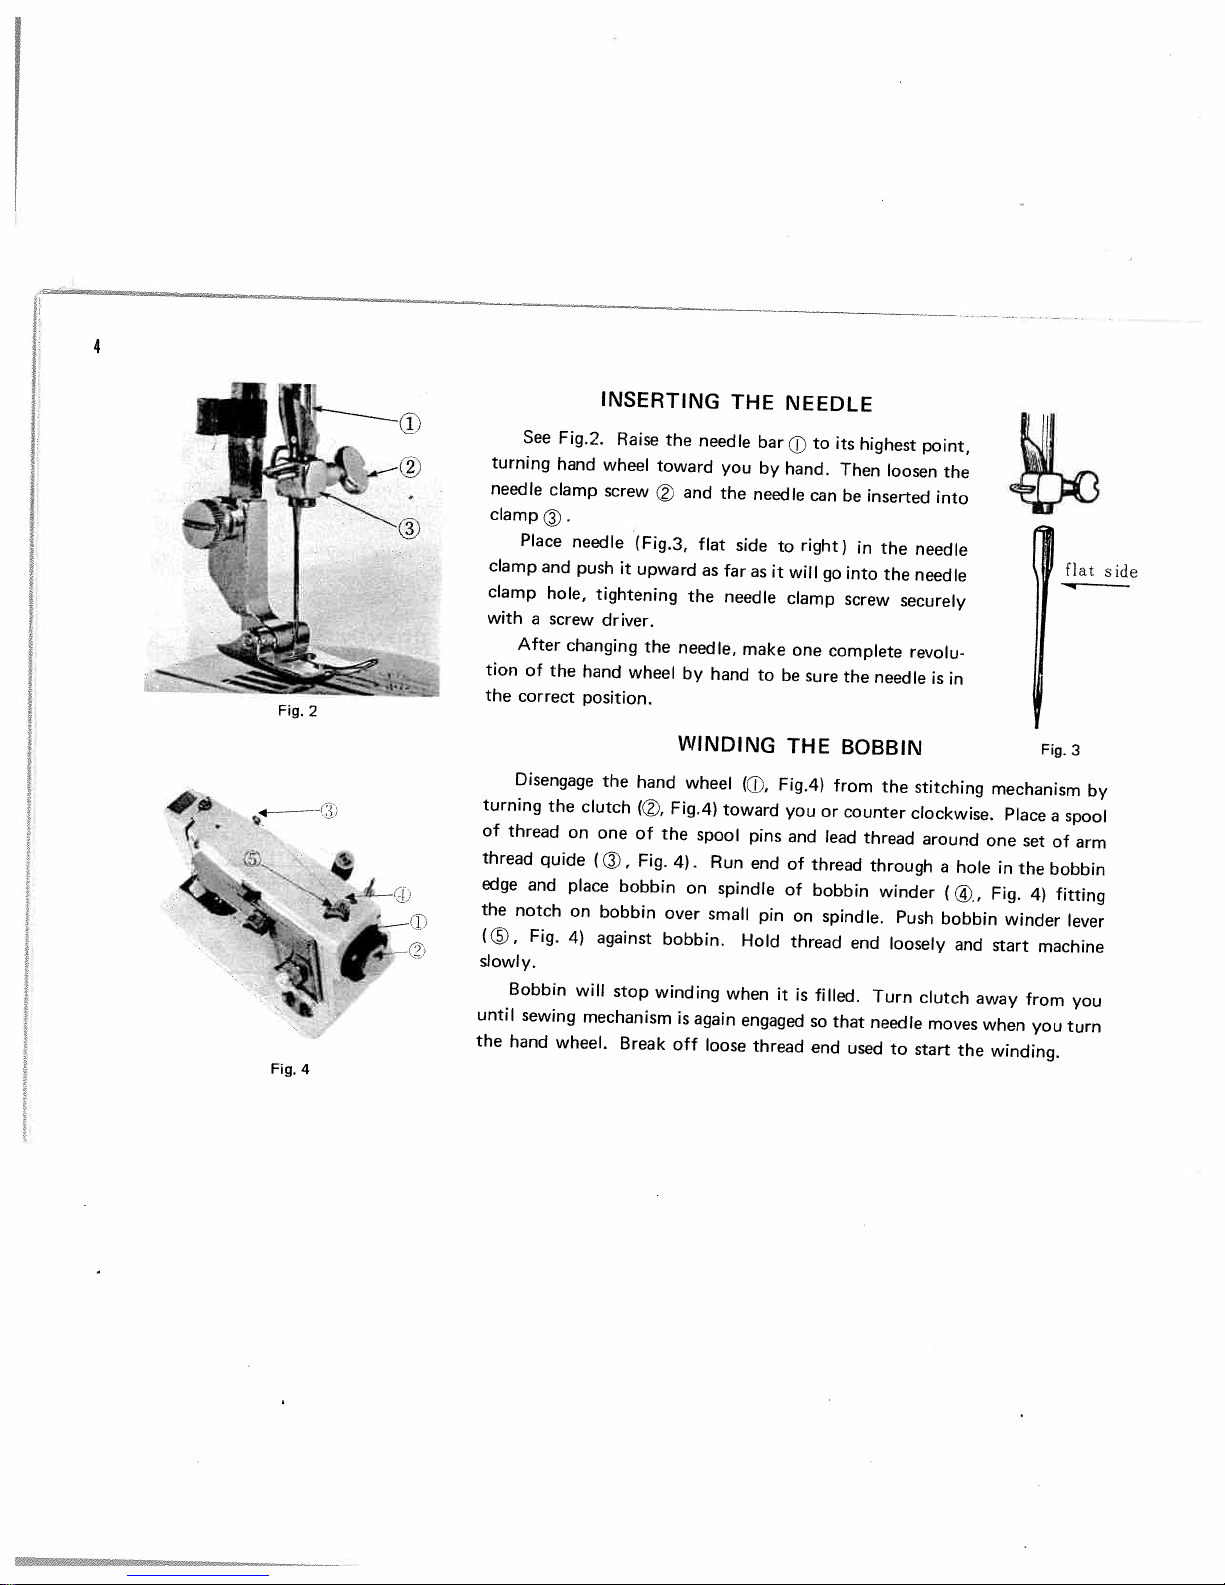
INSERTING
See
Fig.2.
Raise
the
turning
needle
clamp
clamp
clamp
with
tion
the
44
I
.‘
turning
of
thread
edge
1
the
(,
slowly.
until
the
Fig.
4
hand
clamp
©.
Place
and
hole,
screw
a
After
of
the
correct
Disengage
the
thread
guide
and
notch
Fig.
Bobbin
sewing
hand
wheel.
wheel
screw
needle
push
it
tightening
driver.
changing
hand
position.
the
clutch
on
one
(©.
place
bobbin
on
bobbin
against
4)
will
stop
mechanism
Break
toward
(Fig.3,
upward
the
wheel
hand
((,
of
the
Fig.
bobbin.
winding
over
THE
needle
you
and
the
flat
sidetoright)
as
far
the
needle
needle,
by
hand
WINDING
wheel
Fig.4)
toward
spool
Run
4).
on
spindle
small
when
is
again
off
loose
NEEDLE
bar
(1’
by
hand.
needle
as
will
it
clamp
make
to
be
THE
Fig.4)
(ID.
you
pins
and
end
of
of
pin
Hold
it
engaged
thread
to
can
one
sure
thread
bobbin
on
thread
is
filled.
so
end
its
highest
Then
be
in
go
into
screw
complete
the
BOBBIN
from
or
counter
lead
thread
spindle.
end
that
used
loosen
inserted
the
the
securely
needle
the
through
winder
Push
loosely
Turn
needle
to
point,
the
into
needle
needle
revolu
is
in
stitching
clockwise.
around
hole
a
(®..
bobbin
and
clutch
moves
start
the
i.JJ
mechanism
Place
one
set
in
the
Fig.
winder
start
away
from
when
winding.
flat
Fig.3
a
spool
of
bobbin
fitting
4)
lever
machine
you
turn
side
by
arm
you
Page 6
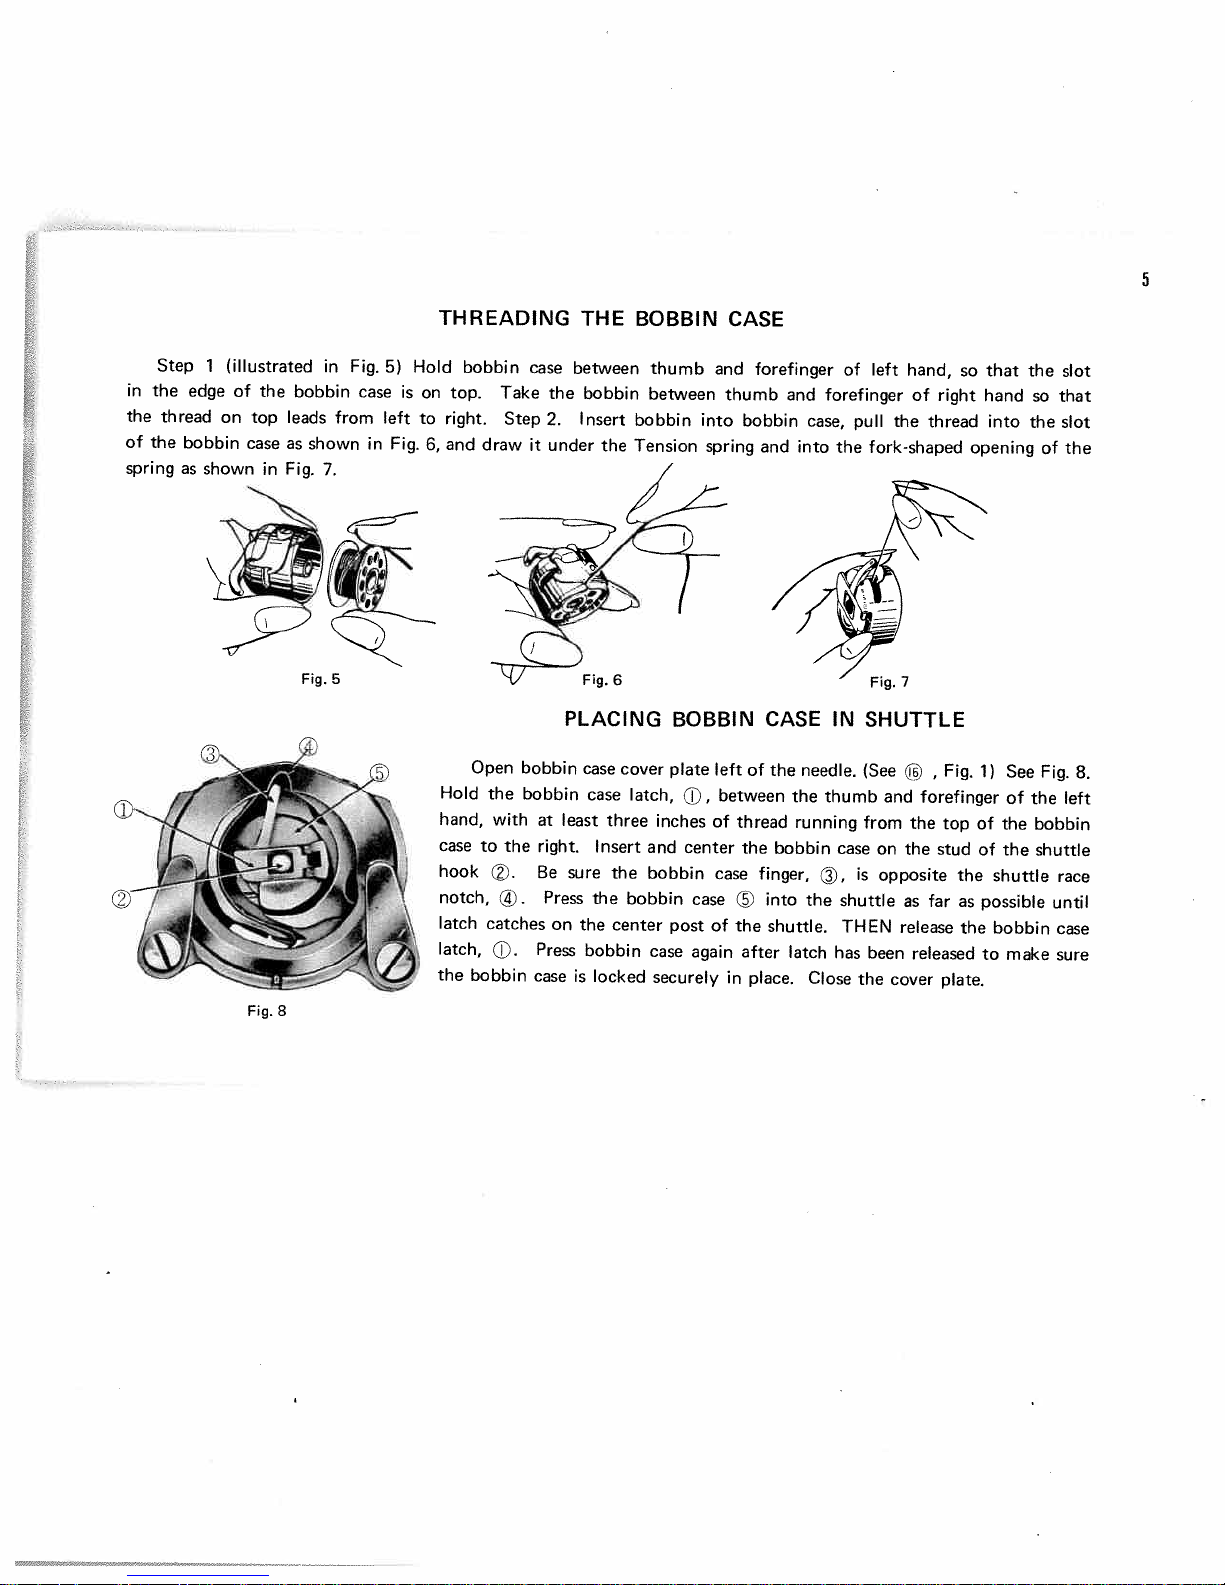
5
the
in
the
of
the
spring
Step
thread
as
1
edge
bobbin
shown
(illustrated
of
the
on
top
case
in
Fig.
8
bobbin
leads
as
shown
Fig.
Fig.
in
7.
5
Fig.
from
case
in
THREADING
Hold
5)
on
is
left
to
Fig.
6,
case
latch
latch,
the
bobbin
top.
right.
and
Hold
hand,
hook
notch,
Take
Step
draw
Open
the
with
the
to
.
®.
catches
.
bobbin
case
the
2.
under
it
bobbin
bobbin
at
right.
Be
Press
on
Press
case
THE
between
bobbin
Insert
Tension
the
Fig.
6
PLACING
case
cover
case
latch,
least
three
Insert
sure
the
the
bobbin
center
the
bobbin
is
locked
BOBBIN
thumb
between
bobbin
CASE
and
thumb
into
spring
BOBBIN
plate
left
between
(J,
of
inches
and
bobbin
post
case
securelyinplace.
center
case
of
again
thread
case
©
the
forefinger
bobbin
and
CASE
the
of
the
bobbin
finger,
into
shuttle.
after
and
case,
into
needle.
the
running
®,
the
latch
Close
of
left
forefinger
pull
the
fork-shaped
Fig.
IN
SHUTTLE
(See
thumb
from
case
on
is
shuttle
THEN
has
been
the
hand,
of
the
7
and
forefinger
the
the
opposite
as
release
released
cover
right
thread
,
Fig.
top
stud
the
far
plate.
that
so
hand
into
opening
1)
of
of
as
possible
the
to
See
of
the
the
shuttle
bobbin
make
the
so
the
of
Fig.
the
bobbin
shuttle
until
slot
that
slot
the
8.
left
race
case
sure
Page 7

B
1.
2.
3.
4.
5.
6.
7.
8.
9.
10.
you
(Fig.
out
draw
inches
Turn
their
to
Place
lead
down
into
under
into
Up
left.
Down
again.
Into
Through
into
three
through
Hold
until
will
9)
straight.
toward
long.
UPPER
the
highest
spool
thread
and
notch
thread
through
guide
needle
or
the
the
hand
of
through
around
on
guide
take-up
inside
needle
from
four
needle.
end
needle
formed
be
Place
the
THREADING
toward
wheel
position.
on
thread
hole
set
one
right
the
bar
from
lever
in
guide
face.
clamp
to
left
inches
upper
of
all
goes
over
thread
both
the
of
back
spool
in
of
hand
(©,
thread
guide
right
of
thread
the
the
machine,
you
pin,
arm
tension
side
Fig.
right
pulling
thread
way
upper
ends
SINGLE
raise
to
thread
discs
of
check
10)
to
bar
and
loosely
down
thread
under
leaving
the
guide,
from
and
and
the
NEEDLE
take-up
right
spring
turn
comes
which
of
slot
threads
both
over
I
hand
then
the
lever
left,
to
threaded
wheel
back
can
presser
and
Fig.9
up.
be
foot
three-or
needle
discs
toward
loop
A
pulled
four
and
Fig.
10
Page 8
7
length
The
is
5
the
Figures
Number
you
Fig.1)as
adjust
released
is
turn
the
to
Before
properly.
screw
the
(Fig.
and
Turn
When
,
(0
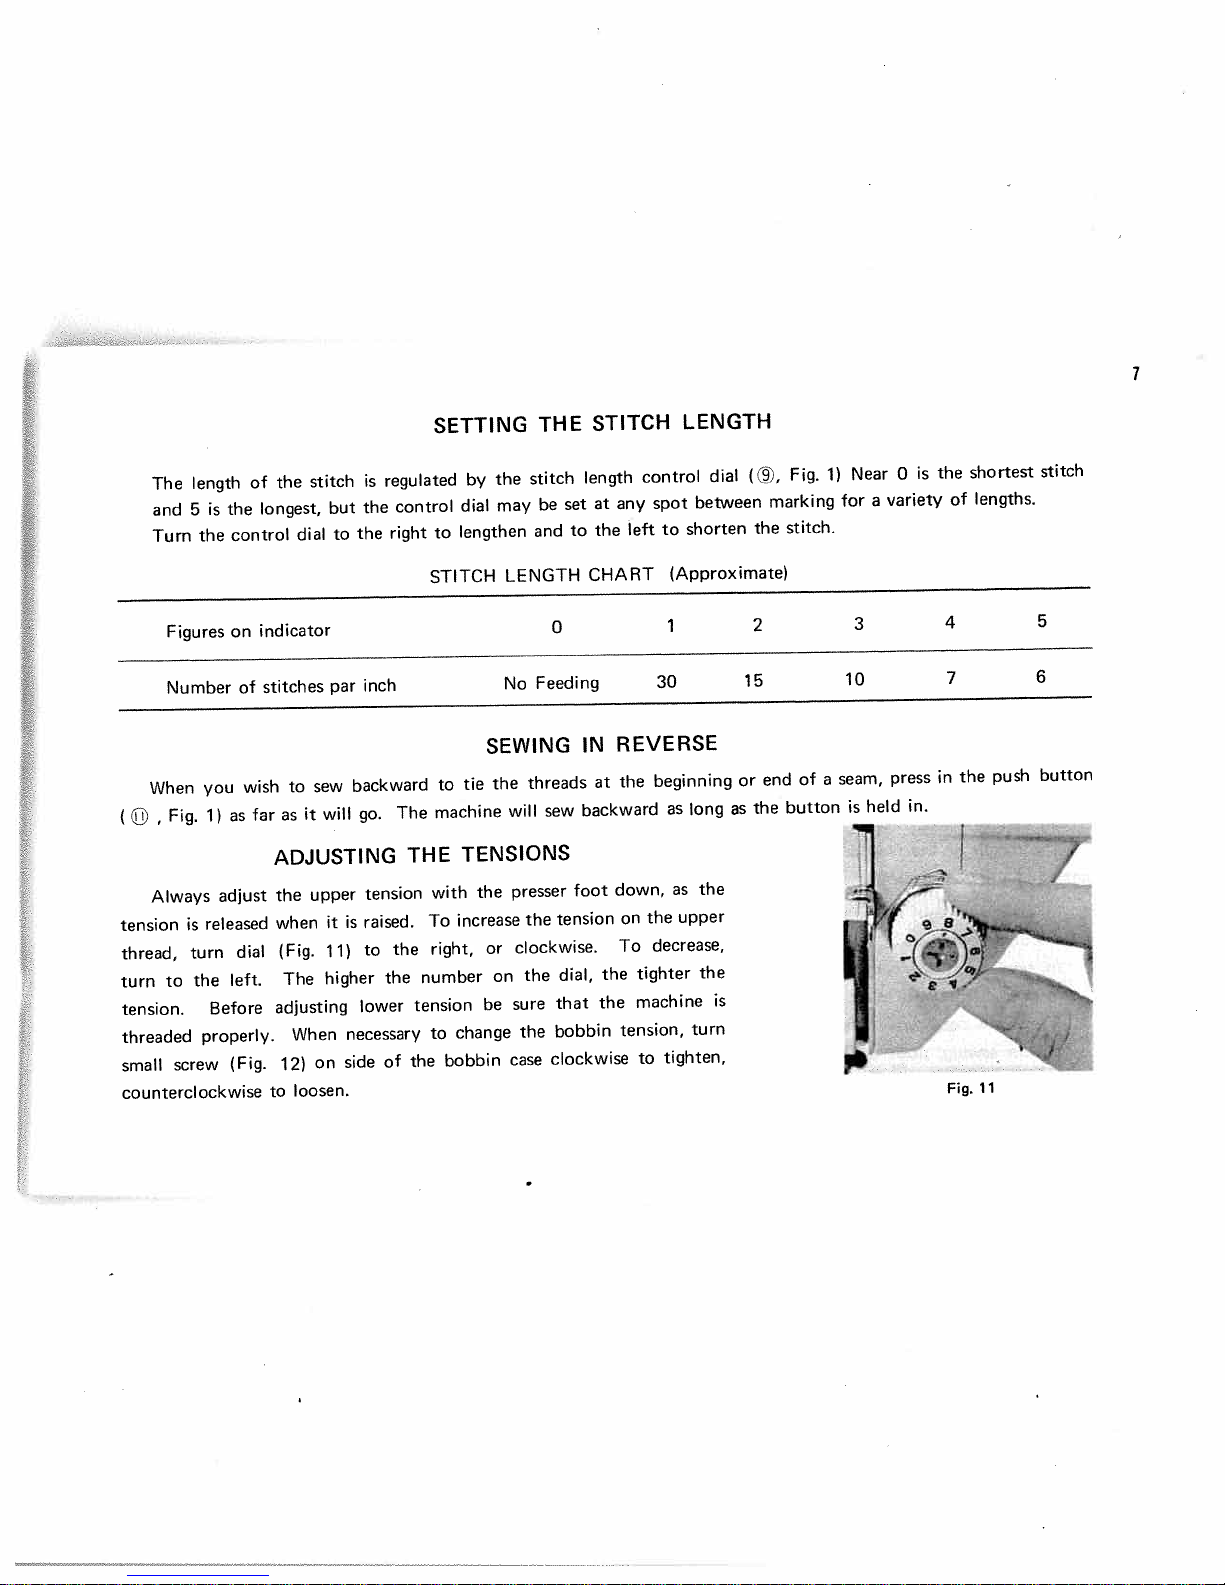
Always
tension
thread,
turn
tension.
threaded
small
counterclockwise
the
of
longest,
control
indicator
on
stitches
of
to
wish
asitwill
far
ADJUSTING
the
when
(Fig.
dial
The
left.
adjusting
12)
to
stitch
but
dial
sew
upper
it
11)
higher
When
on
loosen.
is
the
the
to
inch
par
backward
go.
tension
raised.
is
to
lower
necessary
side
regulated
control
right
STITCH
The
THE
with
To
right,
the
the
number
tension
to
the
of
SETTING
the
by
dial
may
lengthen
to
LENGTH
No
SEWING
the
tie
to
machine
TENSIONS
the
increase
or
on
be
change
bobbin
THE
stitch
be
and
0
Feeding
threads
will
sew
presser
tension
the
clockwise.
dial,
the
that
sure
bobbin
the
clockwise
case
STITCH
length
at
set
the
to
CHART
IN
at
backward
foot
the
the
LENGTH
control
any
spot
shorten
to
left
(Approximate)
1
30
REVERSE
beginning
the
as
as
down,
upper
the
on
decrease,
To
tighter
machine
tension,
tighten,
to
dial
between
long
the
the
is
turn
as
(),
15
or
marking
the
2
end
the
Fig.
stitch.
of
button
1)
a
Near
for
3
10
seam,
is
a
held
is
0
variety
press
in.
the
in
of
4
7
the
Fig.
shortest
lengths.
push
11
stitch
5
6
button
Page 9

When
the
upper
and
lower
tensions
perfect
a
fabric
in
,oosen
pulled
fabric
forms
(Fig.
12
Fig.
;
‘%
-4
Fig.
/////
•y
1
Q/
:\\‘
\\‘‘
Fig.
When
(Fig.
When
loops
15).
‘
14
up
stitch
(Fig.
the
over
14).
the
over
willbeformed
13).
upper
tension
the
upper
upper
tension
the
lower
c\\
“
thread
thread
c’
‘
with
is
too
tight,
which
is
too
lying
‘\
Fig.
15
both
loose,
are
is
flat
properly
threads
the
lying
the
under
interlocking
lower
flat
upper
balanced,
thread
on
thread
fabric
the
is
the
The
setting
1.
In
the
In
2.
marked
When
3.
button
go.
heightofthe
of
push
the
button
sewing
on
marked
on
sewing
“UP”
itisnecessary
sewing,
buttons.
thin
thick
down
push
feed
dog
materials,
“DOWN”
materials,
farasit
as
turn
to
the
may
such
down
the
button
such
will
regulated
be
silk,
as
as
as
go.
work
marked
FEEDING
according
creape
farasthe
overcoats,
freely
as
“DOWN”asfar
OF
chine
de
while
line.
push
embroidering
in
FABRIC
to
the
etc.,
the
button
as
thickness
push
and
will
it
material
of
the
being
Fig.
sewn,
16
by
proper
Page 10

When
thin
on
about
Release
Fig.
halfway
In
darning,
release
the
on
the
way
plate.
down.
cap
lighter
silk
halfway
and
17)
spot.
DARNING
order
mending
the
snap
down,
To
SEWING
WEIGHT
pressure
or
filmy
down,
all
the
then
move
to
and
cap
(,
lock,
which
return
(Fig.
18)
way
press
(a),
feed
THIN
material,
AND
the
certain
Fig.
Fig.
drops
to
LIGHT
OR
FABRICS
sew
the
to
pressure
the
Fig.
18)
is
by
cap
required
pressing
(©,
MONOGRAMMING
in
freely
fabric
of
Press
feed
press
free-hand
by
“DOWN”
well
“UP”
kinds
completely
18)
17)
the
normal,
satisfactorily
cap
snap
down
any
direction
embroidery,
pressing
below
button,
should
lock,
again
button
the
be
((I),
to
for
down
all
needle
push
PUIsz
Fig,
9
17
Fig. 18
Page 11

lii
Have
Do
may
and
highest
the
hand
The
ing
and
the
and
slightly
needle.
try
not
deflect
NEVER
Place
lower
Turn
point
needle
wheel
speed
amount
the
sure
Be
needle
presser
20,
take-up
to
the
run
material
the
hand
the
at
to
of
to
bar
foot
pass
and
holding
Leave
PREPARING
lever
the
help
needle
machine
and
You
its
start
the
of
foot.
wheel
are
highest
the
machine
pressure
presser
REMOVING
the
stop
located
are
draw
and
the
thread
ends
the
highest
at
feeding
and
without
threads
toward
now
point,
machine.
machine
threads
in
of
cause
in
ready
regulated
is
exerted
at
fabric
the
over
both
thread
TO
point
by
to
it
material
position
you
to
is
it
You
on
THE
when
highest
the
the
hands,
under
SEW
before
pulling
break.
until
begin
not
merely
by
the
WORK
the
back
thread
the
starting
the
under
under
the
sewing.
necessary
press
increasing
control.
thread
position.
to
and
cutter.
as
so
presser
material
presser
presser
the
needle
to
the
take-up
left,
the
to
not
foot.
By
touch
or
Now
Pull
sew.
to
as
foot.
foot
at
is
having
control.
decreas
Fig.
down
bend
this
its
the
lever
raise
19
the
Fig.
20
Page 12

11
straight
For
the
straight
Changing
hinged
cover
narrow
and
foottotheir
1.
Set
Set
Select
Push
Use
Move
Select
the
the
the
zigzag
1.
2.
3.
4.
2.
3.
NOTE:
stitch
the
replace
highest
blind
Z-B
desired
button
the
blind
desired
1.
2.
sewing
needle
Foot
and
foot
the
points.
stitch
dial©to
stitch
®
presser
stitch
stitch
When
finished
In
zigzag
the
on
on
plate
and
tighten
zigzag
lever
“0”
length
and
ZIGZAG
foot
lever
length
you
work
sewing,
surface
fine
which
Plate.
needle
Dto
position.
on
reverse
and
cDto
on
sew
will
of
fabric
To
screw
“M”
dial
stitching
needle
dial
thin
not
loosen
the
STRAIGHT
very
or
are
included
change
securely.
with
plate
position.
®.
canbeperformed.
SEWING
plate.
position.
“M”
©.
fabric,
pucker.
the
cloth.
soft
presser
apply
upper
in
To
that
a
material,
your
foot,loosen
change
straight
for
and
select
thin
tension
STITCHING
want
may
you
accessory box.
thumb
needle
plate,remove
sewing,
desired
sheetofpaper
slightly,
and
screw
while
zigzag
to
see
to
Both
the
use
the
have
remove
and
raising
width
reverse side
that
the
straight
narrow needle
zigzag
screws
and
the
needle
dial
on
of
lower
stitch
slide
the
thread
presser
slots.
foot.
the
bar
Fig.
fabric.
does
foot
Replace with
bobbin
and
the
21
Then
not appear
and
case
presser
the
Page 13

12
How
3.
ZB
versatile
dial
and
your
stitch
machine
length
is
control
will
dial.
become
apparent
with
practice,
as
just
changing
the
Satin
Use
The
is
obtained
action.
The
Patterns
V\ANWA/WM/\/\
Stitch
zigzag
satin
width
presser
stitch
may
by
foot
which
setting
set
be
is
anywhere
really
the
just
stitch
a
length
from
very
ZIGZAG
short
as
just
past
Stitch
Long
zigzag
near
STITCH
Length
Long
Short
Long
Short
and
(Repeat)
stitch,
as
0
to
0
Short
possible
the
Fig.
and
widest,
22
PATTERNS
Gradually
and
I
basis
the
without
5.
for
stopping
Any
return
Any
most
Z.
B
point
from
move
to
point
from
embroidery,
the
feeding
Dial
from
0.
1
to
0
(Repeat)
1
to
5.
to
5,
5.
Fig.
23
Page 14

A
-vct,
m
I
C-)
I
-4
-4
C,,
z
I
—
CD
8
C).
-
o.
CD
ri
-
3•
CD
0
CD
CD
‘
—
-‘
CD3
N
(C
-.,
—(0,
0
ci)
Q.
ci)
<
‘.4
C)
0
r
—
CD
C.)
(0
CD
£
-4
3
1!
‘
.
‘-4
CD
D
CD
‘4
40V
—
D
8
1
ci)
in
ci)
CD
OCD
in
C—
<3
ci)
0
-4
0
-‘
ci)-CD
-.
U,
-4,
-
CD3
ci)
CD
;
-.
3•
CD
3
8
ci)
0
CD
U,
C-
(p
A
A
AA
A
A
-4
0
CD
CD
(‘3
CD
CD
CD
VVV
-4
CD
C’)
V
.
3
CD
CD
3
CC
CD
ci)
3
CD
ci)
C)
CD
-
n
CD
4
ci)
CD
‘-4
-4
-‘
-4,
0
0
CD
in
in
-‘
CD
V
c
CD
-4,
in
—
ci)
CD
-‘
3
.,,
o
0
ci)
D
‘-4
—
CD
C
4,
3
-
-4
CD
0
(C
.CD
-
CD
3
0
8
ci,
-4
0
-C
Page 15

14
10.
1.
2.
3.
4.
5.
6.
7.
8.
9.
Remove
Push
Set
Set
Place
Turn
Turn
if
necessary.
When
stopping
To
“0,”
a
rounded
button
thread
Apply
If
a
for
the
to
permit
to
the
the
the
lock
and
four
drop
blind
Z-B
the
the
the
needle
with
the
to
under
the
hole
two
fabric
presser
feed
stitch
dial
button
Z-B
dial
hand
goes
the
zigzag
make
toothpick
fabric
button,
above
button
hole
stitching
with
foot
button
to
wheel
a
few
method
button.
and
lever
“0”
so
until
into
needle
stitch
stitches
in
the
forming
the
the
replace
marked
to
position.
that
its
the
needle
slowly
the
center
in
the
and
over
the
regular
to
is
to
be
Now
remaining
same
with
“DOWN”
“M”
position.
left
goes
by
hand
of
left
prevent
in
the
button
way.
a
shank.
sew
on
sewn,
lift
two
procedure
SEWING
button
hole
through
each
hole.
same
Fasten.
buttons,
follow
presser
holes.
all
the
comes
to
be
hole,
ravelling,,
hole.
between
Remove
with
the
foot
Hooks,
as
for
ON
sewing
way
directly
the
sure
run
If
you
the
the
same
slightly
sewing
BUTTONS
foot.
down.
right
the
needle
the
return
wish
two
toothpick
four
procedure
snaps,
two
under
hand
machine
the
you
holes,
holes,
and
etc.,
hole
the
hole
clears
Z-8
may
and
hooks,
move
needle,
of
both
at
medium
dial
place
and
wind
as
above
fabric
are
sewn
buttons.
the
sew
etc.
to
then
button.
holes
speed,
gently
in
the
making
lower
button.
five
the
or
presser
Correct
six
foot.
width
stitches,
Fig.
25
Page 16

A
buttonhole
1.
Replace
Move
2.
Set the
3.
4.
Set the
Stitch
5.
With
6.
showing lower
7.
Take
Remove
8.
tion
9.
Stitch
10.
Remove
showing
11.
Stitch
12.
Slit
cutterorseam
If
you
paper
NOTE:
MAKING
can
be
regular
the
Z-B
stitch
the
needle
4or5
needle
showing
the
bar
the
the
buttonhole
plantomake
which
When
the
on
presser
blind
stitch
dial
length
length
out
bar
stitchesinfabric.
from
right
length
needle from fabric,
tack
sameaslower
ripper.
canbetorn
the
pitch
both
madeinany
foot
lever
AU
to
position
control
of
the buttonhole.
of
fabric,
tack of
fabric,
side
of
of
the buttonhole.
of
buttonhole
bar
between
Be
buttonholes
away
left
side
by
means of
will
side
BUTTONHOLES
length
within
buttonhole
with
“M”
to
turn the
buttonhole
buttonhole
careful
pitchisdifferent
be
position.
for
forward
dial
at
number
Z-B
turn
and
the
LI
turn
tack.
the
after
the
Z-B
the
two
rows
nottocut the stitching
on
sheer
stitching
stitch
the
same.
the
foot.
stitching
between
%
dial
to
dial
Z-B
dialtothe
of
stitching
or soft
under
from
length
range
the
right,
the
to
material,
the
the
control
of
limited width.
of
buttonhole.
“0”
and
to
right
left,
to
with
or
place
fabric.
right
side
dial,
the
to the
the
the
the
so
“1”
illustration
illustra
illustration
buttonhole
bar
tacks.
tarlatan
pitch,
that
pitches
adjust
15
Fig.
26
4
or
2
Ifl
Buttonhole
Fig
27
Page 17

18
With
with
Set
the
number
For
be
sewn
rolled
the
material
can
continue
bar
and
beginning
and
sew
by
adjusting,
tion.
the
hemmer.
When
proceed
Insert
the
slot
the
narrow
Z-B
“3”
general
easily.
sew
in
Be
hemming
to
edge
on
needle
hemmer
dial
for
zigzag
hemming,
diagonally,
Then
to
being
2
of
the
order
and
careful
(Fig.
make
of
lace
the
right
NARROW
at
its
foot.
at
“0”
stitched
and
insert
the
point
rolled
or
3
stitches
hem
between
that
the
the
sewing
not
to
28)
and
sewing
a
hem
or
trimming
side
of
highest
Set
position
cut
prepare
it
in
edge
feed
in
the
the
HEMMER
position,
the
blind
for
hem.
the
the
into
the
just
beneath
the
scroll.
slowly
your
of
result
too
much
on
lace
same
(be
sure
hemmer.
stitch
straight
Set
right
material
scroll
and
right
material
will
be
or
are
required
manner
the
replace
stitch
corner
of
the
Then
carefully,
thumb
can
as
too
right
regular
lever
stitched
length
of
so
hemmer.
needle,
be
given
little
as
side
to
“M”
to
the
that
lower
holding
and
scrolled
in
the
material
in
one
explained
is
down)
presser
position.
hem
or
suit.
material
it
can
Pull
so
that
the
presser
forefinger
nicely
illustra
operation,
above.
into
—
foot
at
to
be
Out
it
the
r
into
Fig.
29
Page 18

Make
leading
scroll
the
for
as
of
top
lace
the
plain
the
edge
Should
sure
lace
hemmer
of
hemming,
fabric.
in
one
you
that
edge
Then
stitching.
Fig.
encounter
the
with
30
needle
into
with
put
pierces
the
the
the
the
(Fig.
skipped
it
hemmer’s
hand.
left
side
right
and
lace
29)
EMBROIDERING
stitches,
to
close
slot
To
apply
up.
fabric
embroidering
pressing
button
the
after
prefer
rather
carefully
the
edge
the
the
with
lace
the
Insert
combined
easy
It
is
down
marked
embroidery
Stretch
removing
and
high
and
fabric
just
hand
right
the
in
from
lace
the
into
WITH
follow
to
monogramming.
or
snap
the
“DOWN”
spring
fabric
the
the
the
lower
while
speed
sure
be
stretched
not
is
above
“French
hemmer
on
in
presser
presser
to
the
while
the
HOOP
A
a
lock
down
the
an
moving
keep
turned
guiding
Manner,”
with
left,
and
stamped
Release
the
on
all
needle
embroidery
foot.
lifter.
bar
the
fingers
enough
tight
edge
the
the
hem
the
design
pressure
way.
the
clamp.
hoop,
the
Set
hoop
out
of
material
insert
right
the
The
slowly
of
or
the
the
side
can
to
or
pressure
release.
Then
(See
and
stitch
operate
the
darning
a
hem.
being
fabric
down,
made
be
work
hang
Fig.
place
width
with
needle.
from
Push
30)
the
both
Begin
hemmed
be
to
and
to
free
the
upper
the
under
at
machine
hands.
spring
to
hemmed
put
enclose
hand
the
drop
the
the
is
stitch,
into
it
the
when
foot
feed
end
needle
size
Work
needed.
on
by
you
at
17
of
a
Page 19

18
This
covered
insert
Loosen
right
or
CORDING.
Loosen
cord.
needle
cord
baste
To
adjustable
and
cord,
attachment
thumb
of
left
centered
is
in
covered
sew
foot
on
cording,
screw
needle.
Fold
thumb
place
so
edge
in
(Fig.
needle
of
is
and
to
bias
screw
needle
cord
base
THE
used
to
slide
strip
and
31,32).
to
stitches
fabric.
ADJUSTABLE
make
to
in
zippers.
sew
to
fabric
set
closer
either
over
foot
Machine
reset
foot
of
hole.
material,
and
so
to
CORDING
Fig.
Loosen
needle
of
Stitching
more
Adjust
convenient,
closing.
is
AND
31
thumb
hole.
should
Guide
be
to
sew
ZIPPER
SEWING
and
screw
metal
close
to
from
of
either
FOOT
IN
slide
zipper
zipper
Fig.
ZIPPER
foot
so
along
allow
to
right
or
32
needle
edge
left
of
easy
side,
enters
foot
opening
which
(Fig.
center
33)
and
ever
Page 20

19
guide
This
placing
by
the
Use
foot
lightly
the
needle,
the
of
to
line,
top
presser
press
stitching
When
of
rows
accompanying
Adjust
the
clamp
on
bar
seam
seam
making
for
pronged
the
successive
attached
is
may
it
gauge
stitching
screw
width
QUILTING
holder
(Fig.
screw
fabric.
rows
so
serve
also
SEAM
as
along
threaded
in
desired.
parallel
between
34).
letting
By
will
that
as
GAUGE
guide
a
edges
hole
GUIDE
rows
be
the
seam
a
for
of
in
of
the
Adjust
the
an
curved
width
OR
straight
fabric.
bed
stitching
presser
the
guide
equal
part
guide.
CLOTH
Fasten
machine
of
foot
curved
ride
distance
is
seams
is
attached
and
the
on
the
to
GUIDE
and
gauge
(Fig.
bar
apart.
the
to
first
right
even
with
35).
Fig.
34
Fig.
35
Page 21

20
CARE
MAINTENANCE
AND
YOUR
OF
MACHINE
TO
HOW
Your
operating
sewing
of
Before
points
toward
Avoid
To
back
unit
point
To
rarely
Fig.
in
OIL
machine
smoothly.
you
oiling
indicated
until
you
over-oiling.
parts
oil
on
indicated
moving
oil
require
38.
YOUR
should
do.
the
by
the
under
hinges
its
in
oiling,
MACHINE
How
upper
arrows
take-up
Only
the
Fig.
37.
parts
open
be
often
a
and
inside
plate
oiled
part
in
lever
drop
bed
apply
occasionally
depends
of
Fig.
36
at
is
needed
is
the
of
a
face
the
oil
and
the
turn
its
machine,
drop
plate,
at
the
on
sewing
hand
lowest
each
at
of
spots
to
amount
unit
point.
at
oil
which
indicated
keep
wheel
point.
tip
at
the
each
only
it
36
Fig.
37
Fig.
Page 22

Fig.
21
SHUTTLE
The
This
Cleaning
Turn
position.
Remove
Turn
remove
Clean
by
Apply
When
Turn
position.
Place
into
Replace
into
clamps,
ped
Put
4.
Put
5.
into
THE
stitch
loose
with
will
and
remove
To
the
bobbin
the
the
the
removing
drop
a
the
replace
to
the
shuttle
position.
notch,
securely
bobbin
the
notch
forming
threads
interfere
removal
hand
head
Tilt
shuttle
two
shuttle
shuttle
all
of
cleaning
hand
shuttle
and
(B),
into
bobbin
(E)
shuttle
the
wheel
case
race
race,
threads,
oil
shuttle
the
wheel
hook,
race
lock
making
into
bobbin
case
of
mechanism
and
the
with
the
of
until
on
back
Fig.
(A>
race
cover
the
lint,
finger
with
has
until
(D),
cover,
into
certain
position.
into
cover.
race
lint.
efficient
will
lint
assembly,
needle
the
hinges.
its
39.
cover
(C)
shuttle,
etc.
tip
been
assembly:
the
against
(C),
position
the
case.
shuttle
the
occasionally
operation
safeguard
proceed
reaches
clamps
shuttle
and
shuttle
and
outer
to
completed,
needle
reaches
shuttle
fitting
with
clamps
race,
as
(B)
hook.
edge
driver
pin
shuttle
have
becomes
the
follows:
its
outward
race
of
proceed
its
and
lower
at
race
been
fitting
the
of
perfor
highest
and
(D)
cover
shuttle.
highest
adjust
edge
cover
snap
tongue
as
OILING
CLEANING
39
AND
clogged
machine.
mance.
1.
2.
3.
4.
5.
follows
1.
2.
3.
Page 23

22
Ripper
1.
Small
2.
Large
3.
Plastic
4.
Bobbins
5.
Felts
6.
Package
7.
Quilting
8.
Cloth
9.
Needle
10.
11.
Straight
Embroidery
12.
Button
13.
Buttonhole
14.
Narrow
15.
Zipper
16.
“THOSE
PURCHASED
BE
DEALER’S
ACCESSOR
(Buttonhole
Driver
Driver
Oiler
(3)
for
Spool
Needle
of
Guide
Guide
plate
Stitch
Sewing
Hemmer
Foot
PARTS
ARE
AT
STORE”
I
ES
(Sealed
pin
and
Thumb
Straight
for
Presser
Spring
Foot
(Plastic)
Foot
Foot
STANDARD
ANY
Cutter)
and
Filled)
(2)
Screw
Stitch
Foot
SEWING
CAN
AND
MACHINE
©
Iii
I\\
©
00
©
Page 24

Although
they
Upper
Be
Check
Use
Do
Lower
Check
Be
Needle
Do
Be
Skipped
Do
Insert
Use
Be
Stitches
Make
Machine
Clean
If
for
can
be
Thread
sure
on
correct
not
have
Thread
correct
sure
lower
Breaks
not
tug
sure
presser
Stitches
not
use
needle
correct
sure
pressure
Loop
sure
Binds
thread,
condition
a
while,
your
remedied
Breaks
needle
correct
needle
upper
Breaks
or
a
blunt
correctly.
needle
tensions
dust
continues,
and
sewing
is
inserted
way
method
tension
pull
foot
on
and
wipe
with
size
tension
on
is
or
size
foot
are
dry.
machine
minor
properly.
to
thread
for
thread.
of
threading
is
not
the
fabric
firmly
bent
for
thread.
is
sufficient
properly
lint
from
it
may
Then
CHECK
is
adjustments.
machine.
too
tight.
too
tight.
while
attached
needle.
balanced
hook,
be
lubricate
designed
bobbin
sewing
to
when
shuttle
that
the
UP
for
case.
bar.
sewing
and
machine
again
FOR
maximum
this
as
heavy
that
machine
and
with
will
race.
is
fine
SMOOTH
efficiency,
bend
and
fabrics.
is
threaded
gummy
with
sewing
SEWING
should
eventually
oil.
machine
any
correctly.
Apply
oil.
of
break
kerosene
the
the
following
needle.
oil
to
difficulties
holes,
run
23
occur
rapidly
Page 25

0
1’
1
I
I,
‘1
 Loading...