

Unitron T Max UP Pro, T Max SP Pro, T Max UP 800, T Max SP 700, T Max UP 700 User Manual
...Page 1
Max™ behind-the-ear
(BTE) hearing aid guide
Guide pour les
instruments auditifs
contours d’oreille Max
MC
A Sonova brand
Page 2

Thank you for choosing these hearing aids.
We care deeply about people with hearing
loss. We work closely with hearing healthcare
professionals to provide hearing solutions that
improve lives in meaningful ways.
Because hearing matters.
This user guide applies to the following models:
Year of introduction: 2018
T Max
™
SP Pro
T Max
™
SP 800
T Max
™
SP 700
T Max
™
SP 600
T Max
™
SP 500
T Max
™
UP Pro
T Max
™
UP 800
T Max
™
UP 700
T Max
™
UP 600
T Max
™
UP 500
Merci d’avoir choisi ces instruments auditifs.
Nous nous dévouons entièrement aux
personnes sourant de perte auditive. Nous
travaillons en étroite collaboration avec des
audioprothésistes an de proposer des
solutions de pointe, adaptées aux besoins
de tous. Parce que l’audition, c’est essentiel.
Ce guide d’utilisation s’applique aux modèles
suivants :
Année de lancement : 2018
T Max
MC
SP Pro
T Max
MC
SP 800
T Max
MC
SP 700
T Max
MC
SP 600
T Max
MC
SP 500
T Max
MC
UP Pro
T Max
MC
UP 800
T Max
MC
UP 700
T Max
MC
UP 600
T Max
MC
UP 500
Page 3

5
Your hearing aids
Hearing healthcare professional: _______________
___________________________________________
Telephone: _________________________________
Model: _____________________________________
Rechargeable option
Serial number: ______________________________
Replacement batteries:
Size 675 or
Size 13 ( Rechargeable)
Warranty: __________________________________
Program 1 is for: _____________________________
Program 2 is for: ____________________________
Program 3 is for: ____________________________
Program 4 is for: ____________________________
Date of purchase: ____________________________
Page 4

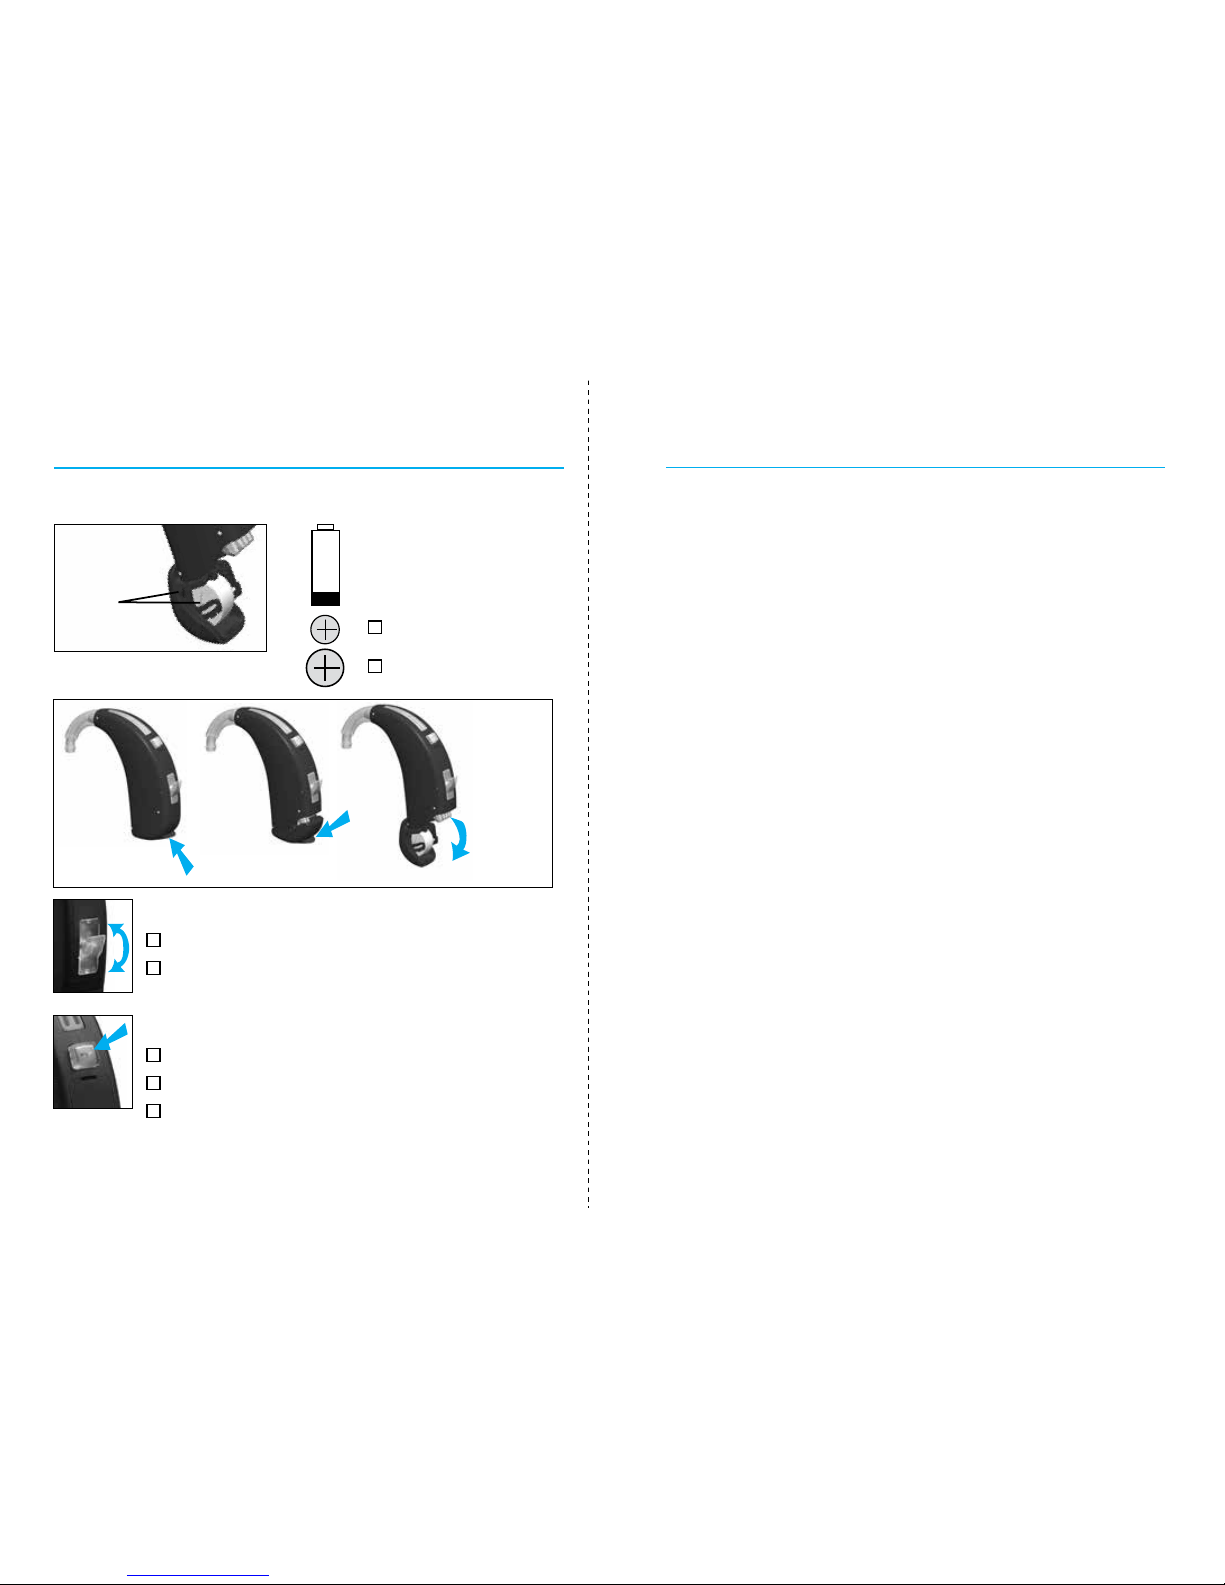
Quick reference
Changing batteries Low battery warning
2 beeps every
30 minutes
13
675
On/O
Plus
(+) signs
Lever
volume control
not activated
Push button
switching programs
volume control
not activated
on o open
Vos instruments auditifs
Audioprothésiste : ___________________________
___________________________________________
Téléphone : _________________________________
Modèle : ___________________________________
Option rechargeable
Numéro de série: ____________________________
Piles de remplacement :
Taille 675 ou
Taille 13 ( Rechargeable)
Garantie : __________________________________
Le programme 1 correspond à : ________________
Le programme 2 correspond à : ________________
Le programme 3 correspond à : ________________
Le programme 4 correspond à : ________________
Date de l’achat : _____________________________
Page 5
Aide-mémoire
Remplacement des piles Avertissement de pile faible
2 bips toutes les 30
minutes
13
675
Marche/arrêt
Signes
plus (+)
Levier
commande de volume
n’est pas activé
Bouton-poussoir
changer de programme
commande de volume
n’est pas activé
Marche Arrêt Ouvert
Table of contents / Table des matières
Your hearing aids at a glance ............................................................ 2
Warnings .......................................................................................... 4
SoundCore technology .....................................................................9
Hearing aids with the rechargeable option ..................................... 10
Putting your hearing aids on your ears ............................................ 12
Turning your hearing aids on and o ...............................................13
Battery information .........................................................................15
Operating instructions .................................................................... 18
Using the telephone ....................................................................... 23
To attach the optional magnet: ....................................................... 24
Caring for your hearing aids ............................................................ 26
Cleaning your hearing aids ............................................................. 27
Accessories ....................................................................................30
Assistive listening devices ..............................................................32
Troubleshooting guide....................................................................34
Information and explanation of symbols ........................................39
Compliance information ................................................................. 41
Client feedback .............................................................................. 43
Additional notes ............................................................................. 44
Aperçu de vos instruments auditifs ................................................46
Avertissements ..............................................................................48
Technologie SoundCore ................................................................. 53
Instruments auditifs avec option rechargeable ............................... 54
Mise en place des instruments auditifs sur vos oreilles .................56
Mise en marche et arrêt de vos instruments auditifs ...................... 57
Informations sur la pile ..................................................................59
Instructions d’utilisation ................................................................62
Utilisation du téléphone .................................................................67
Entretien de vos instruments auditifs ............................................. 70
Nettoyage de vos instruments auditifs ............................................71
Guide de dépannage ...................................................................... 78
Information et explications sur les symboles ...................................83
Information sur la conformité .........................................................85
Commentaires du client .................................................................87
Remarques supplémentaires ..........................................................88
Page 6
2 3
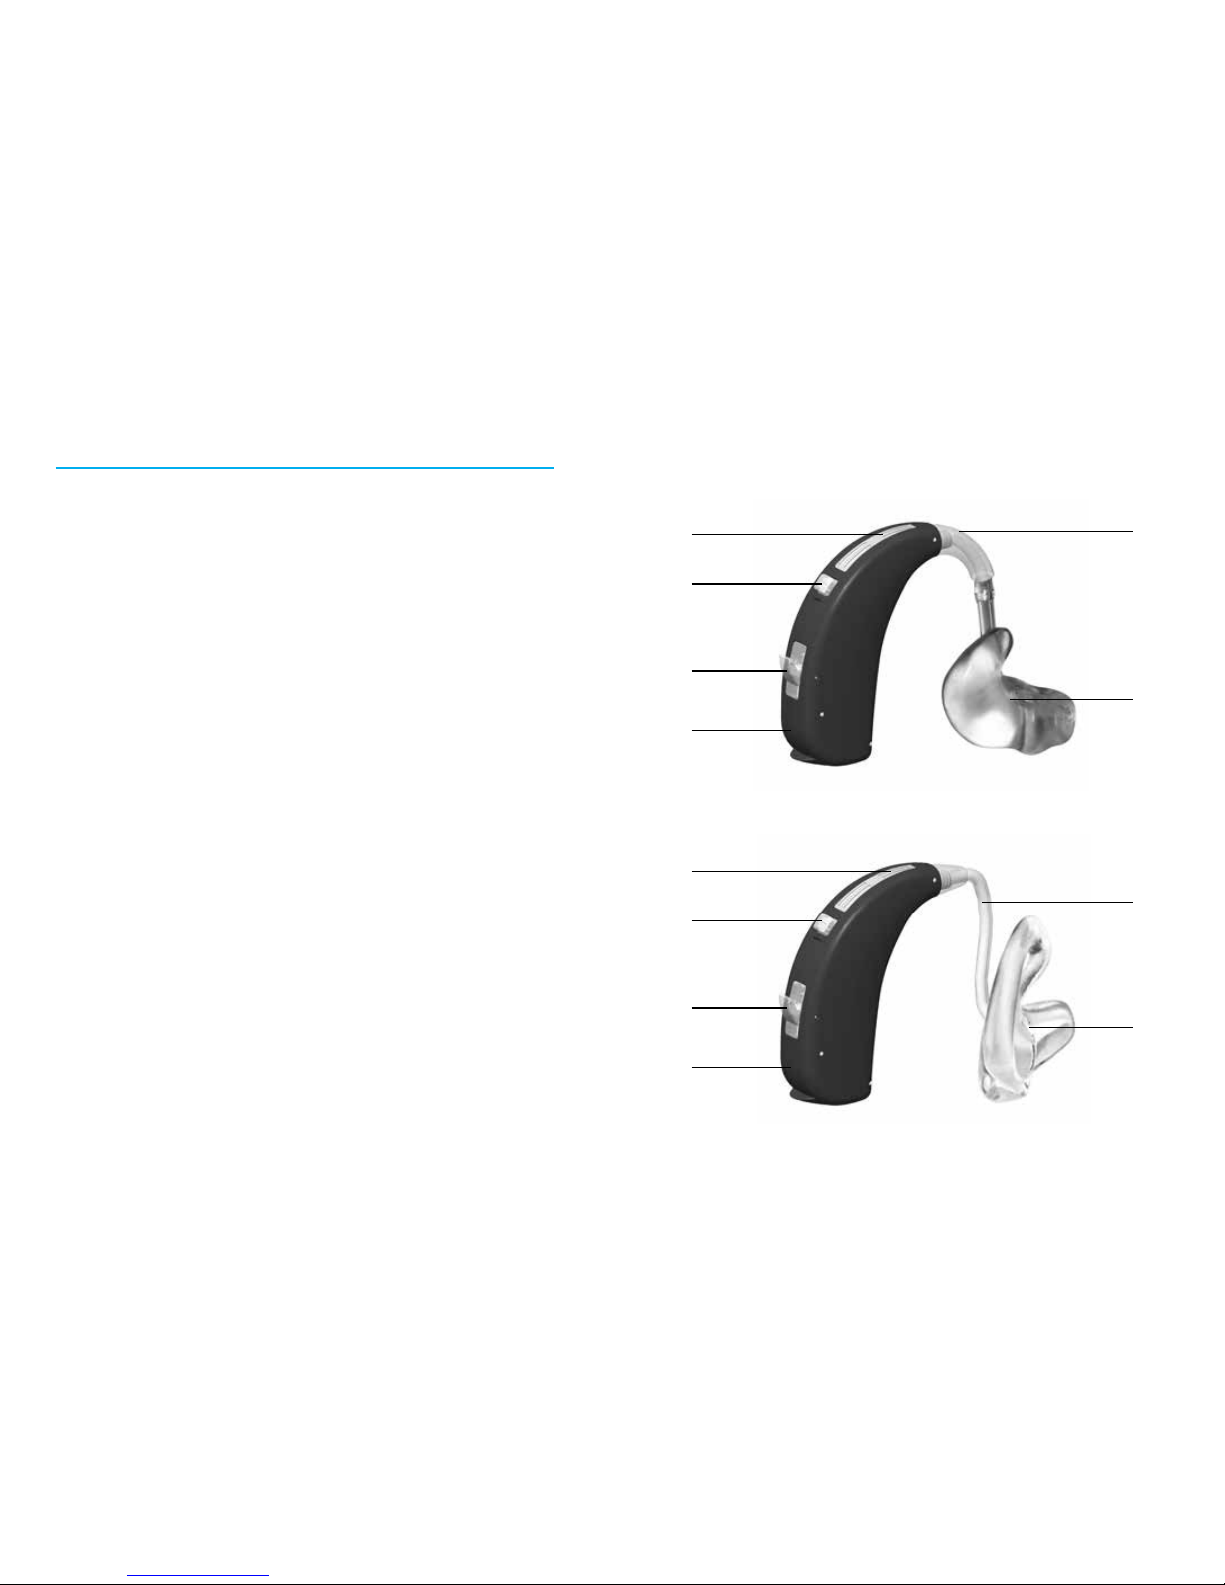
Your hearing aids at a glance
1 Earhook - your custom made earmold attaches
to your hearing aids using the earhook
2 Microphones - sound enters your hearing aids
via the microphones. Microphone shield -
protects microphones from dirt & debris
3 Push button - switches between listening
programs or changes the volume level,
depending on your customized tting
4 Lever - controls the volume
5 Battery door/on & o - close the door to turn on
your hearing aids, partly open the door to turn
o your hearing aids. Opening the door all the
way gives you access to change the battery
6 Earmold - allows the sound to pass from the
hearing aids to the ear and holds the hearing
aids in place
7 Power slim tube - sound travels down the tube to
the ear canal
2
3
4
5
2
3
4
5
1
6
7
6
T Max BTE hearing aids
Page 7

4 5
Warnings
The intended use of hearing aids is to
amplify and transmit sound to the ears and
hereby compensate for impaired hearing.
The hearing aids (specially programmed for
each hearing loss) must only be used by the
intended person. They should not be used
by any other person as they could damage
hearing.
Hearing aids should only be used as directed
by your physician or hearing healthcare
professional.
Hearing aids will not restore normal hearing
and will not prevent or improve a hearing
impairment resulting from organic conditions.
Do not use your hearing aids in explosion
hazard areas.
Allergic reactions to hearing aids are
unlikely. However, if you experience itching,
redness, soreness, inflammation or a burning
sensation in or around your ears, inform your
hearing healthcare professional and contact
your physician.
In the unlikely case that any parts remain in
the ear canal aer the removal of the hearing
aid, contact a physician immediately.
The following is only applicable for persons
with active implantable medical devices (i.e.
pacemakers, debrillators, etc.):
- Keep the wireless hearing aid at least 15 cm
(6 inches) away from the active implant.
- If you experience any interference, do not
use the wireless hearing aids and contact
the manufacturer of the active implant.
Please note that interference can also
be caused by power lines, electrostatic
discharge, airport metal detectors etc.
Special medical or dental examination
including radiation described below, may
adversely aect the correct functioning of
your hearing aids. Remove and keep them
outside the examination room/area before
undergoing:
- Medical or dental examination with X-ray
(also CT scan).
- Medical examinations with MRI/NMRI
scans, generating magnetic elds.
Page 8

6 7
- Hearing aids don’t need to be removed
when passing security gates (airports etc.).
If X-ray is used at all, it will be in very low
doses, and will not aect the hearing aids.
Special care should be exercised in wearing
hearing aids when maximum sound
pressure levels exceed 132 decibels. There
may be a risk of impairing your remaining
hearing. Speak with your hearing healthcare
professional to ensure the maximum output
of your hearing aids is suitable for your
particular hearing loss.
Magnet and battery warnings
Never leave hearing aids, batteries or magnets
where small children and pets can reach
them. Never put hearing aids or batteries
in your mouth. If a hearing aid or battery is
swallowed, call a physician immediately.
The magnet may aect some medical
devices or electronic systems. Always keep
the magnet (or the telephone equipped
with the magnet) at least 30 cm (12") away
from pacemakers, credit cards or other
magnetically sensitive devices.
Precautions
The use of hearing aids is only part of hearing
rehabilitation; auditory training and lip
reading instruction may be required as well.
In most cases, infrequent use of hearing aids
does not provide full benet. Once you have
become accustomed to your hearing aids,
wear your hearing aids everyday all day.
Your hearing aids use the most modern
components to provide the best possible
sound quality in every listening situation.
However, communication devices such as
digital mobile phones can create interference
(a buzzing sound) in hearing aids. If you
experience interference from a mobile phone
being used close by, you can minimize this
interference in a number of ways. Switch your
hearing aids to another program, turn your
head in a dierent direction or locate the
mobile phone and move away from it.
Labeling
The serial number and year of manufacture are
located inside the battery door.
Page 9

8 9
Mobile phone compatibility rating
Some hearing aid users have reported a buzzing
sound in their hearing aids when they are using
mobile phones, indicating that the mobile
phone and hearing aid may not be compatible.
According to the ANSI C63.19 standard (ANSI
C63.19-2011 American National Standard
Methods of Measurement of Compatibility
Between Wireless Communications Devices
and Hearing Aids), the compatibility of a
particular hearing aid and mobile phone can be
predicted by adding the rating for the hearing
aid immunity to the rating for the mobile phone
emissions. For example, the sum of the hearing
aid rating of 2 (M2/T2) and a telephone rating
of 3 (M3) would result in a combined rating of 5.
Any combined rating that equals at least 5 would
provide “normal use”; a combined rating of 6 or
greater would indicate “excellent performance.”
The immunity of this hearing aid is at least M2/
T2. The equipment performance measurements,
categories and system classications are based
upon the best information available but cannot
guarantee that all users will be satised.
The performance of the individual hearing
aids may vary with individual mobile phones.
Therefore, please try this hearing aid with your
mobile phone or, if you are purchasing a new
phone, please be sure to try it with your hearing
aid prior to purchase.
SoundCore technology
SoundCore™ includes four intelligent features
working together to understand your listening
environment making the fluid adjustments
needed so you can actively participate in every
conversation across every environment.
Page 10
10 11
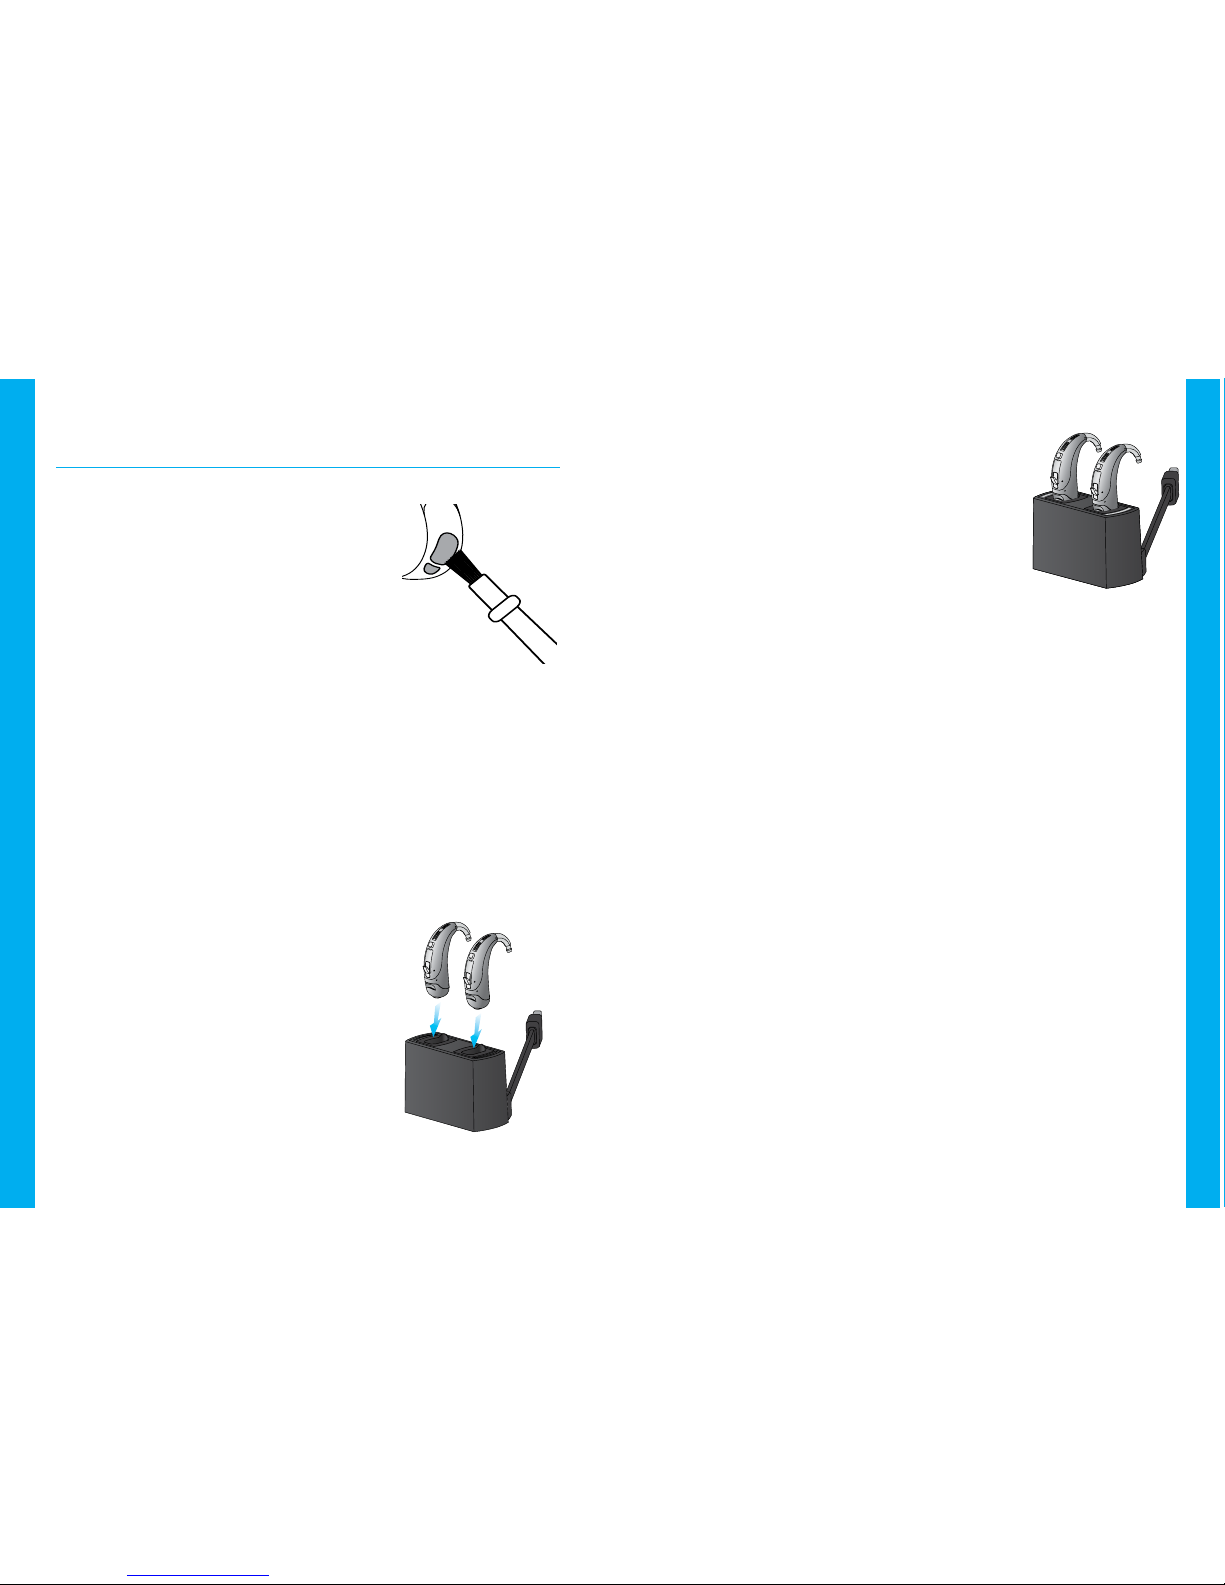
Hearing aids with the rechargeable option
Clean every night
1) Clean your hearing aid charge
pads using the cleaning brush
provided and using a clean,
dry tissue.
2) Use the cleaning brush to
clean the slots in the charging base.
Do not use any liquids for cleaning.
Charge every night
1) Plug the power cord into the USB wall
adapter and into a power outlet, avoid a
laptop or computer. Lights on the charging
base will blink green once.
2) Place your hearing aids in the
charging slots every night.
The ear pieces should be on
the same side of the charger
as the power cable, as shown
in the picture.
3) When your hearing aids are
correctly placed, both lights will
blink green.
4) Check that the lights have
blinked green at least 5 times
to ensure the hearing aids are
charging.
5) Solid green lights mean your hearing aids are
fully charged.
Do not open the battery door as this will drain
the rechargeable battery.
Tips
• When not in use, keep your hearing aids in the
charger. They cannot overcharge.
• Do not place the hearing aids in the charger
if the charger is unplugged, this will drain the
batteries.
• If you receive a low battery warning from the
hearing aids, place them in the charging base
to charge or replace with traditional batteries.
• If the charging lights are red, remove the hearing
aids and refer to your Charging base guide.
Page 11
12 13
Putting your hearing aids on your ears
Your hearing aids may be color-coded with a
small dot on the battery door:
red = right ear; blue = le ear.
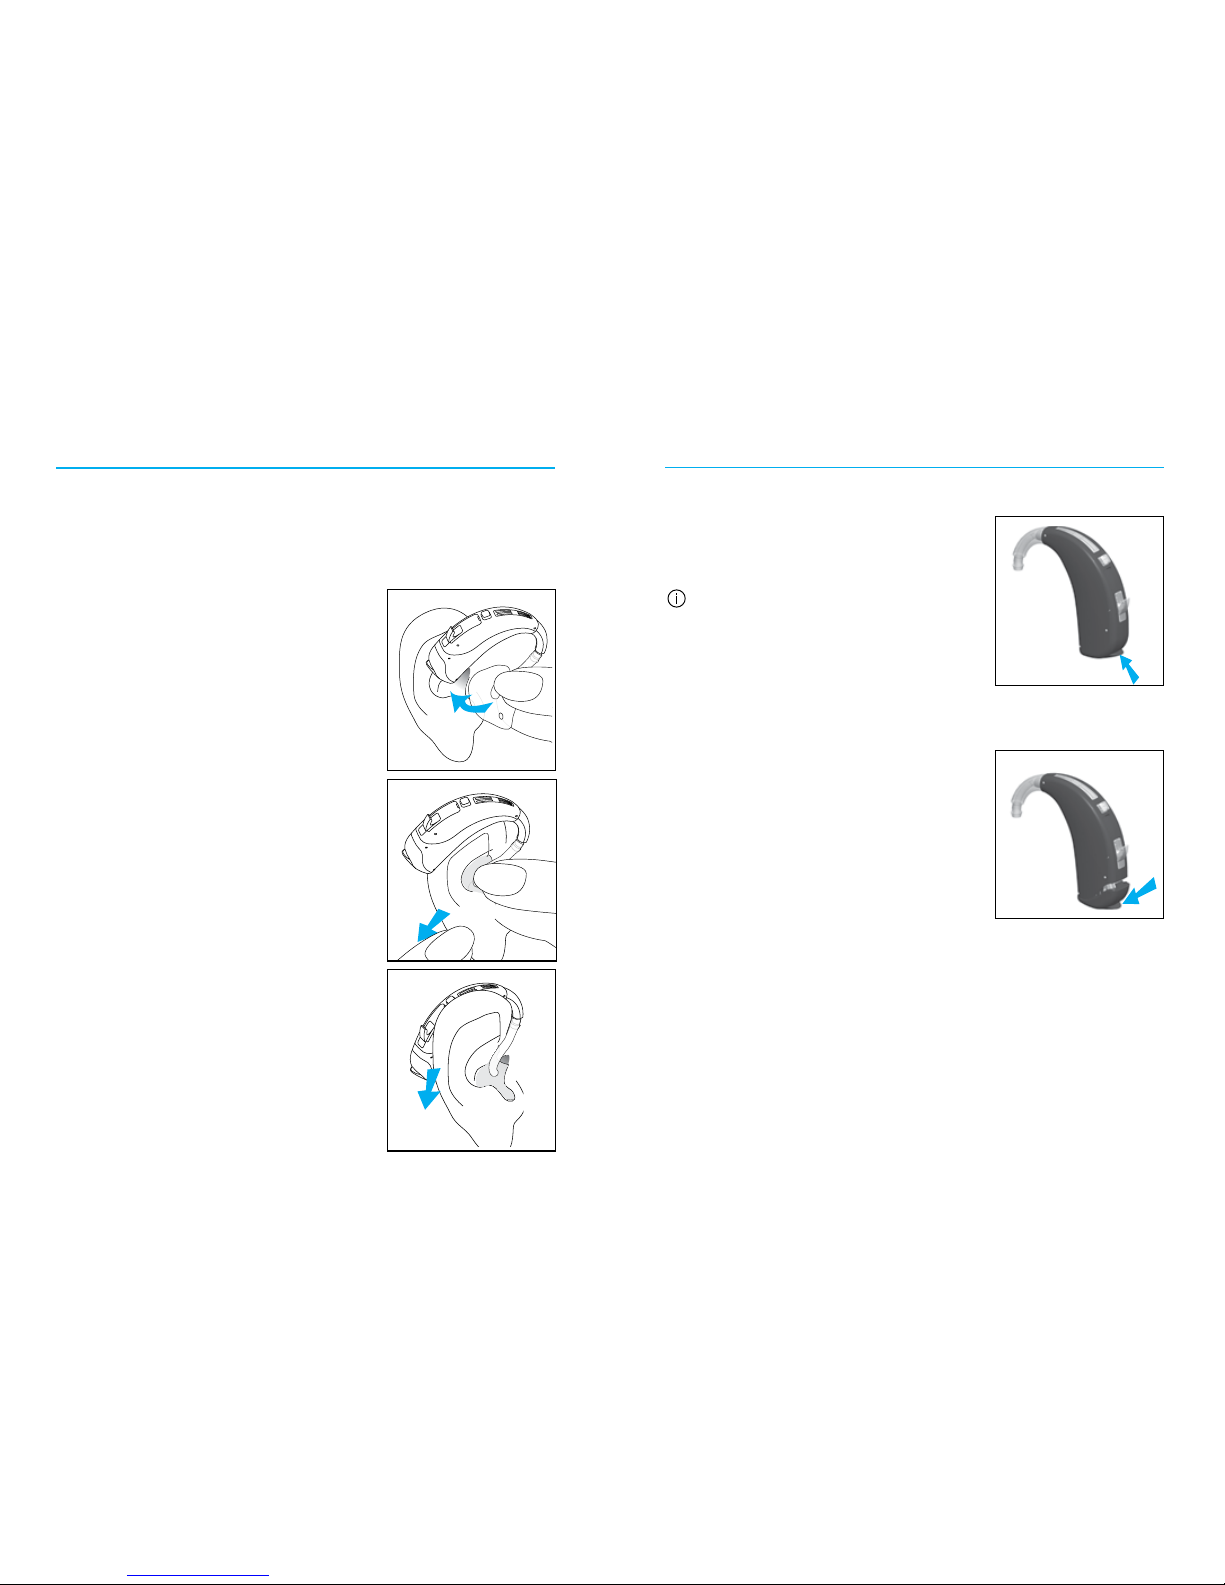
BTEs with earmolds
1. Hold the earmold between
your thumb and index
nger. The opening should
be pointing in towards your
ear canal with the hearing
aid resting upwards over
the top of your ear.
2. Carefully insert the earmold
in your ear. The earmold
should t into your ear
snugly and comfortably.
3. Place the hearing aid over
the top of your ear.
1.
2.
3.
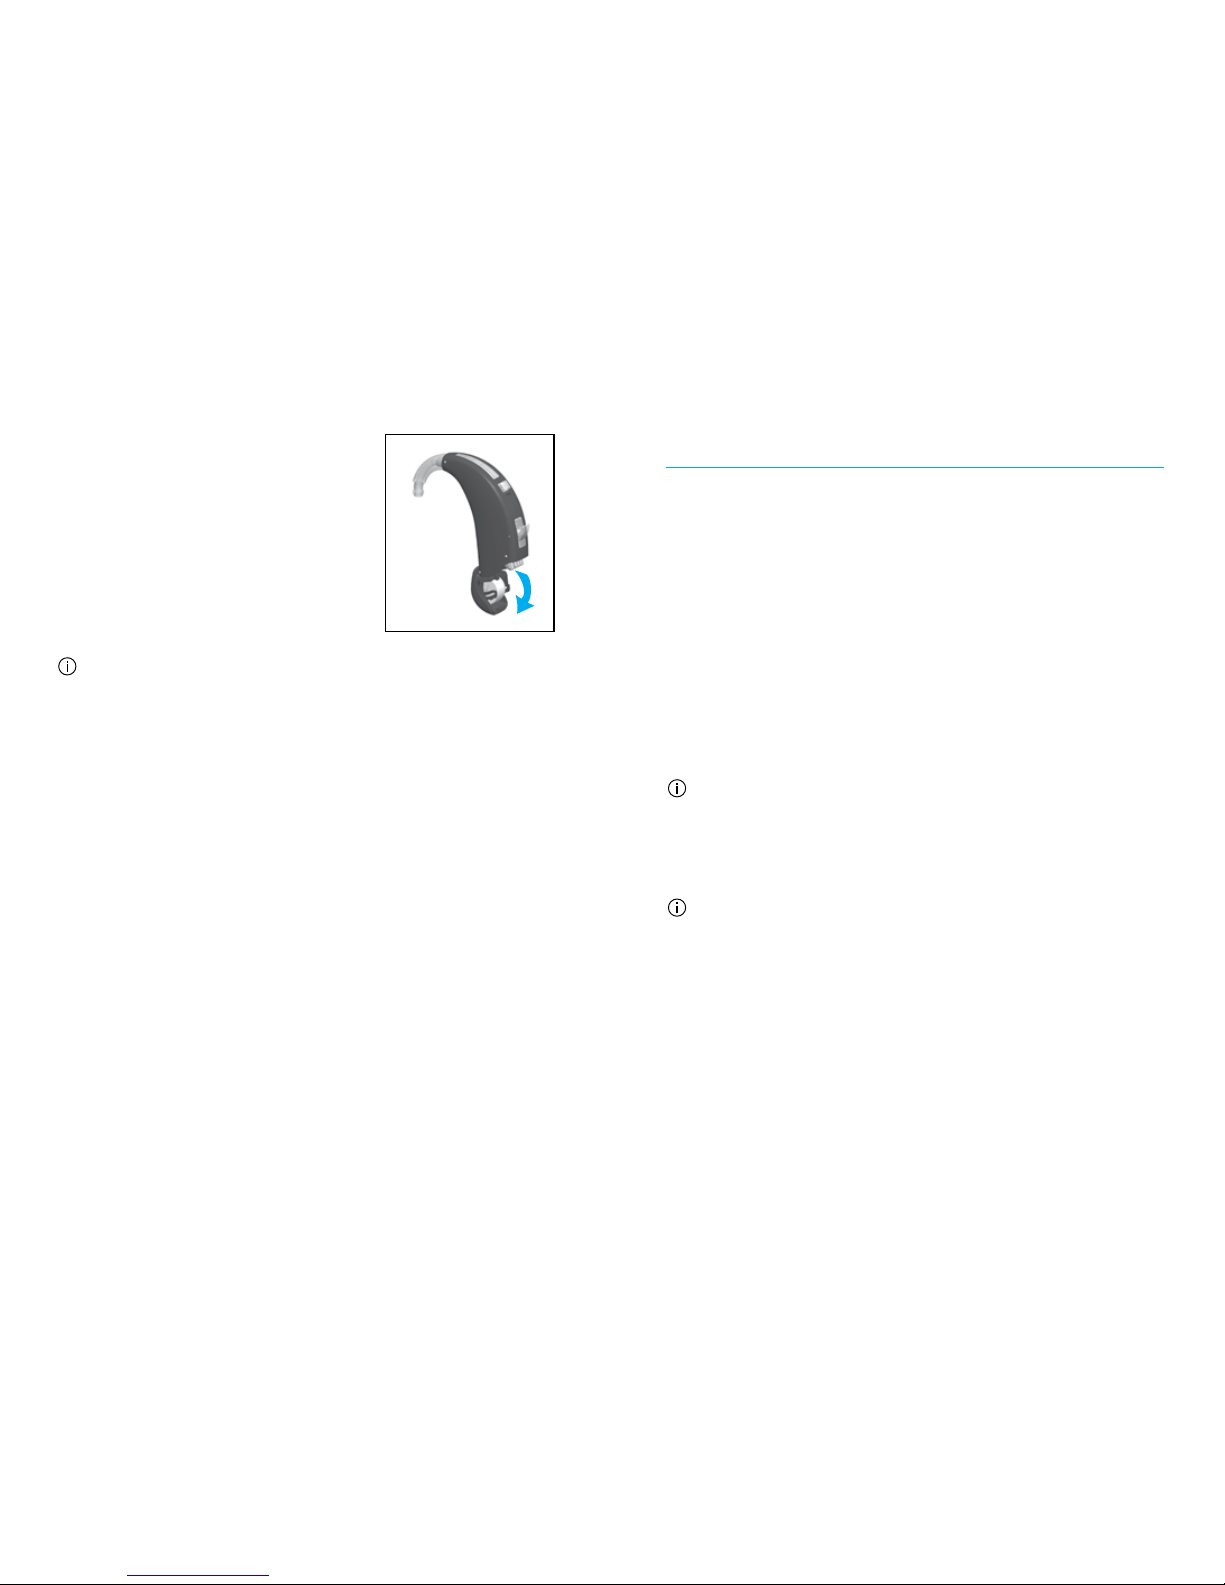
Turning your hearing aids on and o
The battery door acts as an on and o switch.
1. ON: Close the battery door
fully.
Note: It may take 5 seconds
before the hearing aid turns
on. Your hearing healthcare
provider can additionally
increase the start up delay if required.
2. OFF: Partially open the
battery door.
o
2.
1.
on
Page 12
14 15
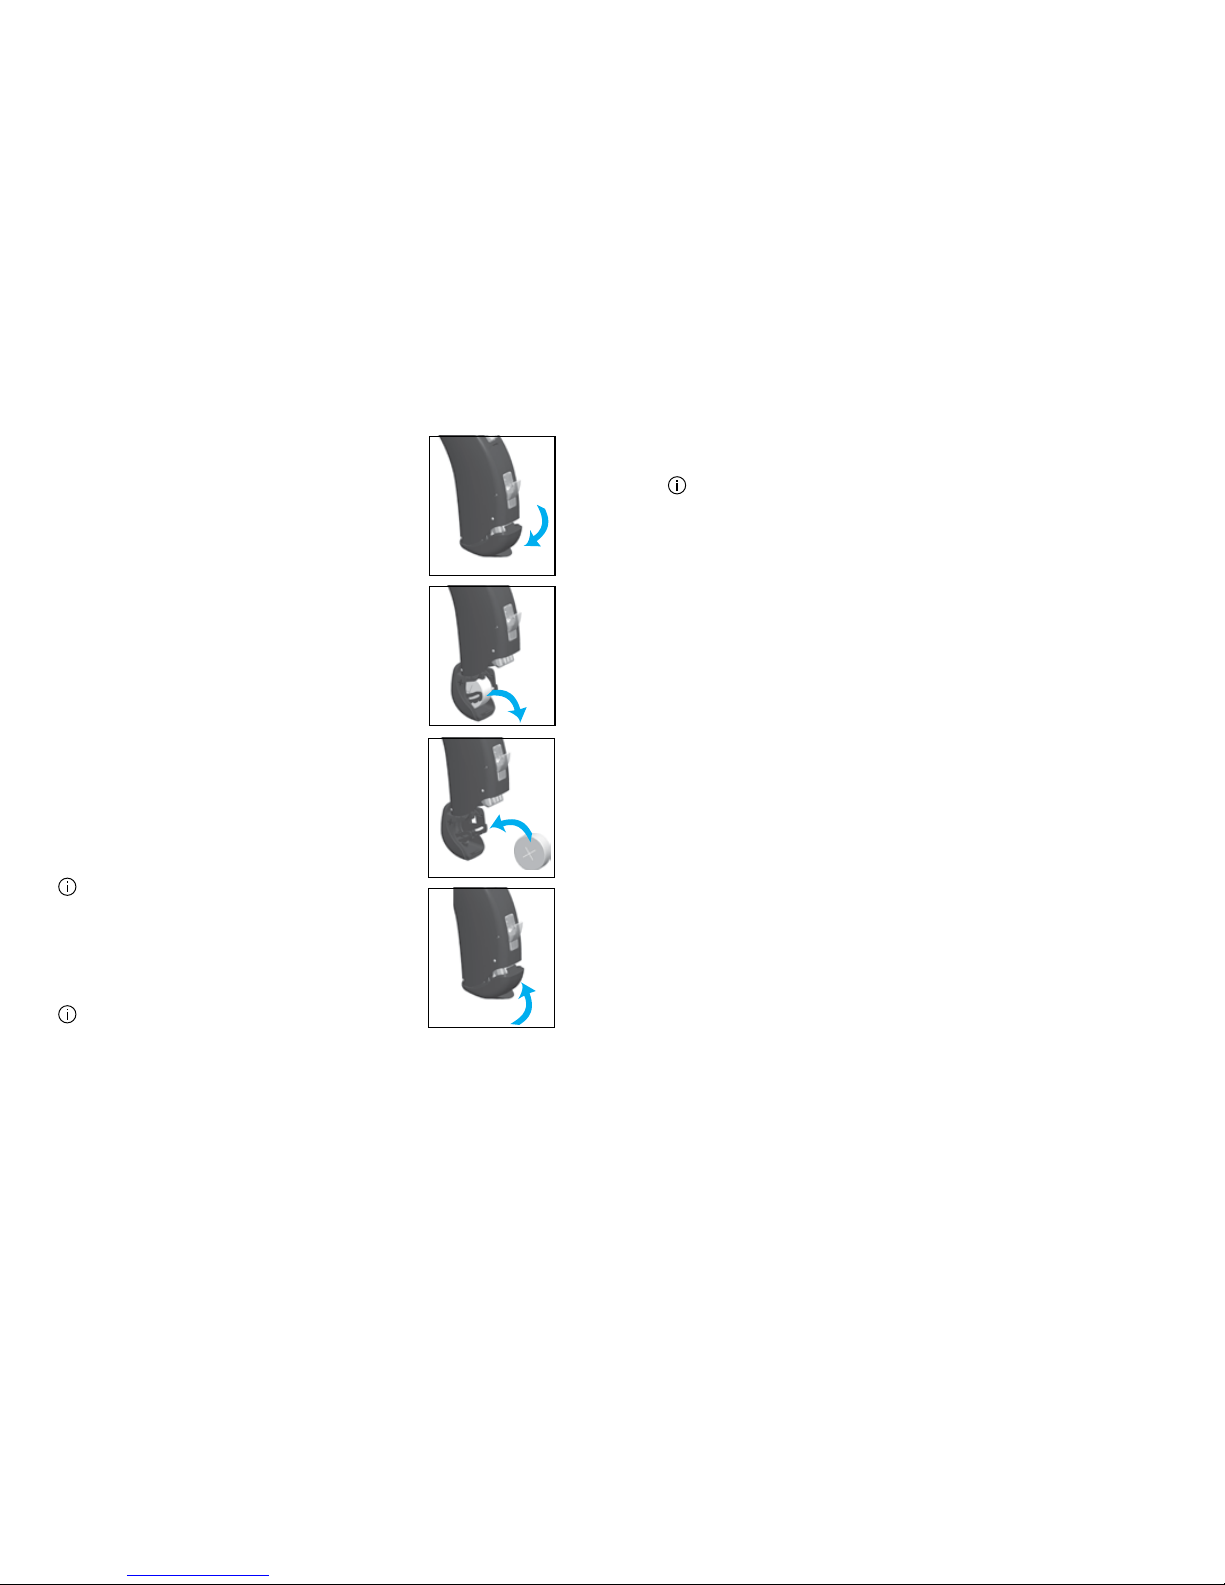
3. OPEN: Fully open the
battery door to access
and change the battery.
Note: When turning your hearing aid on and o
while it is on the ear, grasp the top and bottom
of the device with your index nger and thumb.
Use your thumb to open and close the battery
door.
open
3.
Battery information
Low battery warning
Two long beeps indicate the hearing aid
battery is low. Aer the low battery warning,
sounds may not be as clear. This is normal and
can be xed by changing the batteries.
If you can’t hear the low battery warning, your
hearing healthcare professional can change
its pitch or loudness. If you prefer, it can be
turned o entirely.
If you have the rechargeable option, charge your
hearing aids every night. If you hear the low
battery warning, place your hearing aids in the
charging base.
Your hearing aids are designed to generate a
low battery warning every 30 minutes until you
change the batteries, but depending on the
condition of the batteries, they may die before
another low battery warning occurs. Therefore,
it is recommended that the batteries are
replaced as soon as possible once you hear the
low battery warning.
Page 13
16 17
Replacing the battery
1. Gently swing out the battery
door with your ngernail.
2. Grasp the battery with your
thumb and index nger and
remove.
3. Insert the new battery into the
battery compartment with the
plus (+) sign on the battery
facing the same way as the
plus (+) sign on the side of the
battery door. This will ensure
that the battery door closes
properly.
Note: If the battery is inserted
incorrectly, the hearing aid will not
turn on.
4. Close the battery door.
Note: There is a tamper proof
battery door option for these
hearing aids. Please see your hearing
healthcare professional for further information.
2.
3.
1.
4.
Caring for batteries
If you have the rechargeable option, please see
the Charging base guide for instructions on how
to care for your rechargeable batteries.
• Always discard batteries in a safe and
environmentally friendly way.
• To prolong battery life, remember to turn
your hearing aids o when not in use.
• Remove the batteries and keep the battery
door open while hearing aids are not in
use. This will allow internal moisture to
evaporate.
Page 14
18 19
Operating instructions
Your hearing aids come with two controls that
allow you to further adjust your hearing aids –
a lever and a push button.
Lever
The lever on your hearing aids can be
set up as a volume control.
Press up to increase the volume;
press down to decrease the volume.
As you change the volume level, your hearing
aids will beep.
Volume setting Beeps
Recommended volume level 1 beep
Turning volume up
short beep
Turning volume down
short beep
Maximum volume level
2 beeps
Minimum volume level
2 beeps
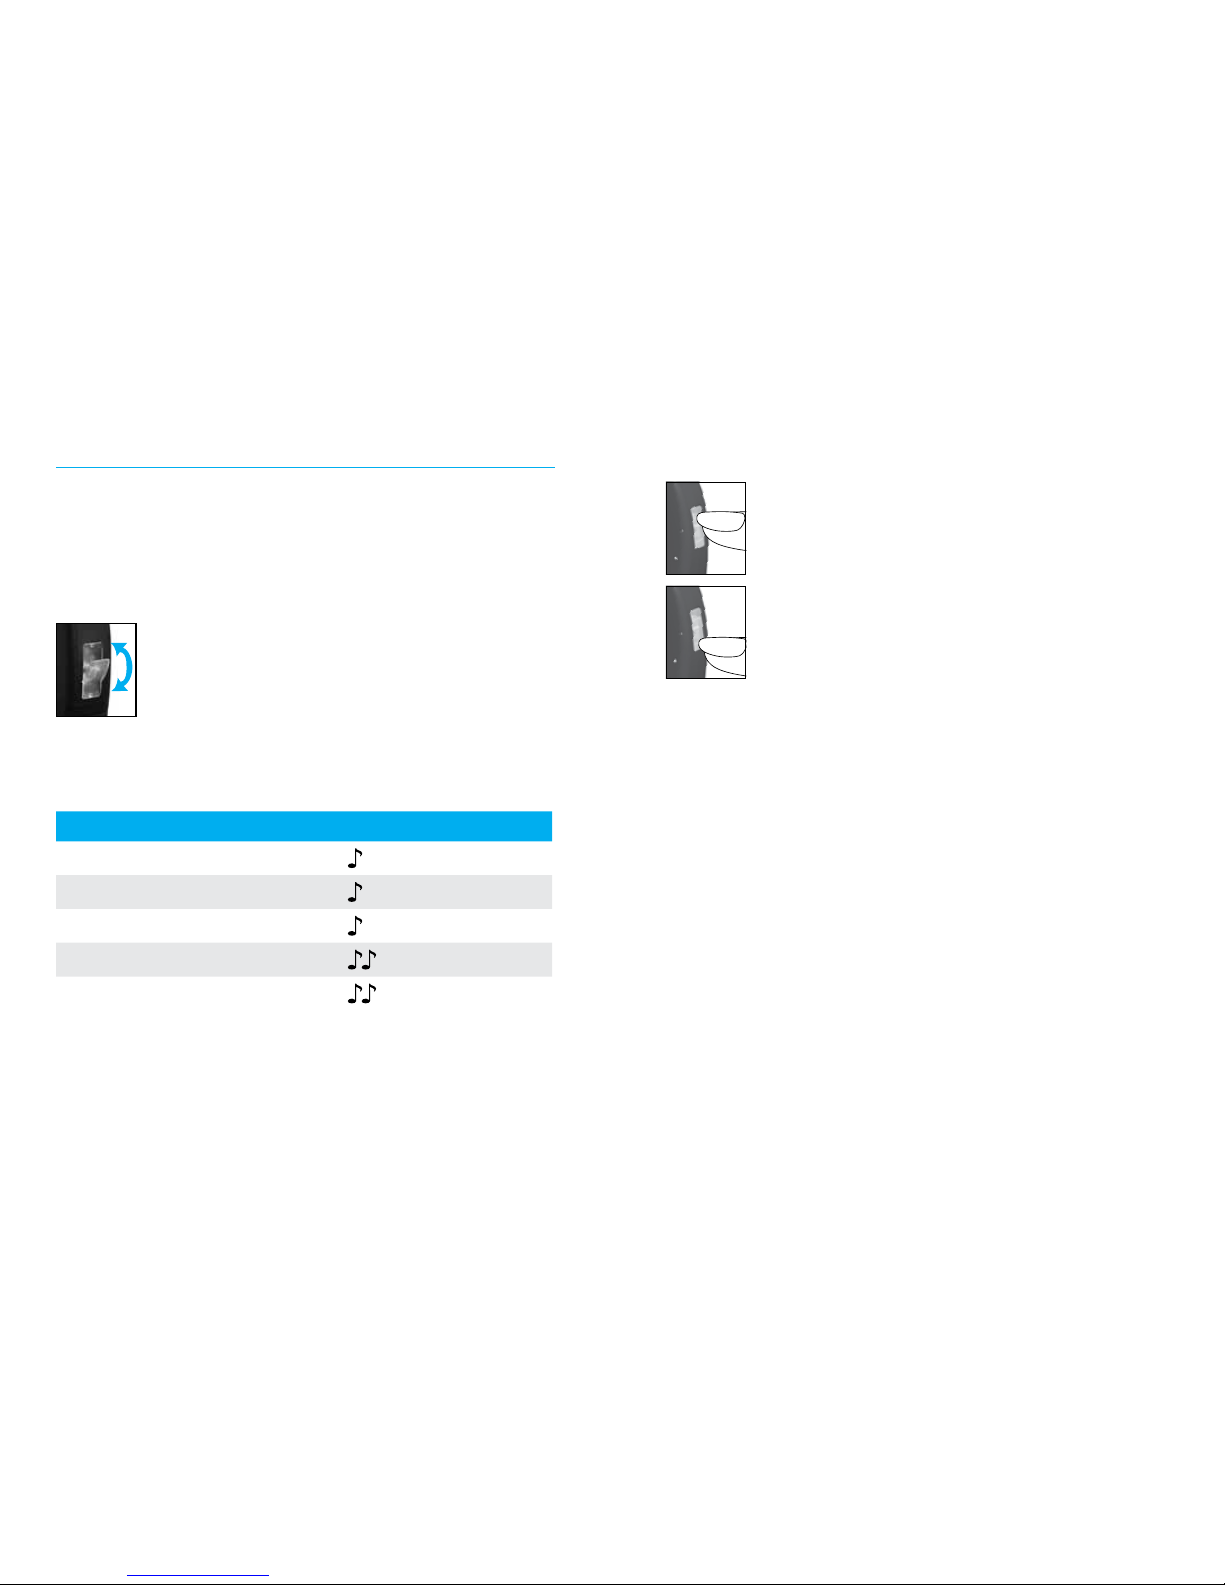
Tamper-resistant cover
Some hearing aids are tted with
tamper-resistant covers instead of
levers to prevent someone from
accidentally adjusting the hearing
aids. The cover can still be used to
make adjustments but it requires
using a ngernail or a small tool to
push up or down.
Page 15
20 21
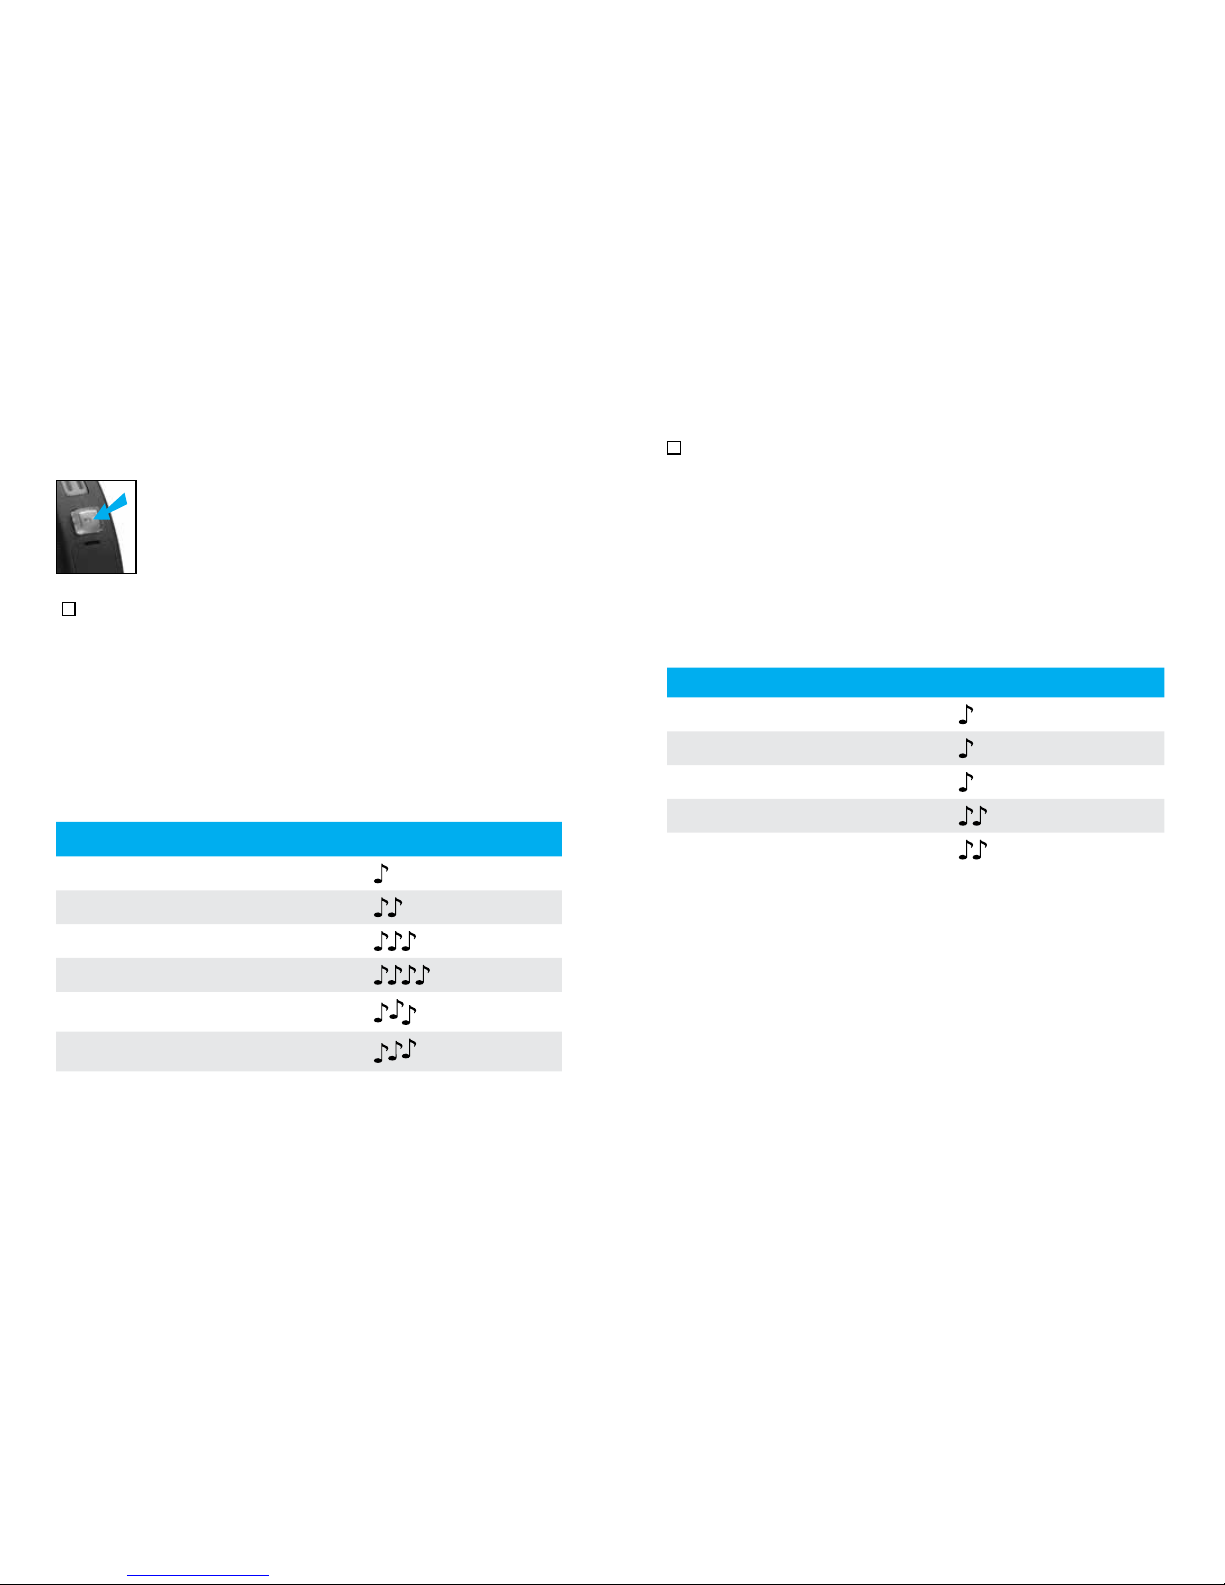
Push button
Your hearing aids are equipped with
a push button which can be set for
switching between programs or to
adjust your volume.
Program control
If the push button has been congured as
a program control, each time you push the
button, you will move to a new hearing aid
program.
Your hearing aids beep to indicate which
program you are in.
Program setting Beeps
Program 1 (e.g. automatic program) 1 beep
Program 2 (e.g. speech in noise)
2 beeps
Program 3 (e.g. easy-t/telephone)
3 beeps
Program 4 (e.g. music)
4 beeps
Easy-t/telephone
short melody
Easy-DAI
short melody
DuoLink (if enabled) Opposite ear beeps
the same as side
being adjusted
Volume control
If the push button has been congured as a
volume control:
• Push the button on your right hearing aid to
increase the volume in both hearing aids.
• Push the button on your le hearing aid to
decrease the volume in both hearing aids.
Volume setting Beeps
Recommended volume level
1 beep
Turning volume up
short beep
Turning volume down
short beep
Maximum volume level
2 beeps
Minimum volume level
2 beeps
Page 16

22 23
DuoLink
If DuoLink is enabled, when you change the
volume or program settings on one hearing aid,
the other one changes as well.
For example, if your push button is congured
as a program control and DuoLink is enabled,
when you push the button on one hearing aid,
the program will change on both hearing aids.
Remote control
Your hearing aids may also come with an
optional remote control which allows you to
switch between dierent listening programs,
and change your volume.
Using the telephone
Push button
Your hearing healthcare professional may have
set up a phone program on your hearing aids
that you can access using the push button or
optional remote control.
Easy-t
Your hearing aids may also have a telephone
feature, which automatically switches to
a dedicated telephone program when a
telephone receiver is brought close to one of
your hearing aids. You will hear a short melody
when you switch to the easy-t program. When
the telephone receiver is moved away from the
hearing aid it will automatically return to the
previous listening program.
If your hearing aid doesn’t automatically switch
to the easy-t program when a receiver is held
to your ear, you may need to attach an easy-t
magnet to your telephone. The magnet is
designed to strengthen the magnetic eld at
the earpiece of the telephone.
Page 17

24 25
To attach the optional magnet:
1. Clean the telephone receiver.
Hold the magnet near
the “listening end” of your
telephone receiver and release
it. The magnet will flip to the
appropriate side and seek
the optimal position on the
telephone receiver.
2. Place the double-sided tape
in this optimal position on the
telephone receiver.
3. Attach the magnet to the tape.
Your hearing healthcare
professional may also have set up
a phone program that you can access through
your optional remote control.
1.
2.
3.
Binaural Phone
The Binaural Phone* feature allows you to hold
a phone to one ear and hear the sound clearly
in both ears. No accessories are required.
Binaural Phone is available in your hearing
aids through:
Push button
Easy-t
If your hearing aids are congured to work with
the wireless uDirect
™
or uStream streamers,
you might benet from a Bluetooth
®
handsfree option. Refer to the uDirect or uStream
user guide for more information.
Bluetooth® is a registered trademark owned by the Bluetooth SIG, Inc. and
used under license by Unitron.
*Not available on all technology levels.
Page 18

26 27
Caring for your hearing aids
Protecting your hearing aids
• If your hearing aids are rechargeable:
• Place in powered charging base when not
in use.
• If your hearing aids are non-rechargeable:
• Open the battery doors when not in use.
• Always remove your hearing aids when
using hair care products. The hearing aids
can become clogged and cease to function
properly.
• Do not wear your hearing aids in the bath or
shower or immerse them in water.
• If your hearing aids do become wet, do not
attempt to dry them in an oven or microwave.
Do not adjust any controls. Open the battery
doors immediately, remove the batteries and
allow your hearing aids to dry naturally for
24hours.
• Protect your hearing aids from excessive heat
(hair dryer, vehicle glove box or dashboard).
• Regular use of a dehumidier, such as a
Clean Dry kit, can help prevent corrosion
and prolong the life of your hearing
aids. Remove batteries before using a
dehumidier.
• Do not drop your hearing aids or knock them
against hard surfaces.
Cleaning your hearing aids
Use a so cloth to clean your hearing aid at
the end of each day, and place it in its case
with the battery door open to allow moisture to
evaporate.
Ear wax is natural and common. Ensuring your
hearing aids are free of ear wax is an important
step in your daily cleaning and maintenance
routine.
Never use alcohol to clean your hearing aids,
earmolds or domes.
Do not use sharp tools to dislodge ear wax.
Sticking household items into your hearing aids
or earmolds can seriously damage them.
Page 19

28 29
Cleaning your earmolds
Clean the earmold and the
outside of the earhook with a
damp cloth at the end of each
day. Avoid getting any water
in the hearing aids.
Do not use alcohol to clean
your earmolds.
If the earmolds become plugged, clear the
opening with a wax loop or pipe cleaner.
If your physician prescribes eardrops, clean
any moisture that may get into the earmolds or
tubing to prevent plugging.
If the earmolds require further cleaning:
1. Disconnect the plastic tube from the hook of
the hearing aid, by holding the hearing aid
in one hand and gently pulling the tubing
away from the earhook.
2. Wash only the earmolds and tubing in warm
water with a mild soap.
3. Rinse them with cool water and dry
overnight.
4. Make sure the earmold tubes are completely
dry. Reconnect them to the earhook on your
hearing aid by sliding the tubing back on
to the earhook. Use of a hearing aid blower
can assist with removing moisture/debris
from the tube. See your hearing healthcare
professional for more information.
Page 20

30 31
Accessories
The uDirect , uStream, uMic
™
,
uTV™ and a
remote control are optional accessories that
may be available for your hearing aids.
uDirect 3, uStream and uTV 3
uDirect and uStream are streamers that
provide easy, hands-free access to Bluetooth
enabled devices, such as mobile phones.
They can provide remote control functions to
adjust your hearing aids for increased listening
comfort. uDirect also has a wired audio jack
to plug in devices like MP3 players and a DAI
input to plug in an FM receiver.
uTV is used with a streamer (uDirect
or uStream) to send sound from your TV
directly to your hearing aids. The uTV can
also transmit sound from stereo systems,
computers and other audio sources.
For more information on using the uDirect ,
uStream or uTV , please see the user guide for
that accessory. For information on how to get
a streamer or uTV accessory, please contact
your hearing healthcare professional.
uMic
uMic is a personal wireless microphone
system that lets you hear conversations better
in noisy environments, through either uStream
or uDirect .
Remote control
Your hearing aids may also come with an
optional remote control which allows you to
switch between dierent listening programs,
and change your volume settings.
Page 21

32 33
Assistive listening devices
Listening in public places
Telecoils pick up electromagnetic energy
and convert it into sound. Your hearing aid’s
telecoil option can help you listen in public
places equipped with telecoil compatible
assistive listening devices such as a
loop system.
When you see this symbol, a loop
system is present and it is compatible with
your hearing aid. Please contact your hearing
healthcare professional for more information
on loop systems.
Connecting to external audio sources
Your hearing aids may have a direct audio
input (DAI) to connect to other audio sources,
such as a stereo or television, using an FM
system or a cable. The uDirect , an optional
wireless accessory, also has a DAI jack.
When your hearing aids detect a DAI signal,
they switch to your easy-DAI program
automatically. A short melody indicates that
easy-DAI is active. When you disconnect the
DAI, your hearing aids return to the previous
program automatically.
Ask your hearing healthcare professional
for information about the DAI system and a
connector cord.
Page 22

34 35
Cause Possible remedy
No sound
Not turned on Turn on
Low/dead battery Replace battery or place
rechargeable hearing aids
in charging base*
Poor battery contact Consult your hearing
healthcare professional
Battery upside down Insert battery plus (+) side
up
Earmolds/power slim
tubes blocked with ear
wax
Clean earmolds. See
“Cleaning your hearing
aids”. Consult your hearing
healthcare professional
Plugged microphone
shield
Consult your hearing
healthcare professional
Troubleshooting guide
Cause Possible remedy
Not loud enough
Low volume Turn up volume; see
hearing healthcare
professional if problem
persists
Low battery Replace battery or place
rechargeable hearing aids
in charging base*
Earmolds not inserted
properly
See “Putting your hearing
aids on your ears”.
Reinsert carefully
Change in hearing Consult your hearing
healthcare professional
Earmolds blocked with
ear wax
Clean earmolds. See
“Cleaning your hearing
aids”. Consult your hearing
healthcare professional
Plugged microphone
shield
Consult your hearing
healthcare professional
*If needed, you can temporarily replace the Silver Zinc
rechargeable battery with a traditional 13 Zinc-air battery. Do
not throw away your rechargeable battery.
Page 23

36 37
Cause Possible remedy
Intermittent
Low battery Replace battery or place
rechargeable hearing aids
in charging base*
Dirty battery contact Consult your hearing
healthcare professional
Two long beeps
Low battery Replace battery or place
rechargeable hearing aids
in charging base*
Whistling
Earmolds not inserted
properly
See “Putting your hearing
aids on your ears”.
Reinsert carefully
Hand/clothing near ear Move hand/clothing away
from your ear
Poorly tting earmolds Consult your hearing
healthcare professional
Cause Possible remedy
Not clear, distorted
Poorly tting earmolds Consult your hearing
healthcare professional
Earmolds blocked with
ear wax
Clean earmolds. See
“Cleaning your hearing
aids”. Consult your hearing
healthcare professional
Low battery Replace battery or place
rechargeable hearing aids
in charging base*
Plugged microphone
shield
Consult your hearing
healthcare professional
Earmolds falling out of ear
Poorly tting earmolds Consult your hearing
healthcare professional
Earmolds not inserted
properly
See “Putting your hearing
aids on your ears”.
Reinsert carefully
*If needed, you can temporarily replace the Silver Zinc
rechargeable battery with a traditional 13 Zinc-air battery. Do
not throw away your rechargeable battery.
Page 24

38 39
Cause Possible remedy
Weak on the telephone
Telephone not positioned
properly
Move telephone receiver
around ear for clearer
signal. See “Using the
telephone”
Hearing aid requires
adjustment
Consult your hearing
healthcare professional
For any problems not listed in the guide, contact your
hearing healthcare professional.
Information and explanation of symbols
xxxx
With the CE symbol, Unitron Hearing conrms that this
Unitron product – including accessories – meets the
requirements of the Medical Devices Directive 93/42/
EEC as well as the Radio Equipment Directive 2014/53/
EU on radio and telecommunications transmitters.
The numbers aer the CE symbol correspond to the
code of certied institutions that were consulted under
the above-mentioned directives.
This symbol indicates that it is important for the user to
read and take into account the relevant information in
this user guide.
This symbol indicates that it is important for the user
to pay attention to the relevant warning notices in this
user guide.
Important information for handling and eective use
of the product.
This symbol indicates that the products described in
these user instructions adhere to the requirements
for an application part of Type B of EN 60601-1. The
surface of the hearing aid is specied as applicated
part of Type B.
©
Copyright symbol
Page 25

40 41
This symbol shall be accompanied by the name and
the address of the authorised representative in the
European Community.
This symbol shall be accompanied by the name and
the address of the manufacturer (who are placing this
device on the market).
Operating conditions:
This device is designed such that it functions without problems
or restrictions if used as intended, unless otherwise noted in
these user guides.
Transport conditions:
Temperature: –20° to +60° Celsius (–4° to +140° Fahrenheit).
Humidity: Up to 90% (non condensing).
The symbol with the crossed-out garbage bin is to
make you aware that this device may not be thrown
away as normal household waste. Please dispose
of old or unused devices, at waste disposal sites
intended for electronic waste, or give your device to
your hearing healthcare professional for disposal.
Proper disposal protects the environment and health.
The Bluetooth® word mark and logos are registered
trademarks owned by Bluetooth SIG, Inc. and any
use of such marks by Unitron is under license. Other
trademarks and trade names are those of their
respective owners.
Max Max is a trademark of Unitron.
Compliance information
Declaration of conformity
Hereby, Unitron Hearing declares that this product meets the
requirements of the Medical Device Directive 93/42/EEC and
complies with Radio Equipment Directive 2014/53/EU. The full
text of the Declarations of Conformity can be obtained from the
manufacturer.
Australia/New Zealand:
Indicates a device’s compliance with applicable Radio
Spectrum Management’s (RSM) and Australian
Communications and Media Authority (ACMA) regulatory
arrangements for the legal sale in New Zealand and
Australia. The compliance label R-NZ is for radio products
supplied in the New Zealand market under conformity
level A1.
The hearing aid described in this user guide is certied under:
Standard hearing system
USA - FCC ID: Canada - IC:
T Max SP VMY-UWTM1 2756A-UWTM1
T Max UP VMY-UWTM1 2756A-UWTM1
Notice 1
This device complies with Part 15 of the FCC Rules and with RSS210 of Industry Canada. Operation is subject to the following two
conditions:
1) this device may not cause harmful interference, and
2) this device must accept any interference received, including
interference that may cause undesired operation.
Page 26

42 43
Notice 2
Changes or modications made to this device not expressly
approved by Unitron may void the FCC authorization to operate
this device.
Notice 3
This device has been tested and found to comply with the limits
for a Class B digital device, pursuant to Part 15 of the FCC Rules
and ICES-003 of Industry Canada. These limits are designed
to provide reasonable protection against harmful interference
in a residential installation. This device generates, uses and
can radiate radio frequency energy and, if not installed and
used in accordance with the instructions, may cause harmful
interference to radio communications. However, there is
no guarantee that interference will not occur in a particular
installation. If this device does cause harmful interference
to radio or television reception, which can be determined by
turning the equipment o and on, the user is encouraged to
try to correct the interference by one or more of the following
measures:
• Reorient or relocate the receiving antenna
• Increase the separation between the equipment and receiver
• Connect the device into an outlet on a circuit dierent from
that to which the receiver is connected
• Consult the dealer or an experienced radio/TV technician for
help
Client feedback
Record your specic needs or concerns and bring to
your rst oce visit aer getting your hearing aids.
This will help your hearing healthcare professional
to address your needs.
________________________________________
________________________________________
________________________________________
________________________________________
________________________________________
________________________________________
________________________________________
________________________________________
________________________________________
________________________________________
Page 27

44
45
Additional notes
___________________________________________
___________________________________________
___________________________________________
___________________________________________
___________________________________________
___________________________________________
___________________________________________
___________________________________________
___________________________________________
___________________________________________
___________________________________________
Page 28

46 47
Aperçu de vos instruments auditifs
1 Coude auriculaire - vos embouts auriculaires
sur mesure sont raccordés à vos instruments
auditifs par le coude auriculaire
2 Microphones - le son entre dans vos
instruments auditifs par l’intermédiaire des
microphones. Protège-microphone - protège
les microphones de la saleté et des résidus
3 Bouton-poussoir - permet de passer d’un
programme d’écoute à un autre ou de changer
le niveau de volume, selon vos réglages
personnalisés
4 Levier - permet de régler le volume
5 Couvercle du compartiment à pile/mise en
marche et arrêt - fermez le couvercle pour
mettre en marche vos instruments auditifs,
ouvrez partiellement le couvercle pour les
arrêter. L’ouverture complète du couvercle vous
permet d’accéder à la pile pour la remplacer
6 Embout auriculaire - permet aux sons de
passer des instruments auditifs aux oreilles et
maintient les instruments auditifs en place
7 Tube n puissance - le son voyage le long du
tube n vers le canal auditif
2
3
4
5
2
3
4
5
1
6
7
6
Instruments auditifs contours d’oreille T Max
Page 29

48 49
Avertissements
Les instruments auditifs doivent être utilisés
pour amplier et transmettre le son aux oreilles
et ainsi compenser la perte auditive. Les
instruments auditifs (spécialement programmés
pour chaque perte auditive) doivent être
uniquement utilisés par la personne pour
laquelle ils ont été réglés. Ils ne doivent en aucun
cas être utilisés par d’autres personnes, puisque
cela pourrait causer des problèmes d’audition.
Les instruments auditifs doivent être utilisés
conformément aux instructions de votre
audioprothésiste.
Les instruments auditifs ne rétabliront pas
l’audition normale. De plus, ils ne préviendront
pas ni n’amélioreront une perte auditive due à
des conditions organiques.
Vos instruments auditifs ne doivent pas être
utilisés dans des zones présentant un danger
d’explosion.
Les réactions allergiques aux instruments
auditifs sont peu probables. Cependant, en
cas de démangeaison, de rougeur, de douleur,
d’inflammation ou de sensation de brûlure à
l’intérieur ou autour des oreilles, informez votre
audioprothésiste et communiquez avec votre
médecin.
Dans l’éventualité improbable où des pièces
resteraient dans votre conduit auditif après
le retrait de l’instrument auditif, contactez
immédiatement un médecin.
Les directives suivantes concernent uniquement
les personnes qui possèdent des dispositifs
médicaux implantables actifs (c.-à-d. des
stimulateurs cardiaques, des débrillateurs,etc.):
- Gardez l’instrument auditif sans l à au moins
15cm (6pouces) de l’implant actif.
- Si vous constatez la présence d’interférences,
n’utilisez pas les instruments auditifs sans l et
communiquez avec le fabricant de l’implant actif.
Veuillez noter que l’interférence peut aussi être
causée par des lignes électriques, une décharge
électrostatique, des détecteurs de métal
d’aéroport, etc.
Certains examens médicaux ou dentaires, comme
les rayonnements décrits ci-dessous, peuvent
nuire au fonctionnement de vos instruments
auditifs. Retirez-les et gardez-les à l’extérieur de
la salle/pièce d’examen avant desubir:
- Des examens médicaux ou dentaires avec des
rayons X (ainsi qu’un tomodensitogramme).
- Des examens médicaux par IRM qui génèrent
des champs magnétiques.
Page 30

50 51
Précautions
L’utilisation d’instruments auditifs ne constitue
qu’un aspect de la rééducation auditive;
l’entraînement auditif et l’apprentissage de la
lecture labiale peuvent aussi être nécessaires.
Dans la plupart des cas, une utilisation irrégulière
des instruments auditifs ne permet pas de tirer
pleinement avantage de ceux-ci. Une fois que
vous êtes habitué à vos instruments auditifs,
portez-les tous les jours et toute la journée.
Vos instruments auditifs utilisent les composants
les plus récents pour vous orir la meilleure
qualité sonore, quel que soit votre environnement
d’écoute. Cependant, des instruments de
communication, comme les téléphones mobiles
numériques, peuvent créer des interférences
(bourdonnement) avec vos instruments auditifs.
Si vous constatez la présence d’interférences liées
à la proximité d’un téléphone mobile, vous pouvez
minimiser celles-ci de diérentes manières:
changer le programme de vos instruments auditifs,
tourner la tête dans une autre direction ou repérer
le téléphone mobile pour vous en éloigner.
Identication
Le numéro de série et l’année de fabrication
sont indiqués sur l’intérieur du couvercle du
compartiment à pile.
- Les instruments auditifs n’ont pas besoin d’être
retirés pour passer les barrières de sécurité
(aéroport, etc.). Si des rayons X sont utilisés, ce
sera en très petites doses qui n’aecteront pas
les instruments auditifs.
Faites extrêmement attention lorsque vous
portez vos instruments auditifs dans un endroit
où le niveau de pression sonore maximal
dépasse 132 décibels. Vous pourriez aecter
l’audition qu’il vous reste. Communiquez avec
votre audioprothésiste pour vérier que le niveau
de sortie maximal de vos instruments auditifs
convient à votre perte auditive.
Avertissements concernant l’aimant et la pile
Ne laissez jamais les instruments auditifs,
les piles ou les aimants à la portée de jeunes
enfants ou d’animaux. Ne mettez jamais les
instruments auditifs ou les piles dans votre
bouche. Si un instrument auditif ou une pile est
ingéré, appelez immédiatement un médecin.
L’aimant peut aecter certains dispositifs
médicaux ou systèmes électroniques. Maintenez
toujours l’aimant (ou le téléphone équipé de
l’aimant) à une distance d’au moins 30cm
(12pouces) des stimulateurs cardiaques, des
cartes de crédit ou de tout autre dispositif
sensible aux champs magnétiques.
Page 31

52 53
Note de compatibilité de téléphone cellulaire
Certains utilisateurs d’instruments auditifs
ont signalé un bourdonnement dans leurs
instruments auditifs lorsqu’ils utilisent des
téléphones cellulaires, ce qui indique que le
téléphone cellulaire et l’instrument auditif ne
sont peut-être pas compatibles. Selon la norme
ANSI C63.19 (ANSI C63.19-2011 (American
National Standard Methods of Measurement of
Compatibility Between Wireless Communications
Devices and Hearing Aids), la compatibilité d’un
instrument auditif particulier et d’un téléphone
cellulaire peut être prédite en ajoutant la cote de
l’immunité de l’instrument auditif à la cote des
émissions du téléphone cellulaire. Par exemple,
la somme de la cote d’un instrument auditif de
2 (M2/T2) et de celle d’un téléphone de 3 (M3)
donnerait une cote combinée de 5. Toute cote
combinée égale à au moins 5 procurerait une
« utilisation normale »; une cote combinée de 6
ou plus indiquerait « une excellente performance ».
L’immunité de cet instrument auditif est d’au
moins M2/ T2. Les mesures de performance de
l’équipement, les catégories et les classications
des systèmes sont basées sur les meilleures
informations disponibles, mais ne peuvent garantir
que tous les utilisateurs seront satisfaits.
Remarque : Les performances de chaque
instrument auditif peuvent varier selon les
téléphones cellulaires. Par conséquent, essayez
cet instrument auditif avec votre téléphone
cellulaire ou, si vous achetez un nouveau
téléphone, assurez-vous de l’essayer avec votre
instrument auditif avant de l’acheter.
Technologie SoundCore
SoundCoreMC comprend quatre fonctionnalités
intelligentes qui fonctionnent conjointement
pour comprendre votre environnement
d’écoute en faisant aisément les ajustements
nécessaires pour que vous puissiez participer
activement à chaque conversation dans tous les
environnements.
Page 32

54 55
Instruments auditifs avec option
rechargeable
Nettoyage chaque soir
1) Nettoyez les stations de recharge de
vos instruments auditifs à l’aide de la brosse de
nettoyage fournie et d’un mouchoir propre et sec.
2) Utilisez la brosse de nettoyage pour nettoyer
les fentes du socle de chargement.
N’utilisez aucun liquide lors du nettoyage.
Chargement chaque soir
1) Branchez le cordon d’alimentation dans le
chargeur mural USB et dans une prise. Évitez
d’utiliser un ordinateur ou un portable. Les
voyants du socle de chargement clignoteront en
vert une fois.
2) Placez vos instruments auditifs sur les fentes
de chargement chaque soir.
Chaque instrument auditif doit
être positionné du même côté
du chargeur que le cordon
d’alimentation de celui-ci,
comme indiqué sur l’illustration.
3) Lorsque vos instruments auditifs
sont placés correctement,
les deux voyants lumineux
clignoteront en vert.
4) Vériez que les voyants ont
clignoté en vert un minimum de
5 fois pour vous assurer que les
instruments auditifs se rechargent.
5) Les voyants verts allumés en continu indiquent
que vos instruments auditifs sont entièrement
rechargés.
N’ouvrez pas le compartiment des piles, car cela
usera la pile rechargeable.
Conseils
• Lorsque vous ne les utilisez pas, laissez vos
instruments auditifs sur le chargeur. Ils ne
peuvent pas se charger plus que nécessaire.
• Ne placez pas les instruments auditifs dans le
chargeur s’il est débranché, car cela usera les piles.
• Si les instruments auditifs émettent un
avertissement de pile faible, placez-les sur le
socle de chargement pour les recharger ou
remplacez-les par des piles classiques.
• Si les voyants de chargement sont rouges, retirez
les instruments auditifs et consultez votre guide
principal de chargement.
Page 33

56 57
Mise en marche et arrêt de vos
instruments auditifs
Le couvercle du compartiment
à pile agit comme un
interrupteur marche/arrêt.
1. Mise en marche : Fermez
complètement le couvercle
du compartiment à pile.
Remarque : L’instrument auditif peut prendre
5 secondes à se mettre en marche. Votre
audioprothésiste peut encore augmenter le
délai de mise en marche si cela est nécessaire.
2. Arrêt : Ouvrez partiellement
le couvercle du compartiment
à pile.
Mise en place des instruments auditifs
sur vos oreilles
Vos instruments auditifs peuvent posséder un
code de couleur sous la forme d’un petit point
situé sur le couvercle du compartiment à pile :
rouge = oreille droite;
bleu = oreille gauche.
Contours d’oreille avec
embouts auriculaires
1. Saisissez l’embout
auriculaire entre le pouce et
l’index. L’ouverture doit être
orientée vers votre conduit
auditif, l’instrument auditif
reposant en haut de votre
oreille.
2. Insérez doucement l’embout
auriculaire dans votre oreille.
L’embout auriculaire doit
être agréable à porter et bien
ajusté à votre oreille.
3. Placez l’instrument auditif
sur le dessus de votre oreille.
1.
2.
3.
arrêt
2.
1.
marche
Page 34

58 59
3. Ouvert : Ouvrez
complètement
le couvercle du
compartiment
à pile pour accéder à la pile
et la remplacer.
Remarque : Pour mettre
en marche ou arrêter votre
instrument auditif lorsque vous le portez,
saisissez le haut et le bas de l’instrument auditif
entre votre index et votre pouce. Ouvrez et
fermez le couvercle du compartiment à pile à
l’aide de votre pouce.
Informations sur la pile
Avertissement de pile faible
Deux longs bips indiquent que la pile de
l’instrument auditif est presque épuisée. Après
l’avertissement de pile faible, les sons pourraient
ne pas être aussi clairs. Cela est normal et peut
être corrigé en changeant les piles.
Si vous n’entendez pas l’avertissement de pile
faible, votre audioprothésiste peut modier le ton
et le volume de celui-ci. Si vous préférez, cette
fonction peut être désactivée.
Si vous avez choisi l’option rechargeable, chargez
vos instruments auditifs toutes les nuits. Si vous
entendez l’avertissement de pile faible, placez vos
instruments auditifs sur la station de charge.
Vos instruments auditifs sont conçus pour émettre
un avertissement de pile faible toutes les 30
minutes jusqu’à ce que vous changiez les piles;
toutefois, selon l’état des piles, celles-ci peuvent
s’épuiser avant qu’un autre avertissement se
produise. Il est donc recommandé de remplacer
les piles dès que possible lorsque vous entendez
l’avertissement de pile faible.
ouvert
3.
Page 35

60 61
Remplacement de la pile
1. Ouvrez doucement le couvercle du
compartiment à pile avec votre ongle.
2. Attrapez la pile à l’aide de votre pouce et de
votre index puis retirez-la.
3. Insérez la nouvelle pile dans
le compartiment à pile en
alignant les signes (+) de la
pile et du bord du couvercle
du compartiment à pile. Cela
permettra au couvercle du
compartiment à pile de se fermer
correctement.
Remarque : Si la pile est mal
insérée, l’instrument auditif ne se
mettra pas en marche.
4. Fermez le couvercle du
compartiment à pile.
Remarque : Un couvercle de
compartiment à pile inviolable
est oert en option avec ces
instruments auditifs. Consultez
votre audioprothésiste pour obtenir
de plus amples renseignements.
2.
3.
1.
4.
Entretien des piles
Si vous avez choisi l’option rechargeable,
veuillez consulter le guide de la station de
charge pour obtenir des instructions sur
l’entretien de vos piles rechargeables.
• Débarrassez-vous toujours des piles de
manière sûre et écologique
• Pour prolonger la durée de vie de la pile,
pensez à arrêter vos instruments auditifs
lorsque vous ne les utilisez pas.
• Retirez la pile et laissez le couvercle du
compartiment à pile ouvert lorsque vous
n’utilisez pas les instruments auditifs. Cela
permettra à l’humidité située à l’intérieur
de s’évaporer.
Page 36

62 63
Instructions d’utilisation
Vos instruments auditifs se présentent avec deux
réglages qui vous permettent de les ajuster plus
précisément : un levier et un bouton-poussoir.
Levier
Le levier de vos instruments auditifs
peut être conguré comme une
commande de volume.
Appuyez vers le haut pour augmenter le
volume; appuyez vers le bas pour diminuer le
volume. Lorsque vous changerez le volume, vos
instruments auditifs émettront des bips.
Commande de volume Bips
Volume recommandé
1 bip
Augmentation du volume
bip court
Diminution du volume
bip court
Volume maximal
2 bips
Volume minimal
2 bips
Couvercle inviolable
Certains instruments auditifs sont
munis de couvercles inviolables au
lieu de leviers, pour empêcher le
réglage accidentel des instruments
auditifs. Le couvercle peut tout de
même être utilisé pour eectuer des
réglages, mais l’utilisation d’un ongle
ou d’un petit outil est nécessaire pour
le pousser vers le haut ou vers le bas.
Page 37

64 65
Bouton-poussoir
Vos instruments auditifs sont équipés
d’un bouton-poussoir qui peut être
conguré pour passer d’un programme
à l’autre ou régler le volume.
Commande de programme
Si le bouton-poussoir a été conguré comme
un bouton de programme, vous passerez à
un nouveau programme d’instrument auditif
chaque fois que vous appuierez sur le boutonpoussoir.
Votre instrument auditif émet des bips pour
indiquer le programme que vous utilisez.
Réglage du programme Bips
Programme 1
(ex. programme automatique)
1 bip
Programme 2 (ex. parole dans un
environnement bruyant)
2 bips
Programme 3
(ex. easy-t/téléphone)
3 bips
Programme 4 (ex. musique)
4 bips
Easy-t/téléphone
courte mélodie
Entrée audio directe facile
(Easy-DAI)
courte mélodie
DuoLink (si activé)
L’instrument auditif
opposé émet des bips
semblables à ceux du
côté que l’on ajuste
Commande de volume
Si le bouton-poussoir a été conguré comme
commande de volume :
• Appuyez sur le bouton-poussoir de votre
instrument auditif droit pour augmenter le
volume des deux côtés.
• Appuyez sur le bouton-poussoir de votre
instrument auditif gauche pour baisser le
volume des deux côtés.
Commande de volume Bips
Volume recommandé
1 bip
Augmentation du volume
bip court
Diminution du volume
bip court
Volume maximal
2 bips
Volume minimal
2 bips
Page 38

66 67
DuoLink
Si DuoLink est activé, lorsque vous changerez
le contrôle du volume ou des programmes
sur un instrument auditif, le réglage se fera
également dans l’autre instrument.
Par exemple, si votre bouton-poussoir a
été conguré comme une commande de
programme et que DuoLink est activé, lorsque
vous appuyez sur le bouton-poussoir sur un
de vos instruments auditifs, le programme
change dans les deux instruments auditifs.
Remote control
Vos instruments auditifs peuvent également
être fournis avec une télécommande en option.
Celle-ci permet de passer d’un programme
d’écoute à un autre et de changer vos
commandes de volume et vos réglages de
confort/clarté.
Utilisation du téléphone
Bouton-poussoir
Votre audioprothésiste peut avoir conguré un
programme téléphonique sur vos instruments
auditifs auquel vous pouvez accéder à l’aide du
bouton-poussoir ou de votre télécommande en
option.
Easy-t
Vos instruments auditifs peuvent également
être dotés d’une fonction téléphone qui se
déclenche automatiquement lorsqu’un récepteur
téléphonique se situe à proximité de l’un de vos
instruments auditifs. Vous entendrez une courte
mélodie lorsque vous passerez au programme
easy-t. Lorsque vous éloignez le récepteur
téléphonique de l’instrument auditif, ce dernier
retourne automatiquement au programme
d’écoute précédent.
Si votre instrument auditif ne passe pas
automatiquement au programme easy-t
lorsqu’un récepteur est placé à proximité de
votre oreille, vous aurez peut-être à xer un
aimant easy-t à votre téléphone. L’aimant est
conçu pour renforcer le champ magnétique
de l’écouteur des téléphones.
Page 39

68 69
Pour xer l’aimant en option:
1. Nettoyez le récepteur du
téléphone. Tenez l’aimant près
de l’extrémité d’écoute du
récepteur de votre téléphone
puis lâchez-le. L’aimant se
retournera du côté approprié
et cherchera l’emplacement
optimal sur le récepteur
téléphonique.
2. Placez un ruban adhésif
double face sur cette position
optimale, sur votre récepteur
téléphonique.
3. Fixez l’aimant au ruban adhésif.
Votre audioprothésiste peut également
congurer un programme téléphonique
auquel vous pouvez accéder à l’aide de votre
télécommande en option.
Téléphone binaural
La fonction téléphone binaural* vous permet
de tenir le combiné d’un téléphone devant une
oreille et d’entendre le son clairement dans les
deux oreilles. Aucun accessoire n’est requis.
Vous pouvez accéder à la fonction téléphone
binaural sur vos instruments auditifs en
utilisant:
Le bouton-poussoir
Easy-t
Si vos instruments auditifs sont congurés
pour fonctionner avec l’accessoire sans l
uDirect
MC
ou les diuseurs uStream, vous
pouvez proter d’une option mains libres
Bluetooth
MD
. Consultez le guide de l’utilisateur
uDirect ou uStream pour obtenir plus de
renseignements.
1.
2.
3.
®
Bluetooth est une marque de commerce déposée de Bluetooth SIG Inc.
*Non oert sur certains niveaux de technologie.
Page 40

70 71
Entretien de vos instruments auditifs
Protection de vos instruments auditifs
• Si vos instruments auditifs sont rechargeables :
• Placez-les sur la station de charge branchée
lorsqu’ils ne sont pas utilisés.
• Si vos instruments auditifs ne sont pas
rechargeables :
• Ouvrez les couvercles des compartiments
à pile lorsque l’instrument auditif n’est pas
utilisé.
• Retirez toujours vos instruments auditifs lorsque
vous utilisez des produits de soin pour les
cheveux. Les instruments auditifs pourraient
s’obstruer et ne plus fonctionner correctement.
• Ne portez pas vos instruments auditifs dans le
bain ou sous la douche et ne les immergez pas
dans l’eau.
• Si vos instruments auditifs venaient à être
mouillés, n’essayez pas de les faire sécher dans
un four traditionnel ou à micro-ondes. N’ajustez
pas les commandes. Ouvrez immédiatement le
compartiment à pile, retirez les piles et laissez
vos instruments auditifs sécher à l’air libre
pendant 24 heures.
• Protégez vos instruments auditifs de la chaleur
excessive (sèche-cheveux, boîte à gants ou
tableau de bord).
• L’utilisation régulière d’un déshumidicateur,
comme un ensemble Clean Dry, peut aider à
lutter contre la corrosion et prolonger la durée de
vie de vos instruments auditifs. Retirez les piles
avant d’utiliser un déshumidicateur.
• Ne laissez pas vos instruments auditifs tomber
ou heurter des surfaces dures.
Nettoyage de vos instruments auditifs
À la n de chaque journée, utilisez un chion
doux pour nettoyer votre instrument auditif et
placez-le dans son étui en laissant le couvercle
du compartiment à pile ouvert pour permettre à
l’humidité de s’évaporer.
Le cérumen est une matière naturelle. Vérier que
vos instruments auditifs ne contiennent pas de
cérumen est une étape importante de la routine
quotidienne de nettoyage et d’entretien.
N’utilisez jamais d’alcool pour nettoyer vos
instruments auditifs, embouts auriculaires ou
dômes.
Page 41

72 73
N’utilisez pas d’outils pointus ou tranchants
pour enlever le cérumen. Insérer des objets dans
vos instruments auditifs ou dans les embouts
auriculaires peut gravement les endommager.
Nettoyage des embouts auriculaires
et des écouteurs
À la n de chaque journée,
nettoyez l’embout auriculaire
et l’extérieur du coude
auriculaire à l’aide d’un
chion humide. Évitez l’eau
dans vos instruments auditifs,
ainsi qu’autour de ceux-ci.
N’utilisez pas d’alcool pour nettoyer
vos embouts auriculaires.
Si les embouts auriculaires venaient à être
obstrués, dégagez leur ouverture à l’aide d’un
cérustop ou d’un cure-pipe.
Si votre médecin vous prescrit des gouttes
pour les oreilles, enlevez l’humidité qui peut
s’introduire dans les embouts auriculaires ou
le tube, pour en prévenir l’obturation.
Si les embouts auriculaires nécessitent
un nettoyage approfondi :
1. Déconnectez les tubes de plastique du
coude de l’instrument auditif en tenant
ce dernier dans une main et en retirant
doucement le tube du crochet auriculaire.
2. Lavez seulement les coudes auriculaires
et le tube dans de l’eau tiède avec un savon
doux.
3. Rincez-les ensuite à l’eau froide et laissezles sécher jusqu’au lendemain.
4. Assurez-vous que les tubes de l’embout
auriculaire sont complètement secs.
Reconnectez-les au coude auriculaire de
votre instrument auditif en glissant le tube
dans le coude auriculaire. L’utilisation
d’un séchoir pour instruments auditifs
peut vous aider à retirer toute humidité
ou tout résidu du tube. Consultez votre
audioprothésiste pour obtenir de plus
amples renseignements.
Page 42

74 75
Accessoires
Les accessoires uDirect , uStream, uMic,MC
uTV
MC
et la télécommande sont des options
pouvant être oertes avec vos instruments
auditifs.
uDirect , uStream et uTV 3
uDirect et uStream sont des diuseurs qui
orent un accès mains libres facile à des
dispositifs dotés de la technologie Bluetooth,
comme des téléphones mobiles. Ils disposent
également de fonctions qui permettent de
régler à distance vos instruments auditifs pour
un plus grand confort d’écoute. Le uDirect est
aussi doté d’une prise d’entrée audio câblée
pour brancher dans des dispositifs comme les
lecteurs MP3 et une entrée audio directe pour
brancher dans un receveur FM.
Le système uTV est utilisé conjointement
avec un diuseur (uDirect ou uStream)
pour transmettre le son de votre télévision
directement à vos instruments auditifs.
L’accessoire uTV peut également transmettre
le son de votre chaîne stéréophonique, de votre
ordinateur et de vos autres sources audio.
Pour obtenir de plus amples renseignements
sur l’utilisation de uDirect , uStream ou uTV ,
veuillez consulter le guide de l’utilisateur pour
ces accessoires. Veuillez communiquer avec
votre audioprothésiste pour savoir comment
vous procurer un diuseur ou un accessoire
uTV.
uMic
Le uMic est un système de microphone
personnel sans l vous permettant de
mieux entendre les conversations dans des
environnements bruyants grâce à uStream ou
uDirect .
Remote control
Vos instruments auditifs peuvent également
être fournis avec une télécommande en option,
qui permet de passer d’un programme d’écoute
à un autre et de changer vos réglages de
volume.
Page 43

76 77
Aides de suppléance à l’audition
Écoute dans des endroits publics
Les télécapteurs captent l’énergie
électromagnétique et la convertissent en son.
Le télécapteur optionnel de votre instrument
auditif peut aider votre écoute dans les
endroits publics équipés d’aides de
suppléance à l’audition compatibles
avec les télécapteurs, par exemple un
système de boucle magnétique. Lorsque vous
voyez ce symbole, cela signie qu’un système
de boucle est installé. Ce système de boucle
est compatible avec votre instrument auditif.
Veuillez consulter votre audioprothésiste pour
plus de renseignements sur les systèmes de
boucle.
Raccordement aux sources audio externes
Vos instruments auditifs peuvent être dotés
d’une entrée audio directe (EAD) qui permet de
les connecter à d’autres sources audio, comme
une chaîne stéréophonique ou une télévision,
à l’aide d’un système de modulation de
fréquences ou d’un câble. L’accessoire sans
l uDirect en option possède également une
prise DAI.
Quand vos instruments auditifs détectent un
signal EAD, ils passent automatiquement en
programme Entrée audio directe Easy-DAI. Une
courte mélodie indique que l’option Entrée
audio directe Easy-DAI est activée. Quand vous
déconnectez la EAD, vos instruments auditifs
retournent automatiquement au programme
précédent.
Consultez votre audioprothésiste pour obtenir
de plus amples renseignements au sujet du
système EAD et d’un câble de raccord.
Page 44

78 79
Symptôme Solution possible
Aucun son
Pas en marche Mettre en marche
Pile faible ou épuisée Remplacer la pile ou placer
les instruments auditifs
rechargeables sur la station
de charge*
Mauvais contact de
la pile
Consulter votre audioprothésiste
Pile à l’envers Insérer la pile avec le signe plus
(+) vers le haut
Embouts
auriculaires/ tubes
ns puissance
obstrués par du
cérumen
Nettoyer les embouts
auriculaires. Consulter la section
« Nettoyage de vos instruments
auditifs ». Consulter votre
audioprothésiste
Protège-microphone
obstrué
Consulter votre audioprothésiste
Guide de dépannage
Symptôme Solution possible
Volume insusant
Volume bas Augmenter le volume; consulter
un audioprothésiste si le
problème persiste
Pile faible Remplacer la pile ou placer
les instruments auditifs
rechargeables sur la station
de charge*
Embouts auriculaires
mal insérés
Consulter la section « Mise
en place de vos instruments
auditifs sur vos oreilles ».
Remettre soigneusement
l’instrument auditif en place
Changement dans
l’audition
Consulter votre audioprothésiste
Embouts auriculaires
obstrués par du
cérumen
Nettoyer les embouts auriculaires.
Consulter la section « Nettoyage
de vos instruments auditifs ».
Consulter votre audioprothésiste
Protège-microphone
obstrué
Consulter votre audioprothésiste
*Au besoin, vous pouvez remplacer temporairement la
pile rechargeable argent-zinc par une pile zinc-air 13
traditionnelle. Ne jetez pas votre pile rechargeable.
Page 45

80 81
Symptôme Solution possible
Intermittence
Pile faible Remplacer la pile ou placer
les instruments auditifs
rechargeables sur la station
de charge*
Contact de pile sale Consulter votre audioprothésiste
Deux bips longs
Pile faible Remplacer la pile ou placer
les instruments auditifs
rechargeables sur la station
de charge*
Silement
Embouts auriculaires
mal insérés
Consulter la section « Mise
en place de vos instruments
auditifs sur vos oreilles ».
Remettre soigneusement
l’instrument auditif en place
Main/vêtement près
de l’oreille
Éloigner la main/le vêtement de
votre oreille
Embouts auriculaires
mal ajustés
Consulter votre audioprothésiste
Symptôme Solution possible
Manque de clarté, distorsion
Embouts auriculaires
mal ajustés
Consulter votre audioprothésiste
Embouts auriculaires
obstrués par du
cérumen
Nettoyer les embouts
auriculaires. Consulter la section
« Nettoyage de vos instruments
auditifs ». Consulter votre
audioprothésiste
Pile faible Remplacer la pile ou placer
les instruments auditifs
rechargeables sur la station
de charge*
Protège-microphone
obstrué
Consulter votre audioprothésiste
Embouts auriculaires tombent de l’oreille
Embouts auriculaires
mal ajustés
Consulter votre audioprothésiste
Embouts auriculaires
mal insérés
Consulter la section « Mise
en place de vos instruments
auditifs sur vos oreilles ».
Remettre soigneusement
l’instrument auditif en place
*Au besoin, vous pouvez remplacer temporairement la
pile rechargeable argent-zinc par une pile zinc-air 13
traditionnelle. Ne jetez pas votre pile rechargeable.
Page 46

82 83
Symptôme Solution possible
Faible au téléphone
Téléphone mal
positionné
Déplacer le téléphone sur
l’oreille pour obtenir un signal
plus net. Consulter la section
« Utilisation du téléphone ».
Les instruments
auditifs doivent être
ajustés
Consulter votre audioprothésiste
Pour tout autre problème ne gurant pas dans ce guide,
communiquez avec votre audioprothésiste.
Information et explications sur les
symboles
xxxx
Le symbole CE est une conrmation par Unitron que ce
produit Unitron – ainsi que les accessoires – satisfait
aux exigences de la directive 93/42/CEE sur les
appareils médicaux ainsi qu’à celles de la directive
2014/53/EU sur les émetteurs radioélectriques et de
télécommunications.
Les numéros après le symbole CE correspondent
au code des institutions homologuées consultées,
conformément aux directives susmentionnées.
Ce symbole indique qu'il est important que l'utilisateur
lise et prenne en compte les renseignements
appropriés dans ce manuel.
Ce symbole indique qu'il est important que l'utilisateur
prenne connaissance des avertissements appropriés
dans ce manuel d'utilisation.
Renseignements importants sur la manipulation et
l’utilisation ecace de ce produit.
Ce symbole indique que les produits décrits dans ces
consignes d'utilisation respectent les exigences d'un
élément d'application de type B selon la norme EN
60601-1. La surface de l'instrument auditif est spéciée
en tant qu'élément appliqué de type B.
©
Symbole du droit d’auteur
Page 47

84 85
Ce symbole doit être accompagné du nom et de
l'adresse du représentant autorisé de l'Union
européenne.
Ce symbole doit être accompagné du nom et de
l'adresse du fabricant (qui met ce dispositif sur le
marché).
Conditions d'utilisation :
Cet instrument est conçu pour fonctionner sans aucun problème
ou restriction s'il est utilisé aux ns pour lesquelles il a été prévu,
à moins qu'il n'en soit indiqué autrement dans ces manuels.
Conditions de transport
Température : -20° à 60° Celsius (-4° à 140° Fahrenheit).
Humidité : Jusqu'à 90 % (sans condensation).
Le symbole de la corbeille barrée vous informe que
cet instrument ne doit pas être jeté dans une poubelle
ordinaire. Rapportez-le aux points de collecte pour
le recyclage des équipements électroniques, ou
donnez-le à votre audioprothésiste qui en disposera
de façon appropriée. L'élimination correcte protège
l'environnement et la santé.
L'appellation commerciale et les logos BluetoothMD sont
des marques déposées propriétés de Bluetooth SIG,
Inc. et toute utilisation de telles marques par Unitron
est faite sous licence. Toutes les autres marques
déposées ou appellations commerciales appartiennent
à leurs propriétaires respectifs.
Max Max est une marque de commerce d’Unitron.
Information sur la conformité
Déclaration de conformité
Unitron Hearing déclare que ce produit respecte la Directive
93/42/EEC sur les Dispositifs médicaux et la Directive 2014/53/
EU sur les Équipements radioélectriques. Le texte des
Déclarations de conformité peut être obtenu auprès du fabricant.
Australie/Nouvelle-Zélande:
Indique la conformité d’un appareil avec les dispositions
réglementaires de la Radio Spectrum Management (RSM)
et de l’Australian Communications and Media Authority
(ACMA) pour la vente légale en Nouvelle-Zélande et en
Australie. L’étiquette de conformité R-NZ est pour les
produits vendus sur le marché néozélandais en vertu du
niveau de conformité A1.
L'instrument auditif décrit dans ce guide est certié en tant que:
Système d'écoute standard
États-Unis - FCC ID : Canada - IC :
T Max SP VMY-UWTM1 2756A-UW TM1
T Max UP VMY-UWTM1 2756A-UW TM1
Avis 1
Cet appareil est conforme à la partie 15 des règles de la FCC et
avec le règlement RSS-210 d'Industrie Canada. Son utilisation
est assujettie aux deux conditions suivantes:
1) cet appareil ne doit pas causer d'interférences nuisibles, et
2) cet appareil doit accepter toute interférence reçue, incluant
l’interférence pouvant provoquer un fonctionnement non
désiré.
Page 48

86 87
Avis 2
Tout changement ou modication fait à cet appareil et non
expressément approuvé par Unitron peut conduire à l'annulation
de l'autorisation de la FCC d'utiliser cet appareil.
Avis 3
Cet appareil a été testé et satisfait les limites d'un appareil
numérique de classe B, relativement à la partie 15 des règles
de la FCC et ICES-003 d'Industrie Canada. Ces limites sont
conçues pour assurer une protection raisonnable contre toute
interférence néfaste pouvant survenir dans une résidence.
Cet appareil génère, utilise et peut émettre une énergie de
fréquence radio et, si installé et utilisé en ne respectant pas
les consignes, peut causer une interférence et nuire aux
communications radio. Toutefois, il n'est pas garanti que de
l'interférence ne surviendra pas dans certaines installations.
Si cet appareil cause des interférences nuisibles à la réception
des ondes radio ou de télévision, ce qui peut être déterminé en
éteignant puis en rallumant l'appareil, l'utilisateur est encouragé
à essayer de remédier à ces interférences via une ou plusieurs
des mesures suivantes :
• Réorienter ou déplacer l'antenne de réception
• Augmenter la distance entre l'équipement et le récepteur
• Brancher l'appareil dans une prise sur un circuit diérent de
celui dans lequel le récepteur est branché
• Consulter le vendeur ou un technicien expérimenté en radio/
télé pour de l'aide
Commentaires du client
Notez vos besoins ou vos préoccupations spéciques
et apportez-les lors de votre première visite suivant la
réception de vos instruments auditifs.
Cela aidera votre audioprothésiste à répondre à vos
besoins.
________________________________________
________________________________________
________________________________________
________________________________________
________________________________________
________________________________________
________________________________________
________________________________________
________________________________________
________________________________________
Page 49

88
Remarques supplémentaires
___________________________________________
___________________________________________
___________________________________________
___________________________________________
___________________________________________
___________________________________________
___________________________________________
___________________________________________
___________________________________________
___________________________________________
___________________________________________
Page 50

Unitron Hearing, a division of
National Hearing Services Inc.
20 Beasley Drive, Kitchener, ON
NE Y6 Canada
Sonova AG
Laubisrütistrasse 28
CH-8712 Stäfa, Switzerland
For a listing of Unitron group
companies, please visit
www.unitron.com
Pour obtenir la liste des entreprises
du groupe Unitron, visitez le
www.unitron.com
Page 51

Distributor / Distributeur
2018-05 029-6240 © 2018 Unitron Hearing. All rights reserved.
7 613389 142358
unitron.com
 Loading...