

Unitron Stride P 500, Stride P 700, Stride P Dura Pro, Stride P Dura 800, Stride P Dura 700 User Manual
...
Stride
behind-the-ear (BTE)
hearing aid guide

Thank you
Thank you for choosing these hearing aids.
We care deeply about people with hearing
loss. We work closely with hearing healthcare
professionals to make advanced, purposedriven solutions available to everyone.
Because hearing matters.
Your hearing aids
Hearing healthcare professional: _______________
___________________________________________
Telephone: _________________________________
Model: ____________________________________
This user guide applies to the following models:
Year of introduction: 2015
Stride™ P Pro
Stride™ P 800
Stride™ P 700
Stride™ P 600
Stride™ P 500
Year of introduction: 2016
Stride™ M Pro
Stride™ M 800
Stride™ M 700
Stride™ M 600
Stride™ M 500
Stride™ P Dura Pro
Stride™ P Dura 800
Stride™ P Dura 700
Stride™ P Dura 600
Stride™ P Dura 500
Serial number: ______________________________
Replacement batteries: Size 13 Size 312
Warranty: __________________________________
Program 1 is for: ____________________________
Program 2 is for: ____________________________
Program 3 is for: ____________________________
Program 4 is for: ____________________________
Date of purchase: ____________________________

Quick reference
Table of contents
Low battery
Battery size On/O
warning
2 beeps
every
30 minutes
312
13
On
Changing batteries
Stride M Stride P Dura Stride P
Plus (+) signsBattery symbol Battery symbol
Push button Rocker switch
switching programs
volume control
volume control
O
Your hearing aids at a glance ..................................................... 2
Warnings .................................................................................... 6
Putting your hearing aids on your ears..................................... 10
Turning your hearingaids onando ........................................12
Batter y information ...................................................................13
Tinnitus masker ....................................................................... 16
Operating instructions ..............................................................19
Using the telephone ................................................................. 25
Protecting your hearing aids .................................................... 28
Cleaning your hearing aids ....................................................... 29
Accessories .............................................................................. 33
Assistive listening devices ....................................................... 34
Troubleshooting guide ............................................................. 36
Warning to hearing aid dispensers (tocomplywith the U.S.
Food and Drug Administration (FDA) regulations) ...................41
Information and explanation of symbols ................................. 44
Compliance information ........................................................... 46
Patient feedback ...................................................................... 48
Additional notes ....................................................................... 49
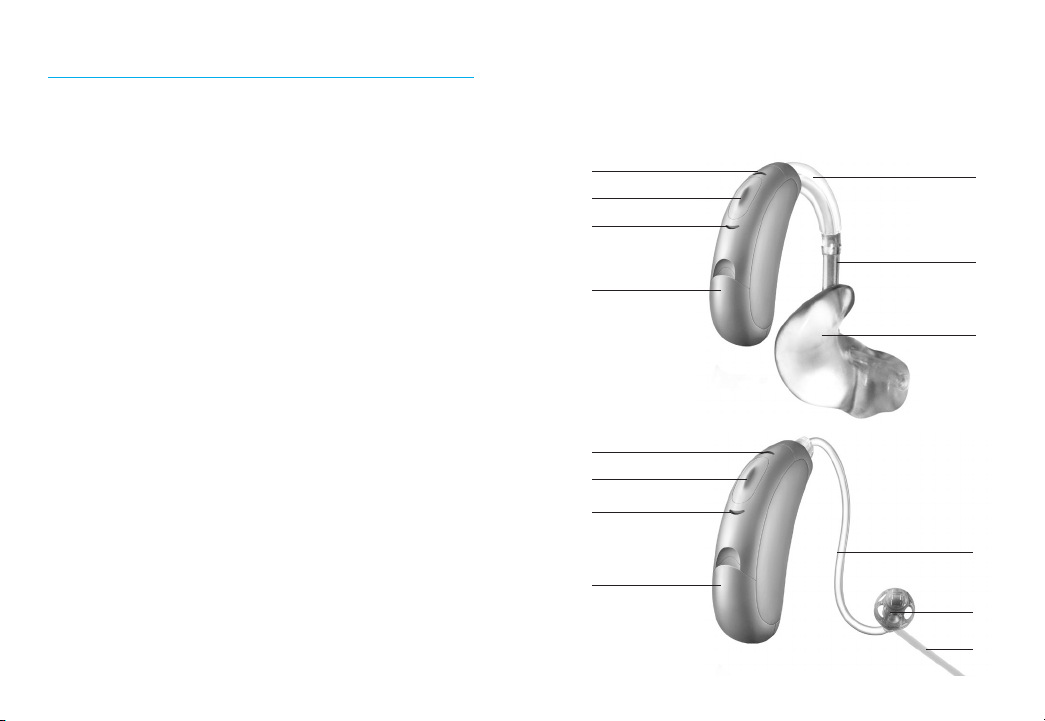
Your hearing aids at a glance
1 Earhook - your custom made earmold attaches
to your hearing aids using the earhook
2 Microphone - sound enters your hearing aids
through the microphones. Microphone shield protects microphones from dirt & debris
3 Push button - switches between listening
programs or changes the volume level,
depending on your customized tting
4 Rocker switch - controls the volume level
5 Battery door (on & o) - close the door to turn on
your hearing aids, open the door all the way to
turn o your hearing aid or to change the battery
6 Tubing - part of the earmold that attaches it to
the earhook
7 Earmold - allows the sound to pass from the
hearing aids to the ear and holds the hearing
aids in place
8 Slim tube - sound travels down the slim tube to
the ear canal
9 Dome - holds the slim tube in place in your ear
canal
2 3
10 Retention piece - helps prevent the dome and
slim tube from moving out of the ear canal
Stride M BTE hearing aids
2
3
2
5
2
3
2
5
1
6
7
8
9
10
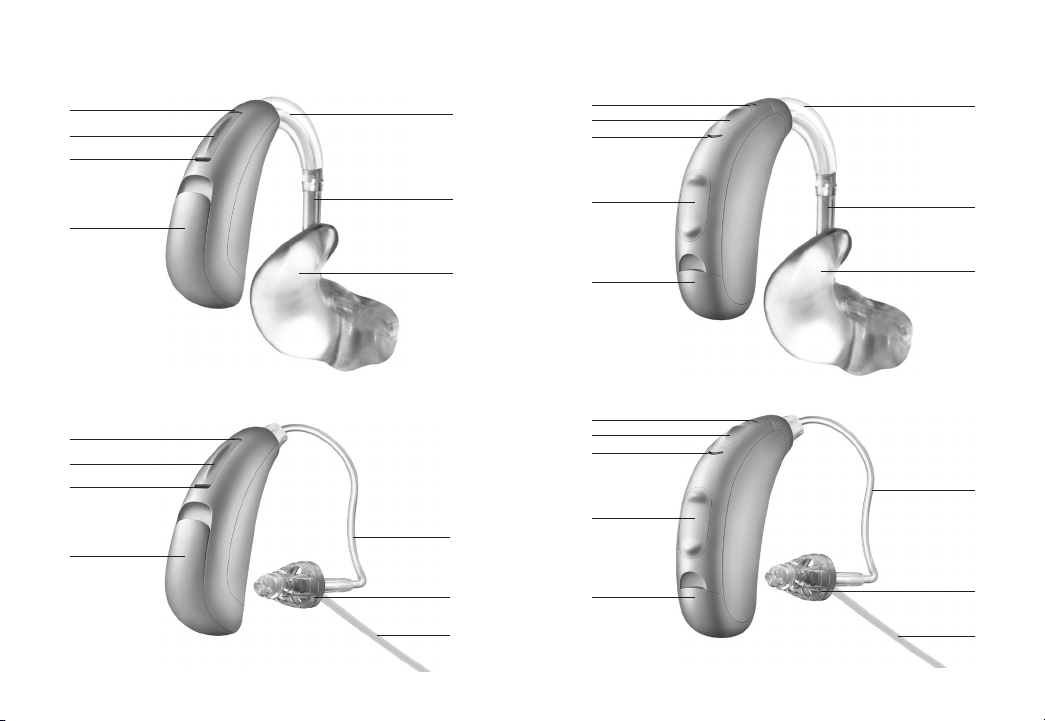
Stride P Dura BTE hearing aids
Stride P BTE hearing aids
2
3
2
5
2
3
2
5
4 5
1
6
7
8
9
10
2
3
2
4
5
2
3
2
4
5
1
6
7
8
9
10

Warnings
The intended use of hearing aids is to
amplify and transmit sound to the ears and
hereby compensate for impaired hearing.
The hearing aids (specially programmed for
each hearing loss) must only be used by the
intended person. They should not be used
by any other person as they could damage
hearing.
Hearing aids should only be used as
directed by your physician or hearing
healthcare professional.
Hearing aids will not restore normal
hearing and will not prevent or improve a
hearing impairment resulting from organic
conditions.
Do not use your hearing aids in explosion
hazard areas.
Allergic reactions to hearing aids are unlikely.
However, if you experience itching, redness,
soreness, inflammation or a burning
sensation in or around your ears, inform
6 7
your hearing healthcare professional and
contact your physician.
In the unlikely case that any parts remain
in the ear canal aer the removal of the
hearing aid, contact a physician immediately.
Remove your hearing aids for CT and
MRI scans or for other electromagnetic
procedures.
Special care should be exercised in wearing
hearing aids when maximum sound
pressure levels exceed 132 decibels. There
may be a risk of impairing your remaining
hearing. Speak with your hearing healthcare
professional to ensure the maximum output
of your hearing aids is suitable for your
particular hearing loss.
Magnet and battery warnings
Never leave hearing aids, batteries or
magnets where small children and pets
can reach them. Never put hearing aids or
batteries in your mouth. If a hearing aid
or battery is swallowed, call a physician
immediately.

The magnet may aect some medical
devices or electronic systems. Always keep
the magnet (or the telephone equipped
with the magnet) at least 30 cm (12”) away
from pacemakers, credit cards or other
magnetically sensitive devices.
Precautions
The use of hearing aids is only part of
hearing rehabilitation; auditory training and
lip reading instruction may be required as
well.
In most cases, infrequent use of hearing
aids does not provide full benet. Once you
have become accustomed to your hearing
aids, wear your hearing aids everyday all
day.
Your hearing aids use the most modern
components to provide the best possible
sound quality in every listening situation.
However, communication devices such as
digital cell phones can create interference
(a buzzing sound) in hearing aids. If you
experience interference from a cell phone
being used close by, you can minimize this
interference in a number of ways. Switch
your hearing aids to another program, turn
your head in a dierent direction or locate
the cell phone and move away from it.
Too high distortion during dialing or
phoning may mean that the phone handset
is stressed by the magnet. To avoid any
damage, please move the magnet to
another place on the telephone receiver.
Note to hearing healthcare professional
Domes should never be tted on patients
with perforated eardrums, exposed middle
ear cavities, or surgically altered ear
canals. In the case of such a condition, we
recommend to use a customized earmold.
Labeling
The serial number and year of manufacture are
located inside the battery door.
8 9
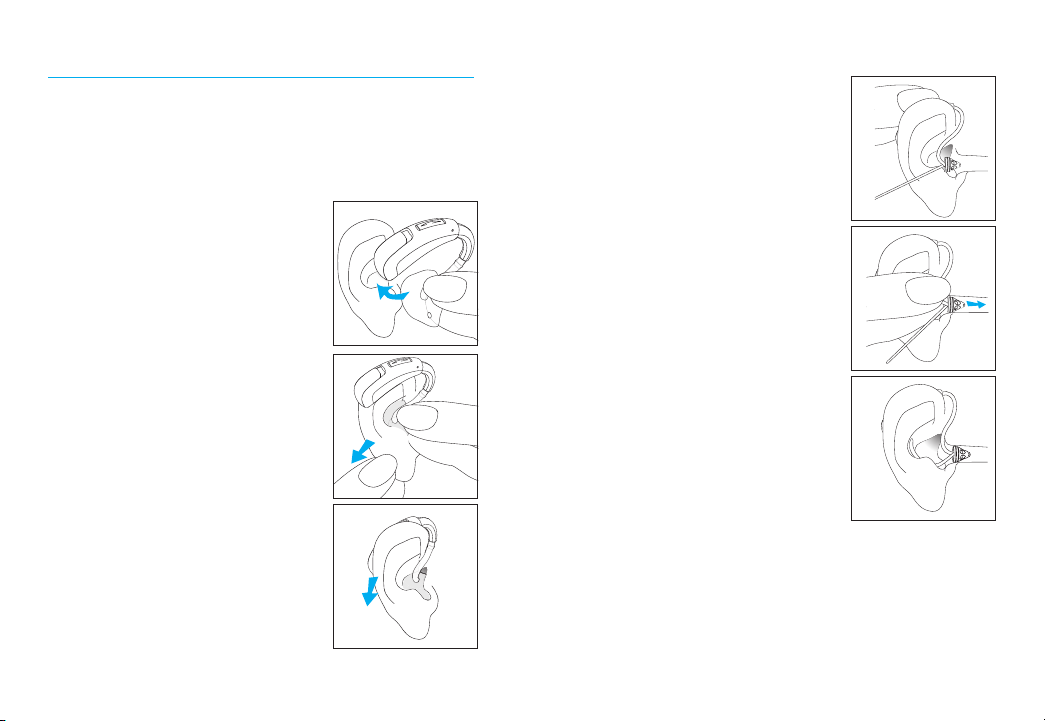
Putting your hearing aids on your ears
Your hearing aids may be color-coded with a
small dot on the battery door: red = right ear;
blue = le ear.
Hearing aids with earmolds
1. Hold the earmold between
your thumb and index
nger, with the opening
facing toward your ear
canal and the hearing aid
resting above your ear.
2. Carefully insert the
earmold in your ear. You
may need to twist it slightly
to the back. The earmold
should t into your ear
snugly and comfortably.
Gently pull down and back
on your earlobe to help you
insert the earmold into your
ear canal more easily.
3. Place the hearing aid over
the top of your ear.
10 11
1.
2.
3.
Hearing aids with domes
1. Place the hearing aid over
the top of your ear. The
slim tube should lie flush
against your head and not
stick out.
2. Hold the slim tube where it
attaches to the dome and
gently push the dome into
your ear canal.
3. Place the retention piece
in your ear so it rests at the
bottom of the opening of
your ear canal.
1.
2.
3.

Turning your hearingaids onando
The battery door acts as an on and o switch.
1. On: Close the
1.
battery door
fully.
Note: It may
take ve
seconds
before the
hearing aid
turns on.
Your hearing
healthcare
professional
can increase
the start up
delay if required.
2.
2. O: Open the battery door.
Note: When turning your hearing aid on and o
while it is on the ear, grasp the top and bottom
of the device with your index nger and thumb.
Use your thumb to open and close the battery
door.
1.
2.
Battery information
Low battery warning
Two long beeps indicate the hearing aid battery
is low. Aer the low battery warning, sounds
may not be as clear. This is normal and can be
xed by changing the batteries.
If you can’t hear the low battery warning, your
hearing healthcare professional can change its
pitch or loudness. If you prefer, it can be turned
o entirely.
Your hearing aids are designed to generate a
low battery warning every 30 minutes until you
change the batteries, but depending on the
condition of the batteries, they may die before
another low battery warning occurs. Therefore,
it is recommended that the batteries are
replaced as soon as possible once you hear the
low battery warning.
12 13
 Loading...