

United States Stove Company 1869 Caboose Potbelly Owner's Manual
Owners Manual
1869
Caboose Potbelly
COAL ONLY STOVE
CAUTION!
Read All Instructions Carefully Before
Starting The Installation or Operating
This Stove.
DO NOT USE THIS HEATER
IN A MOBILE HOME OR TRAILER
SAVE THIS MANUAL FOR FUTURE REFERENCE
THIS MANUAL WILL HELP YOU TO OBTAIN EFFICIENT, DEPENDABLE SERVICE FROM THE HEATER, AND ENABLE YOU TO ORDER
REPAIR PARTS CORRECTLY. KEEP IN A SAFE PLACE FOR FUTURE REFERENCE.
NOTE: THIS IS NOT A
U.L. LISTED COAL BURNING STOVE
The use of wood in this stove, other than
for coal ignition purposes, is prohibited
by law.
UNITED STATES STOVE COMPANY
227 Industrial Park Road
P.O. Box 151
South Pittsburg, TN 37380
(423) 837-2100
Keeping America Warm
since 1869
851499D-1501G
Illustrations
15"
19.5"
21.6"
36"
FLOOR
PROTECTOR
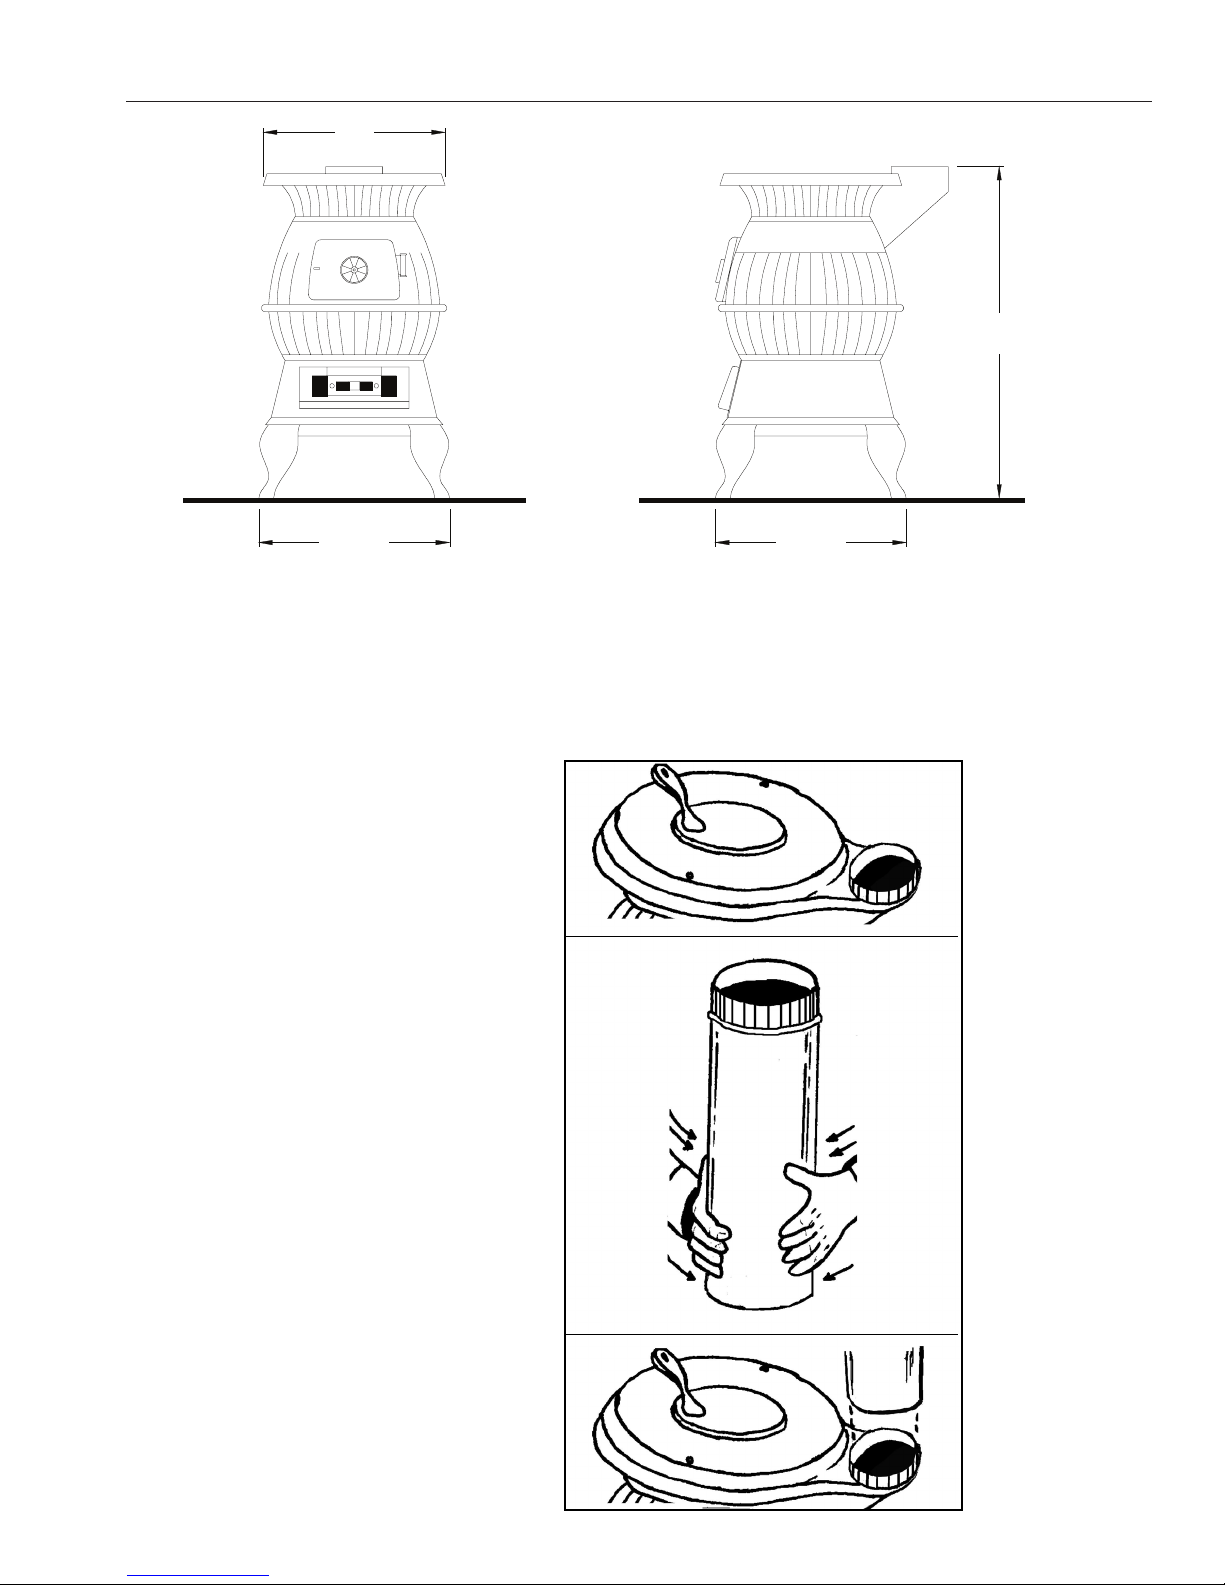
STOVE DIMENSIONS
FIGURE 1.
Height (Overall) .......................................... 36"
Width .......................................................... 21.6"
Depth .......................................................... 19.5"
Firebox Capacity......................................... 40 lbs.
Firebox Depth ............................................. 10"
Flue Size..................................................... 6"
Door Opening ............................................. 8" x 10"
Specications
Material ....................................................... 100% Cast Iron
Fuel............................................................. Coal
NOTE: Bituminous, large nut to small egg or Anthracite, large egg
to small broken.
BTU Rating ................................................. 200,000
Weight ........................................................ 216 lbs.
This stove has a circular ue
outlet and uses a standard 6"
stovepipe.
To attach pipe, simply slide the
crimped end of the stove pipe
into the ue outlet and secure
with metal screw. Connect balance of stove pipe into a class
A chimney
2

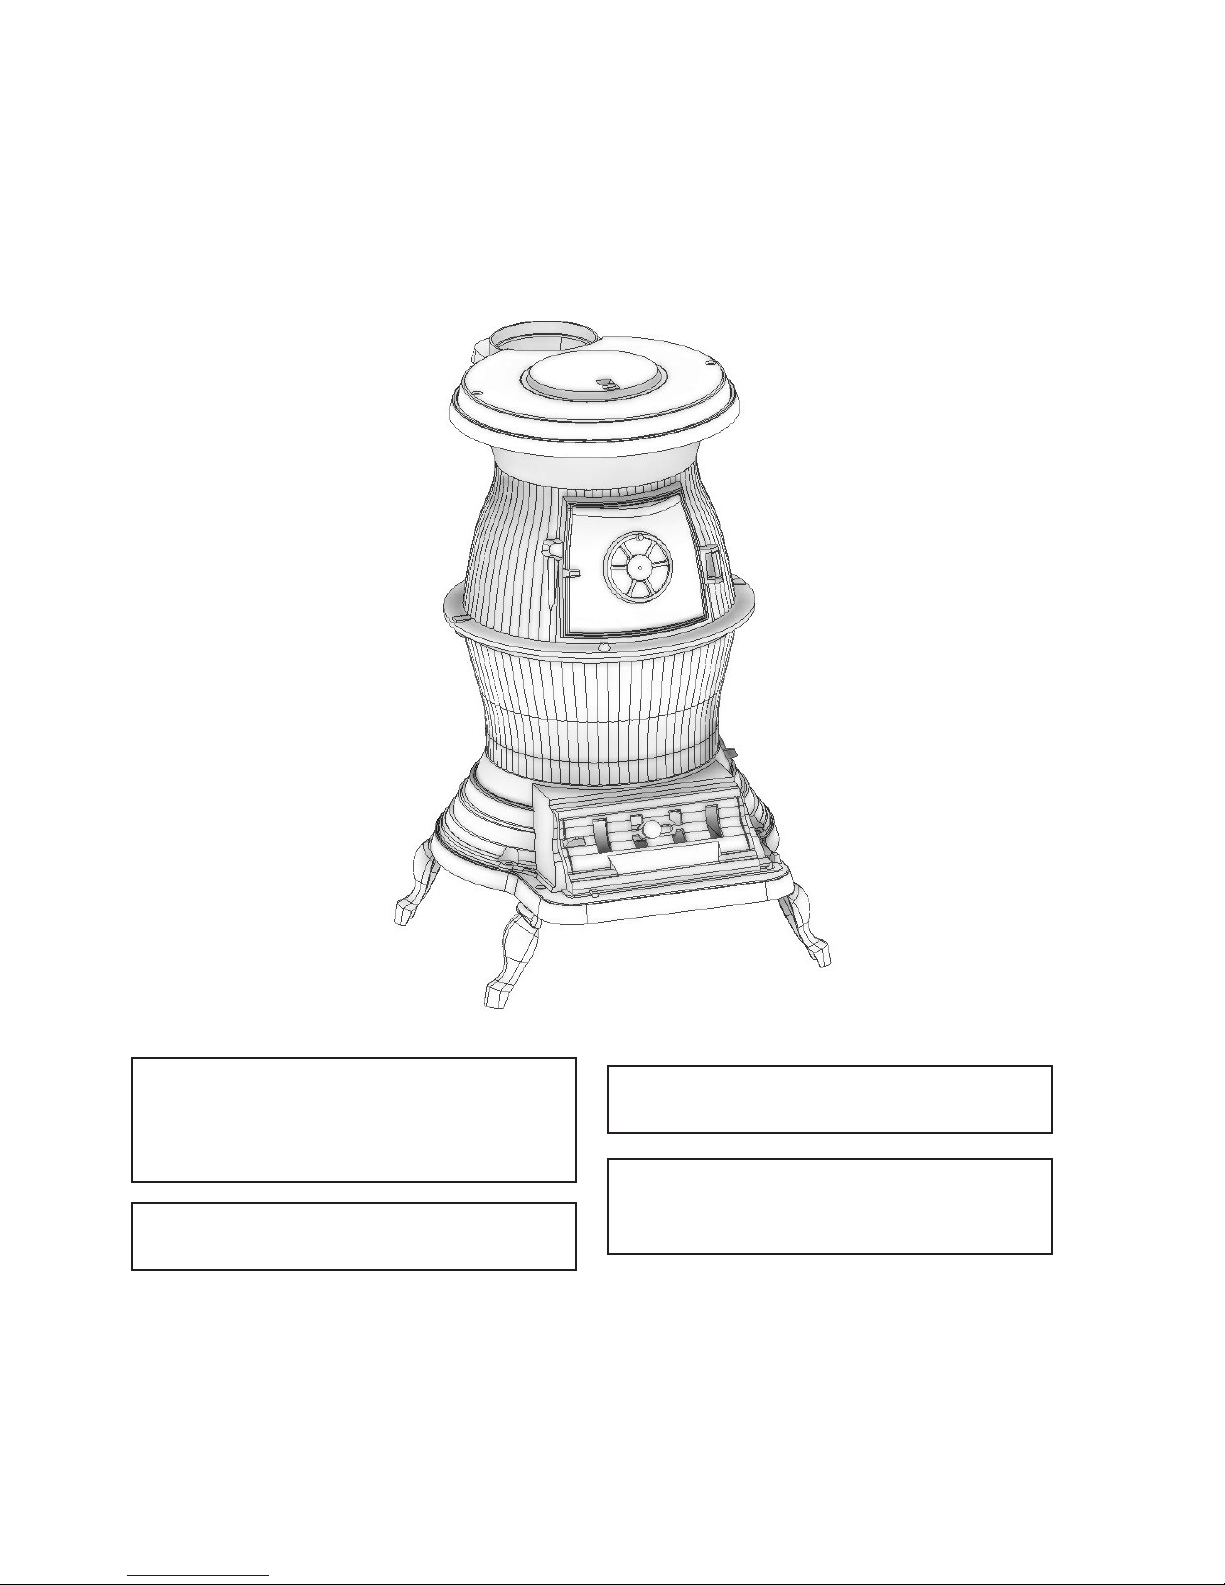
CONGRATULATIONS!
You have purchased a heater from North America's oldest manufacturer of coal burning products. Our Caboose Potbelly
Stove is reminiscent of the potbelly stoves seen in the train stations and cabooses of yester year. This high performance
potbelly stove is constructed of all cast iron and is designed to burn coal. Its generous repot capacity with shaker grate
allows 40 lbs. of coal to burn for eight hours before requiring refueling. Separate ash door with slide draft control at bottom
creates a "forge effect" that insures proper combustion. Long ared top with 8" lift out lid facilitates fry pan or tea kettle.
Stove comes assembled except for legs.
Safety Rules
SAFETY NOTICE: If this heater is not properly installed a house re may result. For your safety, follow the installation
directions. Contact local building or re ofcials about restrictions and installation inspection requirements in your area.
Read these rules and the instructions carefully.
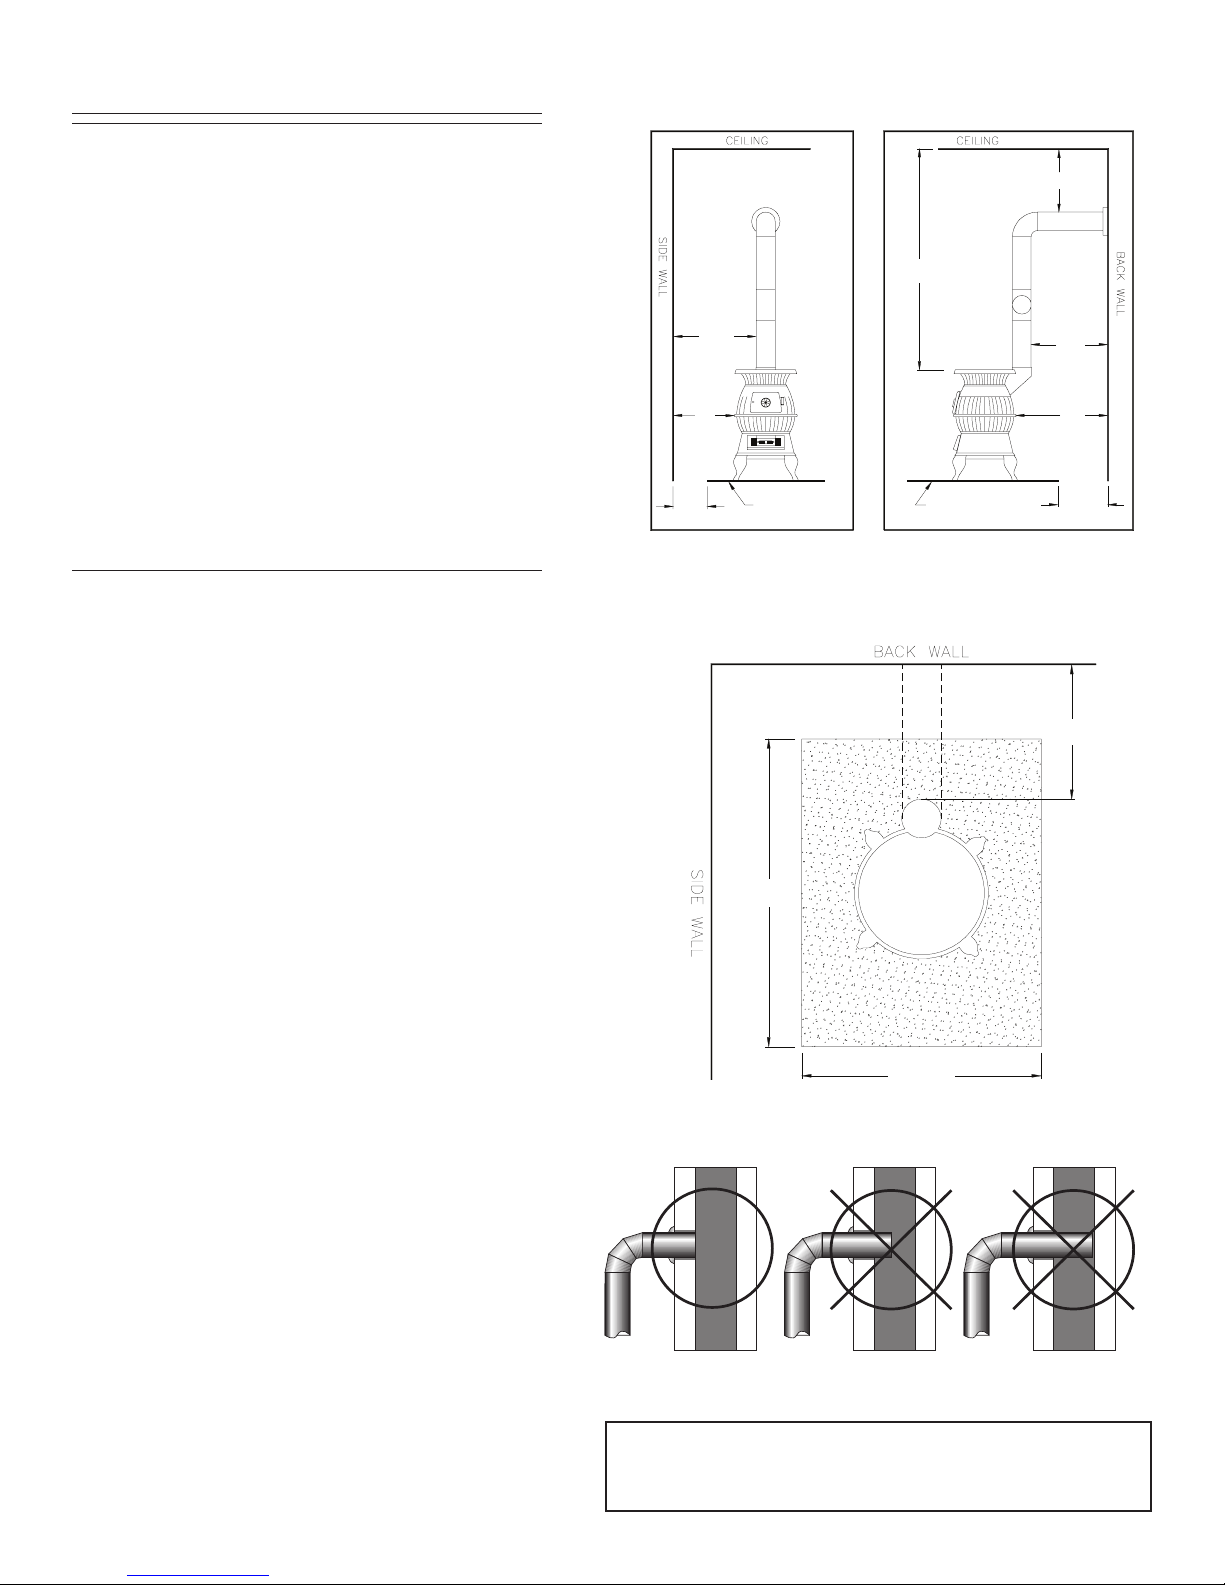
1. The installation of this stove must comply with your local building code rulings. Please observe the clearances to combustibles.
(Refer to Figures 2 and 3) Stove must be 36" from a combustible wall (wood or plaster board) at rear or sides.
2. DO NOT install this stove in a mobile home or trailer.
3. Always connect the stove to a chimney and vent to the outside. Never vent to another room or inside a building.
4. DO NOT connect a solid fuel burning appliance to an aluminum Type B gas vent. This is not safe and prohibited by the NFPA
(National Fire Protection Agency) This stove requires approved masonry or a UL 103 HT Listed Residential Type and Building
Heating Appliance Chimney. Use a 6" diameter chimney or larger, that is high enough to give a good draft.
5. Be sure that your chimney is safely constructed and in good repair. Have the chimney inspected by the re department or a
qualied inspector. Your insurance company may be able to recommend a qualied inspector.
6. Creosote or soot may build up in the chimney connector and chimney and can cause a house/building re. Inspect the chimney
connector and chimney twice monthly during the heating season and clean as necessary. (See Chimney Maintenance, page 6)
7. Provide air for proper combustion from outside the house into the room where the stove is located. If the intake is not in the same
room, air must have free access to the room.
8. To prevent injury, do not allow anyone to use this stove who is unfamiliar with the correct operation of the stove.
9. For further information on using your stove safely, obtain a copy of the National Fire Protection Association publication "Using Coal
and Wood Stoves Safely" NFPA No. HS-10-1976. The address of the NFPA is Batterymarch Park, MA, 02269.
10. Dispose of the ashes in a metal container with a tight tting lid. Keep the closed container on a non-combustible oor or on the
ground, well away from all combustible materials. Keep the ashes in the closed container until all cinders have thoroughly cooled.
The ashes may be buried in the ground or picked up by a refuse collector.
11. The special paints used on this stove may give off some smoke and an odor while they are curing during the rst few res. Paint
discoloration will occur if the stove is overred.
12. This stove has a painted surface which is durable but it will not stand rough handling or abuse. When installing your stove, please
handle with care. Clean with soap and warm water when stove is not hot. Do not use any acids or scouring soap, as the will wear
and dull the nish.
13. While the stove is in operation, all persons, young children especially, should be alerted to the hazards from high surface
temperatures and should keep away to avoid burns or clothing ignition. Small children should be carefully supervised when they
are in the same room with the stove.
14. Keep stove area clear and free of all combustible materials such as gasoline and/or other ammable vapors and liquids.
3
Assembly and Installation
CORRECT WRONG WRONG
Stovepipe/Flue Connections
FIG. 6
FLUE CONNECTION-NON-COMBUSTIBLE WALL
PIPE
BAROMETRIC
DRAFT REGULATOR
ELBOW
PIPE
COLLAR
THIMBLE
NON-COMBUSTIBLE WALL
FLOOR
PROTECTOR
(60"
MIN
.)
FLOOR
PROTECTOR
10-1/4
36"
18"
FIGURE 2 FIGURE 3
42"
36"
39-1/2"
14-1/2"
FIG. 6
FLUE CONNECTION-NON-COMBUSTIBLE WALL
FLOOR PROTECTOR
PIPE
BAROMETRIC
DRAFT REGULATOR
ELBOW
PIPE
COLLAR
THIMBLE
NON-COMBUSTIBLE WALL
FIG. 7
CHIMNEY CAP MANDATORY
3 FT. MIN.
2 FT. MIN
10 FT.
PIPE REDUCER
11 FT. MINIMUM
PIPE
BAROMETRIC
DRAFT REGULATOR
NON-COMBUSTIBLE
CONSTRUCTION IN
ACCORDANCE WITH
NFPA 211
FLOOR
PROTECTOR
(60"
MIN
.)
FIG. 4
FLOOR
PROTECTOR
10-1/4
36"
18"
FIGURE 2 FIGURE 3
42"
36"
39-1/2"
14-1/2"
FLOOR
PROTECTOR
NON- COMBUSTIBLE
CONSTRUCTION IN
ACCORDANCE WITH
NFPA 211
DASHED LINES
SHOW STRAIGHT
OUT CHIMNEY
CONNECTOR
36"
54"
36"
1. Uncrate and/or unpack the heater, removing all packing
material, being careful not to dispose of the Parts Bag.
2. Remove the following contents:
A. (4) Legs with nut and bolt package
B. (1) Lid with (1) Lid Lifter
C. (1) Shaker Grate
D. (1) Ash Door with (1) Slide Draft
E. (1) Feed Door
3. Carefully lay the stove on its side, preferably on a soft
surface. Note: Cardboard shipping carton placed at
works well for this application.
4. Securely attach all four (4) legs to lower chamber
using nut and bolt package.
5. Carefully return stove to upright position and place it in
desired location.
6. Place lid in position on top plate.
7. Position ash door with slide draft on front of lower chamber.
8. Place shaker grate in lower chamber.
MINIMUM CLEARANCE
TO COMBUSTIBLE WALLS
Place the heater on solid masonry or solid concrete. When
the heater is used on a combustible oor, use an Underwriters
Listed oor protector. The oor protector must comply with
UL Standards. The base should extend at least 18" beyond
the door side of the heater and should extend under the ue
pipe if it is elbowed towards a wall. (Fig. 4).
1. The stove must have its own ue. Do not connect this
unit to a chimney ue serving other appliances.
2. After observing the clearances to combustibles, locate
your oor protector accordingly and carefully place the
stove in your selected location. Install stove pipe, elbows
and thimble as necessary, utilizing either a recently
cleaned and inspected masonry chimney or a UL 103 HT
Listed Residential Type and Building Heating Appliance
Chimney.
3. If your chimney continues to draft excessively, then use
a Barometric Draft Regulator.
4. Use three (3) sheet metal screws in each stove pipe and/
or elbow joint to rmly hold the stove pipe together. Use
6" round black/blue stove pipe, not galvanized stove pipe .
5. Recheck illustrations Fig. 2 through 7 to be sure you
have the proper clearances shown from the stove and
the connector pipe to combustible surfaces. NOTE: If
a wall is only faced with brick or stone, consider it as a
combustible wall.
6. DO NOT install this stove in a mobile home or trailer.
7. If you have too much draft, then install a 6" cast iron
stove pipe damper in the rst joint of the stove pipe.
4
HEATER/FLOOR PROTECTOR LOCATION
CAUTION: KEEP FURNISHINGS AND OTHER
COMBUSTIBLE MATERIALS AWAY FROM THE
FIG. 5
HEATER.
 Loading...