

United States Stove Company 1821, 1821Q, 1821B, 1821A Owner's Manual
OWNERS MANUAL
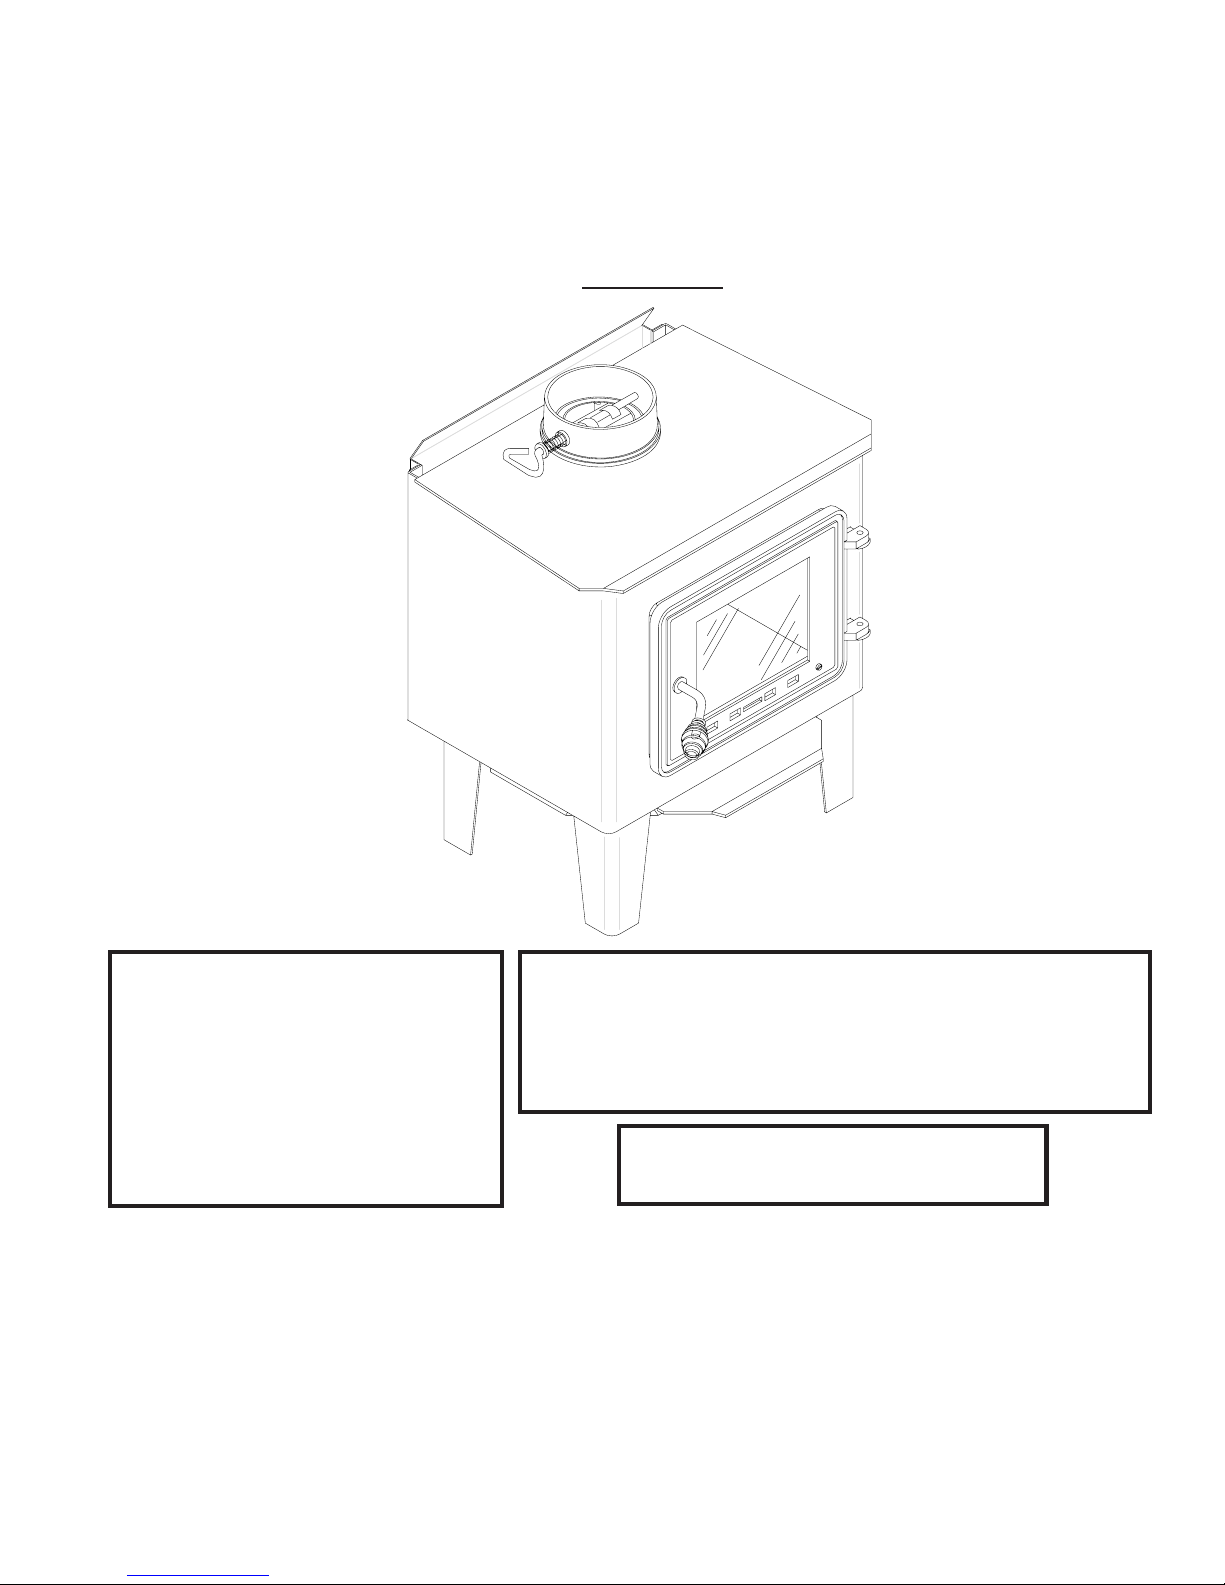
SMALL PLATE HEATER
MODELS: 1821, 1821B, 1821A, 1821Q
SAFETY NOTICE:
CAUTION!
Read All Instructions Carefully
Before Starting The Installation
or Operating This Heater.
Improper Installation Could Void
Your Warranty!
SAVE THIS MANUAL FOR FUTURE REFERENCE
THIS MANUAL WILL HELP YOU TO OBTAIN EFFICIENT, DEPENDABLE SERVICE FROM THE HEATER, AND ENABLE YOU TO
ORDER REPAIR PARTS CORRECTLY. KEEP IN A SAFE PLACE FOR FUTURE REFERENCE.
UNITED STATES STOVE COMPANY
If this heater is not properly installed, a house fire may
result. For your safety, follow the installation instructions. Contract local building or fire officials about
restrictions and installation requirements in your area.
DO NOT USE THIS HEATER
IN A MOBILE HOME OR TRAILER
227 Industrial Park Road
P.O. Box 151
South Pittsburg, TN 37380
(423) 837-2100
Made in China
85988G
1

CONGRATULATIONS!
You've purchased a heater from North America's oldest manufacturer of wood burning products.
By heating with wood you're helping to CONSERVE ENERGY!
Wood is our only Renewable Energy Resource. Please do your part to preserve our wood supply. Plant at
least one tree each year. Future generations will thank you.
tools and materials needed
TOOLS
Pencil
6 Foot Folding Rule or Tape Measure
Drill, Hand or Electric
Drill Bit 1/8" Dia. (For Sheet Metal Screws)
3/8" Box, Open End or Small
Adjustable Wrench
9/16" Box, Open End or Small
Adjustable Wrench
5/16" Nut Driver or
5/16" Socket w/Ratchet
Screw Driver (Blade-Type)
Gloves
Safety Glasses
6" Pipe, 6" Elbow, Collar and Thimble; As Required
(24 gauge min.)
1/2" Sheet Metal Screws (No. 10A x 1/2")
6" Inside Diameter Underwriters Laboratories (UL)
Listed Residential Solid Fuel Factory-Built
Triplewall Chimney or Exiting Masonry Chimney.
Floor Protector Material As Specified in
Figures 2,3, &4.
Furnace Cement (Manufacturer Recommends:
Rutland Black Code 78 or Equivalent)
MATERIALS
Dimensions
Fig. 1
2

SAFETY RULES
SAFETY NOTICE: If this heater is not properly installed a house fire may result. For your safety, follow the
installation directions. Contact local building or fire officials about restrictions and installation inspection
requirements in your area.
Read these rules and the instructions carefully.
Check with local codes. The installation comply
1.
with their rulings. Observe closely the clearances
to combustibles (page 4).
Do not install this heater in a mobile home or
2.
trailer.
DO NOT connect a wood burning heater to an
aluminum Type B gas vent. This is not safe and
is prohibited by the National Fire Protection Association Code.
Always connect this heater to a chimney and vent
3.
to the outside. Never vent to another room or
inside a building.
The freestanding room heater requires a ma-
4.
sonry or a UL Listed Residential Type and Building Heating Appliance Chimney.
Be sure that your chimney is safely constructed
5.
and in good repair. Have the chimney inspected
by the Fire Department or a qualified inspector.
Your insurance company may be able to recommend a qualified inspector.
12.
13.
14.
15.
Disposal of Ashes- Place ashes in a metal
container with a tight fitting lid. Keep the closed
container on a non-combustible floor or on the
ground, well away from all combustible materials. Keep the ashes in the closed container
until all cinders have thoroughly cooled. The
ashes may be buried in the ground or picked up
by a refuse collector.
Keep the firebox section free of excess ashes.
Observe clearances to combustible materials
specified in this manual to avoid a fire hazard.
CARING FOR PAINTED PARTS- This heater
has a painted jacket, which is durable but it will
not stand rough handling or abuse. When
installing your heater, use care in handling.
Clean with soap and warm water when heater
is not hot. DO NOT use any acids or scouring
soap, as these wear and dull the finish. PAINT
DISCOLORATION WILL OCCUR IF THE
HEATER IS OVERFIRED. FOLLOW OPERATING INSTRUCTIONS CAREFULLY.
Make sure the chimney is high enough to give a
6.
good draft.
Inspect chimney connector and chimney twice
7.
monthly during the heating season for any deposit of creosote or soot which must be removed
(see Chimney Maintenance, page 10).
DO NOT BE ALARMED IF HEATER SMOKES
8.
UPON INITIAL FIRING. The special paint used
on this heater must be cured during initial firing.
This smoking will occur only on initial firing.
CAST IRON PARTS MUST BE "SEASONED"
9.
TO AVOID CRACKING. BUILD ONLY SMALL
FIRES DURING THE FIRST FEW DAYS OF
USE.
To prevent injury, do not allow anyone to use this
10.
heater who is unfamiliar with the correct operation of the heater.
For additional information on using your Room
11.
Heater safely, obtain a copy of the National Fire
Protection Association (NFPA) publication "Chimneys, Fireplaces, and Solid Fuel Burning Appliances" NFPA No. 211. The address of NFPA is
Battermarch Park, Quincy, MA 02269.
16.
17.
18.
19.
20.
The firebox walls in this heater may become
slightly distorted over a period of use. The
slight distortion does not affect the operation of
the unit.
CAUTION: HOT WHILE IN OPERATION.
KEEP CHILDREN, CLOTHING, AND FURNITURE AWAY. CONTACT MAY CAUSE SKIN
BURNS.
CAUTION: DO NOT CONNECT TO ANY AIR
DISTRIBUTION OR DUCT SYSTEM.
CAUTION: STORE SOLID WOOD FUEL A
SAFE DISTANCE AWAY. DO NOT STORE
SOLID WOOD FUEL WITHIN HEATER INSTALLATION CLEARANCES OR WITHIN
THE SPACE REQUIRED FOR ASH REMOVAL.
DO NOT USE A GRATE OR ELEVATE THE
FIRE.
CAUTION! Do not touch the metal or glass surfaces of the heater until it has thoroughly cooled.
3
LOCATING THE ROOM HEATER
AS A LOCATION IS SELECTED, KEEP THE FOLLOWING IN MIND:
1. Keep the chimney connection as short as possible.
The heater must have its own chimney flue. Do not
connect any other appliance to the same flue. If there
is no chimney where you wish to place the heater, you
can use a UL Listed Type 103 HT, Solid Fuel, Factory
Built Chimney. (Figure 7)
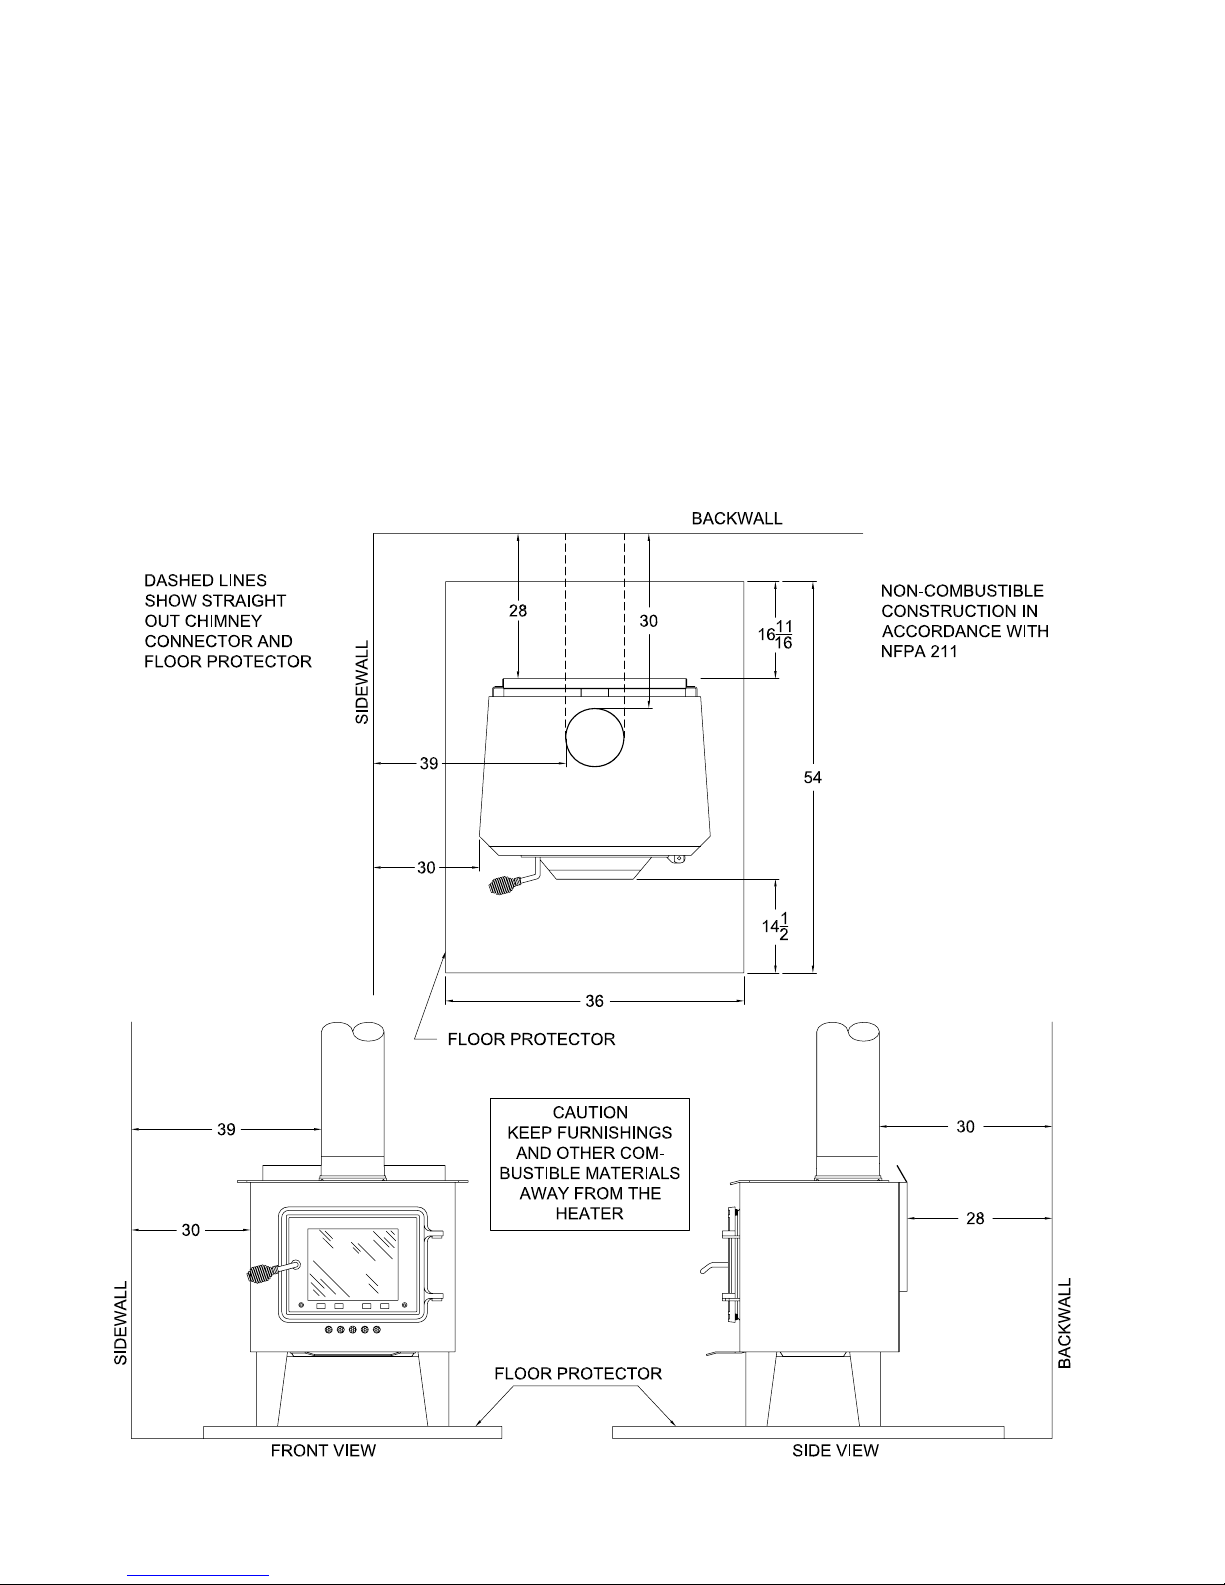
2. Place the heater on solid masonry or solid concrete.
When the heater is used on a combustible floor, use a
non-combustible floor protector having a thermal con
ductivity of K=0.45 BTU in./ft. 2 hr.deg. F. with 28
gauge sheet metal or a UL Listed Floor Protector.
MINIMUM CLEARANCE TO COMBUSTIBLE WALLS
Have the floor protector extended 14-1/2" in front of the
hearth extension, 1-3/4" to each side, 10-3/8" to the
rear underneath and 2" to each side of the chimney
connector. (See Figure 2)
3. Check Figures 2, 3, & 4. You should have at least the
clearances shown from the heater and the connector
pipe to combustible surfaces. If you have a solid brick
or stone wall behind your heater, you can place the
heater as close as you wish to the wall. If the wall is only
faced with brick or stone, treat it as a combustible wall.
Fig. 2
Fig. 3
Fig. 4
4
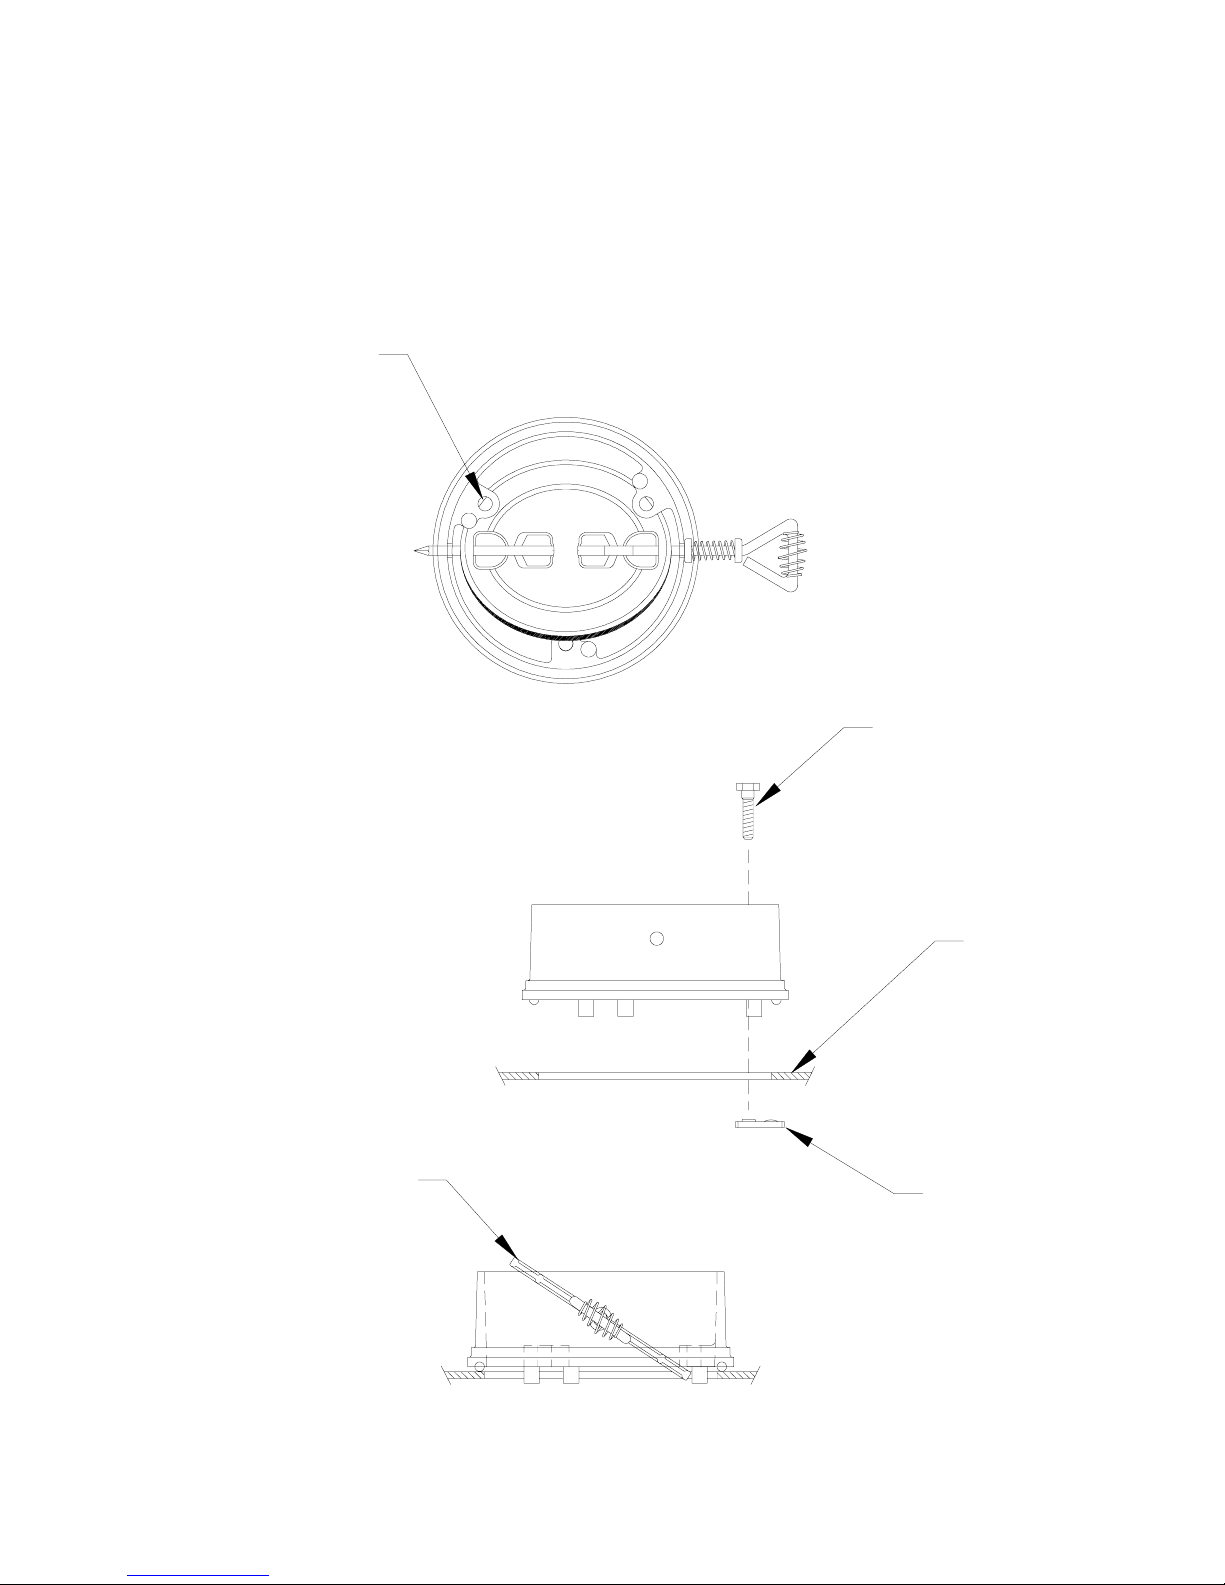
MOUNTING CAST-IRON FLUE COLLAR
This heater comes equipped with a cast-iron flue collar with holes to mount the solid damper as
shown below.
Flue Collar - 24561
Solid Damper - D6
5/16-18 x 1-1/2" Bolts (3 req.) - 83432
Weld Tab (3 req.) - 83431
Gasket - 88042
Holes in Flue collar
where bolts attach
to heater top.
Bottom view of flue collar
with damper installed
Peel off tape from the back of
the gasket and attach the
gasket to the heater top
around the flue collar
opening.
Mount flue collar to the
top of the heater using the
(3) 5/16-18 x 1-1/2"
Bolts and the (3) Weld tabs
provided in the
parts bag.
The damper must
be install as shown in
this illustration. Slide
the damper into the
flue collar on an angle
and then slide the
damper handle thru
the holes in
the flue collar.
5/16-18 x 1-1/2
Bolt
Heater top
Side view of flue collar
mount to heater top
Weld Tab
Cross-section of flue
collar
5
 Loading...