

Page 1
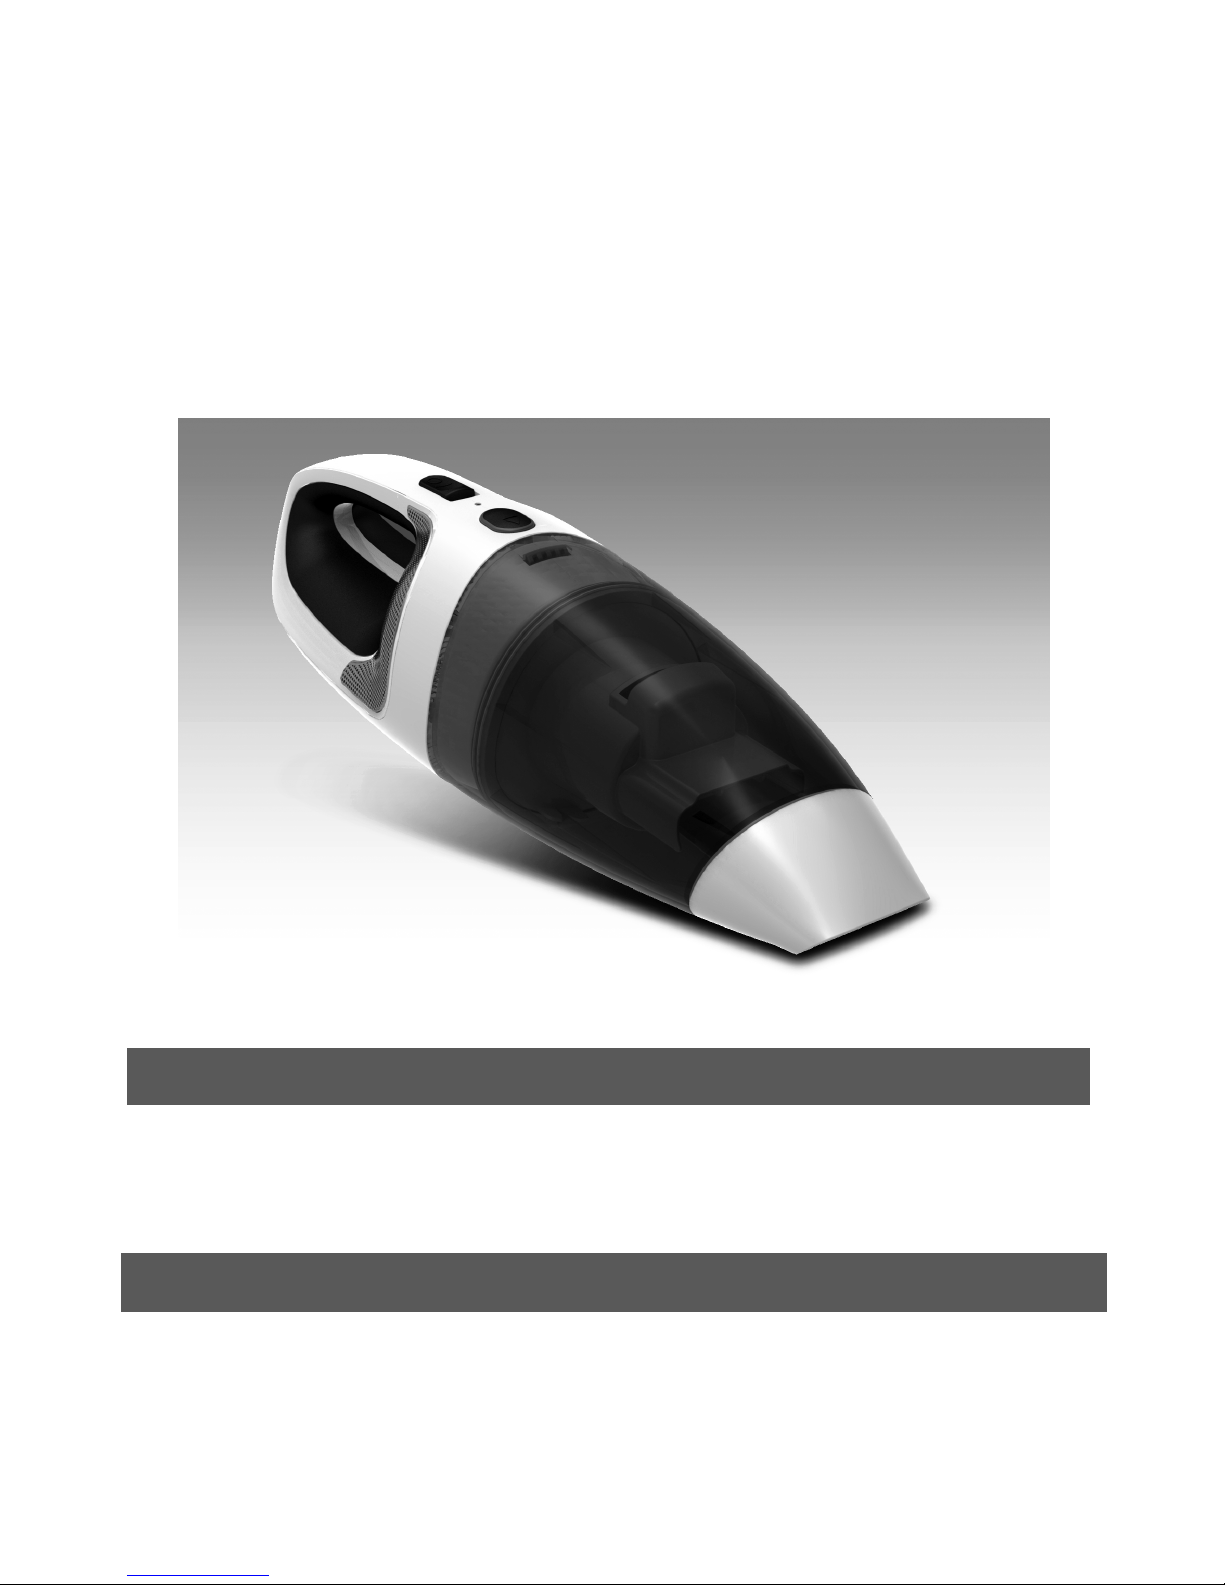
Model No: R-102
Handheld vacuum cleaner
User Manual
Brief Introduction
It is a cordless handy rechargeable vacuum cleaner.
It is wet and dry, can suck up dust and water easily.
It is very convenient for home or any similar places.
General description( Fig. 1)
Page 2
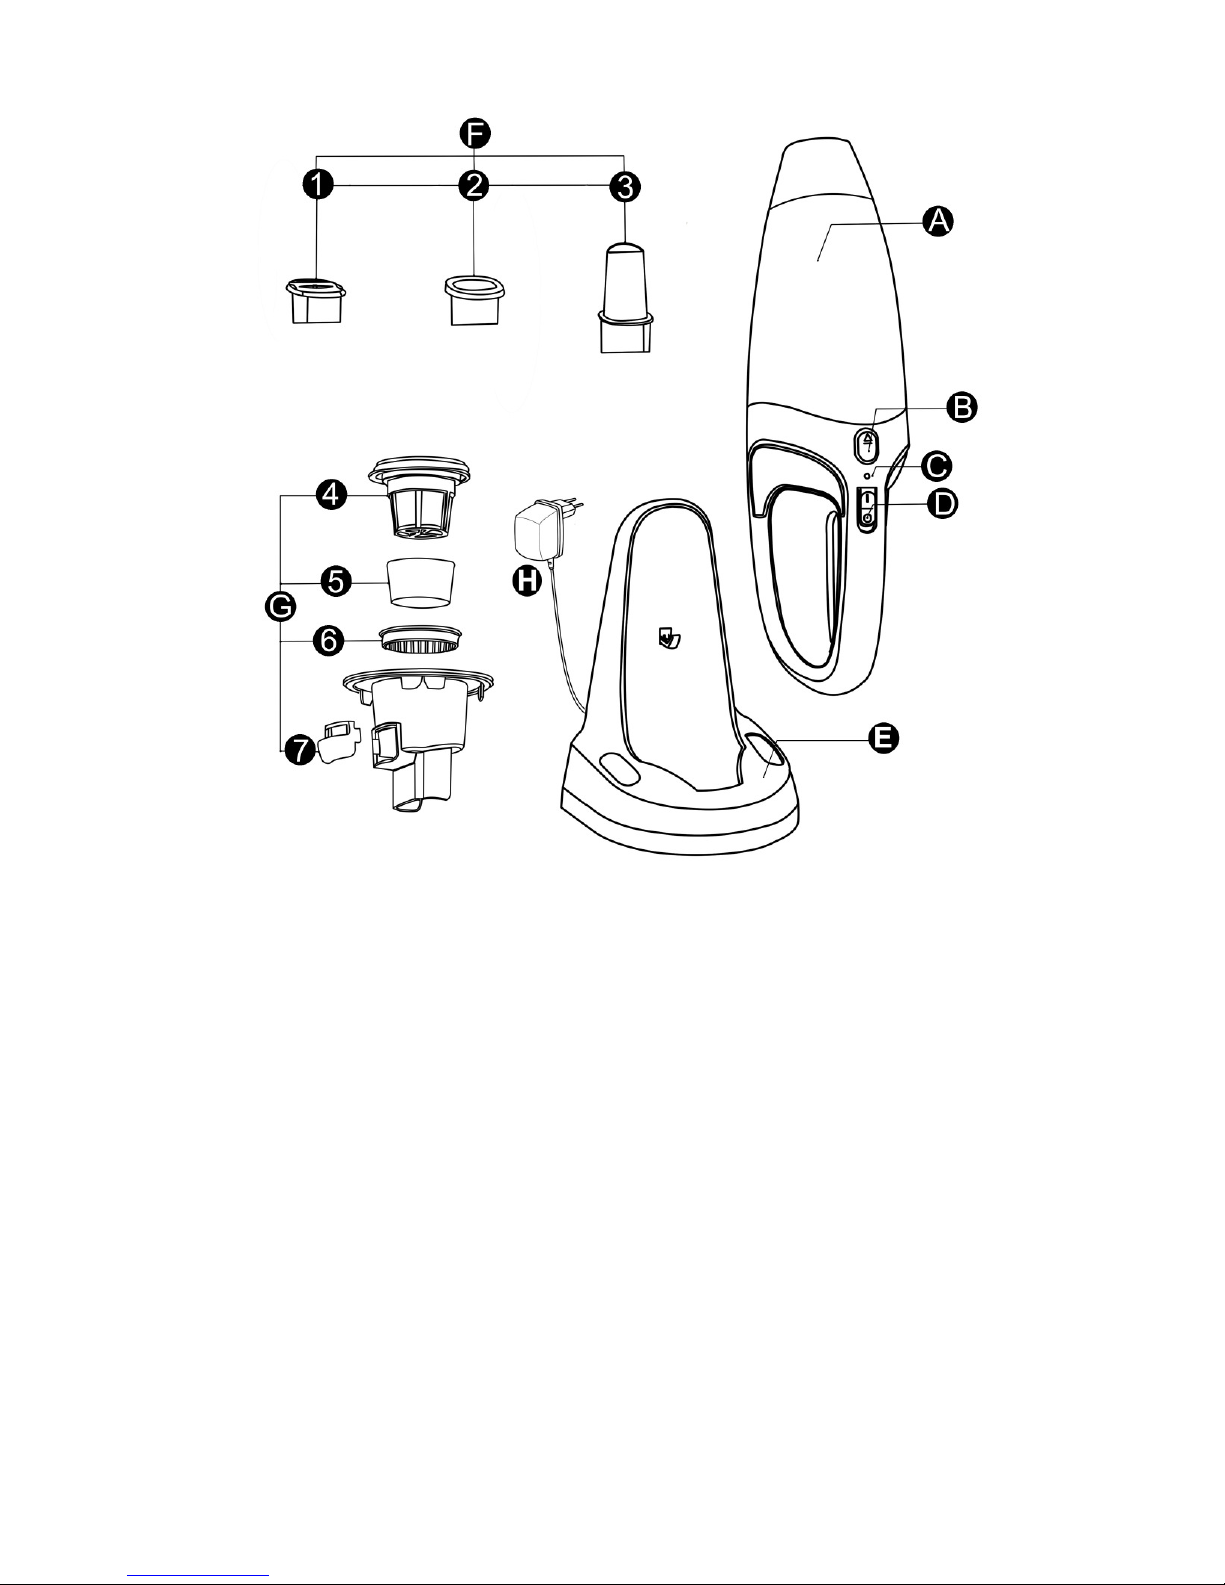
A. Dust compartment
B. Dust compartment release button.
C. On/off slide
D. Charging light(LED)
E. Charger base
F. Accessories:
1. Squeegee brush; 2.Brush tool;3.Crevice tool,
G. Filter unit, including:
4.Inner filter holder; 5.Inner filter; 6. Filter ring
7.Outer filter
H. Adaptor
Page 3

Important
Read this user manual carefully before you use the
appliance and save it for future reference.
Danger
- Never suck up flammable substances or corrosive
liquids and do not suck up ashes until they are cold.
- Never immerse the vacuum cleaner or the charger in
water.
Warning
- Check if the voltage indicated on the appliance
corresponds to the local mains voltage before you
connect the appliance.
- Do not use the appliance if the plug, the mains cord
or other parts are damaged.
- If the cord of the adaptor is damaged, it can not be
replaced and the adaptor must be discarded.
- The adaptor and the charge of this appliance can not
be replaced. If the adaptor or charger is damaged,
the appliance must be discarded.
- This appliance is not intended for use by persons
(including children) with reduced physical, sensory
or mental capabilities or lack of experience and
knowledge, unless they have been given supervision
or instruction concerning use of the appliance by a
person responsible for their safety.
Page 4

- Children should be supervised to ensure that they do
not play with the appliance.
Caution
- Remove the adaptor from the wall socket before you
clean the charger.
- Only charge the vacuum cleaner with the adaptor and
the charger supplied. During charging, the adaptor
feels warm to the touch. This is normal.
- Do not hold the appliance with the dust compartment
pointing upwards and do not tilt the appliance to
one side when you suck up liquids.
- Always switch off the vacuum cleaner after use.
- The voltage on the contact strips in the charger is low
and therefore not dangerous.
- Never block the exhaust air openings during
vacuuming.
- Switch off the appliance when you recharge it.
- Always use the vacuum cleaner with the filter unit
assembled.
- When you have used the appliance to suck up liquids,
empty and dry the dust compartment before you
store the appliance in the charger.
- To avoid the risk of electric shock, be careful when
you drill holes in the wall to attach the charger,
especially close to a wall socket.
Page 5
Preparing for use
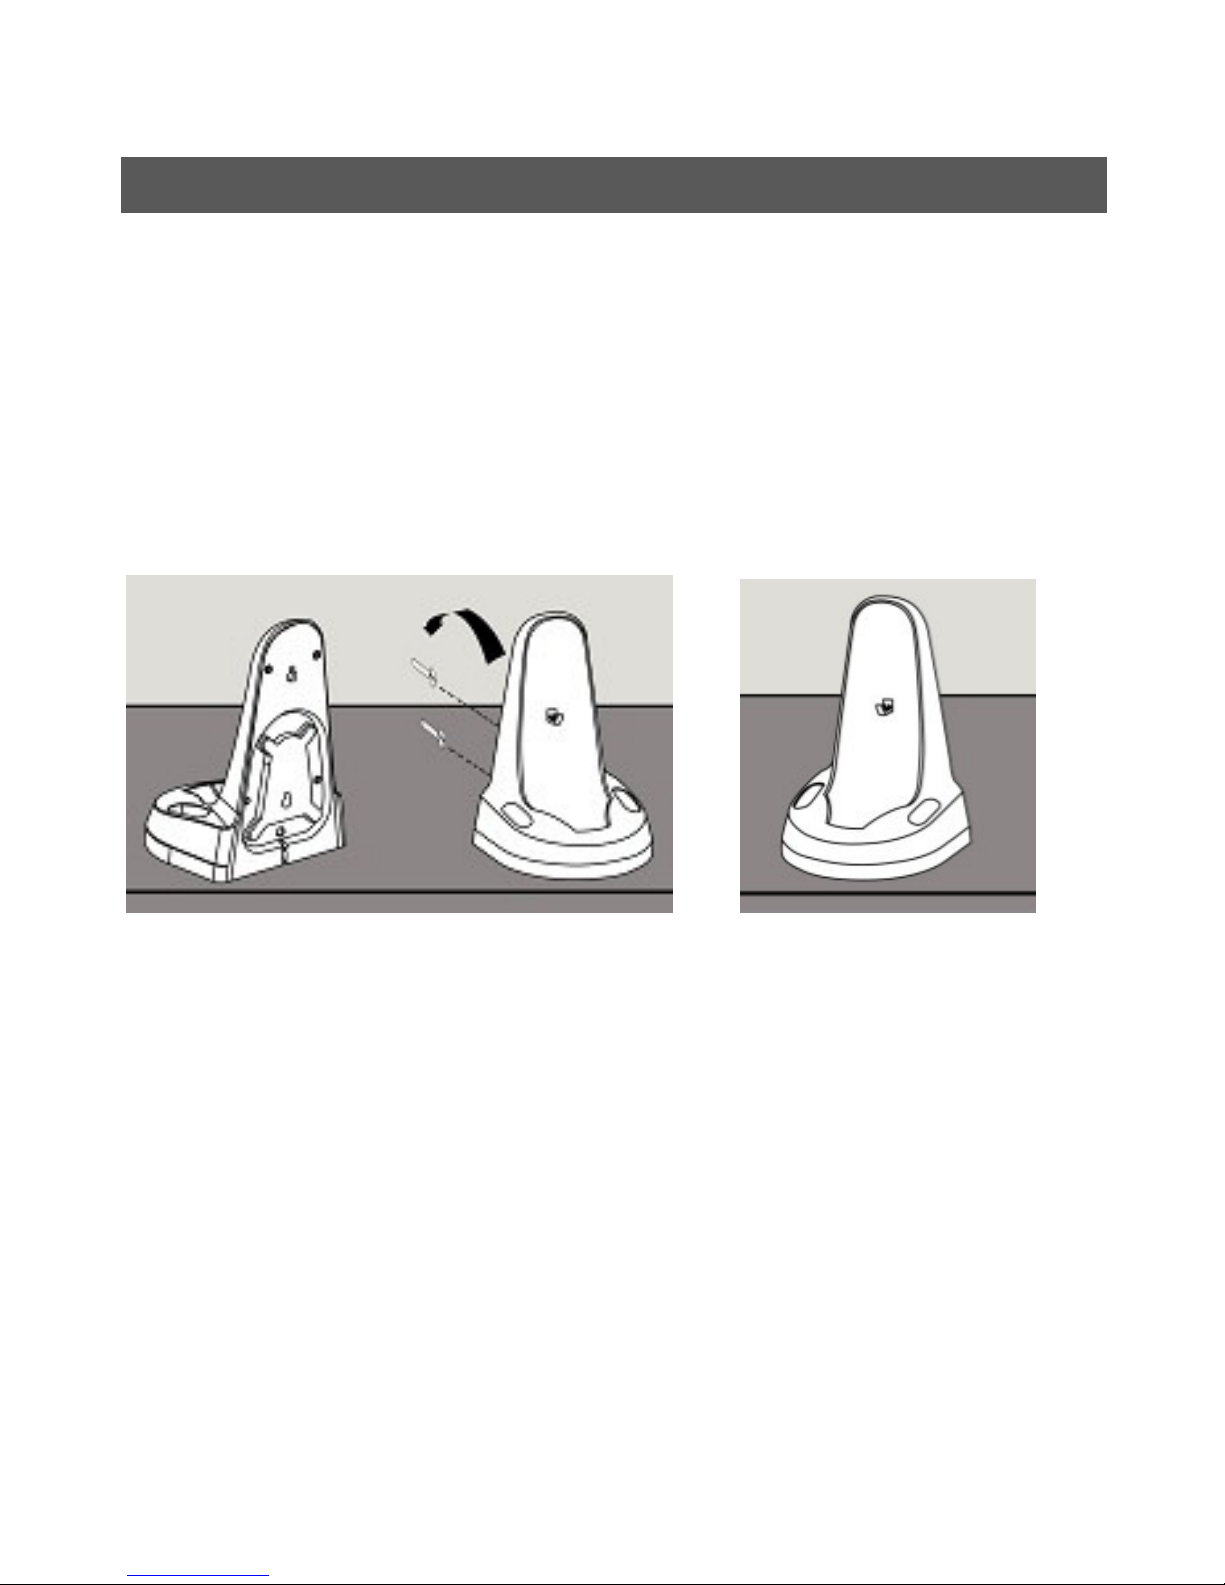
Installing the charger
1. Attach the charger to the wall as shown(Fig.2).
If you attach the charger to the wall, the space
between the screw holes has to be 12 cm.
2. You can also place the charger on a horizontal
surface(e.g.a table or desk)(Fig. 3)
(Fig.2) (Fig.3)
Charging the appliance
Charge the appliance for at least 10 hours every time
when the appliance runs out of power.
1. Make sure the appliance is switched off.
2. Put the adaptor in the wall socket,.
3. Place the vacuum cleaner on the charger(Fig.4)
* The charging light goes on to indicate that the
appliance is in charging(Fig.5)
Page 6
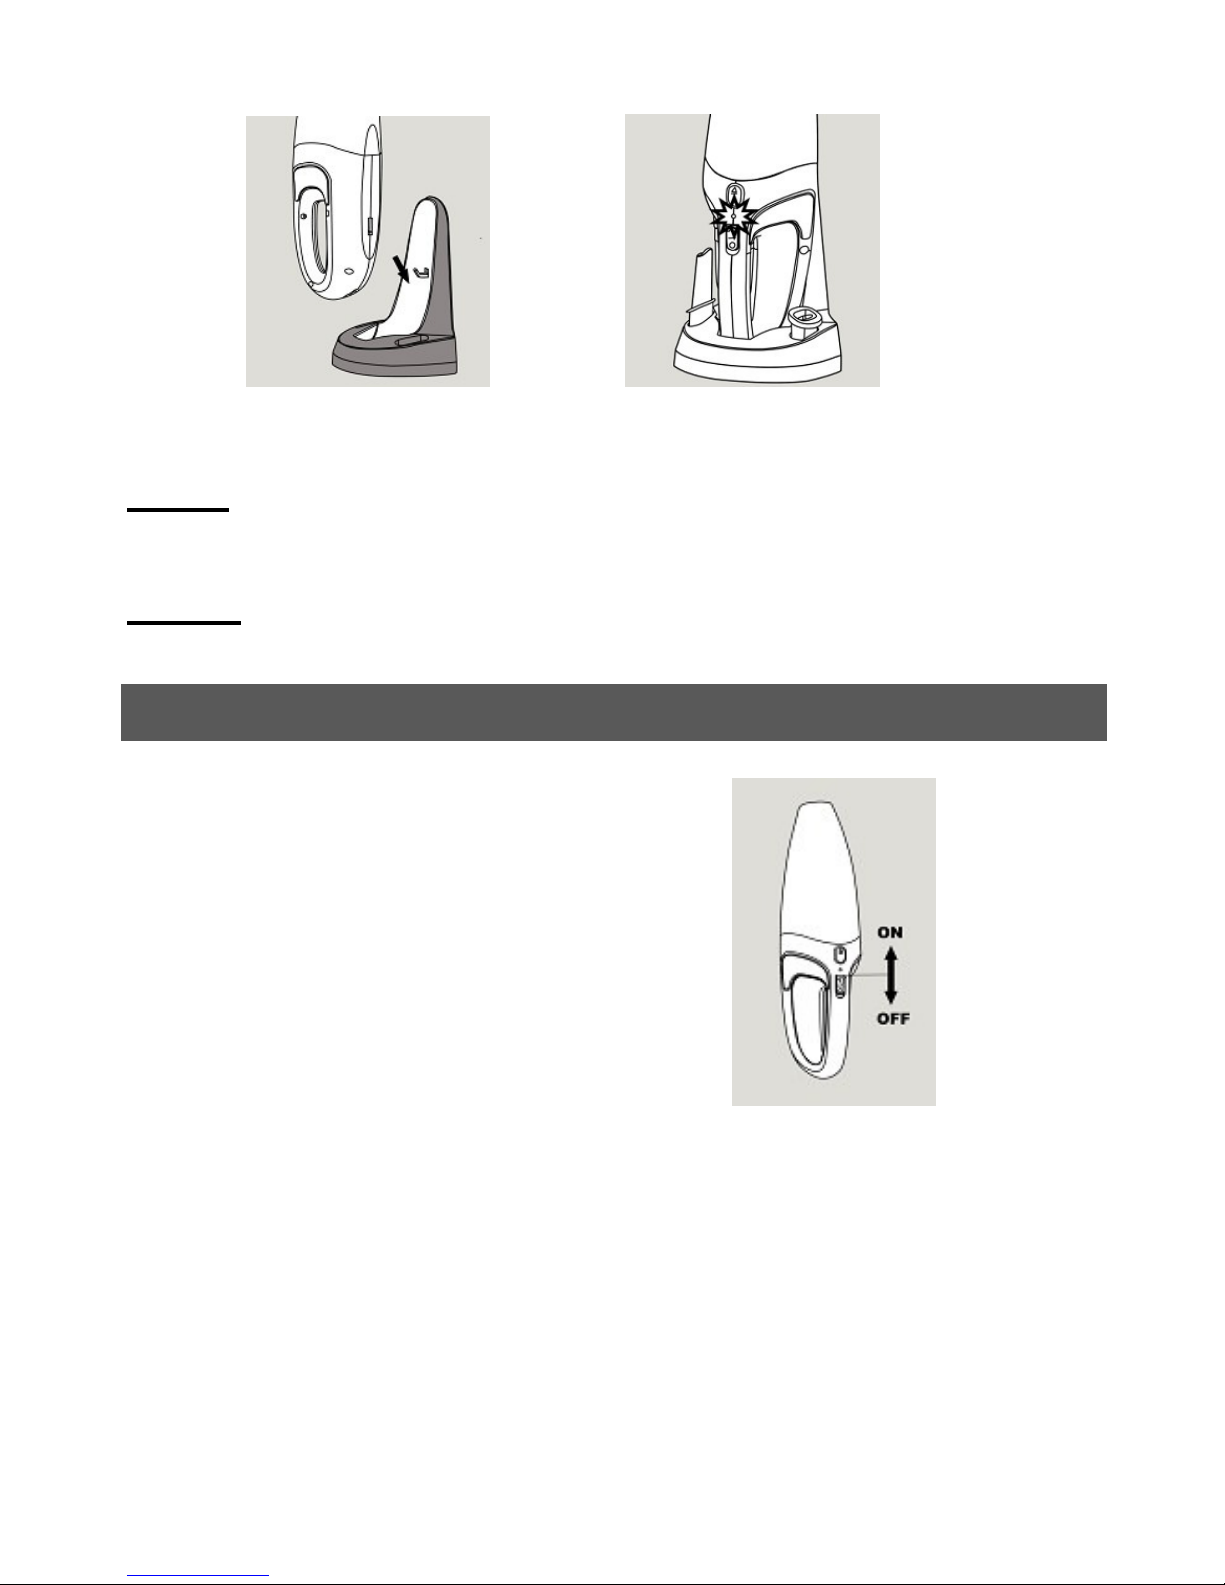
(Fig.4) (Fig.5)
Note: The charging light stays on as long as the
appliance is in the plugged-in charger.
Note: The charging light does not give any information
about the battery charge level of the vacuum cleaner.
Using the appliance
1. Push the on/off slide
Forwards to the switch
on the appliance.
2. Push the on/off slider
backwards to switch
off the appliance (Fig.6) .
Accessories
The appliance comes with the following accessories:
- a brush tool to clean delicate surfaces;
- a crevice tool to vacuum corners or narrow gaps;
- a squeegee to suck up liquid.
(Fig.6)
Page 7
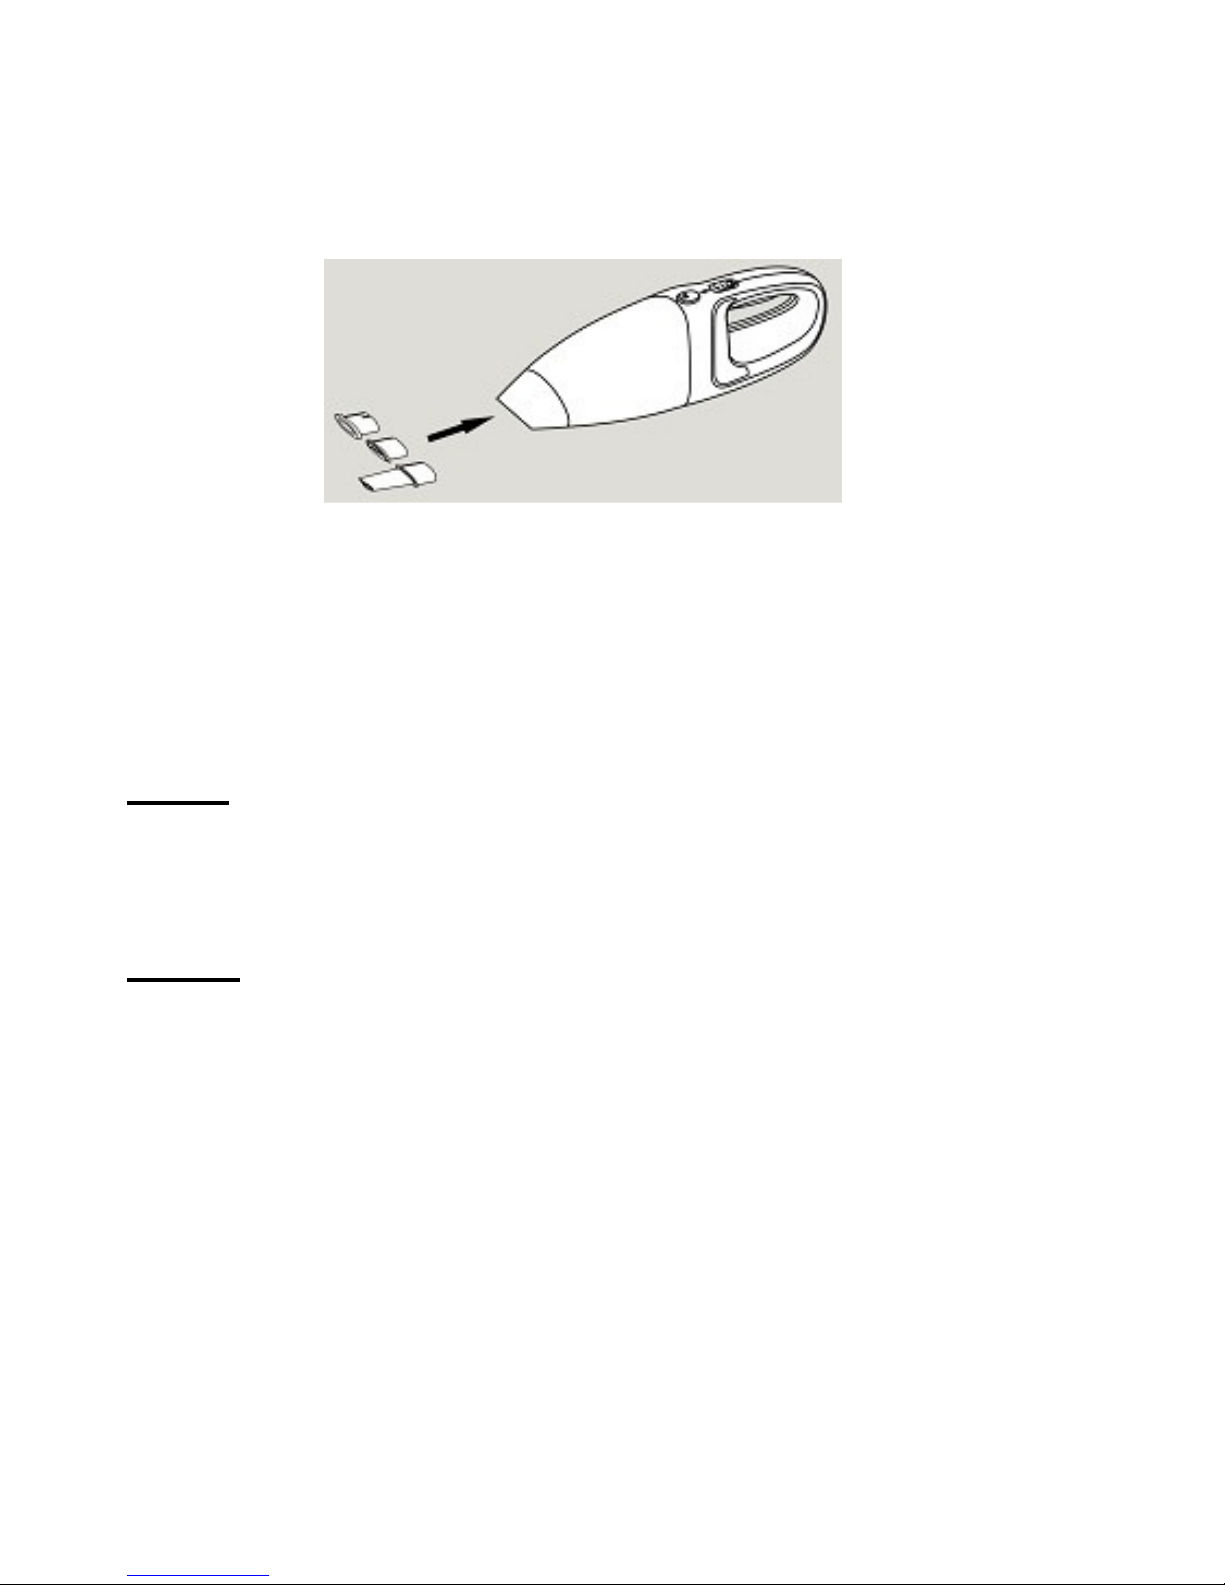
1. Take the accessory you want to use.
2. Attach the accessory to the nozzle of the appliance.
(Fig.7)
Sucking up liquid
Connect the squeegee to the appliance.
1. Hold the appliance with the nozzle pointing
downwards at an angel of 30o.
Note: Never hold the appliance with the nozzle
pointing upwards when there is liquid in the dust
compartment.
Note: Do not tilt the appliance to one side or shake the
appliance when there’s liquid in the dust compartment
3. Place the squeegee on the surface to be cleaned.
Make sure the squeegee stays in contact with the
surface.
4. Suck up liquid
Stop sucking up liquid when the liquid level inside the
dust compartment has reached the maximum
indication.
Page 8
5. Empty and dry the dust compartment each time
you have used the appliance to suck up a liquid.
Cleaning:
Always remove the adaptor from the wall socket
before you clean the charger. When you have used the
appliance to suck up liquid always empty and dry the
dust compartment after use. Clean the appliance and
the charger with a damp cloth.
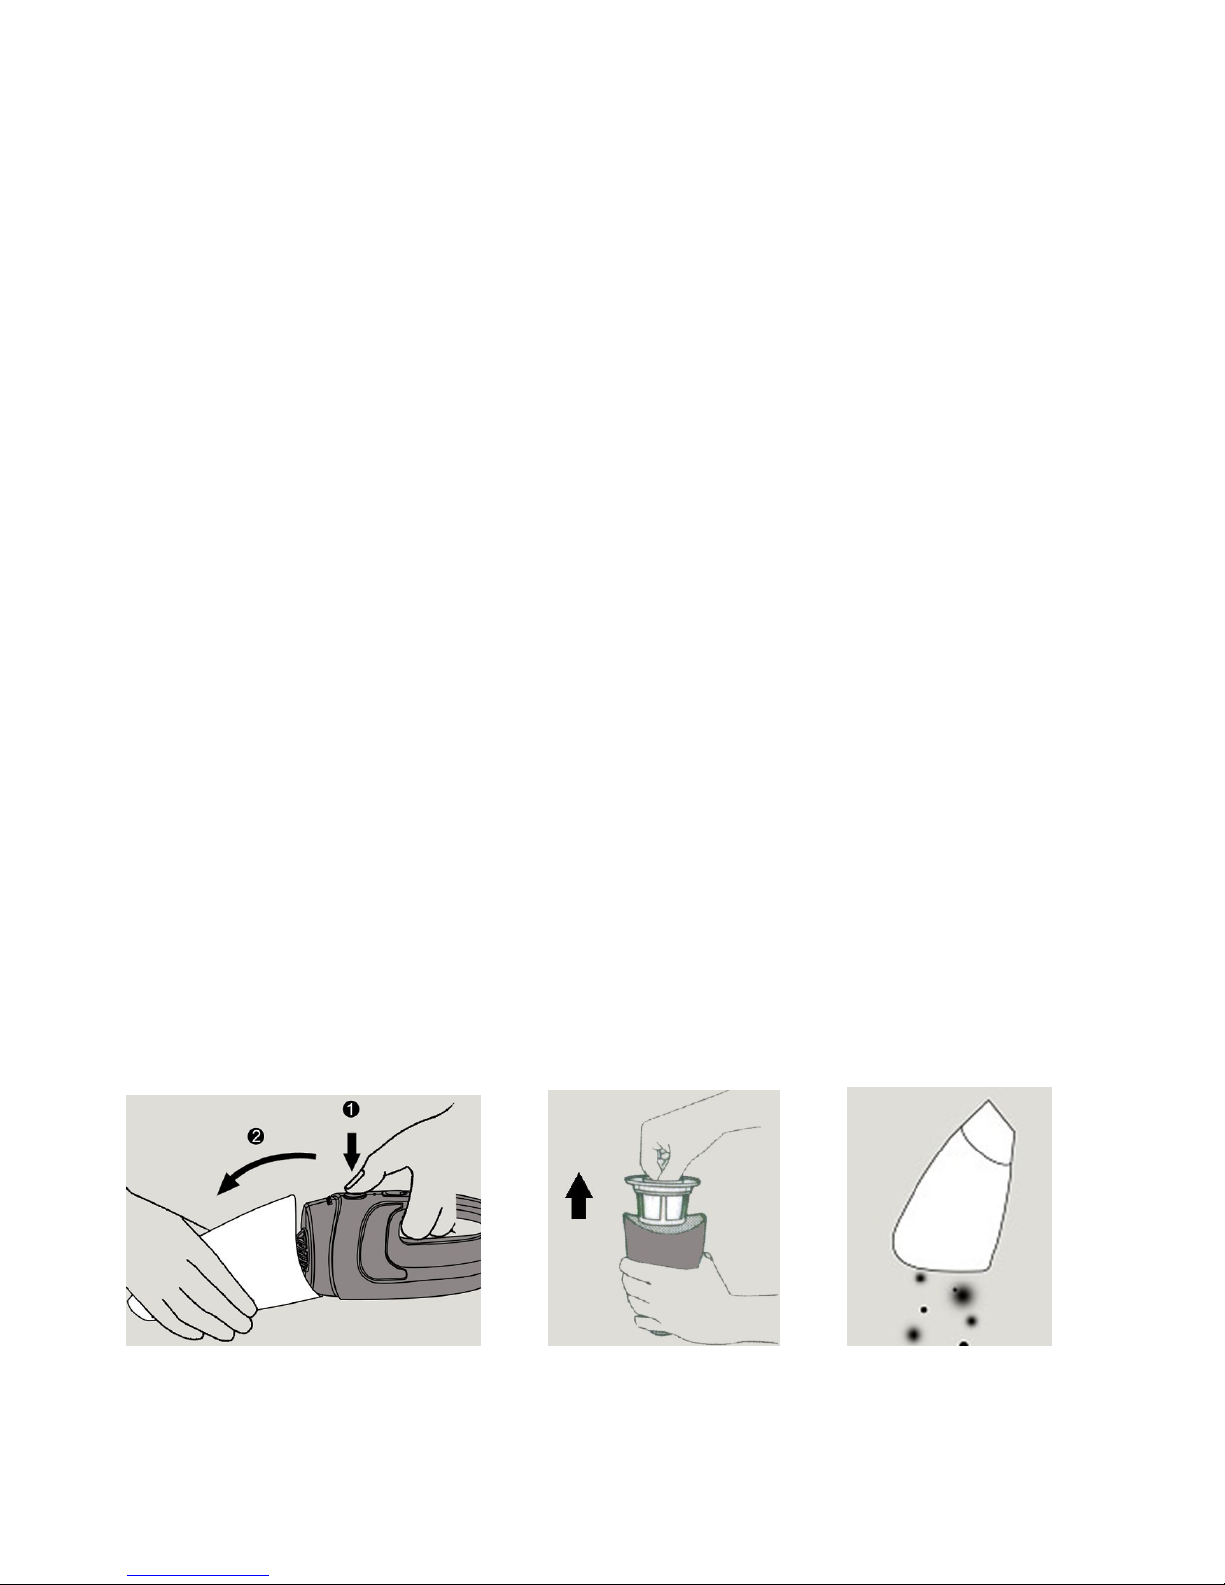
1. Hold the appliance over a dust bin, press the dust
compartment release button(1) and remove the
dust compartment(2) .(Fig.8)
2. Remove the filter unit from the main body(Fig.9).
3. Empty the dust compartment by shaking it with
the free hand(Fig.10). If necessary, clean the dust
compartment with a damp cloth.
Make sure you empty and clean the dust compartment
regularly.
(Fig.8) (Fig.9) (Fig.10)
Page 9
Note: If there is liquid in the dust compartment,
empty the dust compartment and wipe it dry.
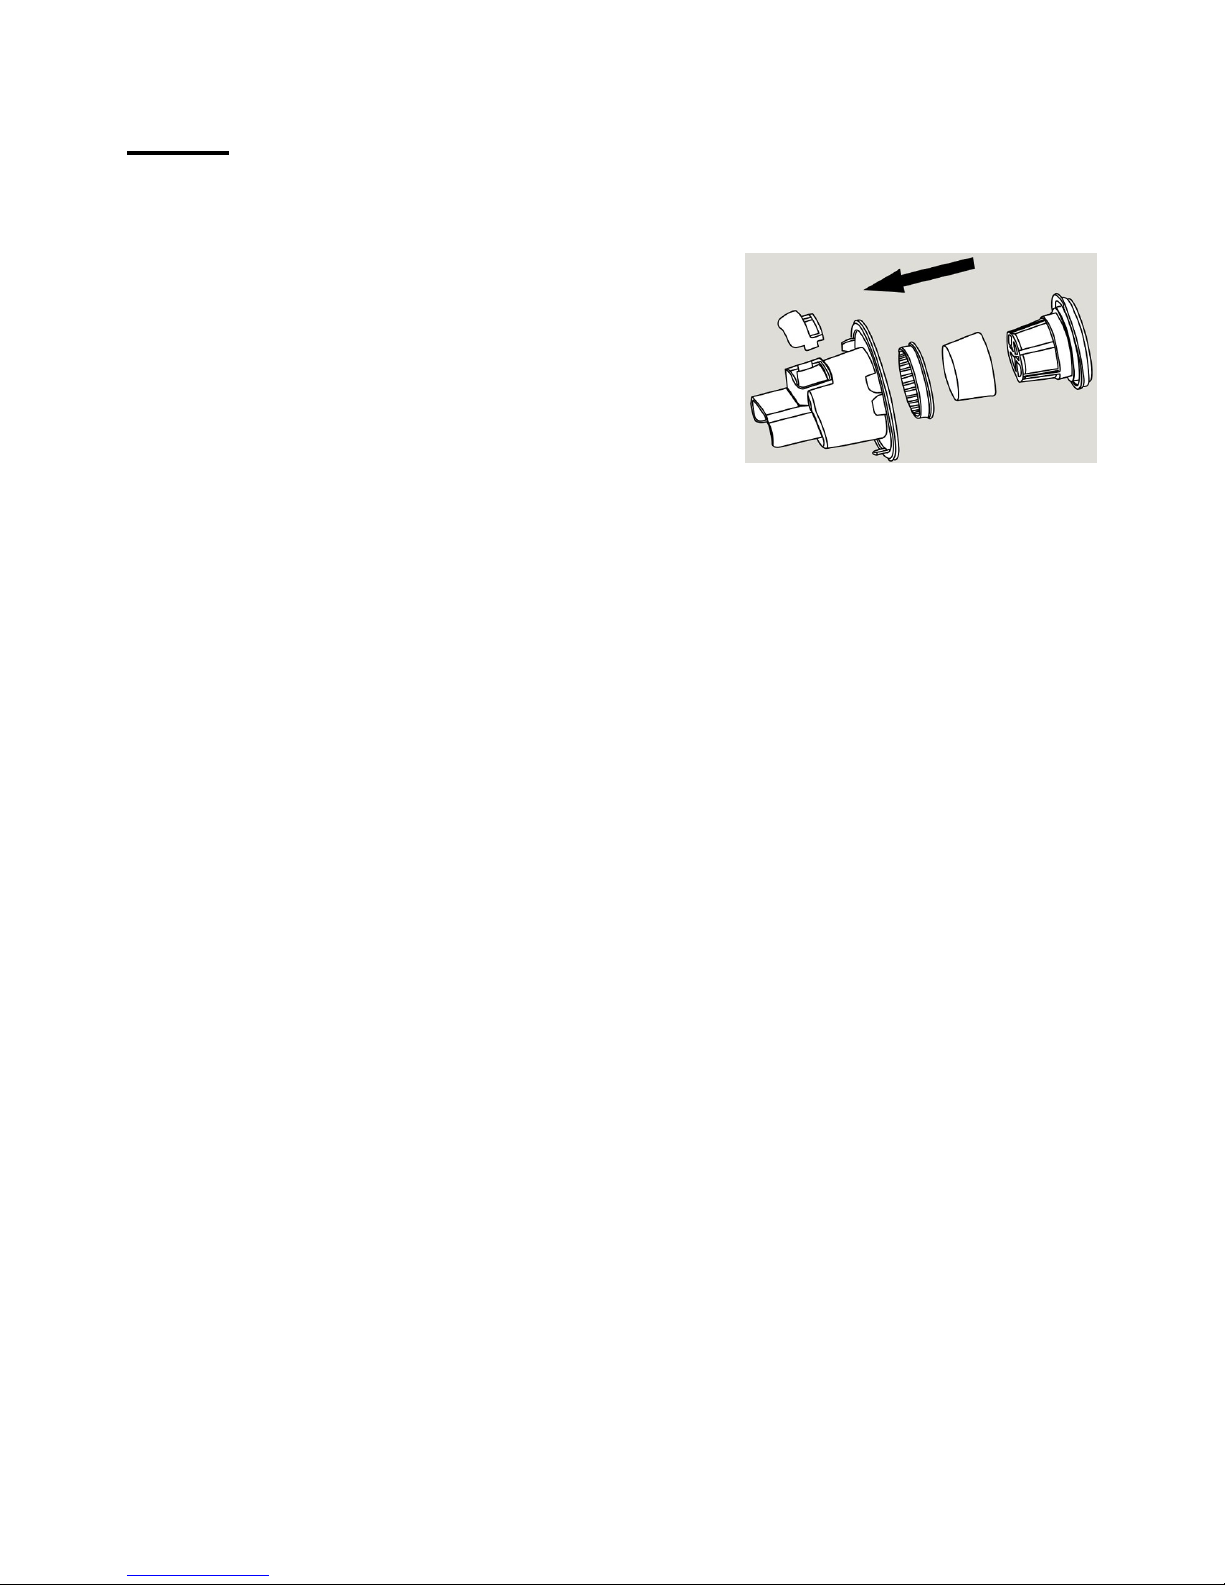
4. Clean the filter unit:
Take the outer filter from
the filter holder and then
the filter ring and remove
inner filter from the filter
holder.(Fig.11)
Clean the inner filter and the
outer filter with a brush or with a normal vacuum
cleaner if it is very dirty.
Note: If necessary, you can clean the inner filter and
the outer filter in cold or lukewarm water. Dry the
inner and outer filter thoroughly before you use the
filter unit again.
5. Put the inner filter back into the filter holder, put
the filter ring and then the outer filter.(Fig.12)
6. Put the filter unit back to the dust compartment.
(Fig.13).
7. To reattach the dust compartment, align the slot on
the dust compartment with the projection on the
appliance. First attach the bottom of the dust
compartment(1) and then push the top of the dust
compartment towards the appliance(2) until it
locks into place("click")(Fig.14)
(Fig.11)
Page 10
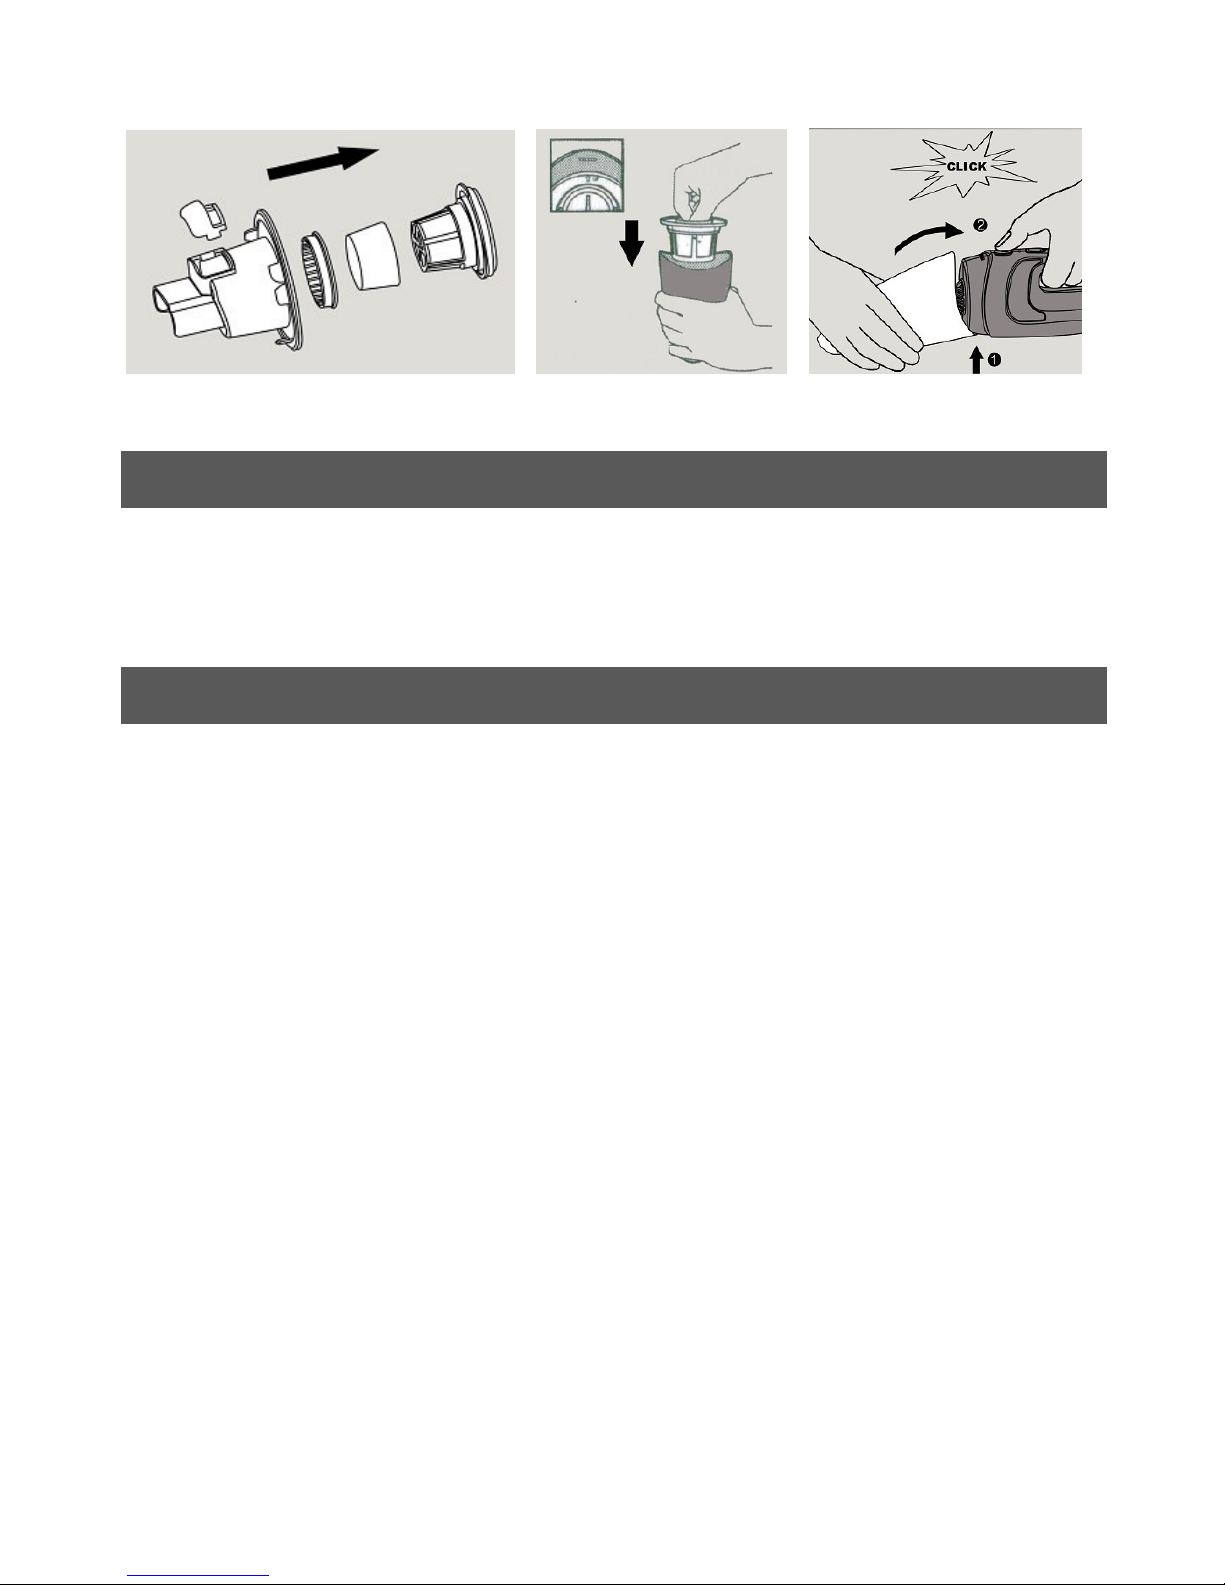
(Fig.12) (Fig.13) (Fig.14)
Storage
You can store the vacuum cleaner and the accessories
on the charger.
Replacement
We advise you to replace the inner filter after a
prolonged period of use or if you can no longer clean it
properly.
Replacing the inner filter
1. Remove the filter unit from the main body.
2. Take the outer filter from the filter holder.
3. Gently take off the filter ring, then the inner filter.
4. Place a new inner filter on the filter holder and
put the ring on to attach it.
5. Put the outer filter back and fix them properly.
6. Put the filter unit back into the dust compartment.
Note: Make sure you insert the filter unit in the correct
way.
Page 11

Environment
- Do not throw away the appliance with the normal
household waste at the end of its life, but hand it in
at an official collection point for recycling. By doing
this, you help to preserve the environment.
- The build-in rechargeable batteries contain
substances that may pollute the environment.
Remove the batteries when you discard the
appliance. Do not throw away the batteries with the
normal household waste, but hand them in at an
official collection point.
Saving energy
If you are not going to use the appliance for a longer
period of time, remove the adaptor from the wall
socket to save energy.
Disposing of the rechargeable batteries
N-MH batteries may explode when exposed to high
temperatures or fire.
Only remove the rechargeable batteries if they are
completely empty.
Remove the rechargeable batteries in the following
way:
Page 12
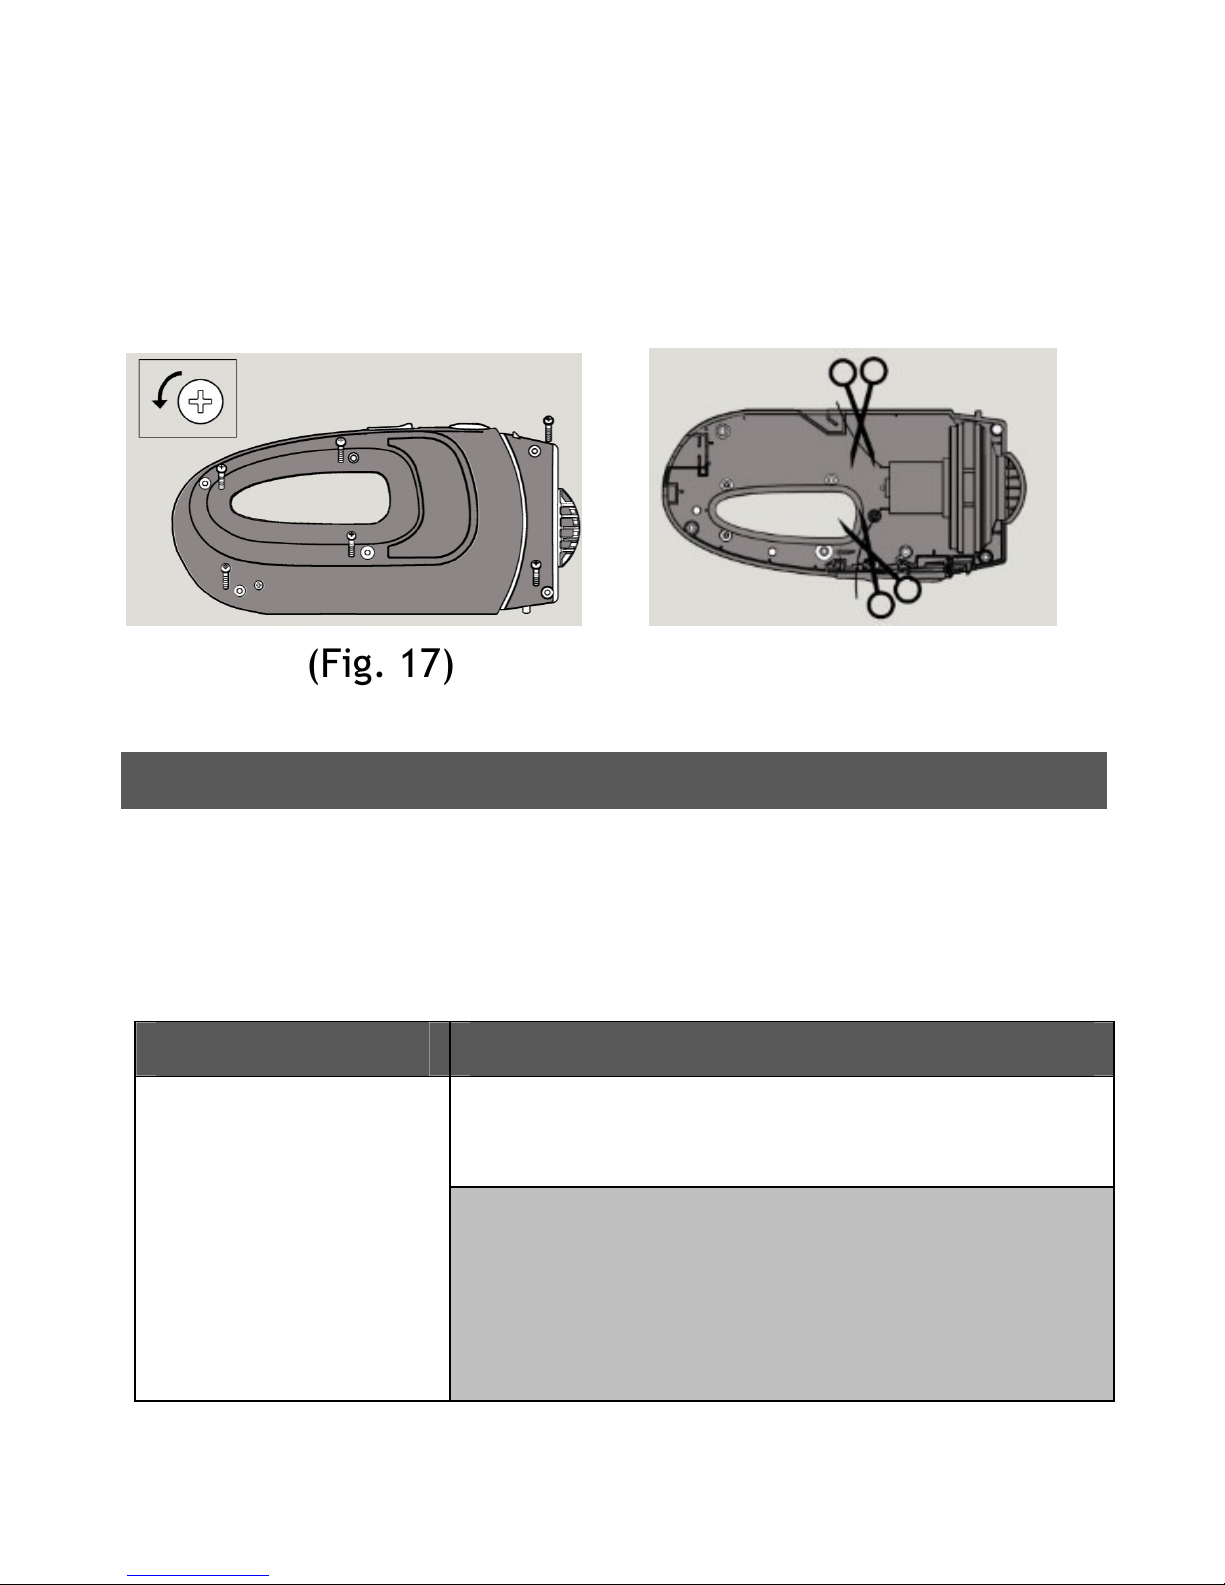
1. Let the vacuum cleaner run until it stops, undo the
screws and open the vacuum cleaner.(Fig 17)
2. Cut the connecting wires one by one and remove
the batteries.(Fig 18)
(Fig. 17) (Fig.18)
Trouble shooting
This chapter summarizes the most common problems
you could encounter with your vacuum cleaner. Please
read the different sections for more details.
Problem Solution
The appliance
does not work
The batteries may be low.
Recharge the batteries.
You may not have put the adaptor
properly in the wall socket.
Put the adaptor properly in the
wall socket.
Page 13

The appliance may have been
switched on while it was on the
charger. Make sure the appliance is
switched off when you charge it.
The charging
light does not
go on
Make sure that the adaptor is
inserted properly in the wall
socket and that the appliance is
switched off.
The vacuum
cleaner does
not vacuum
properly
The dust compartment may not be
attached properly to the
appliance. Attach the dust
compartment properly to the
appliance.
The dust compartment may be full.
Empty the dust compartment.
The filter unit may be clogged.
Clean the inner filter and the outer
filter(See the chapter"Cleaning")
Dust escapes
from the
vacuum
cleaner
The dust compartment may be
full.Empty the dust compartment.
The dust compartment may not be
attached properly to the
appliance. Attach the dust
compartment properly to the
appliance.
Page 14

Perhaps the filter unit is not placed
properly in the dust compartment.
Place the filter unit properly in the
dust compartment.
The vacuum
cleaner does
not work
properly when
on of the
accessories is
attached to
the nozzle.
The dust compartment may be full.
Empty the dust compartment.
The accessory may be clogged.
Remove the obstruction from the
accessory.
The filter unit may be clogged.
Clean the inner filter and the outer
filter(See the chapter. Cleaning)
The surface is
still very wet
after
vacuuming
liquid.
Perhaps the squeegee is not
attached to the nozzle. Attach the
squeegee to the nozzle when you
want to suck up liquid.
Perhaps you do not hold the
appliance in the right way. Hold
the appliance with the nozzle
pointing downwards at an angle of
30o.Do not tilt the appliance to one
side and make sure the squeegee
touches the surface to be cleaned.
Page 15

Liquid leaks
from the
appliance.
The filter unit may be wet .Make
sure the inner filter and the outer
filter are dry before you place the
filter unit in the dust
compartment.
You may not have put the filter
unit in the dust compartment.
Never use the appliance without
the filter unit.
Perhaps the filter unit is not placed
properly in the dust compartment.
Place the filter unit properly the
dust compartment.
Perhaps the amount of liquid in the
dust compartment exceeds the
maximum indication. Empty the
dust compartment immediately
and dry it. Never let the dust
compartment fill up with liquid
beyond the maximum indication.
Page 16

IMPORTANT INFORMATION FOR CORRECT DISPOSAL
OF THE PRODUCT IN ACCORDANCE WITH EC
DIRECTIVE 2002/96/EC.
At the end of its working life, the product must not
be disposed of as urban waste.
It must be taken to a special local authority
differentiated waste collection centre or to a dealer
providing this service.
Disposing of a household appliance separately avoids
possible negative consequences for the environment
and health, deriving form inappropriate disposal and
enables the constituent materials to be recovered to
obtain significant savings in energy and resources. As a
reminder of the need to dispose of household
appliances separately, the product is marked with a
crossed-out wheeled dustbin.
 Loading...