

Page 1

TB80 Quick Start Guide
EN
FR
DE
P. 2
P.25
P. 46
EN
P. 70 Additional Information
Rugged Tablet
Page 2

As we are often updating and improving our products, your device’s software may have
a slightly different appearance or modified functionality than presented in this Quick
Start Guide.
EN
Table of contents
Package Contents
4
Description of the tablet
5
Inserting mini SIM & Micro-SDcards
8
Windows
Getting started
10
Connecting to aWiFi
12
Getting familiar with Windows 10
13
The Windows 10interface
14
Windows notificationcenter
16
Android
Getting started
18
4G & WiFi connections
20
Google & Contacts
22
Hints &tips 24
Page 3

EN
Package Contents
Check your product box for the following items:
- Fieldbook K80 withhand strap
- Active Stylus pen
- Battery for stylus pen
- Micro USBcable
- USB host cable
- AC adapter with EU, UK and USplug
The items supplied with your device and available accessories may vary depending on
your region or service provider.
The supplied items are designed only for your device and may not be compatible with
other devices.
Unapproved accessories may cause your device to malfunction.
3
Page 4

4
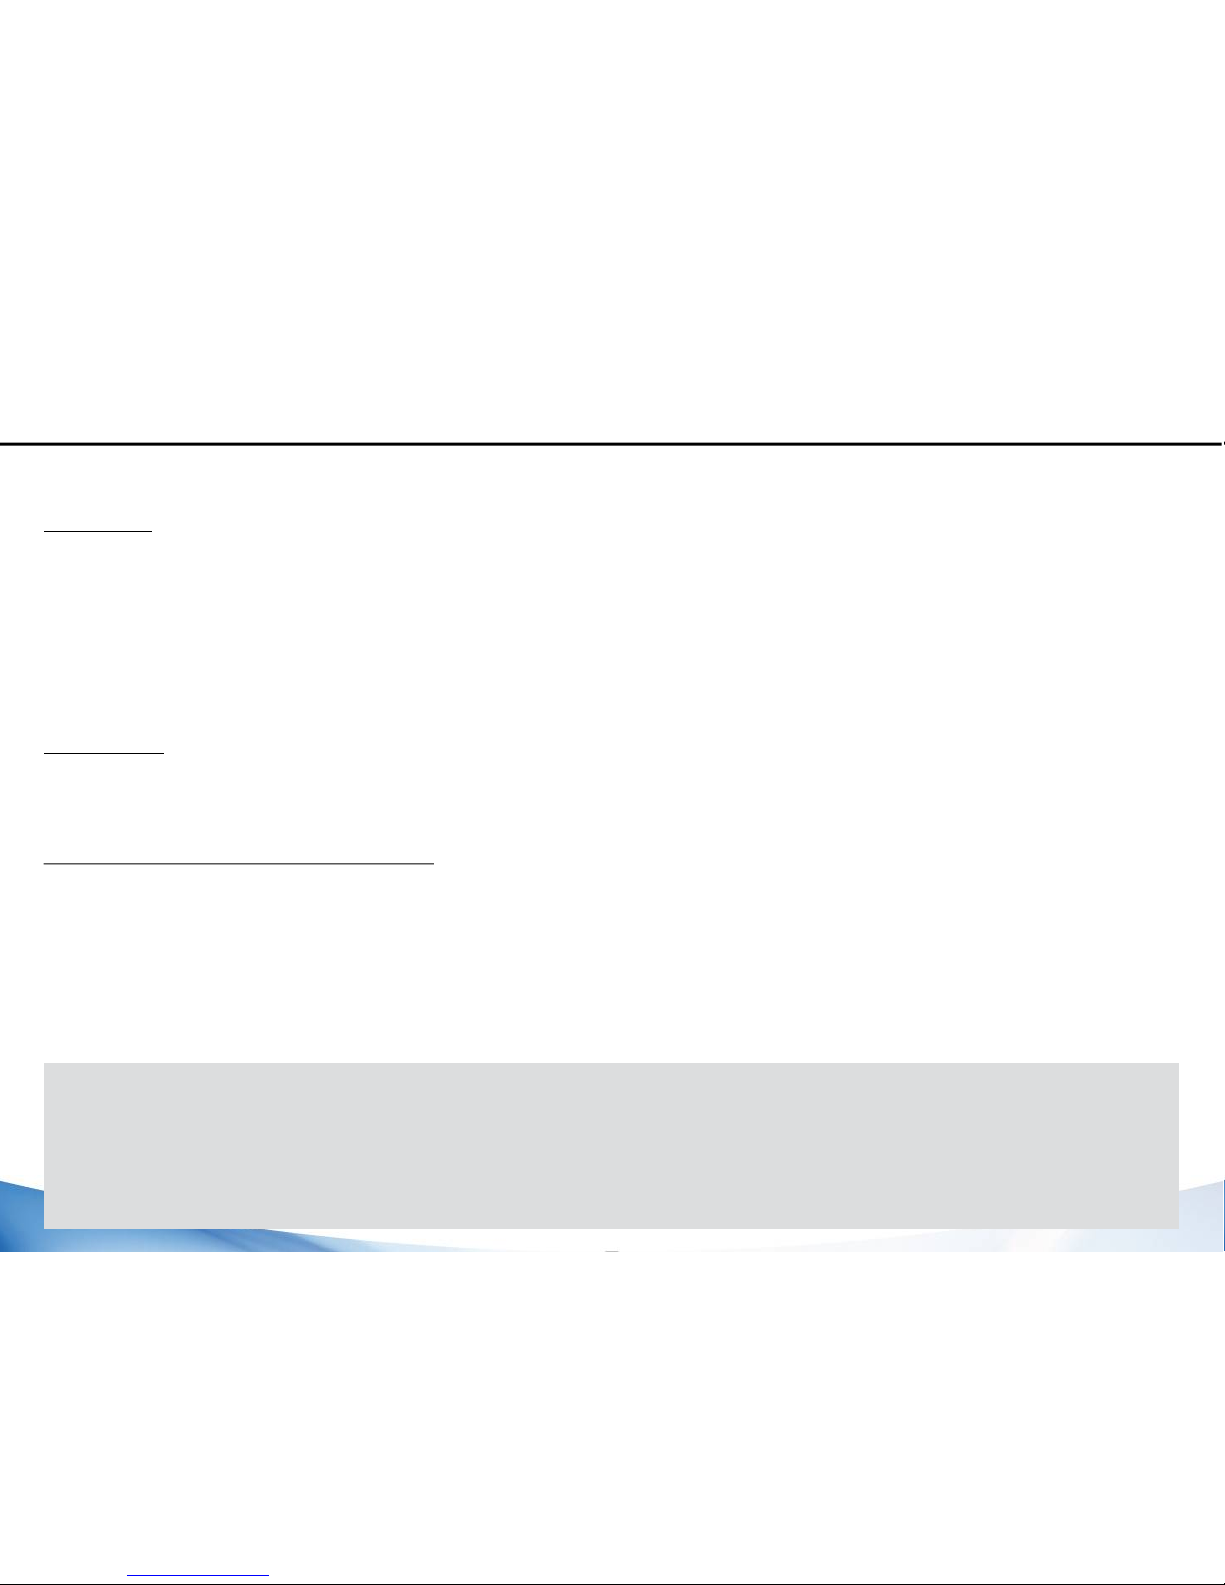
Description of the tablet
1 2 3 4 5
6
7
8
1Function buttonF
2 Power On/Off
3 Volume +
4Volume -
5
6
7
8
Barcode scanner(option)
Front camera
Touchscreen
Pogo connector
Page 5
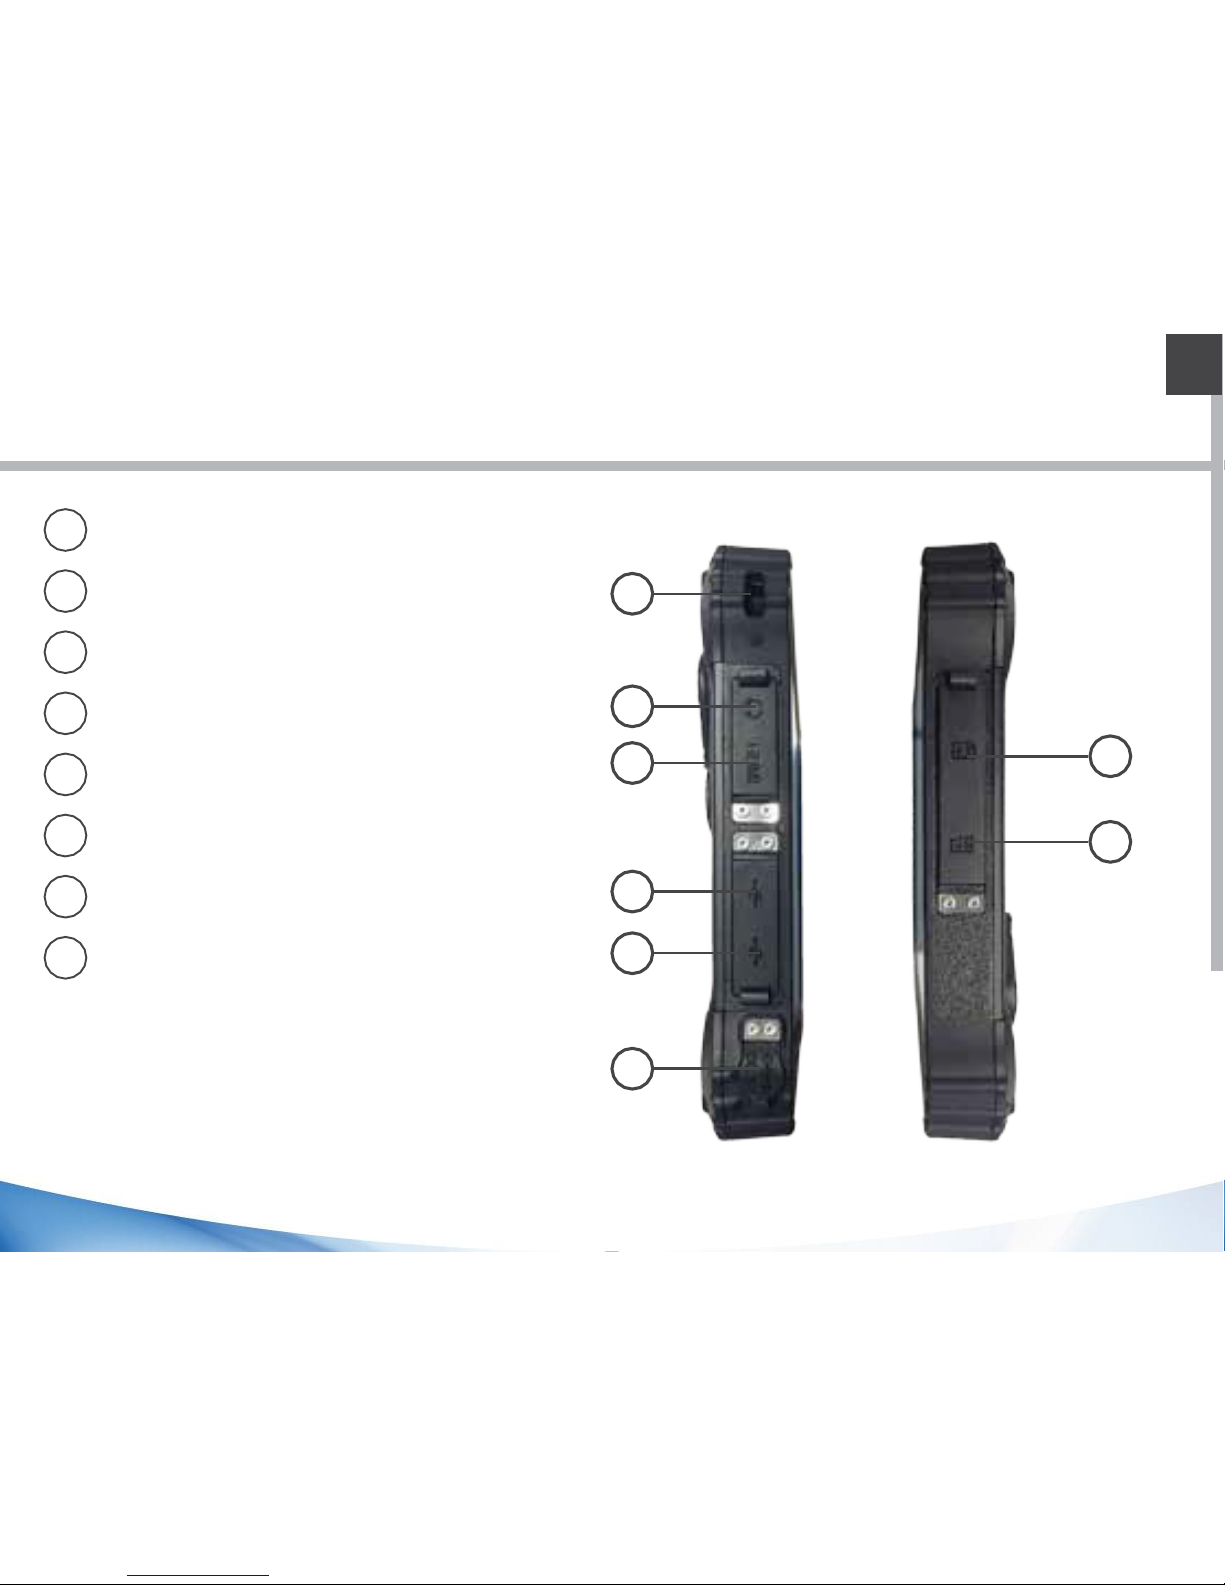
5
EN
Description of the tablet
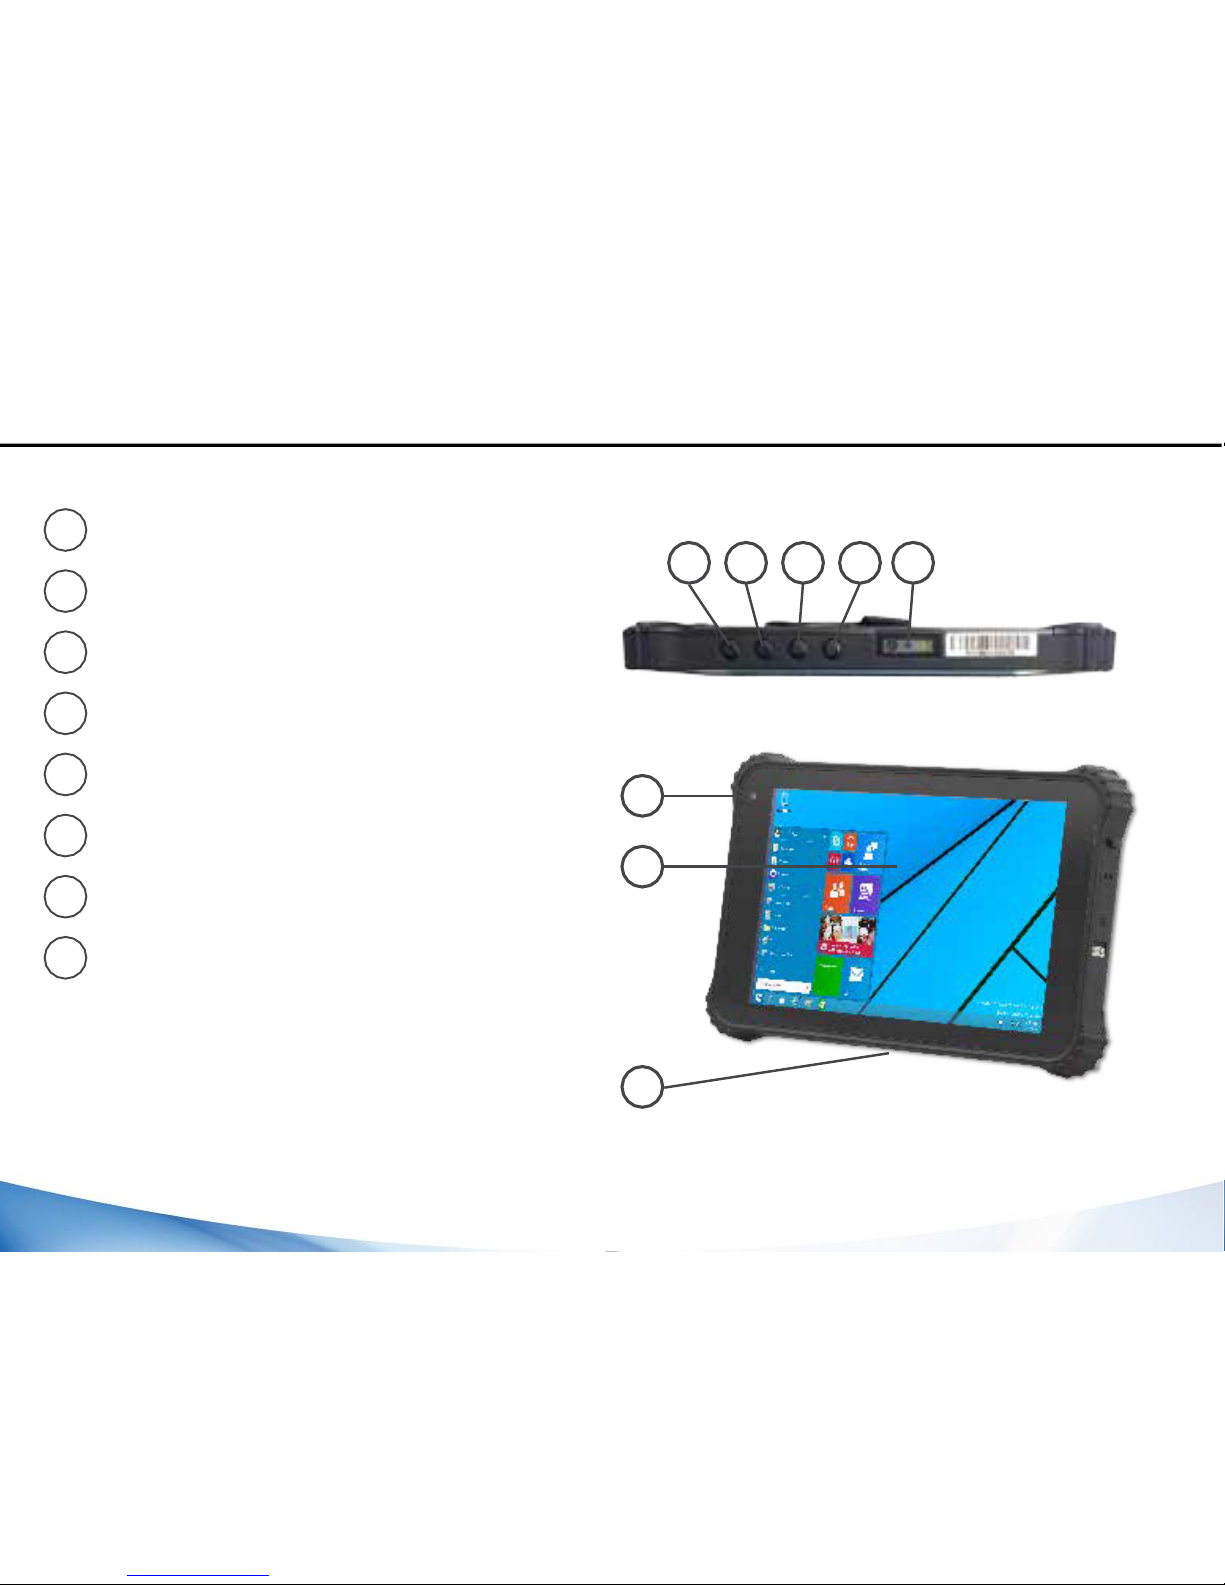
9
10
11
12
13
14
15
16
9
Kensington Lock
10
Audiojack
11HDMIport
12 USB port
13 USB port
14 DC-In
15SIM card slot
16
SD card slot
Page 6
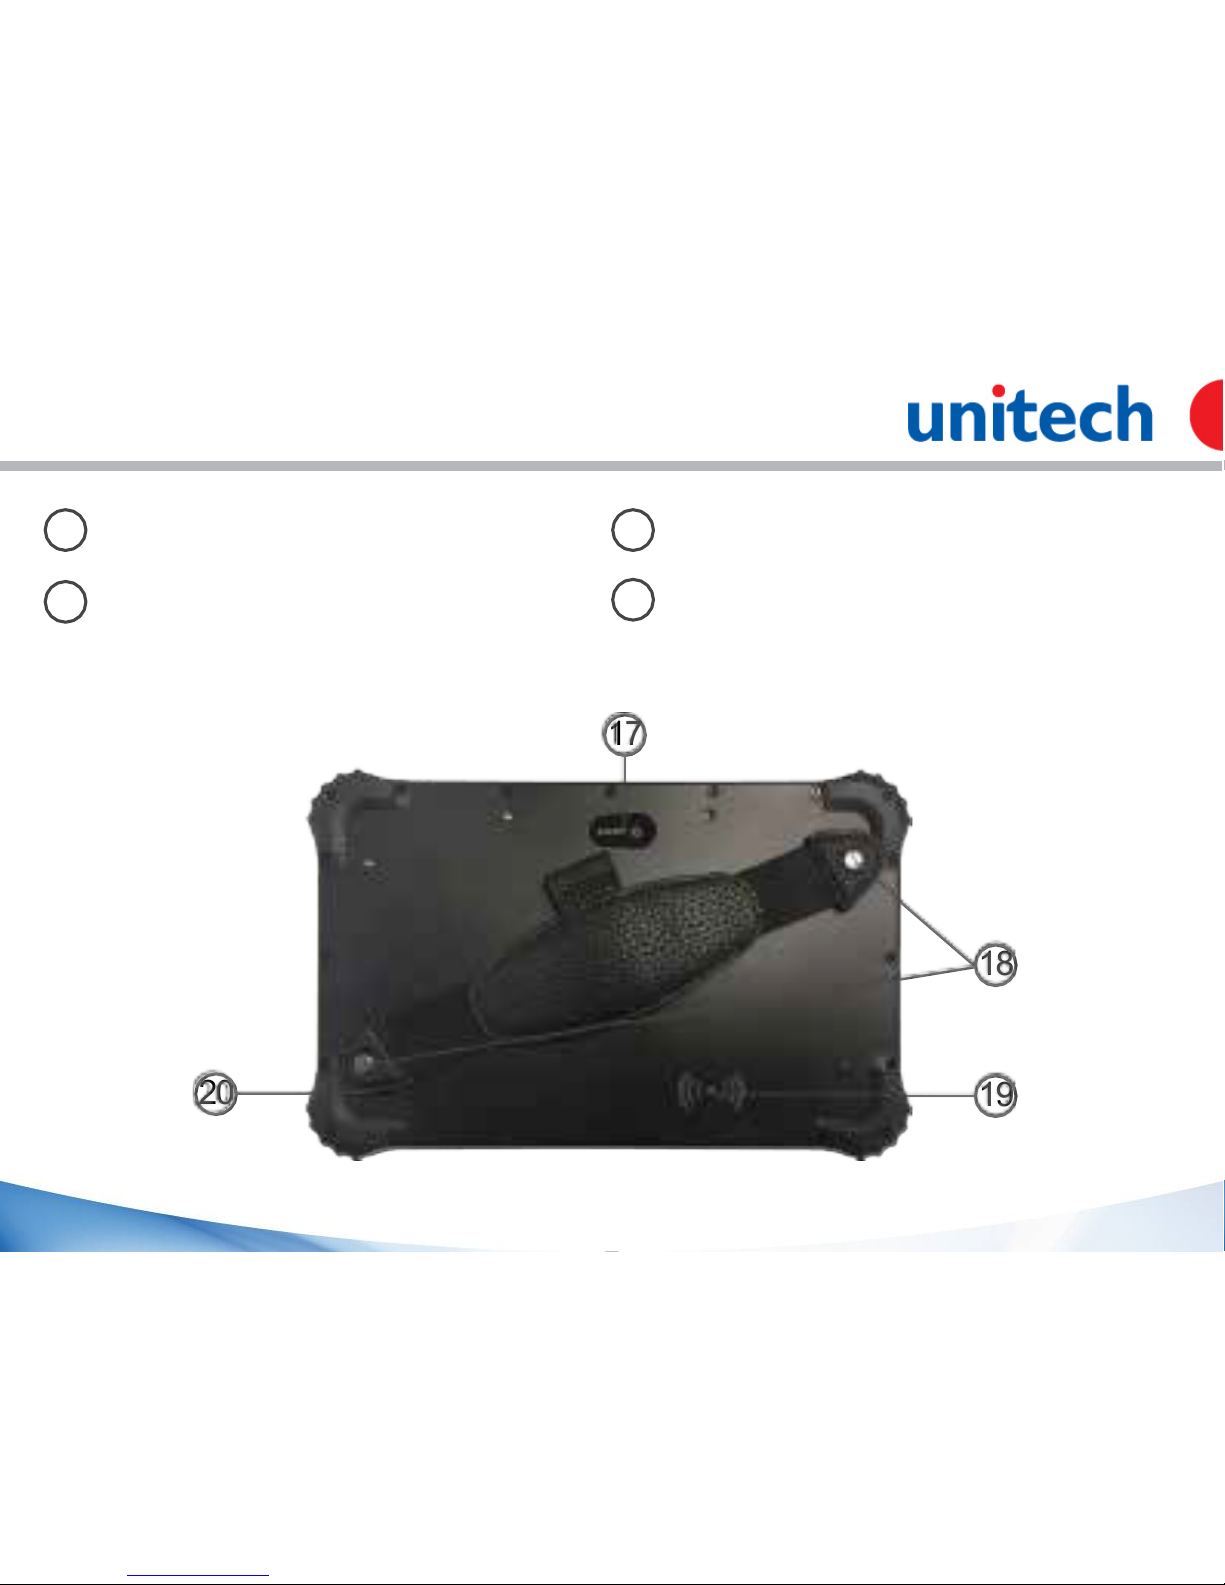
6
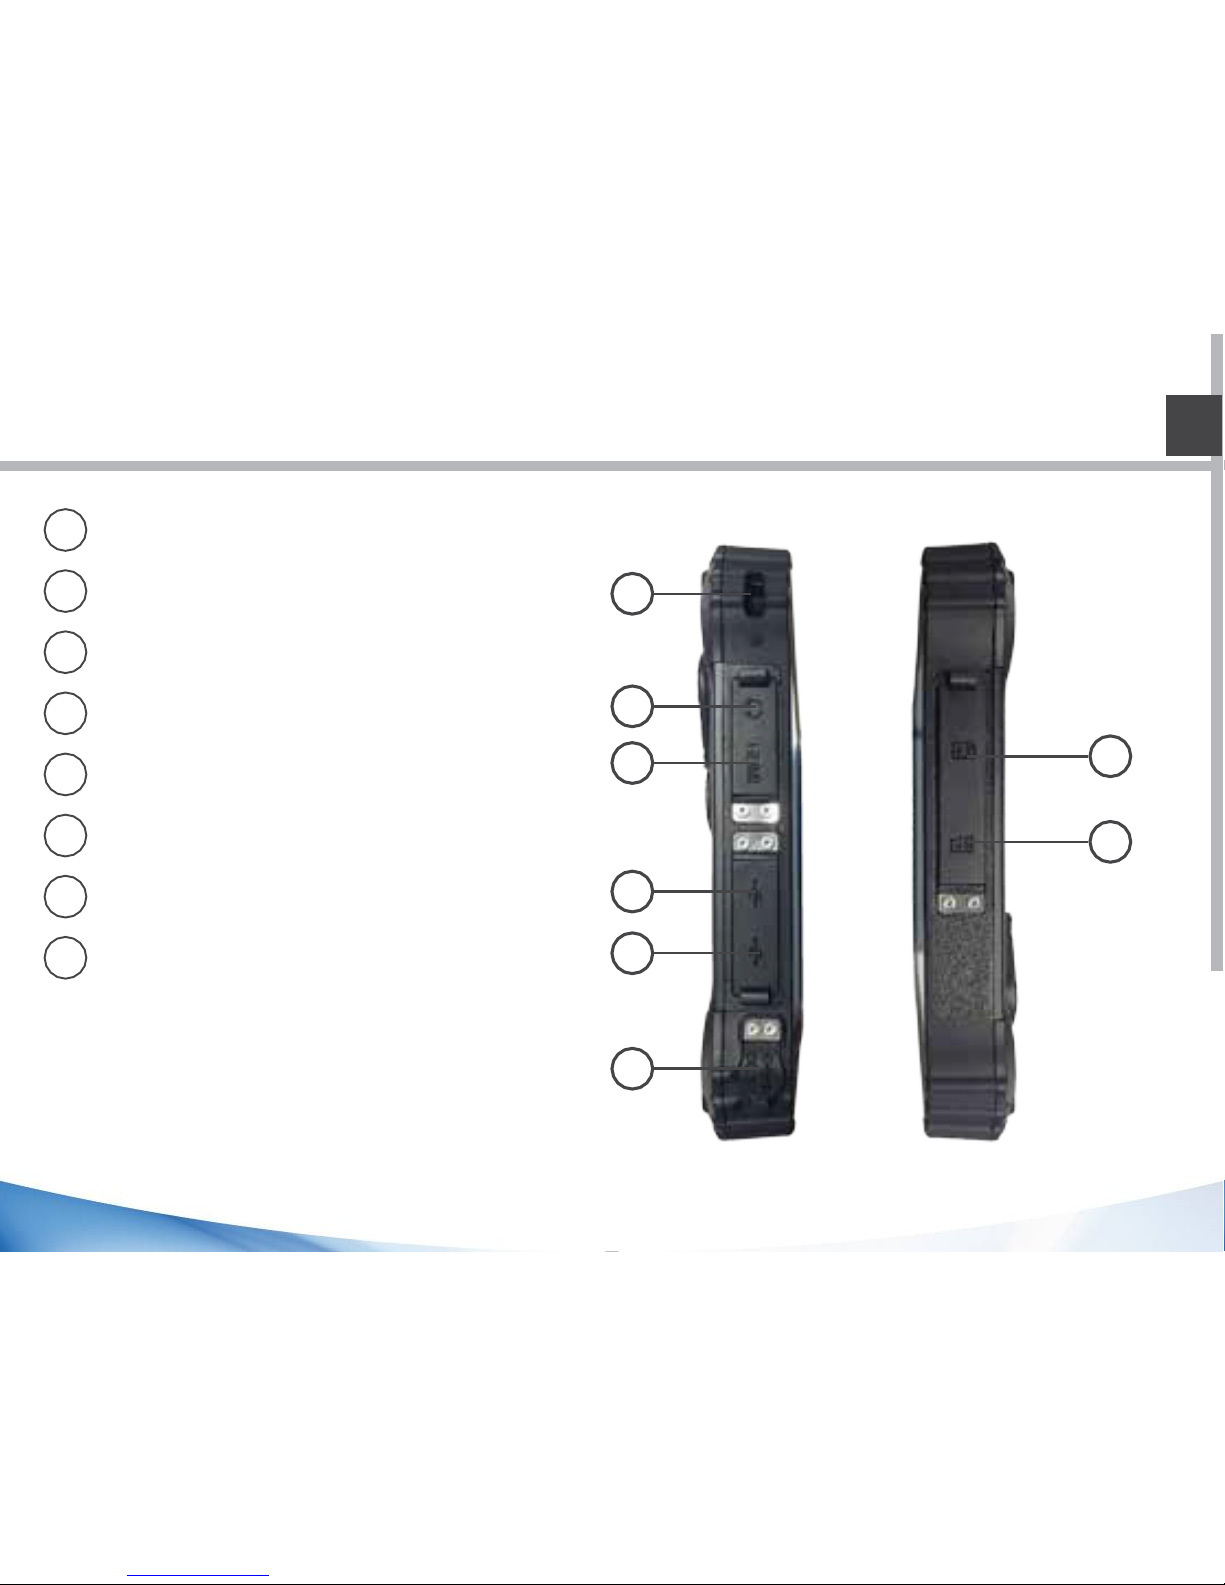
17 Rear camera
18
Hand strap fixationpoints
Cord fixation point
19
RFIDarea
20
17
19
18
20
Page 7
7
EN
Inserting mini SIM & Micro-SD cards
WARNING: Make sure to turn off your device before inserting a SIM or memory card.
Opening
Pull to open the rubber cover.
Inserting the mini SIMcard
The slot accepts only mini SIM cards. Insert them with the contact side down into the
SIM slots like shown in the picture on the right.
Inserting a SDcard
Insert the micro SD card like show in the picture on the right.
Closing
Push the rubber cover back into place to ensure the IP rating of the unit.
Tip:
For the SIM card, aPin number may be requested. Enter the SIM card pin number and
tapOK.
Page 8

8
Page 9
9
EN
TurnON
1. Press and hold the ON/OFF button to turn on the device.
TurnOFF
1. Click on the Windows symbol on the lower left corner of the screen.
2. Select the Power button ,then select Shut down.
Initialsetup
The first time you start up your device, the Windows Startup Screen will be the first
screen displayed. Follow the on-screen instructions on each screen in order to properly
install the operating system. We strongly recommend that you create a Microsoft
account, so you can enjoy more features.
Windows // Getting started
Tip:
If the Fieldbook is used by more than one person, it is recommended to create an user
account for each person. Every user can set its default parameters to his needs.
Page 10

10
Microsoftaccount
A Microsoft account is an email address and password that you use to sign in to
Windows. It’s free and easy to set up, and you can do so with any email address you
choose, or get anew email address (for example, you can use an Outlook.com, Gmail, or
Yahoo! address for your Microsoft account.). With a Microsoft account, you can:
- get apps from the Windows Store
- back up all your important data and files using free cloud storage
- link your social networking accounts to the People app, and you’ll see
your friends’ contact info and status updates in one place
For detailed information about how to use Windows 10, please visit:
http://windows.microsoft.com/en-us/windows-10/getstarted-get-to-know-windows-10
Page 11
11
EN
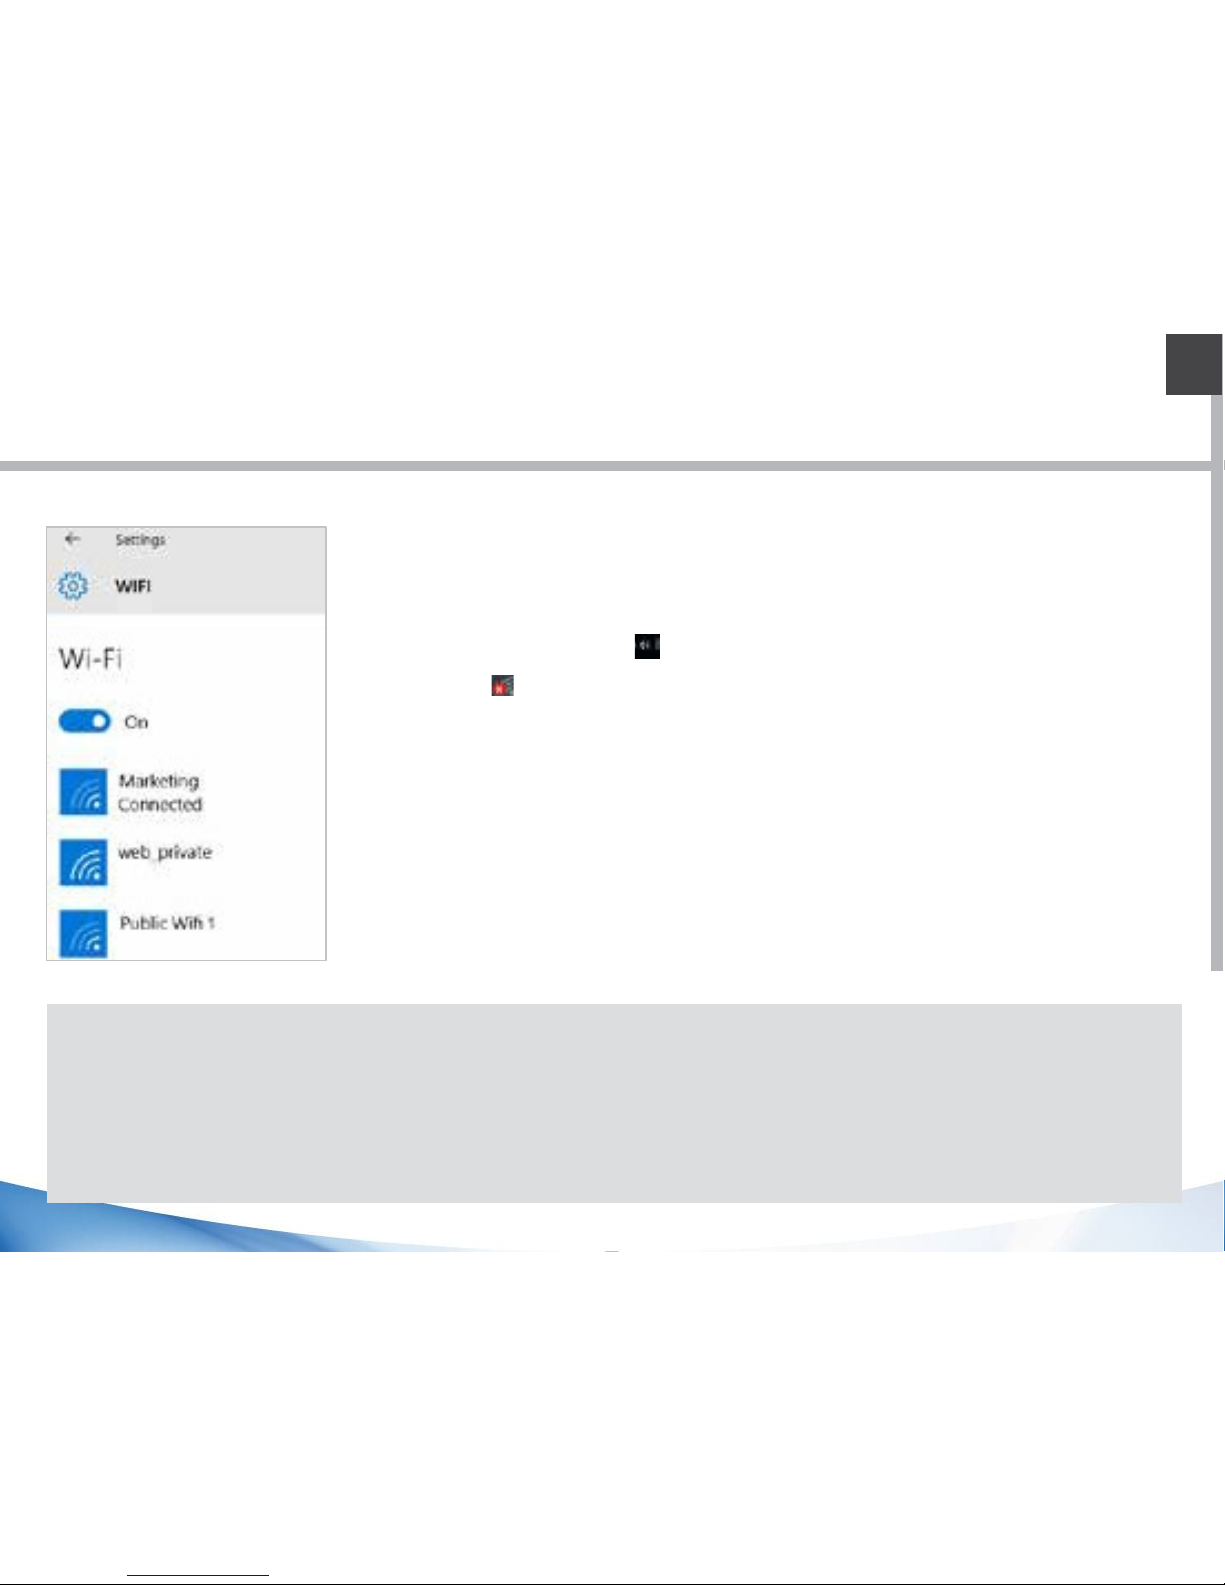
Make sure that you are in aWiFi zone.
1.Click on the arrow on the lower right corner and select the
WiFi icon .
2.Select the name of network you want to connect to, tap on
Connect and enter apassword if required.
Windows // Connecting to a WiFi network
Tip:
- To get the correct WiFi password (or settings) for the network, contact
the WiFi network provider.
- If you want to connect to this network every time it’s in range, select
the ‘Connect automatically’ check box.
Page 12

Turningthedeviceoff
In Shut DownMode, no data will be saved and the tablet will boot to the operating system’s
main screen the next time it is turned on. If you have entered data, either save it to the internal
storage or to other storage media.
1. On theleft side of the screen, select the Windows button.
2. Select the Power button ,then select Shut down.
Or press and hold the power button for about 2-10 seconds till the screen‘Slide to shut down
your PC’appears and then use the touchpad to slide down the screen.
Start screen tilescustomisation
Pinning icons:Use the touchpad and the touchpad buttons to select the icon you want to
move from your apps list to the Start screen.
Moving icons:If you want to move an icon, Use the touchpad and the touchpad buttons to
select the icon and drag it to where you want it and drop it.
More options for icons:Use the touchpad and the right touchpad button to click atile and
showoptions.
12
Windows // Getting familiar with Windows 10
Page 13
13
EN
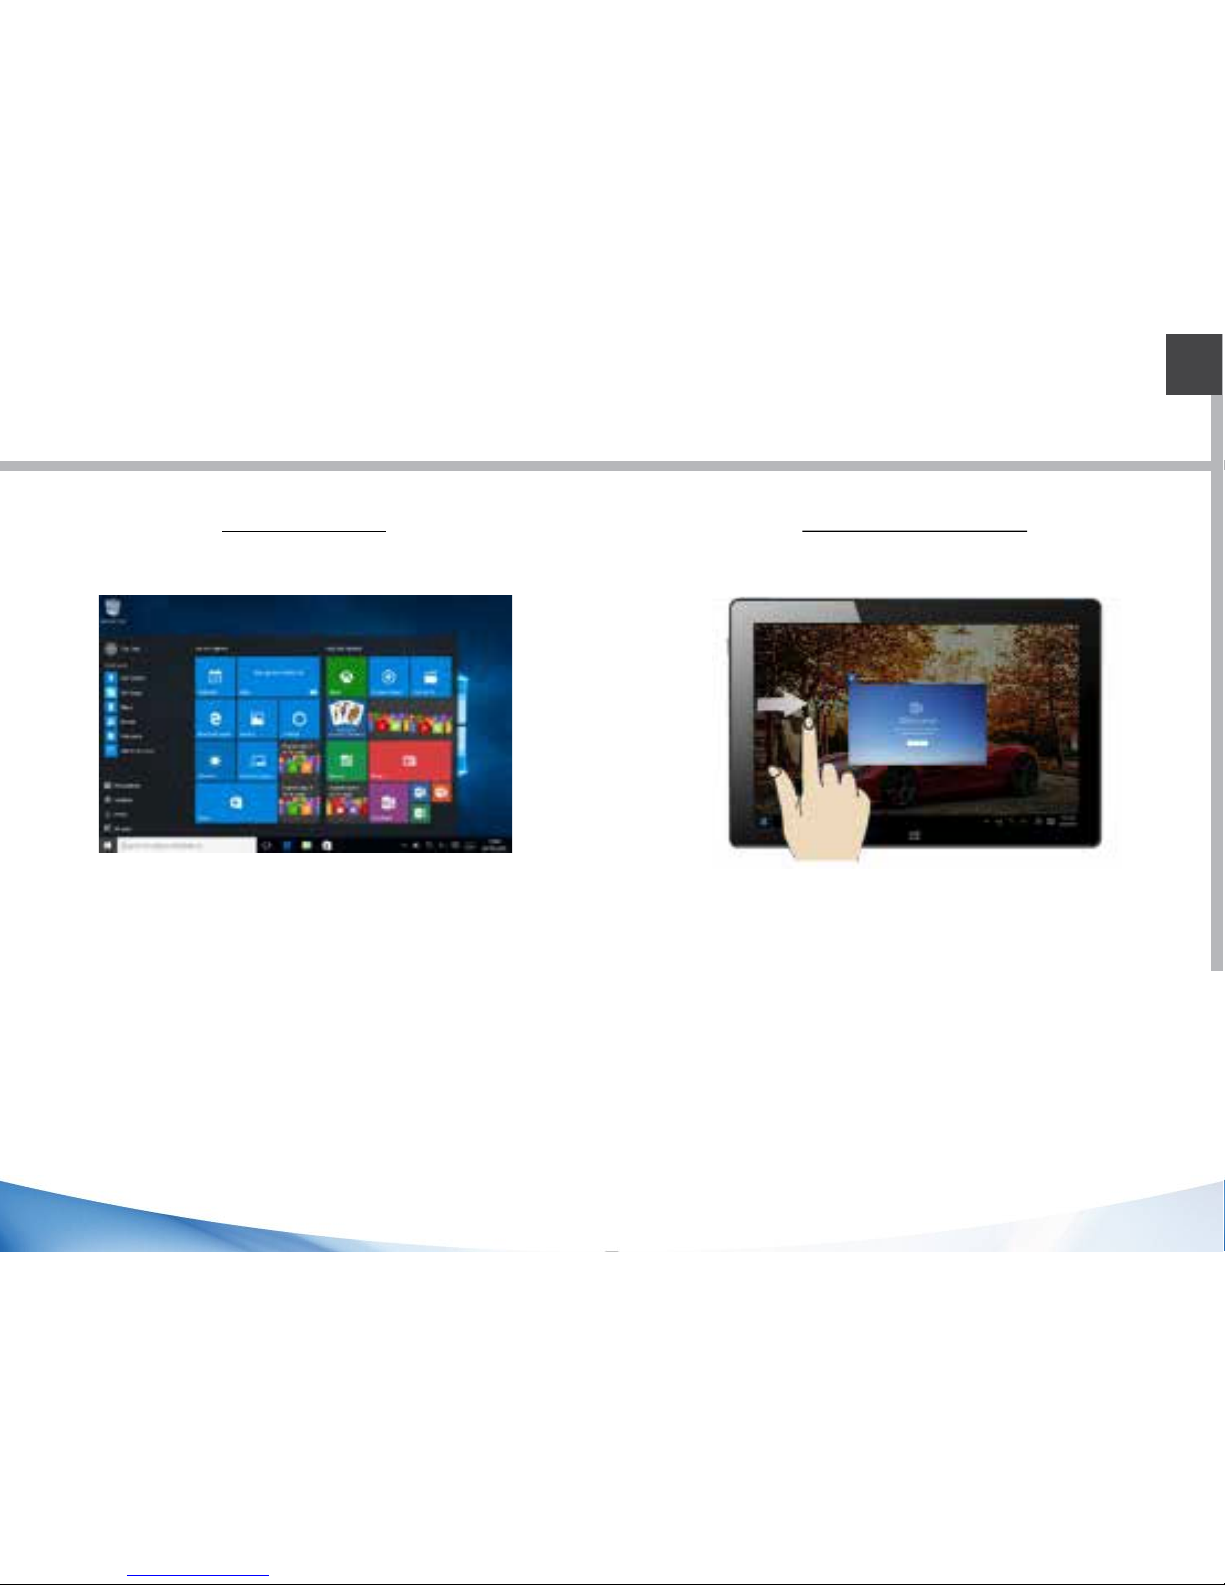
Windows // The Windows 10 interface
Slide from the left side of the
screen to the right to open the
running programs
Start Screen Slide to the right
The “Start” screen is the
launching pad to access your
favourite apps and websites
with only one click. To access
this screen, click the Windows
button on the lower left corner
of thescreen.
Page 14
14
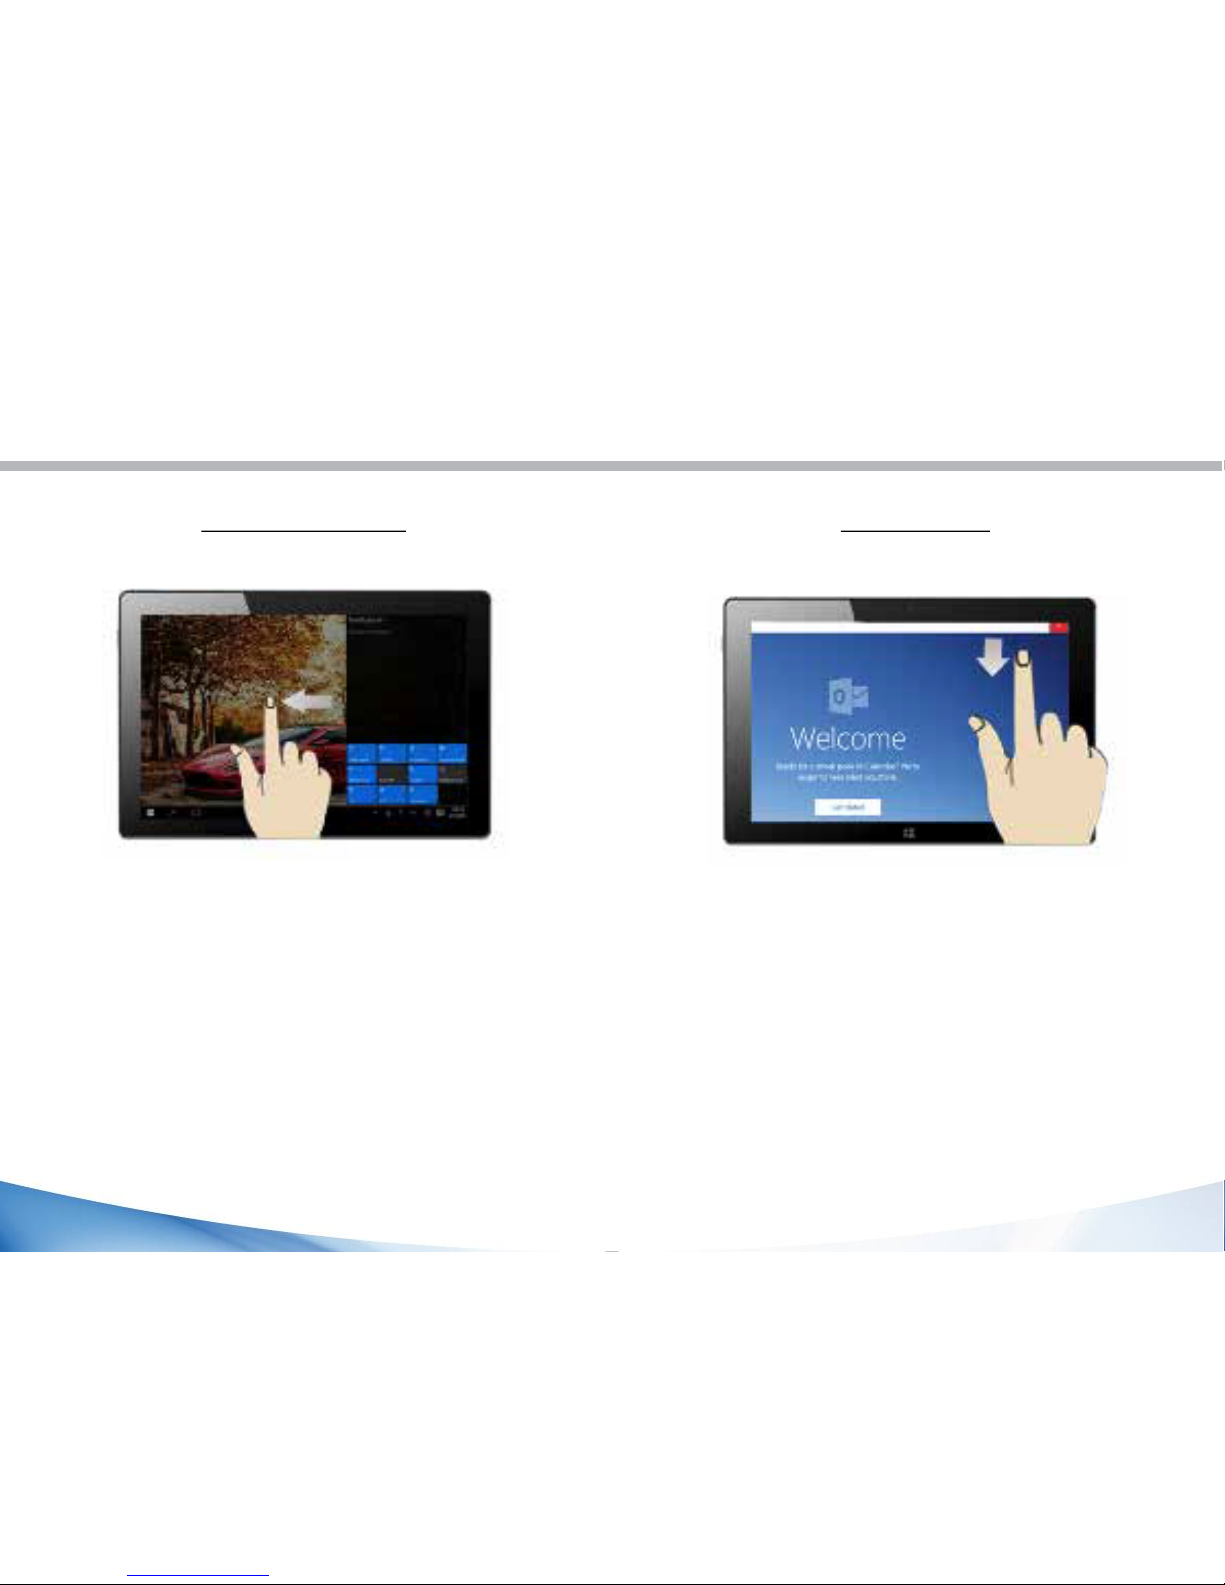
Slide to the left
Slide from the right side of
the screen to the left to open
the notificationcenter
Slide down
Slide down from the upper
side of the screen while a
window is open. You can then
place the window on either
side to start the split screen.
Page 15
15
EN
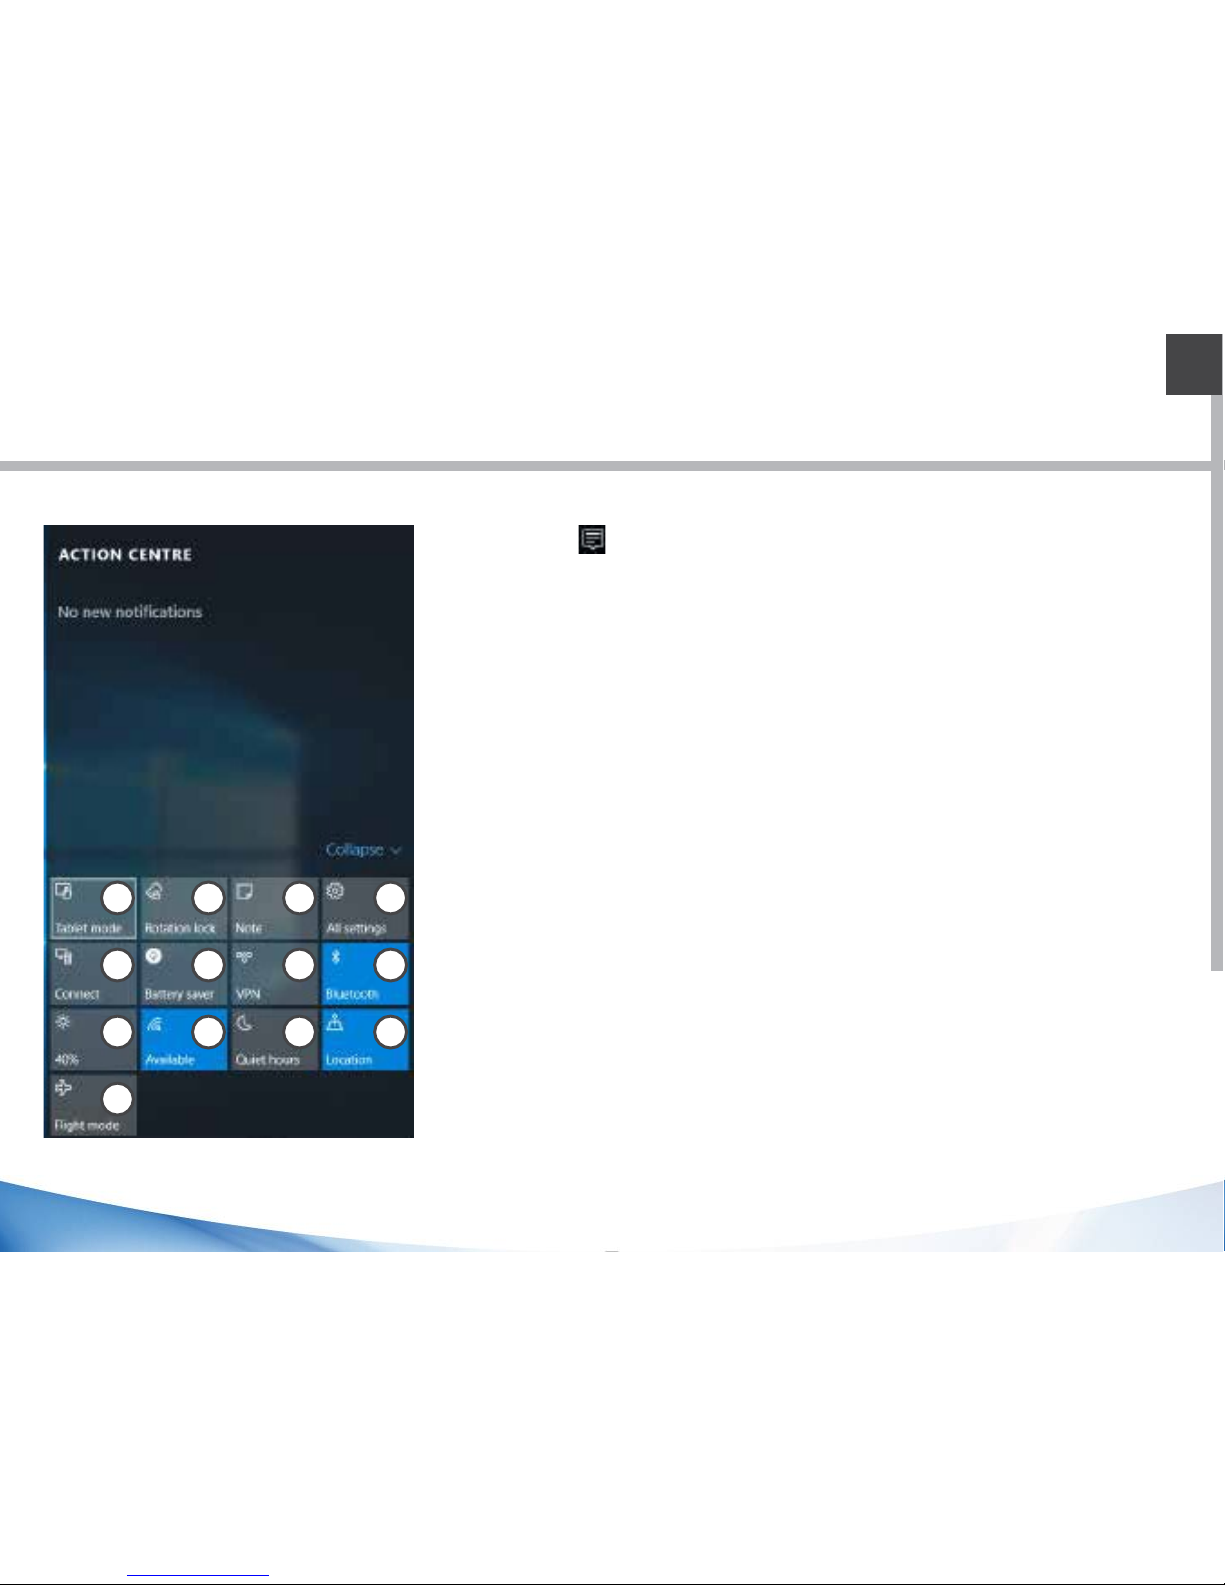
Windows // Windows notification center
Clickthe icon in lower right corner of the screen to
display the notification center.
1 - To change from PC mode to tablet mode
2 - To turn on/off the screen rotation
3- To takenotes
4 - To access all settings
5 - To connect other devices
6-To manage the device’s battery
7 - To make aVPN connection
8 - To turn on/off the Bluetooth connection
9 - To adjust the screen brightness
10 - To turn on/off the WiFi connection
11 -To turn on/off the Quiet hours option
12 -To turn on/off location services
13 -To turn on/off the flight mode
1
2 3
4
5
6 7
8
9
10 11
12
13
Page 16
16
TurnON
1.Press and hold the ON/OFF button to turn on the device.
When you turn on your device, aPIN code may be requested.
2.Type the PIN code supplied with your SIM card.
Beware of typing a wrong PIN code.
3. Select‘OK’.
TurnOFF
To turn off your device, press and hold the ON/OFF button, and then select Power off >
OK.
Sound & Notification profiles
1. When the device is turned on, press the Volume Up/Down button.
2. Select anoption.
Android // Getting started
Tip:
Your device goes in standby mode when you do not use it for aspecified period of
time. To wake up your device, press the ON/OFF button.
To set the duration, go to Settings > Display > Sleep.
Page 17

17
EN
Through thewizard
The first time you start up your Fieldbook, the installation wizard will help you set up
yourdevice:
- Language
- Date &time
- WiFi connection
- Location serviceoptions
Touch screenactions:
Tap: Touch once toselect or launch amenu, option, or application.
Tap and hold: Tap an item and hold it for more than 2seconds.
Drag:Tap an item and move it to anew location.
Double-tap: Tap an item twice quickly.
Flick: Briskly scroll up, down, left, or right to move through lists or screens.
Pinch: Place twoof your fingers far apart, and then pinch them together.
Page 18

18
Android // 4G & WiFiconnections
4Gconnection
With your SIM card, you should be connected to the Internet without any further setup.
The Fieldbook will only have signal if you are in an area covered by your provider’s
network. When connected to the 4G network, the 4G icon is displayed in the status bar.
Activating the mobile data
To be able to access Internet, mobile data must be activated.
1. Drag down the status bar.
2. Tap the “Settings” icon to open the settings menu.
3. Tap“SIM cards”
4. Tap“Mobile data” toactivate it.
Page 19

19
EN
WiFiconnection
Make sure that you are in aWiFi zone. You can access the WiFi settings quickly from the
statusbar.
1.Drag down the status bar.
2. The status dashboard isdisplayed.
3. Tap the “Settings”icon to open the settings menu.
4. Tap “Wi-Fi”
5.If Wi-Fi is off, slide the Wi-Fi switch to the“ON”position. Once the WiFi is on, the
Fieldbook will scan and display the Wi-Fi networks in range.
6. Tap the name of the network you want to connect to.
Private networks are shown with a lock icon and will require to enter your password.
Page 20

Adding a Google account
A Google account lets you take full advantage of Google apps and services
1. Go to“Settings” >“Accounts” >“Add account”.
2. Select the account type“Google”toadd.
3. Follow the onscreen instructions to enter information about the account.
Once the account is created, you can access Play Store, Gmail, Hangouts, Maps and many
other apps.
Synchronizing info
Information must be sync to be saved. Your data are backed up on Google servers.
1. Go to“Settings”>“Accounts”>“Google”.
2. Select youraccount.
The list of information that can be sync are displayed.
3. Check all informationin order to sync them.
You can get them back in case of loss of your device or SIM card.
When your Google account is added to a new device, all your saved information are
collected.
20
Android // Google & Contacts
Page 21

EN
Saving your contacts
When your contacts are saved, they are always available on the web and can be synced
to any Android phone that’s set up with your Google account.
1.Install the SIM card with your contacts in your phone.
2. Tap on the All Apps screen,
3. Tap “Contacs”
4. Tap the Menu button > “Import/Export”.
5.In Import/export contacts, select“Import from SIM card”.
6. Select your Google account.
7. Check contacts to be imported and validate.
8.Once the contacts are imported in the Google account, go to“Settings”>“Accounts”>
“Google”.
9. Select you Google account. Make sure“Contacts”is checked.
10. Select the Menu button, then“Syncnow”.
Your contacts are saved to via your Google account.
21
Page 22

The extended homescreen:
Navigate between different home screen panels by swiping left and right.
Home button
Short press the Home button to go back to the main screen.
Tap and hold the Home button to display all the apps you have opened. Swipe any app
left or right to close it.
Moving a home screenitem:
Tap and hold an item until the positioning gridlines appear, then slide it to the desired
location, and release yourfinger.
Removing a home screen item:
Tap and hold the item you wish to delete. Slide your finger towards the top of the screen
and drop it over the "Remove" icon.
Uninstalling anitem:
From the "All apps" screens, tap and hold an item, slide your finger towards the top of
the screen and drop it over "Uninstall" bin.
Creating application folders:
Drop one app icon over another on a home screen and the two icons will be combined
ina folder.
22
Android // Hints & tips
Page 23

23
EN
Widgets:
Tap the“Menu”button > tap“Widgets”. From the main Widget screen, you can move
around widgets just as you do for app icons.
Changing your wallpaper:
Tap the“Menu”button > tap“Wallpapers”.
Locking thetouchscreen:
From the quick settings dashboard in the status bar, touch “Settings”. In “Settings”,
scroll down and touch“Security”. Touch“Screen lock”. Touch the type of lock you would
like to use. After you set a lock, a lock screen is displayed whenever your screen wakes
up, requesting the pattern, pin or other specified key.
Page 24

FR
Comme nous mettons à jour et améliorons régulièrement nos produits, le logiciel
de votre appareil peut présenter une interface ou des fonctionnalités légèrement
différentes de celles décrites dans ce guide.
Table des matières
28
29
32
34
36
37
38
40
Contenu de la boîte
Description de latablette
Insertion de carte SIM &carte mémoire
Windows
Mise enroute
Se connecter à un réseau WiFi
Se familiariser avec Windows10
L’interface Windows10
Centre des notifications Windows
Android
Mise en route
Connexions 4G &WiFi
Compte Google &Contacts
Trucs &Astuces
42
44
46
48
Page 25

FR
Contenu de la boîte
Vérifiez que les éléments ci-dessous sont présents dans la boîte :
- Fieldbook K80 avecdragonne
- Stylet actif
- Batterie pour stylet
- Cable MicroUSB
- Cable USBhost
- Adaptateur secteur avec prise UE, UK etUS
Il se peut que les éléments fournis, de même que les accessoires, varient
en fonction de votre localité ou de votre opérateur. Les éléments fournis sont conçus
uniquement pour votre appareil et ils pourraient ne pas être compatibles avec d’autres
appareils. Des accessoires non conformes peuvent être la source d’un mauvais
fonctionnement.
25
Page 26
26
Description de la tablette
1 2 3 4 5
6
7
8
1BoutonF
2 Bouton d’alimentation
3 Volume +
4Volume -
5
6
7
Scanner de code à barres(option)
Caméraavant
Ecran tactile
8
ConnecteurPogo
Page 27
27
FR
Description de la tablette
9
10
11
12
13
14
15
16
9
Kensington Lock
10
Prisecasque
11 Port HDMI
12 Port USB
13 Port USB
14 DC-In
15 Carte SD
16 Carte SIM
Page 28

28
17 Caméraarrière
18
Fixation dragonne
Fixation cordon
19
ZoneRFID
20
17
19
18
20
Page 29

29
FR
Insertion de carte SIM & carte mémoire
ATTENTION: Bien éteindre la tablette avant d’insérer une carte.
Ouvrir
Tirez pour ouvrir lecouvercle.
Insérer la carte mini-SIM
L’emplacement SIM n’acceptent que des cartes mini-SIM. Insérez la carte les contacts vers
le bas, comme indiqué sur l’image de droite.
Insérer la carte mémoire
Insérez la carte micro-SD comme indiqué sur l’image.
Fermerture
Poussez le couvercle en place pour assurer la protection IP de la tablette.
ASTUCE:
Un numéro de code PIN pourrait être demandé.
Page 30

30
Page 31

31
FR
Allumer
1. Appuyez longement sur le bouton ON/OFF pour allumer votre appareil.
Eteindre
1. Agauche de l’écran, cliquez sur le bouton Windows.
2. Cliquez sur le bouton Démarrer ,puis sur Arrêter.
Paramètrage initial
La première fois que vous démarrez l’appareil, l’écran de démarrage Windows sera le
premier écran affiché. Suivez les instructions à l’écran afin de procéder àune installation
complète du système. Nous vous recommandons fortement de créer un compte
Microsoft afin de profiter des nombreuses fonctionnalités.
Windows // Mise en route
ASTUCE : paramètrer d’autres comptes:
Si plus d’une personne utilise l’appareil, chaque personne devrait avoir son propre
compte. Chacun pourra s’identifier et personnaliser son espace avec un fond d’écran,
des applications favorites, une boîte de réception d’emails, et plus encore.
Page 32

CompteMicrosoft
Un compte Microsoft est composé d’une adresse email et d’un mot de passe utilisés pour
s’identifier dans Windows.C’est gratuit et facile àparamètrer, en outre vous pouvez utiliser
n’importe quelle adresse email ou créer une nouvelle adresse. Par exemple :vous pouvez
utiliser un compte Outlook, Gmail ou Yahoo! pour votre compte Microsoft.
Avec uncompteMicrosoft, vous pouvez :
-télécharger des applications àpartir de la boutique Windows.
-sauvegarder tous vos fichiers et données importants sur l’espacede stockage cloud fourni
gratuitement.
-relier vos comptes des réseaux sociaux àl’application People et vous aurez accès donc aux
informations de vos amis ainsi qu’aux mises àjour de leur statut en un seul endroit.
S’enregistrer avec un compte Microsoft
Cliquer sur Paramètres > Comptes > Votre compte > Se connecter avec un compte
Microsoft. Il pourra vous être demandé de vérifier votre mot de passe actuel.
Pour plus d’informations sur la façon d’utiliser Windows 10, visitez:
http://windows.microsoft.com/fr-fr/windows-10/getstarted-get-to-know-windows-10
32
Page 33

33
FR
Assurez-vous d’êtredans une zone WiFi
1.Cliquez sur la flèche dans le coin inférieur droit et
sélectionnez l’icône WiFi .
2.Sélectionnez le nom du réseau auquel vous voulez vous
connecter, puis cliquez sur Se Connecter et entrez le mot
de passe correspondant (sinécessaire).
Windows // Se connecter à un réseau WiFi
ASTUCES:
-Pour obtenir le mot de passe correct (ou les réglages) du réseau WiFi, contactez le
fournisseur d’accès àInternet.
-Si vous désirez vous connecter à un réseau à chaque fois qu’il est à portée, cochez la
case “Se connecter automatiquement”.
Page 34

Eteindrel’appareil
Lors de l’extinction de l’appareil, aucune donnée n’est sauvegardée et l’appareil affichera
l’écran principal au prochain démarrage. Si vous avez saisi des données, sauvegardez-les sur le
stockage interneou un autre espace de stockage.
1. Agauche de l’écran, cliquez sur le bouton Windows.
2. Cliquez sur le bouton Démarrer ,puis sur Arrêter.
OU maintenez appuyé le bouton physique pendant 2à10 secondes jusqu’à ce que l’écran
affiche‘Faireglisser pour éteindre votre PC’. Utilisez le pavé tactile pour faire glisser.
Personnaliser les tuiles de l’écran d’accueilWindows
Epingler des icônes:Utilisez le pavé tactile et les boutons du pavé tactile afin de sélectionner
l’icône àdéplacer de la liste des applications vers l’écran d’accueil.
Déplacer des icônes:Si vous voulez déplacer une icône, utilisez le pavé tactile et les boutons
du pavé tactile pour sélectionner l’icône afin de lapositionner sur l’emplacement souhaité.
Plus d’options avec les icônes:Utilisez le pavé tactile et le bouton droit du pavé tactile pour
cliquer sur une tuile et afficher les options.
34
Windows // Se familiariser avec Windows10
Page 35

35
FR
Windows // L’interface Windows 10
Glisser vers la droite
Faites glisser ducôté gauche
de l’écran vers la droite pour
ouvrir les programmes en
cours d’exécution.
Ecrand’accueil
L’écran d’accueil Windowsest
le point d’accès en un click à
tous vos sites et applications
favoris. Pour accéder àl’écran
d’accueil Windows, appuyezsur
le bouton Windows de votre
clavier ou cliquez sur le bouton
Windows en bas à gauche de
l’écran.
Page 36

36
Glisser vers lagauche
Faites glisser du côté droit
de l’écran vers la gauche
pour ouvrir le centre des
notifications
Glisser vers lebas
Faites glisser vers le bas de la
partie supérieure de l’écran
tandis qu’une fenêtre est
ouverte. Vous pouvezensuite
placer la fenêtre de chaque
côté pour démarrer l’écran
partagé.
Page 37

37
FR
Windows // Centre des notifications Windows
Cliquez sur l’icône dans le coin inférieur droit de
l’écran pour afficher le centre des notifications.
1 - Pour passer de l’affichage PC à l’affichagetablette
2 - Pour activer/désactiver la rotation de l’écran
3- Pour prendre des notes
4- Pour accéder àtous les paramètres
5 - Pour connecter d’autres appareils
6 - Pour gérer la batterie de l’appareil
7- Pour réaliser une connexion en VPN
8- Pour activer/désactiver la connexionBluetooth
9 - Pour ajuster la luminosité de l’écran
10- Pour activer/désactiver la connexion WiFi
11- Pour activer/désactiver l’option Ne pas déranger
12 - Pour activer/désactiver les services delocalisation
13 - Pour activer/désactiver le mode avion
1
2 3
4
5
6 7
8
9
10 11
12
13
Page 38

38
Allumer
1.Appuyez longement sur le bouton ON/OFF pour allumer votre appareil Lorsque vous
allumez votre appareil, il est possible qu’un code PIN vous soit demandé.
2.Tapez le code PIN fourni avec votre carte SIM.
Attention : assurez-vous de saisir le bon code PIN.
3. Sélectionnez‘OK’.
Eteindre
Pour éteindre votre tablette, faites un appui long sur le bouton ON/OFF, puis
sélectionnez Eteindre >OK.
Profil sonore & notifications
1. Lorsque la tablette est allumé, appuyez sur lebouton volume
2. Sélectionnez une option
Android // Mise en route
ASTUCE:
L’écran tactile s’éteint après une certaine période d’inactivité. Pour
rallumer l’écran, faites un appui court sur le bouton ON/OFF. Pour définir
la mise en veille, allez surParamètres>Affichage>Veille.
Page 39

FR
Assistant de démarrage
La première fois que vous allumez votre tablette, l’assistant de démarrage vous permet
de le paramétrer:
- Langue
- Date &heure
- ConnexionWiFi
- Les options du service de localisation
Utilisation de l’écran tactile
Appuyer: appuyez une fois pour sélectionner ou lancer un menu, une option ou une
application.
Appuyer et maintenir: sélectionnez un élément et maintenez votre doigt appuyé plus
de 2secondes.
Déplacer: sélectionnez un élément, maintenez votre doigt appuyé et déplacez-le.
Tapoter: tapotez un élément deux fois rapidement.
Défiler: faites défiler rapidemlent vers le haut, vers le bas, vers la gauche, vers la droite
pour parcourir des listes ou des écrans.
Zoomer: placez deux doigts sur l’écran et les écarter pour zoomer ou les rapprocher
dans un mouvement de pincement pour dézoomer.
39
Page 40

40
Android // Connexions 4G & WiFi
Connexion4G
Avec votre carte SIM 4G, vous devrez pouvoir vous connecter à Internet sans aucun
paramètrage supplémentaire. Votre Fieldbook n’aura de signal que si vous êtes dans une
zone de réseau 4G/3G/EDGE couverte par votre opérateur. Lorsque vous êtes connectés
au réseau 4G, l’icône 4G est affichée dans la barre de statuts.
Activer les données mobiles
Pour accéder àInternet, l’icône Données mobiles doit être activée.
1. Tirezvers le bas la barre destatuts.
2. Appuyez sur l’icône“Paramètres”pour afficher la page des paramètres.
3. Appuyez sur“Cartes SIM”.
4. Appuyez sur“Donnéesmobiles”.
Page 41

41
FR
ConnexionWiFi
Assurez-vous d’être dans une zone WiFi. Vous pouvez accéder rapidement aux
paramètres WiFi à partir de la barre de statuts.
1.Tirez vers le bas la barre de statuts.
Le panneau des statuts s’affiche.
2. Appuyez sur l’icône“Paramètres”pour afficher la page des paramètres.
3. Appuyez sur“Wi-Fi”.
4. Si le Wi-Fi est désactivé, faites-glisser l’interrupteurWi-Fi sur la position“Activé”. Une fois
que le Wi-Fi est activé, la tablette recherche des réseaux Wi-Fi àportée.
5. Sélectionnez lenom du réseau auquel vous voulez vous connecter.
Les réseaux privés sont affichés avec un cadenas. Ils nécessitent un mot de passe.
Page 42

Ajouter un compte Google
Un compte Google vous permet de profiter au maximum des applications et des services
Google que vous pourriez utiliser.
1. Sélectionnez“Paramètres” > “Comptes”>“Ajouter un compte”.
2. Sélectionnez“Google”pour le type de compte àajouter.
3. Suivez les instructions àl’écran pour saisir les informations demandées.
Une fois que le compte est créé, accédez aux applications Play Store, Gmail, Hangouts,
Maps etbeaucoup d’autres.
Synchroniser des informations
Vos informations doivent être synchronisées afin d’être sauvegardées. Vos données sont
enregistrées sur les serveursGoogle.
1. Sélectionnez“Paramètres”>“Comptes”>“Google”.
2. Sélectionnez votre compte. La liste des informations qu’on peut synchroniser est affichée.
3. Cochez les cases de toutes les informations afin de les synchroniser.
Vous pouvez les récupérer en cas de perte de votre tablette ou de votre carte SIM.
Lorsque vous ajoutez votre compte Google à un nouvel appareil, toutes les informations
sauvegardées sont collectées.
42
Android // Compte Google & Contacts
Page 43

43
FR
Sauvegarder vos contacts
Tous vos contacts sont disponibles sur le Web et peuvent être synchronisés sur
n’importe quel tablette Android paramétré avec votre compte Google.
1.Insérer votre carte SIM incluant vos contacts dans votre tablette.
2. Appuyez sur l’icon“Toutes les applications”
3. Appuyez sur l’application“Contacts”.
4. Appuyez sur le bouton de Menu puis sélectionnez“Importer/Exporter”.
5. Dans“Importer/exporter contacts”, sélectionnez“Importer àpartir de la carte SIM”.
6. Sélectionnez votre compte Google.
7. Sélectionnez les contacts à importer puis validez.
8.Une fois les contacts importés sur votre compte Google, sélectionnez“Paramètres”>
“Comptes”>“Google”.
9. Sélectionnez votre compte Google. Assurez-vous que“Contacts”est coché.
10.Appuyez sur le bouton de Menu, puis sélectionnez“Synchroniser maintenant”. Vos
contacts sont sauvegardés via votre compte Google.
Page 44

44
L’écran d’accueil étendu:
Naviguez entre les différents écrans d’accueil en faisant glisser votre doigt vers la gauche
ou vers ladroite.
BoutonAccueil
Appui court pour retourner à l’écran d’accueil.
Appui long pour afficher les applications ouvertes. Faites glisser une application vers la
gauche ou vers la droite pour la fermer.
Déplacer une icône de l’écran d’accueil:
Maintenez votre doigt appuyé sur l’icône jusqu’à ce que s’affichent les lignes de
positionnement, puis faites-la glisser vers l’emplacement souhaité, et relâchez.
Supprimer une icône de l’écran d’accueil:
Maintenez votre doigt appuyé sur l’icône, puis faites-la glisser vers le haut de l’écran, et
déposez-la sur l’icôneSupprimer.
Désinstaller une application:
A partir de l’écran “Toutes les applications”, maintenez votre doigt appuyé sur l’icône,
puis faites-la glisser vers le haut de l’écran et déposez-la sur l’icône Désinstaller.
Android // Trucs & Astuces
Page 45

45
FR
Créer des dossiers d’applications:
A partir d’un écran d’accueil, déposez une icône sur une autre pour les rassembler.
Widgets:
A partir d’un écran d’accueil, appuyez sur le bouton Menu. Sélectionnez Widgets. A
partir de l’écran d’accueil des widgets, vous pouvez déplacer les widgets de la même
façon que vous procédez avec les applications.
Changer le fond d’écran:
Maintenez votre doigt appuyé sur un emplacement vide de l’écran, puis sélectionnez
“Fondsd’écran”.
Verrouiller votre smartphone:
A partir du panneau des réglages rapides dans la barre de statuts, sélectionnez
paramètres. Faites défiler l’écran vers le bas, puis sélectionnez Sécurité. Sélectionnez
Verrouillage de l’écran. Sélectionnez le type de verrouillage que vous voulez utiliser.
Une fois que vous avez sélectionné une option, un écran de verrouillage s’affiche
chaque fois que votre écran est réactivé. Vous êtes alors invité à saisir le schéma, le
code PIN ou tout autre code spécifié.
Page 46

DE
Inhaltsverzeichnis
Da unsere Produkte kontinuierlich aktualisiert und weiterentwickelt werden,
kann die Softwoare Ihres Gerätes in Erscheinung und Funktionalität geringfügige
Abweichungen zu den Darstellungen in dieser Schnellstartanleitung aufweisen.
Verpackungsinhalt 52
53
56
58
60
61
62
64
Beschreibung des Geräts
Einsetzen von SIM und SD Karten
Windows
Erste Schritte
Miteinem WLAN verbinden
Mit Windows 10 vertraut machen
Das Windows 10 Interface
Nachrichtencenter
Android
Erste Schritte
4G- & WLAN-Verbindung
Google-Konten &Kontakte
Android kennenlernen
66
68
70
72
Page 47

Verpackungsinhalt
DE
In der Verpackung sollten folgende Elemente enthalten sein :
- Fieldbook K80 mitHandschlaufe
- Aktiver Digitalstift
- Batterie für aktivenDigitalstift
- Micro USBKabel
- USB Host Kabel
- Netzteil mit EU, UK und US Stecker
Die mit Ihrem Gerät mitgelieferten Elemente und das verfügbare Zubehör können
je nach Region oder Dienstleister abweichen. Die mitgelieferten Elemente wurden
ausschließlich für Ihr Gerät entwickelt und sind mit anderen Geräten nicht kompatibel.
Nicht genehmigtes Zubehör kann zu einer Fehlfunktion Ihres Geräts führen.
47
Page 48

48
Beschreibung des Geräts
1 2 3 4 5
6
7
8
1FunktionstasteF
2 EIN/AUSTaste
3 Lautstärke +
4Lautstärke -
5
6
7
Bacode Scanner(Option)
Frontkamera
Touchscreen
8
Pogo-Anschluss
Page 49

49
DE
Beschreibung des Geräts
9
10
11
12
13
14
15
16
9 Kensington Lock
10 Kopfhöreranschluss
11 HDMI Anschluss
12 USB Anschluss
13 USB Anschluss
14 DC-Eingang
15 SD Kartenschacht
16 SIM Kartenschacht
Page 50

50
17 Rückseitenkamera
18
BefestigungHandschlaufe
BefestigungStiftschnur
19
RFIDLesezone
20
17
19
18
20
Page 51

51
Einsetzen von SIM und SD Karten
DE
ACHTUNG: Schalten Sie das Gerät aus, bevor Sie eine Karte einsetzen.
Öffnen
Ziehen Sie die nicht verschraubte Seite der Verschlusskappe nach oben.
Einsetzen einer SIM Karte
Verwenden Sie ausschließlich mini SIM Karten. Führen Sie die SIM Karte
mit der Kontaktseite nach unten in den Schacht ein, wie in der Abbildung
rechtsgezeigt.
Einsetzen einer micro SD Karte
Führen Sie die Karte wie in der mittleren Abbildung gezeigt ein.
Schließen
Drücken Sie die Verschlusskappe nach unten, um diese zu schließen. Die
Verschlusskappe muss geschlossen sein, um denIP-Schutz zu gewährleisten.
Tipp:
Vor der erstmaligen Benutzung des Geräts sollte der Akku vollständig
aufgeladen werden.
Page 52

52
Page 53

53
DE
Einschalten
1. Drücken und halten Sie die EIN/AUS-Taste, um das Gerät einzuschalten.
Ausschalten
1. Klicken Sie auf das Windows-Symbol in der rechten unteren Ecke des Bildschirms.
2. Klicken Sie auf das Symbol , anschließend auf Herunterfahren.
Installationsassistent
Wenn Sie das Gerät zum ersten Mal in Betrieb nehmen, wird der WindowsStartbildschirm angezeigt. Folgen Sie den Anweisungen auf dem Bildschirm, um eine
vollständige Systeminstallation auszuführen. Es wird empfohlen ein Microsoft-Konto zu
erstellen, um alle Funktionen des Betriebssystems nutzen zu können.
Windows // Erste Schritte
Tipp : andere Konten nutzen:
Wenn das Fieldbook von mehr als einer Person genutzt wird, wird empfohlen für
jede Person ein gesondert Benutzerkonto anzulegen. Damit kann jeder Nutzer seine
Arbeitsumgebung nach seinen Bedürfnissen anpassen.
Page 54

Microsoft-Konto
Ein Microsoft-Konto besteht aus einer Email-Adresse und einem Passwort, um sich am
Betriebssystem anzumelden. Die Erstellung einer Microsoft-Email-Adresse ist kostenlos.
Außerdem kann auch jede andere Email-Adresse, wie zum Beispiel Outlook, Gmail,Yahoo,...,
für die Erstellung des Microsoft-Kontos verwendet werden.
Ein Microsoft-Kontoermöglicht:
-das herunterladen von Anwendungen aus dem Microsoft-Strore
- das Speichern von Dateien in dem kostenlos zur Verfügung Cloud-Speicherplatz
-die Verbindung Ihrer Konten aus den sozialen Medien,um somit Updates Ihrer Kontakte an
einem einzigen Ort zu haben.
Ein Microsoft-Kontoregistrieren:
Klicken Sie auf Einstellungen > Konten > Ihr Konto > Sich mit einem Microsoft-Konto
anmelden. Sie werden aufgefordert Ihre Email-Adresse und Kennwort einzugeben.
Besuchen Sie folgende Adresse um weitere Informationen zur Nutzung vonWindows 10 zu
erhalten:
http://windows.microsoft.com/de-de/windows-10/getstarted-get-to-know-windows-10
54
Page 55

55
DE
Versichern Sie sich, in einer WLAN-Zone zu sein.
1.Klicken Sie auf den Pfeil rechts unten inder Taskleiste
und wählen Sie dasWLAN Symbol
2.Wählen Sie das WLAN-Netwerk aus, zu welchem
Sie sich verbinden möchten. Klicken Sieanschließend
auf Verbinden und geben Sie das Kennwort ein (falls
erforderlich).
Windows // Mit einem WLAN verbinden
Tipp:
-Um die korrekten Netzwerkeinstellungen und/oder das Passwort zu erhalten,
kontaktieren Sie bitte IhrenNetzwerk-Administrator.
-Wenn Sie sich automatisch mit einem Netzwerk verbinden möchten, sobald es in
Reichweite ist, wählen Sie “automatischverbinden”.
Page 56

Ausschalten desGerätes
Speichern Sie alle Daten, bevor Sie das Gerät ausschalten.
1. Klicken Sie auf das Windows-Symbol inder rechtenunteren Ecke des Bildschirms.
2. Klicken Sie auf das Symbol , anschließend auf Herunterfahren.
ODER halten Sie die physische Ein/Ausschalttaste des Gerätes für 2-10 Sekunden gedrückt, bis
der Bildschirm erscheint: “Zum Herunterfahren des PCs ziehen”
Anpassen desWindows-Startbildschirms
Anheften von Apps:Klicken Sie“Start” (Windows-Symbol) und dann“Alle Apps”. HaltenSie die
App, die Sie anheften möchten, gedrückt. Wählen Sie An„Start“ anheften aus.
Verschieben vonApps:Halten Sie die App, die Sie verschieben möchten und schieben Sie sie
an die gewünschte Position.
Gruppieren von Apps: Nachdem Sie eine App angeheftet haben, können Sie sie in eine
Gruppe verschieben. Um eine neue Gruppe von Kacheln zu erstellen, verschieben Sie eine
App-Kachel nach oben oder unten, bis eine Gruppentrennlinie angezeigt wird, und lassen die
Kachel dannlos. Sie können Apps beliebig in und aus der Gruppe verschieben.
56
Windows // Mit Windows 10 vertraut machen
Page 57

57
Windows // Das Windows 10 Interface
DE
Nach rechts streichen
Streichen Sie von der linken
Bildschirmkante nach rechts,
um laufende Programme zu
öffnen.
Startmenü
Das Windows-”Start”-Menü
ist ein zentralerZugriffspunkt
für all Ihre meistgenutzten
Programme, die Siedort
hinterlegen und mit einem Klick
öffnen können.
Page 58

58
Nach linksstreichen
Streichen Sie von derrechten
Bildschirmkante nach links,
um das Nachrichtencenter
anzuzeigen.
Nach untenstreichen
Streichen Sie von deroberen
Bildschirmkante nach
unten, während ein Fenster
geöffnetist. Sie können dann
das Fenster auf einer Seite
positionieren, und auf der
anderen Seite eine weitere
Anwendung.
Page 59

Windows // Nachrichtencenter
DE
Klicken Sie auf das Symbol in derrechten unteren
Ecke des Bildschirms, um das Nachrichtencenter zu
öffnen.
1 - Umschalten zwischen Tablet- und PC-Modus
2 - Bildschirmdrehung aktivieren/deaktivieren
3 - Notizenmachen
4 - Alle Einstellungen aufrufen
5 - Andere Geräte verbinden
6- Batterieverwaltung aufrufen
7 - Eine VPN-Verbindungherstellen
8- Bluetooth-Verbindungen verwalten
9 - Einstellen derBildschirmhelligkeit
10 - WLAN-Verbindungen aktivieren/deaktivieren
11 - Nicht-Stören-Modus ein/ausschalten
12 - Ortungsdienste ein/ausschalten
13 - Ein/Ausschalten desFlugmodus
59
1
2 3
4
5
6 7
8
9
10 11
12
13
Page 60

60
Einschalten
1. Drücken und halten Sie die EIN/AUS-Taste, um das Gerät einzuschalten.
Beim Einschalten des Geräts muss eine PIN-Nummer eingegeben werden.
2. Geben Sie die mit Ihrer SIM-Karte erhaltene PIN-Nummer ein.
3. WählenSie‘OK’.
Ausschalten
Um das Gerät auszuschalten, drücken und halten Sie die EIN/AUS-Taste
und wählen dann Ausschalten > OK.
Ton- und Benachrichtigungsprofile
1. Bei eingeschaltetem Gerät drücken Sie einer der Lautstärketasten
2. WählenSie eine Option aus.
Android // Erste Schritte
Tipp:
Wird der Touchscreen über einen bestimmten Zeitraum hinweg nicht benutzt, wird
dieser vom Gerät abgeschaltet. Um den Bildschirm wieder einzuschalten, drücken Sie
die EIN/AUS-Taste. Für die Einstellung der Dauer gehen Sie zu Einstellungen > Display
> Ruhezustand
Page 61

DE
Installationsassistent
Wenn Sie Ihr Fieldbook das erste Mal in Betrieb nehmen, leitet Sie der
Installationsassistent durch einige Bildschirme, um Ihnen dabei zu helfen, die
grundlegenden Einstellungen vorzunehmen:
- Sprache
- Datum &Uhrzeit
- WLANVerbindung
- Standortdienst
Touchscreen-Funktionen
Tippen: Einmal tippen für Auswahl oder starten von Menüs, Optionen oder
Anwendungen.
Tippen und halten: Auf ein Element tippen und länger als 2 Sekunden halten.
Ziehen: Auf ein Element tippen und zu einer neuen Position verschieben.
Doppeltippen: Ein Element zweimal hintereinanderkurz antippen.
Blättern: Schnelles scrollen nach oben, unten, links oder rechts für das Blättern durch
Listen oder Bildschirme.
Drücken: Platzieren Sie zwei Finger etwas auseinander und dann zusammendrücken.
61
Page 62

62
Android // 4G- &WLAN-Verbindung
4G
Mit Ihrer 4G-SIM-Karte sollten Sie ohne weitere Einstellungen mit dem Internet
verbunden sein. Beachten Sie, dass das Fieldbook nur dann ein Signal erhält,
wenn Sie sich imBereich des 4G, 3G- oder EDGE-Netzwerks Ihres 4G-Anbieters
befinden. Ist das Gerät mit dem 4G-Netzwerk verbunden, wird in der Statusleiste das
4G-Symbol angezeigt.
Aktivierung der Mobildaten
Um auf das Internet zugreifen zu können, muss das Mobildatensymbol aktiviert
werden.
1. Ziehen Sie die Statusleiste nach unten.
2. Tippen Sie auf das“Einstellungen”,-Symbol, um das Menü zu öffnen
3. Tippen Sieauf„SIM-Karten“
4. Tippen sie auf„Mobilfunkdaten“, um diese zu aktivieren
Page 63

63
DE
WLAN
Stellen Sie sicher, dass Sie sich innerhalb einer WLAN-Zone aufhalten. Von der
Statusleiste aus können Sie schnell auf dieWLAN-Einstellungen zugreifen.
1.Ziehen Sie die Statusleiste herunter.
Das Status-Dashboard wirdangezeigt.
2. Tippen Sie auf das“Einstellungen”-Symbol, um das Menü zu öffnen.
3. Tippen Sieauf„WLAN“
4. Falls derWLAN-Schalter in die Position„AUS“ ist, schieben Sie diesen auf„AN“.
Nachdem das WLAN eingeschaltet wurde, sucht das Fieldbook nach WLAN-Netzwerken in
Reichweite.
5.Tippen Sie auf den Namen des Netzwerks, mit dem Sie verbunden werden möchten.
Gesicherte Netzwerke werden mit einem Schloss-Symbol angezeigt und erfordern die
Eingabe eines Passworts.
Page 64

Google-Kontohinzufügen
Mit einem Google-Konto können Sie Ihre Google-Apps und Dienste in vollem Umfang
nutzen.
1.Gehen Sie zu „Einstellungen“ > „Konten“ > „Kontohinzufügen“.
2.Wählen Sie für das hinzuzufügende Konto den Typ „Google“.
3.Folgen Sie den Anweisungen auf dem Bildschirm und geben Sie die Informationen für
das Konto ein.
Nachdem das Konto erstellt wurde, können Sie auf Play Store, Gmail, Hangouts, Maps
und viele andere Apps zugreifen.
Synchronisierungsinformationen
Die Informationen müssen synchronisiert werden, um gespeichert werden zu können.
Ihre Daten werden aufGoogle-Servern gesichert.
1. Gehen Sie zu „Einstellungen“ > „Konten“ > „Google“.
2.Wählen Sie Ihr Kontoaus.
Die Liste der synchronisierbaren Informationen wird angezeigt.
3.Markieren Sie alle Informationen, um sie zu synchronisieren.
Im Falle eines Geräte- oder SIM-Kartenverlusts können diese wiederhergestellt werden.
Wird Ihr Google-Konto einem neuen Gerät hinzugefügt, werden Ihre gespeicherten
Informationen erfasst.
64
Android // Google-Konten & Kontakte
Page 65

65
DE
Speicherung IhrerKontakte
Alle Ihre Kontakte sind im Web immer verfügbar und können mit jedem AndroidTelefon synchronisiert werden, das mit dem gleichen Google-Konto eingerichtet ist.
1.Legen Sie die SIM-Karte mit Ihren Kontakten in Ihr Telefon ein.
2.Starten Sie im Menü„Alle Anwendungen“ die App „Kontakte“ .
3.Tippen Sie auf das Menü-Symbol >“Importieren/Exportieren”.
4. Wählen Sie Import von der SIM-Karte.
5. Wählen Sie Ihr Google-Konto aus.
6. Markieren Sie die zu importierenden Kontakte und bestätigen Sie.
7. Nachdem die Kontakte in Ihr Google-Konto importiert wurden, gehen Sie zu
„Einstellungen > Konten > Google“.
8.Wählen Sie Ihr Google-Konto aus. “Kontakte” muss markiert sein.
9.Tippen Sie auf das Menü-Symbol und dann “Jetzt synchronisieren“. Ihre Kontakte
werden in Ihrem Google-Konto gespeichert.
Page 66

Der erweiterteStartbildschirm:
Wechseln Sie durch Wischen nach links und rechts zwischen verschiedenen «Home»Bildschirmen.
Home-Taste
Kurz drücken, um zum Startbildschirm zu gelangen.
Gedrückt halten, um eine Liste geöffneter Anwendungen anzuzeigen.
Ein Element vom Startbildschirm verschieben:
Zum Verschieben eines Elements vom Startbildschirm den Finger darauf legen und so
lange halten, bis die Rasterlinien zur Positionierung erscheinen. Dann an die gewünschte
Stelle schieben undloslassen.
Ein Element vom Startbildschirm entfernen:
Den Finger auf das Element legen und halten. Den Finger auf dem Bildschirm nach oben
bewegen und über dem «Entfernen»-Symbol loslassen.
Ein Element deinstallieren:
Auf den «Alle Apps»-Bildschirmen das betreffende Element berühren und halten. Den
Finger im Bildschirm nach oben bewegen und über dem «Deinstallieren»-Papierkorb
loslassen.
66
Android // Android
TM
kennenlernen
Page 67

DE
Anwendungsordner erstellen:
Ziehen Sie auf einem Startbildschirm ein Anwendungssymbol über ein anderes.
Die beiden Symbole werdenkombiniert.
Widgets:
Berühren Sie das «Alle Apps»-Symbol auf dem Startbildschirm. Berühren Sie
«Widgets» oben auf dem Bildschirm. Auf dem «Widgets»-Hauptbildschirm können Sie
Widgets genau wie Anwendungssymbole auch verschieben.
Hintergrundbild ändern:
Den Finger auf eine freie Stelle des Bildschirms legen und dann aus der Liste
auswählen.
Touchscreensperren:
Berühren Sie Einstellungen auf dem Schnelleinstellungen-Dashboard in der
Statusleiste. Scrollen Sie nach unten und berühren Sie “Sicherheit”. Berühren Sie
Bildschirmsperrung. Berühren Sie die gewünschte Art der Sperrung. Nach erfolgter
Sperrung wird ein Sperrbildschirm angezeigt, sobald der Bildschirm aktiviert
wird. Auf diesem ist ein Muster, eine PIN oder ein anderer festgelegter Schlüssel
einzugeben.
67
Page 68

TB80 Additional Information
EN
R
Page 69

68
This device is intended for home and office use in all EU countries (and other countries
following the EU directive 1999/5/EC) without any limitation except for the countries
mentioned below:
Country Restriction Reason/
remark
Bulgaria
France
General authorization required for outdoor use and public service
Military Radiolocation use. Refarming of the 2.4 GHz band has been
ongoing in recent years to allow current relaxed regulation. Full
implementation planned 2012
Italy
Luxembourg
None
Outdoor uselimited
to 10 mW e.i.r.p.
within the band
2454-2483.5 MHz
None
None
Norway Implemented
If used outside of own premises, general authorization is required.
General authorization required for network and service supply (not
forspectrum)
This subsection does not apply for the geographical aera within a
radius of 20 km from the centre of Ny-Alesund
National restrictions
Page 70

69
Country Restriction Reason/
remark
Russian
Federation
None Only for indoor applications
Page 71

70
The software bundled with this product includes software files subject to certain open
source license requirements. Such open source software files are subject solely to
the terms of the relevant open source software license. Such open source software is
provided on an “AS IS” basis to the maximum extent permitted by applicable law.
For the open source files contained herein, please access “Open source license” section
located at: Settings\About tablet\Legal information on the device for the relevant
copyright and licensing terms. You may obtain a copy of Apache License, Version 2.0
at http://www.apache.org/licenses/LICENSE-2.0. You may also obtain a copy of GNU
General Public License, Version 2 at the Free Software Foundation, INC, 51 Franklin
Street, Fifth Floor, Boston, MA 02110-1301, USA.
Until the date that is three years after our last shipment of this product, you may obtain
a copy of the source code corresponding to the binaries for any GPL-Licensed file by
contacting LOGIC INSTRUMENT customer service at www.logic-instrument.com and
Logic Instrument will send you a link to such source code or will provide instructions to
get the source on a physical medium.
This offer is valid to anyone in receipt of this information.
Open Source Software Offer
Page 72

71
EN
Windows operating instructions of
special function module
1. U-blox GPS
(1). The software bundled with this
product includes software files subject
to certain open .
(2). Use power control tool and
make it power on.
Page 73

72
(3). Open the software, chose receiver,
and chose port again, click COM1.
(4). In the same way for receiver,
chose Baudrate, click 9600.
(5). As below picture, double click
the satellites model picture to
enlarge.
Page 74

73
EN
(6). The blue colors are the satellites that searched, green color are effective
satellites. The numbers in the right are signal value.
standard:
Enviroment: in open
field, no metal in around,
no obstacles. Sunny
weather, no clouds
covering.
Condition: can see
satellites above 12
pieces, effective
satellites above 10
pieces. Have2-3pieces
satellites value reach to
above 40 dB.
Page 75

(1). Copy the serial assistant ( SPU)
on the desktop.
2. 1D moduleoperation
(2). Use power control tool and
make it power on.
(3). Install the opened software, chose
corresponding serial port, Baud rate
chose 9600.
74
(4). Click start key, press the
scanner key on the PAD and start
to scan.
Page 76

75
EN
(5). Ok ! after scan successful, the result will show on the frame automatically.
Page 77

76
3. 2D moduleoperation
(1). Use power control tool and make It power on.
(2). Create a text document.
Page 78

77
EN
(3). Open the text document, click the blank place, press the scan key on the PAD
and start to scan.
(4). The result of scanner will show automatically.
Page 79

Android operating instructions of
special function module
(note: please allow installation of unknow source before software installation)
check: setting—security- unknown source.
78
Page 80

79
EN
1. NFC Moduleoperation
(1). Copy NFC testing software on the local.
(2). Click install, and open.
(3). Put NFC card on the induction area.
(4).OK! Read information, OK!
Standard :
Page 81

80
2. GPS Moduleoperation
(1). Copy GPS testing software on the local.
(2). Click install, and open.
(3). See the GPS status shows off on the top left corner. Click off and enter into set
interface.
Page 82

81
EN
(4).open the switch on the top right
corner, and chose agree again.
(5). Chose mode, click device only.
(6).Finally return GPS main interface. Can see GPS Status shows on.
Page 83

(7).In open field and waiting for 1min
and check if there is a satellite.
(8). OK! wait for 3 mins and check
if satellites value, quantity meet
standard.
standard:
Enviroment: in open field, no metal in around, no obstacles. Sunny weather, no clouds
covering.
Condition: can see satellites above 12 pieces, effective satellites above 10 pieces. Have2-3
pieces satellites value reach to above 40 dB.
82
Page 84

83
EN
open testing software will have operating instruction as below:
3. 1D Moduleoperation
Page 85

84
(1). Copy scan testing software to
local.
(2). Click install, and open.
(3). Chose ttyUSB0 on the serial
port node, chose 9600 or 115200 on
Baud rate options, shows HEX.
(4). Click Serial port operation open
options, press Scan key on Pad to
scan relevant barcode.
(5). OK! after successfully, will show the right characters on the frame.
Page 86

85
EN
4. 2D Moduleoperation
(1). Copy scan code testing software
to local.
(2). Click install, and open.
(3)Click the frame in the below, press the scan key and aim at the barcode which
need to scan.
(4) OK! after scan successfully, will show the right characters on the below frame.
Page 87

86
(5). also can press scanner key to
scan directly and will show as below.
(6). If scanner can not work, you
can try scan the below USB switch
code.
 Loading...