

Page 1
A Versatile Multi-Function Terminal
User’s Manual
F6F5F4F3F2F1
400701G Version 1.0
Page 2

Page 3

i
Preface
About This Manual
This manual explains how to install, operate and maintain the MT680-AMWTAG Versatile
Multi-Function Terminal.
No part of this publication may be reproduced or used in any form, or by any electrical or
mechanical means, without permission in writing from the manufacturer, which includes photocopying, recording, or information storage and retrieval systems. The material in this manual
is subject to change without notice.
© Copyright 2009 Unitech Electronics Co., Ltd. All rights reserved.
Unitech TASHI Web site: http:\\www.unitech-sbd.com
Unitech Global Web site: http:\\www.unitech-adc.com
Microsoft, Windows and ActiveSync are either registered trademarks or
trademarks of Microsoft Corporation. Other product names mentioned in
this manual may be trademarks or registered trademarks of their respective companies and are hereby acknowledged.
Regulatory Compliance Statements
FCC Warning Statement
This equipment has been tested and found to comply with the limits for a Class B digital
device, pursuant to part 15 of the FCC rules. These limits are designed to provide reasonable
protection against harmful interference in a residential installation.
This equipment generates, uses and can radiate radio frequency energy and, if not installed
and used in accordance with the instructions, may cause harmful interference to radio communications. However, there is no guarantee that interference will not occur in a particular
installation. If this equipment does cause harmful interference to radio or television reception,
which can be determined by turning the equipment off and on, the user is encouraged to try to
correct the interference by one or more of the following:
– Relocate the receiving antenna.
– Increase the separation between the equipment and receiver.
– Connect the equipment into an outlet on a circuit that is different from the receiver.
– Consult the dealer or an experienced radio/television technician for help.
1. This Transmitter must not cohabitate or operate in conjunction with any other
antenna(s) or transmitter(s).
2. This equipment complies with FCC RF radiation exposure limits set forth for an uncontrolled environment. To maintain compliance with FCC RF exposure compliance
requirements, avoid direct contact to the transmitting antenna during transmission.
3. Any changes or modifications (including the antennas) made to this device that are not
expressly approved by the manufacturer may void the user’s authority to operate the
equipment.
Page 4
ii
Canadian Compliance Statement
This Class A Digital apparatus meets all requirements of the Canadian Interference-Causing
Equipment Regulations.
Cet appareil numérique de la classe A respecte les exigences du Règlement sur le matériel
broilleur du Canada.
European Conformity Statement
Declaration of Conformity with Regard to the R&TTE 1999/5/EC and EMC 89/336/ EEC directives.
RoHS Statement
This device conforms to RoHS (Restriction of Hazardous Substances)
European Union regulations that set maximum concentration limits on
hazardous materials used in electrical and electronic equipment.
Taiwan NCC Warning Statement
根據 NCC 低功率電波輻射性電機管理辦法 規定 :
第十二條 經型式認證合格之低功率射頻電機,非經許可,公司、商號或使用者均不得擅自變
更頻率、加大功率或變更原設計之特性及功能。
第十四條 低功率射頻電機之使用不得影響飛航安全及干擾合法通信;經發現有干擾現象時,
應立即停用,並改善至無干擾時方得繼續使用。
前項合法通信,指依電信法規定作業之無線電通信。
低功率射頻電機須忍受合法通信或工業、科學及醫療用電波輻射性電機設備之干
擾。
Page 5

About This Manual
iii
Battery Notices
The MT680-AMWTAG is equipped with a Lithium-Ion battery. But, after extended storage
periods, the MT680-AMWTAG may not start without an external power source due to battery
discharge. In this case, connect the MT680-AMWTAG to the power cable and recharge the
MT680-AMWTAG for about 12 hours to charge the battery to full capacity.
The battery supplies operational power to the MT680-AMWTAG for approximately two hours
(depending on hardware configuration and with limited backlight use) or provides backup data
for three days when there is no external power source.
Battery Charge Notice
It is important to consider the environmental temperature whenever the Lithium-Ion battery is
charged, which is most efficient at room temperature or in a slightly cooler environment. It is
essential that batteries are charged within the range of 0°C to 45°C (32ºF to 113ºF). Charging
batteries outside of the specified range could damage the batteries and shorten their charging
life cycle.
Storage and Safety Notice
Although charged Lithium-Ion batteries may be left unused for several months, their capacity
may deplete due to build up of internal resistance. If this happens they will require recharging
prior to use. Lithium-Ion batteries may store at temperatures between -20°C to 60°C (-4ºF to
140ºF), however they may deplete more rapidly at the warmer end of this temperature range.
It is also recommended to store batteries at room temperature.
Warranty
The following items are covered under Unitech Limited Warranty:
•
MT680-AMWTAG Versatile Multi-Function Terminal. – 1-year limited warranty.
• Cables – three-month limited warranty.
• Backup Battery – three-month limited warranty.
Page 6

iv
Page 7

v
Table of Contents
Preface
About This Manual .................................................................................... i
Regulatory Compliance Statements .................................................................... i
FCC Warning Statement ................................................................................. i
Canadian Compliance Statement................................................................... ii
European Conformity Statement .................................................................... ii
RoHS Statement............................................................................................. ii
Taiwan NCC Warning Statement ................................................................... ii
Battery Notices .................................................................................................. iii
Battery Charge Notice ................................................................................... iii
Storage and Safety Notice............................................................................. iii
Warranty ............................................................................................................ iii
Chapter 1
Getting Started ........................................................................................ 1
Introducing the MT680-AMWTAG...................................................................... 1
Features ......................................................................................................... 1
Setting up the MT680-AMWTAG......................................................................... 2
Connect Power............................................................................................... 2
Charging the Battery....................................................................................... 2
Using the Touch-screen...................................................................................... 2
Using the MT680-AMWTAG for the First Time ................................................... 3
Powering On the MT680-AMWTAG................................................................ 3
Calibrate Screen............................................................................................. 3
Setting the Date and Time.............................................................................. 3
Chapter 2
Using the Hardware ................................................................................ 4
Using the Function Keys..................................................................................... 4
Using the Windows CE 5.0 Keyboard ............................................................ 5
Entering Characters ................................................................................... 5
Moving the Keyboard ................................................................................. 5
Closing the Keyboard................................................................................. 5
Using the RFID Reader ...................................................................................... 6
Testing RFID Card Verification....................................................................... 6
Using the Camera............................................................................................... 8
Testing the Imager.......................................................................................... 8
Using the Audio Input/Output............................................................................ 10
Skipping the Calibration Routine ...................................................................... 11
Chapter 3
Data Communication............................................................................. 14
Establishing the USB Connection..................................................................... 14
Establishing the MT680-AMWTAG/PC Connection ......................................... 14
USB Cable.................................................................................................... 14
Page 8

vi
Serial Cable.................................................................................................. 14
Ethernet Cable ............................................................................................. 14
Using Mircosoft ActiveSync .............................................................................. 15
Additional Capabilities.............................................................................. 15
Requirements........................................................................................... 15
Installing Microsoft ActiveSync ..................................................................... 15
Connecting the MT680-AMWTAG to the Compute........ .............................. 15
Establishing a Wi-Fi Connection....................................................................... 17
Set Up an IP Address ....................................................................................... 19
Obtaining an IP Address via DHCP Server .................................................. 19
Specifying an IP Address ............................................................................. 20
Chapter 4
Power System ....................................................................................... 21
Charging the Battery for the First Time............................................................. 21
Checking the Battery Status......................................................................... 21
Extending Battery Life....................................................................................... 22
Changing the Automatic Power Settings...................................................... 22
Reducing CPU Speed .................................................................................. 22
Adjusting the Backlight ................................................................................. 23
Performing a Hardware Reset .......................................................................... 24
Performing a Warm Start.............................................................................. 24
Performing a Cold Start................................................................................ 25
Appendix A
System Specification............................................................................. 26
Appendix B
Worldwide Support................................................................................ 27
Page 9

1
Chapter 1
Getting Started
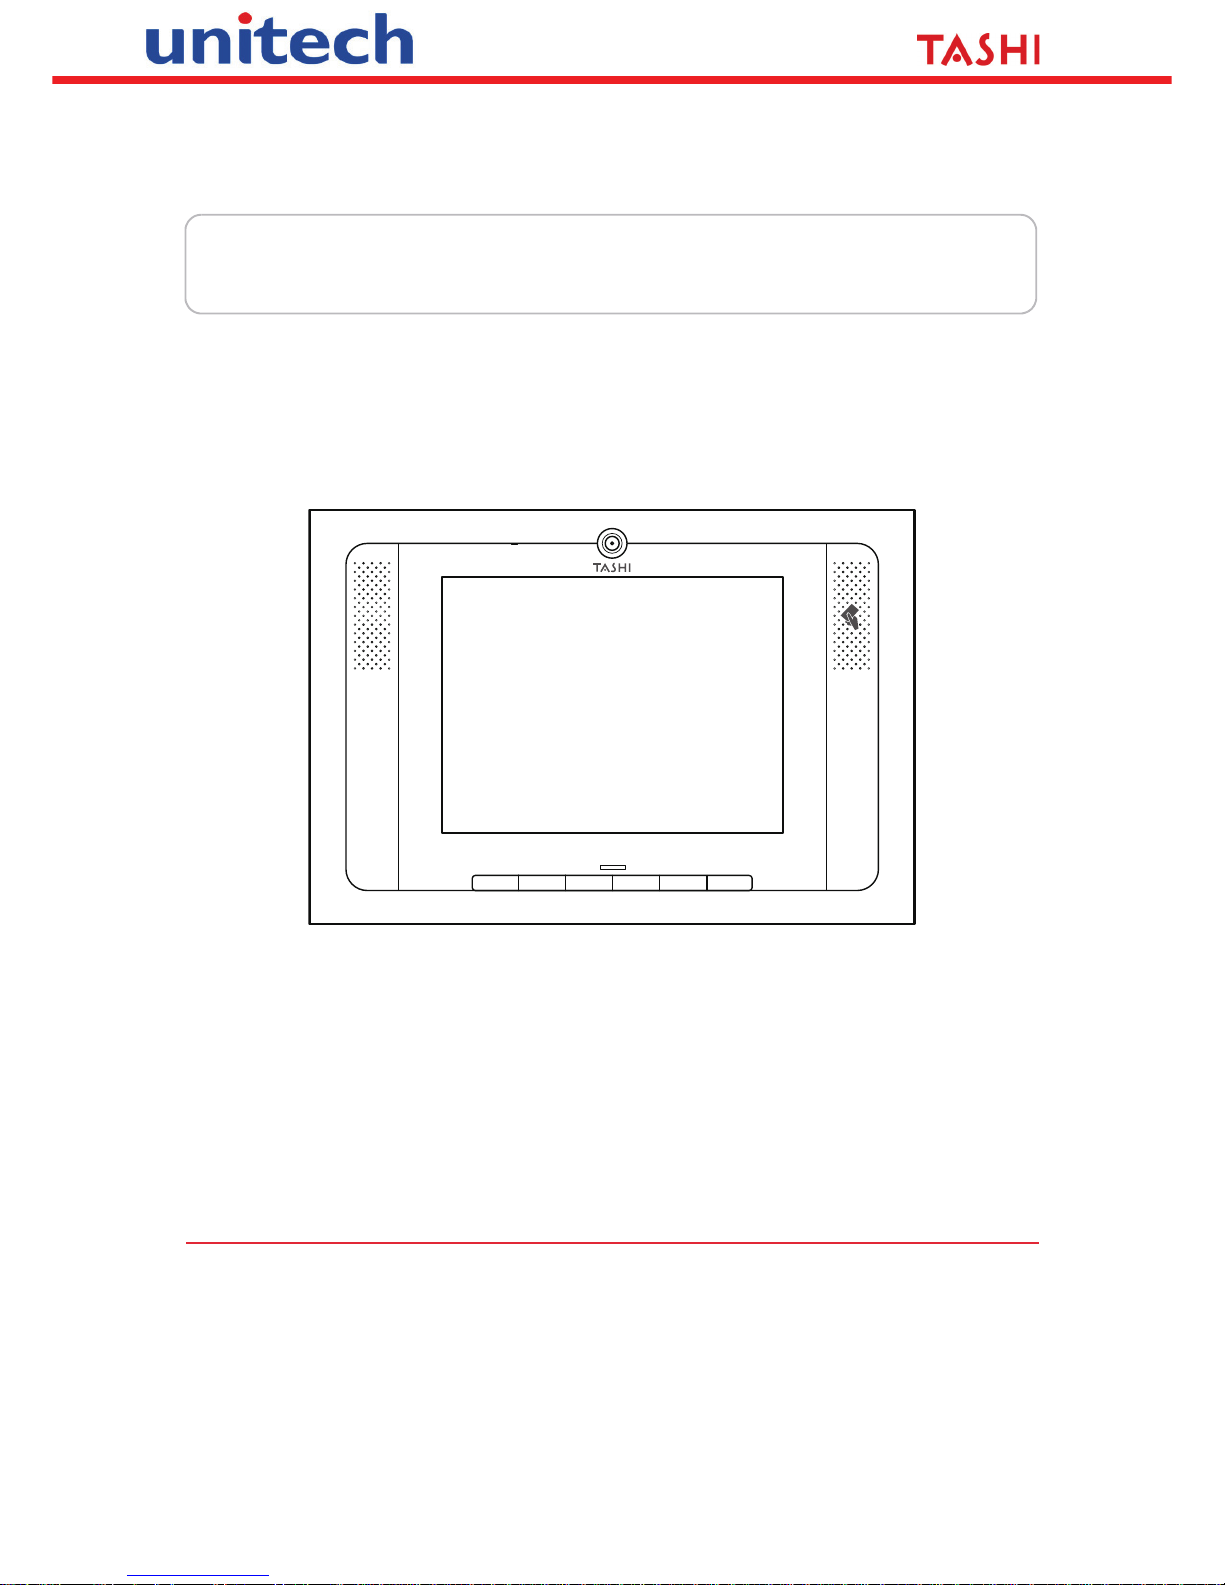
Introducing the MT680-AMWTAG
The MT680-AMWTAG is a versatile fixed-mount TASHI (Time & Attendance, Access Control, Surveillance,
Home Automation and Intercom) Controller. This multi-functional device offers a built-in 2.0-Megapixel CMOS
digital camera, RFID reader, microphone and audio speaker. It runs on a Windows CE 5.0 operating
system which provides a variety of applications that benefit numerous industries.
Features
Internal System
• 520MHz Intel PXA270 Processor
• Microsoft Windows CE 5.0
Memory
• 128 MB SDRAM
• 64 MB FlashROM
Display
• 8” VGA TFT-LCD touch-screen
• 640 x 480 resolution
Multimedia
• 2.0 Megapixel CMOS Camera
• Speaker Audio Outputs (2)
• Microphone Audio Input
RFID Reader (Optional)
• MiFare, 13.56MHz
Wireless Connectivity (Optional)
• Supports 802.11b/g Wireless LAN
Communication
• RS232/485
• USB 1.1 Host
• USB 1.1 Client (for developing use only)
• Relay Outputs (4)
• Photo-Coupler Inputs (4)
• Ethernet 10/100Base-T
• Power-over-Ethernet
Expansion Slot
• CF Memory Slot
• SDHC Memory Slot
Battery Life
• 2-Hour Operational Use
• One Day Data Backup
• Embedded Backup Battery Cell
User Interface
• 6-Hard Keys
• Touch-screen
TASHI Middleware
• Video Streaming
• VoIP/V2oIP
Software Programming Tools
• C#, VB.NET, C++
Page 10
2
Copyright 2009 Unitech Electronics Co., Ltd. All rights reserved. Unitech is a registered trademark of Unitech Electronics Co., Ltd.
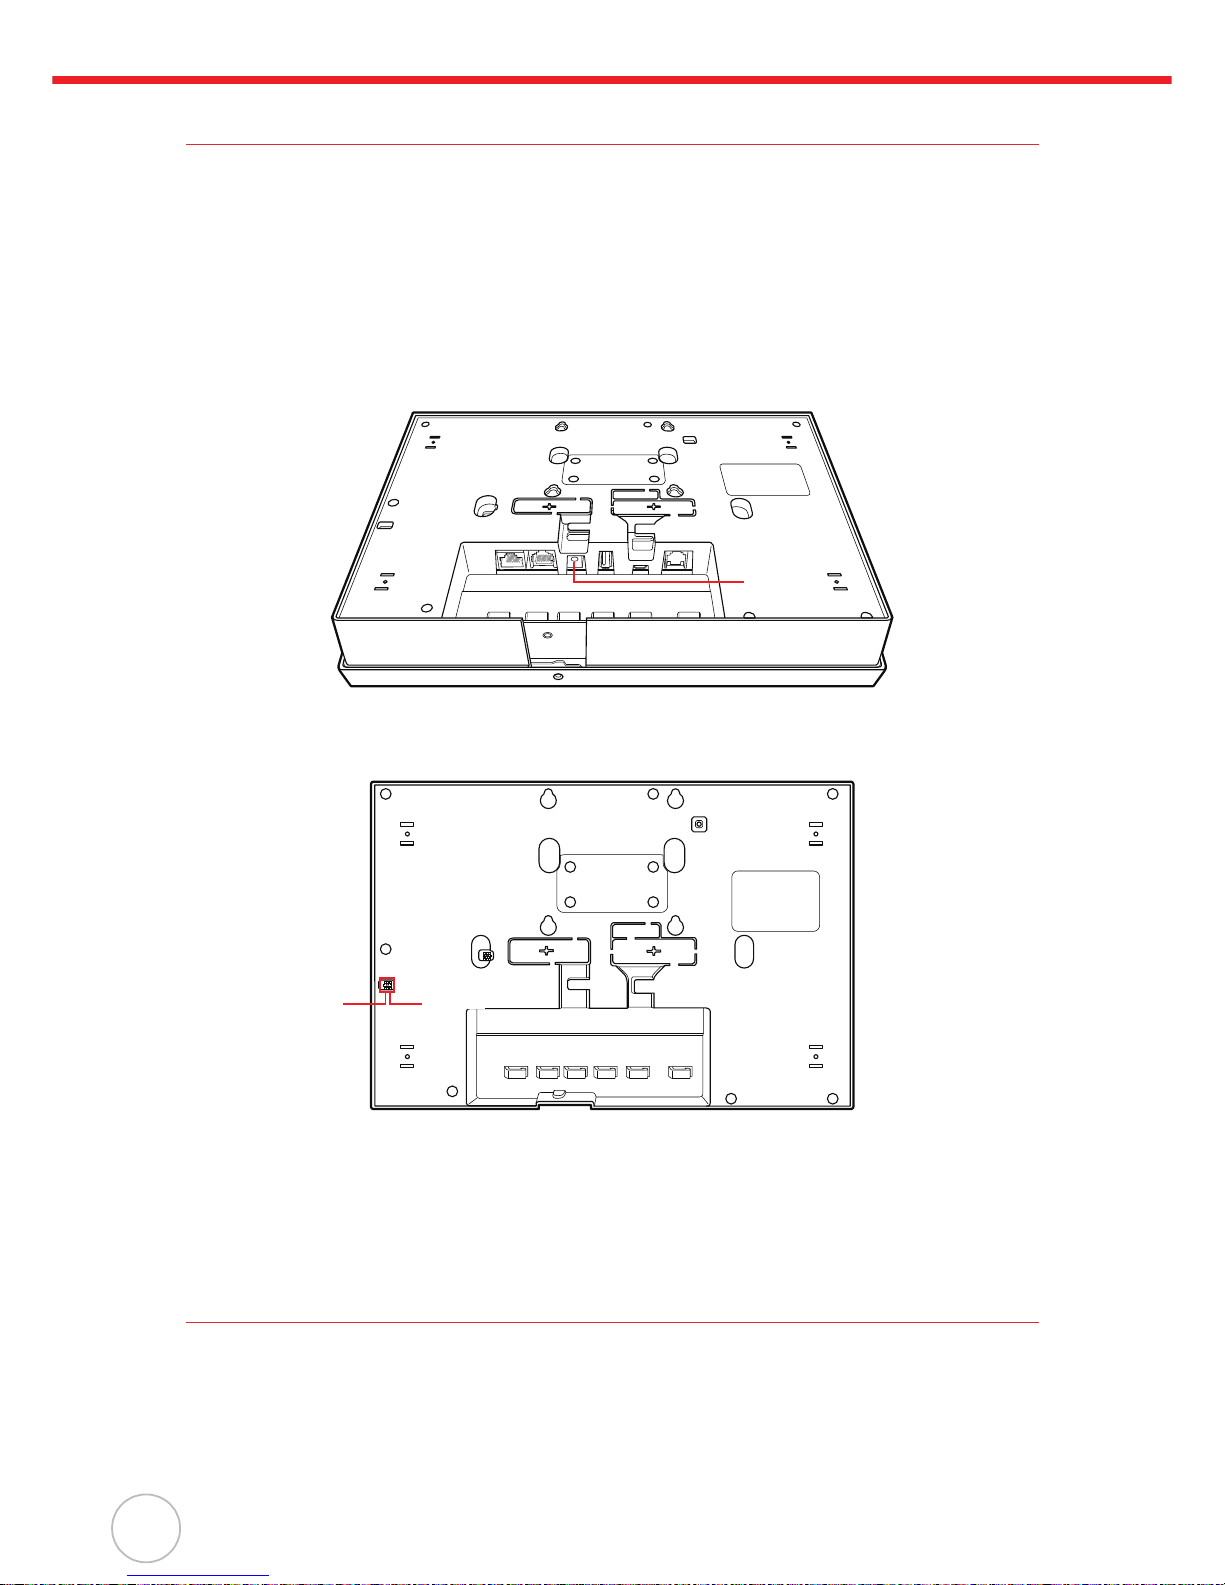
Setting up the MT680-AMWTAG
Connect Power
Connect power to the MT680-AMWTAG through the following:
NOTE: A UPS battery is used for normal operation when there is no external power source.
The battery also functions as a data backup battery. Therefore, data entered may not
be properly stored until the built-in backup battery has been adequately charged.
1. Plug the Power Adapter Cable into the
MT680-AMWTAG’s DC input jack, then connect the other end of
the Power Adapter into an electrical outlet.
2. Locate the Backup Battery Switch on the MT680’s back panel, and move it to the right to the
“On” position.
Charging the Battery
The MT680 must be charged for at least 12 hours before initial use. The battery begins charging as
soon as the Power Adapter Cable plugs into an external power source.
Using the Touch-screen
1. Lightly tap the screen to choose a menu option.
2. Double-tap to open programs.
3. Use the Windows CE Keyboard to type letters or numbers into a data field or a form.
4. Press down and hold on an item to access additional options.
DC Input
Jack
Off
On
Backup Battery
Switch
Page 11
Chapter 1 Getting Started
3
Using the MT680-AMWTAG for the First Time
Once the MT680-AMWTAG has been charged for at least 12 hours, it is time to start up, calibrate the display,
select the time zone, and enter the date and time.
Powering On the MT680-AMWTAG
The MT680-AMWTAG automatically powers on when the Power Adapter Cable plugs into an external power
source. The MT680-AMWTAG welcome screen appears, followed by the Windows CE screen.
NOTE: Move the MT680-AMWTAG Backup Battery Switch to the “On” position before initial use.
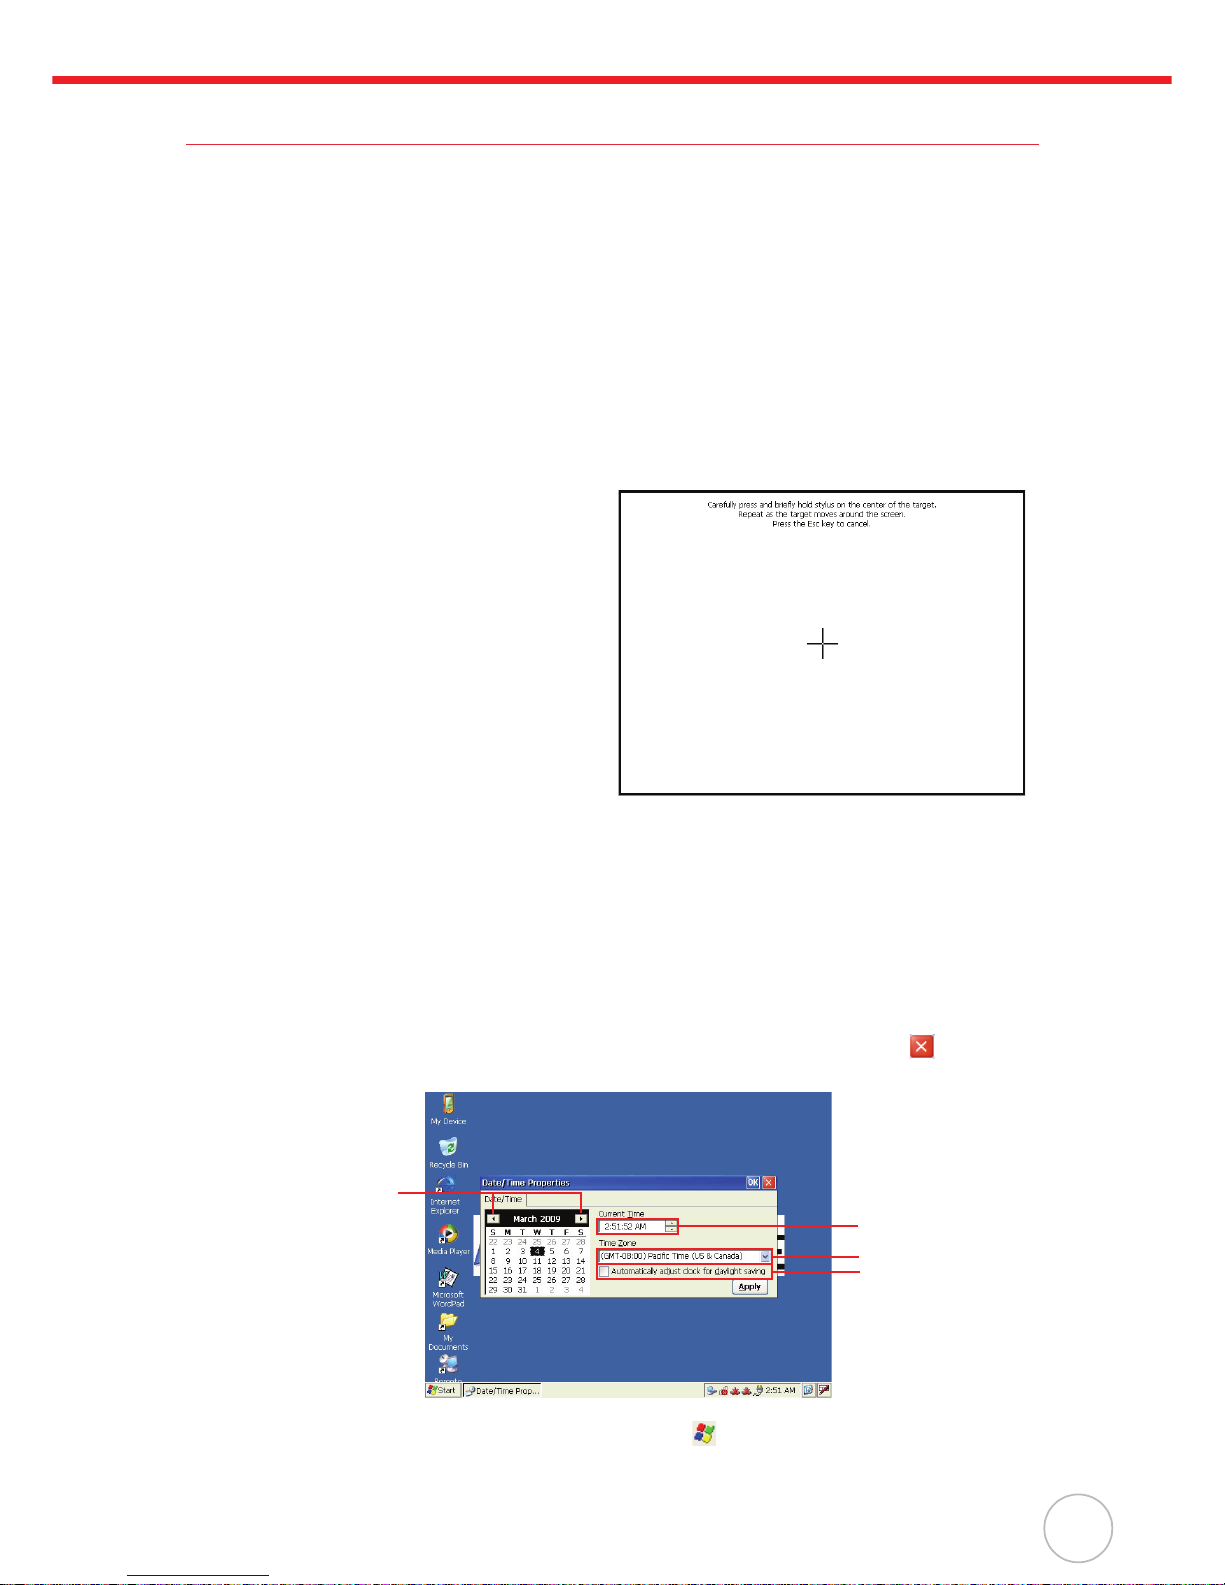
Calibrate Screen
The calibrate screen automatically appears when the unit powers on for the first time or when the system is reset.
Tap a sequence of target marks across the screen.
Tap the screen gently.
When the series of taps is complete, press F6 /
ENTER to confirm calibration or press F5 / ESC to
cancel the calibration.
The Date/Time properties screen will appear after
the calibration has been confirmed.
NOTE: It is possible to bypass the calibra-
tion screen, and date and time
routines. See Skipping the Cali-
bration Routine on page 11.
Setting the Date and Time
In the Date/Time Properties window, touch the screen to select the current date/time, time zone and
daylight saving time option.
• Tap the left or right arrows to scroll through the desired year and month or directly tap the year
or month to change the setting.
• Tap on the Hr/Min/Sec AM/PM to input the Hr/Min/Sec to set the time.
• Tap the arrow and set the correct time zone from the drop-down menu.
• Check the box to enable Windows to automatically adjust for daylight saving.
•Tap Apply to save the settings and exit the Date/Time Properties dialog, or tap to exit with-
out saving.
NOTE: To change the time and date at any time tap: Start → Settings → Control Panel →
double-tap Date/Time.
Set Date
Set Time
Set Time Zone
Set Daylight Saving
Time
Page 12

4
Chapter 2
Using the Hardware
Using the Function Keys
The MT680-AMWTAG contains six function keys.
Function Key Descriptions
Key Main Function
F1 Function Key
F2 Function Key
F3 Function Key
F4 Function Key
F5
Function Key, or ESC performs the same function as tapping the on the
touch screen.
F6 Function Key, or ENTER moves the cursor to the next line or executes a
command.
F6F5F4F3F2F1
Function Keys
Page 13

Chapter 2 Using the Hardware
5
Using the Windows CE 5.0 Keyboard
The Windows CE Software provides a touch-screen keyboard for alphanumeric input. The Windowsbased keyboard replicates the layout of a standard PC keyboard.
Open the Windows CE keyboard by tapping → LargeKB.
Entering Characters
Entering alphabetic and numeric characters on the MT680 is the same as character input on a standard
PC keyboard. Tap the onscreen button corresponding to the desired character.
Moving the Keyboard
Tap the title bar and drag the keyboard to the desired location.
Closing the Keyboard
Tap the keyboard icon → Hide Input Panel to close the Windows CE keyboard.
Keyboard Icon
Page 14

6
Copyright 2009 Unitech Electronics Co., Ltd. All rights reserved. Unitech is a registered trademark of Unitech Electronics Co., Ltd.
Using the RFID Reader
The MT680-AMWTAG features a standard RFID reader, which is compatible with 13.56MHz MiFare cards.
Testing RFID Card Verification
The MT680-AMWTAG has built-in demo programs that allow RFID card verifications.
1. Double-tap the My Device icon on the
Windows CE desktop.
2. Double-tap Windows.
F6F5F4F3F2F1
Bring an RFID Card
Near Here for Reading
Page 15

Chapter 2 Using the Hardware
7
3. Double-tap PDA_10 to open the demo
program.
4. Set the COM Port: field at 2.
Ta p Connect.
5. Choose a card type to activate the demo
test program.
6. Tap Auto and bring the RFID card close to
the sensor. The code will display on the
field below.
7. Tap Stop to end the reading.
Page 16

8
Copyright 2009 Unitech Electronics Co., Ltd. All rights reserved. Unitech is a registered trademark of Unitech Electronics Co., Ltd.
Using the Camera
The MT680-AMWTAG has a built-in 2.0-Megapixel camera that provides the following:
• Capture still images.
• Serve as video recorder.
• Function as an audio/video intercom.
• Incorporates facial recognition through third party software.
Testing the Imager
Test the camera’s efficiency with the MT680’s built-in CameraDemo program through the following:
1. Double-tap My Device on the Windows
CE desktop.
2. Double-tap Windows.
3. Double-tap CameraDemo to open the
demo program.
Page 17

Chapter 2 Using the Hardware
9
4. Tap Preview → Start.
A continuous image is displayed for cap-
turing a(n) image/audio/video.
5. Tap Capture, to photograph an image.
6. To view the image, tap Preview → Stop. And, tap Playback → Show Image. Double-tap the
image file name from the My Device folder.
7. To exit the image, tap Playback → End Show Image.
8. Exit the CameraDemo window by tapping X, or Preview → Exit.
Page 18

10
Copyright 2009 Unitech Electronics Co., Ltd. All rights reserved. Unitech is a registered trademark of Unitech Electronics Co., Ltd.
Using the Audio Input/Output
An audio demo program will test the audio input (recording) and output (playback).
1. Double tap My Device on the Windows
CE desktop.
2. Double-tap Windows.
3. Double-tap wavtest to open the demo
program.
4. Do one of the following:
–Tap Rec to record the voice.
–Tap Stop to finish recording.
–Tap Play to listen to the recording.
Page 19

Chapter 2 Using the Hardware
11
Skipping the Calibration Routine
The FlashConfigUtility program can bypass the screen, and date and time calibration routines when the
MT680 cold starts. Skip the calibration process through the following:
1. Double tap My Device on the Windows
CE desktop.
2. Double-tap Windows.
3. Double-tap FlashConfigUtility to open
the FlashConfigUtility window.
Page 20

12
Copyright 2009 Unitech Electronics Co., Ltd. All rights reserved. Unitech is a registered trademark of Unitech Electronics Co., Ltd.
4. To skip the screen calibration, tap Add
Entry to create a new setting in the Flash
Storage.
5. In the Name of Entry: field, input skip-
Calibration.
In the Type: field, input bool.
In the Set to Value: field, input 1.
Ta p OK.
The message Success, Key Added
appears, indicating a successful entry.
NOTE: The name is case-sensitive.
6. Tap View Key to view this setting.
The read in screen appears with the message skipCalibration:bool:1.
Ta p OK.
7. To skip the date and time calibration, tap
Add Entry to create a new setting in Flash
Storage.
Page 21

Chapter 2 Using the Hardware
13
8. In the Name of Entry: field, input skip-
Clock.
In the Type: field, input bool.
In the Set to Value: field, input 1.
Ta p OK.
The message Success, Key Added
appears, indicating a successful entry.
NOTE: The name is case-sensitive.
9. Tap View Key to view this setting.
The read in screen appears with the message skipClock:bool:1.
Ta p OK.
10. Tap to exit the FlashConfigUtility.
11. Tap Start → Programs → Utilities →
BootMode. The Boot window appears.
12. Tap Cold Boot to cold start the
MT680-AMWTAG
and load the previous settings.
The
MT680-AMWTAG will skip the screen, date and
time calibration process.
Page 22

14
Chapter 3
Data Communication
The MT680-AMWTAG can link to a host computer for data communication via USB, RS232/485 or Ethernet
cables.
Establishing the USB Connection
Connect a USB cable to the MT680-AMWTAG’s USB host port, and connect the other end to a USB peripheral,
such as a: Keyboard, mouse, memory card or HID compliant device.
Establishing the MT680-AMWTAG/PC Connection
The MT680-AMWTAG supports the following connection methods:
USB Cable
Connect a USB cable to the PC’s USB host port, and connect the other end to the MT680-AMWTAG’s
USB client port. The USB connection allows data synchronization. See Using Mircosoft ActiveSync on page 15.
Serial Cable
Plug an RS232 communication cable into the PC’s 9-pin COM port, and connect the other end to the
MT680-AMWTAG’s RS232/485 Port.
NOTE: Turn the RS232/485 Switch to the left (RS232) position.
Ethernet Cable
Plug an Ethernet cable into the PC’s RJ-45 ethernet port, and connect the other end of the cable into
the MT680-AMWTAG’s Ethernet Port.
NOTE: In order for the Power-over-Ethernet module to support power over the RJ-45 Ether-
net cable, the client side must have a POE Hub.
USB Port
(Host)
Ethernet
Port
RS232/485
Port
USB Port
(Client)
RS232/485
Switch
Page 23

Chapter 3 Data Communication
15
Using Mircosoft ActiveSync
Using Microsoft ActiveSync to synchronize and transfer information between any desktop computer
and the MT680-AMWTAG.
Additional Capabilities
Microsoft ActiveSync can:
• Backup and restore data.
• Copy files (rather than synchronize) between th
e MT680-AMWTAG and a desktop computer.
• Control synchronization.
• Select the type and amount of synchronized data.
Requirements
In order to synchronize, Microsoft ActiveSync must be installed on the desktop computer and the MT680-AMWTAG
. The MT680-AMWTAG is already installed with Microsoft ActiveSync. The most updated version of Microsoft ActiveSync can be downloaded from www.microsoft.com.
Installing Microsoft ActiveSync
NOTE: Uninstall the previous version of Mircosoft ActiveSync before installing the latest ver-
sion of Microsoft ActiveSync. The MT680 requires ActiveSync version 4.5 or higher.
Install Microsoft ActiveSync on a computer through the following:
1. Close all programs, including those that run during startup.
2. Disable all virus-scanning software.
3. Download ActiveSync from:
http://www.microsoft.com/windowsmobile/activesync/activesync45.mspx
4. Browse to the download file location, and double-click the file download.
5. Follow the onscreen instructions to complete installation.
Connecting the MT680-AMWTAG to the Computer
1. Power on the MT680-AMWTAG.
2. Connect a USB cable to the
MT680-AMWTAG’s USB host port,
and connect the other end to a
computer.
3. Microsoft ActiveSync starts automatically
configuring the communication port to
work with the MT680-AMWTAG. The
New Partner-ship setup wizard automatically starts.
NOTE: Click Start → Programs → Microsoft ActiveSync, if ActiveSync doesn’t automati-
cally start.
Click Cancel and manually configure the communication settings, if a message
appears indicating that it is unable to detect a connection. Manually configure the communications settings on the computer by clicking MAS → File → Connection Settings
→ Connect Device.
Page 24

16
Copyright 2009 Unitech Electronics Co., Ltd. All rights reserved. Unitech is a registered trademark of Unitech Electronics Co., Ltd.
4. Follow the onscreen instructions.
The Microsoft ActiveSync window
appears, when the configuration process
is complete. Synchronization will initiate
periodically, or upon connection.
NOTE: The computer can create a con-
nection wi
th multiple MT680-AMWTAG
devices. In addition, an
MT680-AMWTAG
can create a connection with up
to two computers.
5. To ensure the correction, on the MT680-AMWTAG,
tap Start → Settings → Control
Panel → double-tap PC Connection.
6. Check Allow connection with desktop
computer when device is attached.
Ta p OK.
Page 25

Chapter 3 Data Communication
17
Establishing a Wi-Fi Connection
The MT680-AMWTAG supports wireless communication with a built-in Wi-Fi card for 802.11b/g WLAN.
It is possible to use the Summit Client Utility to setup or modify the Wi-Fi settings through the following:
NOTE: Wi-Fi access requires a separate service contract through a wireless service provider.
Contact a wireless service provider for more information.
1. Double-tap the SUMMIT icon on the task
bar, or tap Start → Programs → Sum-
mit → scu. The Summit Client Utility win-
dow appears.
NOTE: Alternatively, tap Start → Set-
tings → Control Panel → double
tap Wi-Fi.
2. Tap Admin Login to login as an administrator.
3. Enter the default password as SUMMIT.
Ta p OK.
4. In the Profile tab, tap Scan for available
access points. The Scan window appears.
5. Select a desired SSID (UTE for example)
to create a new profile. Tap Configure.
SUMMIT Icon
Page 26

18
Copyright 2009 Unitech Electronics Co., Ltd. All rights reserved. Unitech is a registered trademark of Unitech Electronics Co., Ltd.
6. The scu window appears, asking to create
a new profile. Tap Yes.
7. Enter the network key in the WEP Key
Entry window. Tap OK.
8. Tap Commit to activate the setting.
9. In the Main tab, scroll down the Active
Profile drop down menu to select UTE.
The network automatically connects.
The radio information containing the active
profile, radio status, client attributes, AP
attributes, connection channel number,
data rate, transmitted power, signal
strength and etc., will display in the Status
tab.
10. Tap Disable Radio to disconnect the access point.
NOTE: Please refer to the User’s Guide on the Summit Web site for detailed information:
http://www.summitdatacom.com/documentation.htm
Page 27

Chapter 3 Data Communication
19
Set Up an IP Address
The MT680-AMWTAG automatically detects WLAN module(FCC ID: TWG-SDCCF10G) during the first installation.
Set the IP address through one of the following methods:
• Obtaining an IP Address via Dynamic Host Configuration Protocol (DHCP) Server.
• Specifying an IP Address.
Obtaining an IP Address via DHCP Server
Make sure a DHCP server is available in the LAN environment before trying to obtain the IP address
through a DHCP server.
1. Tap Start → Settings → Network and
Dial-up Connections.
NOTE: Ta p Start → Settings → Con-
trol Panel → double-tap Network
and Dial-up Connections.
2. Double-tap DM9ISA1.
3. Tap the radio button next to Obtain an IP
address via DHCP and then tap OK.
Page 28

20
Copyright 2009 Unitech Electronics Co., Ltd. All rights reserved. Unitech is a registered trademark of Unitech Electronics Co., Ltd.
Specifying an IP Address
If no DHCP server is available, assign an IP address to each MT680-AMWTAG through the following:
1. Tap Start → Settings → Network and
Dial-up Connections.
NOTE: Ta p Start → Settings → Con-
trol Panel → double-tap Network and Dial-up Connections.
2. Double-tap DM9ISA1.
3. Tap the radio button next to Specify an IP
address. Input the proper IP address,
Subnet Mask and Default Gateway.
4. In the Name Servers tab, input the proper
Primary DNS:, Secondary DNS:, Primary WINS: and Secondary WINS:. Tap
OK.
NOTE: To avoid conflict with the Local
Area Network environment, consult an MIS department for the
correct Transmission Control Protocol / Internet Protocol setting.
Page 29

21
Chapter 4
Power System
Charging the Battery for the First Time
The MT680-AMWTAG is equipped with a Lithium-Ion battery. The MT680-AMWTAG may not power on
after long storage periods without an external power adapter, due to battery discharge. In this case, connect
the MT680-AMWTAG to the power adapter and recharge the device for about 12 hours.
NOTE: The MT680-AMWTAG can operate for approximately two hours (depending on the hard-
ware configuration and backlight usage) or can store data for 24 hours without external power.
Operating the MT680-AMWTAG’s backlight screen at 100 percent brightness consumes the
most power. Therefore, when the MT680-AMWTAG disconnects from its external power source
it will enter into sleep mode, which automatically turns off the backlight. Tapping the touchscreen will set the backlight screen to minimum brightness, saving battery power.
Checking the Battery Status
Check the Power Properties by tapping Start
→ Settings → Control Panel → double-tap
Power.
This status icon appears on the
MT680-AMWTAG’s task-bar indicating the low
battery status. The MT680-AMWTAG will enter
suspend mode when the battery level reaches
Low status, and the MT680-AMWTAG will enter
sleep mode when the battery level reaches Very
Low status. There is a 12 hour time window to
recharge the MT680-AMWTAG, but after this
time period there is a strong risk of losing all the
MT680-AMWTAG's internal memory
This icon appears in the taskbar when the battery is Very Low and the battery should be
recharged as soon as possible.
CAUTION! Immediately backup the
MT680-AMWTAG’s data or risk losing
everything when there is no external
power, and the Main Batteries Very
Low warning window appears.
Page 30

22
Copyright 2009 Unitech Electronics Co., Ltd. All rights reserved. Unitech is a registered trademark of Unitech Electronics Co., Ltd.
Extending Battery Life
Extend the MT680-AMWTAG’s battery life through the following:
• Change the automatic power settings.
• Reduce the CPU speed.
• Minimize the backlight.
Changing the Automatic Power Settings
The MT680-AMWTAG enters an idle mode when there is no task, or all tasks are waiting for input. In the default
setting, the MT680-AMWTAG enters User Idle mode when there is no data input for one minute. The MT680-
AMWTAG remains idle for three minutes when there is no external power source. Pressing the power button will
return the MT680-AMWTAG to the automatic shutdown mode screen.
Change the automatic power settings through the following:
1. Open the Power Properties by tapping
Start → Settings → Control Panel →
Power.
2. Tap the Schemes tab.
3. Tap the automatic shut off time arrow to select from a list of time periods for the following
modes:
– Switch state to User Idle: The MT680-AMWTAG switches to User Idle mode when there is no
user input after the selected time.
– Switch State to System Idle: The MT680-AMWTAG switches from User Idle mode to System
Idle mode when the system is inactive after the selected time.
– Switch State to Suspend: The MT680-AMWTAG switches from System Idle mode to Suspend
mode when the system is inactive after the selected time.
The available time periods are 1, 2, 3, 4, 5, 10 and 30 minutes.
Reducing CPU Speed
Reduce the CPU speed through the following:
1. Tap Start → Settings → Control
Panel → double-tap CPU Speed.
2. Select a lower CPU speed to conserve
battery power.
Page 31

Chapter 4 Power System
23
Adjusting the Backlight
Conserve the MT680-AMWTAG’s battery power by adjusting the backlight screen settings through the following:
NOTE: The MT680-AMWTAG screen contrast has been preset by Unitech for optimum performance.
1. Tap Start → Settings → Control
Panel → double-tap Backlight to adjust
the screen brightness.
2. The color display’s backlight can be customized for the Battery Power and External Power
conditions. Set the backlight behavior and drag the On Intensity and Dim Intensity sliders to
the desired levels.
Field Description
Dim Backlight Minutes until the backlight dims.
Turn Off Backlight Minutes until the backlight turns
automatically off.
Turn on Backlight The backlight turns on when a button is
pressed, or the touch-screen is tapped.
Page 32

24
Copyright 2009 Unitech Electronics Co., Ltd. All rights reserved. Unitech is a registered trademark of Unitech Electronics Co., Ltd.
Performing a Hardware Reset
Perform a reset if the MT680-AMWTAG freezes (i.e., the device no longer responds to pressing buttons on/or
the touch-screen).
Performing a Warm Start
A Warm Start is used to reset or reboot the device without losing data stored in RAM memory. Perform
a Warm Start in any of the following situations:
• The MT680-AMWTAG fails to respond.
• After installing software applications.
• After making changes to certain system settings (i.e. SD card).
CAUTION! A Warm Start will erase all unsaved data.
Method 1: From Windows CE
1. Tap Start → Programs → Utilities →
BootMode.
2. Tap Warm Boot.
Method 2: From Hardware
Locate the Function Keys on th
e MT680-AMWTAG’s front panel, and simultaneously press F3 and F6.
F6F5F4F3F2F1
Page 33

Chapter 4 Power System
25
Performing a Cold Start
A Cold Start will erase all added data and programs, but it will restore the device to the default factory
settings. However, data and application programs stored in the Flash Storage will not be deleted.
Always perform a Warm Start before attempting to use a Cold Start to correct a problem. Data previously synchronized to the computer can be restored during a future Microsoft ActiveSync operation, or
data can be restored from a backup storage card.
Perform a Cold Start by using the BootMode utility in the operating system, or by pressing the Cold
Start Button on the MT680’s back panel.
Perform a cold start in the following situations:
• Reset the operating system.
• Restore th
e MT680-AMWTAG back to factory settings.
• Reset th
e MT680-AMWTAG after a boot loader, keyboard and kernel upgrade.
CAUTION! A cold start erases all data and installed applications in RAM memory.
Method 1: From WinCE
1. Tap Start → Programs → Utilities →
BootMode.
2. Tap Cold Boot.
Method 2: From Hardware
Locate the Cold Start Button on th
e MT680-AMWTAG’s back panel, and press it with a stylus.
Cold Start Button
Page 34

26
Appendix A
System Specification
Processing/Memory CPU 520MHz Intel PXA270
Memory SDRAM: 128 MB
Flash ROM: 64 MB
OS Microsoft Windows CE 5.0
Keypad 6 Function Keys
Display 8” VGA (640 x 480) Pixels
Backlight Touch-screen, TFT-LCD
Communication One RJ45 with POE (DC12V/1A, IEEE802.3af Compliant)
RS232 Support (Optional RJ45 to D-Sub 9pin cable)
RS485 Support (Optional RS485+, RS485-) baud rate at 38400 bps or lower
*RS232/RS485 (Single Port - use S2 switch to select connection type)
USB v1.1 Host
USB v1.1 Client (For developing use only)
One RJ11 Telephone Jack
Relay Outputs (4)
Photo-coupler Inputs (4)
Supports 802.11b/g via CF Interface
Multimedia Camera: 2.0-Megapixel CMOS
Speaker Audio Outputs (2)
Microphone Audio Input
TASHI Middleware Video Streaming
VoIP/V2oIP
Expansion SDHC Compliant, Supports 4GB and Up
CF Socket for WLAN
(FCC ID: TWG-SDCCF10G) or WWAN
Power Source Main External Power (DC12V/2A)
Backup 7.4V Lithium-Ion 1950mAh
Enclosure Weight 1365.7 g. (3.01 lbs.)
Dimension 295mmL X 203mmH X 43mmW
(11.61”H X 7.99”W X 1.69”D)
Environmental Operating Temperature -5ºC – 45ºC (23ºF – 113ºF)
Storage Temperature -20ºC – 60ºC (-4ºF – 140ºF)
Relative Humidity 5% – 95% RH non-condensing
Certification CE, FCC, NCC, CCC and RoHS compliant
Programming C#, VB.NET and C++
RFID Reader
(Optional)
MiFare, 13.56MHz (ISO14443A/B & 15693, or ISO14443A only)
Page 35

27
Appendix B
Worldwide Support
Unitech’s professional support team is available to quickly answer questions or technical-related
issues. Should an equipment problem occur, please contact the nearest Unitech regional service representative. For complete contact information please visit the Web sites listed below:
Region Web Site
Global Operation Center www.unitech-adc.com
Unitech Asia Pacific & Middle East www.unitech-utp.com.tw
Greater China Division www.unitech-sbd.com
Unitech Japan www.unitech-japan.co.jp
Unitech America www.ute.com
Unitech Latin America www.latin.ute.com
Unitech Europe www.unitech-europe.nl
 Loading...