

Page 1

The Unitech PT600/630 Scanner
Introduction
The Unitech PT600 Scanner is a powerful tool for your inventory
needs. It allows you to do all of your inventory fast, and easily.
Point, scan, and plug it into your computer. Then simply import
the data into Furniture Wizard, and your inventory is now
updated, and you’re ready to go!
Page 2

Installing the Unitech PT600/630 Scanner
1. Insert your Furniture Wizard CD into your computer’s CD-ROM
drive.
2. When the Installer opens up, click on Install Furniture Wizard.
3. After agreeing to the license agreement, click on “Install
Additional Components”
4. Follow the instructions on the screen, by clicking “Next”
5. The necessary files will now be copied over to your computer.
6. Take the cable that was included along with your PT600 Scanner
and plug into an available Serial port on your computer. Note
which serial port your scanner is plugged into.
7. Plug in the included power supply into an available outlet, and
plug the other end into the serial cable for the scanner.
8. You will now need to check the port settings for your Comm port.
a. For Windows 98/ME
i. Open up your control panel, and double-click on
the System icon.
ii. Click on the Device Manager tab in the top.
b. For Windows 2000/XP
i. Open up your control panel, and double-click on
the System icon.
ii. Click on the Hardware tab, and click on the
Device Manager icon.
9. Under Ports (COM&LPT) find “Communications Port (Comm X)”.
The X will be the Comm port associated with your Serial port,
usually 1 or 2
10. Note the Comm port in parentheses. This is the Comm port that
you will need to enter into Furniture Wizard in order to use the
PT600 Scanner.
11. Double-Click to open the settings for the Comm port.
12. Click on the “Port Settings” tab.
13. Change the settings to match the following
a. “Bits Per Second” --------------------------------------57600
b. “Data Bits”-------------------------------------------------------8
c. “Parity”------------------------------------------------------None
d. “Stop Bits”--------------------------------------------------------1
e. “Flow Control”----------------------------------------Hardware
14. Click OK to save the settings.
15. Close the Device Manager.
2
Page 3
Configuring the Unitech PT600/630 Scanner
You are now ready to configure your PT600 Scanner for use with Furniture
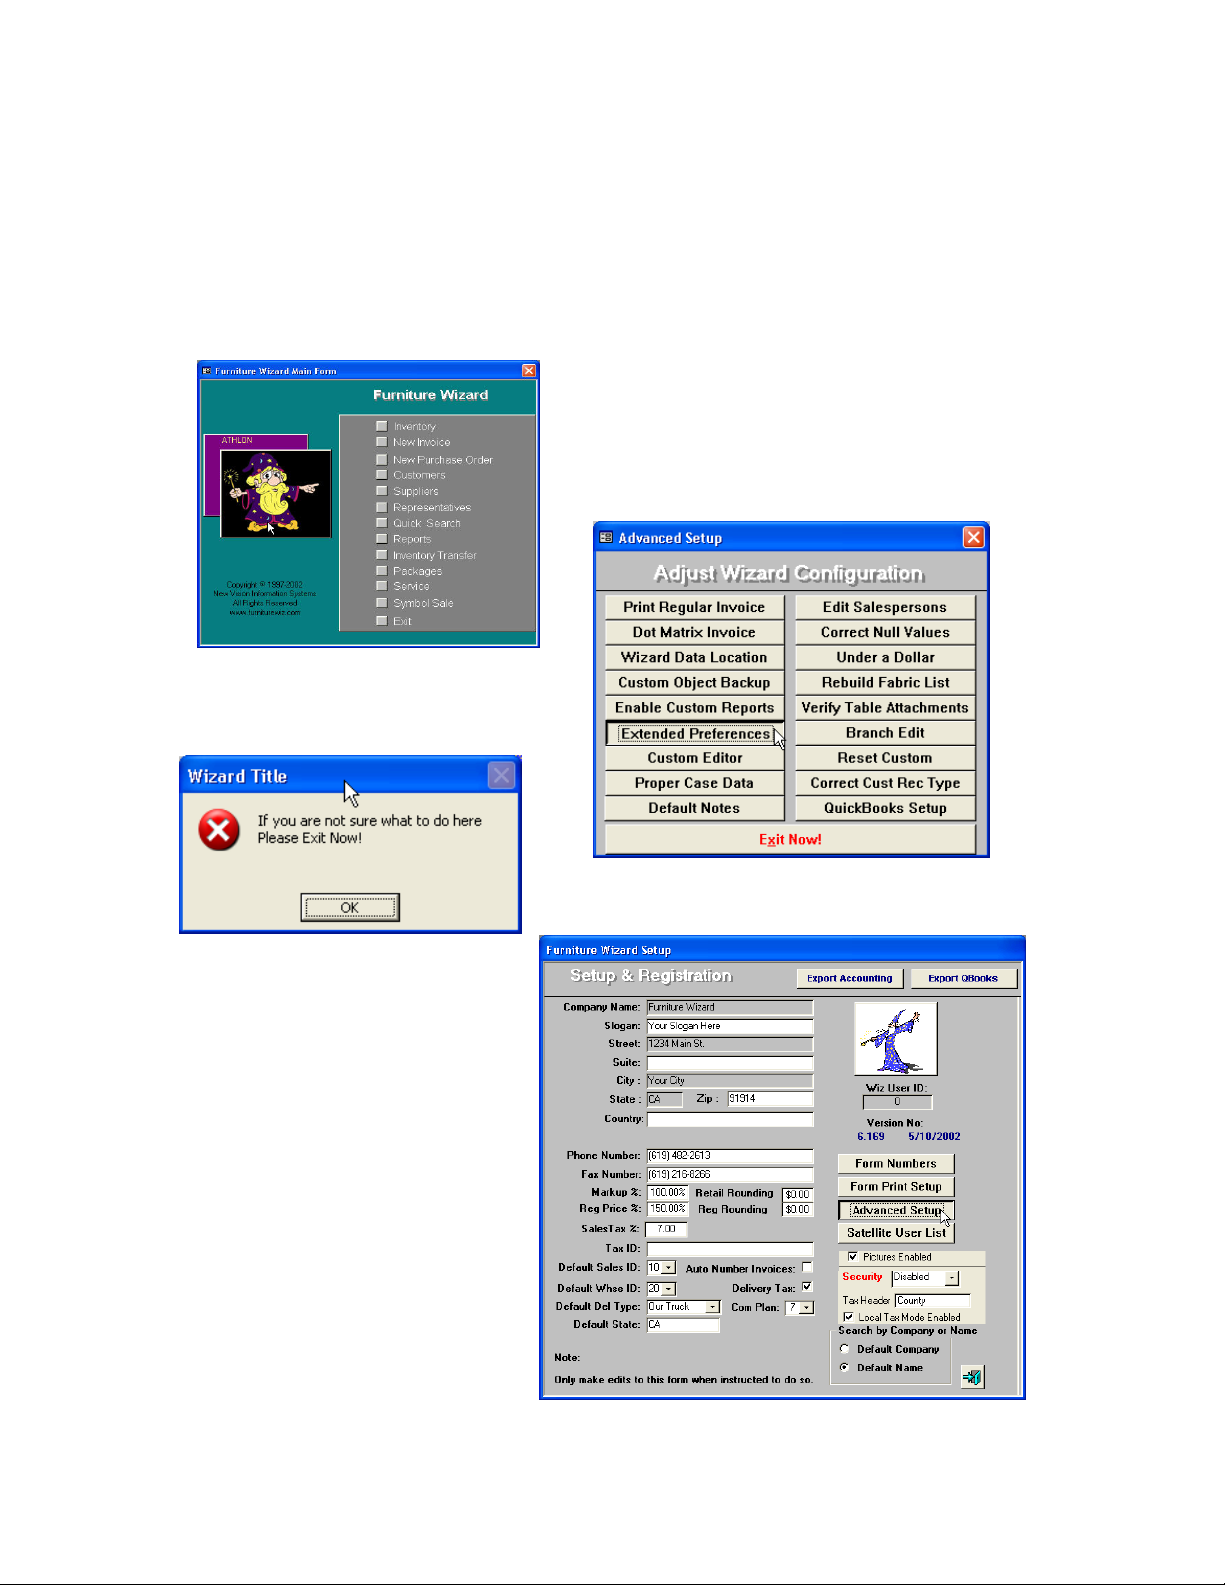
Wizard. Open up your Furniture Wizard Application. You will need to go into the Furniture
Wizard Setup and Registration screen. To do this, double-click on the picture of the
wizard.
You will now be taken to the “Setup and
Registration” screen. Here you will want to click on
the advanced setup button. A window will pop up
with a warning saying, “If you are not sure what to
do here Please Exit Now!” Click Ok to close it.
Double-click on the wizard
Click OK to close it.
You will now in the
“Adjust Wizard
Configuration” screen.
Here you should click
on the “Extended
Preferences” button. A
new window, “Extended
Preferences” will now
come up. Click on the
“Scanners” tab at the
top of this window.
picture
Click on “Extended Preferences”
Click on the “Advanced Setup” button
3
Page 4
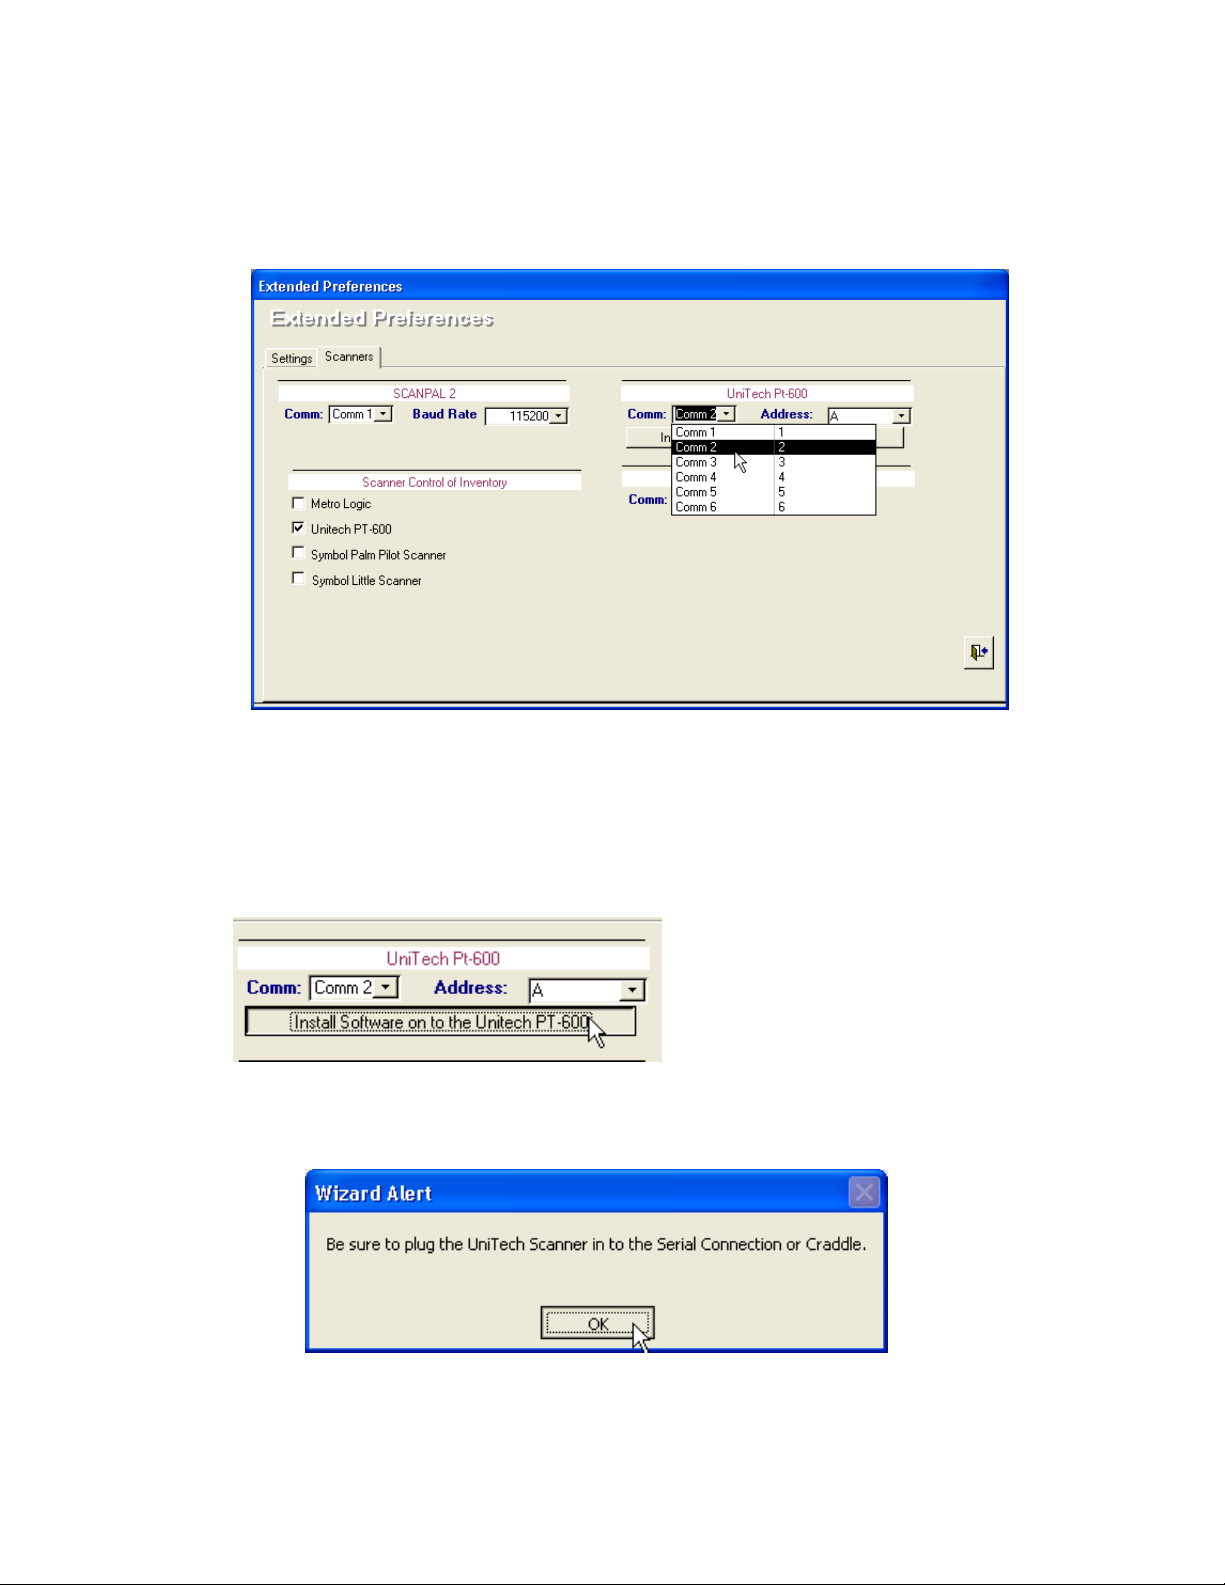
Put a checkmark next to “Unitech PT-600” in the lower left-hand corner of the
y
window. This will let Furniture Wizard know that you will be using the PT600 Scanner.
Now on the right side of the window, click on the down-arrow next to “Comm 1” and
select the Comm port that your scanner is connected to. Also, make sure that “A” is
selected as the address, as that is the default setting.
Select the Comm port that your scanner is plugged into and verify that the
Next you will need to install the software onto your scanner. To do so, you will
simply need to click the “Install Software on to the Unitech PT-600” button. At this point,
please make sure you have your scanner plugged into the serial cable included with your
system, or with the optional docking cradle.
Click the “Install Software on to the
Unitech PT-600” button to install the
software on
Address is set to A (the default).
our new scanner
You will be prompted to make
sure your scanner is plugged into the
serial cable or cradle. Click OK to
proceed.
Make sure your scanner is plugged in, and then click OK
4
Page 5
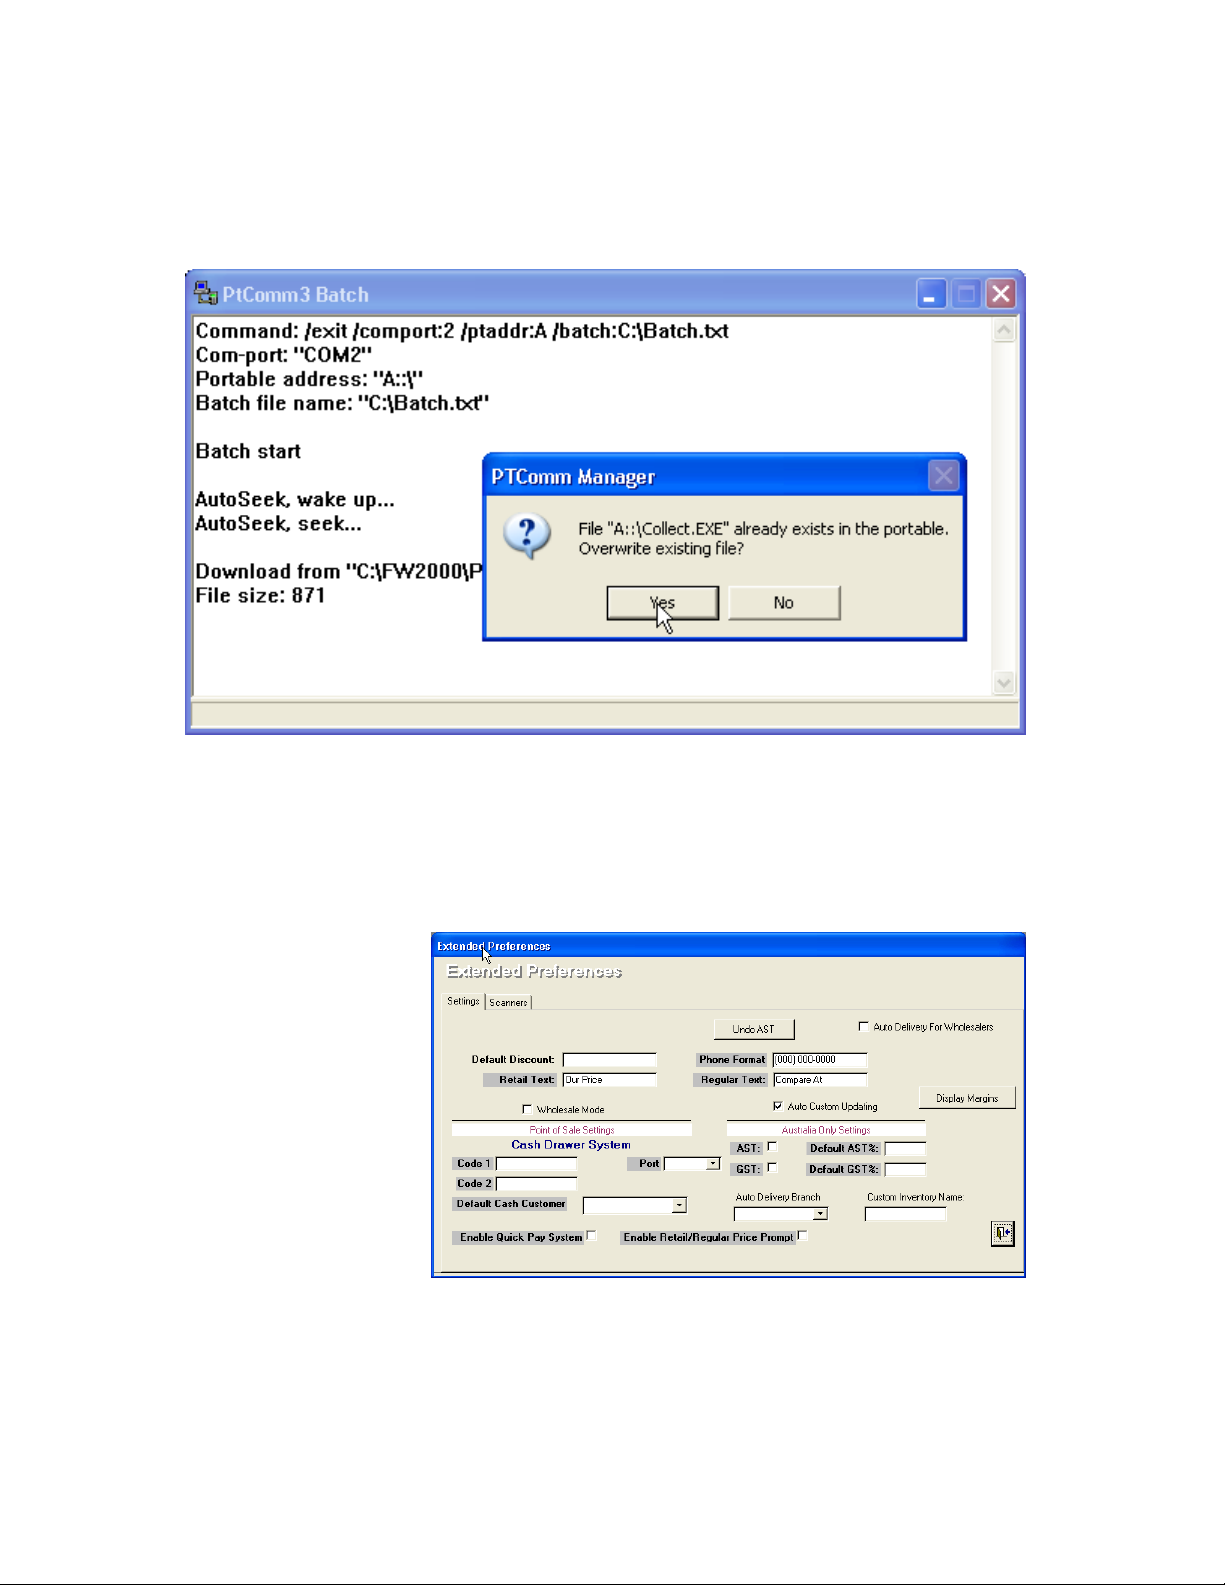
The installer will now proceed to copy over the files to your PT600 Scanner,
g
making it ready for you to use. The installer will ask you to overwrite the files already on
the scanner. Simply click “Yes” to proceed.
The Installer will launch a window informing you of the install process. Press “Yes”
After the Installer is done with copying your files over, you will be brought back
into the “Extended Preferences” window. Please exit out of the “Extended Preferences”
window, and then exit out of the “Setup and Registration” window.
Congratulations!
You are now ready to use your new PT600 Inventory Scanner.
when it asks you to overwrite an existing file.
You will be brought back into the “Extended Preferences”
window. Please exit out of it, and then exit out of “Setup
and Re
istration”
5
Page 6

WARNING
Using Your New PT600/630 Scanner
Now that you are ready to use your PT600 Scanner, you can now begin to take
inventory in your store. To begin taking inventory, press the large orange button on the
scanner to turn it on.
You will now be in the main screen
of the scanner. Here you will be presented
with a choice of programs to run on your
scanner. To take inventory in your store, you
will want to use the collect.exe program on
your scanner. Select collect.exe, and you
are ready to continue.
It is recommended that you take inventory one room at a time. You can
then add to your inventory later on before importing everything into the
NOTE
To begin scanning your store, make sure the scanner is turned on. Now take
your scanner, aiming it at the barcode of a label printed in Furniture Wizard, and press
the large orange button. The scanner will now have the barcode, and show the number
on its display. Now, check how many of those items you have in your inventory.
program
Using the keypad, type in the number of
items you have.
Your scanner defaults to a quantity of 1. If
you have more then one item, then you will need
to first delete that 1, by hitting the “C” button on
the keypad, and then typing in your actual
quantity. You can also use the C button whenever
you press the wrong number, and then type in the
correct amount.
Hit the “C” button to clear
the 1 from the Qty: line
Once you have the number in the “Qty:”
line, Press either of the orange “ENT” buttons.
You are now ready to move on to the next
item. Repeat the process until you have completed
doing an inventory of your store
Package tags should NOT be scanned.
You should only scan tags for individual
items. If you scan a Package tag it will be
NOTE
Do NOT scan in any barcodes while the scanner is plugged into the
cable. This can cause errors in your data, and may adversely affect
your scanner’s configuration. Always unplug your scanner before you
begin scanning.
ignored when reconciling the Inventory.
Press the
Large button
to turn on
your scanner
6
Page 7

Importing Your Scanned Inventory
Now that your inventory is complete, you will need to add your new inventory to
Furniture Wizard. To do so, you have to plug your scanner into its cable or the optional
charging Cradle. Now, go into your Furniture Wizard program, and click on the Inventory
Button on the main screen.
On the inventory screen, click the “Reconcile Inventory” button. This will bring up
the “Reconciliation Menu”
Click on the “Reconcile Inventory” Button
in the bottom right corner to open up the
hand side, in the “Import Data” section.
“Reconciliation Menu”
To import your data into the computer, click on the “PT-600” button on the right-
Enter
Furniture
Wizard, and
Click on the
Inventory
button
Click on the “PT-600” button on the
right hand side, in the “Import
Data” section
7
Page 8

Performing Your First Inventory Session
When performing your inventory for the first time in your store, you will want to
create a new inventory session. This will take all the items that you scan in and tell the
furniture wizard program how many of each item you have.
If you have already begun a scan of your inventory, and simply
wish to add to it, then do NOT choose to create a new inventory
session. Doing so will take the quantities you have on individual item
numbers and replace it with the number which you have just scanned
in. Instead, read the next section, “Updating your Inventory” which will
WARNING
The Unitech Import Program
window will now pop up on your
screen. Click on the Import button to
begin importing your data.
Here you will select whether this is
part of an “On-Going Inventory
Session” or not.
You will now be asked for the Branch number for this reconcile. Type in the
number associated with the branch you will be working with (10, 20, etc). All items that
are imported into the program will be put into this branch.
explain the process.
Click on the “Import button.
You will now be asked whether
this will be part of an “On-Going Inventory
Session”. If this is the first time you are
performing an inventory, select No. If you
have already performed an Inventory
session and just want to add some items,
see the next section for instructions.
Do not begin an
inventory for a second branch
until the first one has been
completed and reconciled.
Doing so will result in your
WARNING
quantities being combined,
making it unusable
Select a branch number for the reconcile
8
Page 9

Once you have selected a branch, you will receive a list of all the items you have
scanned, along with the quantity that furniture wizard has on those specific items, and
how many you have scanned in during this new inventory session.
Here you can preview a list of all the items you have scanned in, and analyze it
before you decide to integrate the new quantities into furniture wizard. As you might have
several dozens of items on there, it might be useful to have a report outlining all the
items.
Click on the “Reconcile Report” button and you will be shown a report of all your
scanned items, with Qty in stock, Actual Count, and the difference between them, all
sorted by manufacturer.
The Inventory Reconcile Report. It can either be seen onscreen, or printed out
skip to the “Updating Your Inventory” section.
If you have additional items to scan, please keep reading. Otherwise, you may
The Inventory Reconciliation Program window
for easier reviewing
9
Page 10

Continuing a Current Inventory Session
If you have more items to scan in for the same branch, then you can add these
items to your current session, thereby updating your current inventory. Therefore, if in
your previous scan you had 4 chairs, and in your second scan you found 2 more, then
the total would be brought up to 6, instead of replacing the previously scanned in
information.
Continue scanning in your
items, as you have done before in the
previous section. Once complete, plug
in your PT600 scanner to either your
Cable or docking cradle.
The Unitech Import Program
window will now pop up on your
screen. Click on the Import button to
begin importing your data.
you will select whether this is part of
an “On-Going Inventory Session” or
Select
Choosing NO will erase ALL of the items you scanned in
last time, unless you have finished your inventory session
completely (under which case you would be starting over, or
performing an inventory for another branch.
You will now be shown the “Inventory Reconciliation Program” window. Here you
can once again analyze your inventory and also print out another report on your
reconciliation.
Repeat this procedure until you are completely finished with the inventory for
your store. Once finished, move on to the next section.
not.
YES Here
Click on the “Import button.
You will now be asked whether
this will be part of an “On-Going Inventory
Session”. Since you have already
performed an Inventory session and just
want to add some items, select yes.
WARNING
The Inventory
Reconciliation Program
window
10
Page 11

Updating Your Inventory
Now that you have had a chance to go through your scanned items, you can
select which ones you want to integrate into Furniture Wizard. From the “Inventory
Reconciliation Program” window, select the items that you want to import, by adding a
checkmark next to them in the Inventory Reconciliation Program window. If you wish to
add all of the items you have scanned in, then you can click on the “Tag All” button and
all of the items will be marked for you.
Click individually on the items that you wish to select to be imported, or
Furniture Wizard database as items in your inventory, simply hit the “Update Inventory”
button and all changes will be made.
click on the “Tag All” button
Now that you have selected which items you wish to permanently add to your
Click on “Update Inventory” to end your inventory session.
Congratulations! You have now updated your inventory.
11
Page 12

Un-Scanned Inventory
When you perform an inventory scan with your PT600 scanner, only the items
that you have scanned will be updated in your inventory. This prevents you from
accidentally missing an item during your scan and having that item be replaced with an
incorrect quantity. Once you have completed your inventory scan, Furniture Wizard
allows you to see a list of items that were missed during your scan. To see this report,
click on the “Reconcile Inventory” button from the “Inventory” screen in Furniture Wizard.
This will bring you to the
“Reconciliation Menu”. Click on
“PT-600” on the left hand side,
bringing you to the “Inventory
Reconciliation Reporting
Program.”
Click on the “Reconcile Inventory” Button
in the bottom right corner to open up the
view a variety of reports relating to your
reconciliations. By selecting a Branch, and
optionally a Supplier or Category, you can
print a “Count Report, showing you the
current quantities in stock, or “Count Sheet”,
which prints a list of all items and their
barcodes.
“Reconciliation Menu”
From this screen, you can select to
But of most use, is the “Items Not Reconciled” report.
Click on the “PT-600” button on the
left hand side, in the “Reports
Menu” section
12
The “Inventory Reconciliation Reporting Program” window
Page 13

This report allows you to see any items that were not updated during a certain
inventory scan, given any date range of your choosing. To do this, simply select the
branch of your choice, and a starting date and ending date. By selecting a date range
you can make sure to exclude items that were scanned in a prior scan, but not the latest
one.
Select the Branch you wish to print a
report for
Click the “Print” button to see the report
Once you have a scan date selected, click on the “Print” button to see your
report. With this report in hand, you can proceed to verify if these items are actually in
stock or not.
The “Inventory Not Reconciled” report
13
Page 14

Troubleshooting the PT600
If your PT600 is behaving strangely, there are a few things that you can do to
verify it is configured properly.
The first thing you need to check is to make sure that your serial port is
configured properly, with the settings illustrated previously. Once you have verified those
settings, closely follow the following steps to check your scanner, and correct the settings
if necessary.
1. Turn off your PT-600 scanner by pressing the power button (The
small recessed button with a small orange circle and a small line
in the middle).
2. Simultaneously press the “CMD” and left arrows, followed by the
power button. The scanner will now turn on.
3. You will be presented with a Start Menu. Select “SUPERVISOR”
mode by pressing “1”.
4. A screen will come up prompting you for a password. Press
“600” followed by the “ENT” key. (The password will be “630” for
PT630 scanners)
5. From the menu that you are presented with, press 1 for “DEV”.
6. Now, press 2 for “SERIAL”.
7. You will now be shown a series of properties, and the values that
are assigned to them. To move between any set of values, press
the left and right arrow keys. Once you have the correct values,
press the “ENT” button to move on to the next one.
BAUD RATE
57600
LENGTH
PARITY
STOP BITS
FLOW CONTROL
PROTOCOL
ADDRESS
Once you have completed all of those settings, you will be brought back to the
<DEVICE CONFIG> screen. You will need to restart your PT-600 scanner in order to be
able to get back to scanning.
1. Hold down the “CMD” key and simultaneously press the
“ALPHA” key. You will be asked if you wish to perform a warm
start.
2. Press “1” for yes.
3. You will now be faced with the PT-600 start up screen.
4. Press and hold the “CMD” key for a few seconds.
5. This will bring up a menu of options you can do. Press “1” for
“RUN”. When asked to verify the program, press the “ENT” key.
6. Press “1” for “Inv”
You are now ready to resume your scanning.
8 BITS
NONE
1
NONE
MULTI
A
14
 Loading...