

Page 1

PA700 Series Programming Manual
V2. 6. 1 20 1 5 - 02 - 03
PA700 UNITECH
Page 2

Contents
1. USI Communication ................................................................................................................................................... 2
1.1. Enable/disable Scan2Key ................................................................................................................................... 3
1.2. Initialize Data Receiving Procedure .................................................................................................................... 3
1.3. Receive scanned data ........................................................................................................................................ 3
1.4. Receive symbology type ..................................................................................................................................... 3
1.5. Save scanner settings ........................................................................................................................................ 3
1.6. Load scanner settings ......................................................................................................................................... 4
1.7. Close scan service .............................................................................................................................................. 4
1.8. Enable Scan Service .......................................................................................................................................... 4
1.9. Set Preamble ...................................................................................................................................................... 4
1.10. Set Postamble .................................................................................................................................................... 4
1.11. Set Terminator .................................................................................................................................................... 4
1.12. Set Vibration ....................................................................................................................................................... 5
1.13. Set Sound ........................................................................................................................................................... 5
1.14. Set EAN128 Field Separator .............................................................................................................................. 5
1.15. Set Intercharacter Delay ..................................................................................................................................... 5
1.16. Set Keep Scan Timeout ...................................................................................................................................... 5
1.17. Set Intercharacter Delay ..................................................................................................................................... 5
1.18. Send param command ....................................................................................................................................... 6
2. USI Examples .......................................................................................................................................................... 26
2.1. Enable/Disable scanner .................................................................................................................................... 26
2.2. Receive scanned data ...................................................................................................................................... 26
2.3. Programming example ...................................................................................................................................... 26
3. Tips using Scan2Key ............................................................................................................................................... 26
3.1. Want to know the barcode symbology ? ........................................................................................................... 26
3.2. The received data is longer the barcode data .................................................................................................. 26
3.3. Enable/Disable barcode scanning through HTML5 .......................................................................................... 26
4. Simple Data Editing ................................................................................................................................................. 26
4.1. Enable data editing ........................................................................................................................................... 26
4.2. rule.txt ............................................................................................................................................................... 26
PA700 1 UNITECH
Page 3
2key_setting
X
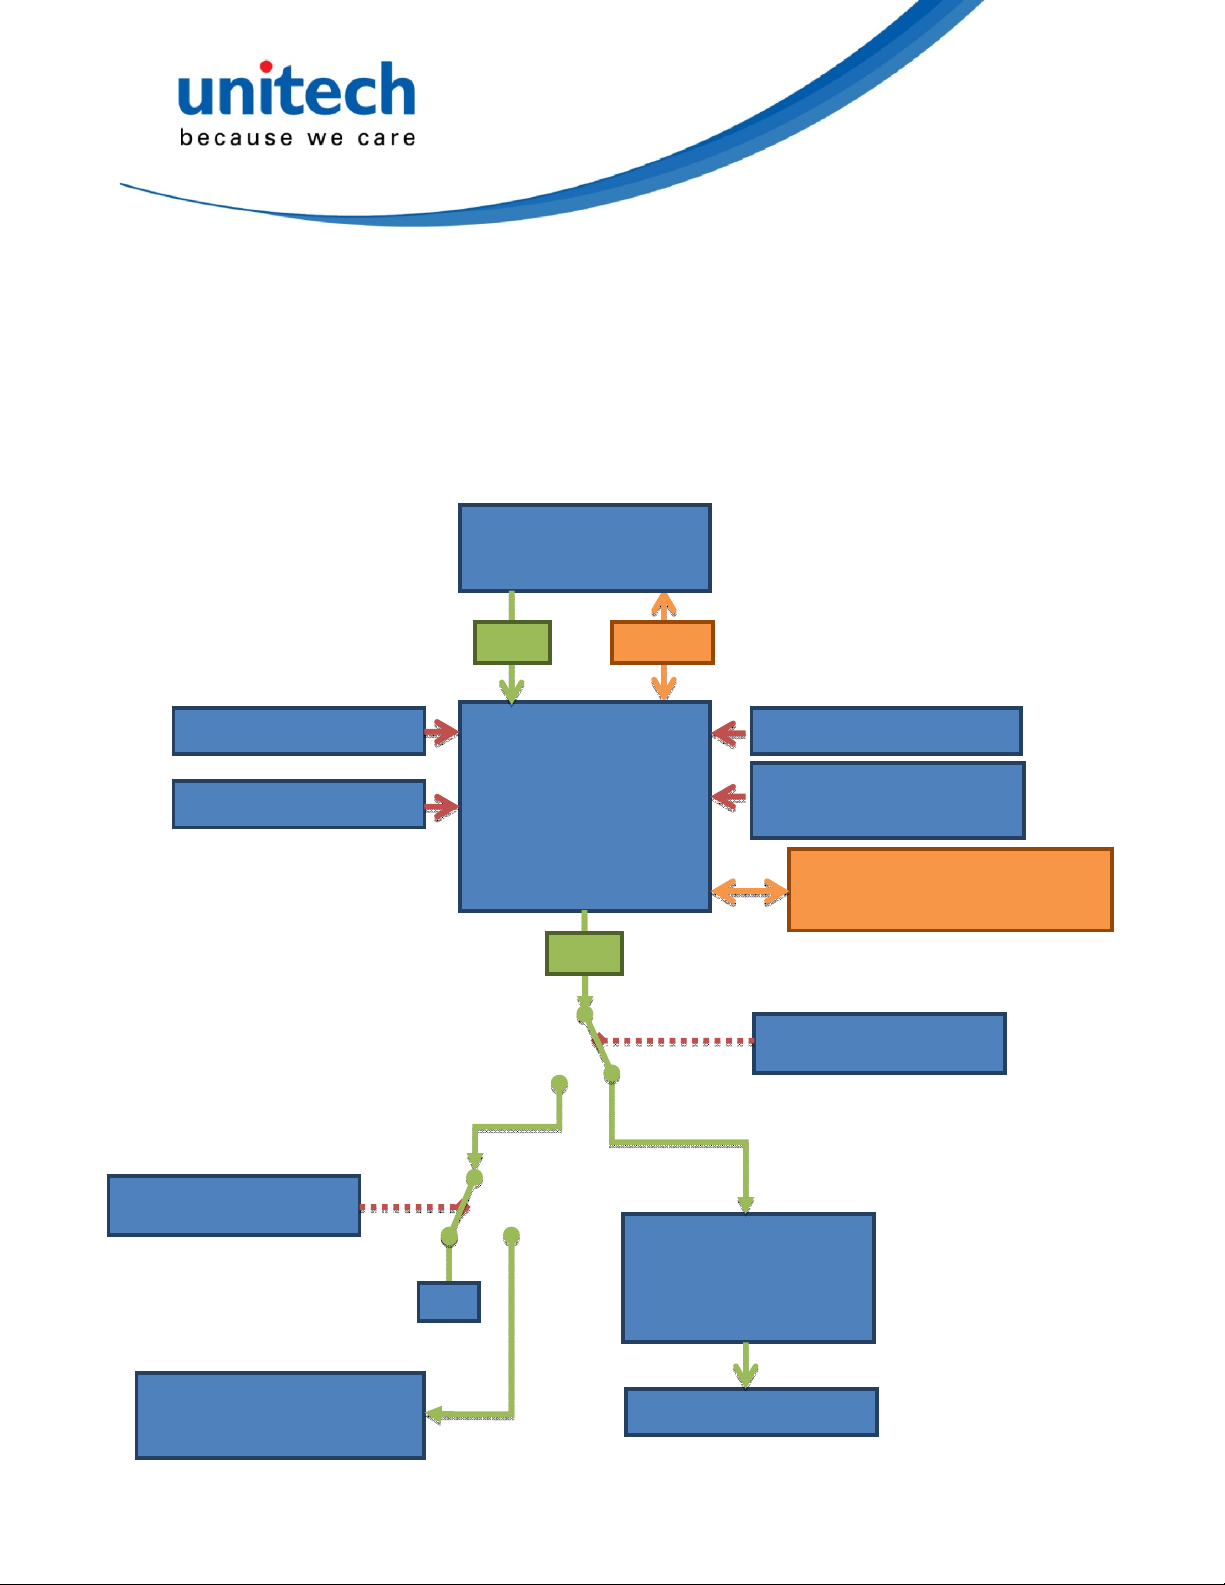
1. USI Communication
All USI cross application communications are done by broadcast intent between USI and user applications.
The below schematic sketches the scanner integration.
ScanServer V1.95 and above (as integrated in OS Built 3230 and above)
unitech.scanservice.start
unitech.scanservice.close
unitech.scanservice.init
Barcode Scanner
&
Decoder
Data
Unitech
Scan
Service
(V1.95 and above)
Data
Settings
Trigger keys left/right
unitech.scanservice.
software_scankey
unitech.scanservice.save_setting
unitech.scanservice.load_setting
com.unitech.scanservice.adapter
unitech.scanservice.scan
Unitech
Scan2Key
unitech.scanservice.datatype
unitech.scanservice.data
Keyboard buffer
Page 4

1.1. Enable/disable Scan2Key
Description: Enable/Disable the Scan2Key which supports keyboard emulation features.
Action: “unitech.scanservice.scan2key_setting”
Extended data: Name: “scan2key”
Type: Boolean (true=ON, false=false)
1.2. Initialize Data Receiving Procedure
Description: Initialize data receiving procedure.
Action: "unitech.scanservice.init"
Extended data: Name: “enable”
Type: Boolean (true=ON, false=false)
Note: Data receiving flow:
Scan2Key Init Scan Trigger Output
ON ON Working Keyboardbuffer
ON OFF Working Keyboardbuffer
OFF ON Working Intent
OFF OFF Not Working None
1.3. Receive scanned data
Description: Receive the data from scanner via intent.
Action: "unitech.scanservice.data"
Extended data: Name: “text”
Type: String
1.4. Receive symbology data
Description: Receive the type of scanned barcode symbology.
Also refer to chapter 3.1
Action: "unitech.scanservice.datatype"
Extended data: Name: “text”
Type: Integer
1.5. Save scanner settings
Description: Save the scanner’s setting.
Action: "unitech.scanservice.save_setting"
Extended data: Name: “Path”
Type: String
Note: File name is fixed: USISETTING.CFG
And default “Path” is /sdcard/ if “Path” is left empty. Make sure path exist.
PA700 3 UNITECH
Page 5

1.6. Load scanner settings
Description: Load the scanner’s setting.
Action: "unitech.scanservice.load_setting"
Extended data: Name: “Path”
Type: String
Note: File name is fixed: USISETTING.CFG.
And default “Path” is /sdcard/ if “Path” is left empty. Make sure path exist.
1.7. Close scan service
Description: Close the scan service.
Action: "unitech.scanservice.close"
Extended data: Name: “close”
Type: Boolean
1.8. Enable Scan Service
Description: Start the scan service
Action: “unitech.scanservice.start”
Extended data: Name: “close”
Type: Boolean (true=ON, false=false)
1.9. Set Preamble
ScanServer V2.05 or above
Description: set preamble to the output data
Action: “unitech.scanservice.preamble”
Extended data: Name: “preamble”
Type: String
1.10. Set Postamble
ScanServer V2.05 or above
Description: set postamble to the output data
Action: “unitech.scanservice.postamble”
Extended data: Name: “postamble”
Type: String
1.11. Set Terminator
ScanServer V2.05 or above
Description: set terminator to the output data
Action: “unitech.scanservice.terminator”
Extended data: Name: “terminator”
Type: String
PA700 4 UNITECH
Page 6

1.12. Set Vibration
ScanServer V2.05 or above
Description: set vibration on/off on good read
Action: “unitech.scanservice.vibration”
Extended data: Name: “vibration”
Type: Boolean (true=ON, false=false)
1.13. Set Sound
ScanServer V2.05 or above
Description: set sound on/off on good read
Action: “unitech.scanservice.sound”
Extended data: Name: “sound”
Type: Boolean (true=ON, false=false)
1.14. Set EAN128 Field Separator
ScanServer V2.05 or above
Description: set EAN128 Field Separator
Action: “unitech.scanservice.fieldseparator”
Extended data: Name: “fieldseparator”
Type: String
1.15. Set Intercharacter Delay
ScanServer V2.05 or above
Description: set intercharacter delay (ms)
Action: “unitech.scanservice.interchar_delay”
Extended data: Name: “intercharDelay”
Type: Integer
1.16. Set Keep Scan Timeout
ScanServer V2.07 or above
Description: set the timeout duration in second(s) which is how long the engine will stay on after the trigger
has been released.
Action: “unitech.scanservice.keepscan”
Extended data: Name: “keepscan”
Type: Integer
Note: Set it to 0 if you want the engine to turn off right after you release the trigger. And maximum should be
less than 10.
1.17. Disable All Symbologies
ScanServer V2.25 or above
Description: disable all symbologies.
Action: “unitech.scanservice.disable_all”
Note: No extended data required.
PA700 5 UNITECH
Page 7

1.18. Send param command
Description: Send parameter command to engine.
Action: "unitech.scanservice.setting "
Extended data: Name: “INDEX”
Type: Integer
Name: “EXTEND”
Type: Boolean
Name: “EXT”
Type: Byte
Name: “NUM”
Type: Byte
Name: “VALUE”
Type: Byte
Note: PA700 1D engine INDEX = 1; 2D engine INDEX = 2.
If parameter number is bigger than 0xEF, set EXTEND to true; else set EXTEND to false.
If EXTEND is true, set EXT to extended parameter code. And NUM to param_num offset.
If EXTEND is false, set NUM to param_num.
And for each parameter, please check out the following JSON data.
“Parameter” is human readable name of the parameter.
“Hex” is the <param_num> or <extended parameter code><param_num offset>.
To get the <value>, please check the “Type”.
If type is 1, that means this parameter only has enable(1)/disable(0) or true(1)/false(0) option.
If type is 2, that means this parameter has multiple options, and the values are listed in “Tag”.
If type is 3, that means this parameter has a range of options, and the range values are between “Min” and “Max”.
<string-array name="UPC_EAN">
<item>{
"Parameter":"UPC-A",
"Type":1,
"Min":0,
"Max":1,
"Hex":0x01
}</item>
<item>{
"Parameter":"UPC-E",
"Type":1,
"Min":0,
"Max":1,
"Hex":0x02
PA700 6 UNITECH
Page 8

}</item>
<item>{
"Parameter":"UPC-E1",
"Type":1,
"Min":0,
"Max":1,
"Hex":0x0C
}</item>
<item>{
"Parameter":"EAN-8",
"Type":1,
"Min":0,
"Max":1,
"Hex":0x04
}</item>
<item>{
"Parameter":"EAN-13",
"Type":1,
"Min":0,
"Max":1,
"Hex":0x03
}</item>
<item>{
"Parameter":"'Bookland EAN'",
"Type":1,
"Min":0,
"Max":1,
"Hex":0x53
}</item>
<item>{
"Parameter":"'Bookland ISBN Format'",
"Type":2,
"Min":0,
"Max":1,
"Hex":0xF140,
"Tag":{
"'0'":"'Bookland ISBN-10'",
"'1'":"'Bookland ISBN-13'"
}
}</item>
<item>{
"Parameter":"'Decode UPC/EAN Supplementals'",
"Type":2,
"Min":0,
"Max":8,
"Hex":0x10,
"Tag":{
"'0'":"'Ignore UPC/EAN With Supplementals'",
"'1'":"'Decode UPC/EAN With Supplementals'",
"'2'":"'Autodiscriminate UPC/EAN Supplementals'",
"'3'":"'Enable Smart Supplemental Mode'",
"'4'":"'Enable 378/379 Supplemental Mode'",
PA700 7 UNITECH
Page 9

"'5'":"'Enable 978/979 Supplemental Mode'",
"'6'":"'Enable 414/419/434/439 Supplemental Mode'",
"'7'":"'Enable 977 Supplemental Mode'",
"'8'":"'Enable 491 Supplemental Mode'"
}
}</item>
<item>{
"Parameter":"'Decocde UPC/EAN Supplemental Reddundacy'",
"Type":3,
"Min":2,
"Max":20,
"Hex":0x50
}</item>
<item>{
"Parameter":"'UPC/EAN/JAN Supplemental AIM ID Format'",
"Type":2,
"Min":0,
"Max":1,
"Hex":0xF1A0,
"Tag":{
"'0'":"'Separate'",
"'1'":"'Combined'"
}
}</item>
<item>{
"Parameter":"'Transmit UPC-A Check Digit'",
"Type":1,
"Min":0,
"Max":1,
"Hex":0x28
}</item>
<item>{
"Parameter":"'Transmit UPC-E Check Digit'",
"Type":1,
"Min":0,
"Max":1,
"Hex":0x29
}</item>
<item>{
"Parameter":"'Transmit UPC-E1 Check Digit'",
"Type":1,
"Min":0,
"Max":1,
"Hex":0x2A
}</item>
<item>{
"Parameter":"'UPC-A Preamble'",
"Type":2,
"Min":0,
"Max":2,
"Hex":0x22,
"Tag":{
PA700 8 UNITECH
Page 10

"'0'":"'No Preamble'",
"'1'":"'System Character'",
"'2'":"'System Character and Country Code'"
}
}</item>
<item>{
"Parameter":"'UPC-E Preamble'",
"Type":2,
"Min":0,
"Max":2,
"Hex":0x23,
"Tag":{
"'0'":"'No Preamble'",
"'1'":"'System Character'",
"'2'":"'System Character and Country Code'"
}
}</item>
<item>{
"Parameter":"'UPC-E1 Preamble'",
"Type":2,
"Min":0,
"Max":2,
"Hex":0x24,
"Tag":{
"'0'":"'No Preamble'",
"'1'":"'System Character'",
"'2'":"'System Character and Country Code'"
}
}</item>
<item>{
"Parameter":"'Convert UPC-E to A'",
"Type":1,
"Min":0,
"Max":1,
"Hex":0x25
}</item>
<item>{
"Parameter":"'Convert UPC-E1 to A'",
"Type":1,
"Min":0,
"Max":1,
"Hex":0x26
}</item>
<item>{
"Parameter":"'EAN-8 Zero Extend'",
"Type":1,
"Min":0,
"Max":1,
"Hex":0x27
}</item>
<item>{
"Parameter":"'UPC/EAN Security Level'",
PA700 9 UNITECH
Page 11

"Type":2,
"Min":0,
"Max":3,
"Hex":0x4D,
"Tag":{
"'0'":"'UPC/EAN Security Level 0'",
"'1'":"'UPC/EAN Security Level 1'",
"'2'":"'UPC/EAN Security Level 2'",
"'3'":"'UPC/EAN Security Level 3'"
}
}</item>
<item>{
"Parameter":"'UCC Coupon Extended Code'",
"Type":1,
"Min":0,
"Max":1,
"Hex":0x55
}</item>
<item>{
"Parameter":"'Coupon Report'",
"Type":2,
"Min":0,
"Max":2,
"Hex":0xF1DA,
"Tag":{
"'0'":"'Old Coupon Symbols'",
"'1'":"'New Coupon Symbols'",
"'2'":"'Both Coupon Format'"
}
}</item>
<item>{
"Parameter":"'ISSN EAN'",
"Type":1,
"Min":0,
"Max":1,
"Hex":0xF169
}</item>
</string-array>
<string-array name="Code_128">
<item>{
"Parameter":"'Code 128'",
"Type":1,
"Min":0,
"Max":1,
"Hex":0x08
}</item>
<item>{
"Parameter":"'Length L1'",
"Type":3,
"Min":1,
"Max":55,
PA700 10 UNITECH
Page 12

"Hex":0xD1
}</item>
<item>{
"Parameter":"'Length L2'",
"Type":3,
"Min":1,
"Max":55,
"Hex":0xD2
}</item>
<item>{
"Parameter":"'GS1-128'",
"Type":1,
"Min":0,
"Max":1,
"Hex":0x0E
}</item>
<item>{
"Parameter":"'ISBT 128'",
"Type":1,
"Min":0,
"Max":1,
"Hex":0x54
}</item>
<item>{
"Parameter":"'ISBT Concatenation'",
"Type":2,
"Min":0,
"Max":2,
"Hex":0xF141,
"Tag":{
"'0'":"'Disable ISBT Concatenation'",
"'1'":"'Enable ISBT Concatenation'",
"'2'":"'Autodiscriminate ISBT Concatenation'"
}
}</item>
<item>{
"Parameter":"'Check ISBT Table'",
"Type":1,
"Min":0,
"Max":1,
"Hex":0xF142
}</item>
<item>{
"Parameter":"'ISBT Concatenation Redundancy'",
"Type":3,
"Min":2,
"Max":20,
"Hex":0xDF
}</item>
</string-array>
<string-array name="Code_39">
PA700 11 UNITECH
Page 13

<item>{
"Parameter":"'Code 39'",
"Type":1,
"Min":0,
"Max":1,
"Hex":0x00
}</item>
<item>{
"Parameter":"'Trioptic Code 39'",
"Type":1,
"Min":0,
"Max":1,
"Hex":0x0D
}</item>
<item>{
"Parameter":"'Convert Code 39 to Code 32'",
"Type":1,
"Min":0,
"Max":1,
"Hex":0x56
}</item>
<item>{
"Parameter":"'Code 32 Prefix'",
"Type":1,
"Min":0,
"Max":1,
"Hex":0xE7
}</item>
<item>{
"Parameter":"'Length L1'",
"Type":3,
"Min":0,
"Max":48,
"Hex":0x12
}</item>
<item>{
"Parameter":"'Length L2'",
"Type":3,
"Min":0,
"Max":48,
"Hex":0x13
}</item>
<item>{
"Parameter":"'Check Digit Verification'",
"Type":1,
"Min":0,
"Max":1,
"Hex":0x30
}</item>
<item>{
"Parameter":"'Transmit Code 39 Check Digit'",
"Type":1,
PA700 12 UNITECH
Page 14

"Min":0,
"Max":1,
"Hex":0x2B
}</item>
<item>{
"Parameter":"'Code 39 Full ASCII'",
"Type":1,
"Min":0,
"Max":1,
"Hex":0x11
}</item>
</string-array>
<string-array name="Code_93">
<item>{
"Parameter":"'Code 93'",
"Type":1,
"Min":0,
"Max":1,
"Hex":0x09
}</item>
<item>{
"Parameter":"'Length L1'",
"Type":3,
"Min":1,
"Max":48,
"Hex":0x1A
}</item>
<item>{
"Parameter":"'Length L2'",
"Type":3,
"Min":1,
"Max":48,
"Hex":0x1B
}</item>
</string-array>
<string-array name="Code_11">
<item>{
"Parameter":"'Code 11'",
"Type":1,
"Min":0,
"Max":1,
"Hex":0x0A
}</item>
<item>{
"Parameter":"'Length L1'",
"Type":3,
"Min":1,
"Max":48,
"Hex":0x1C
}</item>
PA700 13 UNITECH
Page 15

<item>{
"Parameter":"'Length L2'",
"Type":3,
"Min":1,
"Max":48,
"Hex":0x1D
}</item>
<item>{
"Parameter":"'Check Digit Verification'",
"Type":2,
"Min":0,
"Max":2,
"Hex":0x34,
"Tag":{
"'0'":"'Disable'",
"'1'":"'One Check Digit'",
"'2'":"'Two Check Digit'"
}
}</item>
<item>{
"Parameter":"'Transmit Code 11 Check Digits'",
"Type":1,
"Min":0,
"Max":1,
"Hex":0x2F
}</item>
</string-array>
<string-array name="I2of5">
<item>{
"Parameter":"'Interleaved 2 of 5'",
"Type":1,
"Min":0,
"Max":1,
"Hex":0x06
}</item>
<item>{
"Parameter":"'Length L1'",
"Type":3,
"Min":2,
"Max":55,
"Hex":0x16
}</item>
<item>{
"Parameter":"'Length L2'",
"Type":3,
"Min":2,
"Max":55,
"Hex":0x17
}</item>
<item>{
"Parameter":"'Check Digit Verification'",
PA700 14 UNITECH
Page 16

"Type":2,
"Min":0,
"Max":2,
"Hex":0x31,
"Tag":{
"'0'":"'Disable'",
"'1'":"'USS Check Digit'",
"'2'":"'OPCC Check Digit'"
}
}</item>
<item>{
"Parameter":"'Transmit I 2 of 5 Check Digits'",
"Type":1,
"Min":0,
"Max":1,
"Hex":0x2C
}</item>
<item>{
"Parameter":"'Convert I 2 of 5 to EAN-13'",
"Type":1,
"Min":0,
"Max":1,
"Hex":0x52
}</item>
</string-array>
<string-array name="D2of5">
<item>{
"Parameter":"'Discrete 2 of 5'",
"Type":1,
"Min":0,
"Max":1,
"Hex":0x05
}</item>
<item>{
"Parameter":"'Length L1'",
"Type":3,
"Min":1,
"Max":48,
"Hex":0x14
}</item>
<item>{
"Parameter":"'Length L2'",
"Type":3,
"Min":1,
"Max":48,
"Hex":0x15
}</item>
</string-array>
<string-array name="C2of5">
<item>{
PA700 15 UNITECH
Page 17

"Parameter":"'Chinese 2 of 5'",
"Type":1,
"Min":0,
"Max":1,
"Hex":0xF098
}</item>
</string-array>
<string-array name="M2of5">
<item>{
"Parameter":"'Matrix 2 of 5'",
"Type":1,
"Min":0,
"Max":1,
"Hex":0xF16A
}</item>
<item>{
"Parameter":"'Length L1'",
"Type":3,
"Min":1,
"Max":48,
"Hex":0xF16B
}</item>
<item>{
"Parameter":"'Length L2'",
"Type":3,
"Min":1,
"Max":48,
"Hex":0xF16C
}</item>
<item>{
"Parameter":"'Matrix 2 of 5 Redundancy'",
"Type":1,
"Min":0,
"Max":1,
"Hex":0xF16D
}</item>
<item>{
"Parameter":"'Matrix 2 of 5 Check Digit'",
"Type":1,
"Min":0,
"Max":1,
"Hex":0xF16E
}</item>
<item>{
"Parameter":"'Transmit Matrix 2 of 5 Check Digit'",
"Type":1,
"Min":0,
"Max":1,
"Hex":0xF16F
}</item>
</string-array>
PA700 16 UNITECH
Page 18

<string-array name="Codabar">
<item>{
"Parameter":"'Codabar'",
"Type":1,
"Min":0,
"Max":1,
"Hex":0x07
}</item>
<item>{
"Parameter":"'Length L1'",
"Type":3,
"Min":3,
"Max":48,
"Hex":0x18
}</item>
<item>{
"Parameter":"'Length L2'",
"Type":3,
"Min":3,
"Max":48,
"Hex":0x19
}</item>
<item>{
"Parameter":"'CLSI Editing'",
"Type":1,
"Min":0,
"Max":1,
"Hex":0x36
}</item>
<item>{
"Parameter":"'NOTIS Editing'",
"Type":1,
"Min":0,
"Max":1,
"Hex":0x37
}</item>
</string-array>
<string-array name="MSI">
<item>{
"Parameter":"'MSI'",
"Type":1,
"Min":0,
"Max":1,
"Hex":0x0B
}</item>
<item>{
"Parameter":"'Length L1'",
"Type":3,
"Min":1,
"Max":16,
PA700 17 UNITECH
Page 19

"Hex":0x1E
}</item>
<item>{
"Parameter":"'Length L2'",
"Type":3,
"Min":1,
"Max":16,
"Hex":0x1F
}</item>
<item>{
"Parameter":"'MSI Check Digit'",
"Type":1,
"Min":0,
"Max":1,
"Hex":0x32
}</item>
<item>{
"Parameter":"'Transmit MSI Check Digit'",
"Type":1,
"Min":0,
"Max":1,
"Hex":0x2E
}</item>
<item>{
"Parameter":"'MSI Check Digit Algorithm'",
"Type":2,
"Min":0,
"Max":1,
"Hex":0x33,
"Tag":{
"'0'":"'MOD 10/MOD 11'",
"'1'":"'MOD 10/MOD 10'"
}
}</item>
</string-array>
<string-array name="GS1_DataBar">
<item>{
"Parameter":"'GS1 DataBar Omnidirectional'",
"Type":1,
"Min":0,
"Max":1,
"Hex":0xF052
}</item>
<item>{
"Parameter":"'GS1 DataBar Limited'",
"Type":1,
"Min":0,
"Max":1,
"Hex":0xF053
}</item>
<item>{
PA700 18 UNITECH
Page 20

"Parameter":"'GS1 DataBar Expanded'",
"Type":1,
"Min":0,
"Max":1,
"Hex":0xF054
}</item>
<item>{
"Parameter":"'Convert GS1 DataBar to UPC/EAN'",
"Type":1,
"Min":0,
"Max":1,
"Hex":0xF08D
}</item>
</string-array>
<string-array name="Postal_Codes">
<item>{
"Parameter":"'US Postnet'",
"Type":1,
"Min":0,
"Max":1,
"Hex":0x59
}</item>
<item>{
"Parameter":"'US Planet'",
"Type":1,
"Min":0,
"Max":1,
"Hex":0x5A
}</item>
<item>{
"Parameter":"'Transmit US Postal Check Digit'",
"Type":1,
"Min":0,
"Max":1,
"Hex":0x5F
}</item>
<item>{
"Parameter":"'UK Postal'",
"Type":1,
"Min":0,
"Max":1,
"Hex":0x5B
}</item>
<item>{
"Parameter":"'Transmit UK Postal Check Digit'",
"Type":1,
"Min":0,
"Max":1,
"Hex":0x60
}</item>
<item>{
PA700 19 UNITECH
Page 21

"Parameter":"'Japan Postal'",
"Type":1,
"Min":0,
"Max":1,
"Hex":0xF022
}</item>
<item>{
"Parameter":"'Australian Postal'",
"Type":1,
"Min":0,
"Max":1,
"Hex":0xF023
}</item>
<item>{
"Parameter":"'Netherlands KIX Code'",
"Type":1,
"Min":0,
"Max":1,
"Hex":0xF046
}</item>
<item>{
"Parameter":"'USPS 4CB/One Code/intelligent mail'",
"Type":1,
"Min":0,
"Max":1,
"Hex":0xF150
}</item>
<item>{
"Parameter":"'UPU FICS Postal'",
"Type":1,
"Min":0,
"Max":1,
"Hex":0xF163
}</item>
</string-array>
<string-array name="Composite">
<item>{
"Parameter":"'Composite CC-C'",
"Type":1,
"Min":0,
"Max":1,
"Hex":0xF055
}</item>
<item>{
"Parameter":"'Composite CC-A/B'",
"Type":1,
"Min":0,
"Max":1,
"Hex":0xF056
}</item>
<item>{
PA700 20 UNITECH
Page 22

"Parameter":"'Composite TLC-39'",
"Type":1,
"Min":0,
"Max":1,
"Hex":0xF073
}</item>
<item>{
"Parameter":"'UPC Compoiste Mode'",
"Type":2,
"Min":0,
"Max":2,
"Hex":0xF058,
"Tag":{
"'0'":"'UPC Never Linked'",
"'1'":"'UPC Always Linked'",
"'2'":"'Autodiscriminate UPC Composites'"
}
}</item>
<item>{
"Parameter":"'Compoiste Beep Mode'",
"Type":2,
"Min":0,
"Max":2,
"Hex":0xF08E,
"Tag":{
"'0'":"'Single Beep after both are decoded'",
"'1'":"'Beep as each code type is decoded'",
"'2'":"'Double Beep after both are decoded'"
}
}</item>
<item>{
"Parameter":"'GS1-128 Emulation Mode for UCC/EAN Composite Codes'",
"Type":1,
"Min":0,
"Max":1,
"Hex":0xF0AB
}</item>
</string-array>
<string-array name="Symbologies_2D">
<item>{
"Parameter":"'PDF417'",
"Type":1,
"Min":0,
"Max":1,
"Hex":0x0F
}</item>
<item>{
"Parameter":"'MicroPDF417'",
"Type":1,
"Min":0,
"Max":1,
PA700 21 UNITECH
Page 23

"Hex":0xE3
}</item>
<item>{
"Parameter":"'Code 128 Emulation'",
"Type":1,
"Min":0,
"Max":1,
"Hex":0x7B
}</item>
<item>{
"Parameter":"'Data Matrix'",
"Type":1,
"Min":0,
"Max":1,
"Hex":0xF024
}</item>
<item>{
"Parameter":"'Data Matrix Inverse'",
"Type":2,
"Min":0,
"Max":2,
"Hex":0xF14C,
"Tag":{
"'0'":"'Regular'",
"'1'":"'Inverse Only'",
"'2'":"'Inverse Autodetect'"
}
}</item>
<item>{
"Parameter":"'Decode Mirror Images (Data Matrix Only)'",
"Type":2,
"Min":0,
"Max":2,
"Hex":0xF119,
"Tag":{
"'0'":"'Never'",
"'1'":"'Always'",
"'2'":"'Auto'"
}
}</item>
<item>{
"Parameter":"'Maxicode'",
"Type":1,
"Min":0,
"Max":1,
"Hex":0xF026
}</item>
<item>{
"Parameter":"'QR Code'",
"Type":1,
"Min":0,
"Max":1,
PA700 22 UNITECH
Page 24

"Hex":0xF025
}</item>
<item>{
"Parameter":"'Maxicode'",
"Type":1,
"Min":0,
"Max":1,
"Hex":0xF026
}</item>
<item>{
"Parameter":"'QR Inverse'",
"Type":2,
"Min":0,
"Max":2,
"Hex":0xF14B,
"Tag":{
"'0'":"'Regular'",
"'1'":"'Inverse Only'",
"'2'":"'Inverse Autodetect'"
}
}</item>
<item>{
"Parameter":"'MicroQR'",
"Type":1,
"Min":0,
"Max":1,
"Hex":0xF026
}</item>
<item>{
"Parameter":"'Aztec'",
"Type":1,
"Min":0,
"Max":1,
"Hex":0xF13E
}</item>
<item>{
"Parameter":"'Aztec Inverse'",
"Type":2,
"Min":0,
"Max":2,
"Hex":0xF14D,
"Tag":{
"'0'":"'Regular'",
"'1'":"'Inverse Only'",
"'2'":"'Inverse Autodetect'"
}
}</item>
<item>{
"Parameter":"'Mobile Phone/Display Mode'",
"Type":1,
"Min":0,
"Max":1,
PA700 23 UNITECH
Page 25

"Hex":0xF1CC
}</item>
</string-array>
<string-array name="Data_Options">
<item>{
"Parameter":"'Transmit Code ID Character'",
"Type":2,
"Min":0,
"Max":2,
"Hex":0x2D,
"Tag":{
"'0'":"'None'",
"'1'":"'Aim Code ID Character'",
"'2'":"'Symbol Code ID Character'"
}
}</item>
</string-array>
<string-array name="Serial_Parameters">
<item>{
"Parameter":"'Baud Rate'",
"Type":2,
"Min":6,
"Max":6,
"Hex":0x9C,
"Tag":{
"'6'":"'9600'"
}
}</item>
</string-array>
<string-array name="Scanner_Options">
<item>{
"Parameter":"'Power Mode'",
"Type":1,
"Min":0,
"Max":1,
"Hex":0x80
}</item>
<item>{
"Parameter":"'Trigger Modes'",
"Type":2,
"Min":0,
"Max":10,
"Hex":0x8A
"Tag":{
"'0'":"'Level'",
"'1'":"'--'",
"'2'":"'--'",
"'3'":"'--'",
"'4'":"'--'",
"'5'":"'--'",
PA700 24 UNITECH
Page 26

"'6'":"'--'",
"'7'":"'Presentation Mode'",
"'8'":"'Host'",
"'9'":"'Auto Aim'",
"'10'":"'Auto Aim with Illumination'"
}</item>
<item>{
"Parameter":"'Scan Duration'",
"Type":3,
"Min":0,
"Max":99,
"Hex":0x88
}
}</item>
<item>{
"Parameter":"'Transmit No Read Message'",
"Type":1,
"Min":0,
"Max":1,
"Hex":0x5E
}</item>
<item>{
"Parameter":"'Linear Code Type Security Level'",
"Type":2,
"Min":1,
"Max":4,
"Hex":0x4E,
"Tag":{
"'1'":"'Linear Security Level 1'",
"'2'":"'Linear Security Level 2'",
"'3'":"'Linear Security Level 3'",
"'4'":"'Linear Security Level 4'"
}
}</item>
<item>{
"Parameter":"'Inverse 1D'",
"Type":2,
"Min":0,
"Max":2,
"Hex":0xF14A,
"Tag":{
"'0'":"'Regular'",
"'1'":"'Inverse Only'",
"'2'":"'Inverse Autodetect'"
}
}</item>
</string-array>
PA700 25 UNITECH
Page 27

2. USI Examples
2.1. Enable/Disable scanner
Intent intent = new Intent();
intent.setAction("unitech.scanservice.scan2key_setting");
intent.putExtra("scan2key", true);
sendBroadcast(intent);
2.2. Receive scanned data
String SSI_param_data = "";
Intent sendIntent = new Intent("unitech.scanservice.data");
sendIntent.putExtra("text", SSI_param_data);
sendBroadcast(sendIntent);
2.3. Programming example
Programming Source-code example is available as “keypad-test” at
https://portal.unitech.eu/Files/Technical/PA700Scanner(key)Test_1.0.zip
3. Tips using Scan2Key
3.1.
Open the ScanService
Select the tab “Settings”
Select “Data Options”
Select “Transmit Code ID character” and select “AIM Code ID character”
The Barcode symbology will be transmitted as in
http://mdn.morovia.com/kb/AIM-Symbology-Identifiers-SI-10639.html
so a Code128 label with data 097050214112 the barcode will have display
Want
3.2. The received data is longer the barcode data
Open the ScanService, press the third h/w key
Select “Device Option”
Select “Terminator” and remove the text <LF>
Select OK
3.3. Enable/Disable barcode scanning through HTML5
Prerequisites
ScanOff DisableScan2Key.apk (https://12manage.unitech.eu/RDM/tools/DisableScan2Key.apk)
ScanOn EnableScan2Key.apk (https://12manage.unitech.eu/RDM/tools/EnableScan2Key.apk)
For example and code visit http://portal.unitech.eu/tools/android.aspx#
PA700 26 UNITECH
to know the barcode symbology ?
]C0
097050214112
Page 28

4. Simple Data editing
ScanService V2.30 or above
4.1. Enable data editings
To enable data editing, first generate a text file called rule.txt at /sdcard/ folder. ScanService will read this file when it
starts, and apply rules in the file to the final output of the data when using Scan2Key feature. The rule will not apply
when data is sent out via intent.
If you want to stop using the data editing feature, just remove rule.txt from /sdcard/ folder.
4.2. rule.txt
Currently, ScanService will supports max of 10 sets of rules. It goes from 0 to 9, and if it matches qualifier for rule 0,
then it will stop at rule 0. Otherwise it will keep going unit rule 9. If all rules are failed, then empty string will be
outputted.
Each rule requires at least one qualifier. You can have multiple qualifiers in the same set. Only when all qualifiers are
passed, then it will proceed to the modifier. If there is no modifier, then the original data will be outputted.
Each line rule consists of at least 4 sections. And each section is separate by comma.
The first section indicate if this line of rule is a (q)qualifier or (m)modifier.
The second section indicate this line of rule belong to which set of rules. It should be from 0 to 9.
The third section will have different options depends on if this line of rule is qualifier or modifier.
In the case of qualifier:
(t)target symbology: This will be followed by how many symbologies will be in this qualifier, and
then the symbologies which you want to use as qualifier.
In the example, we have 3 symbologies we want to check, and they are
1(code 39), 19(code 39 full ASCII), and 28(QR code). You can find the
number for each symbology in Table A-8. Currently the rule can only take
decimal number, so please convert the hex number in Table A-8 to decimal
first.
To select all symbologies, have the number of symbologies set to 0.
(s)size of barcode: This will be followed by the condition, 0 means equal, 1 means less then, 2
means greater then. And then followed by the size you want to compare to.
(e)regular expression: This will be followed by java regular expression.
In the case of modifier:
(s)selection: This will be followed by start position, and then by length of the selection.
You can put 0 for the length to mean all remaining characters.
rule.txt example:
q,1,t,3,1,19,28
q,1,e,^i.*
m,1,s,1,0
q,2,s,2,10
q,3,t,0
m,3,s,0,0
PA700 27 UNITECH
Page 29

Table A-8. Code Types by SSI ID
Symbology SSI ID Code ID AIM ID
Letter
AIM ID Modifier
Code 39 0x01
Codabar 0x02
Code 128 0x03
D25 0x04
IATA 0x05
ITF 0x06
Code 93 0x07
UPCA 0x08
UPCE 3 0x09
EAN-8 0x0A
EAN-13 0x0B
Code 11 0x0C
MSI 0x0E
EAN-128 0x0F
UPCE1 0x10
PDF-417 0x11
Code 39 Full ASCII 0x13
Trioptic 0x15
Bookland 0x16
Coupon Code 0x17
ISBT-128 0x19
Micro PDF 0x1A
Data Matrix 0x1B
QR Code 0x1C
Postnet (US) 0x1E
Planet (US) 0x1F
Code 32 0x20
ISBT-128 Concat. 0x21
Postal (Japan) 0x22
Postal (Australia) 0x23
Postal (Dutch) 0x24
Maxicode 0x25
Postbar (CA) 0x26
Postal (UK) 0x27
Macro PDF-417 0x28
RSS-14 0x30
RSS Limited 0x31
RSS Expanded 0x32
Parameter (FNC3) 0x33
Scanlet Webcode 0x37
Cue CAT Code 0x38
UPCA + 2 0x48
UPCE + 2 0x49
EAN-8 + 2 0x4A
EAN-13 + 2 0x4B
UPCE1 + 2 0x50
Composite(CC-A + EAN-128) 0x51
Composite(CC-A + EAN-13) 0x52
Composite(CC-A + EAN-8) 0x53
Composite (CC-A +RSS Expanded) 0x54
Composite (CC-A +RSS Limited) 0x55
Composite(CC-A + RSS-14) 0x56
Composite(CC-A + UPC-A) 0x57
Composite(CC-A + UPC-E) 0x58
Composite(CC-C + EAN-128) 0x59
TLC-39 0x5A
Composite(CC-B + EAN-128) 0x61
Composite(CC-B + EAN-13) 0x62
Composite(CC-B + EAN-8) 0x63
Composite (CC-B +RSS Expanded) 0x64
Composite (CC-B +RSS Limited) 0x65
Composite(CC-B + RSS-14) 0x66
Composite(CC-B + UPC-A) 0x67
Composite(CC-B + UPC-E) 0x68
UPCA + 5 0x88
UPCE + 5 0x89
EAN-8 + 5 0x8A
EAN-13 + 5 0x8B
UPCE1 + 5 0x90
Multipacket Format 0x99
Macro Micro PDF 0x9A
e Developer’s Guide
PA700 28 UNITECH
 Loading...