

Page 1

Unitech HT660
Wireless Edition
Installation and User Manual
Page 2

General Store Mobile Solutions
Unitech HT660 Installation
and User Manual
III
Page 3

General Store Mobile SolutionsUnitech HT660 Installation and User Manual
No part of this publication may be reproduced, transmitted, transcribed, stored
in a retrieval system, translated into any language in any form or by any means,
electronic, mechanical, magnetic, optical, chemical, manual, or otherwise, without
prior written permission form:
Crichlow Data Sciences, Inc.
926 East Oleander Street
Lakeland, FL 33801
Disclaimer
Crichlow Data Sciences, Inc. makes no representations or warranties with
respect to the contents hereof and specifi cally disclaims any implied warranties of
merchantability or fi tness for any particular purpose. Further, Crichlow Data Sciences,
Inc. reserves the right to revise this publication and to make changes from time to
time in the content hereof with \out obligation of Crichlow Data Sciences, Inc. to notify
any person of such revision or changes.
References
• The General Store™ is a trademark of Crichlow Data Sciences, Inc.
• MS-DOS, Windows, Windows 95, Windows 98, Windows 98SE, Windows
NT, Windows Millennium, Windows 2000, Windows 2000 Pro, Windows 2000
Server, Windows Server 2003, Windows Server 2008, Windows XP and
Windows XP Pro, Windows 7, are trademarks of Microsoft Corporation.
• IBM PC-XT and AT are trademarks of International Business Machines
Corporation.
• Btrieve and Pervasive are trademarks of Pervasive.
• Fujitsu COBOL is a trademark the Fujitsu Corporation
• Unitech is a trademark of Unitech
IV
Page 4

V
Page 5
contents
Page 6

Table Of Contents
Unitech HT660 Wireless Edition - Installation and User Manual ............................I
Disclaimer ...................................................................................................................................... IV
References ..................................................................................................................................... IV
Chapter 1 - Unitech HT660 Overview and Setup ....................................................3
Your HT660 Includes… ....................................................................................................................3
Step 1 - Connect The USB Cradle ...................................................................................................4
Step 2 - Check the Battery and Power Confi guration ......................................................................4
Installing a New Battery Pack ....................................................................................................5
Charging the Batteries ...............................................................................................................5
Step 3 – Remove Protective Screen Film ........................................................................................5
First Time Use of the HT660 ............................................................................................................6
Pressing the Power ON/OFF Key ..............................................................................................6
Align the Screen .......................................................................................................................6
Setting Time Zone/ Date ............................................................................................................6
Keypad Overview ......................................................................................................................8
Chapter 2 - Connecting the HT660 to Your Wireless Network ............................15
Accessing the Summit Client Utility ...............................................................................................15
Chapter 3 - Software Installation ............................................................................21
What’s on the CD ...........................................................................................................................21
Installing the Software ....................................................................................................................21
Now What? ..............................................................................................................................24
Chapter 4 - Adding the General Store Database ..................................................27
Chapter 5 - Unitech HT660 Communications ........................................................33
How It Works ..................................................................................................................................33
First Time Use ................................................................................................................................34
Confi gure the Omni Communication Server ............................................................................34
Start the Omni Communication Server ....................................................................................38
The Server will minimize to your systray. .......................................................................................38
Chapter 6 - Basic Inventory Functions ..................................................................41
Page 7

Overview ........................................................................................................................................41
Accessing the Inventory Programs Menu ................................................................................42
Purchase Orders ............................................................................................................................42
Entering Your Employee Number and Password ....................................................................43
Collecting Purchase Order Data ..............................................................................................44
Reviewing Collected Purchase Order Data .............................................................................46
Sending Collected P.O. Data to the PC ...................................................................................47
Applying the Collected P.O. Data ............................................................................................49
Receiving .......................................................................................................................................51
Collecting, Reviewing, and Sending the Data .........................................................................51
Applying the Collected Receiving Data ..................................................................................52
Follow these steps to apply the receiving data you collected on the HT660. ..........................52
Transfers ........................................................................................................................................53
Collecting, Reviewing, and Sending the Data .........................................................................53
Applying the Collected Transfer ...............................................................................................54
Follow these steps to apply the Transfer data you collected on the HT660. ...........................54
Adjustments ...................................................................................................................................55
Collecting, Reviewing, and Sending the Data .........................................................................55
Applying the Collected Adjustment .........................................................................................56
Follow these steps to apply the Adjustment data you collected on the HT660........................56
Bin Locations .................................................................................................................................57
Collecting, Reviewing, and Sending the Data .........................................................................57
Applying the Collected Adjustment Data in
the General Store ....................................................................................................................58
Physical Inventory ..........................................................................................................................59
Physical Inventory Options ......................................................................................................59
Preparing Your Store for Inventory ..........................................................................................59
Collecting, Reviewing, and Sending the Data .........................................................................60
Applying the Collected Physical Inventory Data in the General Store .....................................61
Step 2 – Apply the Physical Inventory fi le ................................................................................64
Sales Orders ..................................................................................................................................65
Page 8

Collecting, Reviewing, and Sending the Data .........................................................................65
Processing the Sales Order Files at POS ...............................................................................66
Price Labels ...................................................................................................................................67
Printing Labels .........................................................................................................................67
Restock ..........................................................................................................................................70
Collecting, Reviewing, and Sending the Data .........................................................................70
Processing the report. .............................................................................................................71
Chapter 7 - Price Changes ......................................................................................75
Entering Price Change Data into the HT660 ..................................................................................75
Select the Price Change Program on the HT660 ....................................................................75
Entering Price Change Data ....................................................................................................76
On-Sale Pricing .......................................................................................................................80
Reviewing and Sending Price Change Data ..................................................................................81
Applying the Collected Price Change Data in
the General Store ...........................................................................................................................81
Page 9
1
CHAPTER
Page 10
Chapter 1
Unitech HT660 Overview and Setup
The General Store now supports the HT660, a rugged, compact and ergonomic handheld terminal powered by the WinCE.NET OS. It incorporates an
integral barcode scanning laser/CCD device, color LCD with touch screen,
keypad, BT and wireless communication interface capability.
Your HT660 Includes…
Your HT660 kit contains the following components:
The HT660 handheld terminal and manual CD.
You should also have a General Store Installation CD.
USB Cradle is for data transmission and charging purpose, including a USB cable and an AC
Power Supply to connect the HT660 to an electrical power outlet in order to power the terminal
and / or charge the battery pack, utilizing either
110 or 220 Volt (100 to 240 VAC, 50 or 60 MHz)
electrical outlets available in most countries.
The hand strap is convenient for carrying your
HT660 and also includes a stylus attachment.
The 3.7v, 1950mAh Li-ion rechargeable battery
pack provides the main power
3
Page 11
Step 1 - Connect The USB Cradle
The USB cradle is used for two purposes:
1. Charging the HT660 main and backup batteries.
2. Uploading new programs and updates via Active Sync USB connection.
Since you are using the wireless version of the General Store interface software, connection of the USB cable is optional. However, you must use the
AC adapter that came with the HT660 to power the USB Cradle.
Step 2 - Check the Battery and Power Configuration
Z Your battery has been installed and charged by Crichlow Data Sciences, Inc.
The instructions below are provided mainly as a reference if you ever have to
install a new battery, or perform a cold boot on your Unitech HT660.
Should you need to change the battery, it located in the rear of the HT660
4
Page 12
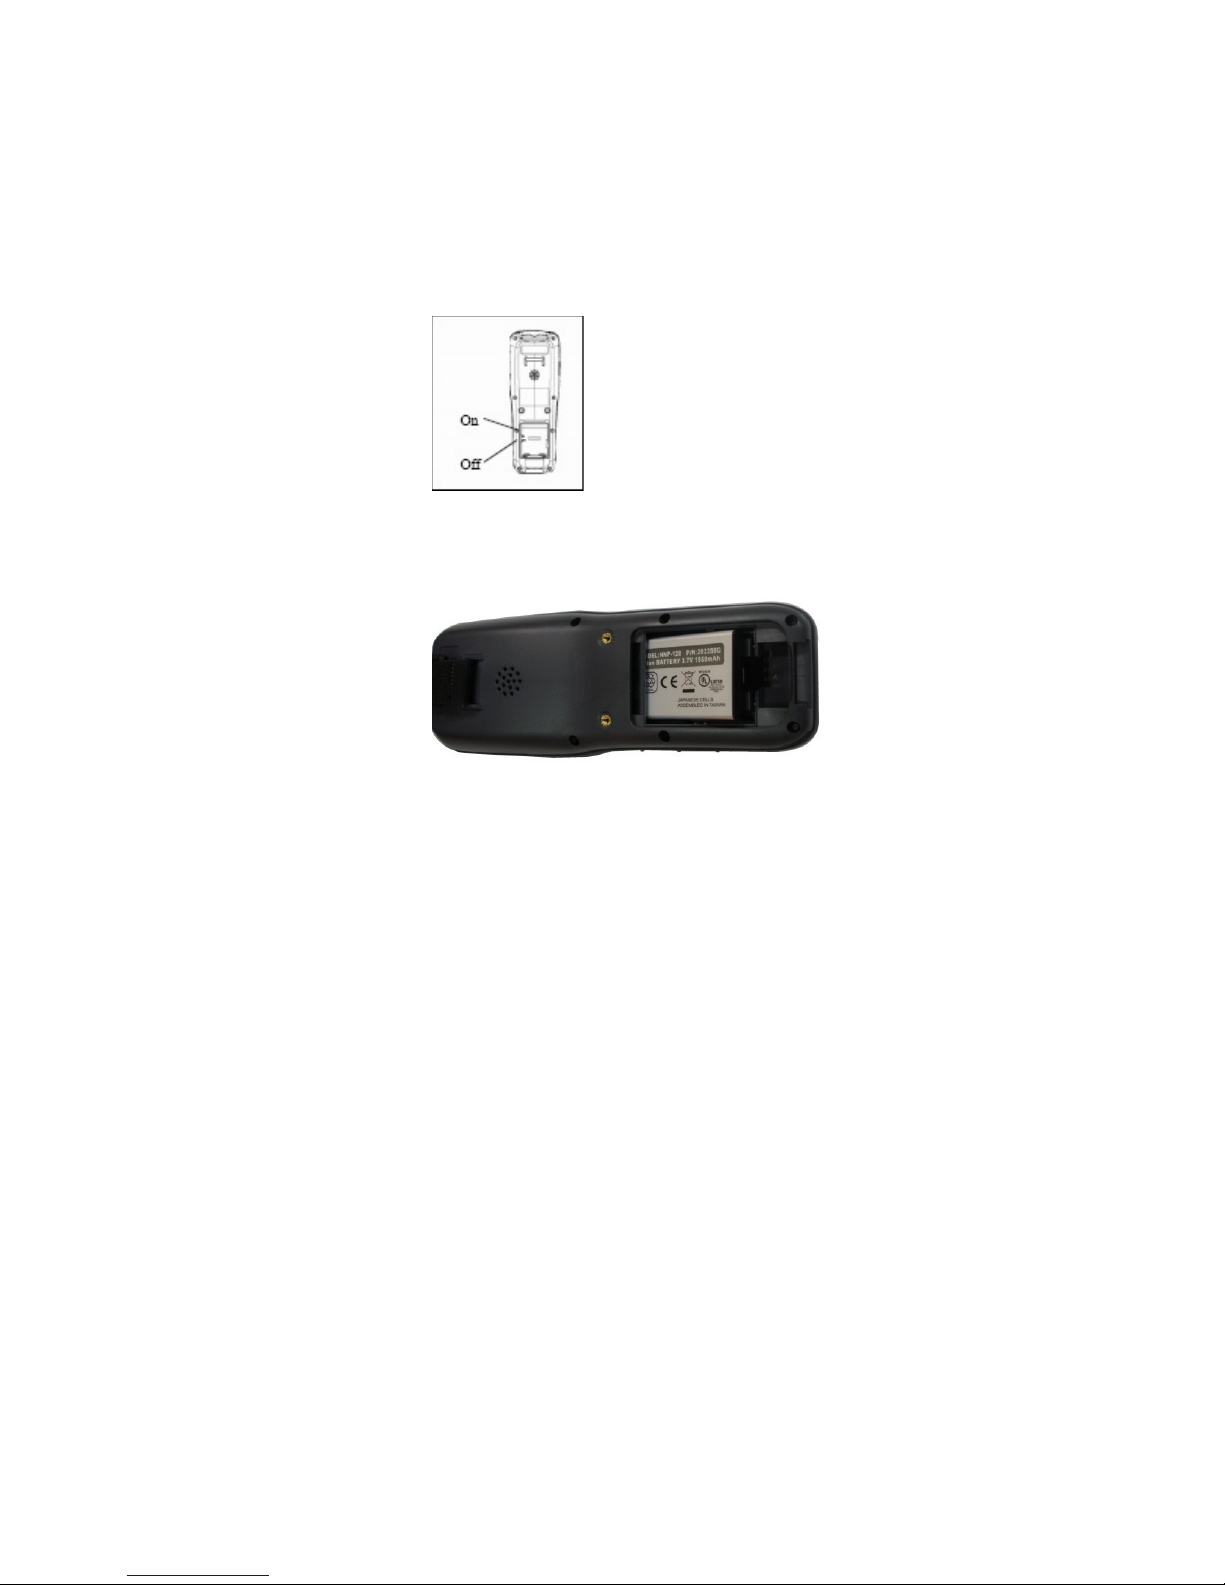
Installing a New Battery Pack
If you ever have to replace the battery pack, follow these instructions:
1. Remove the battery door
3. Move the backup battery switch to the ON position (see below).
4. Insert the battery pack so that the contacts on the battery pack line up
with the contacts in the battery compartment. Fully seat the battery.
Step 3 – Remove Protective Screen Film
Charging the Batteries
The main and backup batteries are charged by placing the HT660 in the
cradle/docking station (fi rst connect the power supply to the Docking Station).
First Time to Charge the Main Battery & Backup Battery
We would like to propose to charge the battery at least up to 12 hours for the
fi rst time to use. While it normally only takes about 4 hours to charge the battery after it’s been drained, when charging the battery for the fi rst time please
allow at least 12 hours. While charging the main battery the backup battery
should also be charged. Please make sure the backup battery has been
switched “ON” (this cannot be emphasized enough).
Z CAUTION: There is a high risk of data loss from RAM if the backup battery is
not fully charged. This can happen if the main battery has been drained and
the unit is not connected to the AC adaptor. For this reason, it is crucial that
the backup battery is switched on before charging the main battery for the
fi rst time.
Step 3 – Remove Protective Screen Film
To protect screen, the HT660 has been provided with a protective plastic
fi lm. You may remove it (if desired). The screen will be more susceptible to
scratching without the fi lm, but will be more readable.
5
Page 13

First Time Use of the HT660
Z NOTE: Your HT660 has already been powered up and confi gured by
Crichlow Data Sciences, Inc. Should you ever have to perform a cold boot on
your HT660, follow the instructions below when turning on the HT660 for the
fi rst time after the cold boot.
Pressing the Power ON/OFF Key
The Unitech HT660 welcome screen appears. The Windows CE screen will
appear shortly thereafter.
Align the Screen
When prompted, use the stylus to tap the targets as they appear in order to
align the touch screen. When you complete the procedure, press any key or
press anywhere on the touch screen to start up the WinCE system.
Setting Time Zone/ Date
Before using the HT660 please take a few minutes to set the time and date
so that data can be properly time-stamped.
Setting the Time Zone First
Follow the steps below to set up your time zone.
1. Tap the location arrow to see a list of cities.
2. Choose your location (or nearest listed one).
3. Select the Daylight Savings Time check box, if necessary.
4. Tap the APPLY button.
6
Page 14
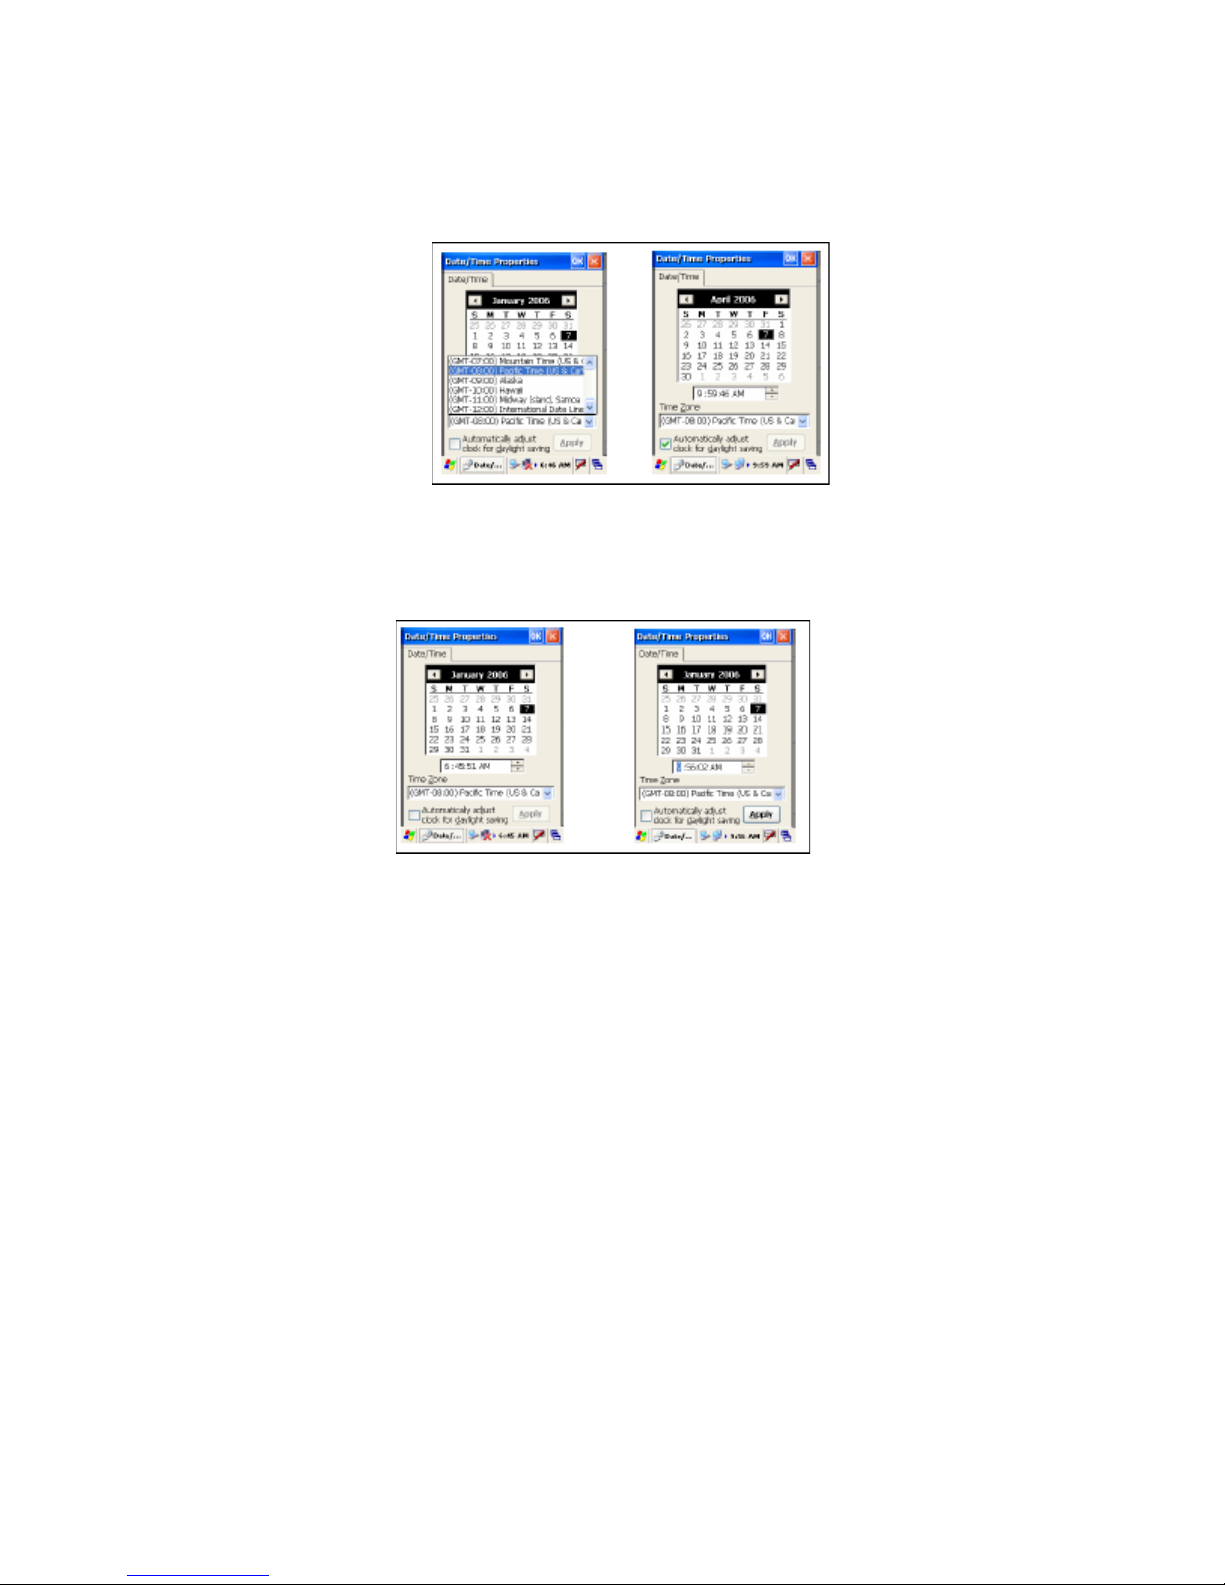
5. Select “Automatically adjust clock for daylight saving” for a Daylight Savings Time zone.
Setting Date/Time
Tap the Left or Right arrows to scroll the year and month you desire. Or,
directly tap location of year or month to change the year or month setting.
First Time Use of the HT660
7
Page 15
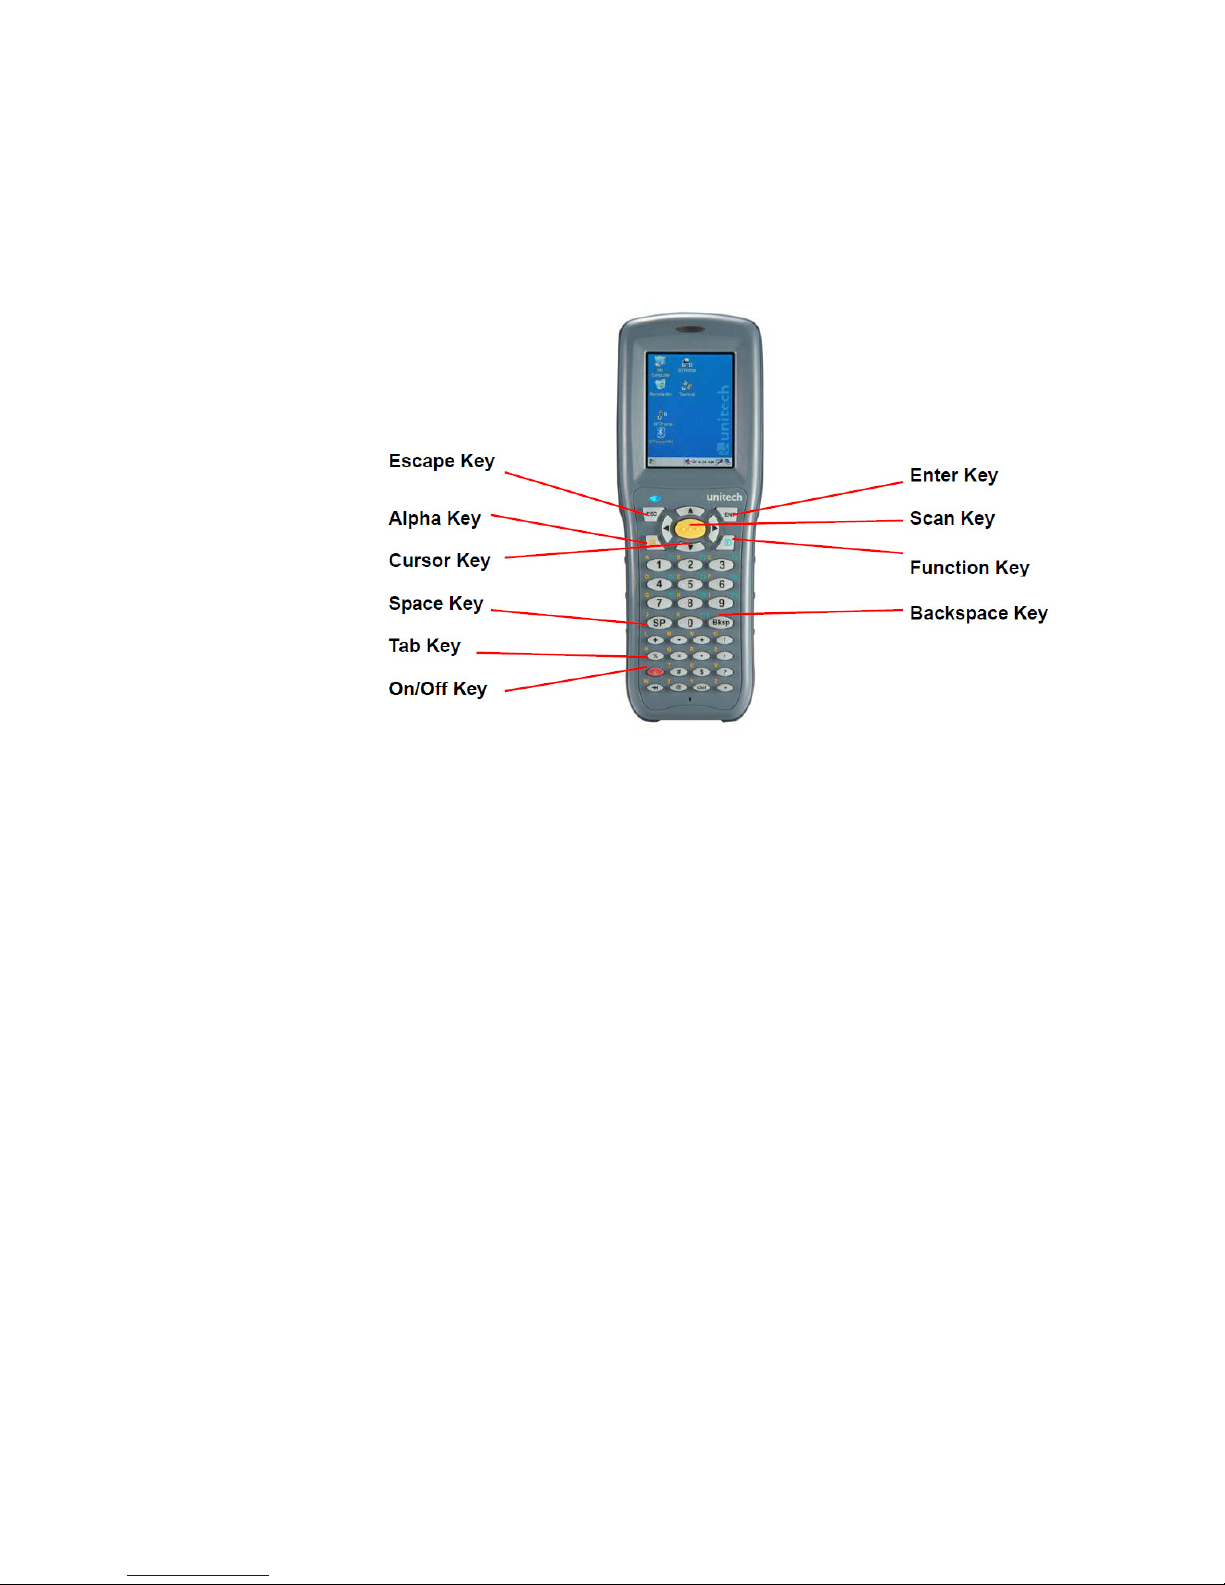
Keypad Overview
Here is a summary of the buttons found on the Unitech HT660, with descriptions of what they do.
l [ENT] The Enter key confi rms data entry.
l [FUNC] The Function Key is used in conjunction with specifi c number
keys to operate as hotkeys (see next page).
l [Bksp] The backspace key erases the character to the left of the cursor.
l [ESC] The escape key returns the user to a previous page.
l [TAB] The Tab key moves the cursor to the next tab or next control on a
form.
l [Cursor] The cursor key moves the cursor around the screen.
l [Alpha] The Alpha key toggles Alpha mode on and off and Caps mode
on and off. One press of the Alpha key causes the HT660’s keys to input
alpha characters, indicated by a blue LED light. A second press causes
the input of upper-case characters, indicated now by a green LED. A third
press returns the HT660 to numerical input.
HT660 HotKeys
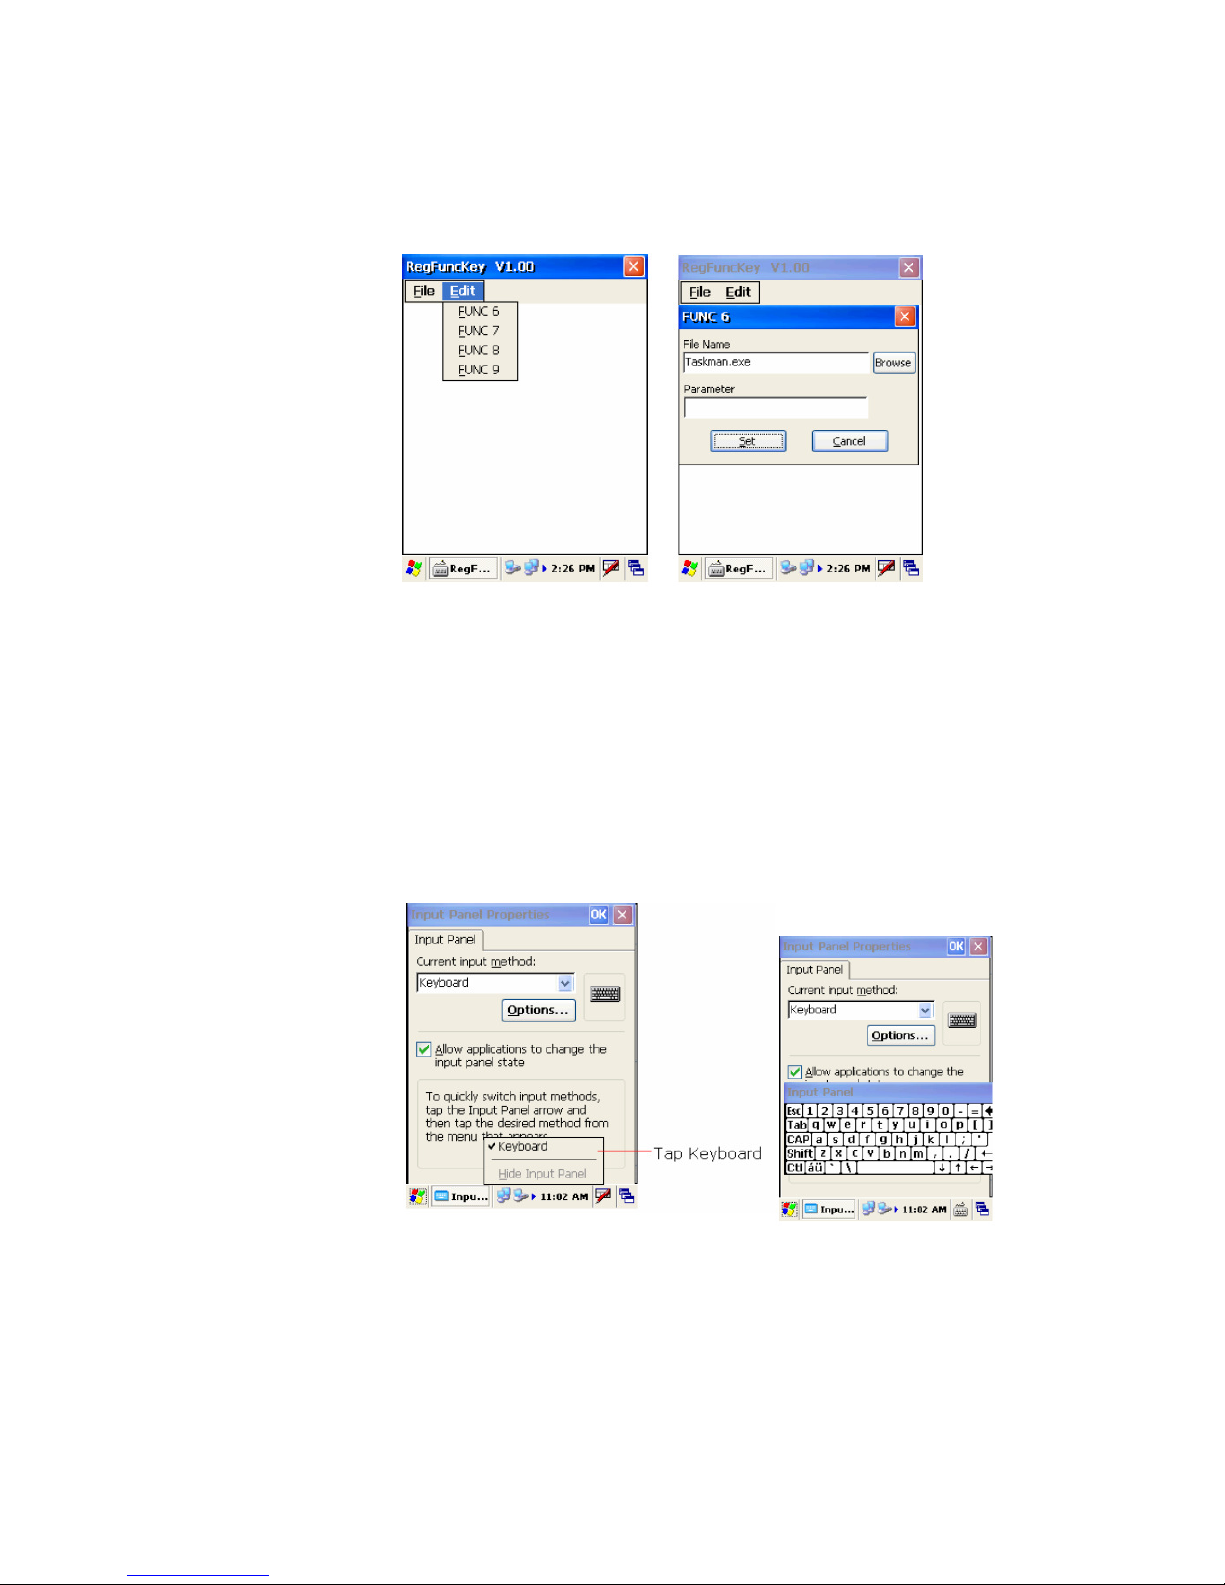
The HT660 provides hotkeys for frequently used functions. Press the Function key and the appropriate numeric key for the following functions listed
below:
l Func 6 = Task Manager
l Func 7 = Scanner Setting
l Func 8 = Power Properties
l Func 9 = System Info
8
Page 16
First Time Use of the HT660
Hotkeys can be modifi ed to suit the user’s preferences. To modify hotkeys,
please follow the path below:
Path: My computer/Windows/RegFuncKey.exe
Software Keyboard (Windows CE Keyboard)
Besides its hardware keypad, the HT660 provides a touch screen keyboard
as an alternative method of character input. This software keyboard replicates the layout of a standard PC keyboard.
Opening the Windows CE Keyboard:
The Windows CE keyboard can be opened by tapping the “keyboard” icon on
the task bar. (Refer to picture).
9
Page 17
Confi guring Your Barcode Scanner
Your Unitech HT660 comes equipped with an integrated laser barcode scanner. It is set at the factory in terms of symbologies like UPCA, UPCE, Code
39, etc.
If for some reason, you need to custom confi gure the barcode scanner, follow
these steps.
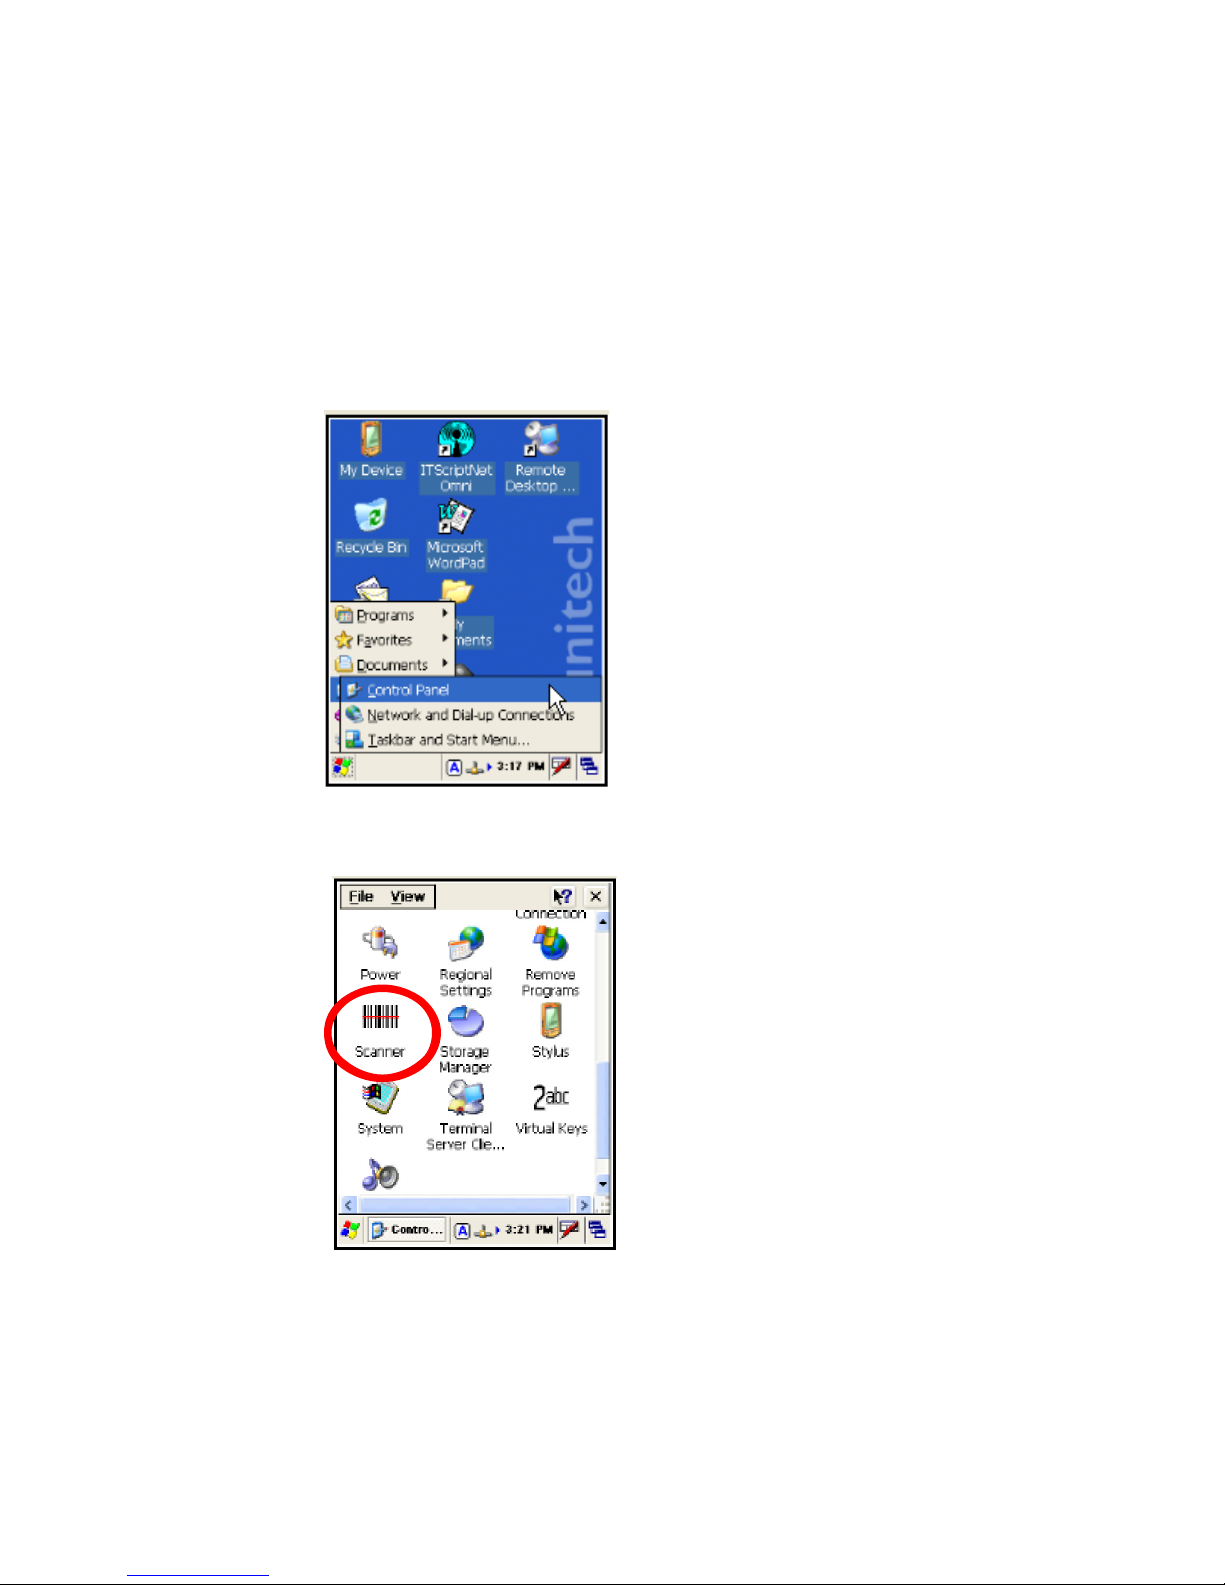
1. Tap the Start icon in the lower left corner of the HT660 screen. Then select
Settings>Control Panel.
2. You will then see the Control Panel Window shown below.
Tap the Scanner icon shown above (circled in red above).
10
Page 18
First Time Use of the HT660
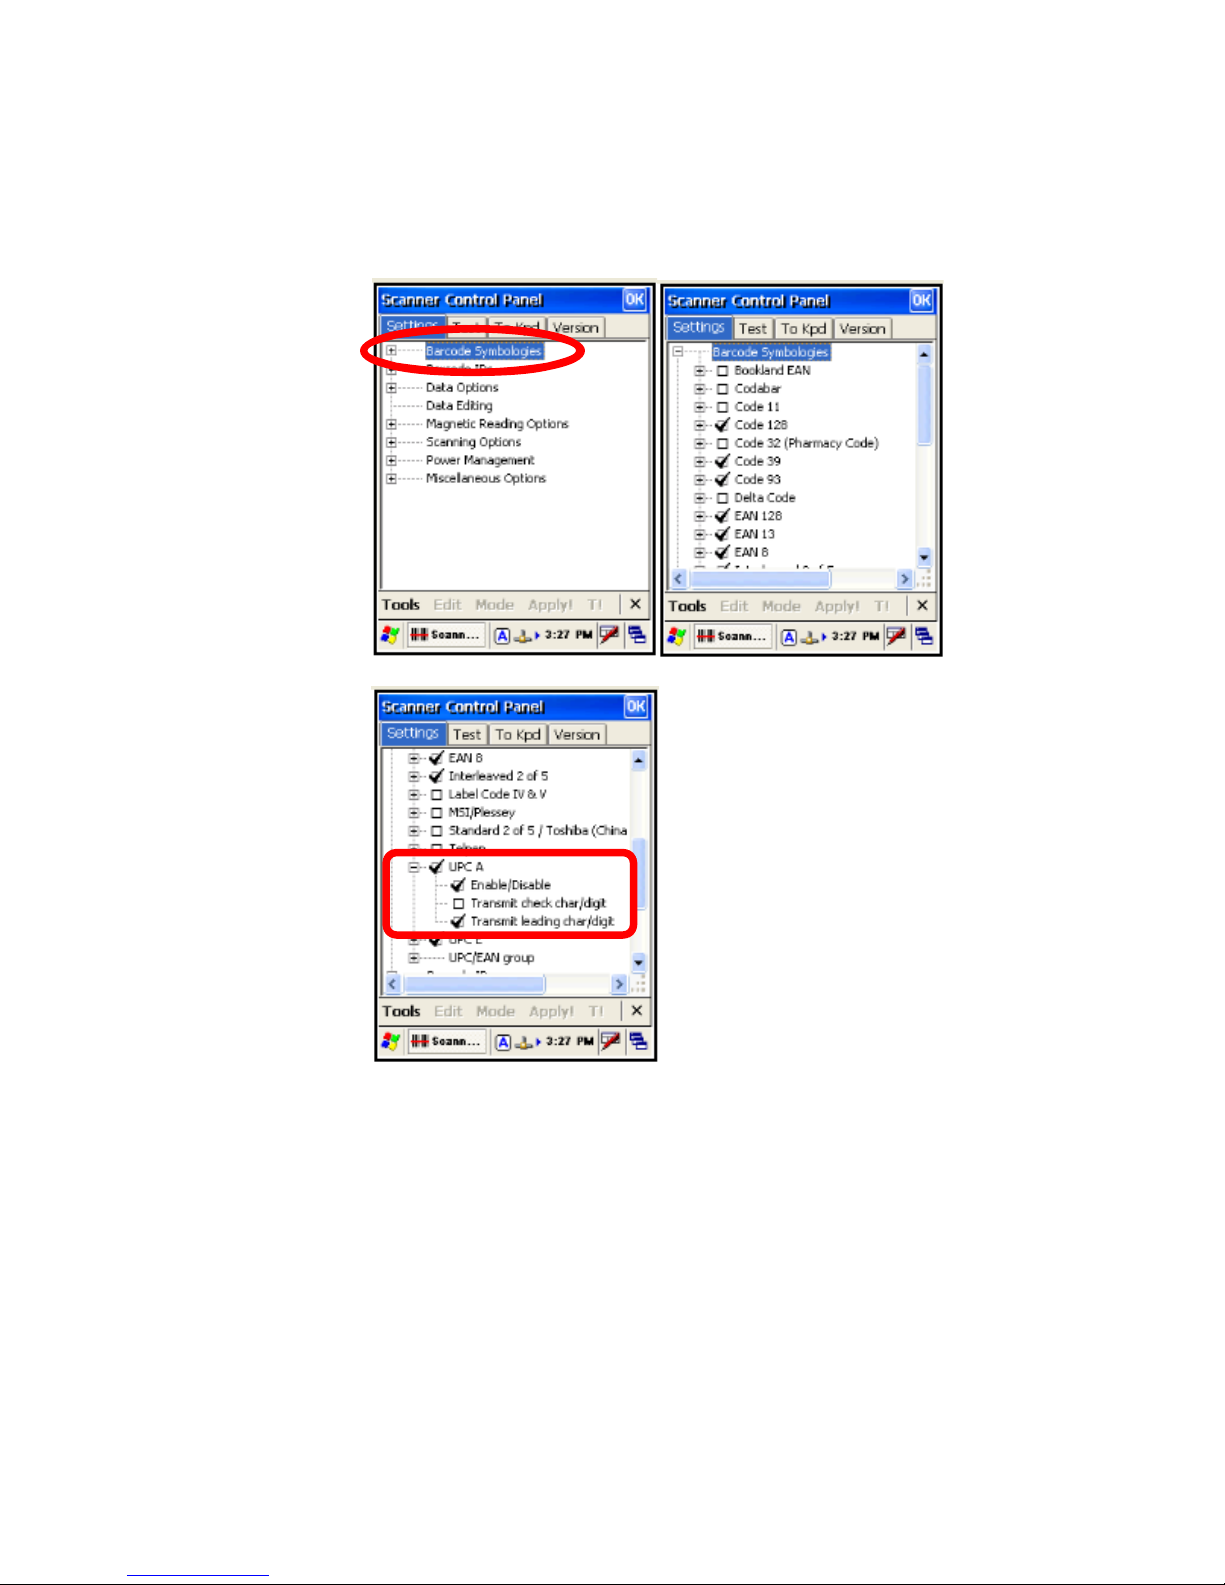
3. Now you can set the barcode symbologies as desired. Tap the “+” plus sign next
to the “Barcode Symbologies” option to expand the tree. Then scroll to the symbology you wish to edit and click the plus sign again, to expand that selection. In
the example below, we selected the UPCA symbology.
4. We then turned on the “Transmit check char/digit” option.
11
Page 19
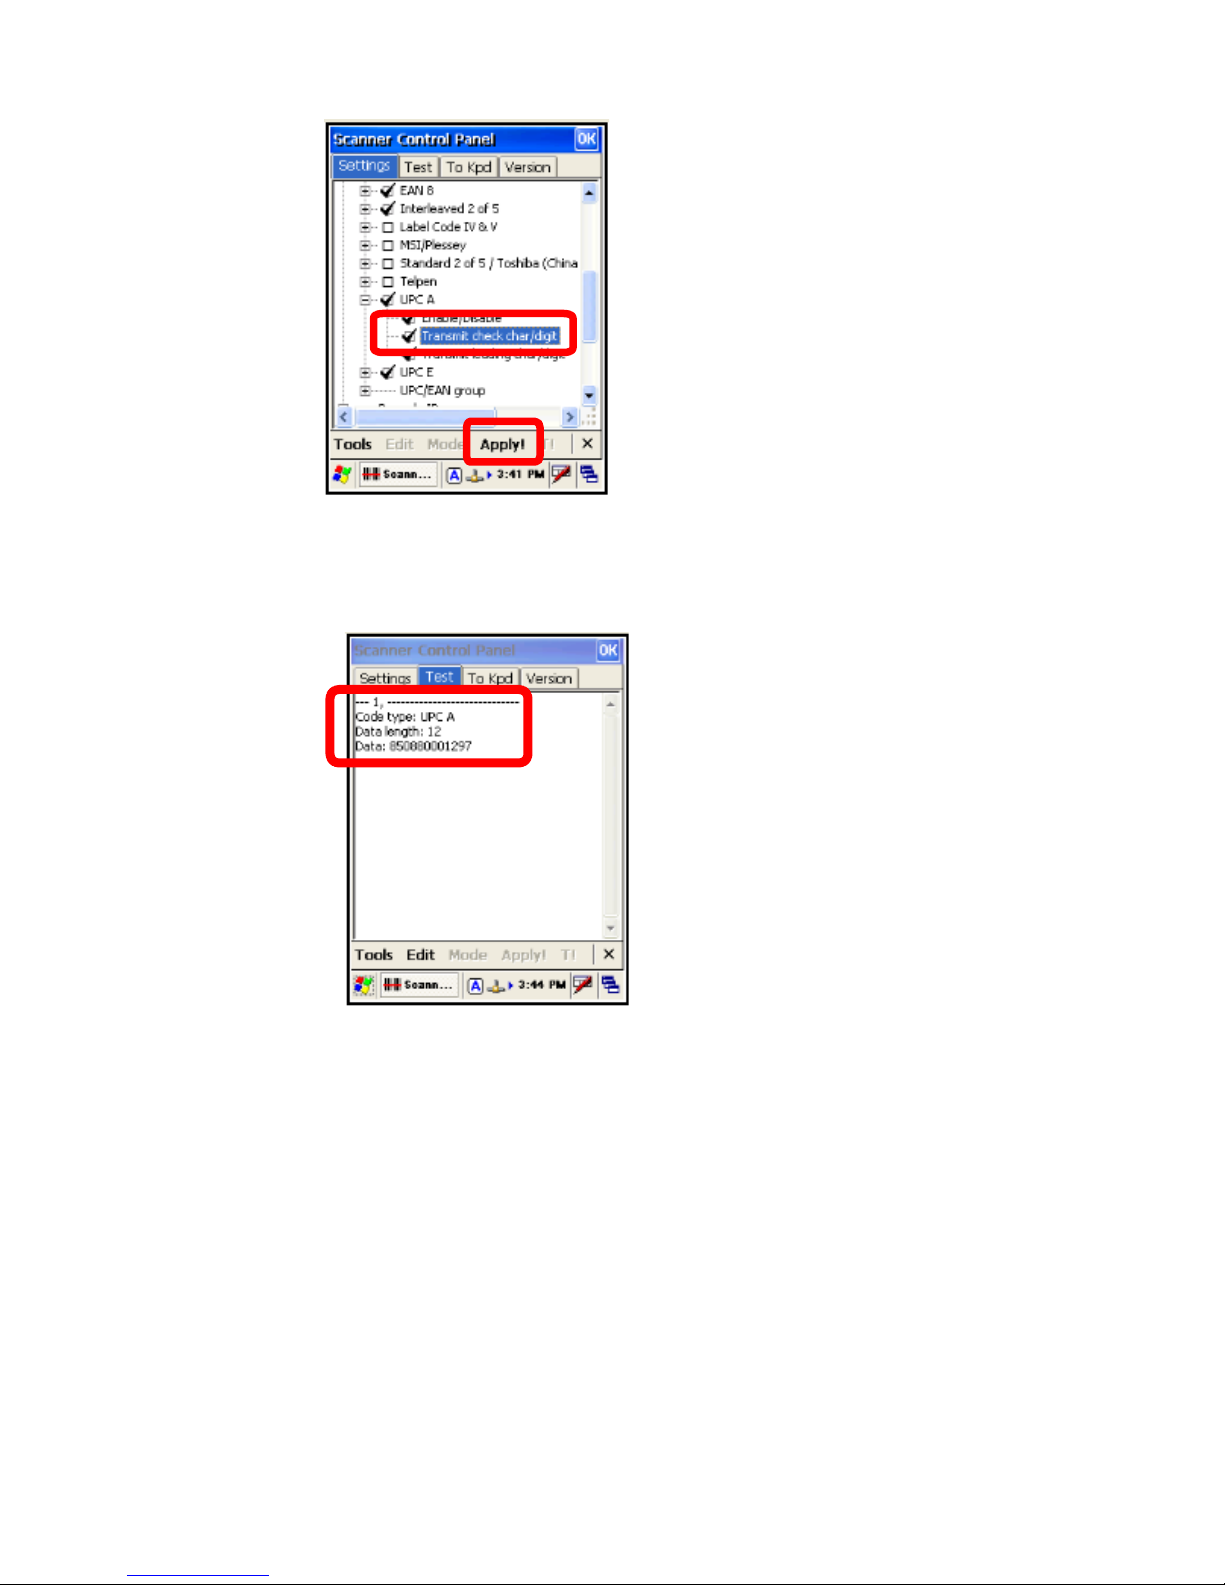
To save your changes, tap the “Apply” button.
5. You can test the scanner by selecting the “Test” tab. Then scan a barcode
6. That’s it! To exit, simply tap the “OK” button at the top right corner of the screen.
12
Page 20

First Time Use of the HT660
13
Page 21

2
CHAPTER
Page 22
Connecting the HT660
to Your Wireless Network
Your Unitech HT660 comes equipped with a Summit 802.11b/g radio card
built in. However, you must set up your login credentials on the HT660,
through the Summit Client Utility, in order access your company network via
a wireless router, or access point.
Accessing the Summit Client Utility
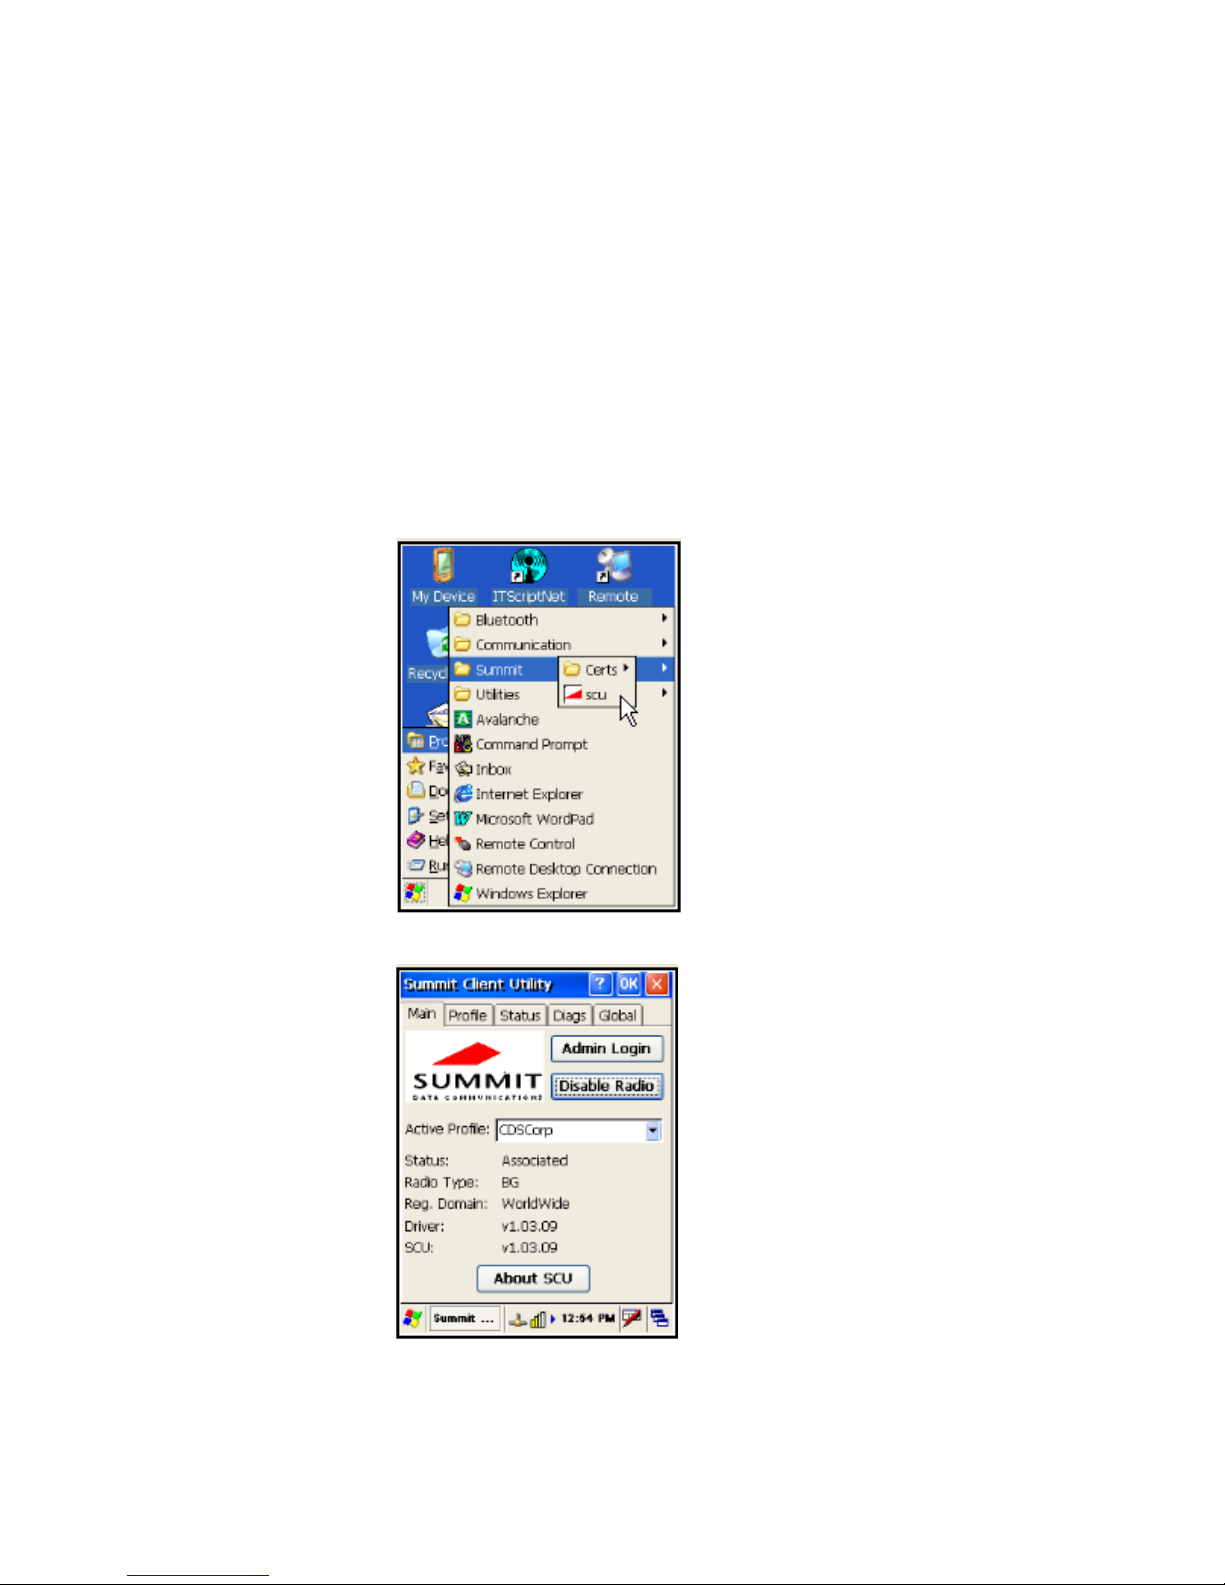
Using your stylus, tap the start icon in the lower left corner of the HT660
screen. Then select Programs>Summit>scu, as shown below.
Chapter 2
You will then see the Summit Client Utility Main tab shown below.
15
Page 23
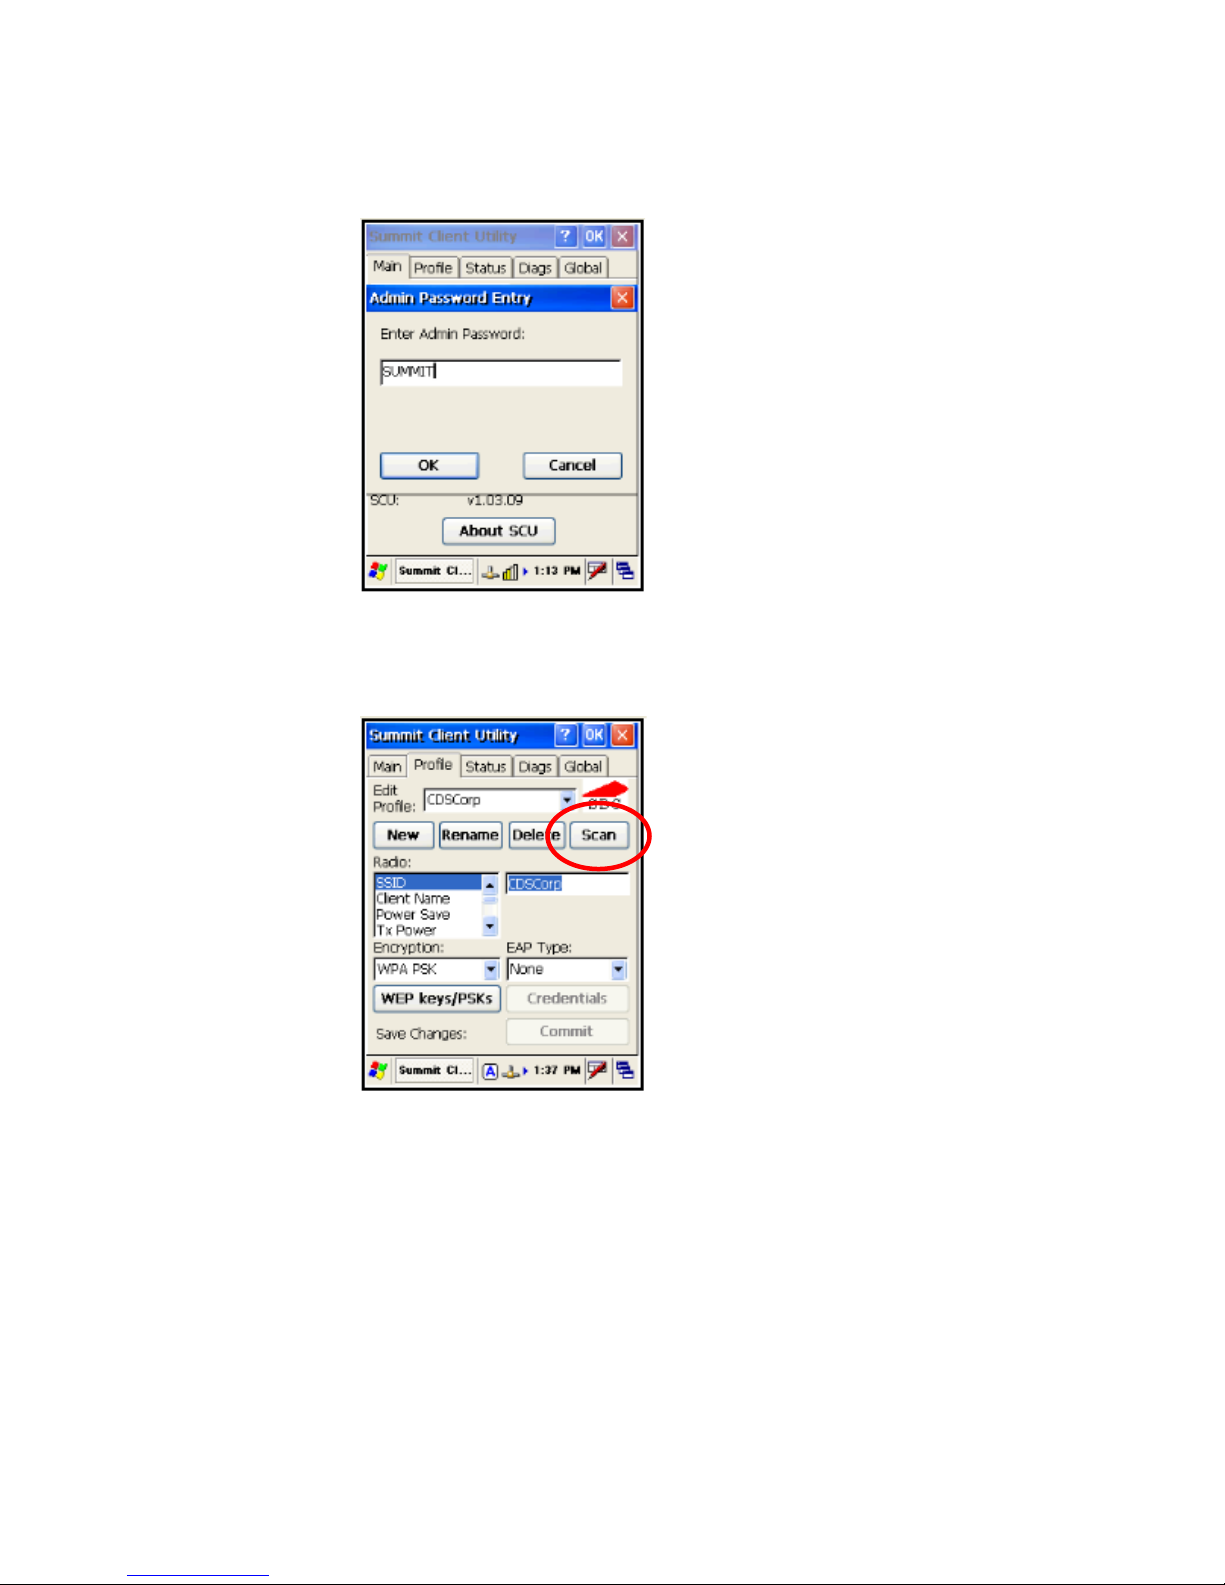
Next, tap the Admin Login button, and enter “SUMMIT” (All CAPS) in the
password fi eld and tap the OK button..
Now select the Profi le tab at the top of the window.
The easiest way to locate your wireless network is to tap the “Scan” button,
shown in the above graphic.
16
Page 24

Accessing the Summit Client Utility
You will see all networks in range. Simply tap the one you want to connect to,
and then tap the “Connect” button.
Tap the “Yes” button to create the new profi le.
17
Page 25
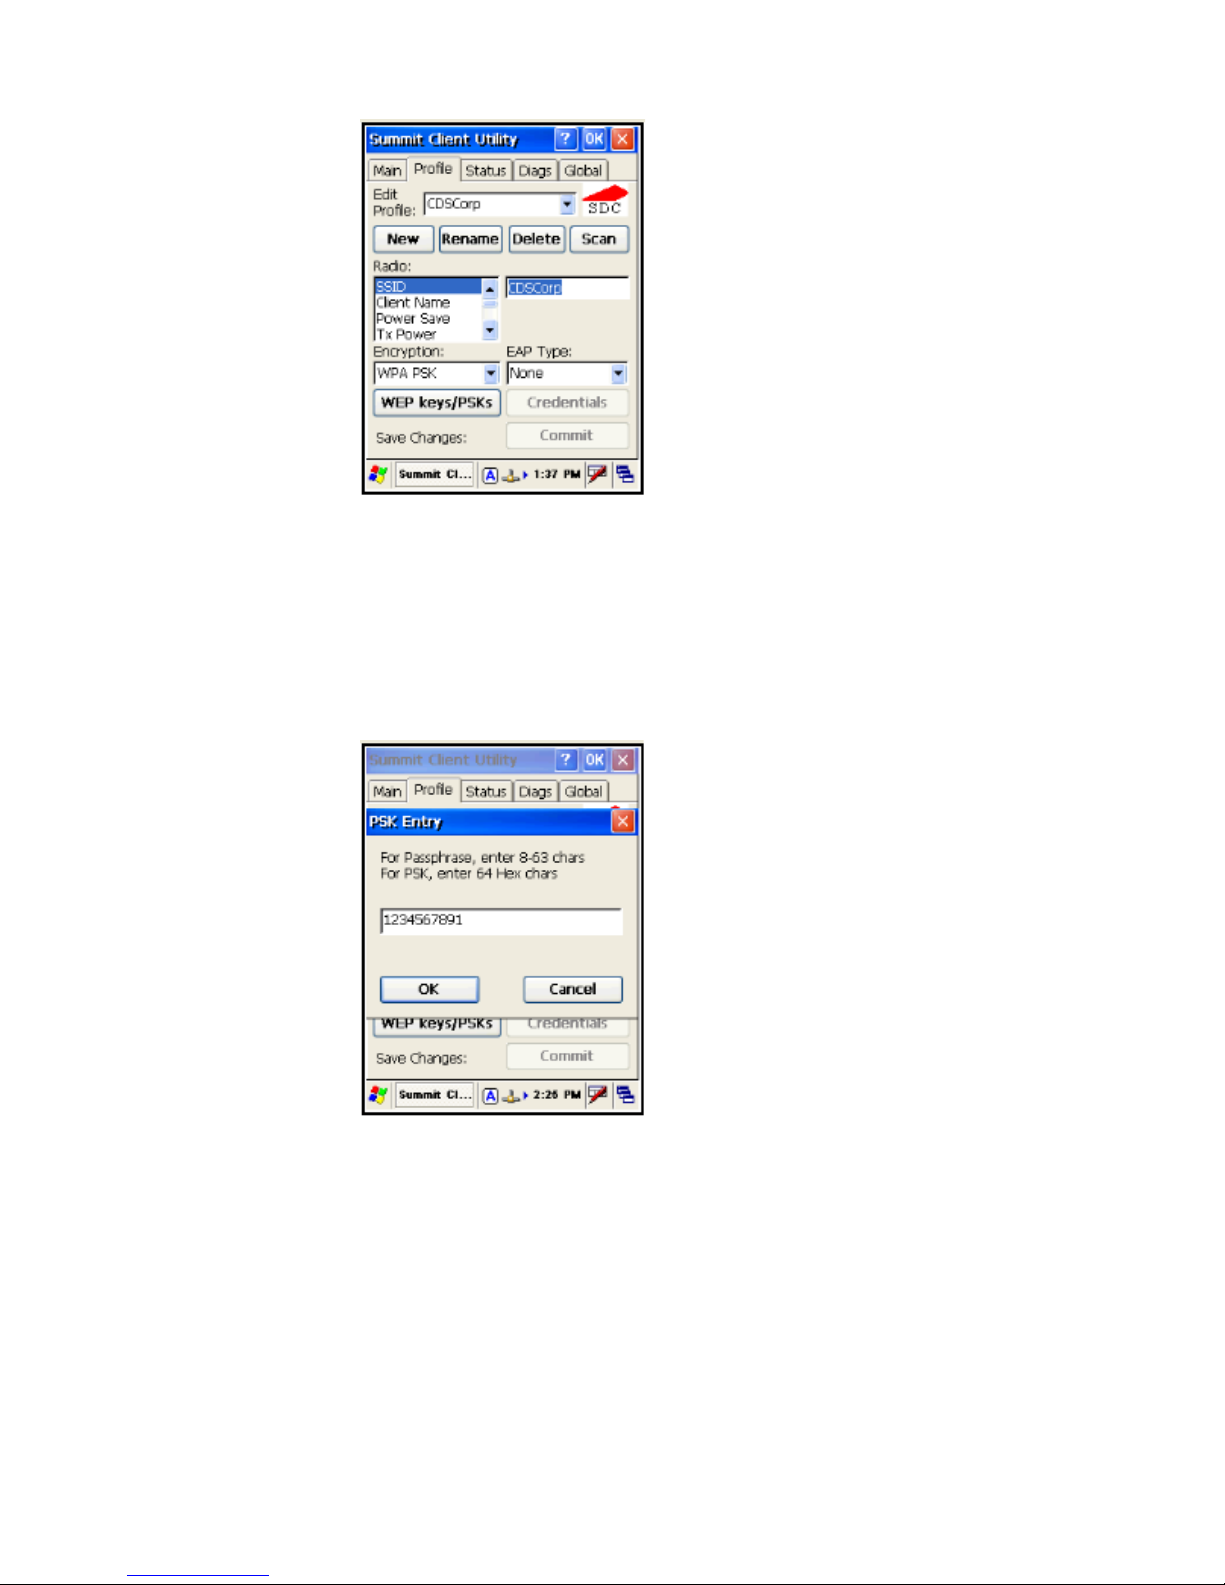
Now, the last step is to set the Encryption type and keys to match that of your
wireless router.
In our example the encryption type is WPA PSK, and we had to enter the
network key (password) by tapping the WEP keys/PSKs button.
18
Page 26

Accessing the Summit Client Utility
Once you have set your wireless connection settings, tap the “Commit” button at the bottom of the Profi le tab. Then return to the Main tab.
Select the profi le you want to use from the “Active Profi le” drop down list. If
your settings were entered correctly on the Profi le tab, you should see that
the “Status” of your selected profi le is “Associated”, as shown below.
If not, re-check your settings and try again. Otherwise, you are connected
and you can tap the “OK” button on the menu bar to exit.
19
Page 27
3
CHAPTER
Page 28

What’s on the CD
The General Store interface CD contains the programs and fi les needed to
allow the Unitech HT660 to communicate with the General Store, including:
• ITScriptNet Omni Communication Server – This software will run in the
background on the computer you are communicating through.
• ITScriptNet Omni Confi guration Utility – This software allows you to set
the server IP address as well as the location the General Store application
programs.
• The ITScriptNet Client Loader for the Unitech Ht660. This program is only
used if you have to reload the General Store application programs on the
Unitech HT660.
• The General Store application programs for the Unitech HT660.
The CD must be installed on the server or workstation that you will be running the ITScriptNet Omni Communication server on.
Chapter 3
Software Installation
Installing the Software
1. Place the CD in the CDROM drive. It should auto-run, and you should see the following
screen.
If you do not automatically see this screen, navigate to the CDROM drive through My Computer, or Windows Explorer, and double click “Launch.exe”.
21
Page 29

2. Then select your install option.
In this example we will choose Single User.
3. Then click Install General Store Files.
4. The install process will then begin.
The fi rst prompt is to install ActiveSync 4.5. Even if you already have a
copy of ActiveSync installed, click “Install”. You will be given the opportu-
22
Page 30

Installing the Software
nity to abandon the ActiveSync portion of the Install on the next screen.
5. ActiveSync is optional, but recommended. If you select yes, you will be
guided through the ActiveSync Install.
Once that is completed, you will automatically be moved into the General
Store portion of the install.
6. Follow the prompts through the rest of the install.
Upon rebooting your PC, you should now see the following icons on your
Once the install has completed, you may be required to re-boot your
computer.
23
Page 31

Now What?
Windows desktop:
In later chapters, we will tell you what these programs are for and how they
work.
Now that the software has been installed, the General Store database must
be confi gured in order for the Unitech HT660 to properly query the General
Store data fi les. This is described in the chapter 4, “Adding the General Store
Database”.
24
Page 32

Installing the Software
25
Page 33

4
CHAPTER
Page 34

Chapter 4
Adding the General Store Database
The General Store utilizes the Pervasive database to store and update data.
In order for the Unitech HT660 to interface with the General Store, you must
provide a gateway to the General Store data fi les through the Pervasive
Control Center. Follow the steps outlined below to add a database called
“TheGeneralStore” in the Pervasive Control Center.
NOTE: This utility requires General Store version 2.0 or higher with
☛
Pervasive.
1. Click start, programs, Pervasive, PSQL10, Control Center.
2. You will see the following screen:
3.
27
Page 35

4. Click the “+” plus sign next to Engines.
Then click the “+” plus sign next to you computer name, which in our
example is robc. Then click the “+” plus sign next to Databases (Engine).
5. You will then see a list of the existing databases. Right click on “Databases (Engine) and then left click “New”, then “Database”.
You will then see the Create Database Wizard screen shown below.
28
Page 36

6. Enter the name of the new database as “THEGENERALSTORE” as
shown below.
Also enter the drive letter and directory where your General Store data
fi les reside. This is typically “C:\GenStore\TgsData on single user systems and fi le servers, or “G:\TgsData” on network workstations.
If you do not know the actual directory name, you can locate it using the
Browse button to the right of the directory fi eld.
Deselect the “Create dictionary fi les” option. Then click “Finish”.
29
Page 37

You will notice that your new database, “THEGENERALSTORE” has been
added to the list.
Close the Pervasive Control Center.
30
Page 38

31
Page 39

5
CHAPTER
Page 40

Unitech HT660 Communications
How It Works
• Change Bin Locations
• Receiving
• Adjustments
• Purchase Orders
• Inventory Transfers
• Physical Inventory
• Price changes
• Sales Orders
• Price Label Printing
• Restock Reporting
Chapter 5
Your Unitech HT660 has been pre-confi gured with the following application
programs:
These programs are accessed on your HT660 by tapping the ITScriptNet
Omni Icon on your HT660’s main screen.
These programs (running under the ITScriptNet Client on the HT660) query
the General store data fi les, and send collected data, via ITScriptNet Omni
Communication Server, a communications package running on your PC.
In short, the ITScriptNet Omni Client on the Unitech HT660 talks to the
ITScriptnet Omni Communication Server on your PC, and vice versa.
Page 41

First Time Use
Confi gure the Omni Communication Server
To confi gure the Omni Communication Server, click the Unitech Omni Confi guration Utility icon on your desktop.
You will see the following screen.
The Host Settings Section
Finding the right IP Address
Click the Advanced tab, and then click the “?” button to the right of the “IP Address” fi eld to locate the correct IP Address.
Never select the “0.0.0.0” option.
Page 42

First Time Use
Once you have selected an address, click “OK”. You will be returned to the
confi guration screen, where you must then click “Apply”.
If the Omni Server is already running, you will prompted to update it.
Click Yes, and thn click OK.
Page 43

Match this IP on the Unitech HT660
Now, you must enter the same IP address on the HT660 through ITScriptNet.
On the HT660, access the ITScriptNet Main Menu.
Then tap the Utilities button, followed by the Confi guration button.
Select the Server tab.
Page 44

First Time Use
You will then see the Host IP fi eld at the top of the screen.
Now enter the same IP address you selected when you ran the Omni Confi guration utility. In our example, this was 10.0.0.21, as shown below.
Now tap the OK button to save the change. You will be returned to the utilities menu, where you tap the red “X” button at the top right corner of the
menu.
Page 45

The Programs Section
You should see all of the programs listed on your HT660 in the programs
section window. These are the programs that the Omni Server will talk to on
your HT660.
If you do not see a program listed, you can add it by clicking the Add button.
Navigate to the \GenStore\TgsData\ directory and select the program you
want to add.
Again, you must click the Save button to apply the change.
Start the Omni Communication Server
Now that the Omni Server has been confi gured, you can start it up by clicking its icon on your desktop. You must do this any time you wish to use you
HT660.
The Server will minimize to your systray.
Start Using the Unitech HT660
Now that you have your HT660 confi gured and communicating with the Omni
Communications Server, you are ready to begin using it. Move on to chapter
6 to learn how to use the many different Unitech HT660 programs.
Page 46

The Server will minimize to your systray.
Page 47

6
CHAPTER
Page 48

Chapter 6
Basic Inventory Functions
This chapter will cover the basic inventory functions supported by the HT660
and how they work, including:
• Purchase Orders
• Receiving
• Transfers
• Adjustments
• Bin Locations
• Physical Inventory
• Sales Orders
• Price Label Printing
• Inventory Restock Report
Overview
Each function includes four basic steps:
1. Selecting the appropriate inventory function on the HT660
2. Entering quantities into the HT660
3. Sending collected quantities from the HT660 up to the computer
4. Applying collected quantities to the appropriate inventory function in the
General Store
Page 49

Accessing the Inventory Programs Menu
If you have not already done so, select ITScriptNet Omni from the HT660’s
desktop
.
You will then see the ITScriptNet Omni main menu.
Select the “Collect Data…” option and you will see the “Select Program”
menu shown below.
Purchase Orders
Locate the Purchase Orders program from the Select Program menu. You
may have to scroll down by using either the cursor keys on the HT660 or
by using your stylus and the scroll bar. Once you have “Purchase Orders”
selected, click “OK”.
Page 50

Entering Your Employee Number and Password
The HT660 will attempt a connection with the Omni Server, to retrieve Store
name and Item Number Justifi cation data.
Purchase Orders
Now you can enter your employee number, followed by the ENT key on the
HT660. You will then be prompted for your password. Enter it followed by the
ENT key on the HT660.
If you do not have a password, you can simply press the ENT key on the
HT660. The system will then check to see if your entries are valid, and that
you have rights to changing inventory quantities. If your credentials check
out, you will be ready to scan barcodes and enter quantities.
Page 51

Collecting Purchase Order Data
You will now be prompted to enter an item number, which you can do by
scanning, or by manual entry. You can also enter a vendor order number or
a base matrix number here as well. Once you enter an item number, you will
see current on hand, bin location, cost and price information for the selected
item.
Now you can enter a quantity, followed by the ENT key on the HT660.
Entering a Vendor Order Number at the Item Number Prompt
Again, when prompted for the item number, you can enter a vendor’s order
number and the system will fi nd all items in your inventory that have the
order number you entered.
Page 52

Purchase Orders
Here, we entered the order number “1234” which resulted in two “hits” to
select from. You can use the cursor keys to navigate to the item you wish to
select and press the ENT key on the HT660, or you can use the stylus and
double-tap the item number you wish to select
Entering a Base Matrix Number at the Item Number Prompt
If you sell apparel items in your store and you utilize the General Store’s matrix feature, you can enter a base matrix number, or style number at the item
number prompt. You will see a matrix grid pop up on the HT660, from which
you can select the appropriate size/color.
Page 53

Reviewing Collected Purchase Order Data
You can review entries at any time by tapping the “Review” button with the
stylus.
Here, you can select lines for deletion, and you can send data. To return to
the item entry screen, tap the “Back” button with the stylus.
Page 54

Sending Collected P.O. Data to the PC
There are two ways to send collected purchase order data to from the HT660
to the PC:
1. Via the “Send Data” button on the Review screen.
2. Via the “Send Data” button on the ITScriptNet Menu.
Via The Review Screen
Purchase Orders
From the Review screen on the HT660, you can tap the Send button to
send the data (fi lename: HTPo.dat) to the PC. Once the send is successful, the collected data is deleted from the HT660, and you will be prompted
to retrieve updated data fi les which are optional. To exit the Purchase Order
program at this point, you would have to tap “Back” to return to the item entry
screen. There, you would have to tap the “Exit” button to exit the program.
Page 55

Via The ITScriptNet Omni Menu
First, you would have to exit the Purchase Order program on the HT660 by
tapping the “Exit” button on the item entry screen.
Scroll down to Purchase Orders. Notice the “*” symbol circled in red in the
above graphic. Whenever there is a data fi le resident on the HT660 for a
particular inventory program, you will see the “*” button displayed to the right
of the program name.
When you are ready to send the fi le, tap the “OK” button. The File will be
sent, and when sending fi les this way, you will be asked if you wish to delete
the resident data fi le. Tap the “Yes” button. You will then be returned to the
ITScriptNet Omni main menu.
Page 56

Applying the Collected P.O. Data
Okay. We have collected purchase order data on the HT660, and we have
sent it to the PC. Now we have to apply it in the General Store.
Follow the steps outlined in the graphic below.
Purchase Orders
1. From the General Store main menu, click Inventory>Purchase Orders.
2. Click the “plus” icon at the top of the screen to add a new purchase or-
der and select the vendor you will be creating the purchase order for.
3. Click “Do Not Compile”.
4. Click the folder icon at the top of the screen. Then select “Yes” to import-
ing the fi le into the current purchase order.
Page 57

5. Click the “Save” icon on the toolbar to save the purchase order.
6. If you wish to print a hardcopy of the purchase order, click the “print”
icon on the toolbar.
That’s it.
Page 58

Receiving
Collecting, Reviewing, and Sending the Data
These steps are the same as those followed under Purchase Orders.
Receiving
The only differences are that you will be selecting the Receiving program,
and the fi le created and sent is named HTRec.DAT.
Page 59

Applying the Collected Receiving Data
Follow these steps to apply the receiving data you collected on the HT660.
1. From the General Store main menu click Inventory>Receiving.
2. Click the File folder icon on the toolbar to apply the fi le.
3. Save the inventory receiving by clicking the “Save” icon on the toolbar.
4. A Receiving report will be printed and archived for you.
Page 60

Transfers
Collecting, Reviewing, and Sending the Data
These steps are the same as those followed under Purchase Orders.
Transfers
The only differences are that you will be selecting the Inventory Transfers
program, and the fi le created and sent is named HTXfers.DAT.
Page 61

Applying the Collected Transfer
Follow these steps to apply the Transfer data you collected on the HT660.
1. From the General Store main menu click Inventory>Transfer Items.
2. Select the store number you are sending the items to.
3. Click the File folder icon on the toolbar to apply the fi le. You will be
asked if you wish to verify each item, or just let them be applied automatically. Select “Yes” for verifi cation, or “No” for automatic application.
Page 62

4. Save the inventory transfer by clicking the “Save” icon on the toolbar.
5. A transfer report will automatically be printed and archived for you.
Adjustments
Collecting, Reviewing, and Sending the Data
These steps are the same as those followed under Purchase Orders.
Adjustments
The only differences are that you will be selecting the Adjustments program,
and the fi le created and sent is named HTAdj.DAT.
Page 63

Applying the Collected Adjustment
Follow these steps to apply the Adjustment data you collected on the HT660.
1. From the General Store main menu click Inventory>Maintenance>Adjust
ments.
2. Select the adjustment method, Replace or Adjust.
3. Click the File folder icon on the toolbar to apply the fi le. You will be
asked if you wish to verify each item, or just let them be applied automatically. Select “Yes” for verifi cation, or “No” for automatic application.
4. Complete the adjustment by clicking the “Exit” icon on the tool bar.
5. An adjustment report will automatically be printed and archived for you.
Page 64

Bin Locations
Collecting, Reviewing, and Sending the Data
These steps are the same as those followed under Purchase Orders.
Bin Locations
The only differences are that you will be selecting the Change Bin Locations
program, and the fi le created and sent is named HTBin.DAT.
Entering Bin Locations
You will also enter Bin Location data instead of quantities on the HT660.
These bin locations can be alphanumeric.
Page 65

Applying the Collected Adjustment Data in
the General Store
Follow these steps to apply the Bin Location Data data you collected on the
HT660.
1. From the General Store main menu click Tools>Unitech Bin Changes.
2. Select “Process” and the bin locations changes will be applied for you.
Page 66

Physical Inventory
The Physical Inventory process is different from simple inventory adjustments, in that anything not physically counted in the store gets zeroed out
automatically by the physical inventory utility.
Physical Inventory Options
The General Store allows you to use hand held devices like the Unitech
HT630 to take physical inventories of:
§ Your entire store
§ Only for a specifi c department, and specifi c categories and/or within
that departments
§ Only for a specifi c vendor
The General Store can actually determine which items you did not count using the
Unitech, and zero those item quantities. All of these adjustments are then printed on
the Inventory Adjustments report.
Preparing Your Store for Inventory
Physical Inventory
This may seem like a “no-brainer”, but when you are physically counting your
store, you do not want to miss anything. Therefore, you must fi rst properly
“prep” your store for the physical inventory. This means the following:
§ All items should be properly bar coded, unless they already have
UPC codes.
§ All items on the selling fl oor should be neatly organized, whether on
shelves or in storage bins.
§ Stock rooms should be neatly organized, and all cases should be
clearly marked with item numbers, and quantities.
Page 67

Collecting, Reviewing, and Sending the Data
These steps are the same as those followed under Purchase Orders.
The only differences are that you will be selecting the Physical Inventory
program, and the fi le created and sent is named HTPhys.DAT.
Page 68

Physical Inventory
Applying the Collected Physical Inventory Data in the
General Store
Applying the Physical Inventory data is a two step process:
• Step 1 - Set the Physical Inventory fi le
• Step 2 - Apply the Physical Inventory fi le.
Step 1 - Setting the Physical Inventory File
Follow these steps to set the physical inventory data data you collected on
the HT660.
1. From the General Store main menu click Tools>Unitech Physical.
2. You will see the following menu.
Click the radio button to the left of the “Physical Count w/Match” option.
Enter HTPhys.DAT as the fi lename, or you can navigate to it using the
browse button to the right of the “From” fi eld. Then click the Process
button.
Page 69

3. You will see the following screen:
a. If You Still Have More Items To Count….
If you still have more items to scan/count, answer “No” here,
and go back to counting inventory with your HT660. You can
repeat steps 1 through 3 for the next round of scanning/counting that you need to complete.
Each time you get to this step, step 3; select “Physical Count w/
Match”. The data will append to what you have already downloaded into The General Store.
Remember, if you want to count one section of your store at a
time, you can repeat steps 1 through 3 as many times as needed, before answering “Yes” to the “…LAST capture…” question.
b. If You Have Finished Counting…..
If you have fi nished physically counting all the items in your
store or department or vendor, and this is your last download,
answer, “Yes” to the “…LAST capture session…” question.
You will then see the following screen:
Here, you have several options:
i. If You Are Taking An Inventory for the Entire Store….
If this is a complete store inventory, simply click the
“Process” key. The system will then compare the actual
inventory fi le against what you have counted. The system then determines which items were not counted and
sets the quantity on those items to zero. This is refl ected
on the adjustments report that gets generated at the
end of the physical inventory process. When complete,
you will be returned to the General Store main menu
Page 70

Physical Inventory
ii. If You Are Taking An Inventory For a Particular Depart-
ment, Vendor, etc…
Department, Category, Sub-Category Inventory
If you are merely counting a department, then you must
select the department, category, and subcategory you
are counting, by using the drop downs for each. You can
select “All” for category or subcategory. Then click the
“Process” button.
The system will then compare the actual inventory fi le
against what you have counted. The system then determines which items in the selected department; category
and subcategory were not counted and sets the quantity
on those items to zero. This is refl ected on the adjustments report that gets generated in step 2, Applying the
Physical Inventory Data.
When complete, you will be returned to the General
Store main menu.
Note! Any items you counted that are not physically in
the department, category, and subcategory you selected
will be dropped. Any items dropped here will not be processed in step 2, Applying the Physical Inventory Data.
Vendor
If you are taking an inventory for a specifi c vendor only,
then you must fi rst enter the vendor number, either
manually, or by clicking the lookup binoculars button to
do a vendor search.
Once the vendor is entered, you must select whether
you want to match all items for which the selected vendor is the primary vendor only, or if you want to match
all items that the vendor is associated with, whether
they are the fi rst, second, third, fourth, or fi fth vendor
(see multiple vendors in the General Store help system
for more information).
After these selections are made, click the “Process” button. The system will then compare the actual inventory
fi le against what you have counted. The system then determines which items in for the selected were not counted and sets the quantity on those items to zero. This is
refl ected on the adjustments report that gets generated
in step 2, Applying the Physical Inventory Data.
When complete, you will be returned to the General
Store main menu.
Note! Any items you counted that do not match the
vendor criteria you selected will be dropped. Any items
dropped here will not be processed in step 2, Applying
the Physical Inventory Data.
Page 71

Step 2 – Apply the Physical Inventory fi le
Now that you have set the physical inventory data fi le, the last step is to apply/process it. Follow these steps to apply the fi le:
1. From the General Store main menu click In
ventory>Maintenance>Adjustments.
2. The adjustment method is forced to replace.
3. Click the File folder icon on the toolbar to apply the fi le. You will be
asked if you wish to verify each item, or just let them be applied automatically. Select “Yes” for verifi cation, or “No” for automatic application.
4. Complete the adjustment by clicking the “Exit” icon on the tool bar.
5. An adjustment report will automatically be printed and archived for you.
That’s it!
Page 72

Sales Orders
Collecting, Reviewing, and Sending the Data
These steps are the same as those followed under Purchase Orders.
Sales Orders
The only differences are that you will be selecting the Sales Orders 01 or 02
programs, and the fi les created and sent are named Orer01.IMP or Order02.
IMP.
Page 73

Processing the Sales Order Files at POS
Now access the point of sale function in the General Store. From the main
point of sale screen, select F4 Order, then select the Import Option.
If you have multiple order import fi les, you will be prompted to select from a
list as shown below.
Click the fi le you wish to import and click “Import”. After entering you salesperson number and any customer information you wish to enter, the items in
the import fi le you selected will be imported into the sale screen.
Page 74

Price Labels
Now, you can add more items and customer information before completing
the transaction.
Price Labels
Printing Labels
You can print 2” price labels with the Zebra QL220 Plus printer. Separate
setup instructions are provided with the printer at tie of purchase.
From the ITScriptNet menu, select Collect Data.
Page 75

Then select the 2” Labels option.
Enter your employee number and press the enter button on the handheld.
Now select the com port you set when syncing the QL220Plus to your handheld, and select Next.
Page 76

Price Labels
Now scan the product barcode, or manually enter the item number, order
number, or alternate lookup number for the product you wish to print labels
for.
Enter the number of labels you wish to print and hit the enter key on the
handheld.
Your labels will then print on the QL220Plus.
In this example, we entered 2 labels.
Page 77

Restock
You may want to use the HT600 to create a pick list of items that need restocking on your store shelves. This is where the Restock option comes into
play.
A separate install cd for the Inventory Pull Report. is supplied with the unit.
Collecting, Reviewing, and Sending the Data
These steps are the same as those followed under Purchase Orders.
In this example, we wil enter two items, one with onhand quantities and one
that is out of stock.
Page 78

Restock
Now we will review and send the data, which will place the fi le HtRstk.csv in
our data directory (typically c:\GenStore\TgsData).
Processing the report.
From The General Store main menu, select Inventory Pull.
Page 79

You will immediately be asked if you wish to rename the data fi le.
Do not answer this prompt untl after you have reviewed the report below.
The report is split between those items that are in stock and thos items that
need to be reordered.
After reviewing the report, make sure to answer Yes to the rename prompt.
Page 80

Restock
Page 81

7
CHAPTER
Page 82

Chapter 7
Price Changes
Entering Price Change Data into the HT660
Select the Price Change Program on the HT660
First, select the price change program on the HT660, following the same
steps outlined in chapter 5, Purchase Orders.
The fi le created and sent is named HTPchg.DAT.
Page 83

Entering Price Change Data
Once your employee information is entered, you will be prompted to enter
an item number, which you can do by scanning, or by manual entry. You can
also enter a vendor order number, alternate lookup number, or a base matrix
number here as well. Once you enter an item number, you will see current on
hand, bin location, cost and standard retail price information for the selected
item.
Notice that the “Change Price” button is highlighted. You can simply press
the ENT button on the HT660 keypad to move to the next screen.
Here you can see all current pricing, and you can select which price level you
wish to change. In this example, we will change price level B to 3 for $8.99.
On the HT660, cursor down to the A-Level Price and press the ENT key on
the HT660 keypad.
Page 84

Entering Price Change Data into the HT660
You will see the following screen where you can set the units (3) and the “for
Price” ($8.99) by typing:
• “3” ENT
• then “8.99” ENT
• then ENT on the HT660 keypad.
Once the price is entered, the “Change Price” button is highlighted. Simply
press the ENT button on the HT660 keypad, you will be returned to the item
number entry screen.
Page 85

Entering a Vendor Order Number at the Item Number Prompt
Again, when prompted for the item number, you can enter a vendor’s order
number and the system will fi nd all items in your inventory that have the
order number you entered.
Here, we entered the order number “1234” which resulted in two “hits” to
select from. You can use the cursor keys to navigate to the item you wish to
select and press the ENT key on the HT660, or you can use the stylus and
double-tap the item number you wish to select.
Page 86

Entering Price Change Data into the HT660
Matrix Items
Entering a Base Matrix Number at the
Item Number Prompt
If you sell apparel items in your store and you utilize the General Store’s matrix feature, you can enter either an individual size/color barcode, or the base
matrix number/style number at the item number prompt. If you enter the base
matrix number, you will see a matrix grid pop up on the HT660, from which
you can select the appropriate size/color.
Entering Price Changes for Matrix Items
Once you select a matrix item, and set the price you wish to change, the
HT660 will ask you if you wish to apply the change to all sizes. Answer Yes,
and the price you enter will be applied to all sizes. Answer No and the price
change will only be applied to the size and color you selected.
After selecting Yes or No, press the ENT key on the HT660 keypad, and the
“Change Price” button will be highlighted. Press the ENT key again to process the price change.
Page 87

On-Sale Pricing
You can also set on-sale pricing with begin and end dates on the HT660.
Here we will set the item on sale at a price of one for $7.96, with sale dates
straining on 2/16/2009 and ending after 12:00pm on 2/21/2009. Here are the
key strokes on the HT660 keypad.
1. 1 ENT
2. 7.96 ENT
3. 021609 ENT
4. 022109 ENT
5. ENT (to apply sale pricing to all sizes)
Page 88

Reviewing and Sending Price Change Data
The “Change Price” button would then be highlighted and we would simply
press the ENT button again to process the sale pricing.
Reviewing and Sending Price Change Data
The steps for reviewing and sending price change data from the HT660 are
the same as those followed under Purchase Orders, which is discussed in
Chapter 5.
Applying the Collected Price Change Data in
the General Store
From the General store main menu, click Tools>Unitech Price Changes.
Select your options for Printing and Price/Shelf labels and click Apply Changes. The price changes collected on the HT660 will be applied and an archive
will automatically be created for you.
Page 89

If you selected price labels, go to Inventory>Labels. Select you label size and
click the “Print Spooled Labels” button.
Page 90

 Loading...