

Page 1
P/N:110401109253X
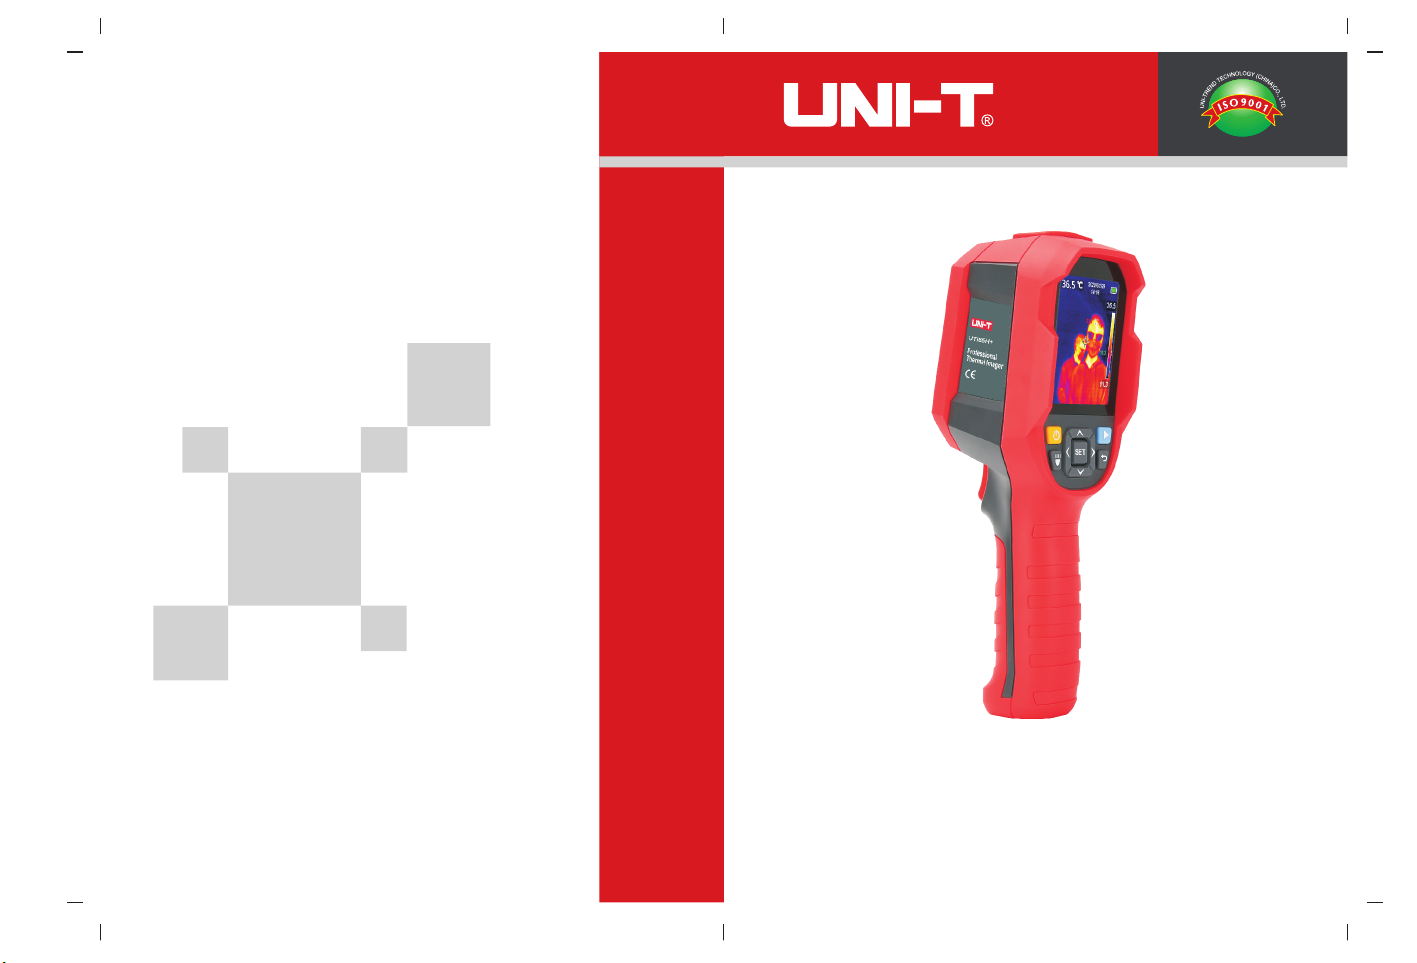
UTi85H+
Professional Thermal Imager
User Manual
Page 2

UTi85H+ User Manual
Preface
Thank you for purchasing this brand new product. In order to use this product
safely and correctly, please read this manual thoroughly, especially the safety
notes.
After reading this manual, it is recommended to keep the manual at an easily
accessible place, preferably close to the device, for future reference.
Limited Warranty and Liability
Uni-Trend guarantees that the product is free from any defect in material and
workmanship within one year from the purchase date. This warranty does not
apply to damage caused by accident, negligence, misuse, modification,
contamination or improper handling. The dealer shall not be entitled to give any
other warranty on behalf of Uni-Trend. If you need warranty service within the
warranty period, please contact your seller directly.
Uni-Trend will not be responsible for any special, indirect, incidental or subsequent
damage or loss caused by using this device.
Page 3

Table of Contents
1. Safety Instructions ---------------------------------------------------------- 4
2. Structure -----------------------------------------------------------------------5
3. Display ------------------------------------------------------------------------- 6
4. Power On/Off ---------------------------------------------------------------- 6
5. Menu Introduction ---------------------------------------------------------- 7
6. Operating Instructions ----------------------------------------------------- 8
7. USB Communication ----------------------------------------------------- 16
8. Specifications -------------------------------------------------------------- 17
9. Maintenance --------------------------------------------------------------- 19
10.Common Emissivity ------------------------------------------------------ 19
UTi85H+ User ManualUTi85H+ User Manual
1. Safety Instructions
To ensure proper use of this product, please read the instructions carefully
before using.
The optimal measuring distance for this product is 1 meter.
To ensure measurement accuracy, please use the product in an operating
environment of 15°C~30°C, <85% RH (non-condensing).
Please use the product indoors without wind.
When changing to a new environment, please turn on the product and leave
it for 10 to 15 minutes before measuring.
The ambient temperature for measuring must be stable. Do not measure in
places with large airflow such as fans and air outlets.
When the measured object comes from a place with a large temperature
difference from the measurement environment, keep it in the measurement
environment for 10 to 30 minutes before measuring.
The product tests the surface temperature of the object. If temperature
compensation is needed, please adjust in the Settings menu.
The product has a self-calibration function. If the reading jumps quickly, please
read the temperature after it gets steady.
After measuring extremely high or low temperature objects, please leave the
product for 10 minutes before next use.
Do not use the product in places with strong sunlight or electromagnetic
interference.
Please do not use this product in flammable, explosive, steamy, wet or corrosive
environments.
Please stop using the product if it is damaged or modified to avoid inaccurate
measurement results.
Please use the correct emissivity to obtain accurate temperature readouts.
To ensure accuracy of the product, please warm it up for 10 minutes before
measuring if it has not been used for a long time.
When being charged, the internal temperature of the product rises, which will
lead to inaccurate temperature measurement. So, it is not recommended
to take measurements during or right after charging the product.
The inherent temperature drift of the sensor will occasionally cause inaccurate
measurement. In this case, press the down button under the temperature
measurement interface to bring out “Calibrating” and automatically calibrate
the temperature.
Page 4
UTi85H+ User ManualUTi85H+ User Manual
2. Structure
Description
Item Item
Micro SD card slot
Type-C USB interface
Interface cover
LED light
Infrared camera lens cover
Trigger
Infrared camera lens
LCD
Power button
Description
Tripod mounting hole
Flashlight button
Left button
Down button
Right button
Back button
Replay button
Up button
SET button
3. Display
Display size: 2.8”
Display resolution: 320 (vertical) x 240 (horizontal) pixels
Description
Item Item
Temperature unit option
Cursor option
Color palette option
High/Low temperature alarm option
Settings option
Temperature bar lower value
Temperature bar upper value
Description
Maximum temperature point
Center point
Center point temperature
Maximum temperature
Date & time
Battery status
4. Power On/Off
Press the power button for 3s to power on, and press the power button for 1s
to power off.
Page 5
UTi85H+ User ManualUTi85H+ User Manual
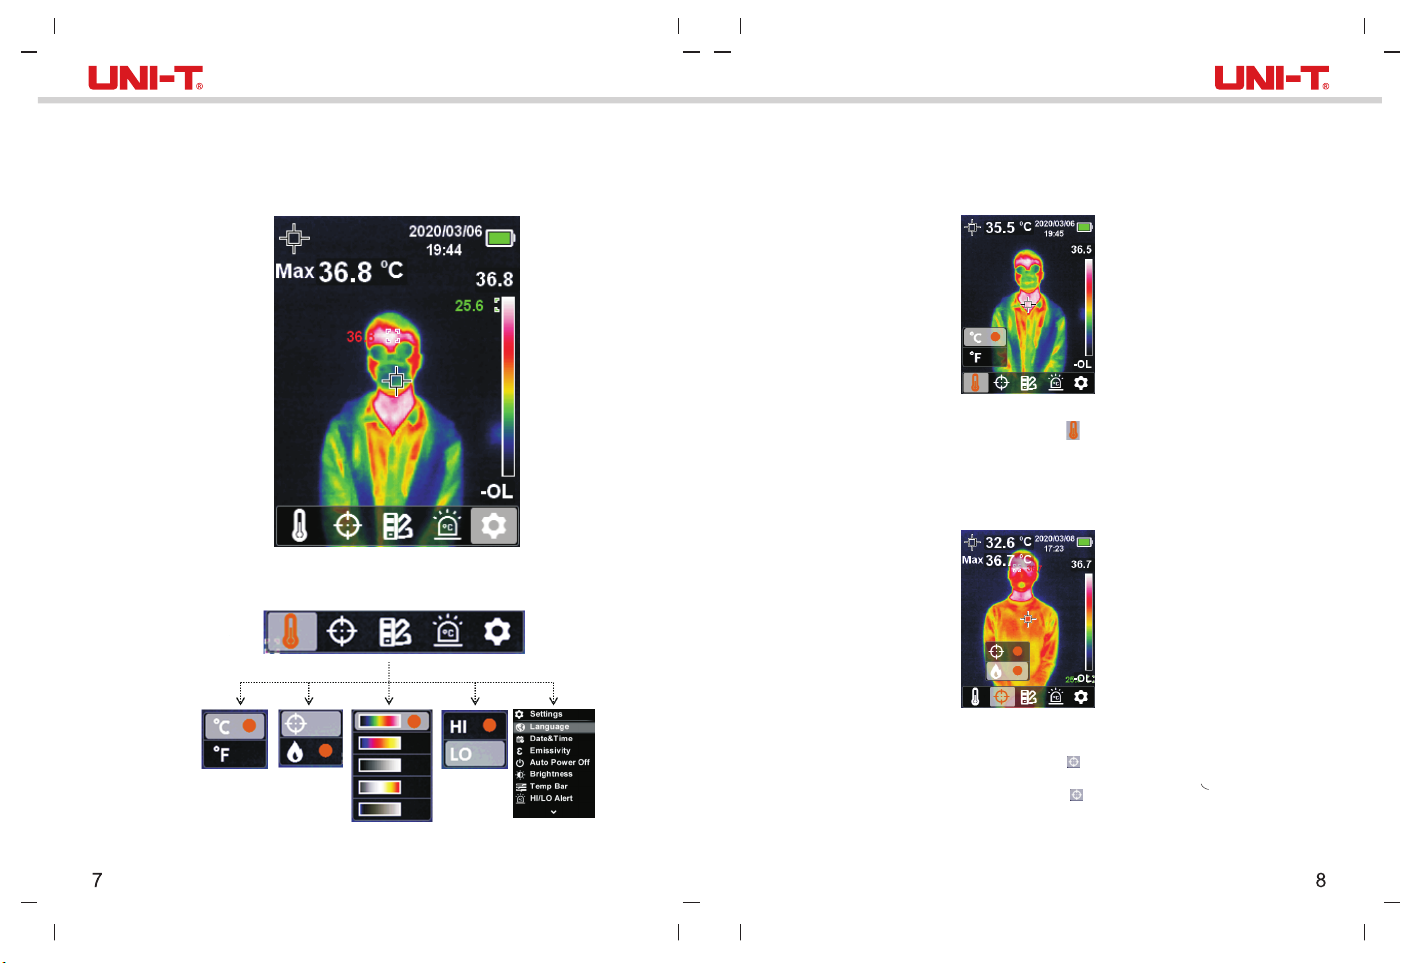
5. Menu Introduction
Thermal imaging page
Main menu
Submenu
Temperature
unit option
Cursor option
Color palette option
High/Low
temperature
alarm option
Settings option
6.Operating Instructions
6.1 Temperature Unit Selection
1. Press the SET button to open the main menu.
2. Press the left/right button to select the option.
3. Press the SET button to enter the temperature unit submenu.
4. Press the up/down button to select °C or °F.
5. Press the back button to exit the current menu.
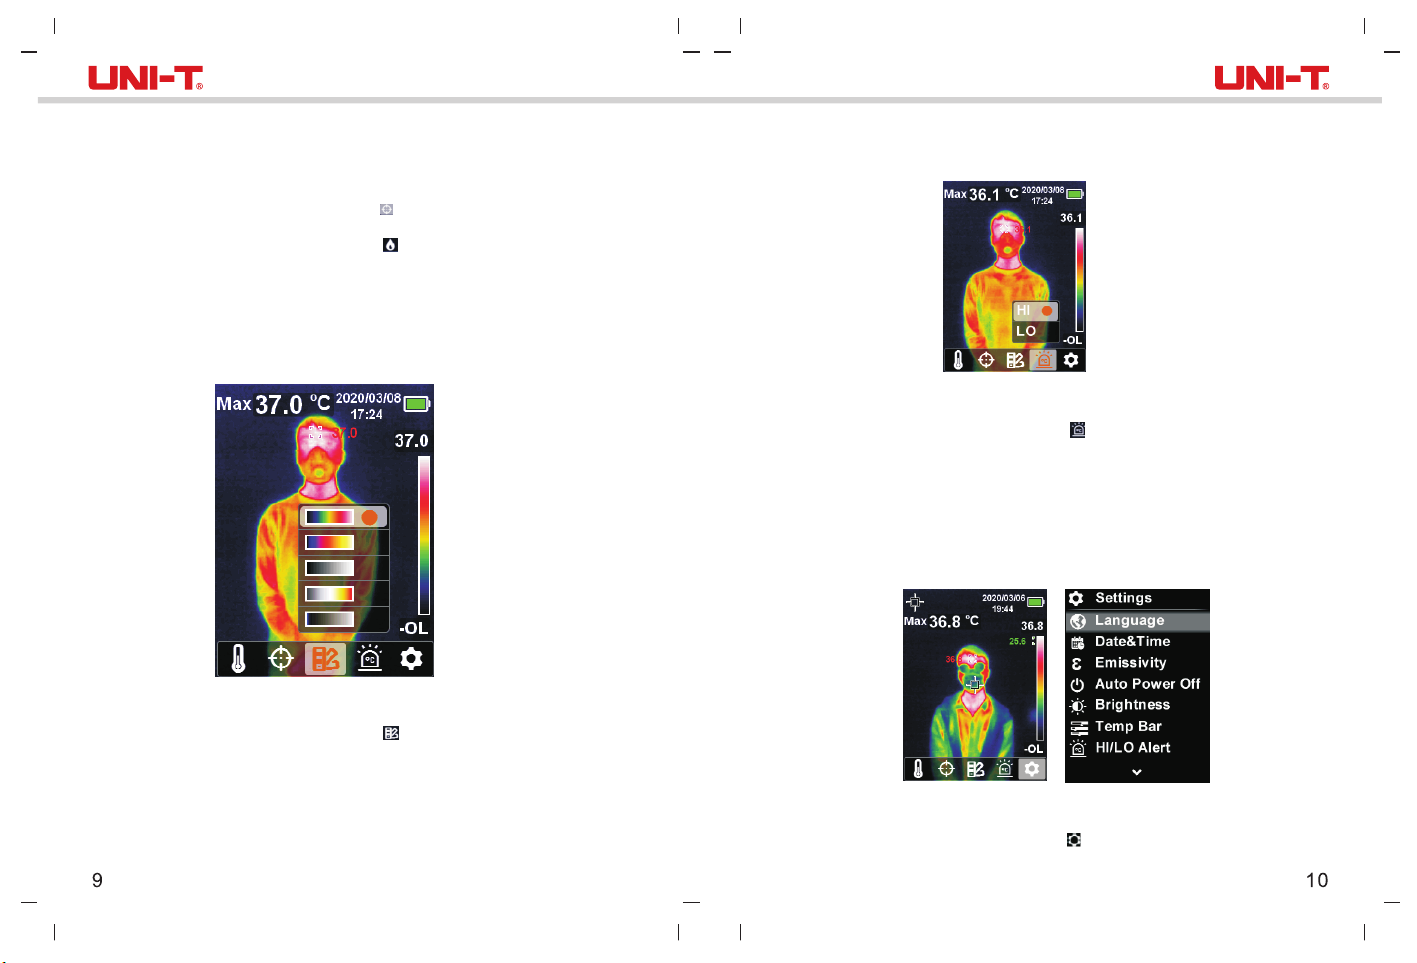
6.2 Center Point and High Temperature Tracking
To track center point temperature:
1. Press the SET button to open the main menu.
2. Press the left/right button to select the option.
3. Press the SET button to enter the cursor submenu.
4. Press the up/down button to select the option.
5. Press the SET button to confirm.
6. The center point marker is turned on (the center point temperature is displayed
in the upper left corner).
7. Press the back button to exit the current menu.
Page 6
UTi85H+ User ManualUTi85H+ User Manual
To track high temperature:
1. Press the SET button to open the main menu.
2. Press the left/right button to select the option.
3. Press the SET button to enter the cursor submenu.
4. Press the up/down button to select the option.
5. Press the SET button to confirm.
6. The high temperature indicator is turned on and the corresponding temperature
is displayed in the upper left corner.
7. Press the back button to exit the current menu.
6.3 Color Palette Selection
1. Press the SET button to open the main menu.
2. Press the left/right button to select the option.
3. Press the SET button to enter the color palette submenu.
4. Press the up/down button to select the desired color from Iron Red, Rainbow,
White Hot, Red Hot, and Ice Blue.
5. Press the back button to exit the current menu.
6.4 High/Low Temperature Alarm
To enable high/low temperature alarm:
1. Press the SET button to open the main menu.
2. Press the left/right button to select the option.
3. Press the SET button to enter the high/low temperature alarm submenu.
4. Press the up/down button to select HI (High) or LO (Low).
5. Press the SET button to confirm.
6. Press the back button to exit the current menu.
Note: High temperature alarm and low temperature alarm can be enabled
simultaneously or separately.
6.5 Settings
To enter Settings menu:
1. Press the SET button to open the main menu.
2. Press the left/right button to select the option.
3. Press the SET button to confirm.
Page 7
UTi85H+ User ManualUTi85H+ User Manual
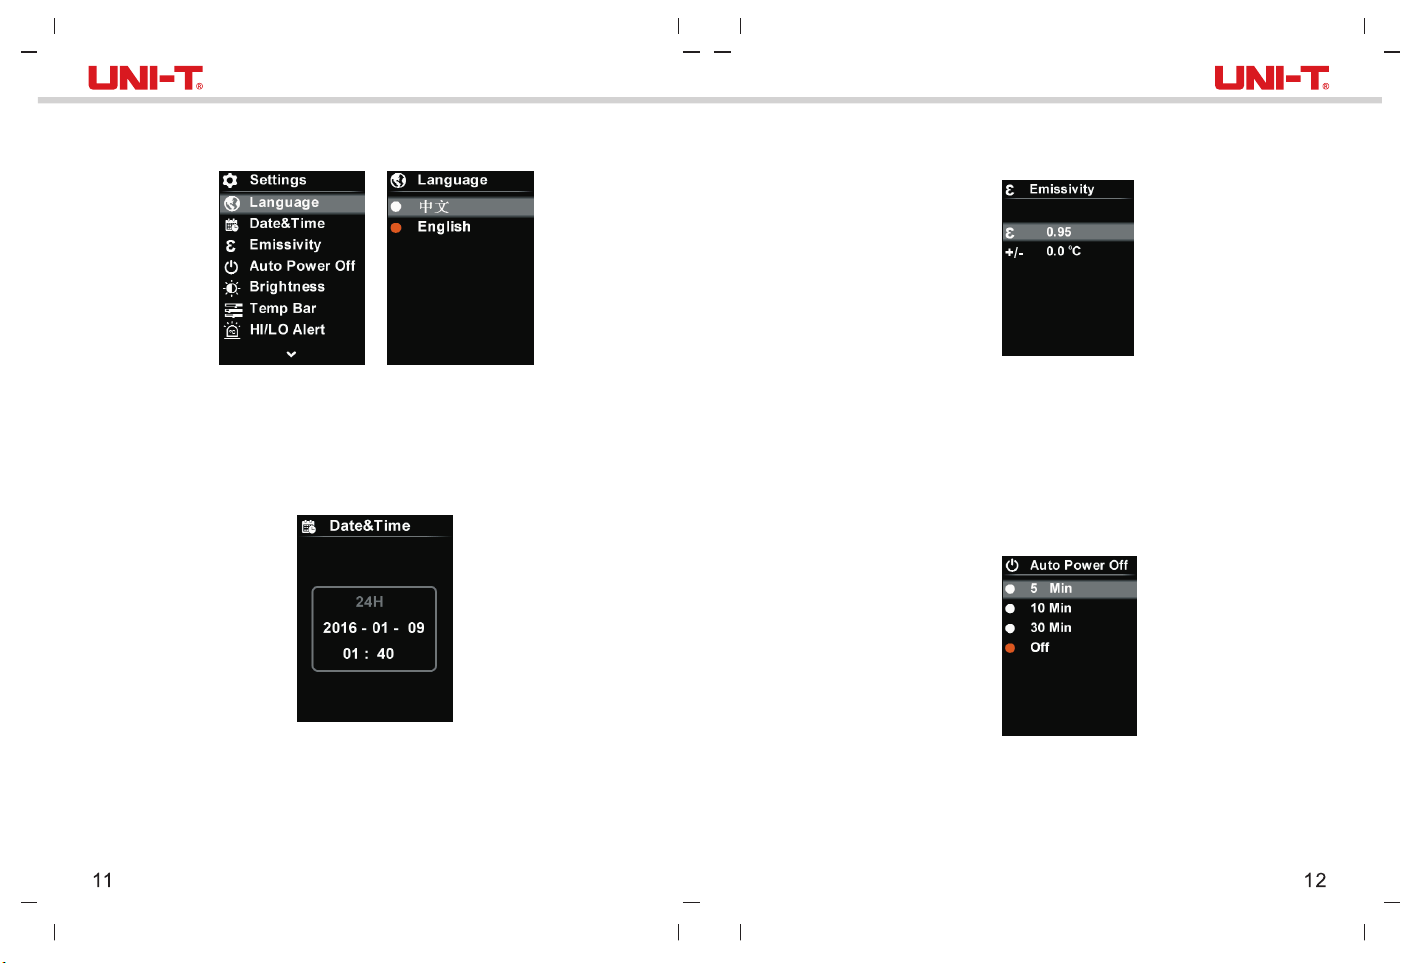
6.5.1 Language
To set language:
1. Press the up/down button to select the Language option in the Settings menu.
2. Press the SET button to enter the Language submenu.
3. Press the up/down button to select the desired language from Chinese and
English.
4. Press the SET button to confirm.
5. Press the back button to exit the current menu.
6.5.2 Date & Time
6.5.3 Emissivity/Temperature Compensation
To set emissivity/temperature compensation:
1. Press the up/down button to select the Emissivity option in the Settings menu.
2. Press the SET button to enter the Emissivity submenu.
3. Press the up/down button to select emissivity or temperature compensation.
4. Press the SET button to enter the parameter adjustment state.
5. Press the up/down button to increase or decrease the value.
6. Press the SET button to save the settings.
7. Press the back button to exit the current menu.
Note: For emissivity values of common materials, please refer to the Common
Emissivity.
6.5.4 Auto Power Off
To set date & time:
1. Press the up/down button to select the Date & Time option in the settings menu.
2. Press the SET button to enter the Date & Time submenu.
3. Press the left/right button to select the parameter to be adjusted.
4. Press the SET button to enter the parameter adjustment state.
5. Press the up/down button to increase or decrease the value.
6. Press the SET button to save the settings and return to set other parameters.
7. Press the back button to exit the current menu.
To set auto power off:
1. Press the up/down button to select the Auto Power Off option in the settings
menu.
2. Press the SET button to enter the Auto Power Off submenu.
3. Press the up/down button to select the desired option from 5 Min, 10 Min,
30 Min, and Off.
4. Press the SET button to confirm.
5. Press the back button to exit the current menu.
Page 8
UTi85H+ User ManualUTi85H+ User Manual
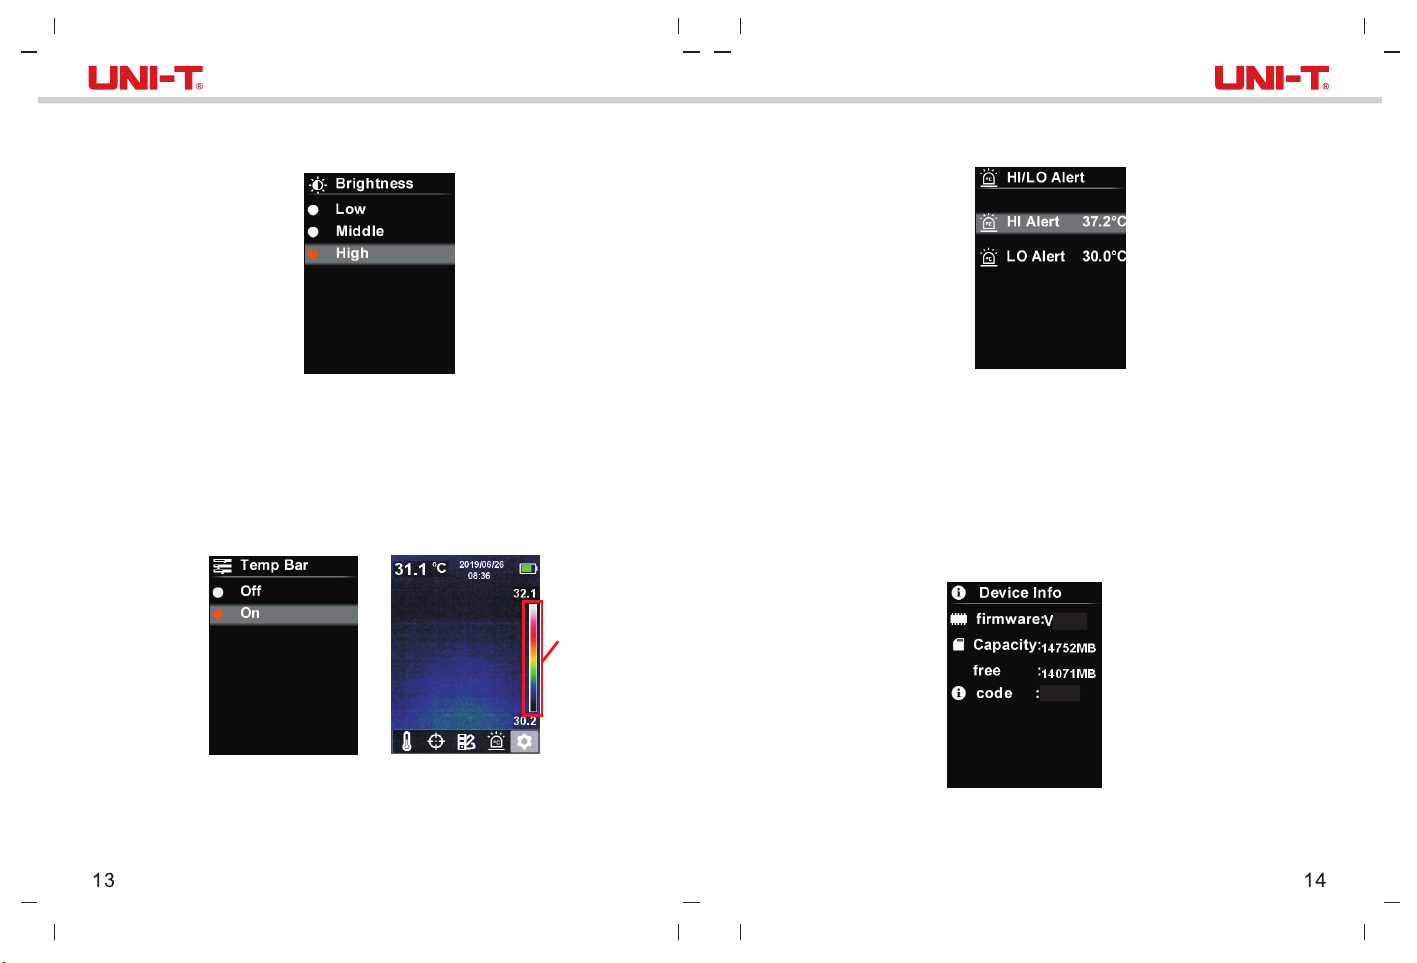
6.5.5 Display Brightness
To set display brightness:
1. Press the up/down button to select the Brightness option in the settings menu.
2. Press the SET button to enter the Brightness submenu.
3. Press the up/down button to select the desired option from Low, Middle,
and High.
4. Press the SET button to confirm.
5. Press the back button to exit the current menu.
6.5.6 Temperature Bar
Temperature bar
6.5.7 Alarm Temperatures
To set alarm temperatures:
1. Press the up/down button to select the HI/LO Alert option in the settings menu.
2. Press the SET button to enter the HI/LO Alert submenu.
3. Press the up/down button to select the desired option from HI Alert and LO Alert.
4. Press the SET button to enter the temperature adjustment state.
5. Press the up/down button to adjust the temperature.
6. Press the SET button to save the settings and return to set another temperature.
7. Press the back button to exit the current menu.
6.5.8 Device Information
0.1
UTi85H+
To turn on/off temperature bar:
1. Press the up/down button to select the Temp Bar option in the settings menu.
2. Press the SET button to enter the Temp Bar submenu.
3. Press the up/down button to select On or Off.
4. Press the SET button to confirm.
5. Press the back button to exit the current menu.
To view the device information:
1. Press the up/down button to select the Device Info option in the settings menu.
2. Press the SET button to view the detail information of the device.
3. Press the back button to exit the current menu.
Page 9
UTi85H+ User ManualUTi85H+ User Manual
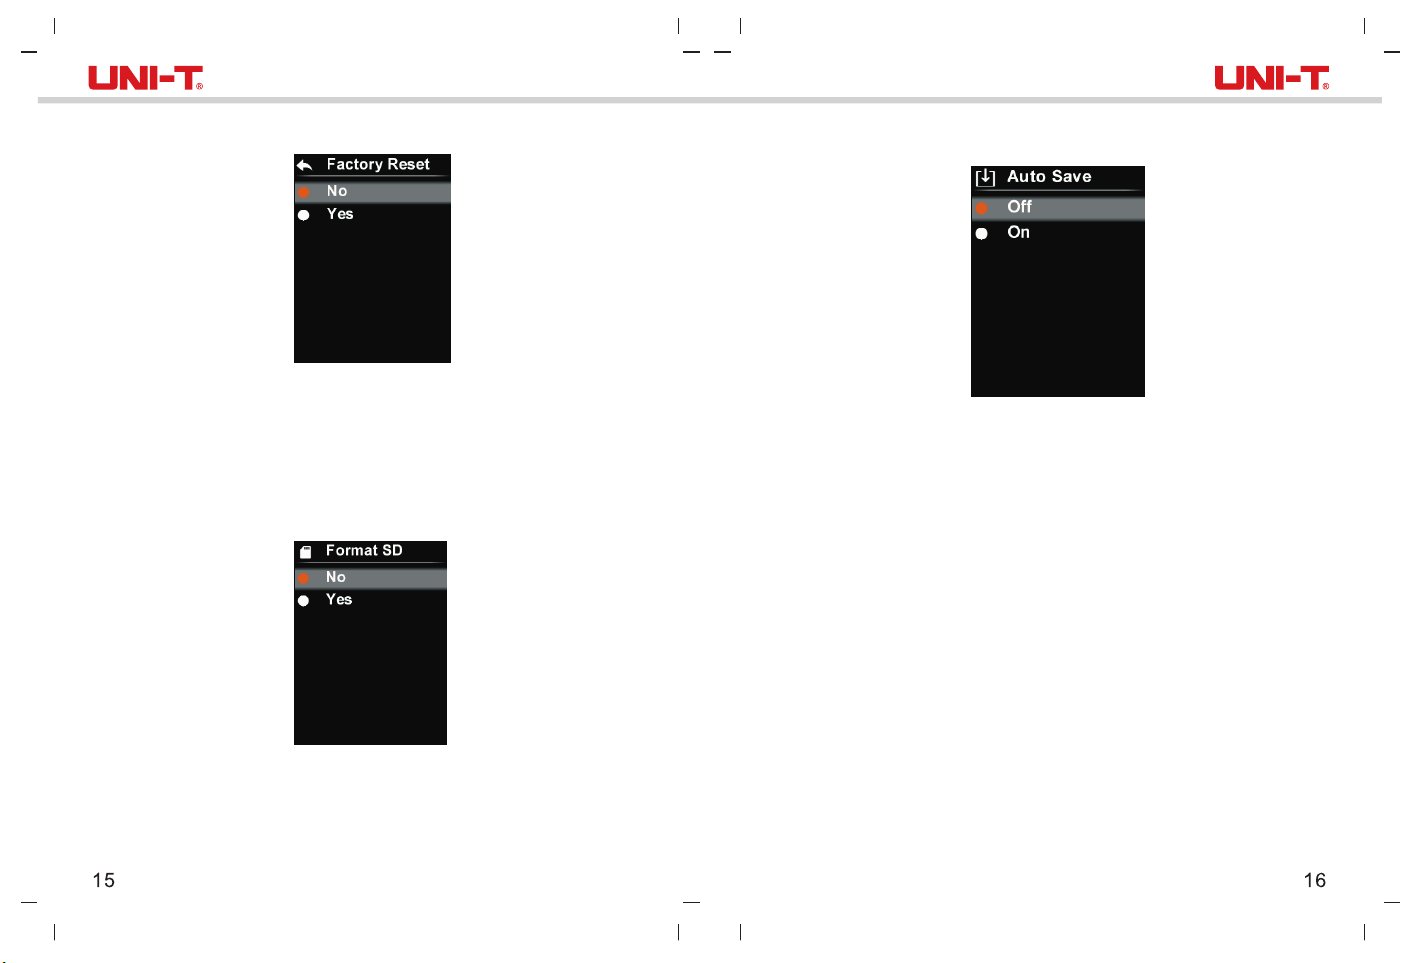
6.5.9 Factory Reset
To restore settings:
1. Press the up/down button to select the Factory Reset option in the settings
menu.
2. Press the SET button to enter the Factory Reset submenu.
3. Press the up/down button to select Yes.
4. Press the SET button to confirm.
5. Press the back button to exit the current menu.
6.5.10 Format SD Card
To format SD card:
1. Press the up/down button to select the Format SD option in the settings menu.
2. Press the SET button to enter the Format SD submenu.
3. Press the up/down button to select Yes.
4. Press the SET button to confirm.
5. Press the back button to exit the current menu.
6.5.11 Auto Save
To turn on/off auto save:
1. Press the up/down button to select the Auto Save option in the settings menu.
2. Press the SET button to enter the Auto Save submenu.
3. Press the up/down button to select On or Off.
4. Press the SET button to confirm.
5. Press the back button to exit the current menu.
Note: Do not remove or insert the SD card in saving or viewing pictures. If the
SD card is replaced during use, restart the device after the replacement to take
and save pictures.
7.USB Communication
1. Download and install the PC software (refer to UNI-T Documents Download
Operation Guide).
2. Connect the USB cable to the PC.
3. Users can browse pictures and analyze data through the PC software.
Regarding its usage, retrieve the Software User Manual from the Help
option of the operation interface.
Note: Do not unplug the USB cable while the software is loading pictures.
Page 10
UTi85H+ User ManualUTi85H+ User Manual
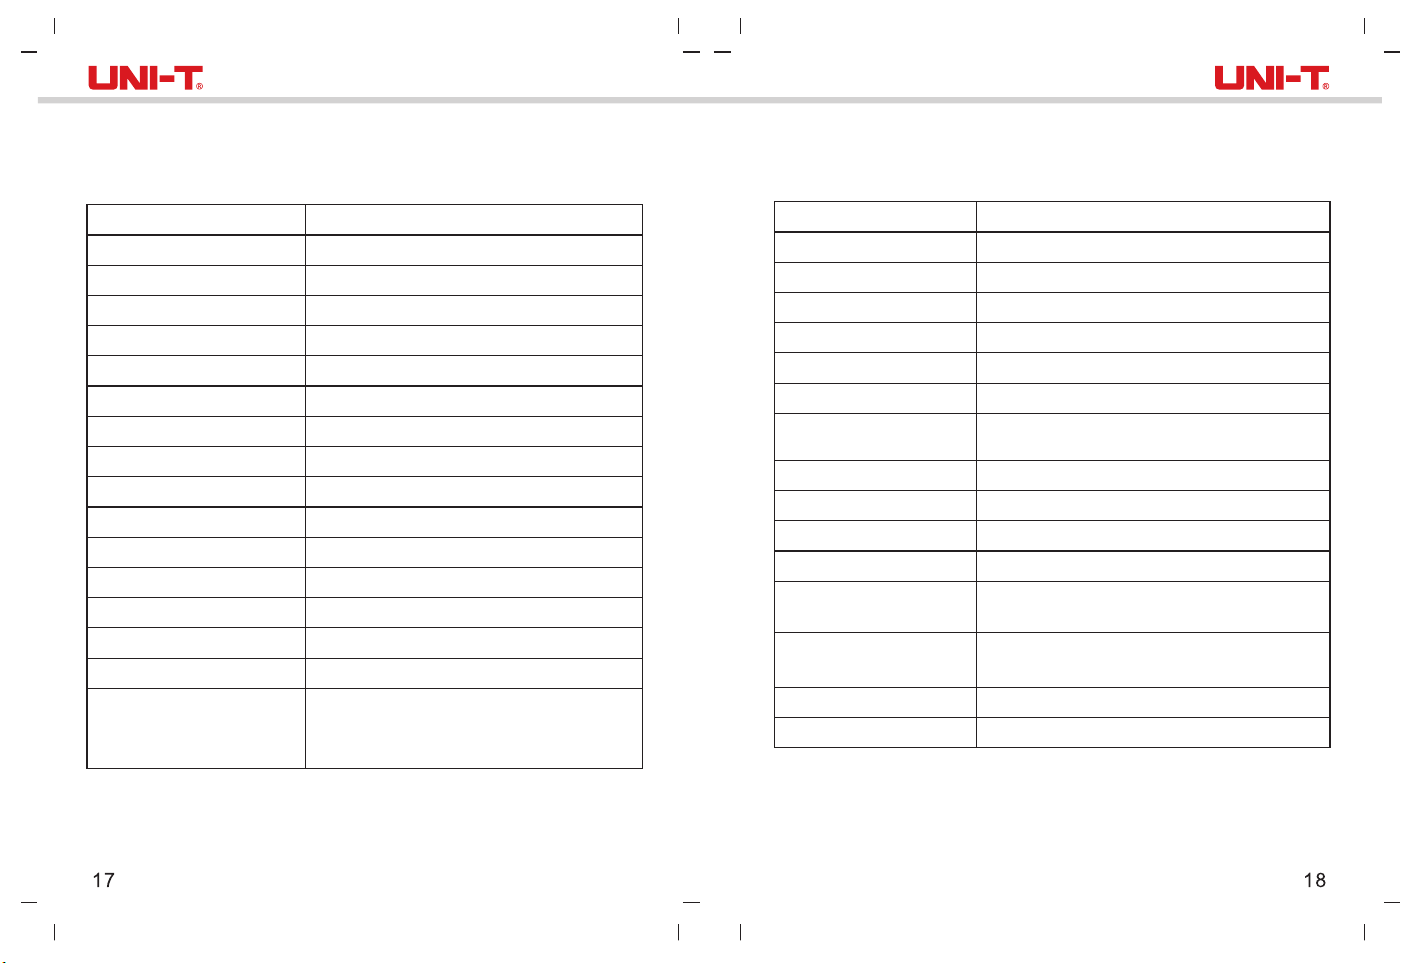
8. Specifications
Sensor
Temperature range
Measurement resolution
Accuracy
Optimal measuring distance
Minimum measuring distance
Response time
IR resolution
Pixel size
Color palette
Infrared spectral band
Field of view (FOV)
Spatial resolution (IFOV)
Thermal sensitivity (NETD)
Frame rate
Image format
Certifications
UFPA
30°C~45°C
0.1°C
±0.5°C (at 25°C ambient temperature)
1 meter
15cm
≤500ms
4800 pixels (80 × 60)
17μm
Iron Red, Rainbow, White Hot, Red Hot, Ice Blue
8μm~14μm
51° (H) × 38° (V)
11mrad
≤150mK
≤9Hz
BMP
-CE
(EN 61326-1:2013, EN 61326-2-2:2013,
EN 61326-2-3)
-RoHS
General parameters
Audio alarm Yes
PC software
Data transmission
Product size (L x W x H)
Display type
Display resolution
Battery
Auto power off
Battery life
Charging time
Charging voltage/current
Image storage
Transportation/storage
environment
Operating environment
Operating altitude
Standard accessories
3.6V/5000mAh rechargeable Li-ion battery
User manual, USB cable, 16GB Micro SD card
Type-C USB interface
236mm x 75.5mm x 86mm
2.8” TFT LCD
320 × 240 pixels
5 minutes, 10 minutes, 30 minutes,
off (default: 30 minutes)
≥6 hours
Micro SD card
-20°C~60°C (-4°F~140°F),
<85% RH (non-condensing)
15°C~30°C (59°F~86°F),
<85% RH (non-condensing)
≤2000m
Yes
4 hours
5V/2A
Page 11
9. Maintenance
Use a wet cloth or weak soap solution to clean the outer shell of the device.
Do not use abrasives, isopropyl alcohol or solvents to clean the outer shell,
lens or window.
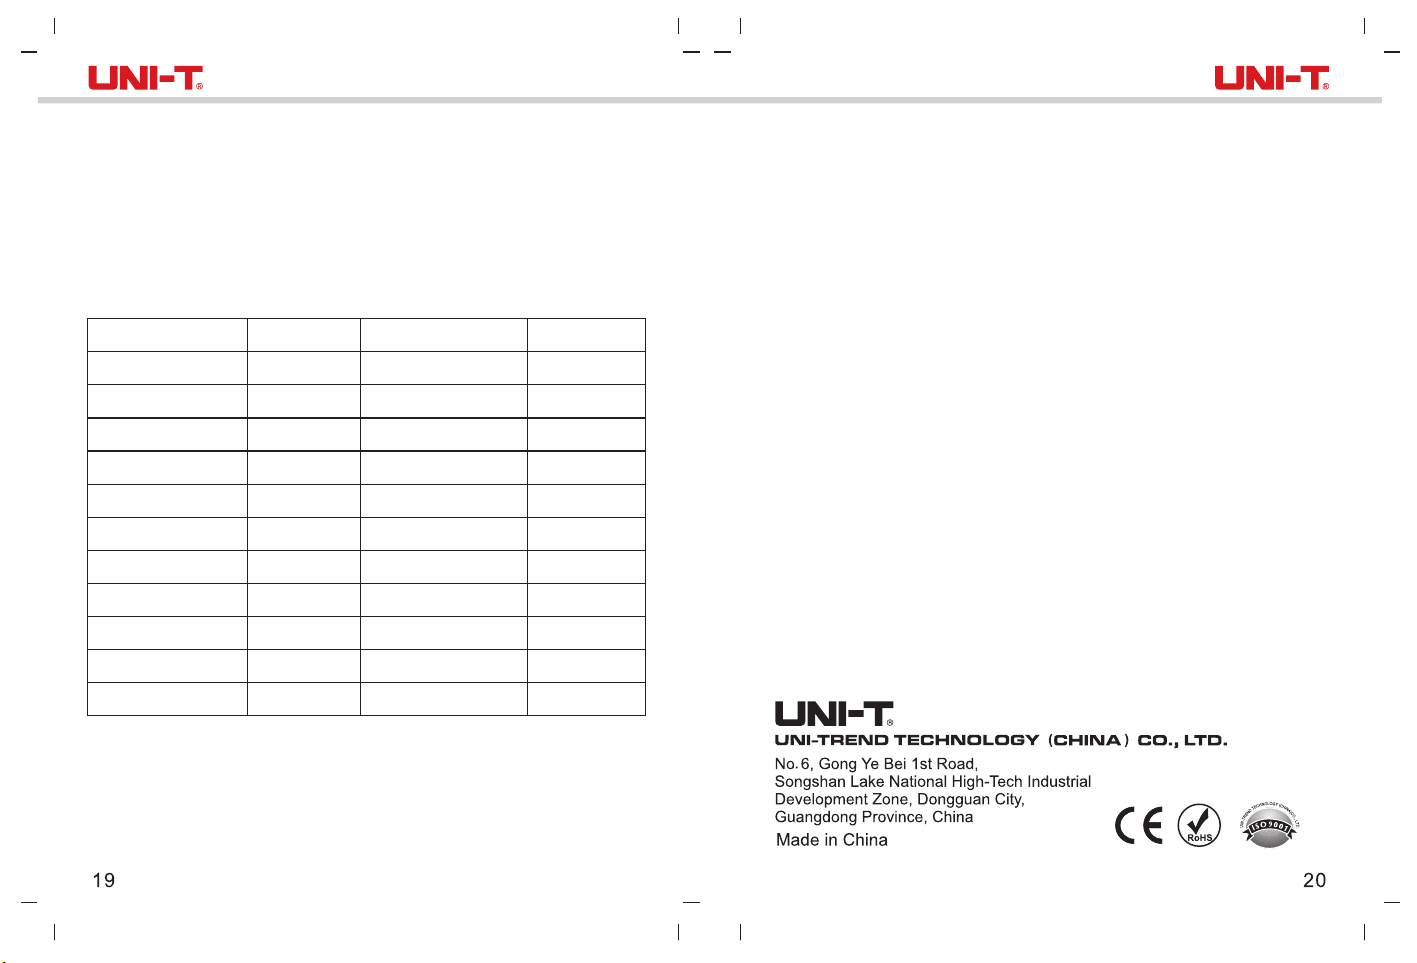
10. Common Emissivity
UTi85H+ User ManualUTi85H+ User Manual
Material
Wood
Water
Brick
Stainless steel
Tape
Aluminum plate
Copper plate
Black aluminum
Human skin
Asphalt
PVC
EmissivityEmissivity Emissivity
0.85
0.96
0.75
0.14
0.96
0.09
0.06
0.95
0.98
0.96
0.93
Material
Black paper
Polycarbonate
Concrete
Copper oxide
Cast iron
Rust
Gypsum
Paint
Rubber
Soil
0.86
0.8
0.97
0.78
0.81
0.8
0.75
0.9
0.95
0.93
Note: This manual can be downloaded from the official website of
Uni-Trend (refer to UNI-T Documents Download Operation Guide).
 Loading...