

Page 1
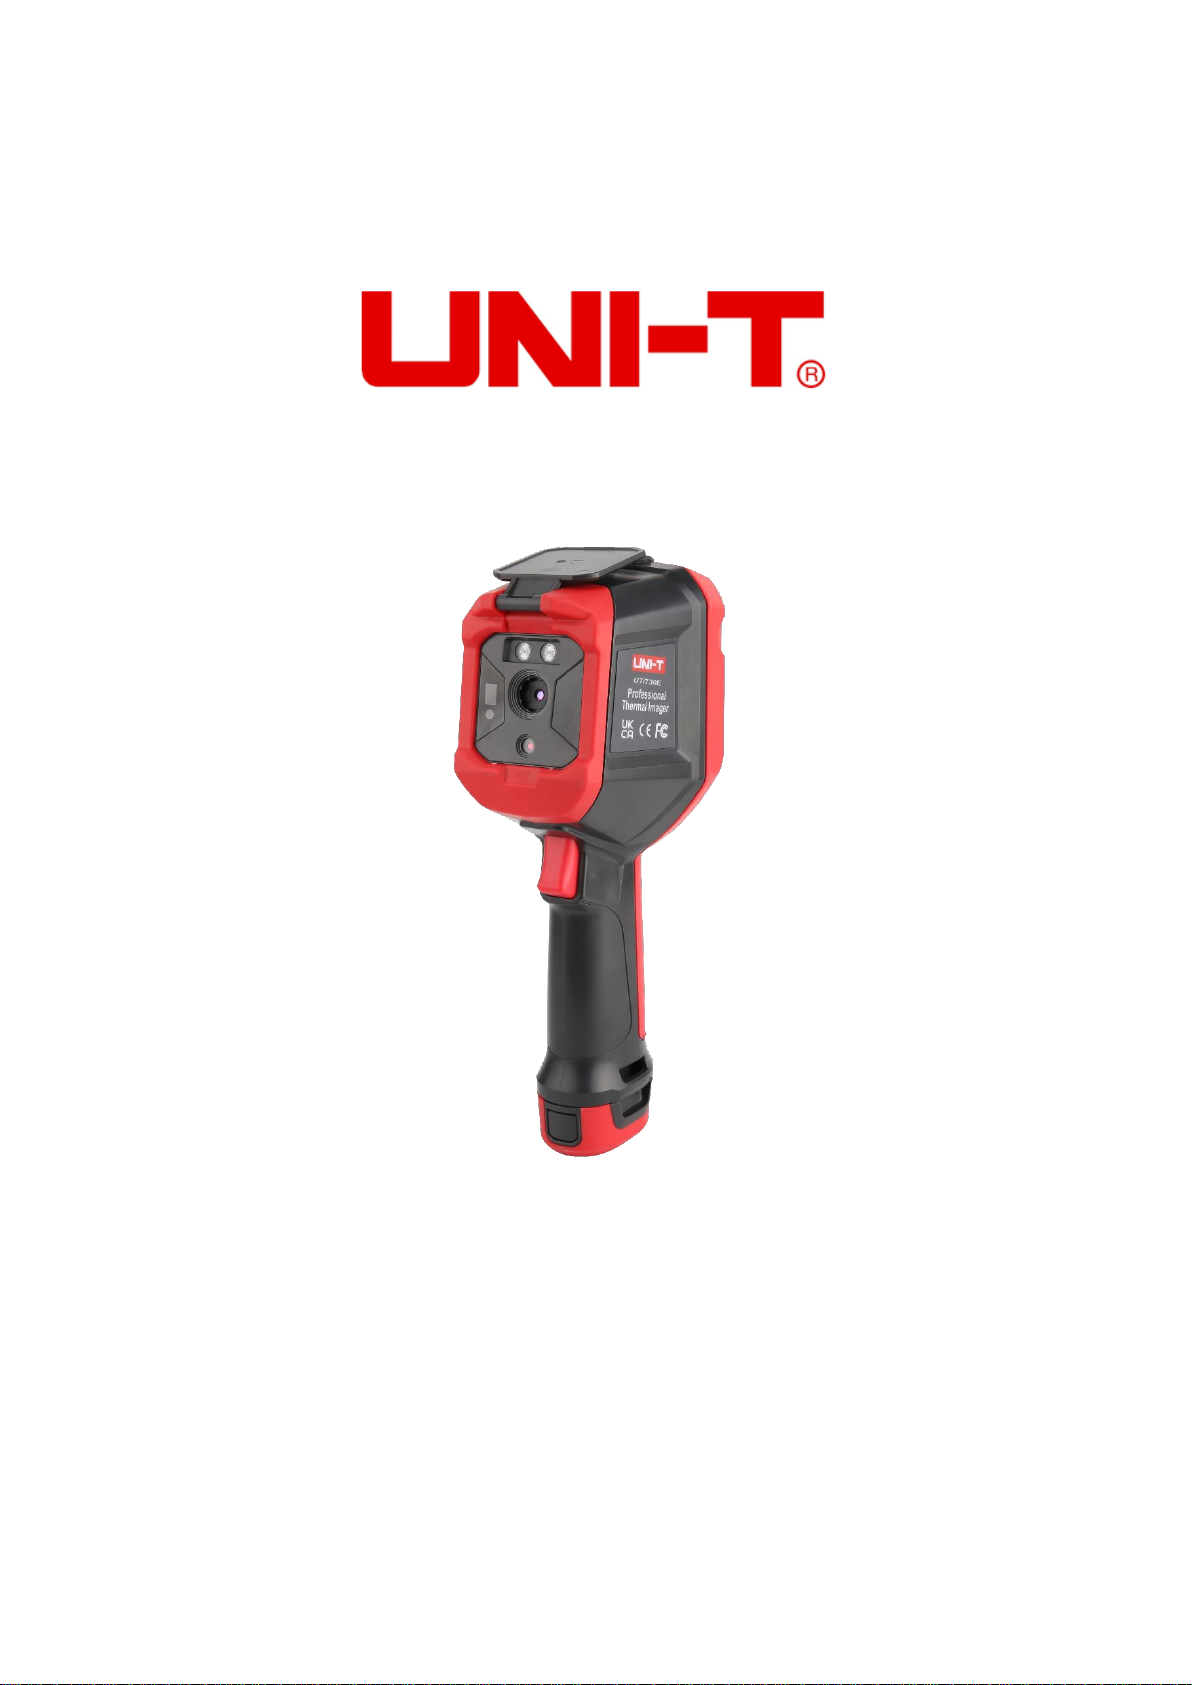
UTi720E/ UTi730E
Professional Thermal Imager
User Manual
Page 2

Professional Thermal Imager User Manual
Preface
Dear user:
Thank you for selecting the brand new UNI-T E Series Infrared Thermal Imaging Device. In order
to use this product correctly, please read the full text of this manual carefully before using, especially
the part about "Safety Precautions".
If you have read the full text of this manual, it is recommended to keep this manual properly with
the accessories of the thermal imaging device or in a place where you can refer to it at any time for
future use.
Limited warranty and limited liability
Our company guarantees that the product is free from defects in material and workmanship for
one year from the date you purchase it. For the warranty, it does not cover the damage caused by
accident, negligence, misuse, modification, contamination or abnormal operation or handling etc.. The
Distributor shall not be entitled to give any other guarantee in the name of the Company. If you need
warranty service during the warranty period, please contact the authorized service center nearby to
obtain the product returning authorization information; andthen send the product to the service center
with the product problem description.
This guarantee is the only compensation you can get. Otherwise, the Company does not provide
any warranty, express or implied, like the implied warranty for the particular purpose. Meanwhile, the
Company shall not be liable for any special, indirect, incidental or consequential damage or loss arising
out of any cause or conjecture whatsoever. For some states or countries do not allow limitations on
implied warranties and incidental or consequential damages, the above limitations and requirements
may not apply to you.
2
Page 3

Professional Thermal Imager User Manual
Contents
1. Performance indicators .................................................................................................... 4
2. Structure .......................................................................................................................... 6
3. Display instructions .......................................................................................................... 7
4. Power on-off..................................................................................................................... 7
5. Instruction of configuration menu .................................................................................... 8
6. Marking tool ..................................................................................................................... 8
7. Image mode ..................................................................................................................... 9
8. Swatches switching ......................................................................................................... 9
9. Temperature measuring tool ............................................................................................ 9
10. Vitta tool ....................................................................................................................... 11
11. Photo view and edit ...................................................................................................... 11
12. Digital amplification & fusion ratio adjustment ............................................................. 12
13. System setup ............................................................................................................... 12
13.1 Camera mode ..................................................................................................... 12
13.2 Units ................................................................................................................... 13
13.3 Parameters ......................................................................................................... 13
13.4 Alarm .................................................................................................................. 14
13.5 QR CODE ........................................................................................................... 15
13.6 Language ............................................................................................................ 15
13.7 Date and time ..................................................................................................... 16
13.8 Wi-Fi ................................................................................................................... 16
13.9 USB mode .......................................................................................................... 16
13.10 Brightness......................................................................................................... 16
13.11 Automatic Shutdown ......................................................................................... 17
13.12 Factory reset .................................................................................................... 17
13.13 Formatting ........................................................................................................ 17
13.14 About ................................................................................................................ 18
14. SD Card ....................................................................................................................... 18
15. Maintain ....................................................................................................................... 18
16. Safety precautions ....................................................................................................... 18
17. FCC Compliance statement ........................................................................................ 19
18. Common emissivity table ............................................................................................. 19
3
Page 4
Professional Thermal Imager User Manual
Mode
Low temperature scale (-20℃~ 150℃)
High temperature scale (0℃~ 550℃ (manual selecting scale)
Thermal imaging pixel
256*192(49152)
IFOV
3.8mrad
Focal length
3.2mm
Sensitivity
<50mK @25℃
Frame frequency
<25Hz
Precision
-10℃~550℃, room temperature of 25℃, and ±2℃/±2% to take the
maximum value
Temperature measurement
scale
- 20℃ ~ 550℃ (-4℉~1022℉)
Mode
Automatic gain
Thermal imaging pixel
320*240(76800)
IFOV
3mrad
Focal length
4.0mm
Sensitivity
<65mK @25℃
Frame frequency
9Hz
Precision
-10℃~400℃, room temperature of 25℃, and ±2℃/±2% to take the
maximum value
Temperature measurement
scale
-40℃~400℃(-40℉~752℉)
Sensor
Un-cooled vanadium oxide
Display resolution
640*480
Emissivity
0.95(default) 0.01~ 1.00
Visible light pixel
2 million
Thermal imaging pixel size
12μm
Swatches
Iron red, rainbow, black heat, white heat, red heat, lava, and high
contrast rainbow
Infrared spectral bandwidth
8~14μm
Field of view
HFOV 56°
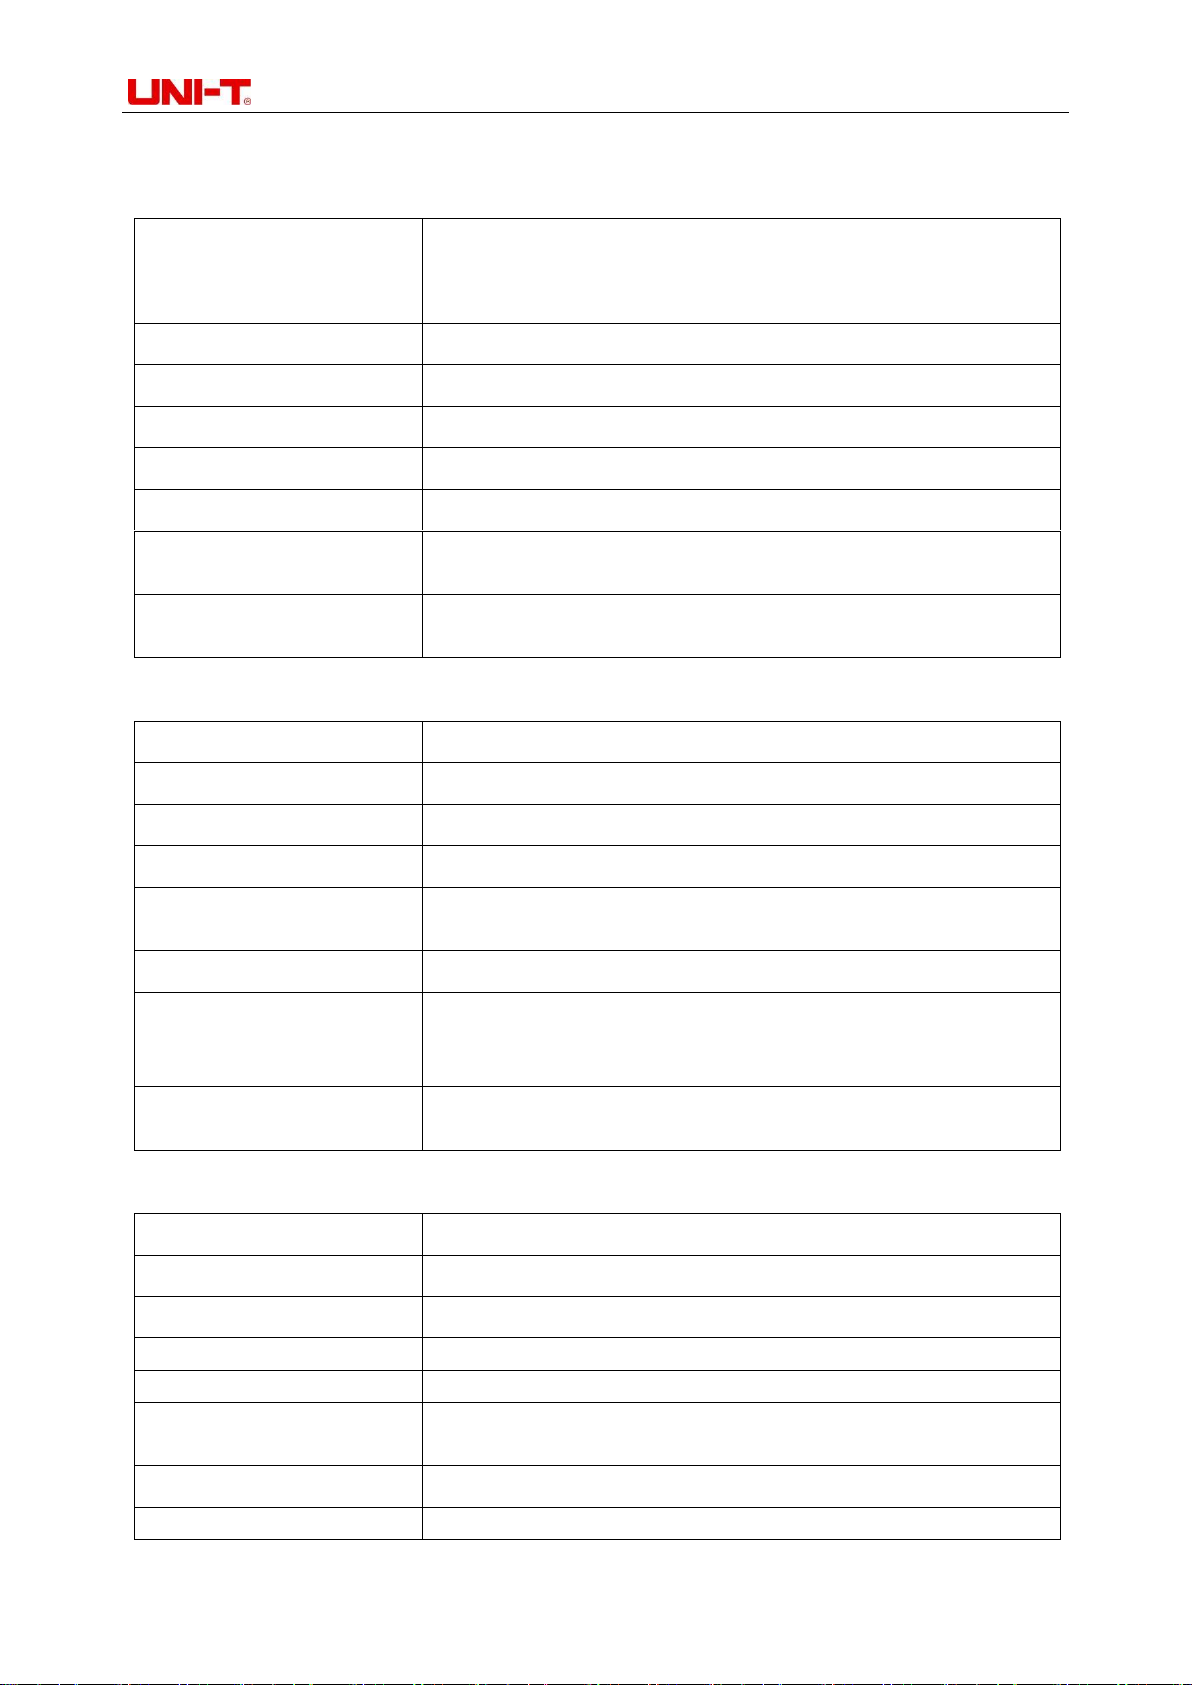
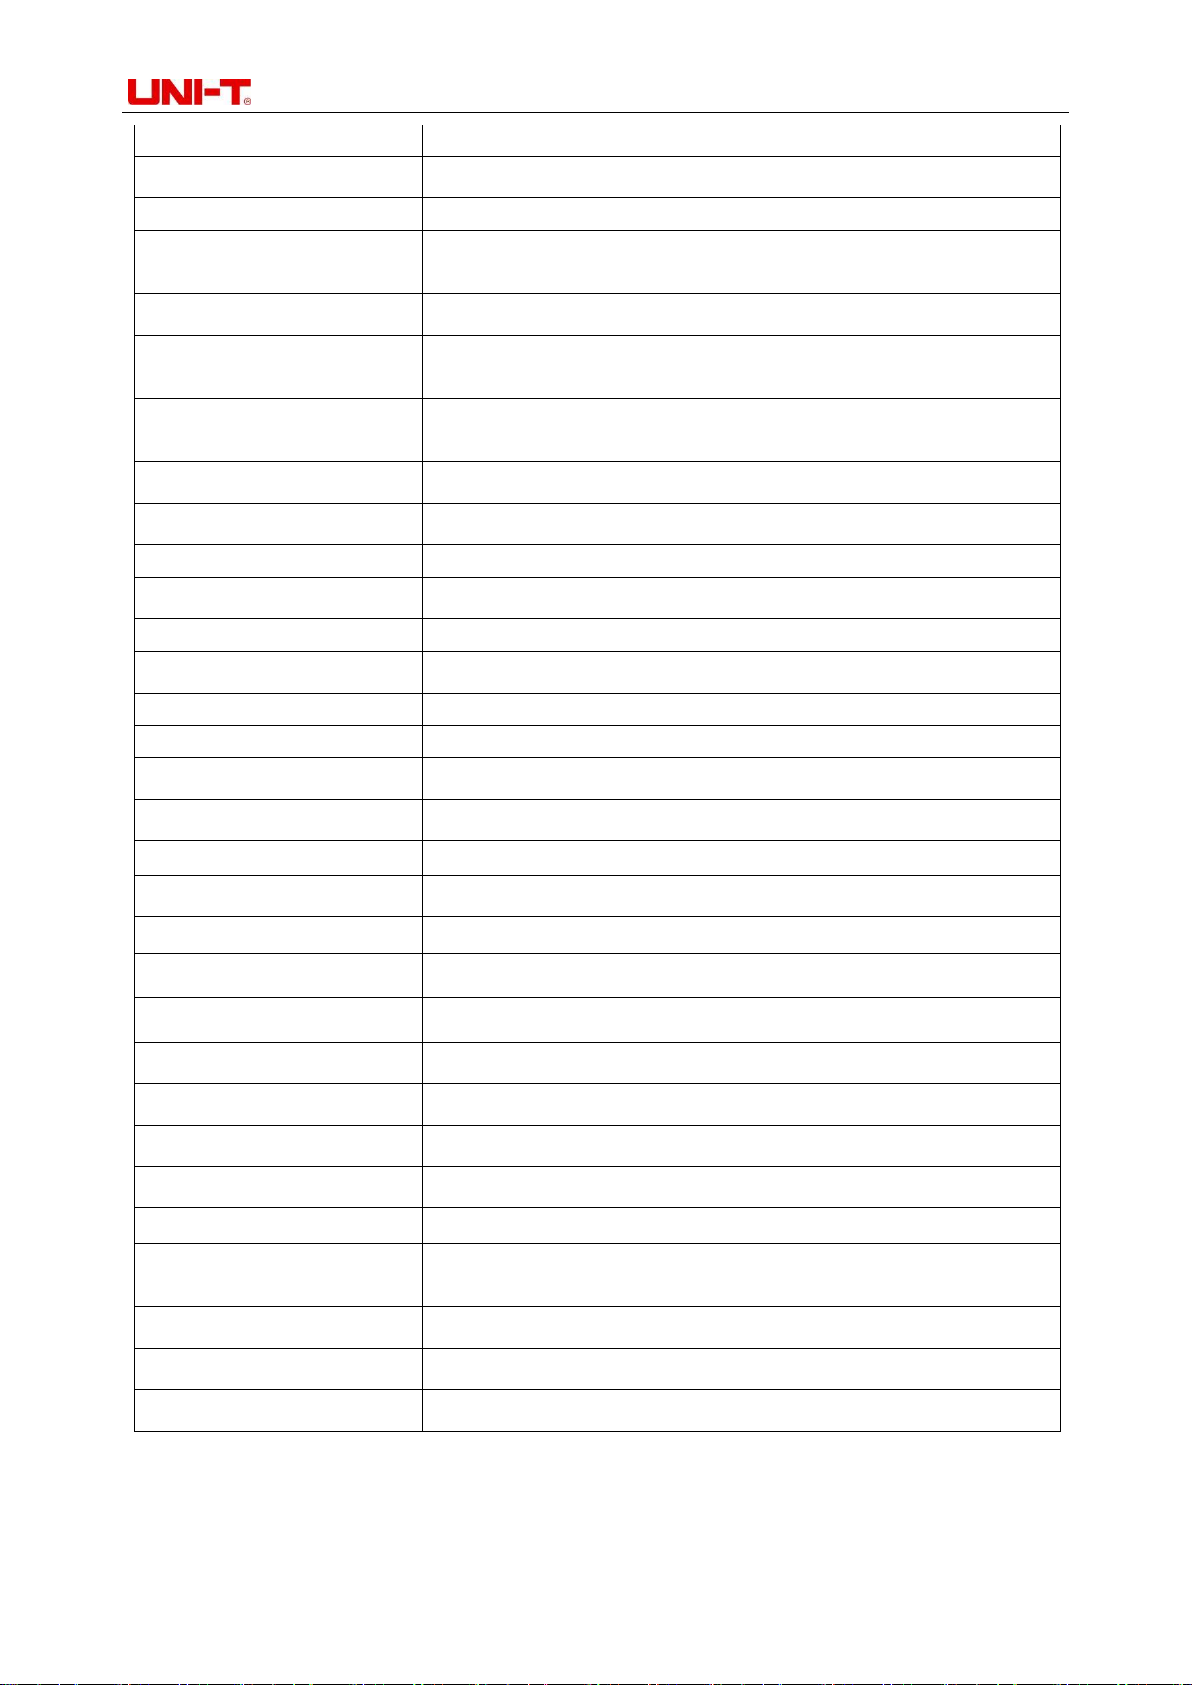
1. Performance indicators
UTi720E:
UTi730E:
UTi720E/UTi730E:
4
Page 5
Professional Thermal Imager User Manual
Focusing mode
Free Focus
Digital zoom
2x,4x
Temperature Sweep
5 points,3 rectangles,3 circles, and1 line (add up to 6)
Vitta tool
Automatic isothermal, proportional isothermal, downward isothermal,
upward isothermal, interval isothermal, and manual isothermal
Temperature display
Center point temperature, and high/low temperature tracking
Temperature measurement
unit
℃(default)、℉、K
High and low temperature
alarm
Yes (LED lighting alarm, and LCD animation alarm)
Image mode
Thermal imaging, visible light, fusion, and picture in picture
Image capture mode
Take pictures, and automatically take pictures
Image save format
JPG
Image browse
Temperature analysis, changingswatches, and remarks
QR code scanning
Yes
USB communication
Type-c USB (Charging, real-time image and USB disk storage)
WIFI
Yes
PC projection screen
Yes
PC analysis software
Yes (live image, photo download and analysis)
Mobile phone APP
Yes (Photo download and analysis)
LED lighting
Yes
Language
English/French/German/Spanish/Russian
Authentication
CE FCC UKCA ROHS
Operation temperature
0℃~ 50℃ (32℉~ 122℉)
Storage temperature
-10℃~ 60℃ (14℉~ 140℉)
Operation humidity
10%~95%RH(Non - Condensing)
Battery
5200mAh(Detachable battery pack)
Auto Power -Off
Yes
Service duration
More than 3 h
Charging period
Less than 4h
Charging voltage/current
5V/ 1.5a 9V/1A 12V/1A
(supported only with standard USB charging below QC2.0)
Image saving
The microSD card supporting 32 GB for maximum
IP level
IP54 ( IEC 60529:1989+A1:1999+A2:2013 )
Drop height
2m
5
Page 6
Professional Thermal Imager User Manual
No.
Description
No.
Description
1
The USB Type - C interface
11
Photo browsing button
2
Upper casing
12
Back key
3
Lower casing
13
Right key
4
SD card slot
14
SET key
5
Interface protection cover
15
Down key
6
LCD display
16
Bracket fixed screw hole
7
Start key
17
Infrared thermal image window
8
Lighting key
18
Lamp
9
Left key
19
Visible light camera window
10
Up key
20
Photo trigger key
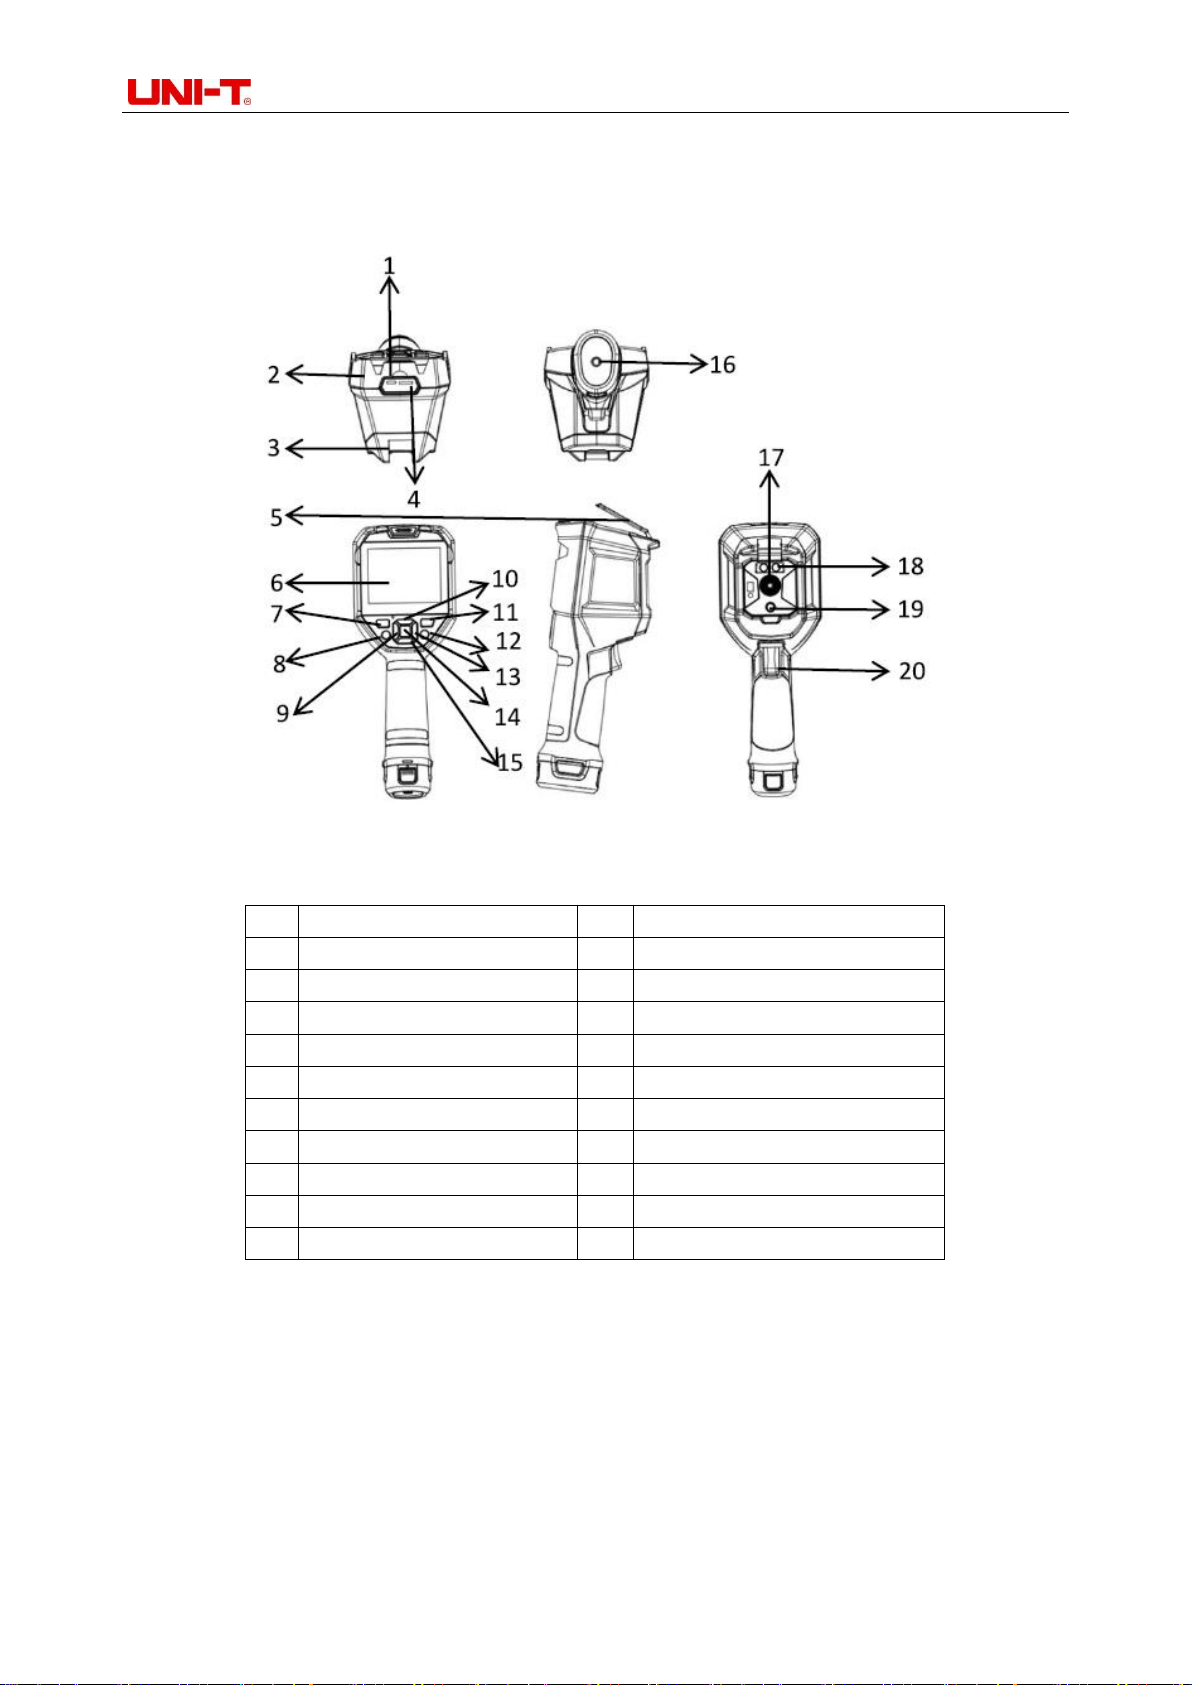
2. Structure
6
Page 7
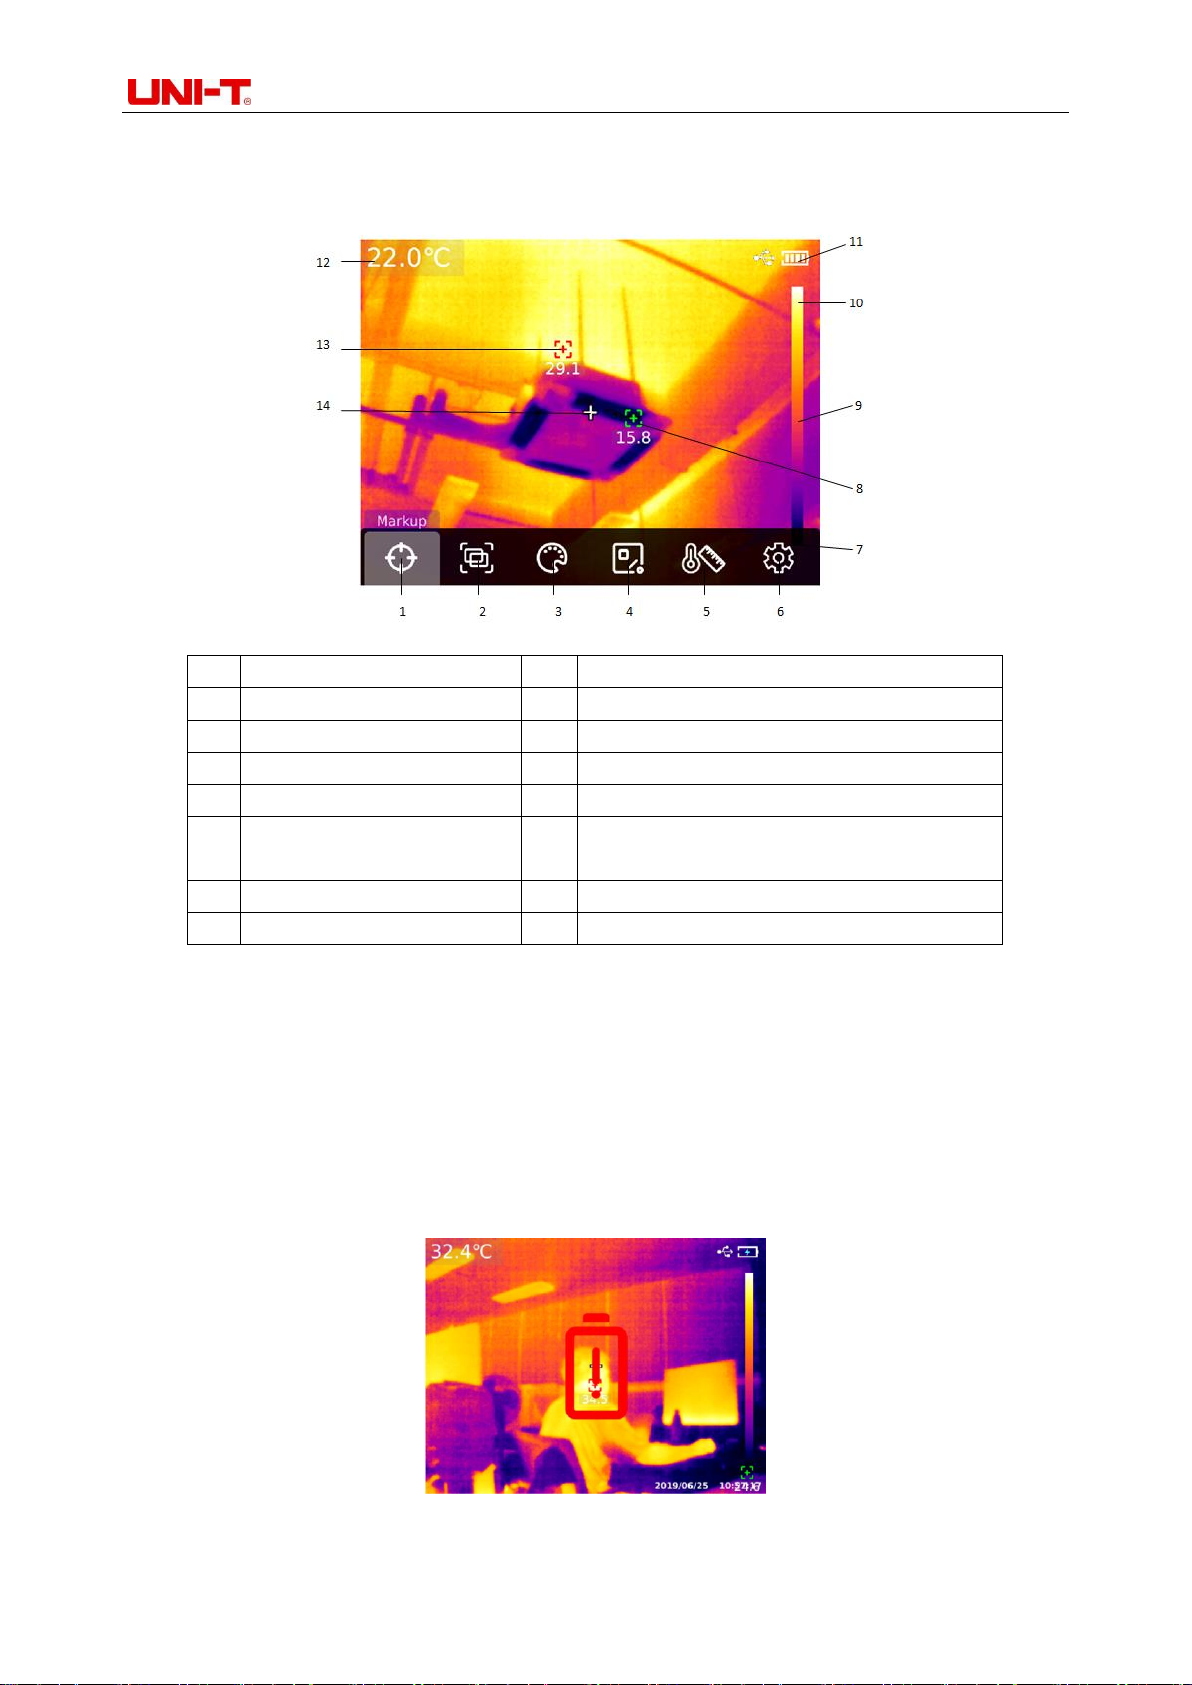
Professional Thermal Imager User Manual
No.
Description
No.
Description
1
Marking tool
8
Automatic tracking of the minimum point
2
Image mode
9
Color temperature bar
3
Swatches switch
10
Upper limit of swatchesscale
4
Temperature measuring tool
11
Electric quantity
5
Vitta tool
12
Temperature of the measurement central
point
6
System setup
13
Automatic tracking of the maximum point
7
Lower limit of swatchesscale
14
Temperature measurement central point
3. Display instructions
Displayresolution: 640×480
4. Power on-off
Long press the "Power button" for 5 seconds to start up the thermal imaging device (if start up the
device just now, the device is not being used for a long time or after the measurement environment
changes, it will take up 30 minutes for starting up the device to measure the temperature). Long press
the "Power button" for 5 seconds to turn off the thermal imaging device. When the thermal imaging
device is in low power mode, the reminder of low power will pop up. At this time, the thermal imaging
device needs to be turned off to charge. When the thermal imaging device is in low power mode all the
time, the thermal imaging devicewill automatically be shut down.
7
Page 8
Professional Thermal Imager User Manual
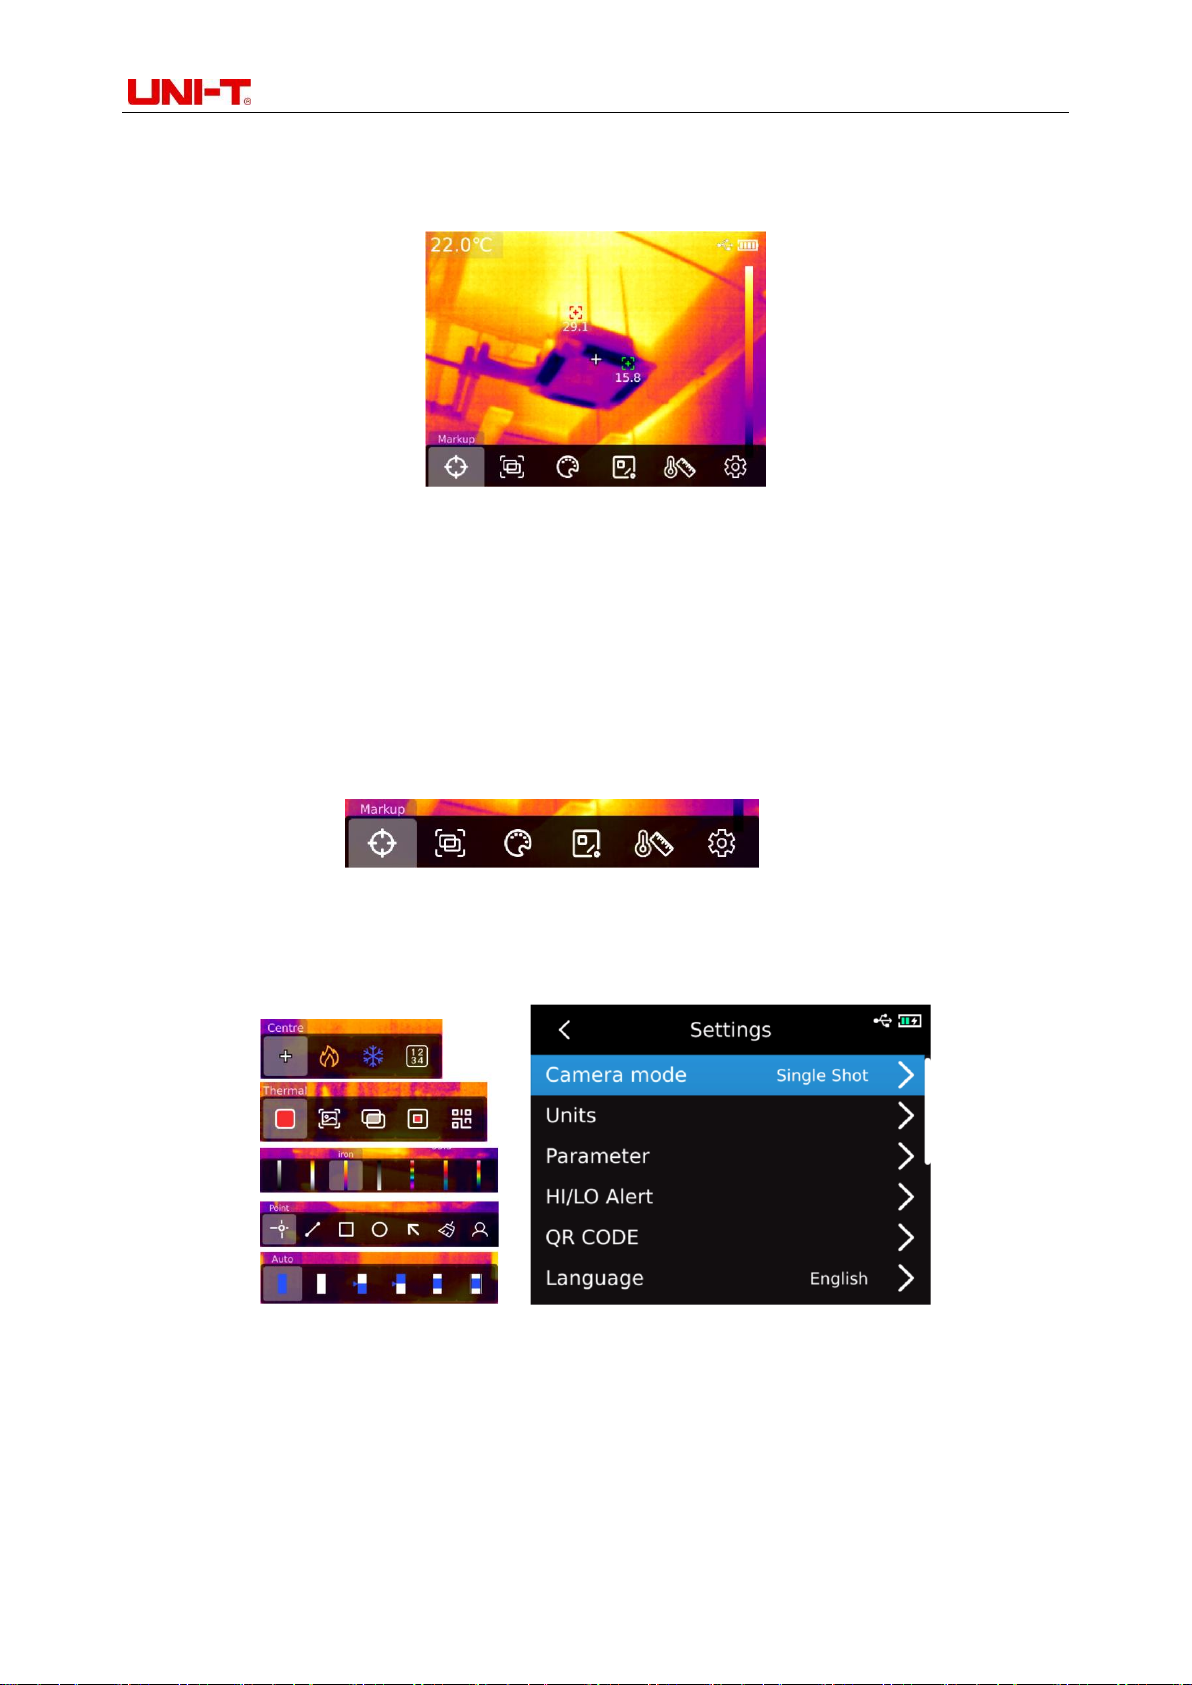
5. Instruction of configuration menu
Configuration options for main menu
Main page of the thermal imaging device
1. Press “SET key” on the home page to display the main menu
2. Press“Left/right key” to select sub-menu
3. Press“SET key” to enter the corresponding sub-menu
4. Press “Left/right key” to select sub-menu Settings
5. Press “SET key” to select Settings
6. Press “Back key” to return to the previous level and save the Settings
7. Press "Back key" again to return to the home page of thermal imaging
Main menu:
Sub-menu:
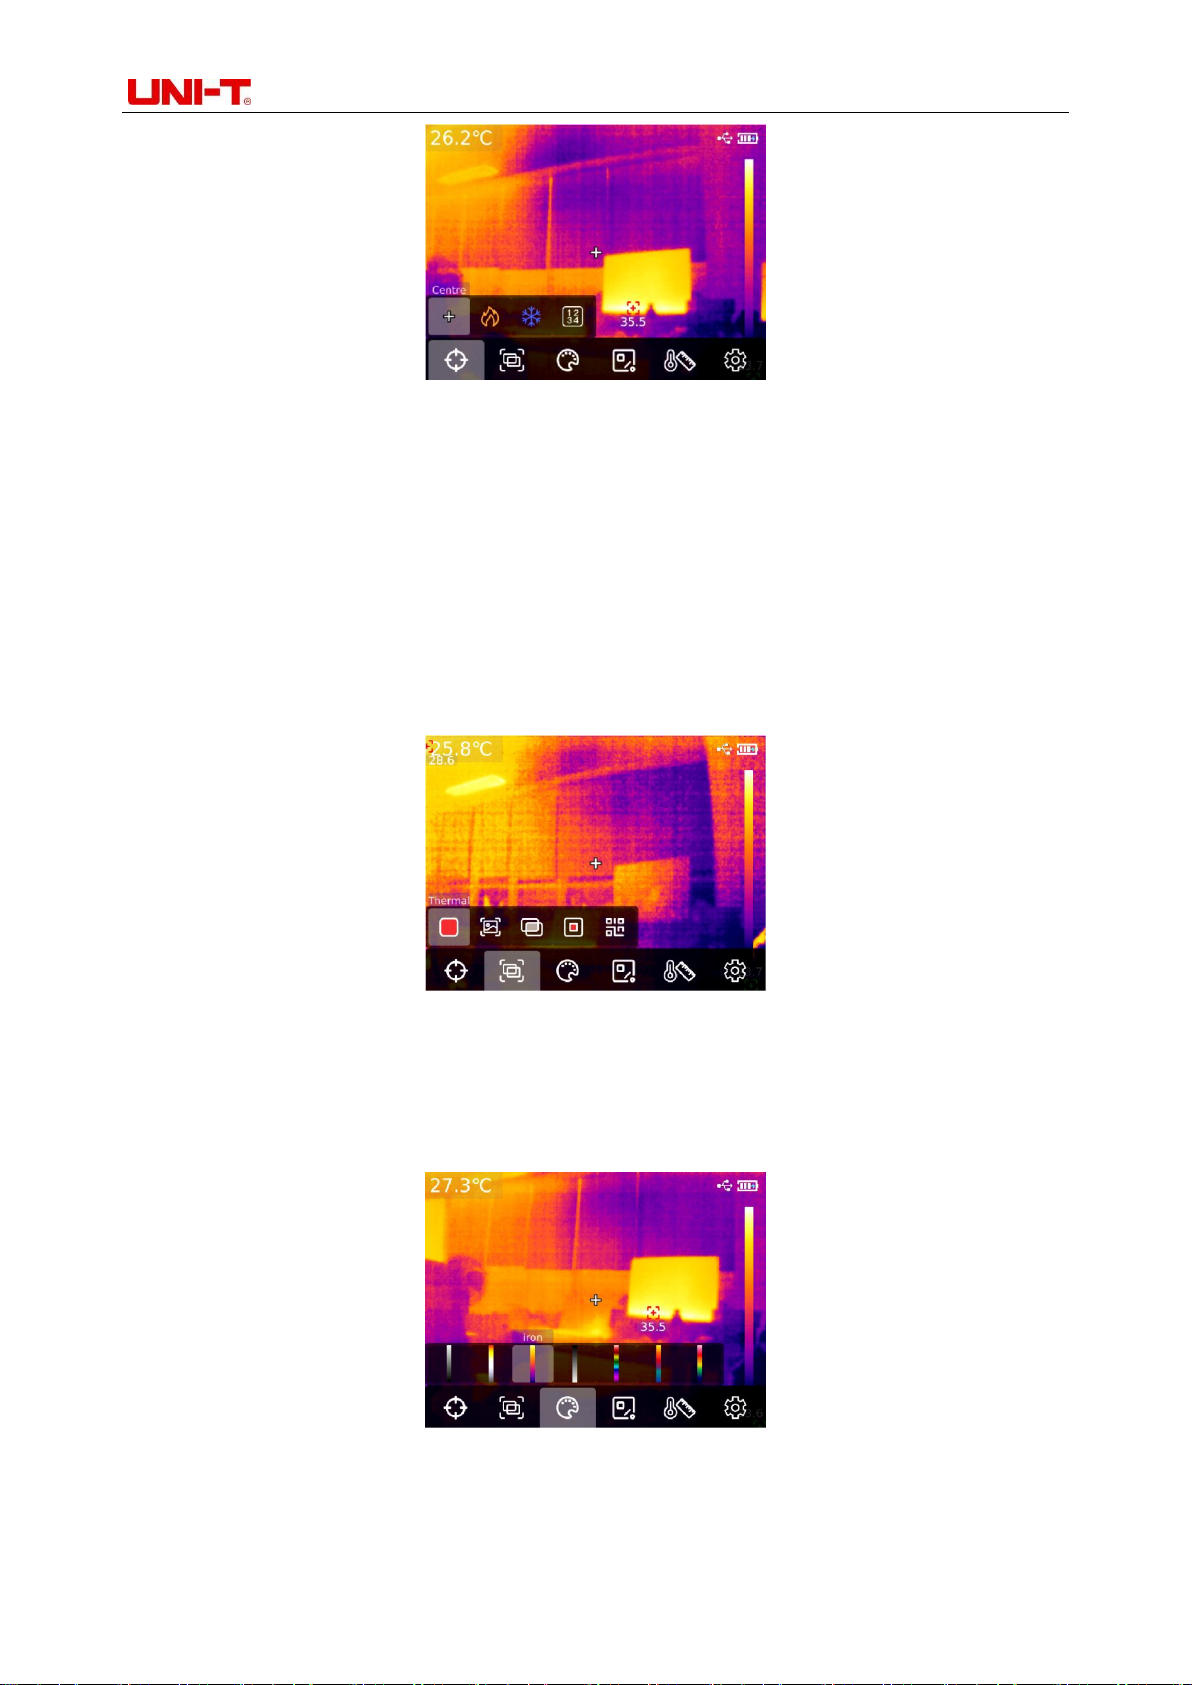
6. Marking tool
If you need to use the center point/high/low temperature tracking/temperature display
function,press "SET key" to pop up the main menu options, select "Marking tool" by using left/right key,
and then press "SET key" to enter the marking tool sub-menu options and make selection byusing
left/right key. (For example: Press "SET key" to select "Center point". When cross collimation appears,
it means that the center point cursor is opened. Press "SET key" again, the cross collimation
disappears, indicating that the function of the center point cursor is closed.
8
Page 9
Professional Thermal Imager User Manual
7. Image mode
Press "SET key" to pop up the main menu, select "Image mode" by using"Left/right key", and then
press "SET key" to enter the sub-menu options of image mode. You can make selection byusing
left/right key. For example, press"SET key" to select "Thermal imaging" to switch the image to thermal
imaging mode. (In the fusion mode, you can adjust the fusion ratio by using"Left/right key" and adjust
the fusion distance by using"Up/down key". In picture in picture mode, you can change the position
and size of the picture in picture by selecting Move or Stretch by using"Left/right key". Press "SET key"
to select "QR code", you can manually enter the QR code or scan the code to obtain QR code, and
select "Cancel" to return to the main page).
8. Swatches switching
Press the "SET key" to pop up the main menu options, select "Swatches Switch" by using
"Left/right key", select the required swatches by using "Left/right key", and there are seven swatches
available: white hot, red hot, iron red, black hot, high rainbow, lava, and rainbow.
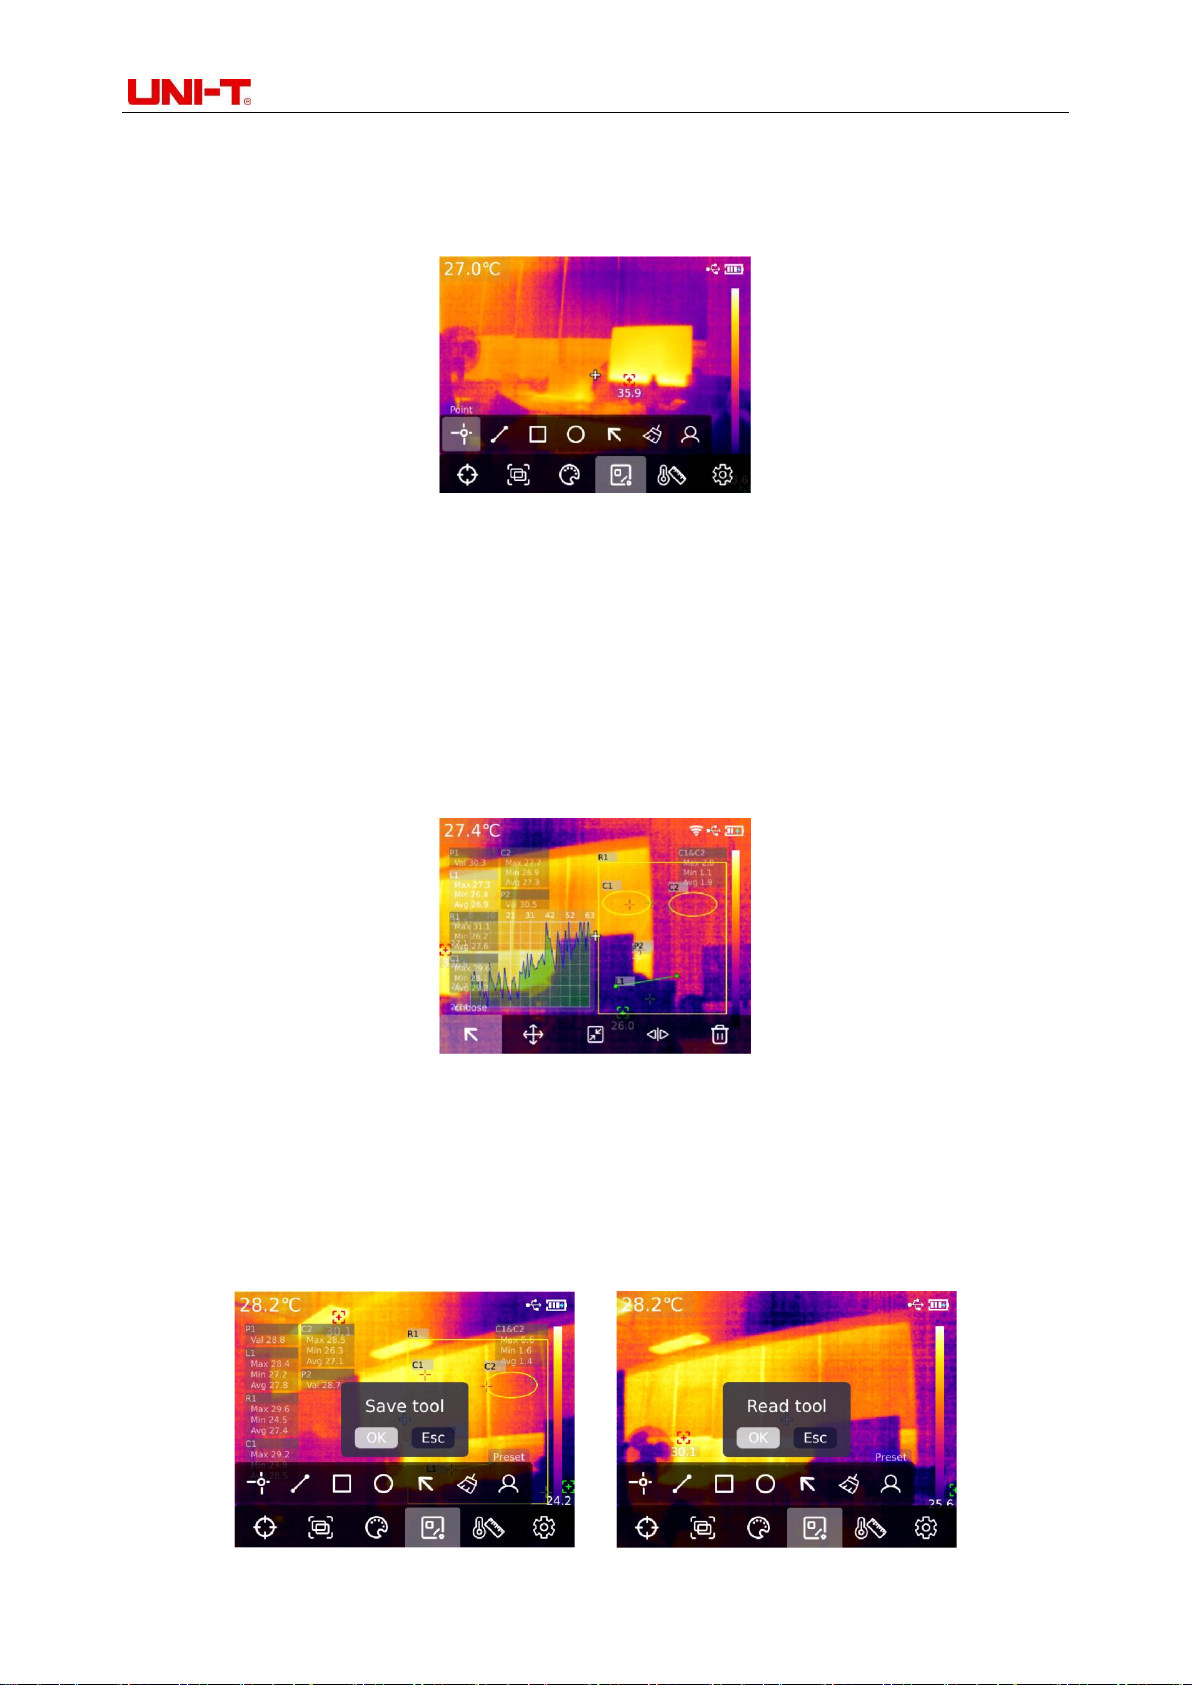
9. Temperature measuring tool
Press the "SET key" to pop up the main menu options, select "Temperature measuring tool" by
9
Page 10
Professional Thermal Imager User Manual
using "Left/right key". By using "Left/right key",select the analysis object type (including point
temperature measurement, line temperature measurement, rectangle, and circle) and select the target
(this function can be used only when the analysis object is added on the home page). Clear all and
preset tools.
Press"SET key" to add point, line, rectangle and circle temperature measurement analysis objects,
and the sub-menu bar of "Select thetarget" will pop up automatically. Select the required functions by
using "Left/right key", including following functions: select, move, stretch (for the point temperature
measurement analysis object, it cannot be stretched), comparing (for the point temperature
measurement analysis object, it can only be compared with point temperature measurement analysis
object, and corresponding comparison information will be displayed on the right after comparison), and
delete (only the currently selected temperature measurement analysis object can be deleted). After
adding the temperature measurement analysis object, the corresponding temperature information will
be displayed on the left side. When select the line temperature measurement analysis object, the
temperature curve of the line area will be displayed in the lower left corner.
After pressing"SET key" to clear all functions, all temperature measurement analysis objects on
the current page will be cleared. If there is the temperature measurement analysis object on the home
page, press "SET key" to select the preset tool, and the "Save Tool" prompt box will pop up. If you
select OK, the current analysis object will be saved and the preset tool can be used next time. If there
is no temperature analysis object on the home page, press"SET key" to select the preset tool, and the
Read Tool dialog box will be displayed. If you select OK, the preset tool saved last time will be added
to the home page.
10
Page 11
Professional Thermal Imager User Manual
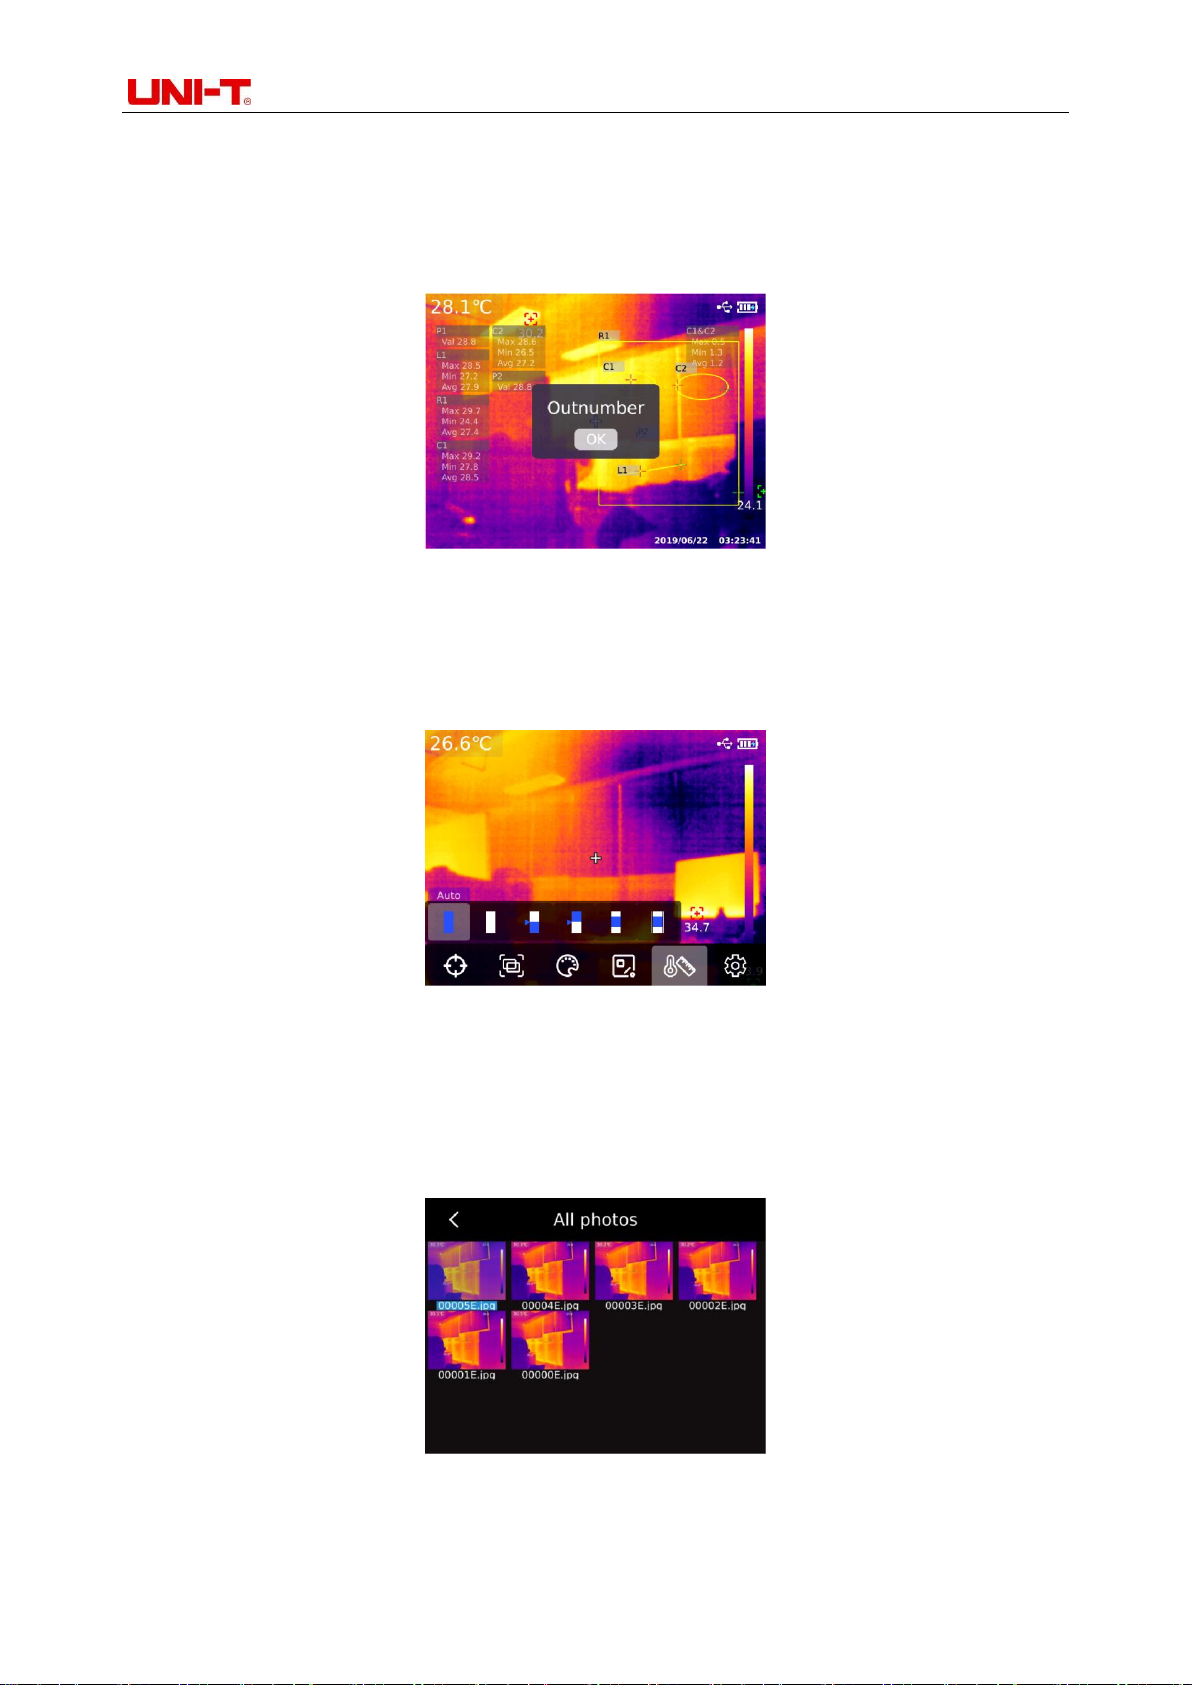
Note: The maximum of five point temperature measurement analysis objects can be added. Forthe
line temperature analysis object, it can be addedonly one.The maximum of three rectangular and
circular temperature analysis objects can be added. The total number of temperature measurement
analysis objects cannot exceed six. If the number of analysis objects exceeds the threshold, will not
add any analysis objects and will display the message" Out number".
10. Vitta tool
Press "SET key" to pop up the main menu, and select "Vitta Tool" by using "Left/right key". Select
the desired vitta tool by using "Left/right key". Six isothermal modes can be selected: Auto isothermal,
Proportional isothermal, Down isothermal, Up isothermal, Interval isothermal, and Manual isothermal.
11. Photo view and edit
On the main page, press the "Photo view key" to enter the multimedia view. Press "Up/Down key"
to select all photos/videos or other folders, and press the "SET key" to enter. Press "Up/Down/Left/Right
key" to select the picture you want to view, press"SET key" to view the picture, and switch the picture
using "Left/right key".
Press "SET key", the picture interfacesub-menu will appear, press "Left/right key" to select the
photo message (for UTi720E, you can view the picture shooting time, modify time, emissivity, infrared
resolution, ambient temperature, humidity, reflection distance and QR code, remarks and other
11
Page 12
Professional Thermal Imager User Manual
information. For UTi730E, you can view the photo shooting time, modify time, emissivity, infrared
resolution, QR code, remarks and other information), modify remarks (after adding remarks, you can
view them in the photo message), state editing (it can be used for second editing of the marking tool,
image mode, swatches switch, temperature measurement tool, vitta tool and other functions on the
original picture, and the function is basically the same as the main page function), QR code (it can be
added to the existing QR code for picture classification. After classification, you can view the
corresponding QR code classification pictures in different folders, and can also delete the QR code of
the current picture or add a new QR code.The new QR code is not added here for folder classification),
and delete photos.
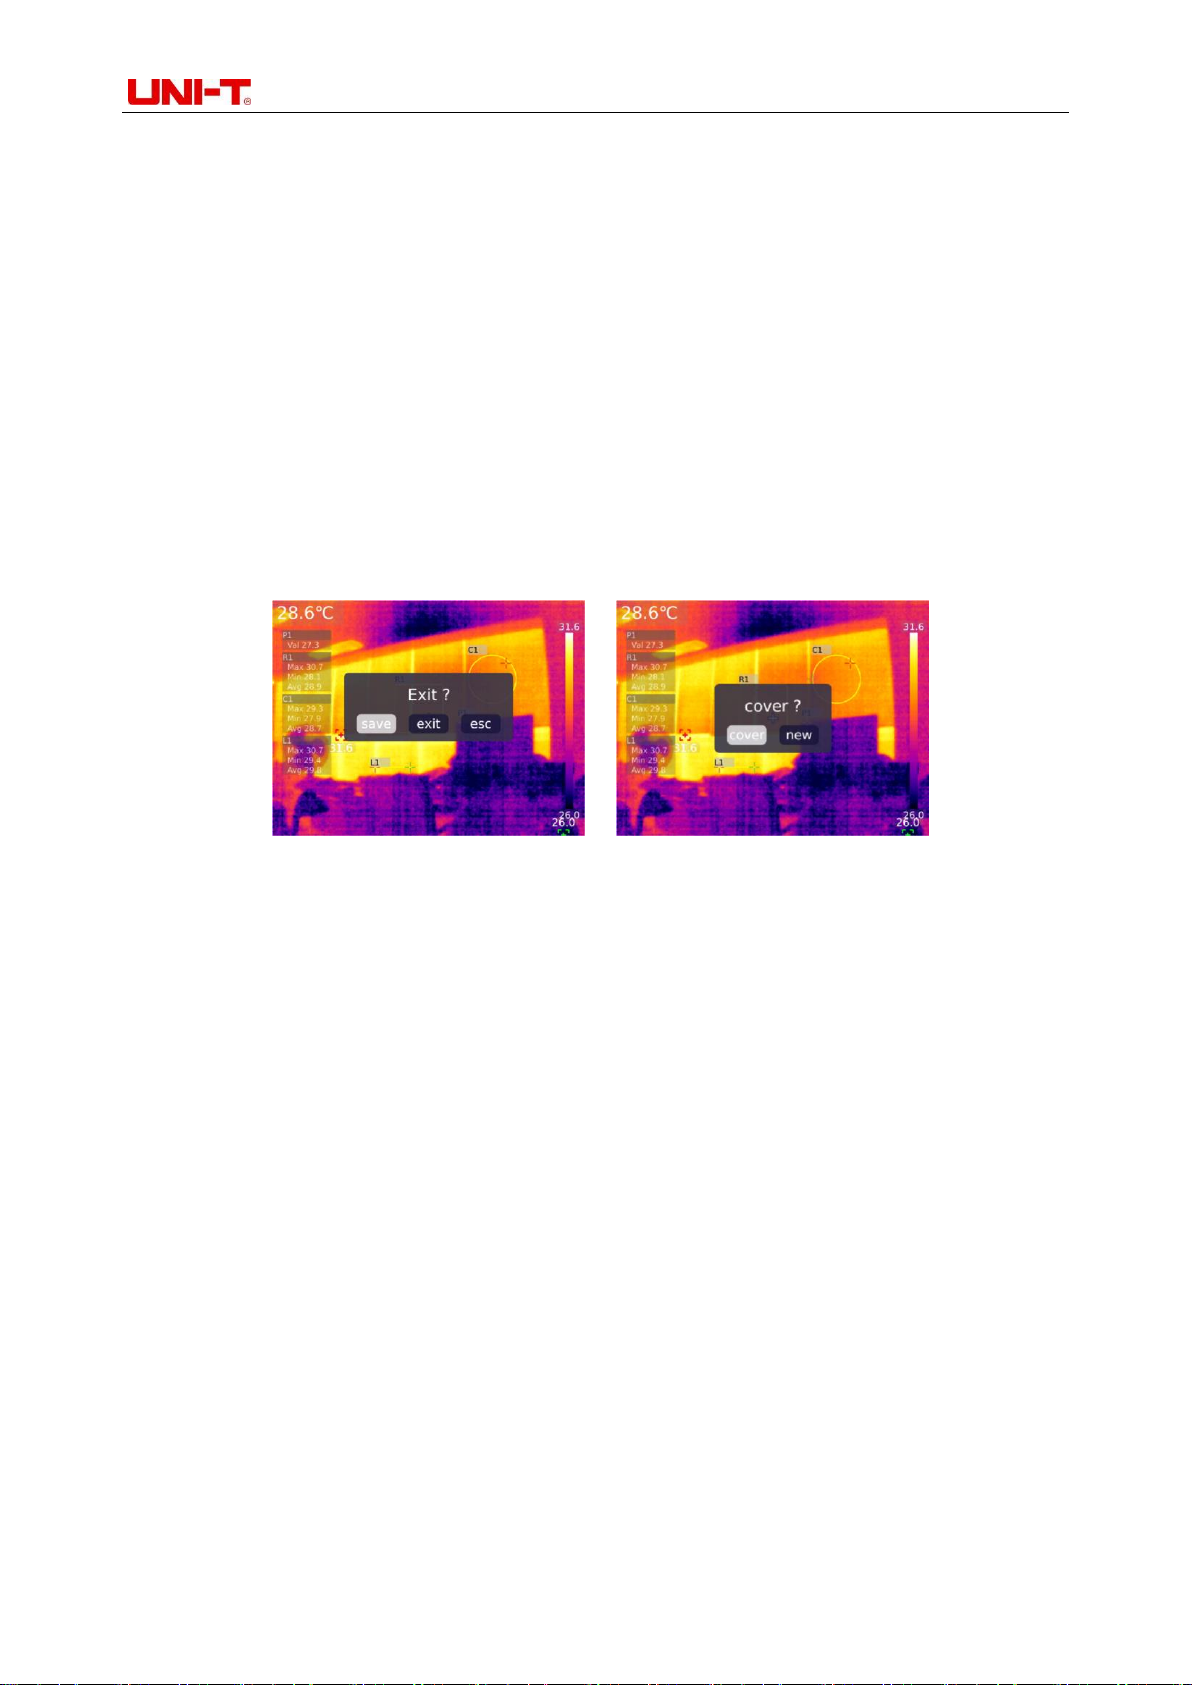
Note: After editing on the status editing page, press "SET key" to open the status editing submenu, select Recovery by using"Up key", and press "SET key" to restore the picture to the initial state.
After editing, press "Back key". The message Exit or Not will be displayed. If you select Exit, the editing
page is directly exited. If you select Save, the message"Cover or not?" will be displayed. If you select
Cover, change the original image and save it, then back to the view page. If you select New, the original
image will not be changed, one new image will be added and back to view page. .
After adding QR code, press "Back key" and the message"Save and exit" will pop up to confirm,
then the added QR code will be saved. If you select Cancel, the QR code will not be saved and exit
the QR code editing page. For QR code added here, it will not be saved to the existing QR code
category. If you need to modify the existing QR code, just modify it in the Settings.
12. Digital amplification & fusion ratio adjustment
On the home page, press "Up key" to enlarge the screen, and the corresponding magnification
factor will be displayed in the upper right corner of the screen. For the switch of magnification factor, it
isswitched with the cycle of 1X, 2X, 4X and 1X.
On the home page, press"Left and right key”to adjust the degree of fusion. The degree of fusion
adjustment is 0%, 25%, 50%, 75% and 100% respectively.
13. System setup
Press "SET key" to enter the sub-menu, select different Settings by using"Up/Down key".Press
"SET key" to enter the secondary page for setting, including: camera mode, units, parameters, alarm,
QR CODE, language, date, time, Wi-Fi, USB mode, brightness, automatic shutdown, factory reset, and
about Settings. Click "Back key" to return to the first-level menu on the setting page, and click the "Back
key" again to return to the main menu.
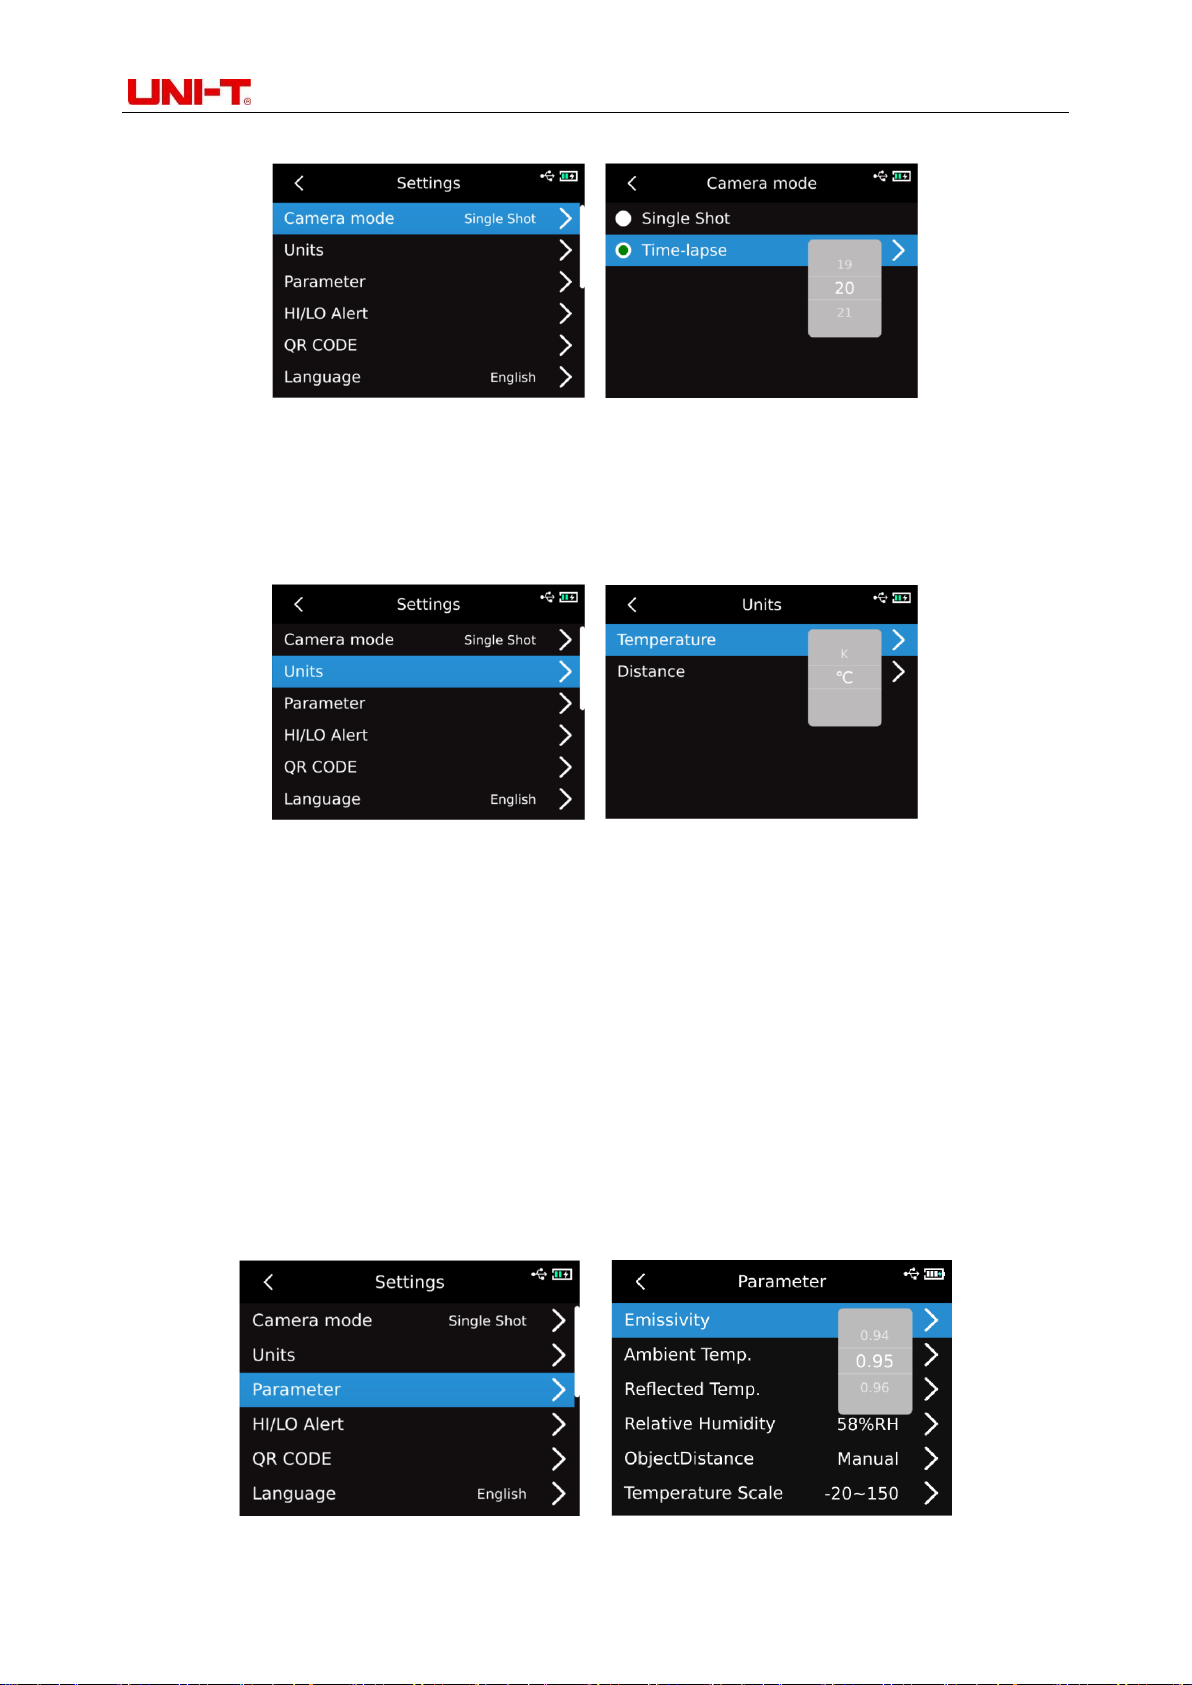
13.1 Camera mode
After entering the first level menu on the Setting page, select "Camera mode"option, press "SET
key" to enter the sub-menu of "Camera Mode", and use "Up/Down key" to select Photo/Auto photo. If
select automatic photo taking, press"Up/Down key" to set the automatic photo taking interval (10s-
12
Page 13
Professional Thermal Imager User Manual
1000s is optional).
13.2 Units
After entering the first-level menu on the Settings page, select "Units" option and press "SET
key"to enter the sub-menu of "Units". Use "Up/Down key" to select the temperature/distance. When
select a temperature, press"Up/Down key" to select the temperature unit (℃/K/℉). For distance units,
they cannot be changed.
13.3 Parameters
UTi720E:
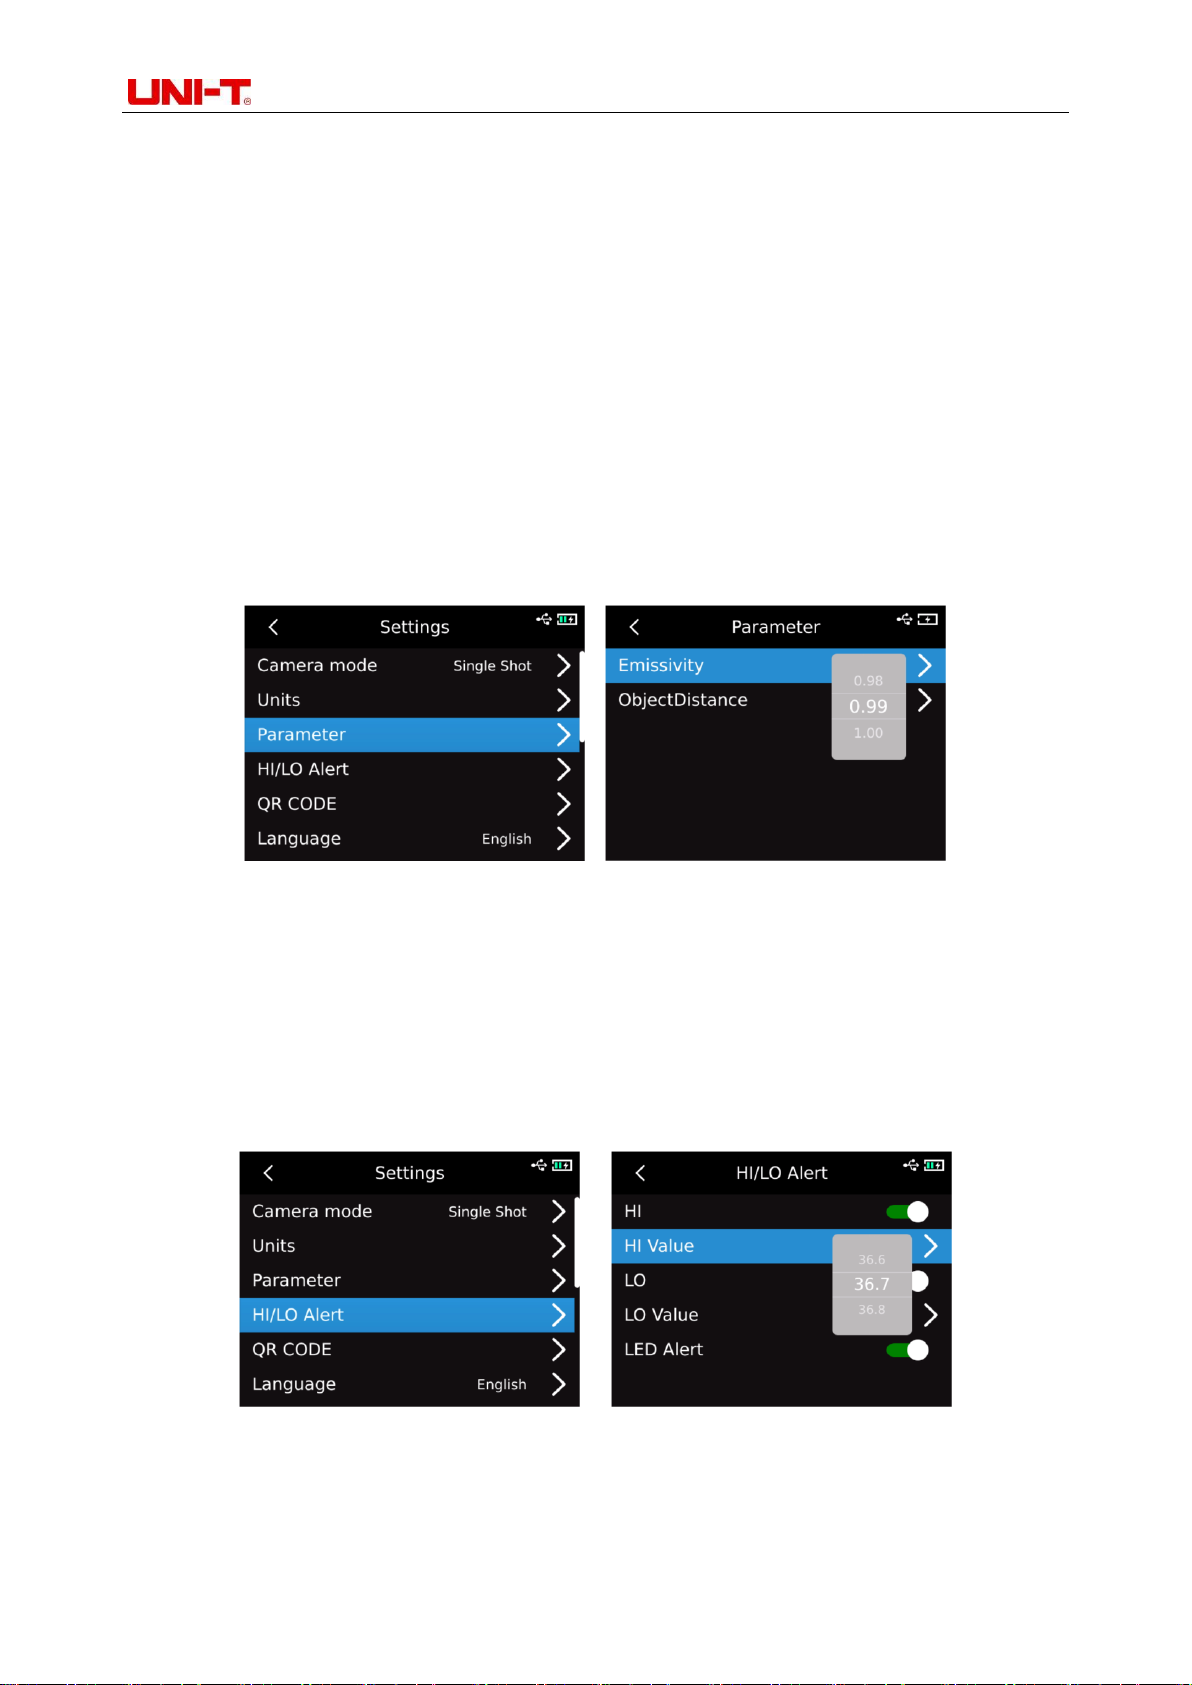
After entering the first-level menu of the Settings page, select the "Parameter" option and press
the "SET key" to enter the sub-menu of "Parameter". Select emissivity/ambient temperature/reflected
temperature/relative humidity/object distance/Temperature scale through the "Up/Down key".
Press"SET key" to select the parameter you want to change, and press "Up/Down key" to select the
value for the parameter.When setting the object distance parameter, press the "SET key" to enter the
"Object distance" sub-menu, and then use the "SET key" and the "Up/Down key" to modify the
parameter.
Low temperature scale:-20℃~150℃
High temperature scale:0~550℃
Note: It takes about 20 seconds to switch the temperature scale. Wait until the switch is stable
before performing other operations or measuring the temperature.
13
Page 14
Professional Thermal Imager User Manual
1. Please refer to 18 Emissivity table;
2. If you cannot determine which value to use, it is recommended to use the following default values:
Emissivity 0.95
Ambient temperature 25℃
Reflected temperature 25℃
Relative humidity 55%RH
Object distance 0.25m
Note: Emissivity and reflected temperature are the two most important parameters that need to
be set correctly. If you are in doubt, please use the default values.
UTi730E:
After entering the first-level menu of the Settings page, select "Parameter"option and press "SET
key" to enter the sub-menu of "Parameter". Select emissivity/object distance through "Up/Down key"
and press "SET key" to select parameters to be changed. Press"Up/Down key" to select the value for
the parameter. When setting the object distance parameter, press "SET key" to enter the sub-menu of
"Object distance", and then use the "SET key" and the "Up/Down key" to modify the parameters.
13.4 Alarm
After entering the first-level menu on the Setting page, select "Alarm" option, press"SET key" to
enter the sub-menu of "Alarm", and select the high temperature alarm/low temperature alarm /LED
alarm by using the "Up/Down key". When selecting high temperature alarm/low temperature alarm,
select high/low temperature alarm value by using"Up/Down key", press "SET key" to select, and set
the required value by using"Up/Down key" (UTi720E: -20℃-550℃ optional, and UTi730E: -40℃~400℃
optional).
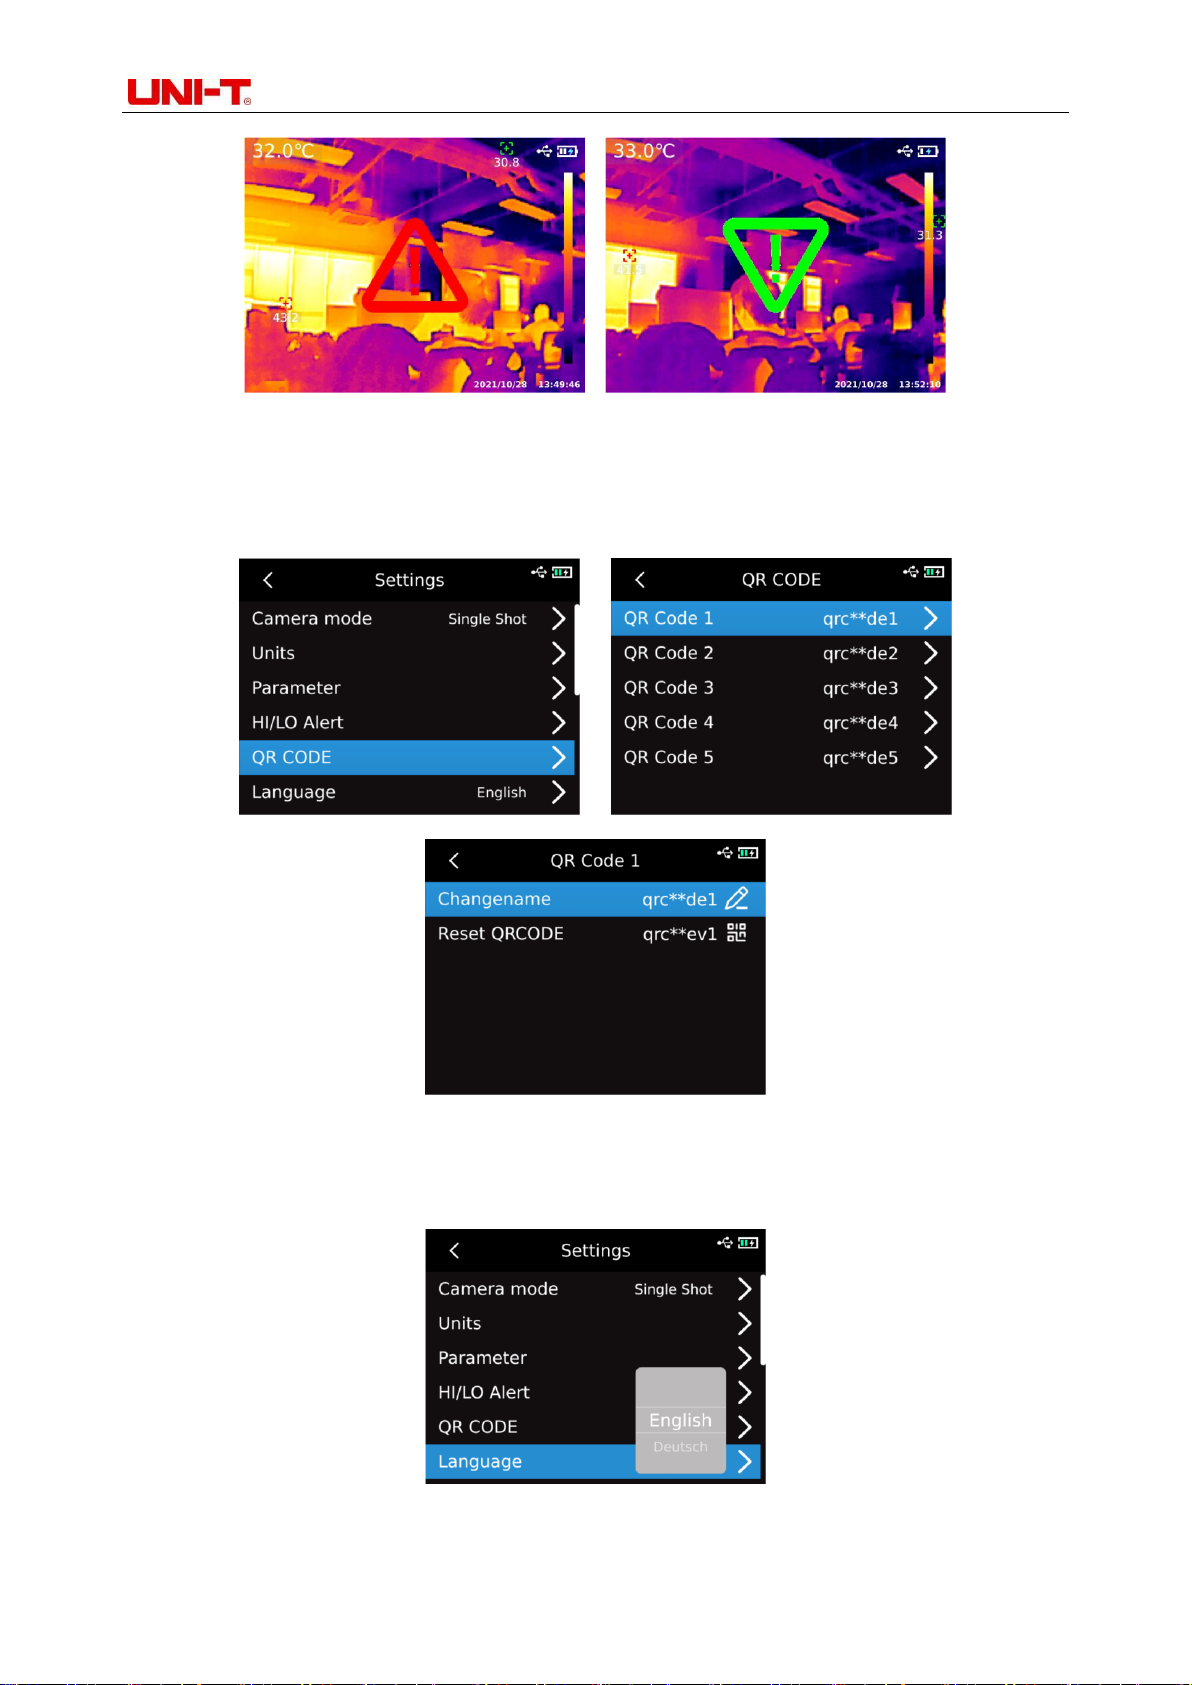
When the temperature of the measured object exceeds the high temperature alarm temperature
value, the red positive triangle will pop up. When the temperature of the measured object is lower than
the low temperature alarm temperature value, the green inverted triangle will pop up.
14
Page 15
Professional Thermal Imager User Manual
13.5 QR CODE
After entering the first-level menu on the Setting page, select "QR CODE"option and press "SET
key"to enter the QR CODE sub-menu. Select different QR Codes by using"Up/Down key"and press
"SET key" to enter the change page for QR CODE name /CODE.
13.6 Language
After entering the first-level menu on the Setting page, select "Language" option andselect English,
French, German, Spanish, or Russian by using"Up/Down key".
15
Page 16
Professional Thermal Imager User Manual
13.7 Date and time
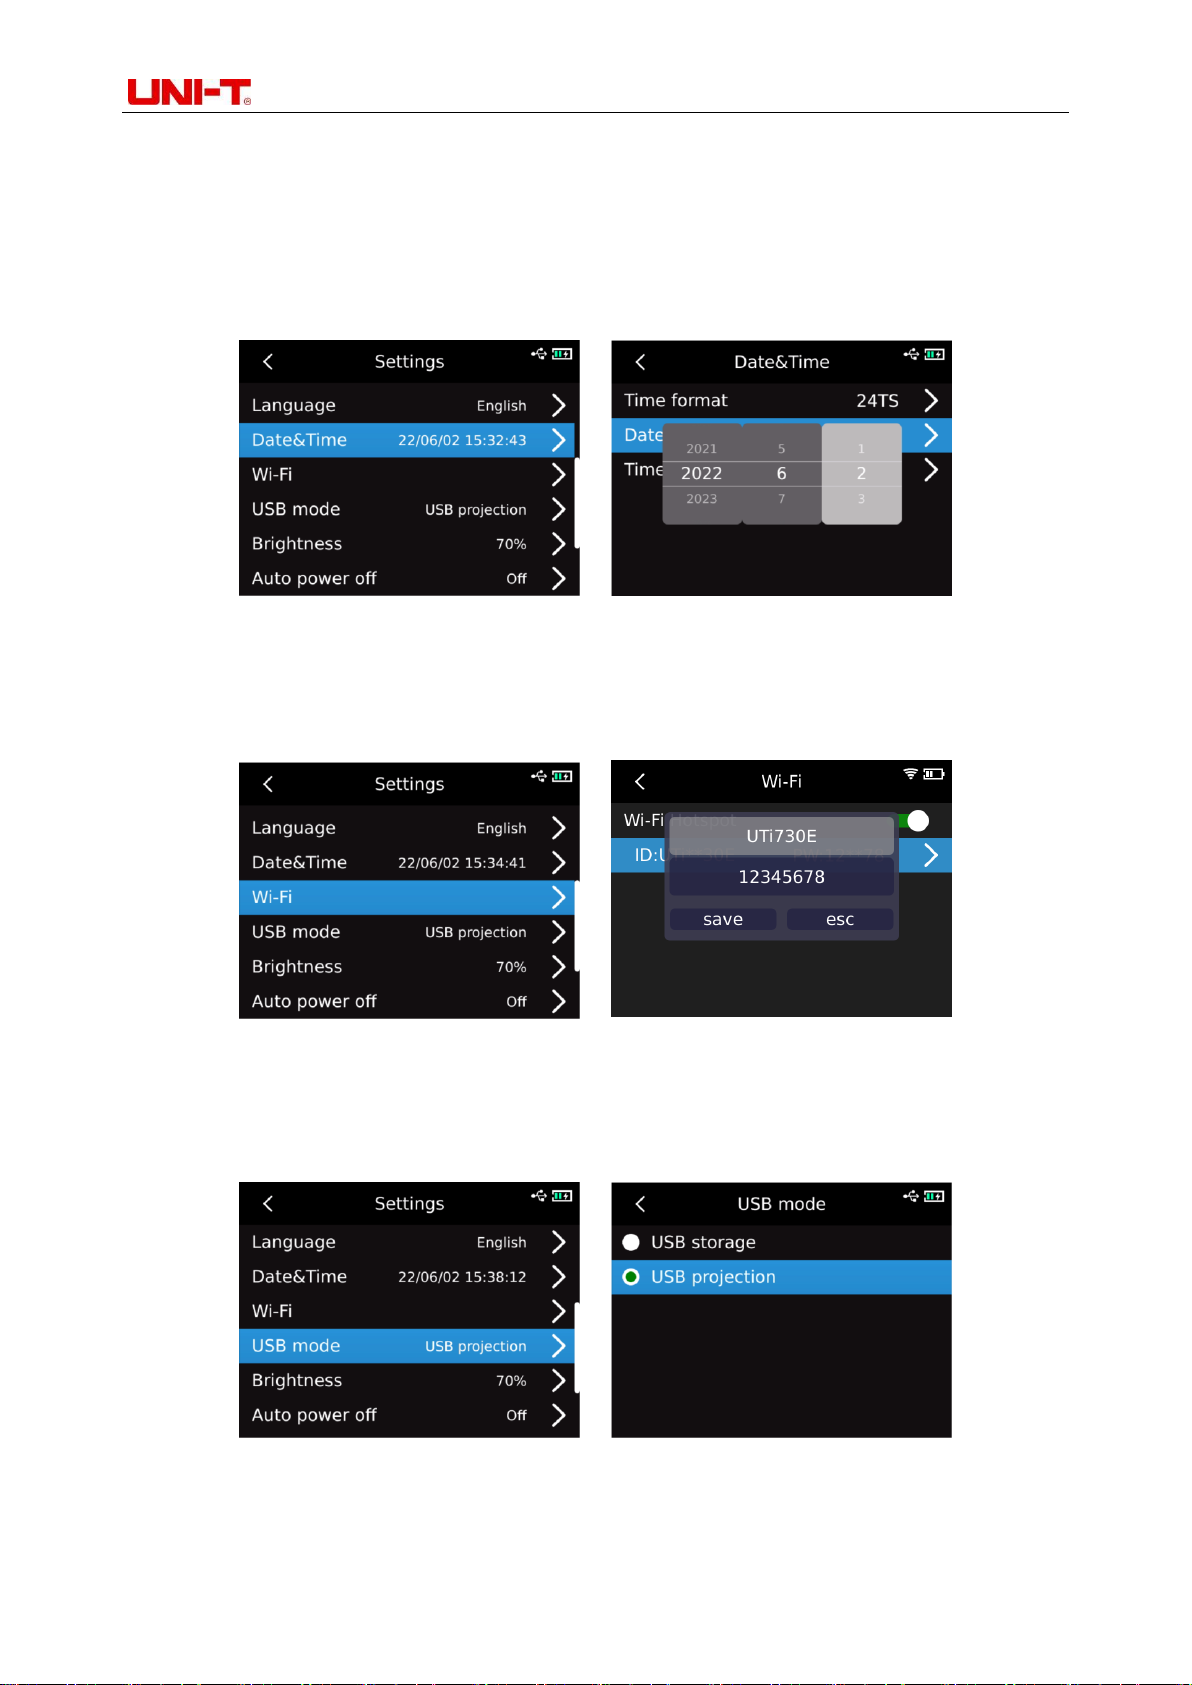
After entering the first-level menu on the Setting page, select Date and Time and press"SET key"to
enter the submenu of Date and Time. Press "SET key" to change the time system/date/time, and
change the value by using "Up/Down key". For example, if you want to change the date, select the
change of year/month/day by using "Left/Right key", and select the specified date by using "Up/Down
key".
13.8 Wi-Fi
After entering the first-level menu on the Setting page, select Wi-Fi option and press "SET key"to
enter the sub-menu. Press "SET key" to open theHotspot, press "Down key" to select the Hotspot ID
and password, and set up by using "SET key".
13.9 USB mode
After entering the first-level menu on the Settings page, select "USB mode" option and press "SET
key"to enter the Sub-menu of "USB mode". Select "USB storage /USB Projection" by using"Up/Down
key"and press"SET key" to select.
13.10 Brightness
After entering the first-level menu on the Setting page, select "Brightness" option, and select the
intensity of brightness (1-100) by using"Up/Down key".
16
Page 17
Professional Thermal Imager User Manual
13.11 Automatic Shutdown
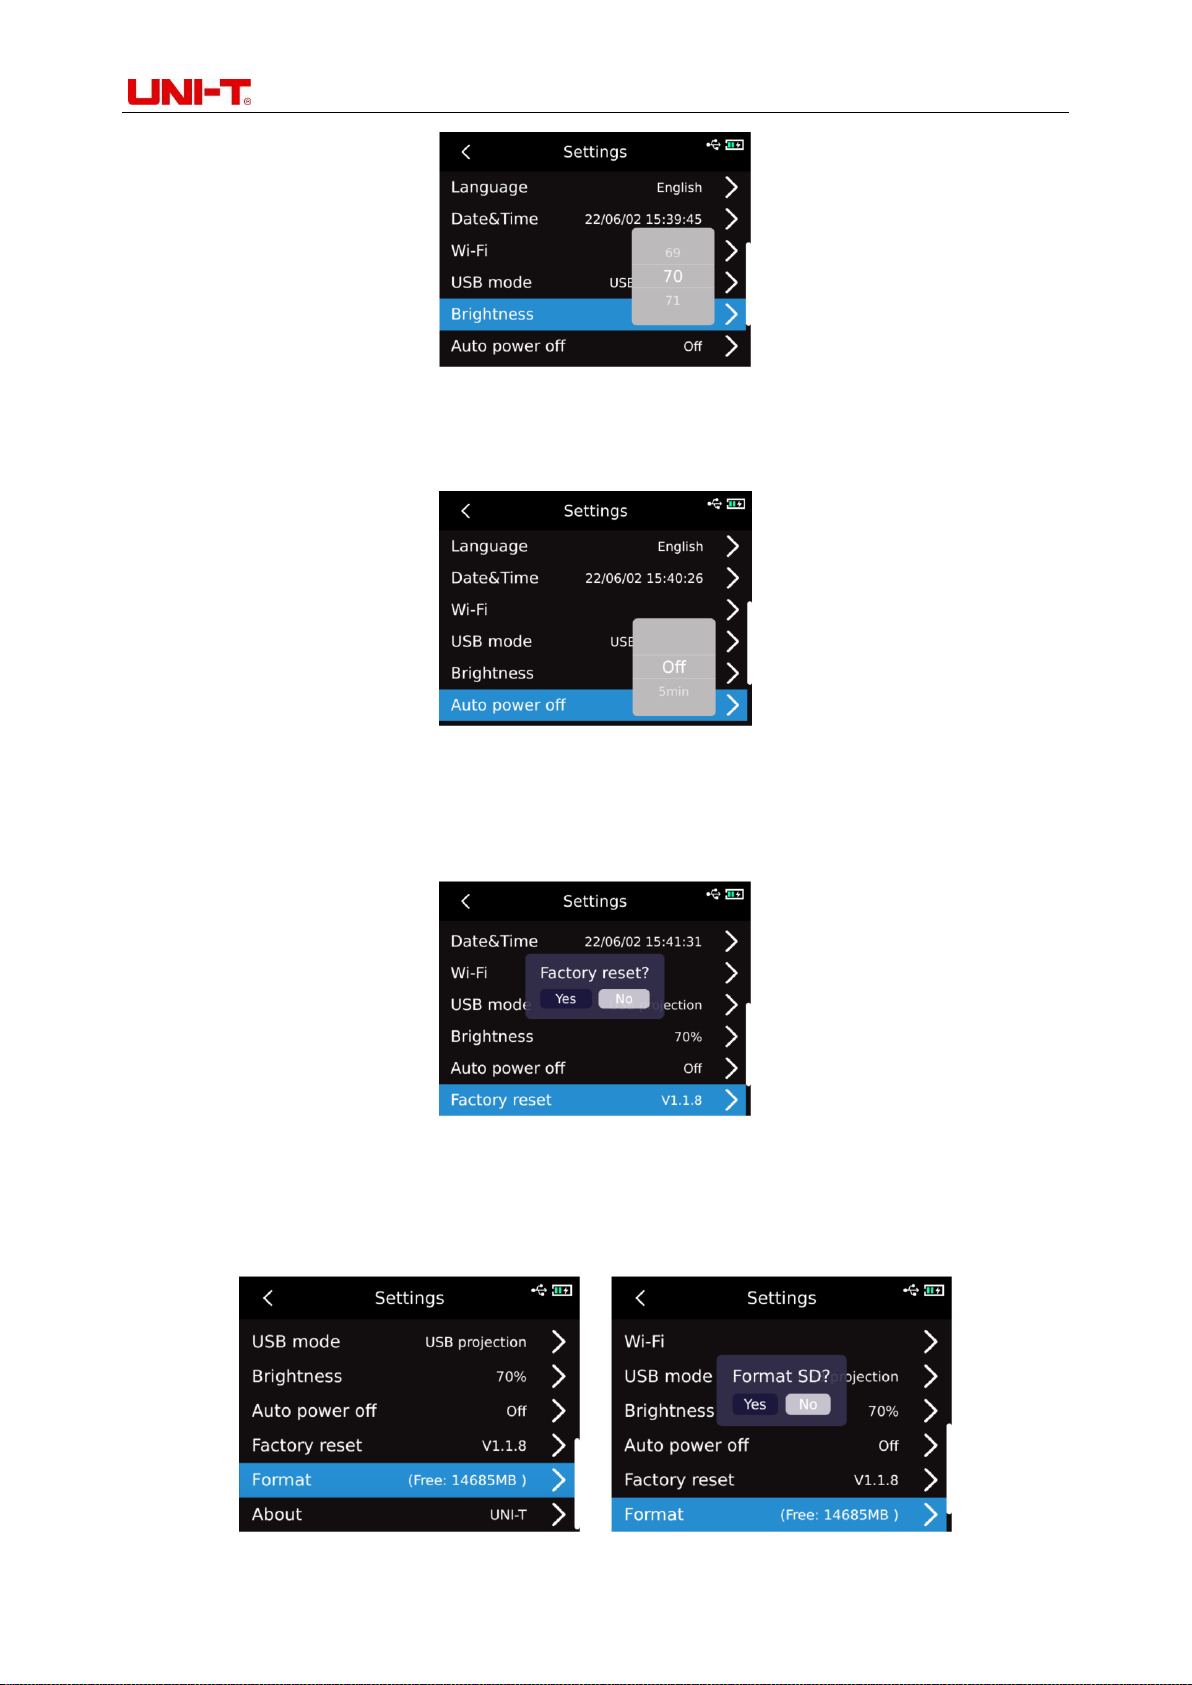
After entering the first-level menu on the Setting page, select "Automatic Shutdown" option, and
select Off /5 /10 /20 /30 /45 /60 /90 by using"Up/Down key".
13.12 Factory reset
After entering the first-level menu on the Settings page, select the option of "Factory reset" option,
press "SET key", and the prompt "Shutdown and factory reset" will pop up. If you select Yes, the device
will automatically shut down, and the instrument will restore factory settings after manual startup.
13.13 Formatting
After entering the first-level menu on the Settings page, select the "Formatting" option and press
the "SET key". If there is SD card, the message "format SD card" will pop up? If you select Yes, will
format the SD card. If there is no SD card , the message "Unknown"will be displayed.
17
Page 18
Professional Thermal Imager User Manual
13.14 About
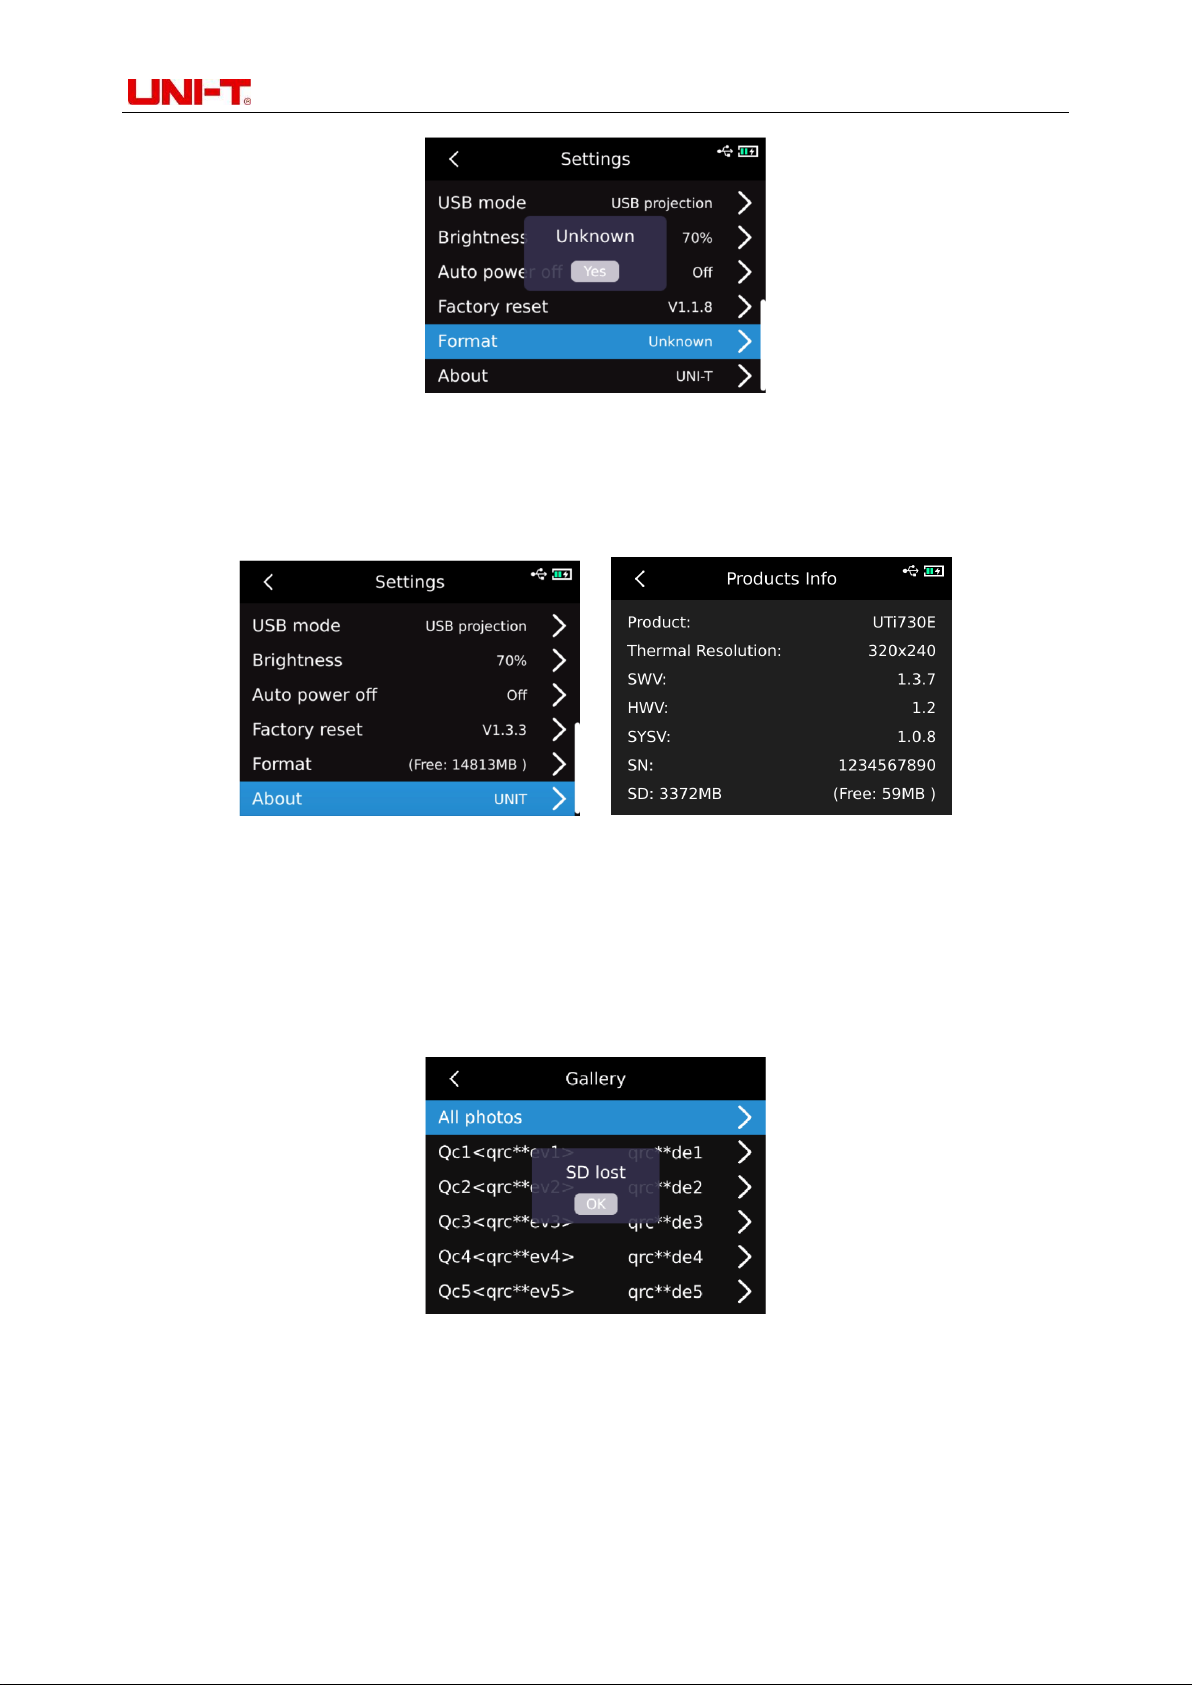
After entering the first-level menu on the Settings page, select "About"option and press "SET key"
to enter the sub-menu of "Product Information". Then you can view product model, infrared resolution,
hardware version, system version, SN, SD capacity and other related product information.
14. SD Card
The device supports microSD cards to store images. In order to prevent excessive image data
from affecting the operating speed, should periodically copy backup data and clear the data in the card.
In order to avoid data abnormalities caused by hot swap, do not remove or insert the SD card repeatedly.
Try to remove or insert the SD card when it is powered off. If you remove the SD card when viewing or
operating an image, the message "SD card is lost" will be displayed.
15. Maintain
Clean the structural housing with the damp cloth or weak soapy solution. Do not use the grinder,
isopropyl alcohol or solvent to clean the lens/window of the instrument housing.
16. Safety precautions
In order to guarantee the accurate measurement results, please read the instructions carefully.
18
Page 19
Professional Thermal Imager User Manual
Material
Emissivity
Material
Emissivity
Wood
0.85
Black paper
0.86
Water
0.96
Poly
carbonate
0.8
Brick
0.75
Concrete
0.97
Stainless
steel
0.14
Copper oxide
0.78
Adhesive
tape
0.96
Cast iron
0.81
Aluminium
plate
0.09
Rust
0.8
Copper plate
0.06
Gypsum
0.75
Black
aluminium
0.95
Oil paint
0.9
Human skin
0.98
Rubber
0.95
Asphalt
0.96
Soil
0.93
PVC plastics
0.93
Please be sure to use the product according to the instructions, otherwise the product will not be free
of warranty after damage. Do not use the instrument in inflammable, explosive, humid or corrosive
environment. Do not continue to use the instrument when it is damaged, broken or corrected, which
will cause wrong test results. Obtain the actual temperature by referring to the radiation coefficient
information; otherwise, the measured temperature may be inaccurate.
Do not aim the lens at the hot light source, like the sun, so as to avoid damage to the lens or
thermal imaging detector. Do not use the product in an extremely hot, cold, dusty, or high-humidity
environment. For specific requirements on temperature and humidity, please see the product
parameter table.
The system supports USB cable to charge the device, but in order to improve charging efficiency,
it is recommended to remove the battery pack and charge the battery pack separately.
17. FCC Compliance statement
This device complies with Part 15 of the FCC Rules. Operation is subject to the following two conditions:
(1) this device may not cause harmful interference, and (2) this device must accept any interference
received, including interference that may cause undesired operation.
18. Common emissivity table
19
 Loading...