

Page 1

Measurement Operation
Before measurement, anticlockwise circumgyrate the
red cover and rock the input terminal.
When all themeasurem en t has bee n comp le te d,
deasil circumgyrate the red cover then hide the input
terminal. (see gure 3)
Figure 3
1. AC / DC Voltage auto Measurement.
Warning
To avoid harm to the Meter, never input higher than
300 V voltage al th ou gh i t is p os si bl e to m easure
higher voltage.
To measure Voltage, connect the Meter as follows:
● Set the switch to V .
● Auto measuremeng mode is a default. Under this
mode can measure AC voltage and DC voltage.
● Connect the test leads across with the object
being measured. The measured value shows on
the display.
● When voltage measurement has been completed,
disconnect the connection between the testing
leads and the circuit under test, and remove the
testing leads away from the input terminal of the
meter.
Note:
The threshold voltage of AC voltage is around 400mV.
2. DC Voltage Measurement
Warning
To avoid harm to the Meter, never input higher than
300 V voltage al th ou gh i t is p os si bl e to m easure
higher voltage.
● Set the switch to V .
● Press SELECT to select DC voltage measurement
mode.
● Connect the test leads across with the object
being measured. The measured value shows on
the display.
● When voltage measurement has been completed,
disconnect the connection between the testing
leads and the circuit under test, and remove the
testing leads away from the input terminal of the
meter.
International Electrical Symbols
Deciency of Built-In Battery
Grounding
AC (Alternative Current)
DC (Direct Current)
Double Insulated
Continuity Test
AC or DC
Diode
Conforms to Standards of European
Warning. Refer to the Operating Manual
The Meter Structure
(see gure 1)
1. Front Housing 2. Functional buttons
3. Switch 4. LCD Display
5. Input Terminals
Display Symbols
(see gure 2)
Figure 2
1. Indicates auto scan mode
2. High voltage indicator
3 Data hold is active
4. Indicates negative reading
5. The meter is in the autorange mode
6. Indicator for AC voltage
7. Indicator for DC voltage
8. The battery is low
Warning: To avoid false readings, which could
lead to po ssi ble el ect ric sh ock or personal injury,
replace the battery as soon as the battery indicator
appears.
9. Minimum reading.
10. Maximum reading.
11. The unit of Capacitance
12 Test of diode
13. The continuity buzzer is on.
14. V : Volts. The unit of voltage.
mV : Millivolt. 1x10 or 0.001 volts.
15. Ω: Ohm. The unit of resistance
kΩ : kilohm. 1x10 or 1000 ohms.
MΩ: Megaohm. 1x10 or 1,000,000 ohms
Button function and auto power off
1.SELECT
Press SELECT to switch between resistance, AC/DC
voltage, continuity buzzer and diode measurement
modes. Press and hold more than 2 seconds in or
exit “sleep” mode.
UT118A/B Operating Manual
Pen Type Meters
UT118A/B
Operating Manual
Overview
This Operating Manual covers information on safety
and cautions. Please read the relevant information
carefully and observ e al l th e Warnings and Notes
strictly.
Warning
To avoid electric shock or personal injury, read the
"Safety Information" and "Rules for Safe Operation"
carefully before using the Meter.
The Model UT118A and UT118B (hereafter referred
to as “the Meter”) are 3000 counts pen type digits
millimeters. The Meter uses large scale of integrated
circuit with professional multimeter IC as its core and
has full range overload protection.
The Meter measures or tests the following:
● AC/DC voltage
● EF Function (UT118B only)
● Resistance
● Diode
● Continuity
● Capacitance
Unpacking Inspection
Ope n the package case an d take ou t the M eter.
Ch ec k t he follo wi n g ite ms car ef ull y to see any
missing or damaged part:
Item Description Qty
1 English Operating Manual 1 piece
2 Test Lead 1 pair
In the event you nd any missing or damage, please
contact your dealer immediately.
Safety Information
This Mete r compli es with standard s EN6101 0: in
pollution degree 2, over voltage category (CATIII
300V) and double insulation.
CATI II : Dist ri bu ti on l ev el , fixe d inst al la ti on , with
smaller transient over voltages than CAT IV.
Use the Me ter only as spe cif ied in this operating
manu al, ot her wise the protection provi ded by the
Meter may be impaired.
In t hi s m an ual , a Warnin g ide nti fi es con di tio ns
and actions that pose hazards to the user, or may
damage the Meter or the equipment under test.
A Note identies the information that user should pay
attention on.
Rules For Safe Operation
Warning
To avoid possible electric shock or personal injury,
and to avoid possible damage to the Meter or to the
equipment under test, adhere to the following rules:
● Before using the Meter inspect the case. Do not
use the Meter if it is damaged or the case (or part
of the case) is removed. Look for cracks or missing
plastic. Pay attention to the insula tion around the
connectors.
● Inspect the test leads for damaged insulation or
exposed metal. Check the test leads for continuity.
Repl ace damage d test leads with ident ical model
number or electrical specifications before using the
Meter.
● Whe n using the test leads, keep your fingers
behind the nger guards.
● Do not apply more than the rated vol tag e, as
marked on the Met er, b et we en the term in al s or
between any terminal and grounding.
● When the Meter working at an effective voltage
ove r 60V DC or 30V AC, sp ecial care sh ould be
taken for there is danger of electric shock.
● Use the proper func ti on , and rang e for your
measurements.
● Disconnect circuit power and discharge all high
voltage capacitors before testing current, resistance,
diodes or continuity.
● Repla ce the bat te ry as soon as t he batt er y
indicator appear s. With a low bat tery, the Meter
might produce false readings that can lead to electric
shock and personal injury.
● Wh e n se r v i c i n g th e Me t e r, use on l y th e
sam e mode l or id en ti cal elect ri ca l specifi ca ti ons
replacement parts.
● Th e interna l circuit of the Mete r shall not be
altered at will to avoid damage of the Meter and any
accident.
● Soft cloth and mild detergent should be used to
clean the surface of the Meter when servicing. No
abrasive and solvent should be used to prevent the
surf ace of the Meter from corrosion, damage and
accident.
● Do not use or store the Meter in an environment
of high temperature, humidity, explosive, inammable
and strong magnetic field. The performance of the
Meter may deteriorate after dampened.
Figure 1
2. HOLD
Press HOLD to enter an d exit hold mode (exce pt
under auto scan mode).
Press and hold the HOLD butt o n mor e t h an 2
second s, the mete r automati cally ho lds the value
which obtains at 6 seconds later, at this time, is
displayed and ickering.
If enter “sleep” mode under hold mode, the meter still
in the hold mode when it be turned on.
3. MAX/MIN
The MAX /M IN mode stor es minim um (MIN ) and
maximum (MAX) input values (except under auto scan
mode). Manual ranging comes when you select this
function.
Press MAX/MIN button MAX MIN MAX/MIN
and vice versa.
Under hold mode and max/min mode, should exit hold
mode rst then press and hold MAX/MIN more than 1
second to exit max/min mode.
4.
Display Backlig ht and tes t le ad light button, Press
once to turn the display backlight and test lead light
on and press again to turn the display backlight and
test lead light off. It will automatically off after around
1 minute.
5. AUTO POWER OFF
To preserve battery life, the Meter automatically goes
into a “sleep” mode if you do not press any button for
around 10 minutes. The Meter can be activated by
pressing any button, then returns to the display for the
function selected previously
6. BUZZER
The buz zer ph ona te go with every time button be
effectual pressed. When the meter will auto power off
in 20 seconds the buzzer beeps three times. Before
power off there will be a long time buzzer beeps.
-3
3
6
Page 2
E. Continuity Measurement
Range Resolution Remark
Open Circuit Voltage around
-1.2V;Buzzer beeps at resistance
≤10Ω; Buzzer not sound when
resistance > 70Ω;
F. Diodes Measurement
Range Resolution Overload Protection
1mV 300Vrms
Remark: Open Circuit Voltage around 3V, Displays
approximate forward voltage drop.
G. Capacitance
Range Resolution Accuracy Overload Protection
3nF 0.001nF
30nF 0.01nF
300nF 0.1nF
3μF 1nF
30μF 10nF
300μF 100nF ±(5%+5)
3mF reference
Remarks:
1. Under auto scan mode the max range is 300μF.
2. There is a residual reading when the circuit is open.
To measure a small value of capacitance, subtract it
to ensure accuracy.
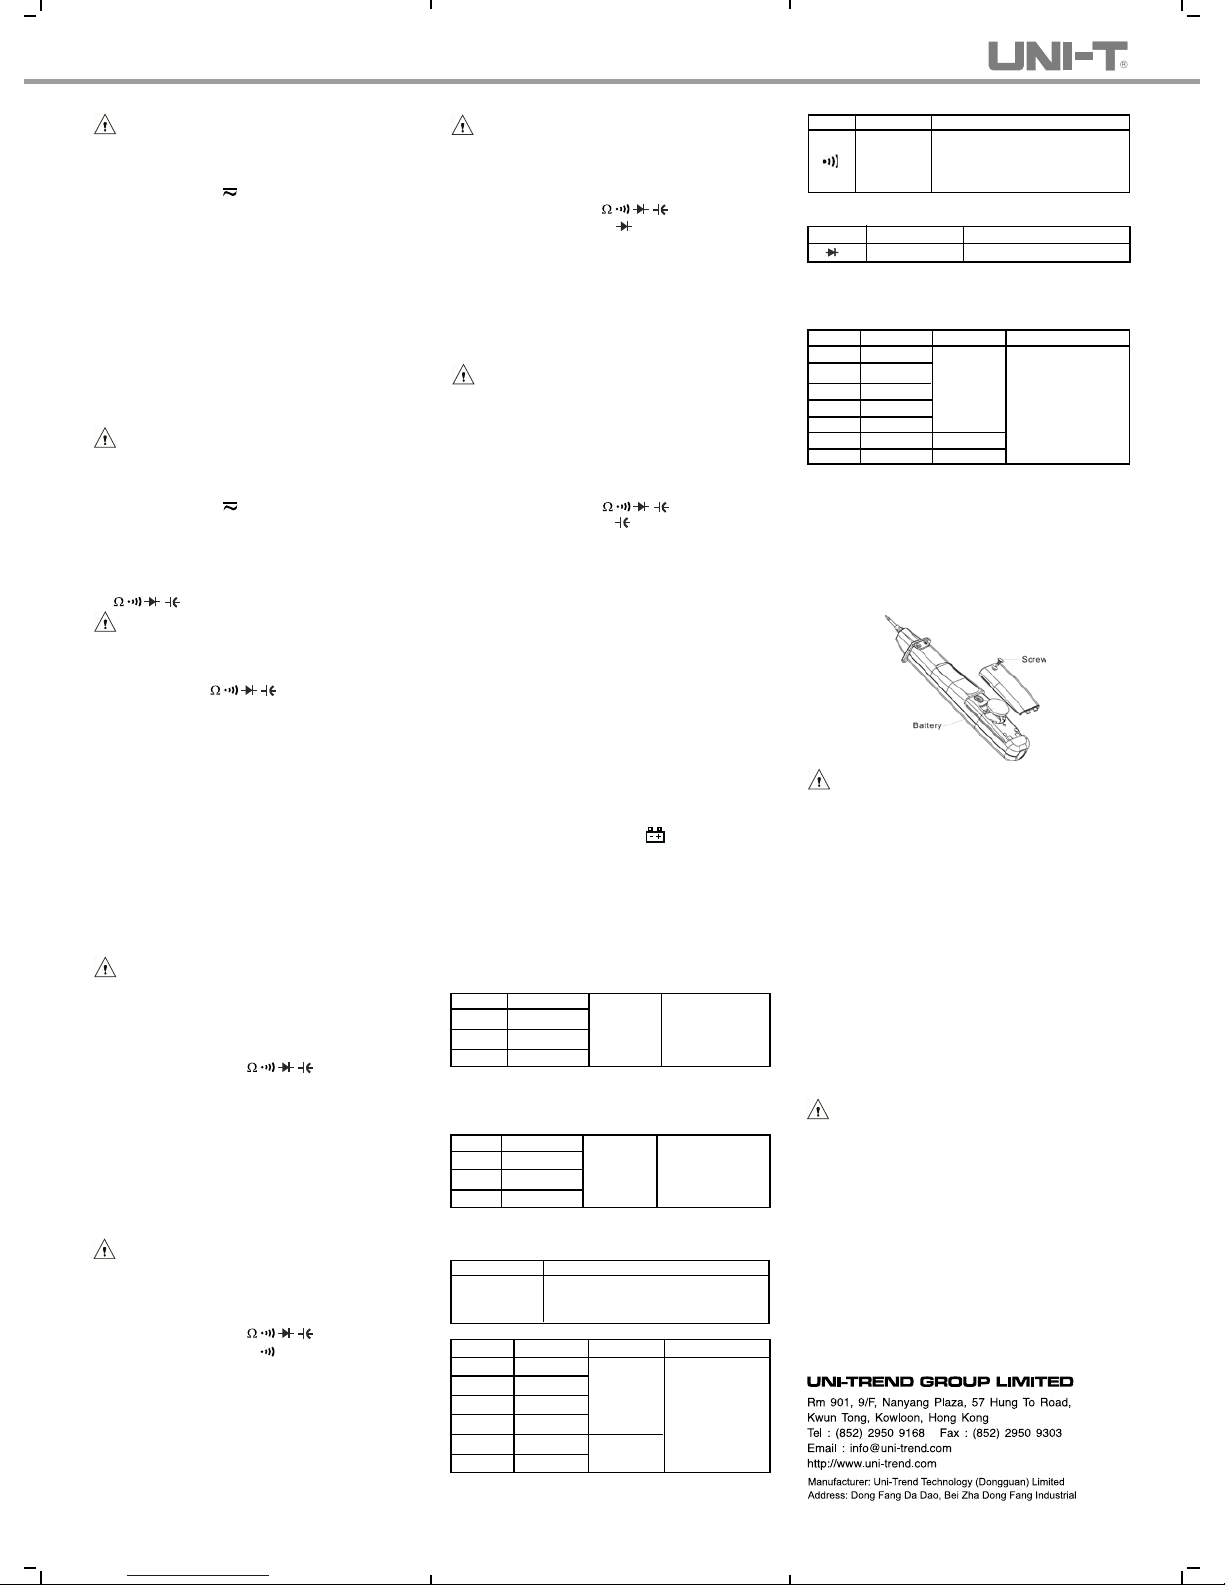
Maintenance
(see gure 4)
This section provides basic maintenance information
and battery replacement instruction.
Figure 4
Warning
Do not attempt to repair or service your Meter unless
you are qual if ied to do so a nd ha ve the rele vant
calibration, performance test, and service information.
To avoid electrical shock or damage to the Meter, do
not get water inside the case.
A. General Service
● Periodically wipe the case with a damp cloth and
mild detergent. Do not use abrasives or solvents.
● To clean the terminals with cotton bar with
detergent, as dirt or moisture in the terminals can
affect readings.
● Turn the Meter off when it is not use and take out
the battery when not using for a long time.
● Do not store the Meter in a place of humidity,
high temperature, explosive, inammable and
strong magnetic eld.
B. Replacing the Battery
Warning
To avoid false readings, which could lead to possible
electric shock or personal injury, replace the battery
as soon as the battery indicator appears.
To replace the battery:
1. Turn the Meter off. Disconnect the connection
between the testing leads and the circuit under test,
and remove the testing leads away from the input
terminals of the Meter.
2. Remove the screw from battery compartment and
separate the battery compartment from the case
bottom.
3. Remove the battery from the battery compartment.
4. Replace the battery with a new 3V battery
5. Rejoin the case bottom and the battery
compartment, and reinstall the screw.
UT118A/B
Operating Manual
Development District,Hu Men Town,Dong Guan City,
Guang Dong Province,China
3. AC Voltage Measurement
Warning
To avoid harm to the Meter, never input higher than
300 V volt ag e alth ou gh it is po ss ib le to measu re
higher voltage.
● Set the switch to V .
● Press SELECT to select AC voltage measurement
mode
● Connect the test leads across with the object being
measured. The measured value shows on the
display.
● When voltage measurement has been completed,
disconnect the connection between the testing
leads and the circuit under test, and remove the
testing leads away from the input terminal of the
meter.
Note:
The threshold voltage of AC voltage is around 400mV.
4. EF Measurement( UT118B only)
Warning
To avoid harm to the Meter, never input higher than
300 V volt ag e alth ou gh it is po ss ib le to measu re
higher voltage.
● Set the switch to V EF and remove the test lead
from the input terminal.
● Press SELECT to select EF measurement mode.
● Unconnected measurement. Place the red
terminals towards the object being measured.
5. auto measurement
Warning
To a voi d damages to the Meter or to the de vices
under test, disconnect circuit power and discharge all
the high-voltage capacitors before measurement.
● Set the switch to .
● Auto measuremeng mode is a default, under this
mode can measure Resistance, Diode, Continuity
and Capacitance automatically.
● For better accuracy, it better separate the object
being measured from the circuit before
measurement.
● When voltage measurement has been completed,
disconnect the connection between the testing
leads and the circuit under test.
Note:
Under auto measurement mode, when input:
Resistance: <15Ω or >10MΩ
Capacitance: <400pF or >1mF
Will get an irresponsible value.
6. Resistance Measurement
Warning
To a voi d damages to the Meter or to the de vices
under test, disconnect circuit power and discharge
all the high -volt ag e capac it ors befor e measu ri ng
resistance.
To measure resistance, do the following:
● Set he rotary switch to .
● Press SELECT to select Ω measurement mode.
● Connect the test leads across with the object being
measured.
● When resistance measurement has been
completed, disconnect the connection between the
testing leads and the circuit under test, and remove
the testing leads away from the input terminals of
the Meter.
7. Continuity Test
Warning
To a voi d damages to the Meter or to the de vices
under test, disconnect circuit power and discharge all
the high-voltage capacitors before continuity test.
To measure resistance, do the following:
● Set he rotary switch to .
● Press SELECT to select measurement mode.
● Connect the test leads across with the object being
measured.
● The buzzer sounds continuously if the resistance
of a circuit under test is≤30Ω, it indicates the circuit
is in good connection.
Note:
When continuity measurement has been completed,
disconnect the connection between the testing leads
and the circuit und er test, and remove the testin g
leads away from the input terminals of the Meter
8. Diodes Test
Warning
To avoid damages to the Meter or to the devices
under test, disconnect circuit power and discharge all
the high-voltage capacitors before measuring diodes.
To measure diode, do the following:
● Set he rotary switch to .
● Press SELECT to select measurement mode
● For better accuracy, it better separate the object
being measured from the circuit before
measurement.
● When diodes measurement has been completed,
disconnect the connection between the testing
leads and the circuit under test.
9. Capacitance Measurement
Warning
To avoid damage to the Meter or to the equipment
under test, disconnect circuit power and discharge
al l hi g h-vo lta g e ca pac ito r s be for e m e a s urin g
capacitance. Use the DC Voltage function to conrm
that the capacitor is discharged.
To mea su re capacit an ce, c on nect the M et er as
follows:
● Set he rotary switch to .
● Press SELECT to select measurement mode
● For better accuracy, it better separate the object
being measured from the circuit before
measurement.
● When diodes measurement has been completed,
disconnect the connection between the testing
leads and the circuit under test.
General Specications
● Maximum voltage between red Terminals and
Grounding: 300Vrms.
● Maximum Display: 3000. Updates 4 times/second
● Temperature:
Operating: 0℃~40℃ (32℉~104℉);
Storage: -10℃~50℃( 14℉~122℉).
● Relative Humidity: ≤75% @ 0℃~30℃;
≤ 50% @ 31℃~40
℃
● Altitude: Operating: 2000m; Storage: 10000m.
● Battery Type: 3V Li-MnO2 Button cell battery
● Battery Deciency: Display “ ”.
● Dimensions (HxWxL): 20.18x26.5x181.5mm
● Weight: Approx.90g (battery included).
Accuracy Specications
Accuracy:±(a% reading+b digits)guarantee for 1 year.
Operating temperature: 18℃ ~ 28℃.
Relative humidity: <75%.
A . AC Voltage
Range Resolution Accuracy
Overload Protection
3V 0.001V
30V 0.01V ± (1%+4) 300Vrms
300V 0.1V
Remark: Input Impedance: ≥10MΩ
Frequency Response: 40Hz ~ 400Hz
B. DC Voltage
Range Resolution Accuracy
Overload Protection
3V 0.001V
30V 0.01V ± (1%+3) 300Vrms
300V 0.1V
Remark: Input Impedance: ≥10MΩ
C. EF Test (UT18B Only)
Range Remarks
<10mm: buzzer beeps;
220V/50H 10~50mm: may and may not beeps;
>50mm: Buzzer not sound
D. Resistance
Range Resolution Accuracy
Overload Protection
300Ω 0.1Ω
3kΩ 1Ω
30kΩ 10Ω
300kΩ 100Ω 300Vrms
3MΩ 1kΩ
30MΩ 10kΩ
Remark: Under auto scan mode the max range is
3MΩ.
± (1%+3)
± (1.5%+5)
±(3%+5)
300Vrms
0.1 Ω
 Loading...