

Page 1

USP-1060
ELECTRIC PRESSURE COOKER
ЭЛЕКТРИЧЕСКАЯ СКОРОВАРКА
INSTRUCTION MANUAL
РУКОВОДСТВО ПО ЭКСПЛУАТАЦИИ
Page 2

ENGLISH ENGLISH
ELECTRIC PRESSURE COOKER
Thank You for buying this UNIT product!
Attention! When you buy UNIT products you have to get the completed warranty card
from shop assistant. Only if you have one you can use the manufacturer’s warranty in
all UNIT service centers for household appliances.
READ ALL THE INSTRUCTIONS BEFORE USING
Purpose of the appliance: Appliance is designed to prepare various dishes under pressure.
CONTENTS OF THE INSTRUCTION MANUAL
SAFETY NOTICES.................................................................................................................3
FEATURES..........................................................................................................................4
APPLIANCE DESCRIPTION....................................................................................................5
BEFORE USE........................................................................................................................7
APPLIANCE USE...................................................................................................................7
STEAMER FUNCTION..........................................................................................................10
CLEANING..............................................................................................................10
TROUBLESHOOTING............................................................................................................10
TECHNICAL CHARACHTERISTICS.......................................................................................11
SPECIFICATIONS................................................................................................................11
RECIPES..............................................................................................................................26
SAFETY NOTICES
When using electrical appliances, basic safety precautions should always be followed to reduce
the risk of fire, electric shock, and/or injury to persons, including the following:
• Before use, read these instructions carefully.
• Never use the utensils along with inflammable products or in a humid location.
• The amount of water and food added to the Inner Pot should be determined in line with step
2 of Appliance Use.
• Never damage the Sealing Gasket or replace it with other rubber gaskets or tension gasket.
• Never twist the Inner Steel Ring with hand or other tools by force. If the Steel Ring slips off
the place, stop using it and replace the Lid.
• Never put any weight on the Relief Valve or replace it with other substitutes.
• The bottom of Inner Pot and Heating Plate surface should be kept clean. Never heat the
Inner Pot on other thermal sources or have it replaced with others pots.
• The Inner Pot is covered with anti-sticking coating. To avoid scratch, wooden or plastic
ladles are recommended.
• The maximum period for heat preservation is 24 hours. However, the duration less than 6
hours is recommended to ensure delicious taste.
• If there is large amount of steam escaping form the edge of the Lid during cooking, remove
the plug immediately and send the utensil to authorized service station for maintenance.
• During moving the appliance it is recommended to hold the Ears instead of the Handle for
safety.
• Never disassemble the utensil by yourself or replace with accessories other than assembled.
• During cooking, in case of alarm sound is heard and one of the following malfunction
codes is displayed, stop using the appliance immediately and send it to an authorized service station for maintenance.
USP-1060
2 3
Page 3

ENGLISH ENGLISH
Error codes
Display code E1 E2 E3 E4
The problem Short circuit of
the sensor
WARNING!
1. In the condition of steam release, keep your face away from the Relief Valve to avoid an
accident.
2. Do not touch the hot Lid immediately after cooking to avoid scald.
3. For safety never cover the Lid edge with towel.
4. Never attempt to open the Lid by force if there is pressure inside. Itisdangerous.
5. After cooking before opening the Lid first cut the power.
KEEP THIS INSTRUCTION MANUAL!
FEATURES
Electric pressure cooker is a modern and multifunctional device which will help you to cook your
favorite dishes fast and easy. In the electric pressure cooker products are prepared by steaming or in it’s own juice, which allows not to use lard or oil. This saves minerals and vitamins, that
lost during usual boiling and fry-up.
Electric pressure cooker is a perfect device for modern housewifes who not only take care of
their health, but also value their time. You don’t need to stay at the stove and watch the food
cooking. You just put in pressure cooker all needed ingredients and set the parameters of
preparing your dish.
Model USP-1060D is equipped with an adapted menu, which allows you to choose the needed
regime for the dish you want to cook. Now you don’t need to remember temperature values
each time when you cook a new dish. Advantages of pressure cooker USP-1060D:
Multifunction and easy operation
• This model of pressure cooker combines functions of a rice cooker, a steamer and a pres-
sure cooking pan. With the help of this appliance you can cook rice, porridge, soup, you can
stew, steam, braise. You don’t have to adjust time or pressure rate just touch the button of a
certain product. And the appliance will work automatically. After cooking finishes you’ll hear a
sound and the cooker will start keeping warm automatically.
• 24-hours postponed start: in case you don’t want to start cooking at once but after some
time, you can use the function of postponed start, when the setting time is up, it will start cooking automatically.
• Memory function: in case of sudden power cut during cooking, it will resume the former
process automatically when power is on again.
Fast Cooking: time and energy saving
• Fast cooking with high pressure (high temperature) that is determined by different types of
food, an optimal way of cooking is chosen for every food type, it saves more time and energy,
reduces cooking time by 15% and energy by 20 % compared with conventional cooking.
• It reduces cooking time by as much as 40% and energy as much 45% compared with con-
ventional electric when braising.
Preserves nutrition, makes food more delicious and healthy
• When oxygen is mixed with food during heating it destroys vitamins. Airtight cooking with
this pressure cooker conserves nutrition and ensures more delicious food as no oxygen is let
in during cooking.
• Cooking at high temperatures (110-115°C) ismore healthy.
• No escaping steam and overflowed food, keepsyour kitchen clean.
Combination of stylish design, quality and safety
This model has stylish design, is equipped with a modern and comfortable panel and eight degrees of protection, which make the work of the appliance more safety and comfortable.
Open circuit of
the sensor
Error of the
pressure regulator
Protectionagainstoverheating
Safe operation
• Safety set for opening or closing the Lid. When the Lid fails to fit the Inner Pot well, the Inner
Pot can not get to high pressure. If there is pressure inside, the Lid can not be opened.
• Safety pressure regulator. If pressure (temperature) control is out of work and the pres-
sure inside is over the maximum working pressure, the Relief Valve will switch to “выпускпара”
automatically for safety.
• Safety pressure release set. If pressure regulator is out of work and the pressure inside
is over the maximum working pressure the pressure release set will release pressure from the
edge of the Lid to avoid burst.
• Safety temperature-limiting set. In case the Inner Pot is empty the power will be cut
automatically.
• Safety over-temperature set. In case of over-temperature, the power will be automati-
cally cut.
• Magnetic protective device. If the lid is not covered well the appliance will not work.
• Connective lid – the construction of the lid allows to have the lid clipped to the body of the
appliance when it’s open.
The main parameters in cooking in a pressure cooker are the following two:
• Time of cooking under pressure - it is the time of a cooking under pressure cycle. If nec-
essary, you can change the time value of cooking under pressure at the Control Panel.
• Warm-up time (the keeping warm function) - when the cooking cycle ends, the keep-
ing warm function turns on automatically and warming-up cycle begins. With this cycle the
temperature is maintained in the appliance from 60 to 80 ° C. The maximum usage time of the
keeping warm function is 24 hours, after which you have to turn the appliance off and disconnect it from the power supply.
APPLIANCE DESCRIPTION
1. Plastic part of the lid
2. Aluminum part of the lid
3. Steel part of the lid
4. Sealing ring
5. Outer plastic part of the body
6. Inner bowl with non-stick coating
7. Handle for easy movement of the appliance
8. Middle steel part of the body
9. Control panel with display and automatic programs
Control Panel Buttons
4 5
Page 4

ENGLISH ENGLISH
1. Indicator of the function of the delayed startup to 24 hours
2. Indicatorofthe “Rice” program
3. Delayed start up to 24 hours
4. Manual setting of the time of keeping warm
5. The “Rice” program
6. Indicatorofthe “Porridge” program
7. Indicatorofthe “Fish” program
8. The “Porridge” program
9. The “Fish” program
10. Indicator of the time of keeping warm
11. The “Meat/Chicken”program
12. The “Steamer” program
13. Indicator of the “Meat/Chicken” program
14. Indicatorofthe “Steamer” program
15. The “Soup” program
16. Cancel a program, function
17. The function of the keeping warm up to 24 hours
18. Indicator of the “Soup” program
19. Indicator of the function of the temperature maintenance up to 24 hours
Control Panel Buttons
Button name What for Programmed time,
Delayed start
(Отложенный старт)
Time of the pressure
(Времядавления)
Keeping warm
(Поддержание
тепла)
Cancel (Отмена) Canceling the func-
Rice (Рис) Cooking rice 12 With the button
With this function,
you can set a countdown to the moment
when the pressure
cooker will start
cooking
This function allows
to increase the time
of pressure maintenance manually
Keeping warm function can be turned on
manually by pushing
the button. Also appliance switches to
keeping warm function automatically
after completion of
the cooking program
tion or a program
minutes
- Interval – 1 hour,
- Interval of the in-
- Interval – 1 hour,
-
Comments
max – 24 hours
crease for one-click
– 1 minute
max – 24 hours
“pressure time” it
is possible to add
from 1 to 20 minutes
more.
Porridge (Каша) Cooking porridge 10 With the button
Fish (Рыба) Cooking fish 5 With the button
Meat/Chicken
(Мясо/цыпленок)
Steam-cooking
(Пароварка)
Soup (Суп) Cooking various
Note: The time shown in the table is the average, and in different situations it may need to
change it depending on the characteristics of the product. We recommend to identify empirically most appropriate time of cooking.
BEFORE USE
• Remove the packing materials from the inside and outside of the appliance and from the
accessories.
• Place the cooker on a flat dry surface.
• Wash all the parts, which may contact with the food including the Inner pot, the Measuring
Cup, the Ladle and the Steamer in warm soap water, rinse and dry.
• Wipe inside and outside of the appliance, and the Lid with the wet sponge and than with a
clean dry cloth.
• Before connecting the cooker to the supply, check the applicable voltage indicated on the
appliance to see whether it corresponds to that of the main supply (220-240 V, 50-60 Hz).
• Don’t dip the appliance into water or other liquid!
APPLIANCE USE
1. Open the Lid turning it counter-clockwise to the clamping position and then lift it.
Cooking meat/
chiсken
Steaming with the
use of a special
grating
soups
25 With the button
15 With the button
20 With the button
“pressure time” it
is possible to add
from 1 to 20 minutes
more.
“pressure time” it
is possible to add
from 1 to 20 minutes
more.
“pressure time” it
is possible to add
from 1 to 20 minutes
more.
“pressure time” it
is possible to add
from 1 to 20 minutes
more.
“pressure time” it
is possible to add
from 1 to 20 minutes
more.
6 7
Page 5
ENGLISH ENGLISH
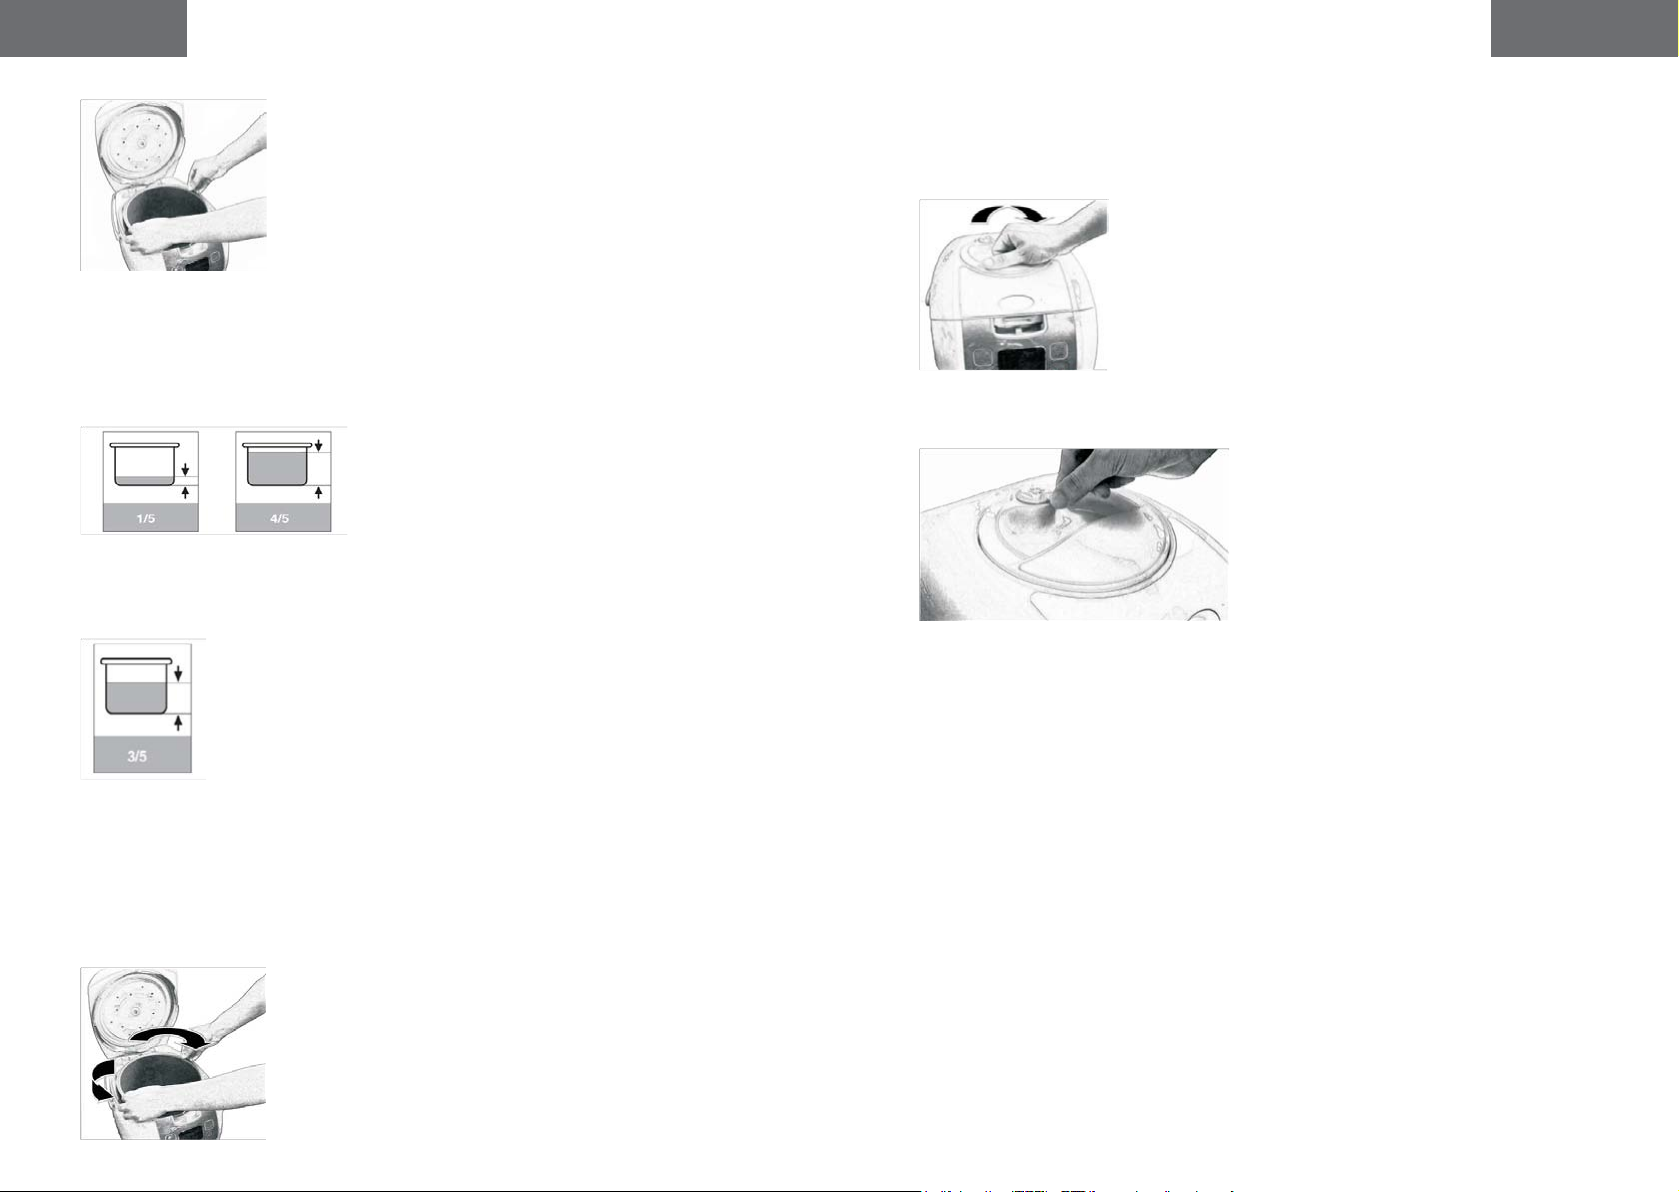
2. Take out the Inner pot. To do this, take the pot with both hands and pull it upward.
The walls inside of the pot has a dual scale of measurement:
- in portions - 1/5, 2/5, 3/5, 4/5;
- and in cups (CUP) - 2, 4, 6, 8;
- and also FULL (full bowl).
Fill the Inner pot with products that you are going to cook, and water, paying attention to the
fact that the level of content should be located between markers 1/5 and 4/5 (minimum level
mark - 1/5, maximum level mark - 4/5).
Pic.1 Minimum and maximum levels of filling the pot
For products that increase in size during the cooking process, the maximum level shall
not exceed the 3/5!
Pic.2 Maximum level of filling the pot while cooking the products that increase in size.
Note: to make the process of cooking evenly it is necessary that the product was completely
submerged in water, otherwise the product which is above the water level may be half-done.
3. Clean the Inner coating of the appliance and Heating element by wiping them with a clean,
slightly moist cloth and dry thoroughly. Before you put the potinto the appliance, make sure that
on the surface of the Inner coating and the Heating element are no contamination.
4. Carefully take the pot with food with both hands by the edges and place it gently pushing.
After you place the pot, gently turn it to securely lock in the device.
5. Next, seal the lid by following these steps:
- Place the elastic ring on the inside of the appliance.
- If the sealing ring loose or is in incorrect position, fix it in an Inner steel ring in a proper way.
- Next take the Lid handle and cover the appliance with it, turn the Lid clockwise until it stops,
at the same time you should hear a slight click. This means, that the Lid is securely locked in
needed position.
6. Set the pressure regulator in the down position, as shown in the figure. In this position, air
can not come out of the device, so it becomes possible to increase the pressure inside the
device.
7. Switch the power on - the display shows “00:00”. Now you should preset cooking parameters on the panel.
Timer setting (skip this step if you don’t need to postpone the time of starting cooking).
In case you want to postpone the time of cooking then before choosing any program press the
Button “Отложенныйстарт” as many times as needed. The figures show the time of the delay,
for example, if you see “00:30” - it means that cooking will start in 30 minutes. The maximum
time setting is 24 hours.
Choose the menu according to different recipes
Press one of the Menu Buttons in relation to the kitchen-stuff you’re cooking (press “Рис” Button for rice cooking, for example) and the indicator of this button lights up.
If necessary you can change the time of cooking with «Времядавления» button after choosing
the appropriate program button.
Note: you should remember that the programmed time is approximate and you can specify it
according to your preferences.
Note: in case the kitchen-stuff don’t belong to any group in the menu you should choose a
similar group.
The time of cooking (programmed)
This time is indicated after you chose the exact type of food button and means the time of cooking after the pressure inside achieves working state. It doesn’t include the time until achieving
working pressure.
8. After time setting wait for some seconds and the process will start.
Pressure holding process begins when pressure inside is high enough.
9. When pressurizing is over, you’ll hear 3 sound signals, they indicate the end of cooking and
the start of keeping warm process.
Press «Отмена»Button to cancel parameter setting or current working status.
10. Take out the food in the following steps:
8 9
Page 6

ENGLISH ENGLISH
• Turn the Relief Valve to down position to release steam.
Note: When cooking fluid food, such as porridge, to avoid squirting up remember not to release
the steam immediately after 3 sound signals. Let the pressure cooker cool down naturally.
Otherwise the fluid food may squirt and result in damage.
• Remove the plug from the socket.
• Turn the Handle counter clockwise; open it and take the food out.
STEAMER FUNCTION
The appliance can be used as a Steamer. For this purpose use a special accessory that you
have bought with the appliance – the Steamer .
• Add some water (1/5 scale) into the Inner Pot. Put the Steamer with kitchen-stuff into the
Inner Pot and close the Lid.
• Turn the Relief Valve to down position.
• Power on the appliance with the Power Cord.
• Choosethebutton “Пароварка».
• Cooking time is up to your preferences – control the cooking time according to your food
or menu. For this use the “Время давления” button.
• Press the “Отмена” button if you would like to stop the cooking process.
CLEANING
• Remove the plug from the socket before cleaning wait until the appliance has normal tem-
perature.
• Take out the Inner Pot and clean it with a sponge or nonmetal soft brush, and then dry it
with towel.
• Rub the Inner Surface of the appliance with a soft cloth.
• Clean the outer coating of the appliance with a soft slightly wet towel. Never dip it in water
for cleaning or run water over it.
• Take off the Water Collector and clean it with a wet towel. Put it back as shown in the pic-
ture:
• Clean the Sealing Gasket, Relief Valve,and Floating Valve with soap water then dry them with
a towel. Aftercleaningputthe parts together again.
3 Steam leaks off the
Lid
4 Indicating lights are
not on
5 E1 Short circuit of the
E2 Open circuit of the
E3 Error of the pressure
E4 Protection against
There isn't a sealing
gasket in the Lid
The sealing gasket
isn't clean
The sealing gasket is
damaged or deformed
The Lid isn't fixed
properly
The appliance isn't
powered on
Someotherproblems Send the appliance
sensor
sensor
regulator
overheating
Put the sealing
gasket into the Lid
(see “Appliance use”
paragraph)
Clean the Sealing
Gasket
Change a broken or
deformed Sealing
Gasket to a new one
in a UNIT service
center
Fix the Lid properly
Check the power
cord and the plug
to a UNIT service
center
Send the appliance
to a UNIT service
center
Attention! For your safety remember that when the appliance is on it must not contact with
water or other liquids especially the cord and the base of the appliance.
You must not dip the appliance into the water to avoid electric shock, fire or injuring.
Never wash the appliance in a dishwasher!
TROUBLESHOOTING
NO. A Problem The Cause The Solution
1 Difficult to close the
Lid
2 Difficult to open the
Lid
The sealing gasket is
not fixed well
The pressure inside
is too high
Fix the sealing gasket well
Let the steam out
turning the relief
valve left or right
SPECIFICATIONS
Model Rated Volt-
USP-1060D 220-240 V 900 W 5 L 22 cm 40-70 kPa
Max Pressure
80 kPa 70-80 ºC 0-24 hours 1-60 min 0-24 hours 20000 cycles
The head office of the manufacturer : «UNIT Handelsgesellschaft G.m.b.H.»
131, Gersthofer Str., A-1180, Vienna, Austria
Exported by: «UNIT Electronics (H. K.) Limited»
3905 Two Exchange Square, 8 Connaught
Place, Central, Hong Kong
age
Keeping
warm Temperature
Power Capacity Diameter Working
Pre-set
Time
Pressurekeeping
Time
Max keep
warm Time
Pressure
Lifetime
but not more
than 5 years
from the
date of the
purchase
10 11
Page 7

ENGLISH
RUSSIAN
Made in People’s Republic of China (P.R.C.)
This appliance is to be stored and used under the following conditions:
temperature – not less than +5°C; relative humidity - not higher than 80%;
See the date of manufacture on the sticker on the appliance body or printed on
As the Manufacturer is constantly working on the improvement of its products,
the design and technical specifications are subject to change without prior
12
aggressive impurities in the air: not allowable.
the box. Date format: MMYY (month;year).
www.unit.ru
notice.
МУЛЬТИВАРКА
USP-1060
Благодарим Вас за покупку изделия фирмы UNIT!
Внимание! При покупке изделия фирмы UNIT Вы должны получить от продавца
заполненный гарантийный талон. Только при его наличии Вы сможете
воспользоваться гарантией производителя во всех сервисных центрах бытовой
техники UNIT.
ПЕРЕД ИСПОЛЬЗОВАНИЕМ ПРИБОРА ВНИМАТЕЛЬНО ПРОЧИТАЙТЕ ВСЮ
ИНСТРУКЦИЮ И СОХРАНИТЕ ЕЕ НА ВЕСЬ СРОК ЭКСПЛУАТАЦИИ.
НАЗНАЧЕНИЕ ПРИБОРА
Прибор предназначен для приготовления различных блюд под давлением.
СОДЕРЖАНИЕ ИНСТРУКЦИИ ПО ЭКСПЛУАТАЦИИ
ОСНОВНЫЕ МЕРЫ БЕЗОПАСНОСТИ.................................................................................13
ОСНОВНЫЕ ХАРАКТЕРИСТИКИ ПРИБОРА........................................................................15
ОПИСАНИЕ ПРИБОРА.......................................................................................................17
ПОДГОТОВКА К ЭКСПЛУАТАЦИИ.....................................................................................19
ЭКСПЛУАТАЦИЯ ПРИБОРА...............................................................................................20
ИСПОЛЬЗОВАНИЕ РЕШЕТКИ ДЛЯ ПРИГОТОВЛЕНИЯ НА ПАРУ........................................23
ЧИСТКА................................................................................................................................23
ПРОБЛЕМЫ, ВОЗНИКАЮЩИЕ В ПРОЦЕССЕ ЭКСПЛУАТАЦИИ И ВОЗМОЖНЫЕ ПРИЧИНЫ
ИХ ВОЗНИКНОВЕНИЯ........................................................................................................24
ОСНОВНЫЕ ТЕХНИЧЕСКИЕ ХАРАКТЕРИСТИКИ................................................................25
РЕЦЕПТЫ...................................................................................................................25
ОСНОВНЫЕ МЕРЫ БЕЗОПАСНОСТИ
При использовании прибора для предотвращения пожара, удара электрическим током
и/или какого-либо другого повреждения, необходимо всегда соблюдать технику
безопасности, включая следующие положения:
• Перед началом эксплуатации прибора внимательно изучите данную инструкцию.
• Никогда не используйте скороварку для приготовления продуктов, которые могут
загореться в процессе приготовления (легко воспламеняющихся продуктов).
• Не размещайте прибор рядом с источниками тепла, такими как отопительные приборы,
газовые и электрические плиты. Не используйте прибор в местах с повышенной
влажностью.
• Количество жидкости и продуктов, закладываемых во внутреннюю чашу, должно
соответствовать количеству, рекомендованному в п. 2 раздела «Эксплуатация прибора»
(см. Рис. 2,3). Категорически запрещается класть во внутреннюю чашу большее
количество продуктов и/или жидкости, чем это указано в п. 2 раздела «Эксплуатация
прибора» (см. Рис. 2,3).
• Категорически запрещается эксплуатация прибора, если уплотнительное кольцо имеет
какие-либо повреждения. Эксплуатация прибора допускается только с уплотнительным
кольцом поставляемым с данной скороваркой. Никогда не используйте в качестве
уплотнительного кольца какое-либо иное кольцо или предмет.
• Никогда не скручивайте и не деформируйте Внутреннее стальное кольцо рукой или
каким-либо предметом. Запрещается эксплуатация прибора при наличии каких-либо
повреждений Внутреннего стального кольца, а также в случае смещения Кольца или
его отсутствия. При наличии повреждений Стального кольца или при его отсутствии
обратитесь в сервисный центр UNIT для замены или ремонта Крышки. При этом ремонт
или замена Крышки по причине повреждений, деформации и смещения Внутреннего
стального кольца не будет считаться гарантийным случаем.
13
Page 8

RUSSIAN RUSSIAN
• Не допускайте загрязнения Предохранителя. Регулярно очищайте Предохранитель от
загрязнений.
• Снимать Крышку с прибора разрешается только когда регулятор давления находится
в положении разгерметизации.
• Регулярно очищайте дно Внутренней чаши и Нагревательный элемент скороварки, не
допускайте их загрязнения. Запрещается использовать Внутреннюю чашу каким-либо
иным способом, кроме как описано в данной инструкции. Не используйте Чашу для
приготовления каких-либо блюд на открытом огне, в микроволновой печи и т. д.
• Запрещается ставить внутрь скороварки какую-либо иную чашу или контейнер, кроме
Внутренней чаши, которая поставляется в комплекте с прибором.
• Внутренняя поверхность Съемной чаши имеет специальное антипригарное покрытие,
которое требует аккуратного и бережного обращения. Чтобы не повредить
антипригарное покрытие Чаши, рекомендуется пользоваться деревянной ложкой или
Пластиковой ложкой поставляемой в комплекте с прибором.
• Помните, что максимальное время использования функции поддержания тепла
составляет 24 часа. По истечении этого времени Вам необходимо выключить прибор,
отключив его от электросети. Запрещается использование функции поддержания
тепла более 24 часов. Запрещается использование функции поддержания тепла при
наличии во Внутренней чаше скоропортящихся продуктов.
Внимание! Помните, что данный прибор работает под давлением и требует очень
внимательного и аккуратного обращения. В случае, если давление внутри прибора
превышает норму, избыток давления будет устранен автоматически, при помощи
Предохранительного клапана. При стабилизации давления внутри прибора, избыток пара
выходит через Предохранительный клапан.
• Избегайте контакта пара с открытыми участками кожи, руками или лицом в процессе
приготовления блюд в скороварке. Существует риск получения ожога!!! Выделение
большого количества пара в процессе использования не является нормой в работе
прибора. Если это произошло, немедленно отключите прибор от электросети и
обратитесь в сервисный центр UNIT для осмотра, ремонта или настройки прибора.
• Будьте предельно осторожны когда перемещаете скороварку, в которой находится
горячая пища или жидкость. Когда двигаете или переносите прибор, держите
скороварку только за Ручки. Никогда не держите прибор за Ручку крышки, когда Вы
двигаете или переносите прибор.
Внимание! Категорически запрещается самостоятельно разбирать прибор (в т.
ч. отсоединять Основание прибора), так как это может привести к пожару, удару
электрическим током или несчастному случаю. Ремонт должен производиться только в
сервисных центрах UNIT.
• Будьте внимательны, во время эксплуатации некоторые детали прибора нагреваются.
Не прикасайтесь к горячим поверхностям прибора. При эксплуатации прибора
используйте только ручки или кнопки.
• Во избежание пожара, удара электрическим током или получения травм следите,
чтобы Съемный сетевой шнур, вилка и основание скороварки не соприкасались с
водой или иной жидкостью!!!
• Будьте особенно внимательны при эксплуатации прибора в присутствии детей и
инвалидов. Запрещается эксплуатация прибора детьми.
• Всегда отключайте прибор от электросети по окончании эксплуатации и перед чисткой.
• Отсоединяя прибор от электросети, держитесь за вилку, а не за Сетевой шнур. Перед
чисткой, и прежде чем снять или установить какую-либо деталь скороварки, дождитесь
полного остывания прибора.
• Запрещается использование электроприбора с видимыми механическими
повреждениями (в т. ч. Сетевого шнура или вилки), а также после его падения или
какого-либо другого повреждения. В этом случае обратитесь в сервисный центр UNIT
для осмотра или ремонта прибора.
• Прибор предназначен только для бытового использования. Запрещается коммерческое
использование прибора.
• Не используйте прибор вне помещения.
• Не допускайте соприкосновения Сетевого шнура с горячими поверхностями. Сетевой
шнур не следует дергать, перекручивать или тянуть. Во время эксплуатации Сетевой
шнур не должен свешиваться с края стола или рабочей поверхности.
• Использование устройств, приспособлений и аксессуаров, не входящих в
комплектацию данного прибора, может привести к пожару, удару электрическим
током или несчастному случаю. Используйте только приспособления и аксессуары,
поставляемые вместе с прибором. В противном случае Вы утрачиваете право на
гарантию и гарантийное обслуживание.
• Не используйте для чистки прибора и аксессуаров абразивные очистители и
агрессивные моющие вещества.
• Прежде чем подключить прибор к электросети, убедитесь в том, что напряжение,
указанное на приборе (220-240 В, 50 Гц) соответствует напряжению электросети в
Вашем доме.
• Никогда не помещайте Внутреннюю чашу или сам прибор в микроволновую печь или
духовку, и не используйте их для приготовления блюд на открытом огне, газовой или
какой-либо иной плите.
• Никогда не используйте скороварку, если во Внутренней чаше нет продуктов и/или
жидкости.
• Не используйте Внутреннюю чашу прибора и саму скороварку для хранения продуктов.
• Запрещается приготовление продуктов в скороварке без добавления воды!
• Если в процессе приготовления Вы услышали звуковой сигнал и на ЖК дисплее
появился знак кода ошибки (см. таблицу ниже), то немедленно отключите прибор
от электросети и обратитесь в сервисный центр UNIT для ремонта или настройки
прибора. Эксплуатация прибора в данном случае запрещается.
Коды ошибок
Код индикации Е1 Е2 Е3 Е4
Неполадка Замыкание
сенсорного
датчика
ВНИМАНИЕ!
1. Будьте особенно осторожны, когда внутри прибора автоматически понижается
давление, так как в этот момент из Предохранительного клапана выделяется пар.
Избегайте контакта горячего пара с лицом или руками – существует риск получения
ожогов.
2. Не дотрагивайтесь до горячих поверхностей и Крышки прибора. Перед тем как снять
Крышку с прибора или перед чисткой, дождитесь полного остывания прибора.
3. Категорически запрещается каким-либо образом блокировать место прилегания
крышки к корпусу прибора, например накрывать его полотенцем.
4. Категорически запрещается открывать Крышку прибора по давлением. Перед тем
как открыть Крышку необходимо дождаться когда значение давления внутри прибора
достигнет безопасного значения.
5. Всегда отключайте прибор от электросети перед тем как открыть Крышку прибора.
СОХРАНИТЕ ЭТУ ИНСТРУКЦИЮ НА ВЕСЬ СРОК ЭКСПЛУАТАЦИИ ПРИБОРА!
ОСНОВНЫЕ ХАРАКТЕРИСТИКИ ПРИБОРА
Электрическая скороварка – это современный и многофункциональный прибор, в
котором Вы легко и быстро сможете приготовить Ваши любимые блюда. В скороварке
продукты готовятся на пару или в собственном соку, что позволяет не использовать для
их приготовления жир или масло, при этом сохраняются витамины и минералы, которые
теряются при обычной варке или жарке.
разомкнутая
цепь в датчике
Ошибка
регулятора
давления
Защита от
перегерва
14 15
Page 9

RUSSIAN RUSSIAN
Электрическая скороварка – это идеальный прибор для современных хозяек, которые
не только заботятся о своем здоровье, но и ценят свое время. Вам не надо стоять
около плиты и следить за приготовлением блюд. Вы просто кладете в скороварку все
необходимые ингредиенты и задаете параметры приготовления блюда.
Модель USP-1060D оснащена адаптированным меню, благодаря которому Вы сможете
выбрать режим работы для блюда, которое Вы хотите приготовить. Вам больше не надо
запоминать значения температуры, каждый раз готовя новые блюда. Преимущества
скороварки USP-1060D:
Функциональность и простота в управлении
Электрическая скороварка сочетает функции трех приборов – рисоварки, пароварки
и кастрюли-скороварки. Вы можете приготовить в скороварке практически любое
блюдо, включая рис, кашу, суп, жаркое, рыбу и т. д. А также использовать данный
прибор для тушения и приготовления продуктов на пару. Для приготовления блюда
Вам не нужно выставлять значения температуры или давления, - управление прибором
сводится к простому нажатию на кнопку панели управления. Вам необходимо просто
заложить продукты в скороварку и при необходимости изменить запрограммированное
время приготовления, а скороварка автоматически будет поддерживать оптимальную
температуру и давление внутри скороварки, необходимые для приготовления блюда. По
завершении процесса приготовления блюда Вы услышите звуковой сигнал, и скороварка
автоматически включит функцию поддержания тепла.
Функция отложенного старта (до 24 часов) – установите время, по прошествии
которого Вы хотите чтобы скороварка включилась, и по истечении заданного времени она
включится автоматически.
Функция памяти – в случае внезапного отключения электроэнергии в процессе
приготовления блюда, прибор автоматически запомнит все установки приготовления,
и при включении прибора процесс приготовления будет продолжен с того момента, на
котором процесс приготовления был прерван.
Быстрое приготовление блюда, экономия времени и электроэнергии
• В скороварке продукты готовятся под давлением, которое определяется типом
готовящихся продуктов, то есть для каждого типа продуктов выбирается оптимальный
способ приготовления – продукты готовятся быстрее – экономится время и
электроэнергия.
• В скороварке Вы можете приготовить блюдо, затратив до 15% меньше времени и
до 20% меньше электроэнергии, чем если бы Вы приготовили блюдо в обычной
пароварке.
• При приготовлении в скороварке рисовой каши, супа, а также при тушении продуктов,
которые обычно долго тушатся, Вы экономите 40% времени и 45% электроэнергии.
Вкусные и полезные блюда
• В скороварке продукты готовятся без доступа воздуха при температуре 110-115°C,
благодаря чему в них сохраняется больше витаминов и минералов, а также сохраняется
исходный вкус продуктов.
• При приготовлении различных блюд традиционными способами (на плите), часто
выделяется большое количество пара и неприятных запахов. Скороварка позволяет
готовить блюда без постоянного выделения пара и запахов готовящихся продуктов.
Сочетание стильного дизайна, качества и надежности
Данная модель имеет стильный дизайн, оснащена современной удобной панелью
и восемью степенями защиты, которые делают работу прибора более безопасной и
комфортной.
• Система безопасности
Крышка прибора сконструирована таким образом, чтобы обеспечить максимальную
защиту даже при очень высоком давлении внутри прибора. Кроме того, Вы не сможете
открыть Крышку, если внутри слишком высокое давление, что является очень важным
моментом для Вашей безопасности. Так как если Вы откроете Крышку прибора под
давлением, это может привести к выделению большого количества пара и ожогам.
• Устройство поддержания безопасного значения внутреннего давления
Если значение внутреннего давления превысит значение, необходимое для приготовления
блюда, сработает Предохранительный клапан снижения давления, при этом из прибора
будет выпущен воздух и давление снизится.
• Устройство уменьшения внутреннего давления
Если не сработает устройство поддержания безопасного значения внутреннего давления,
сработает устройство уменьшения внутреннего давления и избыток давления будет
устранен через дополнительное защитное устройство, расположенное в месте прилегания
Крышки к корпусу прибора.
• Устройство автоматического выключения прибора
Скороварка автоматически выключится, если во Внутренней чаше нет продуктов.
• Защита от перегрева
Скороварка автоматически выключится, если температура во Внутренней чаше превышает
заданную температуру.
• Магнитное устройство защиты — предотвращает включение прибора без крышки.
• Крышка с креплением к прибору — конструкция крышки позволяет открывать ее и
оставлять зафиксированной на приборе.
Основными параметрами при приготовлении продуктов в скороварке являются следующие
два:
• Время приготовления продуктов под давлением – это время, при котором идет
цикл приготовления под давлением. Значение времени приготовления продуктов под
давлением вы при необходимости можете изменить на Панели управления.
• Время подогрева (функция поддержания тепла) – когда заканчивается цикл
приготовления, автоматически включается функция поддержания тепла и начинается цикл
подогрева. При данном цикле работы внутри прибора поддерживается температура от 60
до 80°С. Максимальное время использования функции поддержания тепла составляет
24 часа, по прошествии которых Вы должны выключить прибор, отсоединив его от
электросети.
ОПИСАНИЕ ПРИБОРА
1. Пластиковая часть крышки
2. Алюминиевая часть крышки
3. Стальная часть крышки
4. Уплотнительное кольцо
5. Внешняя пластиковая часть корпуса
6. Внутренняя чаша с антипригарным покрытием
7. Ручка для удобства перемещения прибора
8. Средняя стальная часть корпуса
9. Панель управления с автоматическими программами и дисплеем
Панель управления
16 17
Page 10

RUSSIAN RUSSIAN
1. Индикатор функции отложенного старта до 24 часов
2. Индикатор программы «Рис»
3. Отложенный старт до 24 часов
4. Ручная установка времени поддержания давления
5. Программа «Рис»
6. Индикатор программы «Каша»
7. Индикатор программы «Рыба»
8. Программа «Каша»
9. Программа «Рыба»
10. Индикатор времени поддержания давления
11. Программа «Мясо/Курица»
12. Программа «Пароварка»
13. Индикатор программы «Мясо/курица»
14. Индикатор программы «Пароварка»
15. Программа «Суп»
16. Отмена программы, функции
17. Функция поддержания тепла до 24 часов
18. Индикатор программы «Суп»
19. Индикатор функции поддержания тепла до 24 часов
Кнопки панели управления
Название кнопки Назначение Время поддержания
Отложенный старт С помощью данной
Время давления Функция позволяет
Поддержание
тепла
Отмена Отмена функции или
функции можно
задать отсчет
времени до момента
когда скороварка
начнет готовить
вручную увеличить
время поддержания
давления
Функцию
поддержания
тепла можно
включить вручную
нажав кнопку,
также прибор
автоматически
переходит на
поддержания тепла
после завершения
программы
приготовления
программы.
давления в мин.,
запрограммированное для
данного вида
функции
- Интервал 1 час,
- Интервал
- Интервал 1 час,
_
Примечание
максимум 24 часа
увеличения за
одно нажатие 1
минута
максимум 24 часа
Рис Приготовление риса 12 С помощью
Каша Приготовление каши 10 С помощью
Рыба Приготовление
рыбы
Мясо/Цыпленок Приготовление
мяса/курицы
Пароварка Приготовление
на пару с
использованием
специальной
решетки
Суп Приготовление
различных супов
Примечания: время, приведенное в таблице, является усредненным, и в разных ситуациях
может понадобиться изменить его в зависимости от характеристик продукта, основного
рецепта, предпочтений пользователей, объема продукта, поэтому рекомендуем опытным
путем выявить наиболее подходящее время приготовления.
ПОДГОТОВКА К ЭКСПЛУАТАЦИИ
• Освободите прибор и все аксессуары от упаковочного материала.
• Установите прибор на ровной и сухой поверхности.
• Тщательно промойте все детали, которые будут контактировать с продуктами, включая
Внутреннюю чашу, Мерный стаканчик, Ложку и Решетку для приготовления на пару в
теплой мыльной воде, тщательно ополосните, а затем вытрите насухо.
• Протрите корпус, Внутреннее покрытие прибора, а также Крышку влажной губкой, а
затем тщательно высушите чистой, сухой тряпкой.
• Прежде чем подключить прибор к электросети, убедитесь, что напряжение указанное
на приборе соответствует напряжению электросети в Вашем доме (220-240 В, 50 Гц).
• Не погружайте прибор в воду или какую-либо иную жидкость!
5 С помощью
25 С помощью
15 С помощью
20 С помощью
кнопки «время
давления» можно
добавить еще от
1 до 20 минут.
кнопки «время
давления» можно
добавить еще от
1 до 20 минут.
кнопки «время
давления» можно
добавить еще от
1 до 20 минут
кнопки «время
давления» можно
добавить еще от
1 до 50 минут.
кнопки «время
давления» можно
добавить еще от
1 до 35 минут.
кнопки «время
давления» можно
добавить еще от
1 до 40 минут.
18 19
Page 11

RUSSIAN RUSSIAN
ЭКСПЛУАТАЦИЯ ПРИБОРА
1. Откройте Крышку, повернув ручку против часовой стрелки.
2. Извлеките Внутреннюю чашу из прибора, для этого нужно взять Чашу двумя руками и
потянуть вверх.
На стенках Внутренней чаши есть двойная шкала измерения:
- в долях – 1/5, 2/5, 3/5, 4/5;
- и в чашках (CUP) – 2, 4, 6, 8;
- а также FULL (полная чаша).
Наполните Чашу продуктами, которые собираетесь готовить, и водой, обращая внимание
на то, что уровень содержимого располагался между отметками 1/5 и 4/5 (отметка
минимального уровня – 1/5, отметка максимального уровня – 4/5).
Примечание: для того, чтобы продукт готовился равномерно, необходимо, чтобы он
был полностью погружен в воду, иначе продукт, находящийся над уровнем воды может
оказаться недоваренным.
3. Очистите Внутреннее покрытие прибора и Нагревательный элемент, протерев их
чистой, чуть влажной тряпкой, и тщательно высушите. Перед тем как поместить Чашу
в прибор, убедитесь, что на поверхности Внутреннего покрытия и Нагревательного
элемента нет никаких загрязнений.
4. Осторожно возьмите Чашу с продуктами двумя руками за края и установите ее,
аккуратно надавив на нее. После того как Вы установите Чашу, слегка поверните ее,
чтобы она надежно зафиксировалась в приборе.
5. Далее необходимо герметично закрыть Крышку, для этого выполните следующие
действия:
• Установите эластичное кольцо на внутренней поверхности крышки прибора.
• Если Уплотнительное кольцо плохо закреплено или неправильно расположено,
зафиксируйте его во Внутреннем стальном кольце должным образом.
• Далее возьмите Крышку за Ручку, и накройте ею прибор, поверните Крышку по
часовой стрелке до упора, при этом Вы должны услышать легкий щелчок. Это означает
что Крышка надежно зафиксировалась в нужном положении.
6. Установите Регулятор давления в нижнее положение, как показано на рисунке. В
Рисунок 1. Минимальный и максимальный уровни наполненности чаши
Для продуктов, которые увеличиваются в размерах в процессе приготовления, отметка
максимального уровня не должна превышать отметку 3/5!
Рисунок 2: Максимальный уровень наполнения чаши при приготовлении продуктов,
которые увеличатся в объеме
таком положении воздух не сможет выходить из прибора, благодаря чему становится
возможным повышение давления внутри прибора.
Примечание: Регулятор снижения давления имеет 2 положения: верхнее и нижнее.
В нижнем положении пар не выходит из прибора и нагнетается давление. В верхнем
положении пар свободно выходит. Регулятор требуется перевести в верхнее положение
после окончания программы приготовления, перед открытием крышки.
20 21
Page 12

RUSSIAN RUSSIAN
Включите прибор, подсоединив его к электросети, при этом на дисплее появится «00:00».
Теперь нужно задать параметры приготовления.
Отложенный старт
В случае, если нет необходимости в отложении времени начала приготовления,
пропускайте этот шаг и переходите к следующему.
В том случае, если Вы хотите, чтобы процесс приготовления начался не сразу, а
через определенное время, Вы можете воспользоваться таймером включения. Тогда
подготовленная к работе скороварка самостоятельно начнет приготовление пищи через
заданное время; для этого сразу после включения скороварки (ДО выбора программы
приготовления) в сеть нужно нажать кнопку «Отложенный старт». С помощью этой кнопки
установите нужное время. Например, если указанное значение - «4:00», приготовление
блюда начнется через 4 часа. Максимальное время, на которое Вы можете отложить
приготовление блюда составляет 24 часа.
7. Установка параметров приготовления. На панели управления есть меню, с помощью
которого Вы задаете программу приготовления в зависимости от вида продукта.
Например, для приготовления риса, нужно нажать кнопку «Рис». Для того, чтобы
начать приготовление, нажмите кнопку, соответствующую нужному продукту.
Примечание: стоит помнить о том, что программы рассчитаны на основе средних
значений характеристик продуктов, таких как: степень жесткости, степень зрелости,
предпочтительная степеньразваренности продукта, размер кусков и т. п., поэтому
рекомендуем, основываясь на данных программах, варьировать время приготовления по
своему вкусу.
8. Изменить значение времени приготовления под высоким давлением можно с помощью
кнопки «Время давления», например: если Вы готовите рыбу, нужно после включения
прибора в сеть нажать кнопку «Рыба», при этом появится «0:05», это значение
показывает, что после достижения внутри прибора высокого рабочего давления
до окончания приготовления блюда пройдет 5 минут. В случае, если это время
нужно увеличить, нажимайте кнопку «Установка времени» до тех пор, пока не увидите
нужное значение времени.
Важно! Время между нажатием кнопок определенного продукта и изменения времени не
должно превышать 5 секунд, иначе процесс приготовления начнется, «не дождавшись»
Вашей корректировки времени.
Примечание: Время, указанное после нажатия кнопки нужного продукта -х:хх - не
равно длительности всего периода приготовления, т. к. не включает период времени
от начала приготовления до достижения внутри прибора высокого давления,
необходимого для приготовления блюда.
В случае если продукт, который Вы собираетесь готовить, не относится ни к одной из
групп блюд, которые есть в меню Кнопок выбора блюд на панели управления, необходимо
выбрать группу, близкую по характеристикам и при необходимости изменить время
приготовления при высоком давлении (Х:ХХ).
9. После того как давление внутри достигнет необходимого уровня, начнется обратный
отсчет времени приготовления.
10. По окончании процесса приготовления (по истечении указанного на дисплее времени)
прозвучит звуковой сигнал (3 раза), на Дисплее отобразится «00:00» и автоматически
включится функция поддержания тепла.
Примечание: Нельзя изменить заданное время в процессе приготовления.
• Для того чтобы сбросить параметры приготовления или прервать текущий режим
работы прибора (процесс приготовления, функцию поддержания тепла и т. п.) нажмите
на Кнопку «Отмена ».
• Далее необходимо снизить давление внутри прибора, для этого поверните Регулятор
снижения давления в верхнее положение - положение снижения давления, и подождите
около минуты.
ВНИМАНИЕ! Когда Вы поворачиваете Регулятор снижения давления в верхнее положение,
возможен выброс пара! Во избежание ожога не наклоняйтесь над прибором и следите,
чтобы Ваши пальцы не касались отверстий Регулятора снижения давления.
Внимание! Максимальное время использования функции поддержания тепла составляет
24 часа, по прошествии этого времени выключите прибор, отсоединив его от электросети.
Примечания:
• При приготовлении жидких или вязких блюд (например, каши) не рекомендуется
снижать давление сразу после того, как окончится приготовление. Дайте прибору
остыть. Несоблюдение данного правила может привести к выбросу пара и ожогам.
• Отсоедините прибор от электросети, и отсоедините Съемный сетевой шнур от
прибора.
• Возьмите Крышку за Ручку, поверните Крышку против часовой стрелки до тех пор,
пока Вы не почувствуете, что крепление между корпусом прибора и Крышкой ослабло,
откройте Крышку. Извлеките продукты или готовое блюдо из Чаши.
Примечания:
1. Внутренняя поверхность Съемной чаши имеет специальное антипригарное покрытие,
которое требует очень аккуратного и бережного обращения. Чтобы не повредить
антипригарное покрытие Чаши, рекомендуется пользоваться деревянной ложкой или
Пластиковой ложкой, поставляемой в комплекте с прибором.
2. Будьте очень осторожны при извлечении продуктов или готового блюда из Чаши, так
как стенки Чаши, а также сами продукты могут быть очень горячими!
ИСПОЛЬЗОВАНИЕ РЕШЕТКИ ДЛЯ ПРИГОТОВЛЕНИЯ НА ПАРУ
• Откройте Крышку прибора и налейте во Внутреннюю чашу воды до отметки 1/5 (см.
раздел «Эксплуатация прибора»).
• Установите Внутреннюю чашу с водой, как описано в разделе «Эксплуатация прибора».
• Поместите продукты, предназначенные для приготовления на Решетку, установите
Решетку в Чашу, и закройте прибор Крышкой, см.раздел «Эксплуатация прибора».
• Установите Регулятор снижения давления в нижнее положение (положение
герметизации), см. раздел «Эксплуатация прибора».
• Подсоедините Сетевой шнур к прибору, и затем подключите Сетевой шнур к
электросети.
• Нажмите Кнопку «Пароварка» и при необходимости установите время приготовления,
как описано в разделе «Эксплуатация прибора». По прошествии времени, необходимого
для приготовления блюда, прибор перейдет в состояние поддержания тепла. Для того
чтобы остановить процесс приготовления, нажмите кнопку «Отмена/Поддержание
тепла», отсоедините прибор от электросети и извлеките продукты из Внутренней
чаши, как описано в разделе «Эксплуатация прибора».
ЧИСТКА
• Перед чисткой отсоедините прибор от электросети, и отсоедините Съемный сетевой
шнур от прибора, и дождитесь полного остывания прибора.
• Протрите Верхнюю пластиковую часть корпуса влажным полотенцем.
• Извлеките Внутреннюю чашу из прибора, промойте ее в теплой мыльной воде,
ополосните и тщательно высушите.
• Для того чтобы очистить корпус прибора, протрите его чистой чуть влажной тряпкой,
а затем тщательно высушите чистой сухой тряпкой.
• Промойте Эластичное уплотнительное кольцо в теплой мыльной воде, тщательно
ополосните и высушите.
Примечание: клапан предохранителя следует чистить особенно тщательно, так как наличие
22 23
Page 13

RUSSIAN RUSSIAN
загрязнений может привести к его блокировке, что может помешать Предохранительному
клапану стабилизировать давление внутри прибора в процессе приготовления!!!
На дисплее знак
кода ошибки Е3
На дисплее знак
Ошибка регулятора
давления
Защита от перегерва
кода ошибки Е4
ОСНОВНЫЕ ТЕХНИЧЕСКИЕ ХАРАКТЕРИСТИКИ
• Для чистки основания Предохранительного клапана и Отверстия для воды
рекомендуется использовать щетку
Важно! Для безопасности Вашей и окружающих помните, что любой контакт
электроприборов с водой опасен! Во избежание пожара, удара электрическим током или
получения травм следите, чтобы Съемный сетевой шнур, вилка и основание скороварки
не соприкасались с водой или иной жидкостью!!! Категорически запрещается мыть или
погружать корпус прибора в воду или мыть его в посудомоечной машине!!!
ПРОБЛЕМЫ, ВОЗНИКАЮЩИЕ В ПРОЦЕССЕ ЭКСПЛУАТАЦИИ И ВОЗМОЖНЫЕ
ПРИЧИНЫ ИХ ВОЗНИКНОВЕНИЯ
NO. Проблема Возможная причина Способ устранения
проблемы
1 Крышка плохо
закрывается
2 Крышка плохо
открывается
Уплотнительное кольцо
плохо зафиксировано на
крышке
Внутри слишком
высокое давление
Зафиксируйте уплотнительное
кольцо, как показано на
рисунке5
С помощью поворота
предохранительного клапана
снижения давления вправо
или влево снизьте давление
3 В процессе
приготовления
выделяется много
пара
В крышке нет
уплотнительного кольца
На уплотнительном
кольце есть загрязнения
Уплотнительное кольцо
повреждено
Вставьте уплотнительное
кольцо, как показано на
рисунке5
Очистите уплотнительное
кольцо
Замените уплотнительное
кольцо в сервисном
центре UNIT (не является
гарантийным случаем)
Крышка плохо
зафиксирована
Зафиксируйте крышку
должным образом (см. раздел
«Эксплуатация прибора)
4 Панель управления
не горит
5 На дисплее знак
кода ошибки Е1
На дисплее знак
кода ошибки Е2
Прибор не включен в
сеть
Какие-то другие
неполадки
Замыкание сенсорного
датчика
разомкнутая цепь в
датчике
Проверьте исправность
розетки, шнура, вилки
Обратитесь в сервисный
центр UNIT
Обратитесь в сервисный
центр UNIT
Обратитесь в сервисный
центр UNIT
Модель Напряжение
USP-1060 D 220-240В,
Максимальное
давление
80 кПа 70-80 ºС 0-24 ч 1-60 мин. 0-24 ч 20000 цик-
питания
50 Гц
Температура
подогрева
Изготовитель: “ЮНИТ Хандельс ГмбХ”
Австрия, Вена, А-1180, Герстхофер штрассе, 131
Экспортер: «ЮНИТ Электроникс (ГК) Лимитед»
3905 Площадь Ту Эксчейньдж, Коннут Плейс 8, Центральный,
Гонконг
Произведено в КНР
Дату производства прибора смотрите на наклейке на корпусе прибора; либо печать
Хранение и эксплуатацию прибора производить в сухих отапливаемых помещениях
при температуре не ниже +5°С, относительной влажности не более 80%, при
При перевозке и хранении беречь от механических повреждений и иных
Ремонт и восстановление прибора следует производить в специализированных
Поскольку производитель постоянно работает над совершенствованием своей
продукции, дизайн и технические характеристики могут быть изменены
Товар сертифицирован
В КОНЦЕ ДАННОЙ ИНСТРУКЦИИ МЫ ПРЕДЛАГАЕМ ВАМ РЕЦЕПТЫ ПРИГОТОВЛЕНИЯ
Номинальная
мощность
900 Вт 5 л 22 см 40-70 кПа
Возможное
время
отложенного
старта
Объем Диаметр Рабочее
Возможное
время
приготовления
под давлением
Возможная
продолжительность функции
сохранения
тепла
на коробке. Формат даты: ММГГ (месяц;год).
отсутствии в воздухе агрессивных примесей.
вредоносных воздействий.
мастерских, согласно гарантийному талону.
без предварительного уведомления.
БЛЮД С ПОМОЩЬЮ СКОРОВАРКИ
www.unit.ru
давление
Срок
cлужбы
прибора
лов, но не
более 5
лет с даты
приобретения прибора
24 25
Page 14

RUSSIAN RUSSIAN
РЕЦЕПТЫ
Рис с морепродуктами по-итальянски
Ингредиенты:
различные морепродукты – 200 г
рис – 1 чашка
дыня – 1-2 ломтика
помидоры – 1-2 шт.
лук – 1 шт.
чеснок – по вкусу
сыр – 50 г
сливочное масло – 20 г
соль, перец – по вкусу
Способ приготовления:
1. Положите промытый рис в Чашу, добавьте воды, закройте прибор Крышкой.
Нажмите кнопку приготовления риса: «Рис».
2. Откройте Крышку по окончании приготовления, извлеките рис из Чаши и дайте ему
остыть.
3. Измельчите морепродукты, дыню, помидоры, лук.
4. На сковороде обжарьте в масле измельченный лук, добавив немного оливкового
масла. Добавьте к луку морепродукты, дыню, помидоры и обжарьте их в масле вместе
с луком. В чашу скороварки заложите рис и обжаренные ингридиенты и тушите все
продукты в течение 5 минут. Добавьте перец,
соль, толченый чеснок.
5. Выложите готовое блюдо на тарелку, украсьте зеленью и подавайте.
Картошка с мясом
Ингредиенты
телятина – 500 г
картофель – 500 г
редис – 50 г
имбирь – 10 г
лук – 20 г
свиной жир – 20 г
соль – 15 г
вода – 100 г
вино – 20 г
Способ приготовления:
1. Порежьте телятину на куски. Очистите и порежьте на кусочки картофель, имбирь,
редис. Мелко нарежьте лук.
2. Положите порезанные овощи и мясо в Чашу, добавьте свиной жир, соль, вино и воду.
Перемешайте.
3. Закройте прибор Крышкой и установите режим «Мясо».
4. Выложите готовое блюдо на тарелку, украсьте зеленью и подавайте.
Рис с креветками
Ингредиенты
рис – 320 г
креветки – 250 г
лук – 1 шт.
чеснок – 2 зубчика
оливковое масло – 2 ст. л.
соль, перец – по вкусу
Способ приготовления:
1. Положите промытый рис в Чашу, добавьте воды, закройте прибор Крышкой.
Нажмите кнопку приготовления риса: «Рис».
2. Измельчите лук и чеснок.
3. На сковороде обжарьте в масле,не накрывая крышкой креветки, лук, чеснок.
После этого добавьте в скороварку к рису, положите приправы (по вкусу), закройте
Крышку и в режиме приготовления риса установите время приготовления на 5 минут.
Затем отключите прибор от электросети.
4. Готовое блюдо украсьте имбирем и луком.
Курица по-домашнему
Ингредиенты
курица – 1 кг
сливочное масло – 30 г
сметана – 125 г
яйцо - 2 шт.
соль, перец – по вкусу
Способ приготовления:
Разрезать курицу на четыре части. Положить в чашу, посолить, поперчить.
Закрыть скороварку крышкой и тушить 20 минут.
Хорошо взбить яйца, смешать их со сметаной, влить смесь и непрерывно помешивать, не
доводя до кипения, пока сметана не превратится в маслянистую массу. Выложить курицу
и полить соусом.
26 27
Page 15

RUSSIAN RUSSIAN
Летний салат
Ингредиенты
рис – 250 г
вода или бульон – 1 литр
горчица – 1 ст. л.
уксус – 1 ст. л.
подсолнечное (оливковое или кукурузное) масло –
3 ст. л.
2 помидора
2 сваренных вкрутую яйца
1 луковица
рубленая зелень петрушки
соль, перец – по вкусу
Способ приготовления:
Сварить в скороварке рис. Остудить. Приготовить соус из смеси горчицы, уксуса,
растительного масла, соли, перца. В приготовленный соус положить рис. Выложить в
салатник горкой. Порубить лук, зелень. Порезать помидоры и яйца кружками, гарнировать
ими рис. Посыпать рубленой зеленью.
Салат по-аргентински
Ингредиенты
2 сваренных вкрутую яйца
молодая морковь – 250 г
зеленая фасоль – 250 г
зеленый горошек 250 г
картофель – 250 г
соль – по вкусу
майонез – 1 банка
Способ приготовления:
Тонко нарезать ливер (печень, сердце, желудок) и окорок. Истолочь булку. Нарезать
петрушку и чеснок. Смешать всё вместе с рублеными яйцами. Посолить, поперчить.
Нафаршировать этой смесью курицу. Зашить. В скороварке вскипятить подсоленную воду
вместе с овощами. Положить туда курицу. Закрыть скороварку и варить курицу 25 минут.
Подавать курицу на блюде, обложив овощами. Фарш предварительно вынуть и разложить
по тарелкам отдельно.
Пюре из тыквы
Ингредиенты:
тыква — 1 кг
картофель — 3-4 шт.
сливочное масло — 50 гр.
2 яйца
молоко — 2 стакана
соль, перец по вкусу
Способ приготовления:
Очистить тыкву и картофель. Нарезать на кусочки, положить в скороварку и залить
молоком. Посолить, поперчить, закрыть крышкой и тушить 15 минут. Растереть овощи в
пюре, смешать с маслом и взбитыми яйцами.
ПРИЯТНОГО АППЕТИТА!
Способ приготовления:
Положить овощи в дуршлаг, нарезав предварительно морковь и картофель. В скороварку
налить воды слоем 2 см. Посолить. Поставить в воду дуршлаг (без ручки) с овощами.
Вскипятить воду.
Закрыть скороварку и варить овощи 15 мин. Программа «Пар». Подавать, смешав с
майонезом. Сверху положить нарезанные яйца.
Фаршированная курица
Ингредиенты:
курица — 1 кг
ливер (печень, сердце, желудок) — 200 гр.
сухой хлеб — 200 гр.
Вареный окорок — 200 гр.
Чеснок — 1 зубчик
2 вареных яйца
1 маленький кочан капусты
2 моркови
2 репы
2 картофелины
сельдерей, соль, перец - по вкусу
1 луковица
Рубленная петрушка — по вкусу
28 29
 Loading...