

Page 1
INSTRUCTION MANUAL
РУКОВОДСТВО ПО ЭКСПЛУАТАЦИИ
UNIT
®
UCM–870
ESPRESSO/CAPPUCCINO COFFEE MAKER
КОФЕВАРКА ЭСПРЕССО/КАПУЧИНО
Page 2
2
7
3
1
4
9
6
2
8
5
17
19
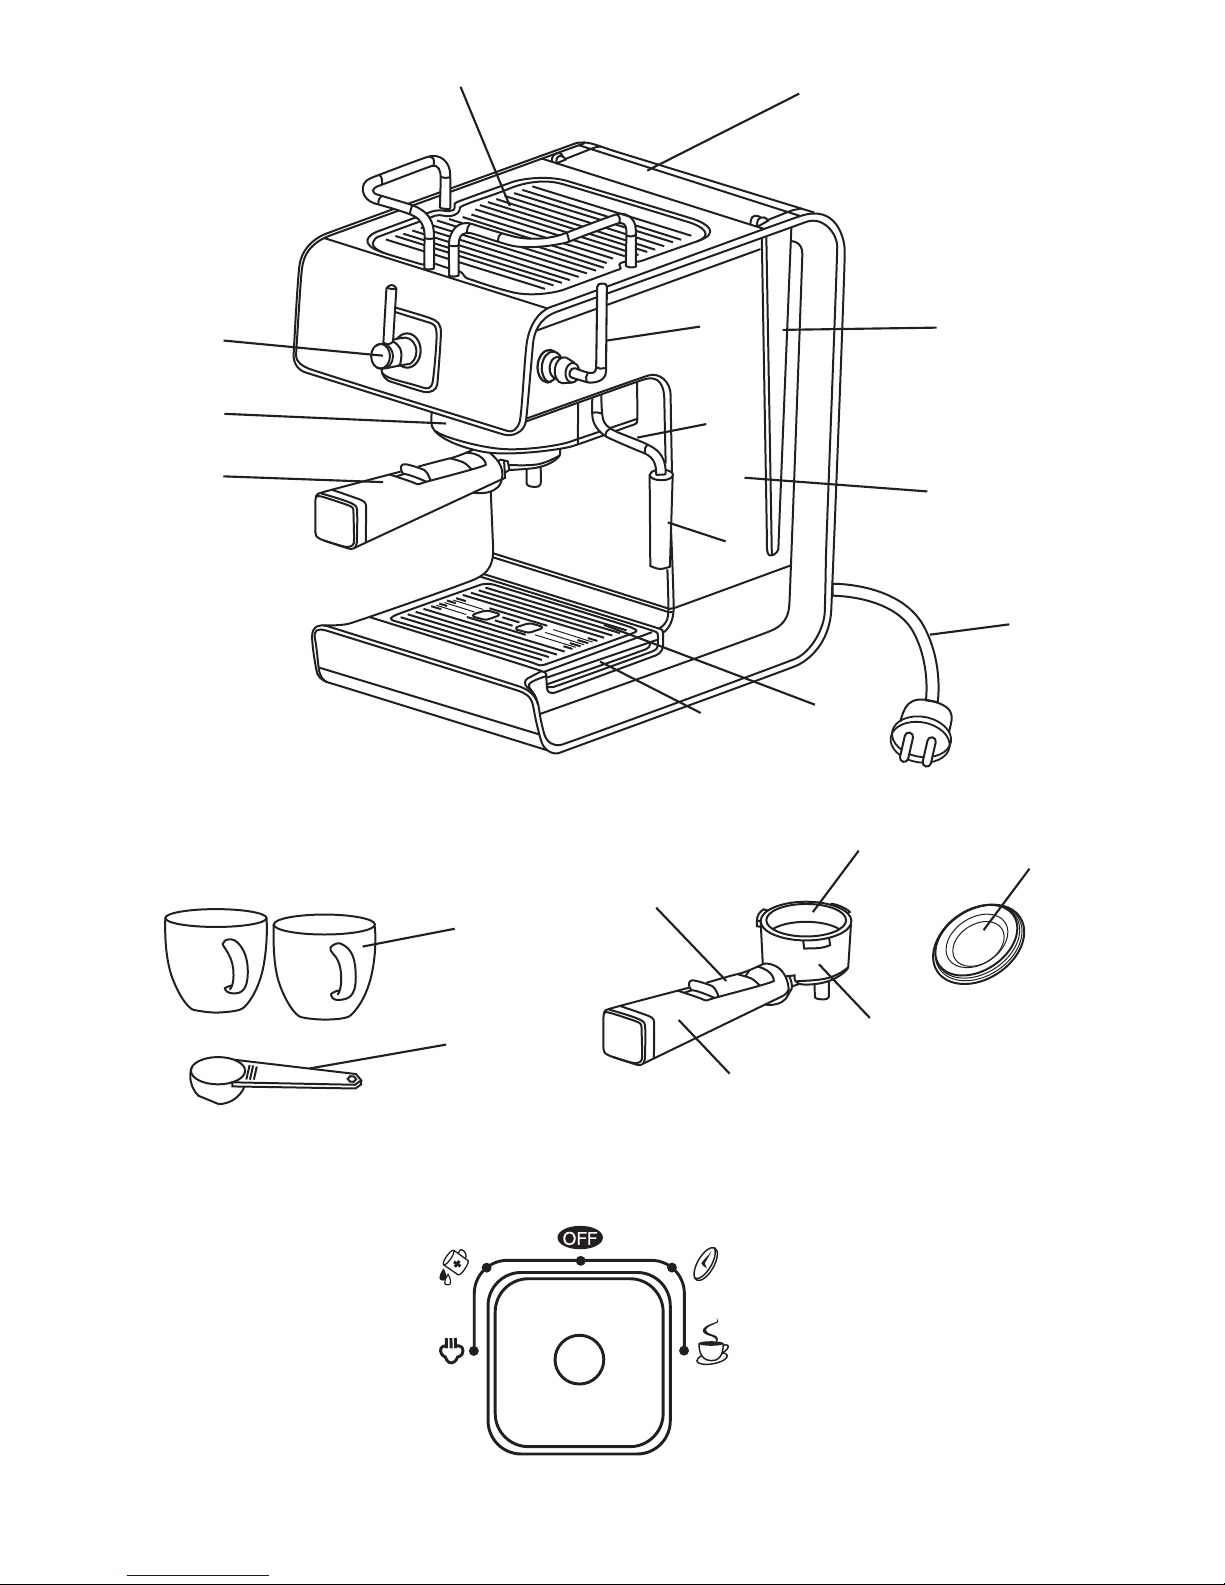
Control Panel/Панель управления
15
20
16
18
10
11
12
13
14
Page 3

ESPRESSO/CAPPUCCINO COFFEE MAKER UCM-870
Thank You for buying this UNIT product!
READ ALL INSTRUCTIONS BEFORE USING.
CONTENTS OF INSTRUCTION MANUAL
SAFETY NOTICES . . . . . . . . . . . . . . . . . . . . . . . . . . . . . . . . . . . . . . . . . . . . . . . . . . . . . . . . . . . . . . . . .3
INTRODUCTION . . . . . . . . . . . . . . . . . . . . . . . . . . . . . . . . . . . . . . . . . . . . . . . . . . . . . . . . . . . . . . . . . .4
APPLIANCE DESCRIPTION . . . . . . . . . . . . . . . . . . . . . . . . . . . . . . . . . . . . . . . . . . . . . . . . . . . . . . . . . .4
PREPARATION ESPRESSO . . . . . . . . . . . . . . . . . . . . . . . . . . . . . . . . . . . . . . . . . . . . . . . . . . . . . . . . . .4
HOW TO MAKE CAPPUCCINO . . . . . . . . . . . . . . . . . . . . . . . . . . . . . . . . . . . . . . . . . . . . . . . . . . . . . . . .5
CLEANING AND MAINTENANCE . . . . . . . . . . . . . . . . . . . . . . . . . . . . . . . . . . . . . . . . . . . . . . . . . . . . . .6
DELIMING . . . . . . . . . . . . . . . . . . . . . . . . . . . . . . . . . . . . . . . . . . . . . . . . . . . . . . . . . . . . . . . . . . . . . . .6
PROBLEMS AND CAUSES . . . . . . . . . . . . . . . . . . . . . . . . . . . . . . . . . . . . . . . . . . . . . . . . . . . . . . . . . . .7
SPECIFICATIONS . . . . . . . . . . . . . . . . . . . . . . . . . . . . . . . . . . . . . . . . . . . . . . . . . . . . . . . . . . . . . . . . . .7
RECIPES . . . . . . . . . . . . . . . . . . . . . . . . . . . . . . . . . . . . . . . . . . . . . . . . . . . . . . . . . . . . . . . . . . . . . . . .9
SAFETY NOTICES
When using electrical appliances, basic safety precautions should always be followed to reduce the risk
of fire, electric shock, and/or injury to persons, including the following:
•
Read all instructions before using the machine.
•
Do not touch hot surfaces. Use handles or knobs.
•
To protect against electric shock, do not immerse Cord (20), plugs or machine in water or other liquid.
•
Close supervision is necessary when any appliance is used by or near children.
•
Turn Switch Control Knob (3) to OFF and unplug from outlet when not in use and before cleaning.
Allow to cool before putting on or taking off parts, and before cleaning.
•
Do not operate any appliance with a damaged Cord (20) or plug or after the appliance malfunctions
or has been damaged in any manner. Return this appliance only to the nearest authorized service
center for repair.
•
Do not use outdoors.
•
Do not let Cord (20) hang over edge of table or counter or touch hot surfaces.
•
Do not place this appliance on or near a hot gas or electric burner or in a heated oven.
•
To disconnect, turn any Switch Control Knob (3) to OFF, then remove plug from wall outlet.
•
Do not use appliance for other than intended use.
•
Use on a hard, flat, level surface only, to avoid interruption of air flow underneath the appliance.
•
Always be sure Reservoir Cover (1) is tightened securely before turning machine on.
•
DO NOT remove Reservoir Cover (1) until pressure is completely relieved. See section
“Pressure”.
•
Warning: To reduce the risk of fire or electric shock, do not remove any service covers. No user
serviceable parts inside. Repair should be done by authorized personnel only.
•
The use of accessory attachments not recommended by the appliance manufacturer may result in
fire, electric shock or injury to persons. Do not use extension cord.
Pressure
To avoid possible burns from hot steam and water, NEVER open the Reservoir Cover (1) while there is
pressure in the Boiler (17). Remove all pressure first.
To remove all pressure, proceed as follows:
1. Ensure the Espresso/Cappuccino Machine is switched off and the Steam Arm (6) is rotated outwards
to the right.
2. Place the stainless steel jug or a similar container under the Frother (7) to catch escaping steam
and hot water. Turn the Steam Control Knob (2) to the indicator position ON.
Note: The capacity of the container for catching the steam and water should be at least 1.5 liter.
ENGLISH
3
Page 4

ENGLISH
4
3. When all steam and pressure has been released, turn the Steam Control Knob (2) to the indicator
position OFF.
KEEP THESE INSTRUCTIONS MANUAL.
INTRODUCTION
You are the owner of the model UCM-870 steam Espresso/Cappuccino Maker. This unique appliance
has been designed to provide you with delicious espresso/cappuccino quickly and conveniently.
Espresso is a unique method of coffee brewing in which hot water is forced through finely ground
coffee. Popular in Europe, it is a far richer and more full-bodied brew than American regular coffee.
Because of its richness, espresso is usually served in 1 1/2 to 2 oz. portions, in demitasse cups.
Most espresso drinkers outside of Europe prefer cappuccino, a drink made of about one third
espresso, one third hot milk and one third foam.
Preparing espresso or cappuccino is very different from brewing regular drip coffee in that this
machine operates pressure and requires special attention. To ensure your safety and the long life
of this appliance, please read all instructions, cautions, notes and attentions.
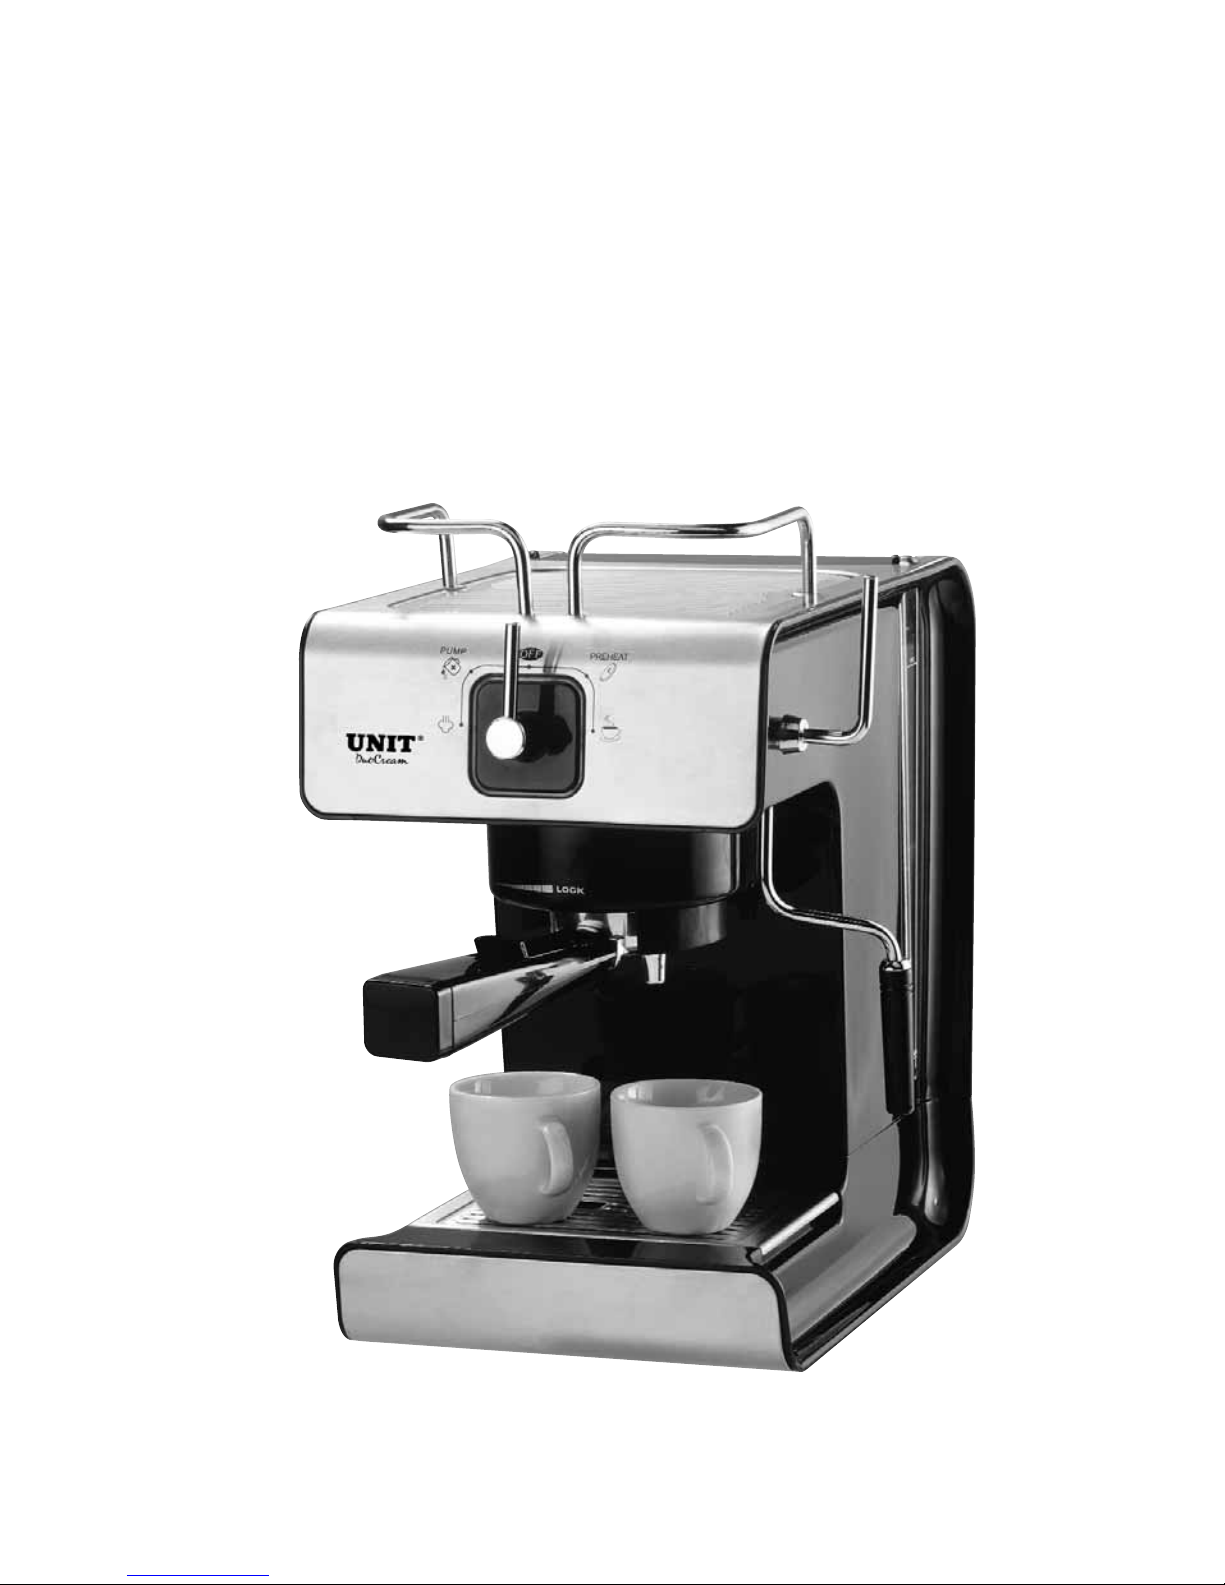
APPLIANCE DESCRIPTION
1. Reservoir Cover
2. Steam Control Knob
3. Switch Control Knob
4. Warmer Plate
5. Removable Water Reservoir
6. Steam Arm
7. Frother
8. Drip Tray Cover
9. Drip Tray
10. Metal Filter Basket
11. Funnel
12. Filter Basket Locking Lever
13. Filter Holder Handle
14. Cream Processor DuoCream
15. Filter Holder
16. 2 cups
17. Boiler
18. Measuring Scoop
19. Adaptor
20. Power Cord
PREPARATION ESPRESSO
Coffee
The coffee should be freshly ground, dark roasted variety. You may want to try a French or Italian roast.
Pre-ground coffee will only retain its flavor for 7-8 days, provided it is stored in an air tight container, in
a cool, dark area. Do not store in a refrigerator freezer.
Whole beans are recommended, to be ground just before use. Coffee beans stored in an air tight
container will keep up to 4 weeks before they are being to lose their flavor.
Grind
This is a vital step in the espresso making process and takes practice. The coffee must be ground fine,
but not too fine.
•
The correct grind should look gritty, like salt or sand.
•
If the grind is too fine, the water will flow through the coffee even under pressure. This grind looks
like powder and feels like flour when rubbed between fingers.
•
If the grind is too coarse, the water flows through the coffee too fast, preventing a full flavored
extraction.
Page 5
Be sure to use a quality grinder or mill for uniform consistency in your espresso grind. Oval shaped
coffee mills are not recommended because the grind is not consistent.
Before Using Your Espresso Maker
1. Wash the all the accessories including the Removable Water Reservoir (5), Frother (7), Drip Tray
Cover (8), Drip Tray (9), Filter Holder (15), Cups (16), and Measuring Scoop (18) in a mixture of
mild detergent and water. Rinse each thoroughly.
2. To rinse the inside of the machine, follow steps for brewing espresso using water only.
3. Unwind the Power Cord (20) of your machine.
How to make an Espresso
1. Fill the Removable Water Reservoir (5) to the MAX (80% of Reservoir) but not less than the MIN
level.
2. Remove the Filter Holder (15) and add the ground espresso coffee beans to the Metal Filter Basket
(10). If the Metal Filter Basket (10) has been removed from the Filter Holder (15), ensure it is
replaced before adding ground espresso coffee beans.
Note: If you want your coffee with créme, place the Creme Processor DuoCream (14) under the Metal
Filter Basket (10).
3. Fill as desired by locating the graduation marks “1” and “2” on the Metal Filter Basket (10). The
numbers indicate the number of cups of espresso that can be produced. Press the coffee evenly
down with the back of the Measuring Scoop (18).
Note: Ensure that the Steam Control Knob (2) on the right of the Espresso/Cappuccino Machine turn
to the Indicator position OFF.
4. Place the Filter Holder (15) underneath the Adaptor (19) so that the Handle (13) is positioned to the
left of center. Lift the Filter Holder (15) is secure.
5. Plug the Espresso/Cappuccino Machine into a standard domestic power outlet and turn the Switch
Control Knob (3) to the indicator position .
6. The Espresso/Cappuccino Machine is ready for use when the pre-heat indicator light that flashes
in red light turns into stable red light without flashing.
7. Position the espresso Cups (16) under the Adaptor (19). Place both of the Cups (16) under the
Adaptor (19) with one nozzle over each cup.
8. Turn the Switch Control Knob (3) to the coffee indicator position . After a few seconds, espresso
will start to dispense from the nozzle into the Cups (16).
9. When sufficient espresso has been made, turn the Switch Control Knob (3) to the indicator
position .
Note: There may be slight dripping from the nozzles after the Espresso/Cappuccino Machine stops
due to excess water in the espresso Filter Holder (15). The Drip Tray (9) is designed to collect this
liquid.
10. It is now important to release the steam pressure by following the directions under “Pressure”.
Note: Never remove the espresso Filter Holder (15) until all steam and hot water has been
released.
HOW TO MAKE CAPPUCCINO
1. Cappuccino is espresso topped with steamed and frothed milk. Frothing milk for cappuccino takes
practice. Do not discouraged if it is not perfect the first time. It may take a few times before you
perfect this process.
2. For best results, we recommend frothing the milk in a separate pitcher and pouring the milk into
your coffee. The milk and pitcher should be cold. Do not use a pitcher which has just been washed
in warm water.
Make the espresso as described previously. When finished making the espresso, proceed as follows:
1. Ensure the Espresso/Cappuccino Machine is switched off and the Steam Arm (6) is rotated
outwards to the right.
2. Fill the stainless steel jug approximately half full of milk.
3. Turn the Switch Control Knob (3) to the indicator position .
ENGLISH
5
Page 6
4. When the indicator light that flashes in red light turns into stable red light without flashing, turn the
Steam Control Knob (3) to the indicator ON.
5. A small amount of water may be emitted from the Steam Arm (6). This is normal. Allow it to run until
only steam is being made.
Note: It is normal when the temperature drops, the indicator light will flash in red light again, when the
temperature reaches the requirement, the indicator light will be on with red light without flashing.
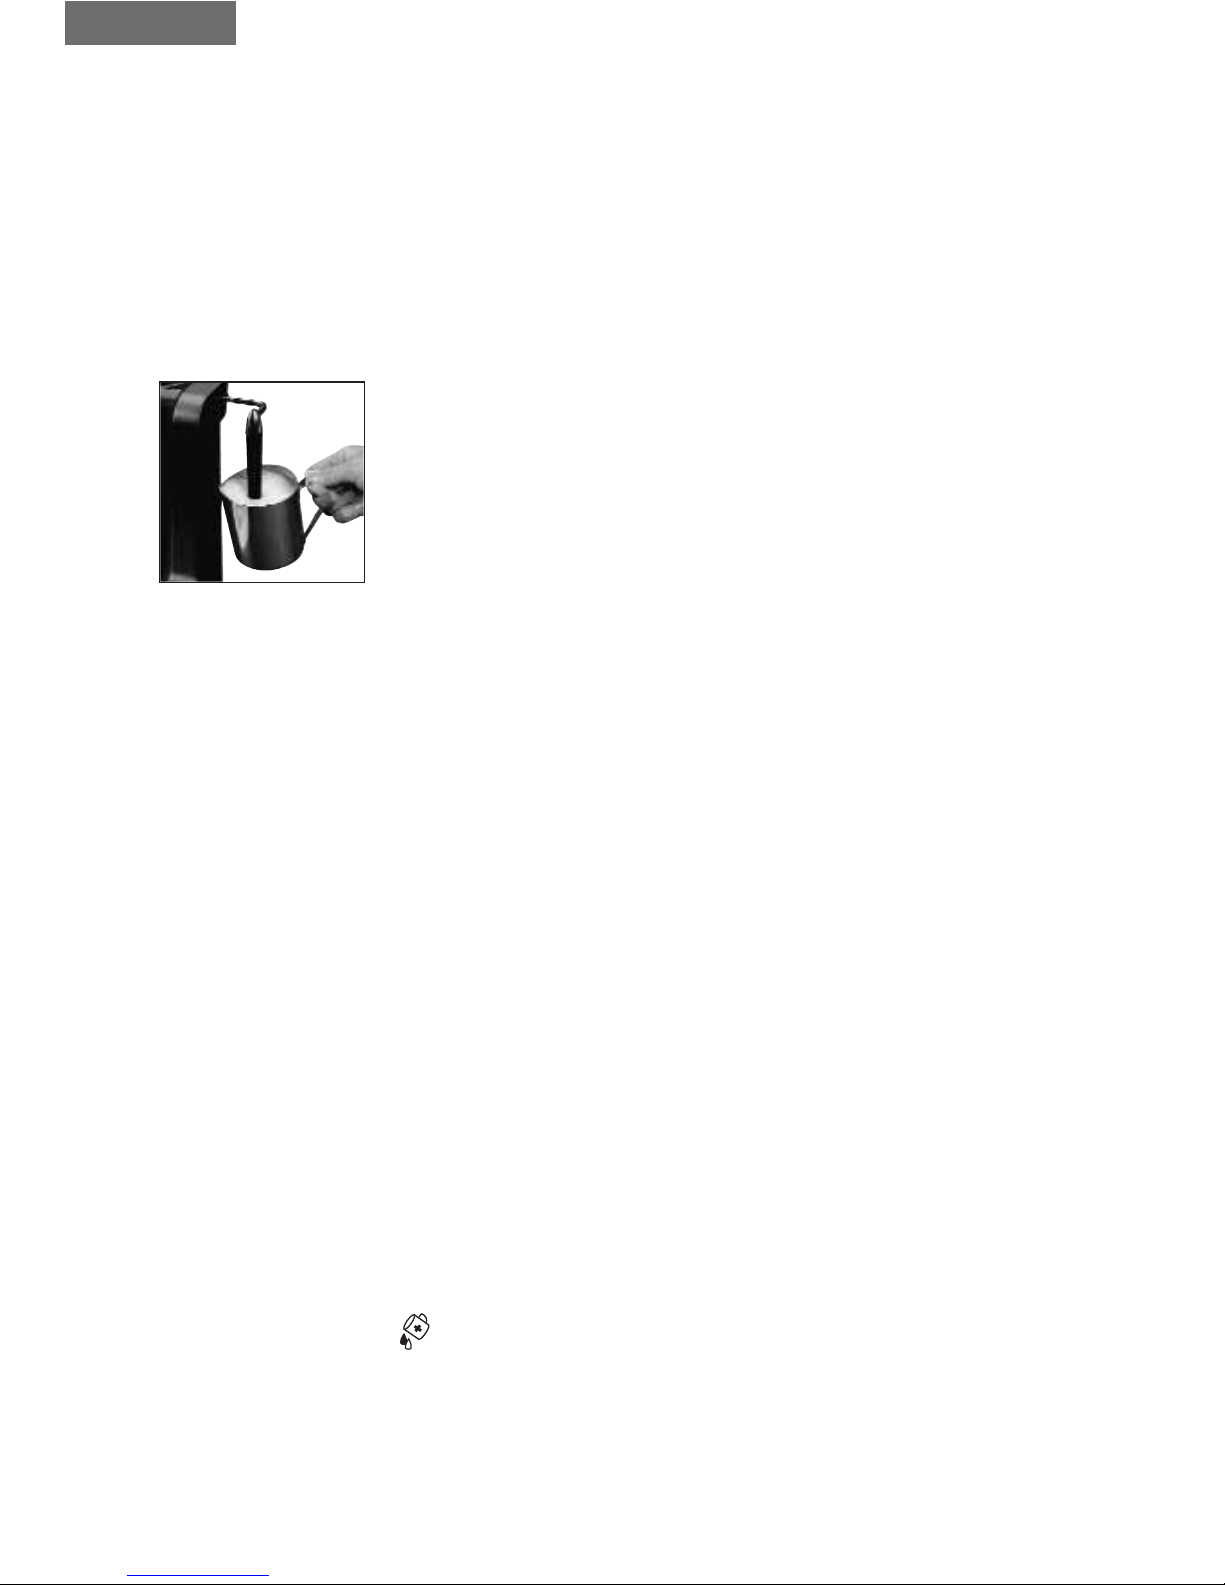
6. Place the stainless steel jug or a similar container under the Frother (7), locating the end of the
Frother (7) beneath the surface of the milk (see picture). Allow the steam to froth the milk. Be careful
not to position the Frother (7) directly against the base or sides of the container to ensure it does
not overheat.
Picture
7. When milk has been frothed, turn the Steam Control Knob (2) to the indicator position OFF.
8. Pour the milk into the espresso. Generally cappuccino is made with half espresso and half milk.
9. When you have finished making espresso and frothed milk, turn off the Espresso/Cappuccino
Machine by turning the Switch Control Knob (3) to the indicator position OFF and unplug the
appliance from the outlet.
Note: Never remove the espresso Filter Holder (15) until all steam and hot water has been released.
10. It is now important to release the steam pressure by following the directions under “Pressure”.
CLEANING AND MAINTENANCE
1. Unplug the appliance Power Cord (20).
2. Clean the Steam Arm (6) immediately after foaming milk by allowing the appliance to produce
steam for another 1-2 seconds, which will clear the Steam Arm (6). Wipe Steam Arm (6) with a
damp cloth. Clean the Steam Arm (6) with a needle if it is still blocked.
3. If necessary, the Frother (7) can be unscrewed and can be washed with soapy water.
4. Removable Water Reservoir (5), Frother (7), Drip Tray Cover (8), Drip Tray (9), Filter Holder (15),
Cups (16) and Measuring Scoop (18) can be washed with soapy water or placed on the top rack
only of your dishwasher.
Caution: Do not immerse machine in water. Do not remove Reservoir Cover (1) while machine is under
pressure. See section “Pressure”.
5. Always empty the Water Reservoir (5) of any water between uses.
6. Wipe housing with a soft wet cloth. Do not use abrasive cleaners or scouring pads as they will
scratch the finish.
7. Do not store the Filter Holder (15) in the Adaptor (19).
How to clean the Boiler
1. When you energize the Espresso/Cappuccino Machine and then turn the Switch Control Knob (3)
to the indicator position . The water will flow through the Boiler (17) from the Water Reservoir
(5) and clean it.
2. While you clean the Boiler (17), please place a jug or similar container on the Drip Tray Cover (8) to
catch the water.
Note: The capacity of the container for catching the water should be at least 1.5 liter.
DELIMING
Mineral deposit build-up in the Espresso Maker will affect the operation of the machine. Your Espresso
ENGLISH
6
Page 7

Maker must be delimed when you begin to notice an increase in the time to brew espresso, or when
there is additional steaming. Also, you will notice a build-up of while deposits on the surface of the
Adaptor (19).
The frequency of cleaning depends upon the hardness of the water used. The following table gives the
suggested cleaning intervals.
Suggested cleaning interval
Type of water Cleaning Frequency
Soft Water every 80 brew cycles
Hard Water every 40 brew cycles
Your Espresso Maker may be delimed using white household vinegar.
Internal parts
1. Make sure all controls are off, the plug is disconnected from the electrical outlet, the machine is
cool and all pressure in the machine has been released (See section “Pressure”).
2. Insert the Filter Holder (15) into the Adaptor (19) and place the glass container (the volume not less
than 1/2 liter) on the Drip Tray Cover (8).
3. Remove the Reservoir Cover (1) and pour 1/2 liter of fresh white household vinegar into the Water
Reservoir (5). Close the Reservoir Cover (1) back and make sure the Cover (1) is on tight.
4. Plug the machine into the electrical outlet.
5. Place a cup with cold water under the Steam Arm (6). Turn the Switch Control Knob (3) to the
position .
6. When all the vinegar has been pumped into the glass container and the flow has stopped, turn
Switch Control Knob (3) to the OFF and allow the machine to cool.
7. Repeat steps 1-6 using only tap water to rise any remaining traces of vinegar out of the machine.
Repeat this process twice, allowing the machine to cool and pressure to be released before
repeating.
PROBLEMS AND CAUSES
Problem Causes
Coffee does not come out - No water in Water Reservoir (5).
- Coffee grind is too fine.
- Too much coffee in the Filter Basket (10).
- Machine was not turned on, or plugged in.
Coffee comes out too quickly - Coffee grind is too coarse.
- Not enough coffee in Filter Basket (10).
Coffee comes out around - Filter Holder (15) is not inserted in the Adaptor (19) properly.
the edge of the Filter Holder (15) - There are coffee grounds around the filter basket rim.
- There is too much coffee in the Filter Basket (10).
- Coffee has been packed too tightly.
No steam is generated - The Water Reservoir (5) is empty.
- Machine is not turned on.
Coffee is splattering out of spout - The Water Reservoir (5) is empty or low, not enough
pressure.
SPECIFICATIONS
Rated voltage: 230 V, 50 Hz
Power: 1150 W
Lifetime: 840 hours, but no more than 5 years from the date of the purchase
ENGLISH
7
Page 8

Manufactured by: «UNIT Handelsgesellschaft m.b.H.»
131, Gersthofer Str., A-1180, Vienna, Austria
This appliance is to be stored and used under the following conditions:
temperature – not less than +5°C; relative humidity - not greater than 80%;
aggressive impurities in the air: not allowable.
As the Manufacturer is constantly working on improvement of its products,
the design and technical specifications are subject to change without prior notice.
www.unit.ru
ENGLISH
8
Page 9

RECIPES
San Francisco Cappuccino
Espresso, hot steamed chocolate, brandy, topped with whipped cream and cinnamon.
Café Irish
Espresso, Irish whiskey, topped with whipped cream.
Café Tuaca
Espresso, tuaca liqueur, topped with whipped cream.
Café Vienna
Espresso, brandy, topped with whipped cream.
Café Tia Maria
Espresso, Tia Maria liqueur, topped with frothed milk.
Café Grand Marnier
Espresso, Grand Marnier liqueur, topped with whipped cream and grated orange peel.
Mexican Café
Espresso, Kahlua, tequila, topped.
Café Romano
Espresso, brandy and lemon twist.
ENGLISH
9
Page 10

КОФЕВАРКА ЭСПРЕССО/КАПУЧИНО UCM-870
Благодарим Вас за покупку изделия фирмы UNIT!
Внимание! При покупке изделия фирмы UNIT
Вы должны получить от продавца заполненный гарантийный талон.
Только при его наличии Вы сможете воспользоваться гарантией производителя
во всех сервисных центрах бытовой техники UNIT.
ВНИМАТЕЛЬНО ПРОЧИТАЙТЕ ВСЮ ИНСТРУКЦИЮ ПЕРЕД ИСПОЛЬЗОВАНИЕМ ПРИБОРА.
НАЗНАЧЕНИЕ ПРИБОРА
Прибор предназначен для приготовления кофе эспрессо/капучино.
СОДЕРЖАНИЕ ИНСТРУКЦИИ ПО ЭКСПЛУАТАЦИИ
ОСНОВНЫЕ МЕРЫ БЕЗОПАСНОСТИ . . . . . . . . . . . . . . . . . . . . . . . . . . . . . . . . . . . . . . . . . . . . . . . .10
ОСОБЕННОСТИ ПРИГОТОВЛЕНИЯ КОФЕ ЭСПРЕССО . . . . . . . . . . . . . . . . . . . . . . . . . . . . . . . . .12
ОПИСАНИЕ ПРИБОРА . . . . . . . . . . . . . . . . . . . . . . . . . . . . . . . . . . . . . . . . . . . . . . . . . . . . . . . . . . . .12
ПРИГОТОВЛЕНИЕ КОФЕ ЭСПРЕССО . . . . . . . . . . . . . . . . . . . . . . . . . . . . . . . . . . . . . . . . . . . . . . .12
ПРИГОТОВЛЕНИЕ КОФЕ КАПУЧИНО . . . . . . . . . . . . . . . . . . . . . . . . . . . . . . . . . . . . . . . . . . . . . . . .14
УХОД И ЧИСТКА . . . . . . . . . . . . . . . . . . . . . . . . . . . . . . . . . . . . . . . . . . . . . . . . . . . . . . . . . . . . . . . . .15
УДАЛЕНИЕ НАКИПИ . . . . . . . . . . . . . . . . . . . . . . . . . . . . . . . . . . . . . . . . . . . . . . . . . . . . . . . . . . . . . .16
ПРОБЛЕМЫ, ВОЗНИКАЮЩИЕ В ПРОЦЕССЕ ЭКСПЛУАТАЦИИ,
И ПРИЧИНЫ ИХ ВОЗНИКНОВЕНИЯ . . . . . . . . . . . . . . . . . . . . . . . . . . . . . . . . . . . . . . . . . . . . . . . . .17
ОСНОВНЫЕ ТЕХНИЧЕСКИЕ ХАРАКТЕРИСТИКИ . . . . . . . . . . . . . . . . . . . . . . . . . . . . . . . . . . . . . . .17
РЕЦЕПТЫ ПРИГОТОВЛЕНИЯ КОФЕ . . . . . . . . . . . . . . . . . . . . . . . . . . . . . . . . . . . . . . . . . . . . . . . . .18
ОСНОВНЫЕ МЕРЫ БЕЗОПАСНОСТИ
Когда Вы используете электроприбор, для того чтобы предотвратить возникновение пожара,
удара электрическим током и/или какого-либо другого повреждения, всегда соблюдайте меры
безопасности, включая следующие:
•
Перед началом эксплуатации прибора внимательно изучите данную инструкцию по
эксплуатации.
•
Будьте внимательны, во время эксплуатации некоторые детали прибора сильно
нагреваются. Не прикасайтесь к горячим поверхностям прибора. При эксплуатации
прибора используйте только ручки или кнопки.
•
Во избежание пожара, удара электрическим током или получения травм следите, чтобы
Сетевой шнур (20), вилка и основание кофеварки не соприкасались с водой или иной
жидкостью!!!
•
Будьте особенно внимательны при эксплуатации прибора в присутствии детей. Никогда не
оставляйте включенный в электросеть прибор без присмотра. Запрещается эксплуатация
прибора детьми.
•
Всегда отключайте прибор от электросети по окончании эксплуатации и перед чисткой. Для
этого поверните Ручку переключения режимов работы (3) в позицию OFF (Выключено), и
только затем отключите прибор от электросети. Отсоединяя прибор от электросети,
держитесь за вилку, а не за Шнур (20). Перед чисткой, и прежде чем снять или установить
какую-либо деталь, дождитесь полного остывания кофеварки.
•
Запрещается использование электроприбора с видимыми механическими повреждениями (в т. ч.
Сетевого шнура (20) или вилки), а также после его падения или какого-либо другого повреждения.
В этом случае обратитесь в сервисный центр UNIT для осмотра или ремонта прибора.
•
Прибор предназначен только для бытового использования. Запрещается коммерческое
использование прибора.
RUSSIAN
10
Page 11

•
Не допускайте соприкосновения Сетевого шнура (20) с горячими поверхностями. Шнур (20)
не следует дергать, перекручивать или тянуть. Во время эксплуатации Шнур (20) не должен
свешиваться с края стола или рабочей поверхности.
•
Не размещайте прибор рядом с источниками тепла, такими как отопительные приборы,
газовые и электрические плиты. Не используйте прибор в местах с повышенной влажностью.
•
Не используйте прибор никаким другим способом, кроме как описано в данной инструкции.
Любое другое использование может привести к пожару, удару электрическим током или
несчастному случаю.
•
Размещайте прибор на ровной, сухой и устойчивой поверхности для того, чтобы обеспечить
беспрепятственную циркуляцию воздушного потока нижней части прибора.
•
Перед тем как включить прибор, убедитесь, что Крышка резервуара для воды (1) плотно
закрыта.
•
НЕ ОТКРЫВАЙТЕ Крышку резервуара (1) под давлением, дождитесь пока давление в
Бойлере (17) достигнет безопасного значения.
•
Внимание! Категорически запрещается самостоятельно разбирать прибор (в т. ч.
отсоединять основание прибора), так как это может привести к пожару, удару
электрическим током или несчастному случаю. Ремонт должен производиться только в
сервисных центрах UNIT.
•
Использование устройств, приспособлений и аксессуаров, не входящих в комплектацию
данного прибора, может привести к пожару, удару электрическим током или несчастному
случаю. Используйте только приспособления и аксессуары, поставляемые вместе с
прибором. В противном случае Вы утрачиваете право на гарантию и гарантийное
обслуживание.
•
При эксплуатации прибора, сначала наполните Съемный резервуар (5) водой, и только
затем подключайте прибор к электросети.
•
Не открывайте, не смещайте Крышку резервуара для воды (1) в процессе приготовления
кофе, так как в этом случае возможно получение ожогов.
•
Не ставьте нагретые Чашки (16) на влажную или холодную поверхность.
•
Не используйте треснувшие или поврежденные Чашки (16).
•
Не используйте для чистки кофеварки и аксессуаров абразивные очистители и агрессивные
моющие вещества.
•
При наличии повреждений прибора (в т. ч. Сетевого шнура (20) или вилки) немедленно
отключите прибор от электросети и обратитесь в сервисный центр UNIT для осмотра,
ремонта или настройки прибора.
•
Избегайте контакта с движущимися деталями прибора.
•
Не передвигайте кофеварку, если на Антикапельной решетке (8) находятся Чашки (16) с
горячим кофе.
•
Прежде чем подключить прибор к электросети, убедитесь в том, что напряжение, указанное
на приборе соответствует напряжению электросети в Вашем доме (230 В, 50 Гц). Не
используйте удлинитель при эксплуатации прибора.
•
Чтобы избежать перегрузок в электросети, нельзя включать другой прибор высокой
мощности в ту же розетку, к которой подключена работающая кофеварка.
•
Внимание! Никогда не заполняйте Съемный резервуар (5) водой, если прибор
подсоединен к электросети. Никогда не заполняйте Съемный резервуар для воды (5) выше
отметки максимального уровня (MAX) и ниже отметки минимального уровня (MIN).
Давление
Чтобы предотвратить возникновение пожара, удара электрическим током или несчастного
случая, НИКОГДА не открывайте Крышку резервуара (1) под давлением, дождитесь пока
давление в Бойлере (17) достигнет безопасного значения.
Чтобы устранить давление в Бойлере (17) выполните следующие действия:
1. Поверните Ручку переключения режимов работы (3) в позицию OFF (Выключено), Ручку
контроля пара (2) в позицию OFF (Выключено) и отключите прибор от электросети.
Поверните Паровое сопло (6) вправо до упора.
RUSSIAN
11
Page 12

2. Поместите стальной контейнер или любую другую подходящую емкость под Насадку
парового сопла (7). Поверните Ручку контроля пара (2) в позицию ON (Включено).
Примечание: Объем емкости контейнера для сбора воды и пара должен быть не менее
1.5 литров.
3. Пар и остатки воды выйдут в контейнер. Поверните Ручку контроля пара (2) в позицию OFF
(Выключено) – теперь давление в Бойлере (17) отсутствует.
СОХРАНИТЕ ЭТУ ИНСТРУКЦИЮ НА ВЕСЬ СРОК ЭКСПЛУАТАЦИИ ПРИБОРА.
ОСОБЕННОСТИ ПРИГОТОВЛЕНИЯ ЭСПРЕССО
Кофеварка эспрессо с функцией приготовления капучино была специально разработана для
быстрого и удобного приготовления кофе эспрессо и капучино в домашних условиях.
Эспрессо – это уникальный метод приготовления кофе: горячая вода с температурой от 86°С
до 90°С при высоком давлении (15 бар) проходит через фильтр с молотым кофе и вытекает в
Чашу (5).
Из-за высокой крепости, кофе эспрессо обычно подают небольшими порциями: одна порция
кофе составляет примерно 45-60 мл, в небольших кофейных чашечках.
Большинство ценителей кофе эспрессо предпочитают следующие пропорции при
приготовлении кофе капучино – 1/3 кофе эспрессо, 1/3 горячего молока и 1/3 молочной пены.
Приготовление кофе эспрессо или капучино сильно отличается от приготовления кофе в капельных
кофеварках тем, что кофеварки эспрессо работают под давлением и требуют очень внимательного
и аккуратного обращения. Пожалуйста, будьте очень осторожны при эксплуатации кофеварок
эспрессо, тщательно выполняйте ВСЕ советы, правила безопасности и предупреждения, которые
есть в инструкции по эксплуатации и на корпусе прибора. Это предотвратит риск возникновения
пожара, травмы или несчастного случая и продлит срок службы прибора.
В комплект к данной кофеварке входит уникальный крем-фильтр DuoCream – Вы всегда
сможете насладиться вкусом ароматного кофе эспрессо с густой пенкой.
ОПИСАНИЕ ПРИБОРА
1. Крышка резервуара для воды
2. Ручка контроля пара
3. Ручка переключения режимов работы
4. Нагревающая поверхность
5. Съемный резервуар для воды
6. Паровое сопло
7. Насадка парового сопла
8. Антикапельная решетка
9. Съемный поддон для капель
10. Стальная чашка-фильтр
11. Воронка фильтра-держателя
12. Фиксатор фильтра
13. Ручка фильтра-держателя
14. Крем-фильтр DuoCream
15. Фильтр-держатель
16. Чашки – 2 шт.
17. Бойлер
18. Мерная ложка
19. Штатив фильтра-держателя
20. Сетевой шнур
ПРИГОТОВЛЕНИЕ КОФЕ ЭСПРЕССО
Молотый кофе
Для приготовления кофе эспрессо требуется свежемолотый кофе, сильной обжарки. Вы
можете также использовать молотый кофе французской или итальянской обжарки.
RUSSIAN
12
Page 13

Если жарить кофе при высокой температуре, зерна приобретают темно-коричневый цвет и
начинают лосниться от обильно выделяющихся масел. Из таких зерен получается напиток с
большей горчинкой, поскольку зерна сильно обжариваются. Эта степень обжарки называется
французской, поскольку во Франции традиционно предпочитают темный крепкий кофе. Самая
сильная обжарка – итальянская – зерна обжаривают до получения очень темного цвета, и они
приобретают маслянистый блеск.
При приготовлении кофе эспрессо также можно использовать готовый молотый кофе, но при
условии, что молотый кофе хранился в плотно закрытом контейнере (без доступа воздуха), в
темном, прохладном месте. Максимальный срок хранения свежемолотого кофе 7-8 дней. Не
храните молотый кофе в холодильнике или морозильной камере.
Кофейные зерна также следует хранить в плотно закрытом контейнере (без доступа воздуха), в
темном, прохладном месте. Максимальный срок хранения кофейных зерен 4 недели.
Как правильно молоть кофе
Для приготовления кофе эспрессо очень важно правильно размолоть кофе. Кофейные зерна
должны быть размолоты достаточно мелко, и в то же время не очень крупно.
•
Правильно размолотый кофе должен выглядеть как соль или песок.
•
Если зерна размолоты слишком тонко (как мука или пудра), то приготовленный кофе
эспрессо не будет ароматным.
•
Если зерна будут размолоты слишком крупно, то кофе будет недостаточно ароматным.
Используйте только высококачественные кофемолки для размалывания кофейных зерен, чтобы
получить молотый кофе однородной консистенции.
Подготовка к эксплуатации
1. Промойте съемные детали кофеварки, включая Съемный резервуар для воды (5),
Наконечник парового сопла (7), Антикапельную решетку (8), Съемный поддон для капель (9),
Чашки (16) и Мерную ложку (18) в теплой воде с жидкостью для мытья посуды, тщательно
ополосните и высушите.
2. Чтобы промыть кофеварку внутри, следуйте инструкциям по приготовлению кофе эспрессо,
используя только воду, без добавления молотого кофе.
3. Раскрутите Сетевой шнур (20), расположенный в основании кофеварки.
Приготовление кофе эспрессо
1. Наполните Съемный резервуар (5) водой. Уровень воды в Резервуаре (5) должен находится
между отметками MAX (максимальный уровень заполнения Резервуара) и MIN (минимально
допустимый уровень воды в Резервуаре).
Внимание! Никогда не заполняйте Резервуар (5) водой, если прибор подсоединен к электросети!
2. Опустите Фиксатор фильтра (12) в нижнее положение. Возьмитесь за Ручку фильтрадержателя (13) и плавно поверните Фильтр-держатель (15) налево на 90°. Теперь аккуратно
отсоедините Фильтр-держатель (15) от прибора. Вставьте Чашку-фильтр (10) в Фильтрдержатель (15).
Примечание: если Вы хотите получить кофе эспрессо с пенкой, то вставьте в Фильтрдержатель (15) сначала Крем-фильтр DuoCream (14), и только затем Чашку-фильтр (10).
3. Наполните Чашку-фильтр (10) молотым кофе до отметки 1 или 2 (количество молотого кофе,
необходимого для приготовления 1 или 2 чашек эспрессо). Никогда не заполняйте Фильтр
(10) выше отметки 2. Тщательно удалите остатки молотого кофе с краев Фильтра-держателя
(15), иначе Вы не сможете надежно закрепить Фильтр-держатель (15) в Штативе фильтрадержателя (19). Слегка спрессуйте молотый кофе Мерной ложкой (18).
Примечание: пред тем, как подключить прибор к электросети, убедитесь, что Ручка контроля
пара (2) находится в позиции OFF (Выключено).
Внимание!
•
Не спрессовывайте молотый кофе при заполнении Чашки-фильтра (10).
•
Не заполняйте Чашку-фильтр (10) выше отметки максимально уровня (отметка «2»), это
может привести к засорению Фильтра (10).
RUSSIAN
13
Page 14

4. Опустите Фиксатор фильтра (12) в нижнее положение. Закрепите Фильтр-держатель (15)
под Штативом фильтра-держателя (19) так, чтобы Ручка фильтра-держателя (13)
находилась слева от центра. Поверните Ручку (13) направо до упора (примерно на 90°);
убедитесь, что Фильтр-держатель (15) надежно зафиксирован в Штативе (19).
5. Убедитесь, что Антикапельная решетка (8) и Поддон для капель (9) правильно расположены
и надежно зафиксированы. Подключите прибор к электросети (230 В, 50 Гц) и поверните
Ручку переключения режимов работы (3) в позицию . При этом индикатор начнет мигать
красным цветом.
6. Для приготовления кофе эспрессо необходимо, чтобы давление в Бойлере (17) достигло
определенного значения. Когда давление в Бойлере (17) достигнет значения, необходимого
для приготовления эспрессо, индикатор перестанет мигать, и начнет гореть ровным
красным цветом.
7. Поместите Чашки (16) под Штатив фильтра-держателя (19), так чтобы каждая Чашка (16)
располагалась под соответствующим выпускным отверстием Фильтра-держателя (15).
8. Поверните Ручку переключения режимов работы (3) в позицию и через несколько секунд
начнется процесс наполнения Чашек (16) горячим эспрессо.
9. После того, как Чашки (16) наполнятся желаемым количеством эспрессо, поверните Ручку
переключения режимов работы (3) в позицию .
Примечание: После завершения процесса приготовления эспрессо, из Фильтра-держателя
(15), в течение какого-то времени, возможно выделение нескольких капель жидкости. Это
происходит из-за избытка воды в Фильтре-держателе (15). Поддон для капель (9) был
специально разработан для сбора избытка влаги. Этот процесс является нормой в работе
прибора и не является гарантийным случаем.
10. Чтобы устранить избыточное давление в Бойлере (17) произведите действия, описанные в
разделе «Давление». Для того чтобы выключить прибор, поверните Ручку переключения
режимов работы (3) в позицию OFF (Выключено), и отключите прибор от электросети.
Отсоединяя прибор от электросети, держитесь за вилку, а не за Шнур (20).
Примечание: Категорически запрещается отсоединять Фильтр-держатель (15) от прибора, до
устранения давления в Бойлере (17).
11. После того, как кофеварка остыла, а давление было устранено, отсоедините Фильтрдержатель (15) от Штатива (19). Зафиксируйте Чашку-фильтр (10) в Фильтре-держателе (15) с
помощью Фиксатора (12), переведя его в вертикальное положение, освободите Фильтр (10)
от остатков молотого кофе и промойте Фильтр (10) и Фильтр-держатель (15) в воде.
Осторожно! Металлические части Фильтра-держателя (15) могут быть очень горячими!!! Перед
тем как дотрагиваться до Фильтра-держателя (15) или Фильтра (10) дайте им остыть.
ПРИГОТОВЛЕНИЕ КОФЕ КАПУЧИНО
1. Кофе капучино представляет собой кофе эспрессо с взбитым при помощи пара в горячую
густую пену молоком (классический рецепт – 1/3 эспрессо, 1/3 горячего молока и 1/3
молочной пены). Приготовление капучино требует определенной практики. Для достижения
наилучшего результата, рекомендуется готовить молочную пену в отдельной емкости, и
после приготовления добавить ее в эспрессо.
2. Молоко и емкость для взбивания молочной пены следует охладить перед взбиванием. Для
приготовления молочной пены лучше использовать стальной или керамический молочник.
Сварите эспрессо, как описано в разделе «Приготовление кофе эспрессо» и следуйте
инструкциям, приведенным ниже:
1. Поверните Ручку переключения режимов работы (3) в позицию OFF (Выключено) и
поверните Паровое сопло (6) вправо до упора.
2. Наполните молочник на 1/2 холодным молоком. Для приготовления капучино лучше
использовать обезжиренное молоко или молоко 2% жирности.
3. Поверните Ручку переключения режимов работы (3) в позицию . При этом индикатор
начнет мигать красным цветом.
4. Когда индикатор перестанет мигать и начнет гореть ровным красным цветом, поверните
Ручку контроля пара (2) в положение ON (Включено).
RUSSIAN
14
Page 15

5. До момента генерации пара, из Парового сопла (6) может выйти некоторое количество
воды. Этот процесс является нормой в работе прибора и не является гарантийным случаем.
Примечание: В данной модели температура в Бойлере (17) поддерживается автоматически.
Когда температура падает, световой индикатор начинает мигать – это означает, что прибор
автоматически повышает температуру до необходимого значения. После того, как
установится необходимая температура, индикатор перестанет мигать и загорится ровным
красным цветом.
6. Возьмите молочник с охлажденным молоком, поднесите молочник к Насадке парового
сопла (7) и аккуратно погрузите Насадку (7) в молоко (см. рис.). При взбивании не
вынимайте Насадку (7) из молока, это может привести к разбрызгиванию горячего молока.
Не касайтесь Насадкой (7) дна и стенок молочника, так как это может привести к их
нагреванию. Взбивайте молоко, пока оно не удвоится в объеме.
Рисунок
7. После того как молочная пена будет готова, поверните Ручку контроля пара (2) в позицию
OFF (Выключено).
8. Разлейте эспрессо по кофейным чашкам (1/3 чашки), долейте горячее молоко (1/3 чашки) и
выложите сверху ложкой молочную пену (1/3). Данный рецепт является классическим
рецептом приготовления капучино. Пропорции между эспрессо, горячим молоком и
молочной пеной могут варьироваться в зависимости от Вашего вкуса и исходного рецепта
приготовления капучино.
9. Чтобы устранить избыточное давление в Бойлере (17) произведите действия, описанные в
разделе «Давление». Выключите кофеварку, повернув Ручку переключения режимов работы
(3) в позицию OFF (Выключено) и отключив кофеварку от электросети, дайте ей остыть.
Примечание: Категорически запрещается отсоединять Фильтр-держатель (15) от прибора,
пока давление в Бойлере (17) не устранено.
УХОД И ЧИСТКА
1. Перед чисткой выключите прибор, повернув Ручку переключения режимов работы (3) в
позицию OFF (Выключено), и отсоединив прибор от электросети. Убедитесь, что кофеварка
полностью остыла.
2. Паровое сопло (6) следует очищать сразу после приготовления молочной пены. Для этого,
выпустите пар из Парового сопла (6), а затем протрите Паровое сопло (6) и Насадку парового
сопла (7) чистой сухой тряпкой. При необходимости прочистите Паровое сопло (6) иглой.
3. При сильных загрязнениях отсоедините Насадку парового сопла (7). Очистите Насадку (7) и
присоедините ее к Паровому соплу (6). Убедитесь, что Насадка (7) надежно зафиксирована
и плотно прилегает к Паровому соплу (6).
4. Все съемные детали кофеварки – Резервуар для воды (5), Насадку парового сопла (7),
Антикапельную решетку (8), Поддон для капель (9), Фильтр-держатель (15), Чашки (16) и
Мерную ложку (18) – промойте в теплой воде с использованием средства для мытья посуды,
тщательно ополосните и высушите. Съемные детали кофеварки также можно мыть в
посудомоечной машине (только на верхней полке).
Внимание!
•
Не погружайте прибор в воду и избегайте любого контакта прибора с водой!!!
•
Никогда не открывайте Крышку резервуара (1) под давлением, дождитесь пока давление в
Бойлере (17) достигнет безопасного значения (См. раздел «Давление»).
RUSSIAN
15
Page 16

5. Всегда выливайте воду из Съемного резервуара (5) после использования. Не оставляйте
воду в Резервуаре (5) на длительное время (например, на ночь).
6. Протрите корпус прибора мягкой, чуть влажной тряпкой. Не используйте для чистки
прибора абразивные очистители и агрессивные моющие вещества.
7. Не храните Фильтр-держатель (15) в Штативе фильтра-держателя (19). Не оставляйте
Фильтр-держатель (15) в Штативе (19) после эксплуатации. После использования и перед
тем, как убрать прибор на хранение всегда отсоединяйте Фильтр-держатель (15) от Штатива
(19). Несоблюдение данного правила может привести к ослаблению крепления между
Фильтром-держателем (15) и Штативом (19).
Очистка внутренних частей кофеварки и Бойлера
1. Наполните Съемный резервуар (5) чистой холодной водой наполовину (примерно 650 мл).
Поместите на Антикапельную решетку (8) любой подходящий контейнер для сбора воды.
Примечание: Емкость контейнера для сбора воды должна быть не меньше 650 мл.
2. Подключите прибор к электросети и поверните Ручку переключения режимов работы (3) в
позицию . Вода, находящаяся в Съемном резервуаре (5) пройдет через Бойлер (17) и
очистит его.
УДАЛЕНИЕ НАКИПИ
При эксплуатации кофеварки, на деталях контактирующих с водой остаются минеральные
отложения (накипь), которые негативно сказываются на работе прибора.
Признаками появления накипи являются:
•
увеличение количества времени, затрачиваемого на приготовление кофе;
•
избыточное образование пара;
•
видимые отложения на поверхности Штатива фильтра-держателя (19).
Кофеварку следует очищать от накипи в зависимости от частоты использования и жесткости
воды. Для определения частоты удаления накипи, следуйте таблице:
Тип воды Частота удаления накипи
Мягкая вода каждые 80 циклов приготовления кофе
Жесткая вода каждые 40 циклов приготовления кофе
Для удаления накипи рекомендуется использовать пищевой уксус.
Примечание: категорически запрещается использовать для удаления накипи
неразбавленную уксусную эссенцию!!!
Внутренние детали
1. Устраните избыточное давление в Бойлере (17) (см. раздел «Давление»). Выключите
прибор, повернув Ручку переключения режимов работы (3) в позицию OFF (Выключено) и
отключив прибор от электросети. Дайте кофеварке остыть (минимум 10 минут).
2. Вставьте Фильтр-держатель (15), без Чашки-фильтра (10), в Штатив фильтра-держателя
(19) и поместите контейнер (емкостью не менее 1/2 л) на Антикапельную решетку (8), чтобы
собрать жидкость, выделяющуюся при удалении накипи.
3. Залейте в Съемный резервуар (5) 1/2 л пищевого (не винного!) уксуса. Закройте Съемный
резервуар (5) Крышкой (1). Убедитесь, что Крышка (1) плотно прилегает к Резервуару (5).
4. Подключите прибор к электросети.
5. Поставьте чашку с холодной водой под Паровое сопло (6). Поверните Ручку переключения
режимов работы (3) в позицию .
6. Когда весь уксус, находящийся в Резервуаре (5), перельется в контейнер, поверните Ручку
переключения режимов работы (3) в позицию OFF (Выключено) и дайте кофеварке остыть.
7. Чтобы удалить остатки уксуса, повторите действия, описанные в пунктах 1-6 несколько раз,
используя только воду. Не забудьте, что после каждого выполнения действий, описанных в
пунктах 1-6, прибор должен остыть, а давление в Бойлере (17) должно быть устранено (См.
раздел «Давление»).
Внимание: При несоблюдении рекомендаций, описанных в разделе «Удаление накипи», Вы
утрачиваете право на гарантию и гарантийное обслуживание в сервисных центрах UNIT.
RUSSIAN
16
Page 17

ПРОБЛЕМЫ, ВОЗНИКАЮЩИЕ В ПРОЦЕССЕ ЭКСПЛУАТАЦИИ,
И ПРИЧИНЫ ИХ ВОЗНИКНОВЕНИЯ
Проблема Причина
Эспрессо не поступает в Чашки (16) - В Съемном резервуаре (5) нет воды.
- Кофе размолот слишком тонко.
- В Чашке-фильтре (10) находится слишком много
молотого кофе.
- Ручка переключения режимов работы (3) находится
в позиции OFF (Выключено) или прибор не подключен
к электросети.
Эспрессо поступает в Чашки (16) - Кофе размолот слишком крупно.
слишком быстро - В Чашке-фильтре (10) находится слишком мало
молотого кофе.
Эспрессо переливается через край - Фильтр-держатель (15) плохо зафиксирован
Фильтра-держателя (15) в Штативе (19).
- Не удалены остатки молотого кофе с крев Фильтрадержателя (15).
- В Чашке-фильтре (10) находится слишком много
молотого кофе.
- Молотый кофе в Чашке-фильтре (10) слишком
плотно спрессован.
Нет генерации пара - В Съемном резервуаре (5) нет воды.
- Ручка переключения режимов работы (3) находится
в позиции OFF (Выключено) или прибор не подключен
к электросети.
Молоко не взбивается в пену - Нет достаточного давления пара.
ОСНОВНЫЕ ТЕХНИЧЕСКИЕ ХАРАКТЕРИСТИКИ
Напряжение питания: 230 В, 50 Гц
Номинальная мощность: 1150 Вт
Срок службы: 840 часов, но не более 5 лет с даты приобретения покупателем
Изготовитель: «ЮНИТ Хандельс ГмбХ»
Австрия, Вена, А-1180, Герстхофер штрассе, 131
Хранение и эксплуатацию прибора производить в сухих отапливаемых помещениях
при температуре не ниже +5°С, относительной влажности не более 80%,
при отсутствии в воздухе агрессивных примесей.
При перевозке и хранении беречь от механических повреждений
и иных вредоносных воздействий.
Ремонт и восстановление прибора следует производить
в специализированных мастерских, согласно гарантийному талону.
Поскольку производитель постоянно работает над совершенствованием своей продукции,
дизайн и технические характеристики могут быть изменены
без предварительного уведомления.
Товар сертифицирован.
www.unit.ru
RUSSIAN
17
Page 18

РЕЦЕПТЫ ПРИГОТОВЛЕНИЯ КОФЕ
Капучино «Сан-Франциско»
1
Состав:
эспрессо
горячий шоколад
бренди
взбитые сливки
щепотка корицы
Смешать все ингредиенты. Разлить по кофейным чашкам. При подаче выложить сверху взбитые
сливки и посыпать корицей.
Кофе по-ирландски
1
Состав:
эспрессо
ирландский виски
взбитые сливки
Смешать все ингредиенты. Разлить по кофейным чашкам. При подаче выложить сверху взбитые
сливки.
Эспрессо «Туака»
1
Состав:
эспрессо
ликер «Туака»
2
взбитые сливки
Смешать все ингредиенты. Разлить по кофейным чашкам. При подаче выложить сверху взбитые
сливки.
Кофе по-венски
1
Состав:
эспрессо
бренди
взбитые сливки
Смешать все ингредиенты. Разлить по кофейным чашкам. При подаче выложить сверху взбитые
сливки.
Кофе «Тиа Мария»
1
Состав:
эспрессо
ликер «Тиа Мария»
3
молочная пена (как для капучино)
Смешать все ингредиенты. Разлить по кофейным чашкам. При подаче выложить сверху
молочную пену.
Кофе «Гран Марнье»
1
Состав:
эспрессо
ликер «Гран Марнье»
4
взбитые сливки
апельсиновая цедра
Смешать все ингредиенты. Разлить по кофейным чашкам. При подаче выложить сверху взбитые
сливки и украсить апельсиновой цедрой.
RUSSIAN
18
Page 19

Кофе по-мексикански
1
Состав:
эспрессо
ликер «Калуа»
5
текила
Смешать все ингредиенты. Разлить по кофейным чашкам и подать.
Кофе «Романо»
1
Состав:
эспрессо
бренди
цедра лимона
Смешать все ингредиенты. Разлить по кофейным чашкам. При подаче украсить цедрой лимона.
1. Пропорции ингредиентов могут варьироваться в зависимости от Вашего вкуса и зависят
исключительно от Ваших предпочтений.
2. Ликер «Туака» (Tuaka) – итальянский ликер, обладает ароматом какао, ванили и кокоса.
3. Ликер «Тиа Мария» (Tia Maria) – ликер с острова Ямайка, вырабатывается на основе кофе,
рома и различных пряностей.
4. Ликер «Гран Марнье» (Grand Marnier) – приготовлен на основе цедры горького апельсина,
смеси специальных сортов коньяка и сахара.
5. Ликер «Калуа» (Kahlua) – мексиканский, сладкий темный ликер с ароматом и вкусом
капучино, готовится из зерен кофе, бобов какао, ванили и бренди.
RUSSIAN
19
 Loading...